


- Protocols

- Articles and Issues
- For Authors
- About
- Become a Reviewer


Immersive Social Interaction Assay (ISIA) for Studying Voluntary and Long-Term Social Behavior in Mice

Published: Vol 16, Iss 16, Aug 20, 2026 DOI: 10.21769/BioProtoc.5789 Views: 167
Reviewed by: Rachael E. HokensonShubham GargAnonymous reviewer(s)
 PDF
PDF  Ask a question
Original research article
The authors used this protocol in:
Jan 2024

Protocol Collections
Comprehensive collections of detailed, peer-reviewed protocols focusing on specific topics




Abstract
Social behavior is highly dynamic and context-dependent, yet many commonly used rodent social assays rely on short testing periods and simplified measures of proximity or investigation. Here, we present a detailed protocol for constructing and using the immersive social interaction assay (ISIA), a behavioral paradigm designed to capture prolonged, voluntary social interactions in freely moving mice. The ISIA apparatus consists of two modified standard rodent home-cage chambers connected by a 3D-printed tube with an adjustable inner diameter. This design enables flexible experimental control: a removable restrictor can confine a head-bar-implanted focal mouse to one chamber while permitting a freely moving conspecific to traverse the full apparatus, enabling assessment of social motivation. Animals can be recorded over extended time windows with familiar or novel conspecifics, in their home territory or in novel environments, and under varying thermal or enrichment conditions, while expressing a broad repertoire of affiliative and aggressive behaviors, including huddling and aggression. The apparatus can be readily integrated with machine learning–based tracking and behavioral classification pipelines for high-throughput analysis. This protocol describes step-by-step construction, setup, and experimental implementation of the ISIA, from apparatus construction and head-bar implantation to video-based behavioral analysis, with the goal of facilitating broader adoption of ethologically relevant behavioral assays in neuroscience research.
Key features
• The ISIA apparatus is modular and cost-effective, built from standard rodent housing and 3D-printed components.
• Enables voluntary, prolonged social interactions in mice, preserving the ability to engage or withdraw and allowing assessment of social motivation.
• Provides flexible experimental control over access between animals (e.g., via an adjustable restrictor) while maintaining naturalistic interaction dynamics.
• Integrates with machine learning–based tracking pipelines for automated, high-throughput quantification of complex social behaviors.
Keywords: Social behavior Social motivation
Social decision-making
Huddling
Ethological assay
Freely moving mice
Head-bar implantation
Behavioral tracking
Social motivation
Social decision-making
Huddling
Ethological assay
Freely moving mice
Head-bar implantation
Behavioral tracking
Background
Social interactions are a fundamental aspect of life in many animal species, from honeybees to humans [1,2]. Understanding the neuronal mechanisms that control social behavior is central to neuroscience and also holds translational significance, as aberrant social interactions are a hallmark of many neurodevelopmental and neuropsychiatric disorders [3,4]. Laboratory studies offer unique advantages for tightly controlling environmental conditions as well as recording and manipulating neural circuits relevant to social behavior. Yet a major challenge remains in designing experimental settings that are relevant to the natural history of the studied species. Although multiple rodent social paradigms are available, most still rely on reductionist measures, often at the expense of ecological validity and interpretability [5–8]. Thus, the development of robust and ethologically relevant behavioral assays is essential for advancing mechanistic insight and, ultimately, for informing therapeutic approaches.
Conventional paradigms, such as the widely used three-chamber social interaction (SI) test, have provided valuable insights into sociability and social novelty preference (e.g., [9–11]). They are straightforward to implement, typically lasting 10–30 min, require minimal specialized equipment (e.g., an arena, wire cups, and a recording device), and are simple to analyze using measures such as time spent near a conspecific enclosure or duration of sniffing. However, these assays fail to capture the dynamic, reciprocal, and context-specific nature of social interactions, and the simplistic measures they provide are difficult to interpret in terms of specific alterations in social behavior. For example, increased time spent in close contact in the three-chamber SI test could reflect a stronger drive for affiliative interactions or for aggressive ones. Other paradigms, such as the resident–intruder test (using either same-sex or opposite-sex conspecifics), permit close contact interactions but force animals into close proximity, thereby confounding interpretation by removing the element of agency from social decision-making. Under such conditions, aggression and sexual behaviors are expressed in situations where animals cannot opt out of interactions and cannot display context-specific behaviors, such as fleeing to their own territory, thereby limiting both ecological validity and translational relevance.
To address these limitations, we developed the immersive social interaction assay (ISIA), a behavioral paradigm designed to capture voluntary and dynamic social interactions in mice across prolonged time windows [12]. The ISIA apparatus consists of two home-cage chambers connected by a plastic tube, whose inner diameter can be adjusted with a removable plastic ring. This design allows flexible control over access between chambers: when test mice are implanted with head-bars, inserting a ring into the tube restricts the animal to one chamber while still allowing unrestricted movement of conspecifics without head-bars. Animals can be recorded in the ISIA apparatus over extended durations, with siblings or strangers, in their own home territory, when connected to other territories, and even when linked to behavioral testing chambers.
The ISIA enables freely moving animals to display a wide repertoire of behaviors, including both affiliative and aggressive interactions, while retaining the autonomy to engage in or withdraw from social encounters. This element of choice allows experimenters to probe not only the occurrence of behaviors but also the motivational processes underlying them, as shown in our studies of huddling behavior [12], where mice were willing to forsake their preferred sleeping location, even within their thermoneutral zone, to gain social contact during sleep. The ISIA apparatus also minimizes stress-related confounding factors, since animals can be manipulated without direct handling through chamber connections. Built from modified standard housing cages, the ISIA is cost-effective and readily scalable, from simple two-chamber interactions to complex multi-chamber designs. In addition, with simple overhead USB cameras, the assay can be integrated with modern machine learning pipelines for behavioral identification, tracking, and classification (e.g., DeepLabCut-based key point estimation [13], SLEAP [14], and DAMM [15]), allowing high-throughput and automated analysis of complex social interactions.
Our laboratory first described the ISIA in Sotelo et al. [12]; here, we provide a detailed step-by-step protocol for its construction, setup, and use in an improved design. This protocol is intended to facilitate broader adoption of the ISIA and to advance the ethologically relevant study of social behavior in laboratory animals.
Materials and reagents
ISIA apparatus
1. PLA filament [OVERTURE PLA Plus (PLA+) 1.75 mm, catalog number: OVB175]
2. Rodent housing cages (Allentown, model: 7115 Cage; or Ancare, model: N10 Mouse)
3. Labeling tape (Stellar Scientific, catalog number: GS-01X500B)
4. Water bottle wire, 62 cm (The Home Depot, 14-gauge plastic-coated galvanized wire, catalog number: 202497552)
5. Top cover (The Home Depot, 1/2 in. mesh, 19-gauge galvanized steel hardware cloth, catalog number: 205960848)
6. Laboratory rodent water bottles
7. Hexagonal weighing dish (Fisher brand, catalog number: 02-202-101)
Head-bar
8. Wire cutter (Hakko, catalog number: CHP-170)
9. Head-bar extender: 832 interconnect pin header (DigiKey, catalog number: ED91100-ND)
10. Head-bar base: 4-position socket connector, 0.079" (2.00 mm) (DigiKey, catalog number: 833-83-004-10-273101-ND)
11. Toothpicks (Gusto, catalog number: B094PFJ5TF)
12. Epoxy (J-B Weld, catalog number: 50112)
13. Super glue (Gorilla Glue Super, catalog number: 7805601)
Surgery
14. Isoflurane (Fluriso, VetOne, catalog number: 501017)
15. Lidocaine (VetOne, catalog number: 510212); dilute to 4 mg/kg in ultra-distilled H2O
16. Carprofen (VetOne, catalog number: 510510); dilute to 5 mg/kg in 0.9% saline
17. Cotton applicators (Solon Manufacturing, catalog number: 56200-S012)
18. Kimwipes (Kimtech, catalog number: 34120)
19. 10% povidone-iodine prep pads (Dynarex, catalog number: 1108)
20. 70% isopropyl alcohol prep pads (Fisher Healthcare, catalog number: 22-363-750)
21. 0.9% saline (Pfizer Injectables, catalog number: 00409488820)
22. 3% hydrogen peroxide (Amazon Basics, catalog number: B07VBZ9384)
23. Eye ointment (Soothe, Bausch + Lomb, catalog number: AB31336)
24. Depilatory cream (Nair, catalog number: 022600223290)
25. Slip-tip sterile syringes, 1 mL (BD, catalog number: 309659)
26. 27G hypodermic needles (Excel International Inc., catalog number: 3372518)
27. Skull screws (J.I. Morris/Swissturn, catalog number: F00CE125)
28. Silk sutures (Surgical Specialties, catalog number: SP116)
29. Suture needle (Mani, catalog number: SE-TI18)
30. OptiBond Universal (Kerr, catalog number: 36519)
31. Dental cement (Kerr, catalog number: 29499)
Equipment
ISIA apparatus
1. Cordless drill (DeWalt, model: DCD771C2)
2. 51 mm hole saw (DeWalt, catalog number: DAH180032-2)
3. 3/8" drill bit (DeWalt, catalog number: DWA1224)
4. Top-handle jigsaw (Bosch, model: JS260 6.0A)
5. Cameras (Angetube, catalog number: 827; or Arducam, catalog number: B0205)
6. (Optional) Temperature loggers (iButton, catalog number: DS1925L-F5#)
7. Prusa i3 MK3S 3D printer
8. Windows PC
Head-bar
9. Wire cutter (Hakko, catalog number: CHP-170)
Surgery
10. Small animal stereotaxic instrument (Kopf, model: 940)
11. Anesthesia system:
a. Gas delivery system (Vetamac, model: VetEquip Compact)
b. Anesthesia vaporizer (Vetamac, model: Tec 3)
c. VaporGuard activated charcoal filter (VetEquip, catalog number: 931401)
d. Oxygen cylinders (Metro Welding, catalog number: OX.USPM870.EAL)
12. Electric shaver (Philips, catalog number: QG3330)
13. Dental drill (Foredom, model: MH-170)
14. 0.5 mm burrs for microdrills (Fine Science Tools, catalog number: 19007-05)
15. Dental curing light (Lion’s Dental Supply, model: iBlast LED dental curing light)
16. Precision flat-head screwdrivers (Tool USA, catalog number: PS-00520)
17. Self-tapping screws (J.I. Morris/Swissturn, catalog number: F00CE125)
Software and datasets
1. PrusaSlicer for 3D printing (Prusa, version: 2.9.2)
2. iSpy for multi-camera video recording (iSpyConnect, version: iSpy 64 v7.2.6.0)
3. Premiere Pro for video editing (Adobe, version: Adobe Premiere Pro 2025)
Procedure
Notes:
1. The tube connecting the two ISIA chambers is 3D-printed and represents an improved version of the one presented in Sotelo et al. [12].
2. This version does not require taping of the components and allows complete closure of the tube using a cap, so the chambers can be used independently (for example, enabling connection between separate home territories).
3. Threaded components should be preconditioned by repeated screwing and unscrewing until they move smoothly across the full range.
4. 3D-printed design files and printing settings are provided in Files S1–S3 and in the GitHub (https://github.com/AER-Lab/ISIA-apparatus) and Zenodo (https://doi.org/10.5281/zenodo.20753281) repositories.
A. 3D-printing of ISIA tube components
1. 3D-print the adapter (×2), inner gate (×2), outer gate (×2), and cap (optional; ×1). Use the design files provided in File S1 and slice the parts using PrusaSlicer or equivalent slicing software. Key settings (use the settings specified in File S2):
a. Nozzle diameter: 0.4 mm
b. No skirt, brim, support material, or raft
c. First-layer speed: 10 mm/s
d. Layer height: 0.3 mm
e. First-layer height: 0.2 mm
f. Infill density: 5%
2. 3D-print the tube and restrictor. Use the design files provided in File S1 and slice the parts using PrusaSlicer or equivalent slicing software. Key settings (use the settings specified in File S3):
a. Nozzle diameter: 0.6 mm
b. No skirt, brim, support material, or raft
c. First-layer speed: 10 mm/s
d. Layer height: 0.4 mm
e. First-layer height: 0.2 mm
f. Infill density: 5%
B. ISIA apparatus assembly
Notes:
1. The ISIA apparatus is constructed using four rodent housing cage bottoms: two serve as bottom components and two as top components (Figure 1A–E).
2. The two chambers of the ISIA are connected via a 3D-printed tube.
3. Housing cage components should be autoclaved after drilling and before installing the 3D-printed components.
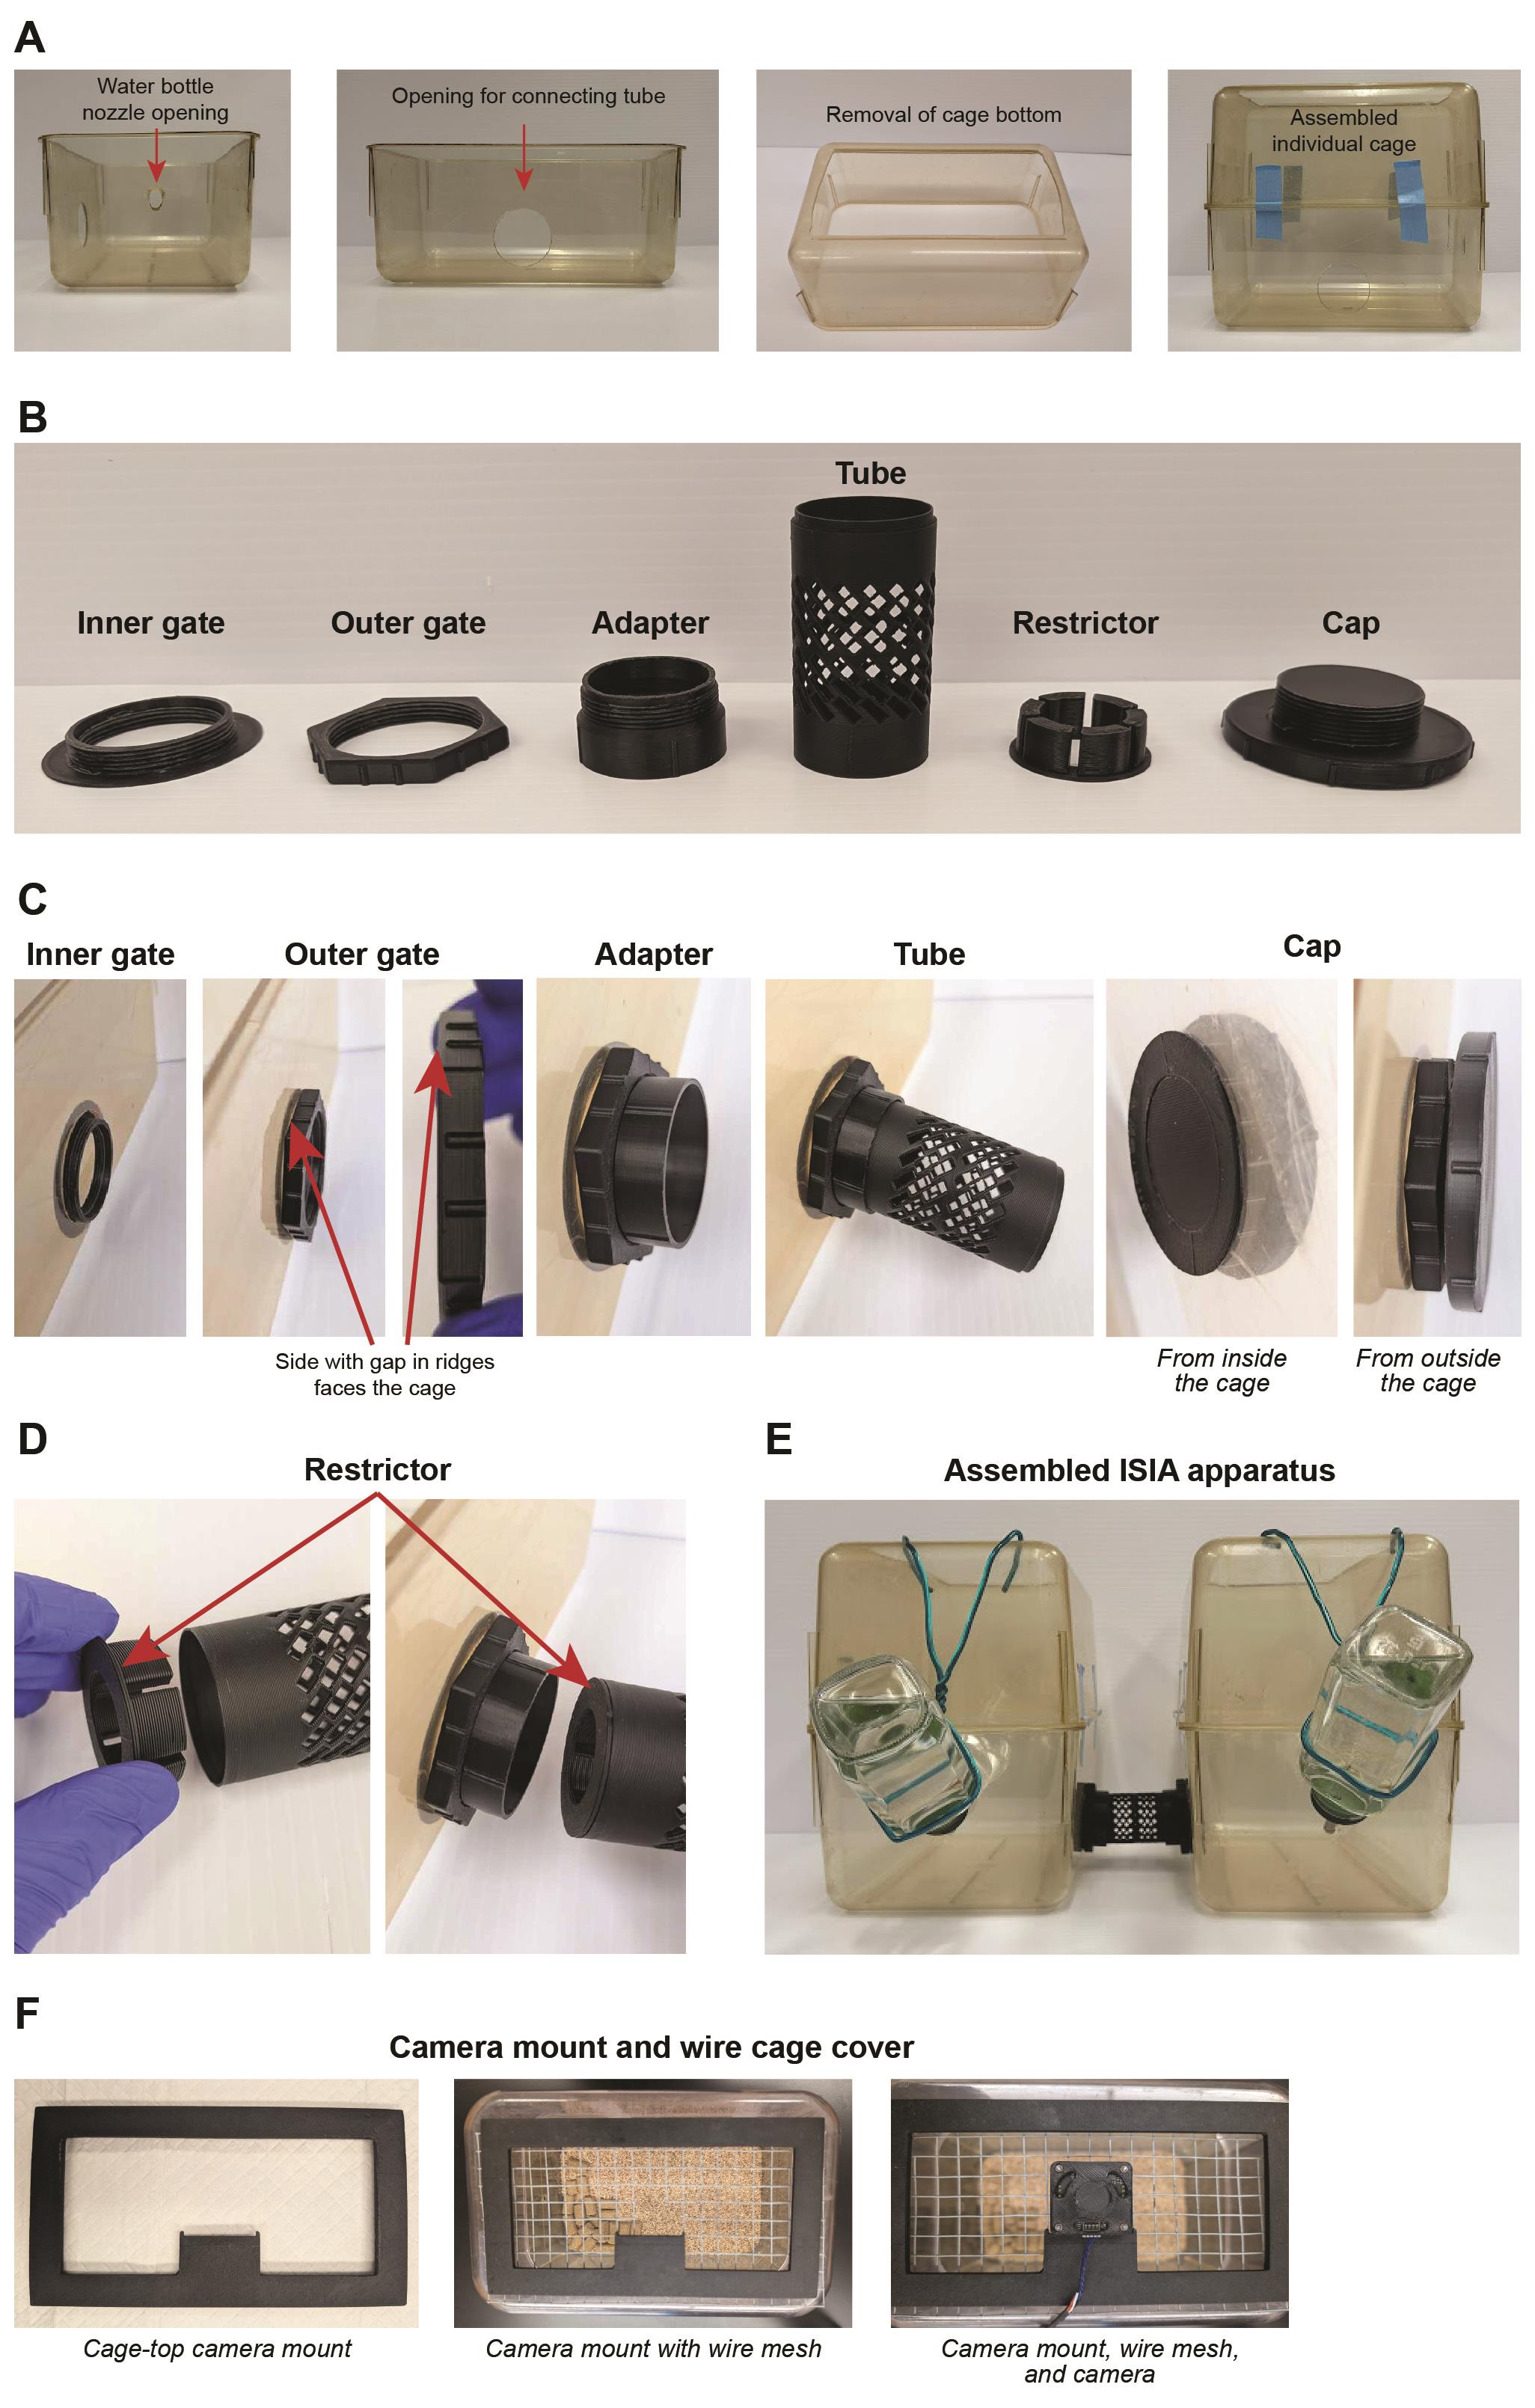
Figure 1. Assembly of the immersive social interaction assay (ISIA) apparatus. (A) Images showing a cage bottom drilled for the water bottle nozzle (far left; red arrow indicates the opening) and connecting tube (middle left; red arrow indicates the opening), removal of the bottom portion of the cage top (middle right), and the assembled individual ISIA chamber (far right), constructed from one top and one bottom cage component connected with labeling tape. (B) Images showing 3D-printed components of the ISIA apparatus. (C) Images showing 3D-printed components mounted onto the ISIA apparatus. From left to right: inner gate positioned on the inner side of an ISIA chamber; outer gate with the gap oriented toward the inner gate (red arrow indicates the gap); adapter attached to the gate mechanism; tube inserted into the adapter; and cap secured to the gate mechanism, shown from the inside and outside. (D) Restrictor inserted into the tube closest to the target chamber (red arrows indicate the restrictor). (E) Fully assembled ISIA apparatus consisting of two individual ISIA chambers connected by a 3D-printed tube, with wire holders and attached water bottles. (F) Cage cover and camera mounting assembly. From left to right: 3D-printed cage-top camera mount, camera mount attached to wire mesh above an ISIA chamber, and the fully assembled cage cover/camera mounting system.
1. Preparation of the ISIA apparatus bottoms
a. Drill openings for the water bottle nozzle: In each cage, drill a hole at a 45° angle, 5.5 cm below the top edge on the short side, using a 3/8" drill bit (Figure 1A).
b. Drill openings for the connecting tube: In each cage, drill a hole on one long side (on opposite sides in the two cages relative to the water bottle hole), 8.5 cm below the top edge and centered between both ends, using a 5.1 cm diameter hole saw (Figure 1A).
c. Smooth all cut surfaces using sandpaper to remove sharp edges.
2. Preparation of ISIA apparatus tops
a. Cut out the bottom of each cage by first drilling four holes—one in each corner of the cage bottom—using a 3/8" drill bit, then connecting the holes with a jigsaw (Figure 1A).
b. Smooth all cut edges with sandpaper to remove any sharp edges.
3. Individual cages assembly: Place each cage top upside down onto a cage bottom to form a double-height, open-top cage, and secure with labeling tape (Figure 1A). Ensure the tape is tightly applied to prevent tipping.
4. ISIA apparatus assembly
a. In each cage, place an inner gate on the inner side of the cage bottom, with the threaded portion extending through the hole (Figure 1B, C).
b. In each cage, attach an outer gate by screwing it onto the threads of the inner gate (Figure 1B, C).
i. The outer gate has ridges along its sides to facilitate gripping and orientation. The ridges extend to the edge on one side but not the other, creating a gap; the side where the ridges do not reach the edge should face the cage.
ii. Tighten the assembly to minimize movement or rotation.
c. Attach an adapter to each gate mechanism (Figure 1C).
d. Insert a tube into the adapter of one cage, then connect the other end of the tube to the adapter on the second cage.
e. A restrictor (Figure 1D) can be inserted into the tube to reduce its inner diameter from 3.7 to 2.5 cm, thereby confining head-bar-implanted mice to one chamber. To insert the restrictor, disconnect the end of the tube closest to the target chamber, insert the restrictor into the tube, and reconnect the tube to the adapter.
f. Hang water bottles using a wire frame attached to the top edge of the cage (Figure 1E).
g. Provide bedding, food, nesting material, and any additional enrichment as needed. In our setup, food is provided on the floor of the home cage; however, modified cage designs allowing food access through a mesh barrier without visual occlusion may also be used.
h. Add cage covers with camera openings to both cages to prevent mice from escaping. Suitable options include a perforated plexiglass sheet, a 1/4” wire mesh, or an inverted microfilter top (AN75).
i. Position cameras above each ISIA chamber to capture the entire apparatus.
Note: To house mice in single ISIA chambers (i.e., half of the ISIA apparatus) before or after ISIA experiments, remove the tube and adapter (if present) and attach a cap to the gate mechanism (Figure 1B, C). Caps should be printed using the same settings as the adapter and gates.
C. Head-bar assembly and implantation
Notes:
1. To use the ISIA apparatus in an experimental setup in which mice are restricted to a specific chamber, implant a head-bar onto a focal mouse such that, upon insertion of the restrictor into the connecting tube, its movement is limited to the desired chamber.
2. In the absence of the restrictor in the tube, head-bar-implanted mice are able to move freely between chambers.
3. The basic ISIA setup is described for a pair of mice: one head-bar-implanted and the other sham-operated.
C1. Head-bar assembly
1. Cut the head-bar extender into a 2 × 2 piece using a wire cutter (Figure 2). Ensure there are no sharp edges.
2. Dip the extender pins in super glue and insert them into the head-bar base (Figure 2). Alternatively, the extender can be left unglued to allow optional attachment or removal at different time points.
3. Cover the exposed gold pins of the head-bar extender with epoxy (e.g., using a toothpick) (Figure 2). Allow the epoxy to fully cure before use.
4. The total height of the assembled head-bar (including the base) should be at least 1.5 cm to enable confinement using the tube restrictor.
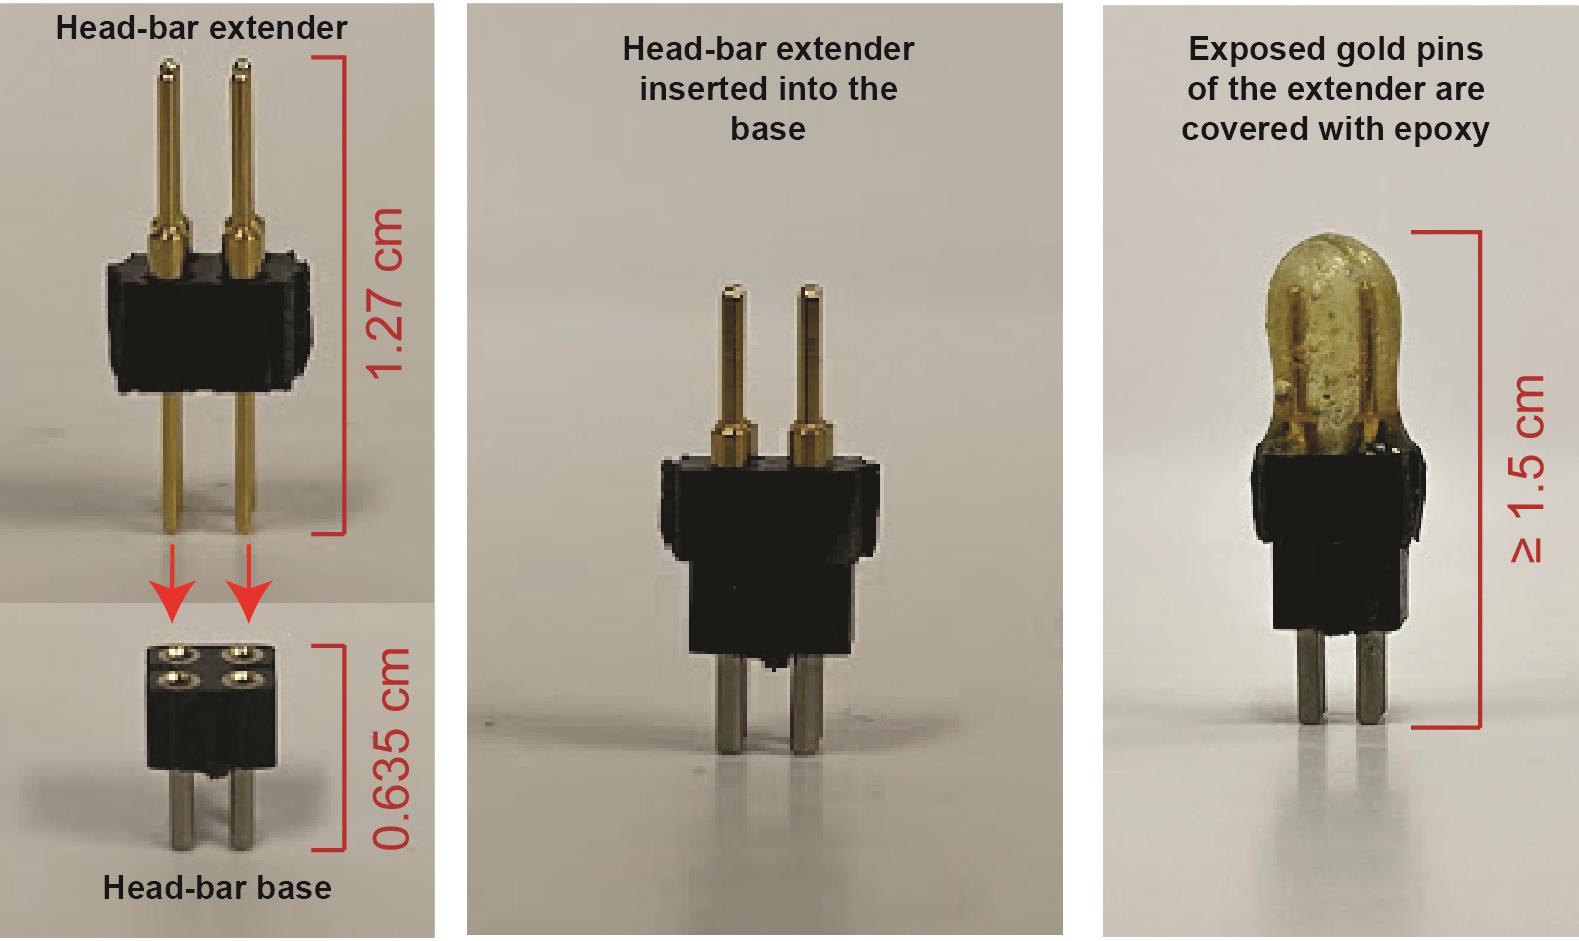
Figure 2. Assembly of the head-bar. Left: Head-bar extender and head-bar base. Red arrows indicate the direction of insertion. Middle: Head-bar base connected to the extender. Right: Fully assembled head-bar with epoxy covering all exposed gold pins. The total height of the assembled head-bar (including the base) should be at least 1.5 cm to enable confinement using the tube restrictor.
C2. Head-bar implantation
1. Anesthetize the mouse with isoflurane (4% oxygen for induction, 1%–2% during surgery) and administer analgesics: 4 mg/kg lidocaine and 5 mg/kg carprofen.
2. Apply eye ointment to the eyes.
3. Position the mouse in the stereotaxic frame over a heating pad and secure it with the nose cone.
4. (Optional) For individual animal identification and tracking, apply fur dye or bleaching to the dorsal fur from below the neck to the base of the tail:
a. For white/agouti mice, apply Tish & Snooky’s Manic Panic dyes (Figure 3).
b. For black mice, bleach the fur of one mouse.
c. Perform this step prior to implantation and allow sufficient time for fur drying.
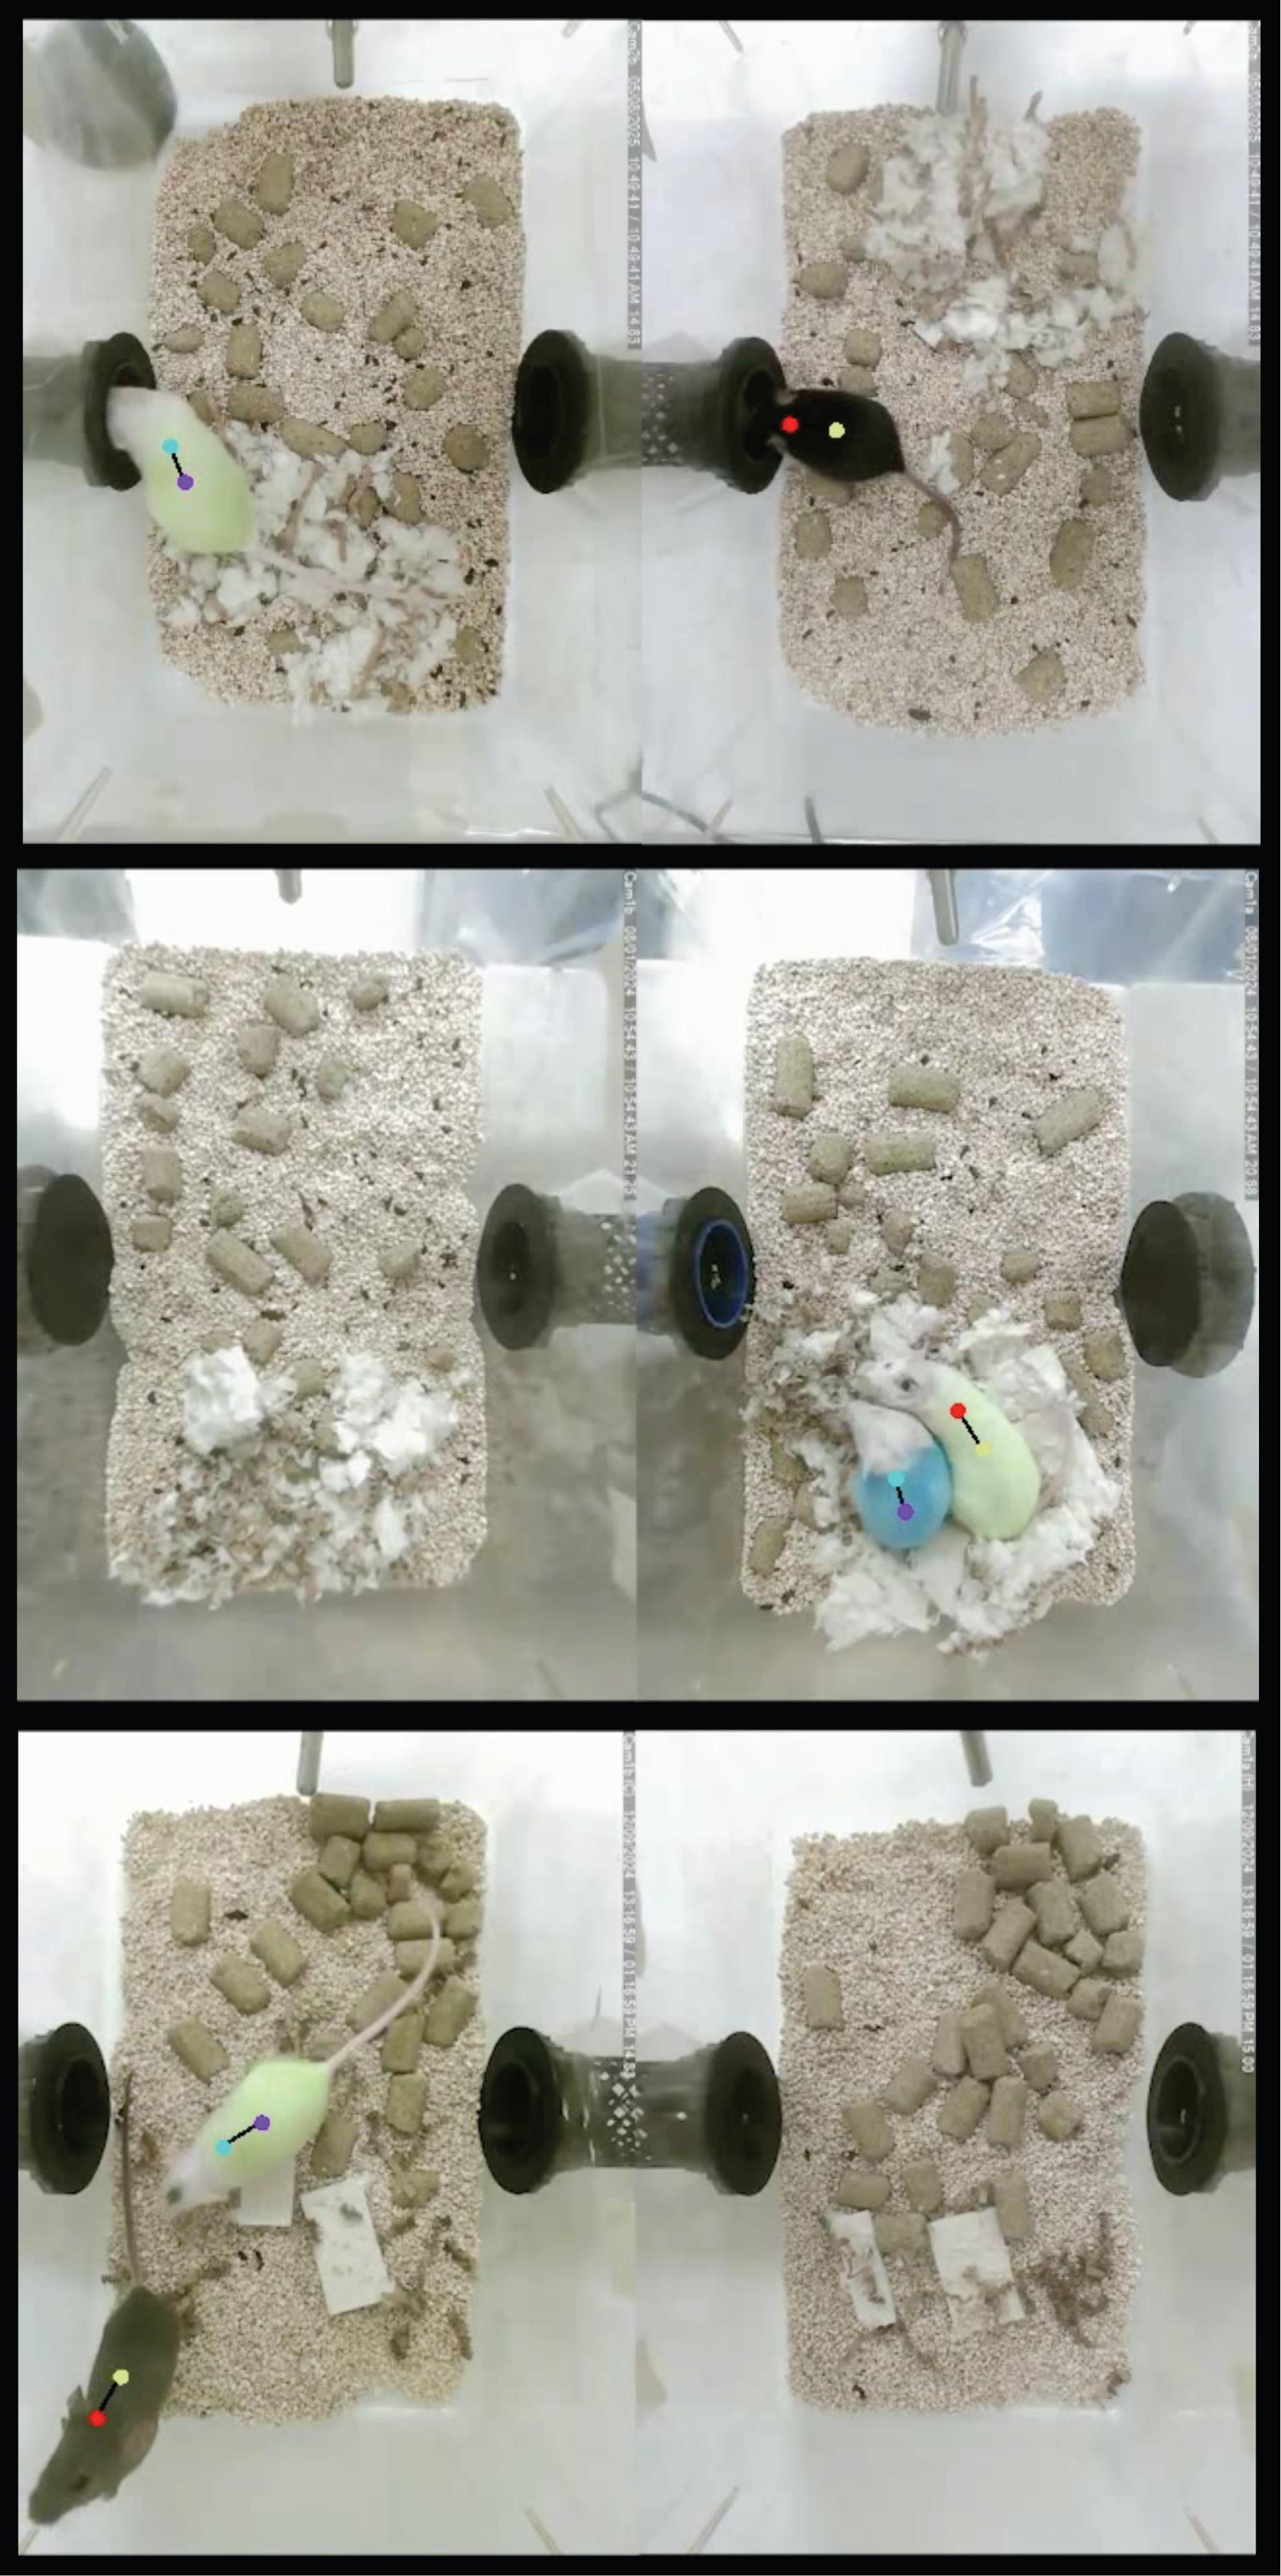
Figure 3. Snapshots from DeepLabCut tracking output from combined videos of the two-chamber immersive social interaction assay (ISIA) apparatus. Images show predicted key points and mice with different fur colors (top: green and black; middle: blue and green; bottom: agouti and green).
5. Remove fur from the scalp using an electric shaver and/or depilatory cream.
6. Clean the scalp using three alternating cycles of 70% isopropyl alcohol and 10% povidone-iodine prep pads, ending with an alcohol pad.
7. Incise the scalp and secure the mouse in the stereotaxic frame using ear bars.
8. Apply 3% hydrogen peroxide to a cotton swab and gently clean the skull surface to expose the bone. Follow with a saline swab to remove residual peroxide.
Note: Skip to step C2.15 if performing a sham surgery.
9. Level the skull and drill holes for two anchor screws. Drill depth should be sufficient to accommodate the skull screws without penetrating underlying neural tissue.
10. Clean the surface of the skull using a cotton-tipped applicator moistened with hydrogen peroxide, followed by saline.
11. Screw the skull screws into the holes using a precision screwdriver.
12. Thoroughly dry the surface of the skull.
13. Apply a thin layer of OptiBond to the skull using a micro-applicator and cure it using a dental curing light.
14. Place the head-bar pins on the skull surface, then apply dental cement to fully cover the screws and pins and secure the head-bar. Ensure the base is firmly secured and apply cement only to the base of the implant (not the sides), as side coverage can interfere with gripping the head-bar during attachment/removal.
15. Cure the cement using a dental curing light.
16. Suture the incision and return the mouse to a recovery cage.
17. Allow mice to fully recover (>5 days) before initiating experiments.
D. Huddling experiments
Notes:
1. The protocol described below enables the determination of motivation for prolonged physical contact (huddling) during sleep, as described in [12]. In its basic implementation, mice are first habituated to the apparatus, after which their preferred sleeping chamber is identified. The head-bar-implanted mouse is then confined to the least preferred chamber. This procedure enables assessment of whether the freely moving mouse relocates its sleeping location to the least preferred chamber and engages in huddling during sleep. The behavior of both mice is tracked, and locomotion and time spent huddling are quantified across freely moving and restricted conditions.
2. This protocol can be adapted to accommodate different experimental goals, including recording mice in novel cages, connecting single ISIA chambers of unfamiliar mice, and recording behavior in chambers maintained at different temperatures or with different enrichment objects. In addition, the protocol can be used to quantify other behaviors, such as aggression and mating.
3. While this protocol focuses on a two-chamber setup, the modular design of the ISIA allows adjustment of the number of chambers, mice, and/or restrictors to suit specific experimental goals (e.g., Figure 4).
4. To prevent light exposure during the dark phase, the screen of the computer used for video recording should remain off whenever possible. If screen use within the experimental room is necessary, a red screen gel filter (e.g., Lee Filter 106 Primary Red) should be used.
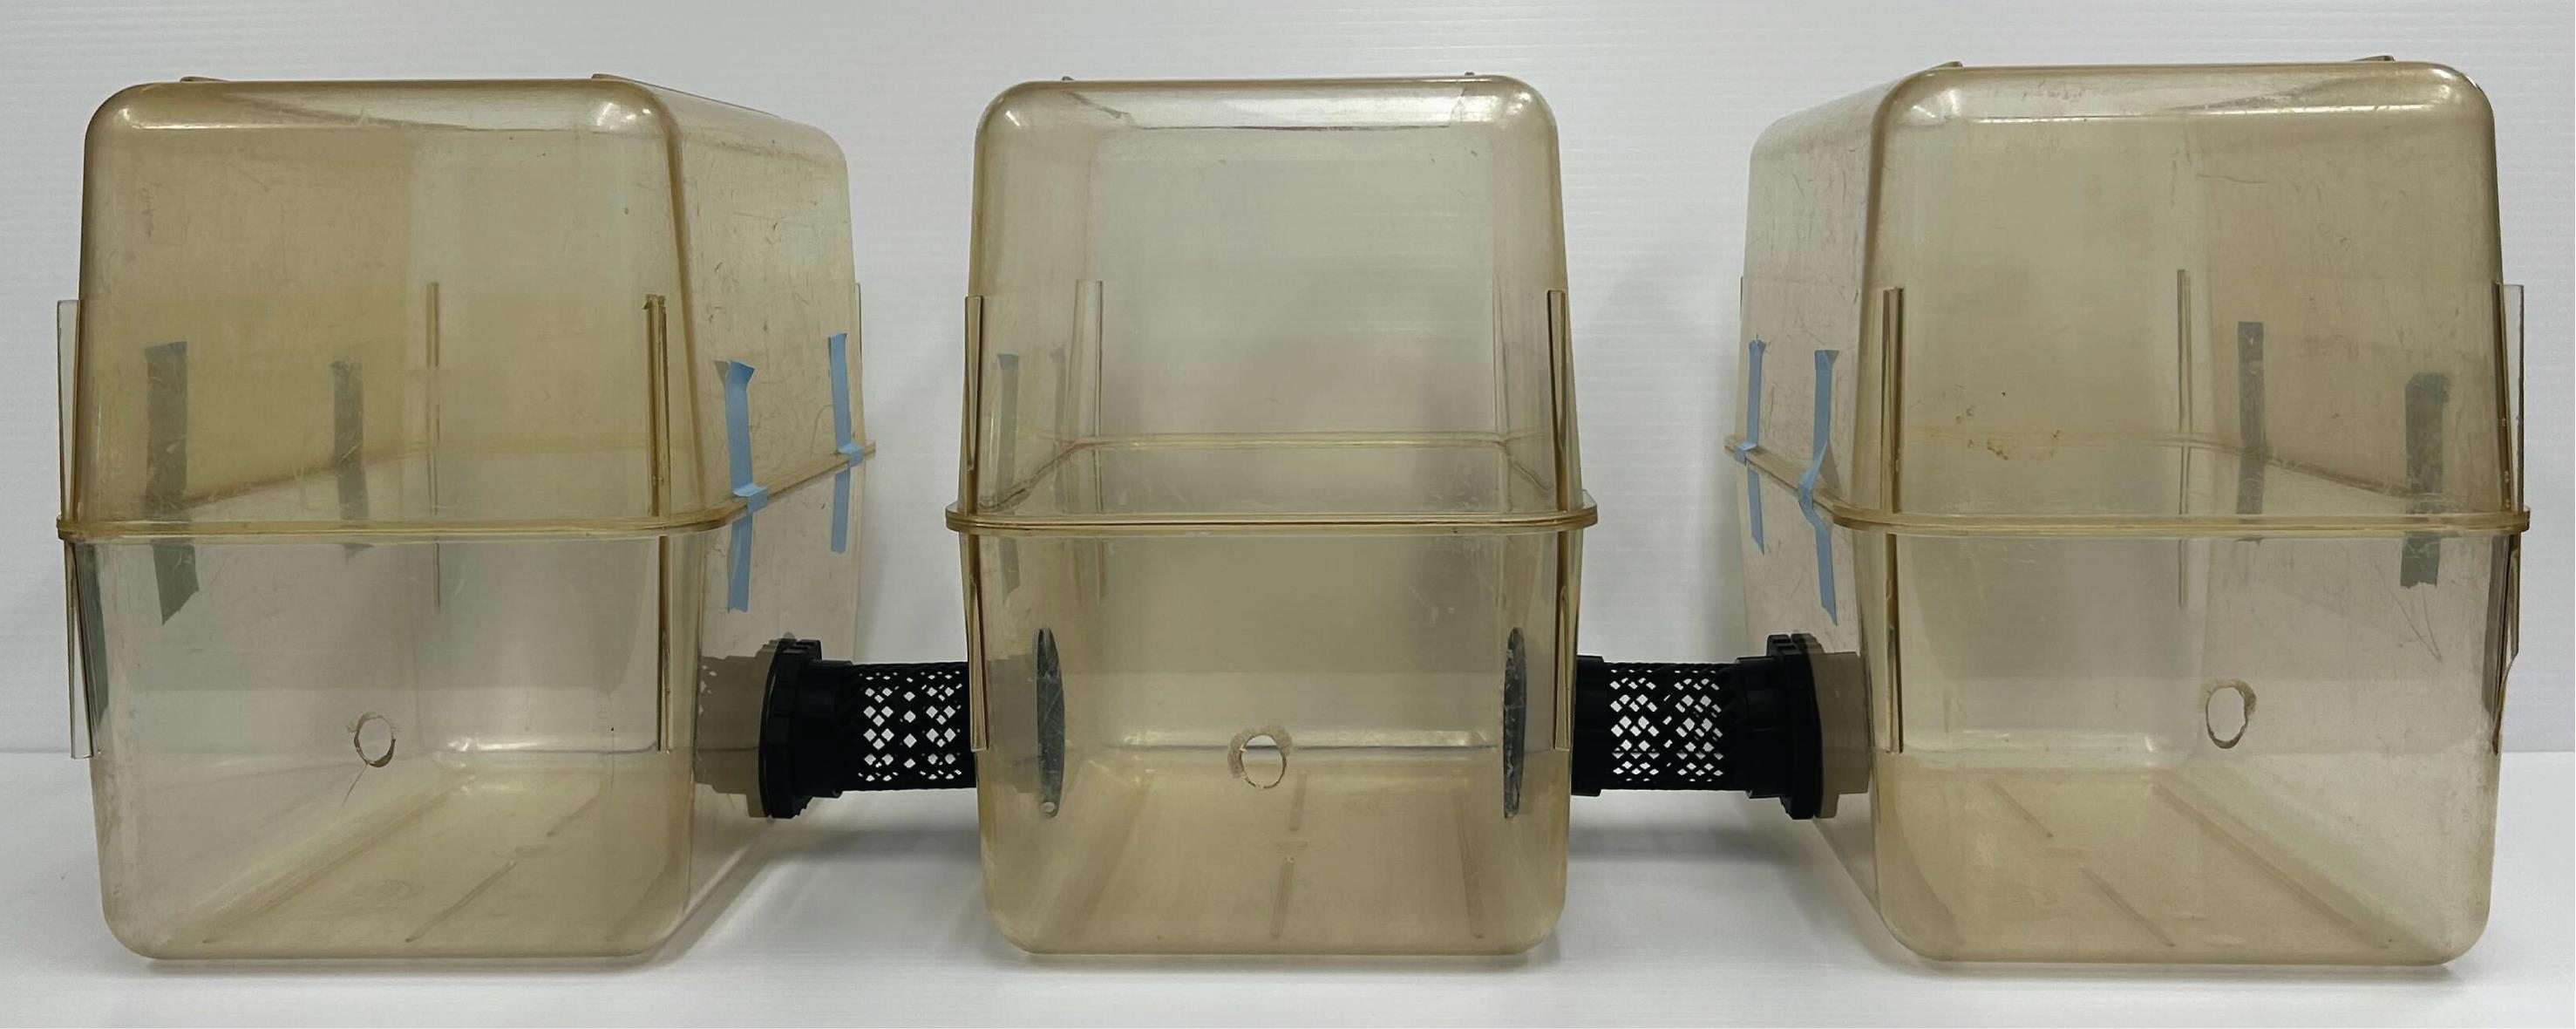
Figure 4. Immersive social interaction assay (ISIA) cage modification. Three-cage ISIA setup. The middle cage contains 51 mm diameter openings on both long sides.
1. Freely moving condition
a. Transfer two mice (one head-bar-implanted and one sham-operated) into the ISIA apparatus (Figure 3).
b. Place a small container (e.g., a weighing dish) below the connecting tube to collect bedding and other debris.
c. Allow 23–72 h of habituation, during which both mice can freely move between chambers.
d. At the end of the dark phase on the final habituation day, divide the nesting material between chambers and video record the apparatus for 24 h using a multi-camera recording system, such as iSpy (iSpyConnect). Mice typically build nests and sleep predominantly in one chamber. The least preferred chamber is defined as the chamber in which mice spend <50% of the time during the light phase.
2. Restriction condition
a. At the end of the next dark phase, disconnect the end of the tube closest to the least preferred chamber, insert the restrictor into the tube (Figure 1D), and reconnect the tube to the adapter.
b. Video record the apparatus for 24 h.
Data analysis
A. Video pre-processing
1. To generate a unified video incorporating both ISIA chambers, combine the recordings from the two cameras using Adobe Premiere Pro (Adobe Creative Cloud).
2. Rotate videos by 90° as needed and adjust their scale and position to standardize chamber dimensions and align the connecting tube across both views.
3. Trim each recording to a common start and end time to achieve temporal synchronization, ensuring that mouse transitions through the connecting tube occur without delay or mismatch between videos.
4. For efficient behavioral analysis, segment recordings into 12-h intervals corresponding to light and dark phases.
5. Export the merged video as a .3gp file at a resolution of 352 × 288 pixels or another suitable format/resolution, depending on the analysis pipeline.
B. Behavioral analysis
1. Use a machine learning–based system (e.g., DeepLabCut [13] or DAMM [15], https://github.com/backprop64/DAMM) to identify and track individual mice. Ensure consistent identity assignment across frames (e.g., via trajectory continuity or model-based identity tracking).
2. For each frame, compute the coordinates of a centroid or two back keypoints for each mouse.
3. Filter the coordinate data to exclude frames in which coordinates fall outside chamber boundaries or have low likelihood values (e.g., ≤0.1), which typically reflect occlusions or tracking failures.
4. For each recording, annotate the edge points of the chambers to enable standardization of coordinate data across experiments.
Note: Lack of proper standardization of chamber size within and across experiments will impair the use of real-world measurements for tracking and behavior classification.
5. Transform coordinate outputs to a consistent real-world distance scale.
6. Compute kinematic measures for each mouse within each chamber. Classify huddling behavior as described in [12]. Briefly, compute, for each frame, the closest proximity (minimum Euclidean distance) between mice. Define huddling as instances in which the distance indicates physical contact (~5 cm) sustained for more than 1 s (based on consecutive frames at the recording frame rate).
Note: This distance is a preset hyperparameter that should be validated for each strain and experimental setup.
7. Refer to [12] for examples of expected results.
Validation of protocol
This protocol or parts of it has been used and validated in the following research article(s):
• Sotelo et al. [12]. Neurophysiological and behavioral synchronization in group-living and sleeping mice. Current Biology (Figure 2A, Table 1, Figure S1A–G]
Supplementary information
The following supporting information can be downloaded here:
1. File S1. ISIA 3D design files
Acknowledgments
Conceptualization, A.C. and A.E-.R.; Investigation, A.C.; Writing—Original Draft, A.C., E.S.M., and A.E-.R.; Writing—Review & Editing, A.C., E.S.M., and A.E-.R.; Funding acquisition, A.E-.R.; Supervision, A.E-.R. This work was supported by the National Institute of Neurological Disorders and Stroke awards R01NS131821 and R01NS129874 to A.E-.R. We thank Chelsea Markunas, Maria Ines Sotelo, and Tyler Kudlak for their contributions to early versions of the ISIA design.
This protocol was used in [12].
Competing interests
The authors declare that they have no conflict of interest.
Ethical considerations
All experimental protocols were approved by both the University of Michigan Animal Care and Use Office and the University of Michigan Unit of Laboratory Animal Medicine.
References
- Wilson, E. O. (2000). Sociobiology: The new synthesis. Harvard University Press. ISBN: 0674002350.
- Eban-Rothschild, A. and Bloch, G. (2012). Social influences on circadian rhythms and sleep in insects. Adv Genet. 77: 1–32. https://doi.org/10.1016/b978-0-12-387687-4.00001-5
- Insel, T. R. and Fernald, R. D. (2004). HOW THE BRAIN PROCESSES SOCIAL INFORMATION: Searching for the Social Brain. Annu Rev Neurosci. 27(1): 697–722. https://doi.org/10.1146/annurev.neuro.27.070203.144148
- Kennedy, D. P. and Adolphs, R. (2012). The social brain in psychiatric and neurological disorders. Trends Cognit Sci. 16(11): 559–572. https://doi.org/10.1016/j.tics.2012.09.006
- Shemesh, Y. and Chen, A. (2023). A paradigm shift in translational psychiatry through rodent neuroethology. Mol Psychiatry. 28(3): 993–1003. https://doi.org/10.1038/s41380-022-01913-z
- Krakauer, J. W., Ghazanfar, A. A., Gomez-Marin, A., MacIver, M. A. and Poeppel, D. (2017). Neuroscience Needs Behavior: Correcting a Reductionist Bias. Neuron. 93(3): 480–490. https://doi.org/10.1016/j.neuron.2016.12.041
- Miller, C. T., Gire, D., Hoke, K., Huk, A. C., Kelley, D., Leopold, D. A., Smear, M. C., Theunissen, F., Yartsev, M. and Niell, C. M. (2022). Natural behavior is the language of the brain. Curr Biol. 32(10): R482-r493. https://doi.org/10.1016/j.cub.2022.03.031
- Datta, S. R., Anderson, D. J., Branson, K., Perona, P. and Leifer, A. (2019). Computational Neuroethology: A Call to Action. Neuron. 104(1): 11–24. https://doi.org/https://doi.org/10.1016/j.neuron.2019.09.038
- Yizhar, O., Fenno, L. E., Prigge, M., Schneider, F., Davidson, T. J., O’Shea, D. J., Sohal, V. S., Goshen, I., Finkelstein, J., Paz, J. T., et al. (2011). Neocortical excitation/inhibition balance in information processing and social dysfunction. Nature. 477(7363): 171–178. https://doi.org/10.1038/nature10360
- Moy, S. S., Nadler, J. J., Perez, A., Barbaro, R. P., Johns, J. M., Magnuson, T. R., Piven, J. and Crawley, J. N. (2004). Sociability and preference for social novelty in five inbred strains: an approach to assess autistic-like behavior in mice. Genes Brain Behav. 3(5): 287–302. https://doi.org/10.1111/j.1601-1848.2004.00076.x
- Silverman, J. L., Yang, M., Lord, C. and Crawley, J. N. (2010). Behavioural phenotyping assays for mouse models of autism. Nat Rev Neurosci. 11(7): 490–502. https://doi.org/10.1038/nrn2851
- Sotelo, M. I., Markunas, C., Kudlak, T., Kohtz, C., Vyssotski, A. L., Rothschild, G. and Eban-Rothschild, A. (2023). Neurophysiological and behavioral synchronization in group-living and sleeping mice. Curr Biol. https://doi.org/10.1016/j.cub.2023.11.065
- Mathis, A., Mamidanna, P., Cury, K. M., Abe, T., Murthy, V. N., Mathis, M. W. and Bethge, M. (2018). DeepLabCut: markerless pose estimation of user-defined body parts with deep learning. Nat Neurosci. 21(9): 1281–1289. https://doi.org/10.1038/s41593-018-0209-y
- Pereira, T. D., Tabris, N., Matsliah, A., Turner, D. M., Li, J., Ravindranath, S., Papadoyannis, E. S., Normand, E., Deutsch, D. S., Wang, Z. Y., et al. (2022). SLEAP: A deep learning system for multi-animal pose tracking. Nat Methods. 19(4): 486–495. https://doi.org/10.1038/s41592-022-01426-1
- Kaul, G., McDevitt, J., Johnson, J. and Eban-Rothschild, A. (2024). DAMM for the detection and tracking of multiple animals within complex social and environmental settings. Sci Rep. 14(1): 21366. https://doi.org/10.1038/s41598-024-72367-2
Article Information
Publication history
Received: May 6, 2026
Accepted: Jul 1, 2026
Available online: Jul 24, 2026
Published: Aug 20, 2026
Copyright
© 2026 The Author(s); This is an open access article under the CC BY-NC license (https://creativecommons.org/licenses/by-nc/4.0/).
How to cite
Crane, A., Sorvino Mancini, E. and Eban-Rothschild, A. (2026). Immersive Social Interaction Assay (ISIA) for Studying Voluntary and Long-Term Social Behavior in Mice. Bio-protocol 16(16): e5789. DOI: 10.21769/BioProtoc.5789.

 Download Citation in RIS Format
Category
Neuroscience > Behavioral neuroscience > Animal model
Neuroscience > Behavioral neuroscience > Cognition
Neuroscience > Basic technology > High-throughput screening
Do you have any questions about this protocol?
Post your question to gather feedback from the community. We will also invite the authors of this article to respond.
 Post a Question


