


- Protocols

- Articles and Issues
- For Authors
- About
- Become a Reviewer


From Design to Practice: A Comprehensive Tutorial for the Rapid Multiplex Engineering of Escherichia coli Using Antibiotic Resistance Markers

Published: Vol 16, Iss 8, Apr 20, 2026 DOI: 10.21769/BioProtoc.5665 Views: 583
Reviewed by: Walmik Karbhari GaikwadAnonymous reviewer(s)
 PDF
PDF  Ask a question
Original research article
The authors used this protocol in:

Sep 2020
Advertisement


Protocol Collections
Comprehensive collections of detailed, peer-reviewed protocols focusing on specific topics




Related protocols
Abstract
Engineering of microbial cells, including E. coli, is essential in prototyping genetic designs used in numerous applications throughout synthetic biology. While many advanced genome editing tools, such as CRISPR-based tools, offer new capabilities with genetically recalcitrant organisms, these tools often do not offer an immediate advantage in readily manipulated microbes, such as E. coli, especially when scarless modifications are not critical. We describe a comprehensive recombineering tutorial that we commonly use for multiplex engineering of E. coli using antibiotic markers. We leverage a group of 15 antibiotic resistance cassettes, most of which can be readily included when designing double-stranded DNA donors intended for recombineering and purchased from several vendors. Using these methods, 10–15 defined modifications to a single host strain can be achieved in less than three weeks, using two-day editing cycles. We discuss sequences and protocols as well as the optimal design of genetic modifications and the associated DNA.
Key features
• Enables 10–15 genomic modifications in less than 3 weeks.
• Includes a comprehensive tutorial on designing donor DNA as well as choosing the appropriate antibiotic markers.
• Includes DNA sequences that are amenable to commercial DNA synthesis.
Keywords: Multiplex Genome engineering
Editing
Recombineering
Antibiotics
E. coli
Genome engineering
Editing
Recombineering
Antibiotics
E. coli
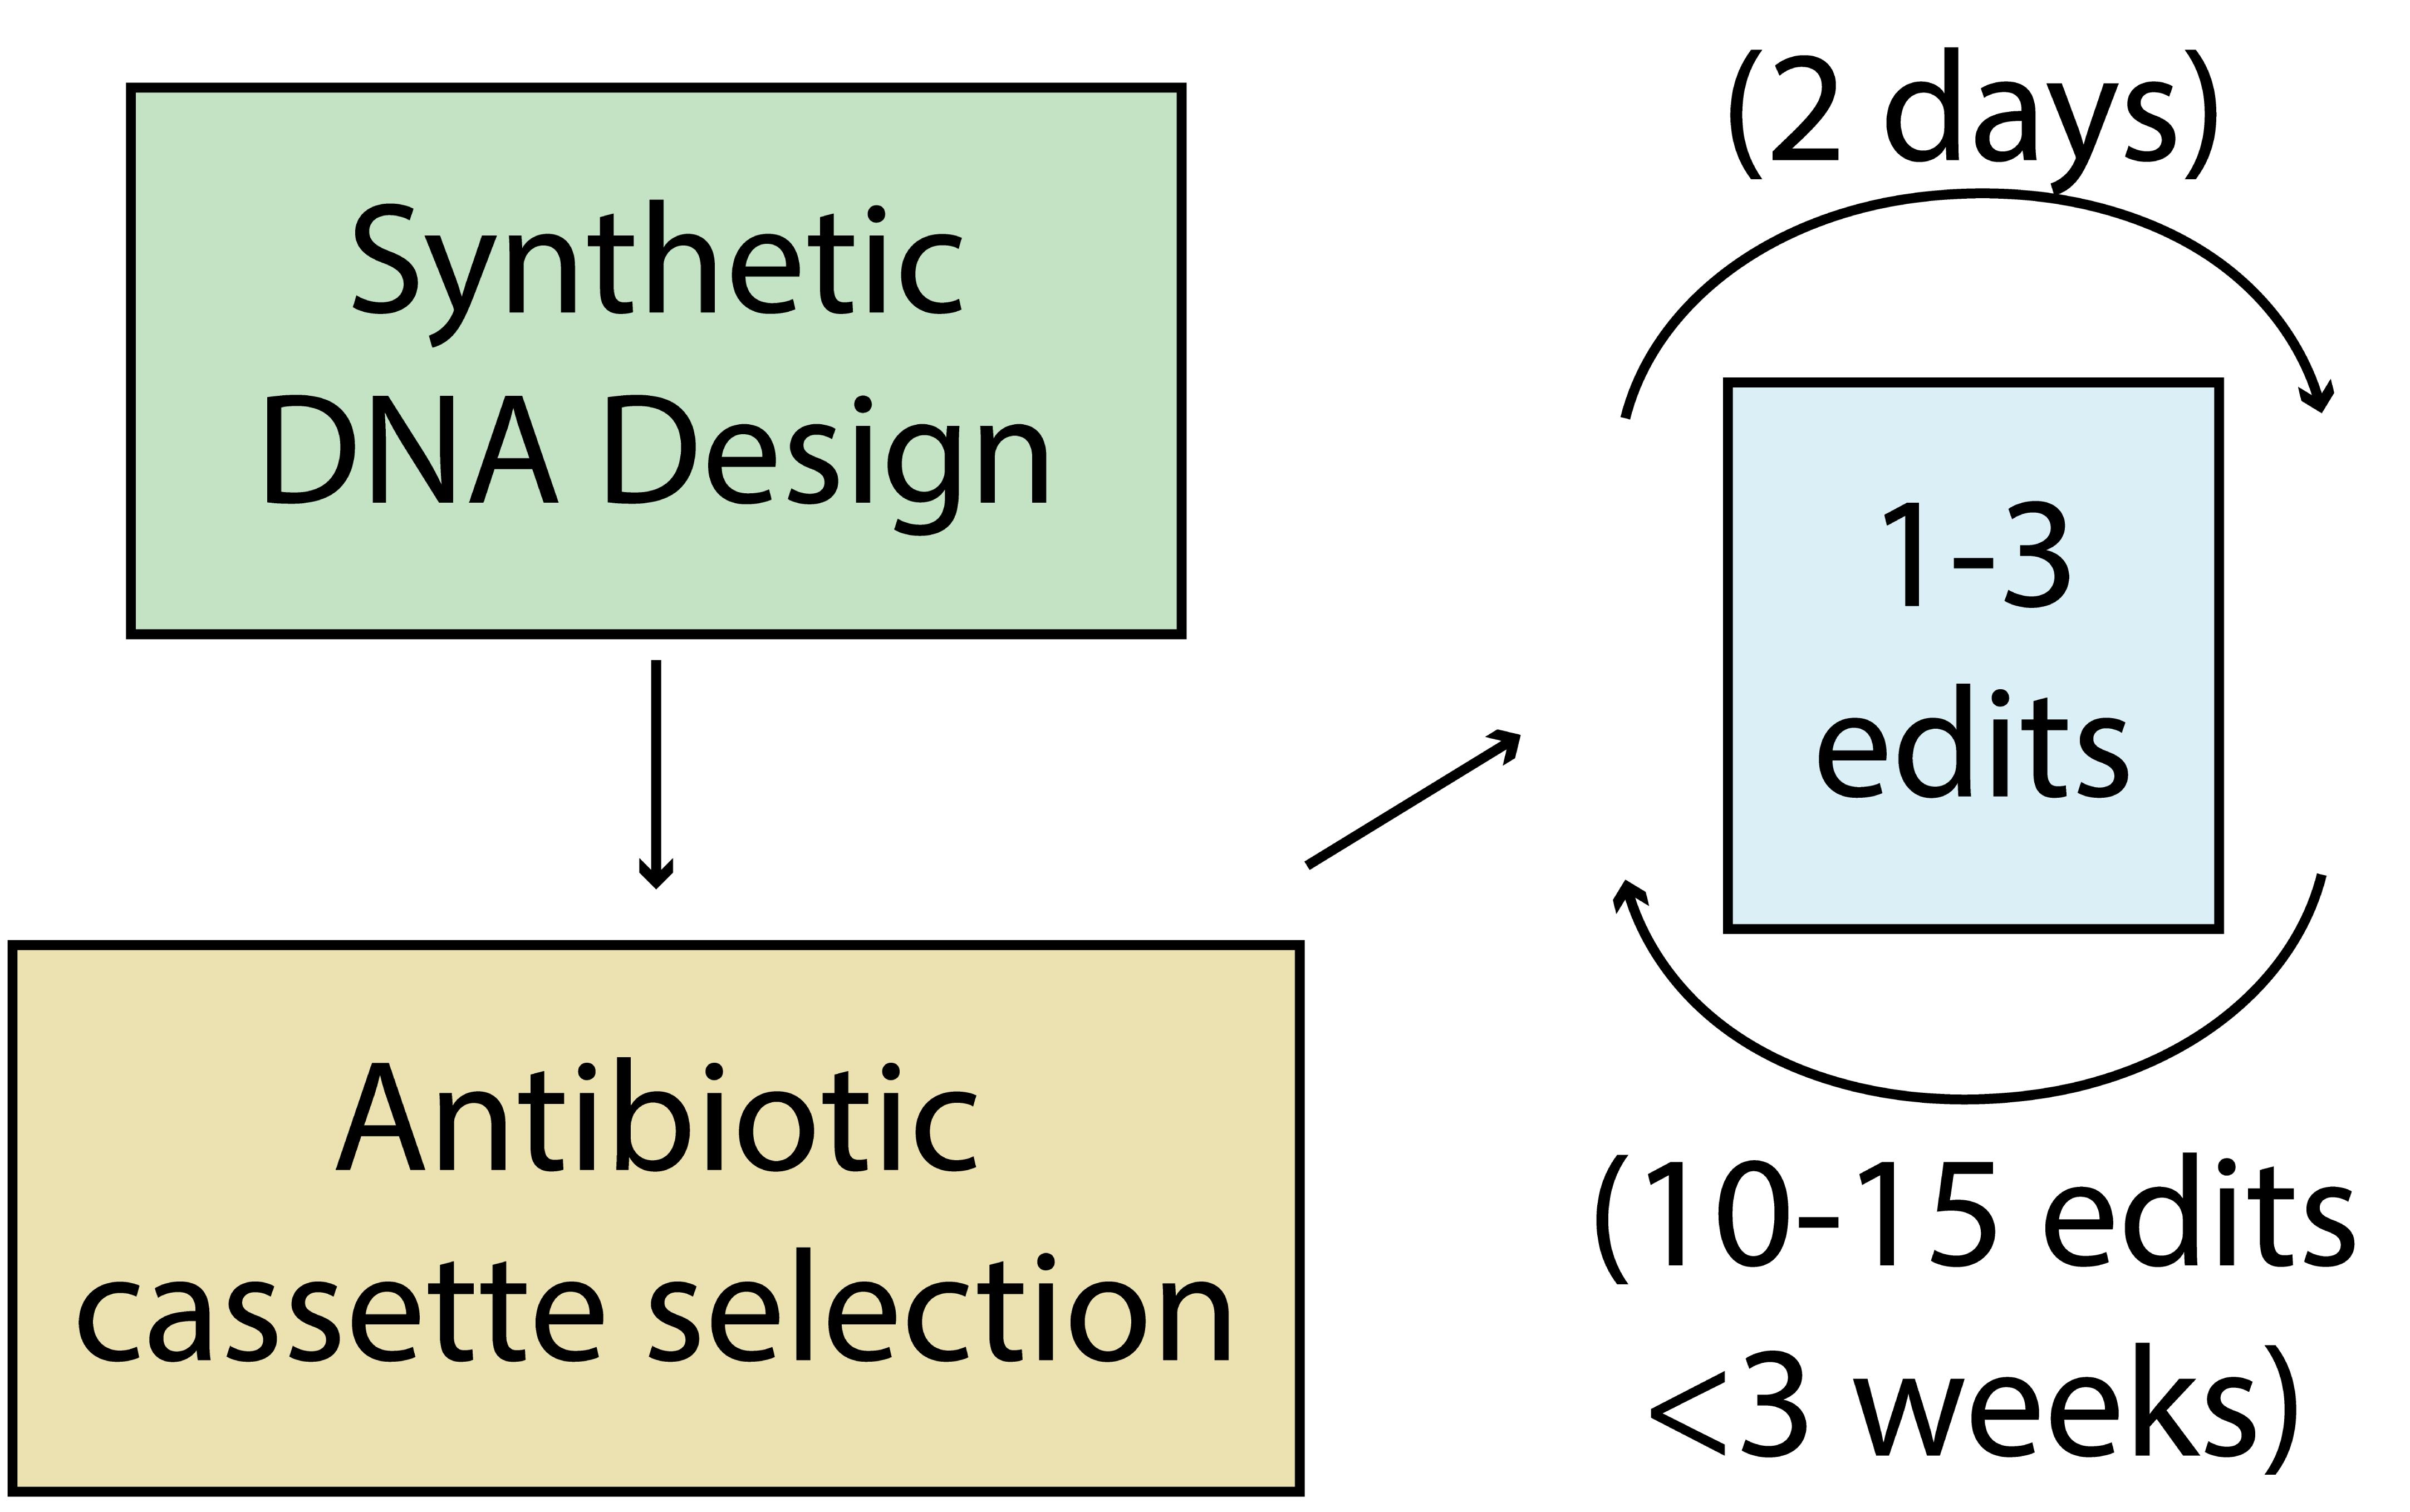
Graphical overview
Background
Genetic manipulation is at the heart of synthetic biology. More complicated genetic designs often require making multiple genetic modifications in parallel in a single cell, or “multiplexing” [1,2]. Many studies in synthetic biology could benefit from, or require, rapid prototyping of these designs. Complex genetic designs are often implemented through a variety of approaches, including the introduction of plasmids as well as chromosomal modifications. The latter toolkit has exploded in recent years since the discovery of CRISPR systems [3]. However, CRISPR/Cas systems require identifying optimal gRNA sequences for each edit and dealing with complexity in cloning and expressing multiple gRNAs, as well as host- and strain-dependent variability [4–6]. In addition, to date, many antibiotic-free multiplexing approaches often require significant colony screening and/or edits to generate an easily selected or screened phenotype [7,8]. Conversely, antibiotic markers enable rapid selection, without the need for significant screening or expression of CRISPR/Cas enzymes and gRNAs. As a result, for many designs, antibiotic markers are still widely used for selection because they can enable a faster pace of editing than newer methods [9–12].
In this tutorial, we walk through recombineering using antibiotic cassettes for engineering E. coli. This includes (1) selection guidelines and sequences of a large group of antibiotic resistance cassettes, readily obtainable via gene synthesis, (2) design criteria for chromosomal modifications intended to minimize polar effects [13], and (3) a detailed recombineering protocol. Using these methods, 10–15 defined modifications to a single host can be achieved in less than 3 weeks, using two-day editing cycles. While this method has been described and vetted in E. coli [14–16], the concepts are readily applicable to other microbial hosts.
Importantly, in addition to the antibiotic marker cassettes discussed here, there are others conferring resistance to a variety of antibiotics, including fluoroquinolones (nalidixic acid, azithromycin), macrolides (erythromycin), doxorubicin, mitomycin C, and others [17–22]. However, we do not recommend their use since many of these are either toxic (even during only handling, such as doxorubicin), reserved for other routine methods (mitomycin used in testing for lysogenic phage, for example), or are antibiotics that are routinely used clinically (fluoroquinolones and macrolides). As antibiotic and reactive resistance is a growing concern [18,23–25], best laboratory biosafety practices and care should be taken in the handling, use, and disposal of all antibiotics and antibiotic-resistant strains [26]. While the use of multiple antibiotic markers can facilitate rapid prototyping in well-controlled laboratory environments, strains with resistance markers are often not allowed in very large-scale commercial applications, where containment is more difficult.
Materials and reagents
Biological materials
1. pSIM-X plasmid; we routinely use pSIM-5 (National Cancer Institute, Bethesda, Maryland, https://ncifrederick.cancer.gov/recombineering/strains-plasmids-and-primers)
2. 2× Taq master mix + dye (Roke Biotechnologies, catalog number: RE-005TMMD400)
Reagents
1. Agar A (BioBasic, catalog number: FB0010)
2. Synthetic double-stranded donor DNA
3. Agarose (Sigma-Aldrich, catalog number: A6013-500G)
4. Tryptone [BioBasic, catalog number: TG217(500g)]
5. Sodium chloride (BioBasic, catalog number: DB0483)
6. Yeast extract (Thermo Fisher, catalog number: 288620)
7. DNA stain Midori green (VWR, catalog number: 102407-968)
8. Apramycin (Sigma-Aldrich, catalog number: A2024-5G)
9. Triclosan (Sigma-Aldrich, catalog number: 72779-5G-F)
10. Gentamicin (Sigma-Aldrich, catalog number: G1264-1G)
11. Tetracycline (Sigma-Aldrich, catalog number: T7660-5G)
12. Chloramphenicol (Sigma-Aldrich, catalog number: C1919-5G)
13. Spectinomycin (Sigma-Aldrich, catalog number: S4014-5G)
14. Kanamycin (Sigma-Aldrich, catalog number: K1377-5G)
15. Ampicillin (Sigma-Aldrich, catalog number: A8351-5G)
16. Trimethoprim (Sigma-Aldrich, catalog number: T7883-5G)
17. Nourseothricin (Sigma-Aldrich, catalog number: N0186-10MG)
18. Tellurite (Sigma-Aldrich, catalog number: 60539-10G)
19. Glycerol (BioBasic, catalog number: GB0232)
20. 2,000× zeocin solution (InVivoGen, catalog number: ant-zn-1)
21. 100× blasticidin solution (InVivoGen, catalog number: ant-bl-1)
22. 80× puromycin solution (InVivoGen, catalog number: ant-pr-1)
23. 500× hygromycin solution (InVivoGen, catalog number: ant-hg-1)
24. DMSO (Sigma-Aldrich, catalog number: D8418-50ML)
25. Ethanol (Lab Alley, catalog number: EAPMB200-1L)
Solutions
1. Luria broth (LB) (see Recipes)
2. Sterile 10% glycerol (see Recipes)
3. Sterile 50% glycerol (see Recipes)
4. LB agar plates (see Recipes)
5. 2,000× apramycin solution (see Recipes)
6. 50,000× triclosan solution (see Recipes)
7. 1,000× gentamicin solution (see Recipes)
8. 1,000× tetracycline solution (see Recipes)
9. 1,000× chloramphenicol solution (see Recipes)
10. 1,000× spectinomycin solution (see Recipes)
11. 1,000× kanamycin solution (see Recipes)
12. 1,000× ampicillin solution (see Recipes)
13. 50× trimethoprim solution (see Recipes)
14. 1,000× nourseothricin solution (see Recipes)
15. 35× tellurite solution (see Recipes)
Recipes
1. LB
| Reagent | Quantity or volume |
|---|---|
| Tryptone | 10 g |
| Sodium chloride | 5 g |
| Yeast extract | 5 g |
| DI/ultrapure water (TOC < 0.500 mg/L) | Fill to 1 L |
a. Autoclave to sterilize at 121 °C for 30 min at 15 psi pressure or higher.
b. Shelf-life < 6 months.
2. Sterile 10% glycerol
| Reagent | Quantity or volume |
|---|---|
| Glycerol | 100 mL |
| DI/ultrapure water (TOC < 0.500 mg/L) | 900 mL |
a. Autoclave to sterilize at 121 °C for 30 min at 15 psi pressure or higher.
b. Shelf-life < 6 months.
3. Sterile 50% glycerol
| Reagent | Quantity or volume |
|---|---|
| Glycerol | 500 mL |
| DI/ultrapure water (TOC < 0.500 mg/L) | 500 mL |
a. Autoclave to sterilize at 121 °C for 30 min at 15 psi pressure or higher.
b. Shelf-life < 6 months.
4. LB agar plates
| Reagent | Quantity or volume |
|---|---|
| Tryptone | 10 g |
| Sodium chloride | 5 g |
| Yeast extract | 5 g |
| Agar A | 15 g |
| DI/ultrapure water (TOC < 0.500 mg/L) | 1,000 mL |
a. Autoclave to sterilize at 121 °C for 30 min at 15 psi pressure or higher.
b. When antibiotics are included, mix them once the solution has cooled down to ~50–60 °C. Antibiotics should be diluted to 1× (working concentration).
c. Pour 20–30 mL of warm solution (~50–60 °C) after autoclaving per Petri dish.
d. Put the lids on the Petri dishes and leave at room temperature for 2 h to solidify.
e. Store at 4 °C and use for up to a month.
5. 2,000× apramycin solution
| Reagent | Quantity or volume |
|---|---|
| Apramycin | 1 g |
| DI/ultrapure water (TOC < 0.500 mg/L) | 10 mL |
a. Sterilize using a 10 mL sterile syringe with a syringe filter.
b. Store at -20 °C. Shelf-life < 1 year.
6. 50,000× triclosan solution
| Reagent | Quantity or volume |
|---|---|
| Triclosan | 140 mg |
| DMSO | 10 mL |
a. Sterilize using a 10 mL sterile syringe with a syringe filter.
b. Store at -20 °C. Shelf-life < 1 year.
7. 1,000× gentamicin solution
| Reagent | Quantity or volume |
|---|---|
| Gentamicin | 200 mg |
| DI/ultrapure water (TOC < 0.500 mg/L) | 10 mL |
a. Sterilize using a 10 mL sterile syringe with a syringe filter.
b. Store at -20 °C. Shelf-life < 1 year.
8. 1,000× tetracycline solution
| Reagent | Quantity or volume |
|---|---|
| Tetracycline | 100 mg |
| Ethanol | 7 mL |
| DI/ultrapure water (TOC < 0.500 mg/L) | 3 mL |
a. Sterilize using a 10 mL sterile syringe with a syringe filter.
b. Store at -20 °C. Shelf-life < 1 year.
9. 1,000× chloramphenicol solution
| Reagent | Quantity or volume |
|---|---|
| Chloramphenicol | 350 mg |
| Ethanol | 7 mL |
| DI/ultrapure water (TOC < 0.500 mg/L) | 3 mL |
a. Sterilize using a 10 mL sterile syringe with a syringe filter.
b. Store at -20 °C. Shelf-life < 1 year.
10. 1,000× spectinomycin solution
| Reagent | Quantity or volume |
|---|---|
| Spectinomycin | 500 mg |
| DI/ultrapure water (TOC < 0.500 mg/L) | 10 mL |
a. Sterilize using a 10 mL sterile syringe with a syringe filter.
b. Store at -20 °C. Shelf-life < 1 year.
11. 1,000× kanamycin solution
| Reagent | Quantity or volume |
|---|---|
| Kanamycin | 350 mg |
| DI/ultrapure water (TOC < 0.500 mg/L) | 10 mL |
a. Sterilize using a 10 mL sterile syringe with a syringe filter.
b. Store at -20 °C. Shelf-life < 1 year.
12. 1,000× ampicillin solution
| Reagent | Quantity or volume |
|---|---|
| Ampicillin | 1 g |
| DI/ultrapure water (TOC < 0.500 mg/L) | 10 mL |
a. Sterilize using a 10 mL sterile syringe with a syringe filter.
b. Store at -20 °C. Shelf-life < 1 year.
13. 50× trimethoprim solution
| Reagent | Quantity or volume |
|---|---|
| Trimethoprim | 100 mg |
| DMSO | 10 mL |
a. Sterilize using a 10 mL sterile syringe with a syringe filter.
b. Store at -20 °C. Shelf-life < 1 year.
14. 1,000× nourseothricin solution
| Reagent | Quantity or volume |
|---|---|
| Nourseothricin | 1 g |
| DMSO | 10 mL |
a. Sterilize using a 10 mL sterile syringe with a syringe filter.
b. Store at -20 °C. Shelf-life < 1 year.
15. 35× tellurite solution
| Reagent | Quantity or volume |
|---|---|
| Tellurite | 17.4 mg |
| DMSO | 10 mL |
a. Sterilize using a 10 mL sterile syringe with a syringe filter.
b. Store at -20 °C. Shelf-life < 1 year.
Laboratory supplies
1. 16 mL culture tubes (Genesee Scientific, catalog number: 21-130)
2. 50 mL conical tubes (Genesee Scientific, catalog number: 28-108)
3. 1 L media bottles (VWR, catalog number: 10754-820)
4. 250 mL Erlenmeyer flasks (VWR, catalog number: 10536-914)
5. 10 mL serological pipets (Genesee Scientific, catalog number: 12-104)
6. 25 mL serological pipets (Genesee Scientific, catalog number: 12-106)
7. Electroporation cuvettes (1 mm gap width) (Genesee Scientific, catalog number: 40-100)
8. Petri dish for agar plates (100 mm × 15 mm) (VWR, catalog number: 10416-320)
9. 10 μL pipette tips (Genesee Scientific, catalog number: 23-121RLC)
10. 200 μL pipette tips (Genesee Scientific, catalog number: 23-150RLC)
11. 1,000 μL pipette tips (Genesee Scientific, catalog number: 23-165RLC)
12. 10 mL sterile syringe (VWR, catalog number: 75846-756)
13. Syringe filter (0.2 μm) (Genesee Scientific, catalog number: 25-244)
14. 1.7 mL microcentrifuge tubes (Genesee Scientific, catalog number: 24-281)
Equipment
1. Pipette controller (Eppendorf, model: 4430000018)
2. Incubator shaker (Kuhner, model: LT-X)
3. Benchtop centrifuge (Thermo Scientific, model: Legend XTR)
4. -80 °C freezer (Thermo Scientific, model: TSX700)
5. Microcentrifuge (Eppendorf, model: 5415R)
6. Electroporator (BTX, model: ECM 630)
7. Thermocycler (Bulldog Bio, model: LifeECO)
Procedure
A. Selection of antibiotic markers
1. Select an antibiotic marker from Table 1. While any marker can be used, we recommend the following cassettes, in order, according to the criteria:
a. Deprioritize antibiotics with poor selection efficiencies.
b. Deprioritize antibiotics commonly used in plasmid selection.
c. Prioritize smaller cassettes.
d. Prioritize low-cost antibiotics.
Table 1. Antibiotic selection criteria
| # | Antibiotic (supplier, catalog number) | Cassette size (bp) | Working concentration (μg/mL) | Cost ($/mL at working concentration) | Additional considerations |
| 1 | Zeocin (InvivoGen, ant-zn-1p) | 441 | 50 | 10.1 | Needs to be used in LB Lennox formulation. |
| 2 | Blasticidin (InvivoGen, ant-bl-1) | 469 | 100 | 279 | Needs to be used in LB Lennox formulation. |
| 3 | Apramycin (Sigma-Aldrich, A2024-5G) | 874 | 50 | 2.19 | Cross-resistance with gentamicin [27]. |
| 4 | Puromycin (InvivoGen, ant-pr-1) | 692 | 125 | 186.25 | Needs to be used in LB Lennox formulation supplemented with 50 mM phosphate buffer, pH 8.0 (added after LB agar has been autoclaved and cooled). |
| 5 | Triclosan (Sigma-Aldrich, 72779-5G-F) | 1178 | 0.28 | 0.002 | Used in many personal care products. Only recommended for chromosomal modifications due to resistance spread concerns [28]. |
| 6 | Gentamicin (Sigma-Aldrich, G1264-1G) | 639 | 20 | 3 | Cross-resistance with apramycin [27], used in veterinary medicine and in plasmid selection. |
| 7 | Tetracycline (Sigma-Aldrich, T7660-5G) | 1283 | 10 | 0.057 | Used for plasmid selection. |
| 8 | Chloramphenicol (Sigma-Aldrich, C1919-5G) | 766 | 35 | 0.321 | Used for plasmid selection. |
| 9 | Spectinomycin (Sigma-Aldrich, S4014-5G) | 884 | 50 | 1.07 | Used for plasmid selection. Used over streptomycin because of better selection [29,30]. |
| 10 | Kanamycin (Sigma-Aldrich, K1377-5G) | 919 | 35 | 0.707 | Used for plasmid selection. |
| 11 | Ampicillin (Sigma-Aldrich, A8351-5G) | 964 | 100 | 2.12 | Used for plasmid selection. |
| 12 | Hygromycin (InvivoGen, ant-hg-1) | 1093 | 200 | 14.6 | Needs to be used in LB Lennox formulation. Deprioritized due to poor selection. |
| 13 | Trimethoprim (Sigma-Aldrich, T7883-5G) | 304 | 200 | 0.417 | Used clinically. Deprioritized due to poor selection [31,32]. |
| 14 | Nourseothricin (Sigma-Aldrich, N0186-10MG) | 639 | 100 | 1950 | Deprioritized due to very high cost. |
| 15 | Tellurite (Sigma-Aldrich, 60539-10G) | 2982 | 50 | 0.988 | Deprioritized due to the very big resistance cassette size. |
2. Obtain the corresponding codon-optimized alleles of the selected marker from Table S1.
B. Design of synthetic DNA required for recombineering
1. Look up the sequence of the genomic region to be modified in an online database such as EcoCyc (http://www.ecocyc.org/).
2. To design the donor DNA, for each side of the target region, select 50–500 base pairs [33] of the DNA that flanks the region to be modified. These are the homology regions. The length of these regions can impact the efficiency of recombination; longer homology regions can increase efficiency but may also increase the cost and difficulty of constructing the donor DNA. DNA design rules are outlined in Figure 1.
3. For homology regions, it is optimal to avoid using promoters or terminators, if possible, as they tend to be AT-rich or have repetitive sequences, which will decrease recombination efficiency, as depicted in Figure 2b below.
4. Between the homology arms, include the sequence modifications you want to introduce.
5. For insertions, deletions, and edits to a gene of interest (GOI), arrange the antibiotic marker and the modification as depicted in Figure 1. Refer to Table 2 for DNA sequences of some transcriptional terminators that are amenable to commercial gene synthesis.
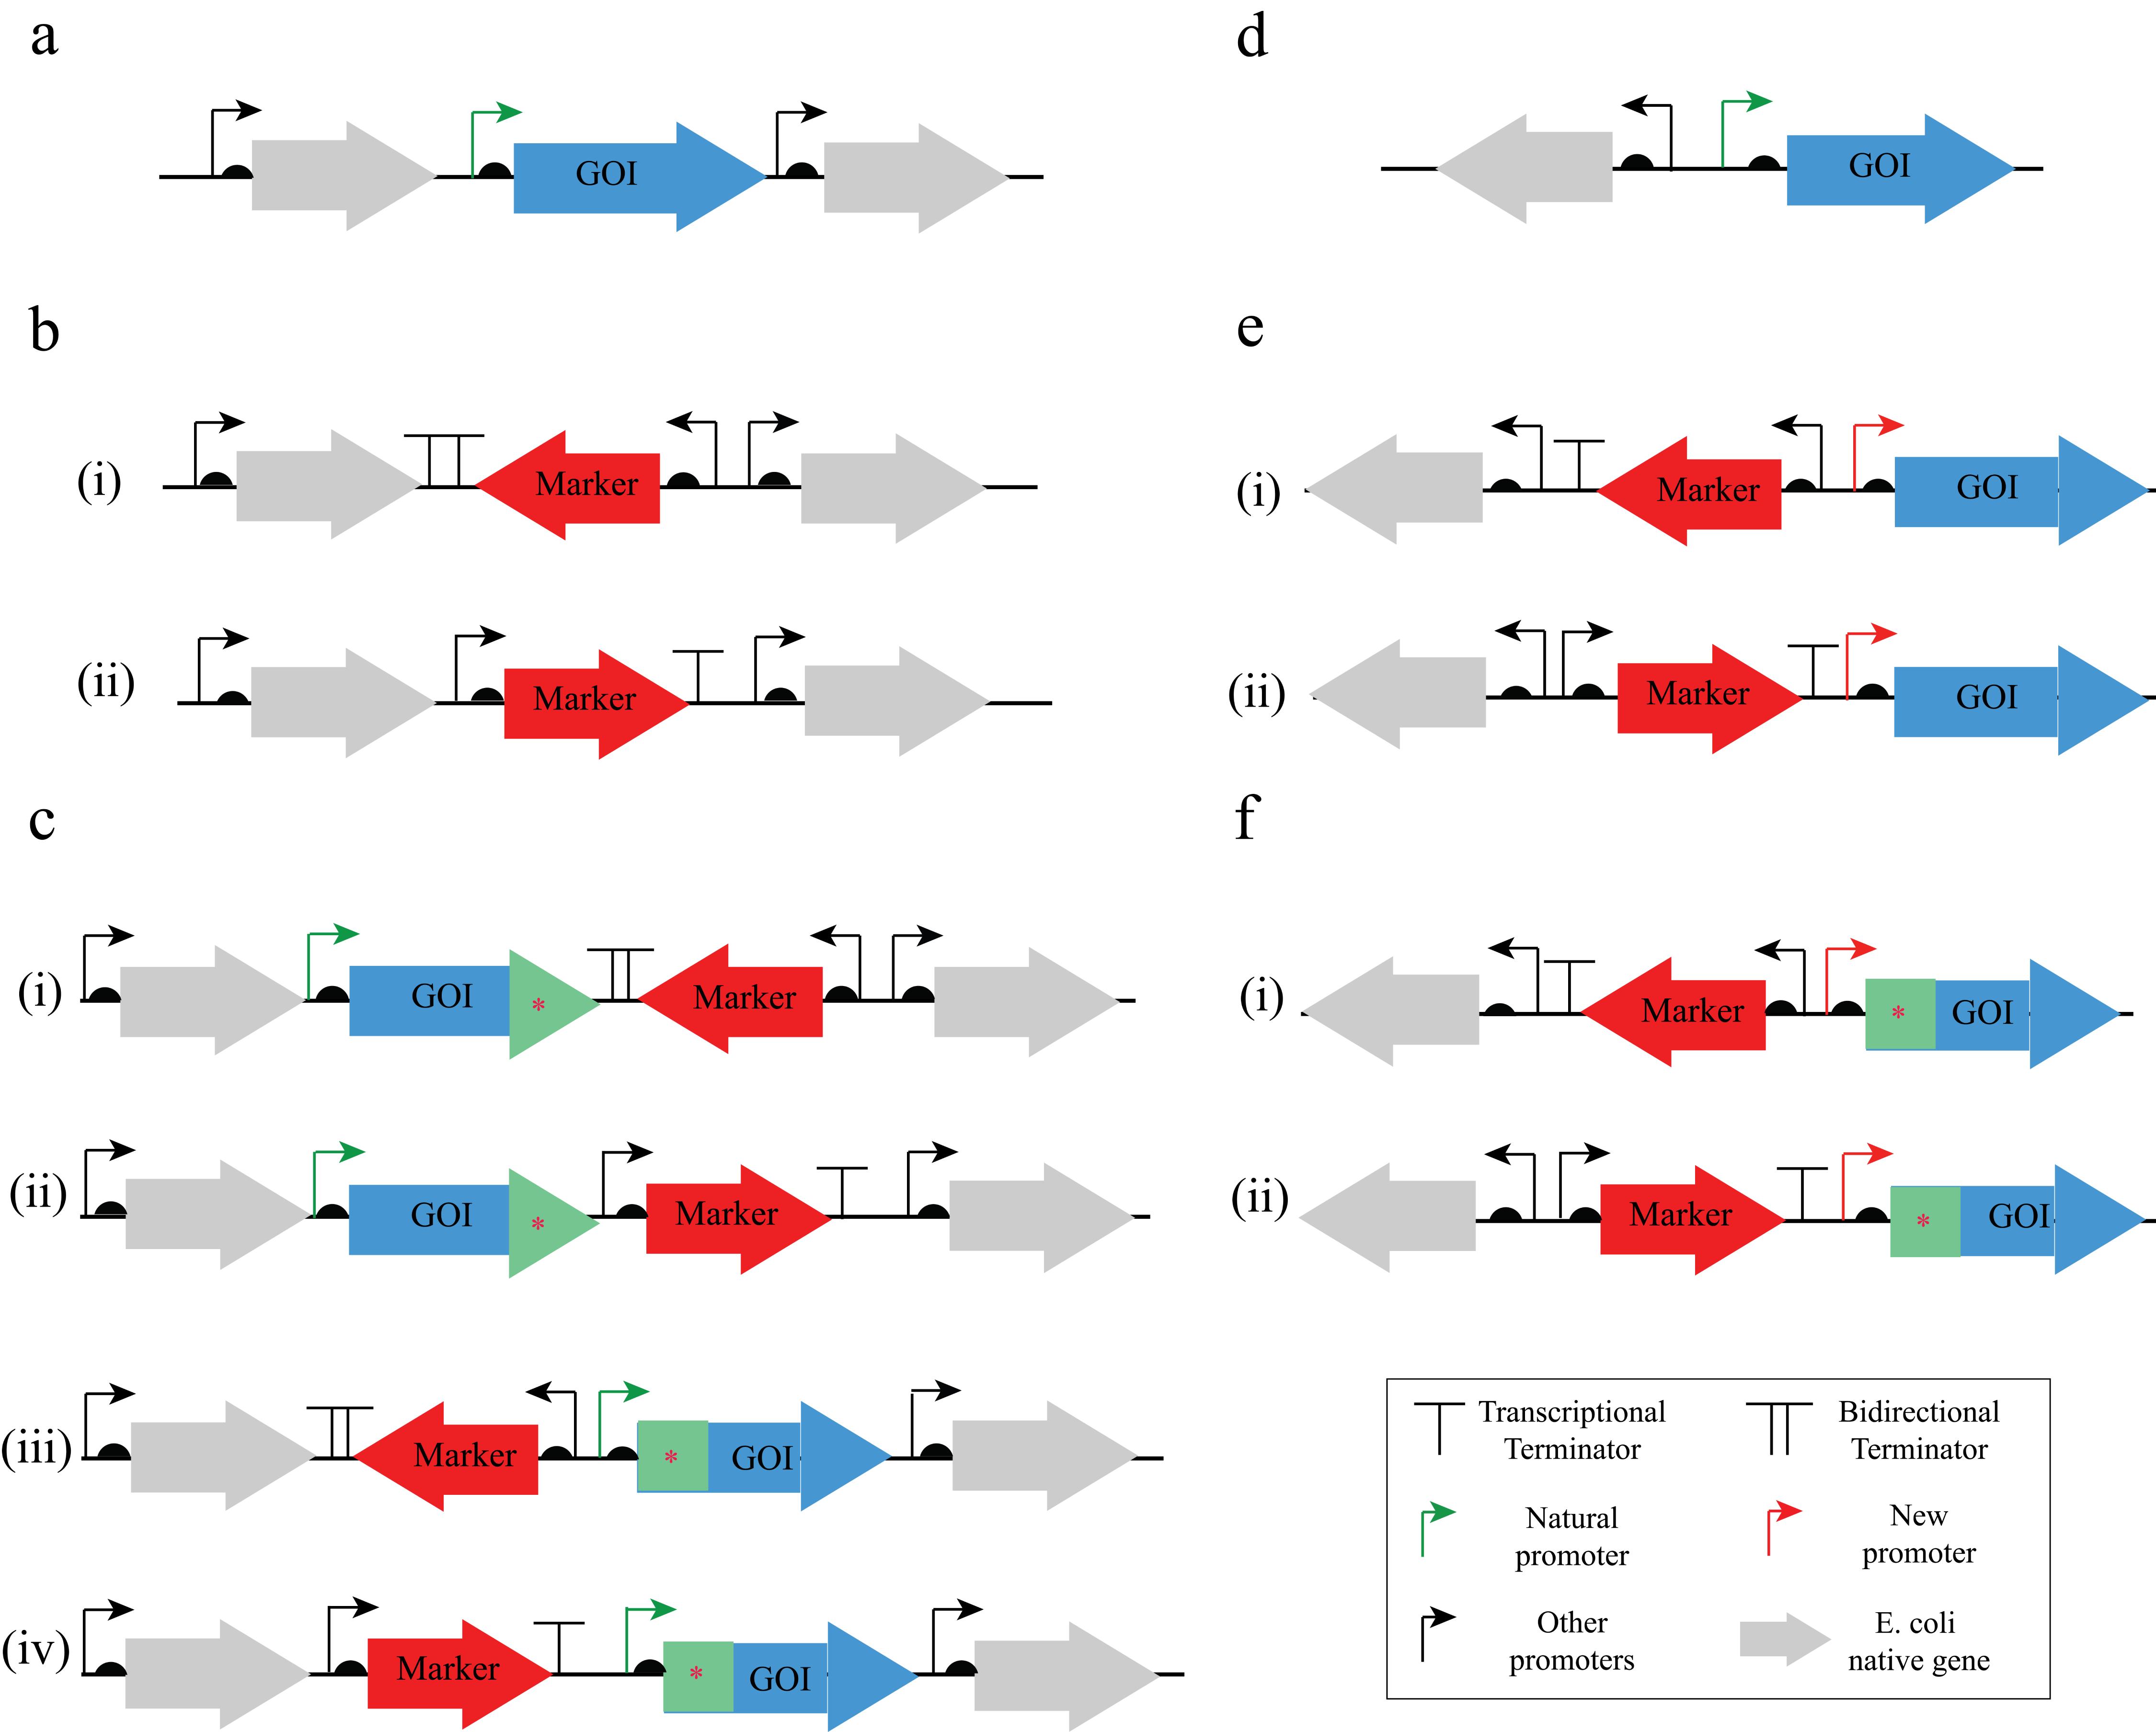
Figure 1. Design of genomic modifications with selective markers to limit polar effects. Editing a gene of interest (GOI), which is a single open reading frame within a single transcriptional unit. (a–c) Editing a GOI while maintaining the natural promoter (green). (a) An example wild-type locus. (b) Gene deletion using a constitutively expressed marker followed by a transcriptional terminator in either direction (i or ii). (c) Gene modification at either the 5′ end (iii and iv) or 3′ end (i and ii), again leveraging constitutively expressed markers followed by a transcriptional terminator. (d–f) Editing a GOI while modifying the natural promoter (green) to a new promoter (red arrow). (d) An example wild-type locus. (e) Promoter replacement using a constitutively expressed marker followed by a transcriptional terminator in either direction (i or ii). (f) Promoter replacement and editing of the 5′ of the GOI (i and ii), again leveraging constitutively expressed markers, followed by a transcriptional terminator. Arrows indicate promoters, black semi-circles indicate ribosomal binding sites, Ts indicate transcriptional terminators, and double TTs indicate bidirectional terminators. Red asterisks and green shading indicate a mutated region.
Table 2. Terminator sequences amenable to commercial DNA synthesis
| Terminator | Bidirectional | Sequence |
|---|---|---|
| tonB Term | Yes | agtcaaaagcctccggtcggaggcttttgact |
| soxR Term | Yes | aaaacaaactaaagcgcccttgtggcgctttagtttt |
| T7Te Term | No | ggctcaccttcgggtgggcctttctgcg |
| T3Te Term | No | cgaagaaaggcccacccgtgaaggtgagcc |
| BBa_B1002_Terminator | No | cgcaaaaaaccccgcttcggcggggttttttcgc |
| rrnBT1 Terminator | No | caaataaaacgaaaggctcagtcgaaagactgggcctttcgttttatctgttgtttgtcggtgaacgctctc |
6. When aiming for small-sized edits (<10 bp) such as point mutations, codon-optimize part of the gene to remove homology with the native sequence while maintaining the amino acid sequence, as depicted in Figure 2a. This is needed to ensure recombination occurs on the correct side of the desired mutation.
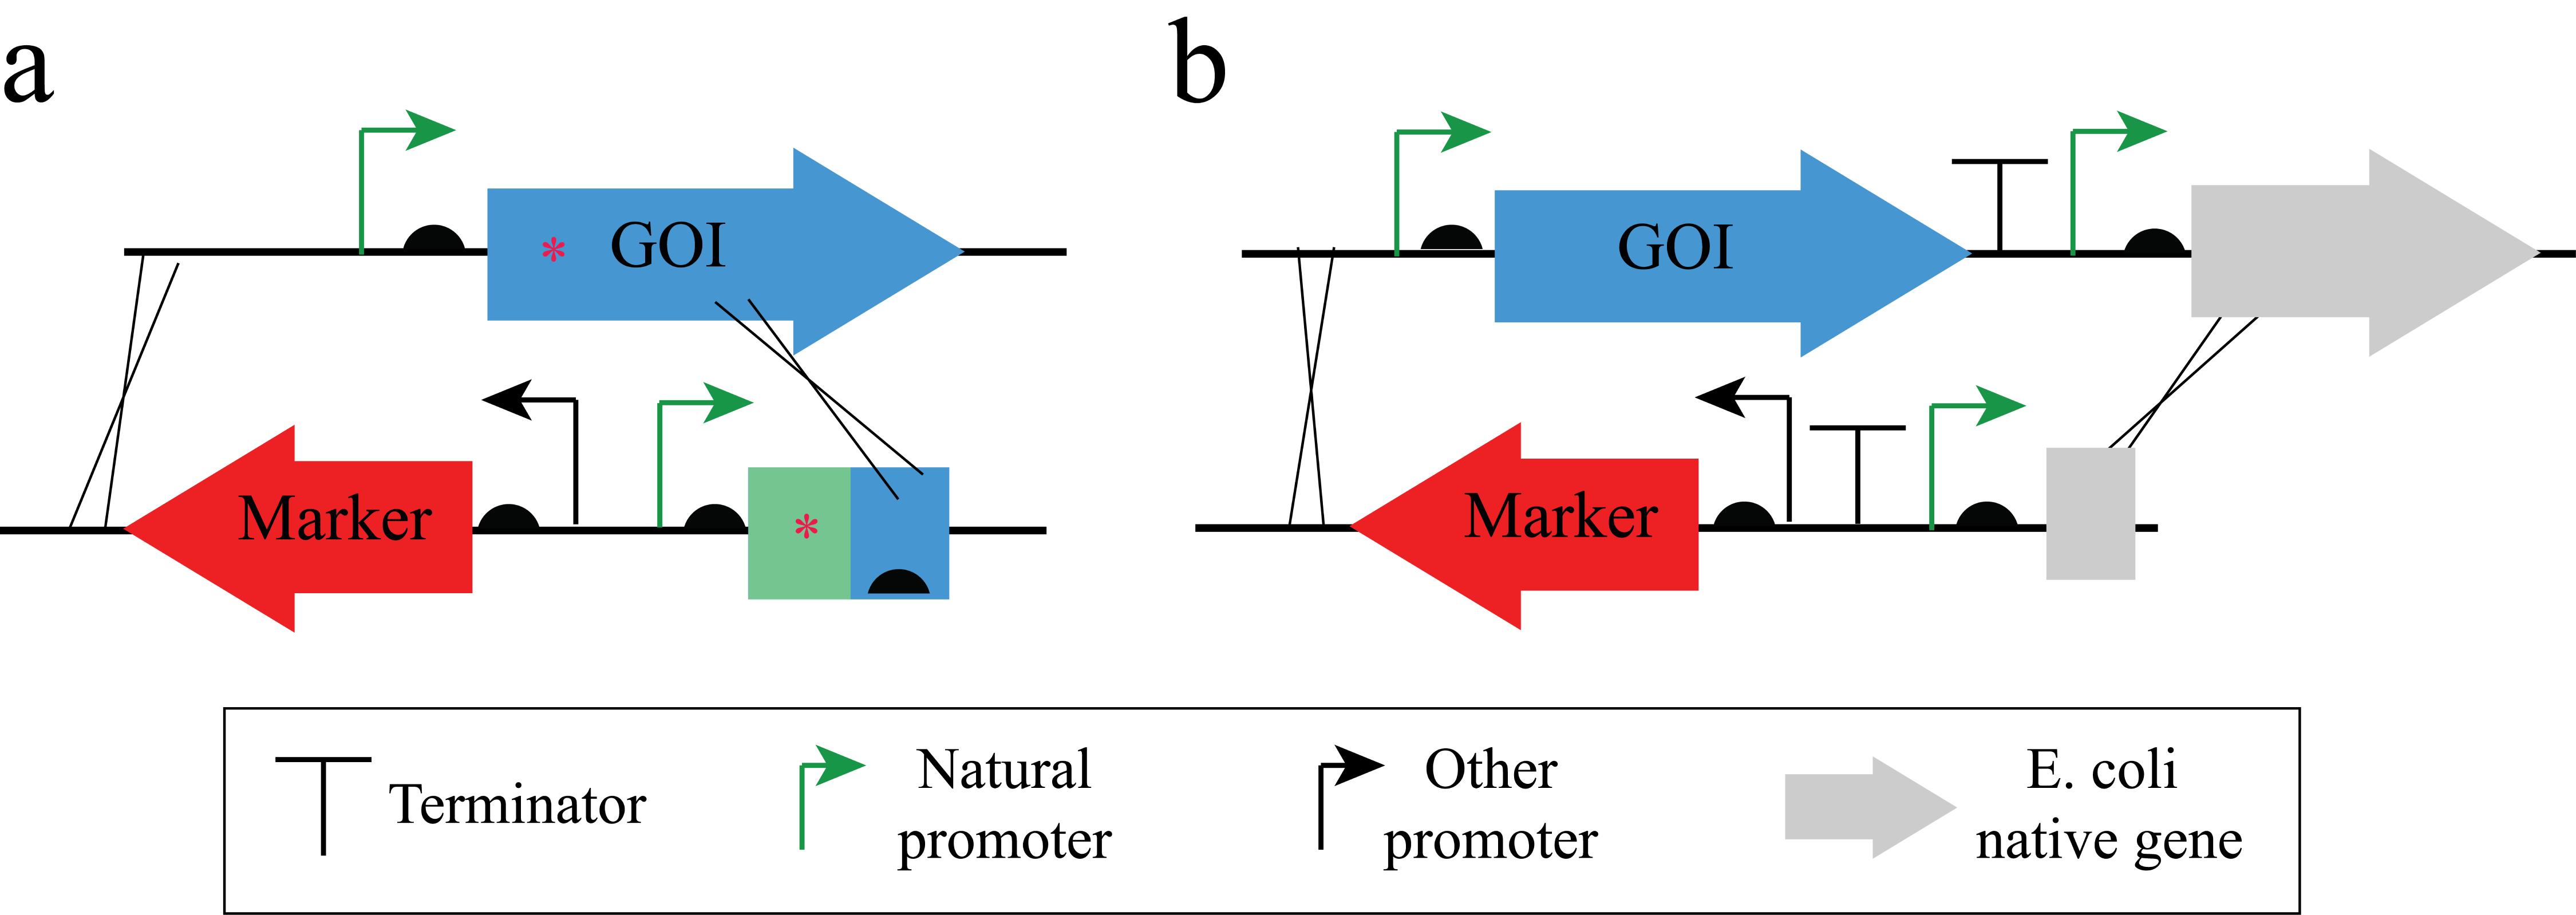
Figure 2. Design of donor DNA for optimal recombination. (a) When mutating a gene of interest (GOI) (top, red asterisk), it is more efficient to design the donor DNA (bottom) with a codon-optimized sequence closest to the marker (green) in order to ensure recombination distal to the desired mutation (red asterisk). The goal is to have adequate expression of the modified gene while reducing the homology between the wild-type sequence and the mutated portion so that recombination preferably occurs within the homology arms of the donor DNA. (b) The AT-rich or repetitive nature of promoters and terminators can reduce recombineering efficiency. It can be more efficient to extend homology arms past terminators and promoter regions into reading frames for optimal editing. Arrows indicate promoters, black semi-circles indicate ribosomal binding sites, and Ts indicate transcriptional terminators.
7. When aiming to overexpress a single gene within an operon, it may be beneficial to first consider keeping the operon unmodified. Instead of altering the existing operon, introduce a second copy of the target gene at a different genomic locus while limiting polar effects, as outlined in Figure 1c above, where the modified GOI would represent the second copy of the target gene, placed at a different genomic locus.
8. When modifying or deleting a gene within an operon, consider introducing the marker gene without its own promoter. This approach allows the native promoter of the operon to control the expression of the marker. This can be effective if the expression of the operon can be achieved when selecting for the genomic modification.
9. As demonstrated in Figure 3, it is also possible to introduce the antibiotic marker with its own promoter in the opposite orientation of the operon.
10. Finally, the marker can be added at either end of the operon, as depicted in Figure 3.
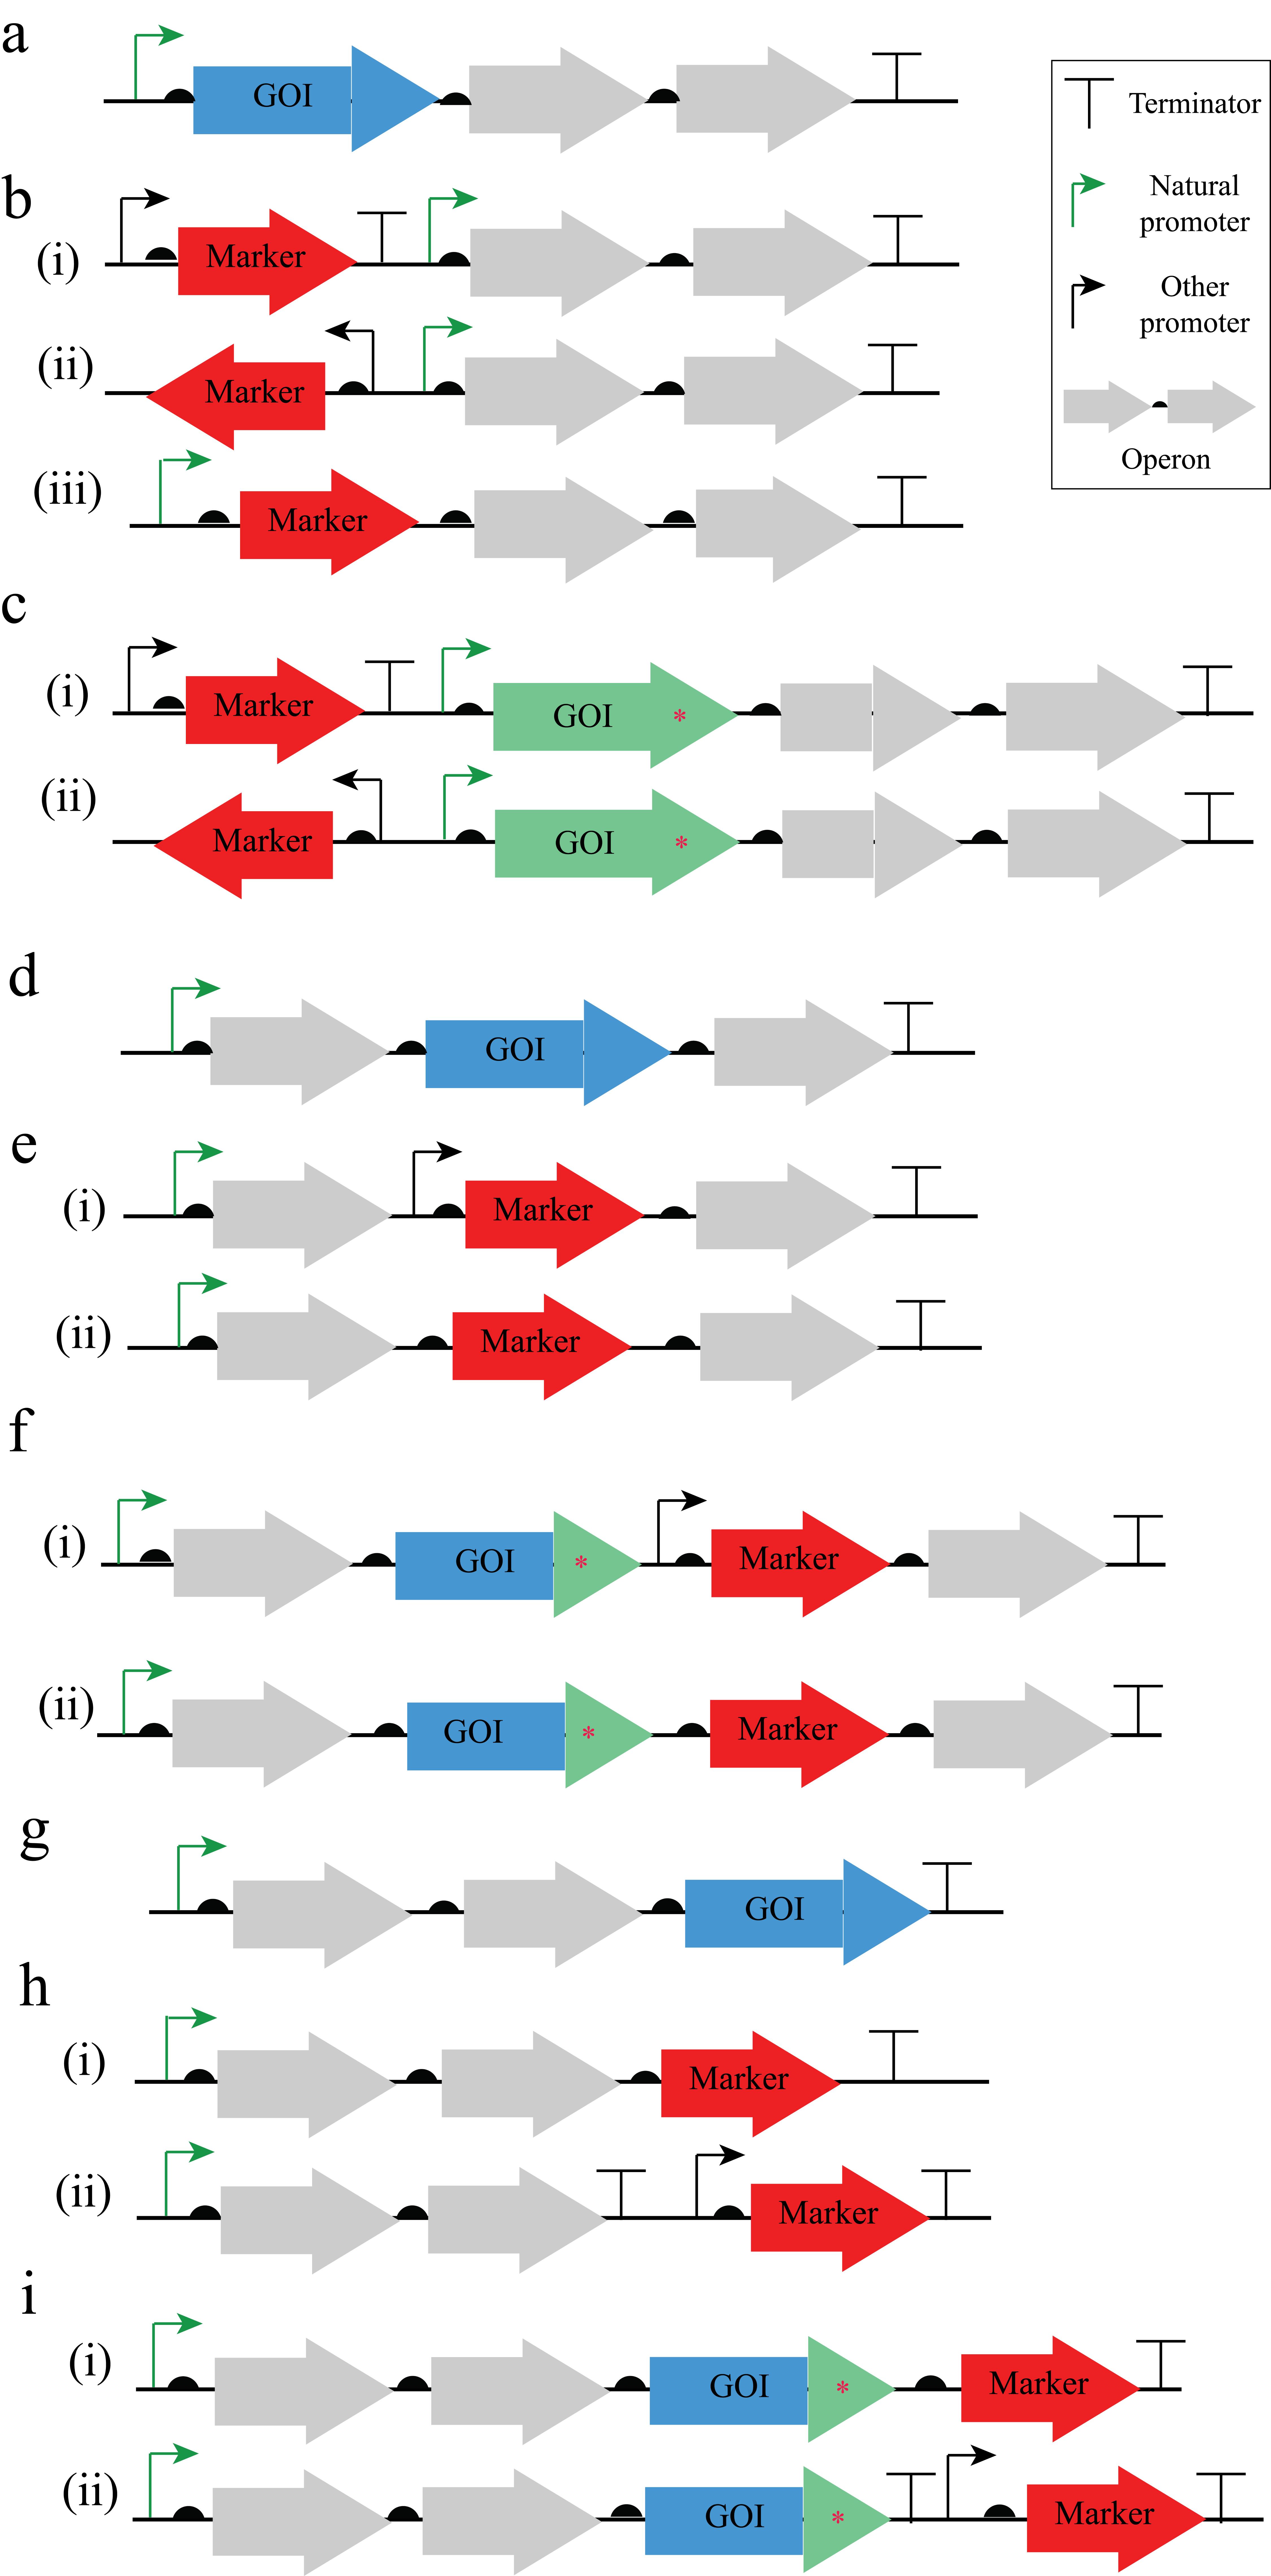
Figure 3. Design of donor DNA for editing a gene of interest (GOI) within an operon. (a–c) Editing a GOI at the beginning of an operon. (a) Example wild-type operon with the GOI as the first gene in the operon. (b) Deletion of the first gene in an operon can be accomplished by (i and ii) moving the natural promoter (green) to the next gene in the operon, or (iii) replacing the gene with a marker, relying on the natural promoter to drive marker expression. (c) Mutation of the first gene in an operon can be accomplished by adding a marker upstream (5′) of the GOI and codon-optimizing the mutated GOI to favor recombination downstream of the gene. (d–f) Editing a GOI in the middle of an operon. (d) Example wild-type operon with the GOI as a gene within the middle of the operon. (e) Deletion of a gene in the middle of an operon can be accomplished by either (i) replacing the gene with a marker and a constitutive promoter, which will drive expression of the downstream genes, or (ii) replacing the gene with a marker relying on the operon’s native promoter to drive expression. (f) Mutating a gene in the middle of an operon can be accomplished similarly to deletion, wherein the mutated GOI is codon-optimized (green) to reduce sequence similarity to the native allele, favoring recombination outside of the mutated sequence. Again, a marker can be added (i) with a promoter, which will drive downstream expression, or (ii) without a promoter and reliant on the operon’s native promoter. (g–i) Editing a GOI at the end of an operon. (g) Example wild-type operon with the GOI as the last gene of the operon. h) Deletion of a GOI at the end of an operon using a marker can either (i) replace the last gene with a marker or (ii) move the end of the operon upstream (5′) by one gene. (i) Mutation of a GOI at the end of the operon is similar to deletion, but again, the mutated sequence is codon-optimized (green) to reduce sequence similarity to the native allele, favoring recombination outside of the mutated sequence. Arrows indicate promoters, black semi-circles indicate ribosomal binding sites, and Ts indicate transcriptional terminators.
11. Design at least one primer to confirm the locus of modification, which means at least one primer should anneal in an unmodified region of DNA that flanks the edit (see Figure 4).
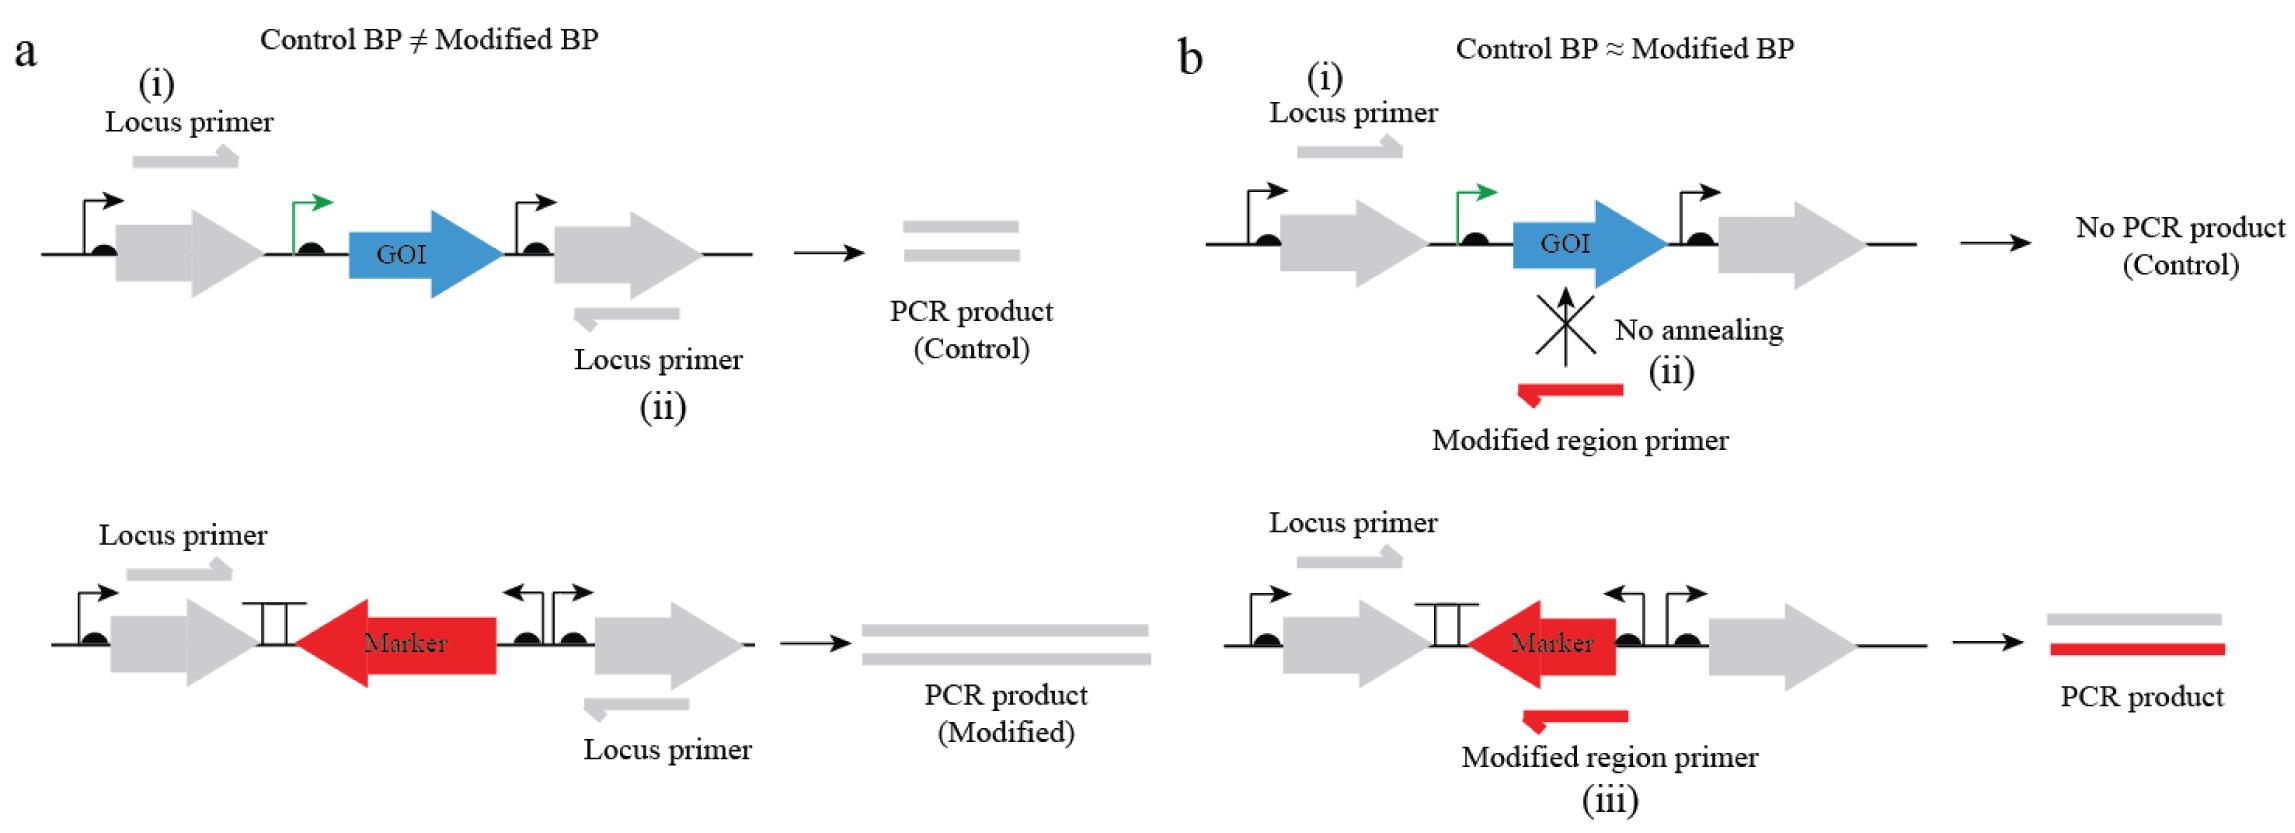
Figure 4. Primer design for PCR confirmation based on size. (a) Primer design when the modification (red) results in a size change [BP (base pairs)] compared to the wild-type control (blue). Two locus primers in grey (i and ii) are designed to anneal on opposite sides of the regions flanking the modification site. The resulting PCR products can be compared with agarose gel electrophoresis to confirm the size change in the modified strain relative to the wild-type control. (b) Primer design when the modification is approximately the same size (<200 bp difference) as the wild-type control. One locus primer (i) in grey is used to confirm the location of the modification. The second primer in red is designed to anneal to the modified region of DNA. This primer cannot anneal to the wild-type control (ii), so no PCR product results from amplification. The modified primer anneals to the modified region in the edited strain (iii), resulting in a PCR product, also confirmed with agarose gel electrophoresis.
12. The second primer can either anneal to an unmodified flanking region of DNA or within the modified region of DNA. Annealing within the modified region is particularly beneficial when the modification results in a PCR product with a similar size to the wild-type control (see Figure 4).
13. Primers should be designed with annealing temperatures within 2–3 degrees of each other. When designing primers, aim for 15–30 base pairs in length and 40%–60% GC content, and minimize the presence of hairpin structures and primer dimerization.
14. Finally, confirm that the designed primers do not anneal at off-target locations with a primer BLAST against the E. coli genome.
15. If primers used to amplify the PCR products do not result in proper sequencing, an additional primer can be designed to sequence the PCR-positive products. This new primer should start ~25–50 base pairs inside of the PCR product with the same specifications given in step B4 during design.
16. A scaled, annotated example of a gene deletion (ClpA) at the end of an operon, as shown in Figure 3i(ii), is depicted in Figure 5. It includes annealing locations for PCR confirmation primers.
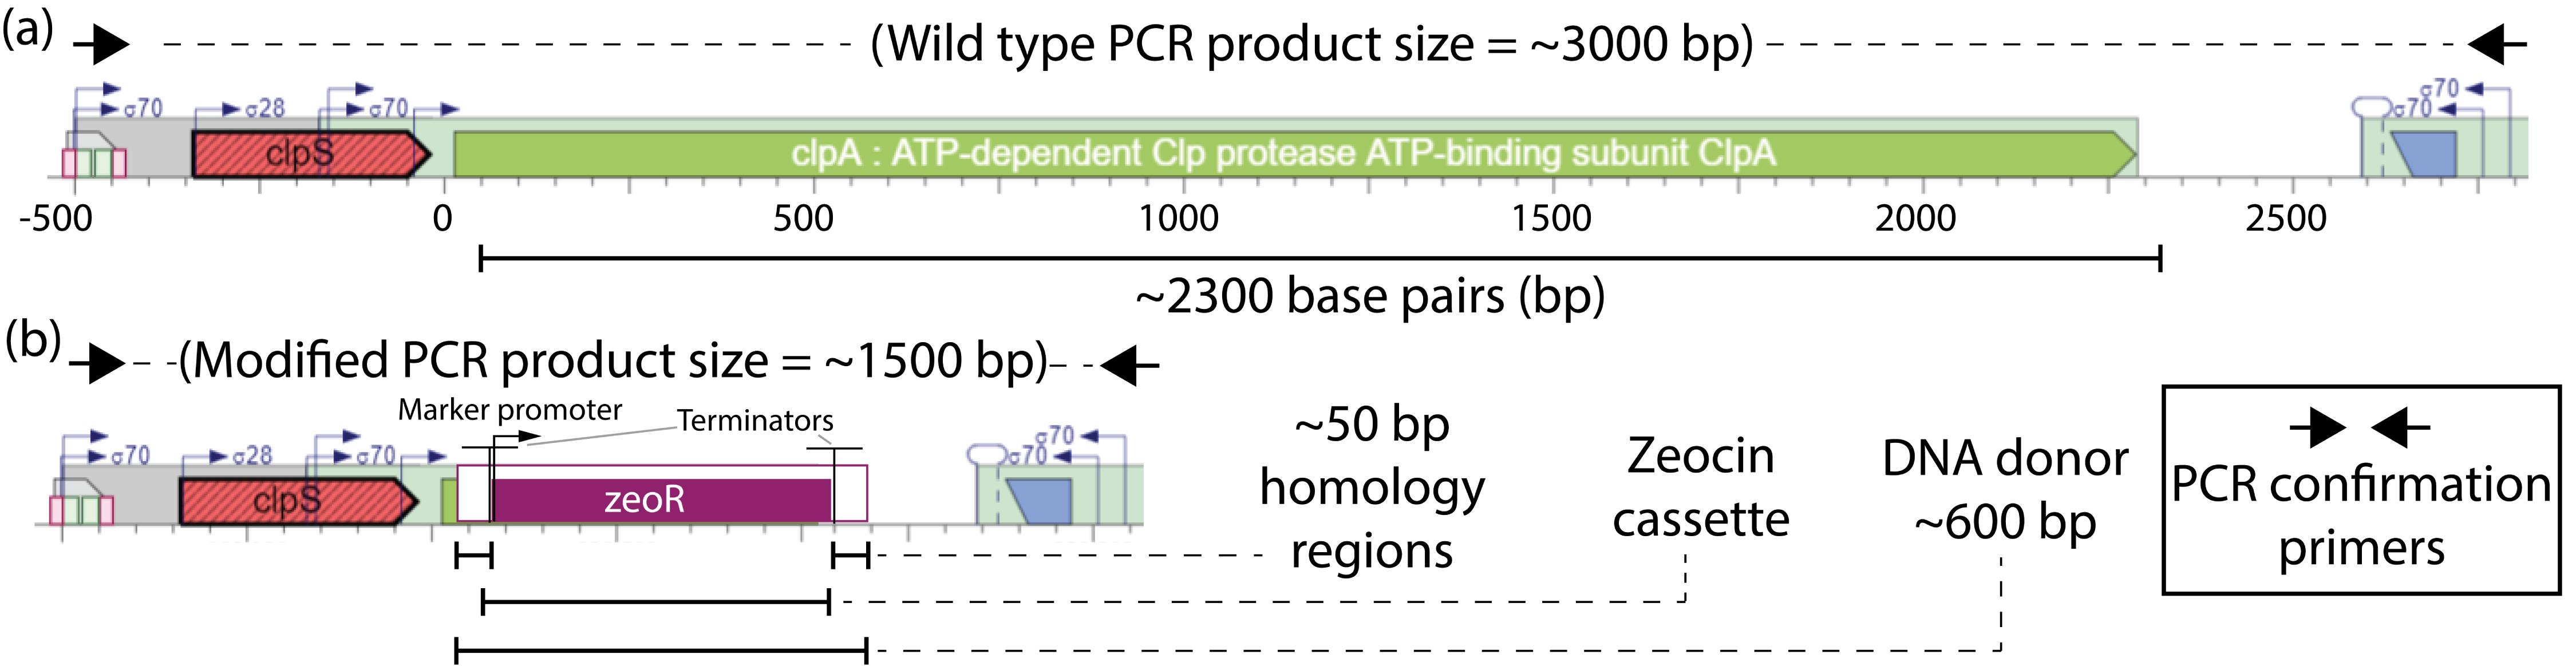
Figure 5. Scaled annotated example of recombineering. (a) ClpSA operon locus is shown. PCR confirmation primers anneal ~500 bp upstream and downstream of the homology regions, resulting in a ~3,000 bp PCR product. (b) ClpA is replaced with a zeocin cassette that introduces terminators upstream and downstream of itself to minimize polar effects. This uses a ~600 bp DNA donor, which includes ~50 bp homology regions at each flank. In this case, the PCR product using the confirmation primers results in a ~1,500 bp product.
C. Recombineering
Note: Refer to Figure 6 for a schematic of the whole procedure.
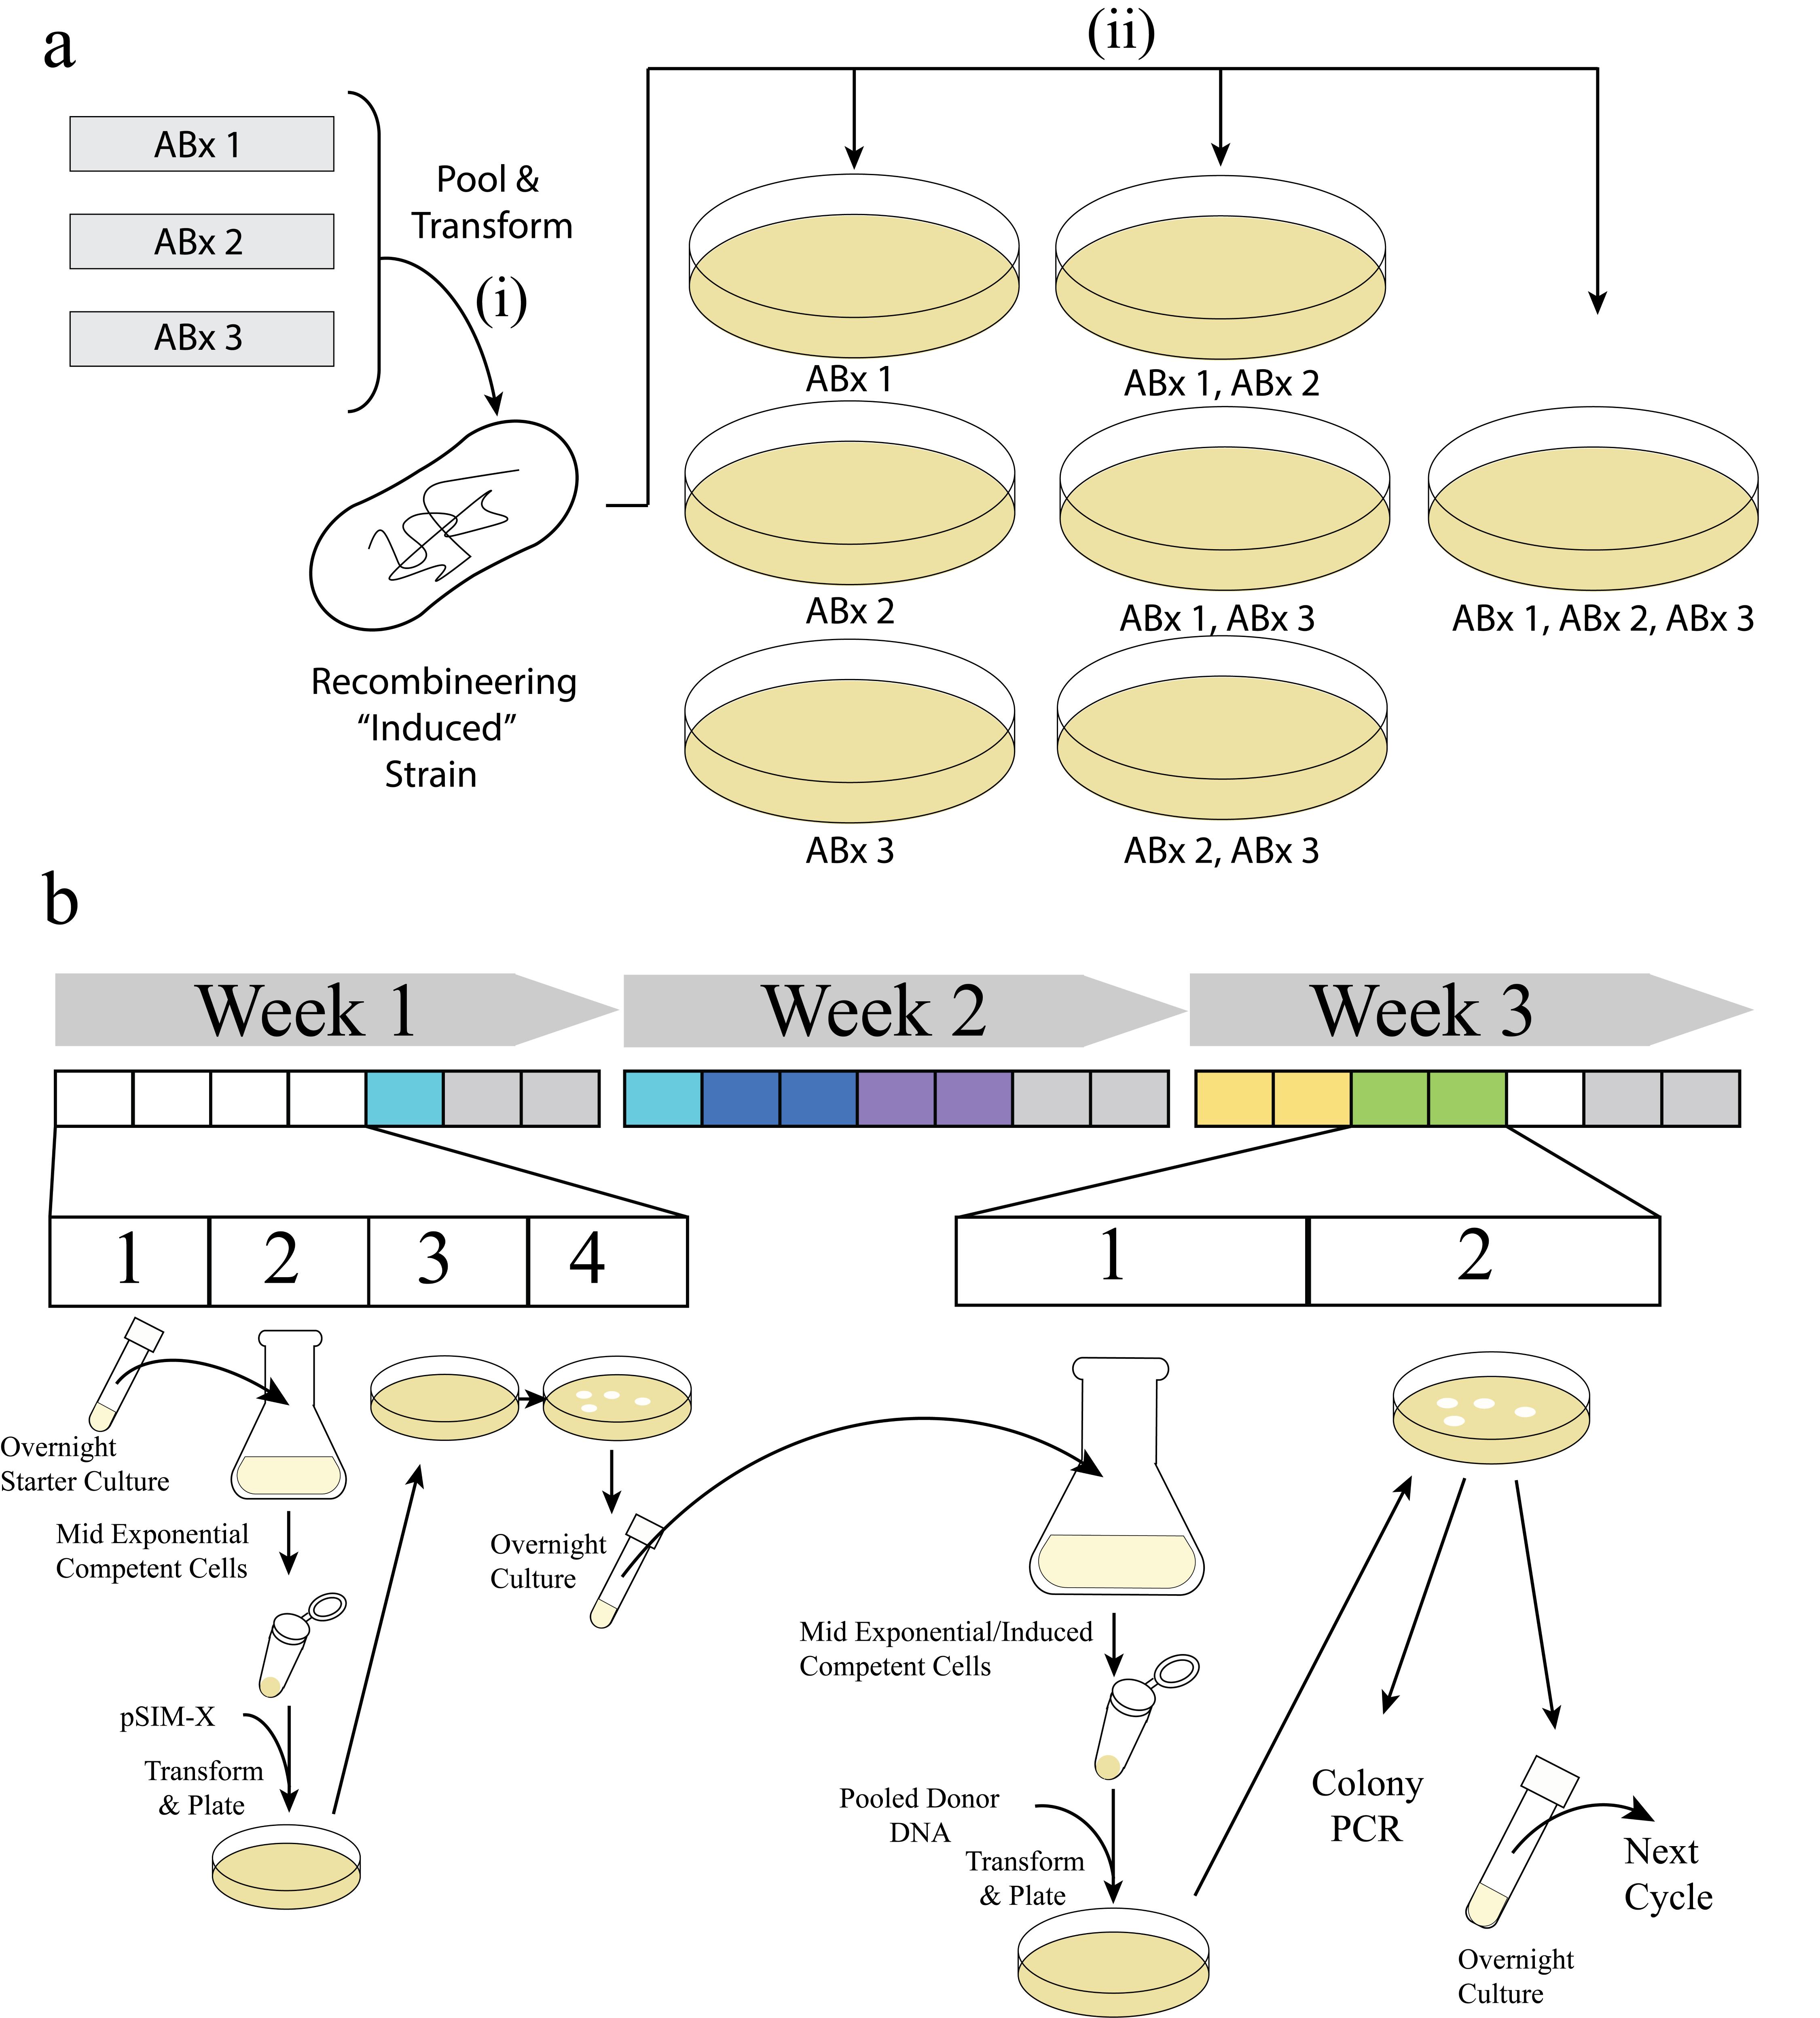
Figure 6. Rapid multiplex engineering of E. coli using antibiotic markers. (a) Multiplex chromosomal editing with multiple pieces of donor DNA with different antibiotic resistance markers (ABx). (i) Up to three different donor DNAs are pooled and used to transform a recombineering-proficient strain. (ii) After recovery, the transformed culture is plated on several plates with combinations of antibiotic markers. The plates allow for the selection of individual edits (donors), all combinations of double edits, and a triple edit. This ensures that you are proceeding as efficiently as possible. Even if no triple or double modifications are successful, obtaining single modifications allows you to progress swiftly. (b) A timeline for the generation of engineered strains. Within three weeks, 10–15 chromosomal modifications can be made in a single strain. In the first week, the process starts with a four-day period (white squares) to generate a recombineering-proficient starting strain. Day 1: An overnight culture of the starting strain is started. Day 2: The strain is made competent and transformed with a recombineering plasmid (such as the pSIM series) and plated. If using the pSIM plasmids or other plasmids with a temperature-sensitive replicon, it may take up to 2 days at 30 °C to obtain large colonies (days 3–4). Day 4: When colonies are visible, a starter culture is started to begin a two-day editing cycle. A two-day editing cycle can be repeated (two-day colored blocks) to obtain multiple edits. The cycle consists of: day 1, starting a culture, inducing in mid-exponential phase to express recombineering proteins, preparing competent cells, transforming with a pool of donor DNA, and, after recovery, plating on selective plates (this may be multiple plates per panel a); and day 2, picking colonies for PCR-based edit confirmation as well as inoculation and overnight cultivation of positive colonies to begin another editing cycle.
1. Generate a recombineering-proficient starting strain
(Day 1)
a. Inoculate an overnight culture with your starting strain in LB (~5 mL) and incubate it at 37 °C and 150 rpm. Incubate overnight (~16 h).
(Day 2)
b. Add 200 μL of the overnight culture to 20 mL of LB in a 250 mL Erlenmeyer flask.
c. Incubate with shaking (150 rpm) for 3–4 h at 37 °C until OD 600 nm is in the 0.5–0.8 range (mid-exponential phase).
d. Harvest cells in a temperature-controlled centrifuge set at 4 °C for 10 min at 3,500 rcf. Remove promptly and pour off the supernatant. Keep the cells in ice.
e. Resuspend pellet and wash three times with 1 mL of 10% ice-cold glycerol. Keep the cells on ice.
f. After the final wash, resuspend in 50 μL of ice-cold 10% glycerol to produce your competent cells. Keep the cells on ice.
g. Add 1 μL of purified pSIM-X plasmid (or alternative) to 25 μL of competent cells and transfer to an ice-cold electroporation cuvette.
h. Electroporate at single pulse, voltage 1,800 V, resistance 200 Ω, and capacitor 25 μF.
i. Transfer 1 mL of LB directly to the electroporation cuvette, pipette up and down to suspend all cells, and transfer to a 2 mL culture tube.
j. Recover the transformed cells at 30 °C and 150 rpm for 2 h.
k. Plate 100 μL (~1/10th of the recovery mixture) onto an LB agar plus the appropriate antibiotic to select for the pSIM plasmid.
l. Incubate the plate for 24–40 h at 30 °C.
(Days 3–4)
m. Using a single colony, inoculate an overnight 5 mL culture in LB and appropriate antibiotics to maintain the pSIM plasmid. Incubate at 30 °C and 150 rpm overnight (~16 h).
2. Multiplex editing
(Day 5)
a. Add 200 μL of the overnight culture to 20 mL of LB in a 250 mL Erlenmeyer flask. At this point, we do not add antibiotics to maintain the pSIM plasmid (although these were included in the overnight culture). We find that this speeds up growth without impacting recombineering.
b. Incubate with shaking for 3–4 h at 30 °C until OD 600 nm is in the 0.5–0.8 range.
c. To induce λ-RED factors, heat shock the cells in a water bath at 42 °C for 10–15 min.
d. Immediately after induction, harvest cells in a temperature-controlled centrifuge set at 4 °C for 10 min at 3,500 rcf. Remove promptly and pour off the supernatant. Keep the cells in ice.
e. Resuspend pellet and wash three times with 1 mL of 10% ice-cold glycerol. Keep the cells on ice.
f. After the final wash, resuspend with 50 μL of ice-cold 10% glycerol to produce your competent cells. Keep the cells on ice.
g. Add 100–200 ng of each donor DNA (up to three) to 25 μL of competent cells and transfer to an ice-cold electroporation cuvette.
h. Electroporate at single pulse, voltage 1,800 V, resistance 200 Ω, and capacitor 25 μF.
i. Transfer 1 mL of LB directly to the electroporation cuvette, pipette up and down to suspend all cells, and transfer to a culture tube.
j. Recover the transformed cells at 30 °C and 150 rpm for 2 h.
k. Plate 50 μL (~1/20th of the recovery mixture) onto an LB agar plate with a single antibiotic, 125 μL onto LB agar plates with two antibiotics, and 400 μL on LB agar with three antibiotics. This ensures that you are proceeding as efficiently as possible. Even if no triple or double modifications are successful, obtaining single modifications allows you to progress swiftly.
l. Incubate the plates for 24–40 h at 30 °C. We find that the pSIM plasmids are maintained even without selection during this stage.
(Day 6)
m. Use single colonies (3–4 from each plate) to start confirmatory colony PCRs using 2× Taq master mix + dye according to the manufacturer’s instructions. Be sure to include a wild-type control culture/colony for each pair of PCR primers.
n. With the same colonies used for PCR, inoculate overnight 5 mL cultures in LB and appropriate antibiotics to maintain chromosomal edits as well as the pSIM plasmid. Incubate at 30 °C and 150 rpm overnight (~16 h).
o. Perform agarose gel electrophoresis to determine which clones have a marker at the correct locus.
p. Purify positive PCR products and send them for sequencing.
(Day 7)
q. Repeat the procedure from step C2a until all intended modifications are completed.
3. Curing of pSIM plasmids
(Day 1)
a. Inoculate 5 mL of LB without antibiotics with the strain to be cured of the pSIM plasmid.
b. Incubate the culture at 42 °C and 150 rpm for 6–8 h.
c. Streak some cells from the culture on agar plates containing no antibiotics.
d. Do not throw away the culture. Place it back in the incubator at 42 °C and leave overnight (~16 h). This will be used if multiple rounds of curing are needed.
e. Incubate the plates at 37 °C overnight (~16 h).
(Day 2)
f. Using the overnight culture, start a new 5 mL LB culture and incubate overnight (~16 h) at 42 °C and 150 rpm.
g. Select 2–5 individual colonies from the streaked plate and blot them on (i) agar plates with antibiotics (e.g., chloramphenicol if working with pSIM5) and (ii) agar plates without antibiotics.
h. Incubate the plates at 37 °C overnight (~16 h).
(Day 3)
i. Colonies that have grown in agar plates without antibiotics, but not in the plates with antibiotics, have been cured from pSIM.
j. If no colonies have been cured, use the overnight culture to repeat steps C3 (day 1 to day 2).
k. Select one of these colonies to inoculate 5 mL of LB and incubate at 37 °C and 150 rpm overnight (~16 h).
(Day 4)
l. Make a permanent stock of the overnight culture by mixing 50% glycerol with the cell culture (1:1). Store these stocks in a -80 °C freezer.
Validation of protocol
This protocol or parts of it has been used and validated in the following research article(s):
• Menacho-Melgar et al. [15]. Scalable, two-stage, autoinduction of recombinant protein expression in E. coli utilizing phosphate depletion. Biotechnology and Bioengineering.
• Menacho-Melgar et al. [34]. Improved, two-stage protein expression and purification via autoinduction of both autolysis and auto DNA/RNA hydrolysis conferred by phage lysozyme and DNA/RNA endonuclease. Biotechnology and Bioengineering.
• Ye et al. [35]. Escherichia coli Cas1/2 Endonuclease Complex Modifies Self-Targeting CRISPR/Cascade Spacers Reducing Silencing Guide Stability. ACS Synthetic Biology.
• Li et al. [14]. Dynamic control over feedback regulatory mechanisms improves NADPH flux and xylitol biosynthesis in engineered E. coli. Metabolic Engineering.
• Ye et al. [16]. Two-stage Dynamic deregulation of metabolism improves process robustness & scalability in engineered E. coli. Metab Eng.
General notes and troubleshooting
Troubleshooting
Problem 1: No colonies after transformation or low recombination efficiency.
1. If using a PCR product as the donor DNA, ensure high-quality, clean DNA is used for transformation. First, make sure to use a PCR clean-up kit to purify your DNA. Verify the purification worked by running the purified PCR product in an agarose gel. Also, verify the purity of the DNA by measuring absorbance at 260 and 280 nm. The 260/280 ratio for pure DNA is ~1.8.
2. Verify the competency of the electrocompetent cells by measuring colony-forming units (CFU). Start by transforming 10 ng of plasmid DNA into your cells. After recovery, prepare serial dilutions of the cells to achieve a range of concentrations. Begin with a known volume of the culture, such as 1 mL, and transfer 100 μL into 900 μL of LB to make a 1:10 dilution. Repeat this process to create additional dilutions (e.g., 10-1, 10-2, 10-3, etc.). Next, label agar plates with the corresponding dilution factors and pipette a small volume (typically 100 μL) from each dilution onto the plates. Spread the liquid evenly using a sterile spreader. Incubate the plates upside down at 37 °C for ~16 h, or until colonies become visible and countable. After incubation, select plates with 30–300 colonies and count the colonies. Calculate the CFU by multiplying the number of colonies by the dilution factor and the plated volume, providing an estimate of viable cells in the original culture. Proper competent cells should result in 109–1010 CFU per microgram of plasmid DNA.
3. Double-check the antibiotic selection marker. Make sure the antibiotic used in the agar plates matches the resistance of the donor DNA. Also, ensure the antibiotic concentration is correct, as too high concentrations can inhibit growth.
4. Verify the design of the homologous arms. Make sure the arms are specific to the target sequence and are at least 40–50 bp long. Shorter arms may reduce recombination efficiency.
5. Make sure cells are in the exponential growth phase (OD 600 nm between 0.5 and 0.8) before induction and making them electrocompetent, as this is typically the optimal state for recombineering.
Problem 2: Too many colonies.
1. Include a negative control in the experiment. This can be a transformation with cells that have not been electroporated with donor DNA, which helps distinguish between background and genuine recombination.
2. Ensure the agar plates are functional. First, ensure the concentration is sufficient, as too low concentrations will result in no selection. Likewise, double-check the agar plate preparation; for example, whether the antibiotic was added when the LB agar solution was too hot or, for puromycin, if the complementary buffer was included. To check this, recover competent cells without transforming the donor DNA and plate them. No growth should be visible after ~16 h.
3. Ensure the competent cells are not contaminated. As in the point above, recover and plate cells that have not been transformed with donor DNA. No growth should occur.
Problem 3: Incorrect insert size or sequence.
1. Sequence the insert to assess if a non-target genome locus is being amplified. If so, increase the primer annealing temperature during the PCR or redesign the PCR confirmation primers.
2. If mutations are observed when a PCR product is used as a donor DNA, use a high-fidelity polymerase for any PCR amplification. This reduces the chance of introducing mutations during the amplification of DNA fragments.
Supplementary information
The following supporting information can be downloaded here:
1. Table S1. Antibiotic cassette DNA sequences
Acknowledgments
This protocol has been used and validated in the following research article(s):
• Menacho-Melgar, Romel, et al. (2020). Improved, two-stage protein expression and purification via autoinduction of both autolysis and auto DNA/RNA hydrolysis conferred by phage lysozyme and DNA/RNA endonuclease. Biotechnology and Bioengineering [34].
• Ye, Zhixia, et al. (2020). Escherichia coli Cas1/2 Endonuclease Complex Modifies Self-Targeting CRISPR/Cascade Spacers Reducing Silencing Guide Stability. ACS Synthetic Biology [35].
• Li, Shuai, et al. (2021). Dynamic control over feedback regulatory mechanisms improves NADPH flux and xylitol biosynthesis in engineered E. coli. Metabolic Engineering [14].
• Ye, Zhixia, et al. (2021). Two-stage Dynamic deregulation of metabolism improves process robustness & scalability in engineered E. coli. [16]
Authors’ contribution
Conceptualization, M.D.L., R.M.M.; Writing—Original Draft, M.D.L., S.M., R.M.M.; Writing—Review & Editing, S.L., J.N.H., E.A.M., R.M.M.; Funding acquisition, M.D.L.; Supervision, M.D.L, R.M.M.
M.D.L. would like to acknowledge the following support: NSF EAGER #1445726, DARPA #HR0011-14-C-0075, DOE EERE grant #EE0007563, ONR YIP #N00014-16-1-2558, and NIH 5R61AI140485.
Competing interests
M.D. Lynch has equity in DINYA DNA and DMC Biotechnologies, Inc. M.D. Lynch, J.N. Hennigan, and R. Menacho-Melgar have an equity stake in Roke Biotechnologies, LLC.
References
- Zhang, J., Hansen, L. G., Gudich, O., Viehrig, K., Lassen, L. M. M., Schrübbers, L., Adhikari, K. B., Rubaszka, P., Carrasquer-Alvarez, E., Chen, L., et al. (2022). A microbial supply chain for production of the anti-cancer drug vinblastine. Nature. 609(7926): 341–347. https://doi.org/10.1038/s41586-022-05157-3
- Li, M., Li, C., Luo, Y., Hu, M., Liu, Z. and Zhang, T. (2022). Multi‐level metabolic engineering of Escherichia coli for high‐titer biosynthesis of 2′‐fucosyllactose and 3‐fucosyllactose. Microb Biotechnol. 15(12): 2970–2981. https://doi.org/10.1111/1751-7915.14152
- Adiego-Pérez, B., Randazzo, P., Daran, J. M., Verwaal, R., Roubos, J. A., Daran-Lapujade, P. and van der Oost, J. (2019). Multiplex genome editing of microorganisms using CRISPR-Cas. FEMS Microbiol Lett. 366(8): e1093/femsle/fnz086. https://doi.org/10.1093/femsle/fnz086
- Hossain, A., Lopez, E., Halper, S. M., Cetnar, D. P., Reis, A. C., Strickland, D., Klavins, E. and Salis, H. M. (2020). Automated design of thousands of nonrepetitive parts for engineering stable genetic systems. Nat Biotechnol. 38(12): 1466–1475. https://doi.org/10.1038/s41587-020-0584-2
- Moreb, E. A. and Lynch, M. D. (2021). Genome dependent Cas9/gRNA search time underlies sequence dependent gRNA activity. Nat Commun. 12(1): 5034. https://doi.org/10.1038/s41467-021-25339-3
- Reis, A. C., Halper, S. M., Vezeau, G. E., Cetnar, D. P., Hossain, A., Clauer, P. R. and Salis, H. M. (2019). Simultaneous repression of multiple bacterial genes using nonrepetitive extra-long sgRNA arrays. Nat Biotechnol. 37(11): 1294–1301. https://doi.org/10.1038/s41587-019-0286-9
- Bassalo, M. C., Garst, A. D., Choudhury, A., Grau, W. C., Oh, E. J., Spindler, E., Lipscomb, T. and Gill, R. T. (2018). Deep scanning lysine metabolism in Escherichia coli. Mol Syst Biol. 14(11): e20188371. https://doi.org/10.15252/msb.20188371
- Garst, A. D., Bassalo, M. C., Pines, G., Lynch, S. A., Halweg-Edwards, A. L., Liu, R., Liang, L., Wang, Z., Zeitoun, R., Alexander, W. G., et al. (2016). Genome-wide mapping of mutations at single-nucleotide resolution for protein, metabolic and genome engineering. Nat Biotechnol. 35(1): 48–55. https://doi.org/10.1038/nbt.3718
- Murphy, K. C. (1998). Use of Bacteriophage λ Recombination Functions To Promote Gene Replacement in Escherichia coli. J Bacteriol. 180(8): 2063–2071. https://doi.org/10.1128/jb.180.8.2063-2071.1998
- Datta, S., Costantino, N. and Court, D. L. (2006). A set of recombineering plasmids for gram-negative bacteria. Gene. 379: 109–115. https://doi.org/10.1016/j.gene.2006.04.018
- Li, X. T., Thomason, L. C., Sawitzke, J. A., Costantino, N. and Court, D. L. (2013). Positive and negative selection using the tetA-sacB cassette: recombineering and P1 transduction in Escherichia coli. Nucleic Acids Res. 41(22): e204–e204. https://doi.org/10.1093/nar/gkt1075
- Thomason, L. C., Costantino, N., Li, X. and Court, D. L. (2023). Recombineering: Genetic Engineering in Escherichia coli Using Homologous Recombination. Curr Protocol. 3(2): e656. https://doi.org/10.1002/cpz1.656
- Fels, U., Gevaert, K. and Van Damme, P. (2020). Bacterial Genetic Engineering by Means of Recombineering for Reverse Genetics. Front Microbiol. 11: e548410. https://doi.org/10.3389/fmicb.2020.548410
- Li, S., Ye, Z., Moreb, E. A., Hennigan, J. N., Castellanos, D. B., Yang, T. and Lynch, M. D. (2021). Dynamic control over feedback regulatory mechanisms improves NADPH flux and xylitol biosynthesis in engineered E. coli. Metab Eng. 64: 26–40. https://doi.org/10.1016/j.ymben.2021.01.005
- Menacho‐Melgar, R., Ye, Z., Moreb, E. A., Yang, T., Efromson, J. P., Decker, J. S., Wang, R. and Lynch, M. D. (2020). Scalable, two‐stage, autoinduction of recombinant protein expression in E. coli utilizing phosphate depletion. Biotechnol Bioeng. 117(9): 2715–2727. https://doi.org/10.1002/bit.27440
- Ye, Z., Li, S., Hennigan, J. N., Lebeau, J., Moreb, E. A., Wolf, J. and Lynch, M. D. (2021). Two-stage dynamic deregulation of metabolism improves process robustness & scalability in engineered E. coli. Metab Eng. 68: 106–118. https://doi.org/10.1016/j.ymben.2021.09.009
- Bolt, E. L., Jenkins, T., Russo, V. M., Ahmed, S., Cavey, J. and Cass, S. D. (2016). Identification of Escherichia coli ygaQ and rpmG as novel mitomycin C resistance factors implicated in DNA repair. Biosci Rep. 36(1): e1042/bsr20150249. https://doi.org/10.1042/bsr20150249
- Gomes, C., Ruiz-Roldán, L., Mateu, J., Ochoa, T. J. and Ruiz, J. (2019). Azithromycin resistance levels and mechanisms in Escherichia coli. Sci Rep. 9(1): e1038/s41598–019–42423–3. https://doi.org/10.1038/s41598-019-42423-3
- Kaur, P. (1997). Expression and characterization of DrrA and DrrB proteins of Streptomyces peucetius in Escherichia coli: DrrA is an ATP binding protein. J Bacteriol. 179(3): 569–575. https://doi.org/10.1128/jb.179.3.569-575.1997
- Ruiz, J. (2003). Mechanisms of resistance to quinolones: target alterations, decreased accumulation and DNA gyrase protection. J Antimicrob Chemother. 51(5): 1109–1117. https://doi.org/10.1093/jac/dkg222
- Schlüter, A., Szczepanowski, R., Kurz, N., Schneiker, S., Krahn, I. and Pühler, A. (2007). Erythromycin Resistance-Conferring Plasmid pRSB105, Isolated from a Sewage Treatment Plant, Harbors a New Macrolide Resistance Determinant, an Integron-Containing Tn 402-Like Element, and a Large Region of Unknown Function. Appl Environ Microbiol. 73(6): 1952–1960. https://doi.org/10.1128/aem.02159-06
- Wiley. (2013). Antibiotics and Bacterial Resistance. John Wiley & Sons.
- Giraud, E., Rychlik, I. and Cloeckaert, A. (2017). Antimicrobial Resistance and Virulence Common Mechanisms. Frontiers Research Topics: e3389/978–2–88945–181–4. https://doi.org/10.3389/978-2-88945-181-4
- Miethke, M., Pieroni, M., Weber, T., Brönstrup, M., Hammann, P., Halby, L., Arimondo, P. B., Glaser, P., Aigle, B., Bode, H. B., et al. (2021). Towards the sustainable discovery and development of new antibiotics. Nat Rev Chem. 5(10): 726–749. https://doi.org/10.1038/s41570-021-00313-1
- Molloy, S. (2010). Reactive resistance. Nat Rev Genet. 11(4): 240–240. https://doi.org/10.1038/nrg2769
- Nambisan, P. (2017). Laboratory Biosafety and Good Laboratory Practices. In: An Introduction to Ethical, Safety and Intellectual Property Rights Issues in Biotechnology: 253–271. https://doi.org/10.1016/b978-0-12-809231-6.00011-9
- Shaw, K. J., Rather, P. N., Hare, R. S. and Miller, G. H. (1993). Molecular genetics of aminoglycoside resistance genes and familial relationships of the aminoglycoside-modifying enzymes. Microbiol Rev. 57(1): 138–163. https://doi.org/10.1128/mr.57.1.138-163.1993
- Westfall, C., Flores-Mireles, A. L., Robinson, J. I., Lynch, A. J. L., Hultgren, S., Henderson, J. P. and Levin, P. A. (2019). The Widely Used Antimicrobial Triclosan Induces High Levels of Antibiotic Tolerance In Vitro and Reduces Antibiotic Efficacy up to 100-Fold In Vivo. Antimicrob Agents Chemother. 63(5): e02312–18. https://doi.org/10.1128/aac.02312-18
- Newcombe, H. B. and Hawirko, R. (1949). Spontaneous Mutation To Streptomycin Resistance And Dependence In Escherichia Coli. J Bacteriol. 57(5): 565–572. https://doi.org/10.1128/jb.57.5.565-572.1949
- Ren, L., Rahman, M. S. and Humayun, M. Z. (1999). Escherichia coli Cells Exposed to Streptomycin Display a Mutator Phenotype. J Bacteriol. 181(3): 1043–1044. https://doi.org/10.1128/jb.181.3.1043-1044.1999
- Dhingra, S., Rahman, N. A. A., Peile, E., Rahman, M., Sartelli, M., Hassali, M. A., Islam, T., Islam, S. and Haque, M. (2020). Microbial Resistance Movements: An Overview of Global Public Health Threats Posed by Antimicrobial Resistance, and How Best to Counter. Front Public Health. 8: e535668. https://doi.org/10.3389/fpubh.2020.535668
- Eliopoulos, G. M. and Huovinen, P. (2001). Resistance to Trimethoprim-Sulfamethoxazole. Clinical Infectious Diseases. 32(11): 1608–1614. https://doi.org/10.1086/320532
- Liu, P., Jenkins, N. A. and Copeland, N. G. (2003). A Highly Efficient Recombineering-Based Method for Generating Conditional Knockout Mutations. Genome Res. 13(3): 476–484. https://doi.org/10.1101/gr.749203
- Menacho‐Melgar, R., Moreb, E. A., Efromson, J. P., Yang, T., Hennigan, J. N., Wang, R. and Lynch, M. D. (2020). Improved two‐stage protein expression and purification via autoinduction of both autolysis and auto DNA/RNA hydrolysis conferred by phage lysozyme and DNA/RNA endonuclease. Biotechnol Bioeng. 117(9): 2852–2860. https://doi.org/10.1002/bit.27444
- Ye, Z., Moreb, E. A., Li, S., Lebeau, J., Menacho-Melgar, R., Munson, M. and Lynch, M. D. (2020). Escherichia coli Cas1/2 Endonuclease Complex Modifies Self-Targeting CRISPR/Cascade Spacers Reducing Silencing Guide Stability. ACS Synth Biol. 10(1): 29–37. https://doi.org/10.1021/acssynbio.0c00398
Article Information
Publication history
Received: May 10, 2024
Accepted: Mar 11, 2026
Available online: Apr 3, 2026
Published: Apr 20, 2026
Copyright
© 2026 The Author(s); This is an open access article under the CC BY-NC license (https://creativecommons.org/licenses/by-nc/4.0/).
How to cite
Munot, S., Li, S., Hennigan, J. N., Moreb, E. A., Lynch, M. D. and Menacho-Melgar, R. (2026). From Design to Practice: A Comprehensive Tutorial for the Rapid Multiplex Engineering of Escherichia coli Using Antibiotic Resistance Markers. Bio-protocol 16(8): e5665. DOI: 10.21769/BioProtoc.5665.

 Download Citation in RIS Format
Category
Biological Engineering > Synthetic biology > Genetic modification
Molecular Biology > DNA > Chromosome engineering
Microbiology > Microbial genetics > Genome editing
Do you have any questions about this protocol?
Post your question to gather feedback from the community. We will also invite the authors of this article to respond.
 Post a Question


