
- Protocols

- About
-


Low-cost Medium-Throughput Protein Expression and Purification in E. coli

Last updated date: Oct 29, 2026 DOI: 10.21769/p3022 Views: 29 Forks: 0
 Download PDF
 Ask a
question

 How to
cite

 Favorite


Abstract
As the cost of synthetic gene synthesis has decreased, more laboratories have access to large libraries of synthetic genes from which to express and purify proteins. However, current protocols for protein expression and purification are either too slow and laborious to work at large-scale, or require specialist equipment, such as robotic liquid handlers. Since many researchers work at a level between these extremes, we present a medium-throughput protocol to express and purify libraries of up to hundreds of genes using standard lab equipment and inexpensive consumables. This protocol includes the cloning, transformation, expression and Ni-NTA purification of up to 96 genes in parallel from E. coli culture volumes of 5-100 mL. The protocol was developed for screening expression of de novo proteins, but has applications in buffer trials, enzymatic assays, binding studies, and biophysical characterization.
Key features
Expression and purification protocol of synthetic gene libraries comprising hundreds of genes in E. coli
Inexpensive method designed to work without requiring specialist lab equipment
5-day protocol from synthetic genes to validation with SDS-PAGE gel of protein presence
Keywords: Protein purification, Ni-NTA, screening, medium-throughput
This protocol is used in: Communications Chemistry (2026), DOI: 10.1038/s42004-025-01817-3
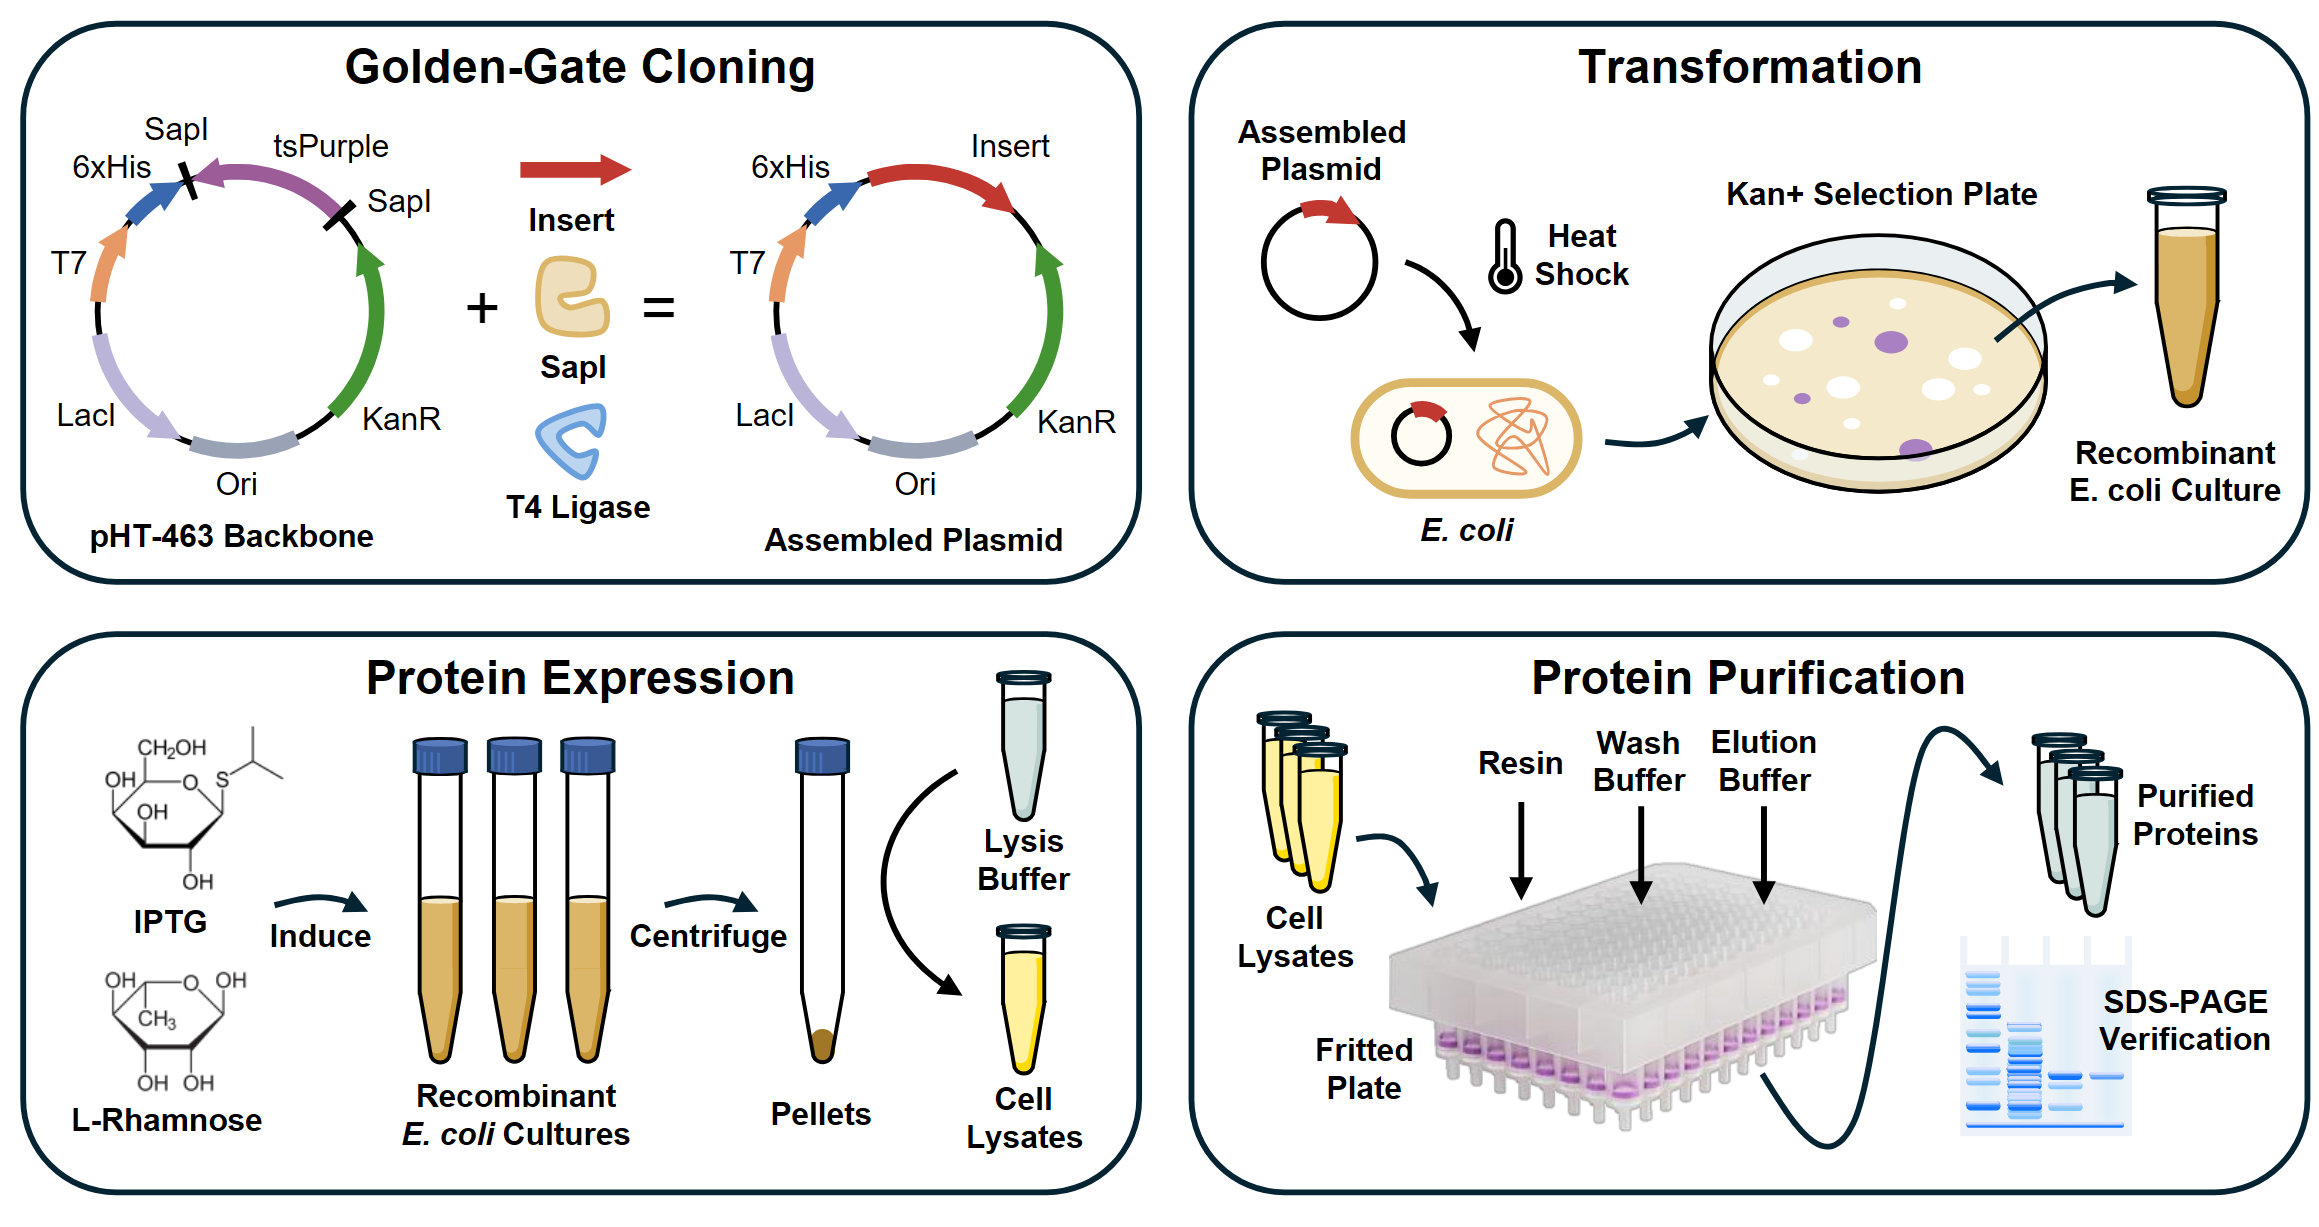
Graphical overview
Background
Over the last 30 years, synthetic DNA sequences have become cheaper, longer, and more accurate. Commercially synthesized DNA fragments are priced as low as $0.07 per base and have lengths of up to 10 kilobases [1], giving more researchers access to large libraries of synthetic genes. This makes it possible to purify many proteins in parallel for use in applications such as antibody screening, enzyme activity comparisons, or optimization of designed proteins.
However, traditional low-throughput protein purification methods, such as fast protein liquid chromatography (FPLC), produce large quantities of purified protein but are poorly suited to purifying more than one protein at a time. Alternatively, small-scale high-throughput methods are designed to purify thousands of proteins, often using liquid-handling robots. These robots are often inaccessible to small laboratories because even low-cost models, such as the Opentrons OT-2, are priced at ~$20,000-$30,000; high-end models may cost as much as $150,000 [2]. There are also non-automated high-throughput methods, but they often require specialist equipment like vacuum manifolds and large numbers of purification columns [3]. Both automated and non-automated high-throughput methods often use culture volumes of ~1 mL, which makes the yield too small for many downstream biophysical and biochemical applications such as activity assays, circular dichroism, cryo-EM, small-angle X-ray scattering, or isothermal titration calorimetry [4].
After finding that published methods gave insufficient yield and were too costly for a synthetic protein screening experiment, we developed this method to serve as a middle ground – a protocol that is cheap, fast, high-yield, requires no costly or specialized equipment, but can still purify up to 96 proteins in parallel. This protocol describes the full process from synthetic gene fragments to purified protein, including Golden Gate assembly, plasmid transformation in E. coli, expression, chemical lysis, and Ni-NTA affinity purification using 96-well fritted plates. We demonstrate the purification of 17 proteins from 50 mL E. coli cultures with yields of up to ~2 mg, showing that the protocol generalizes to applications that require large amounts of protein, including enzyme kinetic assays, interaction and binding studies, biophysical characterization, and potentially even crystallization screening.
Materials and reagents
Biological materials
1. Single Step (KRX) Competent Cells (Promega, catalog number: L3002)
2. pHT453 (EDEV_HU; 6,346 bp), for expression with an N-terminal His6–ubiquitin fusion (Addgene plasmid # 262907).
3. pHT461 (EDEV_ATG; 6,058 bp), for expression without a vector-encoded N-terminal affinity tag (Addgene plasmid # 262908).
4. pHT462 (EDEV_His_only; 6,088 bp), for expression with an N-terminal His6 tag (Addgene plasmid # 262909).
5. pHT463 (EDEV_HT; 6,112 bp), for expression with an N-terminal His6 tag and thrombin cleavage site (Addgene plasmid # 262910).
The four EDEV plasmids are deposited with Addgene. All carry a T7/lac expression region, lacI, a kanamycin-resistance gene and a tsPurple dropout cassette flanked by SapI sites (Figure 1). Annotated GenBank files are provided in Supplementary Data 1. Select the backbone and insert junctions as described in Procedure A1.
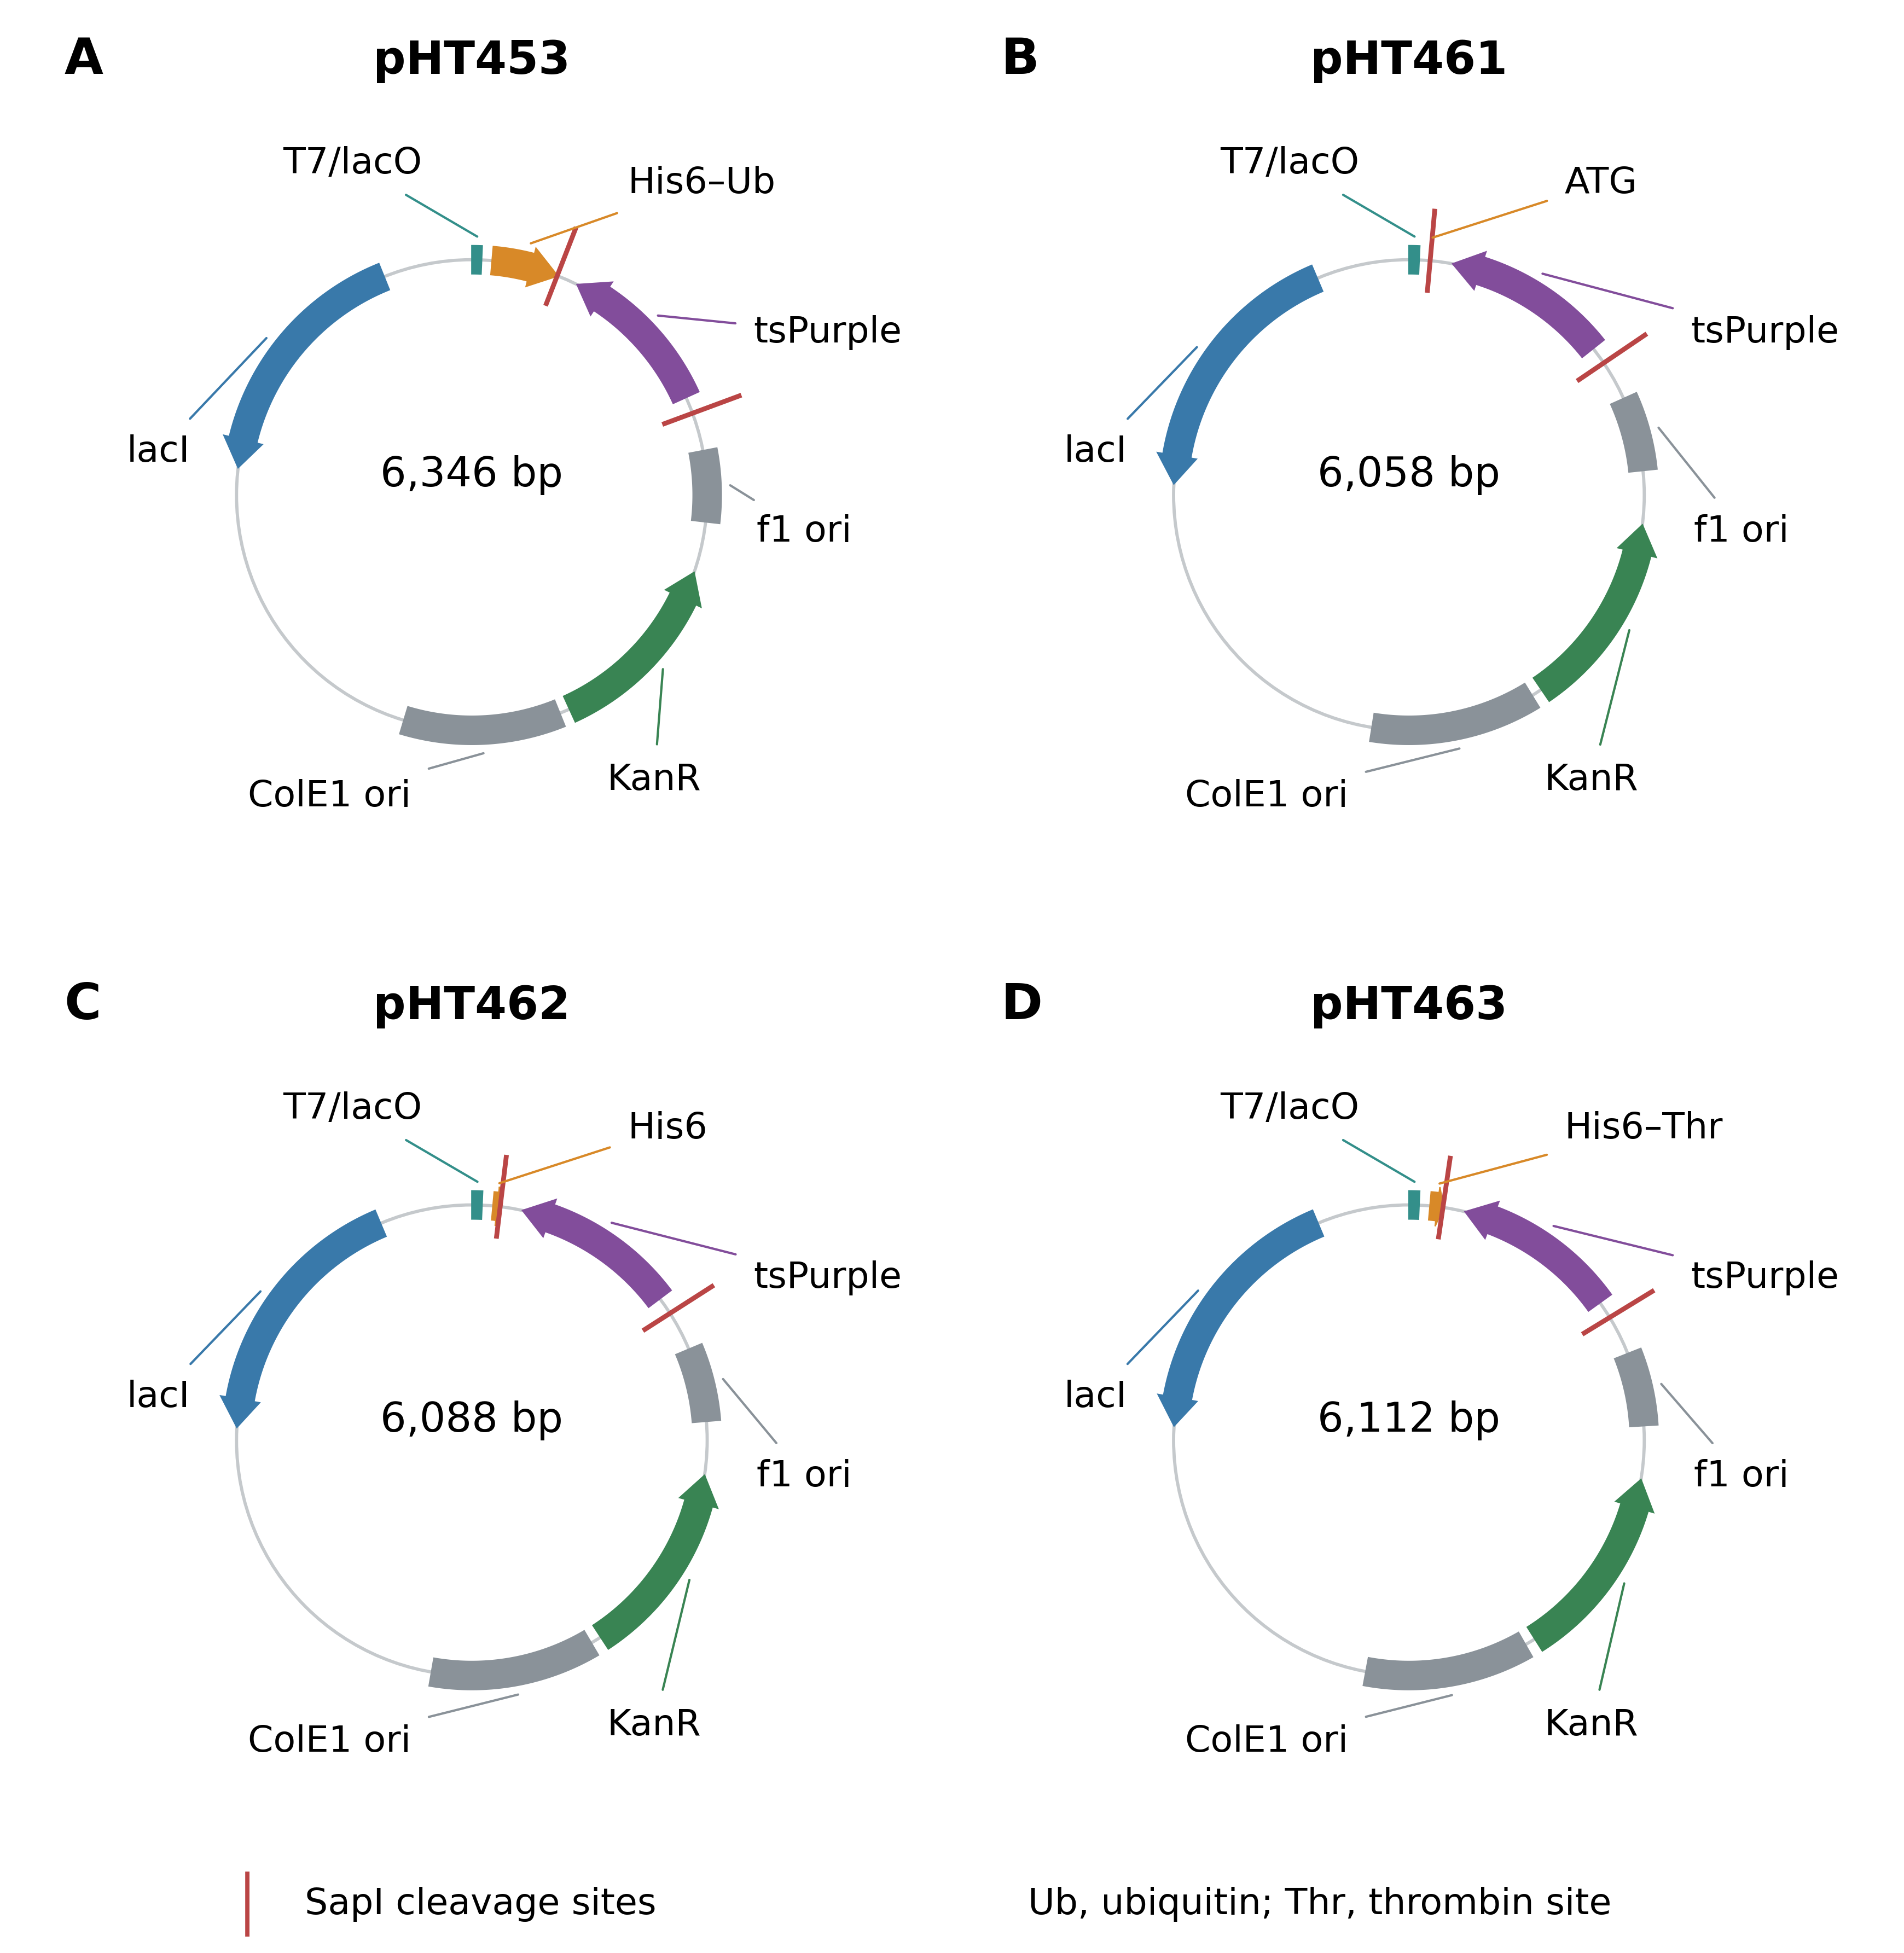
Figure 1. EDEV plasmids for SapI Golden Gate cloning and protein expression. (A) pHT453, His6–ubiquitin; (B) pHT461, no vector-encoded affinity tag; (C) pHT462, His6; and (D) pHT463, His6–thrombin. SapI digestion removes the tsPurple dropout cassette. The target-coding-strand junctions are AGT/TAA for pHT453, pHT462 and pHT463, and ATG/TAA for pHT461. Arrows indicate coding-sequence orientation; red ticks mark SapI cleavage sites. KanR, kanamycin resistance; ori, replication origin; Ub, ubiquitin; Thr, thrombin cleavage site. Maps show selected features.
Reagents
1. SapI (New England Biolabs, catalog number: R0569S)
2. T4 DNA ligase (New England Biolabs, catalog number: M0202S). Note: Make aliquots of T4 DNA ligase buffer and use only freshly thawed aliquots for reaction.
3. Kanamycin (Melford, catalog number: K0126-5G) working concentration: 50 μg/ml
4. Lysogeny broth (LB) powder (Millipore, catalog number: 51208-2.5KG-F)
5. Terrific broth (TB) powder (Melford, catalog number: T15000-5000.0)
6. Agar (Millipore, catalog number: 05040-1KG)
7. L-Rhamnose (Melford, catalogue number: 10030-85-0)
8. IPTG (Melford, catalog number: MB1008-25G)
9. D-Glucose (Thermo Fisher Scientific, catalog number: A16828.36)
10. Glycerol (Thermo Fisher Scientific, catalog number: BP229-1)
11. B-PER™ Bacterial Protein Extraction Reagent (Thermo Fisher Scientific, catalog number: 78243)
12. Lysozyme (Thermo Fisher Scientific, catalog number: 89833)
13. Propan-2-ol (Thermo Fisher Scientific, catalog number: 040983.K2)
14. DNAse I (New England Biolabs, catalog number: M0303S)
15. PMSF, protease inhibitor (Abcam, catalog number: ab141032)
16. Pierce™ Protease Inhibitor Mini Tablets, EDTA-free (Fisher Scientific, catalog number: 15672129)
17. HisPur™ Ni-NTA Resin (Thermo Fisher Scientific, catalog number: 88221)
18. Sodium chloride (NaCl) (Sigma-Aldrich, catalog number: S9888-1KG)
19. Tris base (Melford, catalog number: T60040-5000). Optional: Can be substituted with Tris-HCl (Melford, catalog number: T60050-5000)
20. Imidazole (Sigma-Aldrich, catalogue number: I5513-100G). Caution: Imidazole is toxic, corrosive, an irritant, and may damage fertility.
21. Hydrochloric acid / HCl (Thermo Fisher Scientific, catalog number: L13091.AU)
22. Sodium hydroxide / NaOH (Thermo Fisher Scientific, catalog number: 447280250)
23. Sodium Dodecyl Sulfate / SDS (Thermo Fisher Scientific, catalog number: 28312)
24. Glycine (Thermo Fisher Scientific, catalog number: A13816.0E)
25. Bromophenol Blue (Thermo Fisher Scientific, catalog number: A18469.09)
26. Novex™ Tris-Glycine Mini Protein Gels, 4–20%, 1.0 mm, WedgeWell™ format (Thermo Fisher Scientific, catalog number: XP04205BOX)
27. PageRuler™ Unstained Protein Ladder (Thermo Fisher Scientific, catalog number: 11802124)
28. Quick Coomassie Stain (Protein Ark, catalog number: GEN-QC-Stain-1L)
29. Liquid nitrogen (BOC Gases). Optional: Only necessary if you intend to store your transformed cells as glycerol stocks.
Solutions
1. Lysogeny broth (LB) (see Recipes)
2. Lysogeny broth – Agar (LB-Agar) (see Recipes)
3. Autoinduction Terrific broth (TB) (see Recipes)
4. Kanamycin stock (see Recipes)
5. Lysozyme stock (see Recipes)
6. PMSF stock (see Recipes)
7. Lysis buffer (see Recipes)
8. Wash buffer (see Recipes)
9. Elution buffer (see Recipes)
10. SDS-PAGE sample loading buffer (see recipes)
11. SDS-PAGE running buffer (see Recipes)
Recipes
1. Lysogeny Broth (LB)
Reagent | Final concentration | Quantity or Volume |
|---|---|---|
LB Powder | 25 g/L | 25 g |
ddH2O |
| to 1 L |
Note: Autoclave after mixing. Store at room temperature.
2. Lysogeny Broth–Agar (LB-Agar)
Reagent | Final concentration | Quantity or Volume |
|---|---|---|
LB Powder | 25 g/L | 25 g |
Agar | 15 g/L | 15 g |
ddH2O |
| to 1 L |
Note: Store at room temperature.
3. Autoinduction Terrific Broth (TB)
Reagent | Final concentration | Quantity or Volume |
|---|---|---|
TB Powder | 47.6 g/L | 47.6 g |
Glycerol | 0.4% v/v | 4 mL |
D-Glucose | 0.15% | 1.5 g |
IPTG | 1 mM | 238.3 mg |
L-Rhamnose | 0.1% | 1 g |
ddH2O |
| to 1 L |
Note: Mix TB powder and glycerol with 970 mL water first, then autoclave. Prepare the required quantity of glucose, IPTG, and L-rhamnose in 10 mL ddH2O each and sterilize them using a 0.2 µm syringe filter, then add them to the TB medium. Store at room temperature.
4. Kanamycin stock (1000X)
Reagent | Final concentration | Quantity or Volume |
|---|---|---|
Kanamycin | 50 mg/mL | 500 mg |
ddH2O |
| to 10 mL |
5. Lysozyme stock (100X)
Reagent | Final concentration | Quantity or Volume |
|---|---|---|
Lysozyme | 100 mg/mL | 100 mg |
Glycerol | 50% v/v | 0.5 mL |
ddH2O |
| 0.5 mL |
Total |
| 1 mL |
Note: Aliquot and store at -20 °C to minimize freeze-thaw cycles.
6. PMSF stock (1000X)
Reagent | Final concentration | Quantity or Volume |
|---|---|---|
PMSF | 100 mM | 17.42 mg |
Propan-2-ol |
| 1 mL |
Note: Aliquot and store at -20 °C to minimize freeze-thaw cycles.
7. Lysis buffer
Reagent | Final concentration | Quantity or Volume |
|---|---|---|
Lysozyme stock (100X) | 1 mg/mL | 100 μL |
PMSF stock (1000X) | 100 μM | 10 μL |
DNaseI (2000 units/mL) | 25 units/mL | 125 μL |
Pierce™ protease inhibitor tablet |
| 1 tablet |
B-PER™ protein extraction reagent |
| 9.77 mL |
Total |
| 10 mL |
Note: Prepare lysis buffer on the same day of use.
8. Wash buffer
Reagent | Final concentration | Quantity or Volume |
|---|---|---|
Tris base | 20 mM | 242.28 mg |
NaCl | 150 mM | 876.60 mg |
Imidazole | 25 mM | 170.19 mg |
ddH2O |
| to 100 mL |
1 M HCl |
| to pH 8 |
Note: Adjust buffer to pH 8 by adding 1 M HCl dropwise while monitoring with a pH probe and a stir bar. Tris can be substituted for Tris-HCl (Melford, T60050-100.0); adjust reagent mass to 315.22 mg to maintain the same concentration and use 1 M NaOH instead of HCl to adjust the pH. Store at room temperature.
9. Elution buffer
Reagent | Final concentration | Quantity or Volume |
|---|---|---|
Tris base | 20 mM | 242.28 mg |
NaCl | 150 mM | 876.60 mg |
Imidazole | 500 mM | 3.4039 g |
ddH2O |
| to 100 mL |
1 M HCl |
| to pH 8 |
Note: Adjust buffer to pH 8 by adding 1 M HCl dropwise while monitoring with a pH probe and a stir bar. Tris can be substituted for Tris-HCl; adjust reagent mass to 315.22 mg to maintain the same concentration and use 1 M NaOH instead of HCl to adjust the pH. Store at room temperature.
10. SDS-PAGE sample loading buffer (2X)
Reagent | Final concentration | Quantity or Volume |
|---|---|---|
Tris base | 100 mM | 121.14 mg |
Bromophenol Blue | 0.004% w/v | 0.4 mg |
SDS | 4% w/v | 400 mg |
Glycerol | 20% w/v | 2 g |
DTT | 200 mM | 308.51 mg |
1 M HCl |
| to pH 6.8 |
ddH2O |
| to 10 mL |
Note: Adjust buffer to pH 6.8 by adding 1 M HCl dropwise while monitoring with a pH probe and a stir bar. Tris can be substituted for Tris-HCl; adjust reagent mass to 157.60 mg to maintain the same concentration and use 1 M NaOH to adjust the pH instead of HCl. Either prepare loading buffer on the same day of use or prepare buffer without the addition of DTT. Add DTT shortly before use. Store at room temperature.
11. SDS-PAGE running buffer (10X)
Reagent | Final concentration | Quantity or Volume |
|---|---|---|
Tris base | 250 mM | 30.285 g |
Glycine | 1.918 M | 144 g |
SDS | 34.677 mM | 10 g |
ddH2O |
| to 1 L |
Note: Store at room temperature.
Laboratory supplies
1. Eppendorf tubes (Avantor, catalog number: 525-1164)
2. PCR microtubes (Thermo-Fisher Scientific, catalog number: AB0620)
3. 50 mL Falcon tubes (Fisher Scientific, catalog number: 14-432-22)
4. 96-well PCR plate (Thermo-Fisher Scientific, catalog number: AB0600)
5. 96-well fritted plate (Pall AcroPrep, catalog number: 8130)
6. 96-well collection plate (Thermo-Fisher Scientific, catalog number: AB0796)
7. Eppendorf™ Centrifuge Adapters for Plate Rotors (Thermo-Fisher Scientific, catalog number: 10446332)
8. 55 mm Petri dishes (VWR, catalog number: 390-1375)
9. 0.2 µm Syringe Filter (Sartorius, catalog number: 16534-K)
10. Plating beads (Merck Millipore, catalog number: 71013-3)
Equipment
1. SevenConnect pH Meter S220 (Mettler-Toledo) Note: This product is discontinued. The manufacturer recommends using a SevenDirect pH meter SD50 as a replacement.
2. Fisherbrand™ PTFE Micro Magnetic Stir Bar (Fisher Scientific, catalog number: 11888952)
3. Thermocycler Biorad T100 (Biorad, catalog number: 1861096)
4. Incubator (LTE, catalog number: IP60-U/M)
5. Benchtop Centrifuge Allegra X-15R (Beckman-Coulter, catalog number: 392932)
6. Mini Gel Tank (Thermo-Fisher Scientific, catalog number: A25977)
7. PowerPacTM Basic Power Supply (Bio-Rad, catalog number: 1645050)
8. Solaris™ Open Air Orbital Shaker (Thermo-Fisher Scientific, catalog number: SK2000)
9. White Backlight (Jencons-PLS)
Procedure
A. Construct Design and Reagent Pre-Preparation (Day 0)
1. DNA construct design
a. Select an EDEV plasmid (Figure 1). Use pHT462 for a His6 tag, pHT463 for a His6 tag with a thrombin cleavage site, or pHT453 for a His6–ubiquitin fusion. Use pHT461 when no vector-encoded N-terminal tag is required. For the Ni-NTA purification in Section E, a pHT461 insert must encode its own His tag.
b. Reverse translate the sequences of your target proteins into DNA using a codon optimizer, such as the IDT Codon Optimization Tool or DNAChisel (https://github.com/Edinburgh-Genome-Foundry/DnaChisel). Add the appropriate 5′ flank and the common 3′ flank below to the target-coding sequence. Omit the target stop codon because the 3′ TAA junction supplies it. Each one contains the SapI recognition site “GCTCTTC” (or its reverse complement, GAAGAGC) and six outer flanking bases to improve SapI binding. The cut site for the 5′-3′ strand is marked with ▼ and the 3′-5′ strand with ▲. Note; Make sure you remove all SapI sites from your insert sequence via codon optimization.
i. For pHT453, pHT462 and pHT463, use the 5′ flank 5′-TATGTGGCTCTTCT▼AGT▲-3′, followed by the complete target open reading frame without its stop codon. The AGT junction encodes a serine between the vector-encoded fusion and the target.
ii. For pHT461, use the 5′ flank 5′-TATGTGGCTCTTCT▼ATG▲-3′, followed by the target-coding sequence from codon 2 onward, without its stop codon. The ATG junction supplies the initiating methionine; do not duplicate the start codon.
iii. For all four plasmids, append the 3′ flank 5′-▼TAA▲AGAAGAGCGACCTA-3′ immediately after the final target codon. All flank sequences are written 5′ to 3′ on the target-coding strand.
c. Check the complete assembled coding sequence in silico before ordering. Confirm both junctions, the reading frame, the desired tag and the absence of internal SapI sites. This protocol does not include tag removal. If tag cleavage is required, establish a separate cleavage and cleanup procedure; the AGT junction leaves a serine before the target after ubiquitin cleavage, and the thrombin junction in pHT463 leaves Gly–Ser.
d. Order the DNA sequences as linear DNA fragments in 96-well plate format from a DNA synthesis service. We have successfully used IDT eBlocks™ Gene Fragments and Twist Bioscience Gene Fragments.
2. Reagent preparation
a. Prepare all the media and buffers listed in the Recipes section except for lysis buffer, which should be prepared on the day of use. SDS-PAGE sample loading buffer can be prepared in advance if DTT is excluded from the formulation, DTT should be added fresh.
b. Prepare an LB-Kan agar plate for each protein. Heat 15 mL of LB-Agar for each plate in a microwave until it is fully liquid and allow it to cool to 55 °C, then add 1000X kanamycin stock. Pour the LB-Agar into Petri dishes and leave to solidify without lids. Close the plates, seal using a strip of parafilm, and store at 4 °C upside down.
B. Gene Cloning (Day 1)
1. Golden Gate assembly of plasmids
a. If they are delivered dry, resuspend the DNA fragments with nuclease-free water to a stock concentration of 5 ng/μL.
b. Prepare a Golden Gate reaction mixture for each fragment according to Table 1 in a 96-well PCR plate or individual PCR tubes.
Table 1. Golden Gate reaction volumes per reaction.
Reagent | Final concentration | Quantity or Volume |
|---|---|---|
DNA fragment | 30 fmol |
|
Backbone plasmid | 10 fmol |
|
X10 T4 DNA ligase buffer | 1X | 1 μL |
T4 DNA ligase | 200 units / reaction | 0.5 μL |
SapI | 5 units / reaction | 0.5 μL |
ddH2O |
| to 10 μL |
c. Transfer the PCR plate to a thermocycler and run the program in Table 2. The results of Golden Gate assembly are shown in Fig. 2.
i. Pause Point: After the Golden Gate reaction, the 96-well plate can be stored at -20 °C before use, although repeated freeze-thaw cycles should be avoided. Even if you plan to use the Golden Gate mixture to transform E. coli on the same day, we recommend freezing your leftover mixture as a backup for failed transformations.
Table 2. Thermocycler program for Golden Gate reaction.
Temperature | Time |
|---|---|
37 °C | 15 minutes |
37 °C | 5 minutes |
16 °C | 5 minutes |
Repeat steps 2-3 for 30 cycles. | |
37 °C | 15 minutes |
65 °C | 20 minutes |
2. Plasmid transformation
a. Thaw KRX competent cells on ice, then aliquot 10 μL cells for each reaction into PCR microtubes.
Note: Never allow competent cells to reach room temperature or they will lose competency. Avoid holding PCR tubes for long periods while mixing, because body heat can rapidly warm small volumes.
b. Add 1 μL of Golden Gate mixture to the thawed competent cells. Mix by gently pipetting up and down.
c. Pre-cool the thermocycler to 4 °C, then transfer PCR tubes to the thermocycler and run the program described in Table 3. After the third step, pause the thermocycler, remove the PCR tubes and add 100 μL LB to each reaction well. Then return the PCR tubes to the thermocycler and resume the program.
Table 3. Thermocycler program for E. coli transformation.
Temperature | Time |
|---|---|
4 °C | 30 minutes |
42 °C | 30 seconds |
4 °C | 10 minutes |
Pause and add 100 μL LB |
|
37 °C | 1 hour |
d. Pipette 100 μL of each transformation mixture onto a LB-Kan agar plate.
e. Add plating beads (~5) to each plate and move the plate back and forth vigorously. Alternatively, use a cell spreader to distribute the transformation reaction mixture over the plate.
f. Leave the plates open to dry. Once there is no liquid on top of the gel, pour the beads off into 70% ethanol solution for autoclaving and reuse. Close the plates.
g. Incubate the plates upside down overnight at 37°C.
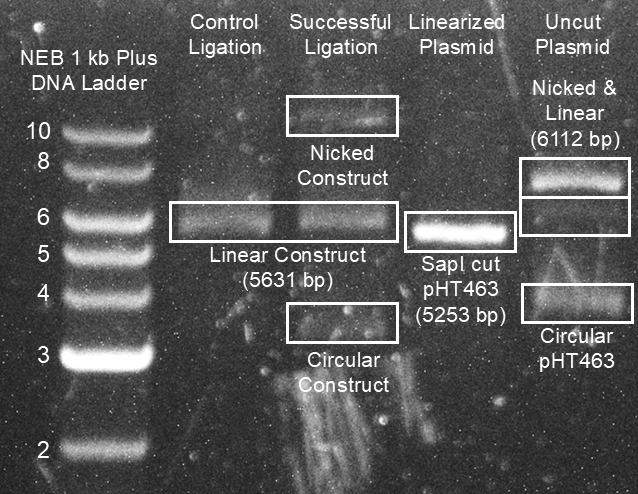
Figure 2. Verification of successful Golden Gate assembly using an agarose DNA gel. A 384 bp synthetic gene was cloned into the pHT463 plasmid through Golden Gate assembly. To visualize the process, parts of the reaction mix were excluded before incubation and then run on a 1% agarose gel stained with SYBR Safe dye (Invitrogen, catalog number: S33102) at 100 V for 70 minutes. Plasmid topologies were putatively assigned to bands and are shown above. In lane 4, the pHT463 plasmid is run alone, showing bands that most likely correspond to a circular or nicked form. In lane 3, SapI is added to linearize the plasmid and remove the tsPurple fragment, producing a band consistent with a linear topology. In lane 1, SapI and the insert sequence are added, producing a band corresponding to a linear annealed construct. In lane 2, the full reaction mix including T4 ligase and T4 ligase buffer is added to produce a band corresponding to the final construct. This sample was transformed into E. coli and verified via Full Circle Labs whole plasmid sequencing. Although multiple bands suggests the annealed fragments were not fully ligated, both circular and nicked forms of the plasmid can be transformed into E. coli and even a small amount of DNA is sufficient for transformation. However, if any uncleaved circular plasmid remains in the sample, it can give rise to purple E. coli colonies that are resistant to the selection media but do not contain the fragment.
C. Colony Picking (Day 2)
1. Starter culture preparation
a. Prepare 1 mL of LB with 1 μL Kanamycin stock in 15 mL tubes for each plate.
b. Pick a single white colony from each plate using a pipette tip and inoculate it into a 15 mL tube with LB (Fig. 3). Incubate overnight with 200 RPM shaking at 37 °C. Note: Colonies that do not have the insert will retain an expression cassette for the purple chromoprotein tsPurple, making them purple. Note that some unexpected DNA changes during transformation, such as mutations or transposon insertions, can lead to white colonies without the correct insert. You can optionally purify plasmid DNA from your picked colony culture using a QIAwave Plasmid Miniprep Kit (Qiagen, catalog number: 27204), then verify your expression plasmid using a plasmid sequencing service (e.g. Full Circle Labs or Plasmidsaurus Whole Plasmid Sequencing).
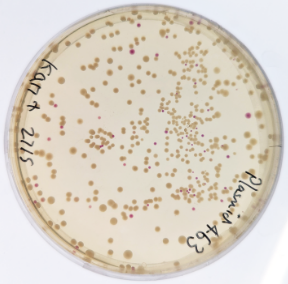
Figure 3. Example plates of E. coli after plasmid transformation. This plate shows E. coli colonies transformed with both putatively correctly constructed (unpigmented) and incorrectly constructed (purple) colonies, visualized against a white backlight.
D. Protein Expression (Day 3)
1. Protein expression
a. You should create glycerol stocks from your overnight cultures by mixing 500 μL of cell culture with 500 μL of 50% glycerol in ddH2O, flash cooling them in liquid N2, and storing them at -80 °C.
i. Pause Point: If you have created glycerol stocks, you can restart purification from Part C: Colony Picking. Inoculate your LB using a small amount of glycerol stock taken with a pipette tip instead of from a colony. Keep your glycerol stocks on ice and avoid letting them defrost.
b. Prepare 5 mL of autoinduction TB with 5 μL kanamycin stock in a 50 mL Falcon tube for each cell culture. Note: To increase yield, you can adjust your cell culture volumes up to 100 mL. See General Notes 3.
c. Dilute overnight LB cultures into TB at a 1:100 ratio.
d. Grow overnight at room temperature.
E. Protein Purification (Day 4)
1. Cell lysis
a. Remove 10 μL sample from each induced cell culture for the SDS-PAGE validation and store at 4 °C. Note: Not all proteins need to be sampled at each stage; see General Notes 2.
b. Centrifuge each cell culture at 4000× g for 10 minutes at 4 °C and discard the supernatant.
i. Pause Point: Centrifuged cell pellets can be frozen at -20 °C and stored for 1-2 weeks before use if needed. Allow the frozen cell pellets to thaw at room temperature before continuing from this step onwards.
c. Prepare chemical lysis buffer according to the formulation given in recipe 7. Add 15 μL of lysis buffer per mL of E. coli culture volume to each pellet. Resuspend the pellet by gently pipetting up and down.
d. Incubate for 15 minutes at room temperature, then centrifuge the lysate at 4000× g for 20 minutes at 4 °C.
e. Remove 10 μL of clear lysate from each culture for the SDS-PAGE validation gel and store at 4 °C.
2. Nickel column chromatography
Note: This step requires a His-tagged target. pHT453, pHT462 and pHT463 supply an N-terminal His6 tag; pHT461 requires a His tag encoded within the insert.
a. Slot a 96-well fritted plate onto a 96-well collection plate. The same collection plate will be used for the whole purification, with the contents being discarded or collected at each stage.
Note: We recommend using a second fritted plate and collection plate as a counterweight during centrifugation. This second plate can either be used to purify more samples, or the collection plate can be filled with deionized water to balance the centrifuge.
b. Add Ni-NTA slurry to the wells of the fritted plate and centrifuge at 1500× g for 5 minutes at 4 °C, then discard the flowthrough. Use 20 μL of Ni-NTA slurry per mL of E. coli culture, or 100 μL for a 5 mL culture with a resulting bed volume of 50 μL.
Note: you may need to increase this to compensate for highly expressed proteins; as a guide, Ni-NTA resin has a typical binding capacity of 15 mg/mL, and recombinant protein yield from E. coli is typically around 0.1 mg/mL of culture but may be up to 1 mg/mL.
c. Equilibrate, load, wash and elute your protein by adding the reagent volumes listed below to each well. After each step, centrifuge at 1500× g for 5 minutes at 4 °C. Load no more than 300 μL at a time to prevent overflowing the collection plate. If more than 300 μL is needed, load and centrifuge multiple times.
d. Equilibrate the resin by adding 6 bed volumes of wash buffer, or 300 μL for a 5 mL culture. Discard the flow-through.
e. Load the resin by adding all cell lysate. Collect 10 μL samples of the flow-through and discard the remainder.
f. Wash the resin by adding 6 bed volumes of wash buffer, or 300 μL for a 5 mL culture. Collect 10 μL samples of the flow-through and discard the remainder.
g. Elute the protein from the resin by adding 4 bed volumes of elution buffer, or 200 μL for a 5 mL culture. Collect all flow-through and store it in Eppendorf tubes at 4 °C.
h. Optionally, you can elute from the resin a second time to maximize yield. Add 4 bed volumes of elution buffer, collect all flow-through and store it in Eppendorf tubes at 4 °C.
i. Pause Point: Purified protein can usually be stored at 4 °C for 1-2 weeks before use. However, this varies based on the stability of the protein, and you should try to use your protein samples as soon as possible after purification. If you want to store your protein samples long-term, aliquot them as needed, flash-cool in liquid N2, and store them at -80 °C. Thaw aliquots on ice before continuing.
F. SDS-PAGE Validation (Day 5)
1. SDS-PAGE gel
a. Prepare SDS-PAGE sample loading buffer (see Recipes section). If you have prepared loading buffer in advance, add DTT to it now.
b. Mix 10 μL loading buffer with each 10 μL validation sample you saved earlier. You should have 4 samples collected for each protein: induced whole-cell culture (step E1a), cell lysate (step E1e), loading flow-through (step E2e), and wash flow-through (step E2f). Additionally, sample 10 μL from your purified protein samples (step E2g).
c. Incubate the samples at room temperature for five minutes. Transfer the samples to a thermocycler and heat them to 98 °C for 5 minutes.
d. Unseal enough Tris-Glycine Mini Protein Gels to run all your samples; each one has 15 lanes. Remove the tape on the cassette bottom and pull out the comb. Wash the gel cassette in deionized water before inserting it into a gel tank.
e. Mix 10X SDS-PAGE running buffer with deionized water at a 1:9 ratio, then fill the gel tank to fully cover the gel cassette.
f. Using a fine pipette tip, load 15 μL of each SDS-PAGE sample into the sample lanes, reserving the final lane for 5 μL protein ladder.
g. Connect the gel tank to a power source and run it for 1 hour at 80 V.
h. Remove the gel cassette from the gel tank, rinse it in deionized water, and crack open the cassette case. Remove the gel, place it in a plastic box, and fully submerge it in Quick Coomassie Stain. Leave it on an orbital shaker overnight to stain.
i. Visualize the gel using a white backlight (Fig. 4).
j. Optionally, test your protein sample concentrations using a NanoDrop Spectrophotometer (Thermo-Fisher Scientific, catalog number: NDLPLUSGL). Calculate your protein’s molecular weight and extinction using Expasy ProtParam, then black the instrument against Elution Buffer and measure absorbance at 280 nm.
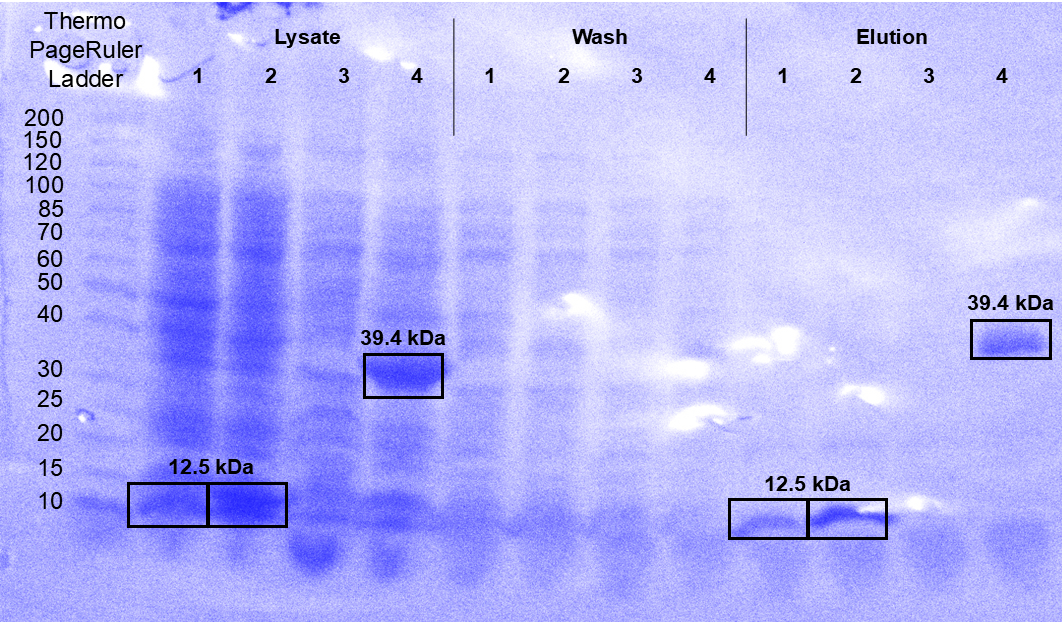
Figure 4. SDS-PAGE validation of the purification of 4 protein samples. Four proteins, including 3 designed binders of phycocyanobilin (samples 1-3, 12.5 kDa) and PETN Reductase (sample 4, 39.4 kDa) were purified from 5 mL E. coli cultures through Ni-NTA affinity chromatography in a 96-well fritted plate. Samples were taken after cell lysis and centrifugation (marked “lysate”), after the first flow-through of wash buffer (marked “wash”), and after the first flow-through of elution buffer (marked “elution”). The elution fraction shows that samples 1, 2, and 4 were successfully purified, while sample 3 may have been insoluble, based on its absence in the lysate sample. Strong bands corresponding to the purified proteins are present in the lysate fraction, but are absent in the wash fraction, as expected.
Validation of protocol
This protocol has been used and validated in the following research article:
Pretorius et al. [5] Designing Novel Solenoid Proteins with In Silico Evolution. Communications Chemistry (Figure 4, panel A).
We further demonstrate that this protocol successfully purified 3 natural small-molecule binding proteins and 14 de novo binding proteins created using LigandMPNN. We transformed these sequences into the PHT463 plasmid and purified 400 μL of protein from 50 mL of E. coli culture, with an average yield of 0.806 mg (Table 4). Wingfield estimates that 2.5-7.5 mg of recombinant protein is present after expression in a 50 mL E. coli culture, giving us a yield of 11–32% [6].
Table 4. Protein Yield from an Example Medium-Throughput Purification
Protein | Number of Amino Acids | MW (Da) | Concentration of 400 μL Eluate (mg/mL) | Total Yield (mg) |
|---|---|---|---|---|
Protein 1 | 127 | 15787 | 2.11 | 0.84 |
| Protein 2 | 364 | 41384 | 2.18 | 0.87 |
Protein 3 | 131 | 16560 | 2.19 | 0.88 |
Protein 4 | 108 | 14533 | 3.04 | 1.22 |
Protein 5 | 111 | 15557 | 1.54 | 0.62 |
Protein 6 | 127 | 17096 | 1.51 | 0.60 |
Protein 7 | 127 | 16869 | 2.76 | 1.10 |
Protein 8 | 130 | 17725 | 2.78 | 1.11 |
Protein 9 | 114 | 16012 | 2.32 | 0.93 |
Protein 10 | 129 | 17383 | 1.46 | 0.58 |
Protein 11 | 99 | 13050 | 0.86 | 0.34 |
Protein 12 | 130 | 17711 | 1.12 | 0.45 |
Protein 13 | 129 | 17529 | 2.27 | 0.91 |
Protein 14 | 119 | 13168 | 4.66 | 1.86 |
Protein 15 | 131 | 16622 | 0.69 | 0.28 |
Protein 16 | 151 | 19889 | 1.68 | 0.67 |
Protein 17 | 97 | 12740 | 1.09 | 0.44 |
Mean |
|
| 2.02 | 0.81 |
General notes and troubleshooting
General notes
1. When doing medium-throughput purification, proteins that are insoluble or otherwise hard to purify are not always worth optimization. Although your downstream applications may vary, this protocol works best with libraries that are large enough to abandon purification of a few proteins without compromising future experiments. Adding extra proteins to your library has minimal extra costs in labour and consumables; at the same time, trying to optimize multiple purifications can be time-consuming, especially since the culture volumes and yields are small.
2. While this protocol describes 5 stages per protein where samples can be collected for SDS-PAGE verification, fully testing all samples might be unrealistic because of the number of gels needed. For example, fully testing 30 proteins would require 11 15-well gel cassettes. Consider taking a smaller representative sample of your protein library at each of the initial four stages and only test the full library at the final, purified stage. If 3 of 30 proteins were taken as a representative sample for the first 4 stages, only 3 gels would be needed.
3. If greater protein yield is needed, E. coli culture volumes can be increased beyond 5 mL if reagent quantities are modified to maintain the concentrations given. For culture volumes greater than 25 mL, switch from 50 mL Falcon tubes to larger plasticware or Erlenmeyer flasks sealed with Parafilm. We also discourage loading 96-well fritted plates with more than 500 μL of Ni-NTA resin. Large resin beds require many loading and centrifugation steps because of the limited capacity of the collection plate, and can dry out because of the long centrifugation steps needed to force buffer through the resin. For higher volumes, you can load and elute resin inside plasticware, such as Eppendorf tubes, rather than using fritted plates. For part E2, rather than centrifuging a plate after each stage, centrifuge your tube at 1000× g to settle the resin, then carefully pipette off the supernatant. Add buffer or lysate and then mix by inversion. We have successfully purified culture volumes of up to 100 mL using this method, but we find that it is more time-consuming and error-prone than using a fritted plate, and that the final protein sample is often contaminated with Ni-NTA resin.
4. Depending on your downstream tasks, you may want to dialyze your protein samples into a different buffer. We find that medium-throughput dialysis is possible by pipetting 200 μL of protein sample into the cap of an Eppendorf tube, covering it with SnakeSkin™ Dialysis Tubing (Thermo-Fisher Scientific, catalog number: 68100), and fixing the membrane in place with a ring cut from an Eppendorf tube. Several ad-hoc dialysis tubes can be immersed in a large beaker of dialysis buffer and left stirred overnight with a stir bar.
Troubleshooting
1. No colonies appear on the plate after plating out the transformation mixture.
Try transforming the uncut backbone plasmid to see whether the Golden Gate assembly protocol or the transformation protocol has failed. If the backbone fails to produce colonies, your transformations are probably failing. Make sure you do not allow the cells to warm while pipetting and potentially increase the volume of competent cells used per transformation from 10 μL to 50 μL. If the control plasmid succeeds and produces purple colonies, your Golden Gate protocol is probably failing. Your T4 DNA Ligase, T4 DNA Ligase buffer, and SapI may have degraded if they were not stored at -20 °C or have experienced too many freeze-thaw cycles. Verify that you are using the correct molar ratio of insert to plasmid DNA. Increasing the number of thermal cycles during the Golden Gate assembly from 30 to 60 can also improve yield.
2. There are no bands corresponding to the target protein in any of the SDS-PAGE validation samples.
The protein may not have expressed due to an incorrect plasmid. Consider purifying plasmid DNA from the cell culture and sequencing it, such as using a QIAwave Plasmid Miniprep Kit (Qiagen, catalog number: 27204) and a plasmid sequencing service. The protein might also be insoluble, aggregated, or toxic, especially if the cell culture was induced above room temperature. Consider inducing expression with a reduced 0.1 mM IPTG concentration, supplementing the lysate with 1 M urea to resolubilize aggregated proteins, switching to an E. coli strain with greater toxic protein resistance like C43(DE3) (Sigma-Aldrich, catalog number: CMC0019), or switching to a different plasmid backbone.
3. The induced whole-cell culture sample contains a band corresponding to the target protein, and no target protein bands are found in subsequent samples.
The target protein may be secreted into the media, in which case it would be discarded with the supernatant after the cell culture is centrifuged. You may be able to purify the protein by collecting the cell media supernatant and loading it directly onto the resin column, skipping step E1.
4. The target protein has a strong band in the loading flow-through sample, which is absent in subsequent samples.
The target protein may not be binding to the resin column. Check using structure prediction software if the N-terminal tag is found on the interior of the protein; if so, consider switching to a different backbone plasmid that uses a C-terminal tag. You might also consider purifying the flow-through using size-exclusion chromatography or ion-exchange chromatography, which do not require the hexahistidine tag to be accessible.
5. The target protein has a strong band in the wash flow-through sample, which is absent in subsequent samples.
The wash treatment may be too stringent, causing the protein to elute too early. Consider using a less stringent wash buffer with 10 mM imidazole and elute using 25 mM imidazole buffer.
6. The purified protein sample contains many bands in addition to the target protein.
The wash treatment may not be stringent enough. Use 12 or more bed volumes of wash buffer during the wash step. Alternatively, use more Ni-NTA resin or load less cell lysate to avoid overloading the resin with E. coli proteins.
Acknowledgments
D.P. was supported by an EPSRC CDT training grant (EP/S022856/1). L.D. is supported by a PhD studentship from the Defence Science and Technology Laboratory (Grant Reference No. RQ29243).
Author contributions: Conceptualization, D.P. and J.W.M.; Investigation, D.P., F.T. and L.D.; Writing—Original Draft, D.P., F.T., L.D. and J.W.M.; Writing—Final Draft, L.D.; Funding Acquisition, J.W.M.; Supervision, J.W.M.
Competing interests
The authors declare no conflicts of interest.
References
Hoose, A., Vellacott, R., Storch, M., Freemont, P.S., Ryadnov, M. G. (2023). DNA synthesis technologies to close the gene writing gap. Nat Rev Chem. 7: 144-161. https://doi.org/10.1038/s41570-022-00456-9
Norton-Baker, B., Denton, M. C. R., Murphy, N. P., Fram, B., Lim, S., Erickson, E., Gauthier, N. P., Beckham, G. T. (2024). Enabling high-throughput enzyme discovery and engineering with a low-cost, robot-assisted pipeline. Sci Rep. 14: 14449. https://doi.org/10.1038/s41598-024-64938-0
Dominguez, M. J., Lantz, B. J., Rhode, R. J., Sharp, Z. L., Finney, K. C., Martinez, V. J., Stollar, E. J. (2018). A multi-column plate adapter provides an economical and versatile high-throughput protein purification system. Protein Expr Purif. 152: 84–91. https://doi.org/10.1016/j.pep.2018.07.009
Bastos, M., Abian, O., Johnson, C. M., Ferreira-da-Silva, F., Vega, S., Jimenez-Alesanco, A., Ortega-Alarcon, D., Velazquez-Campoy, A. (2023). Isothermal titration calorimetry. Nat Rev Methods Primers. 3: 17. https://doi.org/10.1038/s43586-023-00199-x
Pretorius, D., Nikov, G. I., Washio, K., Florent, S., Taunt, H. N., Ovchinnikov, S., Murray, J. W. (2026). Designing novel solenoid proteins with in silico evolution. Communications Chemistry. 9: 10. https://doi.org/10.1038/s42004-025-01817-3
Wingfield, P. T. (2015). Overview of the Purification of Recombinant Proteins. Curr Protoc Protein Sci. 80: 6.1.1–6.1.35. https://doi.org/10.1002/0471140864.ps0601s80
Related files
 supplementary_data_1.txt

- Pretorius, D, Tufail, F, Daniel-Pedersen, L, Taunt, H and Murray, J W(2026). Low-cost Medium-Throughput Protein Expression and Purification in E. coli. Bio-protocol Preprint. 10.21769/p3022.
Do you have any questions about this protocol?
Post your question to gather feedback from the community. We will also invite the authors of this article to respond.
 Post a Question


