
- Home
- Protocols

-

Protocols to develop and maintain immortalized Drosophila cell lines harboring Wolbachia infections
Last updated date: Jun 16, 2026 DOI: 10.21769/p2957 Views: 16 Forks: 0
Title: Protocols to develop and maintain immortalized Drosophila cell lines harboring Wolbachia infections
Authors and affiliations:
Alexandra Lum, Jodie Jacobs, Jonas Nykamp, and Shelbi L Russell*
* correspondence addressed to shelbilrussell@gmail.com
Department of Biomolecular Engineering, University of California Santa Cruz, Santa Cruz, CA, United States.
Genomics Institute, University of California Santa Cruz, Santa Cruz, CA 95064
Graphical abstract:
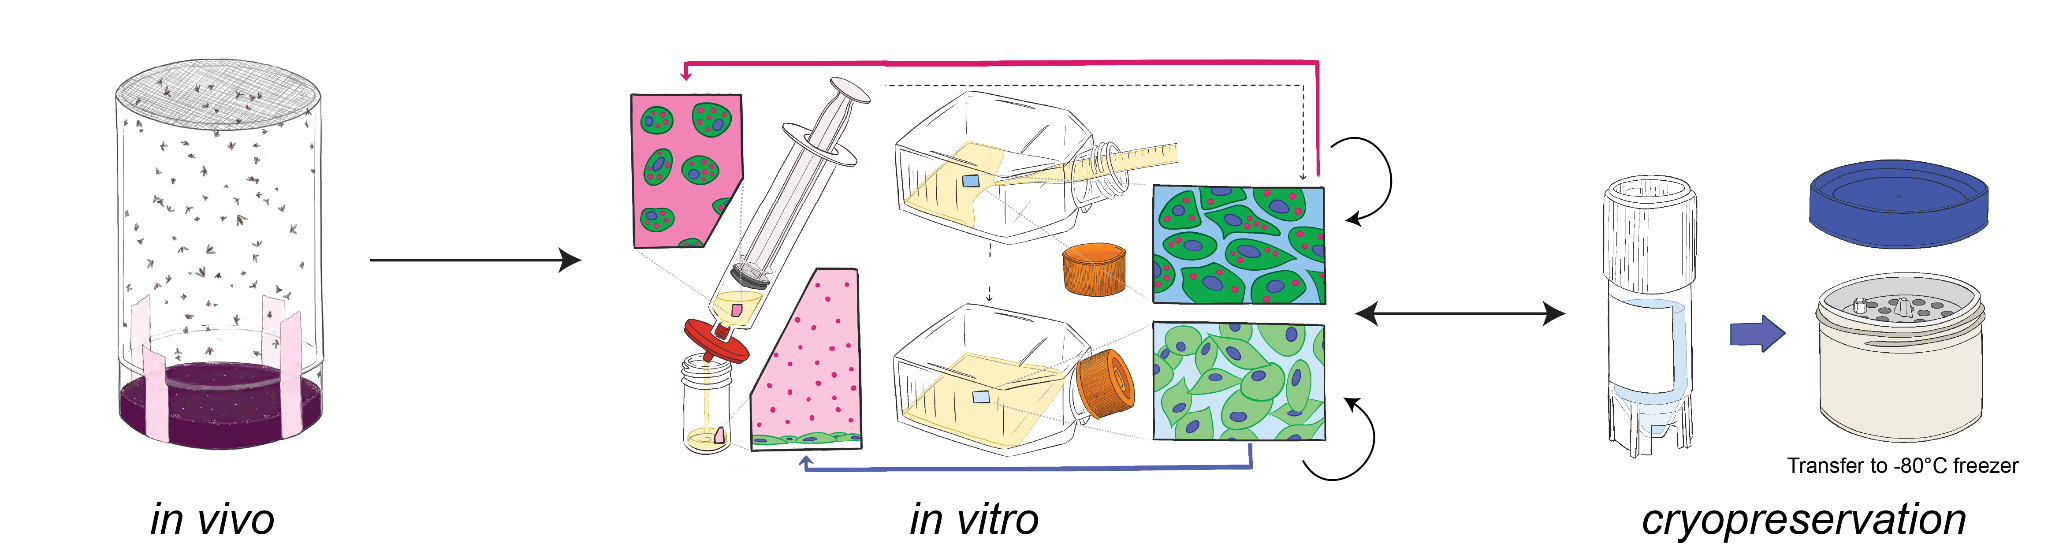
Summary: The inability to culture obligate intracellular bacteria independently of their hosts renders them among the most experimentally challenging organisms, confining much of our knowledge of their gene function to inferences derived from genome annotations 1, 2. Immortalized Drosophila cell lines provide a habitat to grow intracellular Wolbachia symbionts 3 and an arena for assaying host-symbiont interactions 4, 5. We present protocols to generate, maintain, manipulate, and preserve Wolbachia-infected Drosophila cell lines, and a discussion of troubleshooting guidelines and useful applications. For complete details on the use and execution of these protocols, please refer to Mirchandani et al. 6.
Before you begin:
In this paper, we present detailed protocols to make, maintain, manipulate, and preserve Wolbachia-infected Drosophila cell lines (outlined in Figure 1). These protocols are the result of years of practice 6–8 and refinement of many protocols 9–15, across decades. We hope that providing all of these resources in one publication enables both seasoned Drosophila cell biologists, as well as researchers new to the field, to create and work with symbiont-infected cell lines.
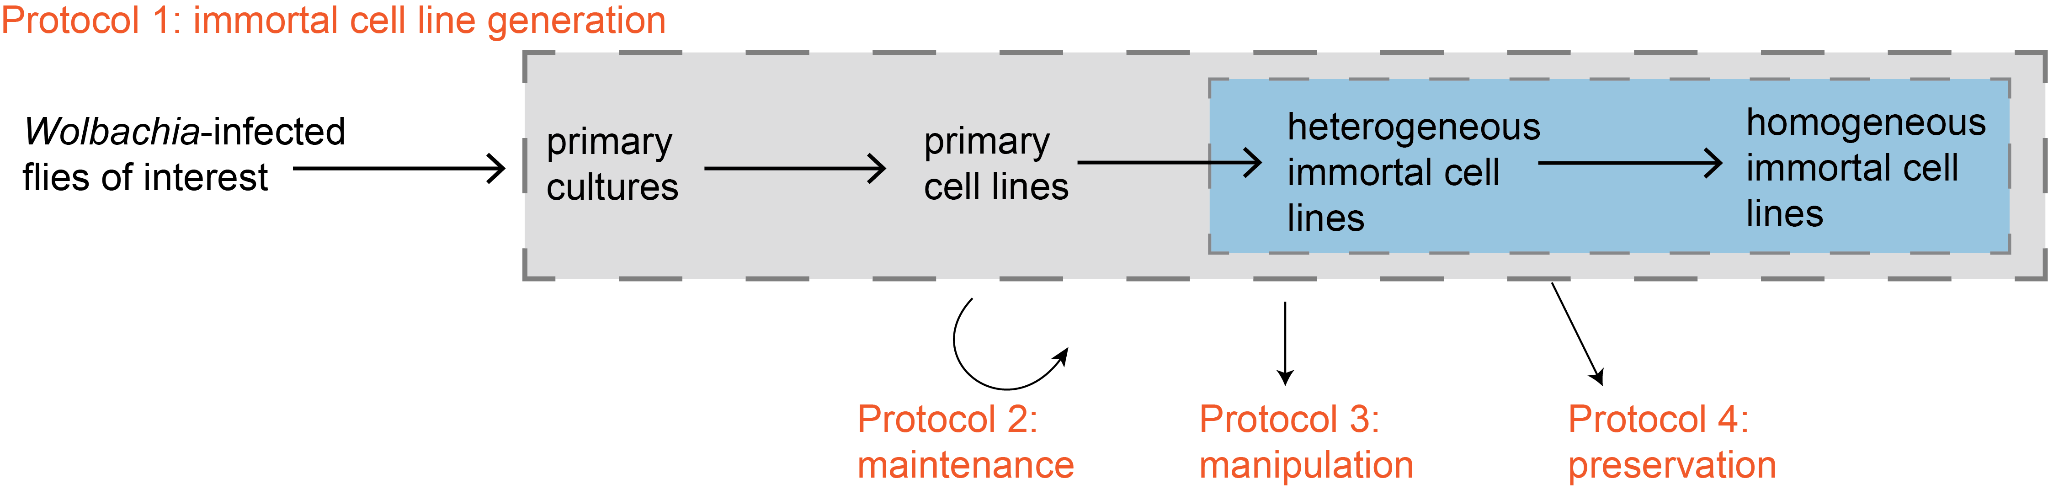
Figure 1. Overview of the cell line protocols we refined and presented in this paper. The arrows drawn from flies to homogeneous immortal cell lines represent the temporal order of events that occur in Protocol 1.
Protocols:
Protocol 1) De novo cell line generation
Timing: two weeks and two days to make primary cell lines; up to six months to make immortal cell lines.
Rationale: Immortalized cell lines are foundational tools in insect biology, yet the repertoire of available lines is limited in both number and cell type diversity. Expanding this repertoire enables different biological questions requiring different cellular contexts. The ability to generate new lines from specific species, strains, or genotypes affords a level of experimental customization that is otherwise unattainable.
The process of generating immortalized lines proceeds through an initial primary culture stage, each phase offering distinct experimental value: primary cultures more faithfully recapitulate the physiological state of cells in vivo, while immortalized lines provide stable, homogeneous populations that concentrate molecular signal, reduce cellular heterogeneity, and, particularly for symbiont research, can sustain Wolbachia titers far exceeding those achievable in whole animals.
The following Protocol describes our approach to generating immortalized Drosophila cell lines that builds on the foundations laid out by primary culture and cell line generation protocols 10, 12, 15, 16, providing researchers with the means to produce tailored biological resources suited to their specific experimental needs. Begin by collecting the reagents and consumables listed in Table 1.
| Reagent/Consumable | Amount | Location in Materials section | Notes |
| Clean Paintbrush● | 1 | Not listed | Inspect for cleanliness |
| Embryo Strainer● | 1 | 2a) Non-sterile fly-work | Inspect for cleanliness |
| Embryo Wash Solution● | 15 mL | 2b) Non-sterile fly-work | |
| Fly cage● | 1 | 2c) Non-sterile fly-work | Inspect for cleanliness |
| Fly food | ** | 2d) Non-sterile fly-work | Used before protocol |
| Grape agar plate● | 1 | 2e) Non-sterile fly-work | |
| MilliQ water● | ** | Not listed | Non-sterile |
| Lab marker●▲ | 1 | Not listed | For labeling flasks |
| Primary cell culture media●▲ | ** | 3d) Sterile cell culture | |
| Serological Pipets - 10 mL● | 4 | 1h) Consumables | |
| Serological Pipets - 5 mL● | 2-3 | 1h) Consumables | |
| Serological Pipets - 2 mL● | 1 | 1h) Consumables | |
| Sterile ultra pure water● | ~39 mL | 3e) Sterile cell culture | |
| T-12 cell culture flask(s)●▲ | ** | 1k) Consumables | |
| Tenbroeck Tissue Grinder● | 1 | 1l) Consumables | |
| Cell culture media▲ | ** | 3b) Sterile cell culture | Protocol 1c - 1.2 only |
| Glass Scrapers▲ | ** | 1f) Consumables | Use if splitting cells |
| Serological Pipets - 5 mL▲ | ** | 1h) Consumables | |
| 15 mL conical tubes▲ | ** | 1d) Consumables | Use if cells aren’t adherent |
| 1250 uL XL vacuum tips▲ | ** | 1c) Consumables | Protocol 1c - 1.1 only |
| T-25 cell culture flasks▲ | ** | 1k) Consumables | Use if cells are immortalizing |
Table 1. Protocol 1 Reagents and Consumables. **Amount varies, ●For primary line generation, ▲For primary line maintenance
- Collect Drosophila embryos
- Increase the number of flies of the desired genotype by growing them in bottles. This can take several weeks, if starting from vials. Refer to one of the many detailed protocols for growing bottles of flies and synchronizing egg laying 16.
- The day before embryo collection, set up flies on a grape plate (~400 females + ~400 males). Knock the flies out on a CO2 pad and transfer the flies to a mesh cage. Then, secure the cage to the grape plate with tape.
- Note: Smaller diameter cages can also be used, which will require fewer flies. For example, a 100 mm plate can hold approximately twice as many flies as a 60 mm plate (as in 12).
- Allow flies to lay on the grape plate for 12-23 hours. Remove flies from the grape plate by knocking the cage upside down against the CO2 pad. Transfer the flies to empty bottles or replace the cage with a fresh grape plate for an additional prep.
- Pause point: This can be left overnight. It is recommended that the plates be left for less than 24 hours, as the embryos may begin hatching if left for too long.
- Under a microscope, without damaging the agar, gently remove fly debris and hatched larvae from the plate with forceps.
- Secure a fine nylon mesh over a beaker with a rubber band. Using a dropper, create a “wet spot” so that liquid can pass through the mesh.
- Cover the surface of the agar with MilliQ water and gently dislodge the eggs from the agar with a clean paint brush. Use a gentle twisting motion with the brush to unstick the embryos from each other. Be careful to minimize repetitive or aggressive motions to avoid eroding the agar.
- CRITICAL: Clumping of embryos reduces the effectiveness of surface sterilization.
- Slowly pour the embryos from the plate onto the mesh, ensuring that the liquid does not flow over the edge of the beaker. Repeat until all of the embryos have been transferred to the mesh.
- Use a dropper to rinse the embryos on the mesh with MilliQ water until the grape residue is gone. Under a microscope, use forceps to remove any remaining larvae or agar from the surface of the mesh. Avoid damaging the embryos with the forceps.
- CRITICAL: It is important that agar and larvae are removed, as they can carry internal contaminants that can’t be purged with surface sterilization, increasing the risk of the prep becoming contaminated.
- Gather the embryos into a pile on the mesh using the dropper. Then transfer the embryos into a 15 mL conical tube with 15 mL of embryo wash solution using the paint brush. Gently scoop the paintbrush under the pile of embryos and deposit them into the wash solution, drying excess wash solution off the brush, and repeating to get the remaining embryos from the mesh.
- Note: The wash solution is slippery and may hinder embryos from sticking to the brush, hence the drying.
- Upon adding embryos to the wash solution, start a 15-minute timer. Place the conical on a rocker or agitate manually for ~13 minutes.
- CRITICAL: Agitation is necessary to prevent anoxia
- Once there are ~2 minutes left on the timer, spin the embryos down at 500xg for 1.5 minutes at room temperature. Then, transfer the conical to the Tissue Culture Hood.
### Conduct all of the subsequent steps with sterile technique in a laminar flow hood ###
- Generate primary cell lines
- Using a 10 mL serological pipette, remove as much of the wash solution as possible without disturbing the embryo pellet. To remove ~15 mL of wash solution, multiple removal passes may be required.
- CRITICAL: If the concentration of bleach is too high, it can cause the cells to lyse. Therefore, it is important to remove as much as possible in this step.
- Using a 10 mL serological pipette, very gently rinse the embryo pellet with 13 mL of autoclaved MilliQ water, allowing the pellet to resettle when disturbed. It is helpful to hold the conical at eye level to watch the dilution of the bleach solution during the first rinse to gauge the efficacy of the rinses. Then remove as much of the water as possible without disturbing the pellet.
- Repeat the previous step two more times for a total of 3 rinses with autoclaved MilliQ water.
- Using a 5 mL serological pipette, gently rinse the embryo pellet with 5 mL of primary culture media, letting the pellet resettle without disturbing. Remove as much of the media as possible without disturbing the pellet.
- CRITICAL: Avoiding disturbing the pellet here is more difficult due to the slipperiness and viscosity of the media.
- Place the holding body of the tissue grinder upright in a stand. Place the plunging wand upside down in a section of the hood where it can remain sterile until use.
- Note: Be sure to touch only the top portion of the wand, when holding it.
- Using a 5 mL serological pipette, take 2 mL of media. Slowly resuspend the embryo pellet and transfer to a tissue grinder. Avoid bubbling the media.
- Note: Take care to minimize the embryos sticking to the Falcon tube or the interior of the pipette. This can happen if too much force is used to resuspend the pellet, shooting the eggs up the sides of the tube, or if bubbles are taken into the pipette.
- Plunge the embryos in the homogenizer 5-7 times while avoiding twisting the plunger. After 1-2 plunges, briefly inspect the homogenate. Adjust force used based on the homogenization rate of the first two plunges to achieve sufficient homogenization.
- Note: In general, using fewer plunges and less force is ideal to avoid cell damage. Embryo homogenate with visibly unhomogenized embryos can still result in successful primary cultures. However, if there is a significant portion of unhomogenized embryos after 5 plunges, gently plunge an additional 1-2 times.
- Note: We recommend avoiding twisting to reduce undue stress on the cells.
- Using a 2 mL pipette, transfer homogenate to T12 cell culture flask(s). Then, fill each flask to 2 mL with additional primary culture media.
- Note: The number of flasks to split the homogenate into is determined by the amount of cell material in the homogenate. In general, more cell material promotes growth within the flask, but also risks outpacing the antibiotics if there is contamination.
- Place sealed flasks in a secondary container. Incubate flasks at 23 °C for ~2 weeks
- Using a 10 mL serological pipette, remove as much of the wash solution as possible without disturbing the embryo pellet. To remove ~15 mL of wash solution, multiple removal passes may be required.
- Generate immortal cell lines
Once you have a successful primary culture, maintaining it correctly is critical to allowing the cells to grow and develop into a cell line and potentially immortalize. Here, we define a Drosophila cell line to be immortal when it divides reliably enough to split it into a fresh flask weekly. Immortilization generally involves the accumulation of mutations in tumor suppressor genes and oncogenes, which permit the cells to continue dividing after differentiation. However, no consensus exists on how to establish the point of immortalization, as the number of required splits can vary among cell lines, as well as the time between splits 9. In our experience, it takes from four to six months to coax a primary cell line to divide often enough to require splitting it in half every week.
Primary cultures and cell lines are notably more fragile than stable lines, and getting them to grow can require much patience. If they are split too often, they die out. If they are not split enough, then they never immortalize. Below, we detail our guidance for coaxing primary cultures and cell lines to spontaneous immortal cell states:
- Protocol 1.1: Primary culture/line maintenance
- Observe the interior of the flasks under a microscope. Check for the presence of cells, adherence of cells to the surface of the flask, the presence of cell debris. Additionally, check if cells have reached confluency.
- Determine the maintenance protocol:
- If the cells are adherent and nearing confluence:
- Gently scrape the surface of the flask without removing the old media. Then, add 2 mL of fresh primary culture media and transfer half of the volume to a new T12 flask.
- Note: The old flask can potentially act as insurance if the new flask doesn’t do well. Alternatively, you can transfer the entire original 2 mL into a new flask, but this runs the risk of completely ending the cell line if the transfer is not successful.
- Gently scrape the surface of the flask without removing the old media. Then, add 2 mL of fresh primary culture media and transfer half of the volume to a new T12 flask.
- If cells are mostly adherent, but not confluent:
- Media can be removed using a vacuum. Remove 50-100% of the media using a sterile tip attached to a vacuum and replace it with fresh primary culture media.
- CRITICAL: Replacing all of the media periodically can help reduce the chance of salt crystals forming in flasks that are slow to proliferate. When removing only 50% each time, salt crystals can start growing at around week 8, while flasks with periodic 100% media replacement typically go for much longer without developing salt crystals.
- Media can be removed using a vacuum. Remove 50-100% of the media using a sterile tip attached to a vacuum and replace it with fresh primary culture media.
- If many cells are floating in the supernatant:
- Transfer media to a sterile conical centrifuge tube and spin down at 100xg for 5 minutes at room temperature.
- Remove as much media as possible without disturbing the pellet, then resuspend the cells in fresh primary culture media and transfer back into the flask.
- Note: This approach is ideal for retaining cells from the supernatant while also slowing down the growth of salt crystals.
- If the cells are adherent and nearing confluence:
- Protocol 1.2: Identifying immortalization and de novo cell line maintenance
- If a particular flask of cells appears to be proliferating very rapidly, overall or in patches, start by splitting the cells into a new T-12 flask by scraping and adding 50% new media (as recommended for adherent and confluent primary cultures).
- If the cells successfully re-adhere and continue growing to confluence after several splits, the entire volume of the flask can be transferred to a T25 flask according to the following steps:
- Gently scrape the surface of the T12 flask.
- Add 2 mL of fresh primary culture media, then transfer the entire volume to a new T25 flask.
- Then add 2 mL of fresh media to the old T12 flask.
- Note: It is not uncommon for primary cells to die upon being transferred to a new flask.
- Note: There may be cells left behind in the T12 flask. Adding fresh media ensures that they have a chance to continue growing.
- Once you have a stable cell line, as defined by regular growth to eventual confluency that continues upon transfer to a new flask:
- Allow the flask to reach confluence before splitting into a new T25 with 4 mL of fresh media. For more on stable cell line maintenance, see Protocol 2 below.
- CRITICAL: A flask can sometimes take several weeks to grow confluent. Oversplitting can cause the cell lines to lose infection or stop dividing altogether, so it is important to allow the flasks to become mostly or completely confluent before splitting.
- Note: Optionally, you can add or replace media in the off weeks, but the cells tend to do better with minimal changes.
- Eventually, transition the cells to regular cell culture media (with 10% FBS and no antibiotics)
- Transition slowly, increasing fraction of regular media:primary media by 25% each week.
- Retain old flasks on primary media, in case the cells do not adjust well and you need to reattempt the media transition.
- Allow the flask to reach confluence before splitting into a new T25 with 4 mL of fresh media. For more on stable cell line maintenance, see Protocol 2 below.
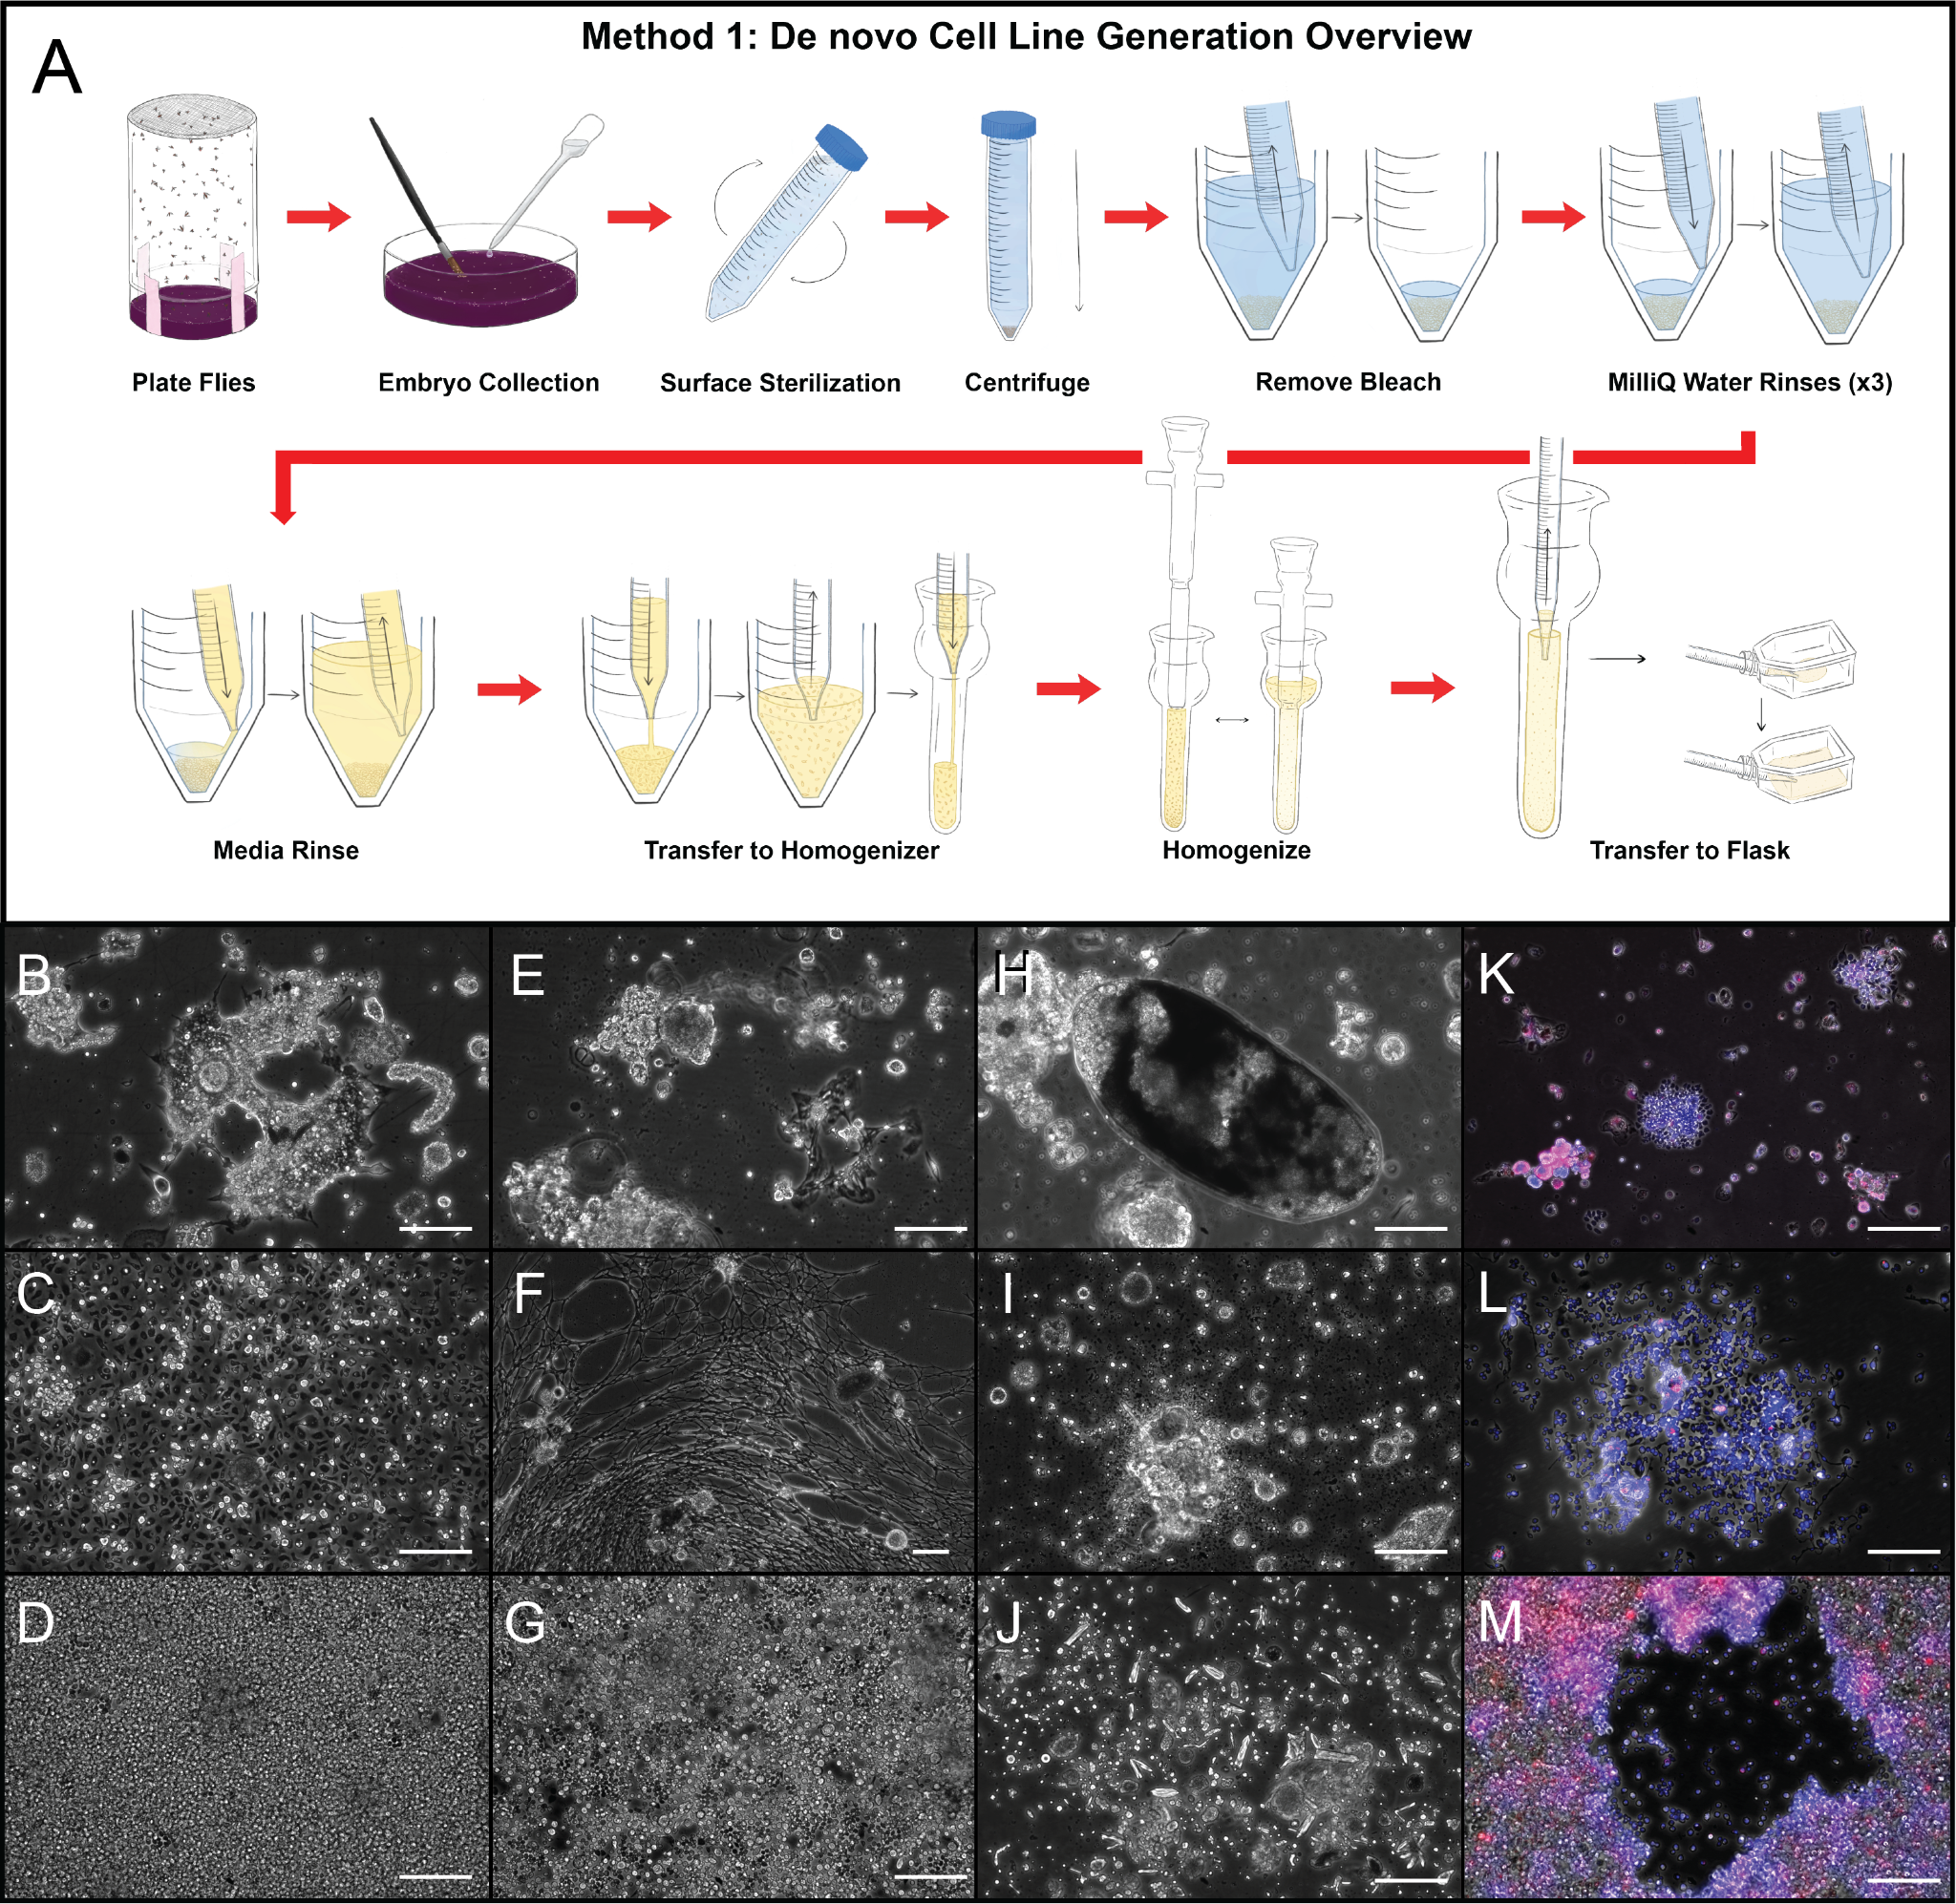
Figure 2. De novo cell line generation (A) protocol and (B-J) representative results obtained from (B, D, G) D. simulans, (C, E) D. melanogaster, and (F) D. willistoni embryos. (H-J) Routine protocol failures include (H) underhomogenization, (I) eventual lysis of primary cells, and (J) salt crystal accumulation in primary lines more than 10 weeks old. (B, E) Primary cultures contain diverse cells and tissues, many of which do not immortalize in M3+20%FBS. (C,F) Early in the immortalization process, (C) heterogeneous cell populations and (F) delicate cell types persist. (D,G) Eventually, immortalized cell lines consist of homogeneous hemoblast-like cell types. (K-M) Composite FISH-labeled images of primary and immortal cell lines. (K) Primary cell line consisting of different cell types with different infection densities. (L) Cell lines early in the immortalization process are often heterogeneous and will either stabilize or lose the infection over time. (M) An introduced wWil infection in the Dsim6B line that naturally cured its wRi infection 6. Images were taken on a Leica DMi8 with a 20x or 10x objective and phase contrast ring set. Scale bars = 100 µm. Red=W2 16S rRNA probe; Blue=DAPI.
- Representative results
- Successful Drosophila cell cultures contain clusters of single adherent cells (Figure 2B-G), with few to no (Figure 2I) intact embryos and little (Figure 2J) cell debris 6.
- Cell cultures made from Drosophila embryos begin as (Figure 2B) primary cultures, some of which proceed to become (Figure 2C) heterogeneous immortalizing lines, a proportion of which ultimately (Figure 2D) immortalize and homogenize morphologically.
- Primary cultures contain cell types that never immortalize under adherent M3+20% FBS growth conditions, such as (Figure 2E) muscle cells that differentiate, and even twitch, but do not last longer than three or four weeks. Delicate cell types with branching processes, such as (Figure 2F), are broken during transfer, and do not regenerate.
- Primary cultures generated from Wolbachia-infected embryos are often infected (Figure 2K and Supplemental Figure 1), but the infection can be lost as the cell line homogenizes and immortalizes (Figure 2L). Reinfection of naturally-cured cell lines (Figure 2M) is easily accomplished with the shell-vial technique (Protocol 3b).
- Troubleshooting: Identifying a singular cause for the failure of a prep is difficult due to the unpredictability of fly behavior as well as the cascading effects of minor changes in technique. Once technical errors can be excluded, contamination and poor egg laying are the most common culprits. We have included tips to solve common problems based on our experience with this protocol.
- Problem: primary culture contamination
- Potential solution: Remove agar to avoid it releasing internal contaminants during the homogenization step
- Explanation: In some cases it is difficult to avoid disturbing the agar, and some Drosophila species slice the agar during ovipositioning (e.g., Drosophila willistoni). Agar is transparent and can be hard to identify under overhead lighting.
- Tip: The best way to avoid getting agar in the prep is by minimizing the amount of agar that ends up on the cleaning mesh in the first place. This is best achieved via gentle brushing technique, and being careful when using forceps near the surface of the agar.
- Tip: In a iv, we recommend angling the light source under the dissecting microscope to reveal texture on the water surface caused by agar. Then, remove the agar without breaking it into smaller pieces.
- Potential solution: Remove all larvae so their gut contents do not contaminate the culture during the homogenization step
- Explanation: Removing all of the larvae with forceps is not always feasible, especially if many eggs hatched.
- Tip: The best way to limit the number of larvae on the grape plate is by ensuring that the plate is not left for more than 24 hours, as this is approximately the duration of embryogenesis at room temperature across species 17. However, we have found that larvae and developed embryos can be transferred from the fly bottles, so it is still necessary to inspect for larvae before proceeding.
- There are two larvae removal steps: removal from the plate is easier, as dry larvae will stick to the forceps and each other. Once submerged in water, the larvae become more difficult to pick up. Carefully inspect the embryos on the mesh at a high magnification. Larvae may blend in under piles of embryos, so it is good practice to shift the embryos around using forceps. Larvae can blend in remarkably well with embryos that have lost their chorions, but are easily identifiable by their softer texture and the fact that they are mobile.
- Potential solution: ensure embryos are surface-sterilized
- Explanation: The wash solution may not have accessed all of the surfaces of the embryo, which can happen if the embryos are sticky and clumped.
- Tip: This can be avoided in a vi by breaking up any clumps of embryos with the paintbrush. If there are still sticky embryos in a viii, they can be gently pried apart using forceps. When using forceps, it is very easy to accidentally puncture the embryo, so use caution when handling.
- Potential solution: replace contaminated media and/or expired antibiotics
- Explanation: The antibiotics in the primary culture media may disguise contamination. Sedimentation of contaminants on the bottom of media containers may not be visible without disruption. Alternatively, expired antibiotics may fail to suppress residual contaminants that could be handled by fresh antibiotics.
- Tip: Carefully inspect the primary culture media for contamination before use. This is done by swirling the media container at eye level and watching for a cloudy mass or sediments settling to the bottom. Additionally, if the media has an overall hazy appearance, it is likely that the antibiotics have gone bad. Generally, it is best to use freshly prepared media during primary preps to maximize the opportunity potential of the antibiotics.
- Potential solution: Remove agar to avoid it releasing internal contaminants during the homogenization step
- Problem: cell lysis in the primary culture flask
- Potential solution: Remove all diluted bleach from the flask to avoid a lethally high pH
- Explanation: It is important to remove as much wash solution as possible during the initial removal in b i. Otherwise, bleach carry-over will kill the cells.
- Tip: Using a pipette controller that can take up and dispense liquid slowly and evenly without sputtering is very helpful. During the embryo pellet rinses, the wash solution around the embryos can be more effectively diluted by dispensing the water aggressively and allowing the pellet to resettle. However, it is important to consider that the embryo pellet may not re-form. As the solution transitions to being purely aqueous, the embryos are more likely to stick to the plastic surface of the tube, and fail to resettle into a pellet. We have had the most success with low-splash bleach, which is more slippery and viscous, enabling us to disrupt and reform the pellet in early washes.
- Potential solution: avoid overhomogenizing the embryos in b vii
- Explanation: With continual homogenization, the tissue grinder can break tissue down into subcellular organelles, resulting in cell debris.
- Tip: For our purposes, the larger clumps of cells from fewer plunges are preferable to cell debris. As each homogenizer will have different amounts of friction between the holding body and the plunging wand, it is best to determine the level of homogenization by visually inspecting the homogenate. A good sense for this will develop with experience, but in general we have had more success with underhomogenizing (to the point that some whole embryos are still visible) than overhomogenizing.
- Potential solution: Remove all diluted bleach from the flask to avoid a lethally high pH
- Problem: Failure to immortalize
- Potential solution: Add more homogenized cells to each T-12 flask
- Explanation: Although they are single-celled, eukaryotic cell line cells often require other cells to divide. If multicellular signals are too dilute, then they do not undergo mitosis.
- Tip: Inspect cultures to ensure that embryos are being homogenized (few whole embryos, as shown in Figure 2H), but cells are not being lysed. Consider diluting the homogenized embryos across fewer flasks to increase the starting cell density.
- Potential solution: Change your split handling to avoid too many or too dilute of splits
- Explanation: In general, primary cells grow the best with minimal disturbances. Occasionally, cells will benefit from being split into new flasks prior to confluency, but overdoing it will stress and dilute the cells, likely stunting growth.
- Tip: Avoid oversplitting.
- Potential solution: Change more media, more often to avoid salt crystals from forming over time in T-12 primary culture flasks (Figure 2J)
- Explanation: Over many weeks, the process of replacing ½ of the media without scraping and transferring the culture to a new flask appears to concentrate salts on the flask surface. This concentration increase is invisible at first, but eventually results in the nucleation of crystals on the flask surface that rupture any adherent cells in their path.
- Tip: Try more frequent full-media changes. Also consider splitting or transferring cells to a new flask without waiting for confluence. This can help extend the time a flask can go before developing salt crystals, but it may also disrupt the immortalization process.
- Potential solution: The cell line was not “meant to be”, so try again.
- Explanation: Many cell types do not divide more than a few times before terminally differentiating and senescing in cell culture 9, 18. In our experience, muscle cells establish primary cultures, but do not divide more than a few times, and do not persist past about six weeks in cell culture. However, they do form bundles and twitch while they are healthy, which could be useful for in vitro studies.
- Tip: Try again. If repeated efforts fail, consider trying another type of insect media that may select for a different cell type. There is evidence that M3 selects for blood-derived cells 9, 19.
- Potential solution: Add more homogenized cells to each T-12 flask
- Problem: primary culture contamination
Protocol 2: Immortal cell line maintenance
Timing: weekly cell splits maintain healthy Drosophila cell lines.
Rationale: Immortal Drosophila cell lines are resilient and adaptable when they are kept healthy and in an exponential growth phase. There are several ways to accomplish this, depending on the infection state and media availability. Given that cell phenotypes can vary due to split conditions and media types 9, 13, 19–21, these considerations are important for interpreting experimental results generated with these cell lines. Here, we detail the protocols we have used over the past decade6–8 to maintain Drosophila cell cultures stably-infected with Wolbachia (Figure 3A).
.
- Choose a media and supplement type
- Media formulation (Supplemental Table 1):
- Shields and Sang M3 Medium, with ʟ-glutamine and potassium bicarbonate (Sigma S3652), is the field-standard for immortalizing 9, 12 and maintaining 9, 13 Drosophila cell lines. It was designed to mimic hemolymph and promote differentiation in vitro through containing a richer composition of amino acids, a lower concentration of chloride salts and organic acids, and the use of Bis-tris buffering agent.
- Schneider’s Medium, with ʟ-glutamine and potassium bicarbonate (Sigma S0146), was designed to culture embryonic cells, predates the formulation of M3, and is suitable for more robust, less fastidious Drosophila cell types 9. It has been useful to our lab during M3 media shortages. The cells that grow well on Schneider’s need to be transitioned slowly to acclimate them to the higher chloride concentration, limited amino acid composition, and alternate source of sodium and potassium ions 9 (and Table S1).
- Echalier and Ohanessian's D22 Medium (currently available as US Biologics D9600 and HiMedia IML005), the precursor to Schneider’s medium, is a minimal salt and nutrient medium capable of sustaining Drosophila cells, and could be considered in times of media shortage or for limited applications. We have not needed to use D22 Medium yet.
- Supplementation of mitogenic factors is necessary for cell passaging 19. We routinely use 10% FBS (one 50 mL one-shot bottle). Other serum sources or fly extract may also be effective 19, but they need to be validated.
- Acclimation to a different media type: Slowly change the composition of the media by 25% each split (from 1:3, 1:1, to 3:1), so that you are using only the new media type by the fourth week. We have done this many times to transition S2, JW18, Dsim6B, and Dsim1B (unpublished) cell lines back and forth between M3 and Schneider’s Medium.
- Media formulation (Supplemental Table 1):
- Split protocols
Splitting cells into new flasks with fresh media at a regular rate ensures that cells keep growing in the log phase, which keeps them healthy and minimizes cell debris in the media. However, maintaining Wolbachia infections also requires an awareness of the strain’s ability to segregate during host cell division and be reuptaken by cell-to-cell transfer, if their host cell lyses. Since these parameters are unknown for most strains, retaining as many infected cells and conditioned media as possible from split to split can serve as a Wolbachia-enrichment strategy. Incubating uninfected cells with Wolbachia-infected cells and extracellular Wolbachia increases the likelihood that they will become infected by cell-to-cell transfer. Begin by collecting the reagents and consumables listed in Table 2.
| Reagent/Consumable | Location in Materials section | Notes |
| 1250 uL XL vacuum tips | 1c) Consumables | For media aspiration (hard-split) |
| Cell culture media | 3b) Sterile cell culture | Inspect for contamination before use |
| Glass scrapers | 1f) Consumables | |
| Lab marker | Not listed | For labeling flasks |
| Serological Pipets - 5 mL* | 1h) Consumables | |
| Serological Pipets - 10 mL* | 1h) Consumables | |
| T-25 cell culture flasks | 1k) Consumables |
Table 2. Protocol 2 Reagents and Consumables. *Use for appropriate volumes. 10mL pipets are unnecessary if volume does not exceed 7 mL, and can be harder to maneuver in a T-25 flask.
- Regular (hard-) split protocol:
Note: We passage our cells every seven days. Different cell lines may be suited to a different schedule and split ratio.
- Swirl the bottle with fresh cell culture media at eye level. Carefully inspect the media for sediments on the bottom. Only use the media if it is completely clear.
- Set up your laminar flow tissue culture hood (e.g., at least a Class II, Type A2 Biosafety Cabinet):
- Clean the surface with ethanol and UV-sterilize it for at least 10 minutes.
- Set up your consumables so that their orientation minimizes you having to reach across the hood.
- Image flasks with a tissue culture microscope or cell counter to determine confluency (Figure 3B-I).
- Proceed if the flasks are at least 70-80% confluent.
- If maintaining newly immortalizing cells, wait until flasks are at least 90% confluent, to overconfluent, before splitting.
- Label new flasks with appropriate identifying information. Henceforth, these flasks will be referred to as “the new flasks,” and the flasks with cells from the previous split will be referred to as “the old flasks.”
- Move old and new flasks into the hood and perform the following steps quickly:
- Aspirate media from the old flask with a sterile pipette tip, and return the flasks to the horizontal position (to prevent dehydration).
- This works best if the majority of cells are adherent.
- If the cells are loosely adherent, leave some media below the flask edge (i.e., stop before tipping the flask to aspirate it all).
- Scrape the surface of the old flask with a new, sterile cell scraper.
- Dispense the scrapers by carefully shaking the end of one far enough out of the autoclave box to be able to grab it without touching other scrapers.
- The flasks can be placed vertically (cap facing the top of the hood), if the cell line is decently robust. For fragile cell lines, it is advised to place them horizontally during this interval as well.
- Using a fresh serological pipette, add fresh cell culture medium to bring the old flask volume to the proper split volume (see also Troubleshooting):
- Aspirate media from the old flask with a sterile pipette tip, and return the flasks to the horizontal position (to prevent dehydration).
Many Wolbachia strain infections can slow the growth of the Drosophila cell lines they replicate in (Figure J-L), and this must be accounted for in their maintenance. To seed enough cells to promote log-phase growth without overgrowing the flask during a one-week (seven-day) split interval, we advise starting with the following split ratios. Note that the split ratio refers to the fraction of the old flask that is transferred into the new flask:
- Split ½ if the cells are infected with Wolbachia:
- add 8 mL media into the old T-25 flask,
- pipette to mix,
- then transfer 4 mL into the new T-25 flask.
- Split ⅙ if the cells are uninfected, and dividing quickly:
- add 3 mL media to the new T-25 flask,
- add 6 mL media to the old T-25 flask,
- pipette to mix,
- then transfer 1 mL from the old flask to the new flask.
These split ratios match the host cell division rate, but also serve to match the joint Wolbachia binary-division rate and cell-to-cell transfer rate. Since Wolbachia-infected cells grow more slowly than uninfected cells, they are at a disadvantage to uninfected cells in culture, if Wolbachia is unable to move cell-to-cell efficiently 6. Retaining excess Wolbachia-infected cells and Wolbachia-conditioned cell culture media during a split helps ensure against accidental loss of the infection.
There are two alternative approaches to this “hard-split” protocol that remove less old media. These “soft-split” approaches retain some amount, up to the full 4 mL of old media. These three split protocols are detailed in the alternative split protocols section, below.
- Incubate cells at 23 °C for seven days before repeating split.
- Incubation at higher temperatures is possible, but balancing the higher division rate of uninfected cells relative to infected cells becomes more difficult over the full week. In our experience 6, at 25-26°C, uninfected cells are confluent in as little as five days, when split weekly at ⅙ dilution.
- Lower temperatures could be considered. See Debec et al. 2016 for a discussion of these possibilities.
- Alternative split protocols
Overview of three protocols for splitting, that differ in how much old media is retained (at the step marked with an asterisk and surrounded by brackets in Figure 3A):
- Hard-split: This non-conservative cell split approach removes all old media before scraping, adding fresh media, and splitting. This is the “regular split protocol”, described above.
- Pros: Removing cell debris and non-adherent cells promotes cell adherence to the flask surface and increases the proportion of healthy cells.
- Cons: Removing infected cells and conditioned media leads to reduced Wolbachia titer and results in more media use and plastic waste than the soft-split protocol.
- Soft-split: This conservative cell split protocol adds just enough new media without removing any old media before scraping, and splitting.
- ½ splits:
- scrape,
- add 4 mL fresh media,
- pipette to mix,
- transfer 4 mL to a new T-25 flask.
- ⅙ splits:
- scrape,
- pipette 5 mL of fresh media, dispel 3 mL to a new T-25 flask and 2 mL to the old flask with 4 mL of confluent cell culture,
- pipette to mix,
- transfer 1 mL to the new T-25 flask with 3 mL of fresh media.
- ½ splits:
- Pros: Promotes the highest feasible Wolbachia titers and reduces media and plastic waste. Fewer steps results in a faster split time and fewer chances of contamination (e.g., during old media removal).
- Cons: For some strains, soft splits can drive Wolbachia titer to levels high enough to result in cell stress and reduced adherence to the flask surface.
- Semi-soft split: This semi-conservative cell split protocol retains about 1-2 mL of old media through the split.
- ½ splits:
- remove 2.5 mL of old media (retaining 1.5 mL),
- scrape,
- add 6.5 mL fresh media,
- pipette to mix,
- transfer 4 mL to a new T-25 flask.
- ⅙ splits:
- remove 2.5 mL of old media (retaining 1.5 mL),
- scrape,
- pipette 7.5 mL of fresh media, dispel 3 mL to a new T-25 flask and 4.5 mL to the old flask with 1.5 mL of confluent cell culture,
- pipette to mix,
- transfer 1 mL to the new T-25 flask with 3 mL of fresh media.
- ½ splits:
- Pros: Promotes higher Wolbachia titer than the hard-split protocol and lower titer than the soft-split protocol.
- Cons: Removing infected cells and conditioned media requires using more media and plastic consumables than the fully soft-split protocol.
- Split ratios for experiments:
Cell lines must be expanded prior to running experiments in order to have biological material to experiment on, but this poses a problem for Wolbachia-infected cell lines that are prone to random infection loss at high split dilutions. Do not exceed ⅓ or ¼ splits of Wolbachia-infected cell lines for more than three weeks. Split flasks from your maintenance lines, and ramp these up slowly over the weeks necessary to get to the cell count your experiments require.
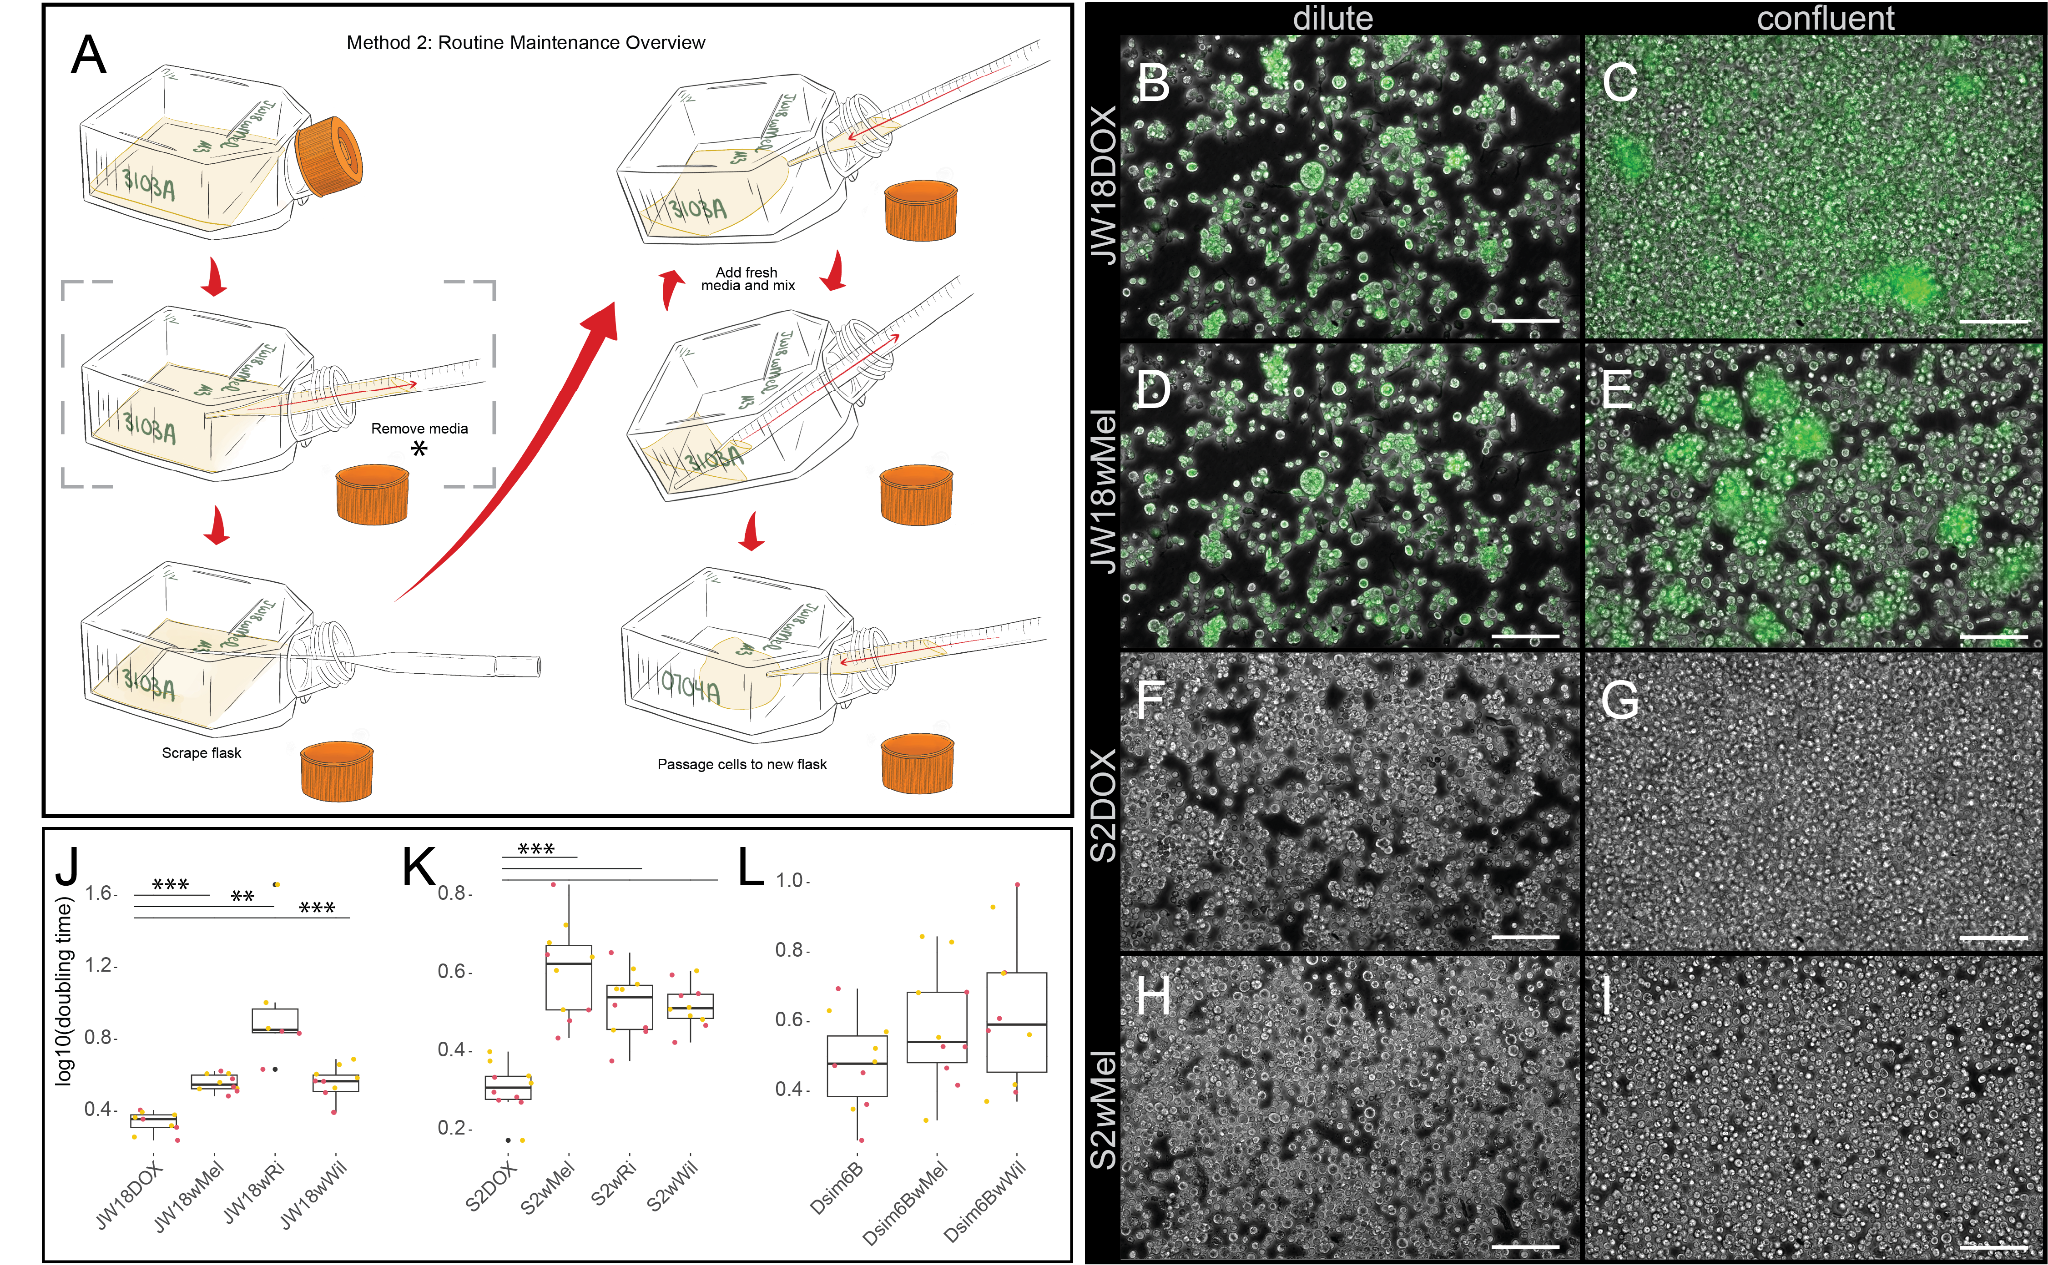
Figure 3. Regular maintenance of immortal cell lines requires weekly splits in response to cell confluency. (A) Protocol for routine maintenance of immortal Drosophila cell lines infected and uninfected with Wolbachia. The bracketed step marked with an asterisk (*) is omitted or reduced in the alternative split protocols. (B-D) Representative images of (B,D,F,H) dilute and (C,E,G,I) confluent flasks of D. melanogaster (B-E) JW18 and (F-I) S2 cell lines, (B,C,F,G) uninfected and (D,E,H,I) infected with the wMel strain of Wolbachia, immortalized with the JW18 cell line 22, 23. Scale bars = 100 µm. Green=Jupiter-GFP. (J-L) Infection with three different strains of Wolbachia, wMel natively from D. melanogaster, wRi from D. simulans Riverside 1984, and wWil from D. willistoni, significantly slow the growth of (J-K) D. melanogaster S2 and JW18 cell lines that were immortalized decades ago (published in 1972 24 and 2012 22, respectively), but not (L) the more recently immortalized line from D. simulans (circa 2018, and published in 2023 6). Wilcoxon rank sum p-values **p< = 0.01 and ***p< = 0.001.
- Representative results:
- Regular splits maintain healthy Drosophila cells that divide logarithmically
- Conditioning Drosophila cells to grow exponentially requires regular maintenance to move a sufficient concentration of cells to promote cell division to a new flask before they run out of space or nutrients. The time between splits is bounded by how dilute the initial suspension can be while still promoting cell division, and the time it takes for the cells to exhaust the new space and resources.
- The “correct” dilution of the old flask into a new flask each week depends on how fast the cells grow, and should be determined empirically. The cells should not be diluted more than they can grow in seven days. If seven days have passed and the flask is not yet confluent, the split should be postponed until confluence or substituted with a media change. If cells are overgrown before seven days, then the split should be diluted further.
- Wolbachia infections often impact subtle aspects of host cell biology that are cell line-dependent (Figure 3B-I and 8)8.
- JW18 cells exhibit slower growth, larger sizes, altered contacts, and distinct morphologies when infected with high titers of wMel Wolbachia 8.
- S2 cells exhibit slower growth, but are only a little bit larger when infected with high titers of wMel Wolbachia 8.
- Dsim6B cells appear to lyse at a higher rate when infected with wMel Wolbachia (Figure 3H vs I)
- Wolbachia infection has a greater impact on host cell growth rate as host cells divide faster (Figure 3J-L and Supplemental Table 2).
- The impact of wMel, wRi, and wWil infection on D. melanogaster JW18 and S2 and D. simulans 6B cell doubling times is plotted in Figure 3J-L. The infected cells were maintained with a soft-split approach to balance the needs of these three different strains.
- At the start of each split, we seed approximately one to two million infected D. melanogaster cells in each T-25 flask, which generates four to eight million cells by the end of the week (Figure 3J,K).
- In contrast, we start each uninfected D. melanogaster cell line with less than a million cells in each flask, which generates more than eight million cells by the end of the week (Figure 3J,K).
- The D. simulans cell line we generated has not yet begun growing fast enough as an uninfected cell line for its growth rate to be significantly impacted by infection (Figure 3L).
- Regular splits maintain healthy Drosophila cells that divide logarithmically
- Troubleshooting:
- Problem: cell lysis
- Potential solution: Transfer more cells during each split
- Explanation: Many eukaryotic cell lines require multicellular signals to cue growth and cell division. Dilute splits may not contain enough cells to induce log-phase mitotic division rates.
- Tip: Retain more cells and conditioned media in your next split by using one of the alternative split protocols. If your most recent flask is too sparse in cells, then try splitting one of your older flasks to see if the cells are still abundant and healthy enough to propagate.
- Potential solution: Avoid having cells spend too long in stationary phase
- Explanation: Cell culture cells must be split while in log-phase to ensure that they continue growing exponentially. If cell densities get high enough to limit resources and accumulate waste byproducts, then the cells shift into stationary phase and stop dividing. It may not be possible to induce them to shift back into log-phase after this point.
- Tip: Split cells before they become over-confluent. If cells become confluent before your split day, then reduce the amount of cells you seed your flask with.
- Potential solution: Avoid maintaining Wolbachia infections at lethally high titers
- Explanation: Some strains appear to be able to reach damaging titers, if too much old media is retained between splits over an extended period of time.
- Tip: If you are using the soft-split protocol, switch to the semi-soft-split or hard-split protocol. If you are already using the hard-split protocol, then increase the dilution at which you are splitting your cells into a new flask.
- Potential solution: Transfer more cells during each split
- Problem: Prevent Wolbachia infection loss by splitting an low dilutions
- Potential solution: Splitting an infected line at too high of a dilution
- Explanation: Uninfected cells outpace infected cells, and ultimately replace them
- Tip: Use a semi- or fully soft split protocol
- Potential solution: Immortalizing a cell type that is incompatible with Wolbachia in general, or some specific strain.
- Explanation: While many Wolbachia strains have general tissue tropisms in many host species 25, they may not be able to infect all cell types and differences may exist in their ability to persist in some cell types in vitro 6.
- Tip: Try optimizing your split conditions to promote higher infection titers that may overcome issues with the Wolbachia strain’s ability to segregate with both daughter cells during cytokinesis and transfer cell-to-cell. Alternatively, use the shell-vial technique (described in Protocol 3) to transfer the strain to a different cell line. Alternate cell lines may provide a more suitable environment for that strain’s persistence and replication.
- Potential solution: Splitting an infected line at too high of a dilution
- Problem: contamination
- Potential solution: Replace contaminated reagents or consumables
- Explanation: If your scraper box, tip box, or other consumable became contaminated without your knowledge, it could result in the contamination of all of your cell lines during the next split.
- Tip: Check your media for contamination. Replace or re-autoclave your consumables. Never share reagents or consumables with other people in the lab.
- Potential solution: Practice good sterile technique to override bad habits
- Explanation: Cell culture experiment success is reliant on proper sterile technique. This is especially true with Wolbachia-infected cell lines that should not be maintained on antibiotics, as they could influence the results.
- Tip: Practice performing good sterile technique prior to starting your experiments. Split cells regularly and monitor the flasks and media for contamination. Aliquot media into single-use containers to minimize the impacts of contamination. In our lab’s experience with training nearly a dozen entry-level researchers, it can take several weeks to months for bad tendencies to be overwritten by good habits.
- Potential solution: Replace contaminated reagents or consumables
- Problem: cell lysis
Protocol 3: Manipulating immortal cell lines
Timing: within 10-12 weeks, an infected cell line can be cured of its Wolbachia infection and an uninfected cell line can be made stably infected with an introduced strain of Wolbachia.
Rationale: Upon immortalization, Drosophila cell lines may or may not be infected. To elucidate the mechanisms driving microbe-induced host phenotypes, the impact of host genetic background must be disentangled from the impact of strain genotype. Swapping Wolbachia strains among Drosophila cell lines is often easy, compared to in vivo approaches that require microinjection. Cells can be treated with antibiotics to remove Wolbachia, and they can be exposed to cell-free Wolbachia by centrifugation to induce new infections. Below, we describe our protocols for doxycycline curing and shell-vial infection of Drosophila cell lines (Figure 4A). Begin by collecting the reagents and consumables listed in Table 3.
| Reagent/Consumable | Location in Materials section | Notes |
| 10 mL Syringes (x2)● | 1a) Consumables | Use one for each filtration step |
| 15 mL conical tubes● | 1d) Consumables | For retaining filtrate |
| 1250 uL XL vacuum tips▲● | 1c) Consumables | ▲Use if hard-splitting cells |
| Cell culture media● | 3b) Sterile cell culture | Inspect for contamination before use |
DOX-containing cell culture media▲ | 3a) Sterile cell culture | |
| Glass scrapers▲● | 1f) Consumables | |
| Lab marker▲● | Not listed | For labeling flasks |
| Pen-strep-containing cell culture media● | 3a) Sterile cell culture | Use if Wolbachia is from embryos |
| Serological Pipets - 5 mL▲● | 1h) Consumables | |
| Serological Pipets - 10 mL▲● | 1f) Consumables | |
| Shell-Vials● | 1h) Consumables | Cannot be autoclaved |
| Syringe filter - 1.2 um● | 1jii) Consumables | |
| Syringe filter - 5 um● | 1jiii) Consumables | |
| T-12 cell culture flasks● | 1k) Consumables | |
| T-25 cell culture flasks▲● | 1k) Consumables | ●Transfer post-protocol once confluent |
Table 3. Protocol 3 Reagents and Consumables. ▲For Dox-curing, ●For Shell-Vial
- Doxycycline (DOX)-curing of in vitro Wolbachia infections
Wolbachia strains are sensitive to a number of antibiotics, including doxycycline 5, 26, 27, tetracycline 11, 22, 28, a variety of quinolones 29, and rifampicin 30. We have had the most experience with doxycycline (DOX) 6, 7, and present that protocol here:
- Make fresh DOX-containing media at a concentration of 10 µg/mL (see Reagents).
- Use the DOX-containing media during your next three to ten splits (see Immortal Cell Line Maintenance).
- Check for Wolbachia infection with PCR 31 and/or FISH6, 7.
- Shell-Vial Technique for infecting immortal cell lines with Wolbachia
The shell-vial technique was first invented for confirming viral infections in 1976, and was soon applied to Rickettsial pathogens by the mid-1980s 32–34 and Wolbachia by 2002 11. We developed a shell-vial protocol from these reports, and optimized it for inducing new Wolbachia infections in Drosophila host cells. Cell-free Wolbachia can be sourced from flies or immortal cell lines, and we present both alternatives, below:
- Day 1: Split the uninfected cell line that you want to infect with Wolbachia.
- If sourcing Wolbachia from another cell line, then also split that cell line.
- Day 2: Prepare shell-vials (in the afternoon, preferably)
- Using the older flask of uninfected cells from the split on Day 1, scrape the flasks and seed vials with 500 µl of resuspended cells plus media
- If obtaining Wolbachia from a fly stock: Prepare embryo plates (@~5 pm) by transferring ~2-3 bottles of flies onto grape plates covered by a fly cage, as in Protocol 1, de novo cell line generation.
- On day 3:
- Prepare Wolbachia
- If obtaining Wolbachia from cell line:
- Filter 0.5 mL of Wolbachia-infected cells through a 5 μm and then a 1.2 μm syringe filter, retaining filtrate.
- If obtaining Wolbachia from fly line:
- Prepare embryos according to Protocol 1, de novo cell line generation, until you obtain embryo homogenate. Use normal cell culture media.
- Filter 0.5 mL of embryo homogenate through a 5 μm syringe filter, and then a 1.2 μm filter, retaining the filtrate.
- [Optional] Quantify cell-free Wolbachia viability with a LIVE/DEAD stain 15.
- If obtaining Wolbachia from cell line:
- Remove media and unattached cells from each shell vial’s monolayer using a serological pipette or a vacuum hose with a sterile tip.
- Add 0.5 ml of Wolbachia-containing medium to the cell monolayer.
- Centrifuge in a swinging-bucket rotor at 2500 xg for 1 hr @ 15C
- Note: The shell vials are approximately the same width as a 15 mL conical falcon tube. Try using a 15 mL tube adapter first.
- Note: If the shell vial’s width does not fit in the 15 mL tube adapter, the 50 mL tube adapter can be used with a 50 mL conical falcon tube. To do so, place up to two shell vials in a 50 mL tube and centrifuge according to the above settings. Take care to avoid inverting the shell vials when removing them from the conical.
- Transfer vial contents to T-12 flasks
- Strike the bottom of each vial on the table to dislodge the cells.
- Pipette 1.5 ml of fresh media into the shell-vial, and mix.
- If Wolbachia came from a cell line, then use regular media.
- If Wolbachia came from embryos, use media containing 1x pen-strep.
- Transfer 2 mL of shell-vialed cells and fresh media to a 12.5 cm2 flask for maintenance at 23°C.
- Prepare Wolbachia
- The following week:
- Transfer contents of T-12 flask to a T-24 flask with an additional 2 mL of fresh media.
- Continue weekly splits using the soft-split protocol until infection establishes.
- Confirm infection with FISH 6, 7.
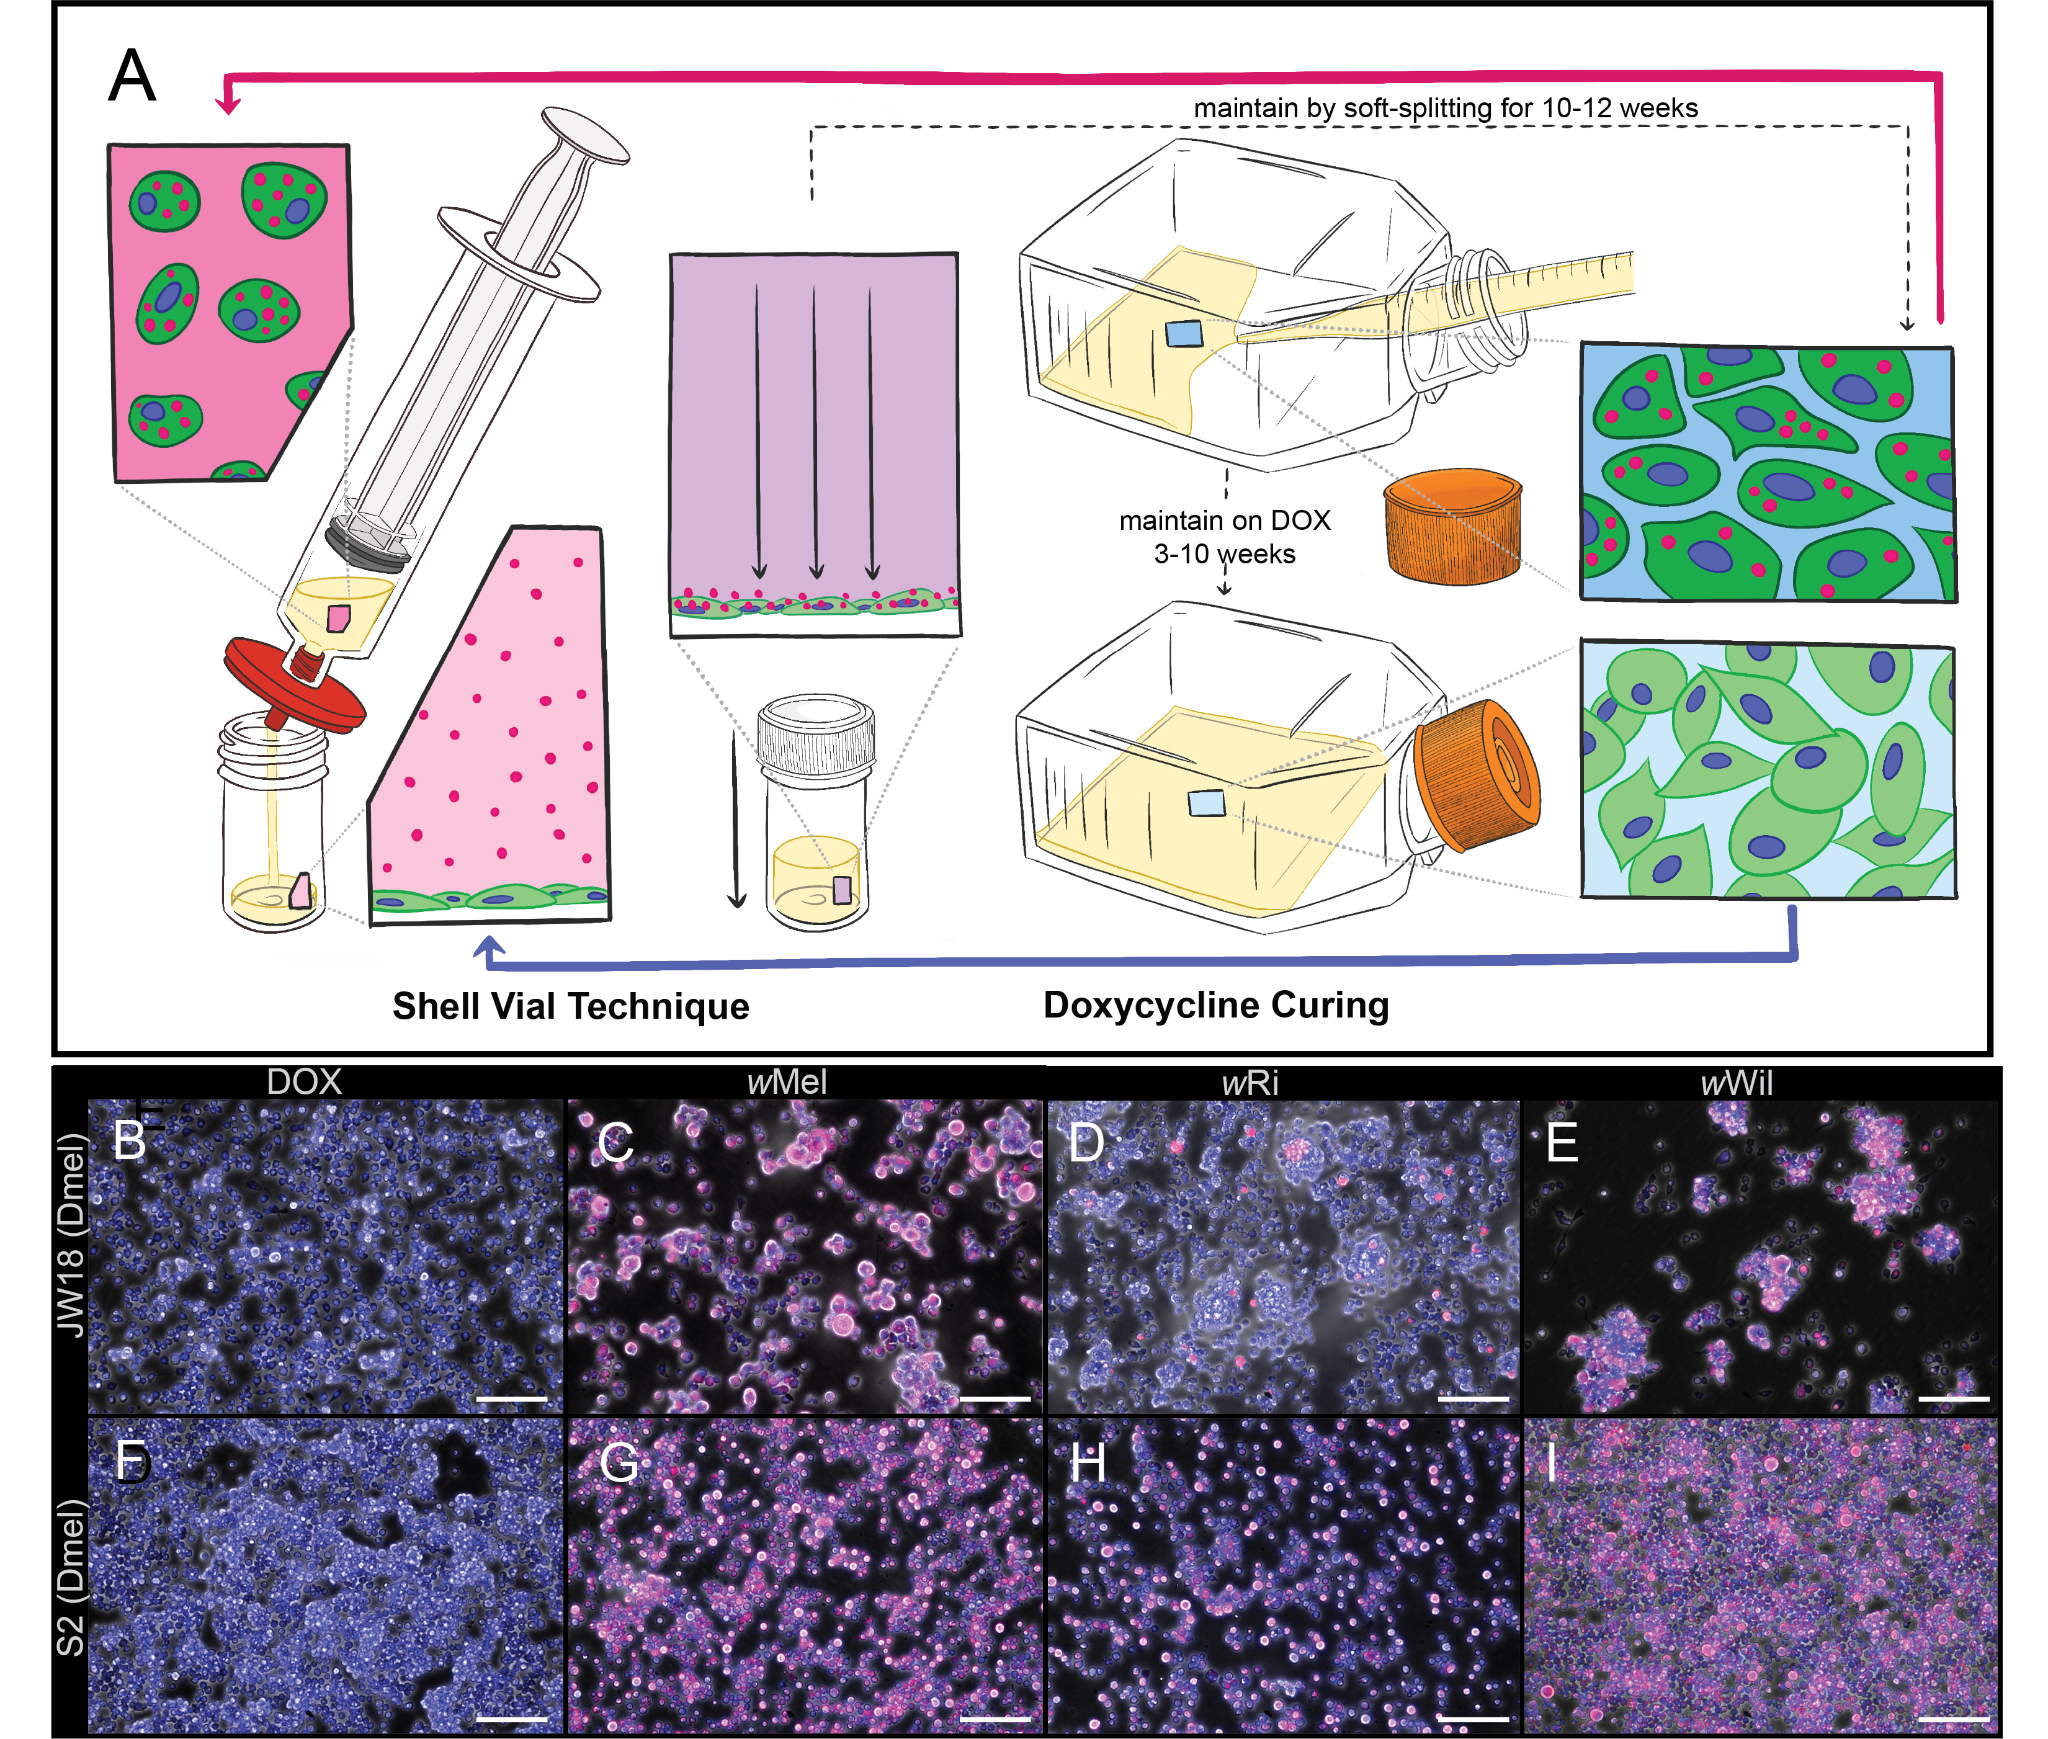
Figure 4. Manipulation of Wolbachia-infected Drosophila cell lines by antibiotic-curing and shell-vial infection. A) Schematic of the shell-vial technique for introducing Wolbachia into Drosophila cell lines (left) and doxycycline-mediated curing of infection (right). Colored panels show magnified views of boxed regions (vial, syringe, or flask), with dotted lines indicating their source locations. Colors are consistent between each highlighted region and its corresponding magnified view. B-I) Merged epifluorescent and phase contrast images of (B-E) JW18 and (F-I) S2 Drosophila cell lines (B,F) cured of their Wolbachia, i.e., uninfected, and (D-E and G-I) infected with the wMel, wRi, and wWil strains of Wolbachia with the shell vial technique. Images were taken on a Leica DMi8 with a 20x or 10x objective. Scale bars = 100 µm. DAPI=blue; W2 16S rRNA FISH probe = red.
- Representative results
- Antibiotics are an effective way to remove Wolbachia infections from Drosophila cell culture cells, and centrifugation is an effective way to introduce new Wolbachia infections (Figure 4B-I). Even difficult strains that appear to have lower cell-to-cell transfer rates like wRi 6 can be effectively introduced to cell culture with the shell vial approach 6.
- Different strains of Wolbachia exhibit variable impacts on host cell adherence to the flask surface, cell diameter, and cell-cell adherence (Figure 4C-E and 4G-I). Only some of these aspects appear to be explained by titer 8.
- Troubleshooting
- Problem: Failure to cure
- Potential solution: Reduce split stress to counter the impact of antibiotics on host cell physiology
- Explanation: Antibiotics impact host cells through impacting mitochondrial physiology.
- Tip: Maintain cells with a soft-split protocol to keep cell counts high and minimize physical stress. Alternative antibiotics (e.g., tetracycline or rifampicin) could also be tried.
- Potential solution: Prepare antibiotic-media fresh to avoid antibiotic degradation
- Explanation: Antibiotics have limited half-lives when diluted in aqueous media and stored at room temperature or 4°C.
- Tip: Make fresh antibiotic-containing media.
- Potential solution: Reduce split stress to counter the impact of antibiotics on host cell physiology
- Problem: Failure to infect
- Potential solution: Optimize shell-vial and maintenance approaches for strains with poor abilities to transfer cell-to-cell.
- Explanation: The wMel strain is able to transfer from one host cell to another extracellularly through the medium 7, but other strains may not be so adept. For example, the Riverside 1984 variant of the wRi strain cannot colonize an uninfected population of host cells in vitro when mixed 50:50, resulting in gradual loss of the infection over time, as uninfected cells out-replicate infected cells 6.
- Tip: Try the shell vial technique with higher and lower concentrations of Wolbachia in the lysate media. This approach creates a cell population as highly infected as possible, but the kinetics of this process are unknown. Infection efficacy rates likely vary depending on the mechanisms for cell entry each strain expresses in each host condition they are extracted from, e.g., embryos or in vitro cell lines. You may need to increase the concentration because not many get in, or you may need to decrease the concentration because too many are successful.
- Potential solution: Repeat with fresh material to ensure Wolbachia are viable
- Explanation: The cell-free Wolbachia obtained post-filtration may not be viable due to shearing, poor maintenance conditions, or having been left for too long outside of host cells.
- Tip: Minimize the amount of time that the Wolbachia filtrate is left between steps. If pulling Wolbachia from cells, ensure that the cells are still healthy and in the growth phase (and that they haven’t been left for several weeks to lyse in an old flask). If the viability of the Wolbachia is still a concern, consider checking Wolbachia viability with a LIVE/DEAD stain before proceeding with the centrifuge step 15
- Potential solution: First try the S2 cell line, which is amenable to many strain types, as some cell lines may be impermissible to some strains.
- Explanation: We are discovering that Wolbachia expresses very different genetic modules, depending on host cell type 8. This finding implies that there could be host cell types that are impermissible to Wolbachia infection because of the response in bacterial gene expression they invoke.
- Tip: To circumvent strain-cell line incompatibility, we recommend that you first re-try your shell vials and incubations, keeping the T-12 flask stage longer to promote retention of the infection. If this fails, then you might be out of luck for now. We are currently dealing with this issue with the 1984 wRi strain 6 and its 2023 counterpart 35.
- Potential solution: Optimize shell-vial and maintenance approaches for strains with poor abilities to transfer cell-to-cell.
- Problem: Contamination
- Potential solution: Practice dry runs of the steps to reduce chances of contamination
- Explanation: The extra consumables, reagents, and steps involved in curing and infecting cell lines creates more chances for contamination to occur than during regular maintenance. This is especially problematic for the shell-vial protocol, which requires several filtration and volume-transfer steps.
- Tip: Run more replicates of your shell-vial infections, to insure against some of them becoming contaminated during the process. Practice setting up the equipment and consumables in the hood to minimize movements.
- Potential solution: Remove as much debris as possible and make fresh surface sterilization media because sourcing Wolbachia from embryos has a higher rate of contamination.
- Explanation: D. melanogaster’s inherently dirty environment, at least in terms of yeast content, makes it difficult to bring embryonic cells into sterile culture. Although the surface-sterilization of embryos with bleach is technically straight-forward, the accidental inclusion of larvae foils a good preparation when their gut contents are released during homogenization. The antibiotics are in the media to overcome some low-level issues with contaminant carryover, but they can be overwhelmed and fail. They also have relatively short half-lives in aqueous solution at room temperature 36, 37.
- Tip: Ensure that you are removing all larvae from the grape plates, prior to surface sterilization and homogenization. If you are having trouble seeing and removing the larvae with forceps from the grape plate and mesh, try using a dissecting microscope to examine the grape plate surface and a desktop magnifying lamp to examine the surface of the mesh. Implement extra water washes to further dilute and remove contaminants. Ensure the antibiotics in your media are fresh, so they have maximum potency. Wolbachia is minimally sensitive to penicillin-streptomycin 14 and aminoglycosides like gentamicin do not penetrate eukaryotic membranes 38, so these inhibit contaminants, if they get in.
- Potential solution: Practice dry runs of the steps to reduce chances of contamination
- Problem: Failure to cure
Protocol 4: Preserving immortal and primary cell lines
Timing: only 30-60 minutes because cells should be exposed to cryoprotectant for as little time as possible before slowly cooling to ultralow temps.
Rationale: Freezing and thawing cell lines is critical for the long-term storage of cell lines, and it enables the preservation of lines as they develop from primary to immortal cell lines. While cryoprotectants, such as DMSO, are necessary to prevent cells from lysing due to ice crystal formation, they also are cytotoxic 39. Below, we present our protocol for minimizing the time cells experience DMSO at room temperature during freezing and thawing (Figure 5A-B). Begin by collecting the reagents and consumables listed in Table 4.
Table 4. Protocol 4 Reagents and Consumables
| Reagent/Consumable | Location in Materials section | Notes |
| 1.2 mL Cryovials● | 1b) Consumables | |
| 15 mL conical tubes●▲ | 1d) Consumables | |
| 1250 uL XL vacuum tips●▲ | 1c) Consumables | For aspirating media |
| Cell culture media●▲ | 3b) Sterile cell culture | ●Used to blow up cell before freezing |
| Freezing media● | 3c) Sterile cell culture | |
| Glass scrapers●▲ | 1f) Consumables | ▲Used post-thaw to split cells |
| Serological Pipets - 5 mL●▲ | 1h) Consumables | |
| Serological Pipets - 10 mL●▲ | 1h) Consumables | |
| T-12 cell culture flasks▲ | 1k) Consumables | |
| T-25 cell culture flasks●▲ | 1k) Consumables | ●Used to blow up cell before freezing |
●Freezing Protocol ▲Thawing Protocol
- Freezing protocol for Wolbachia-infected cell lines
- One week before: Make extra copies of the cell cultures you want to preserve (see Split Ratios for Experiments)
- One day before: Prepare reagents and consumables
- Obtain ice or put Mr. Frosty (Nalgene 5100-0001) in the fridge the night before.
- CRITICAL: Check that the isopropanol is fresh and the reservoir is full.
- Label tubes with relevant identifying information: cell line, infection, and media type at minimum.
- Obtain CryoStor CS5 cell preservation media (C2999-100mL).
- Obtain ice or put Mr. Frosty (Nalgene 5100-0001) in the fridge the night before.
- In the TC-hood: scrape flask, pipette to resuspend cells in media, and transfer the full volume to a sterile 15 mL conical tube.
- [Optional] Count cells to determine if you have at least one million cells per cryovial 40. We typically freeze down around four million cells per cryovial. In our experience, infected confluent flasks have enough cells for one cryovial: ~4e6 cells/mL per T-25 flask equates to ~1.0-1.6e7 cells frozen down per cryotube. Uninfected confluent flasks have enough for two or three cryovials: ~8e6 – 4e7 cells/mL per T-25 flask can be split in two or three to achieve ~1.0-1.3e7 cells frozen down per cryovial.
- See Figure 5C for cell densities at the start and end of each week for each cell line (raw data in Supplemental Table 2).
- This number of cells does not appear to overwhelm the cryoprotectant capabilities of the 1 mL volume of Cryostor, while providing extra cell density during revival.
- Note: This protocol is for 1 flask; adjustments to the volume of cryopreservation media can be made when preparing in aggregate
- [Optional] Count cells to determine if you have at least one million cells per cryovial 40. We typically freeze down around four million cells per cryovial. In our experience, infected confluent flasks have enough cells for one cryovial: ~4e6 cells/mL per T-25 flask equates to ~1.0-1.6e7 cells frozen down per cryotube. Uninfected confluent flasks have enough for two or three cryovials: ~8e6 – 4e7 cells/mL per T-25 flask can be split in two or three to achieve ~1.0-1.3e7 cells frozen down per cryovial.
- Spin cells down at 100xg at 20°C for 5 minutes.
- Aspirate and dispose of the media.
- Resuspend the pellet in 1 mL CryoStor CS5 freezing media and transfer to a cryovial at 4°C, either on ice or in a Mr. Frosty.
- CRITICAL: Once in freezing media, cool the cells to 4°C as quickly as possible, and then continue to gradually decrease the temperature from 0°C to -80°C (-1°C/min, ideally). This prevents cell damage from ice crystals.
- Note: Mr. Frosty is designed to cool cells at -1°C/min. If a Mr. Frosty is not available, a thick styrofoam shipping container can be used to insulate the cryotubes in the -80°C freezer and slow their rate of cooling. Results may be more variable with this approach.
- Note: We have used both CS2 and CS5 freezing media types successfully (Supplemental Table 3). The additional DMSO in CS5 (5%) relative to CS2 (2%) does not appear to inhibit revival. While we were writing this protocol, CS2 was discontinued. We advise using CS5 because it is available to purchase.
- Note: If CryoStor is not available, cells can be cryopreserved in their media, supplemented with 10% DMSO. However, the recovery rate may be lower and take longer than it does for cells that were preserved on CryoStor.
- Once the desired cells have been transferred to cryovials within a Mr. Frosty, transfer them to a -80°C freezer.
- Transfer Mr. Frosty directly to the freezer.
- Do not move the cells for at least 24 hrs, so that they freeze solid without shearing.
- [Optional] After 24 hours, transfer to a liquid nitrogen dewar or a -140°C freezer.
- Thawing Protocol for Wolbachia-infected cell lines
- Preheat a water bath to 23°C.
- Remove the cryovial containing frozen cells from storage and immediately transfer to the water bath. If pulling from the -80°C freezer, transfer cryovials on dry ice.
- Quickly thaw the cells (<1 minute) by gently moving the vial in the water until a small amount of ice is left in the vial.
- CRITICAL: The objective is to keep cells cold and then warm them up to room temperature as fast as possible.
- Transfer the vial to the biosafety cabinet. Before opening, wipe the outside of the vial with 70% EtOH.
- Transfer cells and 9 mL of room temperature cell culture media supplemented with 10% FBS to a sterile 15 mL tube, and gently mix by pipetting.
- CRITICAL: The media used here must match the type of media that the cells were maintained on before freezing.
- Centrifuge the cell suspension at 200xg for 5 minutes. Check for a cell pellet and clear media. If there is cloudy media, centrifuge again.
- Aspirate media without disturbing the cell pellet.
- Gently resuspend the cells in 2.5 - 4 mL media and transfer to a sterile T-12 flask.
- Incubate for 1 week at 23 °C without disturbing cells.
- Visually inspect cells for growth, once confluent, passage to T-25 flask.
- It may take a few weeks for the cells to begin dividing after being frozen. We typically give our cells at least a month to recover.
- Note: We define a full “recovery” to be when cells are growing fast enough to warrant weekly maintenance involving at least a ½ soft-split.
- Note: On Cryostor media, we have seen S2 cells reattached and dividing after 1 week. JW18 typically takes 1-2 weeks.
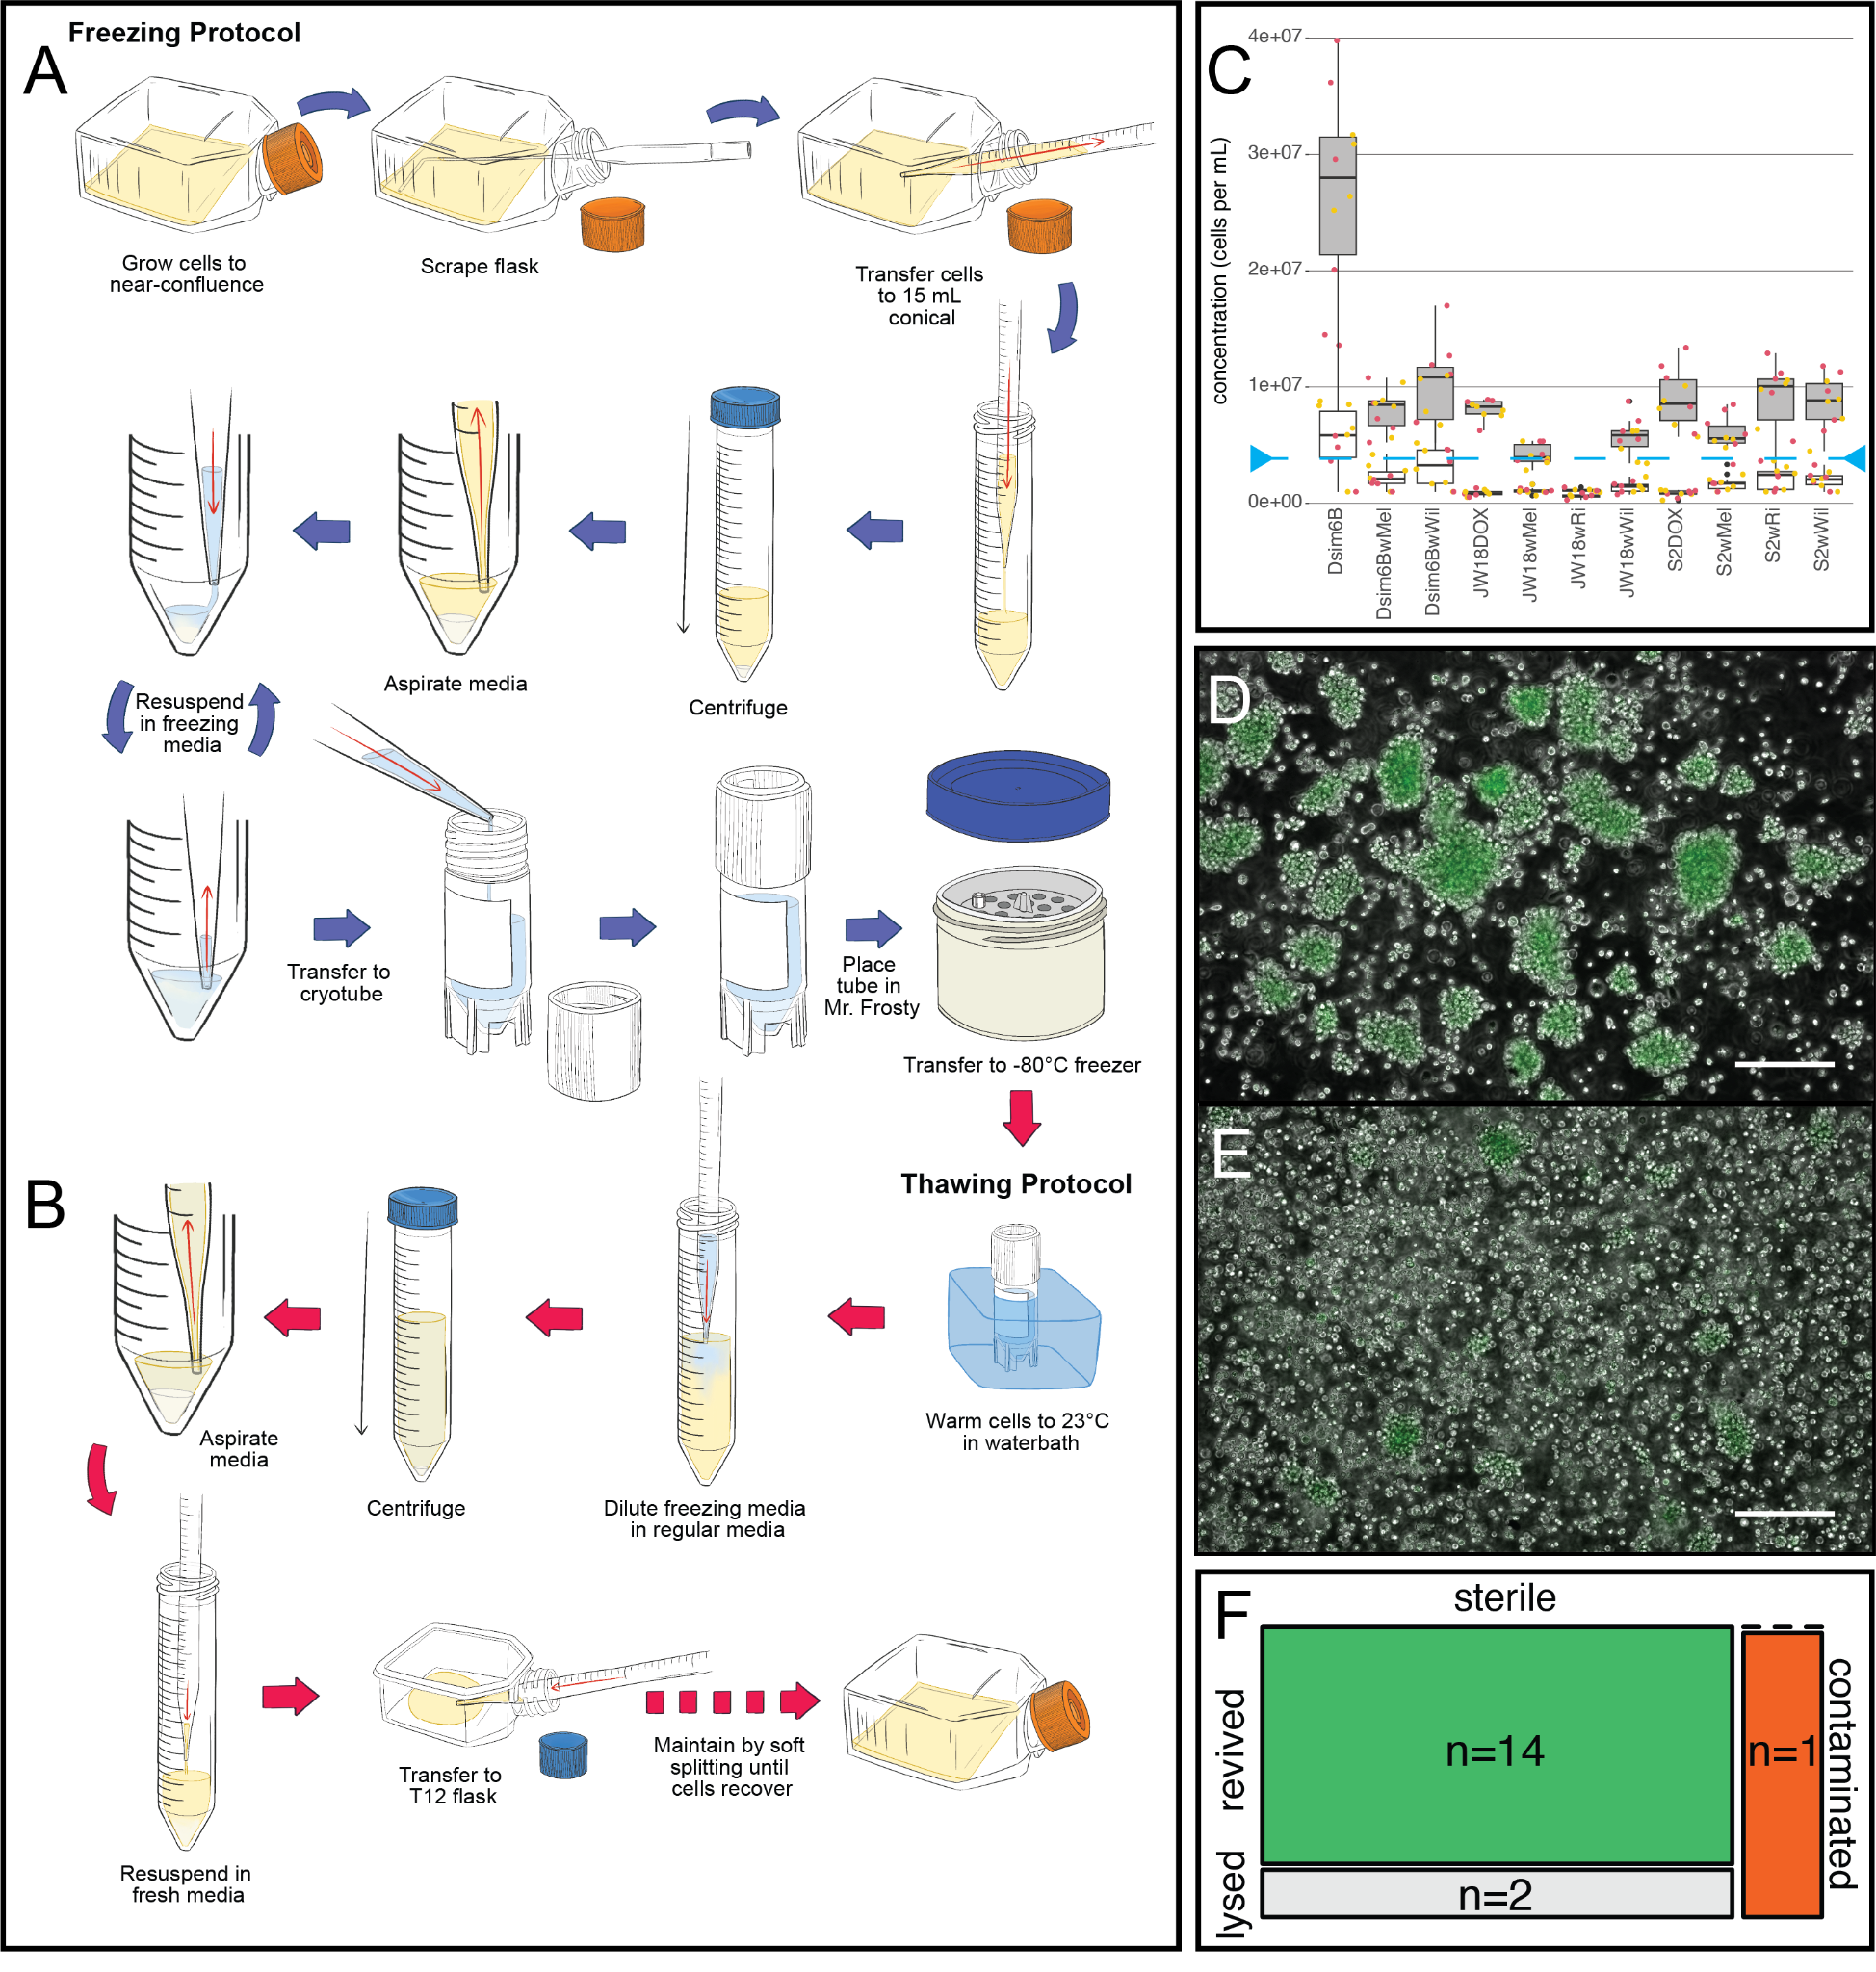
Figure 5. Cryopreservation of Wolbachia infected Drosophila cell lines. A,B) Schematic of the protocol for A) freezing and B) thawing cell culture cells infected with Wolbachia. C) Cell concentrations at the start (white filled boxes) and end (grey filled boxes) of each week under standard maintenance conditions (see Protocol 3). Points are colored by the temperature cells were grown in, yellow represents the constant 23°C incubator and red represents a more variable incubator that regularly rises from 23°C to 25-26°C. The dashed blue line is drawn at 4e6 cells/mL, which is approximately the density infected cells reach at confluency and the number of cells we add to a single cryovial. D-E) Micrographs of thawed cells after one week in T-12 flasks, with different responses to the revival process, from D) immediately robust and adherent, to E) a more rounded, floating, or granulated state that is less adherent and needs more time to recover. Scale bars = 100 µm. F) Distribution of thawing outcomes from our trial of this protocol.
- Representative results
- Revived cells ranged from fully normal in appearance after one week, to somewhat stressed and granular (Figure 5D versus E, respectively). Following cryopreservation and thaw, JW18 cells undergo a gradual recovery over approximately three weeks while S2 cells appear to recover much more quickly. In the first week after seeding, cells show poor substrate adherence, circular morphology with irregular jagged membrane edges, and accumulation of cellular debris that forms visible clumps. Over the second week, growth remains slow but membranes become smoother, debris decreases, and some cells begin to adopt neuronal-like morphologies suggestive of cytoskeletal recovery. By the third week, cells are fully adherent, proliferating at normal rates, and morphologically indistinguishable from pre-freeze cultures, with no visible debris or clumping remaining.
- Wolbachia-infected cells revive a significant fraction of the time with this protocol (p=0.0064, exact binomial test, Figure 5F and Supplemental Table 3). To quantify the success rate of this freeze-thaw protocol, we froze cell lines in batches and thawed replicates from those batches to assess revival rate. Across six batches of freeze-downs and 17 thaws, 14 lines successfully revived. If we hypothesize the null success rate is 50%, then the binomial estimate of the probability of success is 82%, with a 95% confidence interval of 60.4-100%.
- Troubleshooting
- Problem: Cells are not recovering
- Potential solution: Reduce DMSO exposure to reduce its cytotoxic effects.
- Explanation: Dimethyl Sulfoxide, DMSO, or (CH3)2SO, serves as a cellular cryoprotectant but is cytotoxic to cells after prolonged exposure when they are metabolically active 41.
- Tip: Practice your freezing and thawing protocols so that you can perform them efficiently and minimize the time cells experience DMSO at 4°C. Use CryoStor CS5, with 5% DMSO, instead of media supplemented with 10% DMSO.
- Potential solution: Minimize temperature fluctuations during ultracold storage.
- Explanation: Ultracold temperatures are required to keep cells metabolically inactive, but fluctuations in exactly how cold the freezer is can impact cell viability. Water transitions from cell-lethal crystalline to cell-hospitable vitreous forms as it decreases in temperature from zero degrees celsius to -130°C, the vitrification point. While -80°C is well above this temperature, recent work has shown that the smaller crystals that form at these temperatures are less damaging than the large crystals that form at higher temperatures 42.
- Tip: Try storing cells in liquid nitrogen or a more temperature-stable region of your -80°C freezer. Chest freezers will be more thermostable than upright models because they retain their cooled air when the door is opened.
- Potential solution: Freeze more viable cells per vial.
- Explanation: Either too few cells were frozen or too few survived freeze-thaw to promote logarithmic growth (see the Immortal Cell Line Maintenance Troubleshooting section for more information).
- Tip: Give your cells more time to recover by keeping them in a T-12 flask for longer and by splitting them softer (retain old media and cells).
- Potential solution: Reduce DMSO exposure to reduce its cytotoxic effects.
- Problem: Contamination
- Potential solution: Ensure no contamination is present when cells are pelleted and frozen. Discard contaminated batches, when they are detected.
- Explanation: There are many steps and consumables involved in the freezing process that introduce chances for contamination.
- Tip: The contamination could be specific to that cryovial or batch of vials. Try thawing another vial from that batch to know whether the whole batch is contaminated. Discard the remaining tubes, if so, and try thawing a tube from a different batch.
- Potential solution: Reattempt the thaw and revival process in case contamination occurred during these steps.
- Explanation: There are many steps and consumables involved in the thawing process that introduce chances for contamination.
- Tip: Try thawing another cryovial from that or a different batch. Minimize the number you are thawing at one time to decrease the chances of error.
- Potential solution: Ensure no contamination is present when cells are pelleted and frozen. Discard contaminated batches, when they are detected.
- Problem: Cells are not recovering
Materials and Equipment Setup:
All reagents can be prepared days to weeks ahead of time. For some, it is better to use them as freshly-made as possible. This is indicated in the “‘shelflife” section of the reagent protocols below:
- Consumables
- 10 mL Syringe (BD 302995)
- 1.2 mL Cryovials (Simport T309-1A) (Or general provider)
- Obtain:
- Cryovials (Listed above)
- Wide-mouth autoclavable container (we use empty tip boxes)
- Autoclave tape
- Fill the container with cryovials and mark with autoclave tape.
- Autoclave for 30 min on the gravity setting (121°C at 21 psi).
- Note: For best practices, only open the container to remove tubes in a laminar flow hood. The removed tubes can be handled outside of a laminar flow hood (for labeling and transferring cells to and from the freezer) with no issues, so long as they remain tightly capped.
- Obtain:
- 1250 uL XL vacuum tips, tip refills (NC9453815 and USA scientific 1112-1720, respectively)
- Tips come sterile in the box. If refilling, obtain:
- Empty vacuum tip box
- Refill tip rack (USA scientific 1112-1720)
- Autoclave tape
- Place the refill tip rack into an empty tip box. Press down firmly until the rack is secure.
- Close the box and place autoclave tape across the lid and body of the box.
- Autoclave for 30 min at 121°C at 21 psi, i.e., the gravity setting.
- Tips come sterile in the box. If refilling, obtain:
- 15 mL (Falcon 352196) and 50 mL (Falcon 352070) conical tubes (VWR equivalents are also suitable)
- 500 mL filter units with 0.2 µm PES or SFCA membranes (ThermoScientific 566-0020 or 156-4020, respectively)
- Glass scrapers (made from bent glass pipettes)
- Obtain:
- Disposable Borosilicate Glass Pasteur Pipets, 9 in. (Fisherbrand 1367820D)
- Bunsen burner
- Stainless Steel Pipet Sterilization Boxes, Square (Pasteur) (VWR 82027-604)
- Using the edge of the flame, gently heat an approximately 0.5 centimeter section of the pipette 1.5-2 centimeters down from the tip. Let gravity bend the glass to form a 45-90° angle.
- Fill sterilization boxes with bent scrapers and mark with autoclave tape.
- Autoclave for 30 min on the gravity setting.
- Obtain:
- Really useful boxes
- The 8.1 Liter (8.1LC) box holds three rows of four T-25 flasks, four flasks deep.
- The 1.75 Liter (1.75C) box holds two rows of two flasks, two flasks deep.
- Serological pipettes - 2, 5, 10, 25, and 50 mL (Fisher Scientific 1367811C, 1367811D, 1367811E, 1367811, and 1367811F, respectively).
- Shell-Vials: Flat-Bottom Containers, Polystyrene, 7 mL (Greiner Bio-One 189171).
- Syringe filters:
- 25 mm syringe filter with 0.2 um SFCA membrane (ThermoScientific 723-2520)
- 32 mm syringe filter with 1.2 um Supor membrane (Acrodisc 4656)
- 32 mm syringe filter with 5 um Supor membrane (Acrodisc 4650)
- T-12 and T-25 flasks (Corning 353018 and 430168, respectively).
- Tenbroeck Tissue Grinder, 2 mL (DWK 357422) (also called a Dounce Homogenizer)
- Obtain:
- Tissue Grinder (Listed above)
- Aluminum foil
- Autoclave tape
- Wrap the tissue grinder in aluminum foil such that the foil completely covers all surfaces of the tissue grinder.
- Note: Foil coverage must be thorough enough to ensure sterility until use.
- Secure foil with autoclave tape.
- Autoclave for 30 min on the gravity setting (121°C at 21 psi).
- Note: Once used, clean with 70% EtOH and allow to dry completely. With proper care, these can be re-autoclaved and reused indefinitely.
- Obtain:
- Non-sterile fly-work:
- Embryo strainers
- Obtain:
- 100 µm Nitex Nylon Fine Mesh Screen (Genesee Scientific), cut into a 30 cm x 30 cm square.
- 300 mL glass beaker
- Rubber bands
- Use rubber bands to secure the mesh across the beaker opening. The surface should be taut.
- Use a transfer pipette to wet the mesh with water before using it to avoid the water pooling off of the edge.
- Remove the mesh to wash and dry it between uses.
- Obtain:
- Embryo wash solution
- Obtain:
- 20 mL 4.5%-7.5% Sodium Hypochlorite bleach, opened less than six months ago.
- We have had greater success with Great Value Low Splash Bleach (from Walmart, containing 4.275% available chlorine and no phosphorus) than other brands.
- It is potentially important to note that the “low splash” formulation uses surfactants to increase the viscosity of the fluid. These could impact sterilization, chorion removal, and/or cell separation during homogenization. These are officially listed as: Myristamine Oxide, 3332-27-2, Lauric acid, 143-07-7, Myristic acid, 544-63-8, Stearic acid, 57-11-4, Palmitic acid, 57-10-3, Caprylic acid, 124-07-2, Capric acid, 334-48-5, Oleic acid, 112-80-1.
- 30 mL milliQ water
- 125 uL 10% Triton X-100 (Fisher Scientific BP151-100, or equivalent)
- 20 mL 4.5%-7.5% Sodium Hypochlorite bleach, opened less than six months ago.
- Combine in a 50 mL falcon tube and invert until thoroughly mixed
- Shelflife: Fresher is better because bleach is reduced to sodium salt and sodium chlorate over time 43. Since bleach is sold in large volumes and this protocol only uses 20 mL at a time, you are likely to be left with “expired” bleach. Use it for your cell culture decontamination protocols to minimize waste.
- Obtain:
- Fly cages (same diameter as plates) - With proper care, these can be reused indefinitely.
- Fly cages can be ordered in mini (35 mm plates)(Flystuff 59-105), small (60 mm plates)(Flystuff 59-100), and large (100 mm plates)(Flystuff 59-101). Replacement end caps can also be ordered (Flystuff 59-106, 59-102, and 59-103 respectively).
- If making your own, obtain:
- An acrylic cylinder 10-15 cm long with an internal diameter of 80-81 mm and an external diameter of 85-90 mm.
- 250 µm Nitex Nylon Fine Mesh Screen (Genesee Scientific), cut to match outer diameter of plexiglass cylinders
- Non-toxic superglue
- Use superglue to attach mesh to one end of each cylinder
- Wait more than 24 hours to fully cure
- Clean with soap and water between uses
- Note: The above instructions will create a cage compatible with 100 mm plates.
- Fly food
- Buy or make white food in vial and bottle format according to the Bloomington Stock Center Cornmeal recipe 44, which is derived from a recipe published in the DIS by Lakovaara 45.
- If making food in-house, the boiling time (and inversely, water content) is the primary factor influencing the food quality, and can be highly variable depending on the temperature and humidity of a region. Rather than a specific boiling time, we recommend aiming for a medium-thick viscosity like Elmer’s glue or boxed-cake batter (it slowly settles into a smooth surface). Increase the boiling time if the food is releasing liquid during short-term 4C storage 46, and decrease it if the food pulls away from the vial/bottle walls or the food starts drying up after extended time at room temperature, or if the food is so thick it doesn’t settle into a flat surface during the initial pour.
- Grape agar plates
- Obtain:
- Petri dishes, 100 mm diameter (Greiner Bio-One 664161)
- Note: Ensure the size of the petri dish is compatible with the fly cage.
- 30 g Agar (Sigma A7002-5KG)
- 0.5 g Tegosept (methylparaben) (Apex 20-258)
- 300 mL Old Orchard Grape Fruit Juice Concentrate, 12 oz.
- NOTE: This doesn’t require the full container. If making the full batch, remove 55 mL for storage at -20°C.
- 700 mL dH2O (or diH2O)
- 10 mL 190 Proof EtOH (Decon Labs #2801G)
- 1 L glass bottle (microwave-safe), but note that we have used smaller bottles for smaller batches.
- Petri dishes, 100 mm diameter (Greiner Bio-One 664161)
- Add agar and dH2O to a 1 L glass bottle. Shake aggressively to mix.
- Microwave until agar is fully dissolved (about 4 minutes). Watch the mixture carefully and stop the microwave before the mixture boils over. At each stopping point, shake aggressively to rehomogenize agar. You can determine that the agar is fully dissolved if, once the bubbles have fully settled out, the mixture is completely homogenous and transparent. See Supplemental Figure 2 for a visual reference.
- Note: Microwave time can vary depending on the volume of liquid (if making partial-batches) and microwave power. Do not proceed until visually confirming that the agar is dissolved.
- Note: Agar is HOT! Take care to avoid burning yourself.
- Add grape juice concentrate and invert/shake to mix until homogenous.
- Note: aggressive shaking will introduce additional bubbles, which is not desirable for grape plates.
- Dissolve Tegosept into EtOH. Once dissolved, add to the bottle and invert/shake to mix thoroughly.
- Allow the bubbles to settle out and pour into the plates (fill to ~45%). Agar can be stored at 4C for 2-4 weeks and reheated in the microwave.
- Note: We find that the initial pour tends to have more bubbles than subsequent pours from reheated agar. Therefore, we recommend making the agar first and then pouring the plates at a different time.
- Note: Take care to avoid overheating the agar on reheats or reheating too many times. Otherwise, the agar may not solidify properly.
- Obtain:
- Embryo strainers
- Sterile cell culture
- Antibiotic-containing cell culture media
The following protocol provides instructions for preparing antibiotic solutions from powder or liquid. If starting with a liquid solution, proceed to the aliquoting step.
Two antibiotics are presented: doxycycline (DOX), for curing cells of Wolbachia 5, 6, 26, 27, and penicillin-streptomycin (pen-strep) for decontaminating Wolbachia-infected cell cultures without removing Wolbachia 14, 29.
- Obtain:
- Antibiotic of choice to:
- Cure Wolbachia infections:
- Doxycycline monohydrate powder (Sigma D1822-500mg), or equivalent.
- Doxycycline hydrochloride solution (Sigma D3072-1ML)
- Decontaminate cell culture:
- Penicillin-streptomycin solution (10,000 U/mL, or 100x) (Gibco 15140148), or equivalent.
- Penicillin-Streptomycin lyophilized powder (Roche 11074440001). We have not used the powder form, and it appears to be less well-adopted, based on its commercial availability relative to the liquid form.
- Cure Wolbachia infections:
- Sterile deionized (DI) water (if reconstituting powdered antibiotics).
- Syringe filters, 0.2 um (ThermoScientific 723-2520)
- Cell culture media (see 3b below)
- Antibiotic of choice to:
- Measure out the mass of powdered antibiotic or volume of liquid required to make:
- Doxycycline 10 mM (10 µg/mL) solution, for 10 mL:
- From Doxycycline monohydrate powder: 462.45 g/mol*(10e-3 mol/L)*(10e-3 L) = 0.046245 g
- Doxycycline 10 mM (10 µg/mL) solution, for 10 mL:
Conduct the following steps with sterile technique in a laminar flow hood
- Dissolve the powder in 10 mL of sterile DI water.
- Syringe-filter the solution through a 0.2 µm filter.
- Aliquot liquid antibiotics at stock concentrations into ~75 tubes containing 125-135 uL each and store at -20°C.
- Thaw immediately before adding to 60 mL of 10% FBS cell culture media in a T-25 flask
- The working concentration of:
- DOX should be 0.02 mM, or 10ug/mL.
- Pen-strep should be 1x, or 100 U/mL.
- Sterile-filter antibiotic-media through a 0.2 um filter.
- The working concentration of:
- Cell culture media
- Obtain:
- 500 mL Shields and Sang M3 insect media with ʟ-glutamine and potassium bicarbonate (Sigma S3652).
- Note: Schneider’s Medium (Sigma S0146) can also be used, if M3 is backordered. However, not all cell lines grow well on it 9, 19 and cell lines need to be transitioned slowly over, 25% at a time. After four weeks, many cell lines generated on M3 Medium can be maintained on Schneider’s Medium, both with 10% FBS.
- 50 mL FBS (Gibco A3160502), heat-inactivated at 56°C for 30 min prior to use. This step is necessary to inactivate proteins that activate antimicrobial responses 47.
- 500 mL membrane filter, 0.2 µm PES or SFCA membranes (ThermoScientific 566-0020 or 156-4020, respectively)
- 500 mL Shields and Sang M3 insect media with ʟ-glutamine and potassium bicarbonate (Sigma S3652).
- Filter 500 mL of media and 50 mL of FBS into the reservoir.
- Swirl to mix, aliquot if desired, and store at 4C until use.
- Once in use, store at room temperature to make contamination easier to detect.
- Shelflife: Use within four weeks when stored at room temperature. If stored unused at 4C, observe manufacturer expiration dates.
- Obtain:
- Freezing media
- Obtain: CryoStor CS5 cell preservation media (C2999-100mL).
- NOTE: CS2 (C3124) is also effective, but has been discontinued.
- Alternate approach: DMSO (Sigma D2650) to add to media.
- Obtain: CryoStor CS5 cell preservation media (C2999-100mL).
- Primary cell culture media
- Obtain:
- 400 mL Shields and Sang M3 insect media with ʟ-glutamine and potassium bicarbonate (Sigma S3652)
- NOTE: Schneider’s [Sigma S0146] is not recommended for de novo cell line generation.
- 2 bottles of 50 mL Fetal Bovine Serum (FBS) (Gibco A3160502), heat-shocked at 56°C for 30 min prior to use
- 5 mL 100x penstrep (Gibco 15140-148)
- 2.5 mL 10 mg/mL gentamicin (Sigma G1272-50mL)
- 500 mL membrane filter (0.2 µm)
- 400 mL Shields and Sang M3 insect media with ʟ-glutamine and potassium bicarbonate (Sigma S3652)
- From a 500 mL bottle of insect media, remove 100 mL with a pipette.
- Pass 400 mL of media, 100 mL of FBS, 5 mL of 100x penstrep, and 2.5 mL of 10 mg/mL gentamicin through the filter.
- Swirl to mix and store at 4C until in use (see above).
- Shelflife: We recommend creating ~65 mL aliquots to avoid keeping large volumes at room temperature, as the antibiotics go bad at room temperature over time.
- Concentrated solutions of pen-strep are typically stored at -20°C and are good for 2 weeks at 4°C. Primary media can be used for maintenance after the antibiotics expire, but we recommend using fresh antibiotics for primary culture preps to maximize the chances of healthy primary culture establishment.
- Obtain:
- Sterile ultra pure water (MilliQ water)
- Obtain:
- Utra-pure, Type 1 lab-grade (18.2 MΩ·cm at 25 °C) or pure (RO, Type 3) water. We use water produced with a Milli-Q water system (Sigma).
- Autoclavable 1L bottle
- Autoclave tape
- Fill the bottle no more than ⅔ full with water. Loosely secure cap.
- Place autoclave tape across the cap and neck of the bottle
- Autoclave for 30 min in a water-filled bin on the liquids setting.
- Obtain:
Let cool and tighten the cap. Store at room temperature.
Resource availability:
Lead contact
Further information and requests for resources and reagents should be directed to and will be fulfilled by the lead contact, Shelbi L Russell (shelbiLrussell@gmail.com).
Materials availability
The materials we previously generated with this protocol 6 have been deposited in the DGRC.
Acknowledgements: We thank the Sullivan Lab for helpful feedback and discussion about these protocols. This work was supported by NIH grants R00GM135583 and R35GM157189 to SLR, and T32HG012344 to JJ.
Disclosures: We have no conflicts of interest to disclose.
Declaration of generative AI and AI-assisted technologies in the writing process:
During the preparation of this work the author(s) used Claude and Gemini in order to double-check citations and reduce text length to meet word limits. After using this tool/service, the author(s) reviewed and edited the content as needed and take(s) full responsibility for the content of the published article.
Figures and Tables:
Figure 1. Overview
Table 1. Protocol 1 Reagents and Consumables
Figure 2. De novo cell line generation
Table 2. Protocol 2 Reagents and Consumables
Figure 3. Maintenance
Table 3. Protocol 3 Reagents and Consumables
Figure 4. Manipulation
Table 4. Protocol 4 Reagents and Consumables
Figure 5. Freeze thaw
Supplemental Figure 1. Grape agar
Supplemental Table 1. Media compositions
Supplemental Table 2. Cell growth rates
Supplemental Table 3. Freeze thaw metadata
Supplemental Movie 1. De novo cell line preparation protocol
Supplemental Movie 2. Twitching muscle primary cells
REFERENCES:
Related files
 Freeze_Thaw Table.xlsx KEY RESOURCES.xlsx
  Supplemental_Movie_1_compress.mp4 Supplemental_Movie_2.mp4
  Wolbachia-infected_Drosophila_cell_lines (2).pdf
 - Lum, A, Jacobs, J, Nykamp, J and Russell, S(2026). Protocols to develop and maintain immortalized Drosophila cell lines harboring Wolbachia infections. Bio-protocol Preprint. 10.21769/p2957.
Do you have any questions about this protocol?
Post your question to gather feedback from the community. We will also invite the authors of this article to respond.