
- Home
- Protocols

-

Neuro Severity Score assessment
Last updated date: Jan 9, 2023 Views: 645 Forks: 0
Xuan Vinh To, PhD
Neuro Severity Scoring protocol
Equipment
This assessment is based on the protocol in (Flierl et al., 2009), with some minor modifications. The assessment requires some equipment to be obtained/fabricated:
30 cm radius walled circle
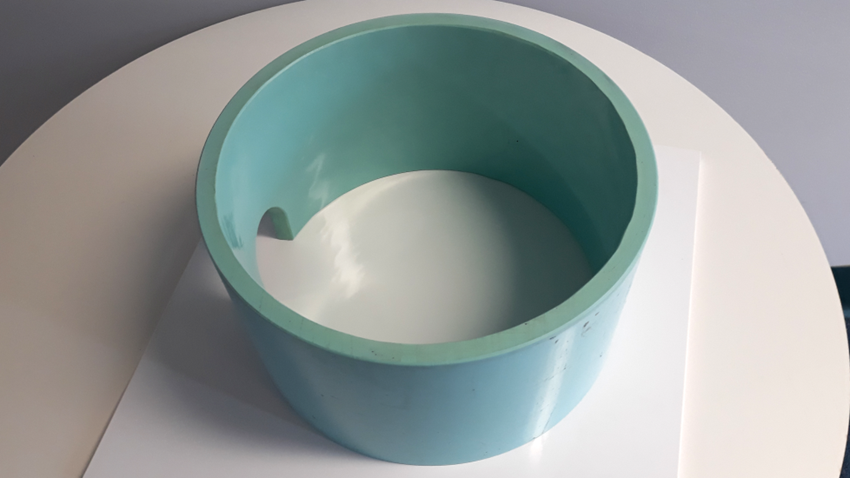
This item is a ~20-30 cm tall, 30 cm inner radius circle with a small opening.
Set of 3, 2, 1, and 0.6 cm beams
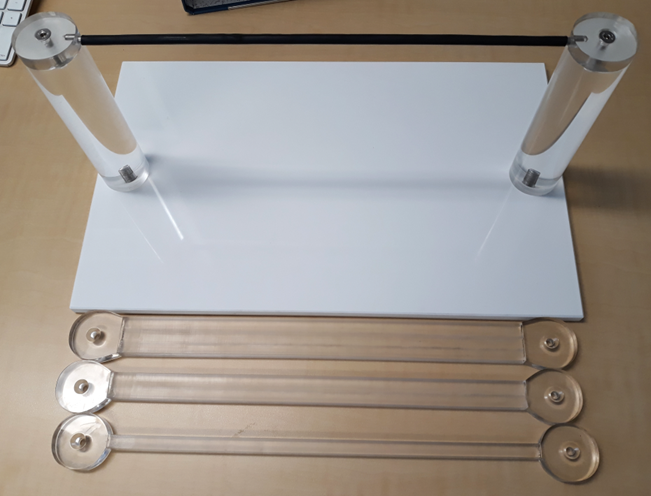
This is a set of beams that are 3, 2, and 1 cm wide and a stick that is 0.6 cm radius. The beams are mounted on upright pillars that are ~30 cm tall and fixed so that the beams and sticks cannot rotate (otherwise the animals will be rolled and tipped once they are on it). The original manuscript used a 0.5 cm stick, but the protocol ended up using 0.6 cm since the inner rod was fabricated with a 0.5 cm radius and a shrink tubing was added to provide some grip/friction. The original task in (Flierl et al., 2009) aimed to see whether the animals can stay upright for more than 30 seconds on a 0.5 cm stick. The difficulty of this task is sensitive towards the precise fabrication of the stick: larger sticks (0.6 vs. 0.5 cm) or stick’s surface that has more friction (rubber-like shrink tubing vs. highly polished glass, plastic, or metal rods) are easier for the animals to stay upright on. (Flierl et al., 2009) did not specify the precise construction of the stick. I found that a 0.5 cm highly polished brass stick is very difficult for the even sham and healthy animals to stay upright on though 0.6 cm stick with rubber shrink tubing is perhaps too easy. My colleague has good experience with 0.5 cm stick with rubber shrink tubing but, in any case, it is important to stay consistent.
If it proves too easy for the animal to stay balance on a certain stick, they will try to cross the stick to the other side, as if it was the beam walk task. Hence, the addition of the 0.6 cm beam walk task. On fabrication and decision to use a certain stick, it can be useful to test on a few healthy animals to see exactly how difficult or easy the animals find the sticks in order to make adjustments: to either the sticks or the scoring system.
The beam and pillars should be setup in such a way that the mice are placed on one pillar and there is no flat platform or surface levelled with the top of the pillar. On the opposite pillar, across the beam or stick, there should be a flat platform or surface levelled with the top of the pillar (these are not shown in the photo above). This is to incentivise the animal to cross the beam/stick to reach the flat and wide platform by walking across the beam. The pillars need to also be moderately tall (~30 cm). Without the flat platform on the other side or the pillar is too short, the mice may just prefer to “shimmy” down the starting pillar to the table. Alternatively, if there is a flat surface levelled with the starting pillar, the animal will also refuse to cross. They need to feel that where they start is tall off the ground and opposite them, across the beam, is a safer flat surface.
Detailed task description:
The detailed task descriptions were adapted from (Flierl et al., 2009). The 11 tasks used were as follow:
- 30 cm circle exit
- Seeking behaviour
- Monoparesis/hemiparesis
- Straight walk
- Startle reflex
- 1 cm beam balance
- 3cm beam walk
- 2cm beam walk
- 1cm beam walk
- 0.6cm beam balance
- 0.6cm beam walk
1). 30 cm circle exit:
Place the animal in the middle of the 30 cm radius walled circle shown above. Monitor how long it takes for the mouse to exit the circle. Healthy mice usually exit within 3 minutes. If they do not exit within 3 minutes, give 1 point
2). Seeking behaviour:
Place the animal back into the 30 cm radius walled circle with the opening covered and observe the behaviour. Healthy mice will explore the surrounding and display sniffing behaviours. If they do not, give 1 point
3). Monoparesis/hemiparesis
Observe the gait pattern. A healthy mouse will display a normal, straight gait pattern (0 points). Monoparesis or hemiparesis is represented by failure to use and ‘dragging’ of one (monoparesis) or two (hemiparesis) paws while walking (score 1 point).
In addition, assess paw grip and grip strength using an anatomic forceps. When being picked up by the tail, a healthy mouse intrinsically ‘grips’ a small forceps touching its paws and holds on to it (0 points), while a head-injured mouse may fail to do so (1 point).
4). Straight walk
Place the mouse on an even surface and assess alertness, initiative and motor ability to walk straight. A healthy mouse intrinsically ‘explores’ its surroundings and displays a normal, straight walking pattern (0 points). A head-injured mouse may fail to display such ‘seeking behaviour’ and/or present with an altered gait pattern, such as a ‘wobbly’ gait, dragging of one or several paws secondary to monoparesis/hemiparesis (1 point)
5). Startle reflex
Clap your hands loudly and monitor response. A healthy mouse will bounce and/or wince (score of 0). If the mouse fails to respond, give 1 point.
6). 1 cm beam balancing
Place the mouse on the 1 cm beam. Leave the mouse for at least 10 s. If it falls, or fails to balance in a ‘perch,’ give 1 point. If not, give 0 points
7). 3, 2, 1 cm beam walk.
Successively put the animal on one end of a 3, then 2 and 1 cm wide and 30 cm long beam and monitor the animal’s ability to cross the beam. If they fail to cross in 3 minutes, give 1 point. If they fail a larger beam, give 1 point, skip the remaining beams and give 1 point per skipped beam
8). 0.6 cm stick balancing:
Place the mouse on a round stick of 5-6 mm diameter. Leave the mouse for at least 10 s. If it falls, or fails to balance in a ‘perch’ on the round stick, give 1 point. If not, give 0 points.
- CAUTION In order to succeed, the mouse must perch on the round stick. Mere ‘holding on’ to the round stick is considered a failed test.
- CAUTION This represents the hardest task for the mouse. Mice should be given three attempts to fulfill the task.
9). 0.6 cm stick walk.
Similar to the beam walk. This task was added since quite several injured animals succeeded the previous task. They should also be given 3 attempts.
Flierl, M. A., Stahel, P. F., Beauchamp, K. M., Morgan, S. J., Smith, W. R., and Shohami, E. (2009). Mouse closed head injury model induced by a weight-drop device. Nat. Protoc. 4, 1328–1337. doi:10.1038/nprot.2009.148.
- To, X(2023). Neuro Severity Score assessment. Bio-protocol Preprint. bio-protocol.org/prep2111.
- To, X. V. and Nasrallah, F. A.(2021). A roadmap of brain recovery in a mouse model of concussion: insights from neuroimaging. Acta Neuropathologica Communications 0(0). DOI: 10.1186/s40478-020-01098-y
Do you have any questions about this protocol?
Post your question to gather feedback from the community. We will also invite the authors of this article to respond.