


- Protocols

- Articles and Issues
- For Authors
- About
- Become a Reviewer


Immobilization of Intact Ex Vivo Gonads From Caenorhabditis elegans for High-Resolution Live Microscopy

Published: Vol 16, Iss 23, Dec 5, 2026 DOI: 10.21769/BioProtoc.5884 Views: 30
Reviewed by: Anonymous reviewer(s)
 PDF
 Ask a question

Original research article
The authors used this protocol in:
Dec 2024

Protocol Collections
Comprehensive collections of detailed, peer-reviewed protocols focusing on specific topics



Related protocols
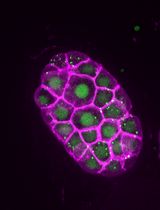
Abstract
C. elegans has emerged as a key model organism for microscopy of intact meiotic nuclei, owing to its small number of chromosomes, transparency, ease of genetic manipulation, and linearly ordered stages of meiotic progression along its gonad. Most studies use either immunofluorescence of extruded and fixed gonad tissue or live imaging of fluorescently tagged proteins within the gonad of the living animal. These techniques enable high-resolution imaging and preserve native cellular dynamics, respectively. To combine these advantages, this protocol describes the methodology for ex vivo imaging of the C. elegans gonads for high-resolution live imaging, including laser-scanning confocal microscopy and single-molecule tracking microscopy. By using a physiologically matched medium, maintaining the gonad’s connection to the carcass, and providing mechanical support with a thin layer of petroleum jelly, we consistently maintain gonad integrity and meiotic function, as described by dynein-driven chromosome motion, in >70% of individual preparations and for >30 min. Advantages of this approach compared to intravital imaging include the ability to add membrane-permeable dyes, reduced aberrations and autofluorescent background, and convenient preparation.
Key features
• Enables fast (<15 min) preparation time for imaging C. elegans meiotic chromosomes.
• Compatible with native imaging of dim fluorescent protein transgenes in live cells.
• Allows addition of small molecules such as fluorescent dyes tagged with HaloTag or SNAP tag ligands.
• Maintains gonad structure and function for 30–60 min of live imaging.
Keywords: C. elegans Microscopy
Live imaging
Single-molecule imaging
Reproductive biology
Meiosis
Graphical overview
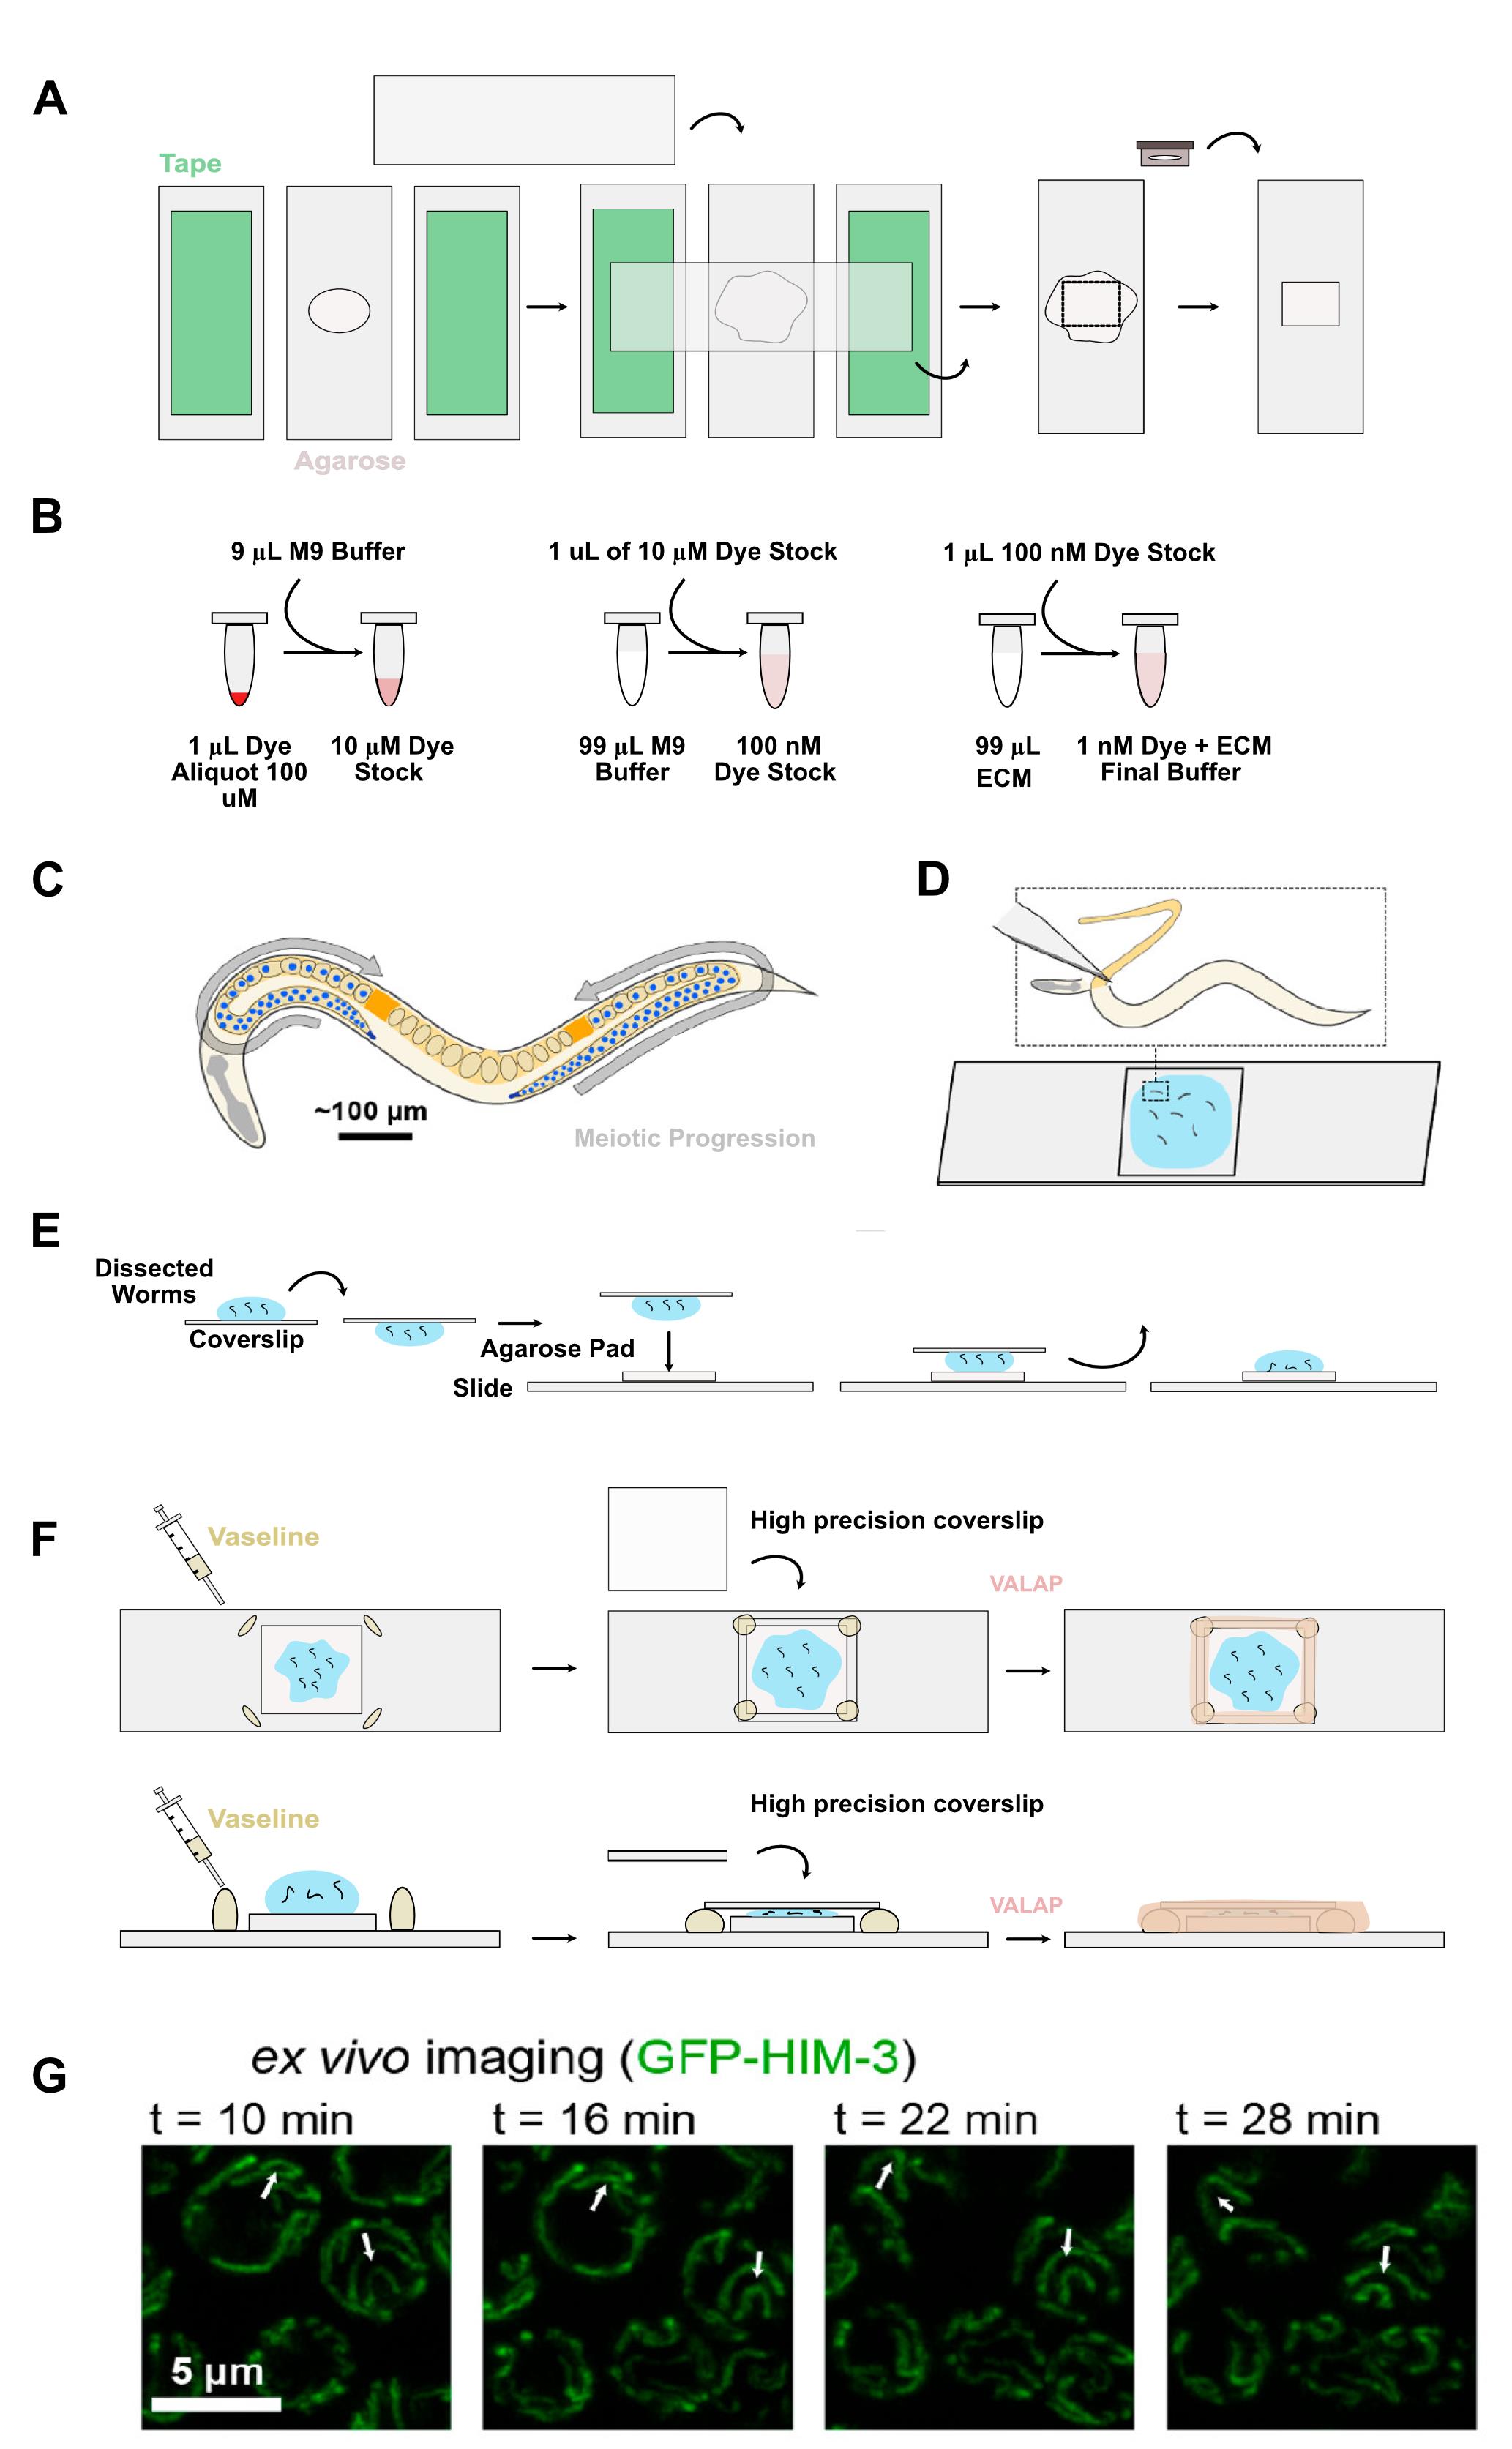
Ex vivo preparation of C. elegans gonad maintains functioning meiotic nuclei. (A) Setup for creation of agarose pads. (B) Illustration of the steps for creating the ECM buffer and serial dilution of fluorescent dye. (C) C. elegans meiosis. (D) Dissections of C. elegans worms for imaging on a glass slide. (E) Illustration of the inversion of the coverslip for transferring worms onto the agarose pad. (F) Using Vaseline to prevent crushing the gonads while still sealing them in place with a coverslip, and the addition of VALAP for the final seal. (G) Meiotic nuclei marked with a fluorescently tagged synaptonemal complex axis protein HIM-3 showing dynein-driven motion. White arrows denote landmarks along chromosomes that are visibly displaced during imaging independent of nuclear rotation. This independent chromosomal movement confirms meiotic function. Panels C, D, and G: Adapted with permission from [1]. Copyright 2021 American Chemical Society.
Background
Meiotic division underlies the formation of germ cells (spores, eggs, sperm) and has been studied in a variety of model organisms with varying advantages. The small nematode roundworm C. elegans is one of the most common and convenient animal models in which to study meiosis by fluorescence microscopy owing to its translucent body, genetic tractability, and linear temporal arrangement of nuclei within its gonad. In contrast to systems including yeast, mice, and humans, in which developing germ cell chromosomes are typically prepared as “spreads” in vitro [2], meiotic nuclei in C. elegans can be imaged within intact gonad tissue via extrusion, fixation, and staining with fluorescent dye-functionalized antibodies [3], allowing researchers to trace the progression of meiosis throughout the gonad. While this technique has advantages, it cannot be used to observe live dynamic processes, and the process of fixation can disrupt delicate molecular structures or subcellular organization. As an alternative, meiotic proteins can be imaged inside the living C. elegans animal using levamisole or other anesthetics, serotonin, and/or physical immobilization [4–6]. In this case, fluorescence imaging can be achieved by conjugating fluorescent proteins to a protein of interest. However, due to the higher autofluorescence background and lower photostability of fluorescent proteins, these labels bleach readily during high-resolution imaging. Imaging within the live worm also requires a specific three-dimensional orientation or “roll” of the worm body for the gonad to be easily visible, and images can be aberrated by the worm cuticle and tissue layers within the animal.
Our technique addresses many of these concerns. With gonad extrusion, we can image clearly without any additional aberrations while simultaneously ensuring meiotic function for 30 min. This technique takes approximately 15 min once practiced, and because the gonad remains intact in a physiologically matched medium, there is less disruption of the sample compared to fixation-based techniques. While it is possible to use exogenous fluorescent dyes in whole-worm preparations such as feeding fluorescent dyes [6,7], their efficiency in terms of time and reagent usage is comparatively limited. The introduction of dyes during the dissection step of our protocol avoids multi-hour incubation steps and allows rapid and efficient staining of enzymatic labels such as the HaloTag or SNAP tag using minimal quantities of total dye (≤0.1 nmol per experiment) compared to fixed gonad or whole-worm preparations [6]. Similarly, small molecule drugs such as nocodazole should be simple to introduce at this stage, as described by another recent study using gonad explants [8]. Because the gonad is no longer encased by the worm cuticle or surrounded by autofluorescent tissues like the gut, this method is less sensitive to optical aberrations and more amenable to imaging of constitutively expressed fluorescent proteins such as GFP than whole-worm preparations. To help achieve reproducible results, the physiological viability of dissected gonads can be validated using the dynein-driven motion of meiotic chromosomes [1], following mitotic germ cell divisions, and/or imaging the structure of the gonad rachis with beta-tubulin [8].
Altogether, this method represents a convenient approach for imaging the C. elegans gonad that is low cost and consistent once practiced. While we have primarily employed this approach to study nuclei in meiotic prophase I (specifically, pachytene), we have achieved preparations with intact tissue from the mitotic tip to the spermatheca, suggesting our technique should allow high-resolution imaging of germ cells and somatic gonad tissues. While we have confined our studies to adult hermaphrodites to date, the explant study reported successful results in L3 and L4 hermaphrodites and late larval males [8], suggesting dissections using younger hermaphrodites and males should also be tractable with our approach.
Materials and reagents
Biological materials
The standard C. elegans strains used in our experiments contain a protein of interest fused to a HaloTag or SNAP tag and a chromosomal/synaptonemal complex marker, typically a GFP-labeled HIM-3 fusion protein. To validate the preparation, HIM-3, GFP-SYP-3, or another chromosomal marker should be used to confirm that meiotic function is maintained (Graphical overview, G). One appropriate strain to use for testing this protocol is CA1218, which expresses the GFP-SYP-3 protein in the germline and is available from the Caenorhabditis Genetics Center (CGC) (https://cgc.umn.edu/strain/CA1218).
Reagents
1. Vaseline petroleum jelly (Unilever), consumer grade, stored at room temperature indefinitely
2. Lanolin (Kyabo Organics), consumer grade, stored at room temperature indefinitely
3. Paraffin wax (Blended Waxes Inc.), consumer grade, stored at room temperature indefinitely
4. Fluorescent dyes functionalized with Halo or SNAP tag ligands, e.g., JF549-HTL (Promega, catalog number: GA111A); typically stored in 1 μL single-use aliquots of 100 μM dye in DMSO at -20 °C for 2 years
5. Levamisole (Thermo Scientific, catalog number: 187870100); stored at room temperature. Can be stored as a 10% stock solution in Milli-Q water at -20 °C for 1 year. Store in 500 μL or less aliquots to avoid more than 10 freeze/thaw cycles per tube
6. Tween-20 (optional) (Sigma-Aldrich, catalog number: 8.22184); stored at room temperature; stock solution of 10% Tween in Milli-Q water for 2 years
7. Leibowitz L-15 w/o phenol red (Gibco, catalog number: 21083-027), stored at 4 °C until manufacturer expiration
8. Fetal bovine serum (Gibco, catalog number: A5256701), stored in aliquots of 50 mL at -20 °C until use; discard or re-aliquot to avoid multiple freeze/thaw cycles after first thaw
9. EGTA (Thermo Scientific, catalog number: 428570500), 100 mM in Milli-Q H2O, stored as a 50 mL solution of 100 mM in Milli-Q H2O kept at 4 °C until use
10. Sucrose (Fisher, catalog number: AA3650830), stored at room temperature as a 1 M solution in Milli-Q water
11. Potassium dihydrogen phosphate (KH2PO4) (Thermo Scientific, catalog number: 011594.36), stored at room temperature
12. Sodium phosphate dibasic anhydrous (Na2HPO4) (Fisher, catalog number: S374-500), stored at room temperature
13. Sodium chloride (NaCl) (Macron, catalog number: 7532-06), stored at room temperature
14. Magnesium sulfate anhydrous (MgSO4) (Fisher, catalog number: M65-500), stored in a 1 M solution at room temperature, filter sterilized
Solutions
1. VALAP sealant (see Recipes)
2. Embryonic culture medium (ECM buffer) (see Recipes)
3. M9 buffer (see Recipes)
Recipes
1. VALAP sealant
| Reagent | Final concentration | Quantity or volume |
|---|---|---|
| Vaseline petroleum jelly | 33.3% | 10 g |
| Lanolin | 33.3% | 10 g |
| Paraffin wax | 33.3% | 10 g |
Typically stored in 1.5 mL aliquots at room temperature.
2. ECM buffer
| Reagent | Final concentration | Quantity or volume (20 mL) |
|---|---|---|
| Leibowitz L-15 w/o phenol red | 84% | 16.8 mL |
| Fetal bovine serum | 9.3% | 1.86 mL |
| Levamisole 10% solution in Milli-Q H2O | 0.01% | 20 μL |
| EGTA 100 mM in Milli-Q H2O | 2 mM | 400 μL |
| 1 M Sucrose in Milli-Q H2O | n/a | Dependent on starting mOsm |
| Milli-Q H2O | n/a | Final to 20 mL |
Check buffer osmolarity using an osmometer and adjust using 1 M sucrose as needed to reach 330 ± 2 mOsm. Gonads are more susceptible to shrink or burst if the osmolarity is outside this range, though we have found in some studies they can tolerate up to 340 mOsm ECM with acceptable gonad health. Store prepared ECM as 200 μL (or other volume as convenient) aliquots in 1.5 mL tubes and at -20 °C until use for up to 2 years. Discard any remaining thawed ECM at the end of each day to avoid freeze/thaw cycles.
3. M9 buffer [9]
| Reagent | Final concentration | Quantity or volume (1 L) |
|---|---|---|
| KH2PO4 | 0.022 M | 3 g |
| Na2HPO4 | 0.042 M | 6 g |
| NaCl | 0.0856 M | 5 g |
| 1 M MgSO4 | 100 μM | 1 mL |
| DI H2O | n/a | 1 L |
M9 buffer can be prepared in a 1 L batch and aliquoted into 50 mL bottles before autoclaving. Once sterile, bottles can be sealed and stored at room temperature indefinitely or until contaminated.
Laboratory supplies
1. Scalpel blades (Feather #11, 2976 #11)
2. Scalpel handle (Feather #3)
3. Worm picks (handmade or, e.g., Tritech Research TWPH1)
4. High-precision (“No. 1.5H” or “HT”, 170 ± 5 μm) coverslips/cover glasses, 22 mm × 22 mm2 (ThorLabs, catalog number: CG15CH2) (18 × 18 mm2 also work well)
5. Microscope slides, 25 mm × 75 mm (1” × 3”) × 1 mm (VWR, catalog number: 16005-106)
6. Razor blades
7. P1000, P200, P20, P10 pipette tips
8. Eyelash brush or other gentle manipulation tool; made by attaching a single fake eyelash to the end of a toothpick with nail polish
9. Fine (<5 mm tip width) paintbrush
10. Empty 30 mm Petri dish or lid
11. Vaseline inside a syringe
Note: We recommend scooping Vaseline into a 5 mL syringe (BD, catalog number: 14-829-45) with a 20-gauge needle (Sol Millenium, catalog number: V111810).
12. Agar plates with nematode growth medium (NGM) and seeded with OP50 E. coli bacteria [9]
Equipment
1. Dissection stereomicroscope (e.g., Zeiss, model: Stemi 305)
2. High-resolution microscope (e.g., Zeiss, model: 880 confocal with Airyscan or Bruker Vutara 352 single-molecule epifluorescence microscope)
3. Humid chambers (sealable containers with a tray that can hold prepared agarose pads above wet paper towels; these are often available at consumer-grade for food storage)
4. Vortexer
5. Heat block
6. Pipettes (P1000, P200, P20, P10)
7. High-precision (mg) scale
8. Incubator or climate-controlled room at the desired temperature for worm maintenance, typically 20 °C
9. Osmometer (e.g., Wescor Vapro Model 5600 or Advanced Instruments Microosmometer 3300)
Procedure
A. Worm preparation
1. To image healthy, young-adult hermaphrodites, prepare worms by picking L4 larvae to fresh NGM + OP50 plates 18 h before dissection. To ensure good meiotic health and reach an epigenetically stable state, rear worms for at least two generations at the desired temperature following starvation or thawing. Worms do not have a maximum number of generations, but strains should be re-prepared from frozen aliquots if they show impaired phenotypes. Worms should be maintained at a stable temperature in an incubator; 20 °C is suitable for most experiments, but germline health persists from 15–25 °C in C. elegans, allowing the use of temperature-sensitive alleles or other temperature-specific experiments.
B. Preparing agarose pads
Note: Agarose pads are best prepared <2 h before dissection.
1. Prepare a 2% agarose solution in Milli-Q water in a 1.5 mL centrifuge tube and place in a heat block set to 90 °C. We find the best results preparing fresh agarose each day. Aliquots of dry agarose can be prepared at scale by weighing approximately 20 mg of agarose per tube, labeling the exact mass in milligrams on each tube, and adding 50 μL of water per mg before use. Place a tube of VALAP in the heat block to melt for later use.
2. Add lab tape to two microscope slides to slightly increase the height of the crossed slide added in step B5. This determines the pad thickness, which should be approximately 80 μm for standard lab tape (Graphical overview, A).
3. Add a microscope slide between the two microscope slides with tape spacers, aligned parallel/vertically.
4. Vortex the 2% agarose solution and add 30–45 μL of molten agarose to the center of the microscope slide without tape.
Note: The volume of the agarose depends on the size of the desired pad as well as the size of the slide the pad will be placed on.
5. Promptly place another microscope slide across the slides (Graphical overview, A).
Note: If the pad does not break cleanly, does not form a clear circle, or becomes misshapen or damaged, prepare a new pad, adjusting the volume and allowing the pad to cool for several seconds to result in a well-formed pad.
6. Push the slide down slightly to flatten the pad. This should form a flat circle of agarose approximately 50–100 μm thick and 12–18 mm in diameter with minimal bubbles or breaks.
7. After 30 s, the agarose pad should be solidified. Peel the slides apart, ensuring the pad does not rip or move to the edges of the slide.
8. Using a razor blade, cut the pad into a square approximately 8 mm × 8 mm in size (Graphical overview, A).
Note: If the pad is not cut to size, it may extend out past the coverslip and interfere with the VALAP layer applied later on.
9. Add 10 μL of ECM buffer without added dye and tip the slide so the liquid covers the entire pad.
10. Place the soaked pad into the humid chamber until use. Check every 30 min to see if pads are still moist and add another 10 μL of ECM buffer without dye if the pad appears dry. We recommend using pads within 2 h of preparation.
Pause point: Once soaked pads are in the humid chamber, they can be kept for up to 2 h as long as ECM is added to mitigate desiccation.
C. Dissecting and mounting worms in ECM
Critical: Once dissections begin, the remaining steps are time-sensitive and need to be performed efficiently and in the correct order. For multiple replicates, we recommend imaging a single, finished slide and then preparing a new slide for another replicate.
1. Thaw aliquots of both ECM buffer and the dye of your choice.
2. Prepare dilutions of the dye using M9 buffer and new PCR tubes to the final dye concentration of your choice. Add 9 μL of M9 buffer to the 1 μL of concentrated dye aliquot tube to drop the concentration to 10 μM and vortex.
3. Add 1 μL of the solution produced in step C2 into a new PCR tube with 99 μL of M9 buffer to reach a concentration of 100 nM.
4. Add 1 μL of the 100 nM dye dilution to 99 μL of thawed ECM buffer to reach a concentration of 1 nM and store all dye dilutions in the dark until ready to use (Graphical overview, B).
5. Add 20 μL of the dye and ECM mixture to a coverslip sitting on top of a slide, ensuring not to disturb the surface tension of the droplet.
6. Transfer 7 adult worms using a worm pick into the dissection buffer. The number of animals can vary depending on dissection skill and availability, but a minimum of 5 and a maximum of 15 typically results in high-quality slides. Try to minimize transferring excess bacteria from the plate to the droplet. Let the worms sit for ~5 min, until motion has slowed for most animals.
Caution: Waiting beyond 10 min can result in evaporation of the droplet and desiccated worms, or unnecessary physiological stress. Dissections should be completed within ~10 min of the worms entering the buffer.
7. Attach a blade to a scalpel handle and dissect the worms by decapitating them between the head (pharynx) and the body (Graphical overview, D; Figure 1A). If the cut is too close to the pharynx, the gonad will not extrude out of the body, and if the cut is too far into the body, the gonad will be cut and ruptured (Figure 1E, F). Try to avoid removing the scalpel from the droplet or spreading the droplet across the coverslip during dissections to maintain a sharp cutting surface and for easier transfer to the pad.
8. Once finished, hold onto the coverslip and quickly flip it over so the drop is facing down (Graphical overview, E).
Caution: Avoid tilting the coverslip excessively to avoid the drop running down the side.
9. Gently make contact between the coverslip and the agarose pad without setting the coverslip on the pad’s surface (Graphical overview, E). Surface tension and gravity will pull the worms onto the pad; afterward, discard the coverslip. Avoid tilting the coverslip either during contact or removal, as this will cause the sample to pool to one edge and be unusable.
Alternative: Pipette the worms from the coverslip to the pad. In this case, add 1 μL of 1% Tween-20 in water at step C4 to reduce worms from sticking to the plastic of the pipette tip.
10. Once transferred, arrange the worms so they are centered on the pad using an eyelash brush. Ensure that the worms do not overlap, and if possible, attempt to keep gonads free from the gut and carcass and the edge of the pad. Debris can be moved off the edge of the pad using the eyelash brush if necessary.
Critical: Move fast enough so the sample does not dry down; the next steps should be done within 5–10 min.
Caution: If the liquid on top of the pads evaporates to a point where the pad needs to be rehydrated, or the sample has dried down, the sample will not be usable and should be remade.
11. Once worms are transferred to the pad using your method of choice, add four small diagonal lines of Vaseline around the agarose pad and gently place a high-precision coverslip on top of the agarose pad (Graphical overview, F). This should not be the same coverslip used for dissections.
12. Using a scalpel handle or other object, gently tap each corner of the coverslip a few times until the coverslip contacts the liquid on the pad, and the liquid seeps over the edge of the pad. The Vaseline layer prevents worms from being crushed under the pressure of the coverslip.
13. Check under the dissection microscope to see if the worms are mostly immobilized and the gonads are not moving. If the carcasses still exhibit significant motion that moves the gonads, push on the corners repeatedly until movement is mostly inhibited. Slight movement of the tail or head is acceptable so long as it does not move the gonad.
Caution: Too much force may crush the gonads. Small additions of pressure followed by assessment of movement are ideal. Some twitching of the tail or carcass is acceptable so long as the gonad is immobilized. Avoid pushing so far that the gonads are crushed. If gonads are all burst or crushed, remake the slide and apply the high-precision coverslip more gently, add more Vaseline, or make thinner pads. See Troubleshooting.
14. Once the coverslip is secure, use a small paintbrush to add a dab of VALAP sealant on each corner of the coverslip. This prevents the coverslip from moving and shearing the gonads during handling.
15. Connect the corners with a solid line of VALAP, avoiding getting any on the center of the coverslip (Graphical overview, F).
16. Once sealed, return to the dissection scope and flip over the sealed slide, placing it upside down on an empty 30 mm Petri dish (i.e., exposing the glass on the other side of the sample opposite to the high-precision coverslip and pad/worms). The slide should rest entirely on the rim of the Petri dish, preventing contact between the high-precision coverslip that will touch the objective and any other surface. At this step, the arrangement of the upside-down slide is as follows: high-precision coverslip on the bottom, followed by the worms, the agarose pad, and finally the glass slide.
Critical: Do not scratch the high-precision coverslip, or you will have to remake the slide.
17. Using a fine felt-tipped pen, place a dot to the left side of each worm worth investigating on the backside of the slide (Figure 1G).
Critical: Do not mark the high-precision coverslip, or you will have to remake the slide. Worms should be fully immobile or have gonads far enough away from any moving body parts; also, gonads should be fully intact and not burst or be squished by the body (Figure 1E, F). A final result of 1–3 or more high-quality gonad preparations per slide should be achieved consistently with this preparation. If desired, label the experimental conditions and time of dissection on the slide.
D. Microscopy and validation of meiotic function
1. Immediately move the slide to the microscope. We image at 60× magnification, but 40× and higher tend to give clear images of meiotic nuclei. Imaging conditions can change depending on experimental conditions. Larger-scale gonad health can be assessed during brightfield or DIC imaging; however, assessing meiotic function with nuclei requires at least 40× magnification and a chromosomal or synaptonemal complex marker of some kind, often visualized with fluorescent proteins. We use a meiotic axis fusion protein GFP::HIM-3 as our marker for assessing meiotic health.
Note: DNA dyes can be added to the ECM mixture if desired; however, our preference is a fluorescent protein marker.
2. Once the slide is in the correct focal plane, use the pen marks on the slide to easily identify worm samples and save time.
3. In general, it is advisable to keep the objective slightly below focus while moving the stage to avoid placing pressure on gonads. Only bring the objective fully into focus once you have found the gonad you wish to image.
4. Select intact gonads where the membrane has not ruptured, few or no nuclei are visible outside the gonad, and there is no pinching or squishing of the gonad for imaging (Figure 1B–D). Gonads that are burst or squished should not be imaged (Figure 1E, F).
5. Assess meiotic function by looking for slight movement and “wiggling” of the chromosomes within the nuclei by fluorescence microscopy, indicating dynein-driven motion [1,4]. This is typically done by using the synaptonemal complex or axis markers GFP:SYP-3 or GFP:HIM-3. If the chromosomes/nuclei continue to translate but the shape/organization of the chromosomes does not change on the minutes scale, meiosis has likely arrested. For a video demonstrating this difference, see Movie S1 from Rog and Dernburg [4].
6. Once imaged, move to the next sample. Remain cognizant of how much time has passed and be diligent in checking for meiotic function in each sample to avoid imaging gonads where meiotic function is impaired. While some gonads maintain function up to 1 h, we have found that imaging beyond 30 min may yield diminishing returns. If there are issues with aberrations or drifting focus, see Troubleshooting.
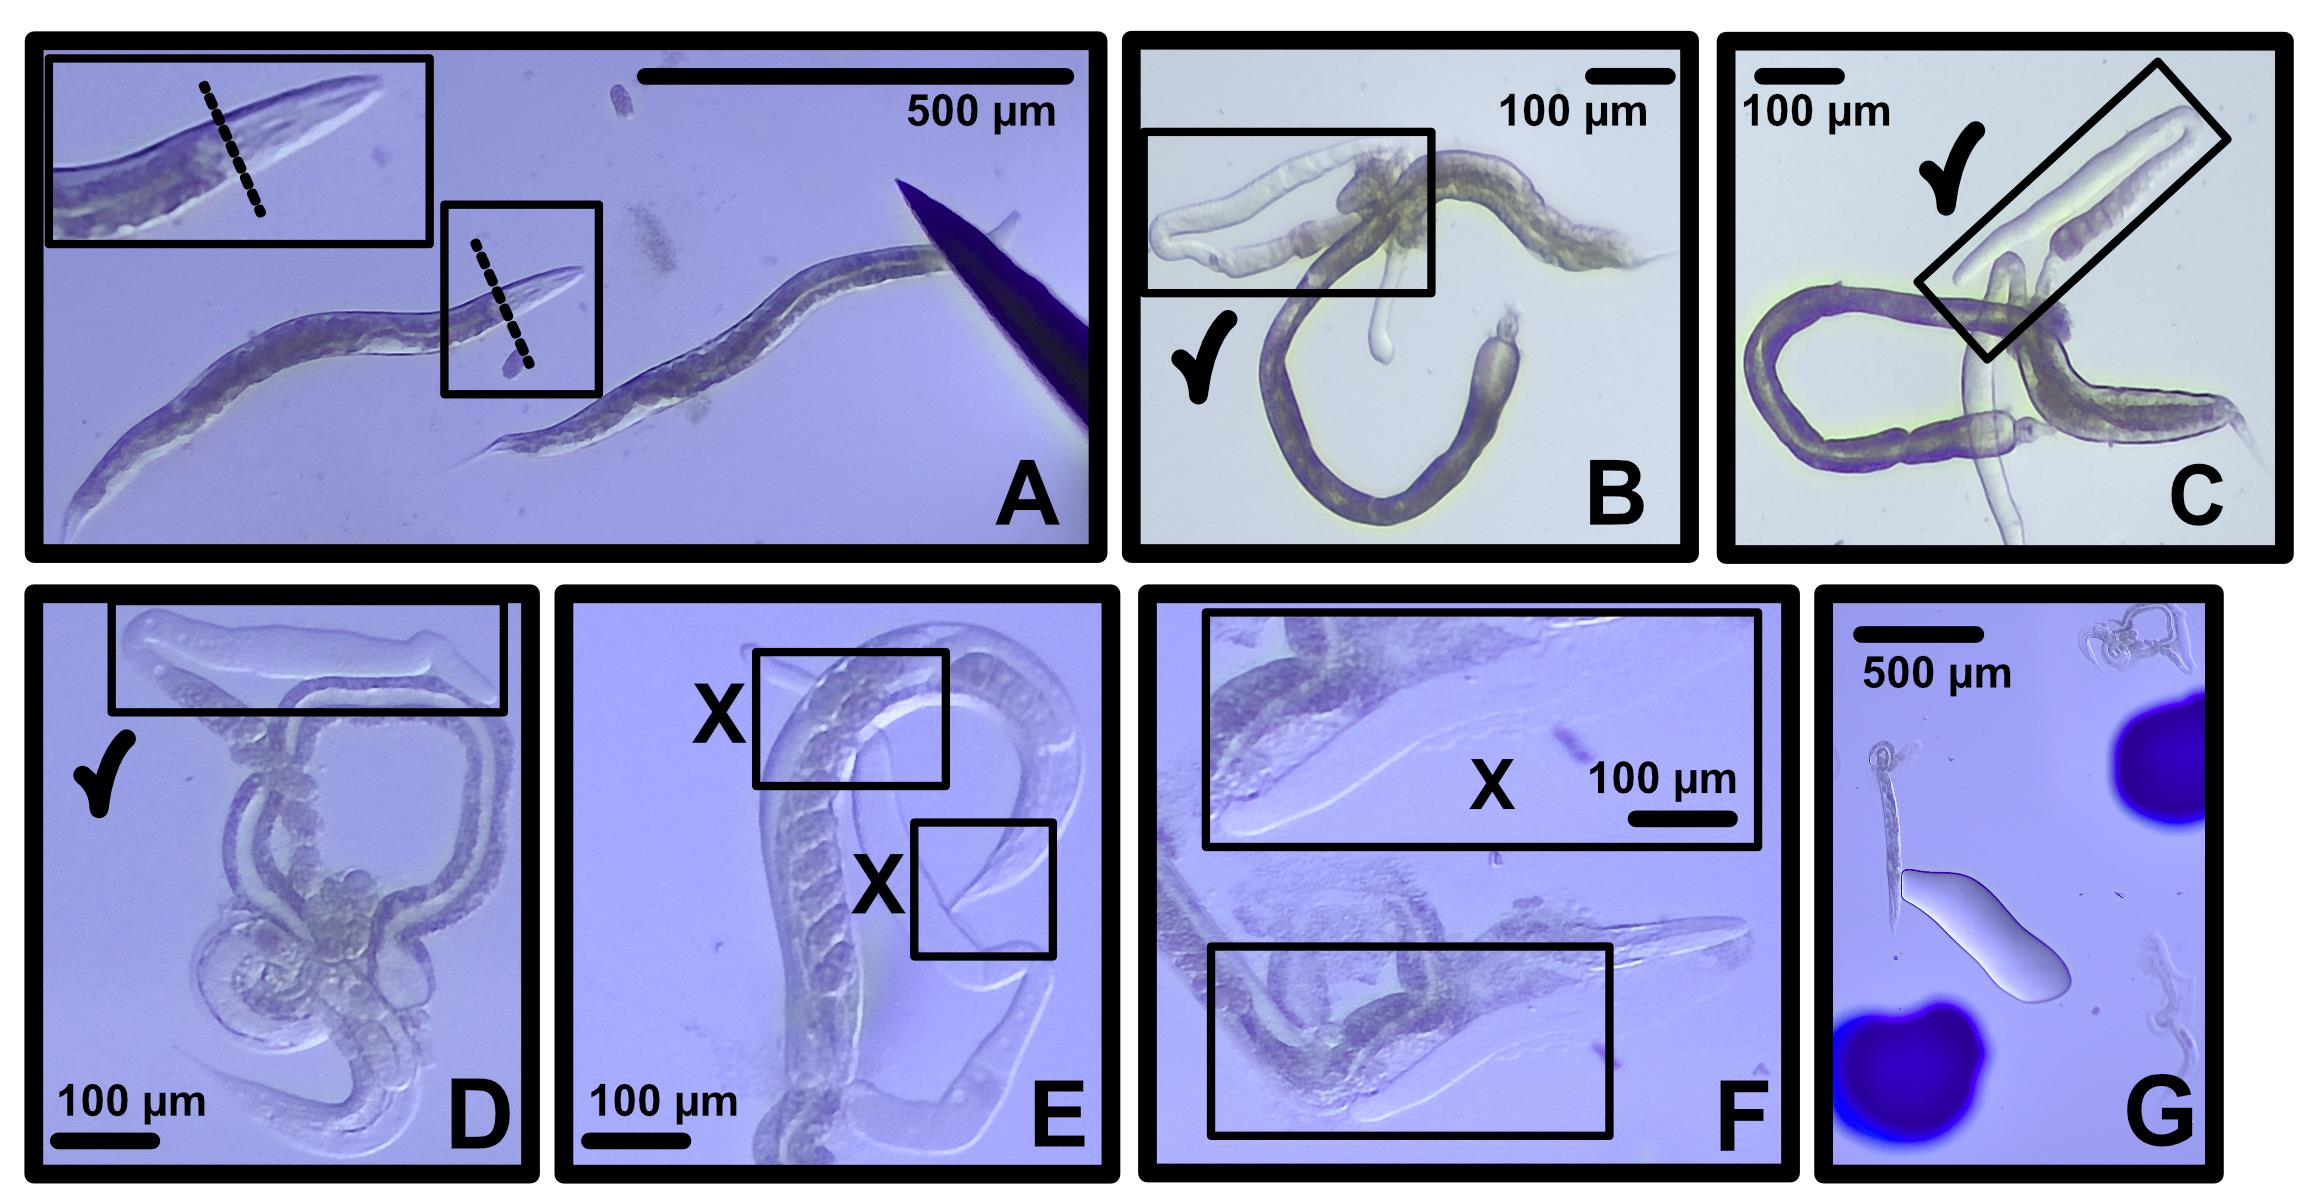
Figure 1. Example dissections of high- and low-quality gonad preparations. (A) Dissecting the worm directly behind the head and before the gut results in good gonad quality and health. (B–D) High-quality dissections of intact and well-positioned gonads with check marks indicating desirable morphology. (E, F) Low-quality dissections of ruptured or squished gonads in poor positions relative to the carcass with an X indicating compromised integrity or geometry. (G) A finished slide demonstrating proper worm spacing with pen marks indicating where the worms are on the slide for easy identification on the microscope.
Validation of protocol
This protocol has been used and validated in the following research articles:
• von Diezmann, L. and Rog, O. [1]. Single-Molecule Tracking of Chromatin-Associated Proteins in the C. elegans Gonad. J. Phys. Chem. B. 125, 6162–6170. https://doi.org/10.1021/acs.jpcb.1c03040
• von Diezmann et al. [10]. Diffusion within the synaptonemal complex can account for signal transduction along meiotic chromosomes. MBoC, https://doi.org/10.1091/mbc.e24-05-0225
General notes and troubleshooting
General notes
1. While convenient, this protocol requires a high level of confidence and skill gained only after repetition, particularly of dissections. Repeating this protocol often in the beginning will result in consistent high-quality slides over time.
Troubleshooting
Problem 1: Worms continue to move.
Possible causes: Lack of anesthetic, insufficient immobilization by the coverslip.
Solution: Try pressing slightly more firmly during preparation. If necessary, confirm the potency and concentration of the anesthetic.
Problem 2: Gonads burst.
Possible cause: Gonads primarily burst due to mechanical pressure.
Solution: Practice gentle addition of the coverslip with Vaseline to avoid damage. Avoid bringing the microscope objective higher than needed to focus.
Problem 3: Microscope focus drifts.
Possible cause: Excess VALAP may prevent a secure placement of the slide.
Solution: Trim VALAP to the sides of the slide or use smaller coverslips to reduce spread.
Problem 4: Microscope images are aberrated.
Possible cause: If the coverslip is tilted, this can induce aberrations.
Solution: Ensure pads are formed flat. Trim pads before adding the coverslip.
Acknowledgments
Funding Sources: NIH MIRA (NIGMS R35GM159985), Damon Runyon Cancer Research Foundation (DFS-56-23), The University of Minnesota Twin Cities.
This protocol is originally described and validated in [1,10].
Previous work used to develop this protocol: [11].
Author contributions
Conceptualization: L.v.D.; Investigation, A.J.H., L.v.D.; Writing—Original Draft and Reviewing & Editing, A.J.H., L.v.D.; Funding Acquisition: L.v.D.; Supervision: L.v.D.
Competing interests
The authors declare no conflicts of interest.
References
- von Diezmann, L. and Rog, O. (2021). Single-Molecule Tracking of Chromatin-Associated Proteins in the C. elegans Gonad. J Phys Chem B. 125(23): 6162–6170. https://doi.org/10.1021/acs.jpcb.1c03040
- Counce, S. J. and Meyer, G. F. (1973). Differentiation of the synaptonemal complex and the kinetochore in Locusta spermatocytes studied by whole mount electron microscopy. Chromosoma. 44(2): 231–253. https://doi.org/10.1007/bf00329119
- Phillips, C. M., McDonald, K. L. and Dernburg, A. F. (2009). Cytological Analysis of Meiosis in Caenorhabditis elegans. In Meiosis. Keeney, S. (Ed.). 558: 171–195, Humana Press, Totowa, NJ.
- Rog, O. and Dernburg, A. F. (2015). Direct Visualization Reveals Kinetics of Meiotic Chromosome Synapsis. Cell Rep. 10(10): 1639–1645. https://doi.org/10.1016/j.celrep.2015.02.032
- Rivera Gomez, K. A. and Schvarzstein, M. (2018). Immobilization of nematodes for live imaging using an agarose pad produced with a Vinyl Record. MicroPublication Biol. doi:10.17912/QG0J-VT85. https://doi.org/10.17912/QG0J-VT85
- Čavka, I., Woglar, A., Wu, Y. L., Durmus, E. B., Sloat, L., Gros, A., López, C. P., Hecht, F., Villeneuve, A. M., Ries, J., et al. (2025). Multi-step implementation of meiotic crossover patterning. bioRxiv. e687980. https://doi.org/10.1101/2025.11.12.687980
- Mueller, B. D., Merrill, S. A., Watanabe, S., Liu, P., Niu, L., Singh, A., Maldonado-Catala, P., Cherry, A., Rich, M. S., Silva, M., et al. (2023). CaV1 and CaV2 calcium channels mediate the release of distinct pools of synaptic vesicles. eLife. 12: e81407. https://doi.org/10.7554/elife.81407
- Zellag, R. M., Cheng, E., Gerhold, A. R. and Labbé, J. C. (2026). Expanding the Caenorhabditis elegans toolkit with gonad explants. Development. 153(14): e205694. https://doi.org/10.1242/dev.205694
- Stiernagle, T. (2006). Maintenance of C. elegans. WormBook. https://doi.org/10.1895/wormbook.1.101.1
- von Diezmann, L., Bristow, C. and Rog, O. (2024). Diffusion within the synaptonemal complex can account for signal transduction along meiotic chromosomes. Mol Biol Cell. 35(12): ee24–05–0225. https://doi.org/10.1091/mbc.e24-05-0225
- Wolke, U., Jezuit, E. A. and Priess, J. R. (2007). Actin-dependent cytoplasmic streaming in C. elegans oogenesis. Development. 134(12): 2227–2236. https://doi.org/10.1242/dev.004952
Article Information
Publication history
Received: Jul 22, 2026
Accepted: Oct 19, 2026
Available online: Nov 12, 2026
Published: Dec 5, 2026
Copyright
© 2026 The Author(s); This is an open access article under the CC BY-NC license (https://creativecommons.org/licenses/by-nc/4.0/).
How to cite
Readers should cite both the Bio-protocol article and the original research article where this protocol was used:
- Hughes, A. J. and von Diezmann, L. (2026). Immobilization of Intact Ex Vivo Gonads From Caenorhabditis elegans for High-Resolution Live Microscopy. Bio-protocol 16(23): e5884. DOI: 10.21769/BioProtoc.5884.
- von Diezmann, L., Bristow, C. and Rog, O. (2024). Diffusion within the synaptonemal complex can account for signal transduction along meiotic chromosomes. Mol Biol Cell. 35(12): ee24–05–0225. https://doi.org/10.1091/mbc.e24-05-0225

 Download Citation in RIS Format
Category
Biophysics > Microscopy > Single-molecule localization microscopy
Cell Biology > Cell imaging > Live-cell imaging
Do you have any questions about this protocol?
Post your question to gather feedback from the community. We will also invite the authors of this article to respond.
 Post a Question


