


- Protocols

- Articles and Issues
- For Authors
- About
- Become a Reviewer


HUVEC Isolation—A Robust Protocol to Obtain Human Umbilical Vein Endothelial Cells From Fresh Preparations

(*Contributed equally to this work, §Contributed equally to this work) Published: Vol 16, Iss 22, Nov 20, 2026 DOI: 10.21769/BioProtoc.5877 Views: 34
Reviewed by: Komuraiah MyakalaAnthony FlamierSalah BoudjadiAnonymous reviewer(s)
 PDF
 Ask a question


Protocol Collections
Comprehensive collections of detailed, peer-reviewed protocols focusing on specific topics



Abstract
Research on angiogenesis necessitates in vitro models that accurately replicate the in vivo vascular system. Human umbilical vein endothelial cells (HUVECs) are widely used in this context due to their stable phenotype, reproducibility, and minimal ethical concerns. Despite the established utility of HUVECs, variability exists among protocols for their isolation from umbilical cords (UCs). These protocols differ in the choice of enzymatic agents, incubation times, mechanical disruption techniques, and post-isolation cell culture strategies. This protocol describes the timely isolation of these primary endothelial cells from UCs and demonstrates its applicability across a range of UC types, thereby enhancing sample availability. The isolation process employs collagenase IV for cell detachment, followed by gentle massage of the UC to facilitate cell collection; cells are then cultured in Endopan 3 medium. Cells are frozen after the first passage or used directly in experiments. The identity and endothelial phenotype of the isolated HUVECs were confirmed through immunofluorescence staining with an endothelial-specific marker (CD31) and a cell junction integrity marker (ZO-1). Flow cytometry further validated the endothelial phenotype by CD31 expression. This protocol offers a cost-effective and reproducible method for isolating HUVECs, particularly advantageous due to the use of a more affordable enzyme and the elimination of pre-coating requirements for cell culture flasks. The protocol is designed to be straightforward, making it accessible to researchers with limited experience in endothelial cell isolation.
Key features
• Versatile application to a broad range of preparations: This protocol accommodates umbilical cords of varying lengths and thicknesses, enhancing sample availability and reducing experimental variability.
• Efficient and selective enzymatic detachment: The use of Collagenase IV ensures effective detachment of endothelial cells with minimized isolation of non-endothelial cell types.
• Enhanced contamination control: The inclusion of amphotericin B and penicillin/streptomycin in the culture medium significantly reduces the risk of contamination, promoting a healthy HUVEC culture.
• Cost-effective and simple cell culture: This protocol eliminates the need for expensive pre-coated culture flasks, making it more accessible to laboratories with limited resources.
Keywords: Human umbilical vein endothelial cells (HUVECs) Endothelial cell isolation protocol
Collagenase IV enzymatic detachment
Immunofluorescence staining
HUVEC differentiation and phenotype confirmation
CD31 as an endothelial cell marker
Graphical overview
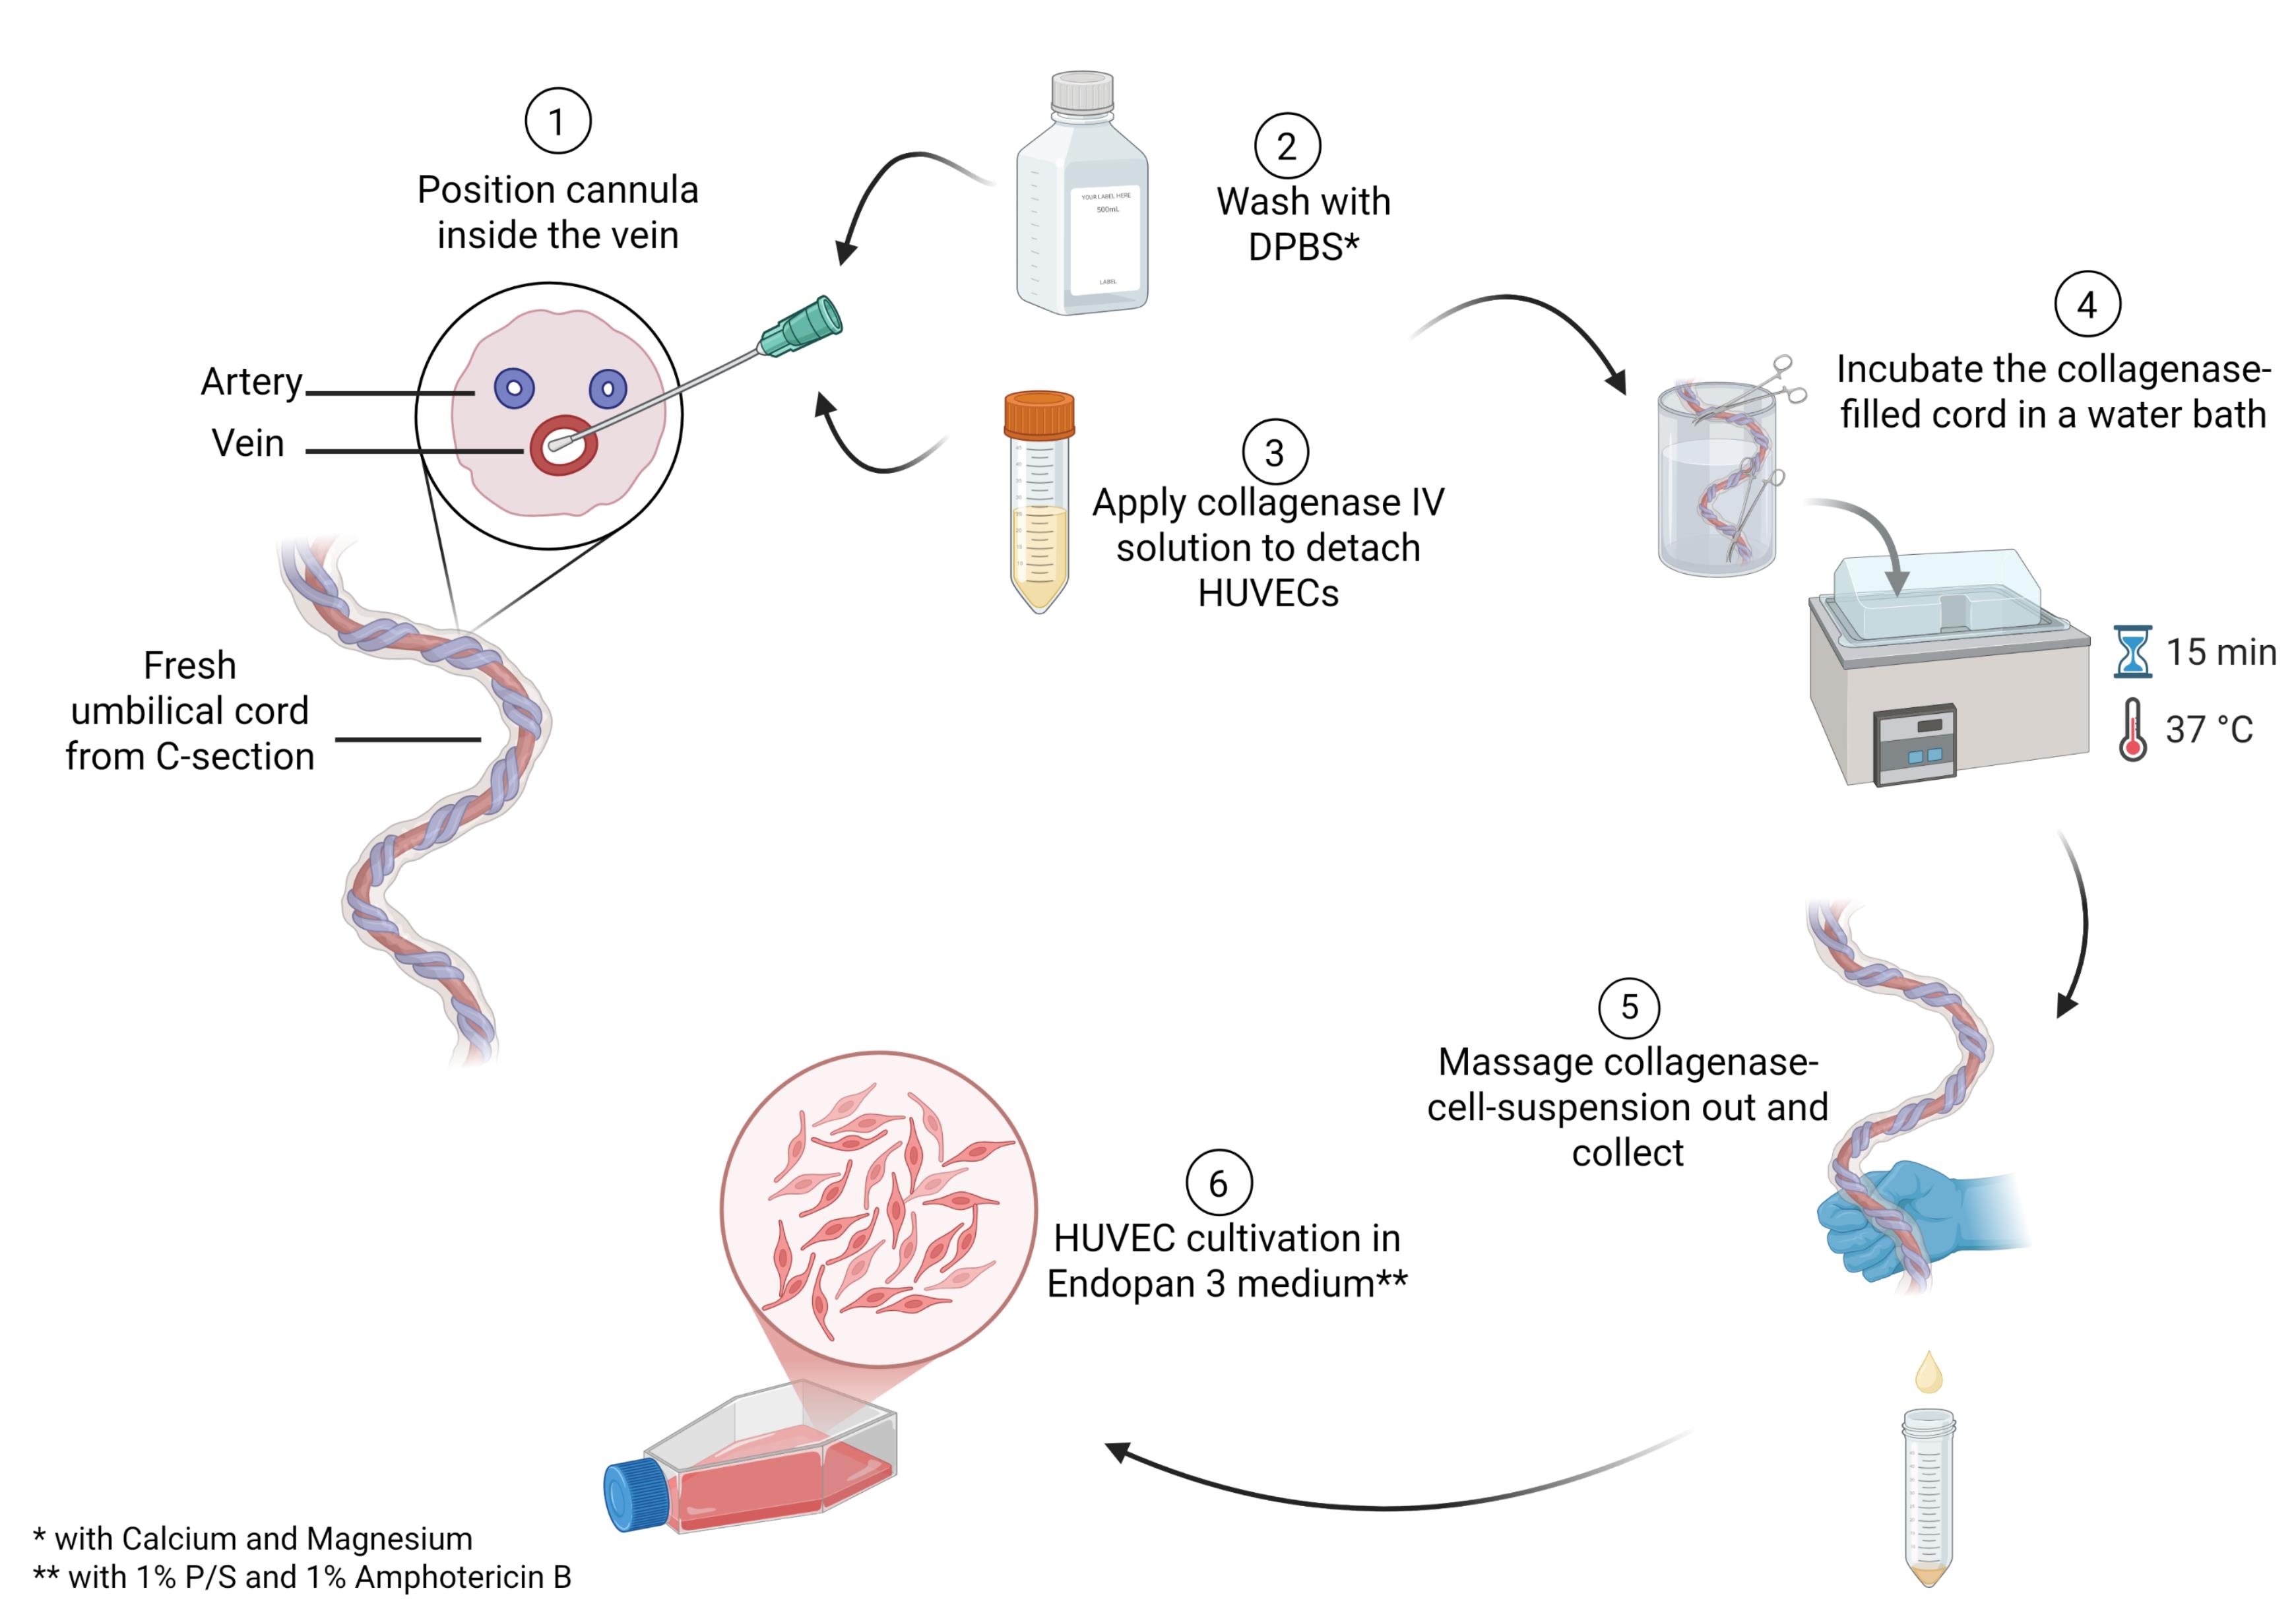
Main steps in the process of human umbilical vein endothelial cell (HUVEC) isolation
Background
In vascular biology, endothelial cells are essential for modeling angiogenesis, blood–brain barrier function, and tumor cell migration [1–4]. While human endothelial cells can be isolated from tissues such as the aorta, liver sinusoids, or the brain, ethical and practical challenges limit their use in laboratory research [5–7]. Therefore, some studies rely on animal-derived endothelial cells, which may not fully replicate human cell behavior. The human umbilical cord (UC), which connects the fetus to the placenta, provides a readily available and ethically acceptable source of primary endothelial cells. The UC is typically discarded after birth, presenting a low ethical barrier for research use [8]. Over the past six decades, the isolation of human umbilical vein endothelial cells (HUVECs) from UCs has become a cornerstone in vascular biology, providing a robust in vitro model for studying endothelial cell biology [8]. HUVECs are valued for accessibility and their ability to mimic physiological properties of human vessels in in vitro assays, making them ideal for a wide range of biomedical applications, including angiogenesis assays, blood–brain barrier modeling, and tumor cell migration studies [2–4].
Despite the shared core principles of cell isolation across published protocols, methodological details vary considerably. Pre-selection criteria for UCs differ across protocols, with differences in factors such as cord length, the presence of blood clots, gestational age, and other relevant donor health indicators [9–11]. This variability can lead to inconsistent results and highlights the need for standardized protocols in HUVEC isolation. For example, some protocols recommend collecting and storing UCs in saline solution at 4 °C [7,9], whereas others do not specify storage conditions [9,11]. The time between UC collection and HUVEC isolation ranges from less than 3 h to up to 48 h [10,12], further contributing to experimental variability. After separation from the donor, UC cells are no longer sustained by the placental environment, which may lead to a progressive decline in cell integrity and yield. Further key differences among existing protocols include the choice of enzymatic detachment agents (e.g., collagenase IV, trypsin, dispase), incubation times, mechanical disruption techniques (e.g., gentle massaging to collect cells or using syringe pressure to expel the enzyme–cell mixture), and post-isolation cell culture conditions [9–14]. Although longer incubation times may increase cell detachment, they may also reduce cell viability or increase contamination with non-endothelial cell types such as fibroblasts.
Additionally, post-isolation culture conditions vary considerably among published protocols. Many protocols require pre-coated flasks [9–12,14] and high concentrations of fetal bovine serum (FBS) [9,11], increasing both the cost and complexity of HUVEC culture. A variety of cell culture media can be used for these endothelial cells, such as Medium 200, EBM-2, or Medium 200 with LVES [9–12,14].
Our protocol addresses the challenges in HUVEC isolation by providing a versatile, efficient, and reproducible method for isolating HUVECs. It can be applied to a broad range of umbilical cords varying in length (minimum of 10 cm) and thickness. The protocol emphasizes timely isolation to preserve cell viability and quality, with isolation ideally performed within hours of delivery to enhance sample availability and reduce experimental variability. Efficient enzymatic detachment is achieved using collagenase IV, which ensures effective and selective detachment of endothelial cells from the umbilical vein, minimizing the isolation of non-endothelial cell types and reducing the risk of contamination. Enhanced contamination control is achieved through the inclusion of amphotericin B and penicillin/streptomycin in the culture medium, significantly reducing the risk of contamination and promoting a healthy and stable HUVEC culture. The protocol also offers a cost-effective and straightforward cell culture approach by eliminating the need for pre-coated culture flasks and reducing the requirement for FBS concentrations, making it more accessible to laboratories with limited resources. The standard cell culture conditions (without pre-coating) also simplify the workflow and reduce experimental variability, further enhancing the protocol's practicality and reproducibility.
Materials and reagents
Biological materials
1. Umbilical cord (from C-section, isolation preferably within 24 h)
Reagents
1. Amphotericin B (Fungizone) (PAN Biotech, catalog number: P06-01100)
2. Collagenase IV, ≥125 CDU/mg, solid, 0.5–5.0 FALGPA units/mg solid (Sigma-Aldrich, catalog number: C5138-100MG, Lot: 0000519267)
3. Dimethyl sulfoxide (DMSO) (Th. Geyer, catalog number: A994.2)
4. Dulbecco’s phosphate-buffered saline (DPBS) w/o calcium and magnesium (PAN Biotech, catalog number: P04-36500)
5. Dulbecco’s phosphate-buffered saline (DPBS*) w/ calcium and magnesium (PAN Biotech, catalog number: P04-35500)
6. Endopan 3 Medium kit (PAN Biotech, catalog number: P04-0010K)
7. Ethanol (99.9%) (Chemsolute, catalog number: 2212.5000)
8. Fetal bovine serum (FBS) (PAN Biotech, catalog number: P30-3302)
9. Penicillin/streptomycin (Biowest, catalog number: L0022-100)
10. Trypsin-EDTA (0.05%) (PAN-Biotech, catalog number: P10-027500)
Additional reagents for validation
1. APC anti-human CD31 mouse IgG (BioLegend, catalog number: 303116)
2. Bovine serum albumin (BSA) (Roth, catalog number: 3737.3)
3. DAPI, 1:1,000 (Novus Biologicals, catalog number: NBP2-31156)’
4. Endothelial cell growth medium 2 (ECGM2) (PromoCell, catalog number: C-22011)
5. Glycerol (Sigma-Aldrich, catalog number: 49767)
6. Hydrochloric acid (HCl) (Merck, catalog number: 109057)
7. Medium 199 (PAN Biotech, catalog number: P04-07050)
8. Mowiol 4-88 (Calbiochem, catalog number: 9002-89-5)
9. Paraformaldehyde 4.5% (PFA) (Chemsolute, catalog number: 2135.5000)
10. Primary antibody CD31 monoclonal antibody (mAb) mouse anti-human, 1:100 (DAKO, catalog number: M0823)
11. Primary antibody ZO-1 (D7D12) mAb rabbit anti-human, 1:100 (Cell Signaling Technology, catalog number: 8193)
12. Secondary antibody donkey anti-mouse IgG, Alexa Fluor 488, 1:400 (Thermo Scientific, catalog number: A-21202)
13. Secondary antibody donkey anti-rabbit IgG, Alexa Fluor 555, 1:400 (Thermo Scientific, catalog number: A-31572)
14. Triton X-100 (Merck, catalog number: 1086031000)
15. Tris hydrochloride (Roth, catalog number: 9090.3)
16. Tween-20 (ITW Reagents, catalog number: A4974)
17. ZO-1 polyclonal antibody (Proteintech, catalog number: CL488-21773)
Solutions
1. Collagenase IV solution (see Recipes)
2. Endopan 3 medium (see Recipes)
3. Endopan 3 medium with supplements (Endopan 3 medium**) (see Recipes)
4. Ethanol (70%) (see Recipes)
5. Freezing medium (see Recipes)
Additional solutions for validation
1. Blocking buffer (see Recipes)
2. ECGM2 medium (see Recipes)
3. Endopan 20 medium (see Recipes)
4. FACS buffer (see Recipes)
5. M199 medium (see Recipes)
6. Mixed medium for endothelial cells (see Recipes)
7. Mowiol mounting medium (see Recipes)
8. PFA (0.04%) (see Recipes)
9. PBS-T (see Recipes)
10. Tris-HCl (see Recipes)
11. Triton X-100 (1%) (see Recipes)
Recipes
1. Collagenase IV solution
| Reagent | Final concentration | Volume for one bottle |
|---|---|---|
| DPBS* | n/a | 15 mL |
| Collagenase IV | 0.1% | 15 mg |
2. Endopan 3 medium
| Reagent | Final concentration | Volume for one bottle |
|---|---|---|
| Endopan 3 | n/a | 500 mL |
| 8 supplements from kit | 1× | 800 μL |
| FBS from kit | 1× | 15 mL |
3. Endopan 3 medium**
| Reagent | Final concentration | Volume for one bottle |
|---|---|---|
| Endopan 3 | n/a | 500 mL |
| 8 supplements from kit | 1× | 800 μL |
| FBS from kit | 1× | 15 mL |
| Amphotericin B | 1% | 5.21 mL |
| Penicillin/streptomycin | 1% | 5.21 mL |
4. Ethanol (70%)
| Reagent | Final concentration | Volume for 50 mL |
|---|---|---|
| Sterile water | n/a | 15 mL |
| Ethanol (99.9%) | 70% | 35 mL |
5. Freezing medium
| Reagent | Final concentration | Volume for 50 mL |
|---|---|---|
| Endopan 3 medium | 50% | 25 mL |
| FBS | 40% | 20 mL |
| DMSO | 10% | 5 mL |
Additional recipes for validation
1. Blocking buffer
| Reagent | Final concentration | Volume for 50 mL |
|---|---|---|
| DPBS | n/a | 50 mL |
| BSA | 5% | 2.5 g |
Stir for 1 h at room temperature. Aliquot and use or store at -20 °C.
2. ECGM2 medium
| Reagent | Final concentration | Volume for one bottle |
|---|---|---|
| ECGM2 | n/a | 500 mL |
| 7 supplements from kit | 1× | 700 μL |
| FBS from kit | 1× | 15 mL |
3. Endopan 20 medium
| Reagent | Final concentration | Volume for one bottle |
|---|---|---|
| Endopan 3 | n/a | 500 mL |
| 8 supplements from kit | 1× | 800 μL |
| FBS from kit | 1× | 15 mL |
| FBS | 20% | 110 mL |
4. FACS buffer
| Reagent | Final concentration | Volume for 50 mL |
|---|---|---|
| DPBS | n/a | 45 mL |
| FBS | 10% | 5 mL |
5. M199 medium
| Reagent | Final concentration | Volume for one bottle |
|---|---|---|
| Medium 199 | n/a | 500 mL |
| FBS | 20% | 126.6 mL |
| Penicillin/streptomycin | 1% | 6.4 mL |
6. Mixed medium for endothelial cells
| Reagent | Final concentration | Volume for one bottle |
|---|---|---|
| ECGM2 medium | 50% | 250 mL |
| M199 medium | 50% | 250 mL |
7. Mowiol mounting medium
| Reagent | Final concentration | Volume or quantity |
|---|---|---|
| Mowiol | 9.6% | 4.8 g |
| Glycerol | 24% | 12 g |
| Sterile water | 1× | 15 mL |
| Tris-HCl (0.2 M, pH 8.5) | 20% | 85 mL |
Mix Mowiol and glycerol with frequent agitation for 1 h at room temperature. Add sterile water and use a stir bar and magnetic stirrer to mix for 1 h at room temperature. Add Tris-HCl and incubate for 2 h at 50 °C with occasional stirring (e.g., stir for 2 min every 20 min). Centrifuge at 5,000× g for 15 min. Aliquot the supernatant and store at -20 °C.
8. PFA (0.04%)
| Reagent | Final concentration | Volume for 50 mL |
|---|---|---|
| DPBS | n/a | 49.6 mL |
| PFA 4.5% | 0.04% | 444 μL |
9. PBS-T
| Reagent | Final concentration | Volume or quantity |
|---|---|---|
| DPBS | n/a | 50 mL |
| Tween-20 | 0.1% | 50 μL |
10. Tris-HCl (0.2 M pH 8.5)
| Reagent | Final concentration | Volume for 1 L |
|---|---|---|
| Sterile water | n/a | 1 L |
| Tris hydrochloride | 0.2 M | 24.2 g |
| HCl | 1× | Few drops |
Dissolve Tris hydrochloride in 800 mL of sterile water. While stirring with a stir bar on a magnetic stirrer, dropwise add HCl to adjust the pH to 8.5. Then, add sterile water to a final volume of 1 L. Store at room temperature.
11. Triton X-100 (1%)
| Reagent | Final concentration | Volume for 50 mL |
|---|---|---|
| DPBS | n/a | 45 mL |
| Triton X-100 | 1 ka% | 5 mL |
Laboratory supplies
1. 3-way stopcock (BD Connecta, catalog number: 394602)
2. 50 mL conical tube, sterile (Greiner Bio-One, catalog number: 227271)
3. Aluminum foil (Labsolute, catalog number: 7696857)
4. Buttoned cannula, sterile (Roth, catalog number: HPX9.1)
5. 130 mm clamps, sterile (Roth/Hammacher, catalog number: TC97.1)
6. 300 mL CorningTM sample containers, sterile (Fisher Scientific, catalog number: 10763394)
7. 22 mm diameter coverslips (Sarstedt, catalog number: HPX1.1)
8. Disposable nitrile gloves (Nitril NextGen, catalog number: 1283)
9. 2 mL NalgeneTM cryovials, sterile (Thermo Scientific, catalog number: 5000-0020)
10. Pasteur pipette (Labsolute, catalog number: 7691061)
11. 150 × 20 mm oversized Petri dish (Sarstedt, catalog number: 82.1184.500)
12. Pipette controller (INTEGRA-Biosciences, catalog number: 155016)
13. Scalpel, sterile (Swann-Morton, catalog number: 0507)
14. 100 mL screw container, sterile (Sarstedt, catalog number: 75.562.005)
15. 10 mL serological pipette (Sarstedt, catalog number: 861.254.001)
16. 30 mL syringe, Luer lock (B. Braun, catalog number: 4717304F)
17. Syringe filter, PA, 0.2 μm (Roth, catalog number: XH57.1)
18. Tape (Durapore, 3 M, catalog number: 1538-1)
19. TC flask T75 (Sarstedt, catalog number: 83.3911.002)
20. Tweezer, sterile, straight, blunt (Roth/Roth Selection, catalog number: 2691.1)
Additional laboratory supplies for validation
1. 1.6 mL Eppendorf tubes (Eppendorf, catalog number: 0030120086)
2. FACS tubes (Sarstedt, catalog number: 55.526.006)
3. Glass slides (Marienfeld, catalog number: 08-104-01)
4. 100 mM Parafilm M (Amcor, catalog number: PM999)
5. 200 μL pipette tips (Sarstedt, catalog number: 70.3030-020)
6. TC flask T75 (Sarstedt, catalog number: 83.3910.002)
7. 24 well TC inserts, 8 μM pores (Sarstedt, catalog number: 83.3932.800)
8. 6-well TC plate (Sarstedt, catalog number: 83.3920)
9. 12-well TC plate (Sarstedt, catalog number: 83.39219)
10. 24-well TC plate (Sarstedt, catalog number: 83.3922)
11. Tweezers, blunt and curved (Roth, catalog number: PX30.1)
Equipment
1. Bead bath (Thermo Fisher, model: precision GP10)
2. Centrifuge (Heraeus Instruments, model: Labofuge 400)
3. CO2 incubator (Thermo Scientific, model: HERAcell 150i, catalog number: 51032719)
4. Inverted microscope with integrated camera (Nikon, model: Eclipse TS100)
5. Laboratory balance, 10 mg to 160 g (Sartorius, model: BP161P)
6. Cell culture hood (Thermo Scientific, model: Herasafe 2025 1.2)
7. Water bath (Thermo Scientific, model: TSGP02)
Additional equipment for validation
1. Water purification system (Sartorius, Arium Mini Plus, catalog number: H2O-MA-UV-T)
2. Benchtop centrifuge (Eppendorf, model: 5415D)
3. Brightfield cell counter (DeNovix, model: CellDrop BF, catalog number: I-20103)
4. Chemical fume hood (Köttermann, model: 2-401-DAAAGY)
5. Flow cytometer (Beckman Coulter, model: CytoFLEX S, BE17054)
6. Inverted fluorescence microscope (Olympus, model: IX83)
7. Live-cell analysis system (Sartorius, model: Incucyte® S3, catalog number: 4647)
8. Magnetic stir bars (Roth, catalog number: X171.1)
9. Magnetic stirrer (IKA, RCT basic, catalog number: Z645060)
10. pH meter (Schott Instruments, model: Lab 860)
11. TEER electrode (Merck Millipore, model: Millicell ERS-2 Replacement Electrode, catalog number: MERSSTX01)
12. TEER measurement device (Millicell, model: ERS-2)
Note: Equivalent products from other manufacturers may be used but should be validated before use.
Software and datasets
1. Microsoft Excel (Microsoft Office 2019, version 16.0) for quantitative analyses
2. Fiji (ImageJ, version 1.54) for visual and quantitative analyses
3. FlowJo v10 (LLC.) for FACS data analyses
4. GraphPad Prism 8 for statistical analyses
Procedure
A. Umbilical cord storage
1. Immediately after separation from the placenta and fetus, transfer the UC into a sterile CorningTM sample container containing 100 mL of DPBS*. Store the container at 4 °C until processing.
Note: Although not mandatory, extracting HUVECs on the same day as delivery may improve cell viability. See General note 1.
B. Preparation before HUVEC isolation
1. Prewarm 65 mL of DPBS* and 40 mL of Endopan 3 medium** in the bead bath at 37 °C.
2. Under a sterile cell culture bench, transfer 100 mL of DPBS* into a CorningTM sample container and prewarm it in the bead bath for subsequent incubation of the UC.
3. Prepare two sterile cell culture hoods as outlined in Table 1 and shown in Figure 1A, B.
Table 1. Materials required in the cell culture benches per sample
| Clean hood | Isolation hood |
1× 50 mL conical tube for filtered Collagenase IV solution 2× Pasteur pipettes 1× pipette controller 1× prewarmed Endopan 3 medium** 1× rack for 50 mL conical tubes 1× 30 mL syringe 1× syringe filter | 1× 3-way stopcock 1× 50 mL conical tube for collagenase–cell suspension 1× 50 mL conical tube with prewarmed DPBS* 1× Buttoned cannula*** 2× clamps*** 1× CorningTM sample container filled with prewarmed DPBS* 1× oversized Petri dish 1× rack for 50 mL conical tubes 1× scalpel 2× 30 mL syringes 1× tweezers*** 1× screw container |
*** Optional: Can be autoclaved and reused.
C. Preparation of collagenase IV working solution
1. Add 15 mg of Collagenase IV powder to a 50 mL sterile conical tube.
2. Under the clean cell culture bench, resuspend in 1 mL of DPBS*. Add 14 mL of DPBS* and mix gently to obtain 15 mL of collagenase IV working solution. See General note 2.
3. Transfer the solution to a 30 mL syringe.
4. Filter the solution through a 0.2 μm PA filter into a sterile 50 mL conical tube. See Figure 1C.
Note: To facilitate drawing the solution into the syringe, first draw 3 mL of air into the syringe, then invert and draw the collagenase solution (seeFigure 1C). See the main steps of HUVEC isolation and preparation inVideo 1.
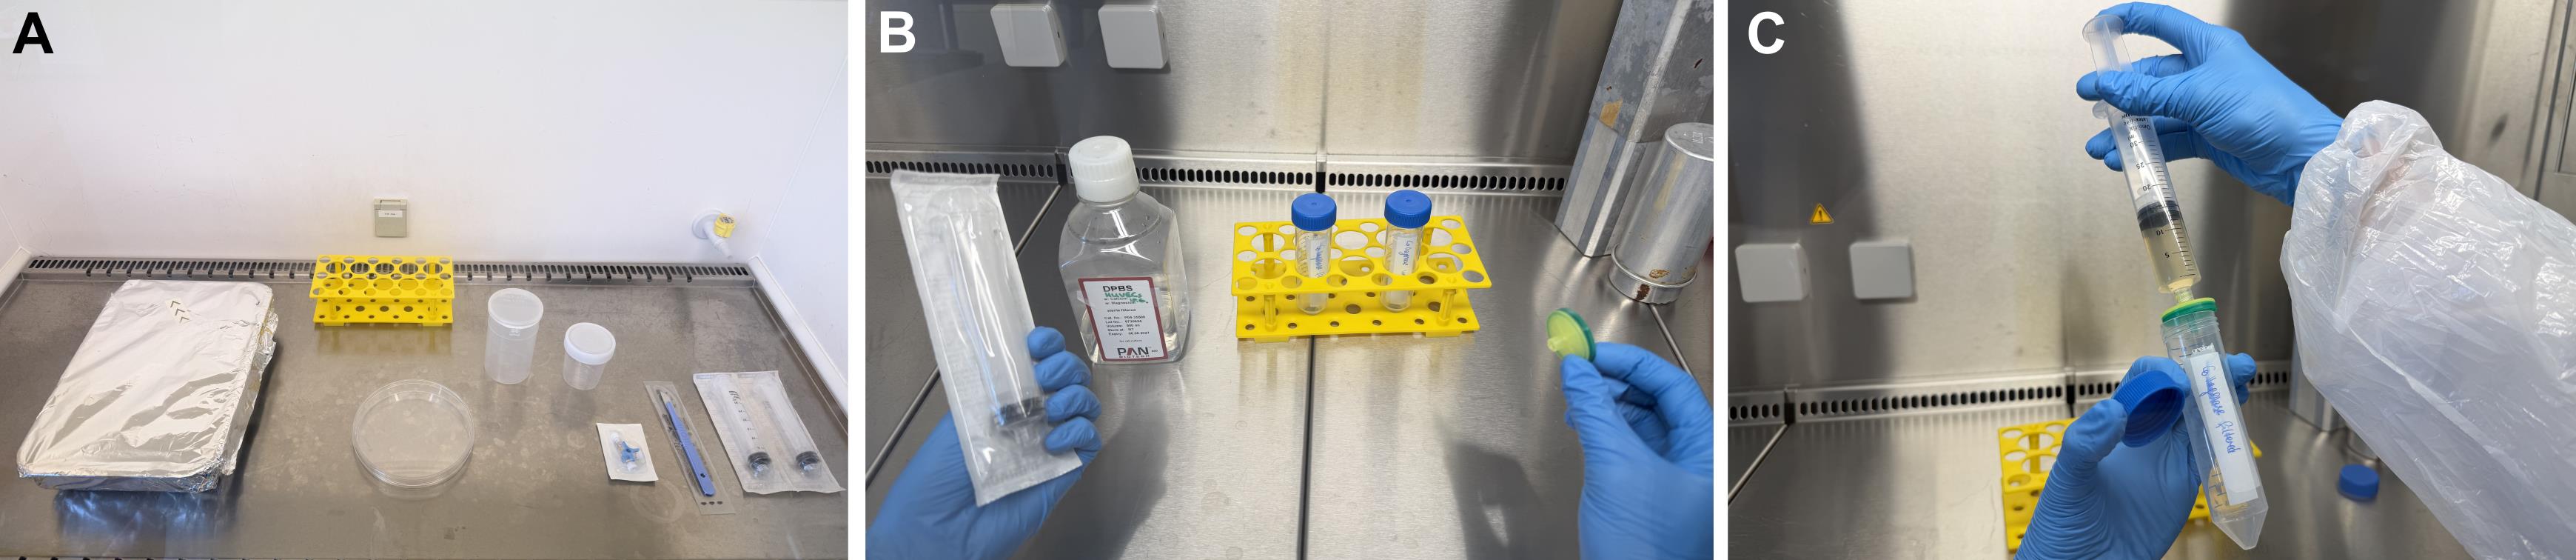
Figure 1. Preparation for human umbilical vein endothelial cell (HUVEC) isolation. (A) Preparation of the isolation hood. (B) Materials in the clean hood. (C) Sterile filtration of the collagenase IV solution.

D. HUVEC isolation
1. Remove the UC from the CorningTM sample container and place it in an oversized sterile Petri dish under the prepared isolation hood. See General note 3.
2. Inspect the proximal and distal ends of the UC. If the ends are damaged or torn, trim 1 cm from each end using a sterile scalpel.
Note: If the UC is longer than 20 cm, cutting it into shorter pieces is recommended to facilitate handling and minimize mechanical stress.
3. Identify the umbilical vein by gently compressing the UC from all sides toward the cut end. Because the vein wall contains less muscular tissue than the arterial walls, blood will leak from the vein, facilitating identification of the correct blood vessel, as shown in Figure 2A.
4. Insert a buttoned cannula into the lumen of the umbilical vein.
Critical: Insert the cannula gently to avoid perforating the vein wall.
Note: If resistance is encountered during insertion, retry from the other end of the UC.
5. Secure the cannula in place using a sterile clamp, leaving a distance of 2 cm from the vein opening.
6. Attach a 3-way stopcock to the cannula, as shown in Figure 2B.
7. Fill a 30 mL syringe with 20 mL of DPBS* and attach it to the straight port of the 3-way stopcock. Gently flush the vein to remove residual blood.
Note: To dislodge blood clots, gently massage the vein with two fingers while flushing.
8. Inspect the vein for perforations during flushing. If leaks are observed, excise the damaged segment with a sterile scalpel. Repeat the flushing step and recheck for leakage.
Caution: Take particular care when cutting to prevent injury.
Critical: Ensure the vein is intact to prevent leakage of the collagenase solution during enzymatic incubation.
9. Flush the vein again with 15 mL of DPBS*.
10. Fill a 30 mL syringe with the sterile collagenase IV working solution. Ensure the syringe is free of air bubbles to prevent interference with the injection process and potential reduction in the effectiveness of the enzymatic detachment.
11. Attach the syringe containing the collagenase IV solution to the 3-way stopcock and slowly inject the solution until the first drops emerge from the distal end of the UC. Immediately seal the distal end of the UC with a second sterile clamp to prevent leakage of the collagenase solution during enzymatic incubation. See Figure 2C.
12. Inject the remaining collagenase IV solution into the vein until it is fully distended. Verify filling by visual inspection and gentle palpation.
Note: Adjust the volume according to the cord length and pressure felt during gentle palpation of the UC.
Caution: Take care not to overfill the vein to prevent rupture.
13. Place the UC in the CorningTM sample container with prewarmed DPBS*, including cannula and clamps as shown in Figure 2D.
Note: Position the clamps as far inside the container as possible to prevent the container from tipping over.
14. To minimize the risk of contamination during incubation outside the cell culture hood, prepare a sterile barrier for the container. Sterilize a piece of aluminum foil by spraying it with 70% ethanol and allowing it to dry completely. Use the sterilized foil as a lid to cover the container, ensuring a tight seal with Durapore tape to maintain a sterile barrier.
Note: This step is critical to prevent contamination of the collagenase-filled cord during the incubation period. Refer to Figure 2E for visual guidance on the setup.
15. Incubate the collagenase-filled UC in a water bath at 37 °C for 15 min.
Note: The collagenase incubation time was limited to provide sufficient detachment of endothelial cells while minimizing prolonged enzymatic exposure and potential cell damage.
Critical: Do not use the same bath device used to prewarm the DPBS* and Endopan 3 medium** for incubating the UC to minimize the risk of cross-contamination.
16. Remove the UC from the water bath and proceed under the isolation hood. Remove the aluminum foil, take the UC out of the container using sterile tweezers, and position it over a sterile 50 mL conical tube.
17. Release the distal clamp and gently massage the vein from the proximal to the distal end to expel the collagenase solution into the tube as shown in Figure 2F.
Caution: Do not massage the UC more than five times and for longer than 90 s in total to facilitate endothelial cell detachment while minimizing excessive mechanical stress and potential contamination with other cell types.
18. Once most of the collagenase solution is transferred into the 50 mL conical tube, flush the vein with 15 mL of DPBS* to recover the remaining collagenase–cell suspension.
19. Centrifuge the collected cells at 400× g for 5 min at room temperature.
20. During centrifugation, discard the UC into the screw container and clear the isolation hood. See General note 3.
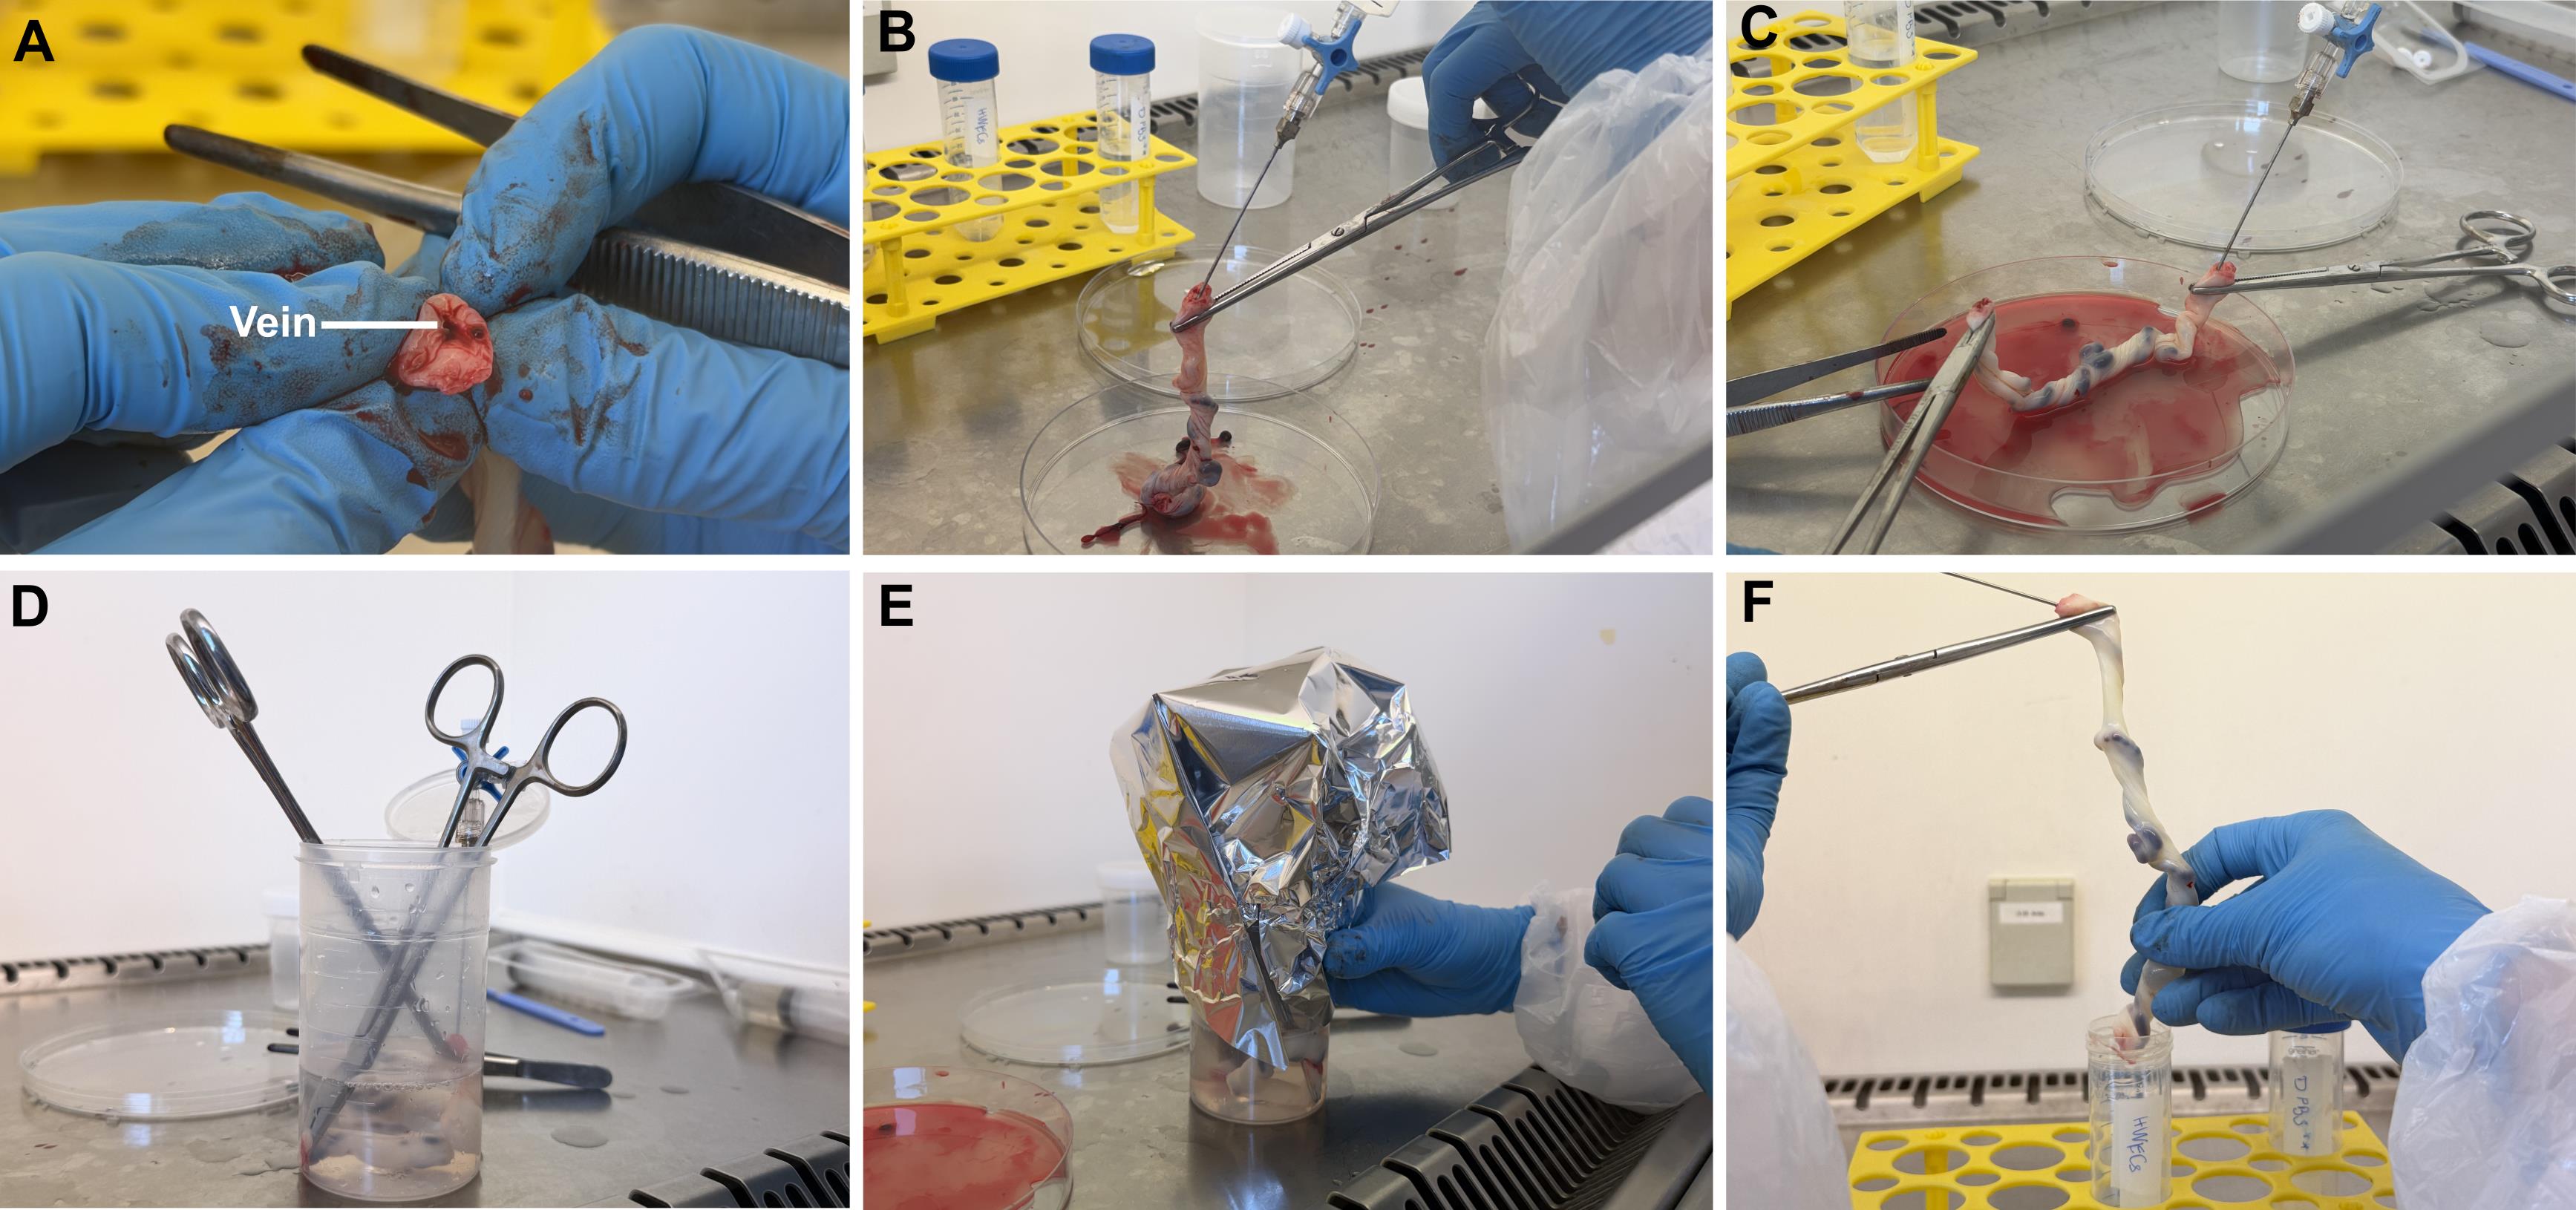
Figure 2. Critical steps in the human umbilical vein endothelial cell (HUVEC) isolation procedure. (A) Identification of the correct umbilical vein. (B) Setup for cannulation of the umbilical vein. (C) Application of collagenase IV solution. (D) Setup for incubation. (E) Incubation setup to minimize contamination risk. (F) Collection of the collagenase–cell suspension.
E. Cell culture under a clean cell culture bench
1. After centrifugation, carefully aspirate the supernatant, leaving approximately 5 mL to avoid disturbing the loose cell pellet.
Critical: The pellet is fragile; aspirate slowly to maximize cell recovery.
2. Add 10 mL of Endopan 3 medium** and carefully resuspend, as the HUVECs can be fragile at this stage.
3. Centrifuge the suspension again at 400× g for 5 min at room temperature to remove any remaining collagenase and cell debris.
4. Aspirate the supernatant carefully. Resuspend the cell pellet in 10 mL of Endopan 3 medium** using a 10 mL serological pipette.
5. Transfer the cell suspension into a T75 cell culture flask.
Note: The initial cell yield varies considerably among individual UCs, particularly depending on cord length and quality. As cells are not routinely counted immediately after isolation in this protocol, a reliable absolute cell number per UC cannot be provided. Typically, however, the isolated cells reach confluence in a T75 culture flask approximately 5 days after isolation, depending on the initial cell yield.
6. Add 10 mL of Endopan 3 medium** to bring the total volume to 20 mL for culture at passage 0.
Note: The cell suspension may appear red due to residual erythrocytes. Therefore, HUVECs may not be clearly visible until the washing step on the following day. See General note 3.
F. Cell expansion and cryopreservation
1. On day 1 post-isolation, aspirate the culture medium.
2. Wash the cell monolayer by carefully adding 5 mL of DPBS to the cell culture flask and incubating for 1 min before aspirating. Repeat the wash at least three times or more, until the resulting DPBS washing solution is clear, and cells are mostly free from cell debris and other non-adherent cell types. During the initial stages of cell culture, some residual debris may still be present in the TC flask. However, this is expected to diminish over time as the cells proliferate and the medium is exchanged. This process is visually demonstrated in Figure 3, which shows the gradual reduction of debris as the HUVECs grow and the medium is refreshed.
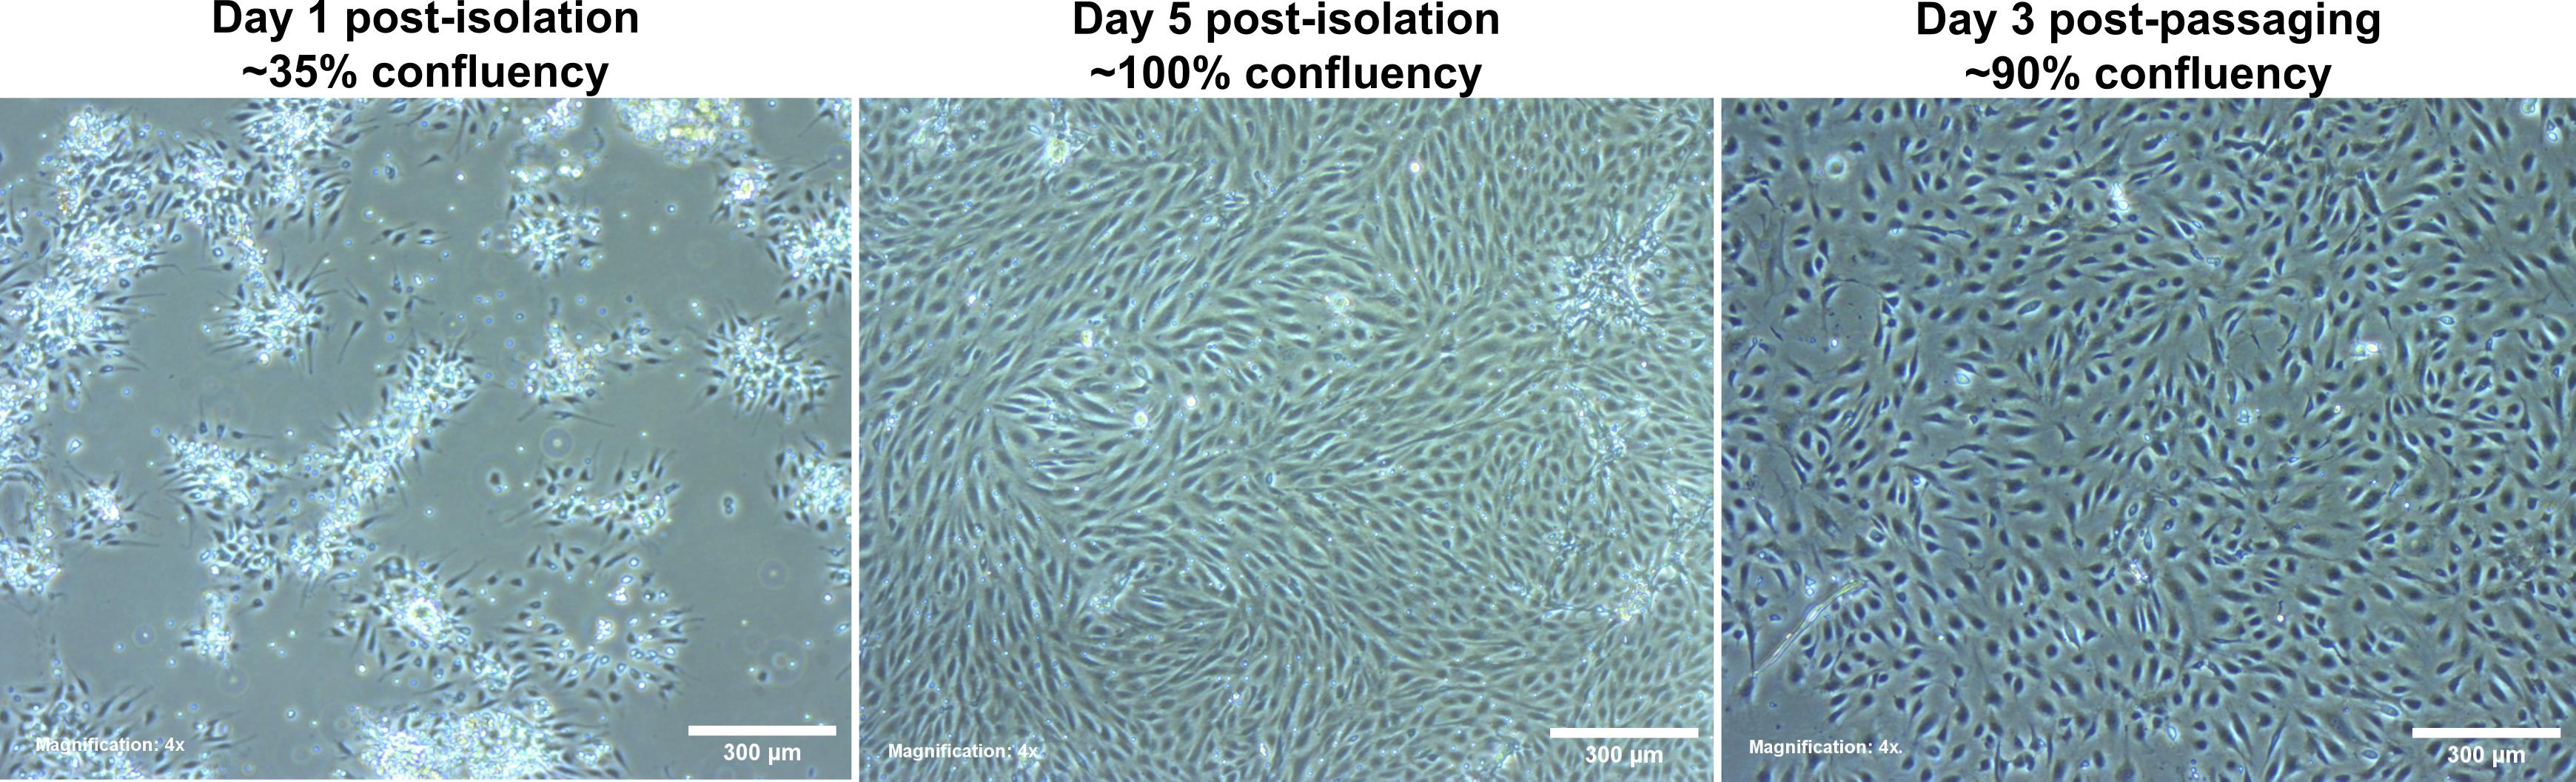
Figure 3. Microscopy images of freshly isolated human umbilical vein endothelial cells (HUVECs). (Left) Day 1 post-isolation in Endopan 3 medium**. (Middle) Day 5 post-isolation in Endopan 3 medium**. (Right) Day 3 post-passaging in Endopan 3 medium. Magnification: 4×.
3. Add 20 mL of fresh Endopan medium**.
4. Perform a complete medium exchange every 2 days. Once cells reach 80%–90% confluence, passage them with 0.05% Trypsin-EDTA for experimental use or for cryopreservation in 1 mL of freezing medium per NalgeneTM cryovial. One confluent T75 flask serves five cryovials. Freeze the cryovials at a controlled cooling rate of approximately 1 °C/min and subsequently store the frozen cells at -150 °C.
Note: After the first passage, use Endopan 3 medium without supplemented amphotericin B and penicillin/streptomycin. HUVECs should not be used beyond passage 5 due to a shift to an inactive proliferation state. See General notes 4–6.
5. When thawing HUVECs, make sure to resuspend the cells in freezing medium quickly in Endopan 3 medium in order to dilute the cell-toxic DMSO. Place the cells in a 15 mL conical tube, centrifuge at 300× g for 5 min at room temperature, and aspirate the medium, leaving only the cell pellet. Resuspend in the needed volume of Endopan 3 medium and incubate under humidified conditions at 37 °C and 5% CO2.
Validation of protocol
This protocol enabled the successful isolation of HUVECs from 45 individual UCs. The isolated cells were subsequently employed in experimental assays and demonstrated robust viability following cryopreservation and thawing, with no signs of cellular degeneration or loss of function.
To confirm the identity of the isolated cells, the expression of CD31 (platelet endothelial cell adhesion molecule-1, PECAM-1) was assessed by flow cytometry (FACS) and immunofluorescence staining.
It is commonly known that HUVECs, when freshly isolated, retain progenitor characteristics and can be stimulated to differentiate into mature endothelial cells by supplements added to the culture medium [4,15].
As the effect of FBS has already been previously examined, a concentration of 20% FBS was selected to differentiate HUVECs and thereby increase the potential expression of endothelial cell-specific marker CD31. As a key mediator of cell–cell adhesion during leukocyte diapedesis, CD31, a transmembrane glycoprotein, is a well-established marker for endothelial lineage, and its consistent expression supported the endothelial phenotype of cultured HUVECs, as illustrated in Figure 4.
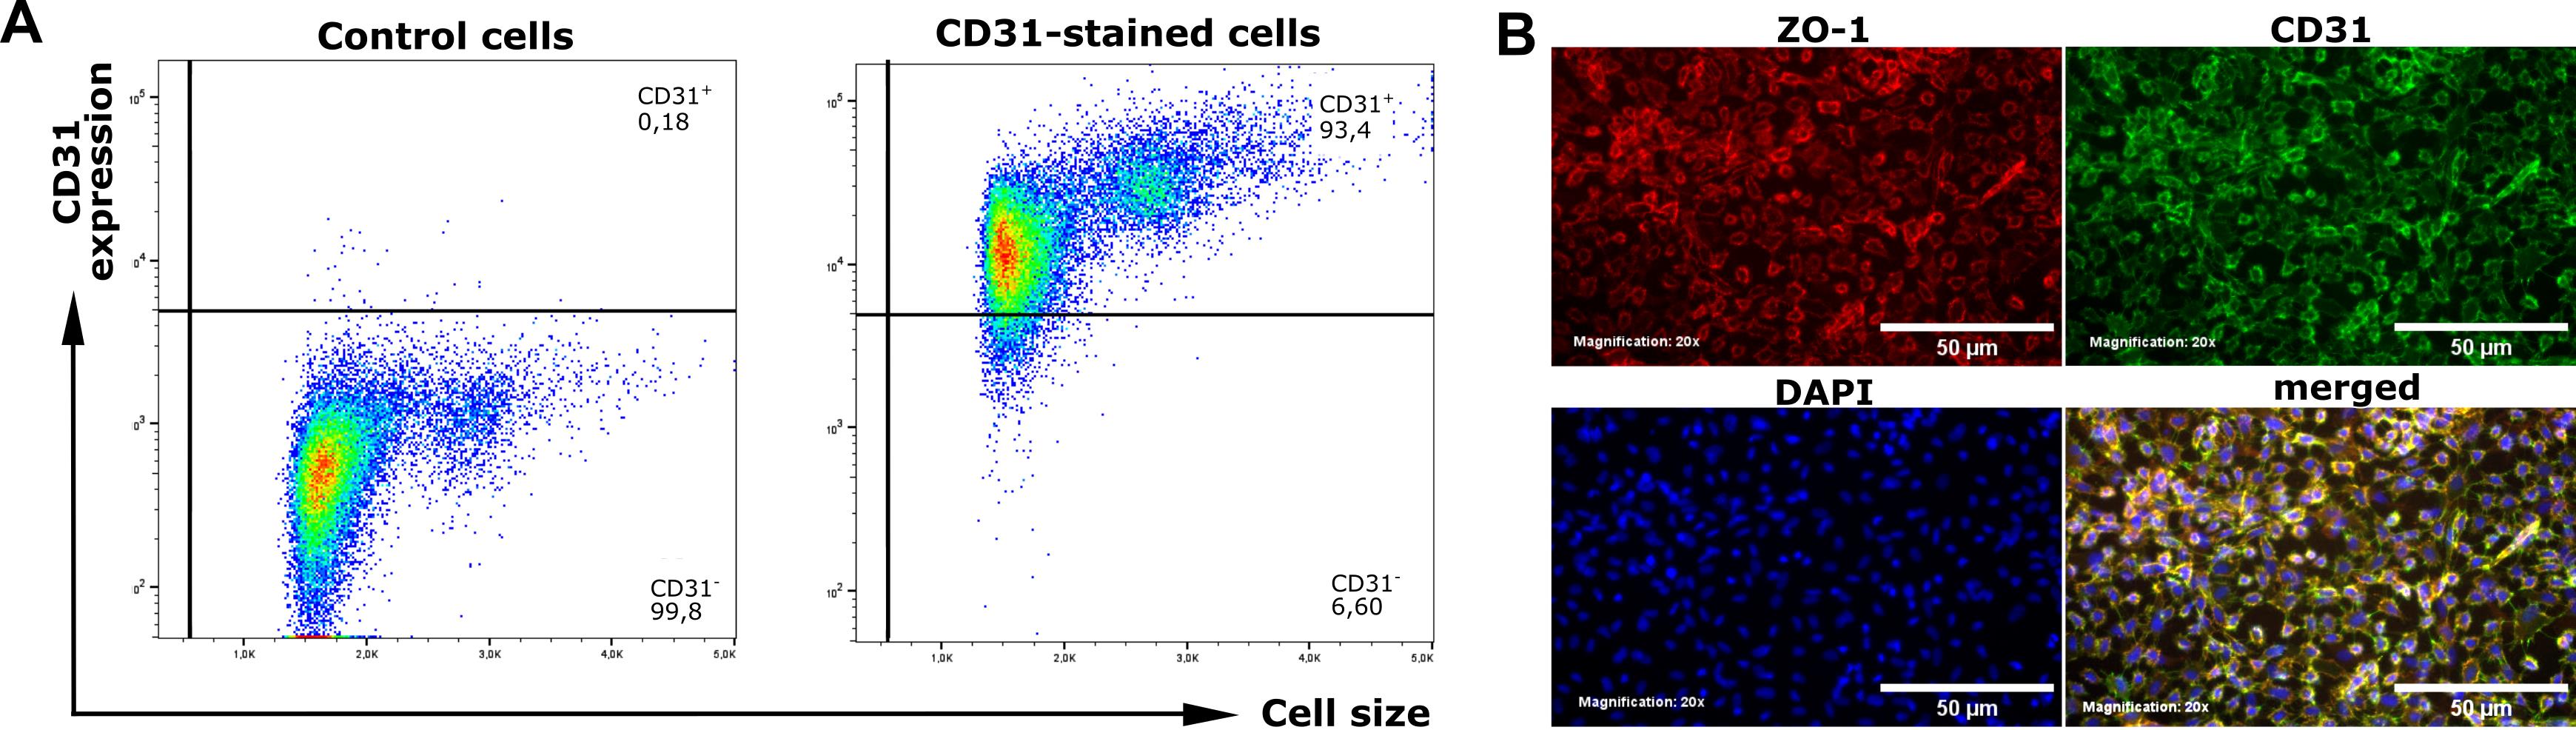
Figure 4. Phenotype confirmation based on CD31 expression after culture in Endopan 20 medium for 10 days at passage 1. (A) Dot plots of FACS analysis showing the gating of CD31-positive cells within the FSC/SSC-gated cell population in unstained control cells (left panel) and CD31-stained cells (right panel) from the same donor. (B) Immunofluorescence staining of nuclei (DAPI, blue), CD31 (green), and the tight junction-associated protein ZO-1 (red), demonstrating the formation of intercellular junctions within the endothelial monolayer. Magnification: 20×.
A. FACS staining
1. Preparation of cells: Culture HUVECs in a T75 flask in Endopan 3 medium under humidified conditions at 37 °C and 5% CO2 until they reach approximately 80% confluence. See General note 6.
2. Day 0: HUVEC seeding
a. Wash with 5 mL of DPBS and trypsinize with 2 mL of 0.05% trypsin-EDTA. See General note 5.
b. For triplicate cultures, seed 1 × 10⁵ cells per well in three wells of a 6-well plate in 2 mL of Endopan 20 medium and culture for 10 days.
Note: Refresh the medium every 2–3 days.
3. Day 10: Staining and FACS
a. Wash cells with 2 mL of DPBS per well and trypsinize with 1 mL of 0.05% trypsin-EDTA. See General note 5.
b. Stop the enzymatic activity by adding 2 mL of FACS buffer per well.
c. Transfer the cell suspension from each well into a separate 50 mL conical tube and count the cells.
d. Transfer 1 × 10⁶ cells into a 1.6 mL Eppendorf tube. Use a benchtop centrifuge to spin cells in Eppendorf tubes at 400× g for 6 min.
e. Pool the remaining cells for use as an unstained negative control for gating during flow cytometry. Transfer the pooled cells into a FACS tube and continue the staining procedure with the counted cells in Eppendorf tubes only.
f. During centrifugation, prepare the staining solution: Add 5 μL of APC anti-human CD31 mouse IgG to 100 μL of FACS buffer per sample.
g. Aspirate the supernatant in Eppendorf tubes and resuspend each cell pellet in 100 μL of staining solution. Incubate for 30 min in the dark at room temperature.
h. After incubation, centrifuge again at 400× g for 6 min. Carefully aspirate the supernatant and resuspend the cell pellet in 250 μL of FACS buffer. Transfer to corresponding pre-labeled FACS tubes.
i. Perform flow cytometry using the APC channel (633 nm). Analyze data via FlowJo. Representative results are shown in Figure 4A.
B. Immunofluorescence staining
1. Preparation of cells: Culture HUVECs in a T75 cell culture flask in Endopan 3 medium under humidified conditions at 37 °C and 5% CO2 until they reach approximately 80% confluence. See General note 6.
2. Day 0: HUVEC seeding
a. Wash with 5 mL of DPBS and trypsinize with 2 mL of 0.05% trypsin-EDTA. See General note 5.
b. For triplicate cultures, use three wells of a 6-well plate and seed 1 × 10⁵ cells per well onto coverslips in 2 mL of Endopan 20 medium and culture for 10 days.
Note: Refresh the medium every 2–3 days.
3. Day 10: Cell fixation
a. Prepare a fresh 6-well plate by adding 2 mL of DPBS to each well.
b. Transfer each coverslip into one of the prepared wells.
Note: To facilitate handling, use a 200 μL pipette tip to lift the coverslips and transfer them into the wells containing DPBS, using tweezers for assistance.
4. Fix the cells on the coverslips by aspirating DPBS and adding 1 mL of PFA (4.5%) per well. Incubate for 15 min at room temperature.
5. Wash three times with 2 mL of DPBS.
6. For short-term storage of fixed coverslips until the day of immunofluorescence staining, add 2 mL of 0.04% PFA in DPBS, seal the lid with Parafilm to prevent evaporation of the toxic PFA solution, and store at 4 °C.
7. Staining day 1
Note: Perform the following steps under a chemical fume hood.
a. If the samples were stored at 4 °C, remove the 6-well plate containing fixed cells on coverslips from the refrigerator and allow it to acclimate to room temperature for 15 min. Aspirate PFA (0.04%) from the wells and wash three times with 2 mL of DPBS per well for 5 min each.
b. Permeabilize cells with 2 mL of Triton X-100 (1% in DPBS) per well for 10 min.
c. Wash three times with 2 mL of DPBS per well for 5 min each.
d. Block cells with 5% BSA in DPBS to prevent nonspecific binding. Incubate for 1 h at room temperature.
e. During incubation, prepare 100 μL of primary antibody solution in 5% BSA in DPBS per coverslip, combining CD31 monoclonal antibody (mAb) for endothelial cells, mouse anti-human (1:100); and ZO-1 (D7D12) mAb rabbit anti-human (1:100).
f. Use the lid of the 6-well plate as a support during primary and secondary antibody staining. At the end of the blocking step, prepare the lid of the 6-well plate by labeling it and cover it with Parafilm.
Caution: Avoid creating wrinkles, which may cause uneven distribution of staining solution during subsequent steps.
g. Apply the staining solution onto cells on coverslips by adding 100 μL of staining solution onto the Parafilm and placing one coverslip on the drop, cells facing down.
Note: To prevent air bubble formation between the cells and the staining solution, gently place the edge of the coverslip near the drop and slowly lower the remainder until the coverslip lies flat on the surface.
h. Incubate overnight at 4 °C in a humid, light-tight box to prevent the samples from drying.
8. Staining day 2
a. On the following day, remove the coverslips from the plate lid and transfer them back into wells with the cells facing up.
b. Wash three times with 2 mL of PBS-T per well for 5 min each.
c. Prepare 650 μL of secondary antibody solution, including DAPI, to have 100 μL per coverslip.
d. Prepare the lid of the 6-well plate with Parafilm, as described in step 7f.
e. Apply 100 μL of staining solution as a drop onto the Parafilm and place one coverslip onto the drop, cells facing down, as previously described.
f. Incubate for 2 h at room temperature in a dark, humid chamber.
g. After incubation, transfer coverslips back into wells with the cells facing up and wash three times with 2 mL of PBS-T for 10 min each.
h. To prepare cells for fluorescence microscopy, mount coverslips on glass slides with Mowiol mounting medium. Add 20 μL of Mowiol mounting medium as a drop on a glass slide and transfer one coverslip onto the drop, cells facing down. Allow the mounting medium to solidify for at least 3 h in the dark at room temperature, preferably overnight.
Critical: Protect the samples from light, as exposure can reduce fluorescence intensity and thereby compromise imaging quality and quantification accuracy.
i. Acquire microscope images of the stained cells with an inverted fluorescence microscope at 20× magnification.
Note: Use consistent exposure settings across all samples. Representative results are shown in Figure 4B.
9. Optimization of cell culture media for HUVEC culture
To establish optimal cell culture conditions for freshly isolated HUVECs, different culture media were tested. HUVEC culture in ECGM2 followed by a switch to a 1:1 mixture with M199 medium is a well-established approach [16]. To assess potential improvement in endothelial barrier integrity, this medium formulation was compared with Endopan 3 medium, an endothelial cell-specific culture medium, which was supplemented to a final concentration of 20% FBS—matching the serum content of the ECGM2/M199 mixture. The comparison was conducted over a period of 10 days, and transendothelial electrical resistance (TEER) measurements were performed to assess the development and stability of the endothelial barrier.
C. Testing different cultivation media for HUVECs
1. Cell culture and preparation: Culture HUVECs in Endopan 3 medium under humidified conditions at 37 °C and 5% CO2 until two T75 flasks reach approximately 80% confluence. See General note 6.
2. Day 0: Experimental setup and membrane equilibration
a. Prepare 7 mL of each medium—Endopan 20 medium containing 20% FBS and ECGM2 medium—in separate 50 mL conical tubes.
b. Prepare one 24-well plate with eight Transwell inserts of 8 μm pore size.
Note: In this study, 8-μm pore inserts were selected, as this pore size is required for subsequent transmigration experiments involving breast cancer cells across the endothelial monolayer. However, smaller pore sizes may be suitable for other variants of endothelial barrier assays using different cancer cell types.
3. Use three inserts per condition and one additional insert cell-free as a negative control for normalization of TEER values for each condition, as outlined in Table 2.
Table 2. Experimental setup to compare endothelial cell-specific media for HUVEC cultivation
| Condition 1 Endopan medium | Condition 2 ECGM2/M199 mixed medium | |
| Day 0 | Baseline TEER measurements Seed HUVECs in Endopan 20 medium in three inserts. Prepare one insert as the negative control. | Baseline TEER measurements Seed HUVECs in ECGM2 medium in three inserts. Prepare one insert as the negative control. |
| Day 3 | Medium exchange with Endopan 20 medium | Transition of cultivation medium: Medium exchange with a 1:1 mixture of ECGM2 and M199 medium |
| Day 7 | Medium exchange with Endopan 20 medium; TEER measurements | Medium exchange with 1:1 mixed medium; TEER measurements |
| Day 10 | Medium exchange with Endopan 20 medium; TEER measurements | Medium exchange with 1:1 mixed medium; TEER measurements |
4. For equilibration of Transwell insert membranes, add 1 mL of the respective medium to the lower chamber and 400 μL to the upper chamber; incubate for 1 h under humidified conditions at 37 °C and 5% CO2.
Note: When working with TC-inserts in 24-well plates, use 1 mL in the lower chamber and 400 μL in the upper chamber of the system.
5. Day 0: Baseline TEER measurements: After membrane equilibration, measure TEER as follows:
a. Prepare 40 mL of 70% ethanol and 40 mL of DPBS in separate 50 mL conical tubes.
b. Calibrate TEER electrodes in ethanol (70%) for 15 min under the sterile cell culture hood.
c. Rinse the electrodes by dipping them into DPBS 3–4 times. Allow excess DPBS to drip off before measurement to prevent transfer of residual liquid to the cell culture.
d. Measure TEER by placing the longer electrode in the lower chamber and the shorter electrode in the upper chamber of the Transwell system. Ensure both electrodes are fully immersed in the medium without contacting the insert bottom during the measurement.
Critical: Avoid any contact with the insert membrane to prevent mechanical damage to the cell monolayer and preserve endothelial barrier integrity. Maintain consistent electrode positioning to ensure comparable TEER values.
e. Perform three consecutive measurements per insert and clean the electrode between measurements with 70% ethanol and DPBS as described above. Calculate the average TEER value for every well and normalize to values of the negative control wells to compensate for daily variations.
6. Day 0: Cell seeding
a. During membrane equilibration, trypsinize and count HUVECs and prepare for seeding. See General note 5.
b. Add fresh medium to four inserts per condition.
c. Seed 3 × 10⁵ cells per insert in 400 μL of the corresponding medium. Use three inserts per condition as outlined in Table 3 to obtain technical triplicates.
Table 3. Seeding scheme for comparison of endothelial cell-specific cultivation media in a 24-well plate
Condition 1 Endopan medium | 300,000 HUVECs Endopan medium (20% FBS) | 300,000 HUVECs Endopan medium (20% FBS) | 300,000 HUVECs Endopan medium (20% FBS) | w/o cells Endopan medium (20% FBS) |
Condition 2 Mixed medium | 300,000 HUVECs ECGM2 medium | 300,000 HUVECs ECGM2 medium | 300,000 HUVECs ECGM2 medium | w/o cells ECGM2 medium |
d. Add 400 μL of culture medium to the remaining insert designated as a negative control for each experimental condition (see Table 3). These cell-free inserts allow background correction and normalization of TEER measurements during the assessment of endothelial barrier integrity.
e. Incubate under humidified conditions at 37 °C and 5% CO2 for the following three days to allow for cell attachment, spreading, and initial growth (see Table 2).
7. Day 3: Medium exchange and medium transition
a. On day 3 after seeding, perform a complete medium exchange in all wells and inserts. Use Endopan 20 medium for condition 1. For condition 2, prepare 7 mL of a 1:1 mixture of ECGM2 medium and M199 medium (see Table 3).
Note: Always aspirate medium from the lower well first, before aspirating from the insert. Proceed similarly for adding medium.
Critical: During aspiration and medium replacement, avoid contact with the cell monolayer to prevent mechanical disruption of the endothelial barrier. Use gentle, controlled pipetting and position the pipette tip along the insert wall to minimize fluid disturbance and protect the monolayer.
b. Incubate the 24-well plate under humidified conditions at 37 °C and 5% CO2.
8. Days 7 and 10: Medium exchange and TEER measurements
a. On day 7 after seeding, refresh the medium in all wells and inserts, as outlined in Table 3.
b. After medium exchange, measure TEER. See steps 5a–e.
c. Repeat medium refreshment and TEER measurements on day 10 after seeding to monitor the progression and integrity of endothelial barrier formation of HUVECs (see Table 3). Representative results are shown in Figure 5.
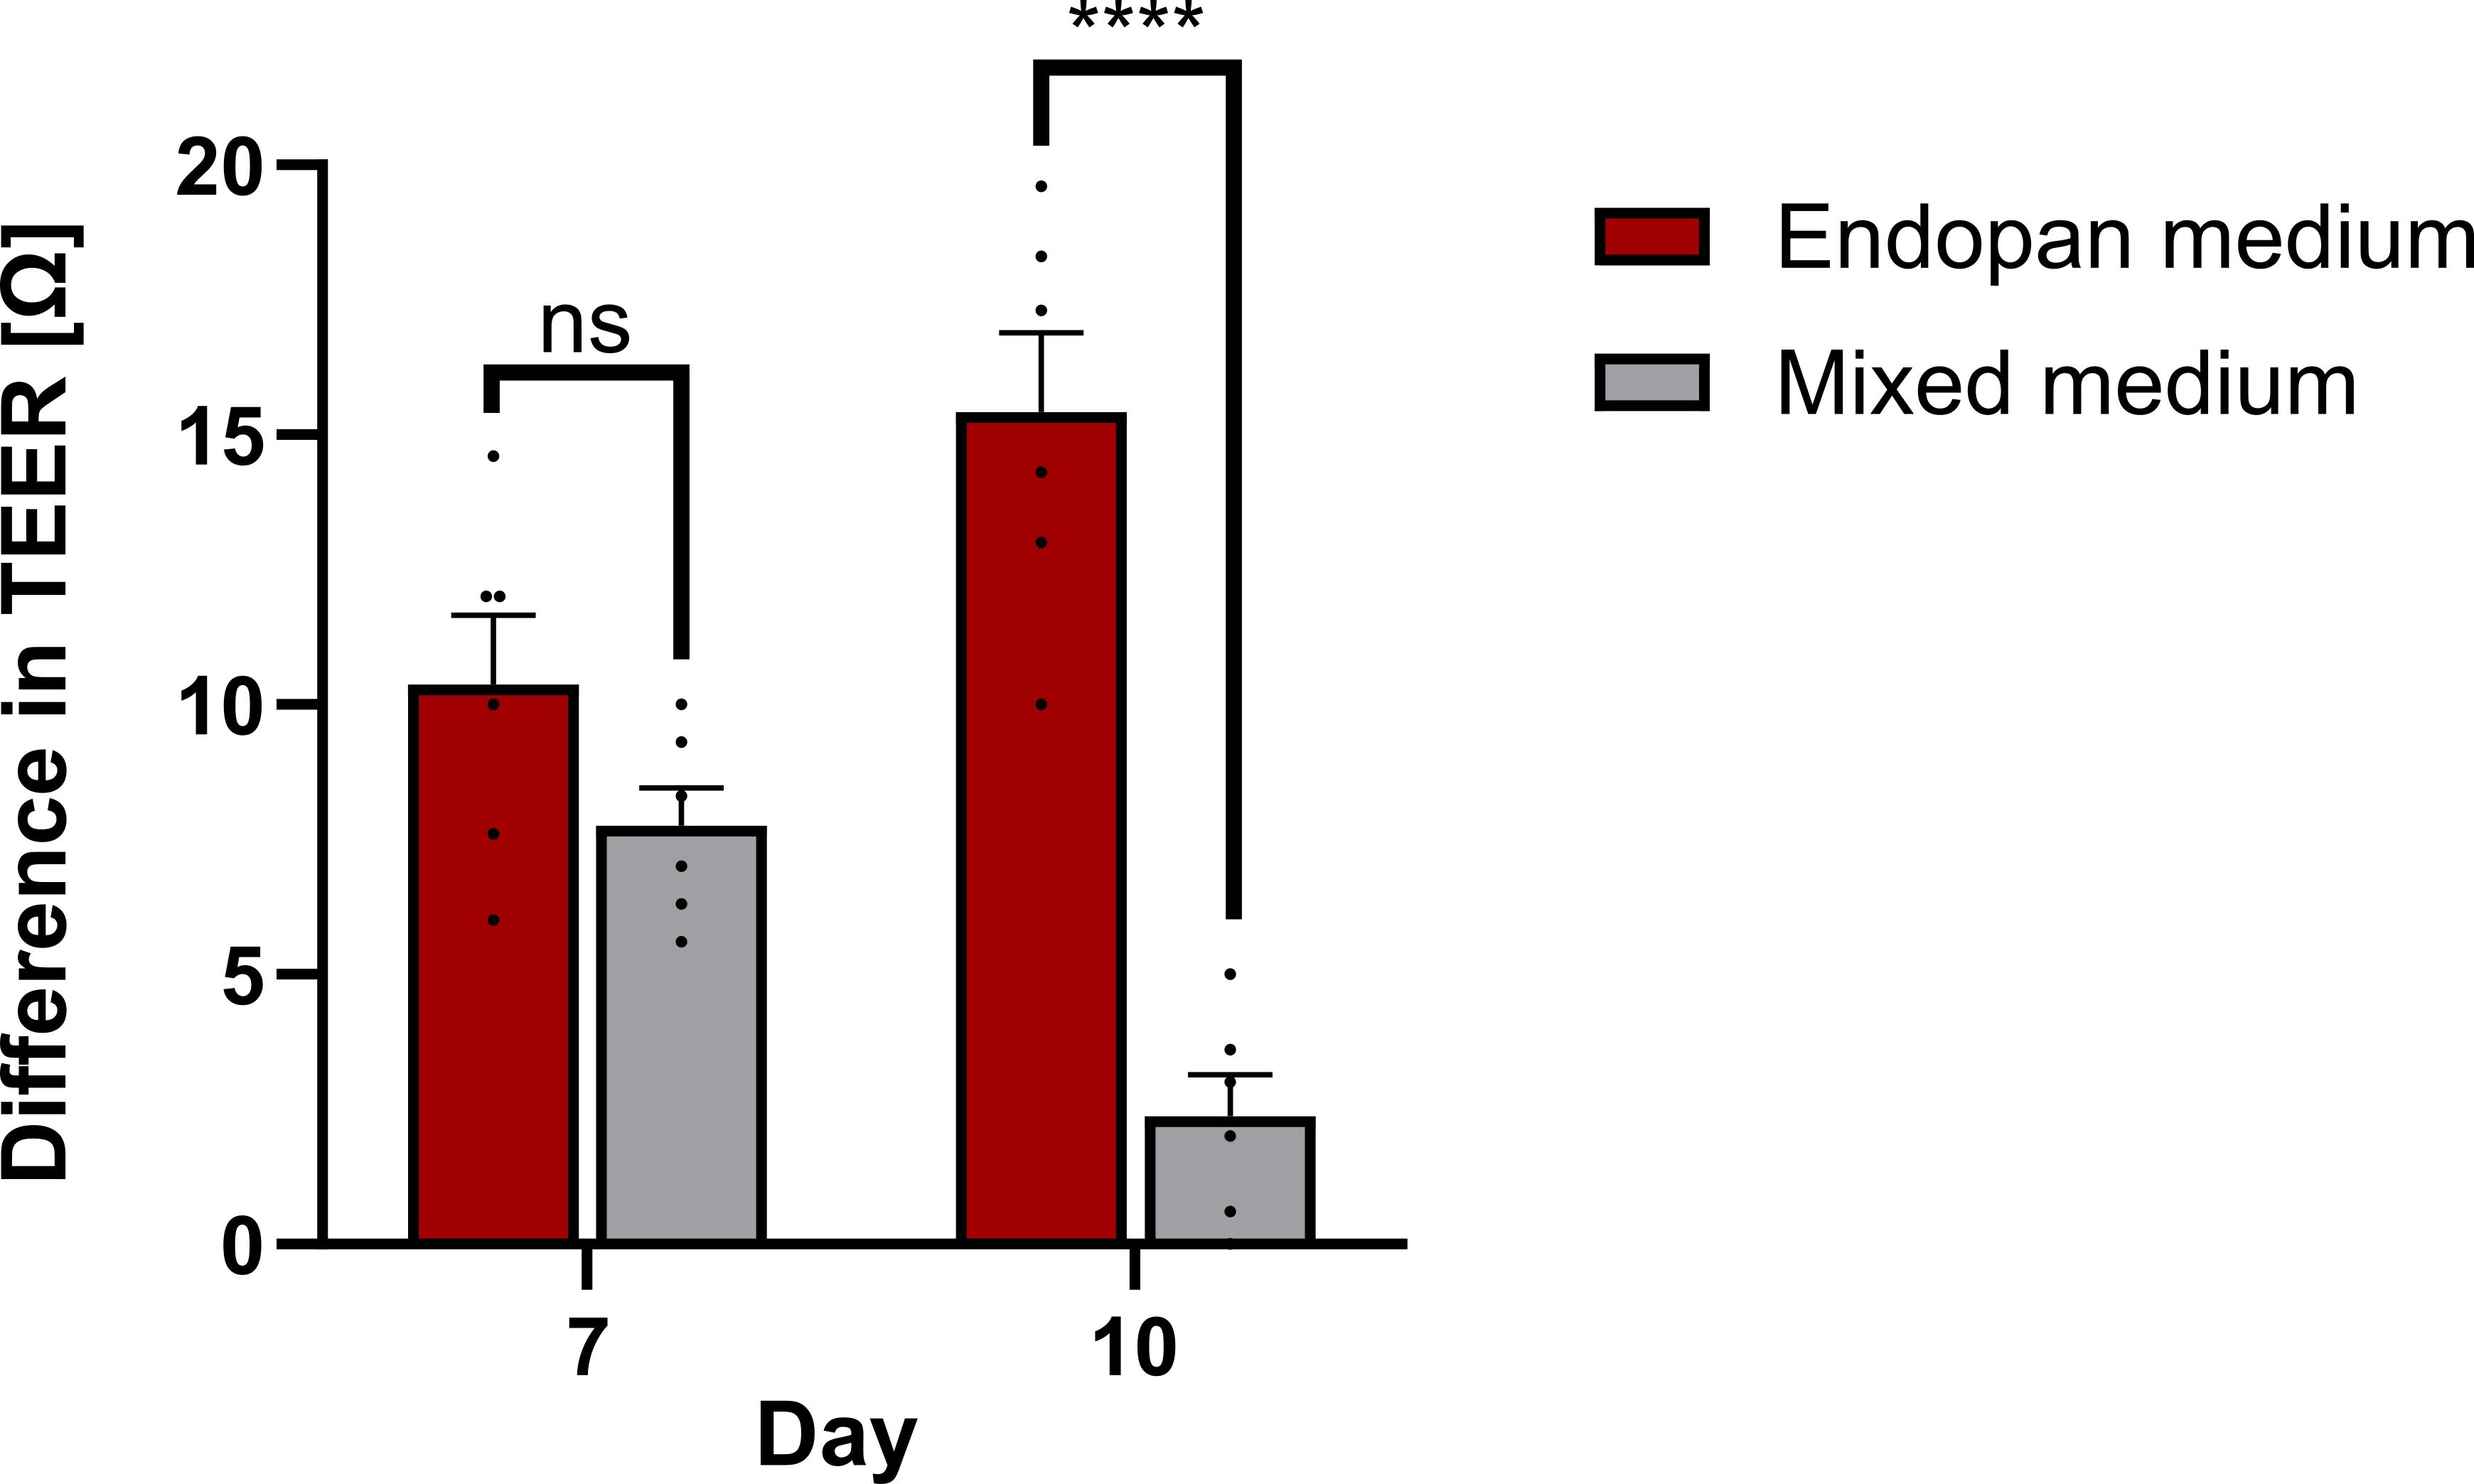
Figure 5. Comparison of HUVEC culture media. Changes in TEER of HUVECs on day 7 and day 10 post-seeding, relative to the baseline measurement on day 0, following cultivation in different culture media. Data represent the mean and SEM from six technical replicates. Statistical significance was assessed using unpaired Student’s t-tests; ns, non-significant; **** p < 0.001.
D. Qualitative and functional assessment of higher passages
To assess the stability of endothelial characteristics in HUVECs across increasing passage numbers, we performed morphological analysis and FACS for the endothelial membrane marker CD31 and the tight junction protein ZO-1. Morphologically, HUVECs from passages 2–5 formed a typical cobblestone-like monolayer during 10 days of culture. Across four biological replicates, HUVECs at passages 6 and 7 showed strongly reduced proliferation properties after seeding and did not form a confluent monolayer (see Figure 6A). FACS analysis of the markers CD31 and ZO-1 revealed a decrease in expression from passage 4 onward. While slightly decreased, passage 5 remains within an acceptable range, whereas passages 6 and 7 express these markers at significantly lower levels (see Figure 6C, D). The findings indicate that these primary endothelial cells undergo a phenotypic drift and functional decline beyond passage 5 and therefore should not be used in experimental assays.
1. Cell culture and preparation
a. Culture four biological replicates of HUVECs in Endopan 3 medium under humidified conditions at 37 °C and 5% CO2 in T25 cell culture flasks starting at passage 2. See General note 6.
b. At approximately 80% confluence, wash and trypsinize the cells. See General note 5.
c. Resuspend the cells in 4 mL of Endopan 3 medium and split them at a ratio of 1:3. Centrifuge the cells at 300× g for 5 min and resuspend in 5 mL of Endopan 3 medium. Cultivate under humidified conditions at 37 °C and 5% CO2 in T25 cell culture flasks.
d. Cryopreserve the remaining two-thirds of the cells in two NalgeneTM cryovials containing 1 mL of freezing medium each and store at -150 °C.
e. Repeat steps D1b–d until passage 7.
2. Day 0: Thawing and cell seeding
a. Thaw one replicate of each passage.
b. Seed 2.5 × 10⁵ cells per well in a 12-well plate containing 1 mL of Endopan 20 medium per well.
c. Culture the cells for 10 days under humidified conditions at 37 °C and 5% CO2.
Note: Refresh the medium every 2–3 days.
3. Day 10: Staining and FACS
a. Wash the cells with 1 mL of DPBS per well and trypsinize with 300 μL of trypsin-EDTA (0.05%). See General note 5.
b. Stop the enzymatic activity by adding 1 mL of Endopan 3 medium per well.
c. Transfer the cell suspension from each well into a separate Eppendorf tube and count cells.
d. Transfer 1 × 10⁶ cells into a separate Eppendorf tube for each sample.
e. Pool the remaining cells to use as single staining controls and negative control cells without staining for gating during flow cytometry.
f. Use a benchtop centrifuge to spin cells in Eppendorf tubes at 400× g for 6 min.
g. Resuspend each staining sample with 250 μL of FACS buffer. Incubate at room temperature for 20 min.
h. Resuspend the unstained negative control in 1 mL of DPBS to remove residual Endopan 3 medium. Centrifuge at 400× g for 6 min. Resuspend the cell pellet in 250 μL of FACS buffer and transfer the cell suspension to a FACS tube.
i. During incubation, prepare the staining solution: Add 5 μL of APC anti-human CD31 mouse IgG and 0.4 μL of ZO-1 polyclonal antibody to 100 μL of FACS buffer per sample. Additionally, prepare one tube each with only one of the two antibodies for single staining controls.
j. Aspirate the supernatant from each Eppendorf tube and resuspend each cell pellet in 100 μL of staining solution. Incubate for 30 min in the dark at room temperature.
k. After incubation, centrifuge again at 400× g for 6 min. Carefully aspirate the supernatant and resuspend each cell pellet in 250 μL of FACS buffer. Transfer each cell suspension to the corresponding pre-labeled FACS tube.
l. Perform flow cytometry with the APC channel for CD31 (633 nm) and FITC-A channel for ZO-1 (488 nm). Analyze data via FlowJo and GraphPad Prism. Representative results are shown in Figure 6.
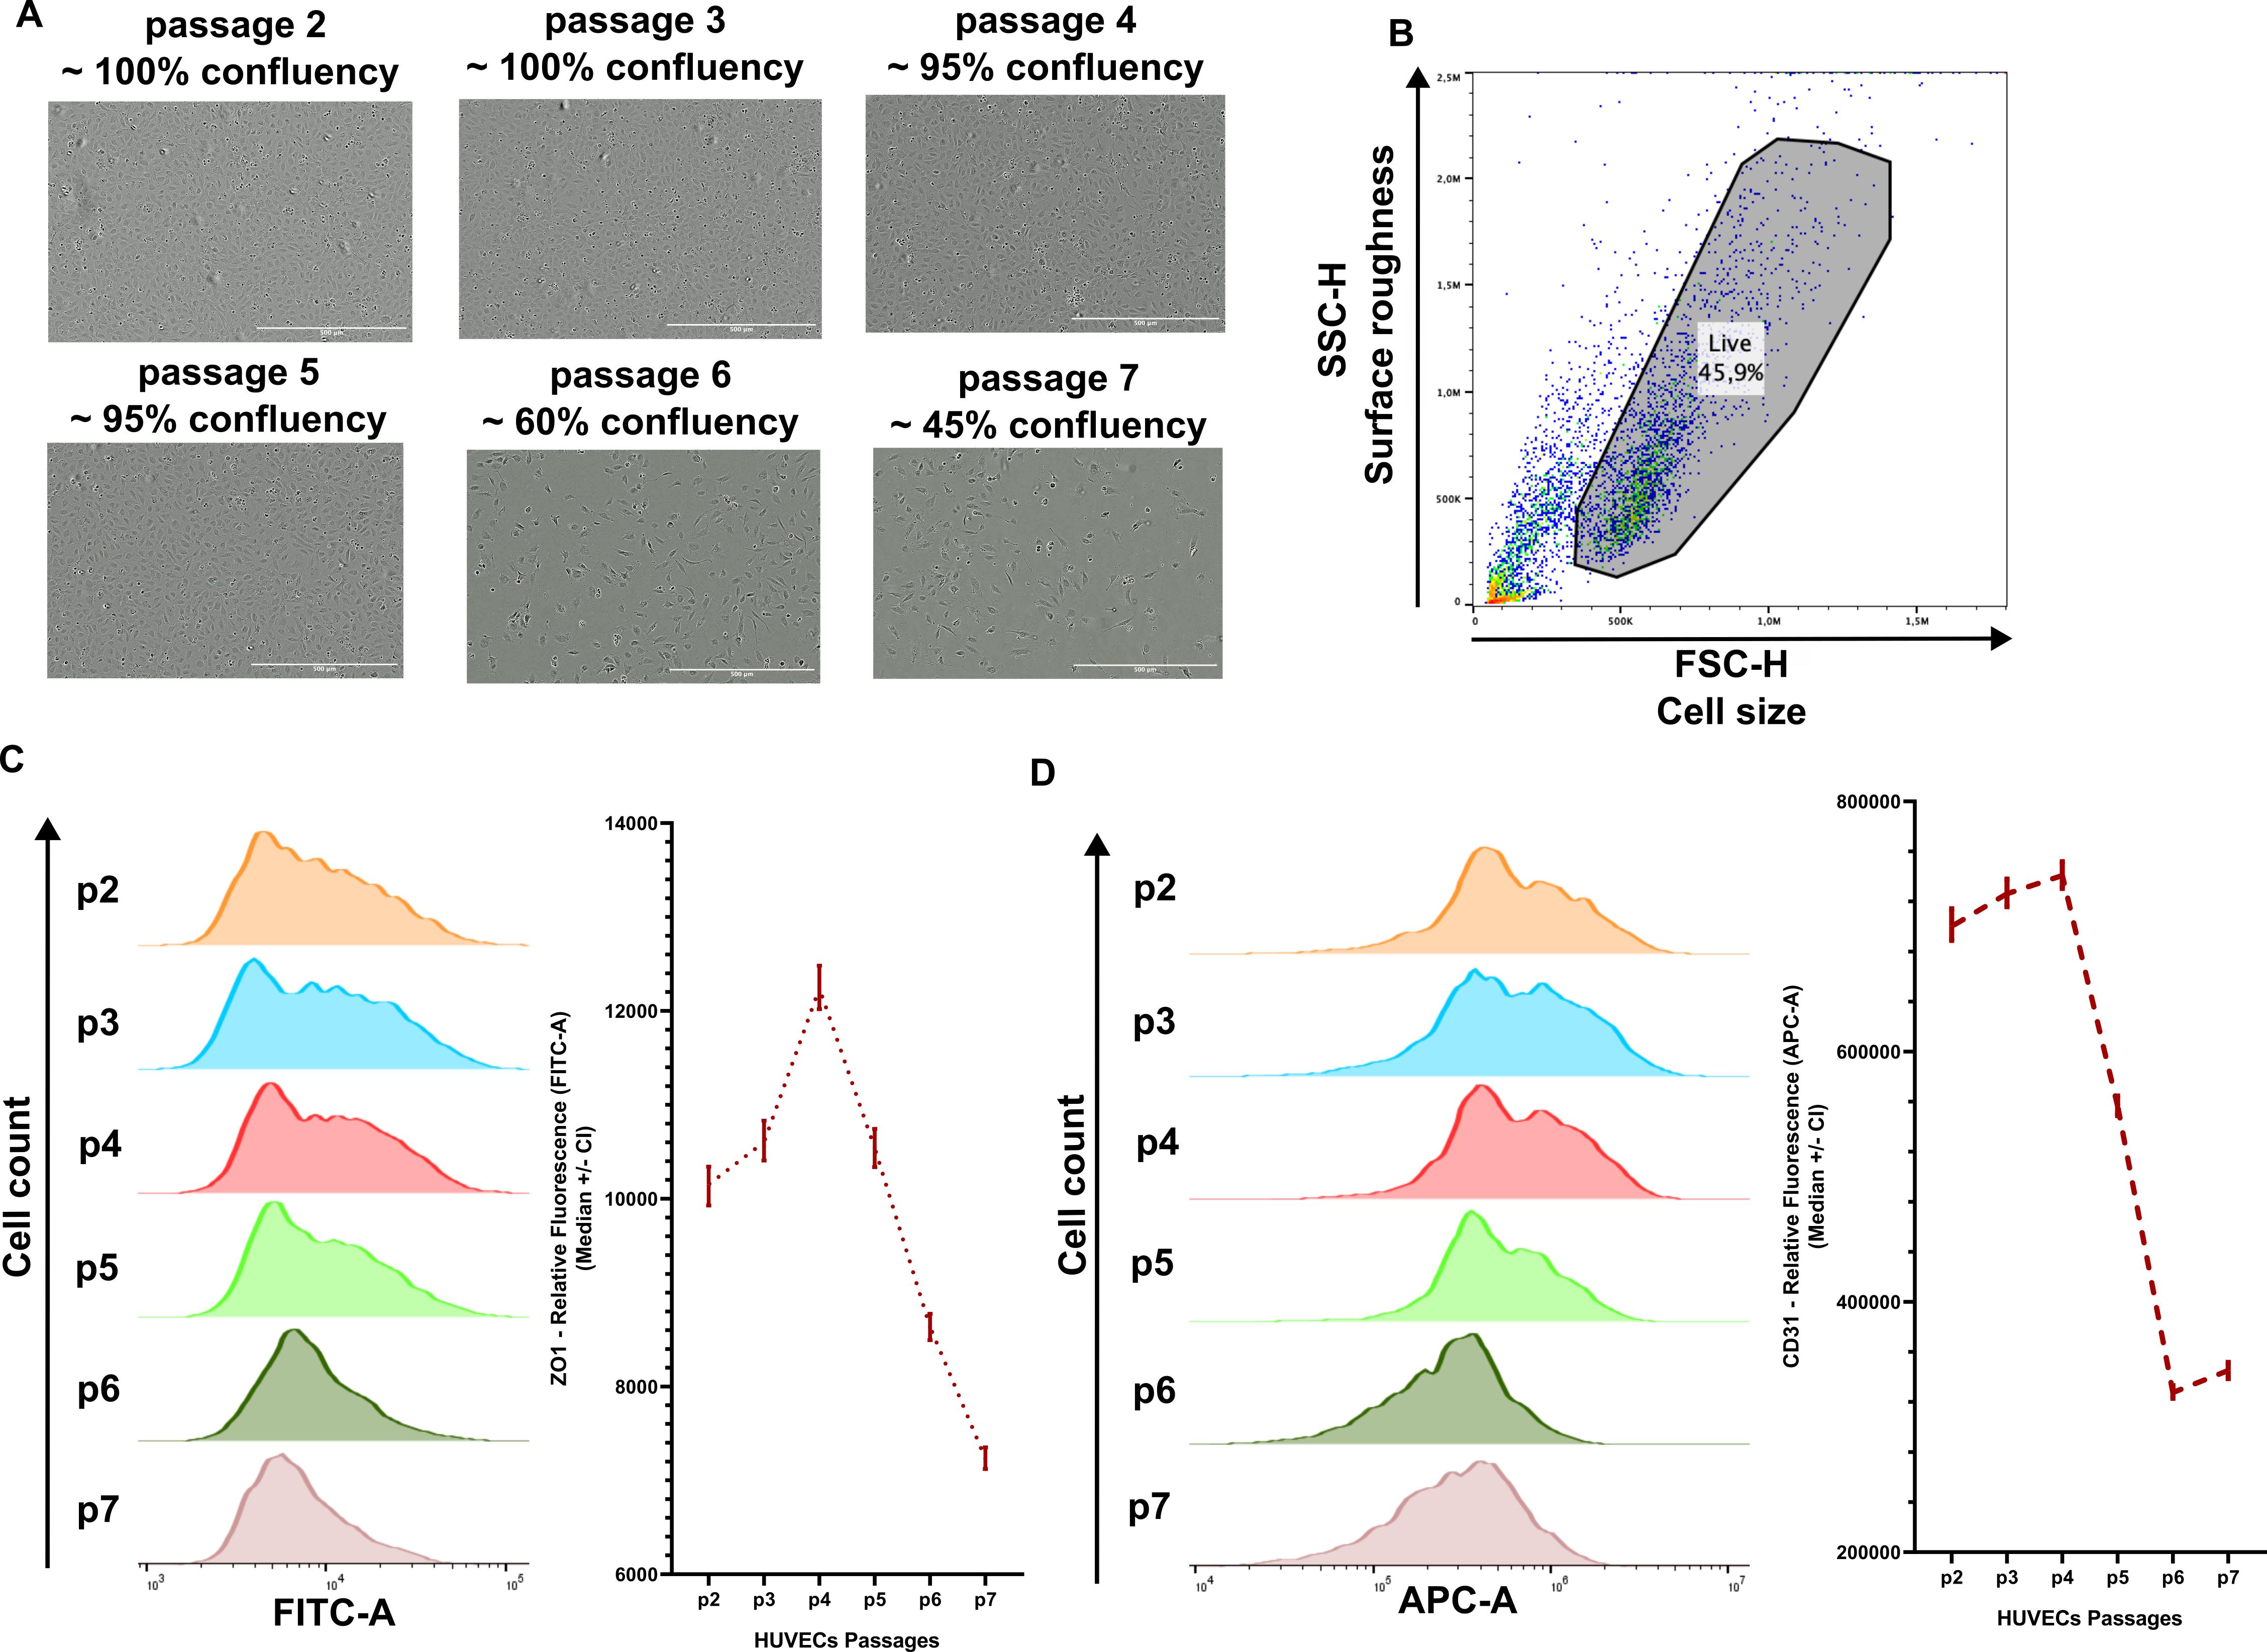
Figure 6. Morphology and marker expression in HUVECs across passages 2–7. (A) Representative microscopy images of HUVECs in each passage at day 9 of culture. (B) Dot plot of FACS analysis with gating of a live cell population in a FSC/SSC-graph. (C) ZO-1 (FITC-A) expression by FACS across passages with a quantification of fluorescence intensity. (D) CD31 (APC-A) expression by FACS across passages with a quantification of fluorescence intensity. Data represent four biological replicates.
General notes and troubleshooting
General notes
1. All procedures involving human tissue must be conducted in accordance with approved informed consent procedures. UCs were obtained from C-sections, preferably from planned ones, due to the consent declaration.
2. Prepare the collagenase IV solution freshly for each UC before the isolation procedure.
3. To minimize contamination risk, divide the workflow across two separate sterile cell culture benches: one dedicated to UC dissection and the other for reagent preparation and cell culture processing. Irradiate both cabinets with UV light for at least 30 min before and after use to work under and regain aseptic conditions. Use separate bead baths or water baths for cell culture reagents and the UC to minimize the risk of cross-contamination.
4. Always use prewarmed medium to prevent exposing cells to temperature-induced stress.
5. When trypsinizing HUVECs, wash with DPBS before adding 0.05% trypsin-EDTA and incubate under humidified conditions at 37 °C with 5% CO2 for 3 min. To neutralize the trypsin, add Endopan 3 medium. Use at least twice the volume of Endopan 3 medium relative to the volume of trypsin-EDTA used.
6. Test the cells regularly for mycoplasma according to your lab’s specific protocol.
Troubleshooting
Problem 1: Vein perforation or leakage during cannulation or injection of solutions.
Possible causes: Excessive force during cannula insertion, pre-existing vein damage, overfilling the vein due to blood clotting, excessive pressure during flushing, or overdistension with collagenase solution.
Solutions: Insert the buttoned cannula gently and not too deeply inside the vein to prevent a rupture (step D4). Inspect the UC for perforations before injection and excise damaged segments carefully (step D8). Adjust the volume of collagenase solution for shorter cords to prevent rupture (step D12). Stop injection immediately if a strong resistance is felt.
Problem 2: The UC ruptures when adding collagenase solution.
Possible causes: The UC is too long, resulting in increased procedural instability and handling difficulties, or the collagenase solution is added with too much pressure.
Solution: Cut the UC, if it is >20 cm long, into shorter pieces and add the collagenase solution carefully and slowly. If the vein ruptures during the application, the used volume is small enough to use the rest of the prepared solution for the second trial with the remaining part of the UC.
Problem 3: Non-endothelial cells appear in the HUVEC culture, not expressing the endothelial marker CD31, as shown in Figure 7 (right panel).
Possible causes: Excessive mechanical manipulation of the UC during recovery of the cells after incubation, resulting in the release of non-endothelial cells (e.g., fibroblasts).
Solution: Thoroughly fill the vein lumen to maximize enzymatic cell detachment and minimize the need for mechanical disruption after the incubation period. If the solution cannot be readily recovered, cut the distal end with a scalpel and thereby clear the way for the collagenase–cell suspension. When massaging, the complete recovery of all cells is not required. Yielding the majority of HUVECs is sufficient to establish a viable and proliferative culture.
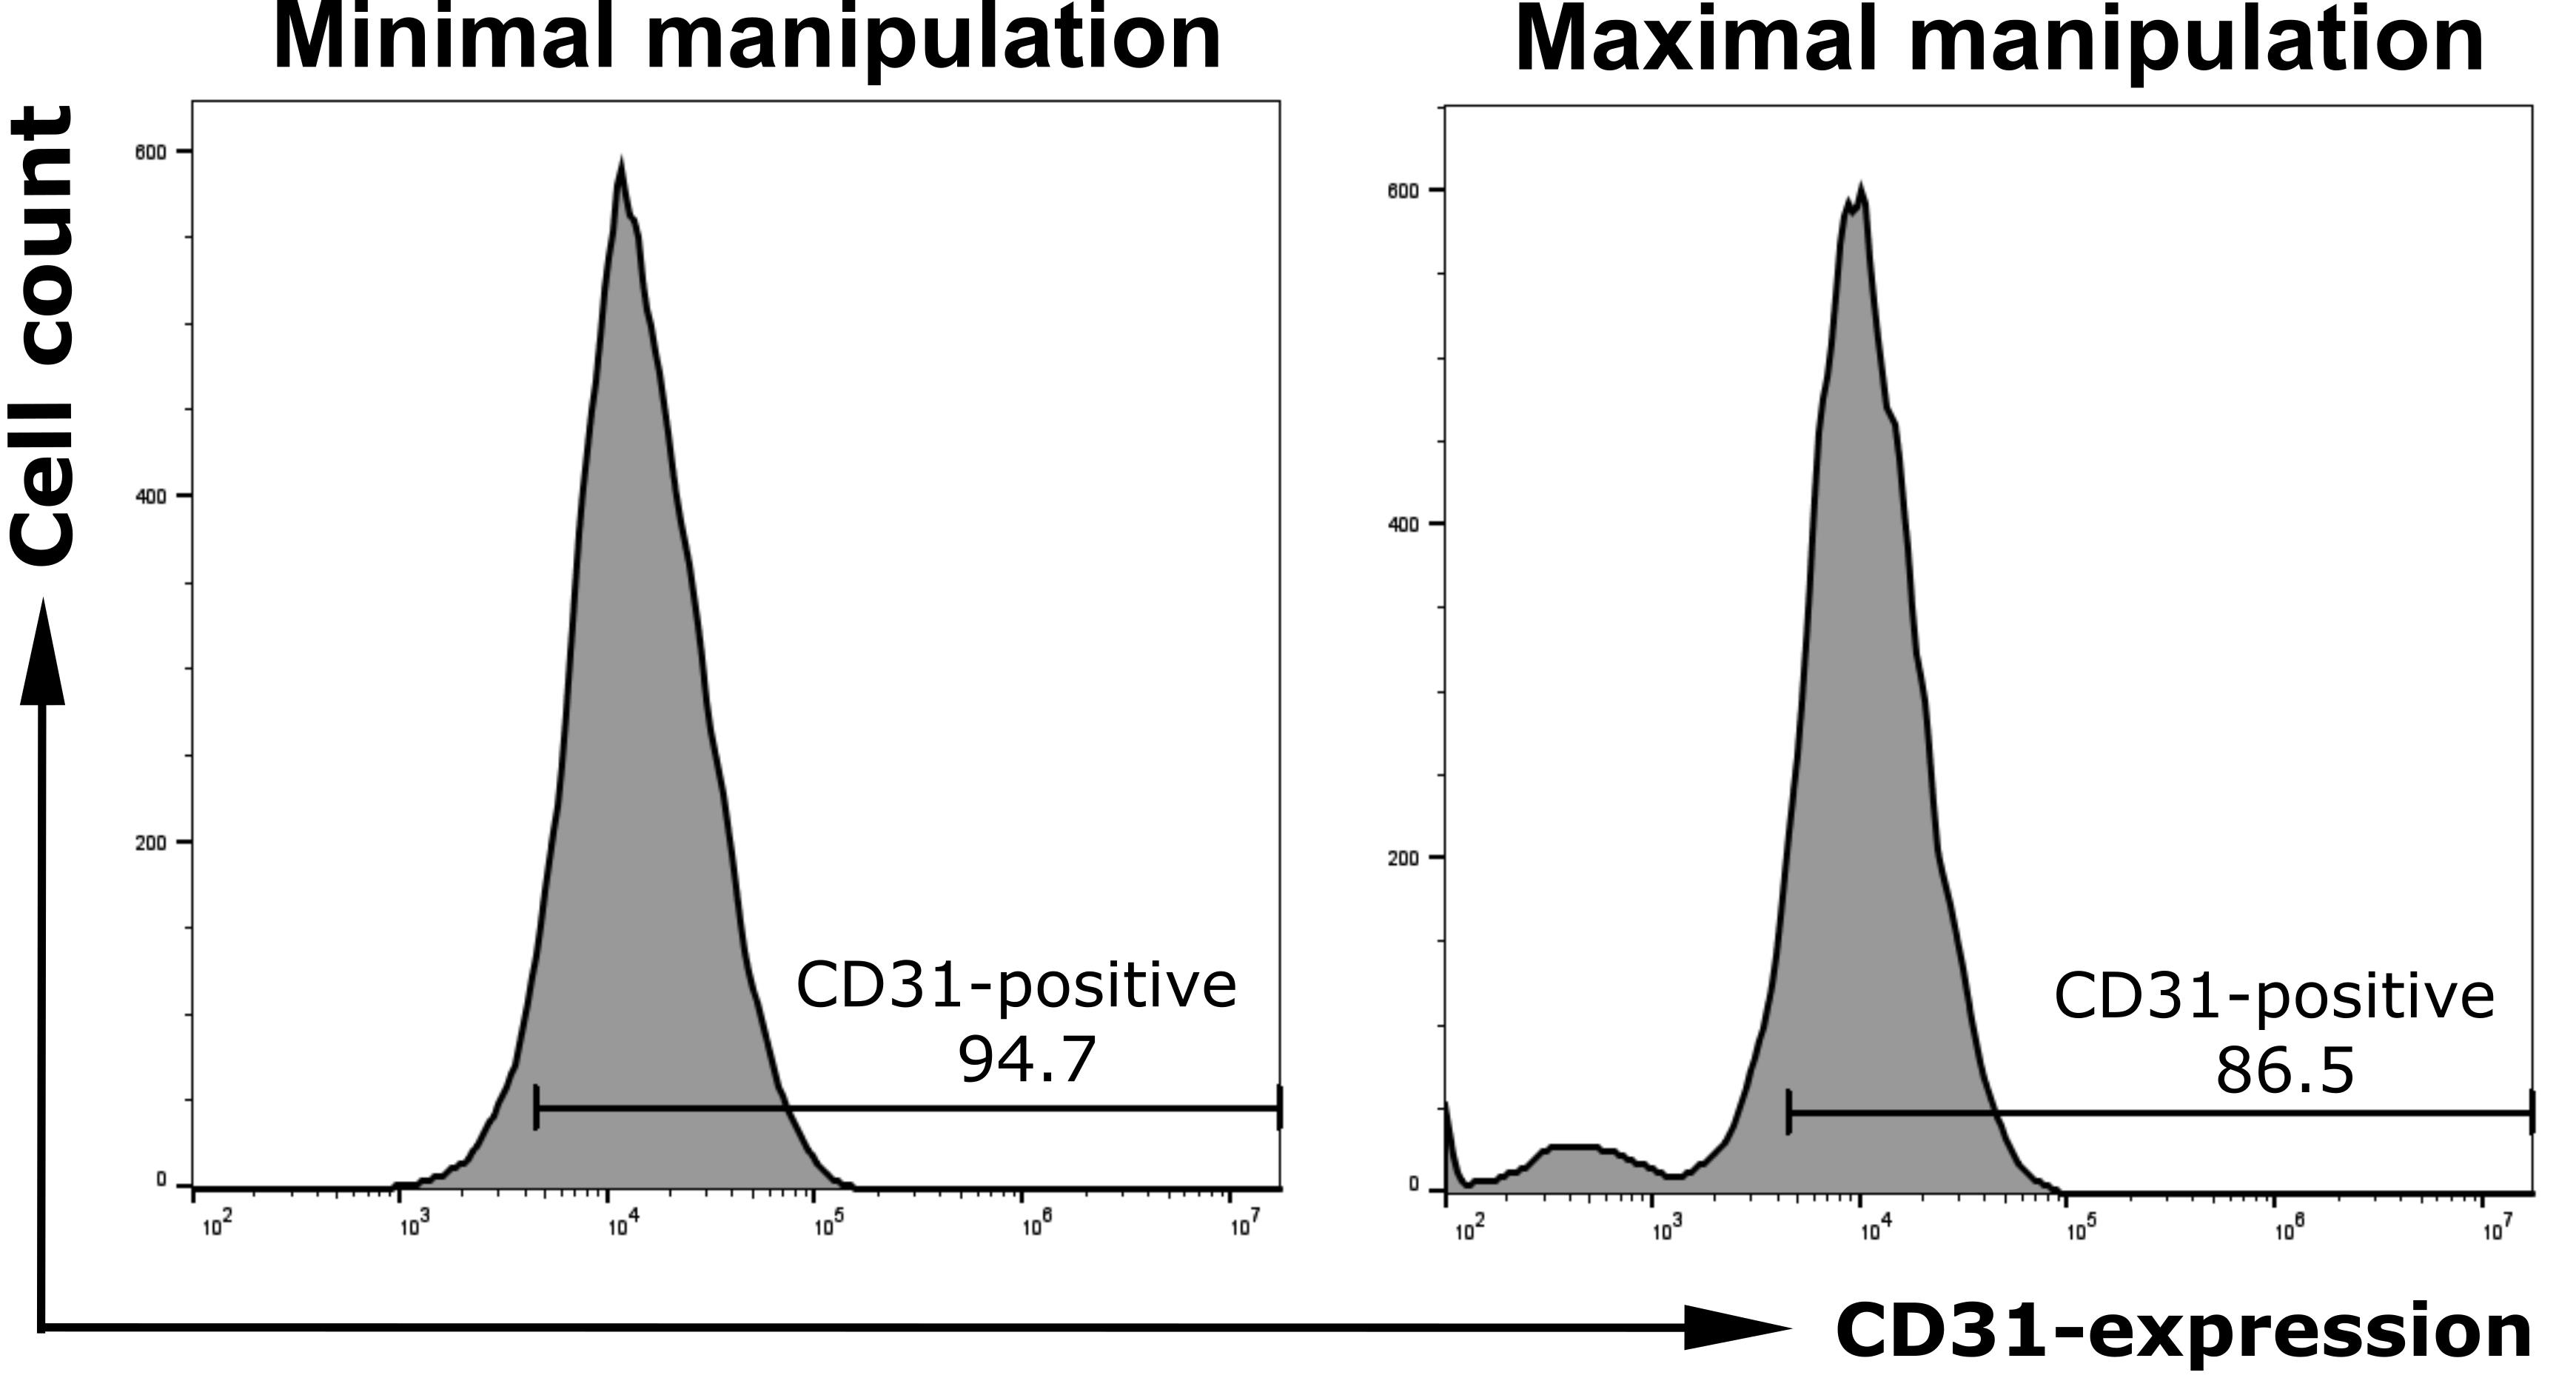
Figure 7. FACS analysis of isolated cells under minimal (left panel) and maximal mechanical manipulation (right panel) of the umbilical cord during the isolation process, both after CD31 staining.
Problem 4: Very few or no cells the following day.
Possible causes: Low initial cell yield due to variability in cord length or quality; insufficient collagenase incubation/detachment; incomplete recovery of detached cells.
Solutions: Ensure that the collagenase solution is prepared and used correctly and that the recommended incubation time is followed. Carefully flush the vein and collect the entire cell suspension. Consider that cell yield may vary between individual cords.
Problem 5: Contamination despite the use of amphotericin B and penicillin/streptomycin.
Possible causes: Microbial contamination of the cord or contamination introduced during handling.
Solutions: Maintain strict aseptic conditions throughout the isolation procedure. Thoroughly use sterile instruments and solutions. Discard contaminated cultures.
Problem 6: Poor cell attachment at passage 0.
Possible causes: Low initial cell yield; disturbance of cells shortly after seeding.
Solutions: Avoid unnecessary movement or medium changes during the initial attachment period and try not to use umbilical cords shorter than suggested.
Problem 7: Weak CD31 staining or high background during IF.
Possible causes: Suboptimal antibody concentration; inappropriate fixation or permeabilization; insufficient washing.
Solutions: For weak CD31 staining, test a lower dilution of the primary antibody within the manufacturer's recommended range. For high background, increase the dilution of the primary and/or secondary antibody and ensure sufficient washing between incubation steps. Include appropriate negative controls to distinguish specific staining from background fluorescence.
Acknowledgments
We are highly grateful for funding support from Novartis Pharma GmbH. Additionally, we want to thank the staff of the gynecology department of UMG Göttingen, especially Kati Kothe for efficiently coordinating the transfer of fresh umbilical cords, and Esther Maguilla Rosado for obtaining informed consent from donors. Also, we appreciate the support of Nadine Winkler and Fatameh Hosami from the Clinical Chemistry Department of UMG Göttingen and AG Schneider for providing flow cytometry instruments, as well as Dinah Größer for her dependable and competent assistance.
The following figures were created using BioRender: Graphical overview, Pantelaiou Prokaki, G. (2026), https://BioRender.com/q97mi84; agreement number: WX2AABQXGL.
Author contributions
Conceptualization, A.R., N.W., A.K., F.W., J.G.; Investigation, A.R., N.W., A.K., F.W.; Writing—Original Draft, A.R., N.W., A.K., F.W.; Writing—Review & Editing, F.W., J.G., M.H., A.F., R.A.; Funding acquisition, F.W., J.G.; Supervision, F.W.
Competing interests
No conflict of interest is declared regarding this article.
Ethical considerations
For HUVEC isolation from umbilical veins, the ethics committee approved the proposal 28/1/23, and informed consent was obtained from all umbilical cord donors.
References
- Hu, Y., Yu, P., Yan, Z., Chen, C., Zhao, Y., Lv, Y., Zhong, J. and Qian, X. (2026). RREB1-driven FMR1 upregulation promotes colorectal cancer angiogenesis via VEGFA-mediated MAPK/PI3K signaling activation. Biochim Biophys Acta Mol Cell Res. 1873(6): 120165. https://doi.org/10.1016/j.bbamcr.2026.120165
- Kelley, M., Fierstein, S., Purkey, L. and DeCicco-Skinner, K. (2022). Endothelial Cell Tube Formation Assay: An In Vitro Model for Angiogenesis. Methods Mol Biol. 2475: 187–196. https://doi.org/10.1007/978-1-0716-2217-9_12
- Margari, A., Konig, S., Jayarajan, V., Rizzato, S., Maruccio, G. and Moeendarbary, E. (2025). Examining Stromal Cell Interactions in an In Vitro Blood–Brain Barrier Model with Human Umbilical Vein Endothelial Cells. Cells. 14(11): 759. https://doi.org/10.3390/cells14110759
- Koperski, A., Rieß, A. L., Schüürhuis, L., Andag, R., Fischer, A., Hasanov, M. F., Gallwas, J. and Wegwitz, F. (2026). Modeling Tumor Cell Transendothelial Migration In Vitro: A Functional Assay for Metastatic Potential. Bio Protoc. 16(22): e5895. https://doi.org/10.21769/BioProtoc.5895
- Elvevold, K., Kyrrestad, I. and Smedsrød, B. (2022). Protocol for Isolation and Culture of Mouse Hepatocytes (HCs), Kupffer Cells (KCs), and Liver Sinusoidal Endothelial Cells (LSECs) in Analyses of Hepatic Drug Distribution. In V. Arechavala-Gomeza and A. Garanto (Eds.), Antisense RNA Design, Delivery, and Analysis (Vol. 2434, pp. 385–402). New York, NY: Springer US. https://doi.org/10.1007/978-1-0716-2010-6_27
- Miglietta, A. G., David-Bercholz, J., Munji, R. N., Pulido, R. S., Soung, A. L., Terrando, N., Daneman, R. and Yang, T. (2025). Protocol for isolation of endothelial cells from adult mouse brain. STAR Protoc. 6(2): 103837. https://doi.org/10.1016/j.xpro.2025.103837
- Wang, J. M., Chen, A. F. and Zhang, K. (2016). Isolation and Primary Culture of Mouse Aortic Endothelial Cells. J Visualized Exp. e3791/52965. https://doi.org/10.3791/52965
- Maruyama, Y. (1963). The human endothelial cell in tissue culture. Z Zellforsch Mikrosk Anat. 60(1): 69–79. https://doi.org/10.1007/bf00329383
- Ganguly, A., Zhang, H., Sharma, R., Parsons, S. and Patel, K. D. (2012). Isolation of Human Umbilical Vein Endothelial Cells and Their Use in the Study of Neutrophil Transmigration Under Flow Conditions. J Visualized Exp. e3791/4032. https://doi.org/10.3791/4032
- Jiménez, N., Krouwer, V. J. D. and Post, J. A. (2012). A new, rapid and reproducible method to obtain high quality endothelium in vitro. Cytotechnology. 65(1): 1–14. https://doi.org/10.1007/s10616-012-9459-9
- Sandhu, A., Parvathi, A., McGhee, J. J., Ismail, S., Loh, I. P., van der Werf, B., Zhang, J. and Sherwin, T. (2025). A modified protocol for the isolation and culture of human umbilical vein endothelial cells. Biochem Biophys Rep. 44: 102221. https://doi.org/10.1016/j.bbrep.2025.102221
- Cheung, A. L. (2007). Isolation and Culture of Human Umbilical Vein Endothelial Cells (HUVEC). Curr Protoc Microbiol. 4(1): emca04bs4. https://doi.org/10.1002/9780471729259.mca04bs4
- Davis, J., Crampton, S. P. and Hughes, C. C. (2007). Isolation of Human Umbilical Vein Endothelial Cells (HUVEC). J Visualized Exp. e3791/183. https://doi.org/10.3791/183
- Lei, J., Peng, S., Samuel, S. B., Zhang, S., Wu, Y., Wang, P., Li, Y. F. and Liu, H. (2016). A simple and biosafe method for isolation of human umbilical vein endothelial cells. Anal Biochem. 508: 15–18. https://doi.org/10.1016/j.ab.2016.06.018
- Bala, K., Ambwani, K. and Gohil, N. K. (2011). Effect of different mitogens and serum concentration on HUVEC morphology and characteristics: Implication on use of higher passage cells. Tissue Cell. 43(4): 216–222. https://doi.org/10.1016/j.tice.2011.03.004
- Vandekeere, S., Dubois, C., Kalucka, J., Sullivan, M. R., García-Caballero, M., Goveia, J., Chen, R., Diehl, F. F., Bar-Lev, L., Souffreau, J., et al. (2018). Serine Synthesis via PHGDH Is Essential for Heme Production in Endothelial Cells. Cell Metab. 28(4): 573–587.e13. https://doi.org/10.1016/j.cmet.2018.06.009
Article Information
Publication history
Received: Jul 5, 2026
Accepted: Oct 14, 2026
Available online: Nov 18, 2026
Published: Nov 20, 2026
Copyright
© 2026 The Author(s); This is an open access article under the CC BY license (https://creativecommons.org/licenses/by/4.0/).
How to cite
Willer, N. A., Koperski, A., Rieß, A. L., Andag, R., Fischer, A., Hasanov, M. F., Wegwitz, F. and Gallwas, J. (2026). HUVEC Isolation—A Robust Protocol to Obtain Human Umbilical Vein Endothelial Cells From Fresh Preparations. Bio-protocol 16(22): e5877. DOI: 10.21769/BioProtoc.5877.

 Download Citation in RIS Format
Do you have any questions about this protocol?
Post your question to gather feedback from the community. We will also invite the authors of this article to respond.
 Post a Question


