


- Protocols

- Articles and Issues
- For Authors
- About
- Become a Reviewer


Hybridization Chain Reaction and Microscopy to Visualize Feeding Site–Specific Gene Expression in Arabidopsis Roots Infected by Plant-Parasitic Cyst Nematodes

Published: Vol 16, Iss 22, Nov 20, 2026 DOI: 10.21769/BioProtoc.5872 Views: 33
Reviewed by: Nicolás M. CecchiniAnonymous reviewer(s)
 PDF
 Ask a question


Protocol Collections
Comprehensive collections of detailed, peer-reviewed protocols focusing on specific topics



Abstract
Plant-parasitic cyst nematodes affect crop growth and cause substantial yield losses. Upon invading plant roots, cyst nematodes convert a few hundred cells from the vascular tissues into a feeding structure, called the syncytium. The nematodes use the syncytium to withdraw nutrients from the host plant, which serves as their sole source of nutrition. The molecular mechanisms underlying feeding site initiation and development remain poorly understood. One of the key factors involved in this process is transcriptional changes in host plants induced by nematode infection. To date, various transcriptomic techniques, including sc-RNAseq and RNA tomography, have been used to study host transcriptional changes during nematode infection. Although these studies provide valuable information, confirmation of the spatial gene expression of candidate genes during syncytium development remains limited. Therefore, we optimized hybridization chain reaction (HCR) and microscopy for high-resolution spatial analysis of gene expression and simultaneous analysis of feeding site morphology. Here, we provide a proof of principle of the protocol, using confocal microscopy to visualize the expression of target genes Protein Phosphatase 2A subunit A3 (AtPP2AA3) and α-Expansin 4 (AtEXPA4), followed by 2-photon excitation microscopy revealing feeding site morphology. This combination enables high-resolution visualization of gene expression in a spatial context, revealing that both AtPP2AA3 and AtEXPA4 are enriched in the feeding structure. We anticipate that this combination of methods can also be applied to other (plant) studies requiring high spatial resolution and can be used to validate transcriptomic data.
Key features
• Infection of Arabidopsis thaliana seedlings with the plant-parasitic cyst nematode Heterodera schachtii.
• Fixation of (infected) seedlings and hybridization chain reaction to study the expression of putative syncytium/feeding site-specific genes.
• Analysis of the samples by confocal microscopy to visualize the expression of candidate genes.
• Analysis of the samples by 2-photon excitation microscopy to unravel the morphology of the feeding site.
Keywords: Arabidopsis thaliana Plant-parasitic nematodes
Cyst nematodes
Heterodera schachtii
Feeding site
Syncytium
Hybridization Chain Reaction
Gene expression analysis
Microscopy
Graphical overview
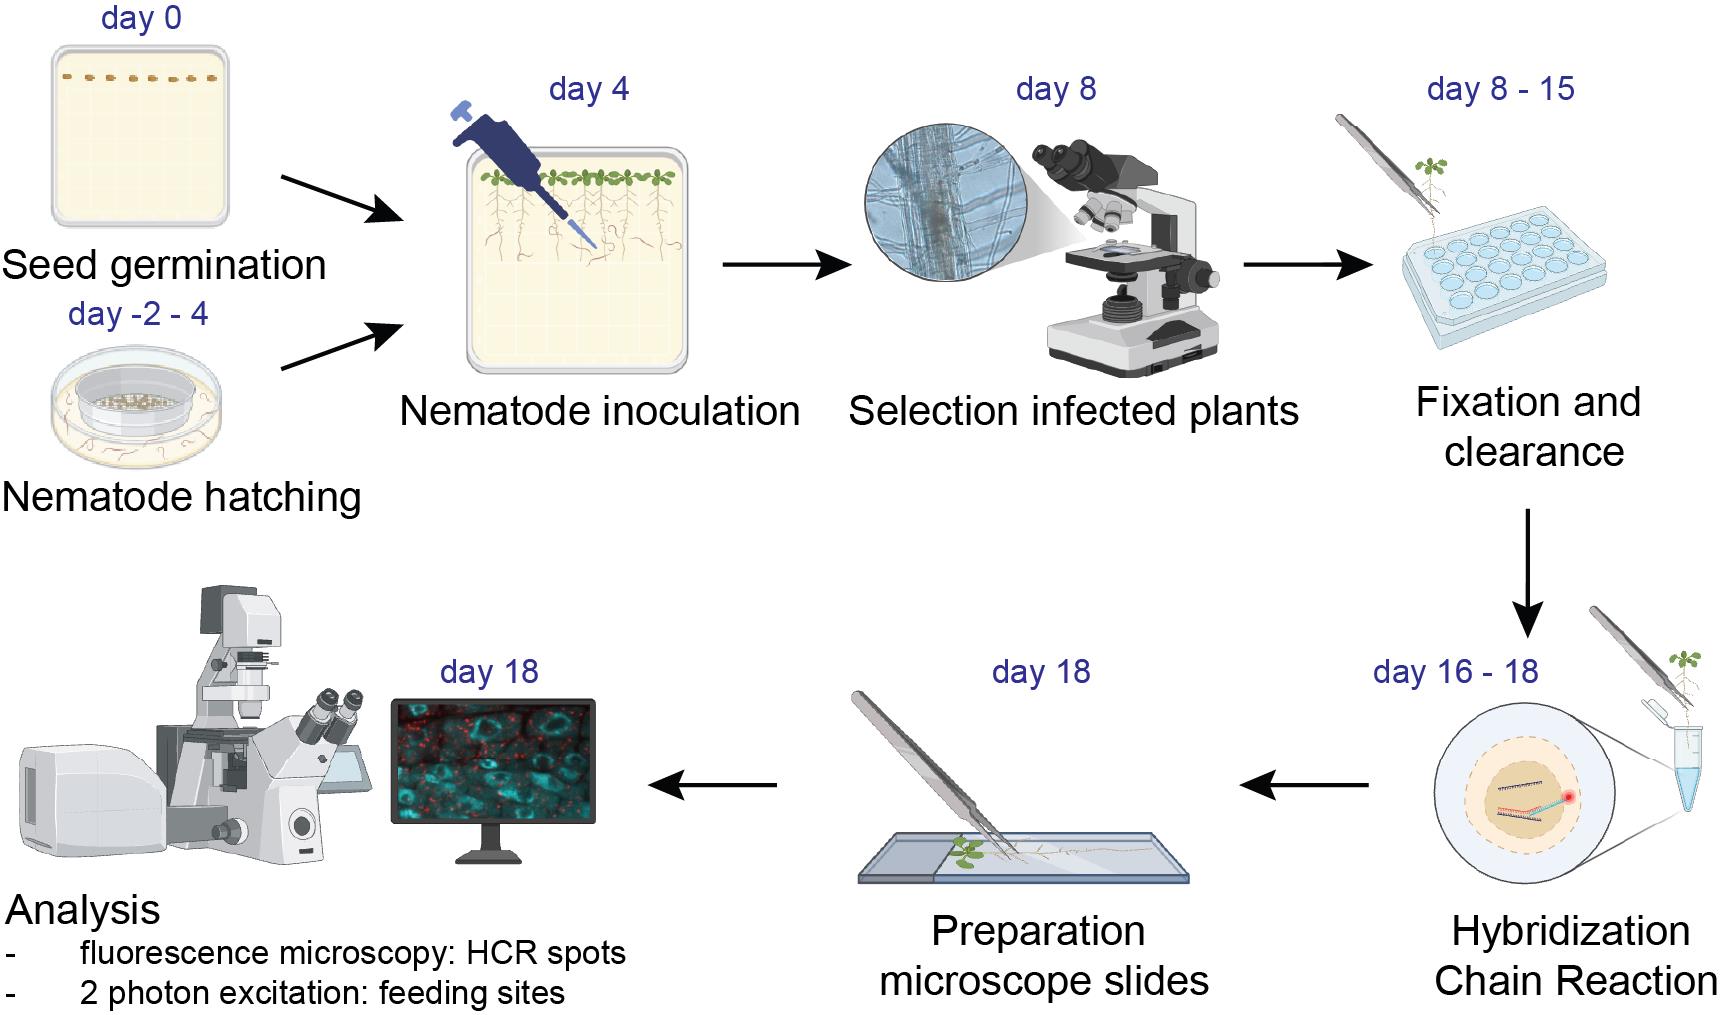
Hybridization chain reaction and microscopy to visualize feeding site–specific gene expression in Arabidopsis roots infected by plant-parasitic cyst nematodes. Workflow diagram of the different steps of the protocol. Image created using BioRender.
Background
Plant-parasitic cyst nematodes, such as Heterodera schachtii, induce the formation of feeding sites, called syncytia, in the root vascular cylinder tissues upon infection. Cyst nematodes withdraw nutrients from the plant via these syncytia, causing substantial crop losses, both in quality and quantity [1,2]. The initiation and expansion of the syncytium is often accompanied by massive transcriptional changes in the host root cells [1]. In recent years, various studies employed transcriptomic techniques, including RNA microarray, microdissection combined with RNAseq, sc-RNAseq, and spatial transcriptomics, to dissect the molecular mechanisms of syncytium development. Single-molecule gene expression could shed light on the spatial expression of genes upon nematode infection. Whole-mount single-molecule RNA fluorescence in situ hybridization (smFISH) has been standardized to visualize and quantitatively measure messenger RNA molecules in Arabidopsis roots [3]. However, upon nematode infection, we found it impossible to image smFISH punctae in feeding cells induced by cyst nematodes near the vascular tissues of the maturation zone in plant roots. Autofluorescence and limited transparency reduced the signal-to-noise ratio in the inner tissues of the root. Additionally, the fluorescence intensity from smFISH punctae was low. To overcome these limitations, we employed hybridization chain reaction (HCR), another powerful RNA-FISH technique, which is an alternative (or improvement) to smFISH [4–7]. The principle is essentially the same: by adding fluorescently labeled probes directed against a specific transcript of interest, this transcript can be visualized in the cell. But in HCR, instead of directly labeling the probes with a fluorescent tag, the probes contain an adaptor to which fluorescently tagged hairpins are added in a second incubation step. This initiates a chain reaction leading to ~10× brighter spots compared to regular smFISH spots (Figure S1). Tissue clearing for fluorescence imaging [8] and HCR [9,10] have been applied to plant roots before but, to date, these methods have not been published for studying feeding site–specific gene expression upon nematode infection.
Here, we present a detailed protocol describing Arabidopsis root infection with cyst nematodes, tissue fixation, HCR, and microscopy to study and spatially resolve gene expression in the syncytium. The localization of syncytia close to vascular tissues and autofluorescence due to tissue damage at the infection site prevent visualization of feeding site morphology with regular confocal microscopy. We report that a combination of sample clearing and 2-photon excitation (2PE) allows a deeper z-acquisition and 3D reconstruction at higher resolution, enabling analysis of feeding site morphology induced by plant-parasitic nematodes. Regular confocal microscopy and 2PE can be combined to first visualize HCR spots and then the feeding site morphology.
Materials and reagents
Biological materials
1. Heterodera schachtii second-stage juveniles (J2) hatched from sand/clay-mix cyst samples [Woensdrecht population from Instituut voor Rationele Suikerproductie (IRS), the Netherlands]
2. Arabidopsis thaliana Columbia-0 (Col-0) accession
Reagents
1. Sodium azide solution (Sigma-Aldrich, CAS: 26628-22-8); 1.0% (w/v) in demi-water
2. Gentamicin sulfate (Duchefa Biochemie, 1405-41-00)
3. Nystatin (Duchefa Biochemie, CAS: 1400-61-9)
4. Zinc chloride (Supelco, CAS: 7646-85-7); 30 mM in tap water
5. Sucrose (food-grade, local retail store); 70% (w/v) in demi-water, dissolve using a magnetic stirrer and autoclave at 121 °C for 20 min
6. Tween-20 (SAFC., 9005-64-5); 10% (v/v) in demi-water and autoclave
7. Triton X-100 (Santa Cruz Biotechnology, CAS: 9002-93-1); 0.4% (v/v) in demi-water
8. Mercury(II) chloride (Sigma-Aldrich, CAS: 7487-94-7); 0.8% (w/v) in demi-water
9. Boric acid (Duchefa Biochemie, CAS: 10043-35-3)
10. Cobalt chloride (Duchefa Biochemie, CAS: 7791-13-1)
11. Copper sulfate (Duchefa Biochemie, CAS: 7758-99-8)
12. Manganese (II) chloride (Sigma-Aldrich, CAS: 13346-34-9)
13. FeNaEDTA (Duchefa Biochemie, CAS: 15708-41-5)
14. Sodium chloride (Duchefa Biochemie, CAS: 7647-14-5)
15. Sodium molybdate (Duchefa Biochemie, CAS: 10102-40-6)
16. Zinc sulfate (Supelco, CAS: 7446-20-0)
17. Nicotinic acid (Duchefa Biochemie, CAS: 59-67-6)
18. Pyridoxine HCl (Duchefa Biochemie, CAS: 58-56-0)
19. Calcium nitrate (Duchefa Biochemie, CAS: 13477-34-4)
20. Magnesium sulfate (Duchefa Biochemie, CAS: 10034-99-8)
21. Potassium nitrate (Acros Organics, CAS: 7757-79-1)
22. Potassium phosphate (Duchefa Biochemie, CAS: 7778-77-0)
23. Myo-inositol (Duchefa Biochemie, CAS: 87-89-8)
24. Thiamine HCl (Duchefa Biochemie, CAS: 67-03-8)
25. Potassium hydroxide, 5 M (Duchefa Biochemie, CAS: 1310-58-3)
26. Sodium hypochlorite (Boom, CAS: 2102 9499); 5%, not commercial bleach
27. Gelrite, 0.7% (Duchefa Biochemie, CAS: 71010-52-1)
28. Daichin agar (Duchefa Biochemie, CAS: 9002-18-0)
29. Nuclease-free H2O (Ambion, catalog number: AM9932)
30. Paraformaldehyde (PFA) (Biolyst Scientific, catalog number: 15710)
31. Phosphate-buffered saline (PBS) (Invitrogen, catalog number: AM9625); diluted in nuclease-free H2O
32. Xylitol powder (Sigma-Aldrich, catalog number: X3375-100g)
33. Sodium deoxycholate (Sigma-Aldrich, catalog number: 30970)
34. Urea (Sigma-Aldrich, catalog number: 5378)
35. HCR probes (directed against your transcript of interest) (Molecular Instruments)
36. HCR hairpins [h1 and h2 (X3-647)] (Molecular Instruments)
37. Sodium chloride (Boom, catalog number: 76021267.5000)
38. Sodium citrate (Boom, catalog number: 76051272.1000)
39. Glucose (Sigma-Aldrich, catalog number: G8270-1kg); 10% w/v in nuclease-free H2O
40. TRIS (Invitrogen, catalog number: 15504-020); 1 M in nuclease-free H2O
41. Catalase (Sigma-Aldrich, catalog number: 18634-1kg)
42. Glucose oxidase, lyophilized from Aspergillus niger (Sigma-Aldrich, catalog number: G2133-10KU)
43. Sodium acetate (VWR, CAS: 6131-90-4); 50 mM in nuclease-free H2O
44. Vaselin (Vaseline Original, 100 mL, catalog number: 8566195)
45. Lanolin (Thermo Scientific, catalog number: A16902.30)
46. Paraffin wax (Sigma-Aldrich, catalog number: 18634-1kg)
47. Ultrapure (type I) water (ELGA PURELAB Felx)
48. 70% ethanol (EtOH) (Boom, CAS: 64-17-5); diluted in nuclease-free H2O
49. HCR HiFi probe hybridization buffer (Molecular Instruments, catalog number: BPH02323)
50. HCR HiFi probe wash buffer (Molecular Instruments, catalog number: BPH01923)
51. HCR gold amplifier buffer (Molecular Instruments, catalog number: BAM02323)
52. HCR gold amplification wash buffer (Molecular Instruments, catalog number: BAM01923)
Solutions
1. Antibiotic solution (see Recipes)
2. KNOP solution I (see Recipes)
3. KNOP solution II (see Recipes)
4. Modified KNOP medium (see Recipes)
5. Seed surface sterilization solution (see Recipes)
6. 4% paraformaldehyde (PFA) (see Recipes)
7. ClearSee (see Recipes)
8. 20× saline sodium citrate (SSC) (see Recipes)
9. Imaging buffer (see Recipes)
10. Glucose oxidase in sodium acetate (see Recipes)
11. Valap (see Recipes)
Recipes
1. Antibiotic solution
| Reagent | Final concentration | Quantity or volume |
|---|---|---|
| Gentamicin sulfate (100 mg/mL) | 1.5 mg/mL | 450 μL |
| Nystatin (0.75 mg/mL) | 0.05 mg/mL | 2 mL |
| Zinc chloride (30 mM) | 3 mM | 27.55 mL |
| Total | n/a | 30 mL |
First, prepare stock concentrations: For gentamicin (100 mg/mL), dissolve 1 mg of gentamicin sulfate in 10 mL of ultrapure water and filter-sterilize using a 0.2 μm filter and a 15 mL syringe. For nystatin (0.75 mg/mL), dissolve 7.5 mg of nystatin in 10 mL of tap water. Aliquot antibiotics into 2 mL Eppendorf tubes and store at -20 °C in a container (in the dark). For zinc chloride (30 mM), dissolve 4.089 g of zinc chloride in 1 L of tap water in a 1 L SCHOTT DURAN bottle and autoclave for 20 min at 121 °C. Store at room temperature.
Note: Although nystatin dissolves in DMSO, make a stock of nystatin in tap water, as DMSO harms the nematode juveniles.
2. KNOP solution I [11]
| Reagent | Quantity or volume |
|---|---|
| Boric acid | 57 mg |
| Cobalt chloride | 0.6 mg |
| Copper sulphate | 1.4 mg |
| Manganese chloride | 57 mg |
| FeNaEDTA | 0.29 mg |
| Sodium chloride | 40 mg |
| Sodium molybdate | 1 mg |
| Zinc sulfate | 7.2 mg |
| Nicotinic acid | 100 mg |
| Pyridoxine HCl | 100 mg |
| Ultrapure H2O | 100 mL |
Prepare a 1,000× stock of KNOP solution I in ultrapure water in a 1 L SCHOTT DURAN bottle. Autoclave for 20 min at 121°C and store at room temperature. Open the bottle in a sterile flow cabinet to prevent contamination.
3. KNOP solution II [11]
| Reagent | Quantity or volume |
|---|---|
| Calcium nitrate | 24 mg |
| Magnesium sulfate | 3.94 mg |
| Potassium nitrate | 24.2 mg |
| Potassium phosphate | 5.4 mg |
| Myo-inositol | 10 mg |
| Thiamine HCl | 1 mg |
| Ultrapure H2O | 1,000 mL |
Prepare a 100× stock of KNOP solution II in ultrapure water in a 1 L SCHOTT DURAN bottle. Autoclave for 20 min at 121 °C and store at room temperature. Open the bottle in a sterile flow cabinet to prevent contamination.
4. Modified KNOP medium [11]
| Reagent | Final concentration | Quantity or volume |
|---|---|---|
| KNOP solution I (1,000×) | 1% | 1 mL |
| KNOP solution II (100×) | 1% | 10 mL |
| Sucrose | 10 g/L | 10 g |
| Daichin agar | 8 g/L | 8 g |
| Total | n/a | 1 L |
To prepare 1 L of modified KNOP medium, add KNOP solution I (1,000×) and KNOP solution II (100×) to a 1 L SCHOTT DURAN bottle in a clean bench. Then, add the sucrose and ~900 mL of ultrapure water. Adjust the pH to 6.4 with potassium hydroxide. Finally, add Daichin agar and top up to a final volume of 1 L. Autoclave for 20 min at 121 °C and pour ~50 mL of sterile media into square Petri dishes. Store plates at room temperature until use.
5. Seed surface sterilization solution
| Reagent | Final concentration | Quantity or volume |
|---|---|---|
| Sodium hypochlorite (5%) | 2.5% | 25 mL |
| Triton X-100 | 0.05% | 25 μL or 2 drops |
| Ultrapure H2O | n/a | Up to 50 mL |
Make a seed-sterilizing solution in a 50 mL Falcon tube, wrap it with aluminum foil, and store at 4 °C. Before every use, invert the Falcon tube several times; the formation of bubbles indicates thorough mixing and should give a chlorine-like odor. Prepared bleach solution can be stored for up to three months, as long as it is opened on a clean bench or until the chlorine-like odor dissipates.
6. 4% PFA
| Reagent | Final concentration | Quantity or volume |
|---|---|---|
| PFA | 4% | 10 mL |
| 10× PBS | 1× | 4 mL |
| Nuclease-free H2O | n/a | 26 mL |
| Total | 40 mL |
Prepare a 4% PFA solution in a 50 mL Falcon tube. Prepared PFA can be used up to one week. Store at room temperature.
7. ClearSee [8]
| Reagent | Final concentration | Quantity or volume |
|---|---|---|
| Xylitol | 10% w/v | 2.5 g |
| Sodium deoxycholate | 15% w/v | 3.75 g |
| Urea | 25% w/v | 6.25 g |
| Nuclease-free H2O | n/a | 15 mL |
| Total | 25 mL |
Prepare ClearSee solution in a 50 mL Falcon tube. The solution, stored at 4 °C, can be used for 2 months. We have not tested longer storage.
Caution: Add 15 mL of nuclease-free water to dissolve the chemicals. If needed, the volume can be topped up with nuclease-free water afterward to a final volume of 25 mL.
8. 20× SSC
| Reagent | Final concentration | Quantity or volume |
|---|---|---|
| Sodium chloride | 3 M | 175.30 g |
| Sodium citrate | 0.3 M | 88.20 g |
| Nuclease-free H2O | 1 L | |
| Total | 1 L |
First, dissolve sodium chloride and sodium citrate in a small volume of nuclease-free water. Adjust the pH to 7.00. The volume can then be topped up with nuclease-free water to a final volume of 1 L.
9. Imaging buffer
| Reagent | Final concentration | Quantity or volume |
|---|---|---|
| Nuclease-free H2O | n/a | 850 μL |
| 20× SSC (see Recipe 8) | n/a | 100 μL |
| 10% glucose in nuclease-free H2O | 0.4% | 40 μL |
| TRIS 1 M | 10 mM | 10 μL |
| 10% Tween | 0.05% | 5 μL |
| Total | 1 mL |
Freshly prepare imaging buffer in a 1.5 mL Eppendorf tube on the day of imaging.
10. Glucose oxidase in sodium acetate
| Reagent | Final concentration | Quantity or volume |
|---|---|---|
| Sodium acetate | 50 mM | 30 mL |
| Glucose oxidase | 3.7 mg/mL | 34 mg |
| Total | 30 mL |
Prepare glucose oxidase solution in a 50 mL Falcon tube. After preparation, aliquot into Eppendorf tubes and store at -20 °C.
Critical: The final solution should be pH 5.0. Adjust if needed.
11. Valap
| Reagent | Final concentration | Quantity or volume |
|---|---|---|
| Vaselin | 50 g | |
| Lanolin | 50 g | |
| Paraffin | 50 g |
Prepare Valap in a glass bottle that can be closed with a lid. Store at room temperature.
Laboratory supplies
1. 50 mL sterile tubes (Sarstedt, catalog number: 62.559.001)
2. 2 mL microcentrifuge tubes (Sarstedt, catalog number: 72.695.201)
3. 10 mL serological pipettes (Sarstedt, catalog number: 86.1254.001)
4. 100–1,000 μL filter tips (Corning, catalog number: 4809)
5. 200 μL filter tips (Sarstedt, catalog number: 70.3031.355)
6. 20 μL filter tips (Sarstedt, catalog number: 70.3030.365)
7. 10 μL filter tips (Sarstedt, catalog number: 70.3010.275)
8. Squared Petri dishes, 120 × 120 mm, plastic (Greiner Bio-One, catalog number: 688102)
9. 1 L Duran laboratory bottle (Sigma-Aldrich, catalog number: Z305200)
10. Magnetic stirrer
11. Toothpicks (Carl Roth, catalog number: EC48.1)
12. Centrifuge glass DURAN with conical bottom, 50 mL (Carl Roth, catalog number: K222.1)
13. Nitrile gloves (Romed HOLLAND, catalog number: NTP805)
14. Duran super duty beaker (Sigma-Aldrich, catalog number: Z680893)
15. Pencil (Staples, catalog number: 3158285)
16. Transparent cling film, unperforated PVC, 30 cm × 300 m roll (universal plastic kitchen foil) (local supermarket)
17. Glass Pasteur pipette (WU Mainz, Supplier Dispolab, catalog number: 200760)
18. Borosilicate glass narrow-neck Erlenmeyer flask 250 mL (Fisher Scientific, catalog number: 15429103)
19. Spatula (Sigma-Aldrich, catalog number: Z648299)
20. Plastic shoe box (Tupperware)
21. 24-well plate (Greiner, catalog number: 662 160)
22. Aluminum foil (Carl Roth, catalog number: AA76.1)
23. DNA LoBind tube 0.5 mL (Eppendorf, catalog number: 022431005)
24. Microscope slides (Avantar, VWR, catalog number: 631-1551)
25. Coverslips (Menzel-Gläser, 24 × 60 mm, #1.5)
Equipment
1. Growth cabinet (Snijders Labs, Micro Clima-series Economic lux chamber, ECL02) set to 21 °C with 16/8 h light/dark cycles using cool white light (MASTER TL-D Super 80 36 W1840; Philips)
2. Pipetboy (Gilson MACROMAN, catalog number: F110120)
3. Pipette (Gilson)
4. Thermo Multifuge 3S-R refrigerated centrifuge swinging-bucket rotor
5. Tabletop centrifuge (Eppendorf, model: 5415C)
6. Flow cabinet (CleanAir, CA/RSV3)
7. Fume hood (INTOS Lab Solutions, catalog number: EN14175)
8. Vortex-Genie 2 mixer (Sigma-Aldrich, catalog number: Z258423)
9. Freezer (-20 °C) (Liebherr Comfort, model: LBH-FKDv-4213-T)
10. Refrigerator (4 °C) (Veriport)
11. Sink with sand filter
12. Sieves for rinsing (500–1,000 μm, 350–375 μm, 175 μm, 100 μm)
13. Sieves for hatching (100 μm)
14. Containers for toxic waste
15. Binocular microscope (Leica, model: MZ12)
16. Racks for conical glass tubes, 50 mL tubes, and Eppendorf tubes (Sigma-Aldrich, catalog number: HS120683)
17. Desiccator (Sigma-Aldrich, model: SYNB135124)
18. Glass Petri dishes (Boeco, Germany)
19. Autoclave (CertoClav Multicontrol, catalog number: L23128502312A)
20. Tokyo RIKAKIKAI EYELA A-3s Vacuum Aspirator
21. Carrousel (Agar Scientific, catalog number: AR384)
22. Forceps (Sigma-Aldrich, catalog number: Z168793)
23. Heat block (Eppendorf, model: Thermomixer compact)
24. Thermocycler (Bio-Rad, model: Thermo Cycler T100)
25. Nikon Eclipse Ti2 inverted microscope with Yokogawa CSU-X1 spinning disk confocal [pinhole 50 μm (fixed)] and Hamamatsu Orca-Flash4.0 V3 digital CMOS C13440-20CU camera
26. Plan Apochromat Lambda objective 10× air, NA = 0.45 (Nikon, model: MRD70170)
28. Plan Apochromat Lambda S objective 40× C Silicon oil, NA = 1.25 (Nikon, model: MRD73400)
29. Leica TCS SP5 on a Leica DMI6000 CS inverted multiphoton/confocal microscope
30. HCX IR Apochromat Lambda objective 25× water, NA = 0.95, WD = 2,500 μm (Leica)
Software and datasets
1. Imaging software Leica Application Suite Advanced Fluorescence (LAS AF) 2.7.2.9586
Procedure
A. Seed sterilization and stratification
1. Transfer ~100–250 dry seeds of Arabidopsis thaliana (Col-0) into a 1.5 mL microcentrifuge tube. The quantity of seeds depends on the experiment.
2. Add 1 mL of 70% ethanol to a tube with Arabidopsis seeds. Invert the tube a few times to rinse the seeds and quickly discard the ethanol.
3. In a clean bench, add 1 mL of seed surface sterilization solution (see Recipe 5) to a tube and invert the tube several times. Put it in a rotating carrousel for 8–10 min and mix in between.
Note: Do not exceed 10 min, as it will affect seed viability. Perform all subsequent steps in the clean bench.
4. Allow the seeds to settle to the bottom of the tube and remove the seed sterilization solution.
5. Rinse the seeds with 1 mL of sterile ultrapure water. Invert the tube to mix the seeds in suspension.
6. Allow the seeds to settle to the bottom of the tube, remove water, and repeat step A5 at least four more times. Repeat until detergent bubbles are not visible.
7. Pour 50 mL of autoclaved modified KNOP medium into a square Petri dish (see Recipes 2–4). Let the medium solidify with the lid partially open (usually 20–30 min) and label the KNOP plates.
8. Use a 1 mL filter tip to place an individual seed on the KNOP medium plates. Sow 8–10 seeds in a row on top of the medium with 1 cm distance between the seeds.
9. Wrap the plates twice with household foil and place them at 4 °C for three to four days for seed stratification.
10. Place the plates vertically in a growth cabinet for four days at 21 °C with 16/8 h light/dark cycles using cool white light.
B. Hatching of Heterodera schachtii
1. In our work, H. schachtii cysts (Woensdrecht population from IRS, The Netherlands) were extracted from sand or clay-mix of Brassica spp.–infected plants, as previously described [12,13].
2. Place a handful of sand containing cysts in a 2 L beaker and fill with tap water. Let it settle for a few minutes until the sand settles to the bottom and the cysts float to the top.
Note: Collect the H. schachtii cysts in the sink.
3. Stack the sieves in order of increasing mesh size, with the smallest mesh size (100 μm) at the bottom, followed by the 175 μm and 350–375 μm sieves, and the 500–1,000 μm sieve at the top. Pour the water with cysts onto the stacked sieves. The 500–1,000 μm sieve helps to filter out plant debris, while the 350–375 μm sieve collects most of the cysts. The 175 μm sieve, with the finest mesh, collects the cysts when the middle one overflows and also helps prevent the sink from being blocked by fine sand and clay particles. The 100 μm sieve also prevents the sink from being blocked by fine sand and clay particles. Repeat this a few times until there are no more cysts in the sand.
Note: The volume of sand required depends on the number of cysts present and how well they hatch.
4. Rinse the sieves extensively with tap water to filter out all dirt. Constantly check whether sieves are not blocked/vacuumed and/or overflowing.
5. Collect the cysts in a 300 mL Erlenmeyer using a wash or dispenser bottle filled with tap water. Do not exceed the 100 mL mark.
6. Add 2 mL of 1% sodium azide solution and fill the Erlenmeyer up to 100 mL with tap water (final concentration is 0.02%).
Caution: Sodium azide is toxic; wear gloves.
7. Gently swirl the Erlenmeyer and incubate for 20 min at room temperature, swirling occasionally.
8. Pour the cysts into a 25 μm sieve over the sink and rinse the cysts for ~3–4 min with running tap water to remove all traces of sodium azide.
9. Decant the cysts onto a 100 μm hatching sieve and place in a glass Petri dish.
10. Prepare the antibiotic solution, 30 mL per hatching sieve (see Recipe 1). Gently pour the antibiotic solution over the sieve with the cysts, then into the Petri dish.
11. Place the Petri dish in a plastic shoe box and incubate at room temperature in the dark.
12. After 3–7 days, collect the second-stage H. schachtii juveniles. If more juveniles are required, add 30 mL of zinc chloride solution (3 mM) on top of the sieve and hatch for another 3–4 days.
Note: The yield for rehatching is often lower than the initial hatch.
C. Collection and sterilization of Heterodera schachtii
1. Collect the juvenile suspension in conical glass centrifuge tubes and centrifuge at 1,830× g (3,000 rpm) for 2 min. Use a low brake speed to not disturb the pellet of juveniles.
Crucial: Do not use plastic centrifuge tubes, as juveniles stick to plastic. Low brake speed is crucial in all centrifuge steps.
2. Aspirate off the supernatant and add the pellets from multiple tubes using a glass Pasteur pipette into one tube, with a maximum volume of 1/3 of the total volume of the tube.
3. Add an equal volume of sterile 70% sucrose and mix extensively with a spatula.
4. Carefully add a layer of tap water on top of the nematode-sucrose column using a spatula without disturbing the nematode-sucrose column.
5. Centrifuge at 814× g (2,000 rpm) for 3 min with low brake speed.
6. Collect the nematodes at the interface of sucrose and water with a glass Pasteur pipette and transfer them to a new conical glass centrifuge tube.
7. Immediately fill the tube with autoclaved tap water and centrifuge at 1,830× g (3,000 rpm) for 2 min with low brake speed and aspirate off the supernatant. Repeat this step twice.
8. Collect the pellet using a glass Pasteur pipette in a 2 mL microcentrifuge tube and fill the tube up to approximately 1,970 μL with tap water.
9. In a fume hood, add 10 μL of 0.4% (v/v) Triton X-100, 8 μL of 1.0% (w/v) sodium azide, and 10 μL of 0.8% mercury(II)chloride. Resuspend and incubate for 20 min at room temperature on a rotating carrousel at low speed.
Caution: Mercury(II)chloride is highly toxic; always work in a flow cabinet and wear nitrile gloves. Collect everything in contact with mercury(II)chloride in a waste container and discard the waste into a container for highly toxic waste.
10. Centrifuge nematodes at 8,160× g (10,000 rpm) for 1 min with low brake speed. Aspirate off the supernatant by pipetting without disturbing the nematode pellet in a clean bench. Fill the tube to 2 mL with sterile tap water.
12. Repeat step C10 three times to wash the juveniles and resuspend them in sterile 0.7% gelrite.
Note: Before use, prepare and autoclave 0.7% gelrite for 20 min at 121 °C and store at room temperature.
13. Resuspend well and pipette 10 drops of 1 μL of the nematode suspension onto a Petri dish. Count the number of sterile second-stage juveniles per microliter using a binocular and calculate the average. If needed, dilute or concentrate the nematode suspension to a concentration of 15 juveniles per microliter.
16. Place the microcentrifuge tube with sterile second-stage juveniles on a carrousel at room temperature until use.
D. Inoculation of Arabidopsis thaliana with Heterodera schachtii
1. Inoculate four-day-old Arabidopsis seedlings with 15–20 sterile second-stage H. schachtii juveniles per plant root in a clean bench.
2. Wrap the plates twice with household foil and incubate vertically for another four days at 21 °C with 16/8 h light/dark cycles.
3. After four days post-inoculation (dpi), use a binocular to check for nematode infections. Select seedlings without overlapping feeding sites.
E. Fixation and clearing of Arabidopsis seedlings
1. Using forceps, transfer the seedlings from the square Petri dish to the wells of a 24-well plate containing 2 mL of 4% PFA. Fixate by incubating them for 30 min at room temperature.
Caution: PFA is toxic. Work in a fume hood with gloves.
Caution: Do not put too many seedlings together in the same well. Up to 10 seedlings works well.
2. Transfer the seedlings to the wells of a fresh 24-well plate containing 2 mL of PBS to wash them.
3. Repeat the previous step so that the samples are washed twice.
4. Take a 24-well plate and fill the wells with 70% EtOH in nuclease-free water. Transfer the seedlings and incubate them for 15 min.
5. Repeat the previous step so that, in the end, the seedlings have been incubated two times for 15 min each.
6. Take a 24-well plate again and fill the wells with 1 mL of ClearSee. Transfer the seedlings to the ClearSee and wrap the plate in aluminum foil. Store at 4 °C.
7. Refresh the ClearSee solution after ~4 days. The old solution has turned green now.
8. Incubate the seedlings in total for at least 7 days in ClearSee at 4 °C, while wrapped in aluminum foil.
9. After 7 (or more) days, the samples can be prepared for imaging.
Pause point: The seedlings can be left in ClearSee for at least three months, while stored in the fridge, wrapped in aluminum foil. We have not tested longer storage.
F. Hybridization chain reaction to visualize transcript(s) of interest
1. Prewarm HCR HiFi hybridization buffer at 37 °C.
2. Transfer the seedlings that you want to stain from the ClearSee to a 0.5 mL tube containing 100 μL of prewarmed HCR HiFi hybridization buffer. Pre-incubate them in a heat block at 37 °C for 30 min, shaking at 350 rpm.
3. After 30 min of incubation, remove the buffer and add 100 μL of fresh, prewarmed HCR HiFi hybridization buffer, to which you add 2 μL of the probes directed against your transcript of interest. In this study, we used probes directed against the genes Protein Phosphatase 2A subunit A3 (AtPP2AA3) and α-Expansin 4 (AtEXPA4).
Note: HCR probes are ordered at Molecular Instruments (see Reagents 35 and 36). By providing the sequence of the transcript(s) of interest, the probes are designed by them. We therefore cannot provide the exact methods by which the probes are designed and synthesized or how the hairpins were fluorescently labeled.
4. Incubate overnight at 37 °C while shaking at 350 rpm.
5. The next morning, prewarm HCR HiFi probe wash buffer at 37 °C.
6. Remove the HCR HiFi hybridization buffer with probes and add 100 μL of prewarmed HCR HiFi probe wash buffer. Incubate the seedlings for 15 min at 37 °C, while shaking at 350 rpm.
7. Repeat the previous step three times so that the seedlings are washed 4× for 15 min in total. After the last wash, store the samples in HCR HiFi probe wash buffer, wrapped in aluminum foil, in the fridge until the end of the day (since the next incubation step is overnight again).
Note: The next steps need to be performed at room temperature and in the dark. The easiest is to put the samples in the drawer of a lab bench.
8. Prewarm HCR gold amplifier buffer to room temperature in the dark.
9. Take the samples from the fridge, remove the wash buffer, and add 100 μL of HCR gold amplifier buffer. Prewarm the samples at room temperature for 30 min in the dark.
10. Meanwhile, heat the hairpins (h1 and h2) in a thermocycler at 95 °C for 90 s.
Critical: In the next step, you need 2 μL of h1 and 2 μL of h2 per sample. Only heat the amount of h1 and h2 needed for the next step. Put the stocks back at -20 °C.
Critical: The hairpins are labeled with a fluorescent dye (we used the far-red label X3-647), so they should be kept in the dark.
11. Cool the heated hairpins at room temperature for 30 min in the dark.
12. After both the seedlings and the hairpins have reached room temperature, remove the HCR gold amplifier buffer from the samples. Add 100 μL of new HCR gold amplifier buffer and add 2 μL of h1 and 2 μL of h2 to each sample.
Critical: Each sample needs both hairpins to amplify the fluorescent signal.
13. Incubate the samples overnight at room temperature in the dark.
14. The next morning, prewarm HCR gold amplification wash buffer at room temperature.
15. Remove the HCR gold amplifier buffer with hairpins from the seedlings and add 100 μL of prewarmed HCR gold amplification wash buffer. Incubate for 15 min at room temperature, in the dark.
16. Repeat the previous step three times so that the seedlings are washed 4× for 15 min in total.
17. The samples are ready to be prepared for imaging now.
Pause point: The samples can be stored in the fridge, while wrapped in aluminum foil, for at least a week, without affecting the brightness of the HCR spots. We have not tested longer storage.
G. Preparation of imaging slides
1. Prepare imaging buffer. Use fresh buffer that is prepared on the day of imaging.
2. Remove the HCR gold amplification wash buffer from the samples. Add 0.5 mL of imaging buffer and incubate for 15 min on ice.
3. Replace the imaging buffer with 0.5 mL of fresh imaging buffer. Add 5 μL of catalase, 5 μL of glucose oxidase, and 1.5 μL of (0.25 mg/mL) DAPI (final concentration 0.75 μg/mL) for nuclear staining. Incubate for approximately 15 min on ice in the dark, wrapped in aluminum foil.
Note: In our experience, incubating longer does not affect the results.
4. Take a microscope slide and, using forceps, transfer a seedling from the 0.5 mL tube to the slide. Add a bit of the liquid from the tube to prevent the sample from drying out. Around 20 μL works well for a 24 × 24 mm coverslip #1.5.
5. Position the sample in the middle of the microscope slide; be sure that the part that you want to image will be covered by the coverslip.
6. Gently put a coverslip on top by letting the coverslip slowly drop from one side (support with needle and forceps).
Critical: Avoid introducing air bubbles. Be gentle. If too much force is used, the seedling will be damaged.
7. Seal the coverslip on the microscope slide with Valap. Melt Valap in a heating block or using a flame and run a single, smooth stroke of a warm Valap-coated brush along each side of the coverslip to create an airtight seal that solidifies within seconds. This prevents the sample from drying out.
H. Analyze samples by microscopy
Critical: To image the three-dimensional structure of the feeding site, we found that confocal z-series with a 2-photon excitation (2PE) works best. However, 2PE bleaches the HCR spots. It is therefore critical to first image the HCR spots using spinning disk or regular confocal imaging. After that, the sample can be used for 2PE. It is also possible to use separate samples for this.
1. Use a small magnification objective (we used 10×) to find the root tip.
2. Zoom in by switching to the 40× silicon-oil objective and image DAPI and HCR spots (fluorescence depends on the hairpins used; in our case, 647 nm) with 445/60 and 615/70 emission filters, respectively. AtPP2AA3 is ubiquitously expressed and hence visible in all cell types. That is why we first image the root tip: it serves as an internal positive control. Using the 40× objective, it is possible to distinguish individual spots while keeping an overview of the root. Scroll through z to find the mid-plane of the root tip, where you can distinguish the quiescent center and all cell types differentiating from there. The cleared sample, thin mounting, and objective used allow making a z-stack to see AtPP2AA3 expression through the entire root. We used a standard laser intensity of 20% and an exposure time of 200 ms.
3. To gain an overview, go back to the lower magnification and find the locations in the root where a nematode has infected and formed a feeding site.
4. Using the 40× silicon oil objective, image the feeding site. The nuclei (DAPI-stained) and cell walls (visible due to autofluorescence) will help you find their location. The nematode nuclei are also stained with DAPI.
Note: Depending on the orientation of the root, it may not be possible to image the entire feeding site with this objective. The best samples are the ones in which the worm is in the same z-plane as the feeding site or in which the worm tail sticks out of the root. Samples in which the worm is closer to the objective than to the feeding site are usually not good enough, because the feeding site is too deep (see General notes).
5. To image the structure of the feeding site, switch to 2PE. To excite DAPI, we used 750 nm.
Critical: Ensure the objective is compatible with multiphoton excitation (we used an HCX IRAPO Lambda 25× 0.95 water objective).
Validation of protocol
We validated this protocol by tissue fixation and clearing followed by HCR and microscopic imaging of Protein Phosphatase 2A subunit A3 (AtPP2AA3) and α-Expansin 4 (AtEXPA4) in the cyst nematode-induced syncytium in Arabidopsis roots. This protocol details optimal conditions for Arabidopsis growth and nematode infection and highlights the importance of tissue fixation and clearing for improved imaging. It provides a detailed procedure for optimal probe penetration, signal amplification, and choice of microscopy to visualize vascular tissue–localized syncytium–specific expression of putative candidates AtPP2AA3 [14] and AtEXP4 (in-house pilot experiment [15]).
Arabidopsis growth and nematode infection
Here, we present a method optimized for Arabidopsis growth and infection with the plant-parasitic nematode H. schachtii. Since Arabidopsis can be grown on various media in vitro, Sijmons et al. tested combinations of media and pH for optimal nematode infection (11). Using modified KNOP media at pH 6.4 is crucial for H. schachtii infection.
Imaging
AtPP2AA3 is traditionally used as a positive control due to its ubiquitous expression across all cell types. For this reason, we always first image the root tip (Figure 1A, C), which serves as an internal positive control. We found supporting evidence in transcriptomic data for enriched expression of AtPP2AA3 in the nematode-infected root [14]. We therefore also visualized AtPP2AA3 in the syncytium (Figure 1D) and found it to be indeed expressed in the syncytium, while it is almost undetectable in uninfected, control samples that were similarly processed and also imaged at identical acquisition settings (Figure 1B).
RNA tomography data of Arabidopsis roots infected with H. schachtii indicated that AtEXPA4 is highly expressed in the syncytium at early stages of nematode infection [16]. Moreover, Saura-Sanchez et al. have shown the expression of AtEXPA4 in the giant cells upon root-knot nematode infection in Arabidopsis and rice [15]. AtEXPA4 is a protein that loosens the cell walls by hydrolyzing the hydrogen bonds between them. As the syncytium results from cell wall breakdown and protoplast fusion, we probed for AtEXPA4 expression in our spatial transcriptomics dataset (Wang et al., in preparation) and performed HCR. Here, we show that we indeed observed AtEXPA4 expression in the syncytium (Figure 2D).
We show that by using 2-photon excitation, the morphology of feeding sites induced by plant-parasitic nematodes can be visualized (Figure 3).
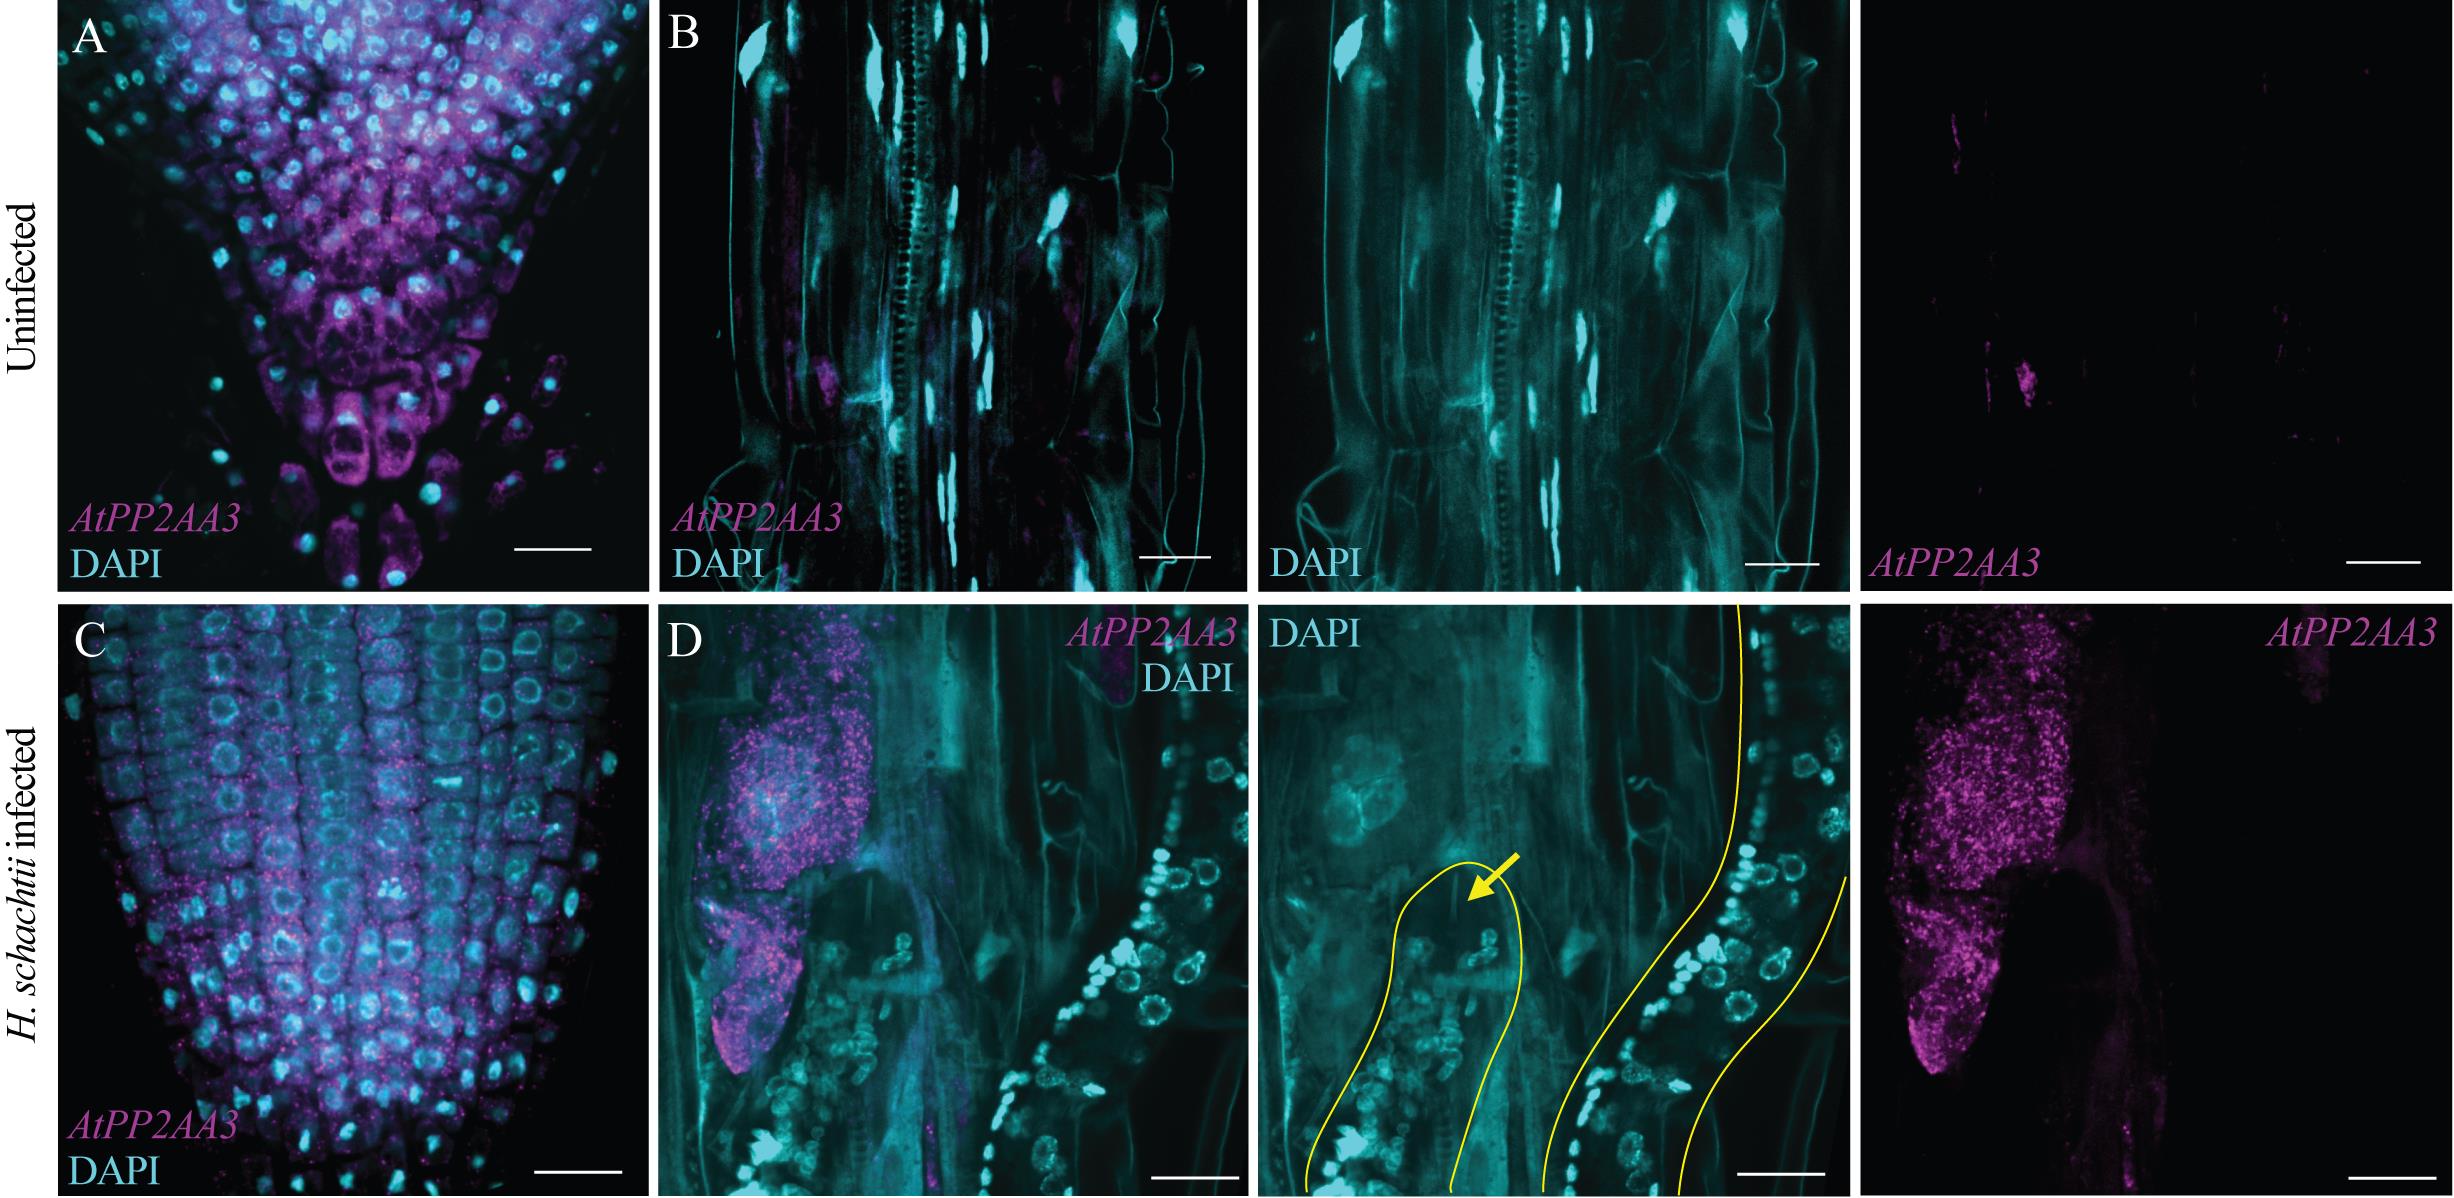
Figure 1. Spatial expression of AtPP2AA3 in an Arabidopsis seedling root infected with Heterodera schachtii, 4 days post-inoculation (dpi), stained using hybridization chain reaction (HCR). In all images, nuclei were stained with DAPI. (A) RNA fluorescence in situ hybridization (FISH) showing transcript expression and localization of AtPP2AA3 in the root tip of a control plant (uninfected). AtPP2AA3 is ubiquitously expressed in all cell types. Using the 40× silicon-oil objective provides an overview of the root tip, while the resolution is sufficient to distinguish individual HCR spots. (B) Localization of AtPP2AA3 transcripts in the elongation/differentiation zone of a control root, compared with the corresponding nematode-induced syncytial region of an infected root (1D). To the right, the separate images of DAPI and AtPP2AA3 are shown. (C) Localization of AtPP2AA3 transcripts in the root tip of a root infected with H. schachtii at 4 dpi. (D) Localization of AtPP2AA3 transcripts in the syncytium surrounding the nematode in the infected root. To the right, the separate images of DAPI and AtPP2AA3 are shown. In the DAPI image, the nematodes are indicated by a yellow line. The stylet is indicated by the yellow arrow. Both plant and nematode nuclei are stained with DAPI. Scale bars: 20 μm. The same acquisition parameters were used.
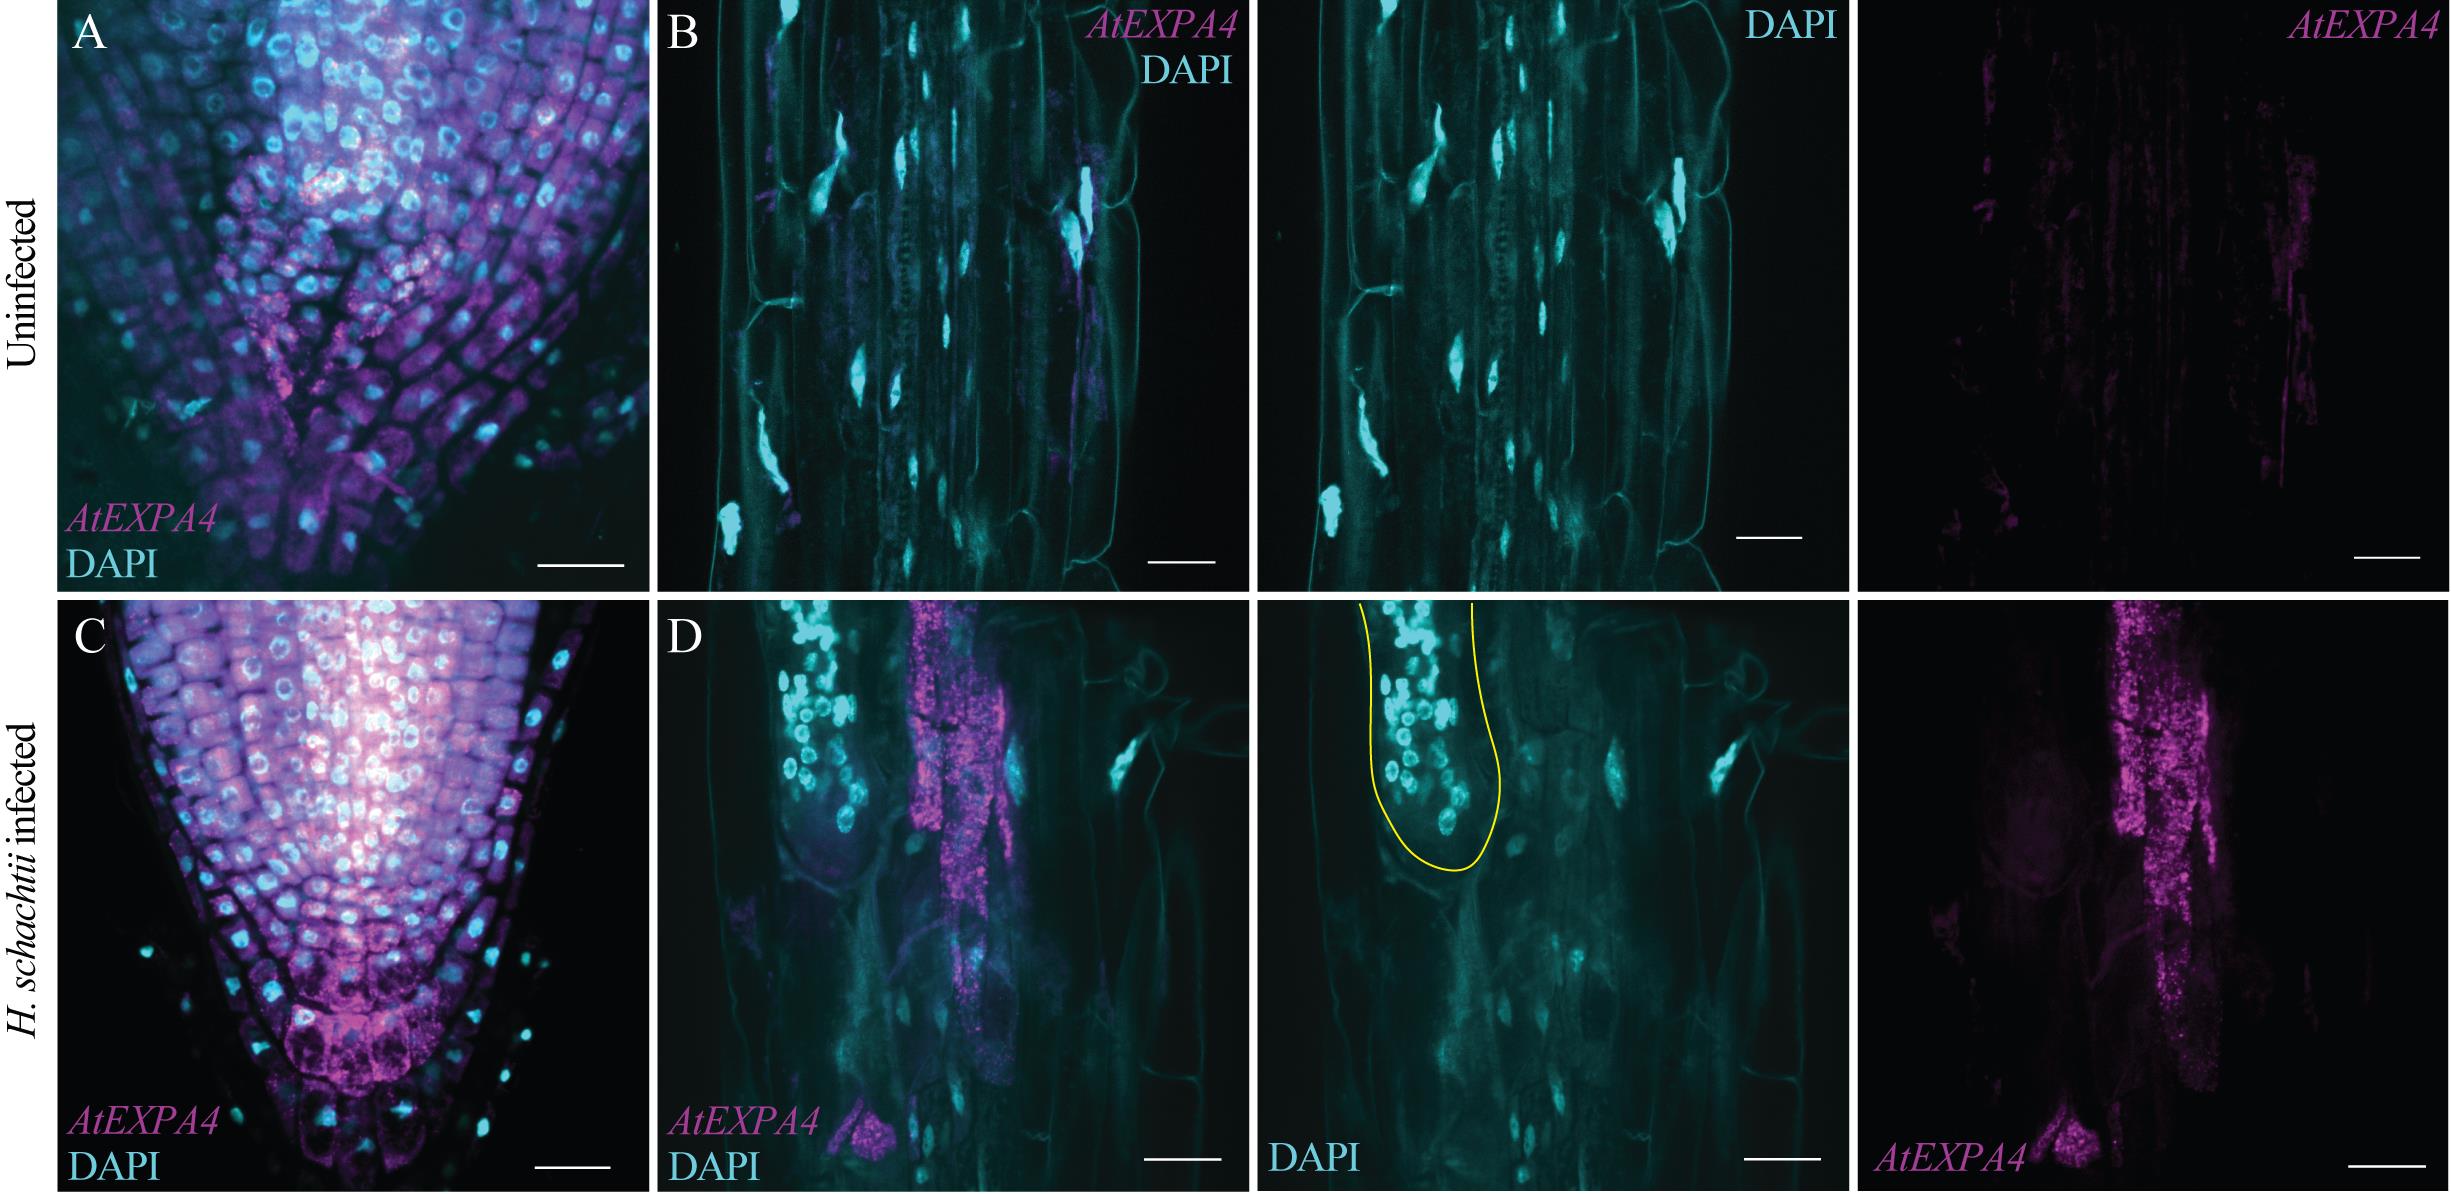
Figure 2. Spatial expression of AtEXPA4 in an Arabidopsis seedling root infected with Heterodera schachtii, 4 days post-inoculation (dpi), stained using hybridization chain reaction (HCR). In all images, nuclei were stained with DAPI. (A) RNA fluorescence in situ hybridization (FISH) showing transcript expression and localization of AtEXPA4 at the root tip of a control plant (uninfected). (B) Localization of AtEXPA4 transcripts in the elongation/differentiation zone of a control root, compared with the corresponding nematode-induced syncytial region of an infected root (2D). To the right, the separate images of DAPI and AtEXPA4 are shown. (C) Localization of AtEXPA4 transcripts in the root tip of a root infected with H. schachtii at 4 dpi. (D) Localization of AtEXPA4 transcripts in the syncytium surrounding the nematode in the infected root. To the right, the separate images of DAPI and AtEXPA4 are shown. In the DAPI image, the nematode is indicated by a yellow line. Both plant and nematode nuclei are stained with DAPI. Scale bars: 20 μm. The same acquisition parameters were used.
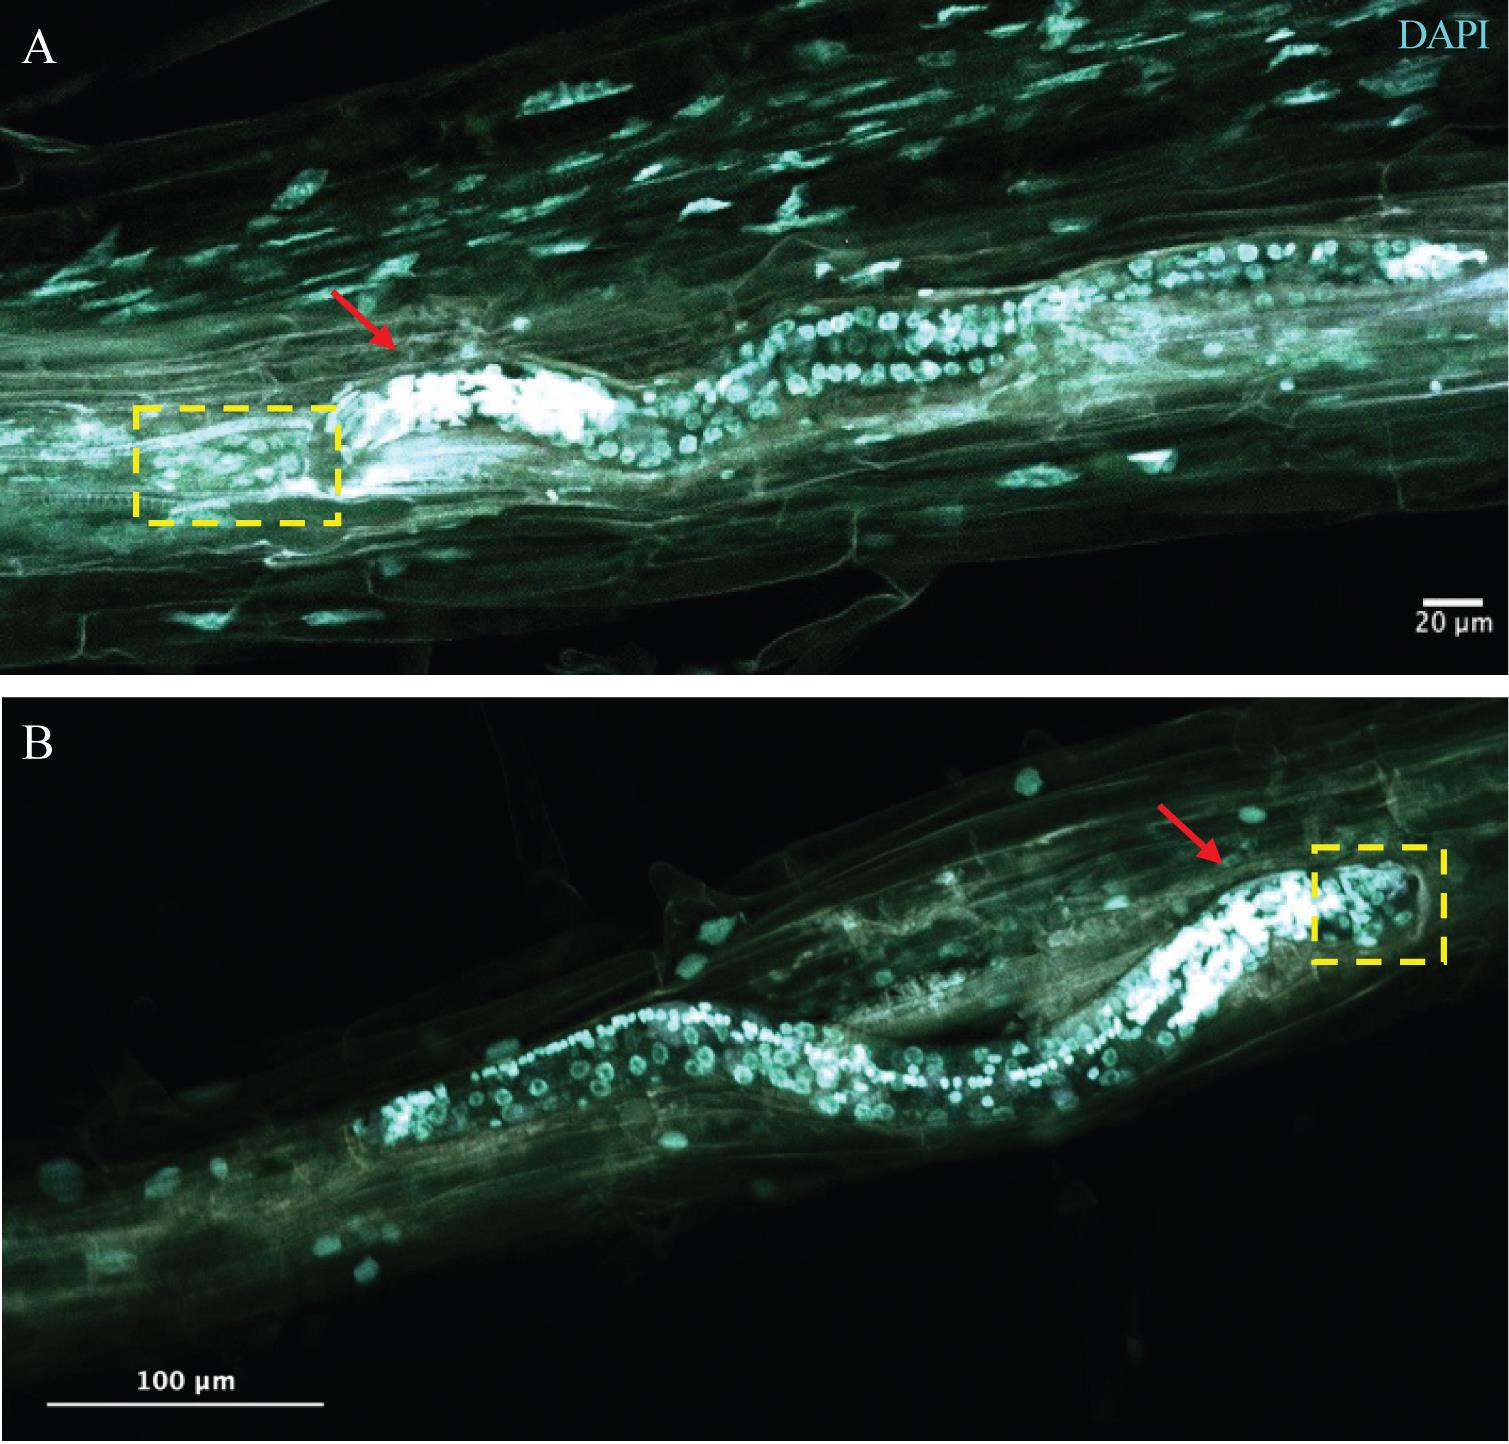
Figure 3. Feeding sites induced by Heterodera schachtii in Arabidopsis seedling roots, at 4 days post-inoculation (dpi), imaged by 2PE. Two independent samples stained with DAPI and imaged by 2-photon excitation (2PE), one plane of a z-stack. The z-slices have 0.70-μm optical thickness, and the entire z-stack is as thick as needed to capture the entire worm and feeding site (depending on the orientation of the worm, this differs per sample). (A) Nematode in an Arabidopsis root, tail to the right, and head (characterized by densely packed nuclei, indicated by a red arrow) to the left-hand side. Early syncytium is localized to the left of the head (indicated by the yellow dashed box). Scale bar: 20 μm. (B) Nematode in an Arabidopsis root, tail to the left, and head to the right-hand side (indicated with a red arrow). Syncytium to the right of the head (indicated by a yellow dashed box). Scale bar: 100 μm.
General notes and troubleshooting
General notes
Imaging the syncytium with regular (point scanner) confocal microscopy is difficult. First, because the syncytium is localized in or near the plant root’s vascular cylinder, which is the innermost part of the plant root. Second, the site where the worm has infected the root is damaged, which causes autofluorescence over a broad spectrum. In our attempt to visualize gene expression in the syncytium, we tested various sample preparation methods, microscopes, and objectives. Eventually, we arrived at the following sequence of steps, which enabled us to visualize gene expression in the syncytium.
1. Arabidopsis growth on KNOP medium with pH 6.4, which is essential for optimal H. schachtii nematode infection.
2. As published by Kurihara et al., clearing the plant tissue using ClearSee reduces the autofluorescence background [8], and thus circumvents the need for FLIM imaging with gating to separate autofluorescence from specific signal.
3. HCR instead of smFISH enhances the brightness of the spots ~10 times, making it possible to use a lower numerical aperture objective and still be able to capture individual spots above background noise (Figure S1).
4. The 40× silicon objective (N.A. = 1.25) described above provides both a sufficient overview of the infected root to be able to find the syncytium and sufficient penetration depth to be able to image the fluorescence at the syncytium with a high signal-to-noise ratio when positioned deep in the root. There are, however, situations where imaging the syncytium remains difficult, if not impossible. This depends on the orientation of the plant root (when the syncytium is closer to the microscope slide than to the coverslip, the penetration depth might not be deep enough). Also, when multiple nematodes are stacked or close together, it may be difficult to distinguish the feeding structures.
We aimed to determine whether AtPP2AA3 and AtEXPA4 were enriched in syncytia compared with non-infected tissue. Our datasets clearly prove this. In several studies, HCR or smFISH signals are used to quantify gene expression in particular cells of a tissue. Here, we did not quantify the expression in feeding cells, because that would provide a false sense of accuracy. First of all, syncytium formation is a highly dynamic process in which changes in mRNA expression levels in hundreds of neighboring cells are involved. There is no true biological replicate, as the exact time point of infection and syncytium formation varies across samples. Translating photon-counting to a semi-quantitative mRNA expression level does not therefore add insight into molecular dynamics. Moreover, during development, the syncytium grows, and its borders are shifting, which would require a real-time readout of enhanced gene expression. In this study, we standardized methods to compare the presence of the transcripts in the syncytium versus the neighboring tissues and versus the same area in the root of an uninfected plant. The results showed that AtPP2AA3 and AtEXPA4 are clearly enriched in the syncytium relative to uninfected tissues.
Troubleshooting
Problem 1: Low yield of second-stage juveniles during hatching.
Possible causes: There are various factors that influence hatching, including the origin of the cyst-containing sand or clay, the storage of the sand/clay material in the laboratory, and the surface sterilization of cysts.
Solutions: The sand/clay sample should be procured from a designated institute/research center. In our case, we obtained the samples from IRS (Instituut voor Rationele Suikerproductie, the Netherlands), which collects field samples from beets infected with cyst nematode. The sand/clay samples should be stored at 4 °C. A lower temperature negatively affects hatching. For efficient hatching, the cyst sterilization should be performed using 1% sodium azide and should not exceed 20 min. An antibiotic solution prepared in 3 mM zinc chloride improves hatching.
Problem 2: Loss of second-stage juveniles during the collection and sterilization step.
Possible cause: Nematodes often stick to a plastic or glass surface.
Solution: Add 2 μL of 0.01% (v/v) Tween-20 to the nematode suspension before centrifugation. This reduces the surface tension and will cause all nematodes to settle in the pellet.
Supplementary information
The following supporting information can be downloaded here:
1. Figure S1. smFISH vs. HCR spots in Arabidopsis seedling roots
Acknowledgments
R.L. and A.P. were partly supported by an NWO domain Applied and Engineering Sciences VIDI grant (18389 to Lozano-Torres, J.L.). The Laboratory of Nematology at Wageningen University and Research, KeyGene, Rijk Zwaan, Enza Zaden, Vilmorin and Cie, and Takii contributed with funding. C.B. was supported by a KNAW Onderzoeksfonds to Korswagen, H.C. (KTO/1303).
Author contributions
Conceptualization, R.S.L., A.P., C.W.B.; Investigation, R.S.L., A.P., N.C.A.R., C.W.B.; Writing—Original Draft, R.S.L., A.P., C.W.B.; Writing—Review & Editing, N.C.A.R., J.L.T., H.C.K.; Funding acquisition, J.L.T., H.C.K.; Supervision, N.C.A.R., J.L.T., H.C.K.
Competing interests
The authors declare no conflicts of interest.
References
- Eves-van den Akker S. (2021). Plant-nematode interactions. Curr Opin Plant Biol. 62: 102035. https://doi.org/10.1016/j.pbi.2021.102035
- Siddique, S. and Grundler, F. M. (2018). Parasitic nematodes manipulate plant development to establish feeding sites. Curr Opin Microbiol. 46: 102–108. https://doi.org/10.1016/j.mib.2018.09.004
- Zhao, L., Fonseca, A., Meschichi, A., Sicard, A. and Rosa, S. (2023). Whole-mount smFISH allows combining RNA and protein quantification at cellular and subcellular resolution. Nat Plants. 9(7): 1094–1102. https://doi.org/10.1038/s41477-023-01442-9
- Choi, H. M. T., Beck, V. A. and Pierce, N. A. (2014). Next-Generation in Situ Hybridization Chain Reaction: Higher Gain, Lower Cost, Greater Durability. ACS Nano. 8(5): 4284–4294. https://doi.org/10.1021/nn405717p
- Choi, H. M. T., Calvert, C. R., Husain, N., Huss, D., Barsi, J. C., Deverman, B. E., Hunter, R. C., Kato, M., Lee, S. M., Abelin, A. C. T., et al. (2016). Mapping a multiplexed zoo of mRNA expression. Development. 143(19): 3632–3637. https://doi.org/10.1242/dev.140137
- Choi, H. M., Schwarzkopf, M., Fornace, M. E., Acharya, A., Artavanis, G., Stegmaier, J., Cunha, A. and Pierce, N. A. (2018). Third-generation in situ hybridization chain reaction: multiplexed, quantitative, sensitive, versatile, robust. Development. 145(12): e1101/285213. https://doi.org/10.1101/285213
- Ikbal, J., Lim, G. S. and Gao, Z. (2015). The hybridization chain reaction in the development of ultrasensitive nucleic acid assays. TrAC, Trends Anal Chem. 64: 86–99. https://doi.org/10.1016/j.trac.2014.08.014
- Kurihara, D., Mizuta, Y., Sato, Y. and Higashiyama, T. (2015). ClearSee: a rapid optical clearing reagent for whole-plant fluorescence imaging. Development. 142(23): 4168–4179. https://doi.org/10.1242/dev.127613
- Duncan, S., Olsson, T. S. G., Hartley, M., Dean, C. and Rosa, S. (2016). A method for detecting single mRNA molecules in Arabidopsis thaliana. Plant Methods. 12(1): 13. https://doi.org/10.1186/s13007-016-0114-x
- Duncan, S., Olsson, T., Hartley, M., Dean, C. and Rosa, S. (2017). Single Molecule RNA FISH in Arabidopsis Root Cells. Bio Protoc. 7(8): e2240. https://doi.org/10.21769/bioprotoc.2240
- Sijmons, P. C., Grundler, F. M., Mende, N., Burrows, P. R. and Wyss, U. (1991). Arabidopsis thaliana as a new model host for plant-parasitic nematodes. Plant J. 1(2): 245–254. https://doi.org/10.1046/j.1365-313x.1991.00245.x
- Baum, T. J., Wubben, M. J., Hardyy, K. A., Su, H. and Rodermel, S. R. (2000). A Screen for Arabidopsis thaliana Mutants with Altered Susceptibility to Heterodera schachtii. J Nematol. 32(2):166–173. https://pmc.ncbi.nlm.nih.gov/articles/PMC2620447/
- Willig, J., Guarneri, N., van Steenbrugge, J. J. M., de Jong, W., Chen, J., Goverse, A., Lozano Torres, J. L., Sterken, M. G., Bakker, J., Smant, G., et al. (2022). The Arabidopsis transcription factor TCP9 modulates root architectural plasticity, reactive oxygen species‐mediated processes, and tolerance to cyst nematode infections. Plant J. 112(4): 1070–1083. https://doi.org/10.1111/tpj.15996
- Truch, J., Jaouannet, M., Da Rocha, M., Kulhanek-Fontanille, E., Van Ghelder, C., Rancurel, C., Migliore, O., Pere, A., Jaubert, S., Coustau, C., et al. (2026). Transcriptional responses of Solanum lycopersicum to three distinct parasites reveal host hubs and networks underlying parasitic successes. bioRxiv. e701158. https://doi.org/10.64898/2026.01.22.701158
- Saura-Sanchez, M., Gómez Rojas, A., Deveux, M., Minne, M., Grones, C., Eekhout, T., Abril-Urias, P., Van Bel, M., Tenorio Berrio, R., Vandepoele, K., et al. (2025). Conserved transcriptional reprogramming in nematode infected root cells. bioRxiv. e674408. https://doi.org/10.1101/2025.09.05.674408
- Pijnacker, A., Wang, Y., Willig, J., Mars, J., Werner, S., Adema, K., Smant, G., Korswagen, H. C. and Lozano‐Torres, J. L. (2025). RNA tomography reveals spatial gene expression maps of Arabidopsis thaliana roots infected with Heterodera schachtii. New Phytol. 249(1): 588–602. https://doi.org/10.1111/nph.70674
Article Information
Publication history
Received: Jul 16, 2026
Accepted: Sep 29, 2026
Available online: Oct 28, 2026
Published: Nov 20, 2026
Copyright
© 2026 The Author(s); This is an open access article under the CC BY license (https://creativecommons.org/licenses/by/4.0/).
How to cite
Lathe, R. S., Pijnacker, A., de Ruijter, N. C., Lozano-Torres, J. L., Korswagen, H. C. and Bruggeman, C. W. (2026). Hybridization Chain Reaction and Microscopy to Visualize Feeding Site–Specific Gene Expression in Arabidopsis Roots Infected by Plant-Parasitic Cyst Nematodes. Bio-protocol 16(22): e5872. DOI: 10.21769/BioProtoc.5872.

 Download Citation in RIS Format
Category
Plant Science
Do you have any questions about this protocol?
Post your question to gather feedback from the community. We will also invite the authors of this article to respond.
 Post a Question


