


- Protocols

- Articles and Issues
- For Authors
- About
- Become a Reviewer


Establishment and Cryopreservation of Primary Fibroblast Cultures From Livestock Ear-Tissue Explants

Published: Vol 16, Iss 21, Nov 5, 2026 DOI: 10.21769/BioProtoc.5856 Views: 19
Reviewed by: Sébastien GillotinTianYeh LimRishith Ravindran
 PDF
 Ask a question


Protocol Collections
Comprehensive collections of detailed, peer-reviewed protocols focusing on specific topics



Abstract
Primary fibroblast cell culture is widely used in livestock research as a renewable genetic source for applications such as cell banking, molecular analyses, and functional studies [1]. Establishing high-quality primary culture requires careful tissue collection, aseptic processing, and optimized cell culture conditions to maximize growth and minimize contamination [2]. This protocol describes a standardized method for establishing primary fibroblast cultures from livestock species, representing multiple breeds, including cattle, swine, sheep, and goats. Although the ear is the primary tissue source described due to its easy accessibility and minimal invasiveness, this protocol may also be used with similar skin or tissue types if needed. Procedures for tissue collection, sample preparation, explant culture, routine maintenance, passaging, and cryopreservation are detailed to support the generation and proliferation of healthy fibroblast cultures suitable for downstream research applications.
Key features
• Describes a reproducible workflow for the establishment, proliferation, passaging, and preservation of fibroblast cultures from livestock species such as goat, pig, sheep, and cow.
• Uses tissue explant culture for gentle, reproducible, and reliable culture establishment.
• Can be used over a variety of breeds, species, animal ages, and tissue types.
Keywords: Livestock Tissue explant
Primary fibroblasts
Cell culture
Cryopreservation
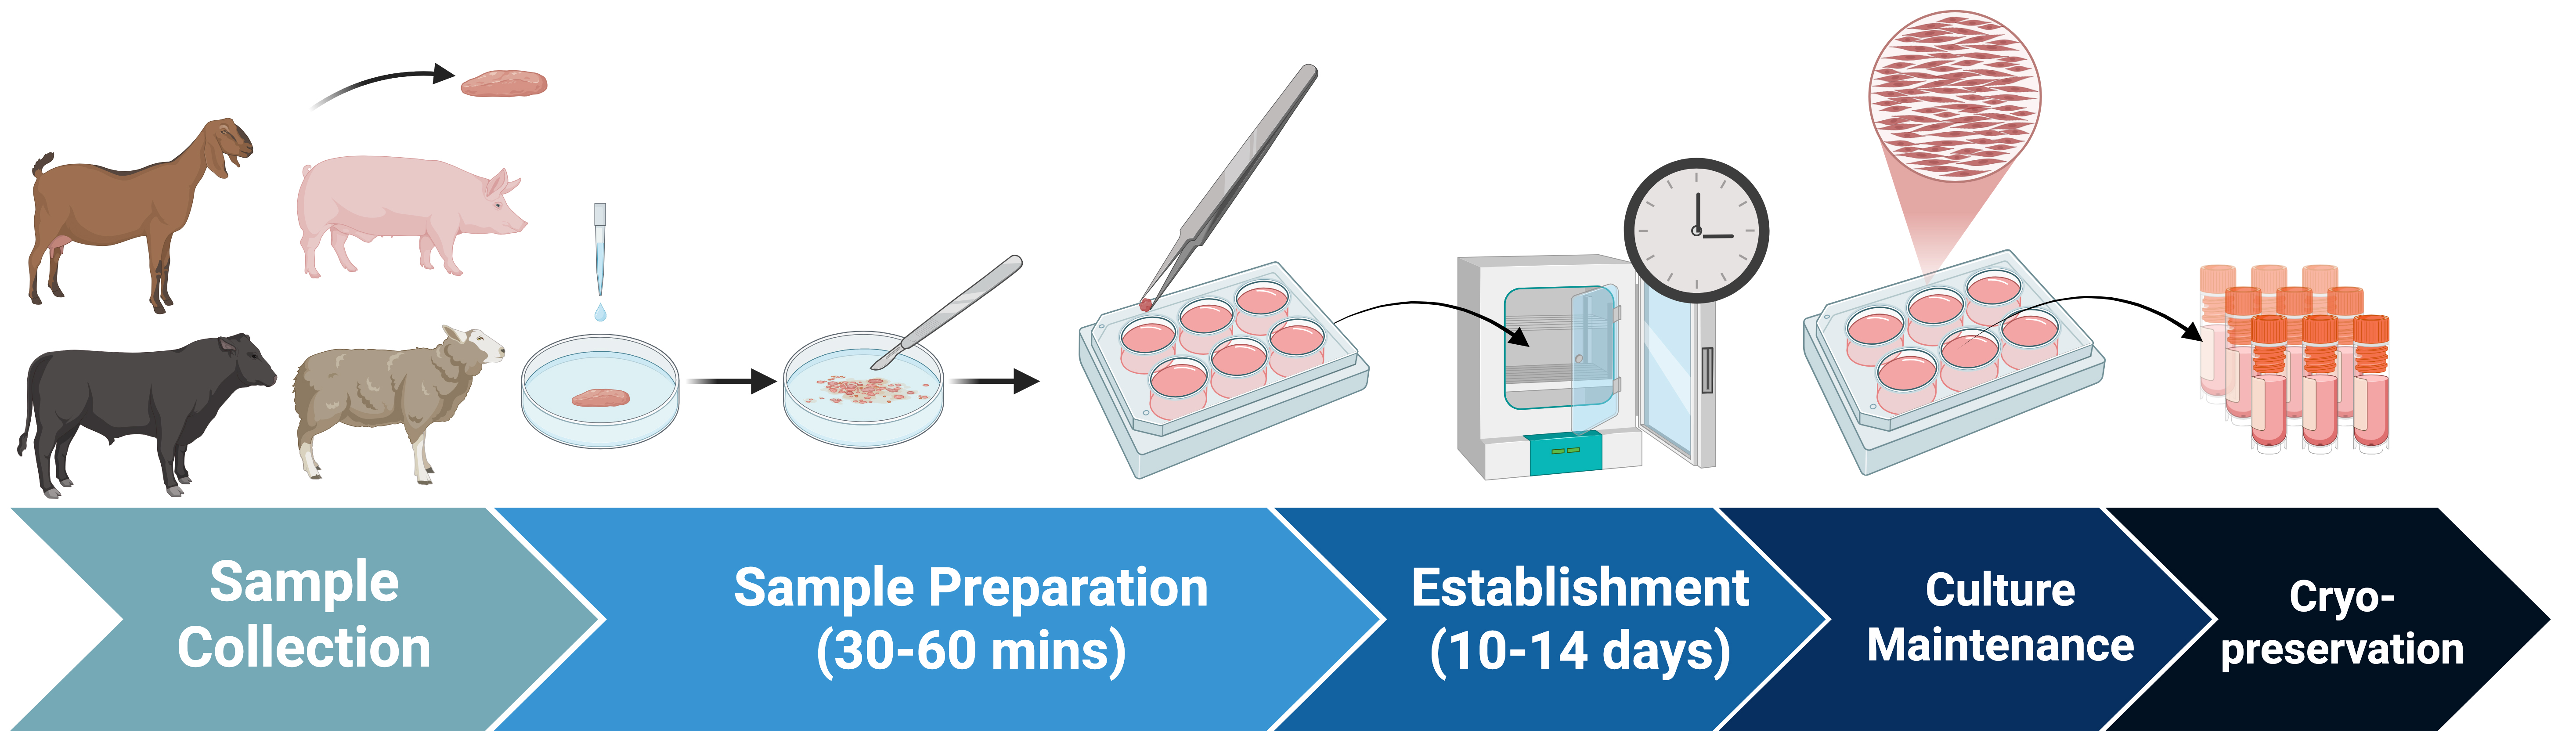
Graphical overview
Background
Fibroblasts are one of the primary connective tissue cells responsible for producing and maintaining the extracellular matrix while contributing to tissue repair and cellular signaling [3,4]. Their ease of culturing and robust growth in in vitro conditions make primary fibroblasts among the most useful cell types for agricultural and biomedical research [3,5,6]. In livestock species, primary fibroblasts serve as valuable resources for genetic conservation [7], cell banking [1], genome editing [8], and other similar areas of research. Because fibroblasts can be established from minimally invasive tissue samples, they provide an effective means of preserving genetic material from animals of diverse breeds, ages, and systems [2]. The ear tissue is particularly well-suited for fibroblast isolation since it is readily accessible, can be preserved for later processing, and does not affect the quality of the carcass. Additionally, ear tissue contains abundant dermal fibroblasts and can be collected from recently deceased carcasses or live animals with minimal stress [2]. Alternatively, fibroblasts may be isolated from a variety of other tissues, including skin biopsies, fetal tissues, tail, and other connective tissues when appropriate [6].
Successful establishment of fibroblast cultures depends on effective sample processing, strict aseptic techniques, appropriate culture conditions, and careful monitoring throughout early culture stages [2]. Standardized protocols improve reproducibility, reduce contamination, and increase the likelihood of obtaining healthy, expandable cell populations suitable for long-term storage and downstream applications. This protocol provides a practical, reproducible approach for establishing primary fibroblast cultures from multiple livestock species and breeds while allowing flexibility for alternative tissue sources.
Materials and reagents
Biological materials
1. Fetal or adult tissue samples (ear, skin, or tissue biopsy)
Reagents
1. Dulbecco’s phosphate-buffered saline without calcium and magnesium (DPBS) (Gibco, catalog number: 14190-144)
2. Dulbecco’s modified Eagle medium (DMEM) (Gibco, catalog number: 11885-084)
3. Fetal bovine serum (FBS) (Gibco, catalog number: 12483-020)
4. Antibiotic-antimycotic 100× (anti-anti 100×) (Gibco, catalog number: 15240-062)
5. 0.05% trypsin-EDTA (Sciencell Research Laboratories, catalog number: NC1672820)
6. Dimethyl sulfoxide Hybri-Max (DMSO) (Millipore Sigma, catalog number: D2650-5X5ML)
7. Skin prep solution Betadine 4oz. bottle 10% strength (Fisher Scientific, catalog number: 503043366)
8. 75% ethanol
9. Antibacterial soap
10. Trypan Blue solution, 0.4% (Gibco, catalog number: 15-250-061)
Solutions
1. Fibroblast growth medium (FGM) (see Recipes)
2. DPBS wash (see Recipes)
3. Freezing media (see Recipes)
4. Collection medium (see Recipes)
Recipes
Before you begin: Aliquot frozen reagents (i.e., FBS, trypsin-EDTA 0.05%, DMSO, anti-anti 100×) into appropriate volumes before storage at -20 °C to minimize multiple freeze/thaw cycles. When possible, use freshly thawed aliquots for each recipe and store mixed solutions in small volumes (indicated on individual recipe instructions) once mixed. Doing so will preserve the integrity of solutions and allow for longer storage and more consistent results.
1. FGM
| Reagent | Final concentration | Volume (50 mL) | Volume (250 mL) |
|---|---|---|---|
| DMEM | 89% v/v | 44.5 mL | 222.5 mL |
| FBS | 10% v/v | 5 mL | 25 mL |
| Anti-anti 100× | 1% v/v (1× final concentration) | 500 μL | 2.5 mL |
| Total | n/a | 50 mL | 250 mL |
Mix reagents to the desired volume of FGM under a sterile flow hood, adding anti-anti 100× last. Ensure thorough mixing of each reagent before adding. Filter through a 0.2 μm vacuum filter within 20 min of mixing to remove potential bacterial or fungal contaminants.
Store in 20–50 mL aliquots at 4 °C for up to 30 days. Media should be red in color. Do not use if medium becomes yellow, bright pink, turbid, or putrid.
2. DPBS wash
| Reagent | Final concentration | Volume (50 mL) | Volume (250 mL) |
|---|---|---|---|
| DPBS | 99% v/v | 49.5 mL | 247.5 mL |
| Anti-anti 100× | 1% v/v (1× final concentration) | 500 μL | 2.5 mL |
| Total | n/a | 50 mL | 250 mL |
Mix reagents to the desired volume of DPBS wash under a sterile flow hood, adding anti-anti 100× last. Ensure thorough mixing of reagents before adding. Optional: For extra precaution, filter through a 0.2 μm vacuum filter to eliminate potential bacterial contaminants.
Store in 20–50 mL aliquots at 4 °C for up to 30 days. Do not use if the wash becomes colored or turbid.
3. Freezing medium
| Reagent | Final concentration | Volume (1.5 mL) |
|---|---|---|
| DMEM* | 80% v/v | 1.2 mL |
| FBS | 10% v/v | 150 μL |
| DMSO | 10% v/v | 150 μL |
| Total | n/a | 1.5 mL |
*You may use 90% v/v FBS, 80% v/v PBS, or 80% v/v DPBS in place of 80% v/v DMEM, but ideal results are obtained with 80% v/v DMEM and 10% v/v FBS.
Make fresh for each use. Mix cold reagents under a sterile flow hood to make up 1.5 mL of freezing medium for each cryo vial.
Store at 4 °C or on ice until immediately before use. Do not use the solution if older than 12 h.
4. (ALTERNATIVE 1.A.) Collection medium
| Reagent | Final concentration | Volume |
|---|---|---|
| DMEM | 99% v/v | 9.9 mL |
| Anti-anti 100× | 1% v/v | 100 μL |
| Total | n/a | 10 mL |
Mix reagents to the desired volume of collection medium under a sterile flow hood, adding anti-anti 100× last. Ensure that reagents are thoroughly mixed before adding them.
Store at 4 °C for up to two weeks. For ideal results, use within three days of mixing.
Laboratory supplies
1. 15 mL conical centrifuge tube (Thermofisher Scientific, catalog number: 12565269)
2. 50 mL conical centrifuge tube (Thermofisher Scientific, catalog number: 12565271)
3. Falcon 6-well flat-bottom plates with lids (Corning, catalog number: 21100-002)
4. SureOne aerosol barrier pipette tips, 1,000 µL, filtered (Fisher Scientific, catalog number: 02707404)
5. T25 EasYFlask, TC surface, filter cap, 25 cm2 (Thermofisher Scientific, catalog number: 2565351)
6. Cryo vial, internal thread, 2 mL (Corning, catalog number: 1232E26)
7. 60 mm × 15 mm Petri dish (Bellco Glass Corporate, catalog number: 23A00L845)
8. Carbon steel scalpel blades #10 (VWR International, catalog number: 76457-448)
9. Scalpel knife handle No. 3 (VWR International, catalog number: 76457-416)
10. Metal tweezers (United Scientific Supplies Inc., catalog number: S111016), autoclave sterilized
11. Sterile polystyrene serological pipettes, 10 mL (Fisher Scientific, catalog number: 1367610J)
12. 250 mL vacuum filter/storage bottle system, 0.2 μM, nylon (Corning, catalog number: 097612)
13. Scissors, autoclave sterilized
Equipment
1. HeracellTM 150i CO2 Incubator 150 L (ThermoFisher Scientific, catalog number: 50116047), set to 37.5 °C and 5% CO2
2. Laminar flow hood, e.g., AirClean 600 PCR Workstation Flow Hood (AirClean Systems, model number: AC632LFUVC)
3. Heated water bath, e.g., PrecisionTM General Purpose Water Bath (Fisher Scientific, catalog number: TSFP10PMO, supplier number: TSGP10DUCK), set to 37–38 °C
4. Inverted microscope, e.g., Motic AE31 Elite 30W Trinocular Inverted Microscope (Motic Microscopy, SKU: 1100100200841)
5. (Optional) Automated Cell Counter, e.g., Invitrogen Countess 3 Automated Cell Counter (Fisher Scientific, catalog number: A49891PKG)
Procedure
A. Sample collection of livestock ear tissue
Critical: Ensure that all animal materials are collected in accordance with local guidelines, institutional regulations, and Standard Operating Procedures (SOPs).
1. After the animal has been appropriately euthanized, thoroughly spray the area with 75% ethanol and rub to remove excess dirt and contaminants. Collect the ear by cutting at its base using sterile scissors.
2. Store the ear in a sealed bag or an airtight container at 4 °C or on ice until processing (see General note 1). Wash the ear thoroughly with antibacterial soap and warm water.
3. (ALTERNATIVE) After properly restraining the animal, thoroughly clean the sample area with 75% ethanol and rub to remove excess dirt and contaminants. Using sterile scissors, an ear notch tool, or a biopsy punch, collect 1–2 cm2 of skin or ear tissue and store in collection media at 4 °C until processing.
B. Sample processing of tissue
Before you begin: Warm FGM and DPBS wash in a 37–38 °C water bath for at least 30 min.
1. Using sterile scissors, cut a 1–2 cm2 section of the ear from the conchal region of the pinna. If possible, avoid the helix and peripheral margins of the external ear (Figure 1).
Note: While fibroblasts can be successfully cultured from nearly any ear location, Figure 1 indicates regions that possess less hair and ear wax contamination, leading to a higher likelihood of success. If samples are collected on live animals, other sampling locations may be necessary. To combat potential contaminants in dirtier locations, incorporate ethanol and antibacterial washes prior to collection.
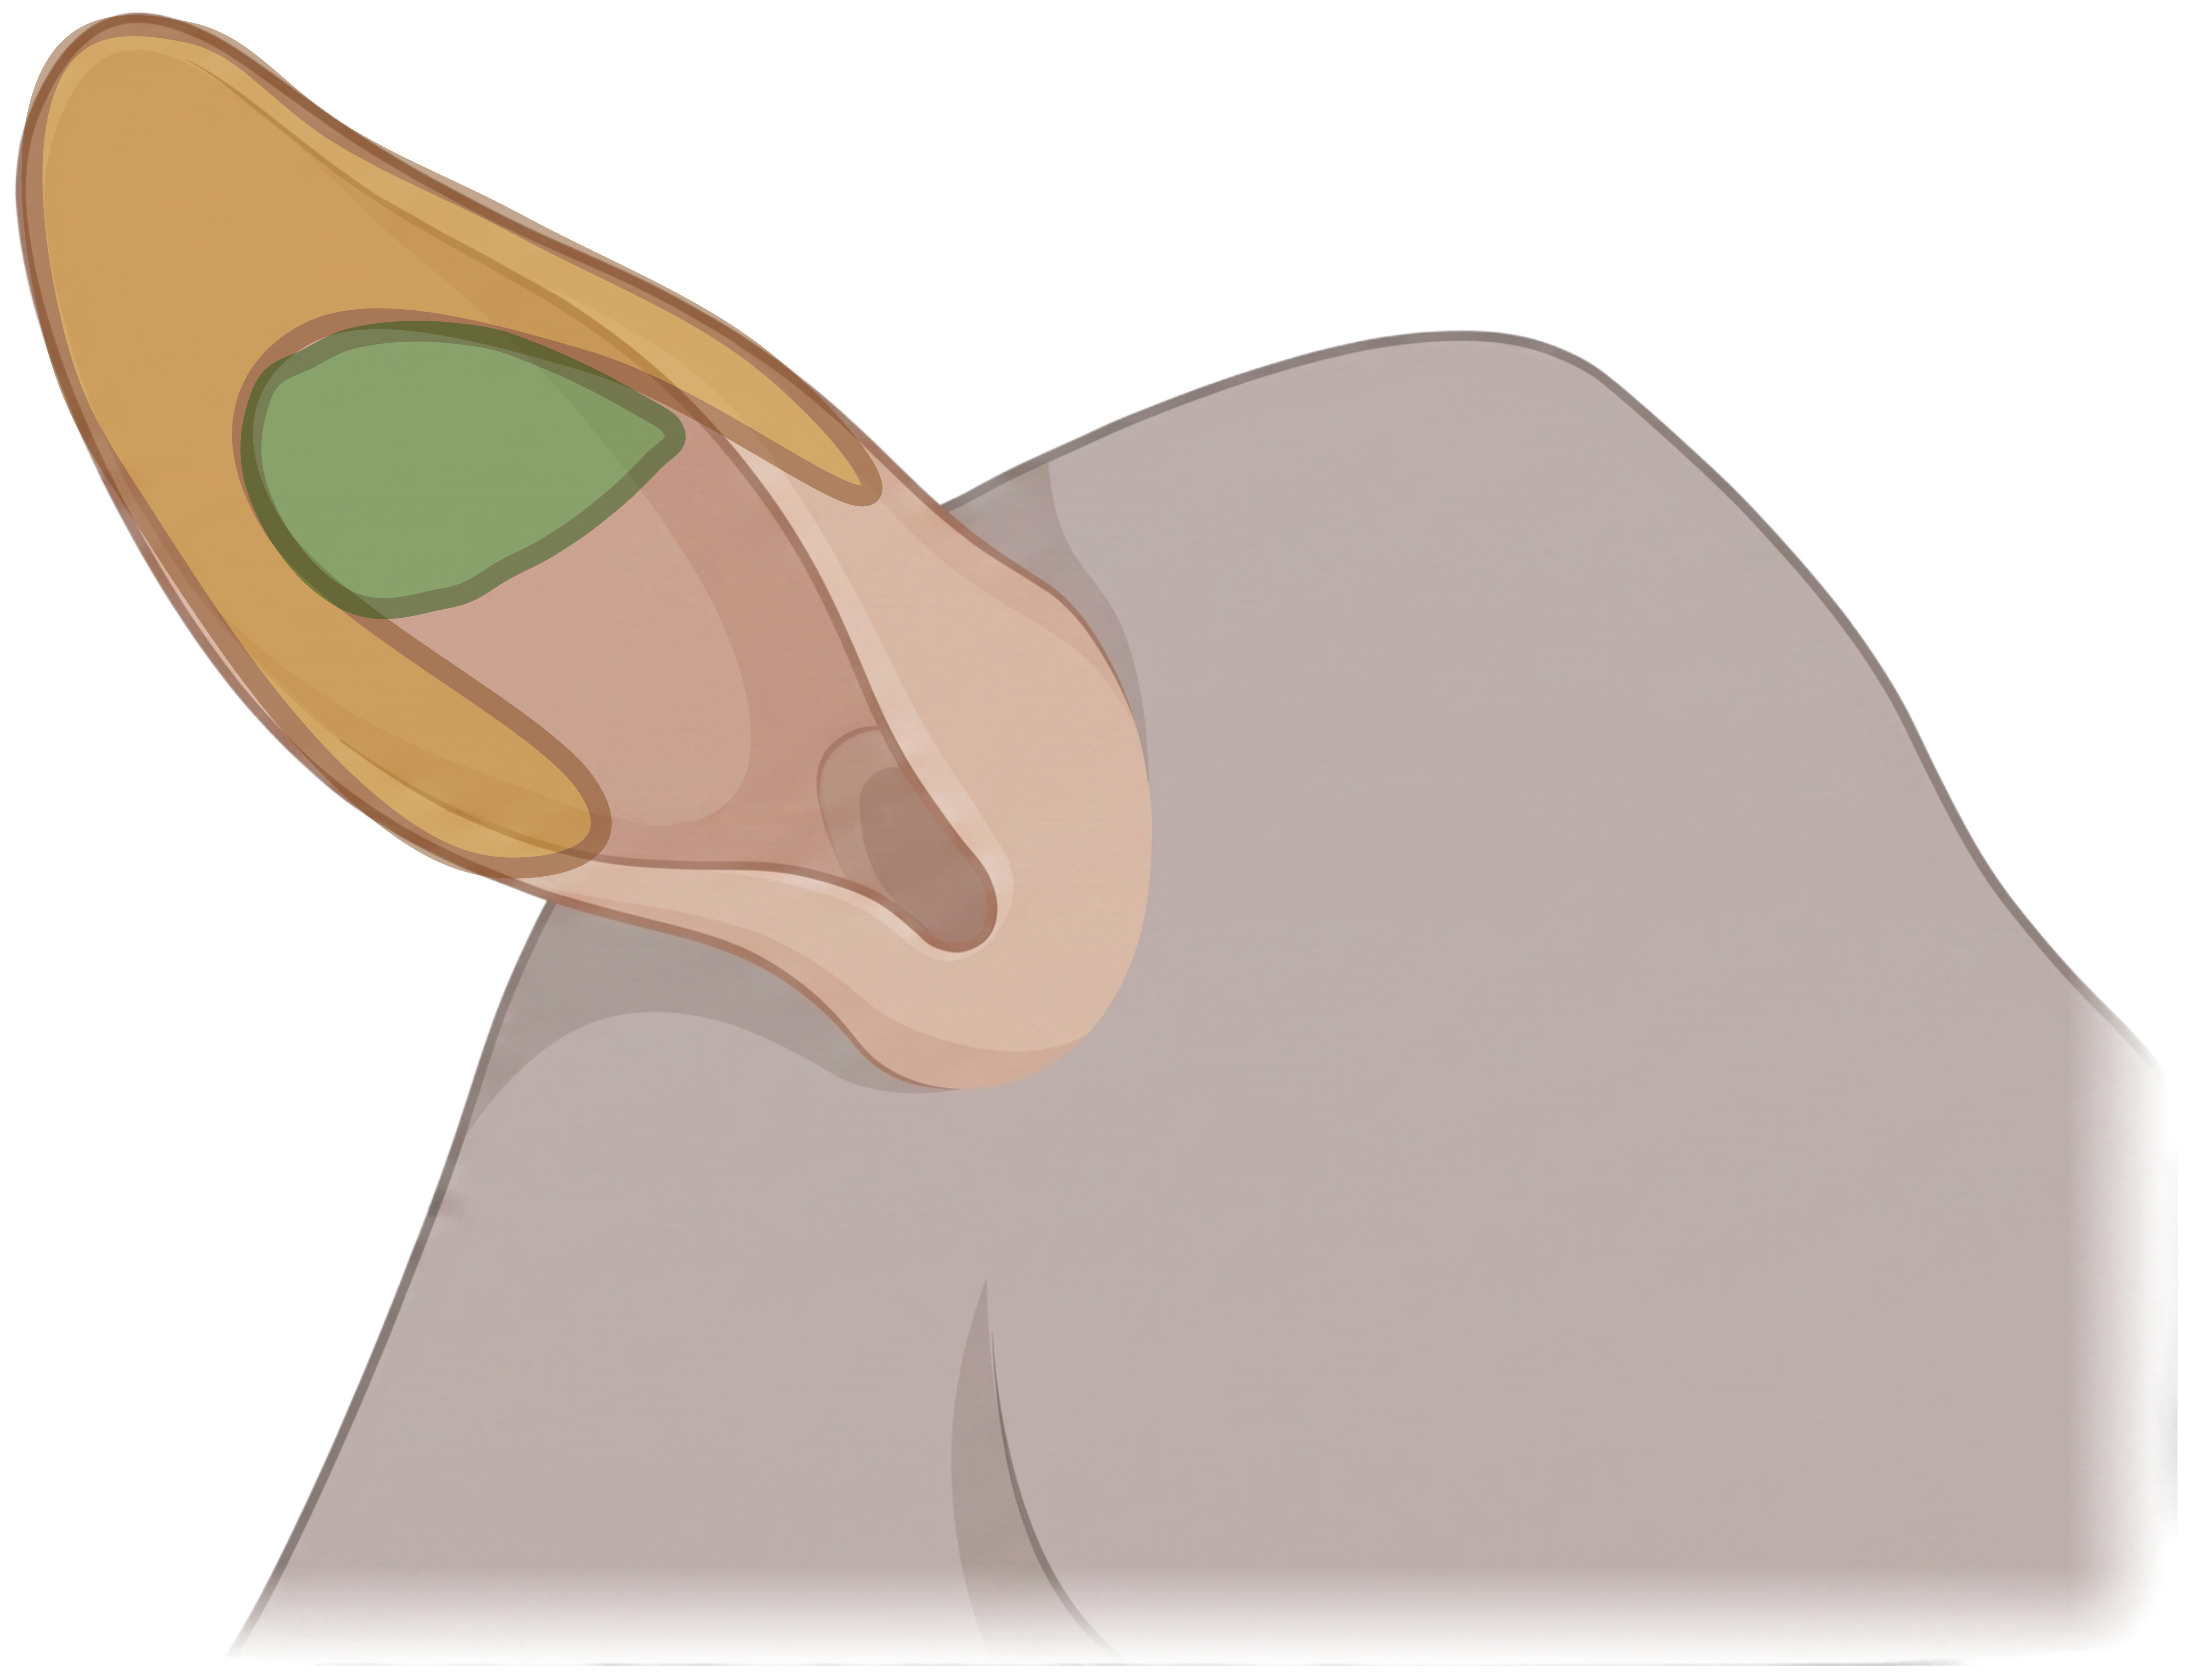
Figure 1. Goat ear illustration, highlighting the ideal sampling region in green and a good sampling region in yellow
2. Wash the sample once with 75% ethanol and three times with warm water and antibacterial soap. Be sure to rinse the sample with sterile water (or DPBS) between each wash (see General note 2). (Optional) Pat the sample dry with a paper towel to remove excess water.
3. Transport the cleaned sample to a flow hood sterilized using ethanol and UV treatment in a sterile 60 mm Petri dish.
Critical: The following steps should be conducted under a laminar flow hood using aseptic techniques and sterile instruments. A UV light sterilization cycle is also beneficial for reducing contamination. Additionally, a laminar flow hood is not intended to act as or replace a biological safety cabinet but rather provide an aseptic environment for the manipulation and handling of fibroblast cultures. Personnel should wear proper personal protective equipment when needed and use a biological safety cabinet when working with any potentially infectious samples.
(Optional) Add 1–2 mL of DPBS wash to the Petri dish to rinse and moisten the sample during transport to the flow hood. This is especially helpful in longer transportation times to reduce tissue drying.
4. Using a sterile scalpel blade with a handle, shave any hair from the sample. Do not remove any layers of skin. Use tweezers to orient and stabilize the sample (Figure 2). (Optional) Add 1–2 mL of DPBS wash or FGM to keep the sample moist and prevent excessive hair accumulation on the scalpel blade.
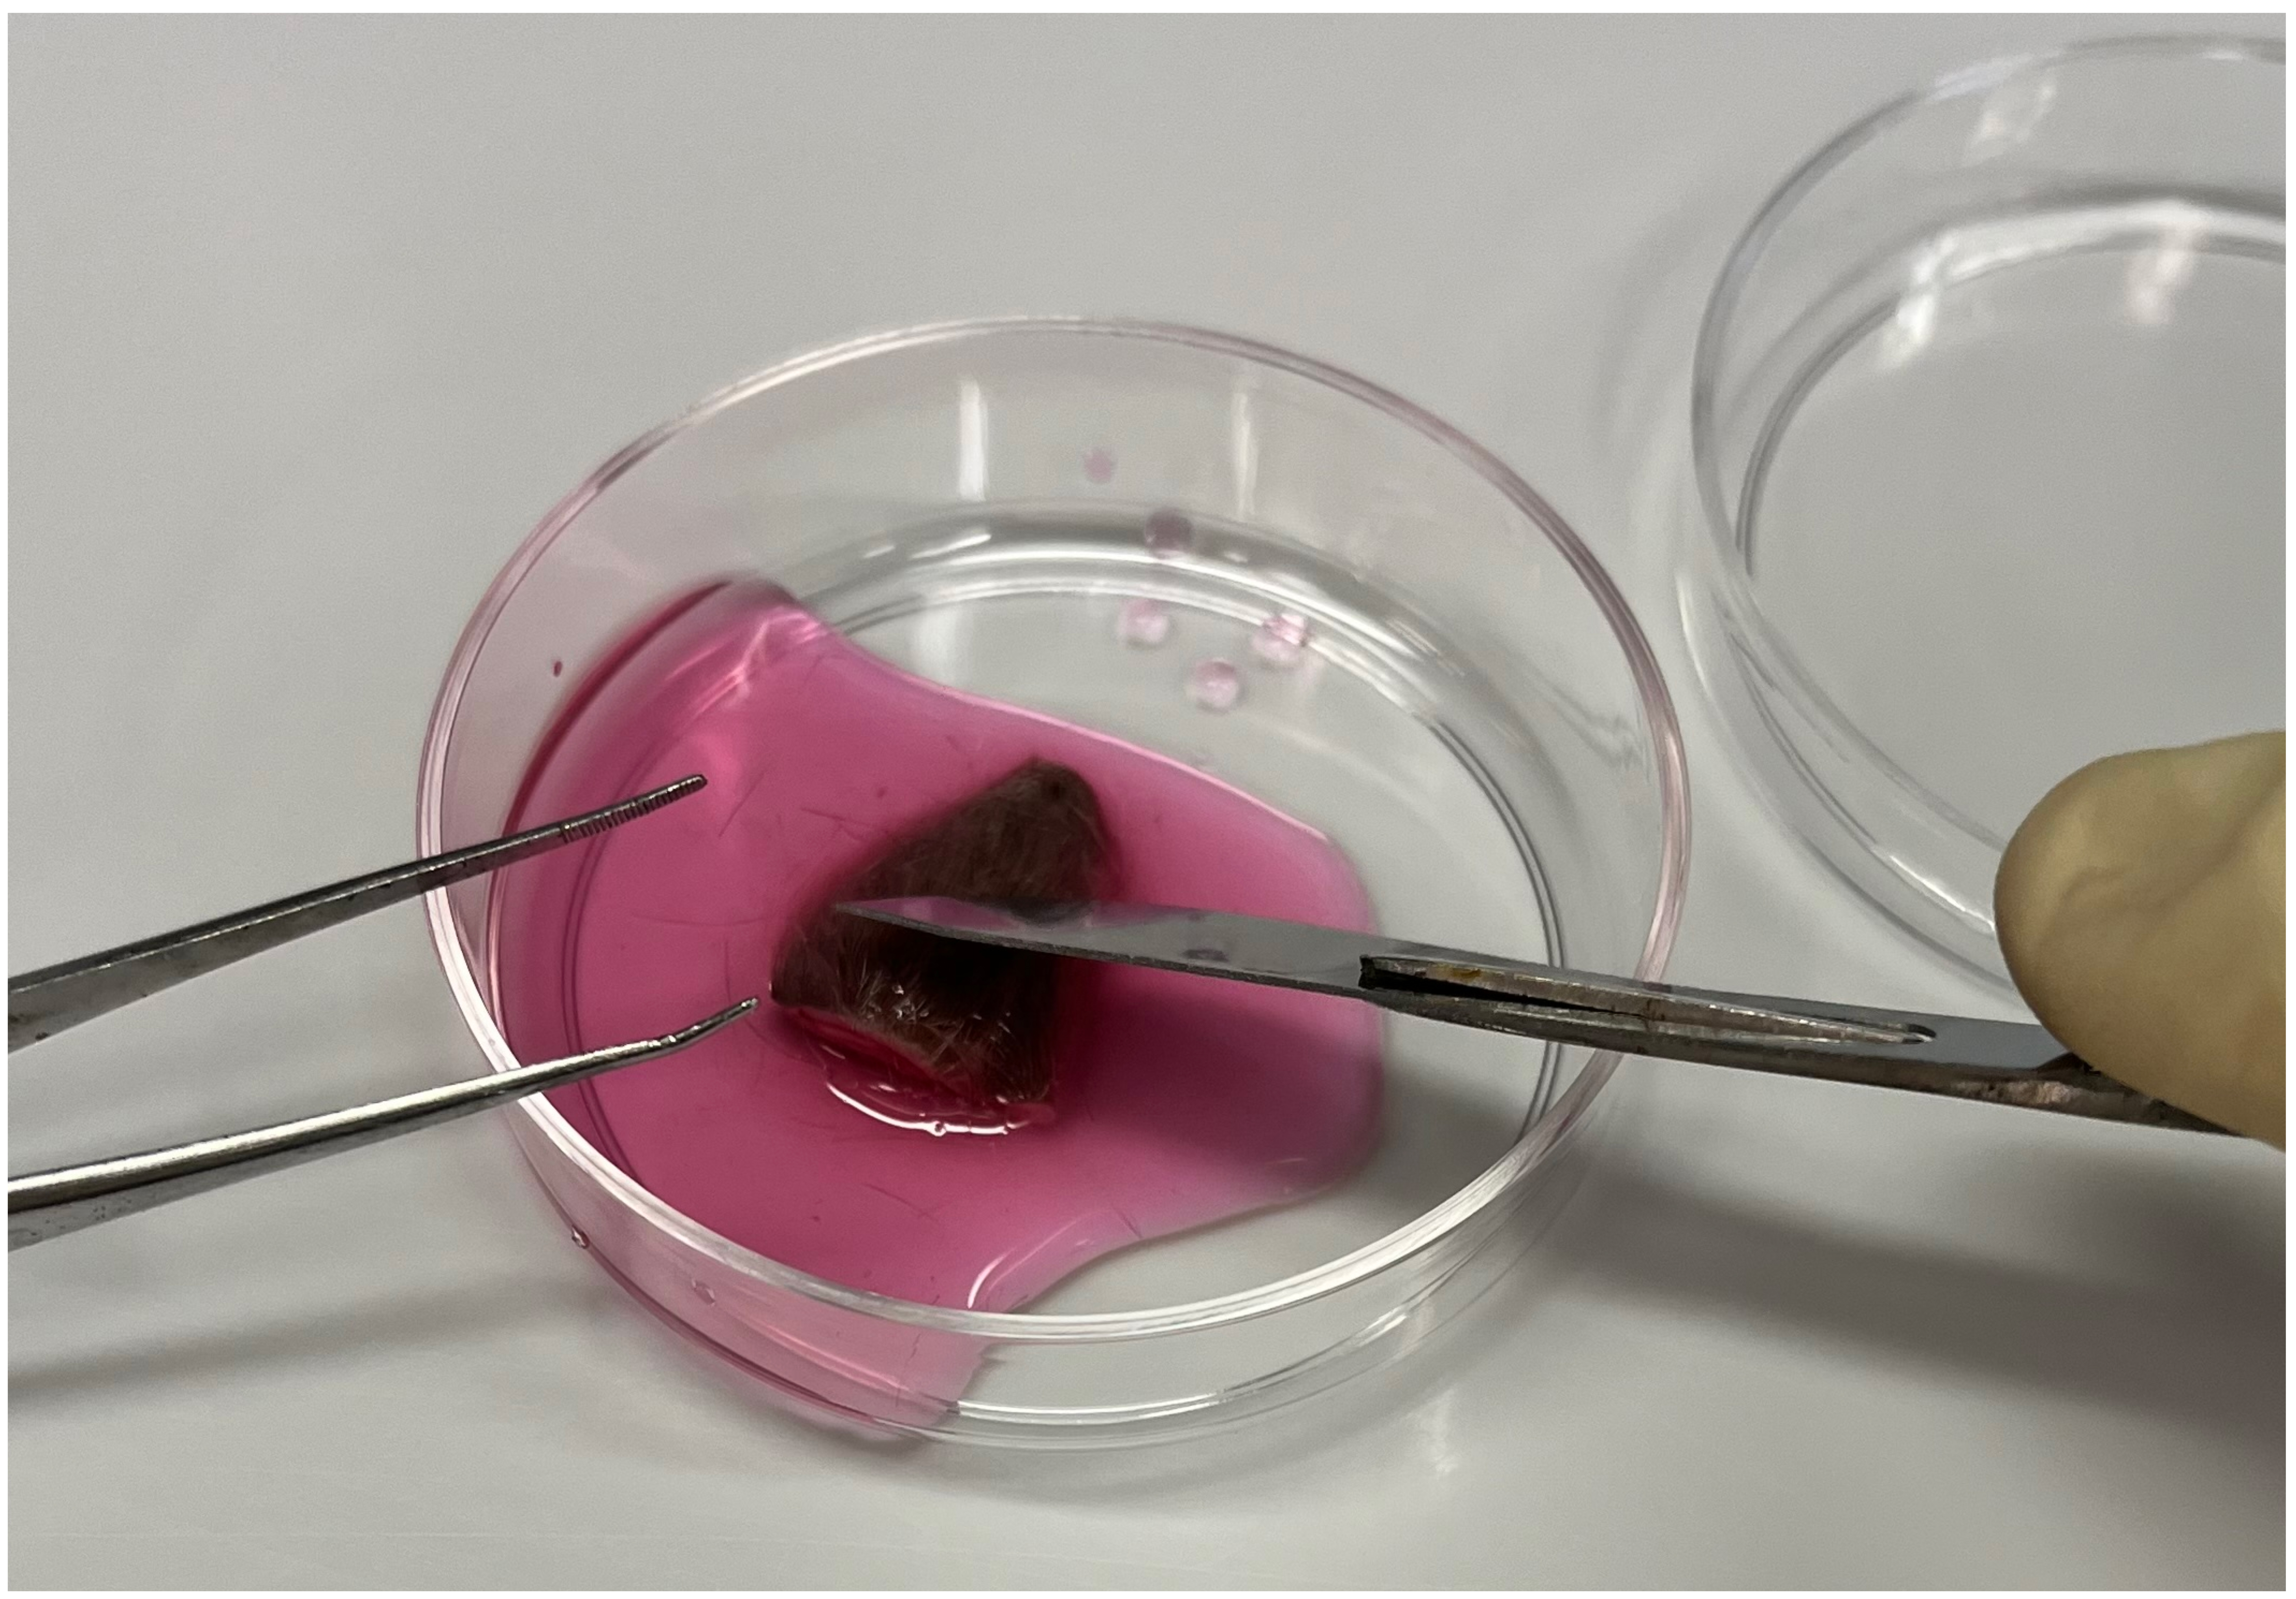
Figure 2. Shaving hair on the bovine ear tissue sample in FGM using a scalpel blade with the handle held at a 45° angle
5. Once all hair is removed, rinse the tissue in a new Petri dish with 3–4 mL of DPBS wash. Repeat three times with fresh DPBS wash or until hair remnants are removed (Figure 3).
Note: While the presence of hair does not heavily affect the viability of the culture, it exponentially increases the risk of contamination. Hair fragments trap bacteria and fungus and limit the ability to properly wash the skin sample.
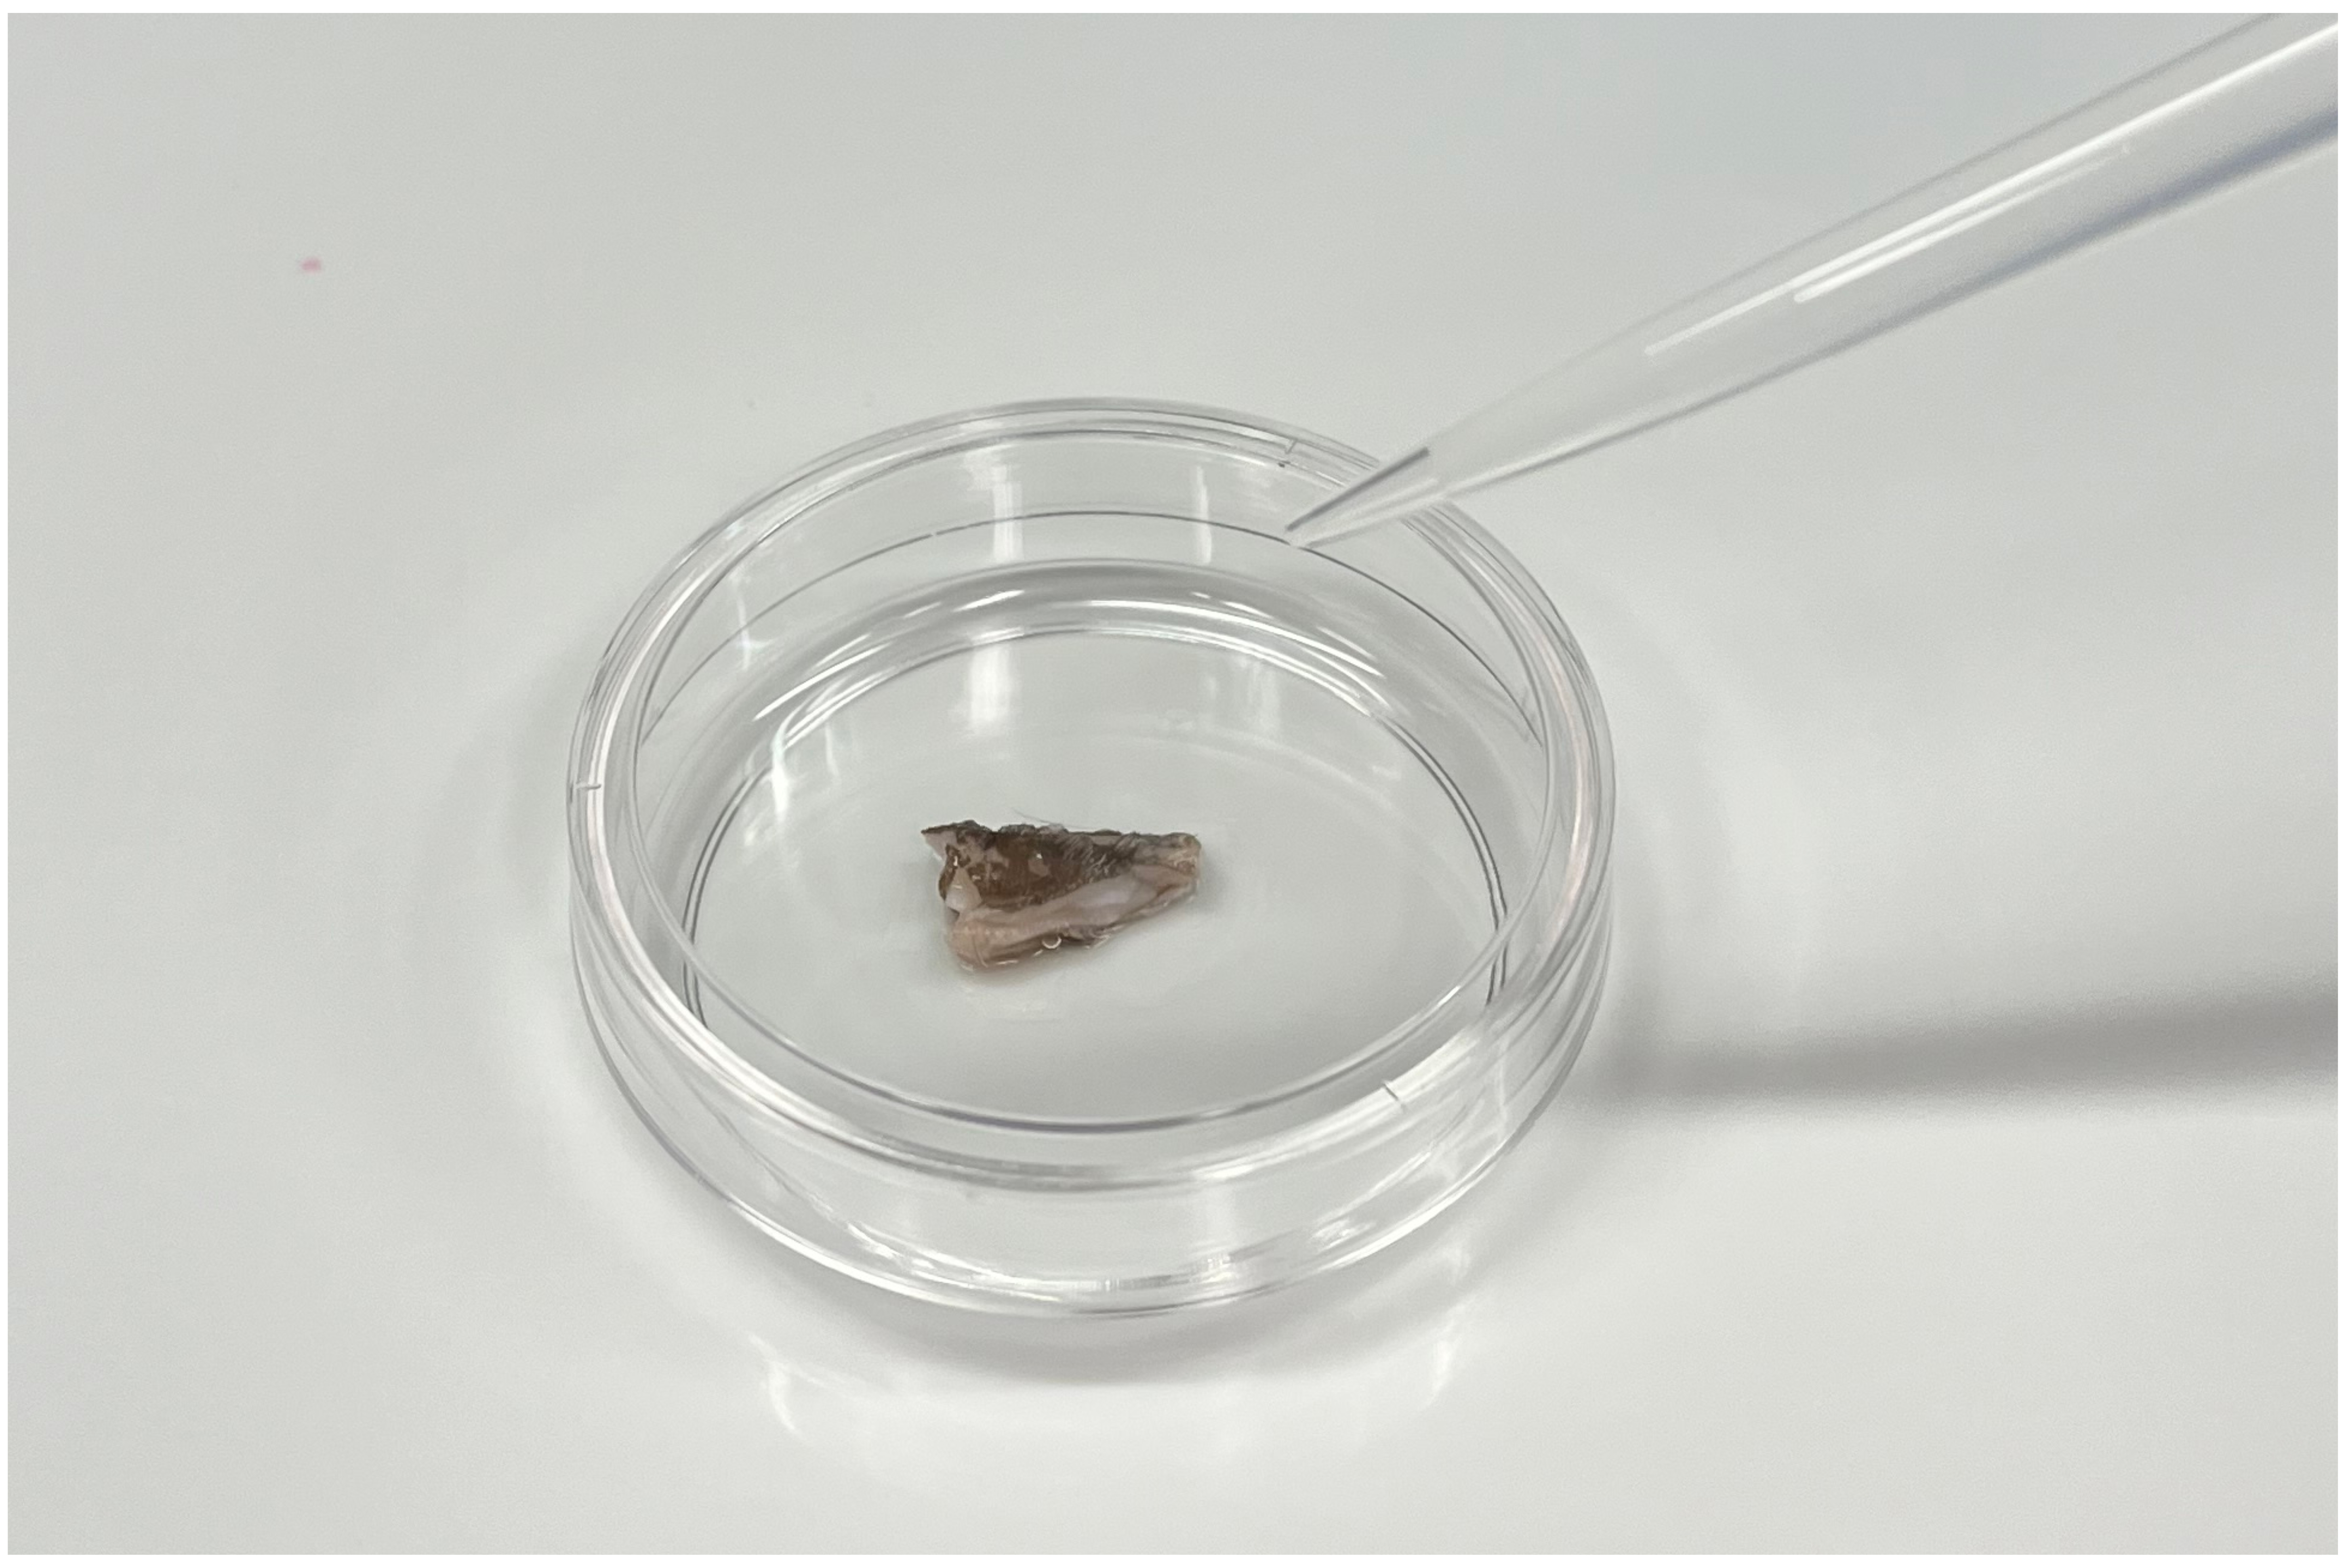
Figure 3. Rinsing the shaved bovine ear sample with DPBS wash
6. Rinse tissue once in 75% ethanol for no more than 30 s. This can be done with a pipette or by briefly submerging the tissue in the ethanol solution. Ensure that both sides of the tissue are rinsed.
7. Rinse tissue in DPBS wash three times. Ensure that both sides of the tissue are rinsed.
8. Coat the tissue with a few drops of betadine. Allow the tissue to rest for 30–60 s. Tap off excess and rinse in DPBS wash twice.
9. Place the cleaned sample in a sterile Petri dish containing a small volume of DPBS wash. Using a new sterile blade, finely mince the tissue into approximately 1 mm2 tissue explants (Figure 4). (Optional) Mince tissue in FGM.
Note: The choice between DPBS wash and FGM is largely based on user preference, as neither approach provides a distinct advantage over the other.
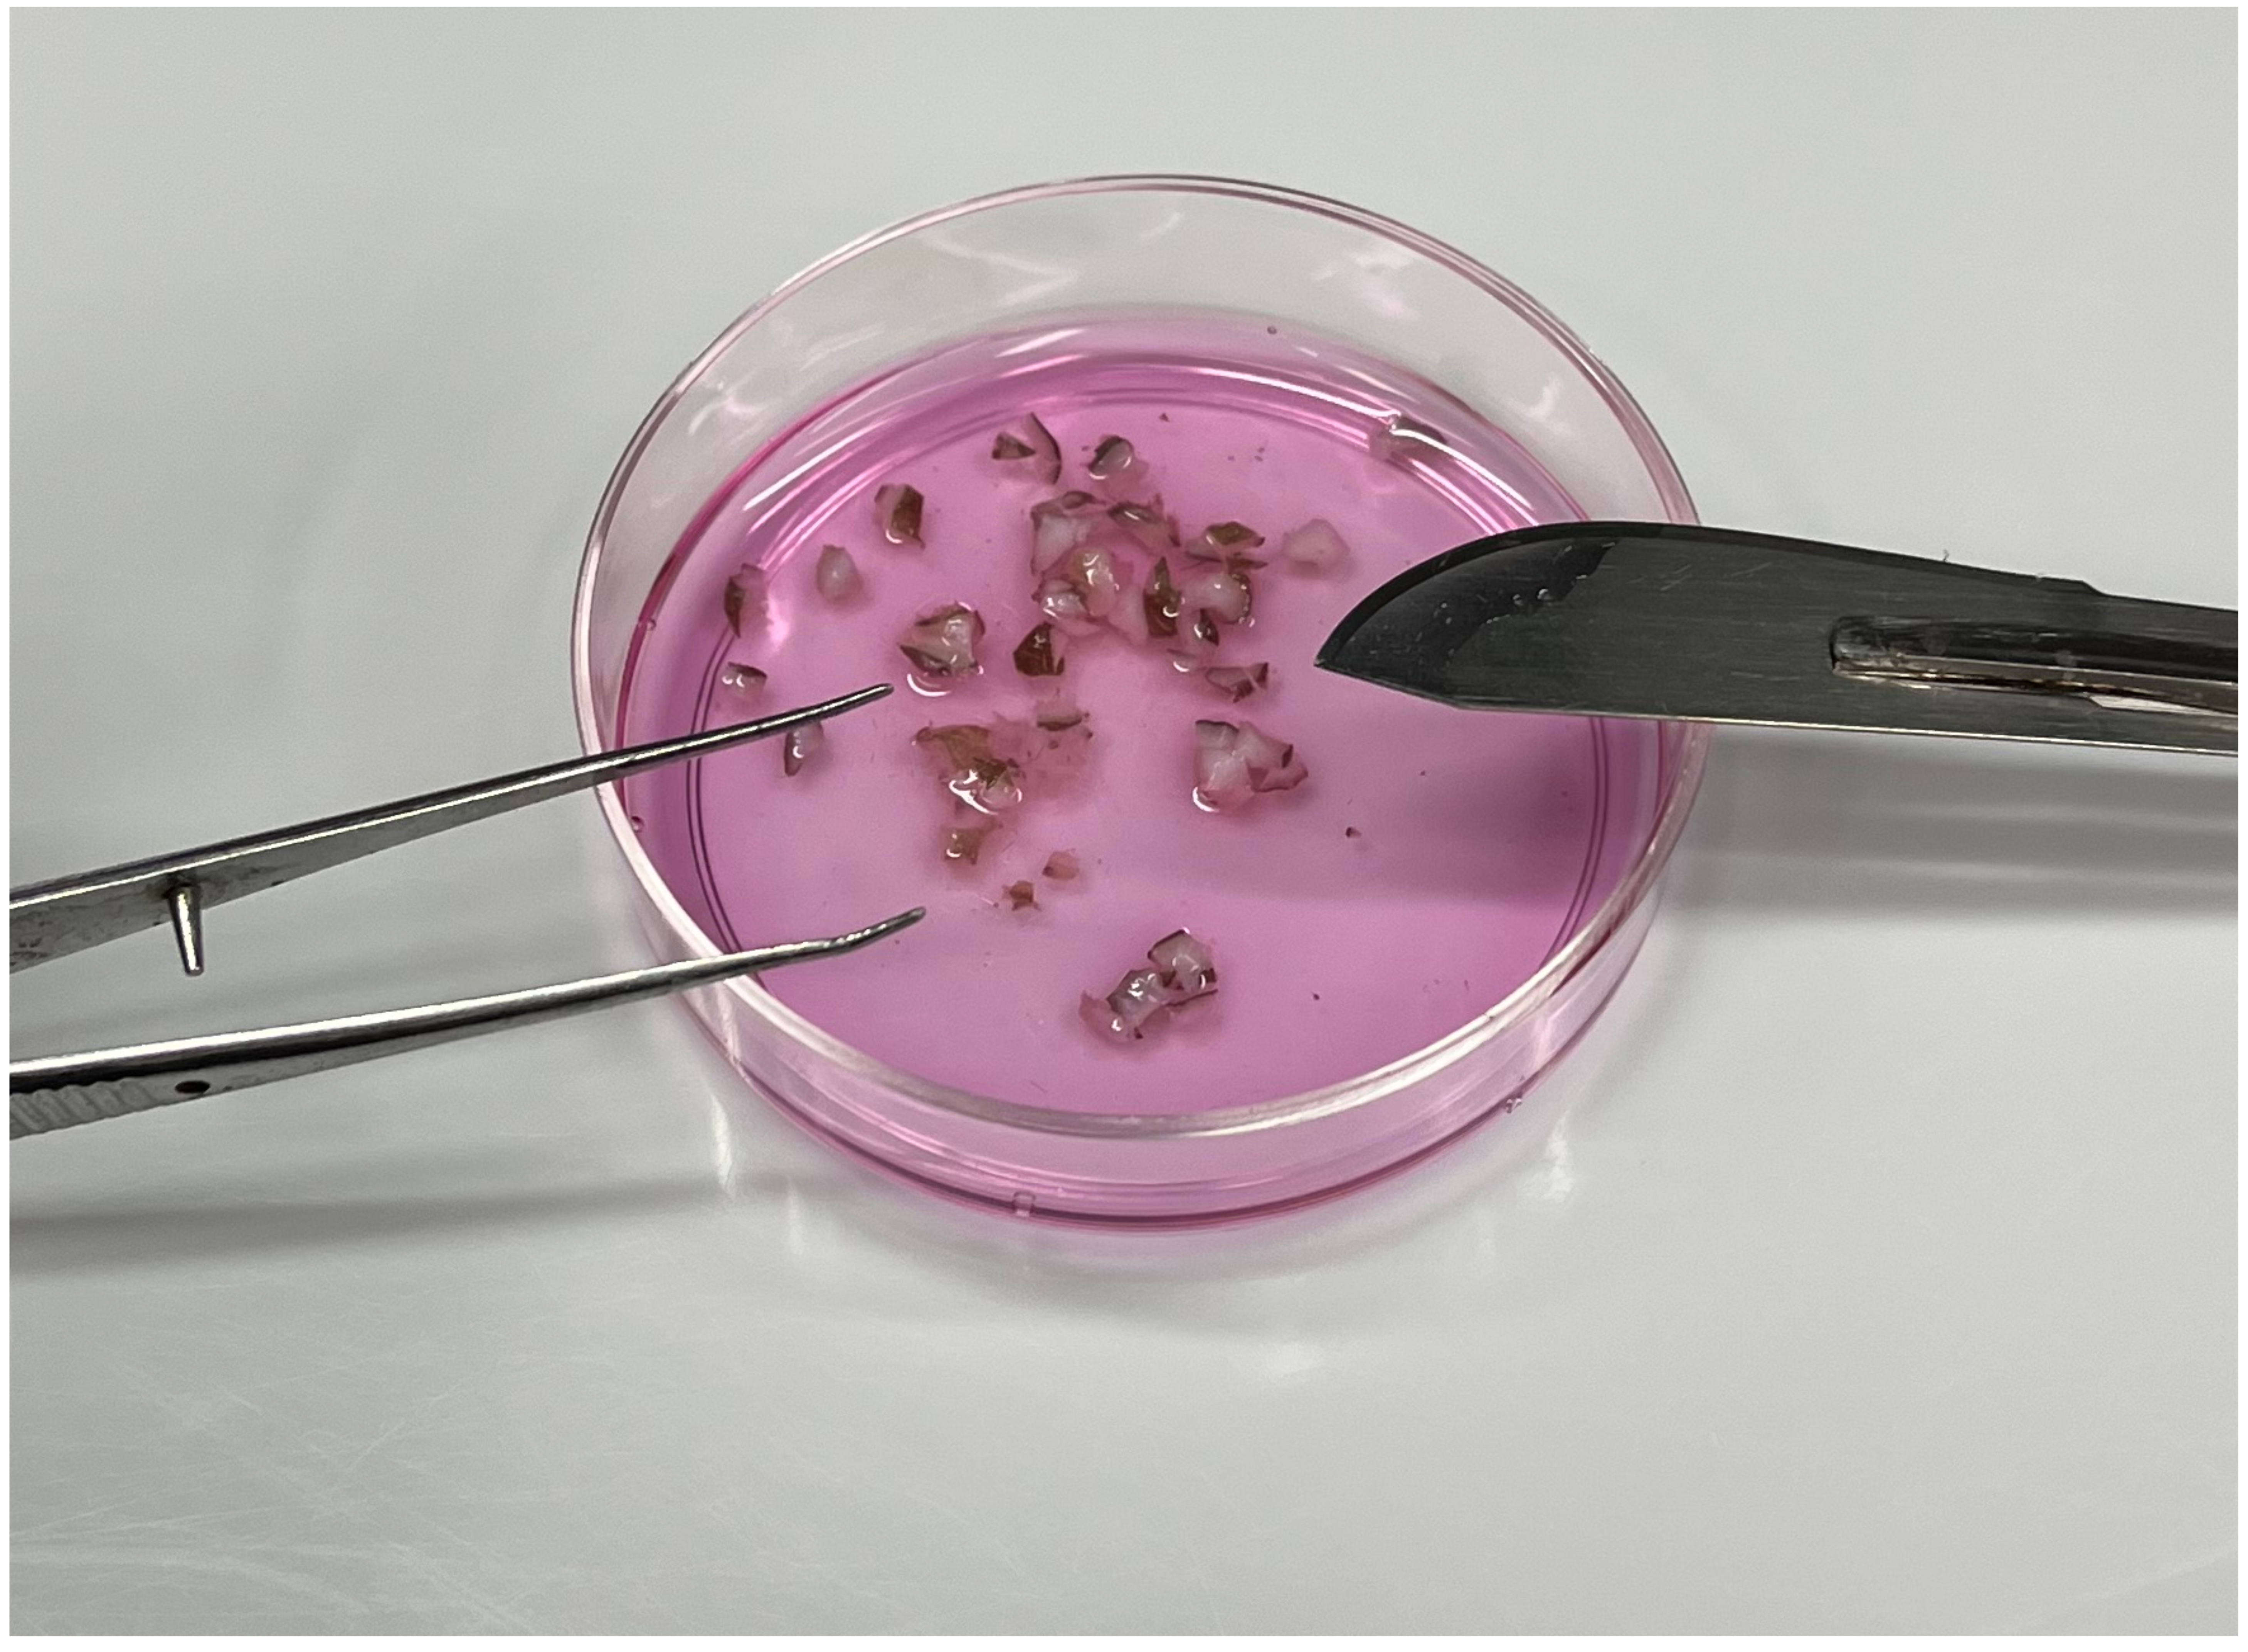
Figure 4. Finely mincing the bovine sample in FGM. Use of FGM in place of DPBS wash is optional.
10. Add 2 mL of prewarmed FGM to each well of a 6-well plate. Using sterile tweezers, transfer 5–7 of the minced tissue explants to each well; 1 cm2 of tissue is enough for 3–4 wells of a 6-well plate (Figure 5).
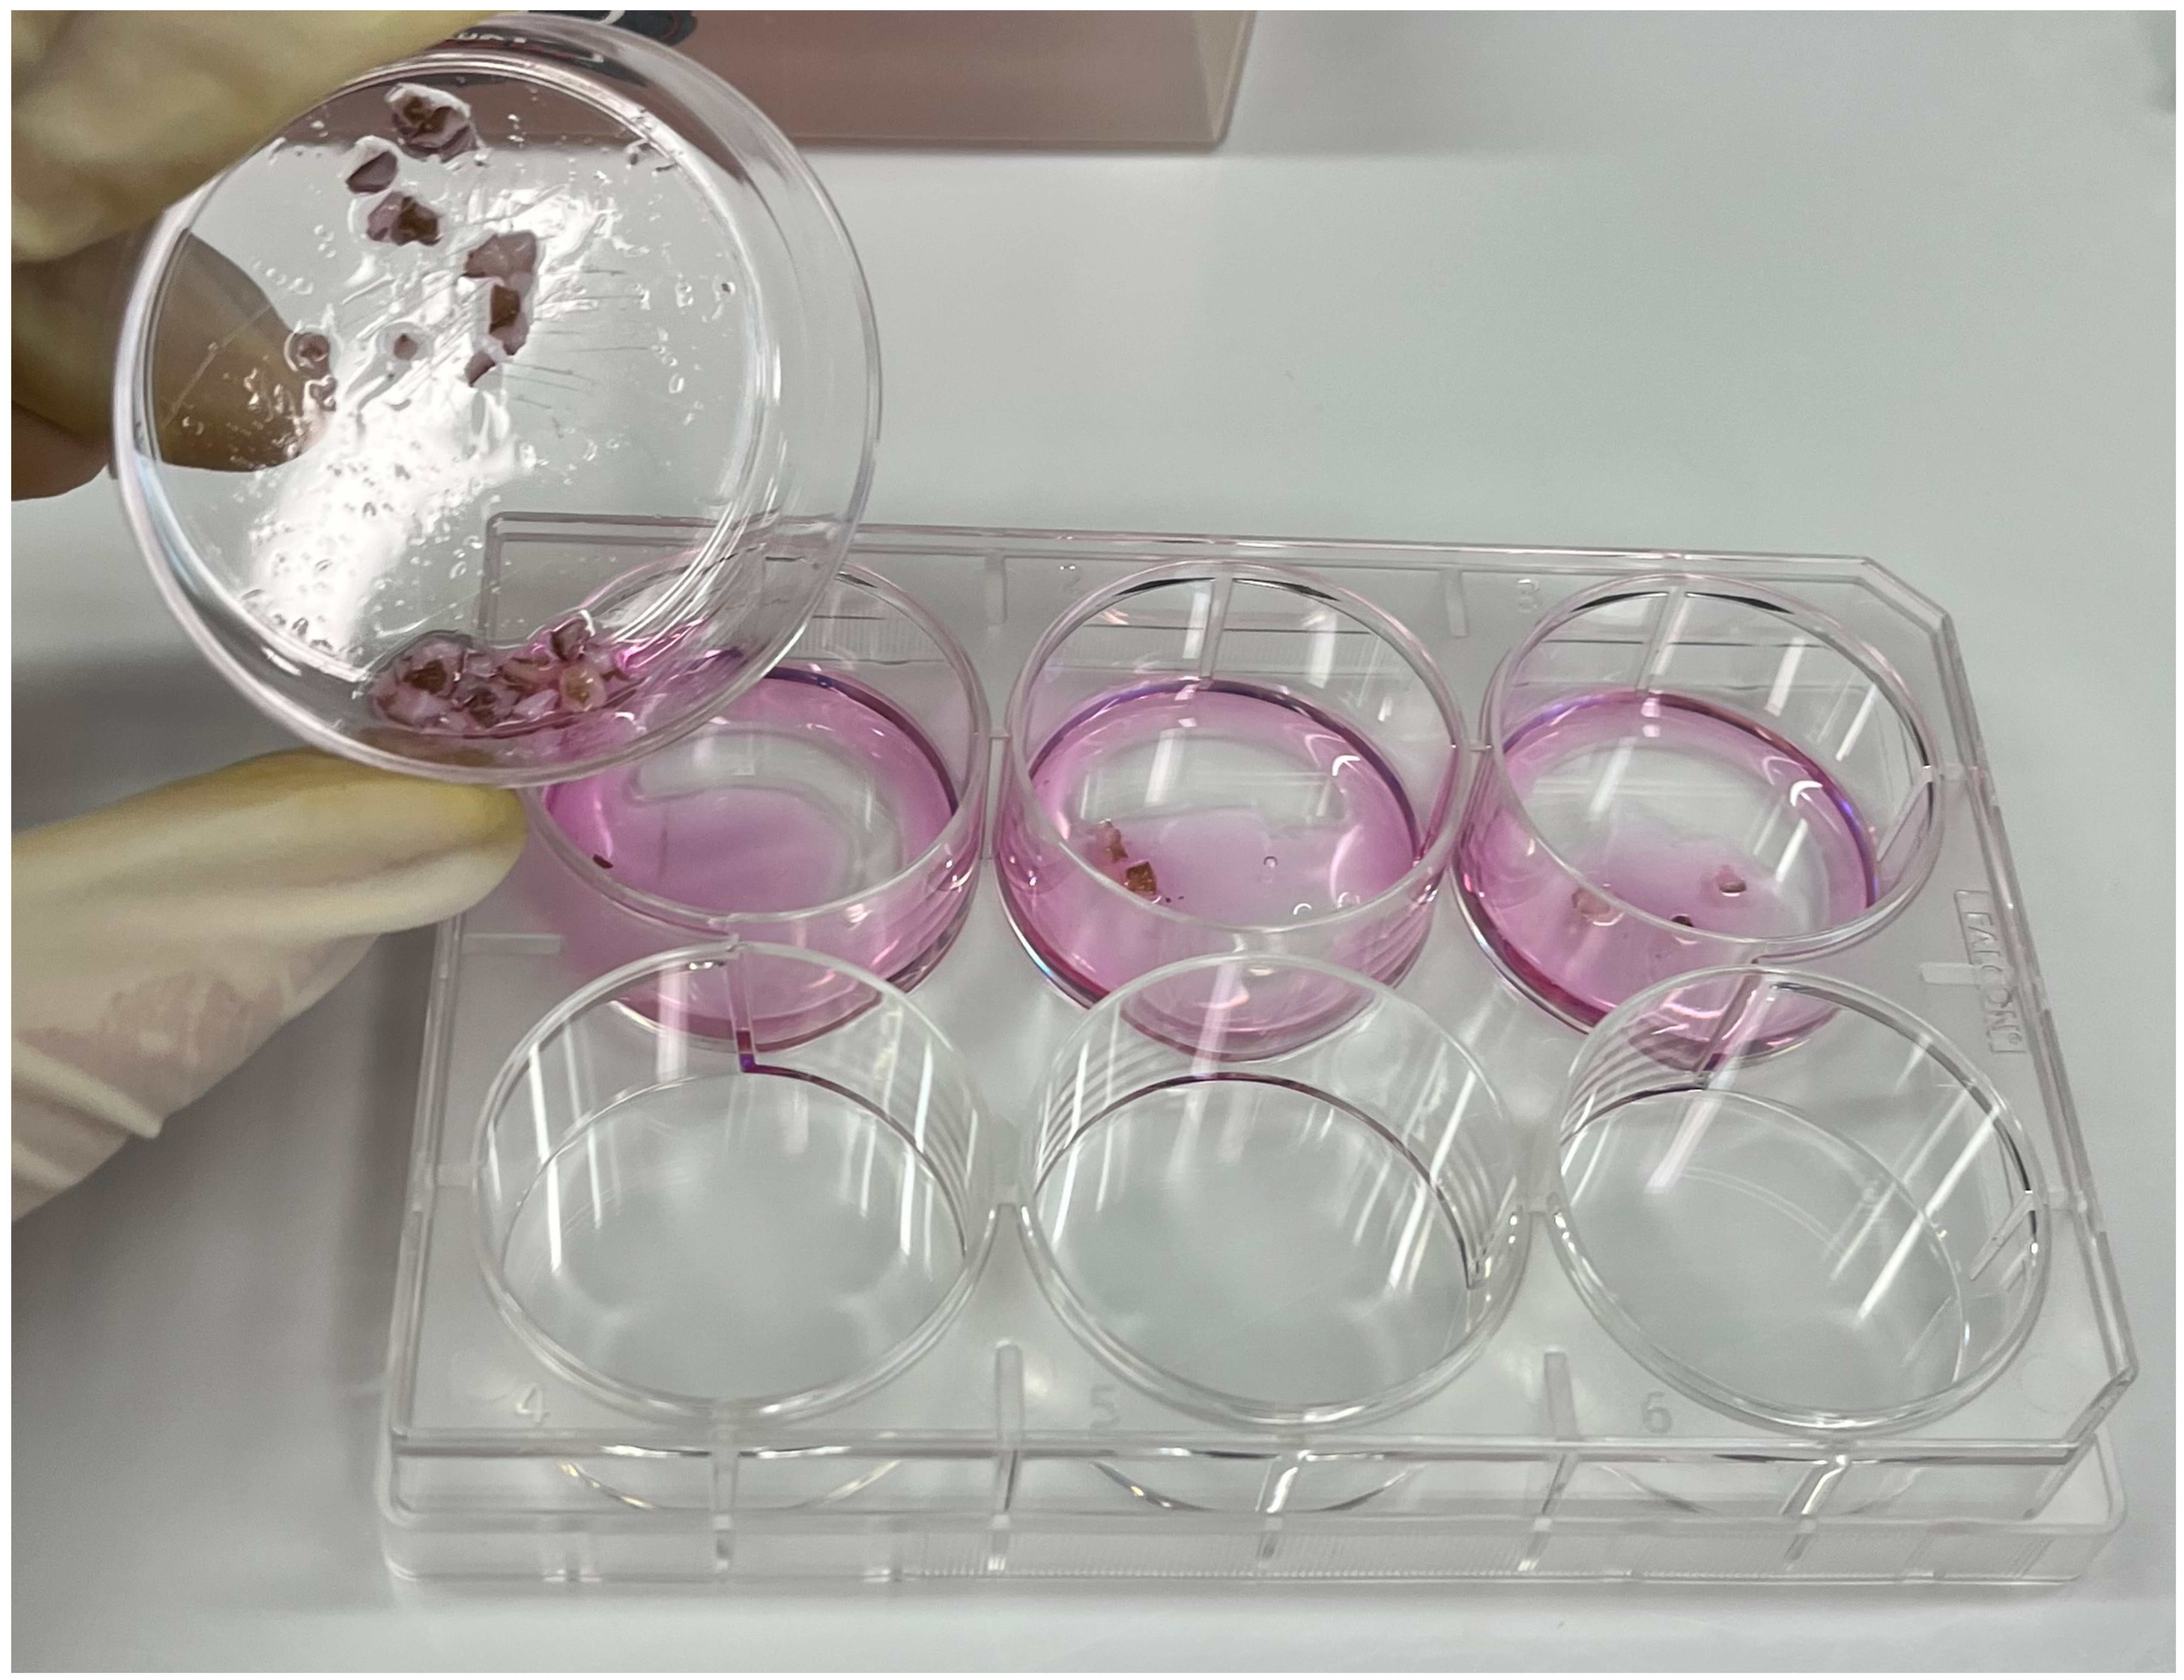
Figure 5. Transferring minced bovine tissue to the prepared 6-well plate
11. Incubate the plate at 37.5 °C and 5% CO2.
C. Establishment of primary fibroblast culture from tissue explants
1. After 24 h of incubation, check the culture plate for signs of contamination such as media color change, putrid scents, or fungal growth. If there are no signs of contamination, allow the culture to incubate for 48–72 h undisturbed. Avoid excessive movement of the plate, as this may dislodge tissue explants and reduce fibroblast outgrowth.
2. After three days of culture, gently add 1 mL of prewarmed FGM to each well. Try not to disturb the tissue explants.
3. Continue to monitor for contamination or infection every 24–48 h until outgrowth is visible. If viable cells are not visible by day 6, remove 1 mL of media from each well and replace with 1 mL of prewarmed FGM. Continue to replace 1 mL of media every 72 h until cells are visible. Cells should initially appear as small circular structures that elongate into spindle-like cells (Figures 6–7) (see General note 3).
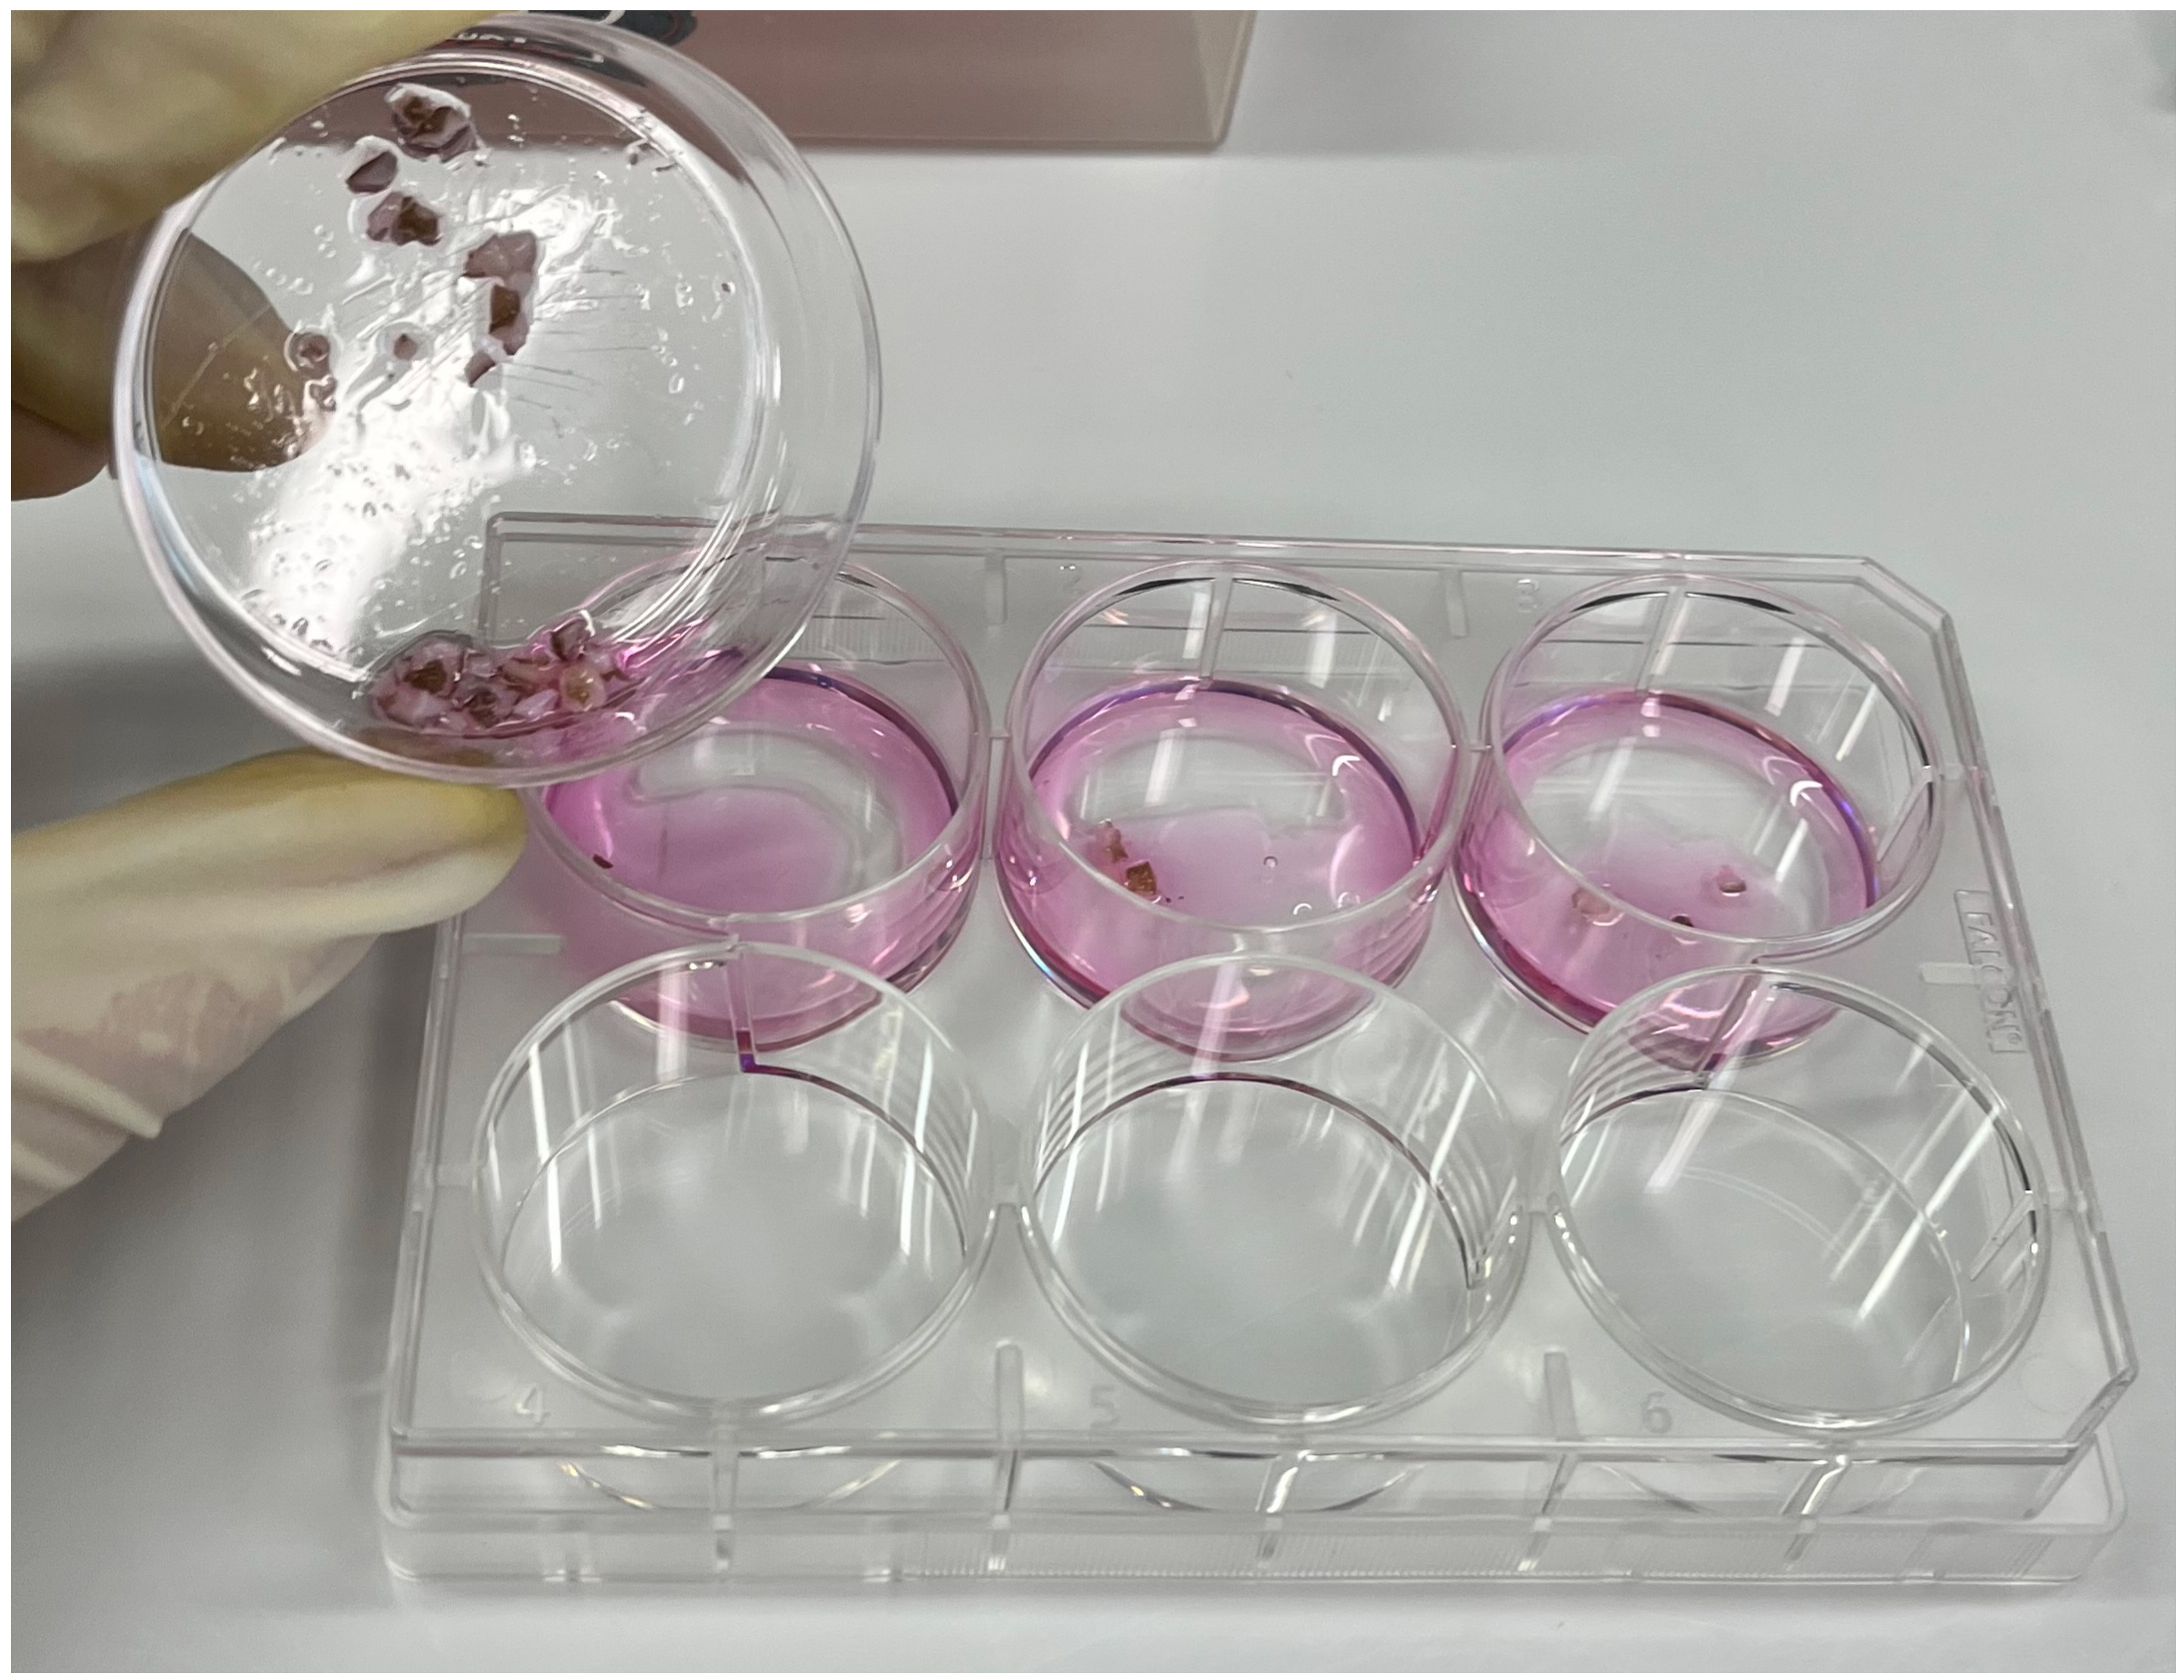
Figure 6. Immature fibroblast cells emerging from tissue explants viewed with brightfield illumination. Magnification: 60×.
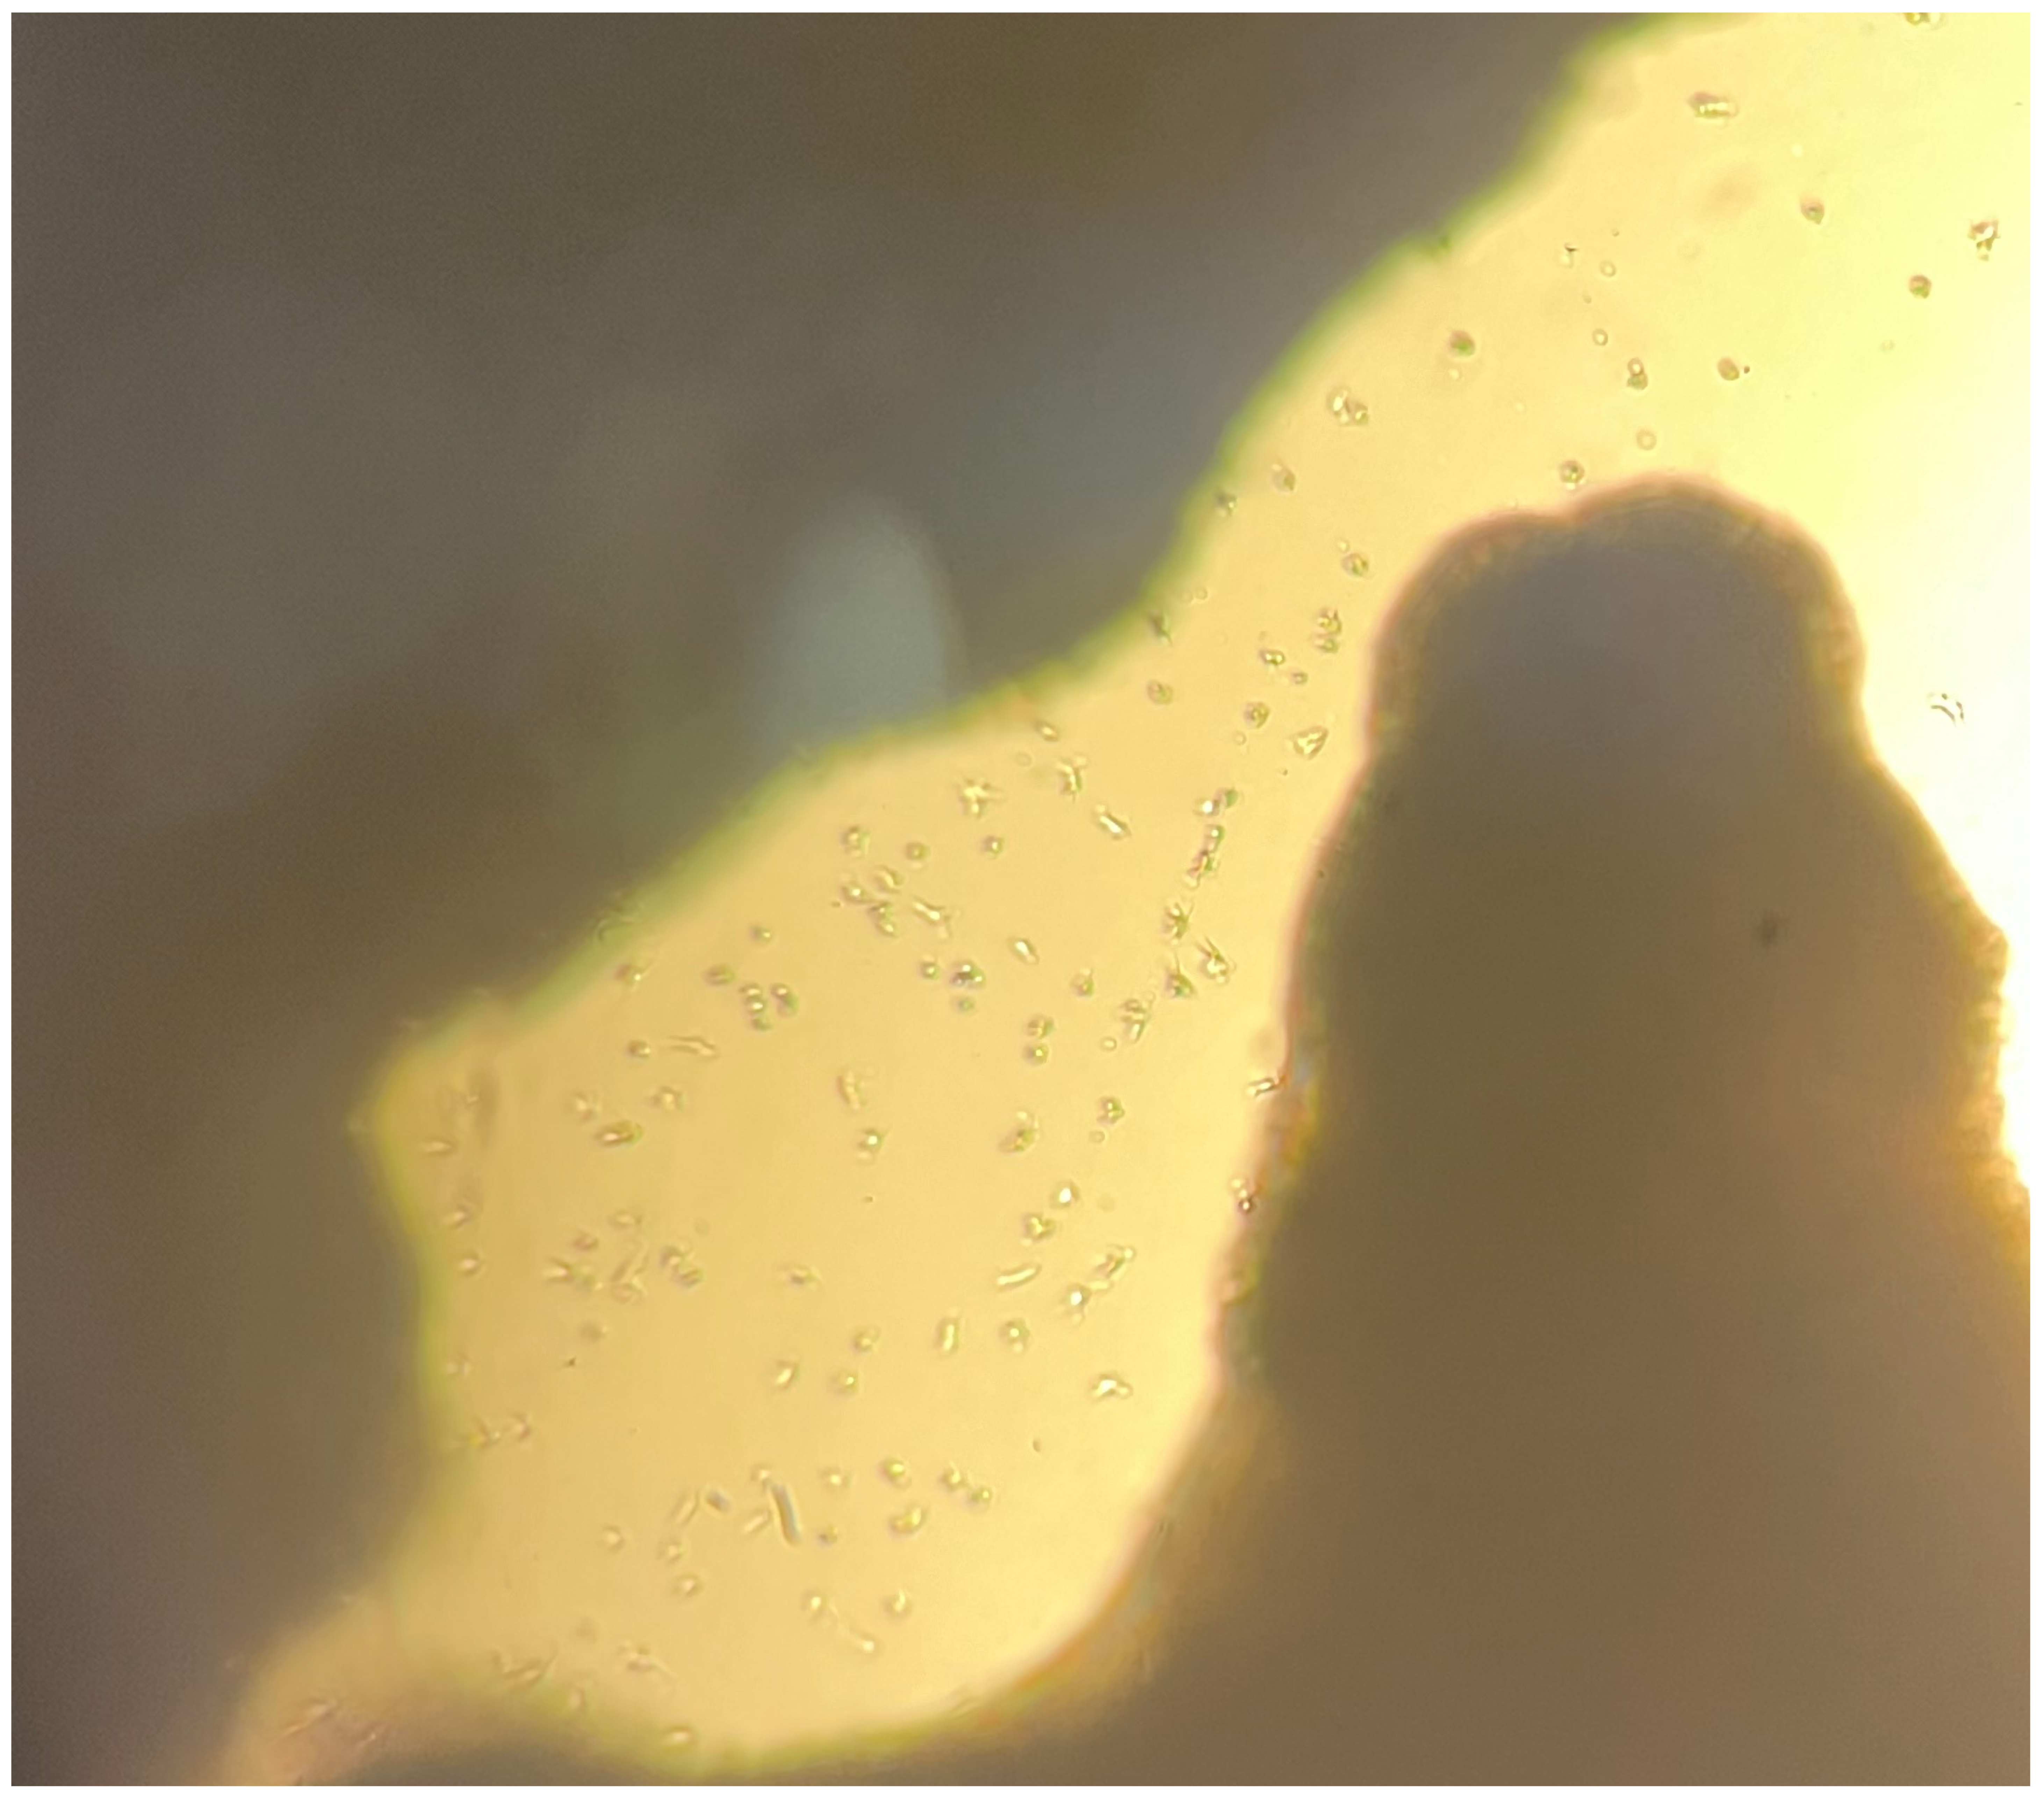
Figure 7. Elongated fibroblast morphology viewed with brightfield illumination. Magnification: 60×.
4. Forty-eight to seventy-two hours after cells are visible, gently remove all minced tissue with sterile tweezers and discard. Avoid touching the bottom of the culture wells. Smaller tissue explants may be removed with a pipette.
5. Remove all media and gently wash each well twice with 1 mL of warm DPBS wash. Remove all residual wash and replace with 2 mL of prewarmed FGM.
6. Repeat step C5 every 48 h until cells reach at least 60%–70% confluence.
Notes:
1. The ideal cell count to seed a T25 flask is approximately 0.7–1 million cells. At 70% confluence, each 6-well plate has roughly 0.7–0.9 million cells per well, meaning that you may use a 1 well: 1 T25 split ratio.
2. Before you proceed: Prewarm FGM, FBS, 0.05% trypsin-EDTA and DPBS wash in a water bath for at least 30 min.
7. Remove FGM from each well. Gently wash each well twice with 1 mL of DPBS wash. Ensure that all residual wash is removed and discarded.
8. Add 1 mL of 0.05% trypsin-EDTA to each well. Incubate plate at 37.5 °C and 5% CO2 for 3–5 min until fibroblast cells release from the plate (see General note 4).
Critical: Incubating for longer than 7 min will result in other cell types releasing into your passage and may induce cellular damage to the fibroblasts (see General note 5).
9. Add 0.56 mL of FBS to each well and gently swirl to mix.
Alternative: DPBS or PBS may be used in place of FBS. DPBS is cheaper but can decrease cell viability.
10. Tilting the plate at a 45° angle, use the cell/trypsin mixture in each well to gently rinse excess cells to one side of the well. Transfer the mixture into a 15 mL conical centrifugation tube.
11. Centrifuge at 250× g for 5 min at 20 °C. (Optional) Remove the supernatant and resuspend the cell pellet in 1–4 mL of FGM. Pipette 10 µL of the resuspended cells into a microcentrofuge tube along with 10 µL of 0.4% Trypan Blue solution. Mix well and allow the sample to incubate at 25 °C for 3 min. Load 10 µL of the Trypan Blue/cell suspension onto a hemocytometer slide and analyze with automated cell counter. Viable cells will remain bright, while apoptotic cells will appear blue. Multiply the resulting cell number by the volume of FGM used for the initial resuspension to determine the total estimated cell count.
12. Repeat step C11 to re-pellet the suspended cells or proceed to step C13.
13. Remove the supernatant and resuspend the pellet in 4 mL of warmed FGM. Transfer resuspended cells to a sterile T25 culture flask and incubate at 37.5 °C and 5% CO2.
D. Maintenance and proliferation of the primary fibroblast cell culture
1. Check culture for contamination, adhesion, and proliferation every 24–48 h. Cells should begin adhering after 4–6 h and elongate after 20 h of passing. Change the FGM every 48–72 h.
2. To refresh FGM, repeat step C5 with modified volumes as shown in Table 1.
Table 1. Volumes for FGM refresh
| Reagent | 6-well plate | T25 | T75 |
|---|---|---|---|
| DPBS wash | 1 mL/well | 3 mL | 7 mL |
| FGM | 2 mL/well | 4 mL | 10 mL |
3. Once cells reach 70%–80% confluence, pass by repeating steps C7–13 with modified volumes and a 1:2 or 1:3 split ratio (Table 2).
Table 2. Volumes for cell passage
| Reagent | 6-well plate | T25 | T75 |
|---|---|---|---|
| DPBS wash | 1 mL/well | 3–5 mL | 7–10 mL |
| 0.05% trypsin-EDTA | 1 mL/well | 3 mL | 5 mL |
| FBS | 0.56 mL/well | 1 mL | 1.7 mL |
| FGM | 2 mL/well | 4 mL | 10–12 mL |
E. Cryopreservation of primary fibroblasts
1. To cryo-preserve cells, repeat steps C7–C11, using the volumes from Table 2. Resuspend cells in 1.5 mL of freshly mixed and chilled freezing medium and transfer to a 2 mL cryo vial, aiming for 1–2 million cells per vial. Store at –80 °C for 24–48 h and then move to liquid nitrogen storage tank or other long-term storage.
Validation of protocol
This protocol was used to successfully establish 45 primary fibroblast cell lines (Table 3) over species such as Bos taurus, Bos indicus/taurus cross, Capra hircus (multiple breeds), Ovis aries, and Sus scrofa. These cultures were usually established with ear tissues; however, tissues such as muscle biopsies and fetal skin were also successful in establishing cultures with a 97.8% success rate.
Table 3. Success rates of protocol in different livestock species
| Species | Tissue type | Breed | Time to initial growth | Quantity attempted | Quantity successfully established | Quantity reached senescence |
|---|---|---|---|---|---|---|
| Ovine (sheep) | Ear | n/a | 5–6 days | 2 | 1 | 0 |
| Caprine (goat) | Ear | Boer, La mancha, Spanish/Nubian | 6 days | 5 | 5 | 1 |
| Porcine (pig) | Ear | White | 6 days | 2 | 2 | 0 |
| Bovine (cow) | Ear, muscle | Angus | 5–6 days | 24 | 24 | 0 |
| Bovine (cow) | Fetus | Angus/Brahman | 2 days | 13 | 13 | 2 |
Immunocytochemistry staining of one of the adult bovine primary fibroblast cell lines revealed vimentin-positive and cytokeratin-negative marker expression (Figure 8). This is consistent with the expected fibroblast cell markers.
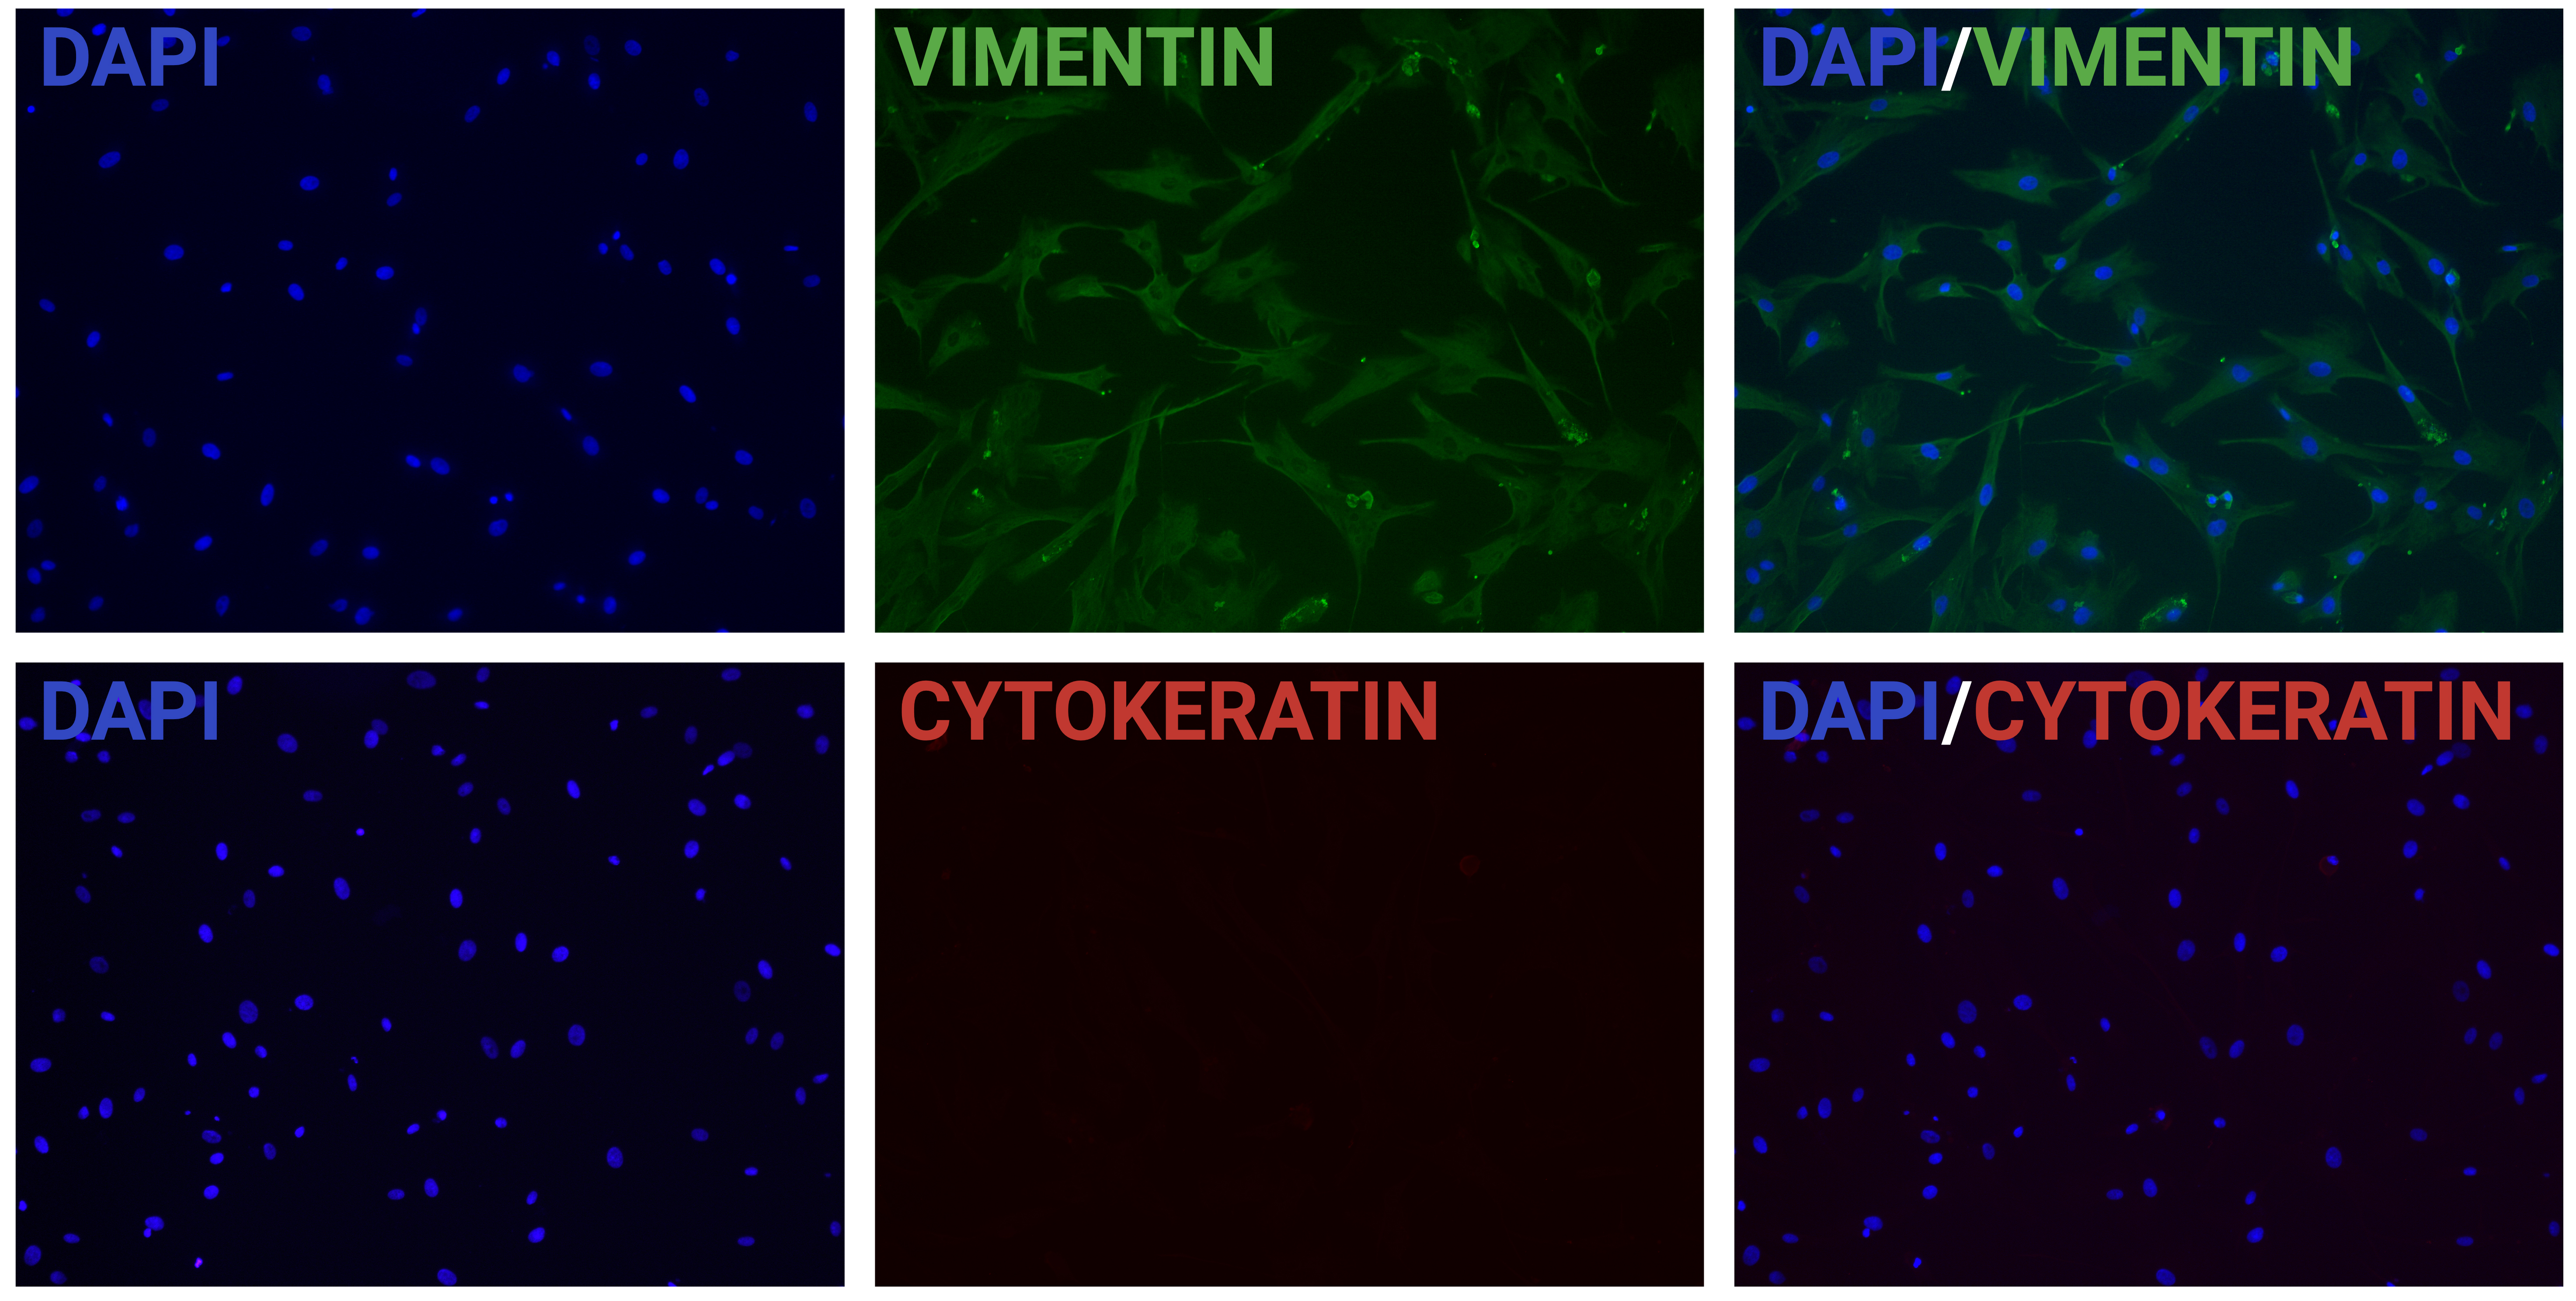
Figure 8. Representative fluorescent immunostaining demonstrating vimentin-positive and cytokeratin-negative staining in bovine fibroblast cells viewed with fluorescence microscopy. Magnification: 100×.
General notes and troubleshooting
General notes
1. Ears can be stored at 4 °C for a maximum of three weeks after collection if properly washed. For the best results, use within two days of collection. Do not use the sample if decomposition odor is present or if hair falls out with gentle washing and/or handling. To reduce tissue damage and cell lysis, do not freeze ear samples.
2. If desired, washing steps may be repeated multiple times to maximize bacterial and fungal removal. However, repeated washing in ethanol can result in tissue damage, so keep ethanol washes to a minimum.
3. Cells and outgrowth are usually visible by day 7 (Table 4). Depending on the age of the animal and storage time before processing, initial growth may take longer. If cells are not visible at 10–14 days, discard and begin again.
4. Goat fibroblasts are often more adherent than other livestock species. You may use 0.1% trypsin-EDTA or incubate for 4–5 min. Do not incubate longer (see General note 5).
5. Prolonged treatment of trypsin-EDTA is toxic to cells. Leaving cells in undiluted trypsin-EDTA for longer than 10 min will cause cellular damage and significantly reduce viability. You may use alternative releasing enzymes or gently tap the plate/flask on a hard surface to release additional cells.
6. In our hands, cultures were routinely used up to passage 15–20; however, the usable passage range may vary by donor, species, tissue source, and culture history. Users should establish an application-specific passage limit using appropriate quality-control assays.
Table 4. Important checkpoints
| Day of culture | Expectation/action |
|---|---|
| Day 0 | Establish tissue explants |
| Day 3 | Add 1 mL of FGM per well |
| Days 5–6 | Fibroblast cells should be visible |
| Days 7–8 | Remove tissue explants |
| Day 9 | Reach confluence in 6-well plate; pass into T25 flask |
| Days 13–14 | Reach confluence in T25 flask |
7. Labeling and line ID examples: Label all cryotubes, flasks, and plates with cell line ID, passage number, date, and researcher initials (Table 5). On cryotubes, be sure to include estimated cell counts. To generate an informative and unique ID, you may use the following example: BF- A3544EF[0125].
Table 5. ID generation for fibroblast cell lines
| Cell ID | Meaning | Interpretation |
|---|---|---|
| B | Bos taurus | Species of the cell line |
| F | Fibroblast | Type of cell line |
| Castrated male | Sex of the cell line | |
| A | Angus | Breed of the cell line |
| 3544 | Ear tag ID | Unique animal ID |
| EF | Example Farms | Location or source of collection (may replace tissue source) |
| [0125] | Jan 2025 | Date of establishment |
Troubleshooting
Problem 1: Fungal contamination observed (Figure 9).
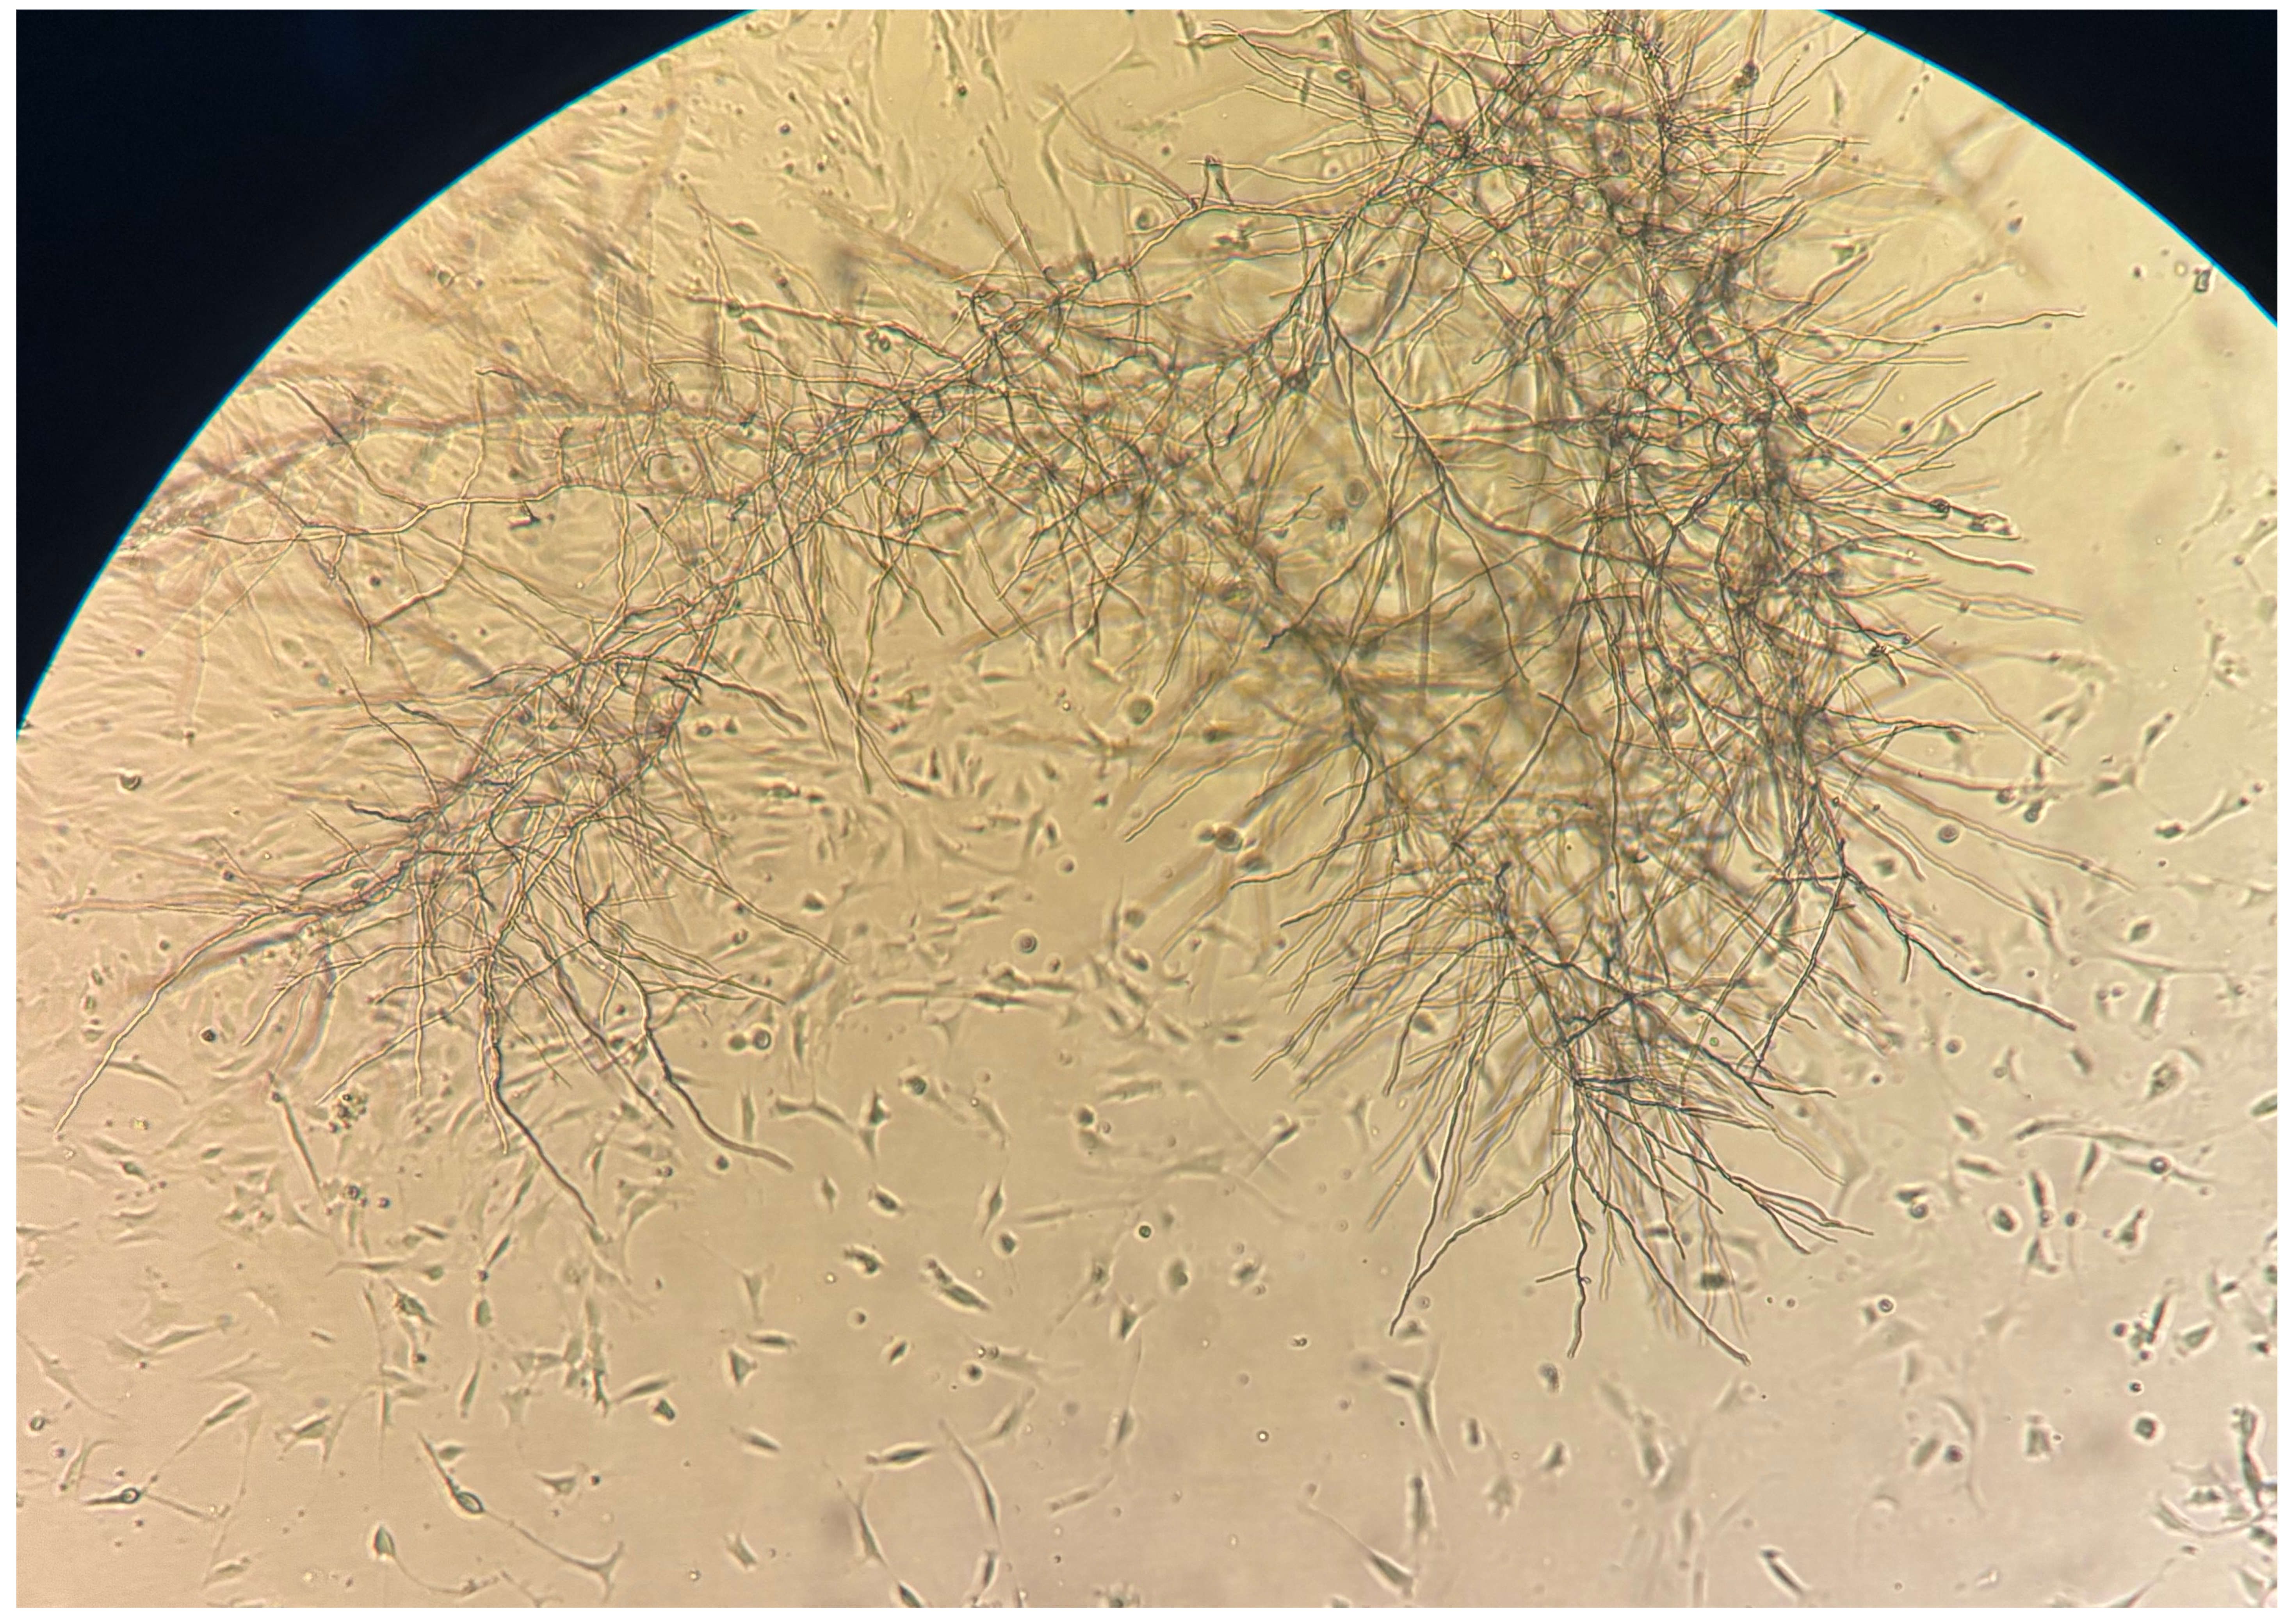
Figure 9. Fungal contamination present in fibroblast culture, appearing as feathery structures, viewed with brightfield illumination. Magnification: 60×.
Possible cause: Fungal spores are present on initial samples.
Solution: Discard contaminated samples and cultures and begin again with an increased number of washes. It is recommended to run a sterilization cycle in the incubator before restarting cultures (see General note 2). If fungal contamination is minimal, remove all fungal growths with a pipette and rinse heavily with DPBS wash. Replace with fresh FGM and observe culture closely. Ensure that the incubator and supplies are free of contamination.
Problem 2: Bacterial contamination is observed (Figures 10–11).
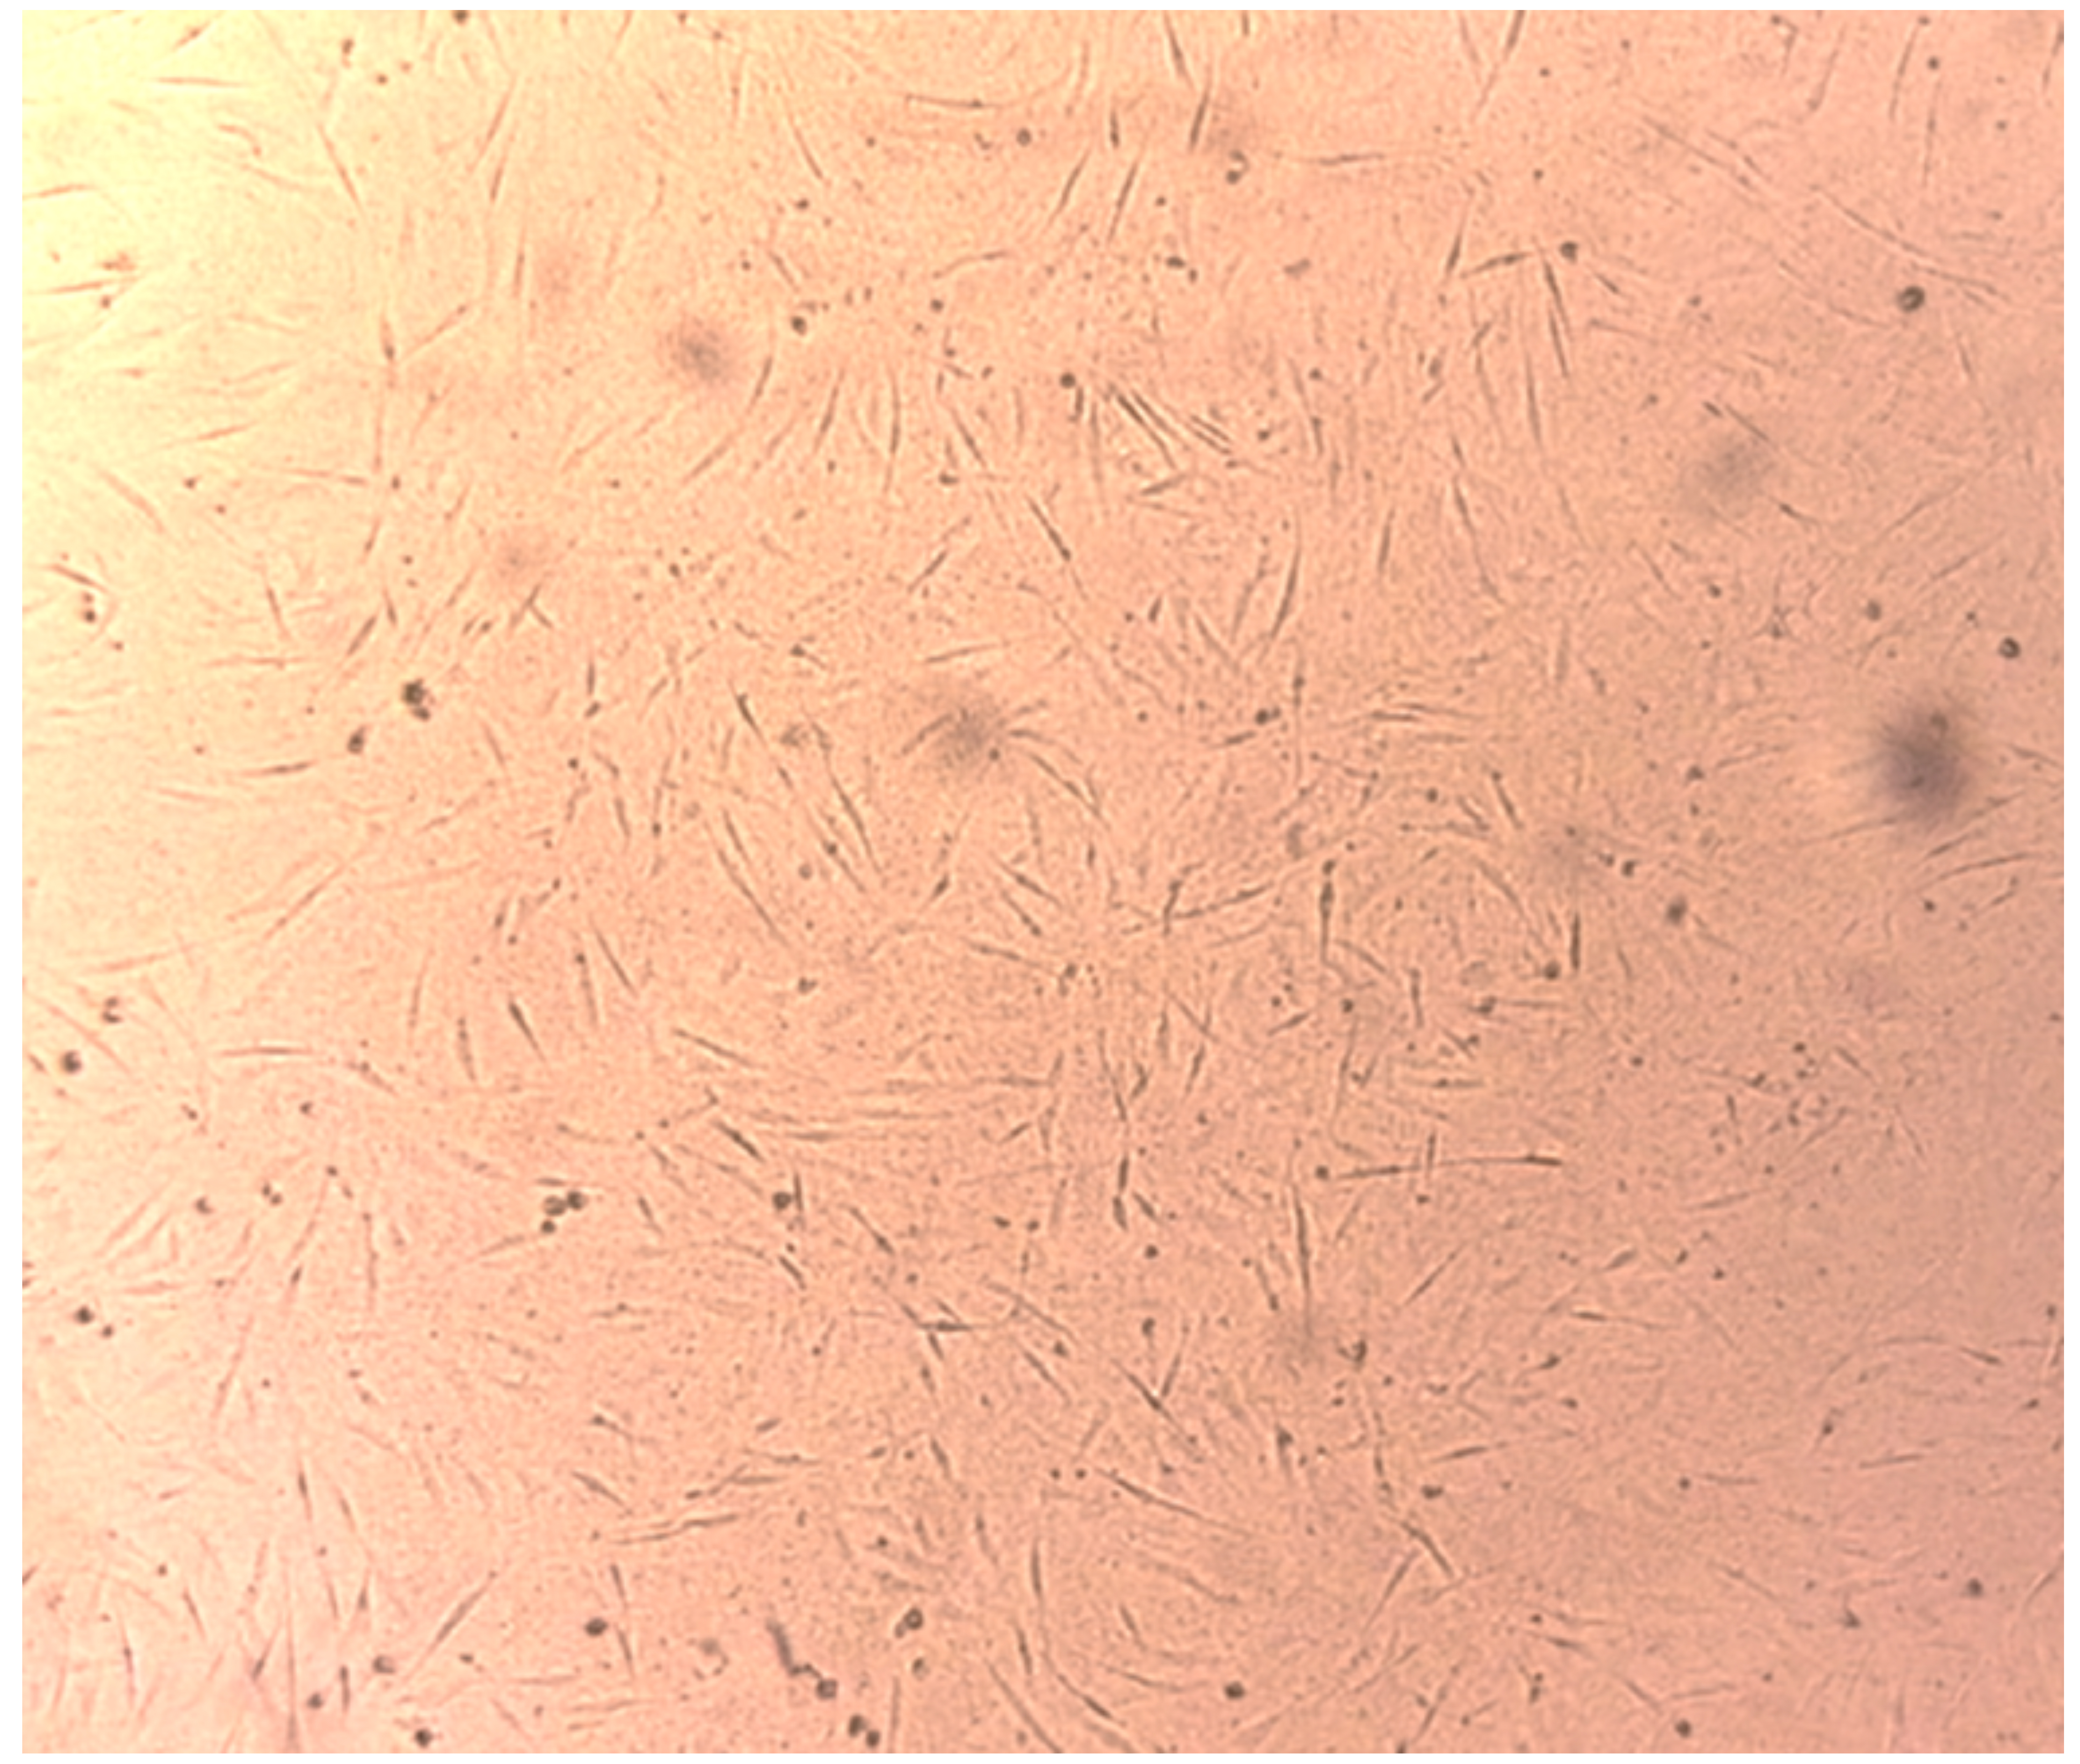
Figure 10. Bacterial contamination in fibroblast culture, appearing as sandy debris, viewed with brightfield illumination. Magnification: 60×.
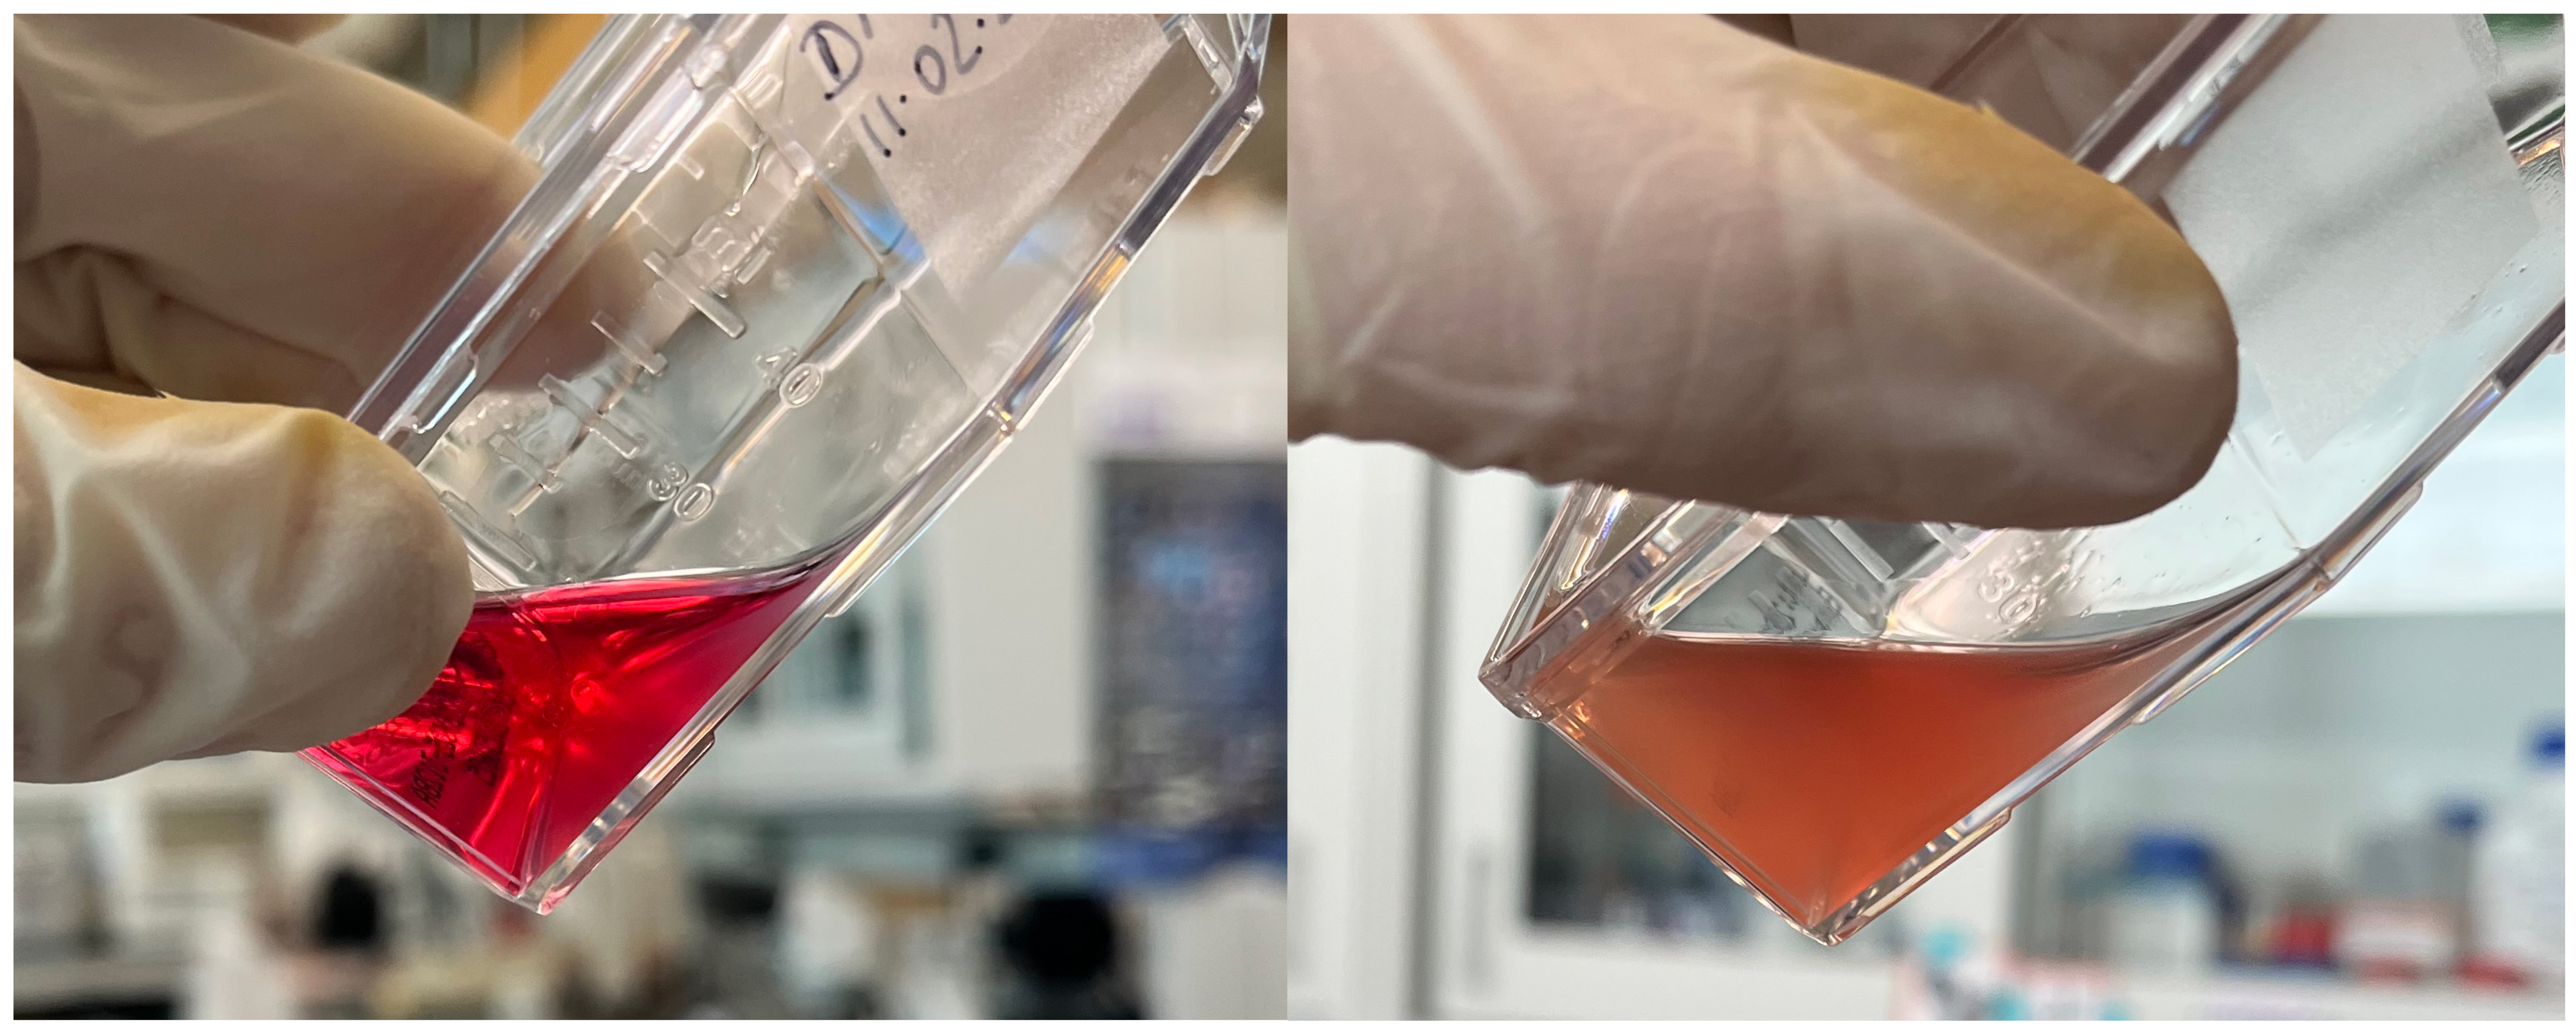
Figure 11. Comparison between healthy fibroblast medium (left) and culture contaminated with bacterial growth (right), indicated by a change in color, turbidity, and strong odor
Possible cause: Bacteria were present on initial samples.
Solution: Discard contaminated samples and cultures and begin again with an increased number of washes. It is recommended to run a sterilization cycle in the incubator before restarting cultures.
Problem 3: Growth is not observed by day 7.
Solution: See General note 3.
Acknowledgments
Funding: This work was supported by the Agriculture and Food Research Initiative’s Animal Breeding, Genetics and Genomics program (A1201) project award nos. 2021-67016-33417 and 2022-08267, from the U.S. Department of Agriculture’s National Institute of Food and Agriculture.
The following figures were created using BioRender: Graphical overview and Figures 1 and 8: https://BioRender.com/y398erv.
Author contributions
Conceptualization, D.H.; Methodology, M.M.; Investigation, M.M.; Writing—Original Draft, M.M.; Writing—Review & Editing, M.M., D.H.; Funding acquisition, D.H.; Supervision, D.H. All authors have read and agreed to the published version of the manuscript.
Competing interests
The authors declare no conflicts of interest.
References
- Zomerdijk, F., Hiemstra, S. J., d'Arbaumont, M., Tixier-Boichard, M. and Boettcher, P. (2020). Quality Management Practices of Gene Banks for Livestock: A Global Review. Biopreserv Biobanking. 18(3): 244–253. https://doi.org/10.1089/bio.2019.0128
- Pereira, A. F., Oliveira, L. R. M., Aquino, L. V. C., Viana, J. V. S. and Rodrigues, L. L. V. (2023). Strategies for the establishment of fibroblastic lines for the conservation of wild mammals. In: Theriogenology – Recent Advances in the Field. IntechOpen, London, UK. https://doi.org/10.5772/intechopen.114028
- Plikus, M. V., Wang, X., Sinha, S., Forte, E., Thompson, S. M., Herzog, E. L., Driskell, R. R., Rosenthal, N., Biernaskie, J., Horsley, V., et al. (2021). Fibroblasts: Origins, definitions, and functions in health and disease. Cell. 184(15): 3852–3872. https://doi.org/10.1016/j.cell.2021.06.024
- Kalluri, R. (2016). The biology and function of fibroblasts in cancer. Nat Rev Cancer. 16(9): 582–598. https://doi.org/10.1038/nrc.2016.73
- Perisse, I. V., Fan, Z., Singina, G. N., White, K. L. and Polejaeva, I. A. (2021). Improvements in Gene Editing Technology Boost Its Applications in Livestock. Front Genet. 11: e614688. https://doi.org/10.3389/fgene.2020.614688
- Fernandes, I. R., Russo, F. B., Pignatari, G. C., Evangelinellis, M. M., Tavolari, S., Muotri, A. R. and Beltrão-Braga, P. C. B. (2014). Fibroblast sources: Where can we get them?. Cytotechnology. 68(2): 223–228. https://doi.org/10.1007/s10616-014-9771-7
- Food and Agriculture Organization of the United Nations (FAO). (2012). Cryoconservation of Animal Genetic Resources. FAO Animal Production and Health Guidelines No. 12. Rome: FAO.
- Rodriguez-Villamil, P., Beaton, B. P. and Krisher, R. L. (2024). Gene editing in livestock: innovations and applications. Anim Reprod. 21(3): e1590/1984–3143–ar2024–0054. https://doi.org/10.1590/1984-3143-ar2024-0054
Article Information
Publication history
Received: Aug 12, 2026
Accepted: Sep 24, 2026
Available online: Oct 26, 2026
Published: Nov 5, 2026
Copyright
© 2026 The Author(s); This is an open access article under the CC BY-NC license (https://creativecommons.org/licenses/by-nc/4.0/).
How to cite
McKendrick, M. and Hagen, D. (2026). Establishment and Cryopreservation of Primary Fibroblast Cultures From Livestock Ear-Tissue Explants. Bio-protocol 16(21): e5856. DOI: 10.21769/BioProtoc.5856.

 Download Citation in RIS Format
Do you have any questions about this protocol?
Post your question to gather feedback from the community. We will also invite the authors of this article to respond.
 Post a Question


