


- Protocols

- Articles and Issues
- For Authors
- About
- Become a Reviewer


Disease Modeling in iPSC-Derived Human Bone Marrow Organoids

(*contributed equally to this work) Published: Vol 16, Iss 20, Oct 20, 2026 DOI: 10.21769/BioProtoc.5837 Views: 27
Reviewed by: Jessica DavisNeha SaxenaShanmugaPriyaa Madhukaran
 PDF
PDF  Ask a question
Original research article
The authors used this protocol in:
Jan 2025

Protocol Collections
Comprehensive collections of detailed, peer-reviewed protocols focusing on specific topics




Related protocols
Abstract
Human bone marrow organoids provide a tractable three-dimensional platform for modeling hematopoiesis and hematologic disease in a human niche–like context. Here, we describe a stepwise protocol for utilizing human induced pluripotent stem cell (iPSC)-derived bone marrow organoids that support autonomous hematopoiesis for hematopoietic disease modeling, mouse xenograft hematopoiesis, and drug sensitivity testing. The workflow combines embryoid body formation, early mesoderm/angiogenic induction under hypoxia, hemogenic endothelial commitment, maturation within a collagen-containing hydrogel, and subsequent suspension culture as individual organoids. The resulting organoids contain endothelial, stromal, and hematopoietic components and reproduce key structural and cellular features of human marrow. We further describe procedures for engraftment of normal donor- or patient-derived CD34+ cells and implantation of mature organoids under the renal capsule of immunodeficient mice to assess in vivo hematopoietic maintenance. In prior applications of this platform, donor-derived CD34+ cells were shown to engraft within the organoid niche and undergo multilineage differentiation, enabling detection of selective erythroid defects caused by DDX41 deficiency and assessment of therapeutic suppression of JAK2V617F-mutant patient-derived hematopoietic cells in a human marrow–like microenvironment. This protocol, therefore, enables disease modeling, in vivo xenograft assessment, and ex vivo functional analysis of patient-derived hematopoietic cells using relatively small input samples.
Key features
• Stepwise differentiation of human iPSCs into bone marrow organoids containing endothelial, stromal, and hematopoietic compartments.
• Efficient engraftment of donor-derived CD34+ HSPCs into mature organoids using a Matrigel-assisted seeding method.
• Applicable to imaging, flow cytometry, cytogenetics, and downstream molecular analyses of organoid and donor-derived hematopoietic cells.
• Includes renal capsule implantation for in vivo xenograft assessment of organoid-supported hematopoiesis.
• Enables disease modeling and ex vivo functional studies of patient-derived hematopoietic cells, including analysis of erythroid and myeloid phenotypes and therapeutic responses.
Keywords: Bone marrow organoid iPSC-derived hematopoiesis
CD34
Myelodysplastic syndrome
Acute myeloid leukemia
Engraftment
JAK2
Myeloproliferative neoplasms
Erythropoiesis
DDX41
Drug sensitivity testing.
iPSC-derived hematopoiesis
CD34
Myelodysplastic syndrome
Acute myeloid leukemia
Engraftment
JAK2
Myeloproliferative neoplasms
Erythropoiesis
DDX41
Drug sensitivity testing.
Graphical overview
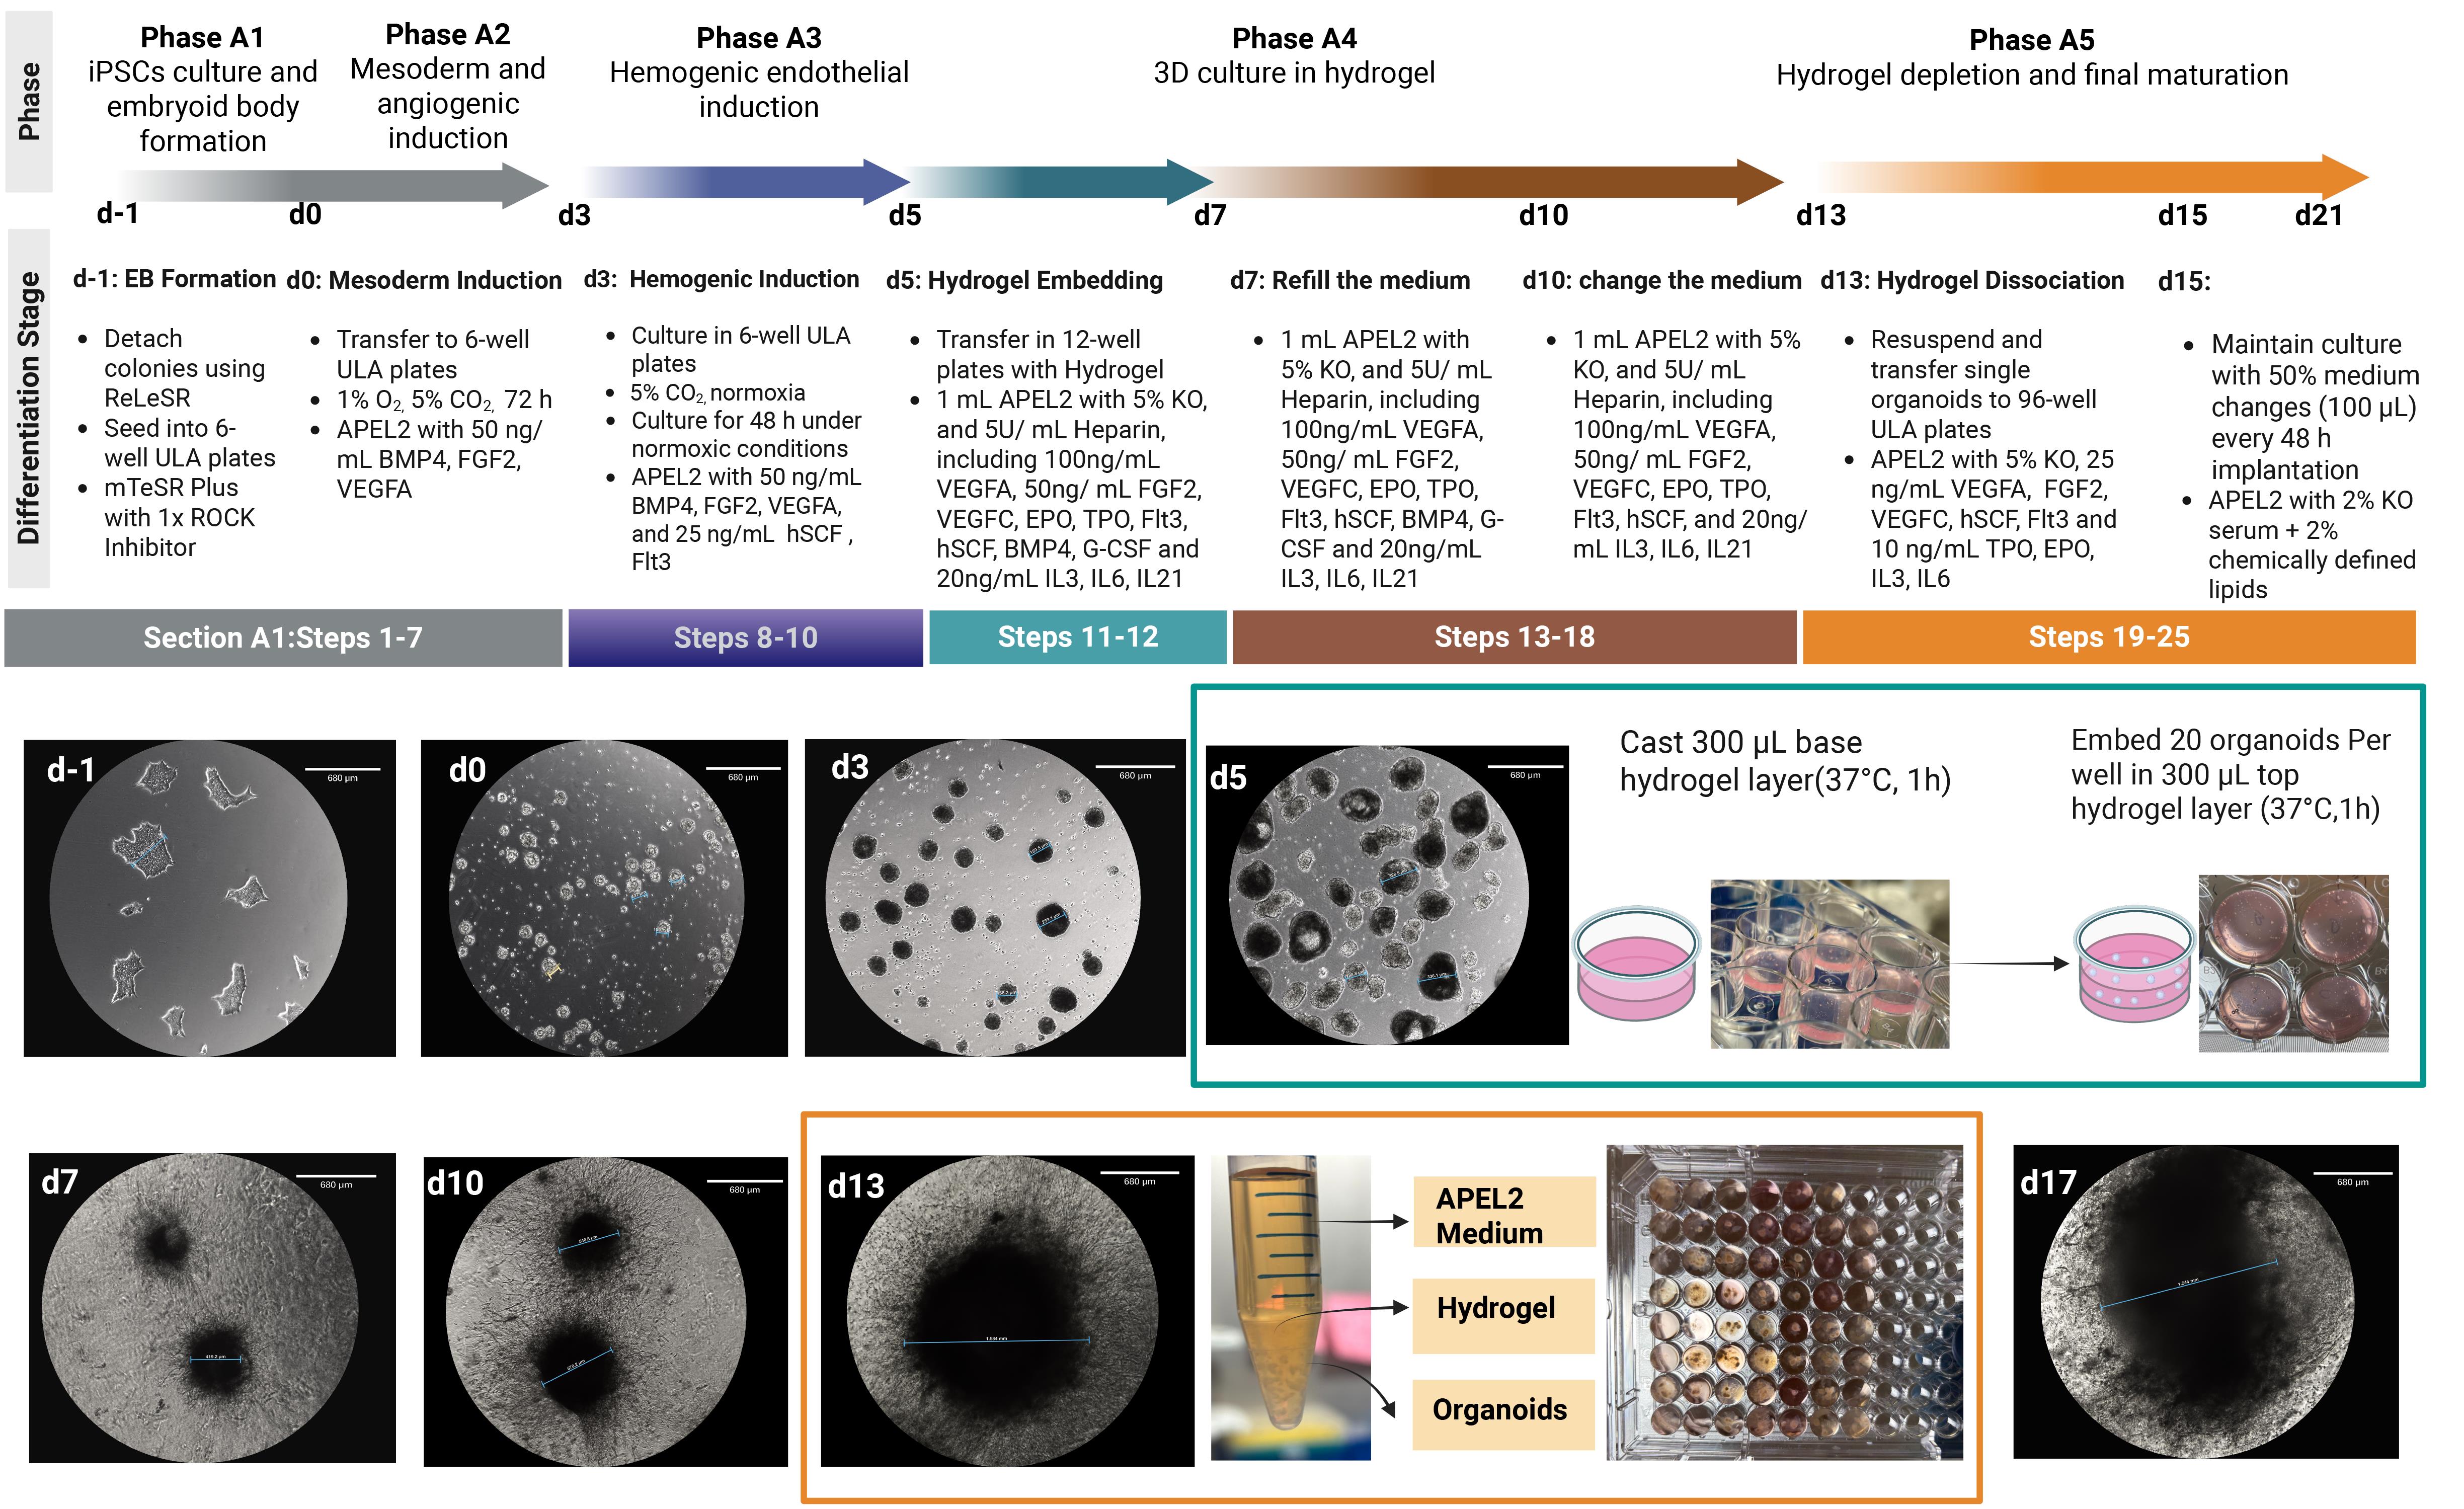
Overview of the bone marrow organoid differentiation in vitro protocol
Background
Human hematopoiesis is regulated by a highly organized bone marrow microenvironment composed of vascular, stromal, and hematopoietic cell populations that cooperate to control stem cell maintenance, lineage commitment, proliferation, and survival [1,2]. Conventional two-dimensional liquid culture systems do not adequately reproduce these multicellular and spatial interactions. Although murine xenograft models have been instrumental for studying human hematopoiesis, they remain limited by species-specific differences in niche-derived signals and by inconsistent engraftment of disease-derived human hematopoietic stem and progenitor cells (HSPCs), particularly in disorders such as myelodysplastic syndromes and other myeloid neoplasms.
Recent advances in human induced pluripotent stem cell (iPSC)-derived marrow organoid systems have established a framework for generating multilineage, vascularized bone marrow–like structures in vitro [3−5]. In particular, human iPSC-derived bone marrow organoids can recreate key endothelial, stromal, and hematopoietic components of the marrow niche in a three-dimensional architecture, providing a more physiologically relevant setting for modeling human hematopoiesis and hematologic disease than conventional suspension culture.
The protocol described here was adapted from that general framework and was used in our study demonstrating autonomous hematopoiesis and efficient engraftment of donor-derived CD34+ cells in human bone marrow organoids [5]. In this system, iPSC aggregates undergo cytokine-directed differentiation, hydrogel embedding, and maturation as individual suspension organoids through day 21, after which they can be engrafted with normal donor- or patient-derived CD34+ HSPCs or implanted under the renal capsule of immunodeficient mice. The resulting organoids support multilineage hematopoiesis and provide a marrow-like niche suitable for confocal Z-stack imaging, flow cytometric analysis, cytogenetic and genomic studies, disease modeling, and in vivo xenograft assessment.
A major advantage of the organoid engraftment platform is that it enables patient-derived hematopoietic cells to be studied within a structured human marrow–like microenvironment rather than in reductionist liquid culture [6]. This is particularly important for primary hematopoietic samples that depend on extracellular matrix, stromal interactions, vascular-associated cues, and short-range niche-derived survival signals. In this setting, donor-derived cells can be localized within the organoid niche and analyzed by imaging and flow cytometry, allowing lineage-specific phenotypes to be evaluated in a context that more closely resembles human marrow biology than standard suspension culture.
This platform has already been applied to multiple disease-focused studies. In one application, engrafted human bone marrow organoids were used to model DDX41-deficient hematopoiesis and revealed selective impairment of erythroid output from donor-derived cells, supporting the use of the system for studying lineage-specific disease phenotypes in a human marrow–like context [7]. In another application, the organoid engraftment model was used to study JAK2V617F-mutant patient-derived hematopoietic cells and to evaluate therapeutic perturbation, demonstrating suppression of donor-derived erythroid and myeloid output in response to cyclosporin A [8]. Together, these studies illustrate that the organoid platform is not only suitable for structural modeling of bone marrow development but also for functional interrogation of disease-relevant hematopoietic phenotypes and therapeutic responses using limited numbers of patient-derived cells.
Accordingly, this protocol includes procedures for organoid generation, donor-cell engraftment, renal capsule implantation, imaging and flow cytometric characterization, and downstream disease modeling applications using patient-derived hematopoietic cells. It provides a practical framework for studying human hematopoiesis, marrow niche interactions, and disease-associated hematopoietic defects in both ex vivo and in vivo settings.
Materials and reagents
Biological materials
1. Human induced pluripotent stem cells (iPSCs) (StemCell Technologies, SCTi003-A)
2. Human bone marrow aspirate samples from healthy donors or patients with myeloid disease, collected under approved institutional protocols
3. Primary normal human bone marrow CD34+ cells (StemCell Technologies, catalog number: 70002)
4. NSG mice (JAX lab, strain #005557)
Cell culture media and supplements
1. mTeSR Plus medium (StemCell Technologies, catalog number: 100-0276)
2. ReLeSR (StemCell Technologies, catalog number: 100-0483)
3. RevitaCell ROCK inhibitor (Thermo Fisher Scientific, catalog number: A2644501)
4. STEMdiff APEL2 medium (StemCell Technologies, catalog number: 05275)
5. StemPro-34 SFM (Thermo Fisher Scientific, catalog number: 10639011)
6. KnockOut serum replacement (Thermo Fisher Scientific, catalog number: 10828010)
7. Chemically defined lipids (Thermo Fisher Scientific, catalog number: 11905031)
8. CryoStor CSB medium (StemCell Technologies, catalog number: 100-1061)
9. Mycoplasma PCR Testing kit (Thermo Fisher Scientific, catalog number: J66117.AMJ)
10. Heparin (Sigma, catalog number: H0200000)
11. StemSpan CD34+ expansion supplement (StemCell Technologies, catalog number: 02691)
12. StemSpan SFEM medium (StemCell Technologies, catalog number: 09650)
13. Cyclosporin A (Sigma-Aldrich, catalog number: 30024-25MG)
14. DMEM/F12 (Thermo Fisher Scientific, catalog number: 11320033)
Cytokines and growth factors
1. BMP4 (Thermo Fisher Scientific, catalog number: PHC9534)
2. VEGFA (StemCell Technologies, catalog number: 78159.1)
3. VEGFC (StemCell Technologies, catalog number: 78202.1)
4. FGF2 (StemCell Technologies, catalog number: 78134.1)
5. IL-21 (StemCell Technologies, catalog number: 78193.1)
6. SCF (StemCell Technologies, catalog number: 78155.1)
7. FLT3 (StemCell Technologies, catalog number: 78137.1)
8. G-CSF (StemCell Technologies, catalog number: 78138.1)
9. TPO (StemCell Technologies, catalog number: 78210.1)
10. EPO (StemCell Technologies, catalog number: 78007)
11. IL-3 (StemCell Technologies, catalog number: 78194.1)
12. IL-6 (StemCell Technologies, catalog number: 78050)
Matrices and dissociation reagents
1. Matrigel for iPSC maintenance and engraftment overlay (Corning, catalog number: 354277)
2. GelTrex reduced-growth-factor basement-membrane matrix (Thermo Fisher Scientific, catalog number: A1413302)
3. VitroCol, Type I human collagen solution (Advanced BioMatrix, catalog number: 5007)
4. Type IV collagen powder (Advanced BioMatrix, catalog number: 5022)
5. Type I collagen powder (Advanced BioMatrix, catalog number: 5008)
6. Collagenase Type I (0.25%) (StemCell Technologies, catalog number: 07902)
General reagents
1. PBS (StemCell Technologies, catalog number: 07905)
2. BSA (Sigma-Aldrich, catalog number: A3294-50G)
3. EDTA (Sigma-Aldrich, catalog number: E9884-100G)
4. Ficoll-Paque density gradient medium (Sigma-Aldrich, catalog number: GE17-5442-02)
5. CD34 MicroBead kit (Miltenyi Biotec, catalog number: 130-046-702)
6. RBC lysis buffer (Thermo Fisher Scientific, catalog number: 00-4333-57)
7. MACS buffer (Miltenyi Biotec, catalog number: 130-091-221)
Cell labeling and viability assay reagents
1. CellTrace Far Red Cell Proliferation kit (Thermo Fisher Scientific, catalog number: C34564)
2. FITC-conjugated Annexin V (BD, catalog number: 556547)
3. DAPI (Thermo Fisher Scientific, catalog number: 41116113)
4. CellVue Far Red for cell membrane labeling (Sigma-Aldrich, catalog number: MIDCLARET-1KT)
Material and reagents for tissue clearing and confocal imaging
1. Fructose (Sigma-Aldrich, catalog number: F0127)
2. Glycerol (Sigma-Aldrich, catalog number: G5516)
3. Slides (Fisher Scientific, catalog number: NC9202659)
4. Coverslip (Sigma-Aldrich, catalog number: CLS285022)
5. Labeling tapes (Fisher Scientific, catalog number: 1590110B)
6. Goat serum (Thermo Fisher Scientific, catalog number: 50062Z)
7. Triton X-100 (Sigma-Aldrich, catalog number: T8787-50ML)
8. 16% paraformaldehyde (PFA) (Thermo Fisher Scientific, catalog number: 043368.9M)
9. Biotinylated UEA1 (Vector Laboratories, catalog number: B-1065-2)
Material and reagents for organoid implantation in mice
1. Mouse anesthesia system with heating pad
2. Ophthalmic ointment (Bausch&Lomb, catalog number: NDC24208-780-55)
3. Analgesic agents (Covetrus, catalog number: NDC11695-6936-1)
4. Absorbable suture (ETHICON, catalog number: J397)
5. Non-absorbable suture (ETHICON, catalog number: 8698)
6. Hair removal cream (Grainger, catalog number: 13Z999)
7. Betadine (Med Vet International, catalog number: PHVBETASCRUB16)
8. 70% ethanol (Thermo Fisher Scientific, catalog number: R40135)
9. Sterile dissecting scissors (Fine Science Tools, catalog number: 15003-08)
10. Fine forceps (Fine Science Tools, catalog number: 91115-10)
11. Sterile gauze (Dukal corporation, catalog number: 6208)
12. Sterile cotton swabs (PuritanTM, catalog number: 253206H 20MM)
13. Glass Pasteur pipette (Chemglass Life Sciences, catalog number: CGN3404102)
14. Saline (Cytiva, catalog number: SH30028.01)
Solutions
1. Collagen dissolving buffer (see Recipes)
2. Hydrogel dilution buffer (see Recipes)
3. Collagen solution (see Recipes)
4. Hydrogel working solution (see Recipes)
5. Mesoderm/angiogenic induction medium (see Recipes)
6. Hemogenic endothelial induction medium (see Recipes)
7. Hydrogel culture medium A (see Recipes)
8. Hydrogel culture medium B (see Recipes)
9. Organoid growth medium (see Recipes)
10. Engraftment-support medium (see Recipes)
11. Tissue clearing buffer (see Recipes)
Recipes
1. Collagen dissolving buffer
| Reagent | Quantity or volume | Final concentration |
|---|---|---|
| Glacial acetic acid | 0.25 mL | 0.25% (v/v) |
| Sodium acetate | 0.01 g | 0.01% (w/v) |
| H2O | 99.75 mL | - |
Note: Filter the prepared collagen dissolving buffer through a 0.22 μm filter.
2. Hydrogel dilution buffer
| Reagent | Quantity or volume | Final concentration |
|---|---|---|
| Sodium bicarbonate | 7.5 g | 0.075 g/mL |
| GlutaMax (200 mM) | 2 mL | 4 mM |
| Ham’s F12 | 69.6 mL | - |
| HEPES | 4.2 mL | - |
| 10× PBS | 20.86 mL | - |
| H2O | 3.34 mL | - |
| Total | 100 mL |
Note: Filter the prepared hydrogel dilution buffer through a 0.22 μm filter.
3. Collagen solution
| Reagent | Quantity or volume | Final concentration |
|---|---|---|
| Type I collagen powder | 15 mg | 3 mg/mL |
| Type IV collagen powder | 5 mg | 1 mg/mL |
| Collagen dissolving buffer | 5 mL | - |
Note: Mix Type I collagen powder with collagen dissolving buffer under sterile conditions in a biosafety cabinet. Agitate the mixture on a hula mixer at 4 °C for at least 12 h. Then, add the VitroCol solution to the collagen type IV powder and continue mixing on a hula mixer at 4 °C for an additional 12 h. During storage, keep the collagen solution at 4 °C with continuous agitation on a hula mixer.
4. Hydrogel working solution
| Reagent | Quantity or volume |
|---|---|
| VitroCol solution (3 mg/mL) | 0.2 mL |
| Hydrogel dilution buffer | 0.1 mL |
| GelTrex | 0.4 mL |
| Collagen solution | 0.3 mL |
| NaOH solution (1 M) | ~10 μL |
| Total | 1 mL |
Note: Prepare the hydrogel working solution on ice. Pre-cool the pipette tip with ice-cold PBS before aspirating Matrigel. Add 1 M sodium hydroxide in increments of less than 2 μL, allowing thorough mixing after each addition. Do not add excessive NaOH at once, as this may generate heat and cause a localized pH imbalance. After each addition, measure the pH using pH test paper. Prepare the hydrogel working solution in small volumes (≤1 mL), as pH adjustment with NaOH becomes difficult at larger volumes. The target pH is 7.0.
5. Mesoderm/angiogenic induction medium
| Reagent | Quantity or volume |
|---|---|
| APEL2 | 10 mL |
| BMP4 (100 ng/μL) | 5 μL |
| FGF2 (100 ng/μL) | 5 μL |
| VEGFA (100 ng/μL) | 5 μL |
Note: Prepare fresh before use.
6. Hemogenic endothelial induction medium
| Reagent | Quantity or volume |
|---|---|
| APEL2 | 10 mL |
| BMP4 (100 ng/μL) | 5 μL |
| FGF2 (100 ng/μL) | 5 μL |
| VEGFA (100 ng/μL) | 5 μL |
| hSCF (100 ng/μL) | 2.5 μL |
| Flt3 (100 ng/μL) | 2.5 μL |
Note: Prepare fresh before use.
7. Hydrogel culture medium A
| Reagent | Quantity or volume |
|---|---|
| APEL2 | 9.5 mL |
| KnockOut serum replacement | 0.5 mL |
| Heparin (1000 IU/mL) | 50 μL |
| VEGFA (100 ng/μL) | 10 μL |
| VEGFC (100 ng/μL) | 5 μL |
| Flt3 (100 ng/μL) | 5 μL |
| FGF2 (100 ng/μL) | 5 μL |
| hSCF (100 ng/μL) | 5 μL |
| EPO (100 ng/μL) | 5 μL |
| TPO (100 ng/μL) | 5 μL |
| IL3 (100 ng/μL) | 2.5 μL |
| IL6 (100 ng/μL) | 2.5 μL |
| IL21 (100 ng/μL) | 2.5 μL |
| BMP4 (100 ng/μL) | 5 μL |
| G-CSF (100 ng/μL) | 5 μL |
Note: Prepare fresh before use. Heparin is included to stabilize heparin-binding growth factors, particularly VEGF, and support their activity during vascular induction.
8. Hydrogel culture medium B
| Reagent | Quantity or volume |
|---|---|
| APEL2 | 9.5 mL |
| KnockOut serum replacement | 0.5 mL |
| Heparin (1000 IU/mL) | 50 μL |
| VEGFA (100 ng/μL) | 10 μL |
| VEGFC (100 ng/μL) | 5 μL |
| Flt3 (100 ng/μL) | 5 μL |
| FGF2 (100 ng/μL) | 5 μL |
| hSCF (100 ng/μL) | 5 μL |
| EPO (100 ng/μL) | 5 μL |
| TPO (100 ng/μL) | 5 μL |
| IL3 (100 ng/μL) | 2.5 μL |
| IL6 (100 ng/μL) | 2.5 μL |
| IL21 (100 ng/μL) | 2.5 μL |
Note: Prepare fresh before use.
9. Organoid growth medium
| Reagent | Quantity or volume |
|---|---|
| APEL2 | 9.5 mL |
| KnockOut serum replacement | 0.5 mL |
| Heparin (1000 IU/mL) | 50 μL |
| VEGFA (100 ng/μL) | 2.5 μL |
| VEGFC (100 ng/μL) | 2.5 μL |
| Flt3 (100 ng/μL) | 2.5 μL |
| FGF2 (100 ng/μL) | 2.5 μL |
| EPO (100 ng/μL) | 1 μL |
| TPO (100 ng/μL) | 1 μL |
| IL3 (100 ng/μL) | 1 μL |
| IL6 (100 ng/μL) | 1 μL |
| IL21 (100 ng/μL) | 1 μL |
Note: Prepare fresh before use.
10. Engraftment-support medium
| Reagent | Quantity or volume |
|---|---|
| StemPro-34 | 9.6 mL |
| KnockOut serum replacement | 0.2 mL |
| Chemically defined lipids | 0.2 mL |
| EPO (100 ng/μL) | 1 μL |
| TPO (100 ng/μL) | 1 μL |
| IL3 (100 ng/μL) | 1 μL |
| IL6 (100 ng/μL) | 1 μL |
Note: Prepare fresh before use.
11. Tissue clearing buffer
| Reagent | Quantity or volume |
|---|---|
| Glycerol | 330 mL |
| Fructose | 297.2 g |
| H2O | 70 mL |
Note: Stir the mixture in a magnetic stirrer overnight to fully dissolve the fructose. The final volume should reach approximately 660 mL after complete dissolution. Store the prepared solution at room temperature in a dry, light-protected area. To minimize water uptake, the solution is aliquoted into 10 mL portions in Falcon tubes, and the caps are sealed with Parafilm. Each aliquoted tube is discarded after use, and unopened sealed aliquots can be stored for up to 6 months under dry conditions.
Laboratory supplies
1. Ultra-low-attachment 6-well plates (Sigma-Aldrich, catalog number: CLS3471-24EA)
2. Ultra-low-attachment 96-well plate (Thermo Fisher Scientific, catalog number: 174925)
3. 6-well tissue culture plate (Sigma-Aldrich, catalog number: CLS3516-50EA)
4. 24-well tissue culture plate (Sigma-Aldrich, catalog number: CLS3524-100EA)
5. 100-μm cell strainers (Sigma-Aldrich, catalog number: CLS431752)
6. 40-μm cell strainers (Sigma-Aldrich, catalog number: 07-201-430)
Equipment
1. Biosafety cabinet (Thermo Fisher Scientific, catalog number: 1910179)
2. Normoxic CO2 incubator set to 37 °C and 5% CO2 (Thermo Fisher Scientific, catalog number: 51036157)
3. Hypoxia-capable incubator set to 37 °C, 1% O2, and 5% CO2 (Thermo Fisher Scientific, catalog number: 51036516)
4. Orbital shaker (Alkali Scientific, catalog number: RS7049)
5. Tube rotor (Thermo Fisher Scientific, catalog number: 88881001)
6. Inverted microscope (Echo Rebel)
Procedure
A. Generation of bone marrow organoids from human iPSCs
A1. iPSCs culture and embryoid body formation
1. Prepare Matrigel-coated 6-well plates for iPSC maintenance. Thaw Matrigel on ice or at 4 °C and dilute it in ice-cold DMEM/F12 according to the manufacturer’s instructions (e.g., 270 μL of Matrigel in 25 mL of DMEM/F12). Mix the solution thoroughly by pipetting up and down 10 times with a pre-chilled 25 mL serological pipette. Immediately dispense 1 mL of the diluted Matrigel solution into each well of a 6-well plate and incubate the plates at 37 °C in 5% CO2. The coated plates are ready for use after 4 h.
2. Maintain iPSCs on Matrigel-coated 6-well plates in mTeSR Plus medium under feeder-free conditions.
Note: Routine iPSC maintenance should follow standard good practices for human iPSC culture, including regular monitoring of colony morphology, timely passaging, and routine mycoplasma testing. Cultures that test positive for mycoplasma contamination should be discarded immediately.
3. Before starting differentiation, iPSC colonies should be 24 h post-passage, evenly seeded, and approximately 250–350 μm in diameter. Remove spontaneously differentiated colonies manually using 10-μL pipette tips under an inverted microscope in a biosafety cabinet.
4. Aspirate the iPSC culture medium and add 1 mL of ReLeSR to each well. Incubate the plate in a CO2 incubator for 45–90 s, aspirate the ReLeSR, and gently add 1 mL of mTeSR Plus supplemented with 1× ROCK inhibitor to each well without pipetting directly onto the colonies. Gently swirl the plate until the iPSC colonies visibly detach from the surface.
5. Using a sterile wide-bore transfer pipette, pass the suspended iPSC clumps through a 100-μm cell strainer into a 50 mL conical tube to remove oversized clumps.
Note: Pre-wet the cell strainer with iPSC culture medium to improve the flowthrough.
6. For each 1 mL of suspended iPSC clumps, add 4 mL of mTeSR Plus supplemented with 1× ROCK inhibitor. Using a sterile wide-bore transfer pipette, dispense 2 mL of the diluted suspension into each well of an ultra-low-attachment 6-well plate. Each well starts with ~0.12 × 10⁶ iPSCs.
Note: This is a critical step; avoid pipetting the iPSC suspension up and down. If mixing is needed, gently invert the tube two to three times before dispensing.
7. Culture for 24 h under normoxic conditions in a standard CO2 incubator to allow embryoid body formation. This is the designated day 0 of the protocol.
A2. Mesoderm and angiogenic induction
1. Check the embryoid bodies under the microscope. After 24 h of culture, the embryoid bodies should ideally reach approximately 100 μm in diameter (Figure 1).
2. Replace the medium with mesoderm/angiogenic induction medium. Gently swirl the plate to suspend the embryoid bodies and transfer them with a sterile wide-bore transfer pipette into a 15 mL conical tube. Add APEL2 medium to a final volume of 5 mL. Place the tube upright in a rack for 20 min to allow the embryoid bodies to settle to the bottom. Slowly aspirate the supernatant using a 1 mL pipette tip, leaving approximately 0.5 mL of medium undisturbed at the bottom of the tube to avoid disturbing the embryoid bodies. For each well of embryoid bodies, add 4 mL of mesoderm/angiogenic induction medium. Gently pipette up and down twice to mix, then dispense 2 mL of the suspension into each well of a new ultra-low-attachment 6-well plate.
3. Culture the embryoid bodies for 72 h under hypoxic conditions at 1% O2. After 72 h of culture, the embryoid bodies should reach approximately 200 μm in diameter (Figure 2).
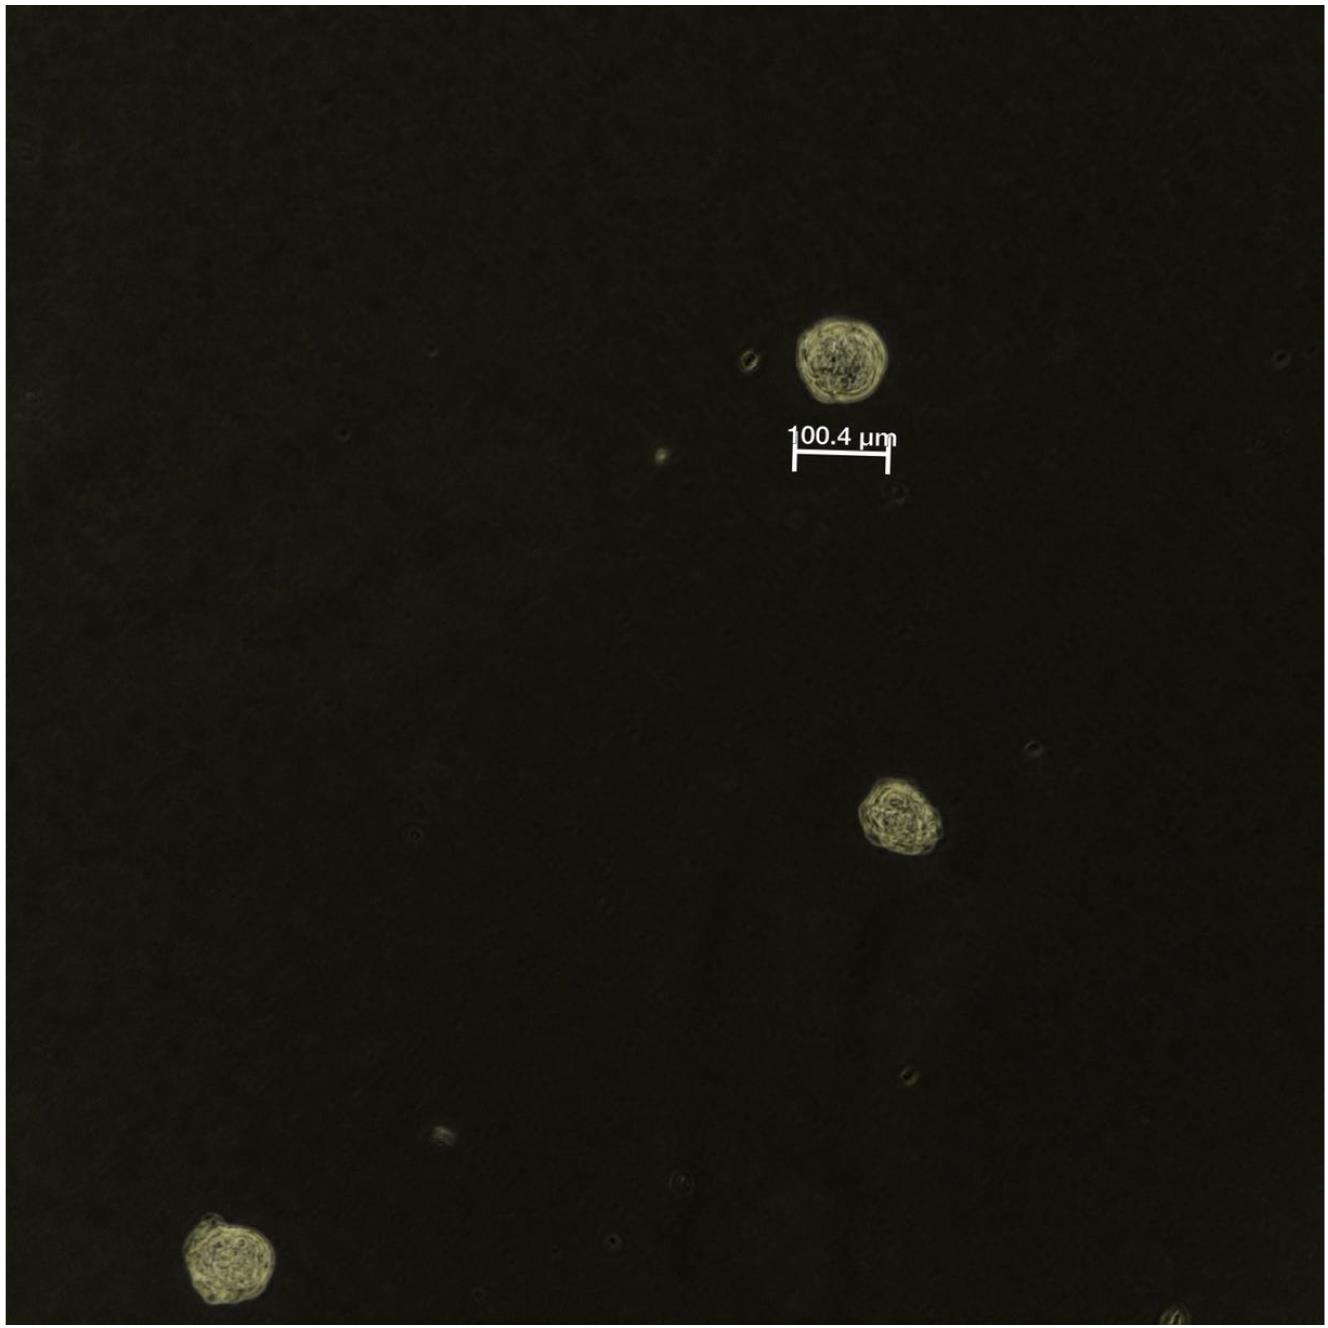
Figure 1. Embryoid body formation after 24 h of culture in an ultra-low-attachment plate. The scale bar indicates that the embryoid bodies are approximately 100 μm in diameter.
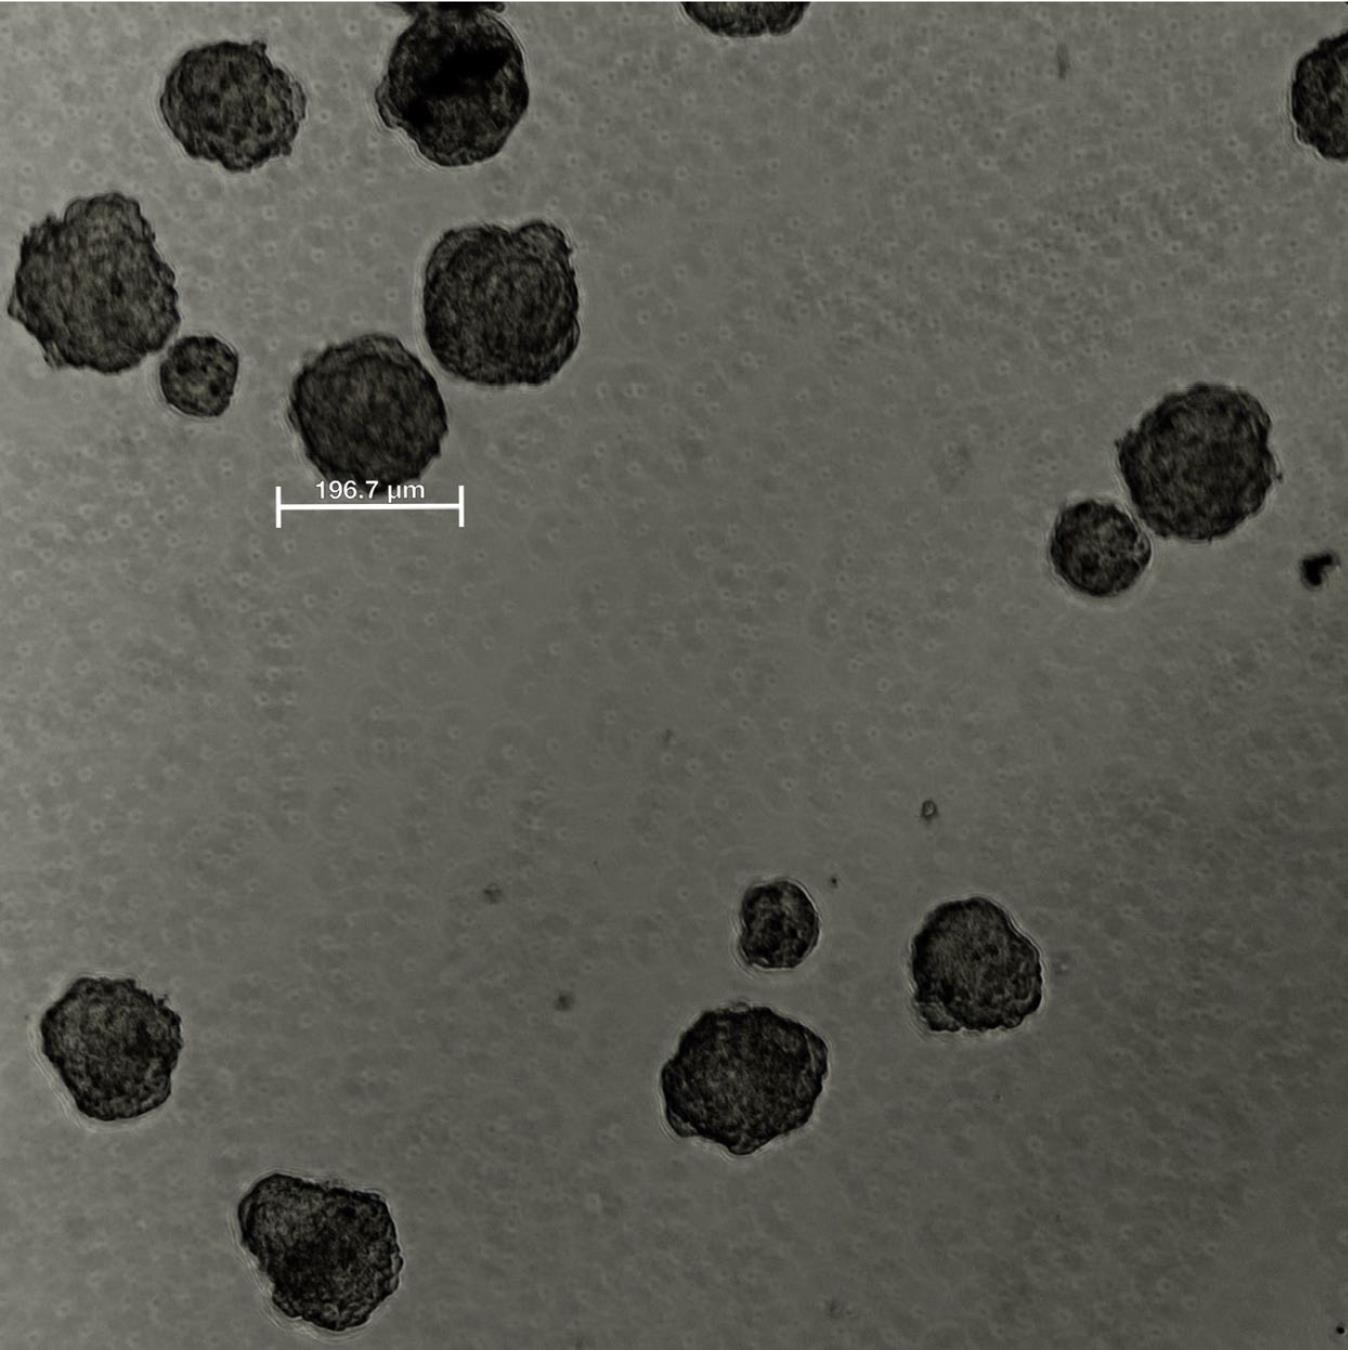
Figure 2. Embryoid bodies after 72 h of mesoderm/angiogenic induction under hypoxic conditions (1% O2). The scale bar indicates that the embryoid bodies are approximately 200 μm in diameter at this stage of differentiation.
A3. Hemogenic endothelial induction
1. Replace the medium with hemogenic endothelial induction medium using the same procedure described in step A2.2.
2. Culture the embryoid bodies under normoxic conditions for 48 h.
A4. 3D culture in hydrogel
1. At this stage, the immature organoids should be approximately 300–400 μm in diameter (Figure 3). Under a microscope, remove fused organoids or those with irregular shapes. Count the remaining spheroid immature organoids and calculate the volume of hydrogel needed for embedding based on 20 immature organoids per well of a 12-well plate.
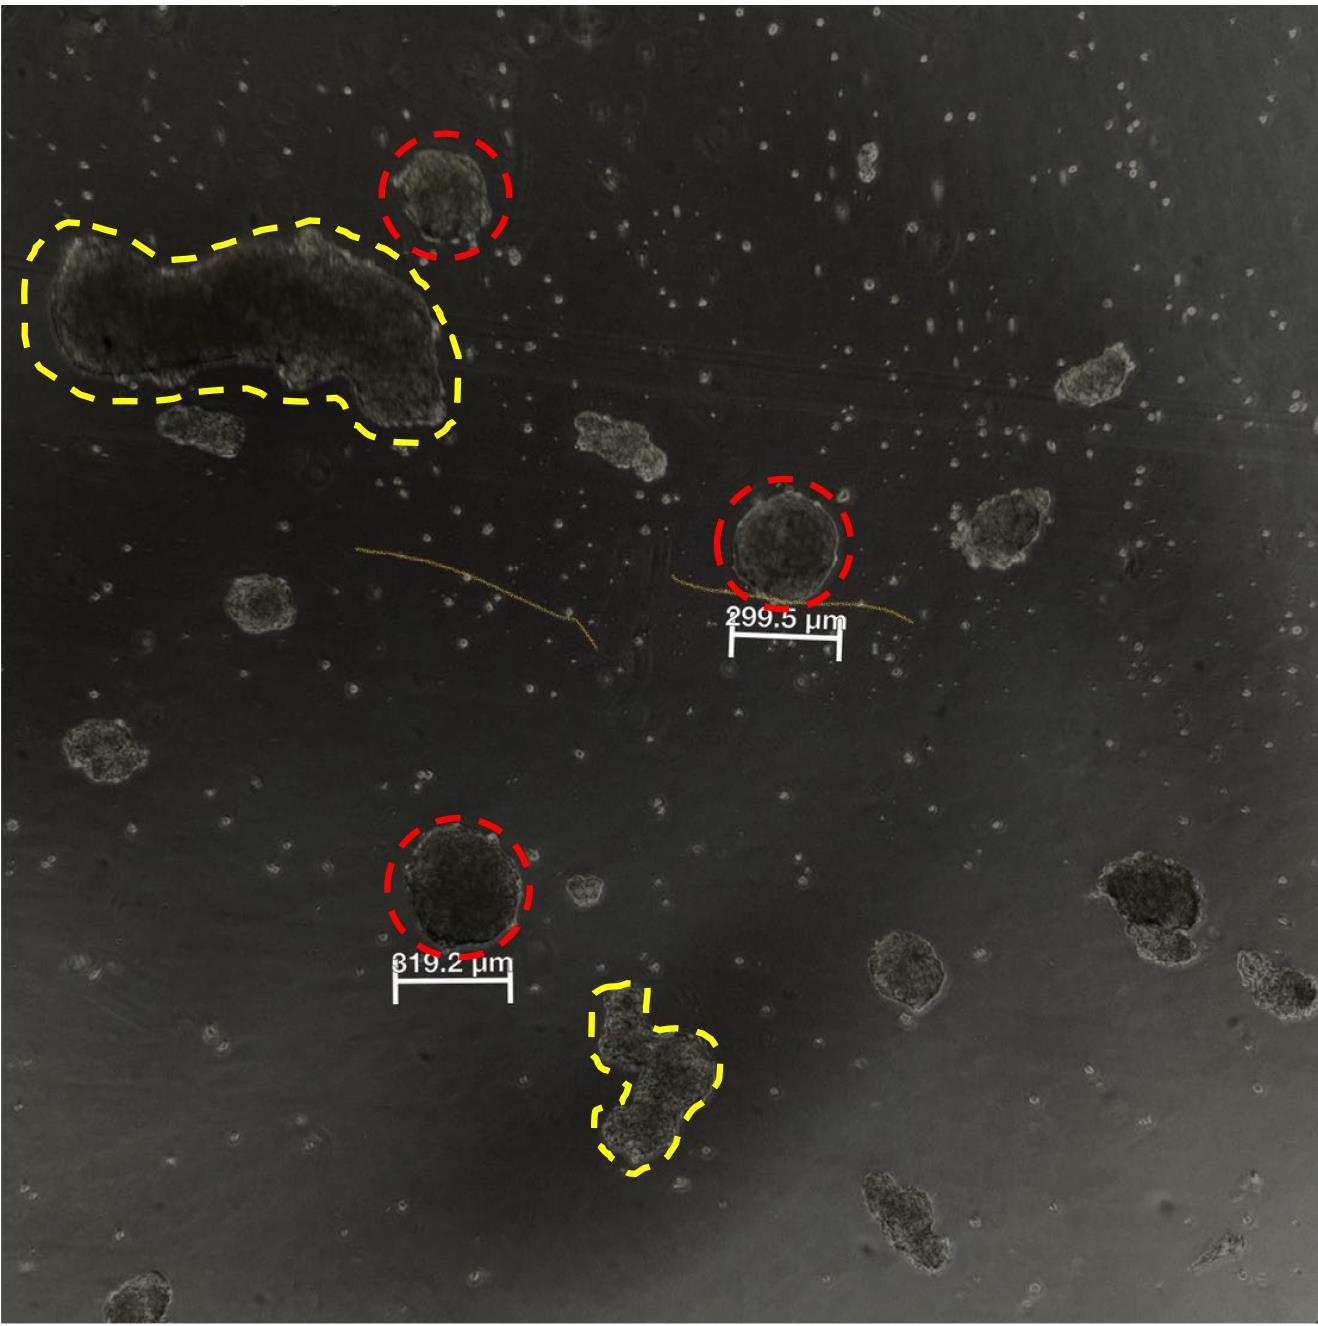
Figure 3. Immature organoids after hemogenic endothelial induction. Fusion of immature organoids can result in irregularly shaped or oversized structures (yellow outlines), which should be excluded. Red circles indicate representative immature organoids with the desired morphology and a diameter of approximately 300 μm, as shown by the scale bars.
2. To prepare the base hydrogel layer, dispense 300 μL of freshly prepared ice-cold hydrogel into each well of a 12-well plate. Incubate the plate under normoxic conditions in a standard incubator (37 °C, 5% CO2) for 1 h, or until the hydrogel has solidified.
3. After the base layer has solidified, collect 20 immature organoids into each 15 mL conical tube using a wide-bore transfer pipette. Place the tube upright in a rack for 15 min to allow the organoids to settle to the bottom. Carefully aspirate the supernatant using a 1 mL pipette tip, leaving as little residual medium as possible.
4. Add 300 μL of ice-cold hydrogel to the bottom of the conical tube. Using a 1 mL pipette, gently resuspend the organoids in the hydrogel and transfer the mixture onto the solidified base layer (Video 1). If the organoids are clustered tightly, briefly adjust the positions of the organoids so they are evenly distributed in the well using a 100 μL pipette tip. Return the plate to a normoxic incubator for an additional 1 h to allow the hydrogel to solidify (Figure 4).
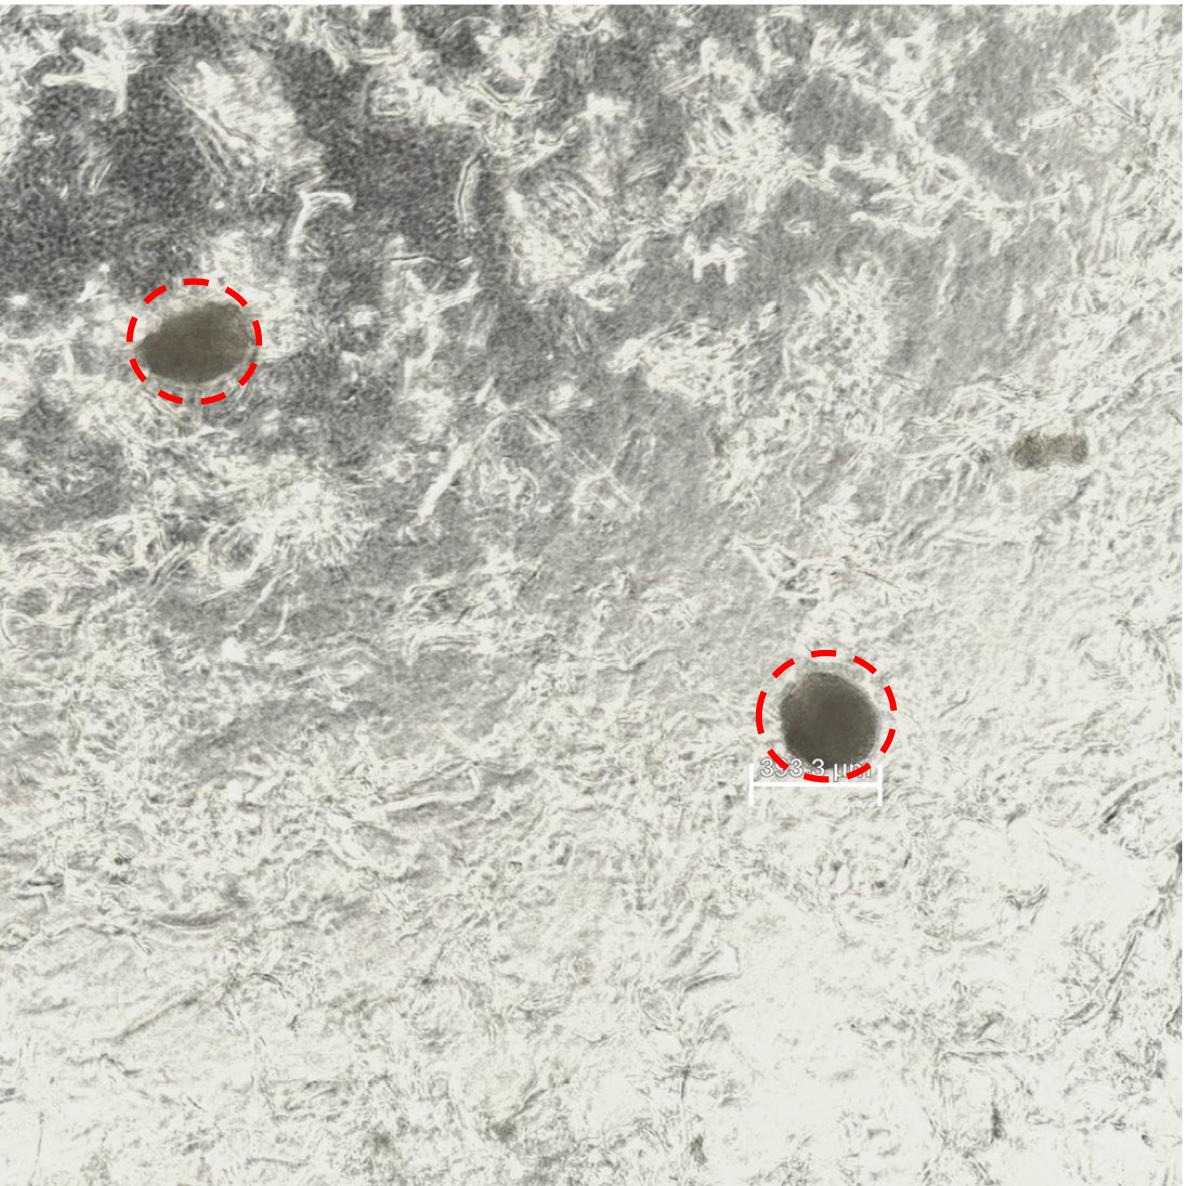
Figure 4. Immature organoids after hydrogel embedding. Red dashed circles indicate embedded immature organoids with the desired spherical morphology.

5. Add 1 mL of hydrogel culture medium A to each well without pipetting directly onto the gel. Culture for 48 h without disturbing the plate. After 48 h, add an additional 1 mL of hydrogel culture medium A to each well and continue culture for another 48 h.
Note: At this time point, the immature organoids should have developed vasculatures sprouting outward into the hydrogel and reached a size of approximately 700 μm in diameter (Figure 5).
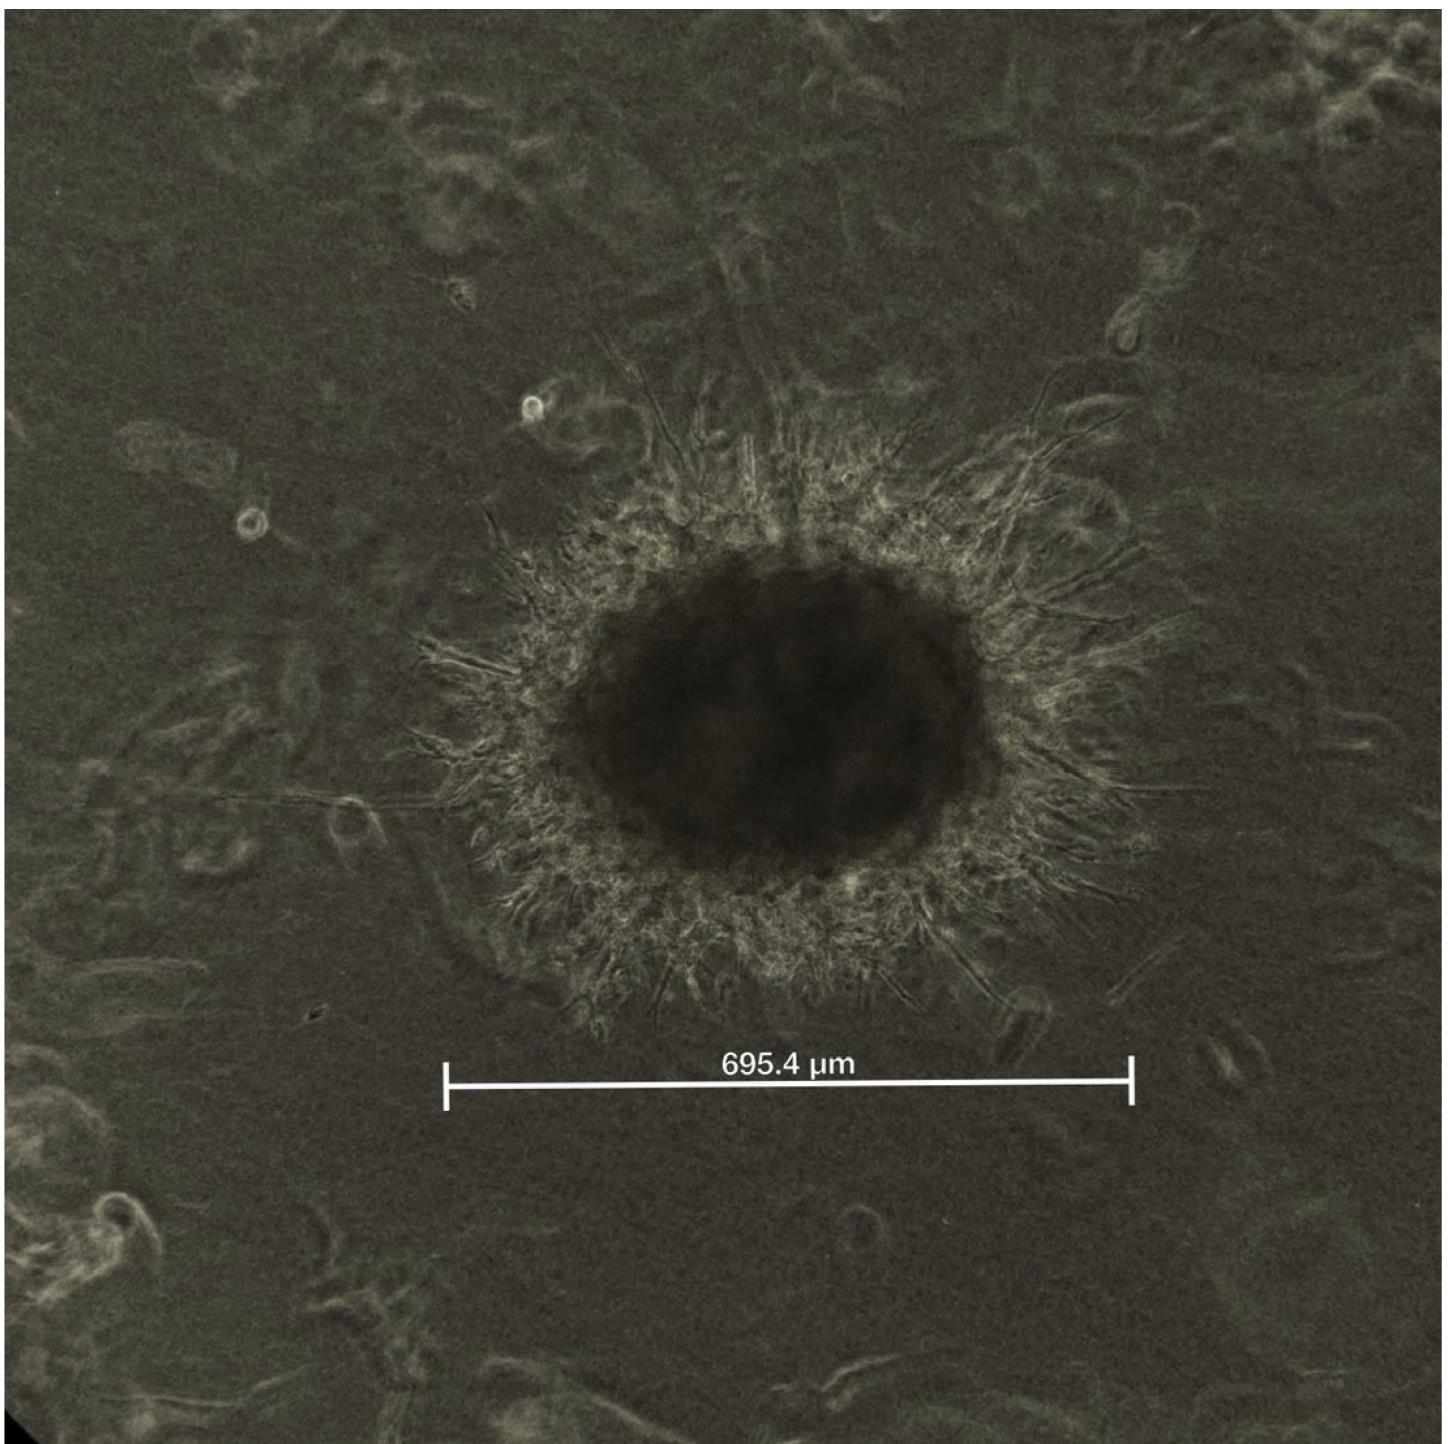
Figure 5. Immature organoids after 48 h of three-dimensional culture in hydrogel. At this stage, the organoids should show vascular sprouting into the surrounding hydrogel and reach approximately 700 μm in diameter, as indicated by the scale bar.
6. Remove 1 mL of conditioned medium from each well and add 1 mL of hydrogel culture medium B. Culture under normoxic conditions for 48 h.
Note: At this stage, the organoids are expected to show increased vascular sprouting and a dense central core. The organoid diameter should reach approximately 1–2 mm (Figure 6).
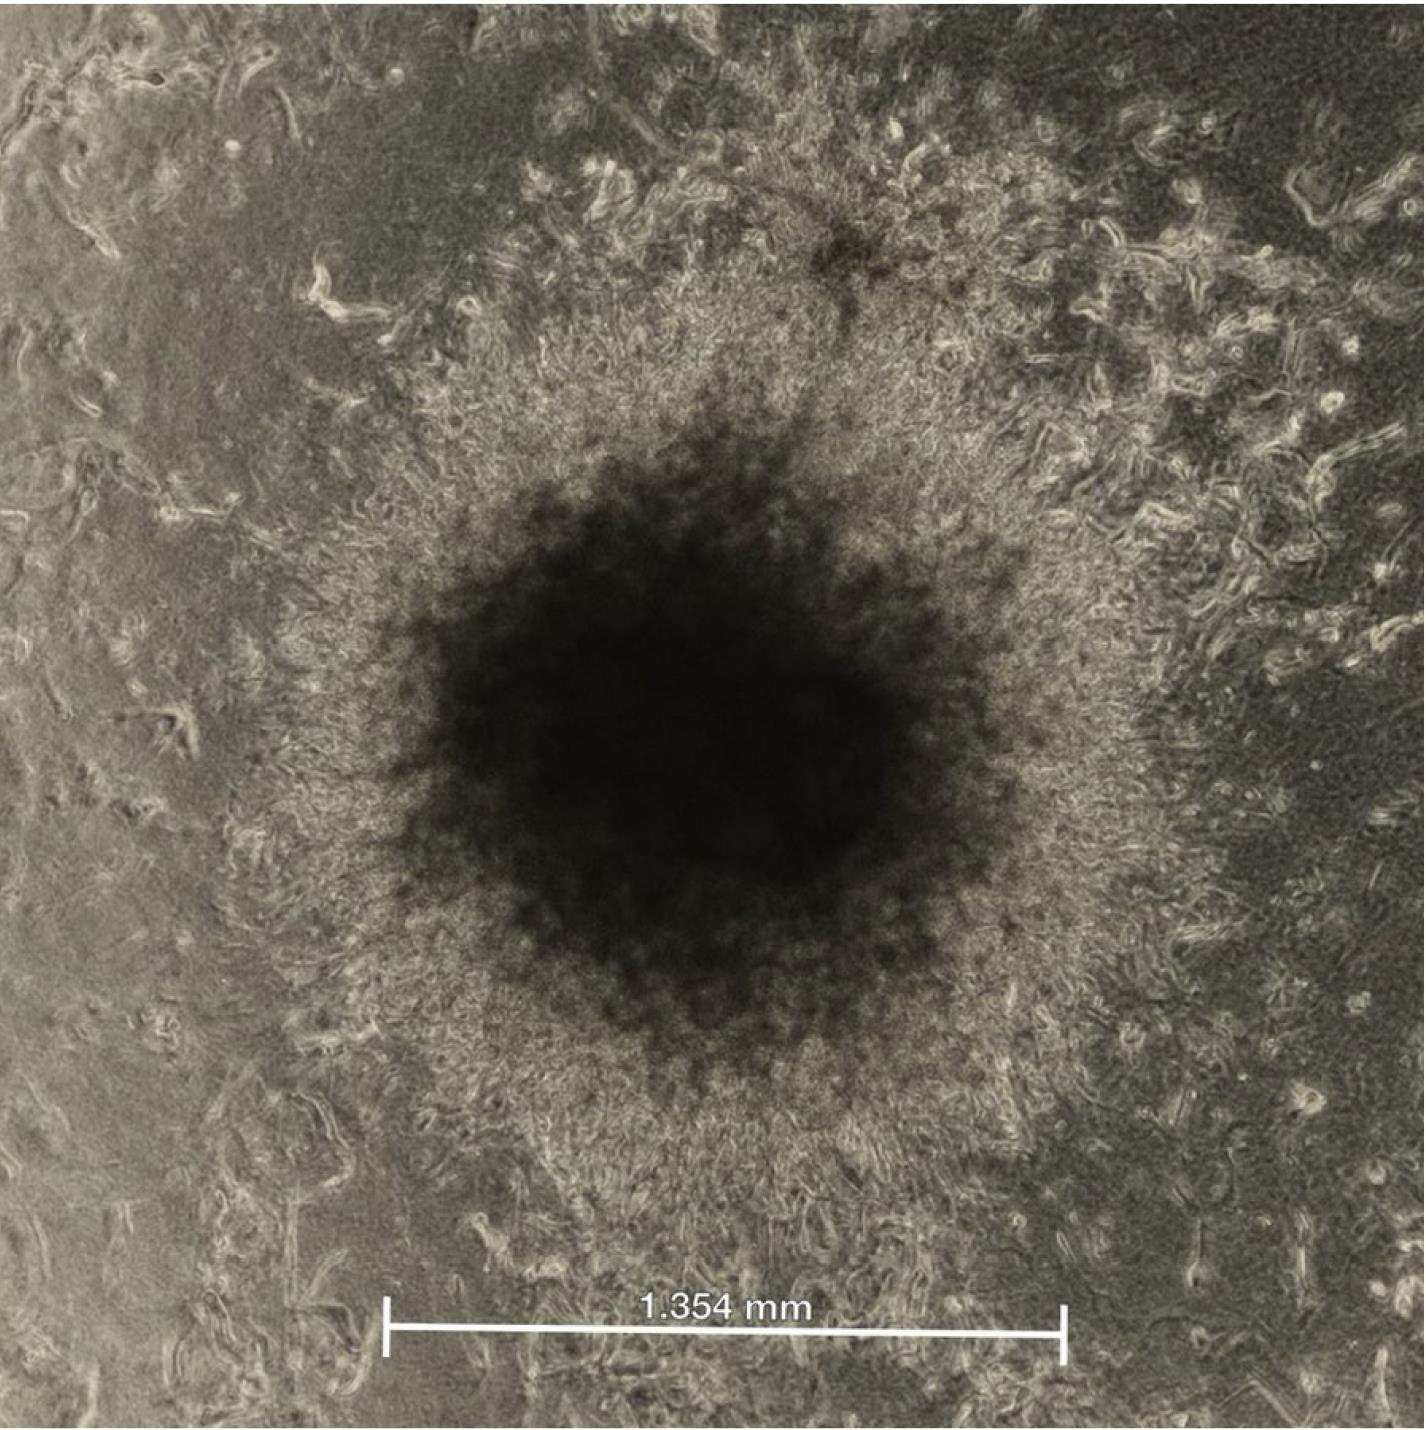
Figure 6. Immature organoids after 96 h of three-dimensional culture in hydrogel. At this stage, the organoids display increased vascular sprouting and typically grow to approximately 1-2 mm in diameter, as shown by the scale bar.
A5. Hydrogel depletion and final maturation
1. Transfer the conditioned medium from each well into a 15 mL conical tube and retain it for later use.
2. Using a wide-bore transfer pipette, gently dispense 1 mL of ice-cold APEL2 medium directly onto the hydrogel to partially disrupt the gel (Video 2).
3. Using a wide-bore transfer pipette, aspirate 2 mL of the ice-cold APEL2 medium and gently pipette up and down until the hydrogel is fully dissociated. Transfer the hydrogel fragments containing organoids into a new 15 mL conical tube.
4. Add ice-cold APEL2 medium to a final volume of 8 mL and centrifuge at 200× g for 10 min at 4 °C. The organoids should collect at the bottom of the tube (Figure 7). Carefully aspirate and discard the supernatant containing gel and medium using a wide-bore transfer pipette without disturbing the organoids.
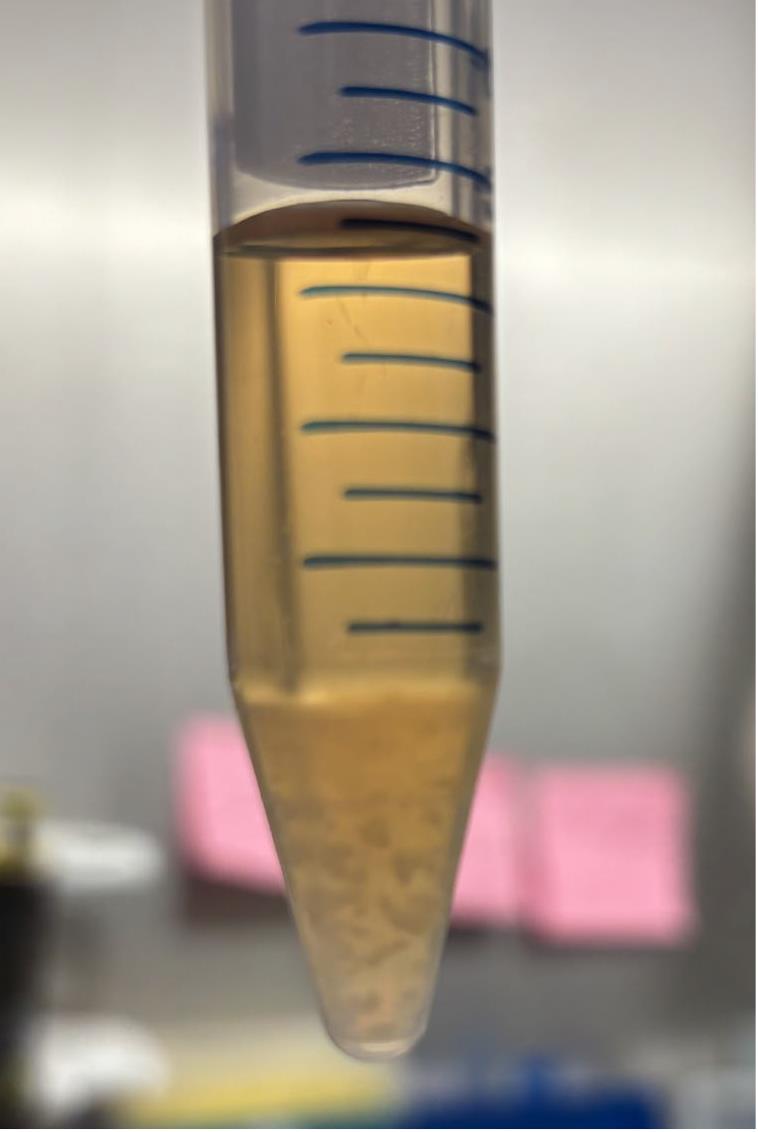
Figure 7. Separation of organoids from the hydrogel. After centrifugation, the organoids are collected at the bottom of the Falcon tube. Carefully aspirate the supernatant without disturbing the organoids.
5. Mix the retained conditioned medium with organoid maturation medium at a 1:1 ratio and gently resuspend the organoids in this medium mixture.
6. Using a wide-bore transfer pipette, gently transfer the organoids into an ultra-low-attachment 96-well plate. Ideally, each well should contain a single organoid.
7. Add the remaining conditioned medium/organoid growth medium mixture to the 96-well plate so that each well contains at least 200 μL of medium. Culture for 72 h to allow final organoid maturation (Figure 8).
Note: After this step, the organoids are ready for engraftment with human-derived HSPCs. For renal capsule implantation, continue culturing the organoids in maturation medium until day 21, with half-medium changes every 48 h using organoid maturation medium (aspirate 100 μL of old medium and add 100 μL of fresh medium). By day 21, the organoids become substantially larger and are easier to manipulate surgically.
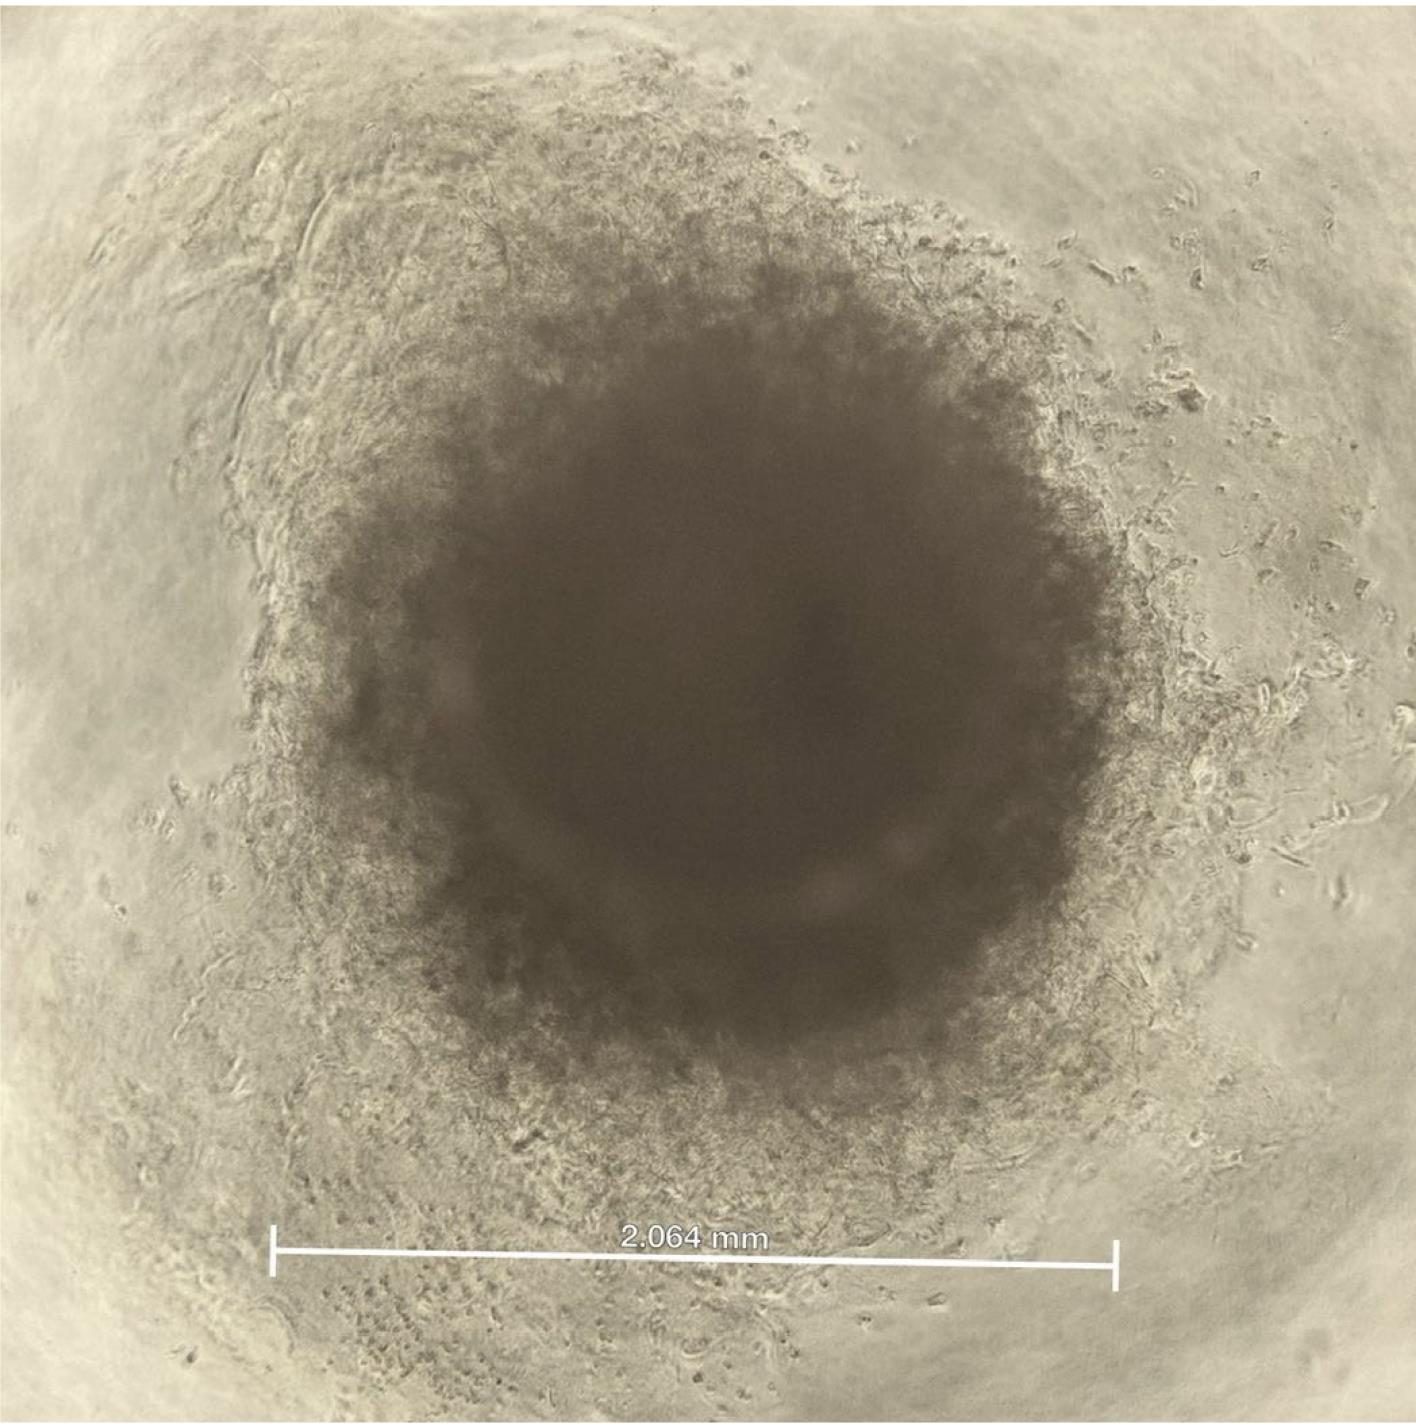
Figure 8. Fully matured bone marrow organoid in a 96-well ultra-low-attachment plate after 72 h of culture in organoid maturation medium. At this stage, the organoid typically reaches a diameter of approximately 2 mm, as shown by the scale bar.
B. Isolation and storage of patient-derived CD34+ HSPCs
1. Dilute bone marrow aspirate using ice-cold MACS buffer at a 1:5 ratio in a 50 mL Falcon tube.
Note: Bone marrow aspirate samples should not be stored at 4 °C for longer than 72 h, as prolonged storage may lead to coagulation, reduced hematopoietic cell viability, and lower recovery of CD34+ HSPCs after purification.
2. Isolate mononuclear cells by Ficoll-Paque density gradient centrifugation. Add 20 mL of Ficoll-Paque to a 50 mL Falcon tube. Using a 25 mL serological pipette, slowly layer the diluted bone marrow aspirate onto the Ficoll-Paque along the inner wall of the tube at a flow rate of <1 mL/s.
Note: Dispense the diluted bone marrow aspirate using a pipette controller set to its lowest dispensing speed. Dispensing 20 mL should take at least 20 s to maintain a flow rate of <1 mL/s.
3. Carefully transfer the tubes to a centrifuge and spin at 400× g for 30 min at 18 °C using the lowest acceleration and deceleration settings. Avoid disturbing the tubes before and after centrifugation to prevent mixing of the layers.
4. After centrifugation, the mononuclear cells will form an interphase layer beneath the clear supernatant. Using a 10 mL serological pipette, remove the upper clear layer. Then, use a 1 mL pipette tip to carefully aspirate the mononuclear cell layer and transfer it to a 15 mL conical tube.
Note: It is acceptable to conservatively collect a small amount of the upper clear layer and Ficoll-Paque layer together with the mononuclear cells.
5. Add ice-cold MACS buffer to the 15 mL Falcon tube containing the mononuclear cells to a final volume of 10 mL. Centrifuge at 300× g for 10 min at 4 °C. The mononuclear cells will pellet at the bottom of the tube. Carefully remove the supernatant.
6. Resuspend the mononuclear cell pellet in ice-cold MACS buffer and enrich CD34+ HSPCs using the MACS Human CD34 MicroBead kit according to the manufacturer’s instructions. After enrichment, count the cells and proceed immediately to downstream applications or cryopreserve the purified CD34+ cells in CryoStor CSB.
C. Engraftment of CD34+ HSPCs into mature bone marrow organoids
1. Thaw cryopreserved CD34+ HSPCs and determine cell number and viability by Trypan Blue staining using an automated cell counter. If viability is below 90%, remove dead cells using a MACS Dead Cell Removal kit according to the manufacturer’s instructions.
2. Label the cells with CellTrace Far Red kit for donor-cell tracking.
3. Resuspend the labeled cells in 200 μL of ice-cold StemPro-34 medium and keep the cell suspension on ice.
4. Add 100 μL of ice-cold Matrigel to the cell suspension and mix gently. Keep the suspension cold until use. Adjust the cell density such that each 30 μL aliquot contains the desired number of HSPCs for one organoid. For drug sensitivity screening, use 5 × 10³ HSPCs per organoid.
Note: Scale the volume according to the number of organoids to be engrafted.
5. Remove the culture medium from each mature organoid from section A.
6. Apply 30 μL of the cell suspension directly onto each organoid to immerse the organoid.
7. Incubate for 30 min at 37 °C.
8. Add 150 μL of engraftment-support medium to each well.
9. Culture the engrafted organoids for 24 h before drug treatment for drug sensitivity screening.
D. Organoid implantation under the kidney capsule
Note: The kidney organoid implantation protocol was adapted from a method previously described by Nicholson et al. [9].
1. Select intact day-21 bone marrow organoids with regular spherical morphology for implantation. Keep the organoids in sterile PBS or culture medium on ice until use.
2. Prepare a sterile surgical field and sterile instruments, including fine forceps, curved forceps, spring scissors or iris scissors, a needle holder, a scalpel, sterile gauze, cotton-tipped applicators, sterile PBS or saline, 5–0 absorbable suture for body wall closure, and wound clips or non-absorbable suture for skin closure.
3. Induce anesthesia with isoflurane in an induction chamber at 3%–5%, then maintain anesthesia by nose cone at 1%–3% during surgery. Confirm adequate anesthesia by the absence of response to a firm toe pinch.
4. Apply ophthalmic ointment to both eyes to prevent corneal drying during anesthesia.
5. Place the anesthetized mouse on a sterile drape over a heating pad in the right lateral decubitus position with the left flank facing upward. Maintain body temperature throughout the procedure and recovery.
6. Remove hair from the left flank using clippers or a chemical depilatory. Prepare the surgical site with alternating antiseptic scrubs, for example, povidone–iodine followed by 70% ethanol.
7. Using a scalpel or fine scissors, make a 1–1.5 cm skin incision over the left flank. Then, make a second incision through the underlying muscle layer, parallel to the spine, sufficient to expose the kidney (Figure 9).
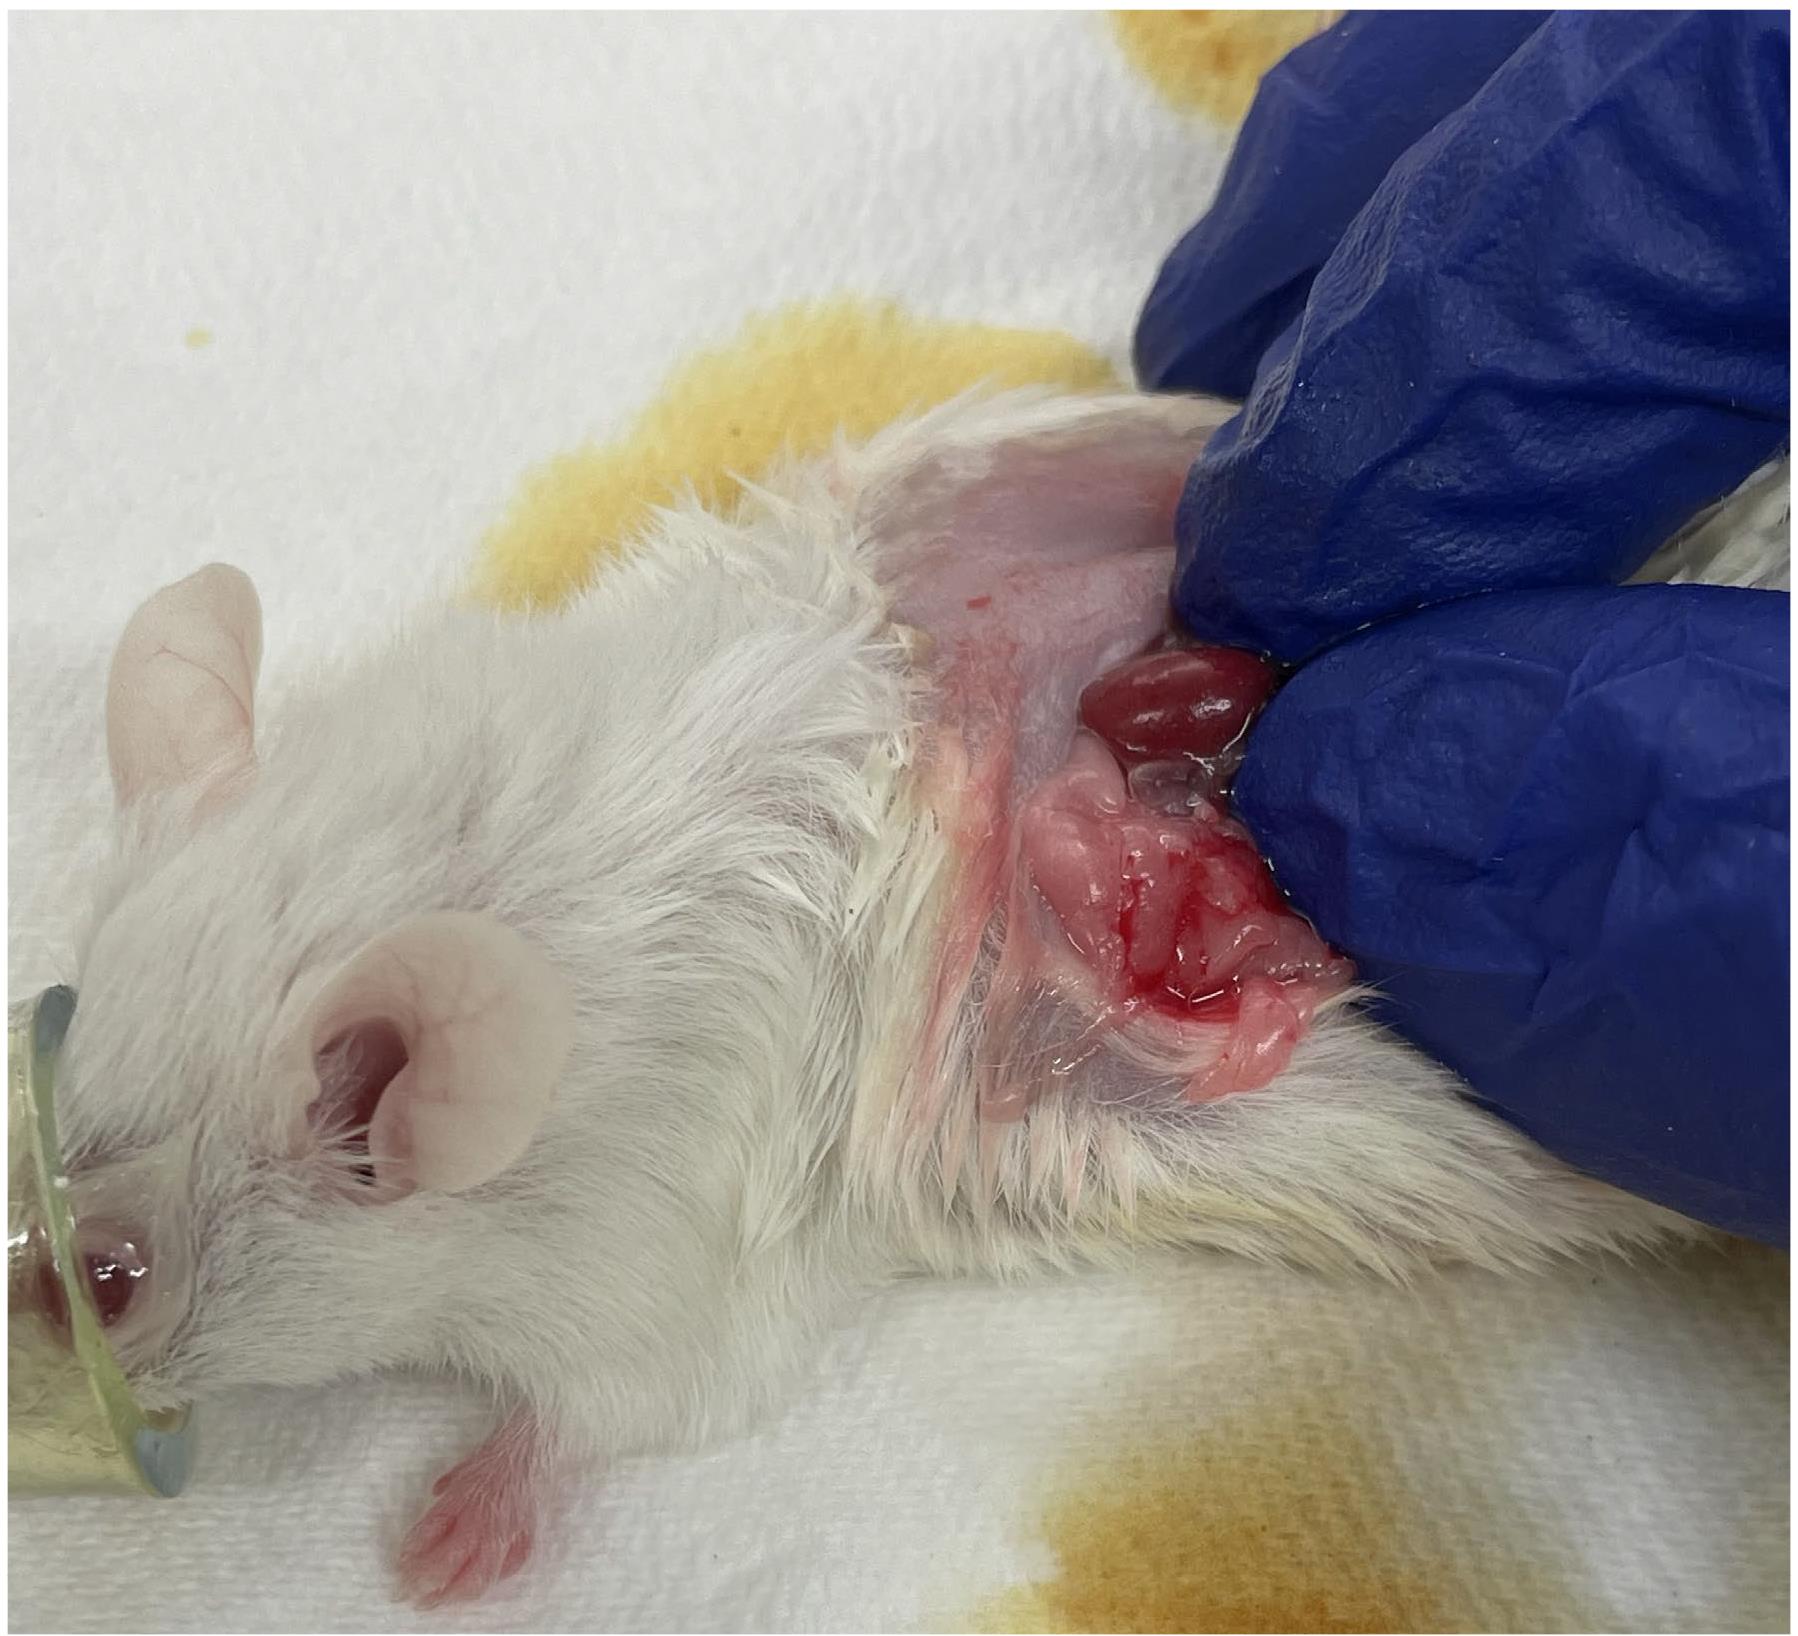
Figure 9. Exposure of the left kidney for organoid implantation. After incision of the skin and muscle layers, the left kidney is gently exteriorized by applying light pressure to the surrounding tissue.
8. Gently exteriorize the left kidney. Do not grasp the kidney or renal vessels directly. Use curved forceps to gently elevate the kidney through the flank incision or apply gentle abdominal pressure to aid exposure. Keep the kidney moist with warm sterile PBS or saline throughout the procedure.
Critical: Do not allow the renal capsule to dry.
9. Using fine forceps, gently lift the renal capsule and make a small incision in the capsule over the caudal–lateral surface of the kidney using fine spring scissors or iris scissors. The opening should be only large enough to accommodate the organoid.
Critical: Avoid cutting into the renal parenchyma.
10. Using a blunt probe made from a glass Pasteur pipette with the tip fire-polished over a gas flame, gently create a shallow subcapsular pocket by separating the capsule from the kidney surface (Figure 10).
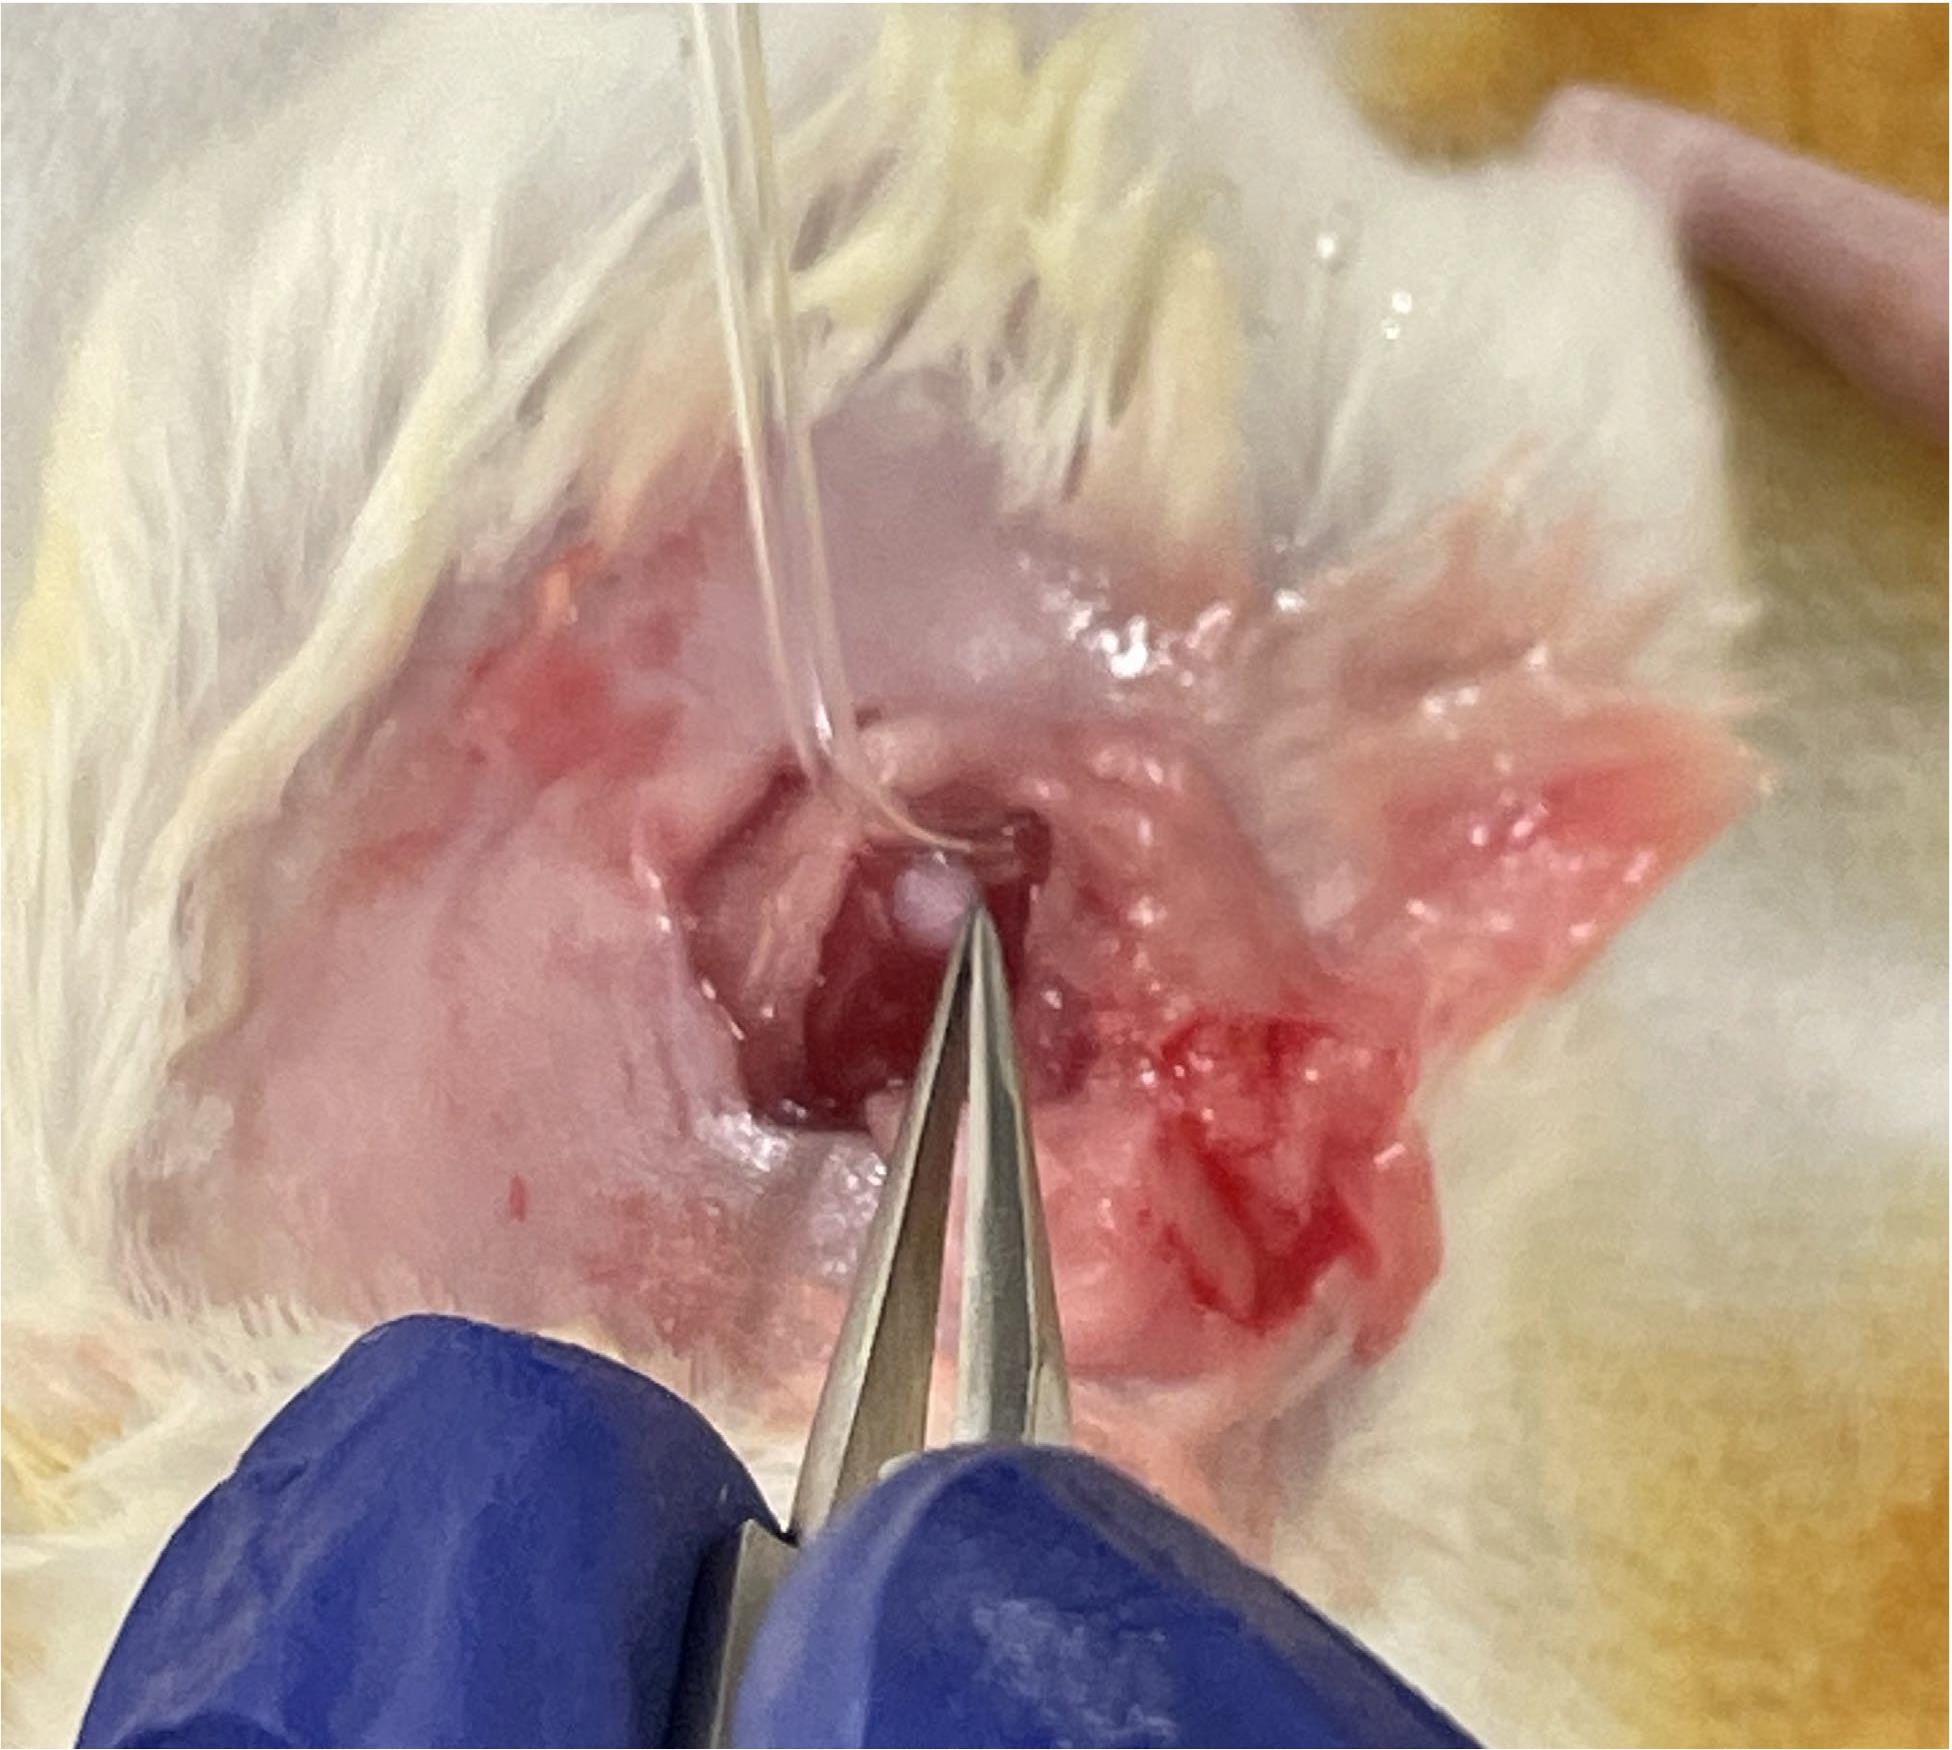
Figure 10. Implantation of the organoid under the renal capsule
11. Transfer one day-21 bone marrow organoid to the capsule opening using sterile fine forceps. Using the blunt probe, gently advance the organoid cranially within the subcapsular pocket until it is fully positioned under the capsule and away from the capsule opening.
Critical: Avoid rupturing the capsule during advancement of the organoid.
12. Return the kidney gently to the abdominal cavity and confirm that the implanted organoid remains under the capsule and does not extrude from the capsule opening.
13. Close the body wall incision with 5–0 absorbable suture.
14. Close the skin using wound clips or non-absorbable suture (Figure 11).
Note: If wound clips are used, remove them after approximately 5–14 days according to wound healing and institutional guidance.
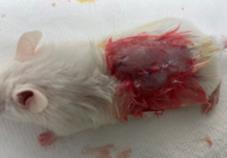
Figure 11. Incision closure with suturing
15. Allow the mouse to recover on a warming pad or under a heat source until fully ambulatory. Continue postoperative monitoring until normal spontaneous movement resumes.
16. Administer postoperative analgesia according to the approved institutional animal protocol. Monitor the mice daily for signs of pain, wound dehiscence, bleeding, infection, decreased mobility, or poor body condition.
17. At the desired endpoint, evaluate implantation success and hematopoietic output by gross examination, histology, and/or flow cytometric analysis.
E. Characterization of organoids by confocal imaging
Note: The three-dimensional imaging protocol for human bone marrow organoids was adapted from the previously published fructose-glycerol-based organoid clearing and imaging method described by Dekkers et al. [10].
1. Transfer mature organoids, with or without patient-derived HSPC engraftment, into a 15 mL Falcon tube using a sterile wide-bore transfer pipette.
Note: Do not combine organoids from different experimental groups in the same tube.
2. Add PBS to a final volume of 5 mL and centrifuge at 200× g for 5 min. Carefully remove the supernatant using a 1 mL pipette tip.
3. Add freshly prepared 4% PFA and fix the organoids at room temperature for at least 2 h.
4. Remove the fixative and add 5 mL of 0.25% Triton X-100 in PBS. Incubate for 30 min at room temperature to permeabilize the organoids.
5. Remove the permeabilization buffer and add blocking buffer (5% goat serum and 0.125% Triton X-100 in PBS). Incubate for 30 min at room temperature.
6. Dilute the primary antibodies and biotinylated UEA1 in blocking buffer at the desired concentrations. Add 250 μL of the antibody solution to one well of a 24-well plate.
Note: Use antibody panels appropriate for the intended analysis. Example antibody panels are provided in Supplemental Table 1 of [5].
7. Transfer the organoid into the well containing the primary antibody solution. Seal the plate with parafilm and incubate at 4 °C on an orbital shaker at 90 rpm for 12 h.
8. Remove the primary antibody solution and wash the organoid with 0.5 mL of 0.125% Triton X-100 in PBS for 15 min. Repeat this wash step three times.
9. Dilute the fluorophore-conjugated secondary antibodies, streptavidin, and DAPI in blocking buffer at the desired concentrations. Add 250 μL of the staining solution to a new well of a 24-well plate.
10. Transfer the organoid into the well containing the secondary antibody solution. Seal the plate with Parafilm and incubate at 4 °C on an orbital shaker at 90 rpm for 12 h.
11. Wash the organoid as described in step E8.
12. Add 0.5 mL of tissue clearing buffer to a new well of a 12-well plate. Using fine forceps, gently hold the organoid at its edge and transfer it into the clearing buffer. Incubate at room temperature for 15 min.
Note: Hold the organoid only at the periphery with the forceps to avoid compressing and distorting its structure. The organoid should become nearly transparent in the clearing buffer. If needed, use a glass Pasteur pipette with a fire-polished blunt tip to gently stir the clearing buffer and locate the organoid.
13. Using a 200 μL pipette tip with the opening cut to approximately 3 mm in diameter, transfer the organoid together with approximately 30 μL of clearing buffer onto an organoid imaging slide.
Note: Detailed methods for preparation of organoid imaging slides can be found in the protocol published by Dekkers et al. [10].
14. Carefully place a coverslip over the organoid and secure the coverslip with tape on both sides.
15. Image the organoids immediately by confocal microscopy.
Note: Representative validation images are provided in Figures 1 and 3 of [5] and in Figure 4K–M of [11].
F. Characterization of organoids with flow cytometry
1. Transfer mature organoids, with or without patient-derived HSPC engraftment, into a 15 mL Falcon tube using a sterile wide-bore transfer pipette.
Note: Do not combine organoids from different experimental groups in the same tube.
2. Add PBS to a final volume of 5 mL and centrifuge at 200× g for 5 min. Carefully remove the supernatant using a 1 mL pipette tip.
3. Add 1 mL of prewarmed 0.25% collagenase to the organoid pellet.
4. Incubate the tube at 37 °C for 15 min. During incubation, gently pipette the suspension up and down every 5 min using a 1 mL pipette tip to facilitate dissociation.
5. After dissociation, pass the cell suspension through a 40-μm cell strainer into a new tube to remove undigested debris.
6. Add MACS buffer to the filtered suspension to a final volume of 5 mL and centrifuge at 300× g for 5 min at 4 °C.
7. Carefully remove the supernatant and resuspend the cell pellet in 200 μL of MACS buffer.
8. Add fluorophore-conjugated primary antibodies at the desired dilutions and incubate the cells for 15 min at room temperature, protected from light.
Note: Use antibody panels appropriate for the intended analysis. Example antibody panels used for flow cytometry characterization are provided in Supplemental Table 2 of [5].
9. Wash the stained cells by adding 1 mL of MACS buffer and centrifuge at 300× g for 5 min at 4 °C.
10. Remove the supernatant and resuspend the pellet in an appropriate volume of MACS buffer for flow cytometry acquisition.
11. Add DAPI immediately before acquisition to exclude dead cells.
12. Acquire the samples on a flow cytometer and analyze the data using FlowJo or equivalent software.
13. Gate singlets and exclude debris and dead cells before downstream analysis of stromal, endothelial, hematopoietic, or donor-derived populations.
Note: For engrafted organoids, first gate on CellTrace+ donor-derived cells, then analyze lineage markers or viability within that population.
14. Quantify the frequency of the desired cell populations and compare across experimental groups.
Note: Representative flow cytometry analyses are provided in Supplemental Figure 3 of [5].
G. Drug sensitivity testing of JAK2V617F-mutant myeloproliferative neoplasm (MPN)-derived HSPCs in engrafted bone marrow organoids
1. For drug sensitivity testing, isolate CD34+ HSPCs from the bone marrow of a patient with JAK2V617F-positive myeloproliferative neoplasm (MPN) and engraft them into mature bone marrow organoids as described in section C. In the published application [8], 5 × 10³ CellVue-labeled donor CD34+ cells were used per organoid.
2. Culture the engrafted organoids for 1 day under normoxic conditions to allow donor-cell lodging within the organoid niche.
3. After engraftment is established, treat the organoids with cyclosporin A (CsA) at 5 or 10 μM, or with DMSO vehicle control, in fresh engraftment-support medium for 3 days.
Note: Users may substitute other compounds or drugs at physiologically relevant concentrations and treatment durations according to the specific goals of their experimental design.
4. At the end of treatment, collect the organoids using a sterile wide-bore transfer pipette and transfer them into a 15 mL Falcon tube.
Note: In the published study, 20 organoids were collected for each flow cytometry assay to improve the robustness of the drug sensitivity analysis. The number of organoids may be adjusted according to experimental design; however, pooling at least eight organoids per flow cytometry assay is recommended.
5. Wash the organoids with PBS and centrifuge at 100× g for 5 min. Carefully discard the supernatant.
6. Add 1 mL of prewarmed collagenase to the organoid pellet and incubate at 37 °C for 15 min. During incubation, gently pipette the suspension up and down every 5 min with a 1 mL pipette tip to facilitate dissociation into single cells. Pass the resulting suspension through a 40-μm cell strainer into a new tube to remove undigested debris.
7. Wash the dissociated cells with PBS or MACS buffer and stain them with fluorophore-conjugated antibodies for flow cytometric analysis of erythroid and myeloid differentiation. In the published MPN application, CellVue was used to identify donor-derived cells, and lineage analysis was performed separately on CellVue-positive donor-derived and CellVue-negative organoid-derived populations.
8. Analyze the samples by flow cytometry. First, gate on CellVue+ donor-derived cells, then quantify erythroid and myeloid populations within the donor-derived compartment using the appropriate lineage markers. In parallel, analyze the CellVue organoid-derived cells as the recipient compartment.
Note: Representative flow analyses can be found in Figure 7E of [8].
9. Compare the lineage output of donor-derived cells between DMSO-treated and CsA-treated groups.
Note: In the published study, CsA treatment caused a dose-dependent reduction in donor-derived erythroid and myeloid output from JAK2V617F-positive patient cells in the organoid model.
H. Using CRISPR/Cas9-edited human CD34+ HSPCs to evaluate the role of DDX41 in erythropoiesis in the bone marrow organoid system
1. Thaw human CD34+ HSPCs and culture 5 × 10⁵ cells in 1 mL of human CD34+ expansion medium (StemCell Technologies, StemSpan SFEM supplemented with StemSpan CD34+ Expansion Supplement).
2. Add approximately 3 × 10⁷ lentiviral particles carrying either DDX41 sgRNA or scrambled sgRNA to 5 × 10⁵ CD34+ cells.
Note: DDX41-knockout HSPCs are used here as an example application of the organoid engraftment assay. Users may manipulate genes of interest in HSPCs using their preferred gene delivery or editing system, such as retroviral or adenoviral vectors or chemical transfection. A detailed method for lentiviral particle production using the lentiCRISPR v2 vector (Addgene #52961) is described in [7].
3. Incubate the cells with lentivirus for 14 h.
4. Wash the infected cells with PBS to remove residual viral particles.
5. Resuspend the cells in fresh human CD34+ expansion medium and allow them to recover for 6 h before organoid engraftment.
6. Label the control and DDX41 sgRNA-transduced CD34+ cells with CellVue according to the manufacturer’s instructions before organoid engraftment. Donor-derived cells were identified as CellVue+ cells after engraftment.
7. Adjust the cell density such that each organoid receives 1 × 10⁴ CellVue-labeled donor CD34+ cells. In the published study [7], 10,000 donor CD34+ HSPCs were co-incubated with each organoid in a 96-well plate.
8. Engraft the donor cells into mature bone marrow organoids as described in section C.
9. Culture the engrafted organoids for three days under normoxic conditions.
10. At the endpoint, collect the organoids using a sterile wide-bore transfer pipette and transfer them into a 15 mL Falcon tube.
11. Pool 10 organoids for each flow cytometry assay. In the published DDX41 organoid experiment, each data point represented cells combined from 10 organoids.
12. Wash the organoids with PBS and centrifuge at 100× g for 5 min. Carefully discard the supernatant.
13. Add 1 mL of prewarmed collagenase to the organoid pellet and incubate at 37 °C for 15 min. During incubation, gently pipette the suspension up and down every 5 min with a 1 mL pipette tip to facilitate dissociation into single cells.
14. Pass the dissociated suspension through a 40-μm cell strainer into a new tube to remove undigested debris.
15. Wash the filtered cells with PBS or MACS buffer and stain them with fluorophore-conjugated antibodies for flow cytometric analysis of donor-derived erythroid and myeloid differentiation.
16. Analyze the samples by flow cytometry. First, gate on CellVue+ donor-derived cells, then quantify lineage output using the appropriate markers. In the published study, CD71 was used to assess erythroid output and CD11b was used to assess myeloid output in donor-derived cells.
17. In parallel, analyze the CellVue-negative organoid-derived cells as the recipient compartment. In the published study, erythroid output from the recipient compartment was also reduced after engraftment of DDX41-deficient donor cells.
18. Compare the frequency of donor-derived CD71+ erythroid cells and CD11b+ myeloid cells between the scrambled sgRNA and DDX41 sgRNA groups. In the published study, DDX41 depletion selectively reduced donor-derived CD71+ erythroid cells, whereas CD11b+ myeloid cells were not significantly reduced.
Note: Representative flow analyses can be found in Figure 7D, F of [7].
Validation of protocol
This protocol has been used and validated in the following research articles:
Ren et al. [5]. Development of iPSC-derived human bone marrow organoid for autonomous hematopoiesis and patient-derived HSPC engraftment. Blood Advances. (Figures 1–5)
Bi et al. [7]. DDX41 resolves G-quadruplexes to maintain erythroid genome integrity and prevent cGAS-mediated cell death. Nature Communications. (Figure 7A–G)
Wang et al. [8]. PPIL2 is a target of the JAK2/STAT5 pathway and promotes myeloproliferation via degradation of p53. Journal of Clinical Investigation. (Figure 7A–G)
Han et al. [11]. Spatial transcriptomic analyses highlight distinct erythroid niches in mice and humans. Nature Genetics. (Figure 4K–M; Figure 6B, C, F)
General notes and troubleshooting
General notes
The general protocol for generating human iPSC-derived bone marrow organoids was adapted from [4]. In our modified protocol, mesoderm/angiogenic induction was performed at 1% O2 rather than 5% O2 to provide a measurably stronger hypoxic stimulus and enhance hypoxia-inducible factor-dependent signaling [12], which is important for the subsequent emergence of hemogenic endothelium and hematopoietic stem cell formation [13]. We also included IL-21 during 3D hydrogel culture to support vascular [14] and HSPC expansion [15,16]. Under our conditions, these modifications supported reproducible embryoid body growth and downstream organoid differentiation. Embryoid bodies typically reached approximately 100 μm after 24 h and approximately 200 μm after 72 h of hypoxic induction, and day-21 organoids were suitable for downstream engraftment, imaging, flow cytometry, and renal capsule implantation. Successful mature organoids were typically dense, spherical, and structurally intact.
To facilitate engraftment, donor-derived CD34+ cells were suspended in a small volume of ice-cold Matrigel before seeding onto mature organoids. This step was intended to improve local retention of the cells on the organoid surface and provide a transient basement membrane-like extracellular matrix environment to support early cell attachment and lodging [17]. Downstream engraftment efficiency depends strongly on the quality and viability of patient-derived CD34+ cells. Bone marrow aspirate samples should therefore be processed promptly, and cryopreserved CD34+ cells should be assessed carefully after thawing. For drug sensitivity testing, 5 × 10³ HSPCs per organoid were sufficient for analysis, but at least nine organoids were required for each treatment condition to generate three biological replicates. Because organoid generation and maturation require several weeks, drug screening cannot be performed immediately after iPSC differentiation is initiated. In addition to cell quality, inter-patient differences in HSPC fitness and disease biology may influence the magnitude of ex vivo drug response. Hydrogel preparation is another major technical variable, as incorrect pH adjustment or poor handling of matrix components can compromise organoid formation. Extended drug treatments may require medium replacement and re-addition of compounds depending on drug stability and experimental design.
Another limitation of the current model is that it is not optimized for mature lymphoid output. In particular, full T-cell maturation is not expected because thymic selection requires a specialized thymic microenvironment that is not reproduced in a bone marrow organoid. Although early B-lineage development may be more compatible with a bone marrow-like niche, robust maturation of functional B cells has not been established in the current system. In addition, the current organoid model does not include a mineralized skeletal compartment or mature osteoblasts and osteoclasts. Therefore, while the model recapitulates key endothelial, stromal, and hematopoietic components of the human bone marrow niche, it is not designed to reproduce interactions that specifically depend on mineralized bone or bone-remodeling cells.
Troubleshooting
Problem 1: Embryoid bodies fail to reach the expected size during mesoderm/angiogenic induction.
Possible causes: Poor starting iPSC quality, incorrect cytokine preparation, or unstable hypoxic culture conditions.
Potential solution: Confirm the quality of the starting iPSC culture, prepare fresh induction medium, and verify that the hypoxia incubator is stable at 1% O2. Under our conditions, embryoid bodies should reach approximately 100 μm after 24 h and approximately 200 μm after 72 h of hypoxic induction.
Problem 2: Patient-derived CD34+ cells show low engraftment efficiency.
Possible causes: Low cell viability after thawing, delayed processing of bone marrow aspirates, insufficient retention of donor cells on the organoid surface, or poor HSPC fitness.
Potential solution: Process bone marrow aspirates promptly and assess the viability of cryopreserved CD34+ cells immediately after thawing. If viability is below 90%, remove dead cells before engraftment. Keep the donor-cell suspension cold after addition of Matrigel and seed the suspension directly onto the organoid surface without delay.
Problem 3: Engrafted donor cells are difficult to detect by flow cytometry.
Possible causes: Low donor-cell input, weak CellVue labeling, poor engraftment, or excessive cell loss during organoid dissociation.
Potential solution: Confirm adequate CellVue labeling before engraftment, use a consistent donor-cell input, and avoid over-digestion or harsh pipetting during collagenase treatment. If the tested drug causes substantial cell death, increase the number of donor cells used for engraftment to ensure sufficient recovery of donor-derived cells for analysis.
Problem 4: Organoids do not dissociate efficiently into single cells for flow cytometry.
Possible cause: Incomplete collagenase digestion or inadequate mechanical disruption.
Potential solution: Use prewarmed collagenase and incubate at 37 °C for the full digestion period. Gently pipette the suspension every 5–10 min during digestion to disrupt the organoid structure. Filter the suspension through a 40-μm strainer before staining.
Problem 5: No human blood cells are detected in NSG mice after renal capsule implantation.
Possible causes: The capsular opening is too large, the capsule is torn during manipulation, or the organoid extrudes when the kidney is returned to the abdominal cavity.
Potential solution: Make the capsular opening only large enough to accommodate the organoid, create a shallow subcapsular pocket before implantation, and gently advance the organoid away from the capsule opening. Confirm that the organoid remains under the capsule before returning the kidney to the abdominal cavity.
Problem 6: Organoids lose their spherical morphology during immunostaining or clearing.
Possible causes: Mechanical compression during transfer or mounting, excessive force with forceps, or distortion under the coverslip.
Potential solution: Handle organoids gently and hold them only at the edge when using forceps. Use wide-bore pipette tips for transfer steps. Avoid grasping the center of the organoid. During mounting, place the coverslip carefully to avoid compressing the structure.
Acknowledgments
This work was supported by the National Cancer Institute (NCI) grant R00CA289959 (K.R.) and EvansMDS Young Investigator Award (K.R.). K.R. is a recipient of the Leukemia & Lymphoma Society (Blood Cancer United) Special Fellow Award.
Author contributions
Conceptualization, E. L., K. R.; Investigation, E. L., A. J.; Writing—Original Draft, A. J., K. R.; Writing—Review & Editing, A. J., A. Z.; Funding acquisition, K. R.; Supervision, K. R., E. L.
Competing interests
K.R. and E.L. are co-founders of MarrowGen and co-inventors on patent application US20260071185A1 related to bone marrow organoid technology. The remaining authors declare no competing interests.
Ethical considerations
All animal experiments were reviewed and approved by the Institutional Animal Care and Use Committee (IACUC) of Stony Brook University under protocol IACUC2026-00002 and were performed in accordance with the approved institutional guidelines and regulations.
References
- Cain, T. L., Derecka, M. and McKinney-Freeman, S. (2024). Author Correction: The role of the haematopoietic stem cell niche in development and ageing. Nat Rev Mol Cell Biol. 26(1): 80–80. https://doi.org/10.1038/s41580-024-00787-z
- Pinho, S. and Frenette, P. S. (2019). Haematopoietic stem cell activity and interactions with the niche. Nat Rev Mol Cell Biol. 20(5): 303–320. https://doi.org/10.1038/s41580-019-0103-9
- Frenz-Wiessner, S., Fairley, S. D., Buser, M., Goek, I., Salewskij, K., Jonsson, G., Illig, D., zu Putlitz, B., Petersheim, D., Li, Y., et al. (2024). Generation of complex bone marrow organoids from human induced pluripotent stem cells. Nat Methods. 21(5): 868–881. https://doi.org/10.1038/s41592-024-02172-2
- Khan, A. O., Rodriguez-Romera, A., Reyat, J. S., Olijnik, A. A., Colombo, M., Wang, G., Wen, W. X., Sousos, N., Murphy, L. C., Grygielska, B., et al. (2022). Human Bone Marrow Organoids for Disease Modeling, Discovery, and Validation of Therapeutic Targets in Hematologic Malignancies. Cancer Discov. 13(2): 364–385. https://doi.org/10.1158/2159-8290.cd-22-0199
- Ren, K., Li, E., Aydemir, I., Liu, Y., Han, X., Bi, H., Wang, P., Tao, K., Ji, A., Chen, Y. H., et al. (2024). Development of iPSC-derived human bone marrow organoid for autonomous hematopoiesis and patient-derived HSPC engraftment. Blood Adv. 9(1): 54–65. https://doi.org/10.1182/bloodadvances.2024013361
- Bourgine, P. E. (2026). Human bone marrow organoids: emerging progress but persisting challenges. Trends Biotechnol. 44(1): 11–21. https://doi.org/10.1016/j.tibtech.2025.05.028
- Bi, H., Ren, K., Wang, P., Li, E., Han, X., Wang, W., Yang, J., Aydemir, I., Tao, K., Ma, R., et al. (2025). DDX41 resolves G-quadruplexes to maintain erythroid genome integrity and prevent cGAS-mediated cell death. Nat Commun. 16(1): e1038/s41467–025–62307–7. https://doi.org/10.1038/s41467-025-62307-7
- Wang, P., Han, X., Ren, K., Li, E., Bi, H., Aydemir, I., Sukhanova, M., Liu, Y., Yang, J., Ji, P., et al. (2025). PPIL2 is a target of the JAK2/STAT5 pathway and promotes myeloproliferation via degradation of p53. J Clin Invest. 135(13): e1172/jci181394. https://doi.org/10.1172/jci181394
- Nicholson, T. M., Uchtmann, K. S., Valdez, C. D., Theberge, A. B., Miralem, T. and Ricke, W. A. (2013). Renal Capsule Xenografting and Subcutaneous Pellet Implantation for the Evaluation of Prostate Carcinogenesis and Benign Prostatic Hyperplasia. J Visualized Exp. e3791/50574. https://doi.org/10.3791/50574
- Dekkers, J. F., Alieva, M., Wellens, L. M., Ariese, H. C. R., Jamieson, P. R., Vonk, A. M., Amatngalim, G. D., Hu, H., Oost, K. C., Snippert, H. J. G., et al. (2019). High-resolution 3D imaging of fixed and cleared organoids. Nat Protoc. 14(6): 1756–1771. https://doi.org/10.1038/s41596-019-0160-8
- Han, X., Ren, K., Wang, P., Bi, H., Li, E., Aydemir, I., Ji, A., Cai, W., Soleimanisardoo, L., Wai, C. M., et al. (2026). Spatial transcriptomic analyses highlight distinct erythroid niches in mice and humans. Nat Genet. 58(7): 1620–1631. https://doi.org/10.1038/s41588-026-02671-2
- Abaci, H. E., Truitt, R., Luong, E., Drazer, G. and Gerecht, S. (2010). Adaptation to oxygen deprivation in cultures of human pluripotent stem cells, endothelial progenitor cells, and umbilical vein endothelial cells. Am J Physiol, Cell Physiol. 298(6): C1527–C1537. https://doi.org/10.1152/ajpcell.00484.2009
- Gerri, C., Marass, M., Rossi, A. and Stainier, D. Y. R. (2018). Hif-1α and Hif-2α regulate hemogenic endothelium and hematopoietic stem cell formation in zebrafish. Blood. 131(9): 963–973. https://doi.org/10.1182/blood-2017-07-797795
- Wang, T., Yang, L., Yuan, M., Farber, C. R., Spolski, R., Leonard, W. J., Ganta, V. C. and Annex, B. H. (2021). MicroRNA-30b Is Both Necessary and Sufficient for Interleukin-21 Receptor-Mediated Angiogenesis in Experimental Peripheral Arterial Disease. Int J Mol Sci. 23(1): 271. https://doi.org/10.3390/ijms23010271
- Ozaki, K., Hishiya, A., Hatanaka, K., Nakajima, H., Wang, G., Hwu, P., Kitamura, T., Ozawa, K., Leonard, W., Nosaka, T., et al. (2006). Overexpression of Interleukin 21 Induces Expansion of Hematopoietic Progenitor Cells. Int J Hematol. 84(3): 224–230. https://doi.org/10.1532/ijh97.06036
- Tormo, A., Khodayarian, F., Cui, Y., Al-Chami, E., Kanjarawi, R., Noé, B., Wang, H. and Rafei, M. (2017). Interleukin-21 promotes thymopoiesis recovery following hematopoietic stem cell transplantation. J HematolOncol. 10(1): e1186/s13045–017–0490–3. https://doi.org/10.1186/s13045-017-0490-3
- Lee-Thedieck, C., Schertl, P. and Klein, G. (2022). The extracellular matrix of hematopoietic stem cell niches. Adv Drug Delivery Rev. 181: 114069. https://doi.org/10.1016/j.addr.2021.114069
Article Information
Publication history
Received: Apr 20, 2026
Accepted: Sep 2, 2026
Available online: Sep 17, 2026
Published: Oct 20, 2026
Copyright
© 2026 The Author(s); This is an open access article under the CC BY-NC license (https://creativecommons.org/licenses/by-nc/4.0/).
How to cite
Li, E., Ji, A., Zheng, A. and Ren, K. (2026). Disease Modeling in iPSC-Derived Human Bone Marrow Organoids. Bio-protocol 16(20): e5837. DOI: 10.21769/BioProtoc.5837.

 Download Citation in RIS Format
Category
Stem Cell > Organoid culture
Cell Biology > Cell isolation and culture > 3D cell culture
Do you have any questions about this protocol?
Post your question to gather feedback from the community. We will also invite the authors of this article to respond.
 Post a Question


