


- Protocols

- Articles and Issues
- For Authors
- About
- Become a Reviewer


Stepwise Generation of Vascularized Multilayered 3D Organotypic Skin Models

(§Technical contact: hzhai3@huskers.unl.edu) Published: Vol 16, Iss 16, Aug 20, 2026 DOI: 10.21769/BioProtoc.5802 Views: 512
Reviewed by: Jessica DavisShanmugaPriyaa MadhukaranPankaj Mogha
 PDF
PDF  Ask a question
Original research article
The authors used this protocol in:

Jan 2026
Advertisement


Protocol Collections
Comprehensive collections of detailed, peer-reviewed protocols focusing on specific topics




Related protocols
Abstract
Skin models play critical roles in understanding disease mechanisms and advancing therapeutic development. However, conventional systems based on 2D cell cultures, in vivo animal models, and ex vivo tissue explants are limited by insufficient physiological complexity, interspecies differences, and restricted accessibility, respectively. Advances in biofabrication technologies have enabled the engineering of 3D skin equivalents that better balance biological complexity and experimental scalability. Here, we present a biofabrication protocol inspired by the regenerative processes of wound healing to construct vascularized 3D organotypic skin models in a stepwise manner. The approach integrates bioprinting for precise spatial organization of cellular compartments with guided cell self-organization to achieve native-like tissue complexity and heterogeneity. Through a programmable culture strategy, tissue maturation proceeds sequentially through keratinocyte proliferation and collective migration, microchannel endothelialization, basal-to-suprabasal differentiation, and progressive extracellular matrix remodeling within a fibrin-based scaffold. The resulting tissue constructs comprise stratified epidermal layers positioned atop a vascularized, fibroblast-remodeled dermal matrix. Beyond reproducing key structural features of human skin, this protocol recapitulates cellular processes associated with tissue regeneration, providing a dynamic platform for investigating disease pathogenesis, progression, and therapeutic responses.
Key features
• This protocol provides detailed procedures for preparing cells and biomaterials used in bioink formulation.
• This protocol outlines a stepwise biofabrication process for integrating keratinocytes, fibroblasts, and endothelial cells into a multicellular skin model.
• This protocol employs PolyJet 3D printing for tissue culture chamber fabrication and extrusion-based 3D bioprinting for spatial placement of cell-laden compartments.
• This protocol leverages a dynamic, wound healing–inspired cell self-organization process under a programmable culture strategy to promote tissue maturation and architectural development.
Keywords: Organotypic skin models Bioprinting
Stratified epidermis
ECM remodeling
Vascularization
Programmable culture
Bioprinting
Stratified epidermis
ECM remodeling
Vascularization
Programmable culture
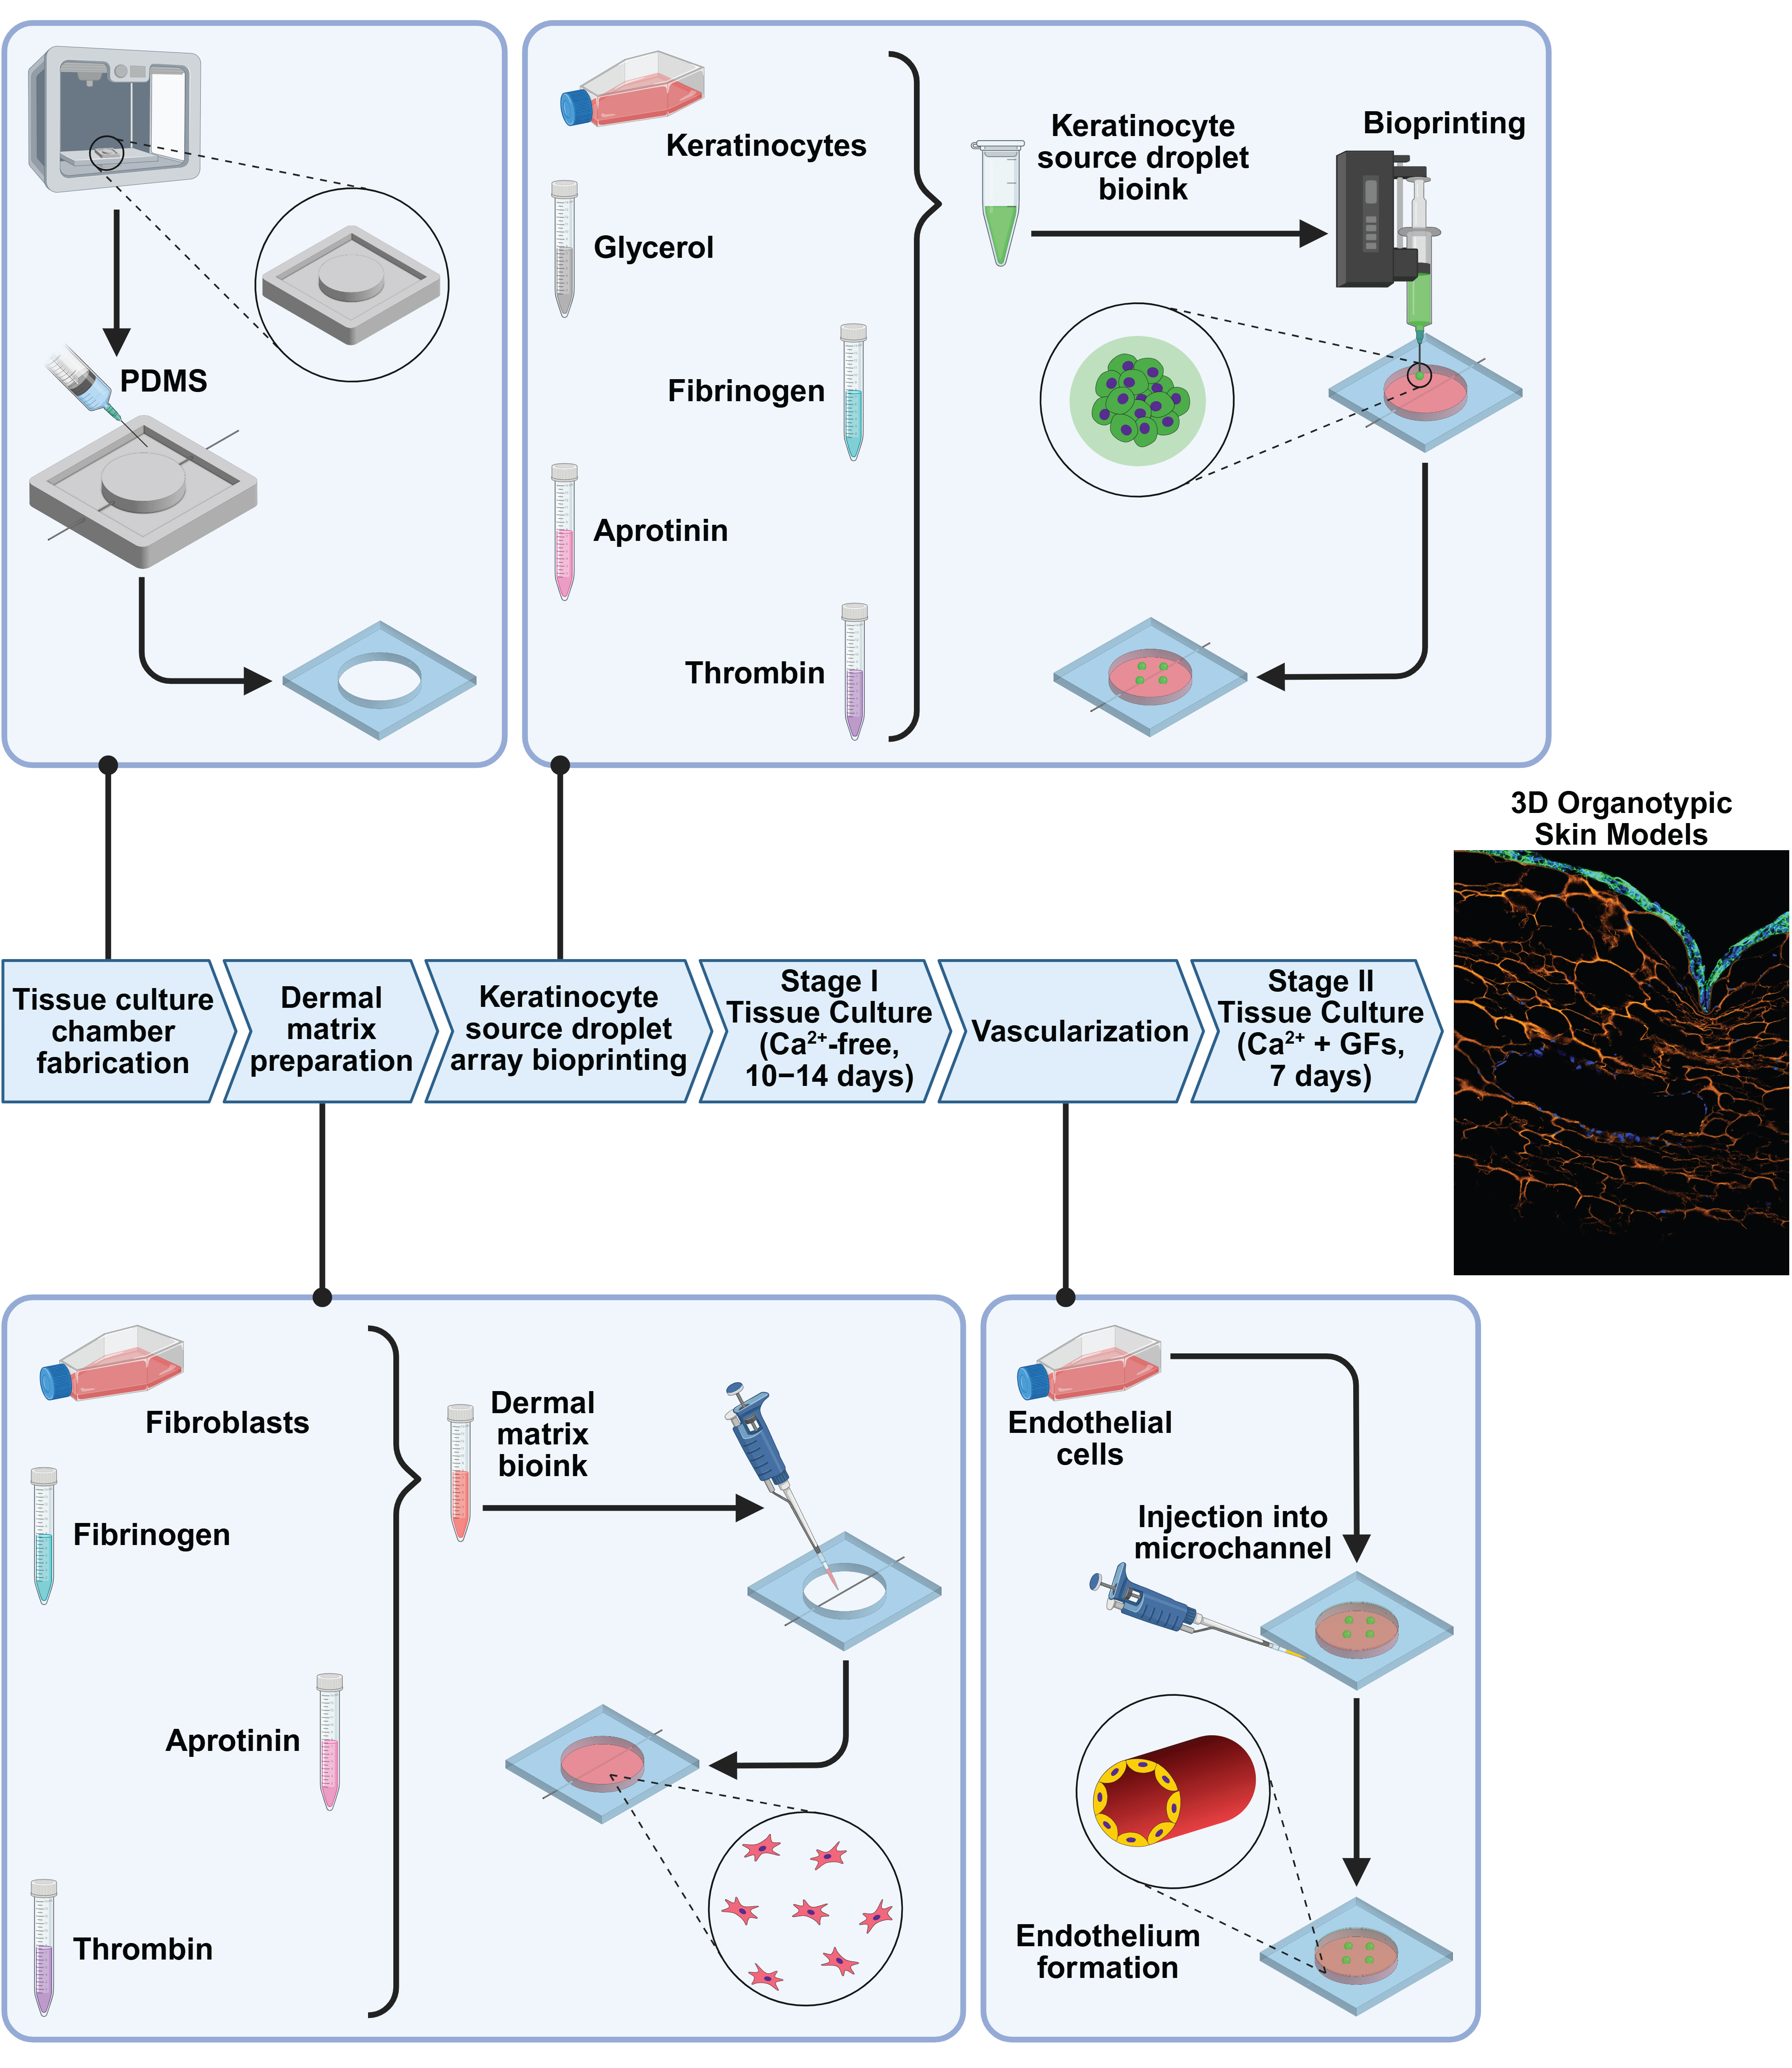
Graphical overview
Background
Skin serves as the body’s primary protective barrier and interface with the external environment [1]. Dysfunction of this barrier is associated with numerous diseases, including cancer, autoimmune disorders, and chronic wounds, and increases susceptibility to both acute and chronic microbial infections [2]. Experimental models that faithfully recapitulate the architecture and function of human skin are therefore essential for understanding disease mechanisms and for developing safe and effective therapeutics [3–5]. However, currently available model systems each present significant limitations. 2D monolayer cultures fail to capture the structural complexity, multicellular interactions, and microenvironmental cues present in native tissues [6–8]. Although animal models provide the physiological context, ethical concerns and interspecies differences limit their translational relevance to human disease [9–11]. Human ex vivo skin explants retain native tissue architecture and function, but their use is constrained by limited tissue availability and the lack of robust methods to maintain long-term viability and functionality. Furthermore, repeated biopsy collection can negatively affect patients' quality of life and well-being [12–15].
Advances in tissue engineering have expanded the ability to reconstruct human skin equivalents in vitro using human-derived cells [16,17]. Conventional skin equivalents commonly employ Transwell-based coculture systems, in which keratinocytes and fibroblasts are cultured to mimic epidermal and dermal compartments. However, these models generally lack perfusable vasculature and provide limited spatial control over cellular organization [18,19]. Microfluidic skin-on-a-chip platforms have enabled the integration of epidermal, stromal, and vascular compartments in more physiologically relevant configurations, yet many rely on porous membranes to separate cell populations and create artificial tissue interfaces [20,21]. More recently, 3D bioprinting has emerged as a powerful tool for spatially organizing multiple cell types within continuous hydrogel matrices without introducing synthetic barriers. By depositing cell-laden bioinks with high spatial precision, bioprinting can generate vascularized, fibroblast-populated dermal compartments together with overlying keratinocyte layers [22–25]. Nevertheless, the limited resolution of current bioprinting technologies makes it challenging to reproduce the highly organized, multilayered epidermis characterized by progressive basal-to-suprabasal differentiation. In parallel, skin organoids derived through stem cell self-organization can recapitulate aspects of epidermal stratification and cellular heterogeneity [26–28]. However, organoid formation often depends on poorly defined animal-derived matrices such as Matrigel and provides limited control over the biochemical and biomechanical properties of the microenvironment, particularly the fibroblast-regulated extracellular matrix (ECM) within the dermis. Consequently, faithfully reproducing both the structural and functional complexity of stratified epidermis and dynamically remodeled dermis remains a major challenge.
Physiological wound healing provides a blueprint for skin regeneration, encompassing coordinated processes of re-epithelialization, ECM remodeling, and angiogenesis. This protocol describes a dynamic biofabrication strategy that integrates 3D bioprinting with guided cell self-organization to recapitulate these regenerative processes and stepwise reconstruct vascularized, multilayered human skin tissues in vitro. From an engineering perspective, 3D printing is used to fabricate customized culture chambers that support integration of multiple cellular compartments, while bioprinting precisely positions cell populations according to native skin anatomy within a fibrin-based scaffold. From a biological perspective, a stagewise culture strategy with media optimized for distinct phases of tissue maturation promotes sequential development of tissue barriers through keratinocyte proliferation and collective migration, microchannel endothelialization, epidermal stratification, and fibroblast-driven ECM remodeling. This coordinated approach supports both long-term tissue viability and physiological function. It is worth noting that this protocol focuses on the epithelialization phases of basal layer formation and basal-to-suprabasal transition under submerged culture. However, its modular architecture and programmable culture workflow can be readily extended to generate full-thickness skin models by introducing an air–liquid interface (ALI) to promote terminal cornification and epidermal maturation.
As proof of concept, the resulting organotypic skin models have been applied to recapture skin disease pathogenesis and evaluate therapeutic candidates in our recent studies [29,30]. More broadly, this protocol illustrates an alternative paradigm for tissue biofabrication. Rather than relying solely on direct physical placement of cells and biomaterials to recreate tissue architecture, it combines engineering-guided assembly with physiological self-organization to restore structural and functional complexity beyond the capabilities of current fabrication technologies alone.
Materials and reagents
Biological materials
1. HaCaT cells, a widely used human keratinocyte line (kindly provided by Prof. Animesh A. Sinha); HaCaT cells tagged with green fluorescent protein on E-cadherin (GFP–E-cad–HaCaT cells) (generated in-house with the help of Prof. James K. Wahl III [29])
2. Normal adult human dermal fibroblasts (NHDF-Ad) (Lonza, catalog number: CC-2511) (passages ≤12)
3. Human umbilical vein endothelial cells (HUVEC) from pooled donors (Lonza, catalog number: C2519A) (passages ≤9)
Reagents
1. DMEM, high glucose, no glutamine, no calcium (Ca2+-free DMEM) (Thermo Fisher Scientific, Gibco, catalog number: 21068028)
2. Fetal bovine serum (FBS) (Thermo Fisher Scientific, Gibco, catalog number: A3160501)
3. GlutaMAX supplement (100×) (Thermo Fisher Scientific, Gibco, catalog number: 35050061)
4. Penicillin-streptomycin (Pen-Strep), 10,000 U/mL (Thermo Fisher Scientific, Gibco, catalog number: 15140122)
5. EGM-2 Endothelial Cell Growth Medium-2 BulletKit (Lonza, catalog number: CC3162)
6. FGM-2 Fibroblast Growth Medium-2 BulletKit (Lonza, catalog number: CC-3132)
7. Fibrinogen, human plasma (MilliporeSigma, catalog number: 341576-M)
8. Aprotinin (MilliporeSigma, catalog number: A4529)
9. Thrombin, human plasma (≥1,000 NIH units/mg protein) (MilliporeSigma, catalog number: T7009)
10. Glycerol, ≥99% (GC) (MilliporeSigma, catalog number: G2025)
11. Trypsin neutralizing solution (ATCC, catalog number: PCS-999-004)
12. Trypsin-EDTA for primary cells (ATCC, catalog number: PCS-999-003)
13. DPBS, no calcium, no magnesium (Thermo Fisher Scientific, Gibco, catalog number: 14190250)
14. Isopropanol (MilliporeSigma, catalog number: I9516)
15. Distilled water (sterilized)
Solutions
1. Ca2+-free DMEM medium (see Recipes)
2. FGM-2 medium (see Recipes)
3. EGM-2 medium (see Recipes)
4. Fibrinogen solution (see Recipes)
5. Thrombin stock solution (100×) (see Recipes)
6. Glycerol solution (50% v/v solution) (see Recipes)
7. Aprotinin stock solution (40×) (see Recipes)
8. DMEM-A medium (see Recipes)
Recipes
1. Ca2+-free DMEM medium
| Reagent | Final concentration | Quantity or volume |
|---|---|---|
| Ca2+-free DMEM | 88% | 44 mL |
| FBS | 10% | 5 mL |
| GlutaMax supplement (100×) | 1% | 0.5 mL |
| Pen-Strep (10,000 U/mL) | 1% | 0.5 mL |
| Total | 100% | 50 mL |
Thaw the pre-aliquoted frozen FBS and Pen-Strep stock solutions at room temperature for approximately 1 h or at 2–8 °C overnight. Supplement Ca2+-free DMEM with GlutaMax, FBS, and Pen-Strep. Store the complete medium at 2–8 °C for up to 1 week.
2. FGM-2 medium
| Reagent | Final concentration | Quantity or volume |
|---|---|---|
| FBM basal medium | 98% | 500 mL |
| FGM-2 SingleQuots supplement pack | 2% | 11.5 mL |
Thaw the frozen FGM-2 SingleQuots supplement pack, containing FBS (10 mL), insulin (0.5 mL), hFGF-B (0.50 mL), and GA-1000 (0.50 mL), at room temperature for approximately 1 h or at 2–8 °C overnight. Add the thawed supplements to FBM basal medium and gently swirl to mix. Store the complete medium at 2–8 °C for up to 1 week or at -20 °C for up to 1 month.
3. EGM-2 medium
| Reagent | Final concentration | Quantity or volume |
|---|---|---|
| EBM-2 basal medium | 97% | 500 mL |
| EGM-2 SingleQuots supplement pack | 3% | 15.2 mL |
Thaw the frozen EGM-2 SingleQuots supplement pack (10 mL of FBS, 0.20 mL of hydrocortisone, 2 mL of hFGF-B, 0.50 mL of VEGF, 0.50 mL of R3-IGF-1, 0.50 mL of ascorbic acid, 0.50 mL of hEGF, 0.50 mL of GA-1000, and 0.50 mL of heparin) at room temperature for ~1 h or at 2–8 °C overnight. Transfer the thawed supplements to EBM-2 basal medium and gently swirl to mix. Store the complete medium at 2–8 °C for up to 1 week or at -20 °C for up to 1 month.
4. Fibrinogen solution
| Reagent | Final concentration | Quantity or volume |
|---|---|---|
| Ca2+-free DMEM medium (Recipe 1) | 100% | 2 mL |
| Fibrinogen | 25 mg/mL | 50 mg |
Dissolve 50 mg of fibrinogen powder in 2 mL of Ca2+-free DMEM medium. Swirl to dissolve completely and place on ice. Freshly prepare the fibrinogen solution immediately before use to minimize enzyme-independent aggregation, non-fibrous gelation, and precipitation. Because fibrinogen powder can be difficult to weigh accurately, adjust the volume of Ca2+-free DMEM as needed to achieve a final fibrinogen concentration of 25 mg/mL.
5. Thrombin stock solution (100×)
| Reagent | Final concentration | Quantity or volume |
|---|---|---|
| DPBS | 100% | 2.5 mL |
| Thrombin | 100 U/mL | 250 U |
Dilute 250 U of thrombin powder in 2.5 mL of DPBS to prepare a stock solution. Mix thoroughly until the powder is completely dissolved. Dispense the solution into 100 μL aliquots and store at -80 °C. Thaw aliquots before use and avoid repeated freeze–thaw cycles to preserve enzyme activity.
6. Glycerol solution (50% v/v)
| Reagent | Final concentration | Quantity or volume |
|---|---|---|
| Ca2+-free DMEM medium (Recipe 1) | 50% | 1 mL |
| Glycerol | 50% | 1 mL |
Mix glycerol and Ca2+-free DMEM medium at a 1:1 (v/v) ratio. Filter-sterilize the solution and store at 2–8 °C.
7. Aprotinin stock solution (40×)
| Reagent | Final concentration | Quantity or volume |
|---|---|---|
| DPBS | 100% | 5 mL |
| Aprotinin | 1 mg/mL | 5 mg |
Dissolve 5 mg of aprotinin powder in 5 mL of DPBS and mix until completely dissolved. Dispense the solution into 250 μL aliquots and store at -80 °C. Thaw aliquots before use and avoid repeated freeze–thaw cycles to preserve enzyme activity.
8. DMEM-A medium
| Reagent | Final concentration | Quantity or volume |
|---|---|---|
| Ca2+-free DMEM medium (Recipe 1) | 97.5% | 9.75 mL |
| Aprotinin (40× solution) | 0.025 mg/mL | 0.25 mL |
| Total | 100% | 10 mL |
Thaw a frozen aliquot of 40× aprotinin solution at room temperature for ~1 h or at 2–8 °C overnight. Add the thawed solution to the complete Ca2+-free DMEM medium and gently swirl to mix. Store the supplemented medium at 2–8 °C for up to 1 week.
Laboratory supplies
1. Tissue culture flasks (25 and 75 cm2 growth areas)
2. Tissue culture dishes (35 and 100 mm diameters)
3. Centrifuge tubes (0.2, 1.5, 15, and 50 mL)
4. Micropipettes (10, 20, 100, 200, and 1,000 μL) and compatible tips
5. Syringe filters (28 mm diameter, 0.2 μm pore size)
6. Vacuum tube-top filter (50 mL capacity, 0.2 μm pore size)
7. SylgardTM 184 silicone elastomer kit (Krayden, catalog number: DC4019862)
8. RTV silicone sealant (Henkel, model: Loctite® SI 595)
9. Needles, 30 gauge (1.5 in, 1 in, and 0.5 in lengths) (Fisnar, catalog numbers: 8001114, 8001104, and 8001094)
10. Coverslips (170 μm thickness, 22 × 22 mm)
11. Clear silicone sheet (250 μm thickness)
12. Dispensing tips, 32 gauge (Nordson EFD, catalog number: 7018462)
13. Dispensing syringe barrels, 3 cc (Fisnar, catalog number: 8001001)
14. Hemocytometer (Bulldog Bio, catalog number: DHC-N420)
15. Other general lab supplies: single-use spatula, disposable glass Pasteur pipets, syringes (3 and 10 mL), razor blades, and double-sided tape
Equipment
1. Cell culture and maintenance: Class II, Type A2 biosafety cabinet, CO2 incubator, autoclave, liquid nitrogen storage system, and inverted microscope
2. General lab equipment: water bath, centrifuge, refrigerator (2–8 °C), freezer (-20 and -80 °C), vacuum desiccator, oven, and vortex mixer
3. 3-axis inline gantry robot (Fisnar, model: F5200N.2)
4. Fluid dispenser (Nordson EFD, model: UltimusPlus II)
5. PolyJet 3D printer (Stratasys, model: Objet500 Connex 3)
6. Thinky mixer (Thinky, model: AR-100)
7. Plasma cleaner (Harrick Plasma, model: PDC-001)
8. Inverted fluorescence microscope for 3D cell culture assays (Leica, model: THUNDER Imager)
9. TEER (WPI, model: EVOM Manual)
10. Nanoindentor (KLA, model: iNano)
11. Peristaltic pump (Ismatec, model: Reglo ICC 4-Channel)
Software and datasets
1. GrabCAD Print associated with the PolyJet printer (Stratasys)
2. Robot Edit associated with the dispensing robot (Fisnar)
Procedure
A. Fabrication of tissue culture chambers
Note: To accommodate the three cell types according to their native spatial organization, custom tissue culture chambers are fabricated from polydimethylsiloxane (PDMS), one of the most widely used materials for microphysiological systems. A unique feature of the chamber design is the incorporation of predefined microchannels within the chamber walls, which precisely position a removable needle template for subsequent generation of a perfusable microvessel within the engineered skin construct (see Figure S1 in [30] for the workflow).
1. 3D-print a customized rigid polymer mold (3D design provided in File S1) using a suitable 3D printer.
Notes:
1. In this protocol, the culture chambers are designed to house 3D tissue models consisting of a ~2-mm thick dermal matrix with a surface area of approximately 177 mm2 (diameter: 15 mm) that supports epidermal formation (comparable to a commercial Transwell insert for a 24-well plate). A microvessel is positioned approximately 1 mm above the chamber bottom. The chamber dimensions are optimized to fit standard 35 mm tissue culture dishes and 6-well plates. Adjust dimensional parameters as needed based on the desired model size and culture conditions.
2. Any 3D printing technology capable of producing molds containing ~300 μm microchannel features can be used. High-resolution printers are recommended to obtain smooth mold surfaces. In this protocol, molds are fabricated using a PolyJet printer (controlled by GrabCAD Print) with VeroClear material under the glossy print setting.
a. After printing, remove the bulk support material. Further clean the printed molds by immersing them in 1 M NaOH and stirring on a hotplate (40 °C) inside a fume hood overnight.
b. Remove the molds from the NaOH solution, rinse thoroughly with distilled water to eliminate dissolved support material, and air dry.
c. Bake the cleaned molds at 75 °C overnight to eliminate surface tackiness and improve surface finish, facilitating subsequent PDMS casting and demolding.
d. After the molds have cooled to room temperature, assemble the mold for PDMS casting by inserting a 1.5-inch-long, 30-gauge needle longitudinally through the predefined alignment microchannels.
Note: The inserted needle serves as a template for generating alignment microchannels within the chamber walls. These microchannels are subsequently used to position a second needle template during dermal matrix casting, enabling the formation of a perfusable microchannel within the dermal matrix in section F.
2. Prepare the PDMS prepolymer mixture for casting.
Note: No specific PDMS mechanical properties are required for this protocol. Alternative flexible and biocompatible materials may also be used. In this protocol, the SylgardTM 184 Silicone Elastomer kit is used.
a. Mix the PDMS base and curing agent at a 10:1 (w/w) ratio (e.g., 40 g of PDMS base and 4 g of curing agent) until homogeneous (e.g., using a THINKY mixer for 5 min).
b. Transfer the PDMS prepolymer mixture into 10 mL syringes.
3. Inject the PDMS mixture into the molds and place them in a vacuum desiccator to remove trapped air bubbles (typically 30 min).
4. Cure the PDMS by baking in an oven at 100 °C for 30 min and allow the molds to cool to room temperature.
5. Carefully remove the template needle from each mold.
6. Demold the PDMS chambers and trim excess material as needed. Wash the chambers thoroughly with isopropanol (IPA) and dry using compressed air or N2.
7. Treat the PDMS chambers and transparent substrates (either coverslips or silicone sheets) with O2 plasma (45 W, O2 flow rate: 14.1–18.3 mL/min, 5 min). Immediately bond the treated surfaces by applying gentle, uniform pressure.
8. Sterilize the assembled chambers by autoclaving using a wet cycle (121 °C, 30 min), followed by a 1-h drying cycle.
B. Cell culture for bioink preparation
Note: The organotypic skin model consists of stratified epidermal layers positioned atop a vascularized, fibroblast-laden dermal matrix and incorporates three cell types: keratinocytes, endothelial cells, and dermal fibroblasts (see Biological materials for the cell sources used in this protocol).
1. Culture HaCaT cells (a widely used keratinocyte cell line) in Ca2+-free DMEM medium (Recipe 1) until reaching 2–2.5 ×10⁶ cells (typically 70%–100% confluency in a T-25 flask).
Note: This culture condition is compatible with both wild-type and fluorescence-tagged HaCaT cells.
2. Culture human dermal fibroblasts (HDFs; primary NHDF-Ad cells) in FGM-2 medium (Recipe 2) until reaching 1.5–1.8 ×10⁶ cells (typically 90%–100% confluency in a T-75 flask).
3. Harvest HDFs, resuspend the cell pellet in 1 mL of Ca2+-free DMEM medium, count the cells, and dilute the suspension to 2.5 × 10⁵ cells/mL. Keep the suspension on ice until use.
Note: HDFs typically detach after 2–3 min of trypsinization.
Critical: The HDF suspension is prepared for fabrication of the dermal matrix bioink (section C), which supports subsequent coculture with HaCaT cells. Therefore, HDFs should be resuspended in Ca2+-free DMEM (Recipe 1) rather than FGM-2 medium (Recipe 2), as the former is optimized to promote HaCaT proliferation and collective migration during Stage I culture (section E).
4. Harvest HaCaT cells for the preparation of the keratinocyte source droplet bioink (section D). Resuspend the cell pellet in 5 mL of Ca2+-free DMEM medium, determine the cell concentration, and prepare a suspension at 5 × 10⁶ cells/mL. Keep the suspension on ice until use.
Note: HaCaT cells typically detach after 3–5 min of trypsinization.
5. Culture HUVECs (primary endothelial cells) in EGM-2 medium (Recipe 3). HUVEC expansion is typically initiated approximately 5 days after model fabrication during Stage I culture to obtain 2–3 ×10⁶ cells (typically 70%–100% confluency in a T-75 flask).
6. Harvest HUVECs for the endothelialization of the microchannel within each model (section F), typically performed 10–14 days after model fabrication, following completion of Stage I culture. After cell counting, resuspend the cells in EGM-2 medium at a concentration of 1 × 10⁷ cells/mL and keep on ice.
Notes:
1. HUVEC viability is sensitive to prolonged trypsinization. Limit trypsin treatment to ≤1 min and neutralize promptly.
2. HDFs and HaCaT cells are incorporated into the models on the day of fabrication. HDFs are first embedded within the fibrin-based dermal matrix, followed by bioprinting of HaCaT-laden source droplets. HUVECs are introduced after completion of Stage I culture. The timing of HUVEC expansion and endothelialization may require adjustment depending on the rate of HaCaT proliferation and collective migration observed during Stage I (section E).
3. The cell numbers listed above are recommended for the fabrication of approximately 10–12 skin models and include a sufficient margin to account for cell consumption during fabrication. Calculate the required number of each cell type based on the number of models to be fabricated.
C. Preparation of the dermal matrix
Note: The 3D skin model is constructed in a bottom-up manner, assembling from the dermal matrix to the stratified epidermal layers. HDF-laden fibrin gels are first formed within the tissue culture chambers (fabricated in section A) to recapitulate the dermal compartment.
1. Thoroughly clean and rinse the tissue culture chambers with distilled water.
Critical: Ensure that capillary action is observed within the microchannels, indicating the absence of residual material and debris.
2. Insert a 1-inch-long, 30-gauge needle (outer diameter: ~310 μm) through the microchannels so that it spans each chamber (see Figure S1, step 7 in [30]).
Note: This needle serves as a template for creating a perfusable microvessel within the dermal matrix during section F.
3. Place the chambers in culture dishes (one chamber per 35 mm dish or four chambers per 100 mm dish). Fill the chambers with distilled water and soak for at least 30 min. Repeat the soaking process at least twice.
Critical: This hydration step is essential for subsequent needle removal, enabling the formation of a smooth microchannel within the dermal matrix for endothelialization (section F).
4. Aspirate the water from the chambers and rinse with Ca2+-free DMEM medium (Recipe 1). The treated chambers are ready for dermal matrix casting.
Note: Leave a trace amount of residual medium in the chambers to facilitate adhesion between the culture chamber and the hydrogel that forms the dermal matrix.
5. While the chambers are being hydrated, thaw an aliquot of 100× thrombin stock solution (100 U/mL; Recipe 5) on ice. Dilute 10-fold with cold DPBS to obtain a 10 U/mL thrombin solution and keep on ice.
6. Thaw an aliquot of 40× aprotinin stock solution (1 mg/mL; Recipe 7) on ice. Dilute 4-fold with cold DPBS to obtain a 0.25 mg/mL aprotinin solution and keep on ice.
Note: Both thrombin and aprotinin solutions are used in sections C and D. Each aliquot is sufficient for preparing approximately 15 models. Calculate the required number of aliquots carefully.
7. Prepare a fibrinogen solution (25 mg/mL; Recipe 4) and keep it on ice.
Note: Calculate the required volume based on the number of models to be fabricated (200 μL of fibrinogen solution per model). To minimize enzyme-independent gelation, prepare sufficient fibrinogen solution for no more than four models at a time. Repeat steps C7–10 as needed for additional models.
8. Prepare the dermal matrix bioink (Table 1) by sequentially combining fibrinogen solution, HDF suspension (section B), aprotinin solution, and thrombin solution in a centrifuge tube (1.5 mL tube for up to two models; 15 mL for larger batches).
Note: The dermal matrix contains HDFs at a density of 1.0 × 10⁵ cells/mL. This seeding density was selected to limit fibroblast overgrowth and preserve fibrin gel stability, thereby supporting keratinocyte proliferation and collective migration during Stage I while allowing controlled matrix remodeling and minimizing excessive fibroblast-mediated contraction that could disrupt epidermal stratification following fibroblast activation in Stage II.
Critical: Mix the cell suspension thoroughly immediately before addition to ensure a homogeneous cell distribution and prevent cell settling. After adding thrombin, mix rapidly but thoroughly. The bioink remains processable for approximately 2 min before gelation begins.
Table 1. Formulation of dermal matrix bioink (per model)
| Reagent | Final concentration | Quantity or volume |
|---|---|---|
| Fibrinogen solution (25 mg/mL) | 10 mg/mL | 200 μL |
| HDF suspension (2.5× 10⁵ cells/mL) | 1.0 × 10⁵ cells/mL | 200 μL |
| Aprotinin solution (0.25 mg/mL) | 0.025 mg/mL | 50 μL |
| Thrombin solution (10 U/mL) | 1 U/mL | 50 μL |
| Total | — | 500 μL |
9. Deposit approximately 500 μL of dermal matrix ink into each chamber to completely fill the chamber volume.
Critical: Dispense the bioink gently at the center of the chamber and allow it to spread evenly. Minimize the introduction of air bubbles during casting.
See Troubleshooting 1 if the dermal matrix bioink cannot be prepared or cast properly (steps C7–9).
10. Allow the dermal matrix to crosslink. When freshly thawed thrombin is used, gelation typically occurs within 2–5 min, resulting in the formation of an HDF-laden fibrin gel within each chamber. Transfer the culture dishes to a CO2 incubator immediately after casting.
D. Bioprinting of the keratinocyte source droplet array
Note: Supported by the dermal matrix prepared in section C, epidermal regeneration is initiated through the self-organization of keratinocytes from bioprinted cell source droplets.
1. Warm the glycerol solution (50% v/v; Recipe 6) to room temperature.
Note: Warming reduces the viscosity of the glycerol solution, facilitating bioink preparation and mixing.
2. Prepare a fibrinogen solution (25 mg/mL; Recipe 4) for HaCaT encapsulation and keep it on ice.
Note: Calculate the required volume based on the number of models to be fabricated. A minimum of 40 μL of fibrinogen solution is required per model when using a 3-cc syringe barrel; adjust the volume as needed for alternative printing configurations. As described in section C, prepare sufficient fibrinogen solution for no more than four models at a time. Repeat steps D2–10 as needed for additional models.
3. Use the 10 U/mL thrombin solution and 0.25 mg/mL aprotinin solution prepared in section C.
Critical: Discard any unused solution after completing section D to avoid activity loss associated with repeated freeze–thaw cycles.
4. Set the dispensing pressure of the 3D bioprinter to 0.8 psi and load the printing program (Code S1, generated using Robot Edit).
Note: In this protocol, bioprinting is performed using a custom-built 3D bioprinter consisting of a benchtop gantry robot integrated with a digital fluid dispenser for precise pressure regulation. The printer is operated inside a biosafety cabinet.
5. Transfer a culture chamber from the incubator to the bioprinter stage.
6. Prepare the keratinocyte source droplet bioink (Table 2) by sequentially combining fibrinogen solution, HaCaT suspension (Procedure B), glycerol solution, aprotinin solution, and thrombin solution in a 0.2 mL centrifuge tube.
Critical: Mix the cell suspension thoroughly immediately before addition to ensure a homogeneous cell distribution and prevent cell settling. After adding thrombin, mix rapidly but thoroughly. Immediately transfer the bioink into a pre-cooled 3-cc syringe barrel fitted with a 32-gauge dispensing tip.
Table 2. Formulation of keratinocyte source droplet bioink
| Reagent | Final concentration | Quantity or volume |
|---|---|---|
| Fibrinogen solution (25 mg/mL) | 10 mg/mL | 40 μL |
| HaCaT suspension (5 × 10⁶ cells/mL) | 1 × 10⁶ cells/mL | 20 μL |
| Glycerol solution (50% v/v) | 10% | 20 μL |
| Aprotinin solution (0.25 mg/mL) | 0.025 mg/mL | 10 μL |
| Thrombin solution (10 U/mL) | 1 U/mL | 10 μL |
| Total | — | 100 μL |
7. Begin bioprinting immediately after mounting the loaded syringe onto the 3D bioprinter. In this protocol, a proof-of-concept 2 × 2 droplet array is printed (Figure 1A, B; Video S1).
Notes:
1. Nitrogen gas is recommended as the driving pressure source instead of compressed air or CO2 to reduce contamination risk. Installing a sterile syringe filter between the pressure source and syringe barrel is also recommended.
2. In this protocol, each droplet has a target volume of ~1.5 μL and is printed with a center-to-center spacing of 2 mm. The resulting droplet diameter typically ranges from 1.4 to 1.6 mm. Minor variations in droplet size may arise from nonuniformities in the surface properties and roughness of the native fibrin gel used as the dermal matrix.

Figure 1. Representative photographs of 3D skin models throughout the biofabrication and maturation process. (A, B) During and after bioprinting of the keratinocyte source droplets. (C) During Stage I tissue culture. (D) During Stage II tissue culture. (E) Following tissue fixation.
8. Print the droplet arrays one model at a time by repeating steps D5–7. See Troubleshooting 1 if droplets cannot be printed properly or if nozzle clogging occurs.
9. Allow the HaCaT-laden droplets to crosslink for approximately 5 min after deposition onto the dermal matrix (Figure 1B). Subsequently, add 200 μL of Ca2+-free DMEM medium (Recipe 1) per model.
Note: Add the medium gently along the chamber wall to avoid disturbing the printed droplets and to minimize hydraulic forces on the newly formed structures.
10. Add distilled water to the culture dishes surrounding the chambers to maintain humidity and minimize medium evaporation. Transfer the culture dishes to the incubator and culture for two days, allowing the cells to adapt to the 3D microenvironment.
Note: Add water carefully and maintain the water level below the inserted needle.
Critical: Cell viability gradually decreases during prolonged suspension. Therefore, sections C and D should ideally be completed within 2 h, and no more than 12 models are recommended per fabrication batch.
E. Stage I tissue culture
Note: Following model fabrication, the culture strategy is shifted toward optimizing tissue maturation. During Stage I, the culture medium is formulated to promote basal layer formation in the epidermal compartment while preserving the integrity of the fibrin-based dermal matrix. A compact basal layer is expected to form through the proliferation and collective migration of keratinocytes originating from the bioprinted source droplets.
1. After the two-day adaptation period, replace the Ca2+-free DMEM medium with DMEM-A medium (Recipe 8). Change the medium with fresh, prewarmed DMEM-A every other day throughout Stage I (Figure 1C).
Critical: HaCaT cells and HDFs are expected to distribute homogeneously within the bioprinted fibrin droplets and dermal matrix, respectively.
See Troubleshooting 2 if nonuniformity is observed during microscopic examination.
Note: DMEM-A is also Ca2+-free to maintain HaCaT cells in a highly proliferative and migratory basal state. Aprotinin is supplemented to slow fibrin degradation associated with the expanding HaCaT population.
2. Monitor keratinocyte activities and distribution daily using an inverted microscope (see Figure S2 in [30]).
Note: While this protocol can be applied to both wild-type and fluorescence-tagged HaCaT cells, GFP–E-cad–HaCaT cells and other fluorescence-expressing keratinocytes are recommended during protocol establishment because the fluorescent labels facilitate cell tracking and visualization (see Figure 2 in [29]).
a. HaCaT cells typically begin proliferating and forming aggregates within the source droplets between days 3 and 5.
b. HaCaT cells continue to proliferate while migrating out of the source droplets and into the inter-droplet regions on the dermal matrix surface, typically between days 5 and 7.
c. Collective migration continues, and keratinocyte populations originating from adjacent droplets begin to merge around day 10.
Note: Between days 7 and 10, the culture medium often turns yellow before medium replacement, indicating a high cell density and active metabolism.
d. A compact basal layer forms within the inter-droplet regions, typically between days 10 and 14. See Troubleshooting 3 if HaCaT cells fail to proliferate or migrate actively.
3. In parallel, measure transepithelial electrical resistance (TEER) to monitor basal layer formation (see Figure S3 in [30]).
Note: TEER values are expected to increase gradually before day 10, corresponding to keratinocyte proliferation and collective migration. A more rapid increase is typically observed between days 10 and 14, indicating the formation of a compact basal layer. Calculate the net resistance by subtracting the resistance measured from a cell-free fibrin gel cultured under the same conditions.
F. Vascularization
Note: Once keratinocyte proliferation, collective migration, and compact basal layer formation have been observed according to the timeline described in section E and confirmed by TEER measurements, the 3D skin model is ready for vascularization through the introduction of a perfusable microvessel lined with endothelial cells.
1. Prepare and sterilize 0.5-inch-long, 30-gauge blunt-end needles (outer diameter: ~310 μm; two needles per model) and double-sided tapes for HUVEC seeding and subsequent microchannel endothelialization.
2. Carefully remove the embedded template 1-inch-long needle from each model to create a microchannel (~310 μm diameter) within the fibrin-based dermal matrix (see Figure S1, step 8 in [30]).
Critical: Remove the needle slowly and steadily to avoid disrupting the adhesion between the fibrin gel and the culture chamber walls. Extensive practice using culture chambers containing cell-free fibrin gels (10 mg/mL) is highly recommended.
3. Gently flush the newly formed microchannel with EGM-2 medium (Recipe 3) using a 10 or 20 μL pipette.
Critical: Avoid introducing air bubbles. Confirm microchannel patency by observing capillary-driven flow through the channel.
4. Mix the HUVEC suspension (1 × 10⁷ cells/mL; prepared in section B) thoroughly to ensure a homogeneous cell distribution.
5. Inject approximately 10 μL of HUVEC suspension into the microchannel using a 10 or 20 μL pipette. Seal both ends of the microchannel with 0.5-inch-long blunt-end needles.
Critical: Pipette slowly and gently to minimize air bubble formation, which can result in defects in the endothelial lining.
6. Assess HUVEC loading using an inverted microscope (10× magnification).
Note: The microchannel should appear fully occupied by HUVECs (Figure 2A). The seeding conditions described here (1 × 10⁷ cells/mL, 10 μL) were optimized for the current chamber design and overnight endothelialization protocol. Appropriate seeding density is critical for establishing a confluent endothelial monolayer along the microchannel wall.
See Troubleshooting 2 if cell leakage is observed after HUVEC injection into the microchannel.
7. Transfer successfully seeded models to 100-mm culture dishes (one chamber per dish) and secure the culture chambers to the dish bottom using double-sided tape. Invert the dishes and place them in the incubator for approximately 2 h.
Critical: Apply no more than 100 μL of EGM-2 medium to each model to maintain hydration of the newly formed basal layer. Excess medium may leak from the model when cultured in the inverted orientation.
Note: Practice the inversion procedure using empty chambers before handling experimental samples to minimize the risk of sample loss.
8. After approximately 2 h, return the dishes to the upright position and incubate for another 2 h. Repeat this inversion cycle at least two additional times.
Critical: Alternating culture orientations promotes uniform HUVEC attachment around the entire circumference of the microchannel.
9. After the final inversion cycle, add 100 μL of fresh EGM-2 medium to each model. Add distilled water around the chambers (as described in step D10) to maintain humidity and minimize evaporation-induced volume loss.
Note: The added water also moistens the double-sided tape, facilitating the removal of the culture chambers from the dishes.
10. Following overnight culture, carefully detach the chambers from the dishes and gently remove the sealing needles from both ends of the microchannel.
11. Flush the endothelialized microchannel gently but thoroughly with prewarmed EGM-2 medium.
Critical: Ensure that all unattached HUVECs are removed from the microchannel (Figure 2B). Examine the model using an inverted microscope. A uniform, confluent endothelial monolayer should line the microchannel, with no visible floating cells. Thorough flushing is essential for maintaining microvessel viability and ensuring reliable performance during subsequent culture and functional assays.
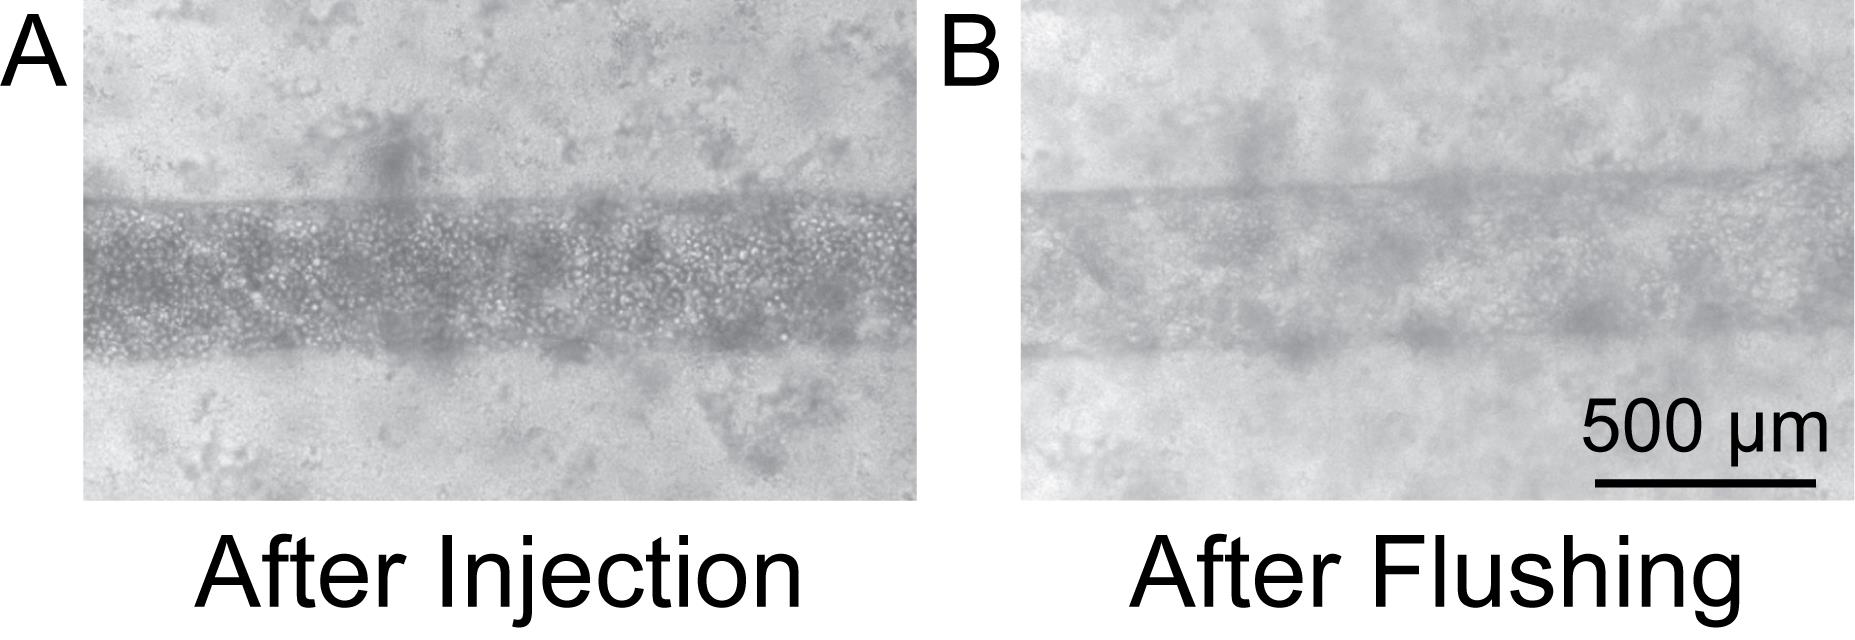
Figure 2. Representative microscopic images of an embedded microchannel. (A) Immediately after HUVEC injection. (B) Immediately after flushing, following overnight culture. To improve visualization of the microchannel, these images were acquired using a matrix without keratinocytes or fibroblasts.
G. Stage II tissue culture
Note: Following microchannel endothelialization, all three cellular compartments have been integrated into the 3D skin model. During Stage II, the culture strategy shifts toward promoting epidermal stratification and dermal matrix remodeling while maintaining the viability and function of the engineered microvessel. Upon completion of this stage, the organotypic tissue constructs are expected to be suitable for disease modeling and therapeutic evaluation.
1. Transfer the tissue culture chambers to 35 mm culture dishes or 6-well plates (Figure 1D).
Note: The customized culture chambers used in this protocol are designed to fit these commonly used culture vessels. The chamber dimensions can be modified during section A to accommodate alternative culture formats.
2. Add 200 μL of EGM-2 medium (Recipe 3) onto the epidermal surface and 200 μL to each space between the culture chamber and the dish or well wall adjacent to the microvessel openings to enable vascular perfusion of the model (total: 600 μL of EGM-2 medium per model) (see Figure S4 [30]).
Critical: Supply medium both topically and through the microvessel to ensure adequate nutrient delivery to all developing tissue compartments.
Note: The culture chambers are compatible with dynamic culture and vascular perfusion experiments. Using the 0.5-inch-long, 30-gauge needles described in section F, the chamber can be connected to a peristaltic pump for controlled flow regulation (see Figure S9 in [30]).
3. Replace the EGM-2 medium daily throughout Stage II, typically for 7 days.
Note: Gently flush the microvessel during medium changes to remove detached HUVECs.
4. Monitor the development and maturation of the epithelial, stromal, and endothelial barriers over time.
Note: The densely packed basal keratinocytes self-initiate differentiation and basal-to-suprabasal transition. Ca2+ (1.6 mM) in EGM-2 medium further promotes epidermal stratification. More importantly, Ca2+ is essential for the assembly of cadherin-mediated junctions in both epithelium and endothelium, which are critical for barrier formation and function. Growth factor supplements in the Stage II medium also activate fibroblasts to remodel the dermal matrix through deposition of ECM components, including collagen fibers (see Figure 3 in [30]).
See Troubleshooting 3 if cell activity does not match expected behavior during follow-up observations.
a. Monitor epidermal layer development using an inverted microscope and TEER measurements.
Notes:
1. Without fixation, basal-to-suprabasal differentiation can be difficult to visualize directly. However, progressive thickening of the epidermal compartment is expected. Following Stage I, TEER values continue to increase and typically reach approximately sevenfold the value of the early day 2 measurement (step E3) by the end of Stage II culture (see Figure S3 in [30]), indicating barrier maturation and epidermal stratification.
2. Because an air–liquid interface is not introduced in this protocol, terminal epidermal cornification is not expected.
b. Measure tissue viscoelasticity using nanoindentation.
Note: Progressive matrix stiffening is expected during Stage II, reflecting fibroblast-mediated extracellular matrix remodeling. Deposited ECM components can be further characterized by immunostaining following tissue fixation.
c. Evaluate vascular function by perfusing fluorescent tracers and monitoring molecular transport.
Note: In the associated study, fluorescein isothiocyanate (FITC)-conjugated dextran (150 kDa) was used as a model macromolecule to mimic antibody transport. A slow, progressive, and spatially uniform spread of fluorescence throughout the tissue is expected, whereas near-instantaneous diffusion is typically observed in an acellular microchannel (see Figure 3 in [30]).
Data analysis
In addition to dynamic characterization of the 3D tissue constructs throughout the two-stage culture process—including time-lapse microscopy (an environmental incubation chamber is recommended for long-term imaging), TEER measurements, viscoelasticity assessment by nanoindentation, and molecular transport analysis—comprehensive end-point characterization is performed after fixation of the biofabricated tissues (Figure 1E), as described in the original publications [29,30]. Whole-mount immunostaining can be used to visualize the spatial organization of the three cellular compartments, whereas microsectioned tissue slices provide a higher-resolution assessment of the multilayered tissue architecture. Recommended markers include:
a. Overall cell distribution: 4′,6-diamidino-2-phenylindole (DAPI)
b. Epithelium: E-cadherin (E-cad)
c. Epidermal stratification: Keratin 5 (K5; basal layer), Keratin 10 (K10; suprabasal layers), and involucrin (INV; upper spinous and granular layers)
d. Endothelium: Platelet endothelial cell adhesion molecule-1 (PECAM-1/CD31)
e. Fibroblast activation: α-smooth muscle actin (α-SMA)
f. Extracellular matrix remodeling: Type I collagen (COL-I).
Image processing and quantitative analysis are performed using the Fiji distribution of ImageJ, including maximum-intensity projection generation, fluorescence intensity quantification, and cell migration tracking. Tile stitching and Z-stack reconstruction are performed using the microscope-associated imaging software.
Replicates and statistical analysis: A minimum of three independent biological replicates is recommended for all quantitative measurements. For each biological replicate, technical duplicates or triplicates should be included whenever feasible. Comparisons between two groups may be performed using a two-tailed Student’s t-test when data meet assumptions of normality or a Mann–Whitney U test when normality assumptions are not satisfied.
Validation of protocol
This protocol has been used and validated in the following research article(s):
Haiwei Zhai et al. [30] 3D organotypic skin models recapitulate autoantibody-driven pemphigus pathomechanisms and targeted therapeutic response. Science Advances (Figures 1–3 and Supplemental Figures 1–9).
The epithelialization protocol is an optimized version of our previous in vitro epidermal reconstruction protocol, which was used and validated in the following research article:
Haiwei Zhai et al. [29] Spatially guided construction of multilayered epidermal models recapturing structural hierarchy and cell–cell junctions. Small Sciences (Scheme 1, Figures 1–3, and Supplemental Figures 1–7).
General notes and troubleshooting
General notes
1. Freshly prepare all bioinks immediately prior to bioprinting.
2. Prepare all solutions and bioinks in a biosafety cabinet. Autoclave all culture chambers before use. Only use sterilized tools and supplies for the biofabrication processes. Perform bioprinting under sterile conditions.
3. Clean the chamber walls and microchannels after each fabrication step to remove any residual material and debris.
Troubleshooting
Problem 1: Fibrinogen-formulated bioinks are difficult to transfer or print.
Possible cause: Fibrinogen solutions can undergo enzyme-independent aggregation and non-fibrous gelation prior to thrombin addition, particularly when stored for extended periods or exposed to elevated temperatures. These processes may lead to the formation of amorphous gel networks and precipitates that increase viscosity and reduce printability. After thrombin is added, clotting may occur too rapidly to allow sufficient time for bioink transfer, casting, or printing.
Solution: Always prepare fibrinogen solutions fresh immediately before casting or printing. Keep fibrinogen solutions, cell suspensions, other bioink components, and all supplies used for bioink preparation, transfer, and printing on ice until use. Minimize the time between bioink preparation and casting or printing. Confirm that Ca2+-free media are used during solution and bioink preparation, as calcium ions accelerate fibrin gelation and may further reduce the available processing window.
Problem 2: Cells do not distribute properly within their designated compartments.
Possible cause: For fibrin-encapsulated HaCaT cells and HDFs, incomplete or slow enzymatic crosslinking may result in cell sedimentation, aggregation, or uneven distribution within the hydrogel. The addition of culture medium before sufficient gelation can disrupt the fragile fibrin constructs and alter cell positioning. For microchannel-lining HUVECs, the concentrated cell suspension may leak into gaps between the dermal matrix and chamber walls due to compromised gel–chamber adhesion during removal of the template or sealing needles. During Stage I culture, insufficient supplementation of aprotinin may accelerate fibrin degradation, leading to loss of structural integrity and subsequent mislocalization of all three cell types during later culture stages.
Solution: Accurately calculate thrombin usage and minimize repeated freeze–thaw cycles to maintain consistent enzymatic activity. Prior to model fabrication, use acellular fibrin formulations to determine the optimal gelation time under the intended experimental conditions. If enzyme-independent gelation, aggregation, or precipitation described in Troubleshooting 1 is observed, discard the affected solutions or bioinks and prepare fresh reagents. To minimize HUVEC leakage, remove template and sealing needles slowly and carefully, and avoid reusing needles once removed. During Stage I culture, supplement the medium with an antifibrinolytic agent such as aprotinin to preserve the integrity of the fibrin-based dermal matrix and keratinocyte source droplets until fibroblasts have sufficiently remodeled the matrix and deposited structural extracellular matrix proteins, including type I collagen.
Problem 3: Cells lose viability or function during model maturation or post-biofabrication evaluation.
Possible cause: Insufficient cell seeding density may reduce intercellular communication, prolong adaptation and growth phases, and increase apoptosis. Low densities of HaCaT cells, HDFs, or HUVECs can impair collective migration, dermal matrix remodeling, and vascular barrier formation. The use of high-passage primary cells or cells with poor viability following recovery from cryopreservation may also compromise long-term cell survival and function during the extended culture period required for 3D skin model maturation. In addition, dehydration of fibrin-encapsulated cells can result in substantial cell loss, particularly in the microliter-scale keratinocyte source droplets.
Solution: Ensure accurate cell counting and cell suspension concentrations for all cell types. Thoroughly redisperse cells before mixing, transfer, seeding, casting, or printing to promote uniform cell distribution. During routine cell expansion, discard cultures exhibiting excessive numbers of floating or unattached cells and re-establish cultures from a fresh cryopreserved stock. Minimize the use of high-passage primary cells for model fabrication and long-term experiments. For vascularization, HUVECs should ideally be used at passages ≤9. For dermal matrix remodeling, HDFs should ideally be used at passages ≤12. To prevent dehydration-associated cell loss, provide culture medium immediately after complete fibrin gelation. Although sufficient time must be allowed for gel formation under Ca2+-free culture conditions, the bioprinted keratinocyte-laden droplets remain sensitive to environmental factors such as humidity and temperature. As described in Troubleshooting 2, optimization of gelation time under local laboratory conditions is critical before routine model fabrication. In addition, incorporation of biocompatible humectants, such as plant-derived glycerol, can improve the resistance of the printed keratinocyte source droplets to dehydration during the fabrication process.
Supplementary information
The following supporting information can be downloaded here:
1. File S1. Tissue culture chamber design.
2. Code S1. Cell droplet array bioprinting program for the Fisnar F5200N.2 gantry robot.
3. Video S1. Cell droplet bioprinting
Acknowledgments
Conceptualization, F.M., R.Y., and H.Z.; Investigation, H.Z., R.Y., F.M., X.J., M.B., and B.Z.; Writing—Original Draft, H.Z., F.M., and R.Y.; Writing—Review & Editing, F.M., R.Y., H.Z., X.J., M.B., B.Z.; Funding acquisition, F.M. and R.Y.; Supervision, F.M. and R.Y.
The customized mold was 3D-printed at the Nano-Engineering Research Core Facility (NERCF), and 3D skin models were imaged with the assistance of Light & Electron Microscopy Core (LEMC) at the University of Nebraska-Lincoln.
The authors thank Dr. Animesh A. Sinha from the Department of Dermatology at the University at Buffalo for providing the HaCaT cells, and Dr. James K. Wahl III from the Department of Oral and Craniofacial Sciences, School of Dentistry, University of Missouri–Kansas City, for guidance on the preparation of GFP–E-cad–HaCaT cells.
This work was supported by the National Institutes of Health, National Institute of General Medical Sciences (P20 GM113126, Nebraska Center for Integrated Biomolecular Communication, F.M.); Nebraska Tobacco Settlement Biomedical Research Development Funds (F.M.); American Cancer Society (IRG-22-146-07-IRG, F.M.); National Institutes of Health, National Cancer Institute (CA036727, Buffett Cancer Center, F.M.); Nexus of Virology, Immunology, and Bioengineering (F.M.); Voelte-Keegan Bioengineering Support (F.M.); National Science Foundation (1826135, 2143997, 2450416, and 2503605, R.Y.); and National Institutes of Health, National Institute of General Medical Sciences (R35 GM150623, R.Y.).
This protocol is adapted from Haiwei Zhai et al. [30], which has been optimized and developed from Haiwei Zhai et al. [29].
The following figure was created using BioRender: Graphical overview, BioRender.com/ybccm72.
Competing interests
F.M., R.Y., H.Z., and X.J. are inventors on a patent application entitled “Three-dimensional skin constructs” related to this protocol, filed on September 11, 2024, with application number 18/830,822. The authors declare that they have no other competing interests.
References
- Proksch, E., Brandner, J. M. and Jensen, J. (2008). The skin: an indispensable barrier. Exp Dermatol. 17(12): 1063–1072. https://doi.org/10.1111/j.1600-0625.2008.00786.x
- Martin, P., Pardo-Pastor, C., Jenkins, R. G. and Rosenblatt, J. (2024). Imperfect wound healing sets the stage for chronic diseases. Science. 386(6726): eadp2974. https://doi.org/10.1126/science.adp2974
- Niehues, H., Bouwstra, J. A., El Ghalbzouri, A., Brandner, J. M., Zeeuwen, P. L. J. M. and van den Bogaard, E. H. (2018). 3D skin models for 3R research: The potential of 3D reconstructed skin models to study skin barrier function. Exp Dermatol. 27(5): 501–511. https://doi.org/10.1111/exd.13531
- Zhao, H., Chen, Z., Kang, X., Yang, B., Luo, P., Li, H. and He, Q. (2023). The frontline of alternatives to animal testing: novel in vitro skin model application in drug development and evaluation. Toxicol Sci. 196(2): 152–169. https://doi.org/10.1093/toxsci/kfad093
- Niehues, H. and van den Bogaard, E. H. (2018). Past, present and future of in vitro 3D reconstructed inflammatory skin models to study psoriasis. Exp Dermatol. 27(5): 512–519. https://doi.org/10.1111/exd.13525
- Jin, X., Rosenbohm, J., Kim, E., Esfahani, A. M., Seiffert‐Sinha, K., Wahl, J. K., Lim, J. Y., Sinha, A. A. and Yang, R. (2021). Mechanical Stress Modulation: Modulation of Mechanical Stress Mitigates Anti‐Dsg3 Antibody‐Induced Dissociation of Cell–Cell Adhesion (Adv. Biology 1/2021). Adv Biol. 5(1): e202170014. https://doi.org/10.1002/adbi.2021700
- Colombo, I., Sangiovanni, E., Maggio, R., Mattozzi, C., Zava, S., Corbett, Y., Fumagalli, M., Carlino, C., Corsetto, P. A., Scaccabarozzi, D., et al. (2017). HaCaT Cells as a Reliable In Vitro Differentiation Model to Dissect the Inflammatory/Repair Response of Human Keratinocytes. Mediat Inflamm. 2017: 1–12. https://doi.org/10.1155/2017/7435621
- Jin, X., Rosenbohm, J., Kim, E., Safa, B. T., Moghaddam, A. O., Seiffert-Sinha, K., Leiker, M., Jones, E., Zhai, H., Baddam, S. R., et al. (2025). Desmosomal cadherin tension loss in pemphigus vulgaris mediated by the inhibition of active RhoA at cell-cell adhesions. iScience. 28(8): 113081. https://doi.org/10.1016/j.isci.2025.113081
- Takae, Y., Nishikawa, T. and Amagai, M. (2009). Pemphigus mouse model as a tool to evaluate various immunosuppressive therapies. Exp Dermatol. 18(3): 252–260. https://doi.org/10.1111/j.1600-0625.2008.00776.x
- Bieber, K., Sun, S., Ishii, N., Kasperkiewicz, M., Schmidt, E., Hirose, M., Westermann, J., Yu, X., Zillikens, D., Ludwig, R. J., et al. (2009). Animal models for autoimmune bullous dermatoses. Exp Dermatol. 19(1): 2–11. https://doi.org/10.1111/j.1600-0625.2009.00948.x
- Berkowitz, P., Hu, P., Warren, S., Liu, Z., Diaz, L. A. and Rubenstein, D. S. (2006). p38MAPK inhibition prevents disease in pemphigus vulgaris mice. Proc Natl Acad Sci USA. 103(34): 12855–12860. https://doi.org/10.1073/pnas.0602973103
- Wurbs, A., Karner, C., Vejzovic, D., Singer, G., Pichler, M., Liegl-Atzwanger, B. and Rinner, B. (2024). A human ex vivo skin model breaking boundaries. Sci Rep. 14(1): e1038/s41598–024–75291–7. https://doi.org/10.1038/s41598-024-75291-7
- Egu, D., Sigmund, A., Schmidt, E., Spindler, V., Walter, E. and Waschke, J. (2019). A new ex vivo human oral mucosa model reveals that p38 MAPK inhibition is not effective in preventing autoantibody‐induced mucosal blistering in pemphigus. Br J Dermatol. 182(4): 987–994. https://doi.org/10.1111/bjd.18237
- Burmester, I. A. K., Emtenani, S., Johns, J., Ludwig, R. J., Hammers, C. M. and Hundt, J. E. (2019). Translational Use of a Standardized Full Human Skin Organ Culture Model in Autoimmune Blistering Diseases. Curr Protoc Pharmacol. 85(1): e56. https://doi.org/10.1002/cpph.56
- Hartmann, V., Hariton, W. V., Rahimi, S., Hammers, C. M., Ludwig, R. J., Müller, E. J. and Hundt, J. E. (2023). The human skin organ culture model as an optimal complementary tool for murine pemphigus models. Lab Anim. 57(4): 381–395. https://doi.org/10.1177/00236772221145647
- Quílez, C., Bebiano, L. B., Jones, E., Maver, U., Meesters, L., Parzymies, P., Petiot, E., Rikken, G., Risueño, I., Zaidi, H., et al. (2024). Targeting the Complexity of In Vitro Skin Models: A Review of Cutting-Edge Developments. J Invest Dermatol. 144(12): 2650–2670. https://doi.org/10.1016/j.jid.2024.04.032
- Yadav, S. and Nguyen, N. T. (2025). Three-dimensional models of human skin for biomedical applications. Biophys Rev. 6(3): e0251982. https://doi.org/10.1063/5.0251982
- Maas-Szabowski, N., Stark, H. J. and Fusenig, N. E. (2000). Keratinocyte Growth Regulation in Defined Organotypic Cultures Through IL-1-Induced Keratinocyte Growth Factor Expression in Resting Fibroblasts. J Invest Dermatol. 114(6): 1075–1084. https://doi.org/10.1046/j.1523-1747.2000.00987.x
- Morgner, B., Tittelbach, J. and Wiegand, C. (2023). Induction of psoriasis- and atopic dermatitis-like phenotypes in 3D skin equivalents with a fibroblast-derived matrix. Sci Rep. 13(1): e1038/s41598–023–28822–7. https://doi.org/10.1038/s41598-023-28822-7
- Wufuer, M., Lee, G., Hur, W., Jeon, B., Kim, B. J., Choi, T. H. and Lee, S. (2016). Skin-on-a-chip model simulating inflammation, edema and drug-based treatment. Sci Rep. 6(1): e1038/srep37471. https://doi.org/10.1038/srep37471
- Valencia, L., Canalejas-Tejero, V., Clemente, M., Fernaud, I., Holgado, M., Jorcano, J. L. and Velasco, D. (2021). A new microfluidic method enabling the generation of multi-layered tissues-on-chips using skin cells as a proof of concept. Sci Rep. 11(1): e1038/s41598–021–91875–z. https://doi.org/10.1038/s41598-021-91875-z
- Shi, Y., Xing, T. L., Zhang, H. B., Yin, R. X., Yang, S. M., Wei, J. and Zhang, W. J. (2018). Tyrosinase-doped bioink for 3D bioprinting of living skin constructs. Biomed Mater. 13(3): 035008. https://doi.org/10.1088/1748-605x/aaa5b6
- Albanna, M., Binder, K. W., Murphy, S. V., Kim, J., Qasem, S. A., Zhao, W., Tan, J., El-Amin, I. B., Dice, D. D., Marco, J., et al. (2019). In Situ Bioprinting of Autologous Skin Cells Accelerates Wound Healing of Extensive Excisional Full-Thickness Wounds. Sci Rep. 9(1): e1038/s41598–018–38366–w. https://doi.org/10.1038/s41598-018-38366-w
- Kim, B. S., Ahn, M., Cho, W. W., Gao, G., Jang, J. and Cho, D. W. (2021). Engineering of diseased human skin equivalent using 3D cell printing for representing pathophysiological hallmarks of type 2 diabetes in vitro. Biomaterials. 272: 120776. https://doi.org/10.1016/j.biomaterials.2021.120776
- Díaz, G., Perry, M., Cárdenas, L., Da Silva, V., Scheck, K., Tschofen, S., Tuffs, S. and Willerth, S. (2025). Protocol for 3D Bioprinting a Co-culture Skin Model Using a Natural Fibrin-Based Bioink as an Infection Model. Bio Protoc. 15(1376): e5380. https://doi.org/10.21769/bioprotoc.5380
- Lee, J. and Koehler, K. R. (2021). Skin organoids: A new human model for developmental and translational research. Exp Dermatol. 30(4): 613–620. https://doi.org/10.1111/exd.14292
- Lee, J., Rabbani, C. C., Gao, H., Steinhart, M. R., Woodruff, B. M., Pflum, Z. E., Kim, A., Heller, S., Liu, Y., Shipchandler, T. Z., et al. (2020). Hair-bearing human skin generated entirely from pluripotent stem cells. Nature. 582(7812): 399–404. https://doi.org/10.1038/s41586-020-2352-3
- Liang, L., Zhou, J. and Leng, L. (2026). Skin organoid diversity and applications in biomedical research: A comprehensive review. Cell Biomaterials 2(6): 100492. https://doi.org/10.1016/j.celbio.2026.100492
- Zhai, H., Jin, X., Minnick, G., Rosenbohm, J., Hafiz, M. A. H., Yang, R. and Meng, F. (2022). Spatially Guided Construction of Multilayered Epidermal Models Recapturing Structural Hierarchy and Cell–Cell Junctions. Small Sci. 2(11): e202200051. https://doi.org/10.1002/smsc.202200051
- Zhai, H., Jin, X., Moghaddam, A. O., Spieker, M. F., Seiffert-Sinha, K., Sinha, A. A., Yang, R. and Meng, F. (2026). 3D organotypic skin models recapitulate autoantibody-driven pemphigus pathomechanisms and targeted therapeutic response. Sci Adv. 12(2): eadz5003. https://doi.org/10.1126/sciadv.adz5003
Article Information
Publication history
Received: Jun 23, 2026
Accepted: Jul 27, 2026
Available online: Aug 7, 2026
Published: Aug 20, 2026
Copyright
© 2026 The Author(s); This is an open access article under the CC BY-NC license (https://creativecommons.org/licenses/by-nc/4.0/).
How to cite
Readers should cite both the Bio-protocol article and the original research article where this protocol was used:
- Zhai, H., Jin, X., Biegert, M., Zahs, B., Yang, R. and Meng, F. (2026). Stepwise Generation of Vascularized Multilayered 3D Organotypic Skin Models. Bio-protocol 16(16): e5802. DOI: 10.21769/BioProtoc.5802.
- Zhai, H., Jin, X., Moghaddam, A. O., Spieker, M. F., Seiffert-Sinha, K., Sinha, A. A., Yang, R. and Meng, F. (2026). 3D organotypic skin models recapitulate autoantibody-driven pemphigus pathomechanisms and targeted therapeutic response. Sci Adv. 12(2): eadz5003. https://doi.org/10.1126/sciadv.adz5003

 Download Citation in RIS Format
Category
Cell Biology > Cell engineering > Tissue engineering
Cell Biology > Cell isolation and culture > 3D cell culture
Biological Engineering > Bioprinting
Do you have any questions about this protocol?
Post your question to gather feedback from the community. We will also invite the authors of this article to respond.
 Post a Question


