


- Protocols

- Articles and Issues
- For Authors
- About
- Become a Reviewer


Efficient and Fast Site-Directed Mutagenesis via Partially or Completely Overlapping Primer Pairs

Published: Vol 16, Iss 16, Aug 20, 2026 DOI: 10.21769/BioProtoc.5792 Views: 388
Reviewed by: Hemant Kumar PrajapatiPriyanka MittalAnonymous reviewer(s)
 PDF
PDF  Ask a question
Original research article
The authors used this protocol in:
Jan 2026
Advertisement


Protocol Collections
Comprehensive collections of detailed, peer-reviewed protocols focusing on specific topics




Related protocols
Abstract
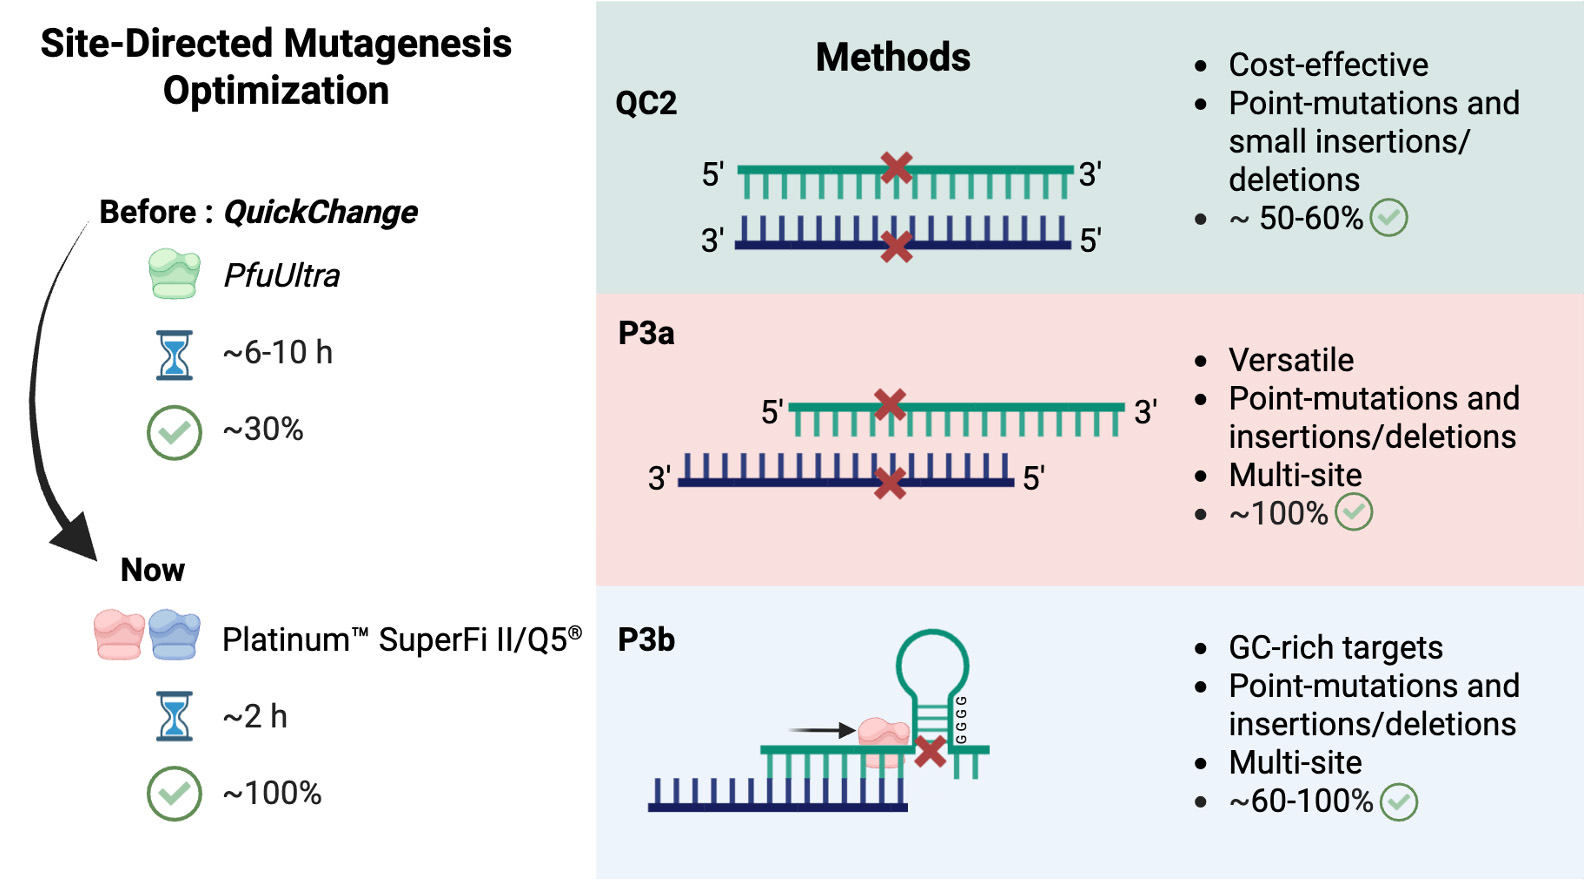
Site-directed mutagenesis is an indispensable molecular biology tool, but traditional methods often suffer from extended reaction time, structural limitations, and variable success rates. This article details three optimized protocols: P3a (primer pairs with 3′-overhangs, version a), P3b, and QuickChange 2.0, which rely on two highly processive DNA polymerases (Platinum SuperFi II and Q5) to accelerate and standardize plasmid engineering. The P3a method utilizes partially complementary primer pairs with distinct 3′-overhangs, achieving ~100% efficiency and enabling seamless cassette mutagenesis (insertion, deletion, and replacement). Building on this, the P3b method introduces specific thermal cycling modifications and a pre-denaturation step to overcome structural barriers resulting from GC-rich sequences. QuickChange 2.0 applies these two advanced polymerases to completely complementary primer pairs, even though the average efficiency decreases to 50%–60%. Replacing Pfu with the highly processive DNA polymerases also reduces PCR time to approximately 2 h. Thus, these new methods are more efficient and rapid than classical QuickChange mutagenesis based on Pfu polymerase.
Key features
• P3a uses 3′-overhang primers and superior polymerases for near-perfect efficiency in routine point mutations and seamless cassette mutagenesis.
• P3b adapts the 3′-overhang primer design with specialized thermal cycling to successfully overcome structural barriers in highly GC-rich templates.
• The QC2 protocol leverages completely complementary primers for fast and reliable introduction of point mutations and small insertions or deletions.
Keywords: Site-directed mutagenesis QuickChange method
PCR
Epigenetic regulator
Cas9
Genome editing
G-quadruplex
QuickChange method
PCR
Epigenetic regulator
Cas9
Genome editing
G-quadruplex
Graphical overview
Background
Since its initial report was made by the Nobel Laureate Michael Smith and his colleagues in 1978 [1], site-directed mutagenesis has become an essential molecular biology technique for engineering specific gene mutations in vitro [2]. Early approaches commonly used phage- or phagemid-based systems to generate single-stranded DNA templates, making the workflow labor-intensive and technically challenging [3–6]. The QuickChange method (or QuikChangeTM, as marketed initially by Stratagene and then by Agilent) is one of the most widely employed strategies in different laboratories, including our own, around the world [7–13]. The method relies on Pfu DNA polymerase-mediated PCR with pairs of completely complementary primers (Figure 1A), followed by DpnI restriction digestion to selectively degrade parental plasmids, which are methylated at the GATC sites and need to be isolated from Dam+ bacterial hosts. While the theoretical mutagenesis efficiency is 100%, the practical level varies widely, depending on the target plasmids and mutations. Furthermore, reliance on the slow, relatively low-fidelity Pfu DNA polymerase often results in extended PCR time and extensive troubleshooting, highly dependent on the plasmid backbones and the mutations to be engineered [14–16]. Another limitation of the QuickChange primer design is that the newly synthesized DNA strands are unsuitable as templates for subsequent PCR amplification cycles, at least as considered by many published reports [14–16], even though an alternative mechanism has also been identified [17]. Consequently, the reaction was considered to proceed linearly rather than exponentially, which, in combination with primer–primer dimer formation and unwanted insertions at primer sites, dramatically reduces the success rates [14–16].
To address these two limitations posed by the QuickChange method, an alternative strategy using partially complementary primers with 3′-protruding ends was initially developed in 2004 [14] and subsequently refined by four different laboratories in 2008 [15,18,19] and 2015 [17]. For convenience, we have referred to this strategy as P3 (primer pairs with 3′-protruding ends) site-directed mutagenesis [16]. Mechanistically, this approach was thought to allow newly synthesized strands to serve as templates for subsequent cycles, enabling exponential amplification [14–16], but it is noteworthy that two alternative mechanisms have been proposed to explain why such primers are advantageous over completely complementary primers [17,20]. Despite these refinements, the mutagenesis efficiency still varies substantially from gene to gene and from mutation to mutation. To investigate this, we systematically tested different Pfu-derived polymerases for generating over a hundred mutations on a dozen plasmids with different sizes and GC contents [16]. To improve the method further, we replaced PfuUltra (an improved version of Pfu) with two super-fidelity polymerases: PlatinumTM SuperFi II and Q5® DNA polymerases [21]. The resulting P3a method achieves a mutagenesis efficiency of near 100% for various plasmids and mutations [21]. These plasmids encode different epigenetic regulators, Cas9, and a protein kinase. The unique "handshaking" feature of P3 primer pairs also enables seamless cassette mutagenesis, allowing for efficient fragment deletions (up to 5 kb), insertions (up to 0.4 kb), and replacements [21]. Notably, Q5 DNA polymerase was found to be inactive for mutagenesis in an early study, likely due to the specific primers used and/or the specific mutation that was engineered [17]. Alternatively, new lots of Q5 polymerase are better than the early ones, likely due to improved purification procedures.
During development of the P3 and P3a methods [16,21], we faced difficulties with plasmids possessing GC-rich sequences, likely due to the formation of G-quadruplexes [22,23]. To resolve such structural barriers posed by high-GC regions, we developed the P3b method. By incorporating a pre-denaturation step prior to PCR and adjusting specific thermal cycling parameters, P3b successfully adapts the P3a framework for GC-rich templates [24]. Alternatively, because classical completely complementary primer pairs remain highly popular and cost approximately 50% less to synthesize than P3a and P3b primers, we applied these advanced polymerases to the traditional QuickChange primer design [20]. This updated protocol, detailed here as QuickChange 2.0 (QC2), successfully reduces the required PCR length from over 10 h to ~2 h. Thus, proper primer design and superior thermostable DNA polymerases are both key to successful PCR-based site-directed mutagenesis.
This article adds value to the related published research by translating these combined findings into a collection of actionable, step-by-step experimental protocols and by providing precise PCR thermal cycling parameters, reagent formulations, and template preparation steps required to execute the P3a, P3b, and QC2 methods. Furthermore, in light of the specific primer-site insertion phenomenon recently identified [20], this collection of protocols, supplemented by various practical tips, should help implement them in different laboratories, provide the context necessary to select the appropriate primer design strategy, and establish a concrete troubleshooting framework for mitigating failed mutagenesis reactions.
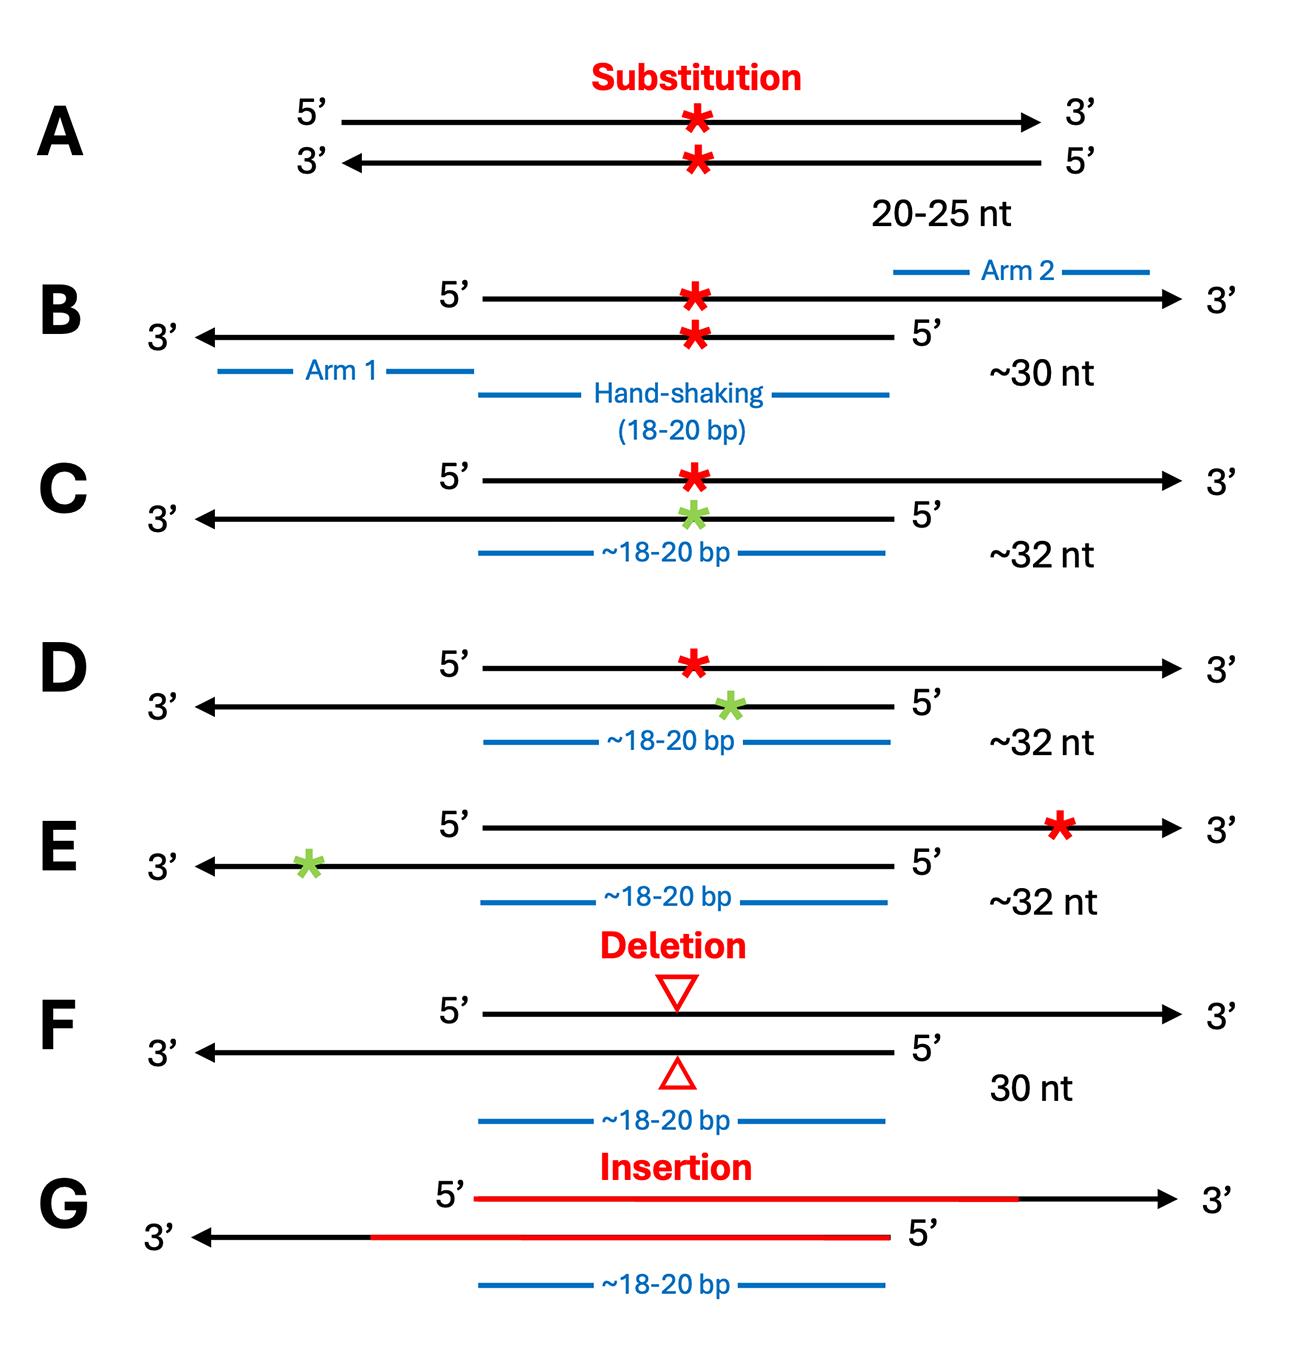
Figure 1. Schematic comparison of primer designs for site-specific mutagenesis. (A) The traditional QuickChange method utilizes completely complementary primer pairs, typically 20–25 nucleotides (nt) in length. Red asterisks indicate the targeted mutation site [16,21]. (B) The P3 method employs partially overlapping primer pairs that generate 3′-overhangs. This optimized P3 design utilizes simplified, shorter primers of approximately 30 nt. These feature 9-bp complementary regions flanking the single-nucleotide mutation (red asterisks). Utilizing shorter primers reduces synthesis costs and minimizes the risk of introducing unwanted mutations caused by impurities in chemical synthesis [16,21]. (C–E) Schematics demonstrating the simultaneous introduction of two distinct mutations (denoted respectively by the red and green asterisks) using a single partially overlapping primer pair. (F) Schematic representation of cassette deletion using P3a primers, where the 5′-arms are complementary to the regions immediately flanking the sequence to be deleted. (G) Schematic representation of cassette insertion using P3a primers, where the complementary arms correspond to the regions flanking the desired insertion site. The figure panels were adapted from [16,21].
Materials and reagents
Biological materials
1. Mammalian expression vectors
Note: As a reference, more than a dozen of plasmids have been tested for these methods, including mammalian expression plasmids for HA-tagged BRPF1 and the FLAG-tagged KAT2B, which have been deposited to Addgene (Addgene, catalog numbers: 250445 and 249547, respectively) [25,26]; expression plasmids for CDK13 and Cas9 [Addgene, catalog numbers: 135276 (deposited by Ben Major and colleagues) and 113096, respectively) [27]; and mammalian expression vectors for untagged D614G and Omicron spike proteins of SARS-COV-2 (SinoBiological, catalog numbers: VG40589-UT and VG40835-UT, respectively) [16,21].
All template plasmids were transformed into and isolated from Dam+ bacterial strains, such as DH5α. Competent cells were prepared as described previously [16,28].
2. 25-nmol scale, standard, and desalted DNA oligos
Note: All primers we have tested have been synthesized at Integrated DNA Technologies, Inc. No polyacrylamide gel or HPLC purification was used.
Reagents
1. 2× PlatinumTM SuperFi II PCR master mix (Thermo Fisher Scientific, catalog number: 12368010) or Q5® High-Fidelity DNA Polymerase (New England Biolabs, catalog number: M0494S)
Note: Notably, while we have used these two enzymes extensively, we have not tested their related preparations, such as the SuperFi PCR master mix and Q5 Ultra II.
2. DpnI restriction enzyme, 20 U/μL (New England Biolabs, catalog number: R0176)
3. Autoclaved Nanopure water
4. Plasmid Miniprep kit (Qiagen, catalog number: 27016)
5. Tryptone (BioShop, catalog number: TRP402)
6. Yeast extract (Gibco, catalog number: 212750)
7. NaCl (Wisent Inc., catalog number: 600-082-1K)
8. KCl (BioShop, catalog number: POC308)
9. NaOH (BioShop, catalog number: SHY700)
10. Glucose (Gibco, catalog number: 15023021)
11. MgCl2, hexahydrate (BioShop, catalog number: MAG510)
12. Ampicillin (BioShop, catalog number: AMP201)
Solutions
1. Super optimal broth with catabolite repression (SOC) medium (see Recipes)
2. Ampicillin stock solution (100 mg/mL) (see Recipes)
3. Luria–Bertani (LB) broth and agar plates (see Recipes)
Recipes
1. Super optimal broth with SOC medium
| Reagent | Quantity | Final concentration |
| Tryptone | 5 g | 2% w/v |
| Yeast extract | 1.25 g | 0.5% w/v |
| NaCl | 125 mg | 8.56 mM |
| KCl | 46.5 mg | 2.5 mM |
| 1 M NaOH | 0.5 mL | 2 mM |
| 1 M glucose | 5 mL | 20 mM |
| 2 M MgCl2 | 5 mL | 40 mM |
| Nanopure water | to 250 mL | — |
| Total | 250 mL | 100% |
Weigh and add tryptone, yeast extract, NaCl, and KCl to a glass bottle. Adjust pH to ~7.0 by adding 0.5 mL of 1 M NaOH. Adjust the volume to 250 mL with Nanopure water. Autoclave for 15 min in a liquid cycle. After autoclaving, cool to room temperature and then add 5 mL of sterile-filtered 1 M glucose and 5 mL of autoclaved 2 M MgCl2 while close to a flame or in a biosafety cabinet. Once opened, 1 mL aliquots should be prepared for storage at -20 °C.
2. Ampicillin stock solution (100 mg/mL)
Weigh 1 g of ampicillin powder into a 15 mL sterile Falcon tube. Add 10 mL of autoclaved Nanopure water and invert until completely dissolved. To prevent contamination, sterilize the solution by passing it through a sterile 0.22 or 0.45 µm syringe filter inside a biosafety cabinet or close to a flame, but this step is unnecessary and often omitted, without causing any problems. Prepare 1–1.5 mL aliquots for storage at -20 °C.
3. LB broth
Weigh and add 10 g of tryptone, 5 g of yeast extract, and 5 g of NaCl into a 1-L glass bottle. Adjust the volume to 1 L with deionized H2O. Add 2 mL of 1 M NaOH to adjust pH to ~7.0. Tightly close the bottle with a cap and shake the bottle several times to mix. Loosen the cap slightly in preparation for autoclaving in the next step. Sterilize by autoclaving according to a liquid sterilization protocol (a 15-min cycle is sufficient for 1 L; for larger volumes, a 30-min cycle is required). Take out the flask carefully from the autoclave machine, allow the media to cool down at room temperature, and tighten the lid. Store the sterilized LB medium at room temperature. Once opened, store it at 4 °C for up to 6 months.
4. LB agar plates
Weigh and add 10 g of tryptone, 5 g of yeast extract, 5 g of NaCl, and 15 g of agar into a 2-L Erlenmeyer flask. Adjust the volume to 1 L with deionized H2O. Add 2 mL of 1 M NaOH to adjust pH to ~7.0. Mix the solution carefully by gently swirling the flask in a circular motion. Sterilize by autoclaving according to a liquid sterilization protocol (a 15-min cycle is sufficient for 1 L; for larger volumes, a 30-min cycle is required). In the meantime, set up a water bath to 50 °C. Take out the flask carefully from the autoclave and place it in the water bath for ~60 min to bring the temperature down, while preventing it from solidifying. Add some water from the 50 °C water bath to a Styrofoam bucket and place the flask with the molten LB agar media inside (this will slow down the solidification of the media). Next to an open flame, add 1 mL of ampicillin (100 mg/mL) and mix thoroughly by gently swirling the flask to uniformly mix the ampicillin, avoiding the formation of air bubbles. With the flame still on, use a 25-mL sterile pipette to transfer ~20 mL of the molten LB media onto the bottom of a sterile Petri dish; then, place the lid on top.
Repeat this procedure quickly with the rest of the molten LB media. Plates can be stacked in 5–10 piles to make the pouring easier and quicker. Leave the dishes on top of an even bench overnight to solidify and reduce the condensation that forms on the lid. The next day, use a permanent marker to mark the sides of the plates with 2 or 3 parallel black bars or lines as the code to indicate that the plates contain ampicillin (other colors or markings can be used depending on the labelling system used in each laboratory). Stack the plates into plastic bags. Remove as much air as possible from the bags and seal them properly to prevent the plates from drying out. Store them at 4 °C. They can be kept there up to 4 months.
Laboratory supplies
1. PCR tubes (Diamed Lab Supplies Inc., catalog number: DIATEC420-1378)
2. Autoclaved Pipetman tips
3. 25 mL sterile serological pipette (Fisherbrand, catalog number: 13-678-11)
4. 100 × 15 mm stackable Petri dishes (Fisherbrand, catalog number: FB0875712)
6. 1.5 mL autoclaved Eppendorf tubes
7. 50 mL plastic centrifuge tubes (Fisherbrand, catalog number: 0644321)
8. Resealable plastic bag
9. LB agar plates with the appropriate antibiotic
10. 2 L Erlenmeyer flask
11. 1 L Graduated glass bottle
Equipment
1. P2, P20, P200 and P100 Pipetman
2. Thermal Cycler (e.g., Bio-Rad, model: PCR T100)
3. Nanodrop UV-Visible spectrophotometer (e.g., Thermo Fisher Scientific, model: NanoDrop 2000)
4. 37 °C bacterial incubator (e.g., Sanyo, model: MIR-153)
5. 37 °C bacterial shaker (e.g., Infors AG, catalog number: 111096)
6. 42 °C water bath
7. Bunsen burner
8. Pipette controller (e.g., Drummond, model: Pipet-Aid)
9. Autoclave machine (e.g., STERIS Life Sciences, model: AMCO Lab 250 Steam Sterilizer)
10. 50 °C water bath (e.g., Precision Scientific, 66800)
11. Analytical scale (e.g., Mettler Toledo, 4200 g scale)
12. Styrofoam bucket
13. Centrifuge (e.g., Beckman Coulter, model: AllegraTM 6R Centrifuge)
14. Benchtop centrifuge (e.g., Eppendorf, model: Centrifuge 5425)
Software and datasets
1. SnapGene software package (v.8.2): https://www.snapgene.com/
Procedure
Basic Protocol 1: P3a site-directed mutagenesis via partially complementary primer pairs to introduce point mutations, insertions, deletions, and fragment replacements.
Basic Protocol 2: P3b site-directed mutagenesis via partially complementary primer pairs for high GC-rich sequences.
Alternate Protocol 1: QC2 site-directed mutagenesis via completely overlapping primer pairs to introduce point mutations and small insertions or deletions.
Alternate Protocol 2: Multisite mutagenesis via the P3a or P3b method.
Basic Protocol 3: Isolation of plasmids from transformed bacterial colonies for sequence analysis.
Basic Protocol 4: Validating mutagenesis results via DNA sequencing.
Basic protocol 1
P3a site-directed mutagenesis via partially complementary primer pairs to introduce point mutations, deletions, insertions, and replacements
This protocol details the practical execution of the P3a method, utilizing partially complementary primer pairs and high-fidelity polymerases to seamlessly introduce point mutations, insertions (up to 0.4 kb), and deletions (up to 5 kb) [21]. Primer design is the most critical factor for mutagenesis efficacy. It is highly recommended to pay particular attention to this step; double-checking the sequence and orientation before primer ordering is essential. The SnapGene software package offers an intuitive tool for this process, generating primer sequences that can be copied and pasted directly to Word or Excel files for record-keeping before ordering. Manual typing of primer sequences is not recommended due to the likelihood of typos that will hinder all mutagenesis efforts.
Following DpnI digestion of the PCR mutagenesis reactions, the mutated plasmids must be transformed into competent bacterial cells for recovery, selection, and amplification. Utilizing well-prepared, standardized culture media, particularly the selective agar plates, is essential to ensure highly reproducible mutagenesis workflows and accurate assessments of the overall mutation success rate.
A. Primer design and preparation
1. Design primers using the SnapGene software package (version 8.2).
a. Point mutations: Design partially overlapping primer pairs (~30 nucleotides long) (Figure 1B). It is recommended that primers include 18–20 nucleotides in the complementary region flanking the single-nucleotide mutation, and 9 nucleotides in the non-overlapping regions. The non-overlapping regions must be oriented to achieve 3′ overhangs. Alternative primer design strategies can be used to introduce two mutations using a single set of primers (Figure 1C–E). Furthermore, as a general design rule, if a target primer sequence contains long runs of A/G or T/C (typically more than five consecutive bases), it is highly recommended to introduce a silent mutation to break the continuous stretch and prevent amplification artifacts.
b. Deletions/insertions/replacements: Design primers where the complementary arms correspond to the regions flanking the desired deletion or insertion site. As illustrated in Figure 1F, deletions are introduced using two primers with 5′-arms complementary to the regions flanking the sequence to be deleted. This approach enables the removal of DNA fragments ranging from a few base pairs to several kilobases. Similarly, insertions are achieved using primers with complementary arms to the regions flanking the insertion site (Figure 1G). Importantly, this approach can also be utilized to replace entire DNA fragments. In this case, the mutagenesis reaction will cause the direct conversion of fragment A to fragment B. Conceptually, insertions and deletions operate simply as specialized variations of fragment replacement where the sequence being replaced or introduced is zero base pairs.
c. Two primer-designing examples:
Example 1: As illustrated in Figure 2A and B, locate the region of interest and replace the necessary nucleotides (e.g., changing the ATC isoleucine-377 codon of BRPF1 to a valine codon requires replacing the "A" with "G"). We recommend using a lower-case letter to track the mutation site: 5′-gTC-3′.
i. Forward primer: Using the top strand (5′ to 3′), highlight ~18–20 nucleotides encompassing the mutation to define the complementary region (Figure 2A) and an additional ~9 nucleotides toward the 3′ end (right) to define the 3′-overhang (Figure 2B). The total primer length should be ~30 nt. Click the Primers tab, select Add Primer, and choose Top Strand. Rename the primer (e.g., I377V-F; Figure 2C, red arrow) and review the calculated %GC and Tm parameters (Figure 2C, red and blue boxes). Click Add Primer to Template to accept the primer design. The primer sequence can be copied directly from the primer window to a Word or Excel file.
ii. Reverse primer: Using the top strand as a reference, highlight the same ~18–20 nucleotides for the complementary region and an additional ~9 nucleotides toward the 5′ end (left) to define the 3′-overhang. Highlight the sequence, navigate to Add Primer, and choose the Bottom Strand option. Review the reverse primer as described above and also add it to the template (Figure 2D). Copy the primer sequence directly from the primer window and paste it into a Word or Excel file.
iii. If the new amino acid residue to be engineered has multiple codons, it is recommended to choose the one with the highest codon usage efficiency if it does not shift the local GC content too much. If the local sequence is GC-rich, it is recommended to choose a codon with T or A. For example, instead of GCC, GCT or GCA are preferred for engineering an alanine residue. For codon usage efficiency, at https://www.genscript.com/tools/codon-frequency-table, the host species to express the target protein can be selected.
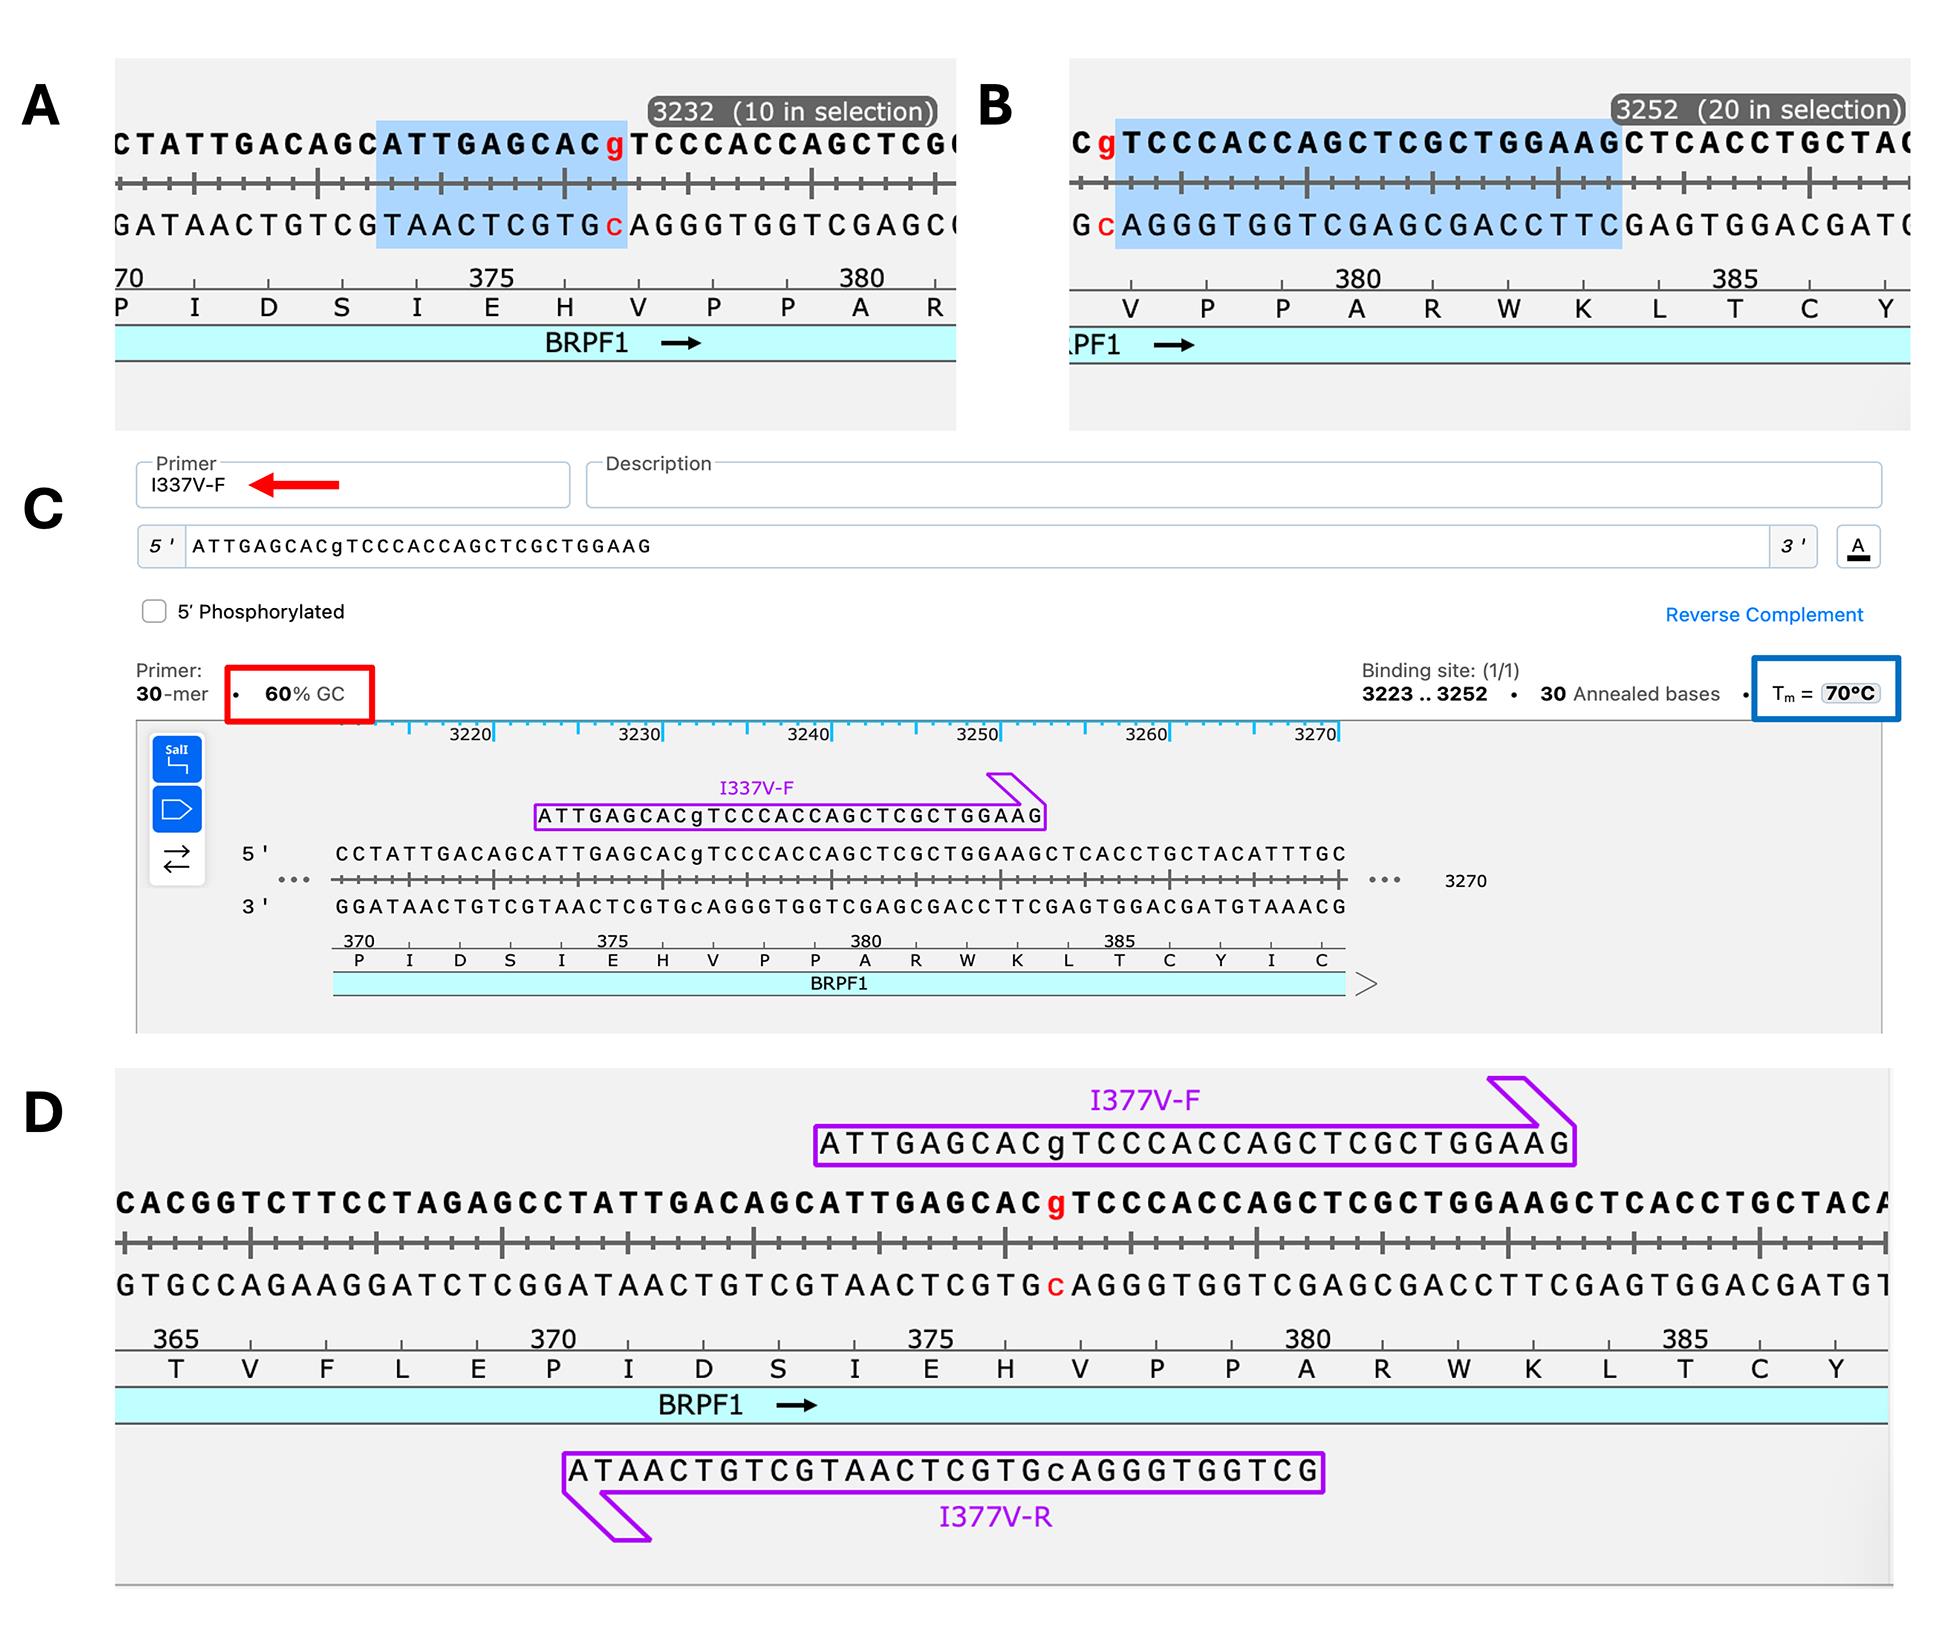
Figure 2. Step-by-step primer design workflow via SnapGene. (A, B) Sequence views illustrating the sequential selection of the forward primer regions. (A) Selection of the ~9 bp complementary region upstream of the mutation site. (B) Subsequent selection of ~20 bp downstream from the mutation site. To track the exact mutation site during the design process, the substituted nucleotide is distinctly marked using both lowercase lettering and red text (e.g., 5′-gTC-3′). (C) Primer generation tab interface. This window allows the user to assign a customized primer name (e.g., I377V-F; indicated by the red arrow) and review the calculated thermodynamic parameters essential for successful PCR amplification, such as %GC (red box) and Tm (blue box), before clicking Add Primer to Template. (D) Final sequence visualization displaying both the designed forward and reverse primers mapped onto the template. This view confirms the correct positioning of the ~18–20 bp complementary regions and ~10–11 bp 3′-overhangs, resulting in a total primer length of approximately 30 nt. This set of primers was previously referred to as I377V-F3/R3 [20].
Example 2: As illustrated in Figure 3, primers for introducing epitope replacement and deletion can be designed similarly to those shown above for engineering point mutations.
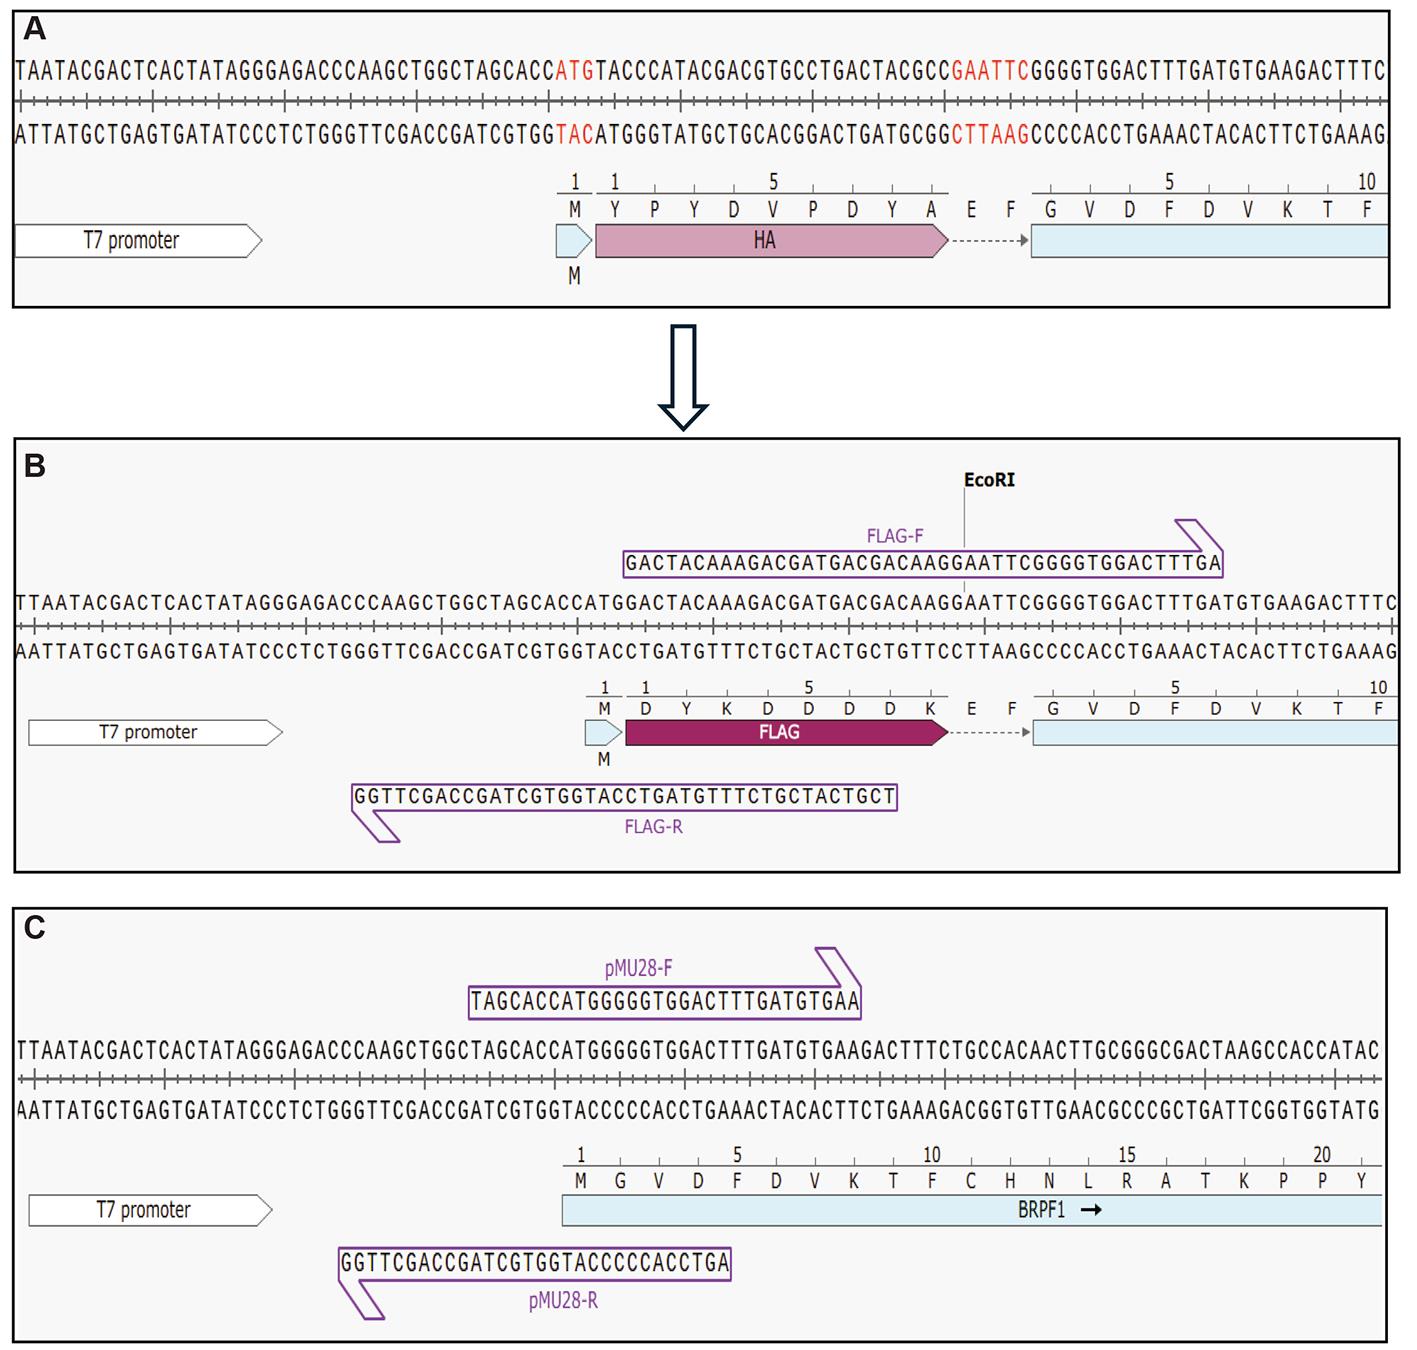
Figure 3. Epitope-tag replacement or deletion on a BRPF1 expression plasmid via P3a cassette mutagenesis. (A) DNA sequence encoding the N-terminal region of human BRPF1. The original sequence contains an N-terminal HA tag followed by an EcoRI restriction site upstream of the BRPF1 coding sequence. The HA tag to be replaced (B) or removed (C) via P3a cassette mutagenesis is highlighted. (B) Design of two partially complementary primers to replace the HA tag with a FLAG tag via P3a mutagenesis. The primers are designed to delete the HA tag and insert the coding sequence for the FLAG tag immediately downstream of the start codon, generating an expression construct for an N-terminal FLAG-tagged BRPF1. (C) Design of two partially complementary primers to delete the HA tag via P3a mutagenesis. The primers are designed to remove the HA tag and EcoRI restriction site, placing the start codon immediately upstream of the BRPF1 coding sequence. For additional examples of deletion, insertion, and replacement, see [21].
2. When satisfied with the design, proceed with ordering the synthesis of the oligos. It is highly recommended to copy and paste the primer sequences directly from SnapGene rather than typing them manually. This simple practice minimizes the chances of introducing typographical errors that could hinder all subsequent mutagenesis efforts. Before submitting the order, double-check the sequence and its orientation according to the matching template.
Note: Following primer design, it is recommended to perform a virtual PCR within SnapGene to validate the successful introduction of the intended mutation. This in silico visualization confirms that the amplified sequence remains in-frame and is free of premature stop codons—a critical check when performing multi-nucleotide replacements, insertions, or deletions. Utilizing this verification step ensures experimental accuracy and optimizes both time and resource allocation.
3. Once a primer is received, check its amount and dissolve the lyophilized oligonucleotide in autoclaved Nanopure water to prepare a 100 μM stock (i.e., 100 pmol/μL), then dilute 5 μL in 95 μL of autoclaved Nanopure water to prepare a 5 μM (i.e., 5 pmol/μL) working solution. For convenience, mix forward and reverse primers for each mutation into a single working solution tube, with each at 5 pmol/μL.
B. Mutagenesis via PCR amplification
1. Measure the concentration of the template plasmid DNA using a Nanodrop UV-Visible spectrophotometer. Based on the concentration, prepare a working dilution of 0.1 μg/μL.
2. Set up a 10 μL PCR reaction containing 4.4 μL of autoclaved Nanopure water, 0.1 μL of the plasmid mixture (0.1 μg/μL; if multiple mutation reactions are carried out with the same plasmid, pre-mix the plasmid with water to minimize pipetting and ensure consistency from reaction to reaction), 0.5 μL of forward/reverse primer mixture (5 pmol/μL for each), and 5.0 μL of 2× Platinum SuperFi II or Q5 PCR master mix.
Note: It is recommended to add the reagents in the order listed above, starting with water and ending with the PCR master mix. This ensures the use of the capillary suction principle to inject the rest of the reagents into the water already in the tube. To reduce pipetting time, if the template is the same, the same tip can be used for all the tubes, except for the addition of different primers and the PCR mix. When adding the PCR master mix, pipette the final solution up and down 2–3 times for the 2× Platinum SuperFi II PCR master mix, but 4–5 times for the Q5 master mix to mix it. Avoid generating air bubbles.
3. Perform PCR on a thermal cycler:
a. Initial denaturation: 96 °C for 3 min
b. 19 to 22 cycles of:
Denaturation: 93 °C for 15 s
Annealing: 52 °C for 20 s (or at an adjusted annealing temperature according to primers, e.g., 60 °C as recommended for SuperFi II polymerase by Thermo Fisher Scientific)
Extension: 72 °C for 3–5 min (20–30 s per kb)
c. Final extension: 72 °C for 5-10 min
d. Hold: 4 °C.
Notes:
1. While standard manufacturer protocols for Q5 and Platinum SuperFi II recommend 98 °C for optimal denaturation, we have also successfully utilized 93 °C for specific P3a-optimized reactions.
2. It is recommended to limit amplification to a maximum of 25 cycles. Although higher cycle numbers favor further amplification, they proportionally increase the probability of polymerase-induced random mutations throughout the synthesized plasmid, even when using high-fidelity DNA polymerases.
C. DpnI digestion and transformation
1. Add 0.25 μL of DpnI (20 U/μL) to each reaction mixture.
2. Transfer the entire content of each tube into a clean PCR tube to prevent contamination from undigested template on the original tube wall.
3. Incubate at 37 °C for 90 min in a thermal cycler. This step can be reduced to 15–30 min (unpublished data); after digestion, transfer the tube to an ice bucket.
4. Thaw DH5α competent cells on the ice bucket and transfer a 10 μL aliquot into a prechilled sterile 0.5 mL Eppendorf tube. The remaining competent cells can be flash-frozen on dry ice for storage at -80 °C.
5. With a flame close by, transfer 1 μL of the DpnI-digested mixture to 10 μL of DH5α competent cells (kept on ice) and gently tap the tube 2–3 times with a finger. Put the tube back on ice immediately.
Note: Typically, we keep the main stocks of competent cells as 1–2 mL per tube in a liquid nitrogen tank for long-term storage (up to 13 years); for working stocks, we take one tube from the tank and thaw it on ice (taking 5–10 min). Quickly, 0.1–0.2 mL aliquots are dispensed into 1.5 mL sterile Eppendorf tubes prechilled on dry ice for flash freezing; such aliquots are kept at -80 °C for up to 6 months. Prior to transformation, one aliquot is thawed on ice, taking approximately 3 min, and 10 μL is transferred into a sterile 0.5 mL tube prechilled on ice for each transformation. If fewer than 10 transformations are carried out, the remaining competent cells can be rapidly frozen on dry ice and stored at -80 °C for the next experiment. But do not freeze and thaw the competent cells more than three times.
6. Incubate the tube on ice for 30 min.
7. Heat-shock at 42 °C for 45 s and quickly return the tube to ice.
8. Next to a flame, add 60 μL of ice-cold SOC medium to each tube.
9. Incubate the tube in a 37 °C water bath for 30 min. No shaking is needed. On the contrary, it is recommended to avoid shaking as the cells are still fragile at this stage, which is different from what is stated in many published protocols.
10. Close to a flame, pipette the transformation mixture onto an LB-agar plate (containing the appropriate antibiotic, such as ampicillin or kanamycin, matching the plasmid to be mutated) as 3–4 drops in a row and spread the drops on the LB agar plate with a sterile 1.5-mL Eppendorf tube. The lower surface of the tube can be used to spread the mixture while its cap is being held with a hand. To spread the mixture, move the tube back and forth over the drops 3–4 times, which is sufficient to spread the bacterial cells for growing colonies that are evenly distributed.
Note: To avoid contamination, aliquots of SOC medium are frozen at -20 °C. To minimize costs, two different transformation mixtures can be spread onto a single agar plate. Draw a central line at the bottom of the plate with a permanent marker and strictly confine each mixture to its respective half, avoiding the center line to prevent the reactions from mixing or cross-contamination. In this case, it is recommended to leave the plate facing up on a bench for 15–60 min.
11. Allow the plates to dry on a bench for 3–5 min.
12. Incubate the plates overnight in a 37 °C bacterial incubator, which should contain a beaker or flask of water to maintain a certain level of humidity. Make sure to flip the plate before placing it into the incubator to avoid potential condensation that would form and drop onto the colonies while they are growing during the incubation.
Pause point: After 18–24 h, inspect the plate for transformed colonies. Colonies can be directly inoculated, or plates can be wrapped up in thin plastic film and stored at 4 °C for later use.
Note: Large colonies are preferred to allow the growth of dense bacterial cultures and obtain high plasmid yields in Basic Protocol 3. For this, the plate can be kept in the incubator up to 24 h. Satellite colonies can form if the incubation is longer than this, and they should be avoided as they are not the correct ones. This is important, as we have seen that purely due to misunderstanding, multiple trainees have tried to obtain colonies by allowing plates at 37 °C for more than one day.
Basic protocol 2
P3b site-directed mutagenesis via partially complementary primer pairs for high-GC plasmid sequences
This protocol is specifically optimized for plasmids where standard P3a and QC2 methods fail due to extremely high GC content (e.g., CAG promoters, intrinsically disordered domains, Cas9 vectors) or stable secondary structures, like G-quadruplexes, that can stall DNA replication [29–32]. To overcome the structural barriers posed by these sequences, P3b utilizes modified PCR parameters characterized by a high-temperature pre-denaturation step at 105 °C, which is designed to fully disrupt stubborn secondary structures before the initial amplification cycle. Furthermore, an elevated denaturation temperature is maintained during cycling to ensure GC-rich regions remain accessible for amplification.
The success of this protocol also relies on the use of Platinum SuperFi II, but not Q5 DNA Polymerase. Its extreme thermal stability, low error rate, and high processivity allow it to withstand these rigorous conditions while maintaining the high fidelity required for mutagenesis. This is unlike the P3a method, for which Q5 and SuperFi II exhibit comparable success rates [21]. For more complex structural edits, the P3b method can also be used to engineer deletions, insertions, or fragment replacements, as tested for the P3a method [21,24].
If colonies are successfully obtained via the P3a method, but Sanger sequencing fails despite the use of appropriate primers or yields unwanted deletions, it is highly recommended to analyze the plasmid sequence and inspect the GC content. Experimentally, it is recommended to perform restriction digestion of the purified plasmids or use Plasmidsaurus for whole-plasmid sequencing (see Basic Protocol 4). Unwanted large deletions or insertions can be easily identifiable as aberrations in the expected restriction pattern when compared to the wild-type template. For routine point mutations, the restriction pattern should remain identical to the wild type. If the intended mutation inadvertently disrupts a known restriction site, simply select an alternative enzyme for this analysis. If restriction digestion confirms the presence of structural aberrations, the P3b method is a potentially effective solution. In our experience with complex templates, such as the FLAG-KAT2B and CDK13 plasmids, high-GC regions within the wild-type backbone rendered the standard P3a method incompatible, even when these GC-rich regions were located far from the targeted mutation site [24]. Transitioning to the P3b protocol successfully resolved these structural barriers.
A. Primer design and preparation
Same as Basic Protocol 1.
B. Mutagenesis via PCR amplification
1. Measure the concentration of your template plasmid DNA using a Nanodrop UV-Visible spectrophotometer. Based on the concentration, prepare a working dilution of 0.1 μg/μL.
2. (Critical) Incubate the plasmid working dilution at 105 °C for 5 min using a thermal cycler with the heated lid engaged to prevent sample evaporation and tube opening. Immediately after, transfer onto ice for rapid cooling.
Note: This pre-denaturation step is performed independently on the template prior to setting up PCR reactions and is not part of the thermal cycler program. The heat-denatured DNA can be used immediately or stored at -20 °C for up to a few months. Alternatively, alkali denaturation can be performed. For this, mix 18 μL of plasmid (0.1 μg/μL) with 2 μL of 2 M NaOH and incubate the mixture at 65 °C for 5 min as described [24]. Transfer the tube to a rack at room temperature and add 2 μL of 2 M HCl for neutralization. Just like the heat-denatured plasmid, the alkali-denatured DNA can be used immediately or stored at -20 °C for up to a few months.
3. Set up a 10 μL PCR reaction containing 4.4 μL of autoclaved Nanopure water, 0.1 μL of the plasmid mixture (0.1 μg/μL; if multiple mutation reactions are carried out, pre-mix the plasmid with the above water to minimize pipetting and ensure consistency from reaction to reaction), 0.5 μL of the forward/reverse primer mixture (5 pmol/μL for each), and 5.0 μL of 2× Platinum SuperFi II PCR master mix.
Note: It is recommended to add the reagents in the order listed above, starting with water and ending with the PCR master mix. This ensures the use of the capillary suction principle to inject the rest of the reagents into the water already in the tube. To reduce pipetting time, if the template is the same, the same tip can be used for all tubes, except for the addition of different primers and the PCR mix. When adding the PCR master mix, pipette the final solution up and down a couple of times to mix it. Avoid the injection of air bubbles.
4. Perform PCR in a thermal cycler:
a. Initial denaturation: 98 °C for 3 min
b. 19 to 22 cycles of:
Denaturation: 96 °C for 15 s
Annealing: 50–60 °C for 20 s (Platinum SuperFi II DNA Polymerase features a universal, standard annealing temperature of 60 °C for most standard primer pairs, but adjusting the annealing temperature for particular cases might be needed, according to Tm values of the primers; Snapgene calculates the Tm values automatically)
Extension: 72 °C for 3–5 min (20–30 s per kb)
c. Final extension: 72 °C for 5–10 min
d. Hold: 4 °C.
Note: It is recommended to limit amplification to a maximum of 22 cycles. Although higher cycle numbers favor further amplification, they proportionally increase the probability of polymerase-induced random mutations throughout the synthesized plasmid, even when using high-fidelity DNA polymerases.
C. DpnI digestion and transformation
Same as Basic Protocol 1.
Alternate protocol 1
QC2 site-directed mutagenesis via completely overlapping primer pairs to introduce point mutations and small insertions or deletions
While the P3a and P3b methods offer unparalleled versatility and efficiency, researchers who strictly engineer simple point mutations may prefer a more cost-effective approach. The QuickChange 2.0 (QC2) method builds upon the familiar, traditional QuickChange primer design by using completely complementary primer pairs that cost approximately 50% less to synthesize than their P3a and P3b counterparts. By upgrading the classical reaction with modern high-fidelity, highly processive DNA polymerases, this protocol retains the rapid 2-h thermal cycling time while reliably achieving an average mutagenesis efficiency between 48% and 69% [20]. The QC2 primer design is fully compatible with both the standard thermal cycling parameters of the P3a method and the specialized pre-denaturation conditions of the P3b method for GC-rich targets. This alternate protocol provides a highly economical workflow for routine point mutagenesis.
A. Primer design and preparation
1. Design completely overlapping primer pairs (~20–25 nucleotides long, Figure 1A), using bioinformatic software such as SnapGene (version 8.2). Center the desired single-nucleotide mutation site within the primer sequence. Because the primers are entirely complementary, the reverse primer must be the exact reverse complement of the forward primer, thereby incorporating the complement of the target mutation (e.g., if the forward primer introduces a C, the reverse primer must contain a G at that position).
2. Dissolve lyophilized oligonucleotides in autoclaved Nanopure water to prepare a 100 μM stock (i.e., 100 pmol/μL), then dilute to create 5 μM working solutions. Mix forward and reverse primers for each mutation into a single working tube (i.e., 5 pmol/μL).
B. Mutagenesis via PCR amplification
Same as Basic Protocol 1 or 2 (if using P3b conditions).
C. DpnI digestion and transformation
Same as Basic Protocol 1.
Alternate protocol 2
Multisite mutagenesis via P3a or P3b methods
Engineering multiple mutations at distant sites presents a unique logistical challenge. Mixing multiple primer pairs in a single PCR reaction often leads to preferential amplification of short inter-primer fragments rather than the full-length plasmid, thereby resulting in mutagenesis failure. Conversely, performing sequential rounds of single-site mutagenesis reactions with standard validation (plating, picking, and sequencing) is time-consuming, requiring weeks to engineer multiple mutations (Figure 4A). QuickChange is inherently limited for multisite mutagenesis, often requiring sequential rounds of mutagenesis that increase time, cost, and error accumulation. To solve this problem, we have developed a rapid multisite mutagenesis strategy (Figure 4B) [24]. This method exploits the near-perfect efficiency (>90%) of the P3a and P3b methods to bypass intermediate plating and colony selection steps. Instead, transformation mixtures are grown in one tube for miniprep isolation of the plasmid mixture, which will then serve immediately as the template for the next round of mutagenesis. This cycle is repeated daily, allowing to engineer one mutation per day without plating bacteria or colony isolation until the final round of mutagenesis (Figure 4B) [24]. However, when the efficiency for each round is only approximately 50%, the overall efficiency after multiple rounds of reactions leads to very low efficiency [24]. Thus, this strategy does not work with the QC2 method.
To successfully implement this rapid cycling strategy, several critical factors need to be considered. First, high mutagenesis efficiency is essential. Use only P3a or P3b conditions to ensure that the efficiency at each cycle remains >90%. As noted above, it is not wise to attempt this with the P3 (Pfu-based) [16] or QC2 protocol [20], whose efficiency is only ~50%. Second, it is important to ensure the plasmid pool isolated after each round is clean and at a sufficient concentration by measuring it via Nanodrop, as carryover contaminants can inhibit subsequent PCR cycles. Moreover, primer design should be optimal, and it is crucial to verify that primers for subsequent rounds do not anneal to the mutation sites introduced in previous rounds to avoid "reverting" the sequence. Finally, while intermediate checks are skipped, the final clone must be fully sequenced across all target sites to confirm the presence of every accumulated mutation (see Basic Protocol 4). It is also recommended to validate this via whole-plasmid sequencing (see Basic Protocol 4). We have used the strategy to engineer five mutations of the SARS-CoV-2 spike protein (Figure 4C) [24].
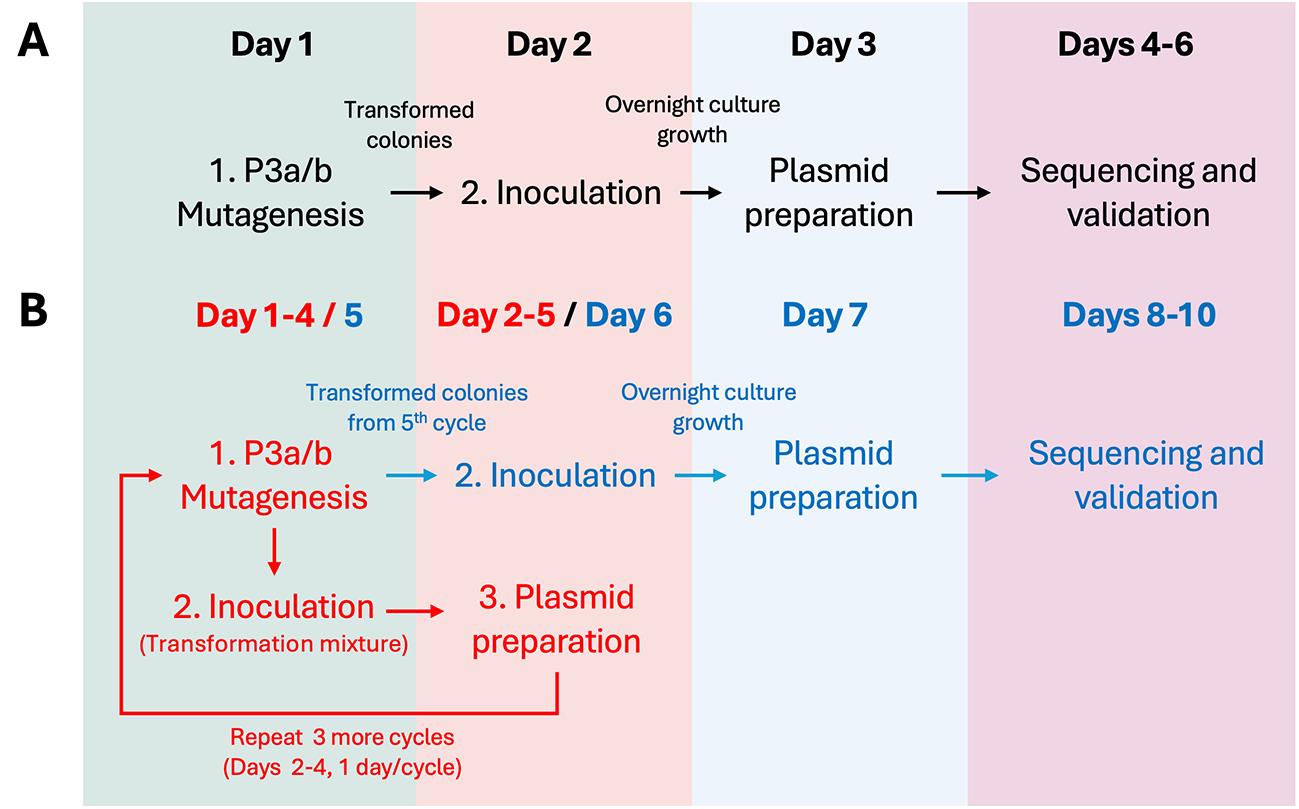
Figure 4. Comparison of standard and multisite mutagenesis workflows. (A) Standard single-site mutagenesis. The workflow follows a linear progression: PCR amplification, DpnI digestion, transformation, and immediate plating on a selective agar plate [21]. On day 2, individual colonies are picked for inoculation and grown in liquid media overnight. On day 3, plasmid isolation is performed, and samples are sent for sequencing and validation. (B) Iterative sequential mutagenesis for multisite mutagenesis. To introduce multiple mutations (e.g., five distinct ones) without sequential plating on agar plates, the post-transformation bacterial mix is directly inoculated into liquid media [24]. On day 2, following overnight amplification, the bulk plasmid population is isolated via miniprep and utilized directly as the template for the next mutagenesis PCR cycle. This cycle (PCR → DpnI → transformation → liquid culture → miniprep) is repeated until the final mutation is introduced. Only after the final cycle are the transformed bacteria plated on solid agar plates to isolate individual, fully mutated colonies, which are subsequently validated using multiple Sanger sequencing reactions or whole-plasmid sequencing to confirm the successful integration of all intended mutations. (C) Domain organization of SARS-CoV-2 spike protein and five mutations identified in new Omicron variants. Refer to [24] for more details.
A. Primer design and preparation
1. Design partially overlapping primer pairs (~30 nucleotides long) (Figure 1B) for all the distinct mutation sites (e.g., 5 primer pairs for 5 different single point mutations), using bioinformatic software such as SnapGene (version 8.2). Verify that primers for subsequent rounds do not anneal to the mutation sites introduced in previous rounds (see Basic Protocol 1, step A1).
2. Dissolve lyophilized oligonucleotides in autoclaved Nanopure water to prepare 100 μM stocks (i.e., 100 pmol/μL) and then dilute them to create 5 μM working solutions. Mix forward and reverse primers for each mutation into a single working solution (i.e., 5 pmol/μL).
B. Mutagenesis via PCR amplification
Same as Basic Protocols 1 and 2. However, a different set of forward/reverse primers must be used in each mutagenesis round.
C. DpnI digestion and transformation
1. Add 0.25 μL of DpnI to each reaction mixture.
2. After PCR, transfer the entire content of each tube into a clean PCR tube to prevent contamination from undigested template on the original tube walls.
3. Incubate at 37 °C for 90 min in a thermal cycler.
4. Next to a flame, add 1 μL of the DpnI-digested mixture to 10 μL of DH5α competent cells (kept on ice).
5. Incubate on ice for 30 min.
6. Heat-shock at 42 °C for 45 s and quickly return to ice.
7. Turn on a flame and add 60 μL of cold SOC medium to each tube.
8. Incubate in a water bath set to 37 °C for 30 min.
9. Next to a flame, carefully add the transformation mixture into 6 mL of liquid LB media with the appropriate antibiotic (matching the plasmid design).
10. Incubate the bacterial cultures in a 37 °C bacterial shaker at 225 or 230 rpm for 16–24 h.
11. The next day, use this bacterial culture to isolate the mutated plasmid from round 1 and use it as a template for round 2 mutagenesis (see Basic Protocol 3).
12. Repeat sections B (mutagenesis via PCR amplification) and C (DpnI digestion and transformation) until reaching the last mutagenesis cycle (e.g., if five different mutations are intended, repeat the mutagenesis step four more times).
13. After the last mutagenesis cycle, carry out Basic Protocol 1, section C (DpnI digestion and transformation). An illustration of this multisite strategy is shown in Figure 4B [24].
Note: If Sanger sequencing is used for sequence validation of the entire construct, ensure that different sequencing primers are utilized to cover and confirm all distinct mutation sites to be engineered during the iterative cycles. Alternatively, whole-plasmid sequencing at Plasmidsaurus can be employed, which does not require any sequencing primers, is more economical than Sanger Sequencing (due to the multisite nature), and provides better coverage (see Basic Protocol 4).
Basic protocol 3
Isolation of plasmids from bacterial colonies for sequence analysis
Plasmids are prepared from bacterial cultures using a QIAprep® Spin Miniprep kit. The steps below are adapted from the manufacturer's protocol, with specific modifications made to expedite the procedure.
A. Inoculation
1. Working near a flame, inoculate 2–4 isolated bacterial colonies from each mutagenesis transformation plate into individual culture tubes (one colony per tube, last step from Basic Protocol 1), each containing 6 mL of LB broth (see Recipes) supplemented with the appropriate antibiotic to a final concentration of 100 μg/mL (e.g., ampicillin).
Note: For P3a, since the expected mutagenesis efficiency is greater than 75%, only two bacterial colonies need to be analyzed per mutation. For QC2, since the efficiency is lower than that of P3a, analyzing 3–4 colonies is required to ensure that at least one is correct. To prevent sample mix-ups, ensure simple but careful labeling of all tubes across every stage of the isolation process (including resuspension tubes, spin columns, collection tubes, and final 1.5 mL storage tubes). Typically, a simple numerical system (e.g., 1–12 for 12 tubes) can help avoid mix-ups and also save time. It is important to keep clear lab records so that each tube can be accurately tracked.
2. Incubate the bacterial cultures in a 37 °C bacterial shaker at 230 rpm.
B. Plasmid isolation
1. The next morning, pellet the bacterial cultures by centrifugation at approximately 2,000× g for 5 min at room temperature.
Optional: It is a good research practice to keep a glycerol stock from your overnight culture as a backup in case the plasmid is lost. Per bacterial culture, remove 0.5 mL of the culture and mix it with 0.5 mL of 50% glycerol. Store the resulting glycerol stock at -80 °C. However, this step takes time and freezer space, so it can be avoided if miniprep plasmids are securely stored and do not get lost.
2. Discard the supernatant by aspiration (e.g., using a glass Pasteur pipette linked to a 2-L flask connected to a vacuum line) as much as possible, but be careful not to allow the vacuum line to suck away the bacterial pellet. One approach is to point the Pasteur pipette slightly away from the pellet.
3. Add 250 μL of buffer P1 to each tube and resuspend the pelleted bacterial cells. Transfer each suspension sample to a fresh 1.5 mL sterile microcentrifuge tube.
4. Add 250 μL of buffer P2 to each tube and mix thoroughly by inverting the tube approximately 3–5 times until the solution becomes clear. Allow the lysis reaction to proceed at room temperature for approximately 1–2 min (but strictly no more than 5 min). Due to the LyseBlue pH indicator, the solution turns blue at this step.
5. Add 350 μL of buffer N3 (pre-chilled and kept at 4 °C) to each tube and mix thoroughly by inverting the tube 3–5 times. The blue solution now turns colorless upon neutralization and white cotton–like precipitates become visible.
6. Immediately place the tube on ice for 5 min; alternatively, the tube can be put inside a ~20 °C freezer (along with a rack, no direct contact of the tube with ice in the freezer) for 5 min.
Note: If using a -20 °C freezer, do not exceed 5 min to prevent freezing. This extra cooling step expedites the precipitation and shortens the subsequent centrifugation.
7. Centrifuge the tubes at ~16,000× g for 3 min in a tabletop microcentrifuge at room temperature. Instead of 10 min, only 3 min is used here to save time, reduce centrifuge usage, and minimize noise from centrifugation.
8. With a sterile 1-mL pipette tip, carefully transfer 0.75 mL of the cleared supernatant onto the QIAprep 2.0 spin column, avoiding the interface with the white precipitates. Only 0.75 mL is taken, instead of the entire supernatant, to minimize the carryover of the precipitates.
Note: This is especially important for sequencing with Oxford Nanopore Technology, which requires plasmids of better quality than restriction digestion and Sanger sequencing.
9. Centrifuge the column at ~5,300× g for 30 s and discard the flowthrough.
10. Wash the column by adding 0.85–0.9 mL of buffer PE (containing 80% ethanol). Centrifuge at ~5,300× g for 30 s and discard the flowthrough in the collection tube.
11. Transfer the column back to the collection tube and centrifuge again at ~5,300× g for 1 min to ensure complete removal of residual wash buffer.
12. Place the QIAprep 2.0 column into an autoclaved 1.5 mL microcentrifuge tube.
13. To elute the DNA, add 100 μL of autoclaved Nanopure water to the center of the column. Let it stand at room temperature for 1–2 min and centrifuge at ~5,300× g for 1 min. Discard the column.
14. Use 1 μL of the eluate to measure the concentration on a Nanodrop UV-Visible spectrophotometer.
Note: If many colonies are analyzed for restriction digestion or Sanger sequencing (e.g., 12 or 24), measure one out of every 4 or 6 samples to verify the plasmid isolation experiment. The typical concentration ranges from 0.1 to 0.5 μg/μL. However, for Oxford Nanopore sequencing, it is recommended to measure the concentration of each plasmid, as the service is much more expensive and requires a more accurate concentration.
15. Date the tube, keep a good record, and store it at -20 °C as the original stock. Even if the content is used up, it is important to keep the empty tube, as it can be used to recover the plasmid when necessary.
Note: To recover the plasmid from such an empty tube, add a few microliters of sterile water, tap the tube a few times, and use 0.1 μL for transformation of 1 μL of DH5α competent cells (as shown in Figure 5B, right), which is especially important when no glycerol stock is prepared in step B1 or is lost.
16. Send an aliquot for Sanger or Oxford Nanopore sequencing (see protocols below) and store the remaining stock at -20 °C.
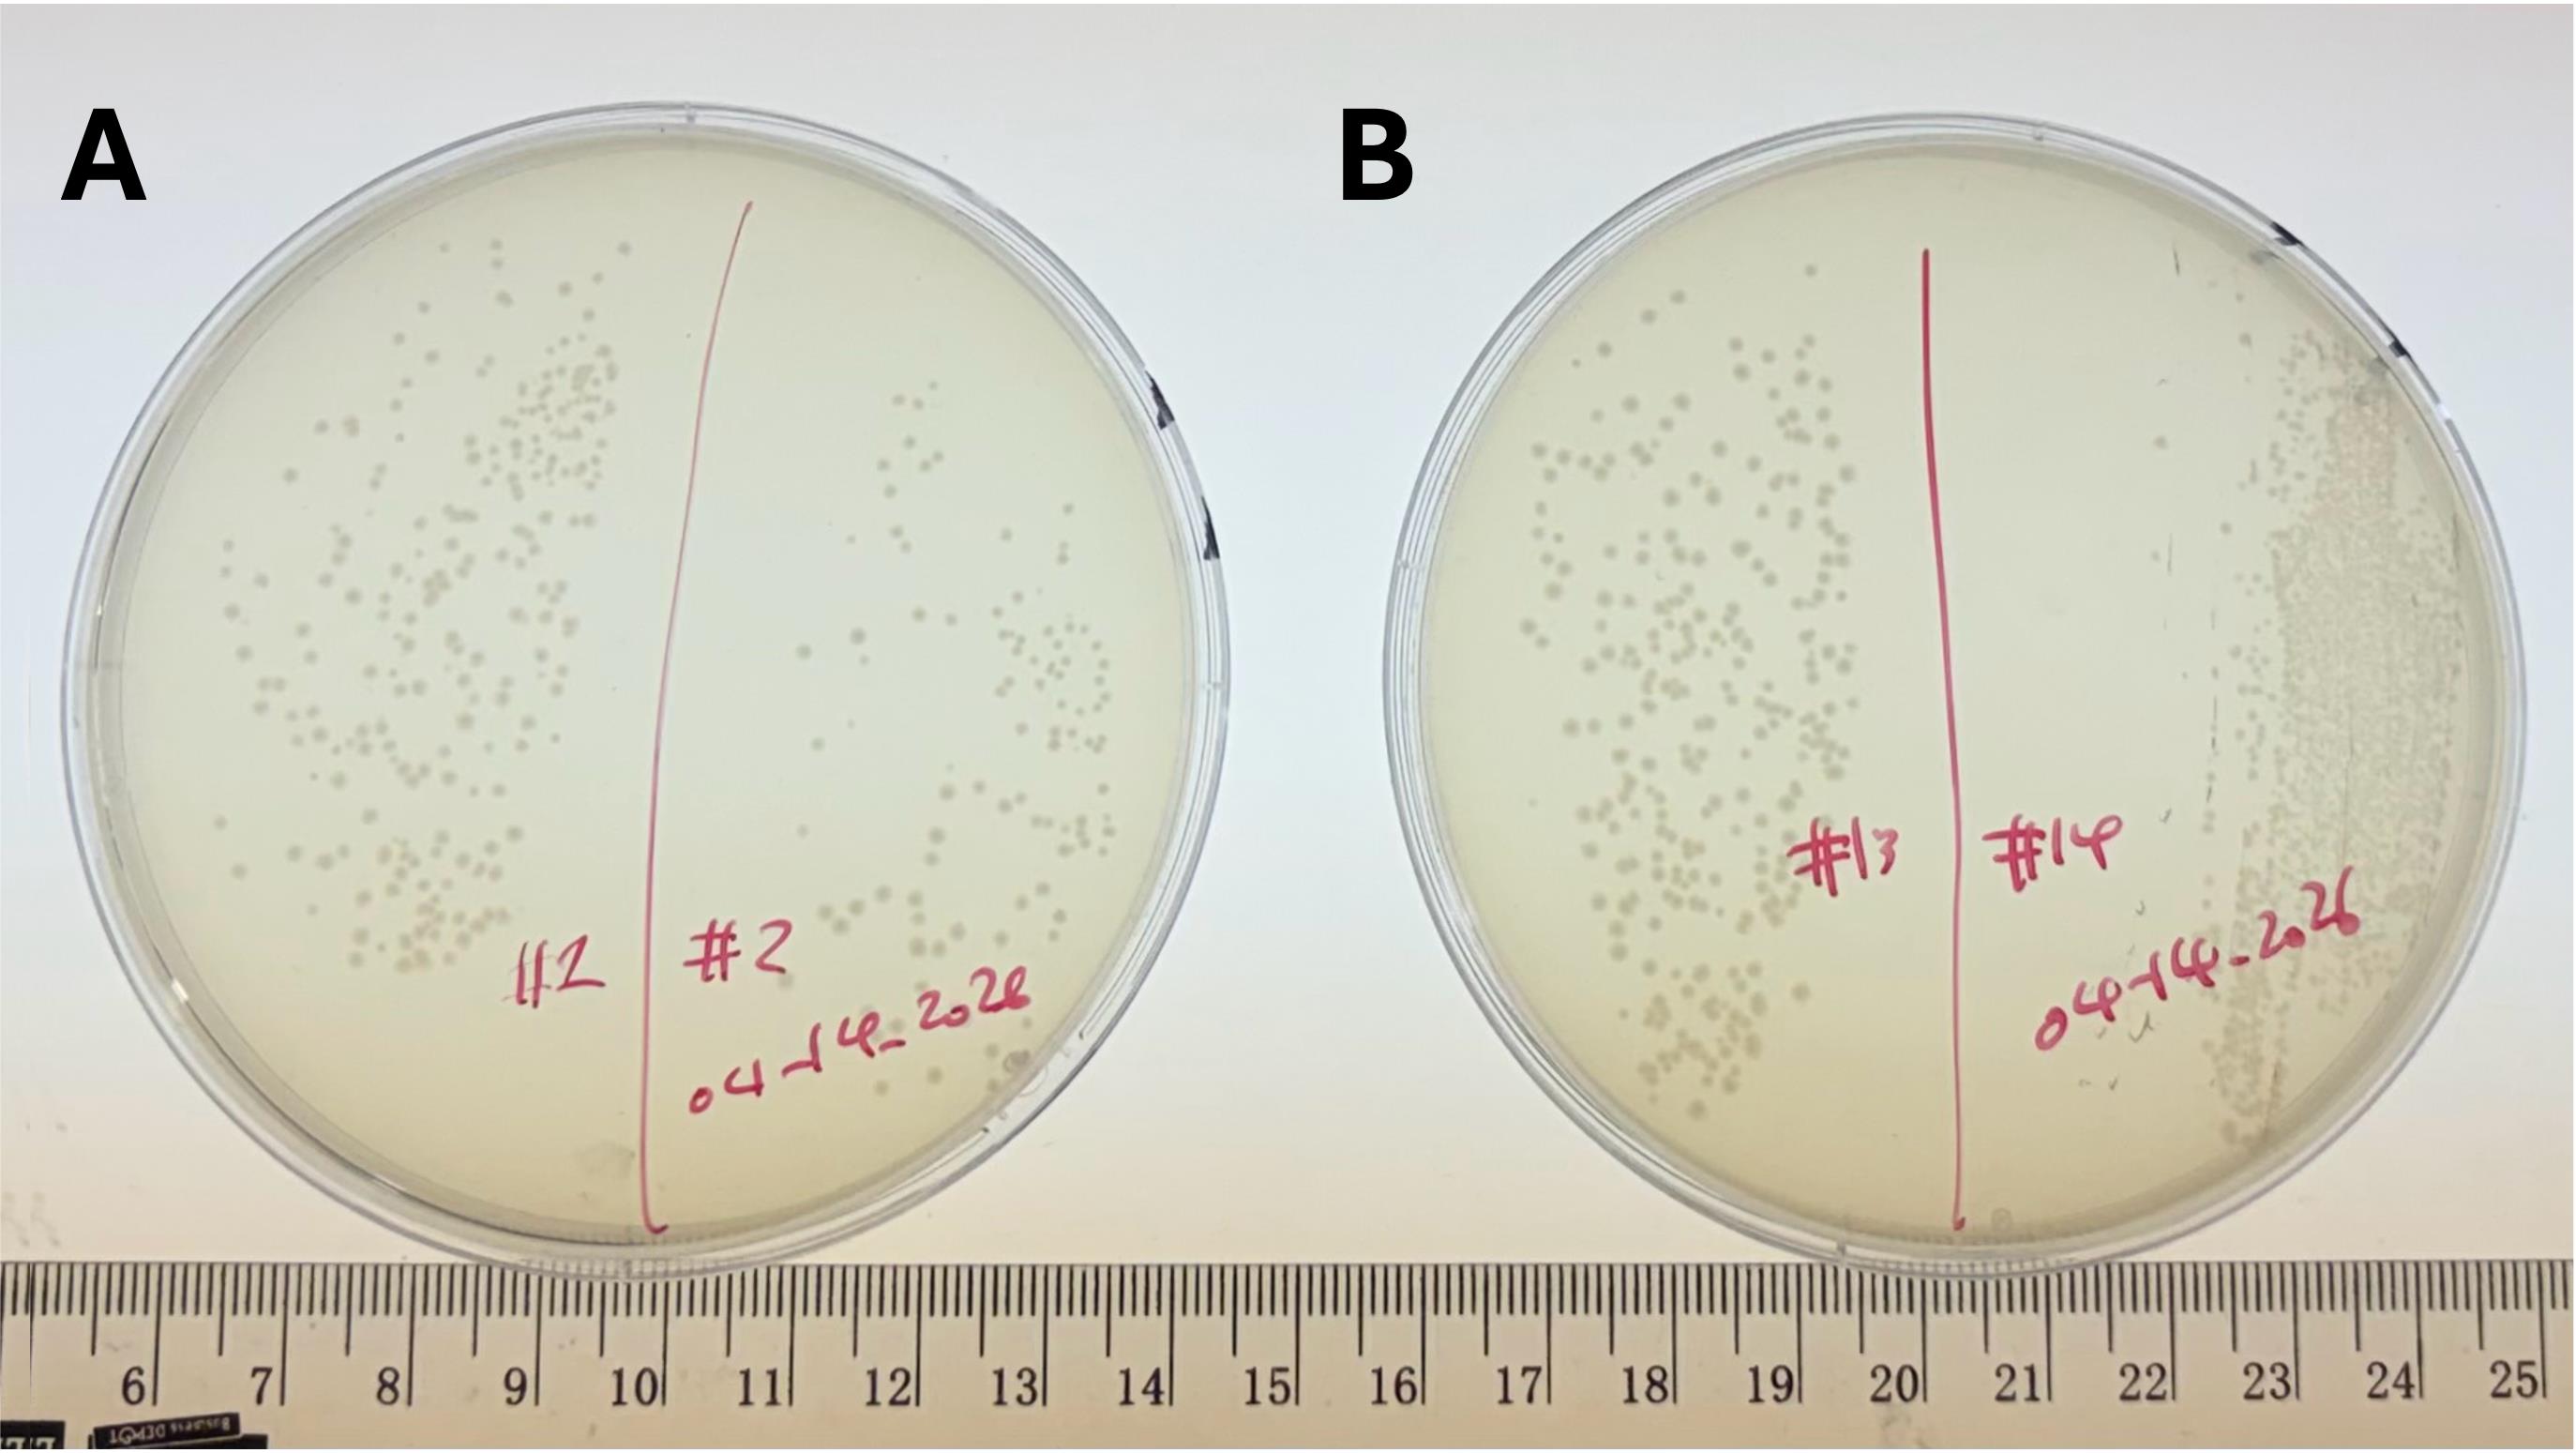
Figure 5. Photos of bacterial plates from typical mutagenesis reactions. (A) A bacterial plate from the transformation of two different mutagenesis reactions marked as #1 and #2, with 1.0 μL each into 10 μL of DH5α competent cells. (B) A bacterial plate from the transformation of a mutagenesis reaction (marked as #13, left), with 1.0 μL of the mutagenesis reaction into 10 μL of DH5α competent cells. The right half (labeled as #14) serves as a control to demonstrate the absolute necessity of the DpnI digestion step. It shows the transformation of 0.1 μL of the untreated wild-type plasmid template (0.1 μg/μL, i.e., 10 ng) into 2.0 μL of DH5α competent cells; instead of being plated out as shown for #1, #2, and #13, the transformed cell mixture from #14 was streaked out with a sterile P200 tip. The massive difference in colony number between #13 and #14 highlights the efficacy of DpnI in eliminating the parental plasmid template. Typically, the colony number from 1.0 μL of a successful mutagenesis reaction mixture ranges from a few to 200, dependent on the mutation and plasmid backbone, whereas without DpnI digestion, 1.0 μL of a mutagenesis reaction mixture from Basic Protocol 1 yields 500–1,000 colonies.
Basic protocol 4
Validating mutagenesis results via DNA sequencing
Large deletions and insertions can be detected by restriction digestion with standard procedures used in many molecular biology laboratories. However, it is still important to confirm the mutations by sequencing. For point mutations and small insertions or deletions, DNA sequencing is the only detection method. Sanger sequencing remains the gold standard in molecular biology for targeted sequence verification. While a single Sanger sequencing reaction provides only localized sequence data, it is inexpensive (approximately $3.50 USD) and offers a turnaround time of 2–3 days (e.g., via Genome Quebec Inc., Montreal, Canada). Because the methods described herein utilize ultra-high-fidelity DNA polymerases (Q5 or Platinum SuperFi II), the likelihood of introducing random, off-target mutations into the broader plasmid backbone during thermal cycling is exceedingly low. Therefore, confirming the targeted locus via localized Sanger sequencing is sufficient for most routine plasmid engineering applications.
However, while highly reliable and cost-effective, localized sequencing still leaves the question of whether unwanted mutations are introduced elsewhere during PCR. Although our experiences with these high-fidelity polymerases show this is rarely a concern, it is ideal to sequence the entire plasmid if resources and time permit. Doing so with Sanger sequencing is time-consuming and much more expensive, but recent advancements in single-molecule sequencing (e.g., the Oxford Nanopore technology) have made this approach highly accessible. Commercial services (e.g., Plasmidsaurus Inc., California, USA) can now sequence an entire construct for $15 USD within a day or so. This is a bit more expensive than one Sanger Sequencing reaction (~$3.50 USD) but provides sequence information of the entire plasmid.
The primary advantage of whole-plasmid sequencing justifies the higher cost: it goes beyond simply confirming the success of the targeted mutagenesis reaction. It corroborates the structural integrity of the entire plasmid and allows researchers to evaluate the overall fidelity of the DNA polymerase utilized. The unified protocol below provides a straightforward guide for preparing both Sanger and whole-plasmid sequencing samples (the latter according to Plasmidsaurus Inc. guidelines for the use of flow cells and chemistry kits from Oxford Nanopore, along with the latest Super Accurate base-calling model) and analyzing the results in SnapGene (version 8.2). To help offset the higher sequencing costs, we also detail a practical plasmid-pooling strategy where two different plasmids can be mixed and sent in a single tube using a 1:4 concentration ratio. This ratio is chosen so that the two samples can be easily distinguished from one another based on the proportional difference in their final sequencing read counts. This should reduce the cost by 50%, i.e., to $7.50 per plasmid.
A. Sample preparation and submission
1. Label a strip of PCR tubes according to the facility specifications.
2. Add 10 μL of the plasmid sample to each tube. The concentration should be at least 0.1–0.2 μg/μL.
a. For Sanger sequencing: Add 10 μL of the corresponding sequencing primer (diluted to 5 μM). The reference primer starting point should ideally be 100–150 bp (and up to 600 bp) 5′-upstream from the mutation site. If the target mutation is close to a high-GC-rich region, it is recommended that the sequencing primer extend the strand containing the stretch of Cs instead of Gs to avoid artifacts.
b. For whole-plasmid sequencing: Primers are not required. To reduce costs, two different plasmids can be submitted in a single tube using a 1:4 concentration ratio so they can be distinguished by read counts (e.g., if concentrations of both plasmids are 0.2 μg/μL, add 2 μL of plasmid A and 8 μL of plasmid B).
Note: Dilution of high-concentration plasmids might have a lower propensity to cause sequencing technical failures with Oxford Nanopore sequencing at Plasmidsaurus. If there are issues with plasmids at concentrations higher than 0.2 μg/μL, it is recommended to dilute the samples to 50 ng/μL and submit them as low-concentration samples.
3. Prepare the tubes for drop-off according to the facility's instructions, e.g., for Genome Québec, place the strip of tubes inside a sellable plastic bag along with the waybill of the corresponding order request. For Plasmidsaurus, place the strip of tubes inside a 50 mL plastic centrifuge tube, along with the QR code of the related order request. Deposit the package at a drop-off box, which will be picked up, with the results ready online in 1–2 days.
B. Analysis of Sanger sequencing results
1. Launch SnapGene (version 8.2) and open the annotated file containing your original wild-type plasmid sequence (this serves as your reference template).
2. Initiate the alignment tool by selecting, from the top menu, View > Align to Reference > Align Imported Sequences.
3. Select the .ab1 file provided by a sequencing service. Use SnapGene to align the individual chromatograms against your reference sequence.
4. Navigate to your specific target locus within the alignment view. Confirm that the desired mutation (substitution, insertion, or deletion) is present and exactly matches your experimental design.
5. Manually examine the rest of the chromatogram to inspect for unwanted mutations.
C. Analysis of whole-plasmid sequencing results
1. Download the sequencing results from the sequencing facility website; Plasmidsaurus offers two links from which two zipped folders can be downloaded. Double-clicking the zipped files generates two folders, with one containing .fastq files and the other containing multiple subfolders, the first of which harbors .ab1 files.
2. Launch SnapGene and open the annotated file containing your original wild-type plasmid sequence (this serves as your reference template, e.g., a .dna file from Addgene).
3. Initiate the alignment of the consensus sequence provided by the sequencing facility (e.g., the .ab1 file) tool by selecting, from the top menu, View > Align to Reference > Align Imported Sequences, and select the .ab1 file.
4. Navigate to your specific target locus within the alignment view. Confirm that the desired mutation (substitution, insertion, or deletion) is present and exactly matches your experimental design.
5. Scan the remainder of the aligned plasmid sequence to ensure no unwanted secondary mutations, large deletions, or structural rearrangements were introduced by the DNA polymerase during the PCR amplification step.
6. It is also important to inspect individual sequenced plasmid molecules that make up the consensus sequence for read quality and depth. For this, select the .fastq (or .fastq.gz) files provided by your sequencing service. Use SnapGene to align the individual raw sequencing reads against your reference template.
7. Similarly, the .fastq file can also be analyzed for individual plasmid molecules, but to avoid computer freezing due to the large memory requirement, the total number of plasmid molecule sequences to be aligned is limited to 100.
Note: The same folder where the .ab1 file is located also contains additional subfolders, including .fasta files and sequence statistics per base and a virtual gel of the sequence sample. FASTQ files contain quality data; examine the Phred quality scores at the mutation site (often displayed graphically by SnapGene). Verify that the mutation is supported by a high depth of overlapping reads and high-quality scores, confirming a pure clonal population rather than a sequencing artifact or wild-type contamination.
Data analysis
The success of the site-directed mutagenesis was confirmed by aligning the resulting Sanger or whole-plasmid sequencing data against the annotated wild-type reference plasmid using bioinformatic software (e.g., SnapGene, version 8.2). This alignment verifies the precise integration of the desired point mutations, insertions, or deletions, and ensures the absence of unintended secondary mutations in the plasmid backbone (for detailed alignment steps, see Basic Protocol 4, sections B and C).
Validation of protocol
To substantiate the utility, efficiency, and reliability of the protocols described herein, these methodologies were systematically evaluated across multiple expression plasmids of varying sizes, GC contents, and structural complexities. Validation of these methods was detailed previously [20,21,24].
A. Validation of the P3a and P3b methods (Basic Protocols 1 and 2, Alternate Protocol 2)
The P3a protocol was evaluated for its ability to introduce single-nucleotide substitutions, insertions, and large-scale deletions. Utilizing partially complementary primer pairs with 3′-overhangs alongside high-fidelity DNA polymerases, the P3a method consistently achieved a mutagenesis efficiency of approximately 100% across diverse expression plasmids (ranging up to ~13 kb). Furthermore, the structural "handshaking" capability of the primers successfully facilitated seamless cassette mutagenesis, demonstrating the reliable fragment deletions (up to 5 kb) and targeted sequence insertions (up to 0.4 kb). As described earlier for the P3a design, this method accommodates substantial structural modifications. An example of seamless epitope tag replacement or deletion is depicted in Figure 3.
To validate its efficacy on structurally difficult templates, the modified P3b protocol was applied to high-GC-rich targets (e.g., complex promoter sequences). Sequences with highly elevated GC ratios tend to form unique DNA structures, such as G-quadruplexes [30,33], which can stall the DNA polymerase under the standard thermal cycling conditions outlined in P3a. By incorporating a pre-denaturation step and raising in-cycle denaturation parameters, P3b yielded highly efficient mutagenesis where traditional QuickChange and standard P3a protocols previously failed. Furthermore, we have experimentally validated the multisite mutagenesis strategy to engineer SARS-CoV-2 spike protein variants containing up to five mutations (R346T, F456L, Q493E, L981F, and V1104L), which are found in derivatives of the JN.1 subvariant. We performed five consecutive rounds of mutagenesis over five days. Analysis of the final clones revealed a success rate of 60% (6/10 correct clones) for the 5-mutation construct, confirming that this rapid cycling protocol is a robust and time-efficient alternative for complex multisite engineering [20]. Rather than plating and isolating individual colonies after each mutation, the post-transformation bacterial mix is directly inoculated into LB liquid media for bulk overnight amplification. The resulting pooled miniprep serves as the immediate template for the subsequent mutagenesis cycle. By bypassing intermediate plating steps, this liquid culture–based sequential workflow drastically reduces the timeline for engineering complex plasmids requiring multiple, independent structural modifications.
B. Validation of the QC2 method (Alternate Protocol 1)
As a comparison to the P3 primer-designing strategy, the QC2 method was systematically tested by engineering 46 distinct mutations across 7 different expression plasmids (varying in size and GC content). While utilizing standard, completely complementary primers that cost roughly 50% less to synthesize than P3a primers, the QC2 method reliably achieved a practical mutagenesis efficiency between 48% and 69%. Sequence analysis of the failed QC2 reactions validated that completely complementary primers have a propensity to initiate false synthesis, resulting in spontaneous short oligonucleotide insertions at the primer sites—confirming that P3a and P3b remain more effective methods. Figure 5 shows bacterial colonies from typical mutagenesis reactions, and Table 1 compares the key features of these three methods.
Table 1. Comparison of the P3a, P3b, and QC2 methods
| Feature | Basic Protocol 1 (P3a) | Basic Protocol 2 (P3b) | Alternate Protocol 1 (QC2) |
|---|---|---|---|
| Primer design | Partially overlapping | Partially overlapping | Completely overlapping |
| Primer overhangs | 3′-protruding ends | 3′-protruding ends | None |
| Typical primer length | ~30 nucleotides (nt) | ~30 nt | ~20 nt |
| Amplification kinetics | Exponential | Exponential | Linear or exponential (see [17]) |
| Approximate PCR duration | ~2 h | ~2 h | ~2 h |
| Target templates | Standard plasmids | Highly GC-rich complex structures | Standard plasmids |
| Supported applications | Point mutations, insertions (≤0.4 kb), deletions (≤5 kb), and multisite mutagenesis | Point mutations, insertions, deletions, and multisite mutagenesis | Point mutations and small insertions/deletions |
| Tested plasmids | >20 (up to ~13 kb) | >10 (up to ~13 kb) | 7 (up to ~13 kb) |
| Total tested mutations | >100 | >40 | 46 |
| Average efficiency | ~100% | 60%–100% | 48%–69% |
C. Time considerations and throughput
By replacing traditional, low-processivity Pfu DNA polymerase with more updated high-fidelity enzymes, the P3a, P3b, and QC2 protocols (Table 1) significantly simplify the overall experimental workflow. A skillful trainee can easily engineer multiple mutants within a 3-day active timeframe. By staggering reactions (e.g., starting a second set of mutagenesis reactions on day 2), researchers can scale this throughput to engineer several dozen mutants within a single week. For regular P3a, P3b, or QC2, the workflow follows this timeframe (see Figure 2A):
1. Day 1: Mutagenesis and transformation
a. Reaction setup: Assembling 8–16 reactions takes 30–60 min.
b. PCR and DpnI digestion: PCR cycling requires ~2.5 h, followed by a 1.5-h DpnI digestion, which can be reduced to 15–30 min (unpublished results).
c. Transformation: Bacterial transformation and plating take roughly 1 h. This means that the entire mutagenesis and transformation workflow can be comfortably completed within one day. Plated colonies are left to grow for 18–24 h.
2. Day 2: Inoculation
a. Culture setup: Transformant colonies are inoculated into liquid LB broth. Cultures are incubated for 18–24 h.
3. Day 3: Plasmid isolation and sequencing preparation
a. Minipreps: Processing 24 minipreps takes an experienced researcher 1.5–2 h.
b. Sequencing submission: Aliquoting the isolated plasmids and preparing the appropriate sequencing primers takes roughly 30 min.
4. Validation by sequencing
Depending on the sequencing facility, Sanger sequencing results are typically returned within 1–3 days. Analyzing 24 sequencing traces via SnapGene (version 8.2) takes ~15 min. If using whole-plasmid sequencing, results can be obtained as fast as 16 h later.
Note: Because the P3a and P3b methods reliably achieve near-perfect mutagenesis efficiencies (~100%), Sanger sequencing functionally serves as a routine confirmatory step rather than a strict screening bottleneck. In rush scenarios, researchers do not need to pause their workflow. They can immediately utilize the mutated plasmids for downstream applications, such as mammalian transfections, immunoprecipitation, or expression in bacterial systems, while concurrently awaiting the final sequencing results.
General notes and troubleshooting
General notes
From mutagenesis to final sequencing and functional analysis, numerous microtubes need to be used and labeled. It is easy to carry out 1–2 mutagenesis reactions and analyze a few mutant plasmids without making obvious mistakes, such as tube or sample switching. However, when there are 10, 15, or 20 mutagenesis reactions to be carried out, special care and good organization are needed to avoid such errors. It is highly recommended to adopt some basic principles of "operational research," frequently used in engineering and economics, to enhance operational efficiency and avoid or minimize mistakes.
For example, when carrying out 8 mutagenesis reactions, we first write a clean lab note about the reactions and assign numbers #1–8 to them. On the note, we draw a simple table about names and volumes of the templates (0.1 μg/μL), primers (5 pmol/μL), the volume of sterile Nanopure water, and the volume of the Q5 or SuperFi II polymerase master mix to be used. A numerical coding system helps avoid tube or sample switch and saves some labeling time when compared to using a specific name for each reaction or tube. Then, we find or prepare tubes containing the primers and plasmid templates, and arrange all of them on a rack in the same order as they appear on the lab note. Afterward, we take an 8-strip of 0.2 mL PCR tubes and label their sides with 1–8, or simply mark tubes 1, 4, and 8. With their caps linked, the strip of tubes can slant on a sheet of clean paper on a laboratory bench, allowing solutions to be added to the bottom of each tube.
When pipetting, we ensure that no pipetting errors are introduced by establishing a repetitive workflow while avoiding experimental planning at that stage. Once the pipetting is done for all tubes, they are transferred to a PCR machine for amplification. At this step, we ensure that the caps are tightly secured to avoid liquid evaporation during PCR. For DpnI digestion and bacterial transformation, the numbering system #1–8 is maintained for the tubes and bacterial plates, which are also dated. Once there are colonies, we analyze two colonies from each mutagenesis reaction by P3a or P3b and label the bacterial tubes sequentially from #1 to #16, which are noted on the lab note. During plasmid miniprep, Eppendorf tubes are still labeled as such until the final stage, where specific plasmid names are assigned. To distinguish plasmids among lab members, we use the initials of each person followed by numbers, such as pXX1–16, where the letters XX are the initials of the person to whom the plasmids belong. Classically, it is suggested to prepare glycerol stocks for bacterial culture, but this consumes a significant amount of time and freezer space. A quick transformation protocol is available (see section C of Basic Protocol 1 and also Figure 5), and since many glycerol stocks tend to yield lower plasmid yields than fresh colonies, we have gradually dropped this step. However, we ensure that each original plasmid tube is kept even if it is empty, to facilitate recovery of the plasmid when needed. Also, after transformation, the strip of PCR tubes containing the remaining DpnI-digested solutions is dated and kept at -20 °C so that they can be easily located, if needed, for re-transformation or analysis of the reaction mixture by sequencing or agarose gel electrophoresis. Typically, if successful, 2.5–5.0 μL of the DpnI-digested mixture should yield a prominent band on a mini-agarose gel after electrophoresis in the presence of ethidium bromide for staining.
The principles described above are very useful, especially for beginners. Related to this, we have encountered an interesting case in which a new graduate student carried out the P3a mutagenesis method twice to engineer two BRPF1 mutants. No colonies were obtained on the first trial. On the second trial, only one colony was obtained for mutant #1 (replacing 3 nucleotide residues with 4 different nucleotides) and two colonies for mutant #2 (replacing one residue with another but downstream from mutation #1). Seeing this unusual, disappointing result, we tried to determine why the experiment did not go as expected. A much more experienced laboratory member repeated the experiment, and 50–100 colonies were obtained for each mutant using Basic Protocol 1. The initial 3 colonies, and also 6 from the newly acquired colonies (with 3 from each mutagenesis reaction), were prepared for plasmid extraction and sent for Sanger sequencing.
As the two mutations are only 50 amino acid residues apart, the forward primer of mutant #1 was used to sequence mutant #2, whereas the reverse primer of mutant #2 was used to sequence mutant #1. The results were surprising: while all three plasmids from the initial two experiments were correct, all 6 plasmids from the new experiment were wild type. Based on our prior experience, something must have been terribly wrong if all 6 plasmids were indeed wild type. Thus, we considered whether tubes were switched at some point. To test this hypothesis, we re-sequenced two plasmids per mutation. We kept the plasmid order but switched the two sequencing primers, i.e., using the forward primer of mutant #1 and the reverse primer of mutant #2 for the supposed plasmids of mutants #1 and #2, respectively. The results indicated that mutants #1 and #2 were switched. This case highlights that tube switching causes significant problems and decreases research efficiency.
One remaining question is whether the initial experiment did not work or only yielded 1–2 colonies, instead of the 50–100 colonies as expected. To address this question, we analyzed 5 μL of each of the initial mutagenesis reactions by agarose gel electrophoresis. The results indicated that some of the amplifications were successful, but not the others. Thus, there were two problems: 1) PCR amplification failure and 2) low transformation efficiency. For the same two mutations, a U1 undergraduate student without any prior research experience was asked to carry out the mutagenesis reactions using the same templates and primers noted above. She failed at the first trial but managed to obtain 5 colonies for mutant #1 on her second attempt. She sequenced one of them, and it was the correct mutant. She used the same reaction for transformation with a new aliquot of competent cells and obtained 18 colonies. She analyzed the DpnI-digested PCR reaction mixture for mutant #1, and the product was as expected. Thus, PCR amplification was successful, but bacterial transformation efficiency was still an issue. The different experiences of these three lab members with the same two BRPF1 mutants, by using the same templates, primers, and reagents, illustrate nicely how to troubleshoot and enhance operational efficiency for engineering site-specific mutations.
Furthermore, these protocols were systematically evaluated and validated using a diverse set of expression plasmids ranging up to ~13 kb in size, as detailed in our previous works [16,20,21,24]. Theoretically, the high efficiency reported should easily extrapolate to most standard plasmid templates utilized in molecular biology. However, researchers should note that target sequences possessing unusually high structural difficulty or severe repetitiveness may fall outside the optimal scope of these specific protocols and could require further sequence-specific optimization. We have not tested the methods with plasmids with AT-rich sequences, which tend to pose challenges for site-directed mutagenesis.
Troubleshooting
Table 2 below lists additional troubleshooting tips, some of which were discussed previously [28].
Table 2. Quick troubleshooting reference guide
| Problem | Possible cause | Recommended solution |
| No colonies or very few colonies obtained after transformation | PCR amplification failure | Analyze 2.5–5 μL of the DpnI-digested reaction mixture on an agarose gel. If no expected band is present, verify template concentration, primer design, and thermal cycling parameters. |
| Low transformation efficiency | If an agarose gel confirms successful PCR amplification, the issue is transformation. Re-transform using 1 μL of the remaining DpnI-digested mixture (stored at -20 °C) with a fresh aliquot of competent DH5α cells. | |
| High GC content or secondary structures stalling PCR | If standard P3a/QC2 PCR fails, inspect the DNA sequence for GC content. If there are high-GC-rich regions, switch to the P3b method. Utilize the 105 °C pre-denaturation step and elevated in-cycle denaturation temperatures. | |
| High number of bacterial colonies | Incomplete DpnI digestion of the parental template | Reaching 5,000–1,000 colonies per plate (Figure 5). Ensure the parental template was isolated from a Dam+ strain (e.g., DH5α). Do not exceed the recommended template concentration (use only 10 ng per reaction). Verify DpnI enzyme activity and incubation time. |
| Poor LB agar plates | Instead of single colonies, there is a sheet of bacteria on the agar surface. This is a good sign indicating the lack of the right antibiotic or inactivation during plate preparation or storage. To test this, a small drop of plain competent cells can be streaked out on an unused plate and incubated at 37 °C overnight. | |
| Sanger sequencing fails, or the region is unreadable despite correct primers | Spontaneous insertions/deletions at the primer sites | Perform a diagnostic restriction digestion. Large indels will alter the wild-type restriction pattern. If confirmed, this is often caused by primer self-annealing (common in QC2). Switch to P3a partially overlapping primers or carry out whole-plasmid sequencing, such as Plasmidsaurus, as it yields the sequence of any plasmid even if they are incorrect. |
| Long mononucleotide repeats in the primer sequence | If the target sequence contains continuous tracts of purines (A/G) or pyrimidines (T/C) exceeding 5 bases, redesign the primers to include a silent mutation to break the stretch. | |
| Mutagenesis succeeds, but unwanted mutations are found in the plasmid backbone | Excessive thermal cycling or polymerase error | Strictly limit PCR amplification to a maximum of 25 cycles. Ensure the use of high-fidelity enzymes (Q5 or Platinum SuperFi II) rather than traditional Pfu derivatives. |
Acknowledgments
Paulina Varela-Castillo: Data curation; writing—original draft; writing—review and editing. Arezousadat Razavi: Data curation; writing—review and editing. Changsheng Zhao: Writing—review and editing. Martin M. Geng: Writing—review and editing. Amitis Nour: Writing—review and editing. Xiang-Jiao-Yang: Conceptualization; data curation; formal analysis; funding acquisition; methodology; writing—review and editing.
This work was supported by funds from the Canadian Institutes of Health Research (CIHR), Natural Sciences and Engineering Research Council of Canada (NSERC), and Compute Canada (now known as Digital Research Alliance of Canada).
This protocol was used in [20,21,24].
Competing interests
The authors declare no known competing financial interests or personal relationships that could have appeared to influence the work reported in this paper.
References
- Hutchison, C., Phillips, S., Edgell, M., Gillam, S., Jahnke, P. and Smith, M. (1978). Mutagenesis at a specific position in a DNA sequence. J Biol Chem. 253(18): 6551–6560. https://doi.org/10.1016/s0021-9258(19)46967-6
- Kresge, N., Simoni, R. D. and Hill, R. L. (2006). The Development of Site-directed Mutagenesis by Michael Smith. J Biol Chem. 281(39): e31–e33. https://doi.org/10.1016/s0021-9258(19)33938-9
- Kunkel, T. A. (1985). Rapid and efficient site-specific mutagenesis without phenotypic selection. Proc Natl Acad Sci USA. 82(2): 488–492. https://doi.org/10.1073/pnas.82.2.488
- McClary, J. A., Witney, F. and Geisselsoder, J. (1989). Efficient site-directed in vitro mutagenesis using phagemid vectors. BioTechniques. 7(3): 282–289.
- Yang, X. J. and Kaufman, S. (1994). High-level expression and deletion mutagenesis of human tryptophan hydroxylase. Proc Natl Acad Sci USA. 91(14): 6659–6663. https://doi.org/10.1073/pnas.91.14.6659
- Hagemeier, C. (1996). Site-Directed Mutagenesis Using a Uracil-Containing Phagemid Template. In Vitro Mutagenesis Protocols. 57: 45–54. https://doi.org/10.1385/0-89603-332-5:45
- Weiner, M. P., Costa, G. L., Schoettlin, W., Cline, J., Mathur, E. and Bauer, J. C. (1994). Site-directed mutagenesis of double-stranded DNA by the polymerase chain reaction. Gene. 151: 119–123. https://doi.org/10.1016/0378-1119(94)90641-6
- Fisher, C. L. and Pei, G. K. (1997). Modification of a PCR-Based Site-Directed Mutagenesis Method. Biotechniques. 23(4): 570–574. https://doi.org/10.2144/97234bm01
- Li, S. and Wilkinson, M. F. (1997). Site-Directed Mutagenesis: A Two-Step Method Using PCR and Dpn I. Biotechniques. 23(4): 588–590. https://doi.org/10.2144/97234bm05
- Wang, W. and Malcolm, B. A. (1999). Two-Stage PCR Protocol Allowing Introduction of Multiple Mutations, Deletions and Insertions Using QuikChangeTM Site-Directed Mutagenesis. Biotechniques. 26(4): 680–682. https://doi.org/10.2144/99264st03
- Hogrefe, H. H., Cline, J., Youngblood, G. L. and Allen, R. M. (2002). Creating Randomized Amino Acid Libraries with the QuikChange® Multi Site-Directed Mutagenesis Kit. Biotechniques. 33(5): 1158–1165. https://doi.org/10.2144/02335pf01
- Li, L., Ghorbani, M., Weisz-Hubshman, M., Rousseau, J., Thiffault, I., Schnur, R. E., Breen, C., Oegema, R., Weiss, M. M., Waisfisz, Q., et al. (2020). Lysine acetyltransferase 8 is involved in cerebral development and syndromic intellectual disability. J Clin Invest. 130(3): 1431–1445. https://doi.org/10.1172/jci131145
- Yan, K., Rousseau, J., Machol, K., Cross, L. A., Agre, K. E., Gibson, C. F., Goverde, A., Engleman, K. L., Verdin, H., De Baere, E., et al. (2020). Deficient histone H3 propionylation by BRPF1-KAT6 complexes in neurodevelopmental disorders and cancer. Sci Adv. 6(4): eaax0021. https://doi.org/10.1126/sciadv.aax0021
- Zheng, L. (2004). An efficient one-step site-directed and site-saturation mutagenesis protocol. Nucleic Acids Res. 32(14): e115–e115. https://doi.org/10.1093/nar/gnh110
- Liu, H. and Naismith, J. H. (2008). An efficient one-step site-directed deletion, insertion, single and multiple-site plasmid mutagenesis protocol. BMC Biotech. 8(1): 91. https://doi.org/10.1186/1472-6750-8-91
- Mousavi, N., Zhou, E., Razavi, A., Ebrahimi, E., Varela-Castillo, P. and Yang, X. J. (2025). P3 site-directed mutagenesis: An efficient method based on primer pairs with 3′-overhangs. J Biol Chem. 301(3): 108219. https://doi.org/10.1016/j.jbc.2025.108219
- Xia, Y., Chu, W., Qi, Q. and Xun, L. (2014). New insights into the QuikChangeTM process guide the use of Phusion DNA polymerase for site-directed mutagenesis. Nucleic Acids Res. 43(2): e12–e12. https://doi.org/10.1093/nar/gku1189
- Qi, D. and Scholthof, K. B. (2008). A one-step PCR-based method for rapid and efficient site-directed fragment deletion, insertion, and substitution mutagenesis. J Virol Methods. 149(1): 85–90. https://doi.org/10.1016/j.jviromet.2008.01.002
- Li, J., Li, C., Xiao, W., Yuan, D., Wan, G. and Ma, L. (2008). Site-directed mutagenesis by combination of homologous recombination and DpnI digestion of the plasmid template in Escherichia coli. Anal Biochem. 373(2): 389–391. https://doi.org/10.1016/j.ab.2007.10.034
- Varela-Castillo, P., Razavi, A., Mousavi, N., Robinson, N. and Yang, X. J. (2026). Efficiency and Fidelity of Site-Directed Mutagenesis with Complementary Primer Pairs. Cells. 15(2): 138. https://doi.org/10.3390/cells15020138
- Yang, X. J. (2025). P3a site-specific and cassette mutagenesis for seamless protein, RNA and plasmid engineering. Genes Cancer. 16: 34–60. https://doi.org/10.18632/genesandcancer.243
- Zhou, T. (2004). Synthesis of unimolecularly circular G-quadruplexes as prospective molecular probes. Nucleic Acids Res. 32(21): e173–e173. https://doi.org/10.1093/nar/gnh162
- Huppert, J. L. and Balasubramanian, S. (2006). G-quadruplexes in promoters throughout the human genome. Nucleic Acids Res. 35(2): 406–413. https://doi.org/10.1093/nar/gkl1057
- Varela-Castillo, P., Zhou, E., Razavi, A., Ebrahimi, E. and Yang, X. J. (2025). Highly Efficient Site-Specific and Cassette Mutagenesis of Plasmids Harboring GC-Rich Sequences. Cells. 14(24): 2016. https://doi.org/10.3390/cells14242016
- Ullah, M., Pelletier, N., Xiao, L., Zhao, S. P., Wang, K., Degerny, C., Tahmasebi, S., Cayrou, C., Doyon, Y., Goh, S. L., et al. (2008). Molecular Architecture of Quartet MOZ/MORF Histone Acetyltransferase Complexes. Mol Cell Biol. 28(22): 6828–6843. https://doi.org/10.1128/mcb.01297-08
- Yang, X. J., Ogryzko, V. V., Nishikawa, J. I., Howard, B. H. and Nakatani, Y. (1996). A p300/CBP-associated factor that competes with the adenoviral oncoprotein E1A. Nature. 382(6589): 319–324. https://doi.org/10.1038/382319a0
- Gu, B., Posfai, E. and Rossant, J. (2018). Efficient generation of targeted large insertions by microinjection into two-cell-stage mouse embryos. Nat Biotechnol. 36(7): 632–637. https://doi.org/10.1038/nbt.4166
- Mousavi, N., Zhou, E., Razavi, A., Ebrahimi, E., Varela‐Castillo, P. and Yang, X. (2025). Efficient Site‐Directed Mutagenesis Mediated by Primer Pairs with 3’‐Overhangs. Curr Protocol. 5(2): e70104. https://doi.org/10.1002/cpz1.70104
- Maity, A., Winnerdy, F. R., Chang, W. D., Chen, G. and Phan, A. T. (2020). Intra-locked G-quadruplex structures formed by irregular DNA G-rich motifs. Nucleic Acids Res. 48(6): 3315–3327. https://doi.org/10.1093/nar/gkaa008
- Varshney, D., Spiegel, J., Zyner, K., Tannahill, D. and Balasubramanian, S. (2020). The regulation and functions of DNA and RNA G-quadruplexes. Nat Rev Mol Cell Biol. 21(8): 459–474. https://doi.org/10.1038/s41580-020-0236-x
- Robinson, J., Raguseo, F., Nuccio, S. P., Liano, D. and Di Antonio, M. (2021). DNA G-quadruplex structures: more than simple roadblocks to transcription? Nucleic Acids Res. 49(15): 8419–8431. https://doi.org/10.1093/nar/gkab609
- Batra, S., Allwein, B., Kumar, C., Devbhandari, S., Brüning, J. G., Bahng, S., Lee, C. M., Marians, K. J., Hite, R. K., Remus, D., et al. (2025). G-quadruplex–stalled eukaryotic replisome structure reveals helical inchworm DNA translocation. Science. 387(6738): eadt1978. https://doi.org/10.1126/science.adt1978
- Hänsel-Hertsch, R., Beraldi, D., Lensing, S. V., Marsico, G., Zyner, K., Parry, A., Di Antonio, M., Pike, J., Kimura, H., Narita, M., et al. (2016). G-quadruplex structures mark human regulatory chromatin. Nat Genet. 48(10): 1267–1272. https://doi.org/10.1038/ng.3662
Article Information
Publication history
Received: Apr 22, 2026
Accepted: Jun 19, 2026
Available online: Jul 29, 2026
Published: Aug 20, 2026
Copyright
© 2026 The Author(s); This is an open access article under the CC BY-NC license (https://creativecommons.org/licenses/by-nc/4.0/).
How to cite
Varela-Castillo, P., Razavi, A., Zhao, C., Geng, M. M., Nour, A. and Yang, X. (2026). Efficient and Fast Site-Directed Mutagenesis via Partially or Completely Overlapping Primer Pairs. Bio-protocol 16(16): e5792. DOI: 10.21769/BioProtoc.5792.

 Download Citation in RIS Format
Category
Molecular Biology > DNA > Mutagenesis
Molecular Biology > DNA > PCR
Molecular Biology > DNA > DNA cloning
Do you have any questions about this protocol?
Post your question to gather feedback from the community. We will also invite the authors of this article to respond.
 Post a Question


