


- Protocols

- Articles and Issues
- For Authors
- About
- Become a Reviewer


A Step-by-Step Protocol for the Isolation of Aloe vera–Derived Extracellular Vesicles via Manual and Shear-Force Homogenization

Published: Vol 16, Iss 8, Apr 20, 2026 DOI: 10.21769/BioProtoc.5664 Views: 540
Reviewed by: Athanas GuzhaMarisa ConteAnonymous reviewer(s)
 PDF
PDF  Ask a question
Original research article
The authors used this protocol in:

Jun 2025
Advertisement



Protocol Collections
Comprehensive collections of detailed, peer-reviewed protocols focusing on specific topics




Related protocols
Abstract
Aloe vera has long been used for its diverse pharmacological properties, motivating continued interest in isolating and preserving the bioactive molecules responsible for its therapeutic potential. More recently, Aloe vera–derived extracellular vesicles (Av-EVs) have emerged as nanoscale, cell-free carriers capable of retaining and delivering these properties, making them attractive for various biomaterials, nanomedicine, and regenerative medicine applications. Multiple techniques are available for extracellular vesicle isolation. These include ultracentrifugation, polymer-based precipitation, size-exclusion chromatography, immunoaffinity capture, ultrafiltration, density gradient separation, and emerging microfluidic platforms. Each method presents distinct trade-offs in purity, yield, scalability, and downstream compatibility. Despite this diversity, standardized workflows tailored to Av-EV isolation remain limited, and the influence of homogenization-induced shear forces and plant maturity on vesicle recovery and characterization has not been systematically addressed. Here, we present a reproducible protocol for isolating Av-EVs from Aloe vera gel employing two distinct homogenization strategies: manual, no-shear force (NB EVs), and blender-based shear-force homogenization (B EVs). The workflow covers gel preparation, serial centrifugation for debris removal, ultracentrifugation as the gold standard for vesicle enrichment, and final sterile filtration. This protocol enables consistent recovery of Av-EVs suitable for physicochemical characterization and functional analyses. It is simple and relies on commonly available laboratory equipment, facilitating broad adoption by ultracentrifugation users and offering adaptability to diverse research projects involving purified Aloe vera gel and Av-EVs, including studies focused on wound healing, fibrotic scarring, and regenerative processes, where coordinated antioxidant, anti-inflammatory, antimicrobial, immunomodulatory, and moisturizing responses are of interest.
Key features
• This protocol allows direct comparison of vesicle yield, size distribution, and protein content across extraction methods.
• This protocol yields ~1.4–2.0 × 10¹⁰ particles/mL per mature leaf for a total of ~8 × 10¹² particles per leaf.
• This protocol yields ~1.2–2.8 × 10¹⁰ particles/mL per young leaf for a total of ~2.8 × 10¹² per leaf.
• EVs from mature Aloe leaves yield protein concentrations of ~160–447 μg/mL, corresponding to ~3,840–10,728 μg of protein per leaf.
Keywords: Exosome EVs
Plant-derived EVs (PDEVs)
Ultracentrifugation
EV characterization
EVs
Plant-derived EVs (PDEVs)
Ultracentrifugation
EV characterization
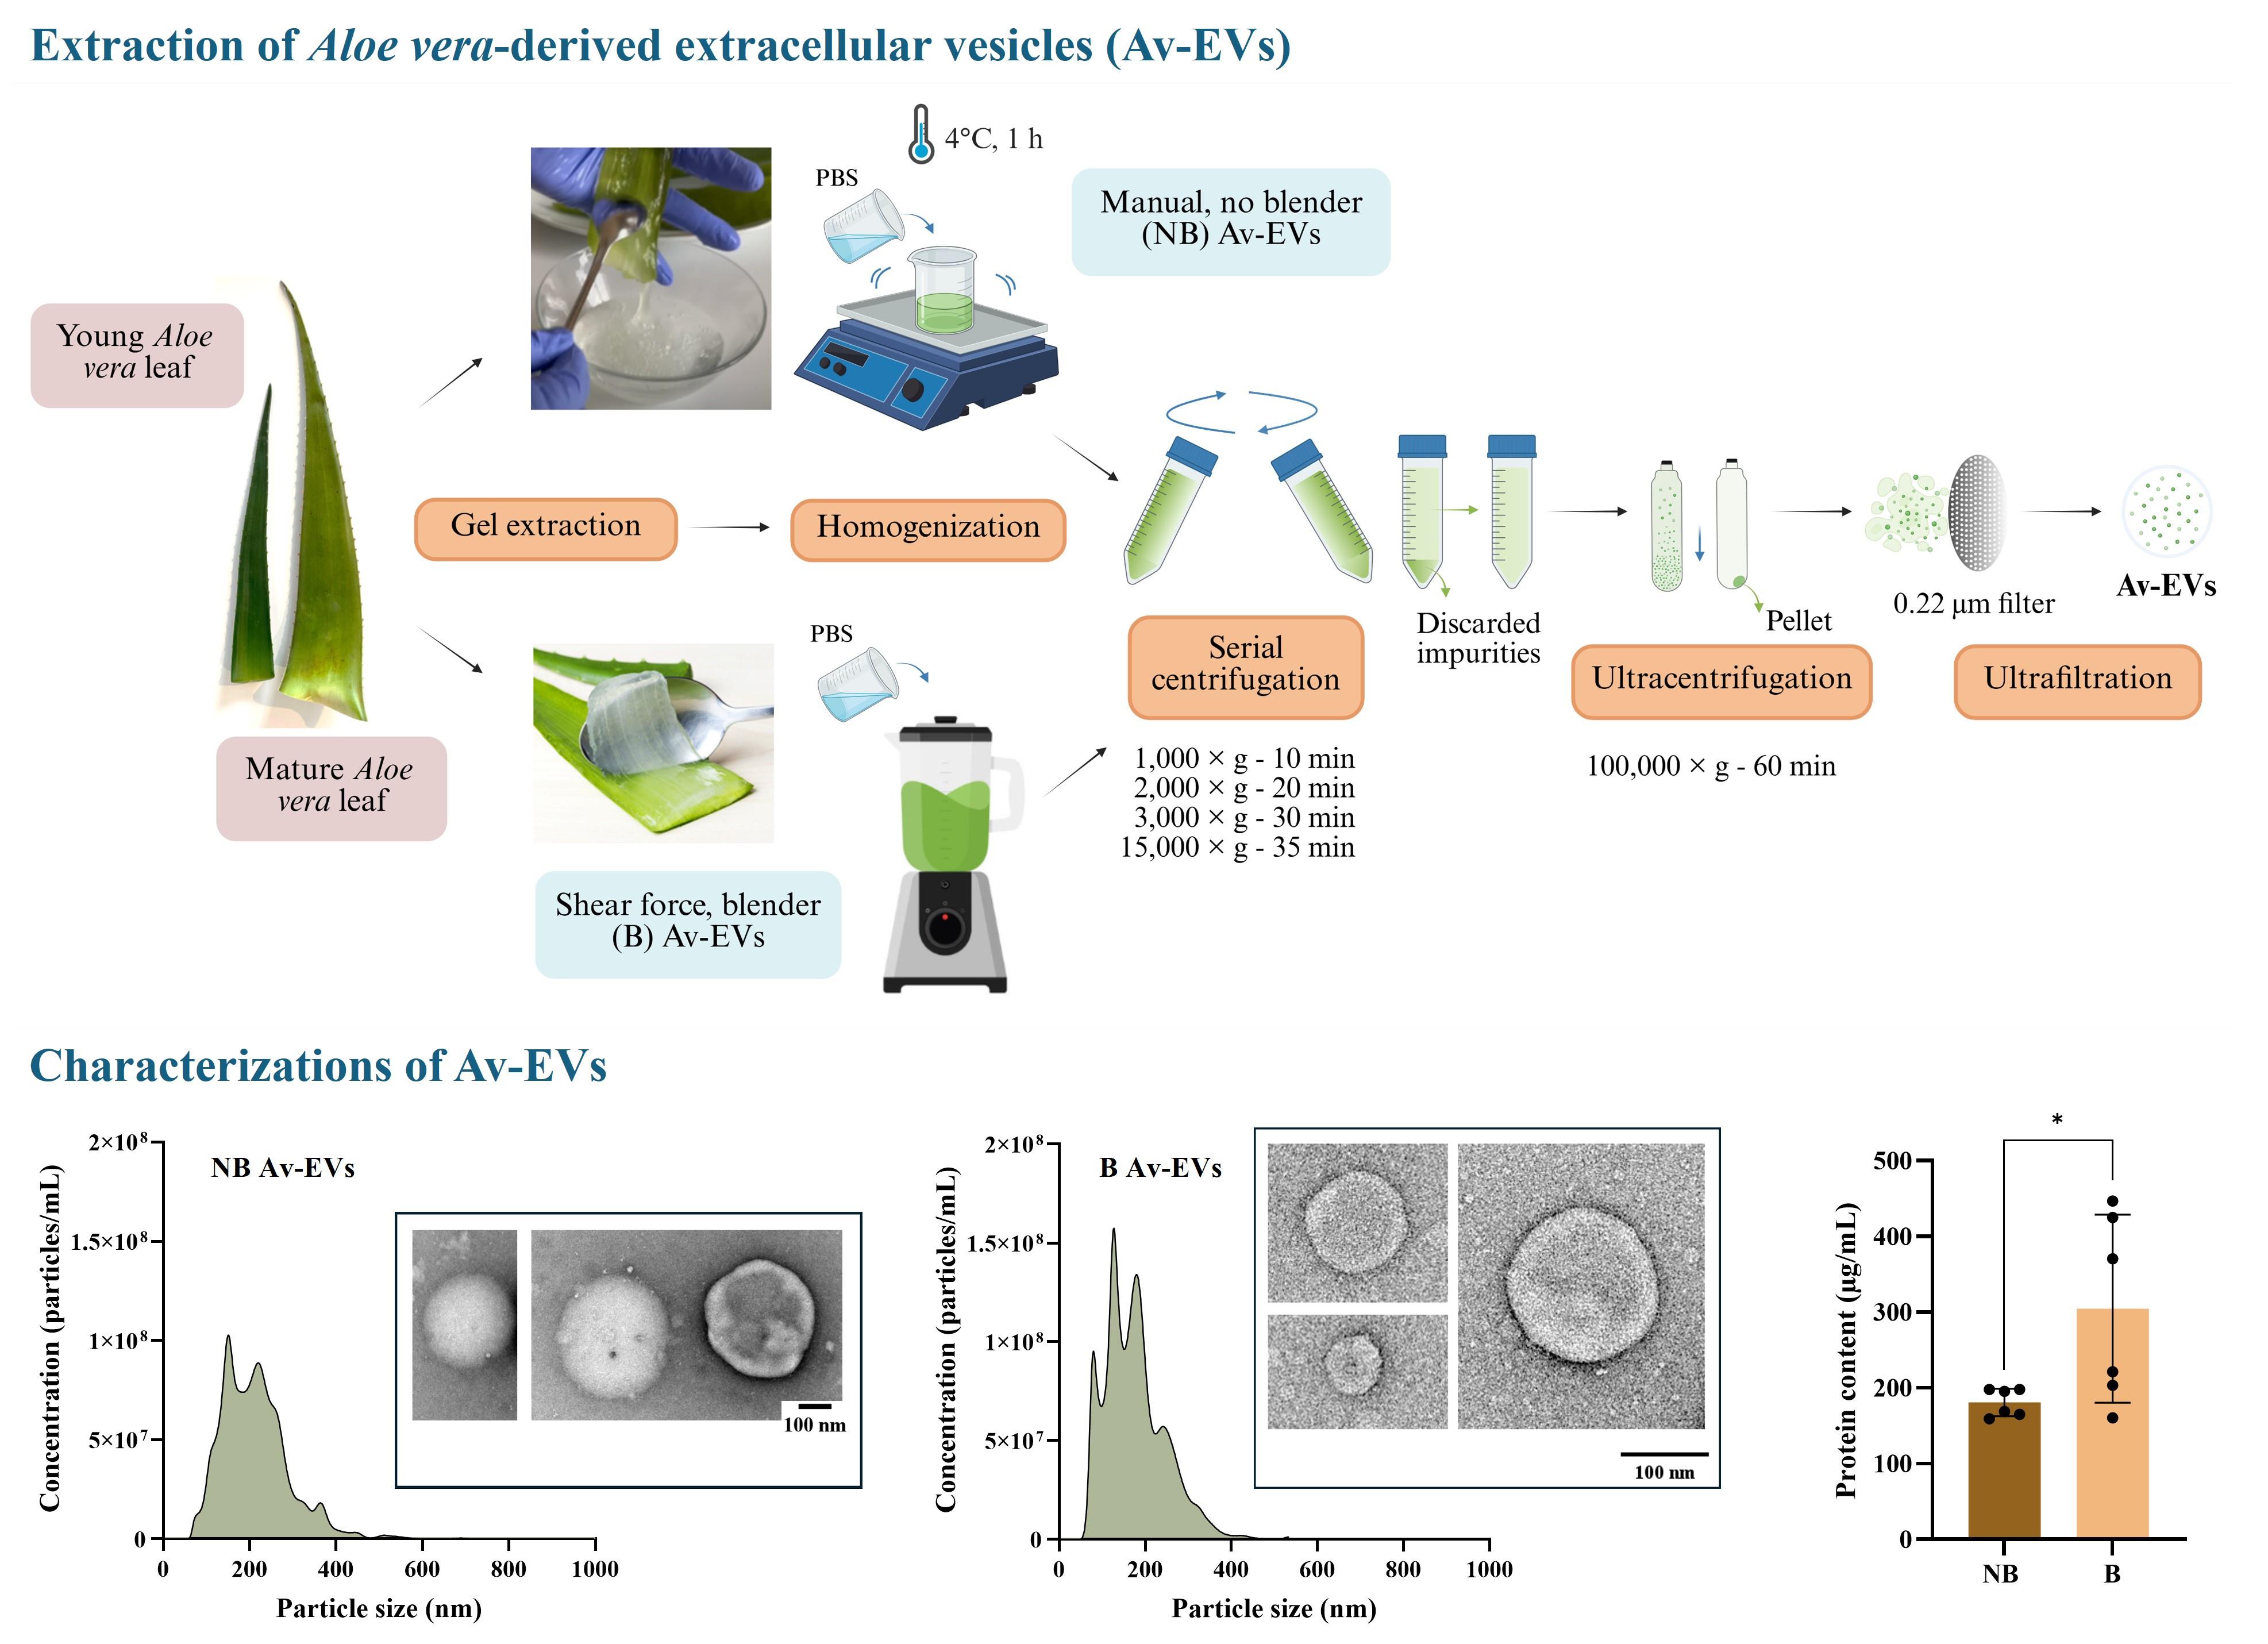
Graphical overview
Background
Plant-derived extracellular vesicles (PDEVs) have emerged as a promising class of naturally occurring nanovesicles that retain the therapeutic benefits of the parent plant while functioning as biocompatible carriers of lipids, proteins, nucleic acids, and metabolites. Delivery of this molecular cargo supports intercellular communication, maintenance of tissue homeostasis, and regenerative processes [1]. Among PDEVs, Aloe vera–derived extracellular vesicles (Av-EVs) have attracted particular attention owing to the plant’s well-recognized pharmacological properties. Aloe vera contains a rich repertoire of bioactive molecules that collectively confer wound healing, antioxidant, anti-inflammatory, antimicrobial, immunomodulatory, and moisturizing effects [2–7]. Historically, these constituents have motivated extensive investigation of Aloe vera–based topical and oral formulations, with numerous in vitro studies, preclinical models, and clinical trials demonstrating high efficacy in skin-related applications [8–25]. Although such formulations remain widely used, recent interest has shifted toward Av-EVs, in which these bioactive molecules are enriched within a small vesicular fraction (~1% of the total gel volume) rather than being dispersed throughout the predominantly aqueous matrix [5].
Preliminary studies indicate that Av-EVs can modulate inflammatory signaling, enhance antioxidant defenses, and inhibit myofibroblast differentiation and contractile activity. Their versatility has also been demonstrated in applications such as drug encapsulation for targeted cancer therapy [26–29]. However, reported isolation methods vary widely, and to our knowledge, no prior study has provided a standardized workflow tailored to Av-EV isolation or systematically examined the combined influence of homogenization-induced shear forces and plant maturity on physicochemical characterization and functional analyses.
Multiple techniques have been described for the isolation of extracellular vesicles, including ultracentrifugation, polymer-based precipitation, size-exclusion chromatography, immunoaffinity capture, ultrafiltration, density gradient separation, and emerging microfluidic platforms. Each method presents distinct trade-offs in terms of purity, yield, scalability, and instrumentation requirements [30]. In this protocol, ultracentrifugation was selected as the gold-standard strategy due to its widespread adoption, reproducibility, and compatibility with downstream analyses. Here, we describe a reproducible workflow for isolating Av-EVs that incorporates two homogenization strategies: manual, no-shear force (NB EVs), and blender-based shear-force homogenization (B EVs). These steps are followed by serial centrifugation for debris removal, ultracentrifugation for vesicle enrichment, and final sterile filtration.
By enabling controlled comparison across extraction strategies and plant maturity stages, the protocol enables systematic evaluation of how processing conditions and source material impact Av-EV properties. The resulting vesicles can then be employed in experimental contexts related to pathological wound healing, such as fibrotic scarring, where coordinated antioxidant, anti-inflammatory, and pro-regenerative responses are relevant. In these settings, Av-EVs may contribute to restoring redox balance, modulating persistent inflammatory responses, and limiting excessive extracellular matrix deposition associated with fibrosis. In particular, our study demonstrated that the manual approach preserved vesicle integrity and bioactivity more effectively than shear-based homogenization, highlighting the importance of the extraction strategy for maintaining vesicle quality [31]. Additionally, EVs derived from mature leaves consistently outperformed those obtained from younger plants, showing stronger downregulation of inflammatory mediators and fibrotic markers [31]. Together, these findings suggest that both extraction strategies and plant maturity are crucial variables that must be carefully controlled to ensure the reproducibility and potency of EV-based therapeutics derived from Aloe sources.
While developed in the context of skin fibrosis research, this workflow can be broadly applied to studies investigating Av-EVs in biomaterials, nanomedicine, and regenerative medicine. For instance, future work may examine whether additional Aloe-associated properties, such as antimicrobial, analgesic, and moisturizing activities, are also mediated by its vesicles. Exploring these potential functions represents an important area for further broadening our understanding of the translational potential of Av-EVs in therapeutic delivery systems, bioactive materials, and tissue regeneration applications.
Materials and reagents
Biological materials
1. Aloe barbadensis miller leaves from mature plants and potted young plants
Note: Aloe barbadensis miller is commonly known as Aloe vera. Leaves from mature plants are commercially available for human consumption and can be obtained from supermarkets or grocery stores; in this study, they were sourced from Melissa’s/World Variety Produce, Inc. (USA). These leaves measured approximately 67 cm × 9 cm × 3 cm, yielded ~400 mL of gel per leaf, and resulted in ~8 × 10¹² particles per leaf. In contrast, Aloe vera potted plants sold in plant shops or nurseries typically represent young specimens. Young leaves measured approximately 45 cm × 5 cm × 1.5 cm, yielded ~100 mL of gel per leaf, and resulted in ~2.8 × 10¹² particles per leaf. These criteria were used to ensure consistency and comparability between maturity groups.
Reagents
1. Dulbecco’s phosphate-buffered saline (DPBS) (Cytiva, catalog number: SH30028.02)
2. Deionized (DI) water
3. PierceTM RIPA lysis buffer (Thermo Scientific, catalog number: 89901)
4. PierceTM BCA Protein Assay kit (Thermo Scientific, catalog number: 23225)
a. Bovine serum albumin (BSA) ampules, 2 mg/mL (Thermo Scientific, catalog number: 23209)
b. Reagent A (Thermo Scientific, catalog number: 23228)
c. Reagent B (Thermo Scientific, catalog number: 1859078)
5. Molecular biology–grade water (Cytiva, catalog number: SH30538)
6. Uranyl formate (Electron Microscopy Sciences, catalog number: 22450)
Solutions
1. BSA standards (see Recipes)
2. 0.75% uranyl formate (see Recipes)
Recipes
1. BSA standards
| Vial | Volume of diluent (RIPA) | Volume and source of BSA | Final BSA concentration |
|---|---|---|---|
| A | 0 | 300 μL of stock | 2,000 μg/mL |
| B | 125 μL | 375 μL of stock | 1,500 μg/mL |
| C | 325 μL | 325 μL of stock | 1,000 μg/mL |
| D | 175 μL | 175 μL of vial B dilution | 750 μg/mL |
| E | 325 μL | 325 μL of vial C dilution | 500 μg/mL |
| F | 325 μL | 325 μL of vial E dilution | 250 μg/mL |
| G | 325 μL | 325 μL of vial F dilution | 125 μg/mL |
| H | 400 μL | 100 μL of vial G dilution | 25 μg/mL |
| I | 400 μL | 0 | 0 = Blank |
2. 0.75% uranyl formate (10 mL)
a. Wear appropriate personal protective equipment, including an N95 respirator.
b. Boil 50 mL of deionized (DI) water in a 100 mL beaker on a hot plate.
c. In a fume hood, weigh 75 mg of uranyl formate into a 50 mL beaker and wrap the container with aluminum foil to protect it from light.
d. Add 10 mL of freshly boiled DI water, then stir until fully dissolved (~5 min) while keeping the solution protected from light.
e. Immediately before use, filter the 0.75% uranyl formate solution through a 0.22 μm syringe filter, placing filtered drops directly into your grid.
Laboratory supplies
1. Sterilized cutting surface
2. Sterilized tablespoon
3. Sterile tweezers
4. Aluminum foil
5. Nitrile examination gloves XS–XL (VWR, catalog number: 76518)
6. Sterilized knife (Victorinox, catalog number: 6.7833.6)
7. Sterile scissors (iBayam, 8" Multipurpose)
8. Sterilized fine-mesh sieve (Homquen)
9. Sterilized graduated containers with a capacity of 1 L
10. 50 mL conical tubes (Cellstar, catalog number: 227261)
11. 10 mL serological pipettes (Celltreat, catalog number: 229210)
12. 50 mL serological pipettes (Celltreat, catalog number: 229230)
13. Centrifuge tubes (Beckman Coulter, catalog number: 361625)
14. Sterile blades (Swann-Morton, catalog number: 0207)
15. 100 μm sterile cell strainer (Greiner Bio-One, catalog number: 542000)
16. 70 μm sterile cell strainer (Greiner Bio-One, catalog number: 542070)
17. 40 μm sterile cell strainer (Falcon, catalog number: 352340)
18. 0.22 μm sterile syringe filters (GVS, catalog number: FJ25BSCCA002AL01)
19. 10 mL sterile luer lock solo syringes (Norm-Ject, catalog number: NJ-4606728-02)
20. 1.5 mL Eppendorf tubes (Greiner Bio-One, catalog number: 616201)
21. 10 μL pipette tips (VWR, catalog number: 76323-394)
22. 20–200 μL pipette tips (VWR, catalog number: 76323-390)
23. 1,000 μL pipette tips (VWR, catalog number: 76323-454)
24. 1 mL sterile luer solo syringes (Norm-Ject, catalog number: NJ-9166017-02)
25. Formvar/carbon grid (200 mesh) (Electron Microscopy Science, catalog number: FCF200-Cu-50)
26. 50 mL glass beaker (Pyrex, catalog number: CLS100050)
27. 100 mL glass beaker (Pyrex, catalog number: CLS1000100)
28. 20 mm × 8 mm magnetic stir bar (Heathrow Scientific, catalog number: HS120548)
29. N95 respirator with valve (VWR, catalog number: 89201-510)
Equipment
1. Orbital shaker (Chemglass CLS-4021-100 Versa-Orb)
2. Commercial blender
3. Centrifuge with adapters for 50 mL conical tubes (Eppendorf, model: 5810)
4. Analytical balance (VWR, model: 124B2)
5. Ultracentrifuge with an MLA-50 rotor (Beckman Coulter, model: OptimaTM MAX-XP)
6. Nanoparticle tracking analysis (NTA) (Malvern Panalytical, model: NanoSight NS300)
7. Spectrophotometer (Molecular Devices, model: SpectraMax iD3®)
8. Talos L120C transmission electron microscopy (TEM, Thermo Fisher Scientific)
Software and datasets
1. NanoSight NTA 3.4 (Malvern Panalytical)
2. Softmax Pro 7 (Molecular Devices)
3. Microsoft Excel (Microsoft 365)
4. TIA (TEM imaging and analysis) (Thermo Fisher Scientific)
Procedure
The MISEV2023 guidelines established by the International Society for Extracellular Vesicles (ISEV) recommend the use of complementary, orthogonal approaches for extracellular vesicle characterization. Accordingly, Av-EV preparations in this study were evaluated by nanoparticle tracking analysis (NTA) to quantify particle number concentration and size distribution, transmission electron microscopy (TEM) to assess vesicle morphology, and total protein quantification to support evaluation of vesicle yield and sample composition [32].
A. Preparation of Aloe vera gel
1. Obtain fresh Aloe vera leaves with similar dimensions.
2. Rinse each leaf thoroughly with DI water to remove surface contaminants and residual mucilage.
3. Place the leaves on a clean cutting surface and remove any dried tissue at the leaf tip and trim the basal end using a sterilized knife, especially if it appears brown or callused due to prior cutting and healing.
4. Trim the pointed ends to facilitate safe handling and access to the transparent inner gel.
5. Carefully trace the perimeter of the anterior leaf skin to separate it from the gel, then peel it off to fully expose the transparent inner gel.
6. Discard any yellow latex and retain only the clear gel portion by gently wiping the gel surface with clean tissue paper. If necessary, briefly rinse with DI water to remove residual latex, as it contains aloin and other compounds that may interfere with vesicle purity and downstream assays.
B. Gel extraction and homogenization
B1. Manual (no blender; NB Av-EVs)
1. Gently scrape the transparent inner gel using a sterilized tablespoon, then scoop it out into a clean, graduated container (or 50 mL conical tubes).
2. Measure the extracted gel volume and add cold, sterile DPBS to achieve a 1:1 (v/v) ratio.
3. Homogenize the mixture using a plate shaker at 100 rpm for 1 h at 4 °C.
4. Pass the homogenized suspension through a sterilized fine-mesh sieve into another clean container to remove remaining solid residues.
B2. Shear-force (blender; B Av-EVs)
1. Remove the entire transparent inner portion from the posterior leaf skin and transfer it to a commercial blender.
2. Perform a brief, low-speed mixing to evenly distribute the gel.
3. Measure the total gel volume and add cold sterile DPBS at a 1:1 (v/v) ratio.
4. Homogenize the mixture until a uniform Aloe vera juice is obtained.
Critical: Use identical DPBS ratios for both homogenization strategies to ensure comparability between NB and B Av-EV preparations.
A schematic overview of the Aloe vera leaf preparation steps for gel extraction is shown in Figure 1.
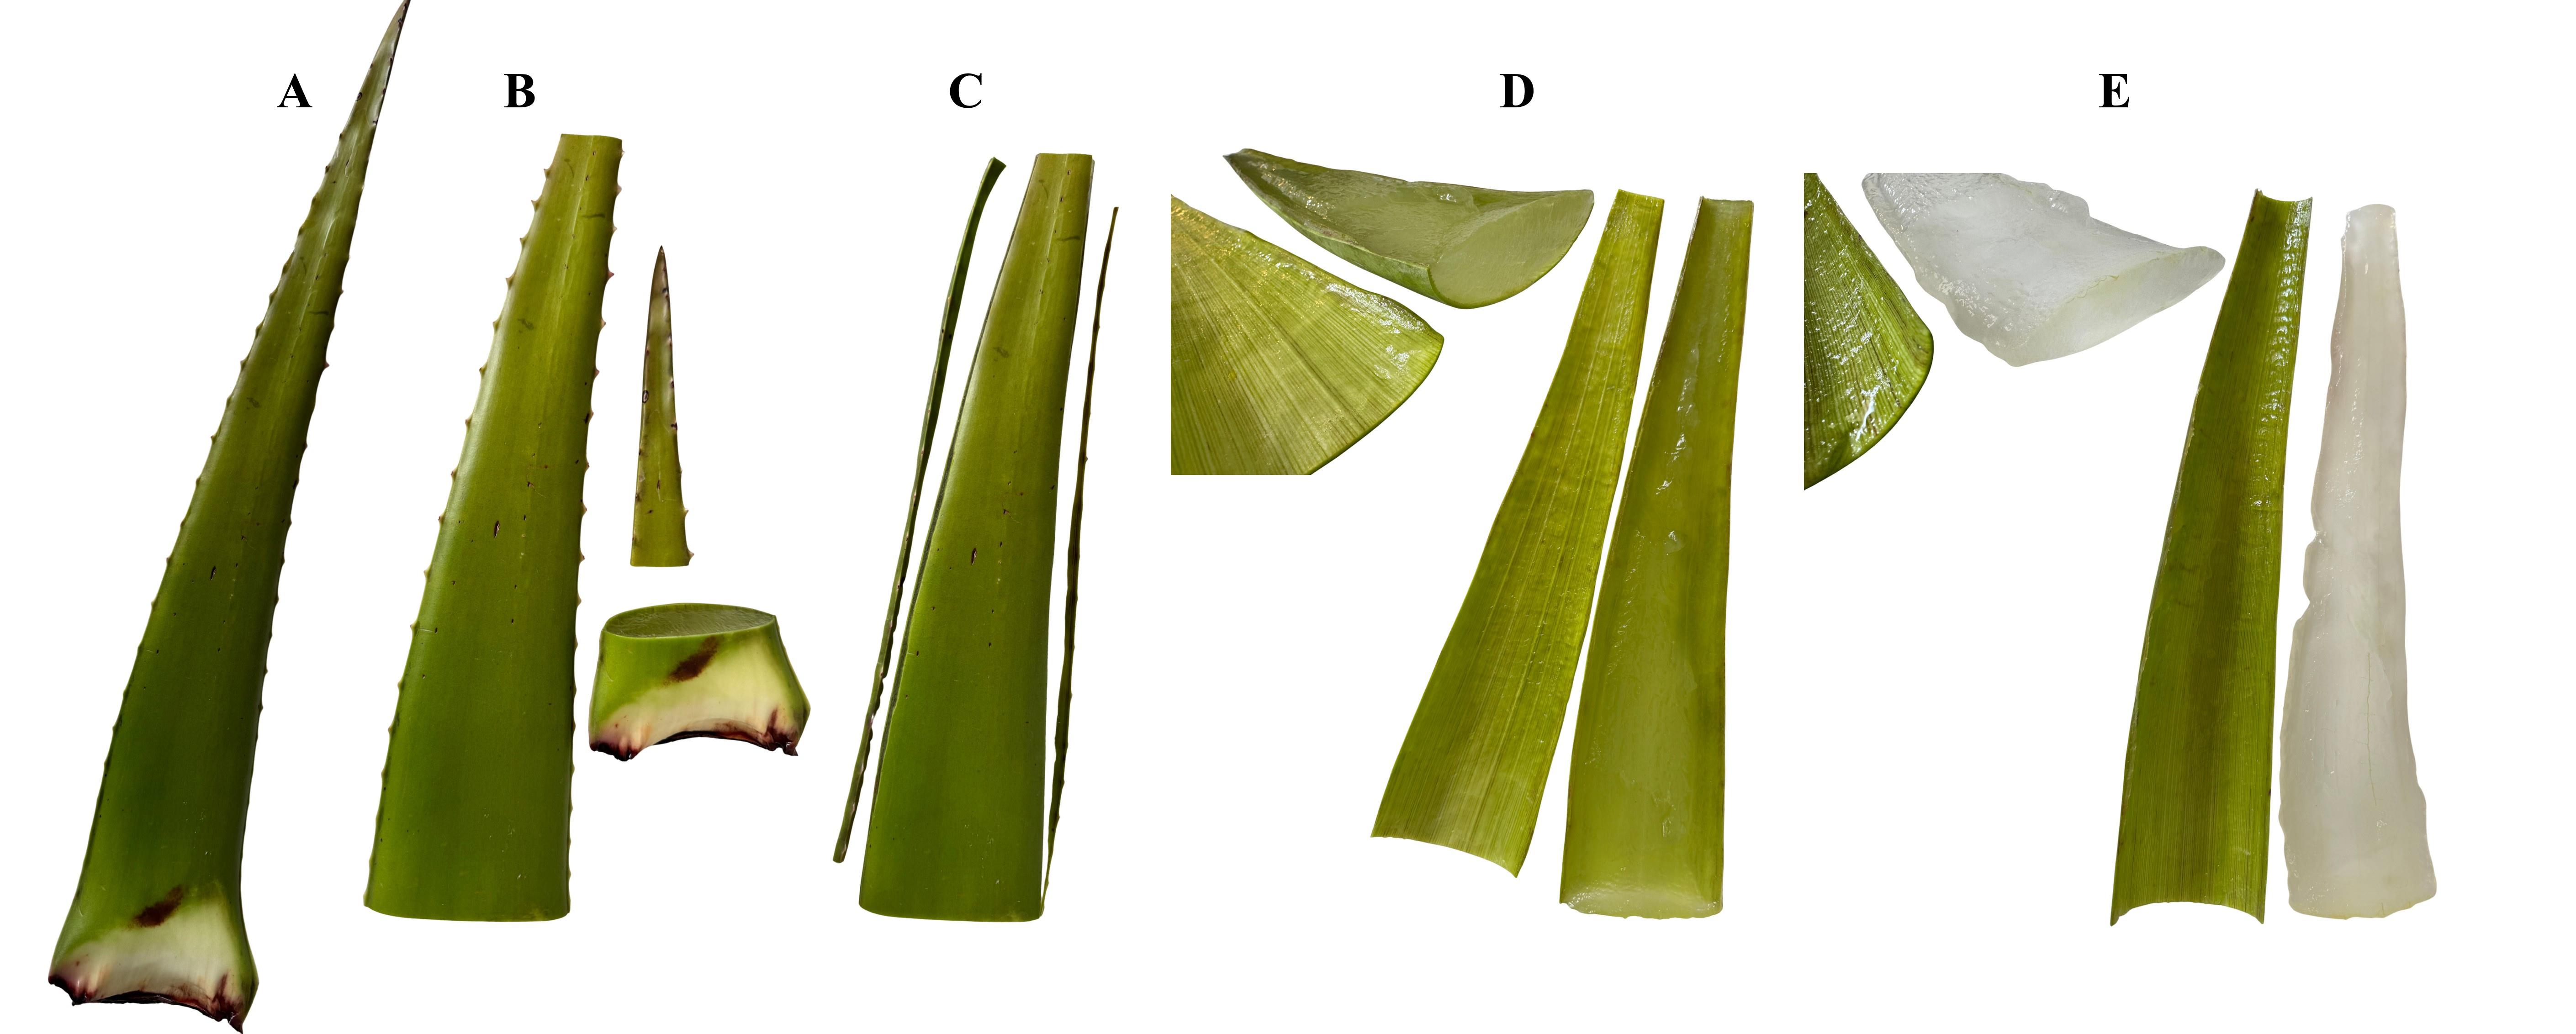
Figure 1. Preparation of Aloe vera leaves for gel extraction. (A) Fresh leaf thoroughly rinsed with DI water to remove surface contaminants. (B) Removal of the basal end and any dried tissue at the tip, including residual yellow latex. (C) Trimming of the pointed lateral edges. (D) Peeling of the anterior leaf skin to expose the transparent inner gel, which is then ready to be scraped for manual extraction (NB method). (E) Complete removal of the transparent inner portion from the posterior leaf skin, which is then ready to be transferred into a commercial blender for shear-force extraction (B method).
C. Serial centrifugation for debris removal
1. If the centrifuge is equipped with temperature control, set the rotor chamber to 4 °C for all centrifugation steps. If temperature control is not available, keep the tubes on ice between runs to maintain samples at low temperature and avoid oxidation.
2. Transfer the soluble fractions obtained from subsections B1 or B2 by gently decanting each tube with a single smooth movement into a new 50 mL conical tube.
3. Perform serial centrifugation as follows:
a. 1,000× g for 10 min
b. 2,000× g for 20 min
c. 3,000× g for 30 min
d. 15,000× g for 35 min
Note: If the centrifuge is not equipped to reach 15,000× g, perform this centrifugation step in the ultracentrifuge for 35 min at 4 °C using appropriate tubes and rotor, following the steps in section D.
4. After each centrifugation step, carefully transfer the supernatants to new conical tubes without disturbing the pellets.
D. High-speed centrifugation at 15,000× g
1. Transfer the supernatants into ultracentrifuge tubes compatible with the rotor being used.
2. Secure each tube by placing the black sealing plugs followed by the hard outer caps, according to the tube manufacturer’s instructions.
3. Weigh all tubes using an analytical balance and balance them precisely by adding more supernatant if available or DPBS until all tubes have equal mass.
4. Load the balanced tubes symmetrically into the rotor.
5. Perform the high-speed centrifugation at 15,000× g for 35 min at 4 °C.
6. After centrifugation, carefully remove the tubes from the rotor without disturbing the pellets using tweezers if necessary.
7. Reserve the clarified supernatants by holding each ultracentrifuge tube with both hands and decanting the supernatant in a single smooth motion into a new 50 mL conical tube placed in a rack, ensuring that the pellet remains undisturbed at the bottom of the tube.
8. Discard the ultracentrifuge tubes and continue working with the clarified supernatants that contain the extracellular vesicles.
Pause point: After completion of the serial centrifugation steps and prior to ultracentrifugation, the clarified supernatants can be aliquoted in 50 mL conical tubes and stored at -80 °C for later processing. In this study, freezing at this stage did not result in detectable changes in Av-EV yield, size distribution, or bioactivity upon subsequent ultracentrifugation and characterization.
E. Ultracentrifugation at 100,000× g and Av-EV recovery
1. Use the clarified supernatants from either section C or D.
2. If using frozen samples, allow them to thaw completely overnight at 4 °C before proceeding with ultracentrifugation.
3. Transfer the clarified supernatants into ultracentrifuge tubes, weigh them, balance them, and load them into the rotor following steps D1–4.
4. Perform ultracentrifugation at 100,000× g for 60 min at 4 °C.
5. After ultracentrifugation, carefully remove the tubes from the rotor without disturbing the pellets using tweezers if necessary.
6. Discard the supernatants by holding each ultracentrifuge tube with both hands and decanting the supernatant in a single smooth motion into an appropriate waste container, ensuring that the pellet remains undisturbed at the bottom of the tube.
7. To access the pellets, cut each ultracentrifuge tube in half using a sterile scalpel or sterile scissors, ensuring that the pellet does not come into contact with any residual liquid retained in the upper portion of the tube.
Note: As an alternative to decanting and cutting the tubes (steps E6–7), the supernatants may be removed by gentle aspiration using a sterile needle attached to a syringe. In this case, leave a small residual volume above the pellets to avoid disturbance.
8. Resuspend each pellet in DPBS at the desired volume.
9. Pool the resuspended pellets obtained from the ultracentrifugation run into a single conical tube to obtain between 5 and 10 mL.
10. Further resuspend the pooled suspension by repeated pipetting using micropipette tips of different sizes to break down remaining aggregates. If necessary, apply brief, low-speed vortexing to achieve a homogeneous suspension.
11. Filter the suspension through a 0.22 μm syringe filter into a new conical tube.
12. Aliquot the purified Av-EV suspension into 1 mL volumes in 1.5 mL Eppendorf tubes.
13. Store aliquots at -80 °C until further use.
14. Repeat the entire procedure as many times as necessary to process the entire homogenized suspension.
Pause point: Aliquoted Av-EVs can be stored at -80 °C for long-term use prior to characterization or functional assays.
A schematic overview of the Av-EV isolation workflow described in sections B–E is shown in Figure 2.
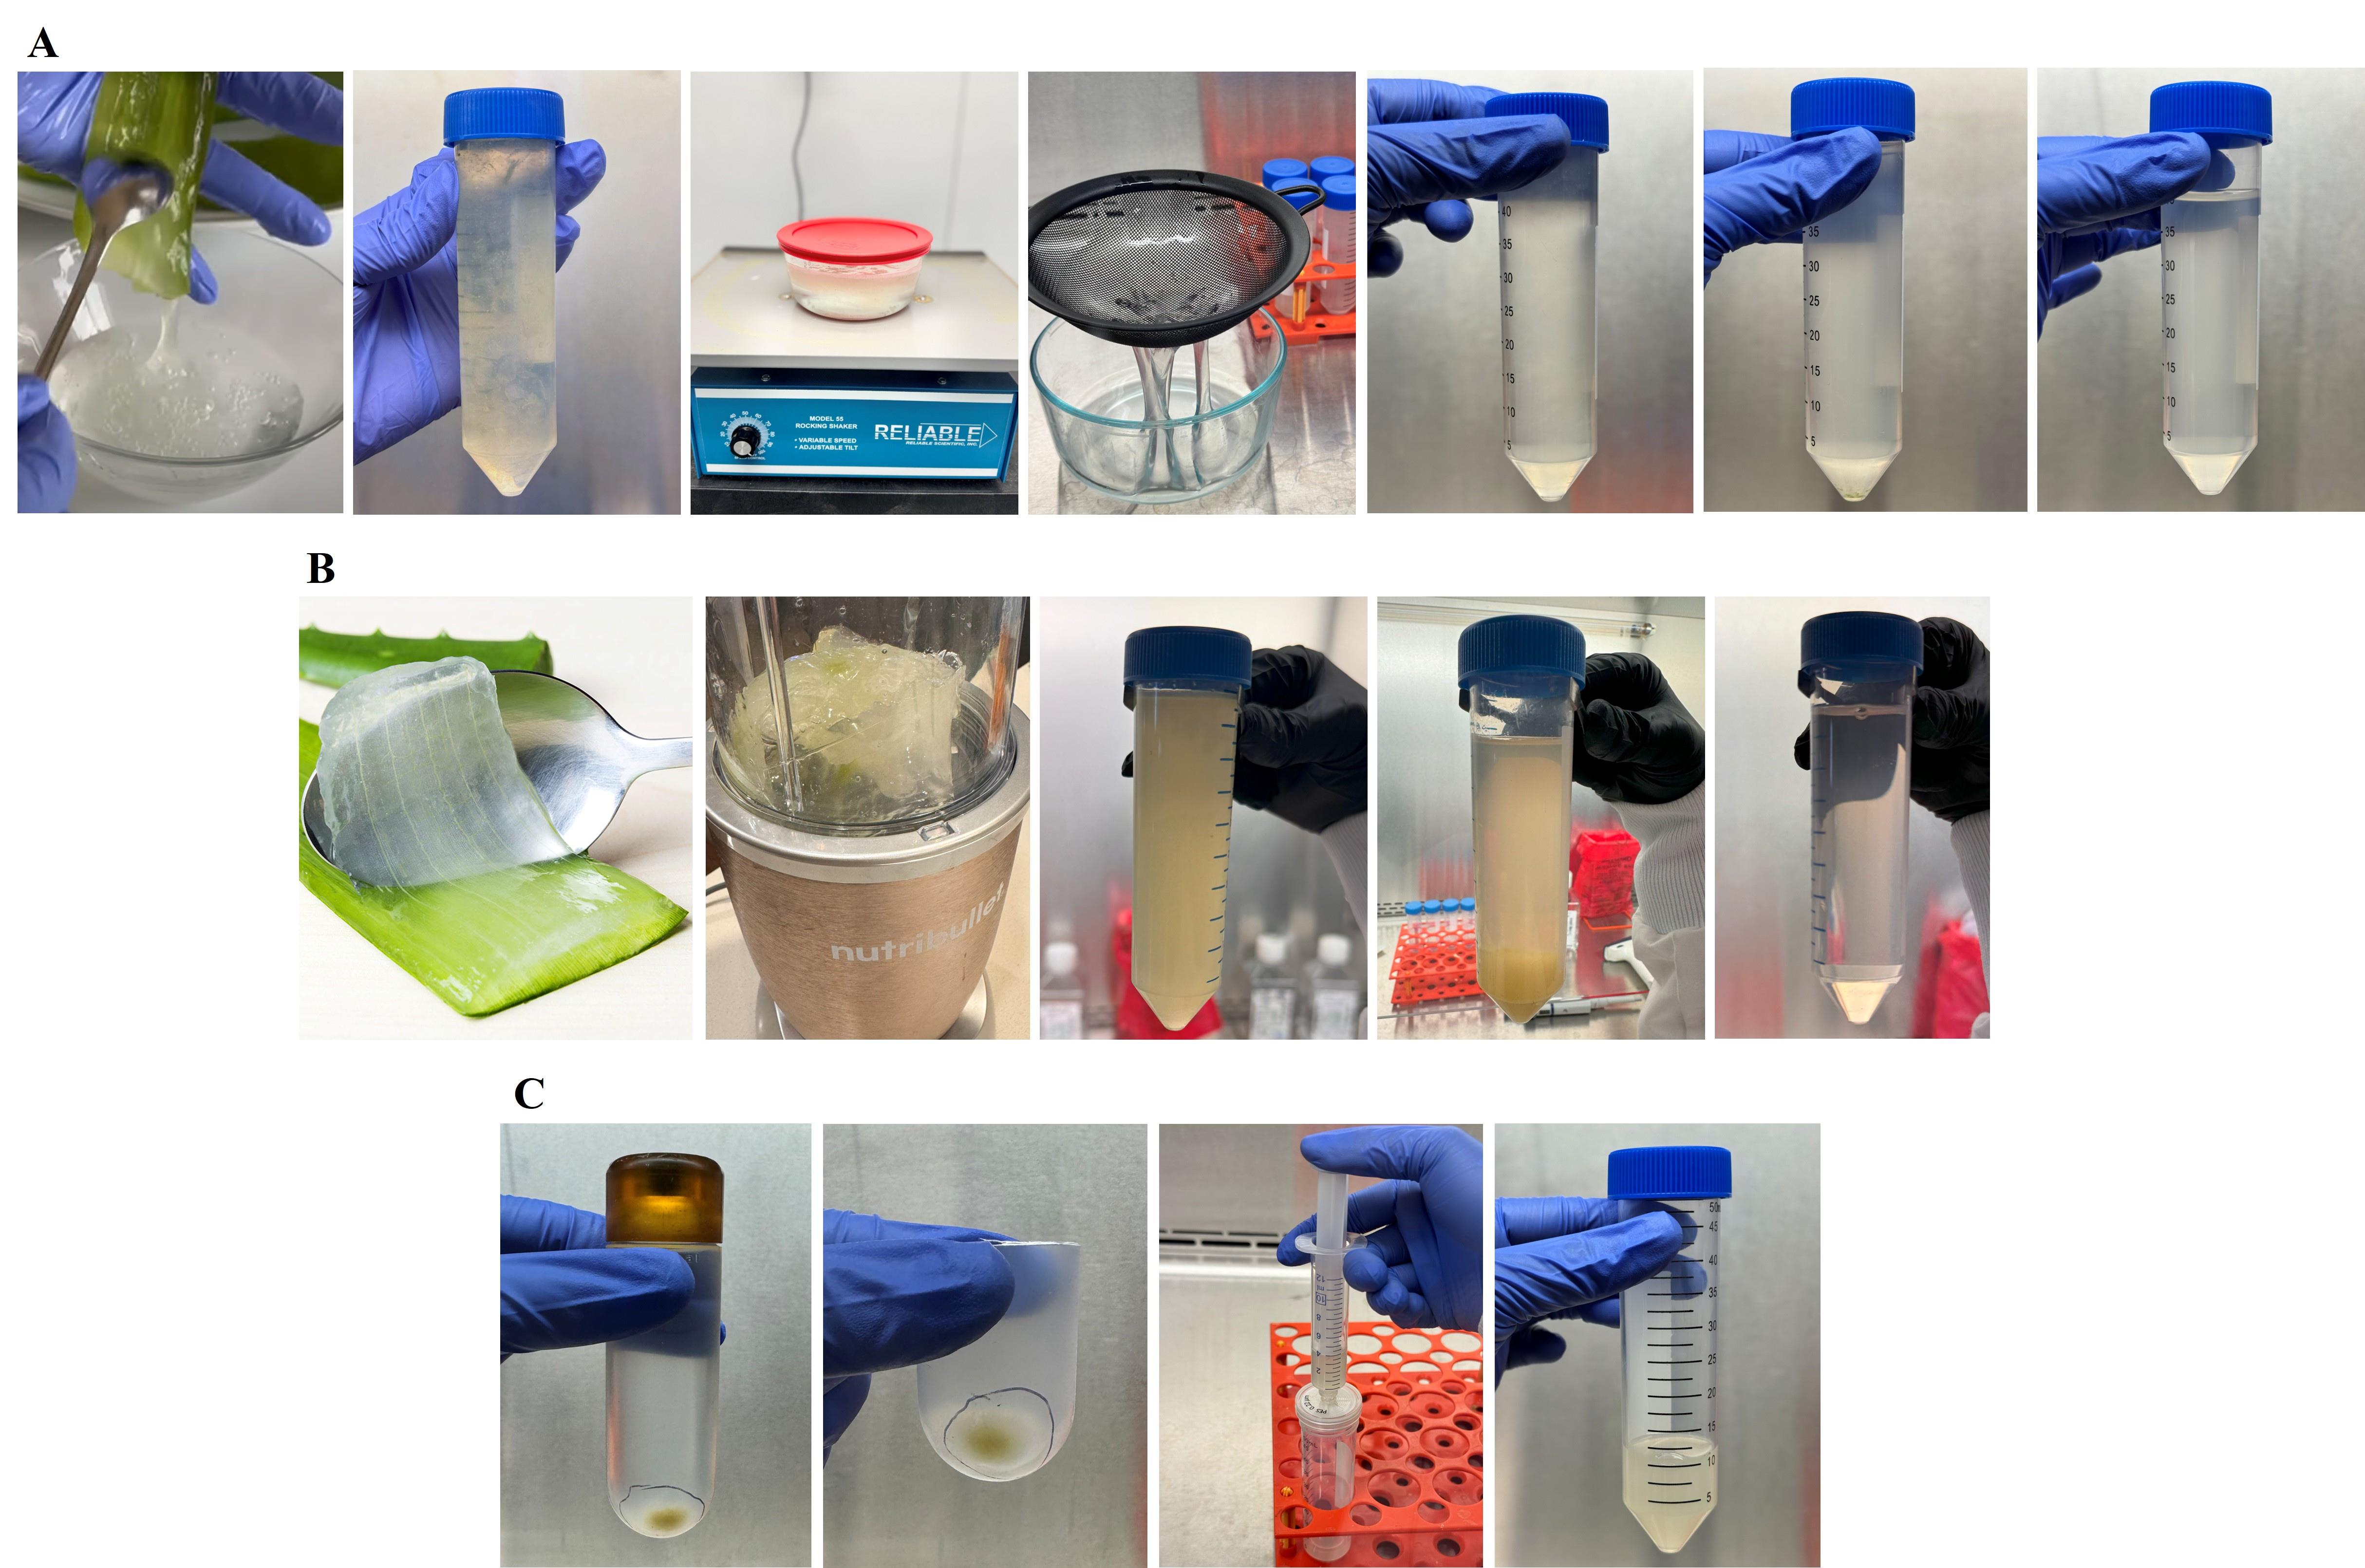
Figure 2. Workflow for the isolation of Aloe vera–derived extracellular vesicles (Av-EVs). (A) Manual (no blender, NB Av-EVs): gel scraping, gentle homogenization, fine-mesh sieving, and sequential centrifugation. (B) Shear-force (blender, B Av-EVs): complete gel extraction, high-shear homogenization, and sequential centrifugation. (C) Ultracentrifugation, Av-EV recovery, and sterile filtration.
F. Nanoparticle tracking analysis (NTA) of Av-EVs
1. Analyze Av-EV samples either immediately after ultracentrifugation or from previously frozen aliquots stored at -80 °C.
2. If using frozen samples, thaw Av-EV aliquots on ice and gently resuspend by pipetting to ensure homogeneity.
3. Examine samples, and if visible aggregates are present, apply a brief, low-speed vortex to disperse aggregates before dilution.
4. Dilute each Av-EV sample (e.g., 1:50 v/v) in DPBS to a final volume of 300–500 μL, achieving a particle concentration within the linear detection range of the instrument (1 × 10⁸ to 1 × 10⁹ particles/mL).
5. Hydrate the loading channel by flushing it with DI water according to the manufacturer’s instructions, making sure that there is no sign of bubbles.
6. Confirm that the channel is completely clean and free of residual particles before sample loading by turning on the camera (as this can lead to background signal and inaccurate particle concentration measurements).
7. Load the diluted sample into the loading channel by gently advancing it until particles become visible on the screen, then adjust the focus accordingly.
8. Set the camera level to 14–16, as appropriate, while avoiding activation of the high noise warning signal.
9. Confirm that particles exhibit uniform Brownian motion without excessive drift or aggregation prior to video acquisition, aiming for a density of 100–200 particles per frame.
10. Adjust the sample dilution as needed (as excessively high particle counts per frame can lead to particle tracking errors, whereas overly diluted samples may result in poor detection and unreliable concentration measurements).
11. Record multiple independent videos per sample as technical replicates (e.g., three videos of 30 s each).
12. Analyze the recorded videos using a detection threshold of ≥5, as appropriate, and ensure that the correct dilution factor is entered for internal calculations, with the viscosity set to 1 Cp.
13. Extract average particle concentration (particles/mL) and size distribution data for each Av-EV sample.
14. Use the resulting particle concentration values to standardize Av-EV dosing and guide concentration selection for subsequent experiments.
Note: It is recommended to maintain identical acquisition and analysis settings for all samples to ensure direct comparability between Av-EVs isolated using different homogenization strategies and plant maturity stages.
G. Protein quantification of Av-EVs using the Pierce BCA assay (microplate procedure)
1. Sample lysis and protein yield calculation strategies
a. Use Av-EV pellets immediately obtained from a single ultracentrifugation cycle.
b. Choose one of the following two strategies for protein quantification, depending on the desired level of granularity and whether the remaining pellets will be preserved for additional downstream assays:
c. (Option A) Single pellet–based extrapolation
i. Select one individual Av-EV pellet and resuspend it in the RIPA lysis buffer by gentle pipetting until fully homogeneous (e.g., ~300 μL).
ii. Incubate lysate at room temperature (RT) for 10 min, then gently mix by pipetting before proceeding to the assay.
iii. Perform the BCA assay on the single-pellet lysate, which will then be multiplied by 6 to calculate the total protein content per ultracentrifugation cycle.
d. (Option B) Pooled-pellet quantification
i. Alternatively, resuspend and pool all six pellets obtained from a single ultracentrifugation cycle into the RIPA lysis buffer (e.g., ~1 mL).
ii. Incubate the lysate at RT for 10 min, then gently mix by pipetting before proceeding to the assay.
iii. Perform the BCA assay on the pooled lysate to directly obtain the protein content per ultracentrifugation cycle.
2. Preparation of BSA standards: Prepare BSA standards (A–I) in RIPA lysis buffer (same diluent as the samples) using the dilution scheme from Recipe 1.
3. Preparation of BCA working reagent (WR)
a. Calculate the total WR volume using: (# standards + # unknowns) × (# replicates) × (WR volume per well).
b. Prepare WR by mixing 50 parts of BCA reagent A with 1 part of BCA reagent B (50:1, Reagent A:B) until the solution is clear and green.
Example: 9 standards + 3 samples, 2 replicates, 200 μL WR/well → (9 + 3) × 2 × 200 μL = 4,800 μL WR.
Prepare 5,000 μL of WR to round up.
For 5,000 μL of WR, mix 4,900 μL of Reagent A + 100 μL of Reagent B.
Note: The number of unknown samples included in the WR volume calculation should account for biological replicates, whereas replicate wells on the microplate represent technical replicates. Determine the number of biological replicates by performing independent lysate preparations using Av-EVs isolated from different Aloe vera leaves. To ensure comparability, use leaves of the same maturity stage (all mature or all young) and with similar dimensions.
4. Microplate procedure
a. Pipette 25 μL of each BSA standard and each Av-EV lysate into a clear 96-well plate, using the number of technical replicates specified in the WR volume calculation.
b. Add 200 μL of WR to each well. Mix the plate thoroughly on an orbital or plate shaker for 30 s.
c. Cover the plate (e.g., with aluminum foil) and incubate at 37 °C for 30 min.
d. Equilibrate the plate to RT and measure absorbance at 562 nm using a plate reader.
5. Data processing and protein concentration calculation
a. Export the absorbance values generated by the plate reader as a .txt file and copy and paste the data into an Excel spreadsheet for further processing.
b. Subtract the average blank (vial I) absorbance from all standards and samples to obtain blank-corrected values.
c. Generate a standard curve using the blank-corrected BSA standards and interpolate the protein concentration of each Av-EV lysate from the curve.
d. Report protein concentration as μg/mL for each Av-EV lysate.
e. Calculate protein content per ultracentrifugation cycle using one of the following approaches, corresponding to the strategy selected in subsection G1:
i. Single-pellet extrapolation: Multiply the protein concentration obtained from one pellet lysate by six, assuming homogeneous distribution across the six pellets generated per cycle.
ii. Pooled-pellet quantification: Use the protein concentration measured from the pooled lysate to directly obtain protein yield per ultracentrifugation cycle.
f. When multiple ultracentrifugation cycles are required to process the total gel volume from a single Aloe vera leaf, calculate the total protein content per leaf by multiplying the protein yield per cycle by the total number of cycles performed.
H. Transmission electron microscopy (TEM) of Av-EVs
Sample requirement: Use an Av-EV suspension prepared by pooling the six pellets from one ultracentrifugation cycle and concentrating them into a final volume of 300 μL of DPBS. Starting with a more concentrated sample is recommended, as it allows dilution if needed to optimize vesicle density on the grid for TEM imaging.
1. Place a formvar/carbon-coated copper grid (200 mesh size) on a clean grid support.
2. Spot 3 μL of the concentrated Av-EV suspension onto the grid.
2. Glow-discharge the grid for 30 s at 30 mA.
4. Incubate the droplet on the grid for 30 s at RT.
5. Remove excess liquid by gently blotting the edge of the grid with filter paper, avoiding direct contact with the coated surface in order to prevent rupturing the support film or disrupting vesicles.
6. Rinse the grid sequentially with molecular-grade water to remove salts and buffer components. Perform rinses by briefly touching the grid surface to a small droplet of molecular-grade water, then blotting the edge again.
7. Counterstain the grid with 0.75% uranyl formate solution for 1 min (see Recipe 2).
8. Blot off the stain by touching the grid edge to filter paper, then allow the grid to air-dry completely.
9. Acquire images from multiple grid regions to confirm representative vesicle morphology and minimize selection bias.
Validation of protocol
This protocol has been used and validated in the following preprint available on bioRxiv:
Ceballos-Santa et al. [31]. Targeting Fibrotic Scars with Extracellular Vesicles Extracted from Mature Aloe vera: Enhanced Antioxidant, Anti-inflammatory, and Antifibrotic Activity through M2 Macrophage Polarization and Myofibroblasts Inhibition. DOI: 10.1101/2025.06.17.660207v2
Additionally, mass spectrometry–based proteomics data comparing NB Av-EVs isolated from mature and young Aloe vera leaves have been deposited in the ProteomeXchange Consortium via the PRIDE partner repository under the dataset identifier PXD069742. All other datasets generated during this study are available through the Figshare repository DOI: 10.6084/m9.figshare.29367212.
General notes and troubleshooting
General notes
1. Selection of Aloe vera leaves is critical for reproducibility: Leaf selection should follow criteria similar to selecting fresh fruit at a grocery store. Choose leaves that are intact, firm, and free of dents, cuts, dehydration, or brown/discolored areas, as damaged tissue may increase cellular debris and oxidative degradation, affecting vesicle yield and purity.
2. Maintain clean and sterile working conditions throughout the protocol: Although the Av-EV suspensions are subjected to a final 0.22 μm sterile filtration step, it is strongly recommended to perform gel extraction and vesicle handling under clean and sterile conditions, preferably within a biosafety cabinet when available. Homogenization steps for both manual and blender-based methods should be carried out using properly sealed containers and a clean, dedicated blender, respectively. Adhering to these practices minimizes contamination risk and maintains reproducibility across preparations.
3. Aloe vera gel is susceptible to oxidation: The bioactive components of Aloe vera can oxidize rapidly once the leaf is opened. Therefore, gel extraction and homogenization should be performed as quickly as possible. Use cold DPBS, keep tubes on ice whenever feasible, and set the centrifuge to 4 °C to preserve vesicle integrity and bioactivity. Following these criteria, if the procedure is resumed using previously frozen samples, controlled thawing at 4 °C (in the refrigerator or on ice) is essential to maintain the cold chain and minimize oxidation. In contrast, thawing at RT may take several hours and can compromise sample integrity.
4. Ultracentrifuge and Av-EV recovery:
a. Proper sealing with black plugs followed by the hard outer caps is critical to prevent tube collapse or volume loss during ultracentrifugation.
b. To balance the ultracentrifugation tubes efficiently, weigh each tube using the analytical balance set to milligrams and identify the heaviest tube. For each remaining tube, subtract its weight from the heaviest value, convert the difference from mg to μL, and add the corresponding volume of supernatant or DPBS until the first three digits of the weights match across all tubes before loading them into the rotor.
c. When using 30 mL ultracentrifuge tubes with a 6-tube rotor (total capacity: 180 mL), processing approximately 800 mL of homogenized gel from a mature leaf requires 4–5 ultracentrifugation cycles, whereas the reduced gel volume from young leaves typically requires 1–2 cycles.
d. Because Av-EV concentrations typically reach 1010 particles/mL or higher, it is recommended to resuspend the pooled pellets in a larger final volume (5–10 mL). This dilution facilitates accurate pipetting and handling during downstream functional assays that require small doses. Overly concentrated suspensions can result in impractically small administration volumes in the microliter range, increasing pipetting error and variability.
e. Filtration through a 0.22 μm syringe filter serves as a sterilization step and removes residual debris; however, it also imposes a size cutoff, preferentially retaining small extracellular vesicles while excluding larger particles or aggregates.
5. Expected outcomes under the described experimental conditions:
a. Gel extraction typically yields approximately 400 mL per mature Aloe vera leaf and approximately 100 mL per young leaf, although minor variations may occur depending on leaf size and hydration.
b. Av-EV recovery yields ~8 × 10¹² particles per mature leaf and ~2.8 × 10¹² particles per young leaf.
c. Based on NTA and TEM, Av-EVs have a size distribution of 150–250 nm, consistent with the expected range for PDEVs.
d. Protein quantification of NB Av-EVs from mature leaves yields consistent concentrations of ~159–198 μg/mL, corresponding to ~3,816–4,752 μg of protein per leaf. In contrast, B Av-EVs from mature leaves exhibit greater inter-replicate variability, with protein concentrations spanning 160–447 μg/mL and total yields of ~3,840–10,728 μg per leaf, suggesting that shear-based homogenization may generate a more heterogeneous vesicle population with increased co-isolation of protein-rich material artifacts.
6. Applicability and scalability of the protocol: While the protocol is optimized for Aloe barbadensis miller gel, it can be adapted to other Aloe species or plant tissues with similar aqueous content by adjusting homogenization and centrifugation parameters.
7. Additional investigation of Av-EV biological activity, such as reduction of free radicals to prevent oxidative stress, attenuation of pro-inflammatory cytokine expression in M1-polarized macrophages with concurrent promotion of M2-like phenotypes, suppression of myofibroblast differentiation in human dermal fibroblasts, and comparative proteomic profiling of Av-EVs derived from mature vs. young leaves, is described in the related publication [31].
Troubleshooting
Problem 1: Av-EV pellet remains partially undissolved after ultracentrifugation (section E).
Possible causes: Particle aggregation, residual cellular debris, or insufficient mechanical mixing during resuspension.
Solutions: Increase the resuspension time and repeatedly pipette using micropipette tips of different sizes to mechanically break down the pellet. If pipetting alone is insufficient, apply brief, low-speed vortexing to further disperse aggregates. If the issue persists, introduce an additional pre-filtration step using sterile mesh filters with decreasing pore sizes (e.g., 100, 70, and 40 μm) prior to final filtration to reduce debris load and prevent saturation or clogging of the 0.22 μm syringe filter.
Problem 2: Volume loss due to bubble formation while filling the ultracentrifuge tubes (section E).
Possible causes: Withdrawal of the serological pipette during dispensing or rapid pipetting can introduce air bubbles into the tube. These bubbles may reduce the effective liquid volume and interfere with accurate tube balancing prior to ultracentrifugation.
Solution: Fill the tubes slowly using a 10 mL serological pipette and avoid withdrawing the pipette once dispensing has started. If bubbles appear, gently remove them with a clean paper towel or carefully break them using a pipette tip before continuing. Repeat the process three times if using the Beckman Coulter centrifuge tubes for a final volume of 30 mL, then seal and balance the tubes.
Acknowledgments
Conceptualization, M.C.C.S. (lead), T.R.G. (supporting), and K.W.K. (equal). Investigation, M.C.C.S. (lead) and K.W.K. (supporting). Methodology, M.C.C.S. (lead), T.R.G. (supporting), and K.W.K. (supporting). Writing—Original Draft, M.C.C.S. (lead). Writing—Review & Editing, M.C.C.S. (lead), T.R.G. (supporting), I.S.O. (supporting), and K.W.K. (supporting). The original research paper in which the protocol was described and validated is Ceballos-Santa et al. [31]. The Graphic overview was created with Biorender.com.
Competing interests
The authors declare no competing interests.
References
- Alzahrani, F. A., Khan, M. I., Kameli, N., Alsahafi, E. and Riza, Y. M. (2023). Plant-Derived Extracellular Vesicles and Their Exciting Potential as the Future of Next-Generation Drug Delivery. Biomolecules. 13(5): 839. https://doi.org/10.3390/biom13050839
- Kumar, R., Singh, A. K., Gupta, A., Bishayee, A. and Pandey, A. K. (2019). Therapeutic potential of Aloe vera—A miracle gift of nature. Phytomedicine. 60: 152996. https://doi.org/10.1016/j.phymed.2019.152996
- Sánchez-Machado, D. I., López-Cervantes, J., Sendón, R. and Sanches-Silva, A. (2017). Aloe vera: Ancient knowledge with new frontiers. Trends Food Sci Technol. 61: 94–102. https://doi.org/10.1016/j.tifs.2016.12.005
- Radha, M. H. and Laxmipriya, N. P. (2015). Evaluation of biological properties and clinical effectiveness of Aloe vera: A systematic review. J Tradit Complement Med. 5(1): 21–26. https://doi.org/10.1016/j.jtcme.2014.10.006
- Pereira, R., Carvalho, A., Vaz, D. C., Gil, M., Mendes, A. and Bártolo, P. (2013). Development of novel alginate based hydrogel films for wound healing applications. Int J Biol Macromol. 52: 221–230. https://doi.org/10.1016/j.ijbiomac.2012.09.031
- Sánchez, M., González-Burgos, E., Iglesias, I. and Gómez-Serranillos, M. P. (2020). Pharmacological Update Properties of Aloe Vera and its Major Active Constituents. Molecules. 25(6): 1324. https://doi.org/10.3390/molecules25061324
- Hamman, J. H. (2008). Composition and Applications of Aloe vera Leaf Gel. Molecules. 13(8): 1599–1616. https://doi.org/10.3390/molecules13081599
- Alawad, W., Othman, M., Hsaian, J. and Alsabek, L. (2022). Effect of aloe vera hydrogel on the scarring and healing of free gingival graft: Randomized controlled trial. Dent 3000. 10(1): e225. https://doi.org/10.5195/d3000.2022.225
- Zhang, N., Gao, T., Wang, Y., Liu, J., Zhang, J., Yao, R. and Wu, F. (2020). Modulating cationicity of chitosan hydrogel to prevent hypertrophic scar formation during wound healing. Int J Biol Macromol. 154: 835–843. https://doi.org/10.1016/j.ijbiomac.2020.03.161
- Danish, P., Ali, Q., Hafeez, M. and Malik, A. (2020). Antifungal and antibacterial activity of aloe vera plant extract. Biol Clin Sci Res J. 2020(1): e4. https://doi.org/10.54112/bcsrj.v2020i1.4
- Hekmatpou, D., Mehrabi, F., Rahzani, K. and Aminiyan, A. (2019). The Effect of Aloe Vera Clinical Trials on Prevention and Healing of Skin Wound: A Systematic Review. Iran J Med Sci. 44(1): 1–9.
- Singh, S., Gupta, A. and Gupta, B. (2018). Scar free healing mediated by the release of aloe vera and manuka honey from dextran bionanocomposite wound dressings. Int J Biol Macromol. 120: 1581–1590. https://doi.org/10.1016/j.ijbiomac.2018.09.124
- Hormozi, M., Assaei, R. and Boroujeni, M. B. (2017). The effect of aloe vera on the expression of wound healing factors (TGFβ1 and bFGF) in mouse embryonic fibroblast cell: In vitro study. Biomed Pharmacother. 88: 610–616. https://doi.org/10.1016/j.biopha.2017.01.095
- Oryan, A., Mohammadalipour, A., Moshiri, A. and Tabandeh, M. R. (2016). Topical Application of Aloe vera Accelerated Wound Healing, Modeling, and Remodeling. Ann Plast Surg. 77(1): 37–46. https://doi.org/10.1097/sap.0000000000000239
- Avijgan, M., Kamran, A. and Abedini, A. (2016). Effectiveness of Aloe Vera Gel in Chronic Ulcers in Comparison with Conventional Treatments. Iran J Med Sci. 41(3 Suppl): S30.
- Eghdampour, F., Jahdie, F., Kheyrkhah, M., Taghizadeh, M., Naghizadeh, S. and Hagani, H. (2013). The Impact of Aloe vera and Calendula on Perineal Healing after Episiotomy in Primiparous Women: A Randomized Clinical Trial. J. Caring Sci. 2(4): 279–286. https://doi.org/10.5681/jcs.2013.033
- Budai, M. M., Varga, A., Milesz, S., Tőzsér, J. and Benkő, S. (2013). Aloe vera downregulates LPS-induced inflammatory cytokine production and expression of NLRP3 inflammasome in human macrophages. Mol Immunol. 56(4): 471–479. https://doi.org/10.1016/j.molimm.2013.05.005
- Nejatzadeh-Barandozi, F. (2013). Antibacterial activities and antioxidant capacity of Aloe vera. Org Med Chem Lett. 3(1): 5. https://doi.org/10.1186/2191-2858-3-5
- Saini, D. K. and Saini, M. R. (2011). Evaluation of radioprotective efficacy and possible mechanism of action of Aloe gel. Environ Toxicol Pharmacol. 31(3): 427–435. https://doi.org/10.1016/j.etap.2011.02.004
- Yun, N., Lee, C. H. and Lee, S. M. (2009). Protective effect of Aloe vera on polymicrobial sepsis in mice. Food Chem Toxicol. 47(6): 1341–1348. https://doi.org/10.1016/j.fct.2009.03.013
- Habeeb, F., Stables, G., Bradbury, F., Nong, S., Cameron, P., Plevin, R. and Ferro, V. A. (2007). The inner gel component of Aloe vera suppresses bacterial-induced pro-inflammatory cytokines from human immune cells. Methods. 42(4): 388–393. https://doi.org/10.1016/j.ymeth.2007.03.005
- Eamlamnam, K. (2006). Effects of Aloe vera and sucralfate on gastric microcirculatory changes, cytokine levels and gastric ulcer healing in rats. World J Gastroenterol. 12(13): 2034. https://doi.org/10.3748/wjg.v12.i13.2034
- Prabjone, R., Thong-Ngam, D., Wisedopas, N., Chatsuwan, T. and Patumraj, S. (2006). Anti-inflammatory effects of Aloe vera on leukocyte-endothelium interaction in the gastric microcirculation of Helicobacter pylori-infected rats. Clin Hemorheol Microcirc. 35(3): 359–66. https://pubmed.ncbi.nlm.nih.gov/16899957/
- Langmead, L., Makins, R. J. and Rampton, D. S. (2004). Anti‐inflammatory effects of aloe vera gel in human colorectal mucosa in vitro. Aliment Pharmacol Ther. 19(5): 521–527. https://doi.org/10.1111/j.1365-2036.2004.01874.x
- Woo, S. W., Nan, J., Lee, S. H., Park, E., Zhao, Y. Z. and Sohn, D. H. (2002). Aloe Emodin Suppresses Myofibroblastic Differentiation of Rat Hepatic Stellate Cells in Primary Culture. Pharmacol Toxicol. 90(4): 193–198. https://doi.org/10.1034/j.1600-0773.2002.900404.x
- Ramírez, O., Pomareda, F., Olivares, B., Huang, Y. L., Zavala, G., Carrasco-Rojas, J., Álvarez, S., Leiva-Sabadini, C., Hidalgo, V., Romo, P., et al. (2024). Aloe vera peel-derived nanovesicles display anti-inflammatory properties and prevent myofibroblast differentiation. Phytomedicine. 122: 155108. https://doi.org/10.1016/j.phymed.2023.155108
- Kim, M. and Park, J. H. (2022). Isolation of Aloe saponaria-Derived Extracellular Vesicles and Investigation of Their Potential for Chronic Wound Healing. Pharmaceutics. 14(9): 1905. https://doi.org/10.3390/pharmaceutics14091905
- Kim, M. K., Choi, Y. C., Cho, S. H., Choi, J. S. and Cho, Y. W. (2021). The Antioxidant Effect of Small Extracellular Vesicles Derived from Aloe vera Peels for Wound Healing. Tissue Eng Regener Med. 18(4): 561–571. https://doi.org/10.1007/s13770-021-00367-8
- Zeng, L., Wang, H., Shi, W., Chen, L., Chen, T., Chen, G., Wang, W., Lan, J., Huang, Z., Zhang, J., et al. (2021). Aloe derived nanovesicle as a functional carrier for indocyanine green encapsulation and phototherapy. J Nanobiotechnol. 19(1): e1186/s12951–021–01195–7. https://doi.org/10.1186/s12951-021-01195-7
- Shami-shah, A., Travis, B. G. and Walt, D. R. (2023). Advances in extracellular vesicle isolation methods: a path towards cell-type specific EV isolation. Extracell Vesicles Circ Nucl Acids. 4(3): 447–460. https://doi.org/10.20517/evcna.2023.14
- Ceballos-Santa, M. C., Gaborski, T. R., Schulze, S. and Wuertz-Kozak, K. (2025). Targeting Fibrotic Scars with Extracellular Vesicles Extracted from Mature Aloe vera: Enhanced Antioxidant, Anti-inflammatory, and Antifibrotic Activity through M2 Macrophage Polarization and Myofibroblasts Inhibition. bioRxiv: e660207. https://doi.org/10.1101/2025.06.17.660207
- Zhang, Y., Lan, M. and Chen, Y. (2024). Minimal Information for Studies of Extracellular Vesicles (MISEV): Ten-Year Evolution (2014–2023). Pharmaceutics. 16(11): 1394. https://doi.org/10.3390/pharmaceutics16111394
- Gordon, S. and Martinez, F. O. (2010). Alternative Activation of Macrophages: Mechanism and Functions. Immunity. 32(5): 593–604. https://doi.org/10.1016/j.immuni.2010.05.007
Article Information
Publication history
Received: Feb 4, 2026
Accepted: Mar 19, 2026
Available online: Mar 30, 2026
Published: Apr 20, 2026
Copyright
© 2026 The Author(s); This is an open access article under the CC BY license (https://creativecommons.org/licenses/by/4.0/).
How to cite
Ceballos-Santa, M. C., Sanchez-Ortiz, I., Gaborski, T. R. and Wuertz-Kozak, K. (2026). A Step-by-Step Protocol for the Isolation of Aloe vera–Derived Extracellular Vesicles via Manual and Shear-Force Homogenization. Bio-protocol 16(8): e5664. DOI: 10.21769/BioProtoc.5664.

 Download Citation in RIS Format
Category
Plant Science > Plant cell biology > Organelle isolation
Cell Biology > Organelle isolation > Extracellular vesicle
Cell Biology > Organelle isolation > Exosomes
Do you have any questions about this protocol?
Post your question to gather feedback from the community. We will also invite the authors of this article to respond.
 Post a Question


