- Protocols

- Articles and Issues
- For Authors
- About
- Become a Reviewer

An Ex Vivo Lung Histoculture Model for Studying Pulmonary Infection and Immune Response With SARS-CoV-2 as an Example of RNA Virus
(*contributed equally to this work) Published: Vol 15, Iss 24, Dec 20, 2025 DOI: 10.21769/BioProtoc.5552 Views: 1132
Reviewed by: David PaulAnonymous reviewer(s)
Original research article
The authors used this protocol in:

Oct 2024

Protocol Collections
Comprehensive collections of detailed, peer-reviewed protocols focusing on specific topics


Related protocols
Abstract
The tissue explant culture (histoculture) is a method that involves maintaining small pieces taken from an organ ex vivo or post mortem in a controlled laboratory setting. Such a technique has a number of advantages: unlike the 2D, organoid, or on-chip cultures, tissue explants preserve the whole complexity of the original tissue in vivo, its structure, extracellular matrix, and the diverse cell populations, including resident immune cells. The explant culture method can be applied to human tissue specimens obtained from biopsies or autopsies, provided that proper ethical protocols are followed. This avoids the difficulties that may arise in translating results obtained on animal models into biomedical research for humans. This advantage makes histocultures especially desirable for studying human pathogenesis in the course of infectious diseases. The disadvantage of the method is the limited lifespan of the cultured tissues; however, a number of approaches allow extending tissue viability to a period sufficient for observing the infection onset and development. Here, we provide a protocol for lung explant maintenance that allows tracing the local effects of infection with SARS-CoV-2 in humans. Further applications of the lung tissues cultured according to this protocol include, but are not limited to, histochemical and immunohistochemical studies and microscopy, FACS, qPCR, and ELISA-based analysis of the conditioned culture media.
Key features
• The protocol relies on lung tissue culture on collagen rafts at the air–liquid interface, followed by infection with viral agents.
• The developed system provides a laboratory-controlled model to investigate the mechanisms of SARS-CoV-2 infection and allows further histological/immunohistochemical, qPCR, FACS, and xMAP cytokine analysis.
• Successful establishment of explant culture requires basic cell culture experience. Successful viral infection requires access to a BSL3 laboratory and relevantly trained personnel.
Keywords: Ex vivo modelGraphical overview
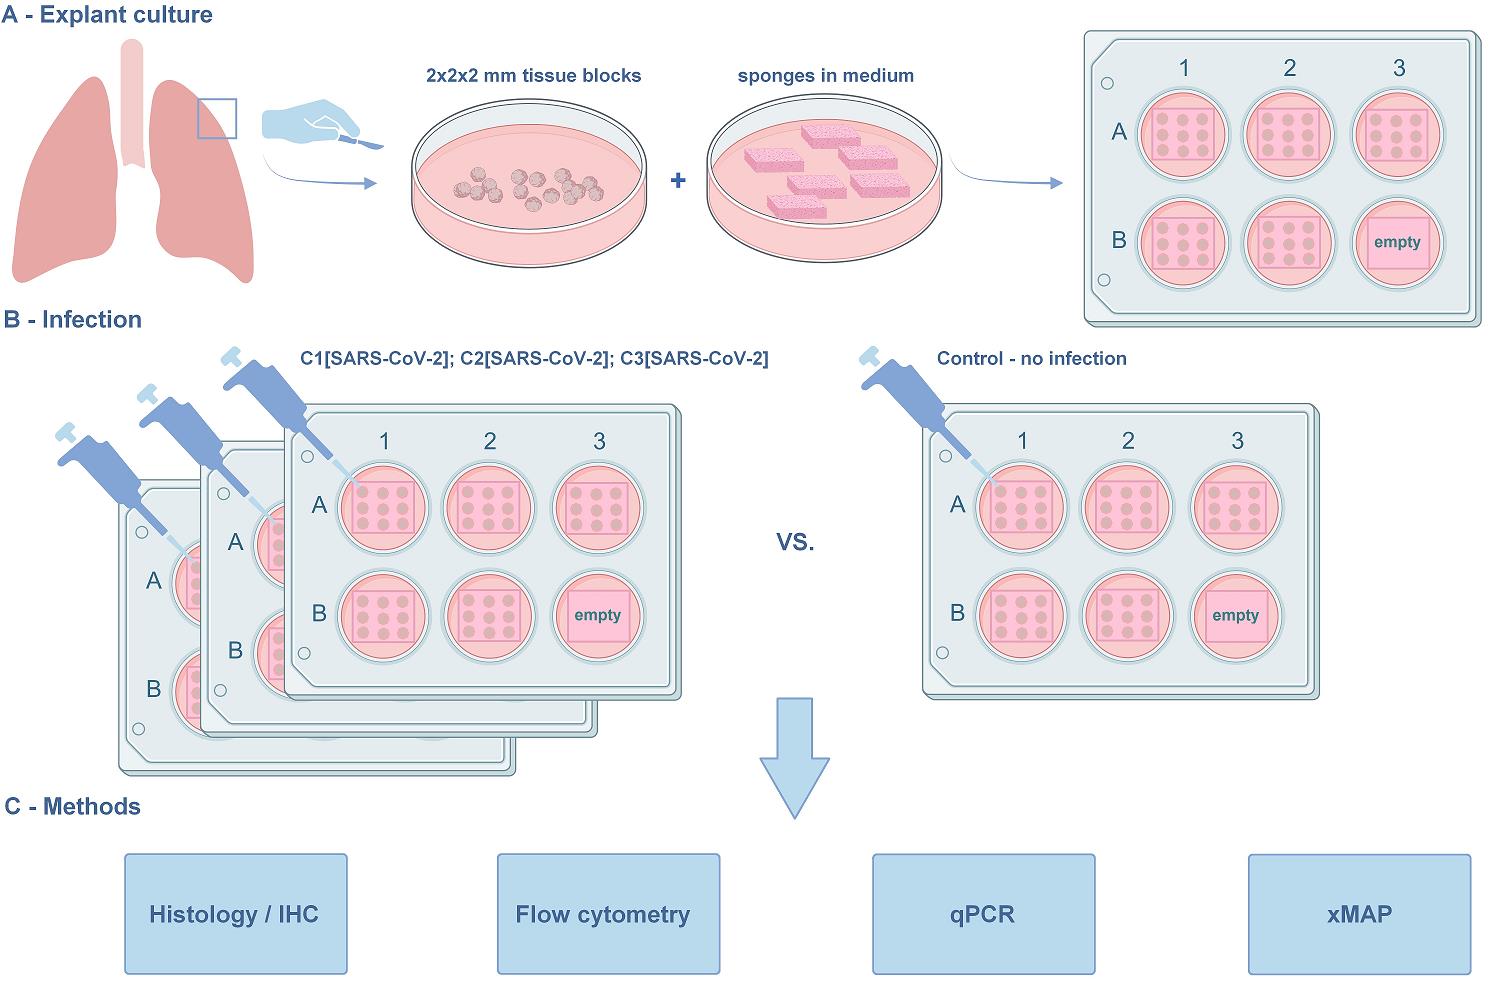
The lung explant culture. (A) Establishment of the lung explant culture at the air–liquid interface. The blocks are derived from the marginal lung tissue of patients with carcinoma undergoing lobe resection. The macroscopically and microscopically intact lung tissue, as assessed by a pathologist, is used in the protocol. (B) Viral infection. The model is suitable for studying SARS-CoV-2 infection and in situ immune response. Three concentrations of the virus were used along with the non-infected negative control. (C) Methods for further analysis compatible with the histoculture model. The protocol was used in [1]. The graphical overview was created with BioRender.com.
Background
The lung is an organ with complicated architecture and diverse cell content that comprises over 40 cell types [2]. For a long time, “the big five” lung diseases—asthma, chronic obstructive pulmonary disease (COPD), acute lower respiratory tract infections, lung cancer, and tuberculosis (TB)—have been among the most common causes of illness, disability, and death worldwide. The recent COVID-19 pandemic has added significantly to the number of respiratory disease cases and associated mortality [3]. This explains the need for meticulously searching for the most relevant, easy-to-maintain, and cost-effective lung models to study lung disease pathogenesis and to test therapeutic strategies under controlled laboratory conditions.
The available lung models include 2D cell cultures of either transformed or non-transformed cell lines. The transformed cell lines, most often cancerous, are easy to maintain and show higher reproducibility. Apart from cancer research, these have been used to investigate other lung pathologies, including infection [4–6]. Despite their relative simplicity, they are limited in use due to the lack of original tissue architecture, cell matrix, and population diversity. Primary non-transformed cells have better potential to imitate in vivo infection [7]. However, they too do not faithfully reflect the complex lung architecture. Hence, attempts have been made to design 3D tissue models, for example, to co-culture cells [8] from 2D monocultures and grow them in 3D [9].
3D models of the lung include organoids and lung-on-a-chip assays. Organoids are 3D culture systems derived from adult/fetal/induced pluripotent stem cells that can proliferate and differentiate into structures that, in part, mimic the organ. Although lung organoids are achieving increased complexity, they remain restricted in both cellular diversity and the sophistication of their extracellular matrix composition [10]. The same is true for the micro-engineered lung-on-a-chip models [11].
Animal models also have their drawbacks. Often, they do not fully represent the human lung pathology due to histological and physiological differences of the lung, including its immune microenvironment [12–14]. Mouse humanization or other additional procedures are often required to study human diseases, which makes such an approach costly and difficult [15,16].
The lung explant culture (histoculture) is a method of maintaining 3D blocks of lung tissue in the laboratory [17]. The tissue architecture, cell diversity, and intercellular interactions are thus largely preserved. Thus, histoculture models show promise for a number of applications in biomedicine and basic research [18].
To date, lung histocultures have been successfully implicated in lung development studies [19,20]. In cancer research, explants from the intact and tumor lung areas were used in a study of metabolic alterations associated with malignancy [21] and to evaluate the effects of therapeutic compounds on cell metabolism and cell death [22]. Respiratory infection studies also greatly benefit from this model [23].
Due to the consistently high relevance of this topic, here, we address a pulmonary infection model. As the lung has a barrier function in the organism, it is a frequent site of diverse infections and associated inflammation and tissue damage [24]. A significant part of the pathogens are RNA viruses, including influenza viruses, respiratory syncytial virus (RSV), and, more recently, some pneumonia-causing coronaviruses. Indeed, SARS-CoV-2 presented the most recent instance of a pathogen with high lung tropism [25,26]; the COVID-19 pandemic fueled a number of new studies of pneumonia pathogenesis [26–29]. Similar to work done on influenza viruses [23], we propose a model of controlled lung infection, test several virus assessment methods, and prove the compatibility of the model with diverse methods to further analyze tissue damage and immune response.
The limited viability of lung tissue presents the greatest difficulty and has to be addressed carefully in the experimental setup. Here, we adapted our previous protocols [30,31,38], developed for different tissue types, to the lung. We report a lung histoculture model that maintains tissue morphology and viability for 10 days—a sufficient time to trace the infection of SARS-CoV-2 in situ. We believe that, similar to what was done on other models, lung histocultures may be used for co-infection studies [32,33] and drug testing [34–36].
Materials and reagents
Biological materials
1. Virus strain: SARS-CoV-2 B.1.1.1 variant (GISAID EPI_ISL_421275), deposited at the National Research Center for Epidemiology and Microbiology Named After Honorary Academician N.F. Gamaleya.
Caution: All experiments using infectious SARS-CoV-2 should be performed in a biosafety level 3 (BSL3) laboratory.
2. Cell line: Vero C1008 clone E6 (ATCC, catalog number: CRL-1586TM)
3. Lung tissue: obtained from the post-surgical material of individuals with primary lung carcinoma who underwent lobectomy. None of the individuals received therapy prior to surgery. The protocol was approved by the Moscow City Ethics Committee and conducted in accordance with the local legislation and institutional requirements.
Reagents
1. PBS (10×), pH 7.2 (GibcoTM, Thermo Fisher Scientific, catalog number: 70013032); store at room temperature (RT)
2. Gelfoam® hemostatic agent absorbable gelatin topical sponge (Pfizer, catalog number: 00009031508); store at RT
3. RPMI-1640 (GibcoTM, Thermo Fisher Scientific, catalog number: 11875093); store at RT
4. Anti-Anti (100×) antibiotic-antimycotic (GibcoTM, Thermo Fisher Scientific, catalog number: 15240-062); store at 4 °C
5. FBS HyClone (HyCloneTM, Cytiva, catalog number: SH30071.03); store at 4 °C
6. GlutaMAX (GibcoTM, Thermo Fisher Scientific, catalog number: 35050087); store at 4 °C
7. Non-essential amino acids (GibcoTM, Thermo Fisher Scientific, catalog number: 11140050); store at 4 °C
8. Sodium pyruvate (GibcoTM, Thermo Fisher Scientific, catalog number: 11360070); store at 4 °C
9. RNAlater (RNA stabilization reagent) (InvitrogenTM, Thermo Fisher Scientific, catalog number: AM7020); store at RT
10. Paraformaldehyde (PFA) (Sigma-Aldrich, Merck Life Science LLC, catalog number: 158127); store at RT in a dark place
11. Collagenase, Type IV, powder (GibcoTM, Thermo Fisher Scientific, catalog number: 17104019); store at 4 °C; protect from light
12. DNase I (InvitrogenTM, Thermo Fisher Scientific, catalog number: 18047019); store at -20 °C
13. Live-Dead fixable stain AlexaFluor 350 (InvitrogenTM, Thermo Fisher Scientific, catalog number: L23105); store at 4 °C; protect from light
14. Human BD Fc BlockTM (BD PharmingenTM, catalog number: 564219); store at 4 °C
15. Stain buffer (FBS) (BD PharmingenTM, catalog number: 554656); store at 4 °C
16. APC-R700 mouse anti-human CD45 (BD PharmingenTM, catalog number: 566041); store at 4 °C; protect from light
17. BD HorizonTM BV510 mouse anti-human CD3 (BD PharmingenTM, catalog number: 566779); store at 4 °C; protect from light
18. BD HorizonTM BUV661 mouse anti-human CD4 (BD PharmingenTM, catalog number: 569782); store at 4 °C; protect from light
19. BD HorizonTM BUV395 mouse anti-human CD8 (BD PharmingenTM, catalog number: 569178); store at 4 °C; protect from light
20.BD HorizonTM BUV805 mouse anti-human CD14 (BD PharmingenTM, catalog number: 612902); store at 4 °C; protect from light
21. BD HorizonTM BUV737 mouse anti-human CD16 (BD PharmingenTM, catalog number: 612786); store at 4 °C; protect from light
22. BD HorizonTM BUV496 mouse anti-human NCAM-1 (CD56) (BD PharmingenTM, catalog number: 569467); store at 4 °C; protect from light
23. BDTM PE-CyTM 7 mouse anti-human CD11c (BD PharmingenTM, catalog number: 652358); store at 4 °C; protect from light
24. BDTM PE mouse anti-human CD123 (BD PharmingenTM, catalog number: 340545); store at 4 °C; protect from light
25. BDTM APC-CyTM 7 mouse anti-human HLA-DR (BD PharmingenTM, catalog number: 335796); store at 4 °C; protect from light
26. Alexa Fluor® 647 mouse anti-human CD66b (BD PharmingenTM, catalog number: 561645); store at 4 °C; protect from light
27. Ethanol 96%, EMPROVE® EXPERT, Ph. Eur., ChP, JP, USP (Millipore, Merck Life Science LLC, catalog number: 100967); store at RT
Caution: This chemical is flammable.
28. Toluene (Sigma-Aldrich, Merck Life Science LLC, catalog number: 589578100); store at RT
Caution: This chemical is flammable.
29. Paraffin HISTOMIX (BioVitrum, catalog number: 247/NS); store at RT
30. Eosin solution (BioVitrum, catalog number: HK-ES-B250); store at RT
31. Hematoxylin solution (BioVitrum, catalog number: HK-G0-CD05); store at RT
32. Anti-N protein antibodies (HyTest, catalog number: C706, rabbit monoclonal); store at 4 °C
33. 0.1% TritonX-100 (Sigma-Aldrich, Merck Life Science LLC, catalog number: X100-100ML); store at RT
Caution: This chemical is toxic.
34. Dual endogenous enzyme block (Dako, Agilent, catalog number: S200380-2); store at 4 °C
Caution: This chemical is toxic.
35. UltraVision Detection HRP DAB kit (LabVision Corp., Thermo Fisher Scientific, catalog number: TL-060-QHD); store at 4 °C
36. Anti-CD68 antibodies (Talent Biomedical, catalog number: AR0349); store at 4 °C
37. Shandon-Mount medium (EprediaTM, Thermo Fisher Scientific, catalog number: 1900333); store at RT
Caution: This chemical is toxic and flammable.
38. RLT buffer (QIAGEN, catalog number: 79216); store at RT
Caution: This chemical is toxic.
39. β-mercaptoethanol (Calbiochem®, Merck Life Science LLC, catalog number: 444203); store at RT
Caution: This chemical is toxic and flammable.
40. RNeasy Mini kit (QIAGEN, catalog number: 74104); store at RT
Caution: Contains chemicals not suitable for use with bleach.
41. RIBO-prep kit (AmpliSens®, catalog number: K2-9-Et-100); store at 4 °C
42. OneTube RT-PCRmix (Eurogene, catalog number: SK101M); store at -20 °C
43. MILLIPLEX MAP human cytokine/chemokine magnetic bead panel (Millipore, Merck Life Science LLC, catalog number: HCYTMAG-60K-PX41); store at 4 °C
44. Tween-20 (Sigma-Aldrich, catalog number: P9416); store at RT
45. Luminex sheath fluid (Luminex, catalog number: 40-50000); store at RT
Solutions
1. Transportation medium (see Recipes)
2. Complete culture medium (see Recipes)
3. Virus expansion medium (see Recipes)
4. PBS 1× (see Recipes)
5. PFA 4% (see Recipes)
6. Digestion mix (see Recipes)
7. Wash buffer for automatic wash (see Recipes)
8. PCR primer-probe mix for viral production in medium testing (see Recipes)
9. PCR primer-probe mix for tissue viral load testing (see Recipes)
Recipes
1. Transportation medium
| Reagent | Final concentration | Quantity or volume |
|---|---|---|
| RPMI-1640 | 99% | 495 mL |
| Anti-anti (100×) | 1% | 5 mL |
| Total | 100% | 500 mL |
Should be prepared in aseptic conditions in the laminar flow cabinet. Store at 4 °C.
2. Complete culture medium
| Reagent | Final concentration | Quantity or volume |
|---|---|---|
| RPMI-1640 | 81% | 405 mL |
| FBS HyClone heat-inactivated | 15% | 75 mL |
| GlutaMAX (100×) | 1% | 5 mL |
| Non-essential amino acids (100×) | 1% | 5 mL |
| Sodium pyruvate (100 mM) | 1% | 5 mL |
| Anti-anti (100×) | 1% | 5 mL |
| Total | 100% | 500 mL |
Should be prepared in aseptic conditions in the laminar flow cabinet. FBS should be heat-inactivated in a water bath at 56 °C for 40 min. After mixing, gently pipette the complete culture medium. Prewarm it at 37 °C in a water bath before starting work. Store at 4 °C.
3. Virus expansion medium
| Reagent | Final concentration | Quantity or volume |
|---|---|---|
| DMEM | 94% | 480 mL |
| FBS HyClone heat-inactivated | 2% | 10 mL |
| GlutaMAX (100×) | 1% | 5 mL |
| Anti-anti (100×) | 1% | 5 mL |
| Total | 100% | 500 mL |
Should be prepared in aseptic conditions in the laminar flow cabinet. FBS should be heat-inactivated in a water bath at 56 °C for 40 min. After mixing, gently pipette the complete culture medium. Prewarm it at 37 °C in a water bath before starting work. Store at 4 °C.
4. PBS 1×
| Reagent | Final concentration | Quantity or volume |
|---|---|---|
| PBS (10×) pH 7.2 | 10% | 100 mL |
| MQ | 90% | 900 mL |
| Total | 100% | 1,000 mL |
Should be prepared in aseptic conditions in the laminar flow cabinet. Store at RT.
5. PFA 4% (m/v)
| Reagent | Final concentration | Quantity or volume |
|---|---|---|
| PFA 95% powder | 4% | 4 g |
| PBS 1× | 96% | 100 mL |
| Total | 100% | 100 mL |
Dissolve 4 g of PFA in 90 mL of PBS 1× at 60 °C. Let it cool to RT and adjust the volume to 100 mL with PBS 1×. Store at RT.
6. Digestion mix
| Reagent | Final concentration | Quantity or volume |
|---|---|---|
| Collagenase, Type IV | 5 mg/mL | 125 μL |
| DNase I, bovine | 40 U/mL | 5 μL |
| RPMI-1640 | 870 μL | |
| Total | 1 mL |
Store at 4 °C.
7. Wash buffer for automatic wash
| Reagent | Final concentration | Quantity or volume |
|---|---|---|
| Tween-20 | 0.05% | 1 mL |
| PBS 1× | 99.95% | 1,999 mL |
| Total | 100% | 20,00 mL |
Store at 4 °C.
8. PCR primer-probe mix for viral production in medium testing (per 1 reaction)
| Reagent | Final concentration | Quantity or volume |
|---|---|---|
Forward primer N2 5’-TTACAAACATTGGCCGCAAA-3’ | 500 nM | 0.5 μL |
Reverse primer N2 5’-GCGCGACATTCCGAAGAA-3’ | 500 nM | 0.5 μL |
Probe N2 FAM5’-ACAATTTGCCCCCAGCGCTTCAG-3’BHQ1 | 500 nM | 0.5 μL |
Forward primer N3 5’-GGGAGCCTTGAATACACCAAAA-3’ | 500 nM | 0.5 μL |
Reverse primer N3 5’-TGTAGCACGATTGCAGCATTG -3’ | 500 nM | 0.5 μL |
Probe N3 VIC5’-ATCACATTGGCACCCGCAATCCTG-3’BHQ2 | 500 nM | 0.5 μL |
| ddH2O | 2 μL | |
| Total | 5 μL |
Store at -20 °C.
9. PCR primer-probe mix for tissue viral load testing (per 1 reaction)
| Reagent | Final concentration | Quantity or volume |
|---|---|---|
Forward primer N2 5’-TTACAAACATTGGCCGCAAA-3’ | 500 nM | 0.5 μL |
Reverse primer N2 5’-GCGCGACATTCCGAAGAA-3’ | 500 nM | 0.5 μL |
Probe N2 FAM5’-ACAATTTGCCCCCAGCGCTTCAG-3’BHQ1 | 500 nM | 0.5 μL |
Forward primer N3 5’-GGGAGCCTTGAATACACCAAAA-3’ | 500 nM | 0.5 μL |
Reverse primer N3 5’-TGTAGCACGATTGCAGCATTG -3’ | 500 nM | 0.5 μL |
Probe N3 VIC5’-ATCACATTGGCACCCGCAATCCTG-3’BHQ2 | 500 nM | 0.5 μL |
Forward primer UBC 5’-TTGGGTCGCAGTTCTTGTTTG -3’ | 500 nM | 0.5 μL |
Forward primer UBC 5’-TGCCTTGACATTCTCGATGGT-3’ | 500 nM | 0.5 μL |
Forward primer UBC ROX5’-TCGCTGTGATCGTCACTTGACAATG-3’BHQ2 | 500 nM | 0.5 μL |
| ddH2O | 0.5 μL | |
| Total | 5 μL |
Laboratory supplies
1. 8.5 cm Petri dishes (Greiner, Bio-One, catalog number: 633181)
2. 10 cm glass Petri dishes (MiniMed, catalog number: 11000245)
3. Scalpel handle Bayha (GMW, catalog number: 85400)
4. Scalpel blades for Bayha scalpel handles (GMW, catalog number: 85411, FORM 21)
5. TC-treated multiple well plates (6-well plate) (Corning® Costar®, catalog number: CLS3516)
6. 96-well plate polystyrene round-bottom clear wells, sterile (Greiner, catalog number: M2311)
7. Microwell 96-well optical flat-bottom plates (Nunc®, catalog number: P8991)
8. Bottle 500 mL with screw cap GL 45, glass, light (IsoLab, catalog number: 061.01.500)
9. 15 mL conical tubes (SPL Lifesciences, catalog number: 51015)
10. 50 mL conical tubes (SPL Lifesciences, catalog number: 50250)
11. 5 mL tubes Pirouet (SSIbio, catalog number: 1410-S0)
12. 2 mL tubes Pirouet (SSIbio, catalog number: SKU: 1310-S0)
13. 1.5 mL tubes Pirouet (SSIbio, catalog number: 1210-S0)
14. 0.5 mL low-binding tubes Pirouet (SSIbio, catalog number: 1110-10)
15. 1.8 mL cryovials (SPL Lifesciences, catalog number: 43012)
16. 5 mL serological pipettes (Corning® Costar®, catalog number: CLS4487)
17. 10 mL serological pipettes (Greiner Bio-One, catalog number: CLS4488)
18. 25 mL serological pipettes (Corning® Costar®, catalog number: CLS4489)
19. 10 μL pipette tips (TH Geyer, catalog number: 7695881)
20. 20 μL pipette tips (PakGent Bio, catalog number: UFPT-F-20)
21. 200 μL pipette tips (TH Geyer, catalog number: 7695884)
22. 1,250 μL pipette tips (TH Geyer, catalog number: 7695887)
23. CountessTM cell counting chamber slides (Thermo Fisher Scientific, Invitrogen, catalog number: C10283)
24. 40 μm strainers (Corning®, catalog number: CLS431750)
25. Lysing matrix A, bulk, 0.56–0.7-mm garnet flakes (MP Biomedicals, catalog number: 11-654-0423)
Equipment
1. Faster SafeFAST Elite RU 212S Class II biological safety cabinet (SafeFAST, catalog number: 212S)
2. Class II biological safety cabinet BMB-II Laminar-С 1,5 NEOTERIC (Lamsystems, catalog number: 1R-B.001-15)
3. Binder CB60 CO2 incubator (Binder, catalog number: 9040-0090)
4. Binder CB-150 CO2 incubator (Binder, catalog number: 9040-0126/CB150-230V-O-RU)
5. CountessTM II FL automated cell counter (Thermo Fisher Scientific, catalog number: AMQAF1000)
6. Water bath (37–65 °C) (BIOSAN, model: WB-4MS)
7. Freezer (-40 °C) (ALS, model: PLATINUM 500SV)
8. Freezer (-80 °C) (Thermo Scientific, model: FORMA 905)
9. Refrigerator (2–8 °C) (Bonvini, model: 750 BGC)
10. Laboratory centrifuge with different rotors (Hettich, model: ROTINA 380R)
11. Laboratory centrifuge (Eppendorf, model: Centrifuge 5415 R)
12. Laboratory centrifuge (Eppendorf, model: Mini Spin)
13. Inverted microscope (objectives: 4×, 10×, 20×) (Zeiss, model: Primovert)
14. FinnpipetteTM F2 GLP Pipetting kit 2 (Thermo Fisher Scientific, catalog number: 11845850)
15. FACSymphony A5 instrument
16. FastPrep-24 homogenizer (MP Biomedicals, catalog number: 116004500)
17. Multiplex system Luminex 200 (Immucor Transplant Diagnostics, Inc., catalog number: 888310)
18. Automatic magnetic washer (Biotek ELx405, Winooski, VT, USA)
19. Multichannel pipette 5–50 μL Discovery Comfort DV8 (HTL, catalog number: 5122)
20. Multichannel pipette 20–200 μL Discovery Comfort DV8 (HTL, catalog number: 5123)
21. Rubber bands
22. Aluminum foil
23. Absorbent pads
24. Racks
25. Laboratory vortex mixer MICROSPIN (BIOSAN, model: FV-2400)
26. Sonicator ProbeTec ET (BD Ultrasonic Cleaner model: 2510E-DTH)
27. Orbital shaker incubator (BIOSAN, model: ES-20)
28. Thermoshaker for plates (BIOSAN, model: PST-60HL)
Software and datasets
1. Bio-Plex Manager Software (BioRad, Version 4.0)
2. FlowJo v.10
3. FIJI ImageJ (v.1.54)
4. R software (R, Version 4.2.1)
5. The data obtained using this protocol are openly available at https://github.com/GeorgeRusakovich/Cytokine-production-in-ex-vivo-model-of-SARS-CoV-2-lung-infection.
Procedure
A. Lung histoculture
1. Get lung tissue from the post-surgical material of individuals with lung carcinoma who underwent lobectomy.
Critical: It is crucial that ex vivo tissue is obtained in full accordance with the approved ethical protocols, transported fast from the hospital, and processed according to the relevant biosafety regulations concerning human material in general (and human pathogenic viruses in particular). The tissue quality and normal morphology must be confirmed by both macroscopic and microscopic evaluation performed by a qualified pathologist on the team. Tissues with necrosis, fibrosis, and tumors must be omitted from further experiments.
a. Use donors with primary lung carcinomas only. Check that the patients received no therapy prior to surgery.
b. Verify that only the macroscopically intact lung tissue from the marginal part of the resected area is taken for explants.
Note: This is assessed by a pathologist.
c. Use a 15-mL sterile tube with 10 mL of transportation medium for each tissue specimen transportation at 4 °C.
2. Deliver the lung tissue to the laboratory no later than 3 h after surgery.
Caution: During transportation, keep the tissue specimen completely submerged in medium and do not disturb the conical tube.
3. Cut the Gelfoam® gelatin sponge into two pieces and pre-wet it in complete culture medium in a Petri dish before starting to cut the lung tissue (see Figure 1A–C).
Note: For this and subsequent steps, work in aseptic conditions in a laminar flow cabinet.
4. Place the lung explant in a Petri dish (see Figure 1D).
5. Cut the lung tissue into 2 × 2 × 2 mm blocks and randomly mix them (see Figure 1E, 1F). Fix a block of tissue in 4% PFA for histological examination (day 0 of tissue culture). Perform histological fixation of two 2 × 2 × 2 mm tissue blocks in 5 mL of 4% PFA (Recipe 5) at 4 °C overnight.
6. Use this specimen to assess the initial tissue morphology and confirm that intact lungs were used throughout the analysis.
7. Culture the rest of the tissue blocks at the air–liquid interface on sponge rafts.
a. Put half of the pre-wet Gelfoam® sponge in one well of the 6-well plate in 2 mL of complete culture medium (see Figure 1G).
Note: The previous version of our protocol included tissue culture on sponges in 12-well plates. Here, we report that 6-well plates are also suitable for all applications that we used.
b. Place 9 tissue blocks on top of the sponge (see Figure 1H) and add 1 mL of complete culture medium (see Figure 1I). The tissue blocks should thus be positioned exactly at the air–liquid interface.
c. Place a similar number of tissue blocks in each well. Adjust the number of wells so that you have a sufficient number of tissue blocks for all observation time points and types of analysis.
Note: We used 3 wells of a 6-well plate to obtain conditioned media for xMAP and qPCR assays, harvesting and replacing it at days 4, 7, and 10 of the experiment. For other types of analysis [tissue qPCR, FACS, histology/immunohistochemistry (IHC)], we used the 9 blocks from a single well per time point. We also suggest culturing 1–3 spare tissue rafts (for the unlikely cases of tissue loss) if the amount of the initially obtained lung tissue allows for it. This amounts to two 6-well plates per each condition (non-infection and each inoculation concentration) (see Figure 2).
d. For infection experiments, plate the non-infected control lungs in separate 6-well plates. If several virus concentrations are intended for testing, also use separate 6-well plates for each of them.
Critical: For each infected plate, make one control well with a sponge raft in it and no tissue blocks, inoculate it, and harvest medium from it exactly as in experimental wells with rafts and tissue blocks.
e. Culture the tissue blocks for 24 h prior to infection. Culture conditions are 37 °C in 5% CO2.
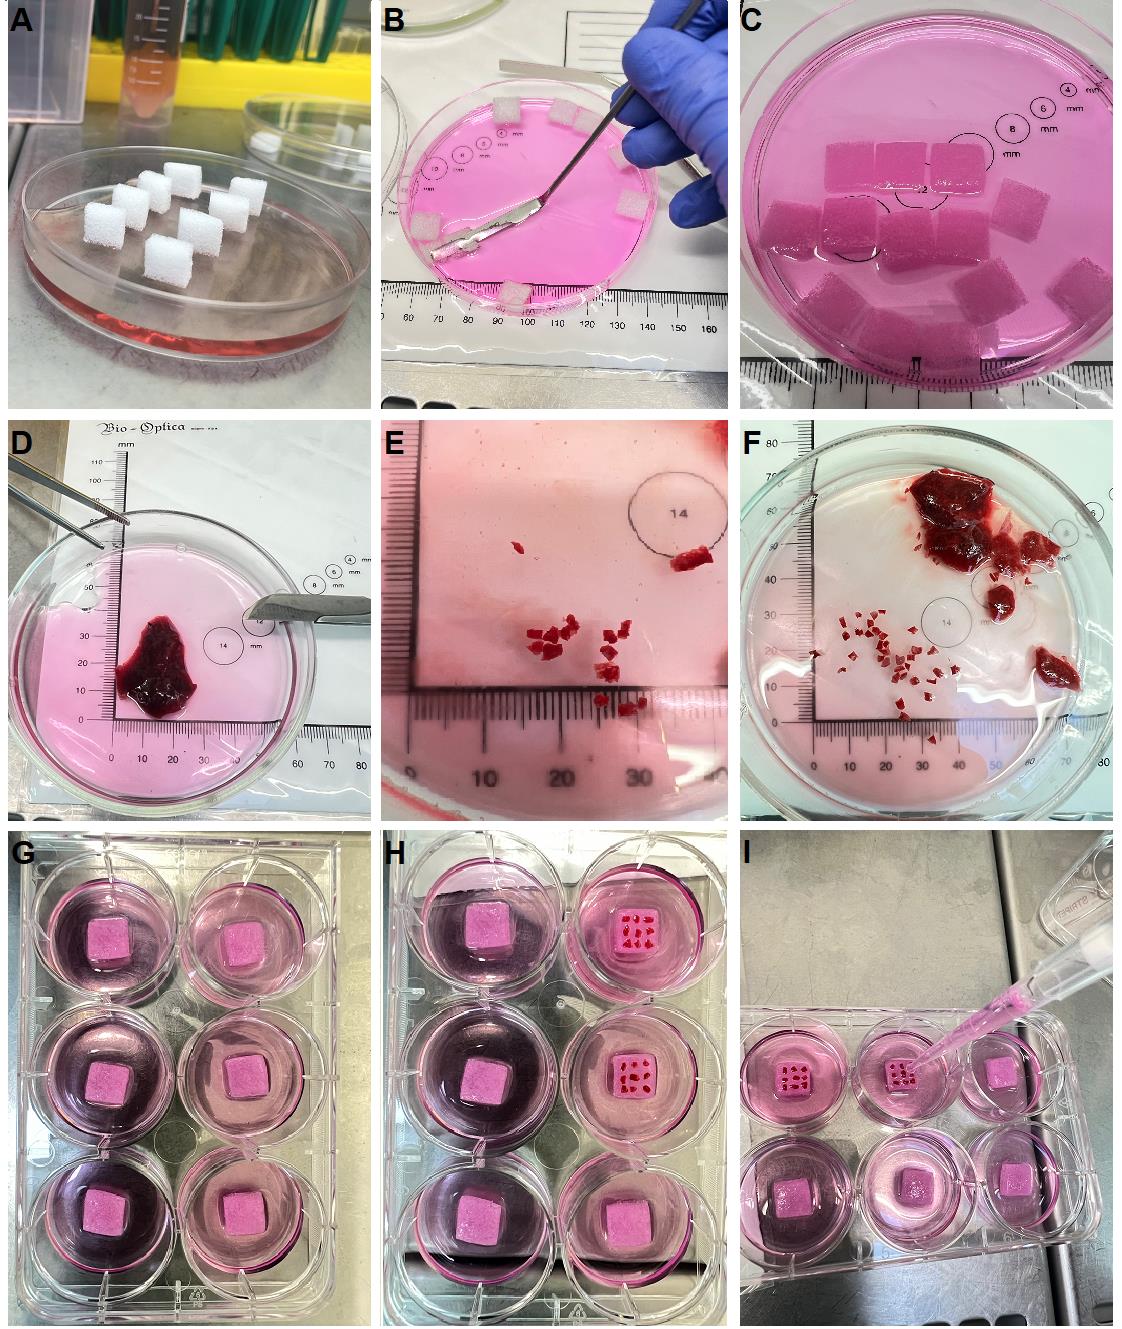
Figure 1. Establishment of lung histoculture at the air–liquid interface. Representative step-by-step processing of an autopsy lung plated into histoculture. (A) Gelfoam® gelatin sponge is cut and first placed in complete cell medium (dry sponges). (B) Sponge is soaked in complete cell medium using a sterile spatula. (C) Properly soaked sponge completely immersed in the medium. (D) Representative lung explant examined by a pathologist intended for histoculture, sterile tweezers, and scalpel with a sharp disposable blade. (E) Explant size. (F) The 2 × 2 × 2 mm tissue blocks should be cut in a sufficient amount for all experimental procedures and then mixed. (G) Pre-wet sponges placed in the center of each culture well with 2 mL of complete cell medium. (H) Explants placed on a pre-wet sponge. (I) Addition of the final 1 mL of complete cell medium to place the explants at the air–liquid interface.
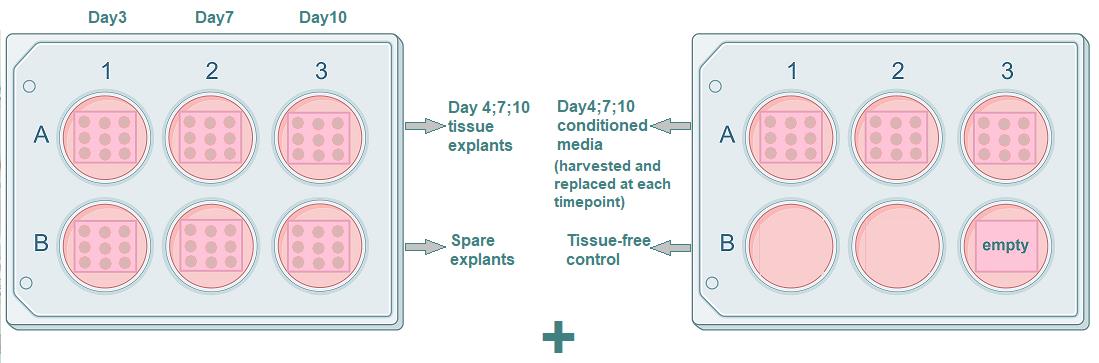
Figure 2. Plating the histoculture. Each well contains 9 tissue blocks on a sponge. (Left) The three upper wells are for harvesting tissue blocks (one per each time point: day 4, day 7, and day 10), and the three lower wells contain spare tissue blocks. (Right) The three upper wells are for harvesting conditioned medium. The medium is harvested simultaneously in one 15 mL tube, mixed, and stored for analysis. Two of the three lower wells are empty; the other well contains an empty sponge for tissue-free control. This plating scheme is repeated for every experimental condition (non-infected tissue and all concentrations of the virus).
B. Virus expansion
1. Propagate SARS-CoV-2 B.1.1.1 variant (GISAID EPI_ISL_421275) in Vero E6 cells in virus expansion medium, and harvest conditioned medium (e.g., media used for histoculture maintenance, containing secreted molecules and viral particles) after 72 h of cultivation.
Note: All experiments using infectious SARS-CoV-2 should be performed in a biosafety level 3 (BSL3) laboratory.
2. Aliquot the harvested medium in 2 mL tubes and titrate it on Vero E6 cells.
3. Determine the virus titer on Vero E6 cells using a 50% tissue culture infectious dose (TCID50) assay:
a. Prepare serial 10-fold dilutions of the virus stock in virus expansion medium.
b. Add 100 μL of stock and serial 10-fold dilutions to Vero E6 cells seeded in a 96-well plate. Use 8 replicates for each concentration.
c. Incubate the cells at 37 °C in 5% CO2 for 96–120 h.
d. Score visually for cytopathic effect.
e. Calculate the TCID50 titer by the Spearman–Kerber method.
Note: Our viral stock solution contained 107 viral particles/mL as assessed by TCID50. Therefore, we used the stock and its 10-fold dilutions containing 106 and 105 particles/mL, respectively, for lung explant infection.
4. Store the aliquots at -80 °C. Thaw once for infection experiments. Do not freeze again; use the remaining virus-containing medium according to the biosafety procedures.
C. Viral infection
1. After 24 h of histoculture establishment, change the complete culture medium to remove dead cells and cell debris. Move the plates to BSL3.
2. Thaw a stock ampoule of the virus. Prepare two 10-fold dilutions in complete culture medium.
Note: Our viral stock solution contained 107 viral particles/mL. Therefore, we used the stock and two 10-fold dilutions containing 106 and 105 particles/mL, respectively, for the lung explant infection.
3. Inoculate the explants with the medium containing 105, 106, or 107 viral particles/mL. Add 10 μL of virus-containing medium on top of each of the nine tissue blocks.
Note: The 10 μL aliquot of two 10-fold dilutions and the stock in our protocol contained 103, 104, and 105 viral particles per lung explant, respectively.
4. For the control well (step A7d) with a sponge raft and no tissue blocks, apply 10 μL of virus-containing medium on a sponge 9 times. This cell-free environment will serve to control the dynamics of the virus wash-out without amplification.
5. Incubate the tissue explants for 1 h at 37 °C in 5% CO2, then change the medium to fresh complete culture medium without virus.
Note: Culture the non-infected controls in a separate plate. To avoid viral contamination, it is preferable to keep them in a separate incubator (we usually kept a spare non-infected control lung plate in a separate laboratory, outside the BSL3).
6. Harvest conditioned medium from control and infected lung tissues 72 h post-infection (day 4):
a. Slowly aspirate the medium with the pipette from 3 wells of a 6-well plate near the well edge. Collect the medium while avoiding the sponges.
Caution: While harvesting and changing the medium, aspirate and add it from the side of the well. Do not touch the sponge or the tissue. This will prevent mechanical damage and minimize shear stress.
b. Put the collected media (V = 9 mL) into a protein low-bind 15 mL tube and mix.
c. Aliquot the medium in six protein low-bind 1.5 mL tubes and centrifuge them at 3,000× g for 5 min at RT.
d. Collect 1 mL of supernatant from each tube and mix once again in a new 15 mL tube.
e. Aliquot and store the medium. We used 100 μL aliquots in 0.2 mL tubes for cytokine measurement and 500 μL aliquots in 1 mL tubes for virus titer measurement.
Note: For each virus concentration, harvest similarly the medium from the tissue-free well, containing a sponge with viruses. Aspirate 3 mL of the medium, mix it, and aliquot in two protein low-bind 1.5 mL tubes. Centrifuge them, collect 1 mL of supernatant from each tube, and aliquot for virus titer measurement.
7. Harvest tissue 72 h post-infection (day 4):
a. Harvest two tissue blocks in 5 mL of 4% PFA in a 5 mL tube.
b. Harvest two tissue blocks in 2 mL of RNAlater in 2 mL tubes.
c. Harvest five tissue blocks and a sponge in 2 mL of digestion mix (see Recipes) in 2 mL tubes.
8. Remove and dispose of the media in the wells used for explant culture.
9. Add 3 mL of the new, warmed (37 °C) complete culture medium into each well.
10. Repeat steps C6–9 on days 7 and 10 of the experiment. The timeline for the experiment is presented in Table 1.
Table 1. Sample collection. Manipulations required on each day of the experiment. The actions performed on each day are indicated by “+”, the actions omitted are indicated by “-”. The media is changed and disposed of on day 1; on other days, it is harvested and stored for analysis of cytokine and virus production. The tissue is stored on days 0, 4, 7, and 10. We suggest mandatory fixation of tissue blocks for histology/IHC and qPCR to confirm and monitor the viral infection. The number of tissue blocks for other applications depends on the experimental design and the amount of available lung tissue. We suggest using tissue for FACS analysis as an option.
| Day of culturing | Culture setting | Infection | Medium changing/harvesting | Tissue for histology/IHC (4% PFA fixation) | Tissue for RNA RNAlater fixation | Tissue for other applications (FACS) |
|---|---|---|---|---|---|---|
| Day 0 | + | - | - | + (2 blocks) | + (2 blocks) | + (5 blocks) |
| Day 1 | - | + | +/- (discard old medium) | - | - | - |
| Day 4 | - | - | +/+ (harvest medium from 3 wells) | + (2 blocks) | + (2 blocks) | + (5 blocks) |
| Day 7 | - | - | +/+ (harvest medium from 3 wells) | + (2 blocks) | + (2 blocks) | + (5 blocks) |
| Day 10 | - | - | +/+ (harvest medium from 3 wells) | + (2 blocks) | + (2 blocks) | + (5 blocks) |
| Day 13 | - | - | +/+ (harvest medium from 3 wells) | + (2 blocks) | + (2 blocks) | + (5 blocks) |
D. Histology and immunohistochemistry
1. Fix the lung tissue blocks (2 × 2 × 2 mm in size) in 5 mL of 4% PFA for further histological and immunohistochemical (IHC) examination.
Note:
1. Keep the blocks in 4% PFA at 4 °C overnight.
2. After fixation, infected specimens may be removed from the BSL3 laboratory.
2. Dehydrate the tissue blocks in subsequent solutions of 50% ethanol, 70% ethanol, 100% ethanol, and 100% ethanol again for 20 min in each.
Note: Use solution volumes at least 10 times higher than the tissue volume. For example, for two tissue blocks of 2 × 2 × 2 mm, use 10 mL of each solution.
3. Incubate the blocks in toluene twice for 30 min and 1 h, respectively.
Note: Use solution volumes at least 10 times higher than the tissue volume. For example, for two tissue blocks of 2 × 2 × 2 mm, use 10 mL of each solution.
4. Keep the blocks overnight in a 1:1 mixture of toluene:Histomix at 56 °C.
5. Cast the tissue blocks in Histomix.
6. Make 4 μm paraffin sections using a microtome and mount them on glass slides.
Note: We recommend using positively charged glass slides for better adhesion.
7. Keep the sections in toluene for 1 h to deparaffinize.
8. Rinse the slides in PBS 1× four times.
9. Histological staining H&E (slide 1): Stain the slides with hematoxylin (expose for 5–10 min and differentiate with tap water) and eosin (expose for 1–5 min and differentiate with ethanol).
Notes:
1. Exposure time may be modified according to your laboratory protocols.
2. We suggest H&E staining as mandatory to validate the condition of the cultured explants at all time points. Specimens withdrawn at day 0 (step A6) must be processed to confirm that the tissue is initially intact (Figure 3). This is done by a pathologist.
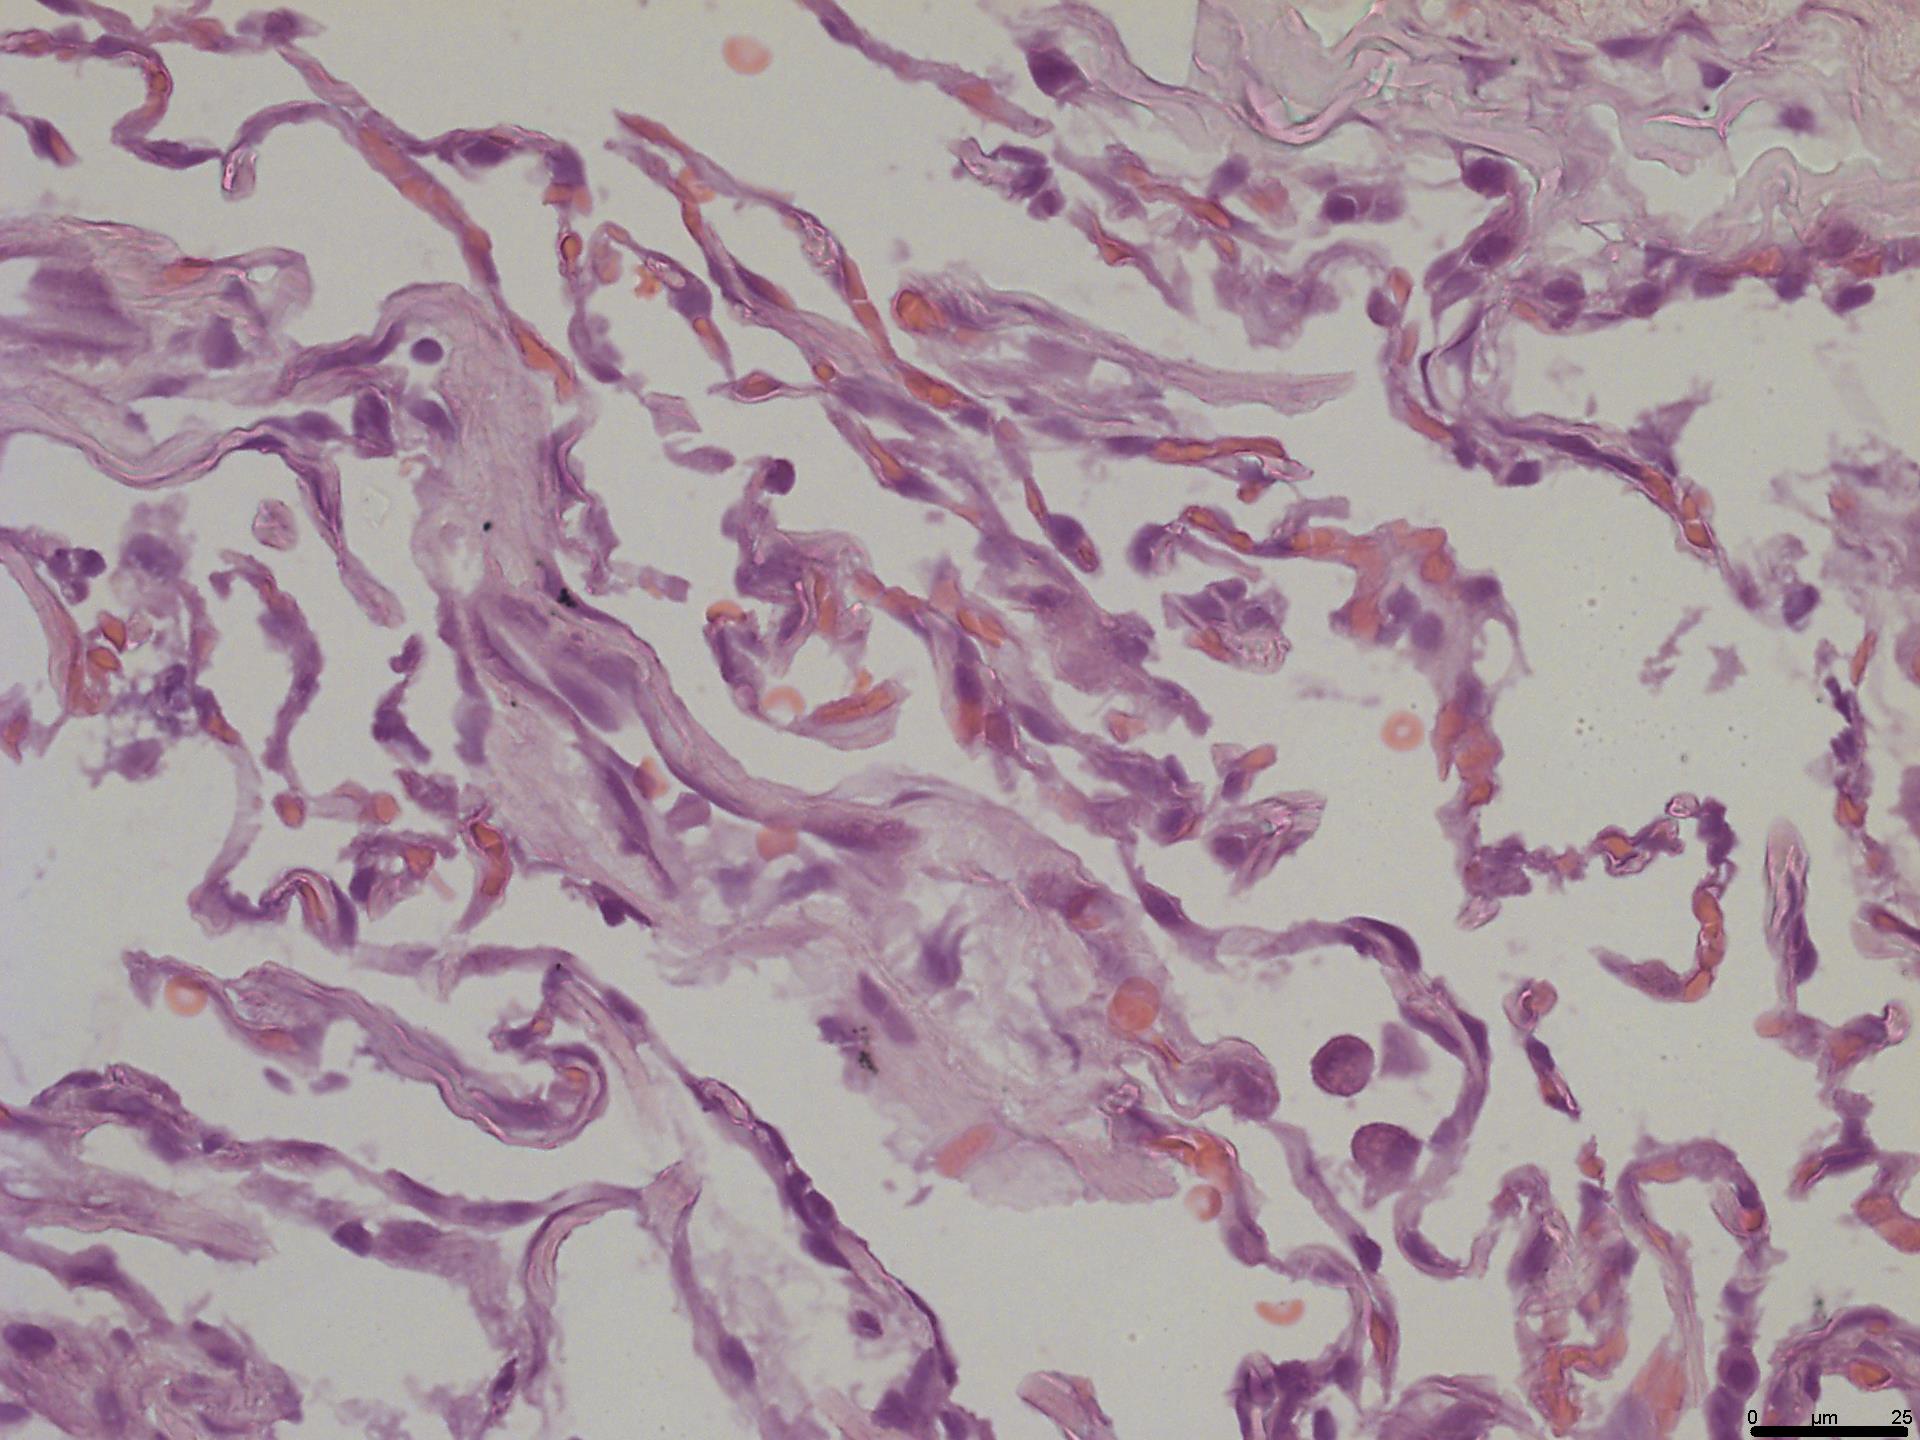
Figure 3. Assessment of lung initial morphology. H&E slide prepared from the lung tissue fixed at day 0 and assessed by a pathologist to confirm its normal morphology. Objective 40×; scale bar, 25 μm.
10. IHC staining (slide 2): Use immunohistochemical (IHC) staining to reveal the antigens of interest. To confirm infection, we visualized the SARS-CoV-2 N protein by immunohistochemistry:
a. Use the UltraVision HRP DAB kit and the anti-N protein antibodies (HyTest C706, rabbit monoclonal) to detect SARS-CoV-2-infected cells.
b. Use slides rinsed in PBS ×1 (step D8). Incubate them in 0.1% Triton X-100 for 1 h at RT.
Note: If a different antibody is used and no staining is observed as a result, consider additional antigen retrieval procedures.
c. Rinse the slides in PBS 1× four times.
d. Use a wax hydrophobic pen to create a boundary around the specimen.
e. Apply the dual endogenous enzyme block on top of the specimen so that it is fully covered. Incubate for 15 min in a humid chamber at RT.
f. Rinse the slides in PBS 1× four times.
g. Apply Ultra V block on top of the specimen and incubate for 5 min at RT.
Caution: After removal of the agent, do NOT rinse.
h. Apply the primary antibody (HyTest C706) diluted 1:100 with PBS 1× on top of the specimen. Incubate for 1 h in a humid chamber at 37 °C.
Note: If a different antibody is used and this step produces a lot of background signal, incubate in a humid chamber at 4 °C overnight instead.
i. Rinse the slides in PBS 1× four times.
j. Apply value primary antibody enhancer on top of the specimen. Incubate for 20 min in a humid chamber at RT.
k. Rinse the slides in PBS 1× four times.
l. Apply value HRP polymer on top of the specimen. Incubate for 30 min in a humid chamber at RT in the dark.
Caution: Avoid light exposure of the agent at this step.
m. Rinse the slides in PBS 1× four times.
n. Apply the ImmPACT DAB chromogen in DAB diluent (1 drop of chromogen—approximately 30 μL—per 1 mL of diluent) on top of the specimen. Incubate for 5–10 min on the benchtop.
Note: Use only freshly diluted DAB chromogen. Visually control the quality of the staining to determine the optimal development time.
o. Counterstain the nuclei with hematoxylin (expose for 5–10 min and differentiate with tap water).
Note: The variety of the antigens analyzed may be optional according to the experiment design, and antibodies of choice may differ. For any other antibody, a modification of the protocol may be needed. For this reason, we suggest IHC staining by hand and not in the machine, as this protocol is more flexible and allows one to better adjust the staining conditions. Please, turn to machine staining only if the antibody is known to be compatible with the procedure and if the results obtained by automated IHC correspond to those obtained by hand staining in the best protocol modification.
11. Dehydrate specimens in subsequent changes of 50% ethanol, 70% ethanol, 100% ethanol, and 100% ethanol solutions, for 5 min in each solution.
12. Clear the specimens in subsequent solutions of toluene and toluene again for 5 min each.
13. Mount the specimens in Shandon-Mount medium. Let them dry.
14. Image the sections using a light microscope with a digital camera (Figure 4).
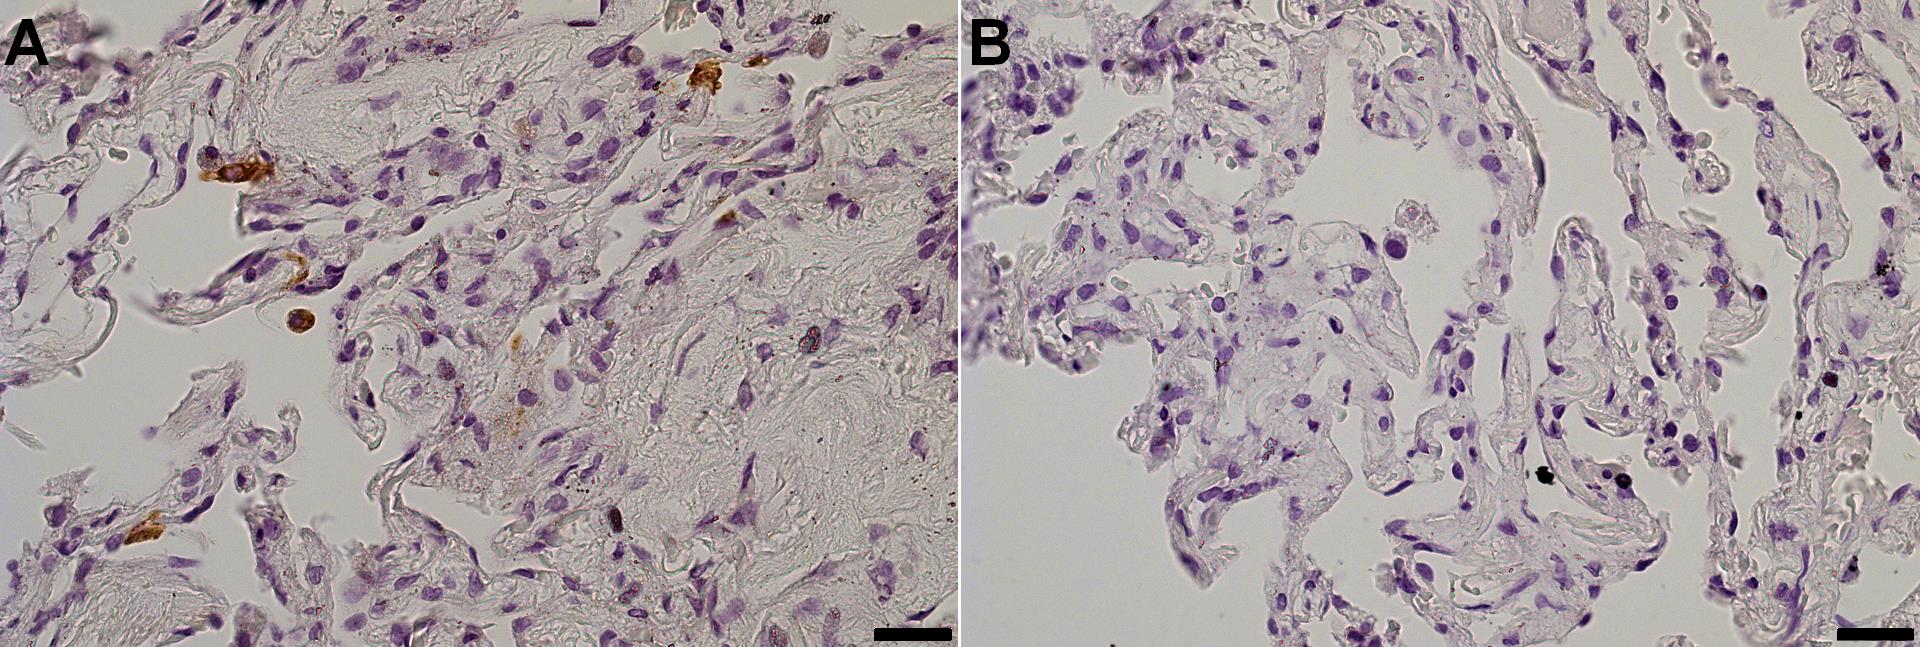
Figure 4. Assessment of infected cells by immunohistochemistry (IHC). Specimens fixed on day 4 were stained for the N protein of SARS-CoV-2. (A) Infected tissue. (B) Non-infected control. Objective 40×; scale bar, 25 μm.
E. RNA extraction from tissue
1. For total RNA extraction from lung tissue, two 2 × 2 × 2 mm lung explants should be stored at -20 °C in RNAlater RNA stabilization reagent.
Note: Most samples in RNAlater solution can be stored at RT for 1 week without compromising RNA quality, and for 1 month at 4 °C, or at -20 °C or -80 °C indefinitely. Do not freeze samples in RNAlater solution immediately; store at 4 °C overnight (to allow the solution to thoroughly penetrate the tissue), then move to -20 or -80 °C for long-term storage.
2. Upon thawing, place the tissue in 700 μL of RLT buffer supplemented with 1% β-mercaptoethanol.
3. Mechanically disrupt the tissue using a FastPrep homogenizer and 0.56–0.7 mm garnet flakes.
4. Centrifuge the homogenized specimens at 10,000× g for 15 min and collect the supernatant.
5. Add an equal volume of 70% ethanol to the lysate and pipette thoroughly.
6. Pass the specimen through a syringe with a 21G needle 3–5 times.
7. Transfer 700 μL of the specimen to a RNeasy Mini spin column.
8. Centrifuge at 10,000× g for 1 min. Discard the flowthrough.
9. Transfer the rest of the specimen to the column.
10. Centrifuge at 10,000× g for 1 min. Discard the flowthrough.
11. Add 650 μL of buffer RW1 to the column.
12. Centrifuge at 10,000× g for 30 s. Discard the flowthrough.
13. Add 500 μL of RPE buffer to the column.
14. Centrifuge at 10,000× g for 30 s. Discard the flowthrough.
Note: Add 4 volumes of ethanol to the RPE buffer when opening it for the first time.
15. Add 500 μL of RPE buffer to the column.
16. Centrifuge at 10,000× g for 2 min. Discard the flowthrough with the collection tube.
17. Change the collection tube. Centrifuge at 13,000× g for 1 min to dry the membrane.
18. Change the collection tube. Elute total RNA in 100 μL of nuclease-free water.
19. Store at -20 °C for further viral load estimation.
F. RNA extraction from medium
1. For total RNA extraction from the conditioned culture media, use the RIBO-prep kit.
2. Thaw the culture medium stored at -80 °C and add 100 μL to 300 μL of lysis buffer.
3. Incubate at 65 °C for 5 min.
4. Add 400 μL of precipitation buffer and vortex.
5. Centrifuge at 13,000× g for 5 min.
6. Remove the supernatant with a pipette, leaving a pellet.
7. Wash the pellet with 500 μL of washing buffer 3.
8. Centrifuge at 13,000× g for 2 min.
9. Remove the supernatant with a pipette, leaving a pellet.
10. Wash the pellet with 200 μL of washing buffer 4.
11. Centrifuge at 13,000× g for 2 min.
12. Remove the supernatant with a pipette, leaving a pellet.
13. Dry the pellet for 5 min with the open lid.
14. Dissolve the pellet in 50 μL of RNA buffer.
Note: Alternatively, use RNAse-free water.
G. Reverse-transcription and qPCR
Note: We demonstrate that SARS-CoV-2 RNA can be detected both in the total RNA of lung tissue (to detect the viral load) and conditioned media (to confirm viral production) in this model (see sections E and F). Both protocols use the one-step RT qPCR with OneTube RT-PCRmix with some modifications.
1. Mix RNA solution (5 μL per well) with 5 μL of primer/probe mix and 10 μL of 2× OneTube RT-PCRmix.
Note: We suggest different primer/probe mixtures for tissue and medium analysis. Please, see Recipes.
2. Perform the PCR program as follows: 20 min at 48 °C for reverse transcription, 5 min at 95 °C, and 50 cycles, each comprising 20 s at 95 °C, 20 s at 58 °C, and 30 s at 72 °C.
Note: The PCR program is similar for tissue and medium analysis.
3. For medium analysis, use the primer-probe mix from Recipe 8.
Note: If quantitative assessment of viral production in medium is preferred, we suggest obtaining RNA from the stock with known virus concentration (step B3) following the protocol in section F, reverse transcribing it, and using its 10-fold dilutions to generate a standard curve.
4. For medium analysis, also use the tissue-free control of an infected sponge to monitor the dynamics of the virus wash-out.
5. For tissue analysis, use the primer-probe mix from Recipe 9.
H. Flow cytometry
1. Collect lung tissue blocks and place them in digestion mix (see Recipes).
2. Incubate the explants for 30 min on a thermomixer at 37 °C and 800 rpm.
3. Digest the Gelfoam sponge in digestion mix for 5 min at RT. Later, add them to the cells obtained from the tissue.
4. Place a 40 μm strainer on a 50 mL collection tube. Wet it with PBS 1×.
5. Pass the digestion mix from the Gelfoam sponge through the strainer.
6. Pass the digestion mix from the tissue through the strainer.
7. Put the tissue on the strainer. Release cells from the tissue using a pestle.
8. Wash the strainer with 1 mL of complete culture medium 3 times.
9. Centrifuge the collected cell suspension at 500× g for 10 min. Discard the supernatant.
10. Wash the cells in 5 mL of PBS 1×.
11. Centrifuge the cell suspension at 500× g for 5 min. Discard the supernatant.
12. Count the cells and place them in flow cytometry tubes.
13. Stain the cells with Live-Dead fixable stain (AlexaFluor 350) for 20 min at RT in the dark.
14. Wash the cells in 4 mL of PBS 1× with 1% FBS.
15. Centrifuge the cell suspension at 500× g for 5 min. Discard the supernatant.
16. Treat cells with a 1:100 dilution of Fc block in BD stain buffer for 10 min at RT.
17. Wash the cells in 4 mL of PBS 1×.
18. Centrifuge the cell suspension at 500× g for 5 min. Discard the supernatant.
19. Incubate cells with the antibodies for 30 min at RT in the dark.
Note: The antibody panel in our protocol only includes the antibodies for surface staining (CD45-APC-R700, CD3-BV510, CD4-BUV661, CD8-BUV395, CD11c-PE-Cy7, CD14-BUV805, CD16-BUV737, CD56-BUV496, CD66b-AlexaFluor 647, CD123-PE, and HLA-DR-APC-Cy7). A different antibody panel may be used according to the experiment design.
20. Wash the cells in 4 mL of PBS 1×.
21. Centrifuge the cell suspension at 500× g for 5 min. Discard the supernatant.
22. Resuspend the cells in 250 μL of 4% PFA for 1 h.
23. Acquire and analyze data (see Figure 5).
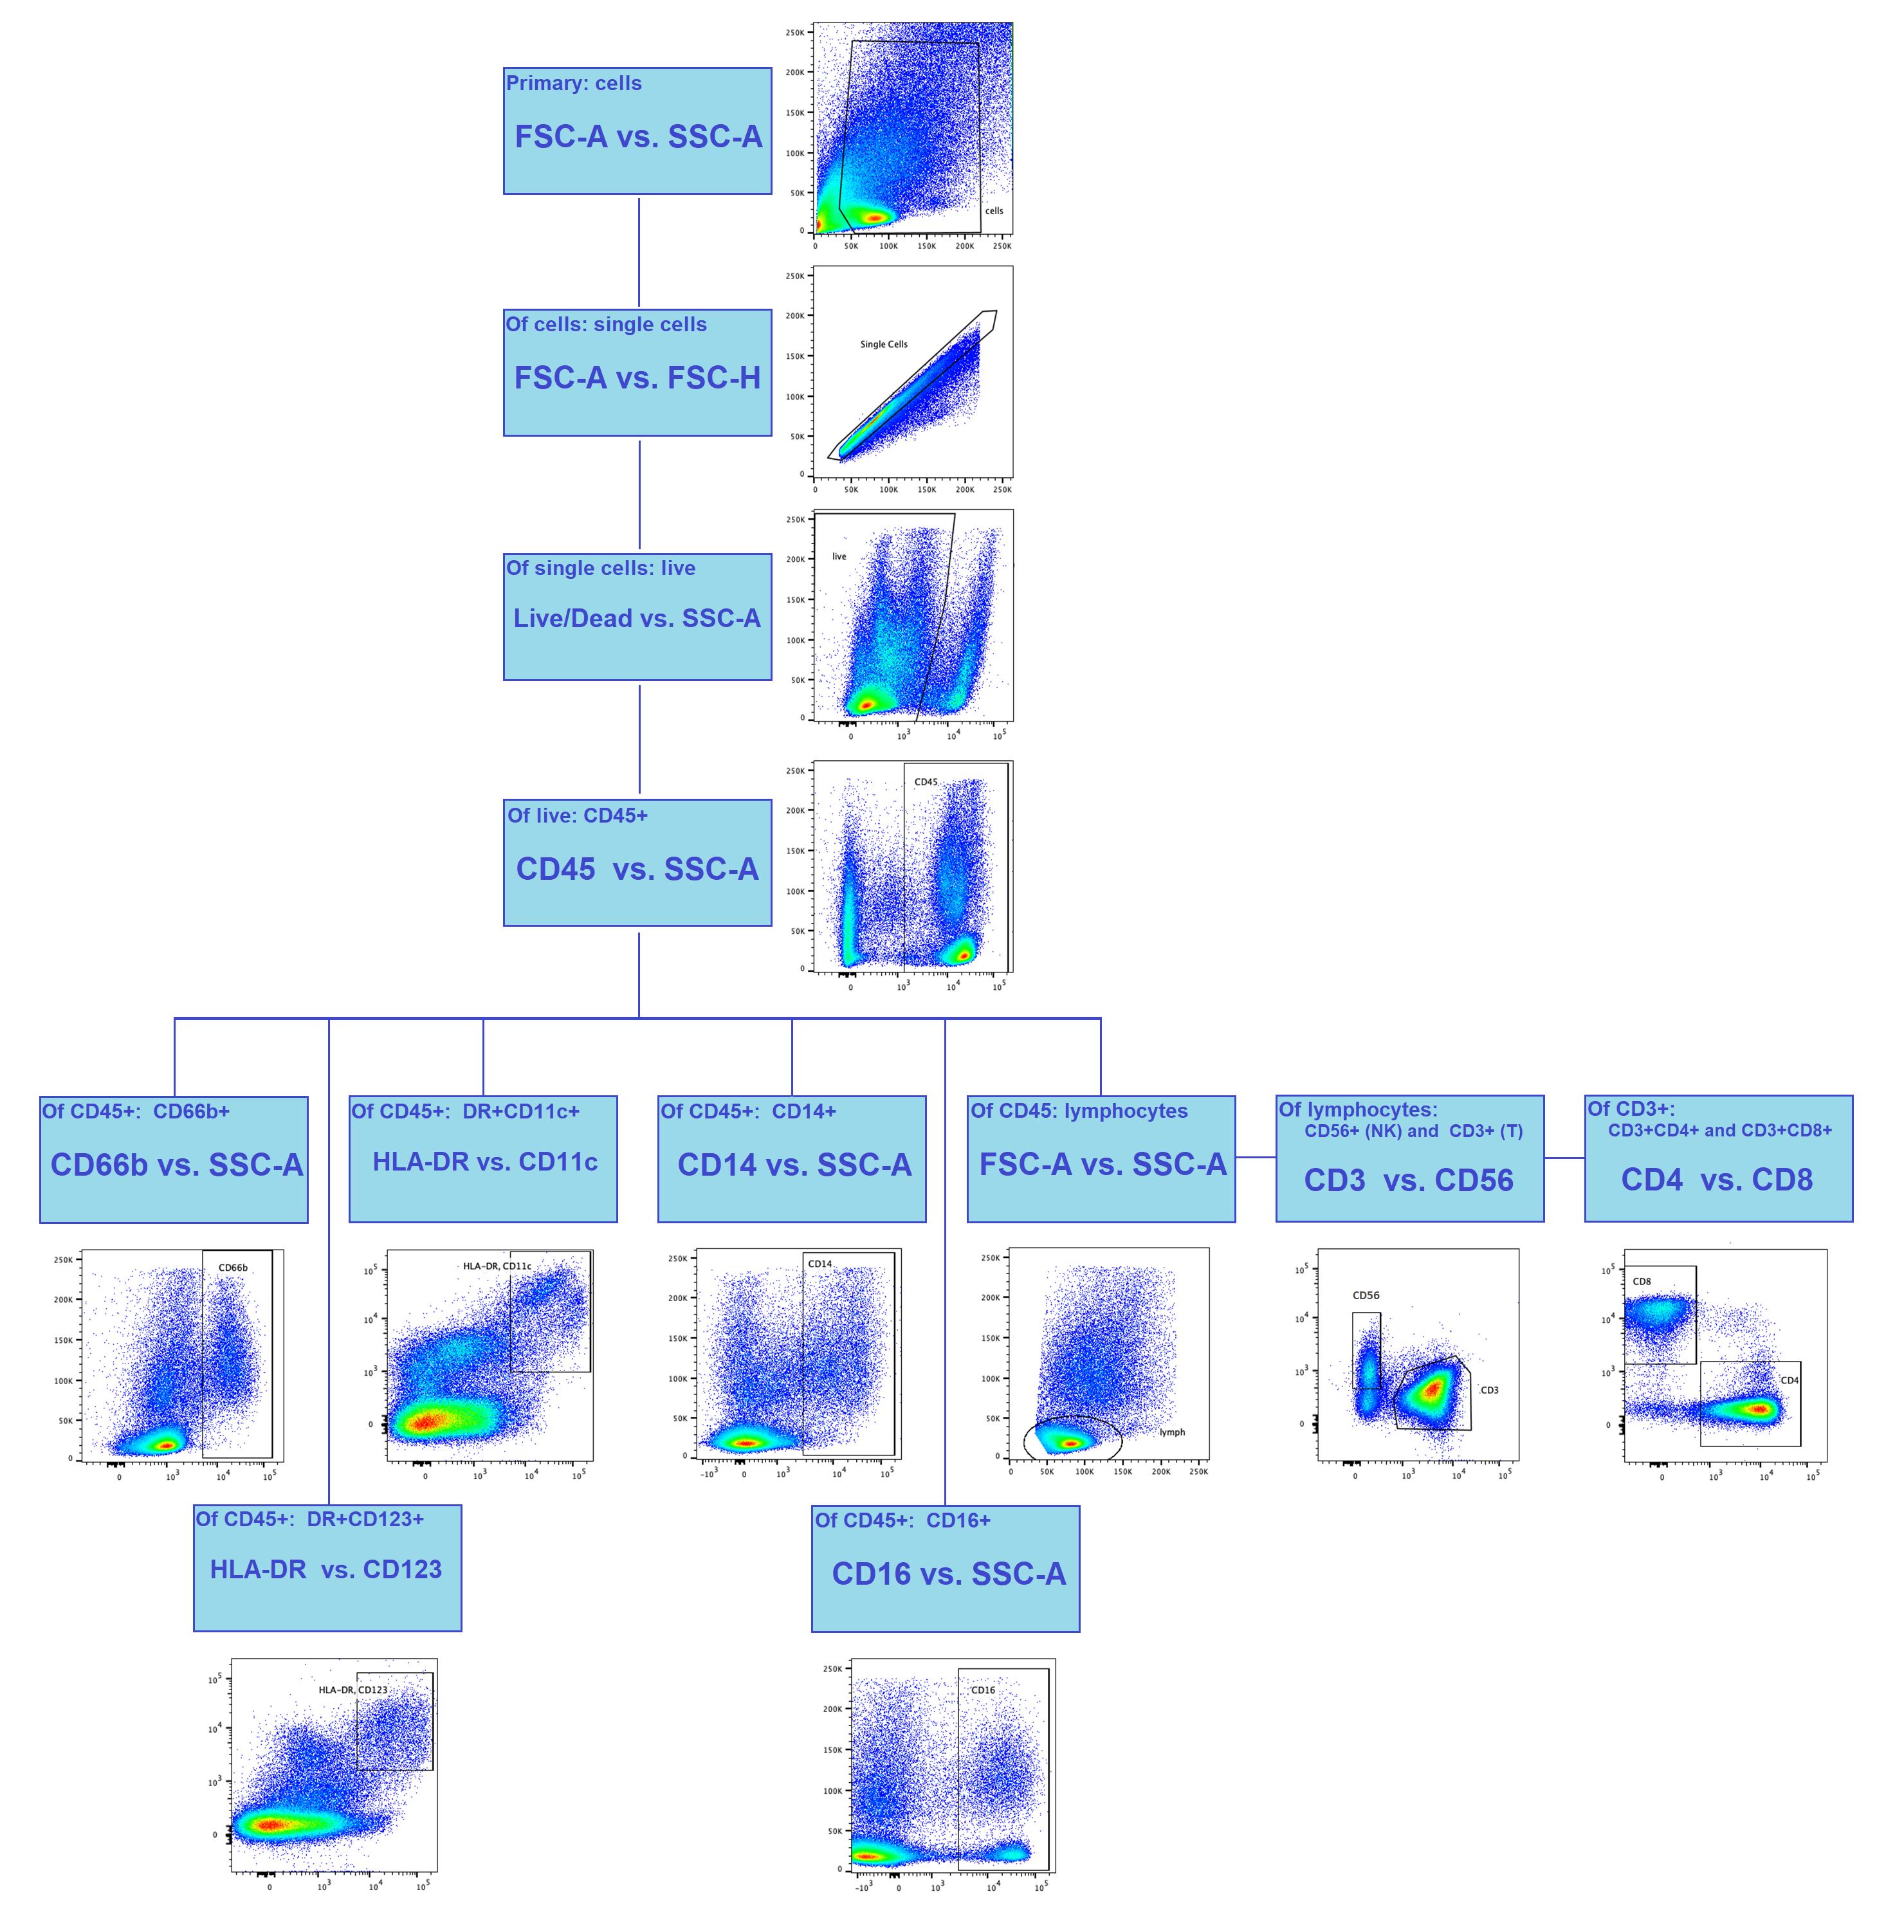
Figure 5. Gating strategy for flow cytometry analysis of lung histoculture. The primary gating and the singlets are distinguished by light scatter, the live/dead dye is used to exclude dead cells, and the leucocytes are gated based on CD45 expression. The daughter populations include granulocytes (CD66b+), DCs (CD11c+DR+; CD123+DR+), and monocytes (CD14+; CD16+). Lymphocytes are separated by light scatter, and daughter populations include NK cells (CD56+CD3-) and T cells (CD3+). T-helper (CD4+CD8-) and cytotoxic T cells (CD8+CD4-) are gated from CD3+ T cells. The gating in its current form allows distinguishing the major immune populations and may be modified according to the aim of the experiment.
I. Cytokine measurement
1. Use the commercial kit MILLIPLEX MAP human cytokine/chemokine magnetic bead panel for measuring 41 analytes in culture medium. The cytokine panel includes interleukin-1α (IL-1α), IL-1β, IL-1RA (IL-1 receptor antagonist), IL-2, IL-3, IL-4, IL-5, IL-6, IL-7, IL-8, IL-9, IL-10, IL-12 (p40), IL-12 (p70), IL-13, IL-15, IL-17A, fractalkine (CX3CL1), growth-regulated alpha (GRO-α or CXCL1), interferon-γ-induced protein-10 (IP-10 or CXCL10), monocyte chemoattractant protein-1 (MCP-1 or CCL2), MCP-3 (CCL7), macrophage inflammatory protein-1α (MIP-1α or CCL3), MIP-1β (CCL4), regulated on activation normally T-cell expressed and secreted (RANTES or CCL5), eotaxin (CCL11), macrophage-derived chemokine (MDC or CCL22), soluble CD40-ligand (sCD40L), epidermal growth factor (EGF), fibroblast growth factor-2 (FGF-2), Fms-like tyrosine kinase 3 ligand (Flt-3L), vascular endothelial growth factor (VEGF), granulocyte colony-stimulating factor (G-CSF), granulocyte-macrophage colony-stimulating factor (GM-CSF), platelet-derived growth factor-AA (PDGF-AA), PDGF-AB/BB, transforming growth factor-α (TGF-α), interferon-α2 (IFN-α2), IFN-γ, tumor necrosis factor-α (TNF-α), and TNF-β.
Note: We have made some changes to the manufacturer’s protocol, so here we describe all steps of our protocol exactly, even if some would be the same as in the manufacturer’s instructions.
2. Perform steps prior to bead fixation at the BSL3 laboratory. Cytokine measurement on the Luminex 200 instrument could be performed at the BSL2 laboratory.
Note: It is important to allow all reagents to warm to RT (20–25 °C) before use in the assay.
3. Preparation of tissue culture supernatant:
a. Centrifuge the sample to remove debris and assay immediately or aliquot and store samples at -20 °C (see section C).
Notes:
1. Avoid multiple (>2) freeze/thaw cycles.
2. A maximum of 25 μL per well of tissue culture or other media may be used.
3. All samples must be stored in polypropylene tubes. DO NOT STORE SAMPLES IN GLASS.
4. Avoid debris, lipids, and cells when using samples with gross hemolysis or lipemia.
4. Preparation of antibody-immobilized beads:
a. To prepare 41 plex premixed beads, add 70 μL of RANTES, PDGF-AA, and PDGF-AB/BB beads to the 38-plex premixed bead bottle.
b. Mix well before use: sonicate the premixed bead bottle for 30 s and then vortex for 1 min before use.
5. Preparation of quality controls:
a. Reconstitute quality control 1 and quality control 2 with 250 μL of deionized water.
b. Invert the vial several times to mix and vortex.
c. Allow the vial to sit for 5–10 min and then transfer the controls to appropriately labeled 0.5 mL tubes. Aliquot them in 125 μL for usage and storage in -20 °C.
6. Preparation of wash buffer:
a. Bring the 10× wash buffer to RT and mix to bring all salts into solution.
b. Dilute 60 mL of 10× wash buffer with 540 mL of deionized water.
c. Store the unused portion at 2–8 °C for up to one month.
7. Preparation of human cytokines standard:
a. Prior to use, reconstitute the human cytokine standard with 250 μL of deionized water for a 10,000 pg/mL concentration of standard for all analytes.
b. Invert the vial several times to mix. Vortex the vial for 10 s.
c. Allow the vial to sit for 5–10 min and then transfer the standard to an appropriately labeled 0.5 mL tube. This will be used as the 10,000 pg/mL standard; the unused portion may be stored at -20 °C for up to one month.
8. Preparation of working standards:
Note: During the preparation of the standard curve, ensure to mix the higher concentration well before making the next dilution. Use a new tip with each dilution.
Critical: Build the standard curve from 8 standard dilutions in triplicate, with 1–3 standard dilutions with a dilution factor of 5 and 4–8 dilutions with a dilution factor of 4. See Table 2.
Table 2. Working standards concentration
| Dilution name | Standard concentration | Volume of deionized water to add | Volume of standard to add | Dilution factor |
|---|---|---|---|---|
| 1 | 10,000 | 250 μL | 0 | - |
| Volume of assay buffer to add | ||||
| 2 | 2,000 | 100 | 25 | 5 |
| 3 | 400 | 100 | 25 | 5 |
| 4 | 100 | 90 | 30 | 4 |
| 5 | 25 | 90 | 30 | 4 |
| 6 | 6.25 | 90 | 30 | 4 |
| 7 | 1.56 | 90 | 30 | 4 |
| 8 | 0.39 | 90 | 30 | 4 |
a. Label eight 0.5 mL tubes as 10,000, 2,000, 400, 100, 25, 6.25, 1.56, and 0.39 pg/mL.
b. Add 100 μL of assay buffer to tubes 2 and 3 of the eight tubes and 90 μL of assay buffer to tubes 4–8.
c. Prepare serial dilutions by adding 25 μL of the 10,000 pg/mL reconstituted standard to the 2,000 pg/mL tube. Mix well and transfer 25 μL of the 2,000 pg/mL standard to the 400 pg/mL tube. Mix well and transfer 30 μL of the 400 pg/mL standard to the 100 pg/mL tube. Mix well and transfer 30 μL of the 100 pg/mL standard to the 25 pg/mL tube. Mix well and transfer 30 μL of the 25 pg/mL standard to the 6.25 pg/mL tube. Mix well and transfer 30 μL of the 6.25 pg/mL standard to the 1.56 pg/mL tube. Mix well and transfer 30 μL of the 1.56 pg/mL standard to the 0.39 pg/mL tube. Mix well.
9. Diagram the placement of standards (0.39, 1.56, 6.25, 25, 100, 400, 2,000, and 10,000 pg/mL), controls 1 and 2, blanks, and samples on the well map worksheet in a vertical configuration.
Note: Most instruments will only read the 96-well plate vertically by default.
10. Run the standards in triplicate and the specimens in duplicate.
11. Add 200 μL of wash buffer into each well of the plate.
12. Seal and mix on a plate shaker for 10 min at RT (20–25 °C).
13. Decant wash buffer and remove the residual amount from all wells by inverting the plate and tapping it quickly onto absorbent towels several times.
14. Add 25 μL of each standard or control into the appropriate wells.
15. Assay buffer should be used for blank (background).
16. Add 25 μL of assay buffer to the sample wells.
17. Add 25 μL of complete culture medium to mimic the matrix effect to the background, standards, and control wells.
Critical: For cell culture supernatants or tissue extraction, use the culture or extraction medium as the matrix solution in blank, standard curve, and controls. If samples are diluted in assay buffer, use the assay buffer as the matrix.
18. Add 25 μL of conditioned medium samples into the appropriate wells. Use dilutions 1 and 1:50 with PBS (for cytokines with concentrations above the upper limit of detection).
19. Vortex mixing bottle and add 15 μL of the mixed or premixed beads to each well.
Note: During addition of beads, shake the bead bottle intermittently to avoid settling.
20. Seal the plate with a plate sealer. Wrap the plate with foil and incubate with agitation on a plate shaker at 450–550 rpm for 10 min at 37 °C. Then, place the wrapped plate at 4 °C in a fridge for overnight incubation (16–18 h).
21. Put the plate on a plate shaker with 450–550 rpm for 30 min at 37 °C.
22. Dilute detection antibodies with wash buffer 1.93 times (13 μL of detection antibodies + 12 μL of wash buffer in 1 well).
Note: Each time, make a volume of the mixture for 10 wells more than those required to avoid shortage.
23. Wash plate with beads twice manually with wash buffer on a magnet from the automatic magnetic washer ELx405.
24. Add detection antibodies mixed with wash buffer in 25 μL per well and incubate on a plate shaker at 450–550 rpm for 1 h at 37 °C.
25. After incubation, add 15 μL of streptavidin-PE solution to the wells and incubate on a plate shaker at 450–550 rpm for 1 h at 37 °C.
26. Wash plate with beads twice, fix with 1% PFA for 1 h at RT, wash again, resuspend in 150 μL of sheath fluid, and analyze on a Luminex 200 instrument.
27. Collect 100 beads per region. During the analysis, use a 5PL fit for the standard curve.
Data analysis
For medium analysis by qPCR, we suggest generating the standard curve using 10-fold dilutions of cDNA fragments containing N2 and N3 regions of SARS-CoV-2, as done in [31]. This will allow for the quantitative virus RNA copy number estimation.
For tissue analysis by qPCR, we suggest a semi-quantitative deltaCt method with expression data normalization to UBC.
Use R 4.2.1 software for all statistical analysis. As the values obtained in our study were, in most cases, not normally distributed according to the Shapiro–Wilk test, we used nonparametric criteria.
For group comparison (comparison of infected vs. non-infected groups, infectious agent concentrations, observation time points), use the Wilcoxon signed-rank test with continuity correction. In order to overcome errors from multiple comparisons, perform a Benjamini-Hochberg FDR correction with calculation of critical values for each comparison matched with corresponding p-values; calculate adjusted p-values and compare them with a critical value of 0.05.
For the correlation analysis, use Spearman’s correlation coefficient. Calculate the corresponding p-values with continuity correction for multiple comparisons. For the calculation of Spearman’s coefficient, treat correlations with |R| ≥ 0.5 and p-adj. ≤ 0.05 as significant.
Data obtained using this protocol are openly available at https://github.com/GeorgeRusakovich/Cytokine-production-in-ex-vivo-model-of-SARS-CoV-2-lung-infection.
Validation of protocol
The qPCR system in this protocol was first proposed in [37]. We have further upgraded it by including the UBC gene as an internal control for data normalization.
The protocol has been used in full and validated in the following research article [1].
Thus, we showed that the viability period of the lung explants was sufficient to trace the viral infection in the lung histocultures. We were able to confirm the SARS-CoV-2 production both in tissue and virus release to the conditioned medium. We also visualized infected cells directly by IHC and further highlighted the inflammatory cytokine profile associated with infection.
General notes and troubleshooting
General notes
The explant grows into the sponge during culture. Cells can be observed on and within the sponge starting from day 4. To retrieve the migrated cells from the sponge, use the digestion mix as described in Recipes. The sponge dissociates in 2–5 min in the digestion mix at RT. After that, cells can be centrifuged. We suggest using these cells in flow cytometry to be sure to capture as many cells as possible and not to lose any epitopes from the cell surface.
Troubleshooting
| Section | Problem | Possible cause | Possible solution |
|---|---|---|---|
| A | The Gelfoam sponge floats in the medium. | The sponge has to be soaked in complete culture medium so that it lies at the bottom of the well, submerged in liquid with the explants on top of it. If the sponge is floating, it has not been pre-wet correctly. | 1) Pre-wet the sponge in complete culture medium and press on it gently with a spatula or forceps. 2) Extend the incubation in the medium for the sponges. 3) Refer to Figure 1 for images of a correctly soaked sponge. |
| B | The lung tissue blocks are deformed upon cutting. | The deformation of the tissue blocks is caused by insufficiently sharp blades and using plastic surfaces for cutting. | Use a glass Petri dish for cutting tissue instead of plastic. Do not reuse scalpel blades. |
| C | Viral infection is not confirmed by the method of choice. | 1) The amount of virus was insufficient for infection. 2) Suboptimal observation time point. 3) The method’s resolution is insufficient. | 1) Re-estimate the virus concentration in frozen stocks. Use the viral stock and a broad range of its dilutions for infection, as the viral load in the post-mortem lungs of COVID-19 patients may differ by several orders of magnitude, and the correct concentration for infection may be difficult to estimate. 2) Turn to earlier observation time points as the infection develops soon and may not be detected later. In our practice, time point day 4 was optimal. 3) Use several detection methods. Include qPCR detection due to its sensitivity. We suggest using qPCR in two types of material and IHC together. |
| D | The IHC staining of choice does not demonstrate positive cells. | Different antibodies may require different antigen retrieval procedures. | 1) Use a preliminary demasking step: incubation in buffer with specific pH (most commonly in citrate buffer pH 5.8). 2) Adjust the temperature and the pH of the buffer. 3) Adjust Triton X-100 concentration. |
Acknowledgments
The authors are very grateful to L.B. Margolis for his invaluable advice and stimulating discussions. We thank Wendy Fitzgerald and Christophe Vanpouille for their invaluable help and consultation regarding the cytokine measurement and analysis.
Conceptualization, D.V., D.P., E.M, A.K.; Investigation, D.V., D.P., E.M., G.R., A.T., N.P., A.K., T.S.; Writing—Original Draft, D.V., D.P., E.M., G.R., A.T.; Writing—Review & Editing, D.P., A.K., N.P., A.K., I.D., A.P., F.R., T.S., D.K., D.L., A.G., E.V.; Funding acquisition, E.V.; Supervision, E.V.
This project was funded by a grant from the Moscow government (Moscow Center for Innovative Technologies in Healthcare, research project 0803-5/23) and ANO “William Harvey”.
The protocol was previously used in Frontiers in immunology (2024), DOI: 10.3389/fimmu.2024.1448515 and is currently being published with minor modifications.
The Graphical overview and Figure 2 were created using BioRender (BioRender.com) and finalized using ImageJ (v.1.54).
Competing interests
Authors A.P. and F.R. were employed by HyTest Ltd.
The remaining authors declare that the research was conducted in the absence of any commercial or financial relationships that could be construed as a potential conflict of interest.
Ethical considerations
The studies involving humans were approved by the Moscow City Ethics Committee (protocol number 50/69_13.10.2020) of the Research Institute of the Organization of Health and Healthcare Management and performed according to the Declaration of Helsinki.
References
- Vorobyeva, D. A., Potashnikova, D. M., Maryukhnich, E. V., Rusakovich, G. I., Tvorogova, A. V., Kalinskaya, A. I., Pinegina, N. V., Kovyrshina, A. V., Dolzhikova, I. V., Postnikov, A. B., et al. (2024). Cytokine production in an ex vivo model of SARS-CoV-2 lung infection. Front Immunol. 15: e1448515. https://doi.org/10.3389/fimmu.2024.1448515
- Adams, T. S., Marlier, A. and Kaminski, N. (2023). Lung Cell Atlases in Health and Disease. Annu Rev Physiol. 85(1): 47–69. https://doi.org/10.1146/annurev-physiol-032922-082826
- Cohen, M., Levine, S. M. and Zar, H. J. (2022). World Lung Day: impact of “the big 5 lung diseases” in the context of COVID-19. Am J Physiol Lung Cell Mol Physiol. 323(3): L338–L340. https://doi.org/10.1152/ajplung.00261.2022
- Gazdar, A. F., Girard, L., Lockwood, W. W., Lam, W. L. and Minna, J. D. (2010). Lung Cancer Cell Lines as Tools for Biomedical Discovery and Research. JNCI: J Natl Cancer Inst. 102(17): 1310–1321. https://doi.org/10.1093/jnci/djq279
- Kuznar-Kaminska, B., Mikuła-Pietrasik, J., Sosińska, P., Książek, K. and Batura-Gabryel, H. (2016). COPD promotes migration of A549 lung cancer cells: the role of chemokine CCL21. Int J Chron Obstruct Pulmon Dis. 11: 1061. https://doi.org/10.2147/copd.s96490
- Pires De Souza, G. A., Le Bideau, M., Boschi, C., Wurtz, N., Colson, P., Aherfi, S., Devaux, C. and La Scola, B. (2022). Choosing a cellular model to study SARS-CoV-2. Front Cell Infect Microbiol. 12: e1003608. https://doi.org/10.3389/fcimb.2022.1003608
- Pizzorno, A., Padey, B., Julien, T., Trouillet-Assant, S., Traversier, A., Errazuriz-Cerda, E., Fouret, J., Dubois, J., Gaymard, A., Lescure, F. X., et al. (2020). Characterization and Treatment of SARS-CoV-2 in Nasal and Bronchial Human Airway Epithelia. Cell Rep Med. 1(4): 100059. https://doi.org/10.1016/j.xcrm.2020.100059
- Ji, J., Jansen, K., Kessler, V., Seisenbaeva, G., Gerde, P., Malmlöf, M., Palmberg, L. and Upadhyay, S. (2024). Cell line-based in vitro models of normal and chronic bronchitis-like airway mucosa to study the toxic potential of aerosolized palladium nanoparticles. Front Med. 11: e1422792. https://doi.org/10.3389/fmed.2024.1422792
- Rothen-Rutishauser, B., Gibb, M., He, R., Petri-Fink, A. and Sayes, C. M. (2023). Human lung cell models to study aerosol delivery – considerations for model design and development. Eur J Pharm Sci. 180: 106337. https://doi.org/10.1016/j.ejps.2022.106337
- Vazquez-Armendariz, A. I. and Tata, P. R. (2023). Recent advances in lung organoid development and applications in disease modeling. J Clin Invest. 133(22): e1172/jci170500. https://doi.org/10.1172/jci170500
- Zamprogno, P., Wüthrich, S., Achenbach, S., Thoma, G., Stucki, J. D., Hobi, N., Schneider-Daum, N., Lehr, C. M., Huwer, H., Geiser, T., et al. (2021). Second-generation lung-on-a-chip with an array of stretchable alveoli made with a biological membrane. Commun Biol. 4(1): e1038/s42003–021–01695–0. https://doi.org/10.1038/s42003-021-01695-0
- Fan, C., Wu, Y., Rui, X., Yang, Y., Ling, C., Liu, S., Liu, S. and Wang, Y. (2022). Animal models for COVID-19: advances, gaps and perspectives. Signal Transduction Targeted Ther. 7(1): 220. https://doi.org/10.1038/s41392-022-01087-8
- Tanner, L. and Single, A. B. (2019). Animal Models Reflecting Chronic Obstructive Pulmonary Disease and Related Respiratory Disorders: Translating Pre-Clinical Data into Clinical Relevance. J Innate Immun. 12(3): 203–225. https://doi.org/10.1159/000502489
- Groneberg, D. A. and Chung, K. F. (2004). Models of chronic obstructive pulmonary disease. Respir Res. 5(1): e1186/1465–9921–5–18. https://doi.org/10.1186/1465-9921-5-18
- Wahl, A., De, C., Abad Fernandez, M., Lenarcic, E. M., Xu, Y., Cockrell, A. S., Cleary, R. A., Johnson, C. E., Schramm, N. J., Rank, L. M., et al. (2019). Precision mouse models with expanded tropism for human pathogens. Nat Biotechnol. 37(10): 1163–1173. htts://doi.org/10.1038/s41587-019-0225-9
- Pujhari, S. and Rasgon, J. L. (2020). Mice with humanized-lungs and immune system - an idealized model for COVID-19 and other respiratory illness. Virulence. 11(1): 486–488. https://doi.org/10.1080/21505594.2020.1763637
- Stoner, G. D. (1980). Chapter 4 Explant Culture of Human Peripheral Lung. Methods Cell Biol. 21A: 65–77. https://doi.org/10.1016/s0091-679x(08)60758-x
- Grivel, J. C. and Margolis, L. (2009). Use of human tissue explants to study human infectious agents. Nat Protoc. 4(2): 256–269. https://doi.org/10.1038/nprot.2008.245
- Shibuya, S., Allen-Hyttinen, J., De Coppi, P. and Michielin, F. (2021). In vitro models of fetal lung development to enhance research into congenital lung diseases. Pediatr Surg Int. 37(5): 561–568. https://doi.org/10.1007/s00383-021-04864-8
- McAteer, J. A., Cavanagh, T. J. and Evan, A. P. (1983). Submersion culture of the intact fetal lung. In Vitro. 19(3): 210–218. https://doi.org/10.1007/bf02618061
- Lesko, J., Triebl, A., Stacher-Priehse, E., Fink-Neuböck, N., Lindenmann, J., Smolle-Jüttner, F. M., Köfeler, H. C., Hrzenjak, A., Olschewski, H., Leithner, K., et al. (2021). Phospholipid dynamics in ex vivo lung cancer and normal lung explants. Exp Mol Med. 53(1): 81–90. https://doi.org/10.1038/s12276-020-00547-x
- Karekla, E., Liao, W. J., Sharp, B., Pugh, J., Reid, H., Quesne, J. L., Moore, D., Pritchard, C., MacFarlane, M., Pringle, J. H., et al. (2017). Ex Vivo Explant Cultures of Non–Small Cell Lung Carcinoma Enable Evaluation of Primary Tumor Responses to Anticancer Therapy. Cancer Res. 77(8): 2029–2039. https://doi.org/10.1158/0008-5472.can-16-1121
- Nicholas, B., Staples, K. J., Moese, S., Meldrum, E., Ward, J., Dennison, P., Havelock, T., Hinks, T. S. C., Amer, K., Woo, E., et al. (2015). A Novel Lung Explant Model for the Ex Vivo Study of Efficacy and Mechanisms of Anti-Influenza Drugs. J Immunol. 194(12): 6144–6154. https://doi.org/10.4049/jimmunol.1402283
- Kradin, R. L. and Mark, E. J. (2018). Pathology of Pulmonary Infection. Diagnostic Pathology of Infectious Disease : 143–206. https://doi.org/10.1016/b978-0-323-44585-6.00008-4
- Valyaeva, A. A., Zharikova, A. A. and Sheval, E. V. (2022). SARS‐CoV‐2 cellular tropism and direct multiorgan failure in COVID‐19 patients: Bioinformatic predictions, experimental observations, and open questions. Cell Biol Int. 47(2): 308–326. https://doi.org/10.1002/cbin.11928
- Budinger, G. S., Misharin, A. V., Ridge, K. M., Singer, B. D. and Wunderink, R. G. (2021). Distinctive features of severe SARS-CoV-2 pneumonia. J Clin Invest. 131(14): e1172/jci149412. https://doi.org/10.1172/jci149412
- Gattinoni, L., Gattarello, S., Steinberg, I., Busana, M., Palermo, P., Lazzari, S., Romitti, F., Quintel, M., Meissner, K., Marini, J. J., et al. (2021). COVID-19 pneumonia: pathophysiology and management. Eur Respir Rev. 30(162): 210138. https://doi.org/10.1183/16000617.0138-2021
- Chilosi, M., Poletti, V., Ravaglia, C., Rossi, G., Dubini, A., Piciucchi, S., Pedica, F., Bronte, V., Pizzolo, G., Martignoni, G., et al. (2021). The pathogenic role of epithelial and endothelial cells in early-phase COVID-19 pneumonia: victims and partners in crime. Mod Pathol. 34(8): 1444–1455. https://doi.org/10.1038/s41379-021-00808-8
- Marano, V., Vlachová, Å., Tiano, S. M. L. and Cortese, M. (2024). A portrait of the infected cell: how SARS-CoV-2 infection reshapes cellular processes and pathways. Npj Viruses. 2(1): 66. https://doi.org/10.1038/s44298-024-00076-8
- Lebedeva, A., Vorobyeva, D., Vagida, M., Ivanova, O., Felker, E., Fitzgerald, W., Danilova, N., Gontarenko, V., Shpektor, A., Vasilieva, E., et al. (2017). Ex vivo culture of human atherosclerotic plaques: A model to study immune cells in atherogenesis. Atherosclerosis. 267: 90–98. https://doi.org/10.1016/j.atherosclerosis.2017.10.003
- Fitzgerald, W., Gomez‐Lopez, N., Erez, O., Romero, R. and Margolis, L. (2018). Extracellular vesicles generated by placental tissues ex vivo: A transport system for immune mediators and growth factors. Am J Reprod Immunol. 80(1): e12860. https://doi.org/10.1111/aji.12860
- Grivel, J., García, M., Moss, W. J. and Margolis, L. B. (2005). Inhibition of HIV‐1 Replication in Human Lymphoid Tissues Ex Vivo by Measles Virus. J Infect Dis. 192(1): 71–78. https://doi.org/10.1086/430743
- Lisco, A., Grivel, J. C., Biancotto, A., Vanpouille, C., Origgi, F., Malnati, M. S., Schols, D., Lusso, P. and Margolis, L. B. (2007). Viral Interactions in Human Lymphoid Tissue: Human Herpesvirus 7 Suppresses the Replication of CCR5-Tropic Human Immunodeficiency Virus Type 1 via CD4 Modulation. J Virol. 81(2): 708–717. https://doi.org/10.1128/jvi.01367-06
- Andrei, G., Lisco, A., Vanpouille, C., Introini, A., Balestra, E., van den Oord, J., Cihlar, T., Perno, C. F., Snoeck, R., Margolis, L., et al. (2011). Topical Tenofovir, a Microbicide Effective against HIV, Inhibits Herpes Simplex Virus-2 Replication. Cell Host Microbe. 10(4): 379–389. https://doi.org/10.1016/j.chom.2011.08.015
- Vanpouille, C., Günaydın, G., Jangard, M., Clerici, M., Margolis, L., Broliden, K. and Introini, A. (2021). The Progestin Medroxyprogesterone Acetate Affects HIV-1 Production in Human Lymphoid Tissue Explants in a Dose-Dependent and Glucocorticoid-like Fashion. Viruses. 13(11): 2303. https://doi.org/10.3390/v13112303
- Alexandrova, L., Zicari, S., Matyugina, E., Khandazhinskaya, A., Smirnova, T., Andreevskaya, S., Chernousova, L., Vanpouille, C., Kochetkov, S., Margolis, L., et al. (2017). Dual-targeted anti-TB/anti-HIV heterodimers. Antiviral Res. 145: 175–183. https://doi.org/10.1016/j.antiviral.2017.07.011
- Komissarov, A., Molodtsov, I., Ivanova, O., Maryukhnich, E., Kudryavtseva, S., Mazus, A., Nikonov, E. and Vasilieva, E. (2021). High SARS-CoV-2 load in the nasopharynx of patients with a mild form of COVID-19 is associated with clinical deterioration regardless of the hydroxychloroquine administration. PLoS One. 16(1): e0246396. https://doi.org/10.1371/journal.pone.0246396
- Vasilieva, E. J.; Ivanova, O. I.; Lebedeva, A. M.; Shagieva G. S.; Shpektor A. V. Method for culturing atherosclerotic plaque explants ex vivo. #2515371, May 10 2014. (patent)
Article Information
Publication history
Received: Sep 9, 2025
Accepted: Nov 12, 2025
Available online: Nov 28, 2025
Published: Dec 20, 2025
Copyright
© 2025 The Author(s); This is an open access article under the CC BY-NC license (https://creativecommons.org/licenses/by-nc/4.0/).
How to cite
Maryukhnich, E. V., Potashnikova, D. M., Vorobyeva, D. A., Rusakovich, G. I., Tvorogova, A. V., Kalinskaya, A. I., Pinegina, N. V., Kovyrshina, A. V., Dolzhikova, I. V., Postnikov, A. B., Rozov, F. N., Sotnikova, T. N., Kanner, D. Y., Logunov, D. Y., Gintsburg, A. L. and Vasilieva, E. J. (2025). An Ex Vivo Lung Histoculture Model for Studying Pulmonary Infection and Immune Response With SARS-CoV-2 as an Example of RNA Virus. Bio-protocol 15(24): e5552. DOI: 10.21769/BioProtoc.5552.
Category
Immunology > Host defense > Human
Cell Biology > Cell isolation and culture > Organ culture
Microbiology > Microbe-host interactions > Ex vivo model
Do you have any questions about this protocol?
Post your question to gather feedback from the community. We will also invite the authors of this article to respond.