- Protocols

- Articles and Issues
- For Authors
- About
- Become a Reviewer

Whole-Mount Visualization of Primary Cilia in the Developing Mouse Brain
Published: Vol 15, Iss 24, Dec 20, 2025 DOI: 10.21769/BioProtoc.5538 Views: 1263
Reviewed by: Anonymous reviewer(s)
Original research article
The authors used this protocol in:

May 2025
Advertisement


Protocol Collections
Comprehensive collections of detailed, peer-reviewed protocols focusing on specific topics


Related protocols
Abstract
Primary cilia are evolutionarily conserved organelles that play critical roles in brain development. In the developing cortex, neural progenitors extend their primary cilia into the ventricular surface, where the cilia act as key signaling hubs. However, visualizing these cilia in a systematic and intact manner has been challenging. The commonly used cryostat sectioning only provides a limited snapshot of cilia on individual sections, and this process often disrupts the ciliary morphology. By contrast, the previously established whole-mount technique has been shown to preserve ciliary architecture in the adult mouse cortex. Here, we adapt and optimize the whole-mount approach for embryonic and neonatal brain, allowing robust visualization of ciliary morphology at the ventricular surface during development. This protocol describes step-by-step procedures for whole-mounting and immunostaining delicate embryonic and neonatal mouse cortices, enabling direct visualization of cilia in neural progenitors in the developing brain.
Key features
• This protocol adapts the whole-mount technique and applies it to delicate embryonic samples from embryonic day 12 (E12) to neonatal brain (P3).
• This protocol details the necessary steps to achieve intact and direct visualization of cilia in the developing mouse cortex.
• This protocol also provides the necessary steps for the dissection and visualization of cilia on the lateral ganglionic eminences (LGE) and medial ganglionic eminences (MGE).
Keywords: Primary ciliaBackground
Primary cilia are evolutionarily conserved microtubule-based organelles that project from the surface of most vertebrate cells and serve as signaling hubs. The primary cilium senses and transduces environmental cues into intracellular signaling pathways. Certain specialized cell types bear motile cilia, typically in multiple copies. Unlike primary cilia, motile cilia generate a rhythmical beating that propels the extracellular fluid or enables cellular motility [1–4]. Dysfunction of cilia leads to a wide range of diseases, collectively known as ciliopathies. Many ciliopathies, such as Joubert syndrome, Orofaciodigital syndrome, and Acrocallosal syndrome, are characterized by brain structural deficits [5,6]. These brain malformations often result in cognitive deficits and intellectual disabilities [3,5,7]. These deficits highlight the essential roles of primary cilia in normal brain development and neural circuitry formation.
During embryonic brain development, neurogenesis is precisely coordinated by radial glia (RG), the main neural progenitors in the developing brain. RG undergo various modes of cell division, producing the diverse neuronal cell types necessary to form functional neural circuits [8–13]. A notable anatomical feature of RG is that their radial processes extend across the entire developing cortex, from the pial (basal) surface to the ventricular (apical) surface [14]. While their nuclei undergo interkinetic nuclear migration—moving back and forth between the apical and basal sides in sync with the cell cycle—their centrosomes and primary cilia remain at the apical surface. In other words, the primary cilia of RG project into the cerebrospinal fluid (CSF) within the ventricles of the brain [15–17]. Studying the morphology of these primary cilia has been challenging. Conventional approaches, such as cryostat sectioning, are not ideal because they may physically damage the delicate structure of primary cilia. The freezing process itself, if not done properly, can cause the formation of ice crystals that distort the cilium. Furthermore, the mechanical slicing of the frozen tissue may shear or break the cilium, leading to artifacts that misrepresent its true morphology. Subsequent steps, such as mounting on slides, may further alter the structure. These damaged and distorted cilia make it difficult to get an accurate observation of their morphology. Finally, because primary cilia are thin, hair-like structures that project from the cell surface, a single section only captures a small, two-dimensional sliver of the cilium's full length. This fragmented view makes it nearly impossible to understand the cilium's overall shape, length, and orientation in its native three-dimensional context [18–22].
In this protocol, we adapt a whole-mount cortical preparation originally developed for the adult brain [23] to embryonic and neonatal brains. We aim to preserve intact ciliary morphology in their three-dimensional perspective at the native ventricular surface. By preserving the complete cytoarchitecture, this method enables a detailed study of ciliary morphology across different brain regions and at various developmental stages.
Materials and reagents
Biological materials
1. C57BL/6 (Jackson Laboratories, strain #000664) aged 6–8 weeks
Note: Embryonic (E) samples can be collected at E12, 14, and 17, and postnatal day (P) 1, 3, 5, and 7. The procedure is applicable to other mouse strains.
Reagents
1. DPBS (Fisher Scientific, catalog number: 14-190-136)
2. Triton X-100 (Fisher Scientific, catalog number: AAA16046AP)
3. Donkey serum (MilliporeSigma, catalog number: S30-100ML)
4. 20% Paraformaldehyde (PFA) (Fisher Scientific, catalog number: 50-980-493)
5. Hoechst (Sigma, catalog number: 94403-1ML)
6. Fluoromount-G mounting medium (SouthernBiotech, catalog number: 0100-01)
7. Rabbit anti-Arl13b (1:200) (Proteintech, catalog number: 17711-1-AP)
8. Rat anti-Arl13b (1:200) (BiCell Scientific, catalog number: 90413)
9. Mouse anti-Arl13b (1:200) (antibodiesinc, catalog number: 75-287
10. Mouse anti-acetylated tubulin (1:200) (Sigma, catalog number: T6793)
11. Mouse anti-β-catenin (1:100) (BD Biosciences, catalog number: 610154)
12. Rabbit anti-ZO1 (1:100) (Zymed, catalog number: 40-2200)
13. Mouse anti-AlexaFluor 488 (Jackson ImmunoResearch Labs, catalog number: 715-545-151)
14. Mouse anti-AlexaFluor rhodamine (Jackson ImmunoResearch Labs, catalog number: 715-025-151)
15. Mouse anti-AlexaFluor 647 (Jackson ImmunoResearch Labs, catalog number: 715-605-151)
16. Rabbit anti-AlexaFluor 488 (Jackson ImmunoResearch Labs, catalog number: 711-545-152)
17. Rabbit anti-AlexaFluor rhodamine (Jackson ImmunoResearch Labs, catalog number: 711-025-152)
18. Rabbit anti-AlexaFluor 647 (Jackson ImmunoResearch Labs, catalog number: 711-605-152)
19. Rat anti-AlexaFluor 488 (Jackson ImmunoResearch Labs, catalog number: 712-545-153)
20. Rat anti-AlexaFluor rhodamine (Jackson ImmunoResearch Labs, catalog number: 712-025-153)
21. Rat anti-AlexaFluor 647 (Jackson ImmunoResearch Labs, catalog number: 712-605-153)
Solutions
1. Blocking buffer (see Recipes)
Recipes
1. Blocking buffer
| Reagent | Final concentration | Quantity or volume |
|---|---|---|
| Donkey serum | 2% | 2 mL |
| Triton X-100 | 0.2% | 200 μL |
| DPBS | n/a | 97.8 mL |
| Total | n/a | 100 mL |
Store at 4 °C.
Laboratory supplies
1. FisherbrandTM surface treated tissue culture dishes, 10 cm dish (Fisher Scientific, catalog number: FB012924)
2. Thermo ScientificTM BioLite 6 cm cell culture treated dishes (Fisher Scientific, catalog number: 12-556-001)
3. 96-well plate (Thermo Fisher Scientific, catalog number: 12-556-008)
4. 24-well plate (Fisher Scientific, catalog: FB012929)
5. AxygenTM MaxyClear Snaplock microtubes, 1.5 mL (Axygen, catalog number: 14-222-155)
6. CorningTM 15 mL centrifuge tubes with CentriStarTM cap (Fisher Scientific, catalog number: 430791)
7. FisherbrandTM SuperfrostTM Plus microscope slides (Fisher Scientific, catalog number: 12-550-15)
8. FisherbrandTM SuperslipTM coverslips (Fisher Scientific, catalog number: 12-541-056)
9. Moria ultra-fine forceps (Fine Science Tools, catalog number: 11370-40)
10. Moria ultra-fine curved forceps (Fine Science Tools, catalog number: 11370-42)
11. Extra fine Bonn 8.5 cm scissors (Fine Science Tools, catalog number: 14085-08)
Equipment
1. Confocal microscope (Zeiss, model: LSM 880)
2. Leica Mica
Note: All other fluorescence microscopes can also be used with 63× lens or above.
3. Vortex mixer (Fisher Scientific, catalog number: 02-215-414)
4. Centrifuge (Eppendorf, model: 5702R)
Software and datasets
1. LAS X (Leica, v3.7.4.23463)
2. Fiji (Version 1.54p)
Procedure
A. Timed pregnancy setup and dissection of embryonic cortex
1. Set up mating pairs in the afternoon and check for plugs the following morning. Once a plug is noticed, wait the designated number of days until the embryos are at the desired stage.
Note: All mouse work was performed according to guidelines approved by the IACUC of the University of California, Merced (animal protocol no. 2023–1151). All mice were maintained in a specific pathogen-free animal facility. Mice were monitored daily and housed in a 12/12 h light/dark cycle, at 19–22 °C with 40%–60% humidity.
2. On the day of the desired embryonic stage (Figure 1A), euthanize the pregnant females and then open the abdomen. Remove the embryos from the uterus carefully, one by one, to avoid damage to the brain. Place embryos in a 10 cm dish with cold DPBS on ice.
Note: For neonatal mice, ice is used as hypothermic anesthesia. The anesthetized pups are then decapitated with sharp scissors (see Laboratory Supplies).
3. Ensure that the embryo is belly down and has the rostral region facing north (Figure 1B). Under a dissection microscope, stabilize the embryo by piercing the nape with extra-fine forceps held in the non-dominant hand. This will stabilize the sample and prevent it from moving around in the DPBS. Using another pair of extra-fine forceps in the dominant hand, carefully peel away the soft tissues (skin and future skull) from the posterior end of the brain to the anterior end (Figure 1B) until the brain is exposed. Once the majority of the overlying tissue has been removed, use fine forceps to gently scoop the brain out.
Critical: Avoid piercing the cortex while dissecting and work slowly when scooping out the brain to maintain proper structural integrity.
4. Wash brains with cold (4 °C) DPBS very carefully.
5. Drop fix the brain in a 15 mL tube filled with cold 4% PFA and fix at 4 °C for 12–24 h.
B. Dissection and whole-mounting of the mouse embryonic telencephalon
B1. Dissection of the cortex
1. Place all brains in a 6 cm dish filled with cold DPBS.
Note: C57BL/6 mice typically have 7–10 embryos per litter. Therefore, add all 7–10 brains to the dish filled with cold DPBS.
2. Separate the two hemispheres using ultra-fine forceps in both hands and orient them to have the inside surfaces facing outward. Retain the olfactory bulb to help orient the structure along the rostral (R) to caudal (C) axis (Figure 1B–D).
3. With ultra-fine forceps, carefully open and peel off the medial wall of the telencephalon indicated by the dashed black line (Figure D). The inner surface of the lateral ventricle should now be exposed (Figure 1E). Make sure to avoid scratching the inner surface during dissection.
4. Separate the dorsal and ventral telencephalon by cutting along the midline indicated by the white dashed line (Figure 1E–G).
Note: The LGE and MGE can be further dissected from each other (Figure 1G). Separating the two GEs will be helpful when mounting the samples onto a coverslip.
5. Transfer the dorsal and ventral telencephalon separately to a 96-well plate filled with 100 μL of DPBS. Two embryonic brains can fit into one well.
Note: The dorsal and ventral regions can be taken apart and go through immunostaining separately. They can also be kept together and dissected once immunostaining is completed. The staining process for embryonic brains can be performed in 96-well plates to minimize reagent use.
B2. Immunostaining of primary cilia in the developing cortex
1. Wash samples three times with 100 μL of DPBS for 5 min in between each wash.
2. Remove DPBS slowly and replace with 100 μL of blocking buffer (see Recipes) for 1 h at room temperature.
3. Remove blocking buffer slowly and replace with 100 μL of primary antibodies consisting of anti-ARL13B (to mark primary cilia) and anti-beta-Catenin (or anti-ZO1) (to delineate cell–cell boundary). Primary antibodies are diluted in blocking buffer. Incubate for 2 h at room temperature while rocking gently.
Pause point: Samples can be left in the primary antibody mixture overnight at 4 °C with gentle rocking.
Note: We found that ZO1 is a better marker to delineate cell boundaries in the early embryonic brain than beta-catenin.
4. Remove primary antibody gently and wash samples three times with DPBS for 5 min in between each wash.
5. Add 100 μL of secondary antibodies diluted in blocking buffer. Incubate for 1 h at room temperature while gently rocking.
6. Remove the secondary antibody mixture and incubate samples in 100 μL of Hoechst for 10 min.
7. Wash with DPBS three times with 10 min in between each wash.
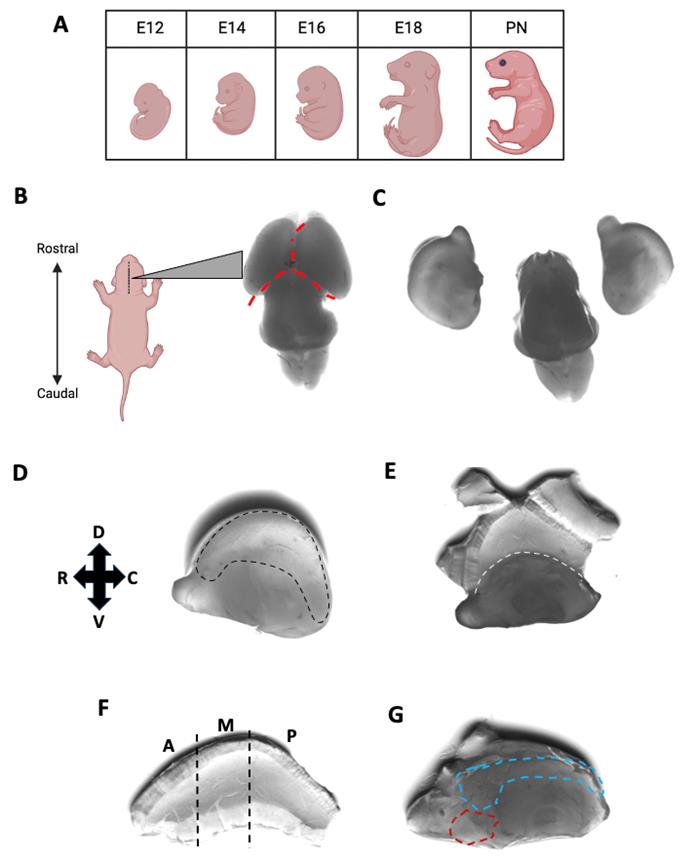
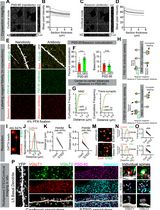
Figure 1. Dissection of the developing cortex for whole-mount staining. (A) Embryonic stages to which this protocol applies, for primary and motile cilia visualization. (B) Brains were fixed at embryonic day 14 (E14). In DPBS, the embryonic brain is oriented with the rostral region facing north. (C) Hemispheres are separated and are rotated 180° for further dissection. (D) The olfactory bulb helps to orient the rostral–caudal axis of the brain. The region circled with a dashed line is the medial wall of the telencephalon. (E) The medial wall is peeled off to expose the inner surface of the lateral ventricle. Above the dashed line: dorsal telencephalon; below the dashed line: ventral telencephalon. (F) The dorsal telencephalon can be divided into anterior (A), medial (M), and posterior (P) regions. (G) The two prominent bulges in ventral telencephalon correspond to lateral ganglionic eminence (LGE, light blue dashed line) and medial ganglionic eminence (MGE, red dashed line).
B3. Mounting the stained cortex onto a slide
1. Under the dissection microscope, open the embryonic brain with sharp forceps and carefully spread it flat, as if flattening an eggshell. Because of its natural curvature, the tissue should be cut into smaller pieces to allow proper flattening, which will facilitate the downstream imaging process. The dorsal telencephalon can be separated into anterior (A), medial (M), and posterior (P) regions, as illustrated in Figure 1F. The ventral telencephalon can be separated into the LGE and MGE regions, as shown in Figure 1G.
2. Transfer two dissected samples to the slide with the inner surface facing upward. Keep one sample on the left side and the other on the right side of the slide to ensure that samples do not merge when adding mounting buffer and cover glass.
Note: At this stage, the inner surface (i.e., the apical side) can usually be distinguished from the outer surface (i.e., the basal side) by its paler color and smoother appearance. In contrast, the outer surface often shows residual blood vessels.
3. Slowly and gently add 10 μL of mounting medium to the sample; place a cover glass slowly on the tissue, avoiding bubbles.
4. Allow slide to dry for a couple of hours before imaging.
5. Image samples using a confocal microscope with 63× or greater magnification to obtain high-resolution images of primary cilia throughout development (Figures 2 and 3).
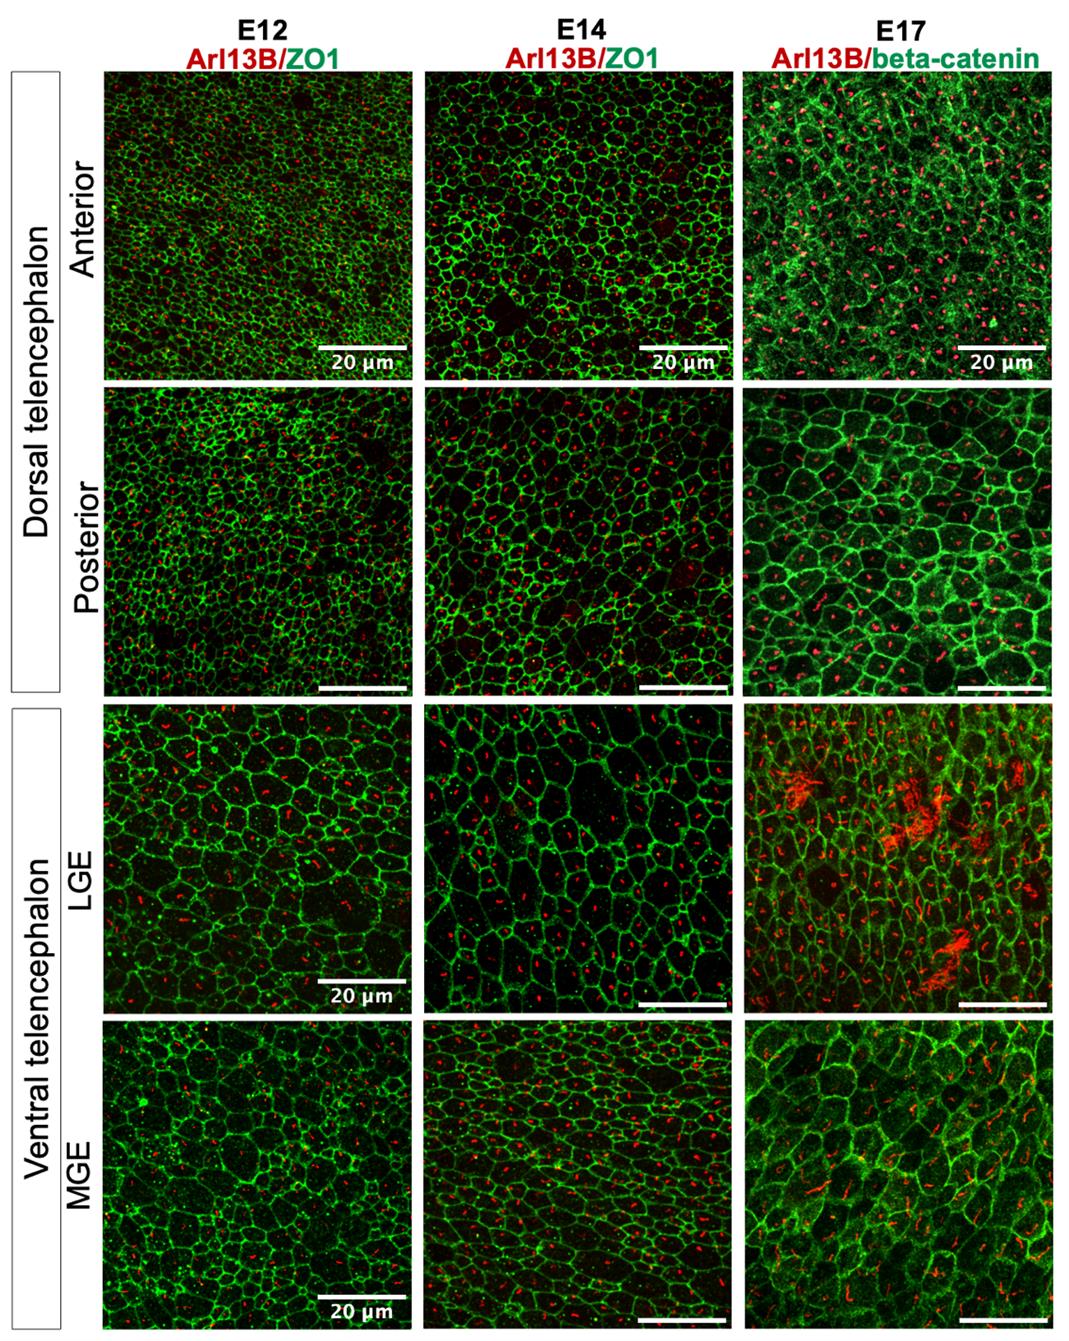
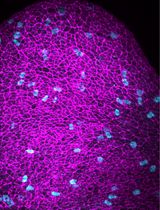
Figure 2. Visualizing primary cilia in the whole-mount embryonic brain. Examples of primary cilia at the inner surface of embryonic brain. Arl13b (red)-marked primary cilia; beta-catenin/ZO1 (markers for adherens junction/tight junctions) (green) highlighted cell boundaries at the apical surface of the embryonic brain. The results for three developmental stages are shown. For each stage, two regions in the dorsal telencephalon and two in the ventral are shown. The results demonstrate that the whole-mount preparation provides a comprehensive view of cilia in their native environment and illustrate the variation of the ciliary length and the apical surface area of the radial glial cells at different developmental stages and in different brain regions.
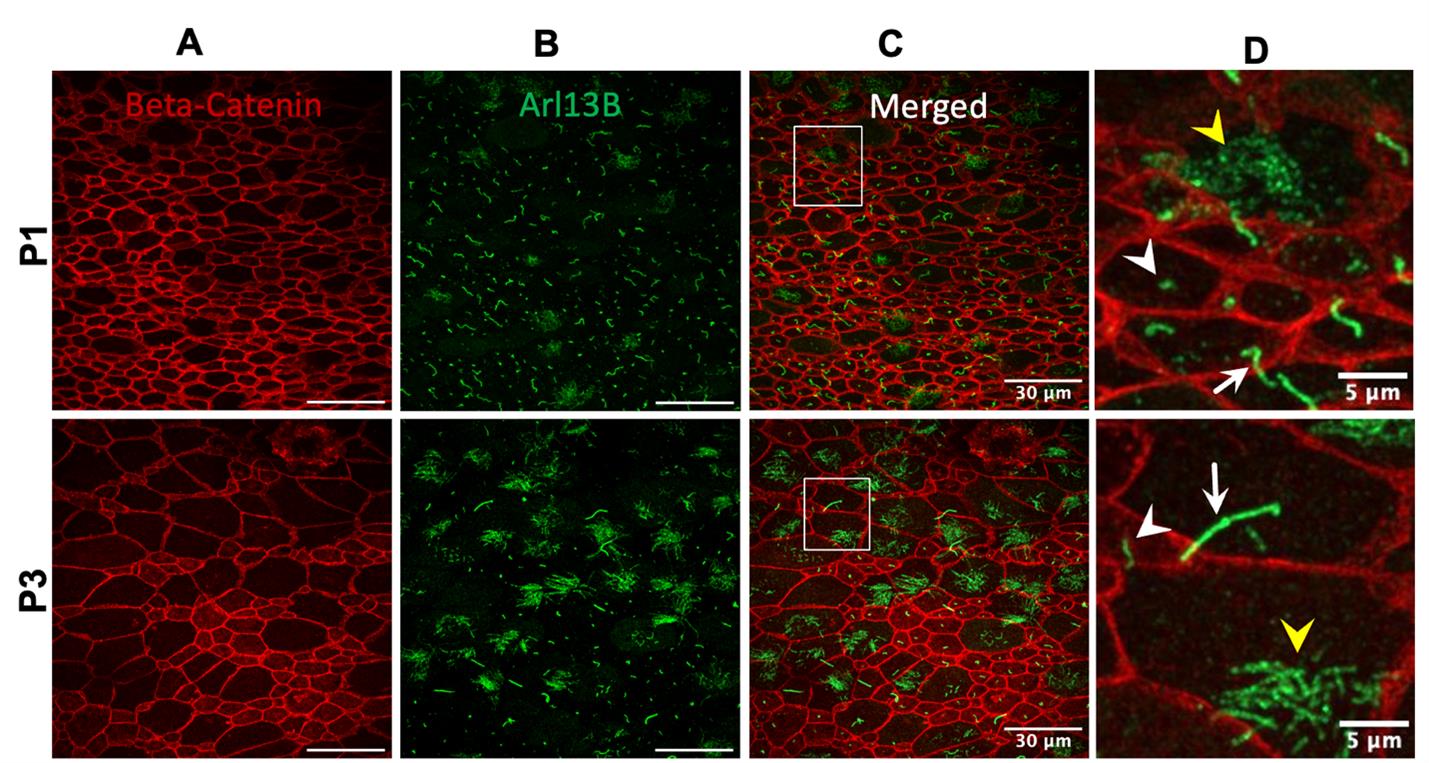
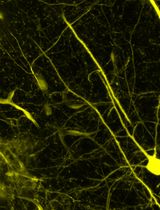
Figure 3. Visualization of primary and motile cilia in the neonatal brain of the dorsal telencephalon. At this stage, the ventral telencephalon has developed into ventral brain structures, including parts of the septum and basal ganglia. The dorsal telencephalon contains both radial glial cells and ependymal cells. Along the ventricular surface, cells display diverse types of ciliation. Some remain single-ciliated (white arrowhead), suggesting they are radial glia; others bear a single, elongated cilium (white arrow), indicating a transitional state toward ependymal cell fate; some are multiciliated (yellow arrowhead), suggesting they are fully differentiated into ependymal cells. The typical pinwheel organization [24–27] is beginning to emerge but has not yet fully developed. Beta-catenin (red) delineates the cell boundaries; Arl13b (green) highlights cilia. The images in column D are the magnified view of the white square area in column C.
Validation of protocol
This protocol has been used and validated in the following research article:
Liu et al. [28]. Proteomic profiling of primary cilia in the developing brain uncovers new regulators of cortical development. bioRxiv (Figures 1, 3, 4, and 5 and Supplemental Figures 3 and 9).
General notes and troubleshooting
General notes
1. Timing is critical in most steps of this protocol. To preserve ciliary structure, brain tissue should be fixed as quickly as possible. Following fixation, tissues need to be processed through dissection, immunostaining, and mounting in a timely manner, ideally within 24 h. Prolonged fixation may cause the tissue to become brittle and susceptible to damage during handling.
Troubleshooting
Problem 1: Tissue gets excessively damaged during dissection.
Possible causes: Forceps used may not be sharp; limited dissection experience.
Solutions: Make sure extra-fine forceps are used for this procedure, which allows for easier dissections. Dissect with fresh samples to limit tissue damage. Tissue dissection may be difficult for researchers with no prior experience with embryonic tissue. However, there are no inherent difficulties in the dissection that would lead to failure. Even if the cortex breaks into smaller pieces, the tissue can still be used for subsequent steps. For comparative experiments, however, it is important to use matching cortical regions, which requires the preparation of complete cortices.
Problem 2: Cilia appear blurry during imaging of the sample.
Possible cause: The coverslip may not be completely dry after mounting, resulting in the sample moving around.
Solution: Ensure the sample is completely dry, which may take ~6 h. This will keep the sample stable and allow the best resolution when imaging.
Acknowledgments
This work was supported by NIH/National Institute of General Medical Sciences (GM143276) and National Science Foundation CAREER award (IOS-2143711) to X.G.
Author contributions: O. Torres Gutierrez: writing the original draft, revising, and editing. X.L.: technical support on experiments. X.G.: conceptualization and writing the original draft, revising, and editing.
The following figures were created using BioRender: Figure 1A, B.
Competing interests
The authors declare no conflicts of interest.
Ethical considerations
All mouse work was performed according to guidelines approved by the IACUC of the University of California, Merced (animal protocol no. 2023–1151). All mice were maintained in a specific pathogen-free animal facility. Mice were monitored daily and housed in a 12/12 h light/dark cycle, at 18–22 °C with 40%–60% humidity.
References
- Sengupta, P. (2017). Cilia and sensory signaling: The journey from “animalcules” to human disease. PLoS Biol. 15(4): e2002240. https://doi.org/10.1371/journal.pbio.2002240
- Goetz, S. C. and Anderson, K. V. (2010). The primary cilium: a signalling centre during vertebrate development. Nat Rev Genet. 11(5): 331–344. https://doi.org/10.1038/nrg2774
- Wallmeier, J., Nielsen, K. G., Kuehni, C. E., Lucas, J. S., Leigh, M. W., Zariwala, M. A. and Omran, H. (2020). Motile ciliopathies. Nat Rev Dis Primers. 6(1): e1038/s41572–020–0209–6. https://doi.org/10.1038/s41572-020-0209-6
- Boutin, C. and Kodjabachian, L. (2019). Biology of multiciliated cells. Curr Opin Genet Dev. 56: 1–7. https://doi.org/10.1016/j.gde.2019.04.006
- Valente, E. M., Rosti, R. O., Gibbs, E. and Gleeson, J. G. (2013). Primary cilia in neurodevelopmental disorders. Nat Rev Neurol. 10(1): 27–36. https://doi.org/10.1038/nrneurol.2013.247
- Braun, D. A. and Hildebrandt, F. (2017). Ciliopathies. Cold Spring Harb Perspect Biol. 9(3): a028191. https://doi.org/10.1101/cshperspect.a028191
- Louvi, A. and Grove, E. A. (2011). Cilia in the CNS: The Quiet Organelle Claims Center Stage. Neuron. 69(6): 1046–1060. https://doi.org/10.1016/j.neuron.2011.03.002
- Kriegstein, A. and Alvarez-Buylla, A. (2009). The Glial Nature of Embryonic and Adult Neural Stem Cells. Annu Rev Neurosci. 32(1): 149–184. https://doi.org/10.1146/annurev.neuro.051508.135600
- Edlund, T. and Jessell, T. M. (1999). Progression from Extrinsic to Intrinsic Signaling in Cell Fate Specification. Cell. 96(2): 211–224. https://doi.org/10.1016/s0092-8674(00)80561-9
- Fode, C., Ma, Q., Casarosa, S., Ang, S. L., Anderson, D. J. and Guillemot, F. (2000). A role for neural determination genes in specifying the dorsoventral identity of telencephalic neurons. Genes Dev. 14(1): 67–80. https://doi.org/10.1101/gad.14.1.67
- Nowakowski, T. J., Bhaduri, A., Pollen, A. A., Alvarado, B., Mostajo-Radji, M. A., Di Lullo, E., Haeussler, M., Sandoval-Espinosa, C., Liu, S. J., Velmeshev, D., et al. (2017). Spatiotemporal gene expression trajectories reveal developmental hierarchies of the human cortex. Science. 358(6368): 1318–1323. https://doi.org/10.1126/science.aap8809
- Panchision, D. M. and McKay, R. D. (2002). The control of neural stem cells by morphogenic signals. Curr Opin Genet Dev. 12(4): 478–487. https://doi.org/10.1016/s0959-437x(02)00329-5
- Wang, L., Wang, C., Moriano, J. A., Chen, S., Zuo, G., Cebrián-Silla, A., Zhang, S., Mukhtar, T., Wang, S., Song, M., et al. (2025). Molecular and cellular dynamics of the developing human neocortex. Nature. 1–10. https://doi.org/10.1038/s41586-024-08351-7
- Marin, O., Valiente, M., Ge, X. and Tsai, L. H. (2010). Guiding Neuronal Cell Migrations. Cold Spring Harbor Perspect Biol. 2(2): a001834–a001834. https://doi.org/10.1101/cshperspect.a001834
- Lehtinen, M. K. and Walsh, C. A. (2011). Neurogenesis at the Brain–Cerebrospinal Fluid Interface. Annu Rev Cell Dev Biol. 27(1): 653–679. https://doi.org/10.1146/annurev-cellbio-092910-154026
- Lehtinen, M. K., Zappaterra, M. W., Chen, X., Yang, Y. J., Hill, A. D., Lun, M., Maynard, T., Gonzalez, D., Kim, S., Ye, P., et al. (2011). The Cerebrospinal Fluid Provides a Proliferative Niche for Neural Progenitor Cells. Neuron. 69(5): 893–905. https://doi.org/10.1016/j.neuron.2011.01.023
- Derderian, C., Canales, G. I. and Reiter, J. F. (2023). Seriously cilia: A tiny organelle illuminates evolution, disease, and intercellular communication. Dev Cell. 58(15): 1333–1349. https://doi.org/10.1016/j.devcel.2023.06.013
- Lun, M. P., Monuki, E. S. and Lehtinen, M. K. (2015). Development and functions of the choroid plexus–cerebrospinal fluid system. Nat Rev Neurosci. 16(8): 445–457. https://doi.org/10.1038/nrn3921
- Derderian, C., Canales, G. I. and Reiter, J. F. (2023). Seriously cilia: A tiny organelle illuminates evolution, disease, and intercellular communication. Dev Cell. 58(15): 1333–1349. https://doi.org/10.1016/j.devcel.2023.06.013
- Jurisch-Yaksi, N., Wachten, D. and Gopalakrishnan, J. (2024). The neuronal cilium – a highly diverse and dynamic organelle involved in sensory detection and neuromodulation. Trends Neurosci. 47(5): 383–394. https://doi.org/10.1016/j.tins.2024.03.004
- May, E. A., Kalocsay, M., D’Auriac, I. G., Schuster, P. S., Gygi, S. P., Nachury, M. V. and Mick, D. U. (2021). Time-resolved proteomics profiling of the ciliary Hedgehog response. J Cell Biol. 220(5): e202007207. https://doi.org/10.1083/jcb.202007207
- Mill, P., Christensen, S. T. and Pedersen, L. B. (2023). Primary cilia as dynamic and diverse signalling hubs in development and disease. Nat Rev Genet. 24(7): 421–441. https://doi.org/10.1038/s41576-023-00587-9
- Volos, P., Fujise, K. and Rafiq, N. M. (2025). Roles for primary cilia in synapses and neurological disorders. Trends Cell Biol. 35(1): 6–10. https://doi.org/10.1016/j.tcb.2024.10.014
- Mirzadeh, Z., Doetsch, F., Sawamoto, K., Wichterle, H. and Alvarez-Buylla, A. (2010). The Subventricular Zone En-face: Wholemount Staining and Ependymal Flow. J Visualized Exp. 39: e3791/1938. https://doi.org/10.3791/1938
- Spassky, N. and Meunier, A. (2017). The development and functions of multiciliated epithelia. Nat Rev Mol Cell Biol. 18(7): 423–436. https://doi.org/10.1038/nrm.2017.21
- Delgehyr, N., Meunier, A., Faucourt, M., Bosch Grau, M., Strehl, L., Janke, C. and Spassky, N. (2015). Ependymal cell differentiation, from monociliated to multiciliated cells. Methods Cell Biol. 127: 19–35. https://doi.org/10.1016/bs.mcb.2015.01.004
- Redmond, S. A., Figueres-Oñate, M., Obernier, K., Nascimento, M. A., Parraguez, J. I., López-Mascaraque, L., Fuentealba, L. C. and Alvarez-Buylla, A. (2019). Development of Ependymal and Postnatal Neural Stem Cells and Their Origin from a Common Embryonic Progenitor. Cell Rep. 27(2): 429–441.e3. https://doi.org/10.1016/j.celrep.2019.01.088
- Mirzadeh, Z., Merkle, F. T., Soriano-Navarro, M., Garcia-Verdugo, J. M. and Alvarez-Buylla, A. (2008). Neural Stem Cells Confer Unique Pinwheel Architecture to the Ventricular Surface in Neurogenic Regions of the Adult Brain. Cell Stem Cell. 3(3): 265–278. https://doi.org/10.1016/j.stem.2008.07.004
- Liu, X., Torres Gutierrez, O., Kaur, G., Al-Issa, Y., Baboo, S., Diedrich, J. K., Cai, E., Yates, J. R. and Ge, X. (2025). Proteomic profiling of primary cilia in the developing brain uncovers new regulators of cortical development. bioRxiv. e652041. https://doi.org/10.1101/2025.05.03.652041
Article Information
Publication history
Received: Sep 23, 2025
Accepted: Nov 2, 2025
Available online: Nov 19, 2025
Published: Dec 20, 2025
Copyright
© 2025 The Author(s); This is an open access article under the CC BY-NC license (https://creativecommons.org/licenses/by-nc/4.0/).
How to cite
Gutierrez, O. T., Liu, X. and Ge, X. (2025). Whole-Mount Visualization of Primary Cilia in the Developing Mouse Brain. Bio-protocol 15(24): e5538. DOI: 10.21769/BioProtoc.5538.
Category
Developmental Biology > Organogenesis > Brain
Cell Biology > Cell structure > Cell surface
Neuroscience > Neuroanatomy and circuitry > Immunofluorescence
Do you have any questions about this protocol?
Post your question to gather feedback from the community. We will also invite the authors of this article to respond.