- Protocols

- Articles and Issues
- For Authors
- About
- Become a Reviewer

Intracerebral Cannula Implantation in Mouse: A Proposed Method to Assess Glioblastoma Invasiveness and Serial Locoregional Treatment
Published: Vol 15, Iss 22, Nov 20, 2025 DOI: 10.21769/BioProtoc.5503 Views: 1999
Reviewed by: Edgar Soria-GomezMario ValentinoAnonymous reviewer(s)

Protocol Collections
Comprehensive collections of detailed, peer-reviewed protocols focusing on specific topics


Related protocols
Abstract
Research on brain disorders, particularly in the field of oncology, requires in vivo models to evaluate various therapeutic approaches, including intracerebral drug delivery. To meet this requirement, the implantation of intracerebral cannulas offers a reliable method for administering candidate therapeutics directly into the brain. This protocol describes a surgical technique for cannula implantation in mice, enabling repeated administration of therapeutic compounds in the context of glioblastoma treatment. The method was designed with an emphasis on using accessible, easy-to-handle, and sterilized tools to optimize surgical outcomes. Particular attention was also given to animal welfare, notably through refined procedures for asepsis, anesthesia, and postoperative care.
Key features
• This protocol requires specific equipment and surgical mice expertise.
• This protocol is dedicated to brain disorders and cancer models, with a particular emphasis on locoregional delivery of drugs and derivatives.
Keywords: CannulaGraphical overview
Intracerebral cannula implantation in mice for serial locoregional infusions
Background
Despite significant scientific advances in chemotherapy (when applicable), radiotherapy, and surgery, malignant tumors of the central nervous system continue to be associated with poor prognosis. In Belgium, the 5-year survival rate among adults remains as low as 22% [1,2]. New emerging treatments are increasingly offering targeted therapies. These therapies aim to modify the tumor microenvironment where the tumor settles and derives essential resources by altering the availability of oxygen and nutrients. More precise targeting of the tumor not only enhances therapeutic efficacy but also reduces off-target toxicity, which often significantly impacts patient quality of life.
The existence of preclinical models designed to evaluate the efficacy of these new therapies is a key element in providing therapeutic opportunities to patients through clinical trials. The implantation of an intracerebral cannula is the method of choice for repeated treatment at the level of the brain, and more specifically within the tumor [3]. Securing the cannula to the brain is a critical step for both the experimental approach and considerations in animal welfare. In this context, various fixation techniques are available, including the use of anchoring screws inserted into the top of the skull (calvaria) and secured with dental cement to anchor the base of the cannula. However, the use of screws is more suitable for rats, where the calvaria is sufficiently thick. In mice, the calvaria is thinner and less calcified, making screw insertion more difficult as there is a risk of damaging the integrity of the skull or the underlying brain tissue [4,5].
The choice of cement is therefore a critical factor in cannula implantation in mice, as the cement alone is responsible for securing the cannula in place. Typically, two types of dental cement are used: zinc polycarboxylate and methyl methacrylate (commonly referred to as pink cement). Zinc polycarboxylate is frequently associated with surgical complications, including skin necrosis, cannula detachment, and infection. Pink cement, although less reactive locally, contains a volatile hydrocarbon that can irritate the respiratory tract.
The use of dental cements that require reconstitution prior to application is relatively constraining as it involves multiple reagents, time-sensitive preparation, and prolonged drying times or UV-induced polymerization [5]. For ethical considerations, animal welfare, and efficient recovery, it is essential to select preparation methods that are as brief as possible to limit the duration of anesthesia. Finally, the polymerization of some cements can generate an exothermic reaction, releasing heat that may reach high temperatures. This thermal effect can lead to burns resulting in necrosis and gliosis (the proliferation of glial cells constituting the supporting tissue of the central nervous system), which remains a significant concern [4].
The protocol presented here describes a method for implanting an intracerebral cannula in mice. This device enables the direct infusion of therapeutic agents directly into the brain, or specifically into the site of a brain tumor that was previously initiated in the animal.
Materials and reagents
Biological materials
1. Balb/cj mice cadavers (Charles River, France)
2. Nod-scid gamma mice, females, 11–12 weeks old (Charles River, France)
3. U87-MG-Luc2 cells (ATCC, Manassas, Virginia, USA, ref: HTB14-LUC2TM)
Reagents
1. Buprenorphine (Vétergesic® 0.3 mg/mL) (Labiana Life Sciences, SA.N Barcelona, Spain)
2. Anti-inflammatory meloxicam (Metacam® 2 mg/mL) (Boehringer Ingelheim Animal Health France, Lyon, France)
3. Lidocaine hydrochloride 1% v/v (10 mg/mL) (Aspen France)
4. Ophthalmic gel (Vidisic®, 2 mg/g) (Dr Gerhard Mann Chem.-Pharm. Fabrik GmbH, Berlin, Germany)
5. Isoflurane (Isoflutek® 1,000 mg/g) (Laboratorios Karizoo, Barcelona, Spain)
6. Chlorhexidine digluconate soap (Clorexyderm® 4%) (MP Labo, Grasse, France)
7. Chlorhexidine digluconate solution diluted in water (Coditane® 50%) (Fraver sa, Kontich, Belgium)
8. Ethanol 70% (diluted in distilled water)
9. Phosphate buffered saline (PBS) (Gibco, catalog number: 392-034)
10. Minimum essential medium (MEM) (Gibco, catalog number: 31095-029)
11. Fetal bovine serum (FBS) (Gibco, catalog number: 10270106)
12. Penicillin-Streptomycin (10,000 U/mL) (Thermo Fisher, catalog number: 15140122)
13. Puromycin dihydrochloride (10 mg/mL) (Thermo Fisher, catalog number: A1113803)
14. TrypLETM Express Enzyme (1×), no phenol red (Thermo Fisher, catalog number: 12604013)
15. NaCl 0.9% (9 mg/mL) (Laboratories Sterop, Brussels, Belgium)
Equipment
1. Guide cannula-single/O.D.0. 48 mm-26G/pedestal 6 mm/3.5, autoclave up to 121 °C (C = 2.5MM, RWD®, catalog number: 62003)
2. Cap-single/O.D.0.30 mm/M3.5 (RWD®, catalog number: 62102, G2 = 0.5MM)
3. Dental cement G-Cem One kit, and provided Loctite (GC G-CEM ONETM, GC Europe NV)
4. Micro-CT scan (Brüker Skyscan, catalog number: 1276)
5. Mini-electric trimmer (Aesculap Schermaschinen® GmbH, catalog number: GT608, 004613)
6. Cotton swabs (Deltalab, Barcelona, Spain, catalog number: 300200)
7. Size 15 scalpel blades (Avantor, Radnor, PA, USA, catalog number: 233-0025)
8. Surgical scissors and forceps (Fine Science Tools, Heidelberg, Germany, catalog numbers: 14064-11, 91108-12)
9. Black marker
10. Microdrill (RWD®, catalog number: 78001)
11. Drill bits (RWD®, HM1008 0.8 mm, round tip, catalog number: 78042)
12. Thermostar temperature controller with heating pad included (RWD®, catalog number: 69026)
13. Standard digital stereotaxic frame with digital readout (RWD®, catalog number: 68803)
14. Anesthesia adaptor for 20–30 g mouse, tube with nosecone mask (RWD®, catalog number: 68077)
15. Standard probe holder, corner type, 0.3–1.5 mm (RWD®, catalog number: 68201)
16. Cannula holder (RWD®, catalog number: 68217)
17. Pair of 60° non-rupture ear bars for mouse (RWD®, catalog number: 68306)
18. Legato 130 single syringe (KD Scientific, Holliston, USA, order code: 788100)
19. Hamilton syringe 10 μL, 700 series with removable needle and 26s needle size, sharp tip (Merck, catalog number: 20697)
20. Hamilton needle, 32G needle size (Hamilton Company, catalog number: 32/51/3)
21. Suture thread 5/0 or 6/0 (VicrylTM)
22. Sterile surgical field (Lohmann & Rauscher, 45 × 75 cm sterile)
23. T75 flask (Sarstedt, catalog number: 833911002)
24. T175 flask (Sarstedt, catalog number: 833911)
Procedure
A. Animal analgesia
1. At least 20 min prior to surgery, administer a subcutaneous injection of Buprenorphine at a dose of 50 μg/kg to each mouse.
B. Animal anesthesia
1. Induce anesthesia by placing the mouse in an induction chamber saturated with 5% isoflurane delivered with an oxygen flow rate of 1.2 L/min.
2. Maintain anesthesia throughout the surgical procedure using 2%–2.5% isoflurane in oxygen at 1.2 L/min.
3. To prevent hypothermia, keep the mouse on a heating pad (approximately 39 °C) from the induction of anesthesia until the end of the surgery.
C. Asepsis
1. Shave the surface of the skull using a small electric trimmer.
2. Decontaminate the skin in three successive steps using cotton swabs soaked in a soapy solution of chlorhexidine digluconate (Clorexyderm® 4%), 70% ethanol, and a diluted disinfectant solution of chlorhexidine digluconate (Coditane® 50%).
3. Repeat the decontamination process by washing the skin three times with each of the above solutions in the same sequence.
D. Cell preparation and loading in the Hamilton syringe
1. Thaw U87-MG Luc2 cells from a vial of 10.106 cells in a T175 flask and let them to adhere and start proliferation for 2 days. Use MEM supplemented with FBS (10%), penicillin-streptomycin (10,000 U/mL), and puromycin (10 mg/mL).
2. Passage cells (P1) when they reach 90%–95% confluency in another T75 flask at a density of 800,000 cells.
3. For the passage, use TrypLETM after rinsing cells twice with PBS.
4. On the day of inoculation, rinse U87-MG Luc2 cells, detach them, wash, and resuspend in PBS at a concentration of 25,000 cells/μL.
5. Load a volume of 2 μL, corresponding to 50,000 cells, into a 10 μL Hamilton syringe mounted on the arm of the stereotaxic frame.
E. Positioning of the animal on the stereotaxic frame
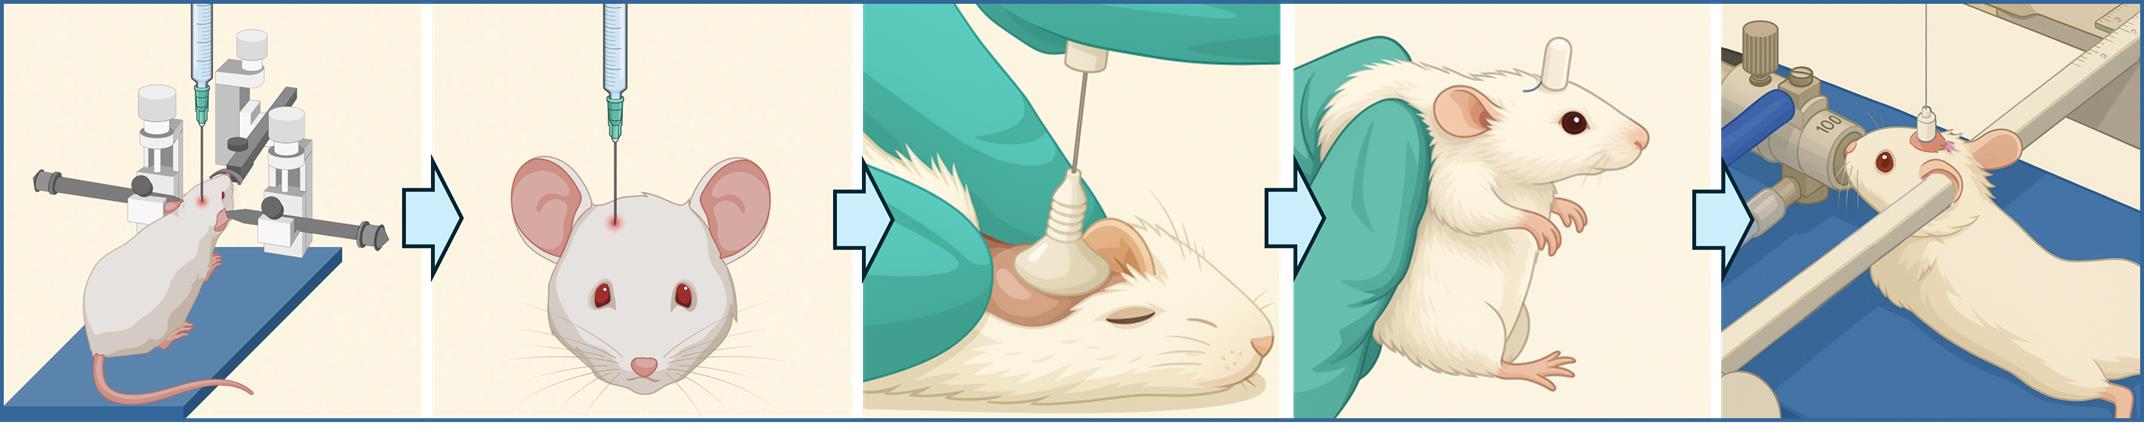
1. Secure the mouse’s head using a bite bar with an opening to accommodate the upper animal's incisors, along with ear bars positioned in each ear canal (Figure 1). A metal tube connected to the anesthetic gas inlet further stabilizes the head.
2. Once the animal is fully stabilized on the stereotaxic frame, apply an ophthalmic gel to the eyes to prevent corneal drying.
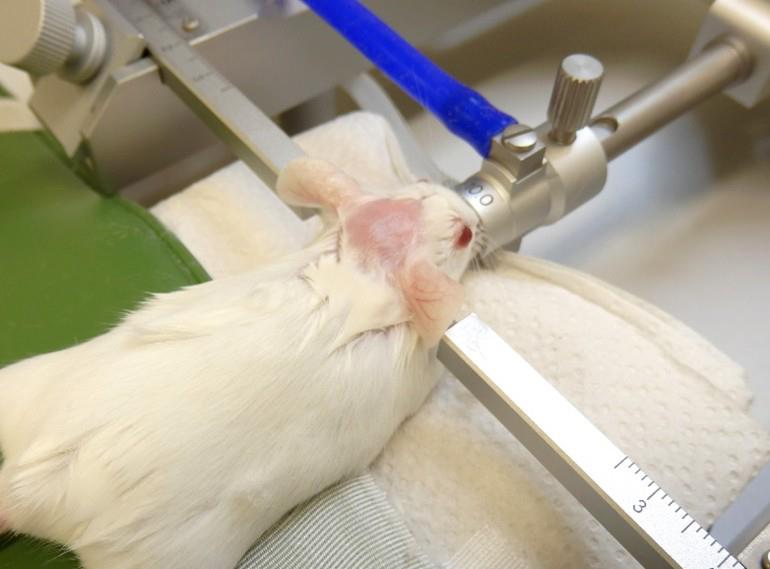
Figure 1. Positioning of the mouse on the stereotaxic frame. The incisors are secured in the opening of the bite bar, while the ear bars are positioned at the entrance of the ear canals to ensure stable head fixation throughout the procedure.
F. Access to the calvaria
1. Place a sterile surgical field over the animal's body, extending up to the base of the skull.
2. Make a ~1.5 cm midline incision in the scalp using a size 15 scalpel blade. If needed, the incision can be extended using fine surgical scissors.
G. Creation of the bone defect according to stereotaxic coordinates
1. Identify the bregma as the anatomical reference point for defect creation on the calvaria (Figure 2).
2. Position the tip of the Hamilton syringe precisely at the bregma.
3. From this reference, advance the needle based on the stereotaxic coordinates as described by Paxinos and Keith [6], moving 2 mm laterally to the right (X + 2) and 1 mm anteriorly (Y + 1) relative to the bregma.
4. Mark the resulting location with a black marker, approaching the needle tip, to indicate the site of the future defect. The needle can be raised slightly to facilitate access with the marker.
5. Remove the needle–syringe apparatus to clear access to the marked area.
6. Apply one drop of 1% lidocaine hydrochloride (10 mg/mL) to the marked area to achieve local anesthesia.
7. Using a 0.8 mm round-tip drill bit mounted on a microdrill, create a bone defect at the marked location on the calvaria.
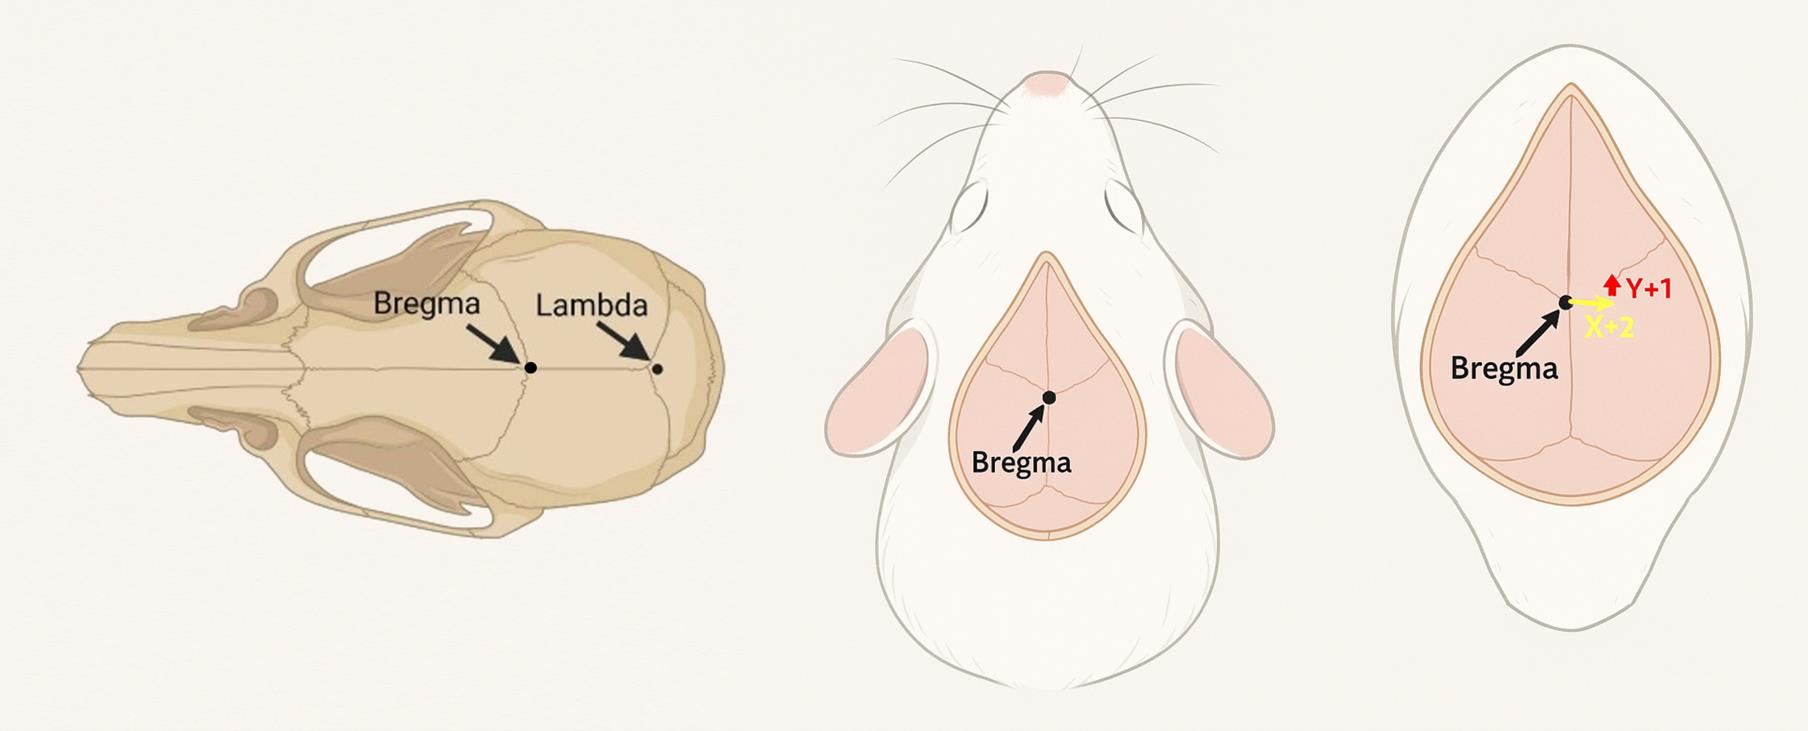
Figure 2. Dorsal view of the calvaria and stereotaxic coordinates. Bregma and lambda are two commonly used anatomical references in mice for stereotaxic procedures. In this protocol, the bregma served as the reference point to determine the coordinates. From this point, the target site to create a burr hole was identified by shifting 2 mm laterally to the right (X + 2) and 1 mm anteriorly (Y + 1) to allow needle insertion for tumor cell inoculation, followed by placement of the metal rod of the intracerebral cannula.
H. Injection in the tumoral environment
1. Carefully position the needle in contact with the brain surface and then slowly advance 3 mm deep into the brain tissue (Z-3). The descent must be performed gradually to minimize tissue damage and reduce the risk of hemorrhage. The appearance of a small drop of blood is not uncommon and can be controlled using cotton swabs.
2. Slowly inject a total volume of 2 μL of the cell suspension (containing 50,000 cells) at a controlled rate of 1 μL/min using a Legato 130 infusion pump (Figure 3, left).
3. Upon completion of the injection, carefully withdraw the needle at a slow and steady pace. Any resulting bleeding can be managed using sterile cotton swabs.
I. Implantation of the intracerebral cannula
1. Clean and dry the surface of the calvaria using cotton swabs. Use PBS if necessary.
2. Carefully apply an adhesive-enhancing primer from the G-Cem One kit around the bone defect to promote adhesion of the cement to the calvaria. Care must be taken to avoid any contact of the adhesive (loctite) with the defect itself, to prevent contact with brain tissue.
3. Unscrew the protective cap of the intracerebral cannula to remove it completely.
4. Mount the cannula on a dedicated cannula holder adapted to the stereotaxic frame (Figure 3, middle).
5. Gently insert the internal guide (metal part located beneath the plastic pedestal) into the intracerebral space through the burr hole until the plastic base encounters the surface of the calvaria. Hold the cannula in this position until it is fully secured.
6. Fix the cannula in place using the ready-to-use dental cement.
7. Remove the sealing cap on the cement syringe, which closes both compartments.
8. Gently apply the cement around the base of the cannula and onto the adjacent surface of the calvaria surface. The cement layer should not exceed the lower third of the cannula’s plastic pedestal to ensure that the cap can be properly screwed back on postoperatively.
9. Wait for 1–2 min to allow the cement to harden and maintain its shape. Keep the cannula secured with the holder during the entire drying period and until the skin is sutured, to ensure stability and prevent intracerebral damage (Figure 3, right).
10. Keep the cannula cap unscrewed during the recovery period to ensure complete drying of the cement and avoid dislodgement (Figure 4).
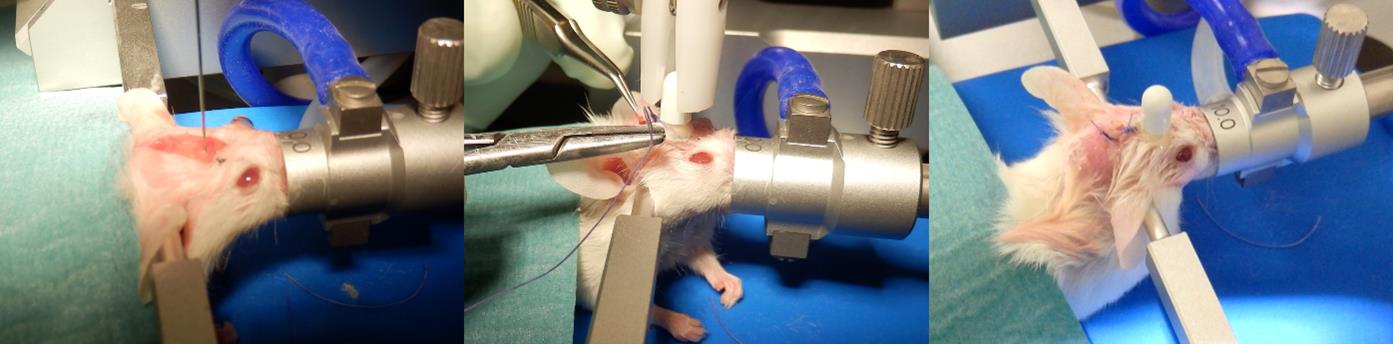
Figure 3. Illustration of surgery. (Left) Stereotaxic injection of tumor cells using a Hamilton syringe. (Middle) Positioning of the intracerebral cannula followed by cement application on the calvaria and final skin suturing. (Right) Completed suture with the cannula securely fixed on the skull.
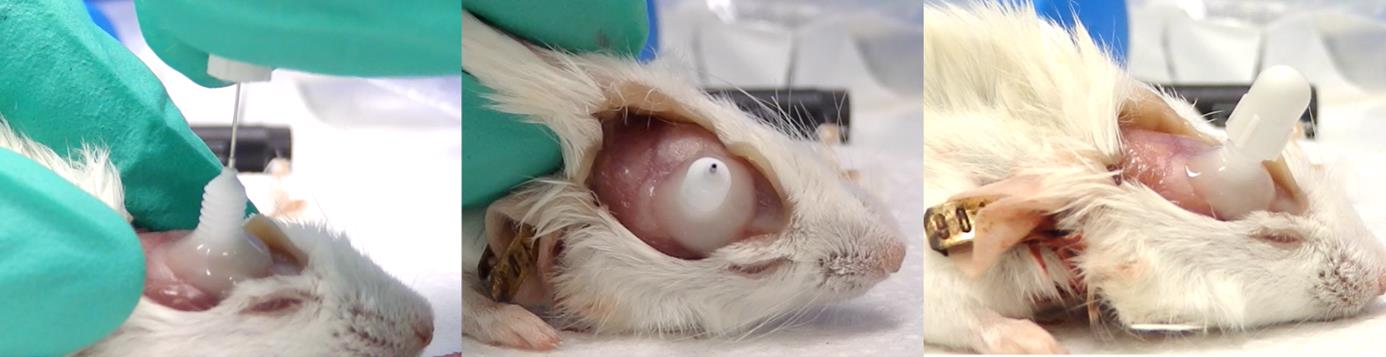
Figure 4. Cadaver representation of the cement construction to hold the intracerebral cannula. Cement is applied around and partially over the base of the cannula guide to ensure firm fixation to the calvaria. In this image, the skin has been incised and reflected to expose the full extent of the cement coverage. In live animals, the skin edges are repositioned and sutured around the cement structure, leaving only the cannula guide and its protective cap exposed.
J. Suture
1. Carefully approximate the skin edges on either side of the cannula and the cement structure. The skin partially covers the cement, while leaving the plastic base of the cannula fully accessible.
2. Make two simple interrupted sutures, one anterior and one posterior to the cannula. It will be sufficient to ensure proper closure of the skin. A 5/0 or 6/0 absorbable suture is appropriate, given the thinness of the skin in this region.
K. Animal wake-up and post-surgery care
1. Immediately after surgery, provide a subcutaneous injection of 500 μL of sterile NaCl 0.9% solution to each mouse and place them in a heated recovery chamber maintained at 38–39 °C until complete awakening.
2. Continuously monitor the animals’ condition throughout the recovery period to see if there are any signs of discomfort or pain.
3. Once the cement has fully hardened, screw the protective cap of the cannula back on to prevent contamination and ensure cannula integrity. However, it should not be fully tightened to avoid damaging the cement structure or the cannula itself.
4. Perform subcutaneous injection of buprenorphine at a dose of 50 μg/kg (once in the morning and once in the afternoon) for two days following surgery. The two injections must be spaced at least 4 h and no more than 6 h apart.
5. Proceed to an additional daily injection of the non-steroidal anti-inflammatory drug meloxicam at 5 mg/kg for 72 h following surgery.
6. Closely monitor animals for pain or distress and apply the predefined ethical endpoints to evaluate the need for euthanasia (Figure 5).
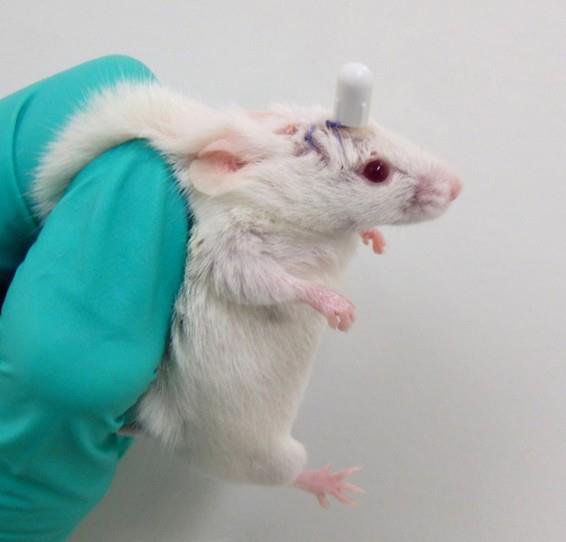
Figure 5. Postoperative observation of a mouse 24 h after intracerebral cannula implantation. The animal is shown the day following surgery, with the cannula firmly in place on the skull. The skin appears clean and properly sutured, and no signs of distress or postoperative complications are observed.
L. Infusions via intracerebral cannula
1. Anesthetize the mouse by placing it in an induction chamber saturated with 5% isoflurane delivered with an oxygen flow rate of 1.2 L/min.
2. Maintain anesthesia throughout the procedure using 2%–2.5% isoflurane in oxygen at a flow rate of 1.2 L/min
3. Secure the animal in a stereotaxic frame using a buccal bar (positioned to hold the incisors) and bilateral ear bars inserted into the ear canals. A metal tube connected to the anesthesia inlet helps stabilize the head further.
4. Apply an ophthalmic gel to both eyes to prevent corneal drying once the animal is properly positioned.
5. Carefully unscrew and remove the cannula cap of the cannula guide.
6. Load up to 10 µL of the cell suspension or treatment solution into a 10 μL Hamilton syringe mounted on the stereotaxic arm.
7. Position the needle at the entrance of the cannula guide and slowly lower it 12 mm into the brain (Z = -12). This depth includes the length of the cannula guide and the needle protrusion. The descent must be performed slowly to minimize tissue damage and bleeding (see General notes 2 and 3 and Figure 8).
8. Infuse the solution gradually at a rate of 1 µL/min using a Legato 130 infusion pump, not exceeding a total volume of 10 µL (Figure 6).
9. Following the infusion, slowly and carefully withdraw the needle. Minor bleeding may occur and can be managed using sterile cotton swabs.
10. Disinfect both the cannula guide and the cap with a cotton swab soaked in 70% ethanol.
11. Gently screw the cap back onto the guide, avoiding over-tightening to facilitate future access.
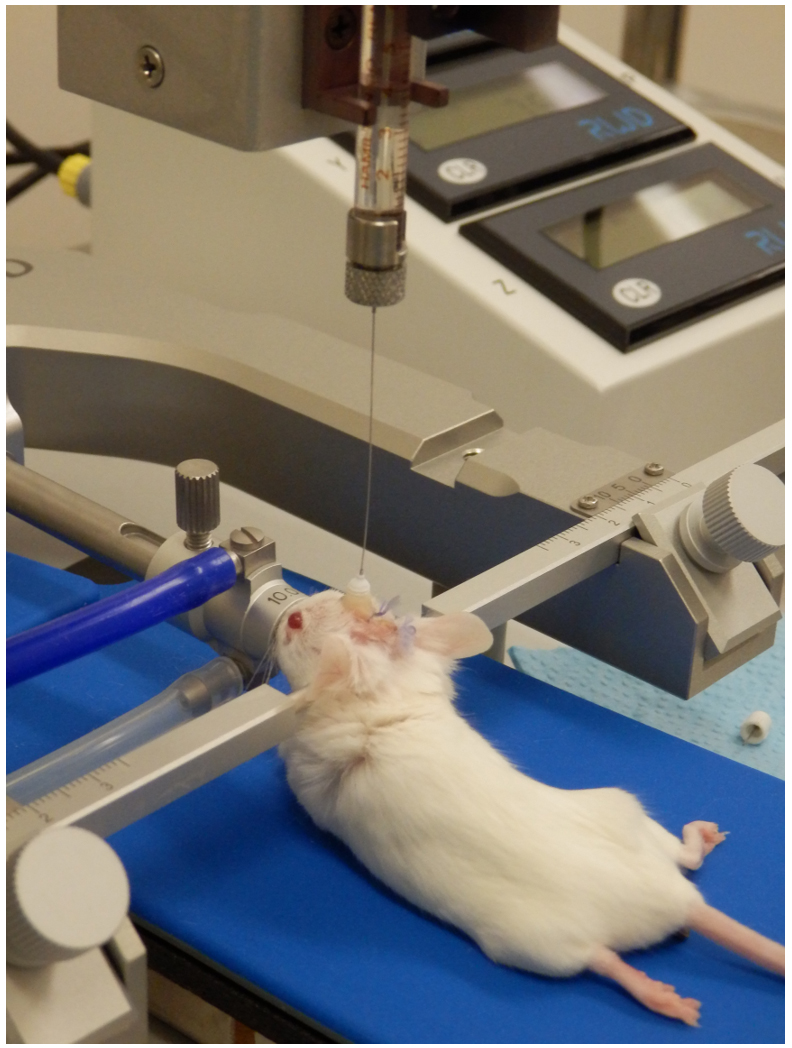
Figure 6. Intracerebral infusion through a cannula guide in a mouse. The image illustrates the positioning of the animal in the stereotaxic apparatus, the alignment of the Hamilton syringe needle with the cannula guide, and the gradual infusion of the treatment or cell suspension into the brain.
Validation of protocol
This protocol was validated several times in training mice, but also through a trial conducted on a cohort of 14 mice. For this trial, Nod-scid gamma female mice, aged 11–12 weeks, were inoculated with 50’000 U87-MG Luc2 cells, followed by the implantation of the intracerebral cannula. One week after cell inoculation, mice started four weeks of treatment, with two intra-cannula infusions per week, with mock PBS or cell-based item (ITEM) intended to limit cell dissemination and metastasis development. Figure 7 shows representative data obtained during the trial.
The 14 mice developed brain tumors, validating the inoculation procedure. At the end of the 5-week trial (one week for tumor engraftment, followed by four weeks of treatment), all surviving mice still had their cannula, which remained in very good condition. The cement was also still in place.
The model implemented enabled consistent and reliable cannula implantations, with a 100% success rate over four weeks implantation period. We did not assess the outcomes beyond this duration. However, based on the stability and integrity of the cannula and cap observed at the end of the four weeks, it is likely that the system could remain functional for several additional days—or even weeks—provided that sanitary conditions are rigorously maintained. It is important to note that any exposure of brain tissue, such as following the creation of a defect, carries a high risk of contamination, which can have severe consequences for the animal. While prophylactic antibiotic coverage may occasionally reduce the risk of infection, in specific pathogen-free (SPF) facilities, strict adherence to aseptic technique is generally sufficient. Moreover, avoiding antibiotics is preferable, when possible, particularly in preclinical studies, to minimize potential confounding effects on the therapeutic outcomes being investigated.
Since November 2024, the Federal Agency for Medicines and Health Products (FAMHP) has prohibited the preventive use of certain classes of antibiotics in animals, including companion animals, livestock, and laboratory animals. This regulation aligns with broader efforts aimed at refining and improving animal welfare. Moreover, prophylactic antibiotic use may interfere with experimental outcomes—particularly in studies involving immunotherapies—by altering the host's immune response. Consequently, rigorous aseptic techniques, combined with the use of sterilized instruments and a decontaminated environment, are essential for the success and reproducibility of this model. The approach described in this protocol effectively prevented any complications.
With respect to materials, the model's reliability and longevity validated our choices. The lightweight autoclavable cannulas proved advantageous for both animal welfare and sterility maintenance. Additionally, the cement used demonstrated excellent biocompatibility and was easy to apply and shape, contributing further to the success of the model.
Finally, the use of a heating pad during the asepsis and surgical procedures, in combination with a recovery incubator and gas anesthesia, played a key role in ensuring successful postoperative recovery. Hypothermia, commonly induced by chemical anesthesia and/or insufficient temperature regulation during surgery, is a well-known factor that can negatively affect recovery. Maintaining thermal support throughout the procedure is therefore essential to minimize physiological stress and improve postoperative outcomes.
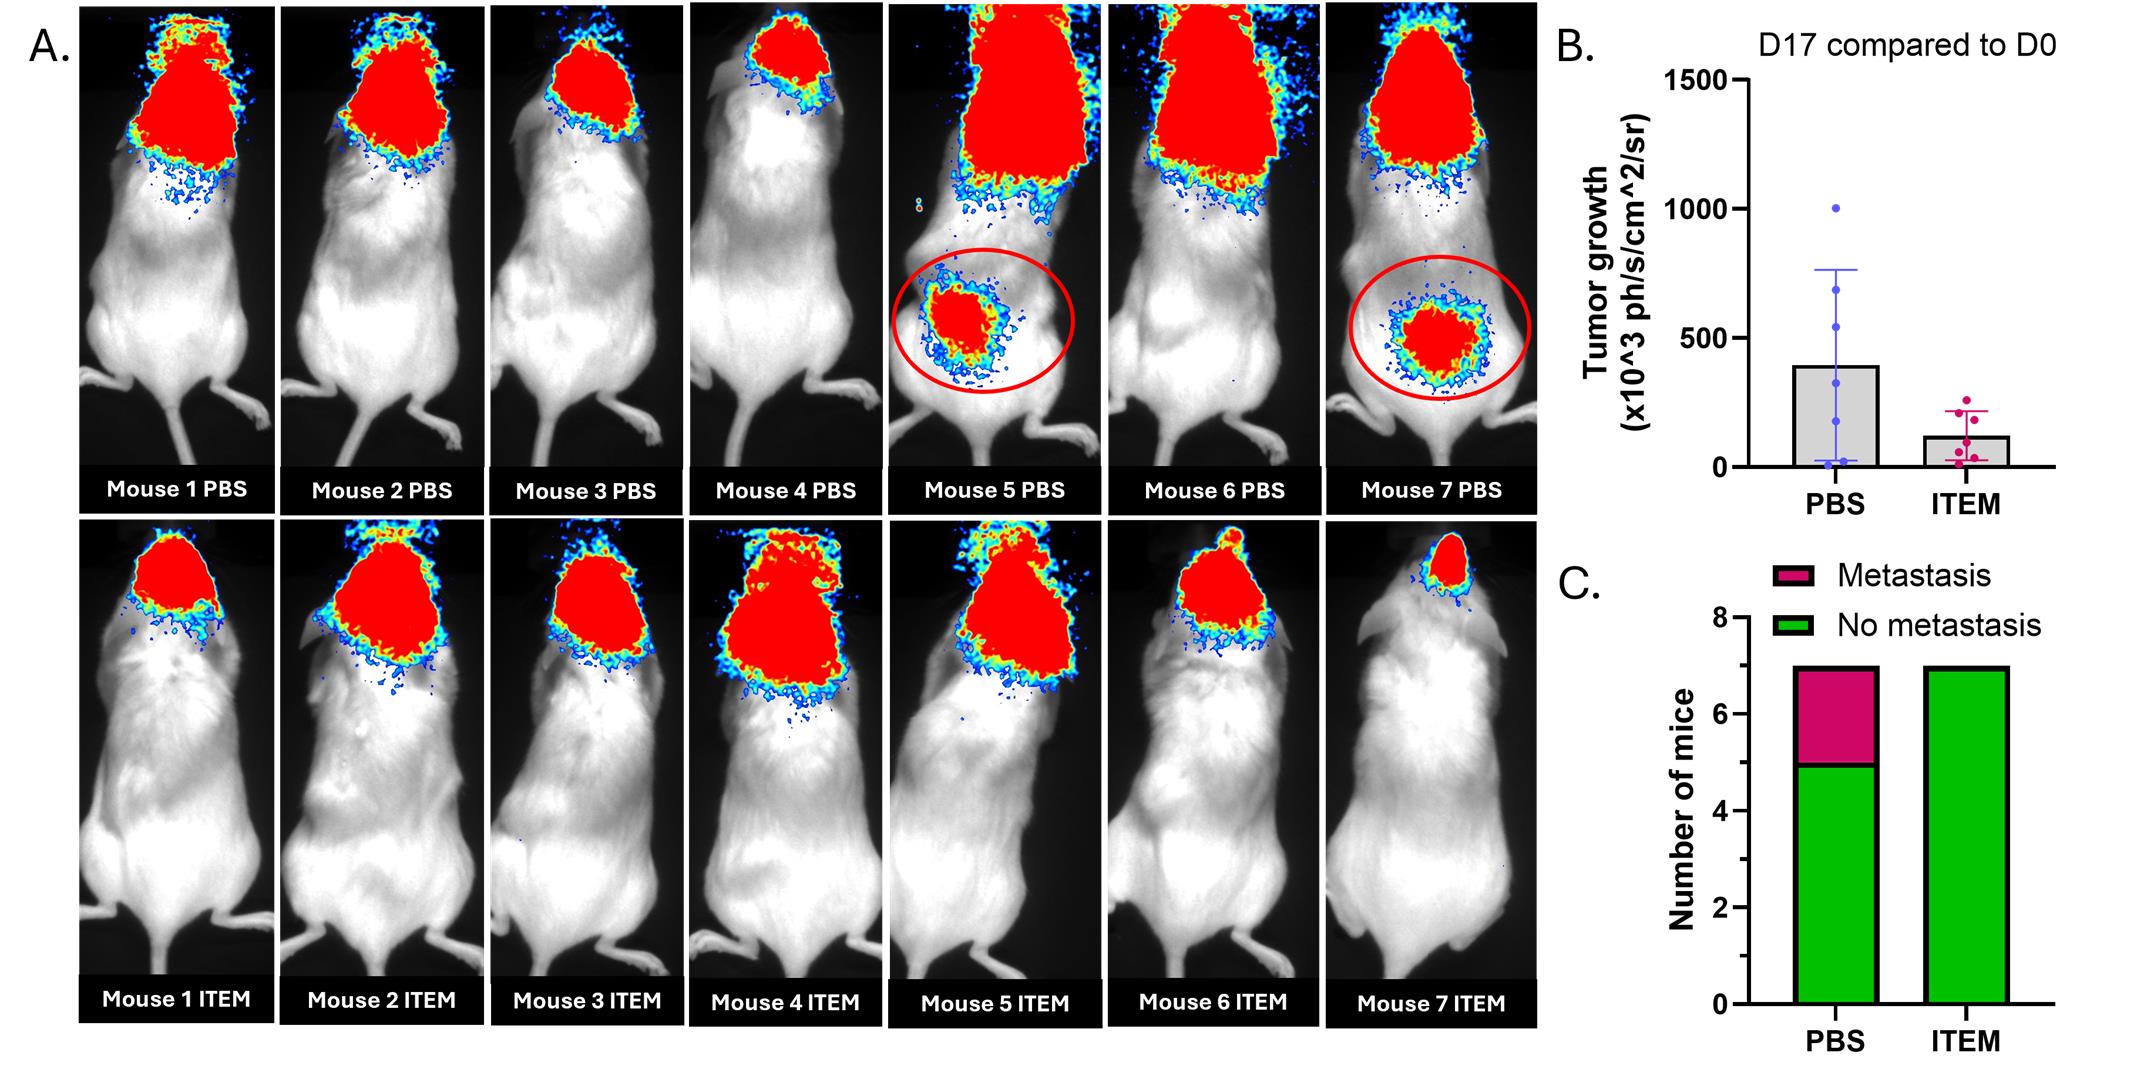
Figure 7. Results obtained in a cohort of Nod-scid mice. Fourteen Nod-scid gamma female mice, aged 11–12 weeks, were inoculated with 50’000 U87-MG Luc2 cells, followed by the implantation of an intracerebral cannula. One week after cell inoculation, mice were treated twice a week through intra-cannula infusion of either PBS or a cell-based item intended to limit cell extravasation (ITEM). (A) Representative dorsal view of mice on day 17 after cell inoculation. At this time, mice received three infusions of mock PBS. Among mice treated with PBS, two out of seven developed metastases in the dorsal region, suggesting co-localization with lymph nodes adjacent to the spinal cord. None of the mice treated with the test item developed metastasis. (B) Assessment of tumor growth, from day 0 to day 17, using bioluminescence-expressing U87-MG Luc2 cells in vivo. Results expressed as ×103 photons/s/cm2/steradian (mean ± SD). (C) Comparison of metastase occurrence in mice treated with mock PBS or the cell-based item (n = 7 per group).
General notes and troubleshooting
General notes
1. This method was developed in accordance with the principles of the 3Rs (Replacement, Refinement, and Reduction). To this end, all instruments and accessories were initially handled to become familiar with their use and optimal positioning. To refine the surgical approach to the calvaria—specifically the technique for skin incision (using scissors or a scalpel) and the creation of the bone defect (drill positioning, drill bit size, and appropriate depth to avoid brain injury)—preliminary tests were conducted on mouse cadavers. Once these procedural aspects were optimized, the implantation of a cannula and its fixation using biocompatible cement were also tested and refined.
2. The choice of material and the design of the intracerebral cannulas were critical aspects of the experimental setup. Plastic cannulas were preferred over metal ones due to their lighter weight, which helped minimize mechanical stress on the animal. Additionally, plastic is compatible with imaging techniques such as micro-CT or X-ray, as it does not generate artifacts. The selected plastic also needs to withstand effective sterilization procedures; an autoclavable material (up to 121 °C) was therefore deemed optimal. Cannulas from RWD® fulfilled these requirements, and the option for custom manufacturing was a significant advantage. The chosen model featured a pedestal length of 2.5 mm and an internal diameter corresponding to a 26G needle, aligning with the typical depth used for tumor cell inoculation in the murine striatal injection model [6]. The cannula cap included a metal tip designed to prevent guide obstruction. This tip extended 0.5 mm beyond the guide once the cap was in place, thus penetrating the intracerebral space by 0.5 mm when closed.
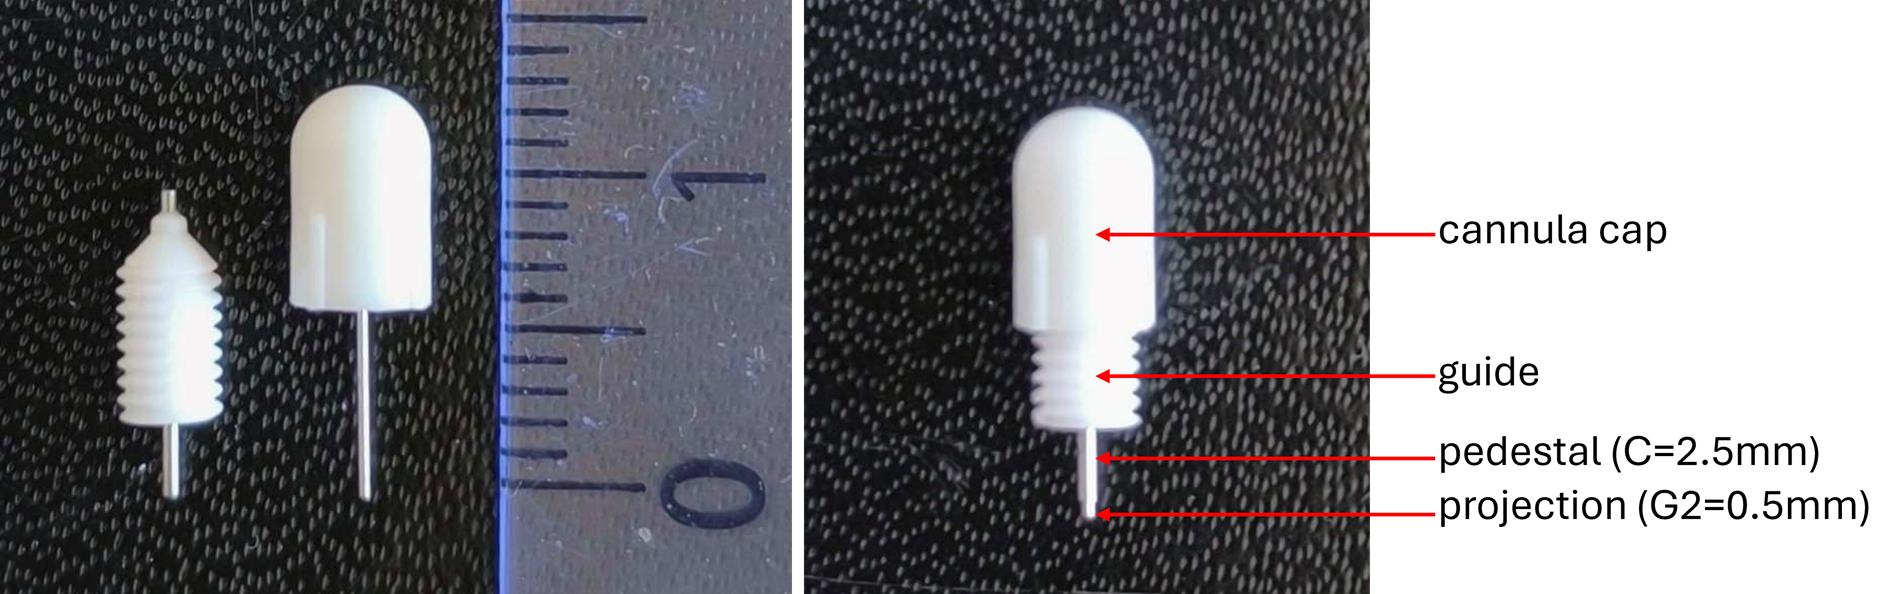
Figure 8. Illustration of an intracerebral cannula and its corresponding cap. The inner part of the cap is equipped with a screw thread, allowing it to be securely fastened onto the cannula once its hollow stem is inserted into the cannula guide.
3. The internal guide of the cannula is designed to accommodate either a needle for localized intracerebral injection or connection to a tubing system. In this study, a direct injection approach was used, whereby a needle was inserted through the cannula guide to reach the tumor site in the brain (Figure 9). As previously described, intracerebral pressure imposes strict volume limitations to avoid tissue damage; therefore, the injected volume was limited to 5 μL. Due to the narrow diameter of the cannula guide, Hamilton 32G needles were employed. Injections were performed at a controlled rate of 1 µL/min using an infusion pump. Mice were anesthetized with isoflurane and placed in a stereotaxic frame to ensure head stability. While maintaining anesthesia, the cannula cap was carefully removed, and the needle was introduced through the guide. The total length of the guide was approximately 10 mm. To ensure penetration into the brain parenchyma beyond the guide exit and to bypass any potential obstructions, the needle was advanced an additional 2 mm. The descent depth was calculated by first aligning the needle tip with the guide entry (once the cap was unscrewed), then lowering it precisely to a total depth of 12 mm using the stereotaxic manipulator.
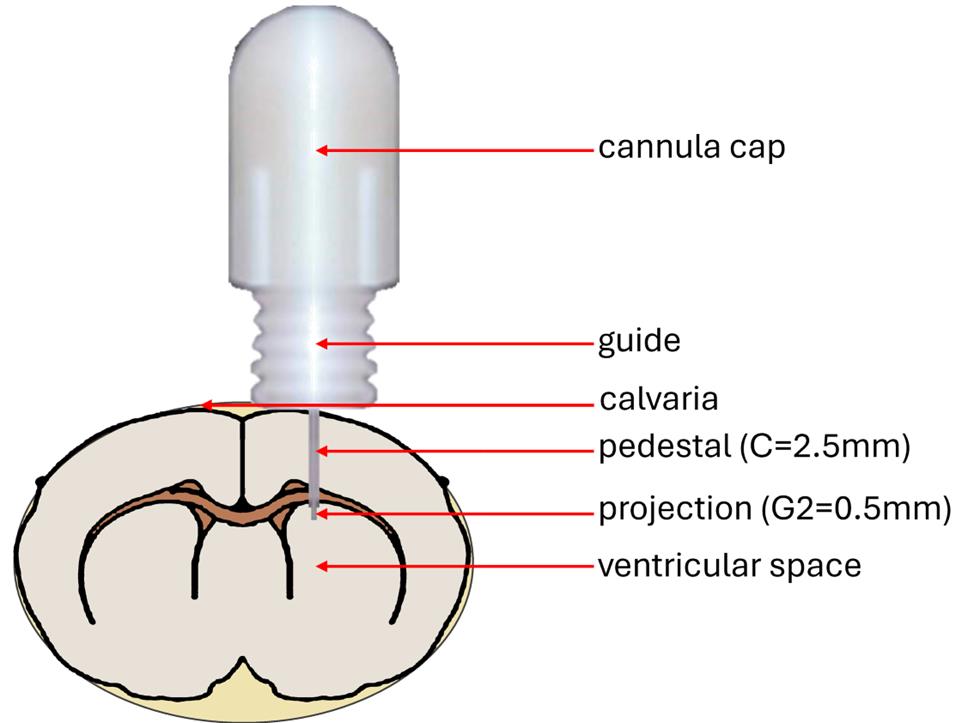
Figure 9. Schematic representation of intracerebral cannula placement in the mouse brain. The base of the cannula guide is positioned on the calvaria and secured with dental cement. The pedestal, along with the projecting portion of the hollow metal rod from the cap, extends into the intracranial space.
4. For cell inoculation, treatment delivery, or intracerebral cannula placement, a cranial defect must be created in the calvaria in a reproducible manner across animals. Anatomical landmarks on the skull surface, particularly the cranial sutures, are used to identify reference points such as the bregma and lambda. In most stereotaxic procedures, the bregma serves as the primary reference for determining coordinates. In this study, based on established murine brain atlases [6], the injection site targeting the right striatum was defined at coordinates X + 2 mm (lateral right) and Y + 1 mm (anterior) relative to the bregma. At this location, a cranial opening was created using a micro-drill fitted with a 0.8 mm diameter ball-head burr. If the bregma seems difficult to locate, it is possible to better visualize it using a magnifying glass, coupled with good lighting of the surface of the calvaria. Drying the surface of the calvaria (with alcohol solution) also allows the sutures of the skull to be better highlighted.
5. The cement selected had to fulfill specific criteria related to both practical use and animal welfare considerations, as follows: (1) This cement needed to be biocompatible, as it would be placed directly onto the calvaria and subsequently covered by the overlying scalp during suturing; (2) the cement was required to polymerize without the use of a curing lamp (UV or otherwise) and without generating heat, to prevent potential injury to the brain, skull, or surrounding tissues; (3) the cement needed to be easy to handle and usable without requiring any specialized instruments for its preparation or application. During initial tests on cadavers, the cement recommended by Agterberg et al. [4] was used (Fuji Plus capsules, Dental Addict, catalog number: 12–135). However, these tests proved inconclusive, as the capsules required a specific metal clamp to hold them in place during cement application around the cannula. Moreover, the capsule components (powder and liquid) required vigorous mixing using a specialized device to achieve proper homogenization. In addition, to reduce the risk of contamination and infection, the cement needed to be sterile and packaged in a format compatible with standard decontamination procedures (e.g., exposure to alcohol, UV light, or hydrogen peroxide). These criteria could not be met with the capsule system proposed by Agterberg et al. [4]. Given these limitations, we opted for an alternative product: G-Cem One, a self-adhesive resin cement supplied in a dual-barrel syringe (Figure 10). Mixing occurs automatically upon activation of the plunger, as the two components are blended within a helical mixing tip. Adhesion to the calvaria is enhanced by the prior application of a loctite-type bonding agent (included in the G-CEM One kit), applied with a brush. The cement’s high viscosity prevents premature spreading during extrusion, allowing for controlled and precise application around the cannula. Its polymerization is rapid (typically within 1–2 min) and does not require external activation. G-Cem One is widely used in dental practice for temporary tooth restorations in humans, thus ensuring both biocompatibility and sterility within the syringe system.
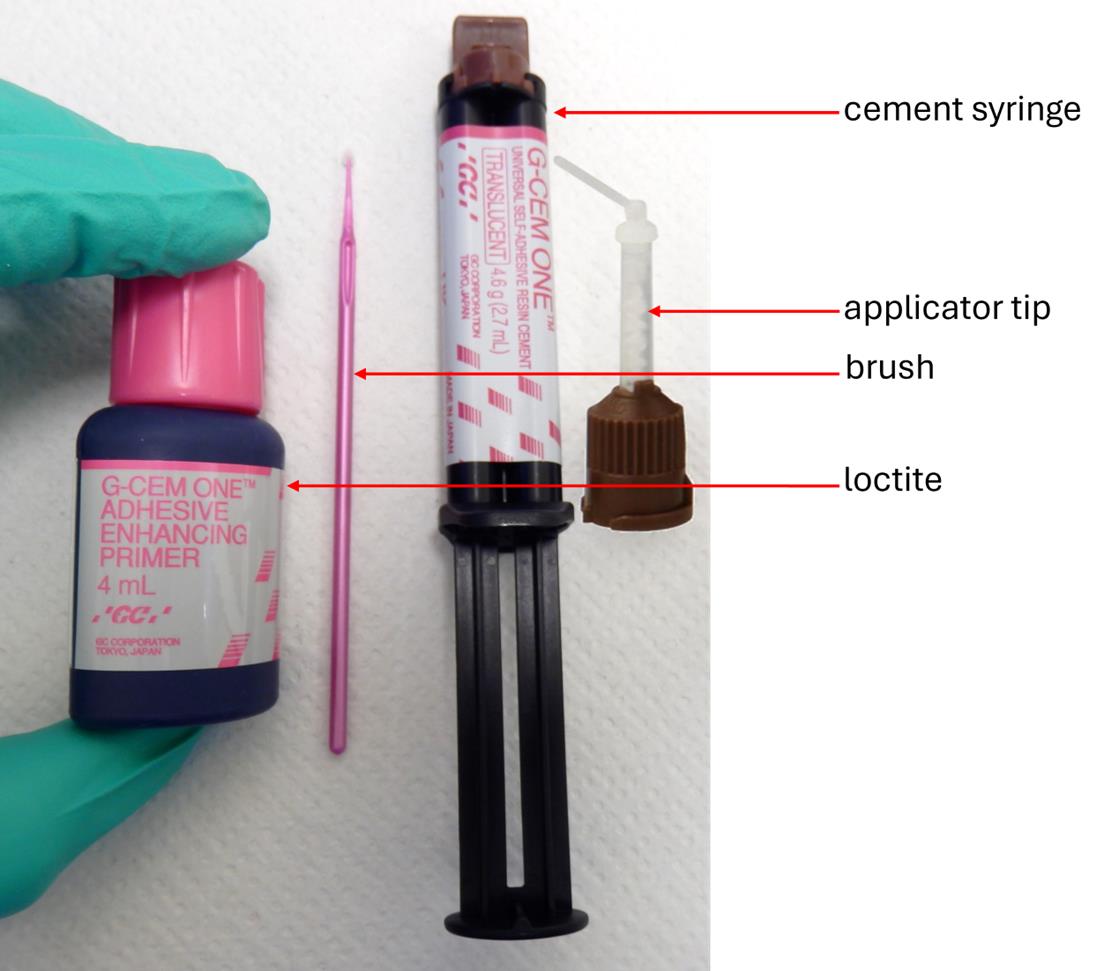
Figure 10. Components of the G-Cem One Cement kit. This kit includes a bottle of loctite adhesive, used to secure the cement between the calvaria and the base of the cannula guide. A small brush is provided for applying the adhesive uniformly over the calvaria prior to cement placement. The dual-chamber syringe contains two separate pastes, which are brought into contact and mixed within the helical section of the applicator tip upon activation of the plunger. This process yields a homogenous, ready-to-use cement that can be easily applied to the mouse’s skull.
6. Cannula implantation and fixation using G-Cem One cement were validated on several cadavers of 6–8-week-old Balb/cJ mice. To assess intracerebral placement, the heads of two mice were excised and imaged using X-ray micro-computed tomography (Figure 11).
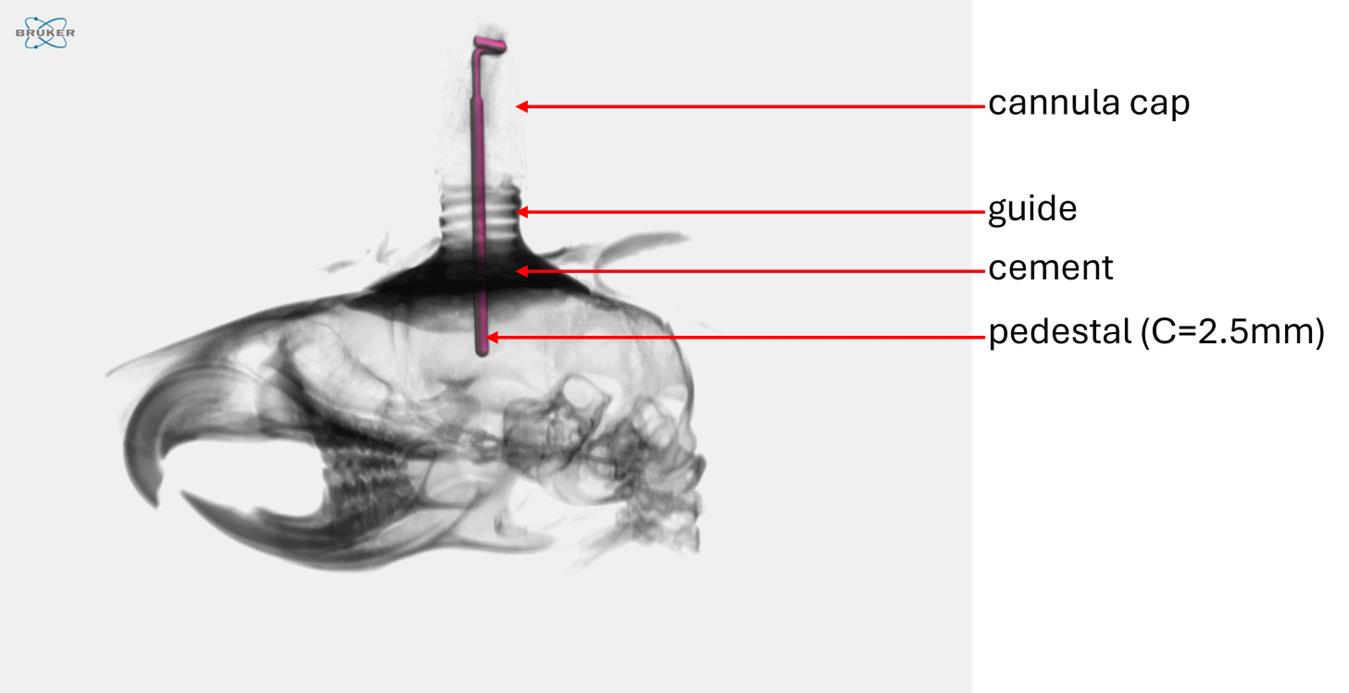
Figure 11. Micro-CT imaging of a mouse cadaver head with an implanted intracerebral cannula. Mouse cadavers were used during the development phase to refine the surgical procedure and optimize tool usage. Micro-CT imaging allowed visualization of the intracranial positioning of the cannula’s internal segment.
7. Maintaining a sterile working environment is critical to the success of the surgical procedure and to minimize postoperative complications. During this intervention, the intracerebral barrier is breached following the creation of calvaria defects, thereby exposing the brain tissue to the external environment. To reduce the risk of infection and promote optimal postoperative recovery, thorough decontamination of the operating room, surgical instruments, and accessories is strongly recommended. Accordingly, all instruments were placed in the surgical room and decontaminated by spraying with hydrogen peroxide (H2O2). Surgical instruments, including forceps and scissors, as well as cannulas and their caps, were sterilized by autoclaving. Syringes used for cement application and their plastic tips were exposed to UV light for decontamination.
8. U87-MG cells are widely used in glioblastoma models. Indeed, they have many advantages (rapid growth, high vascularization, absence of core necrosis…). These cells make it possible to study many characteristics of glioblastoma and to test treatments [7]. However, U87-MG cells form large, well-defined tumors surrounded by a collagen-rich layer, compared to other cell lines, such as U251, which are more infiltrative and more representative of the reality observed in humans [7,8]. Given that their growth is fast, it is important to monitor mice at least once daily to check for their appearance (clinical signs) and behavior. Indeed, the progressive pressure applied by the tumor on the surrounding brain tissue can trigger the appearance of specific signs in rodents, such as motor decline, ataxia, head tilt, disorientation, seizure, or sometimes rotating/circling behavior [9,10]. Bodyweight is also a good indicator of mouse wellness, and they rapidly lose weight when the tumor is increasing in the brain. Tumor evolution must also be controlled at least once a week by bioluminescence [7]. Depending on the number of cells inoculated, the median survival of mice is 3–5 weeks [11].
9. The presence of an intracerebral cannula necessitates specific adaptations to the mouse’s housing. As the cannula is made of plastic, it represents a foreign element that may attract the attention of cage mates, become an object of curiosity, and potentially lead to gnawing behavior. To prevent damage and preserve cannula integrity, the mice are housed individually following surgery. While a mouse may scratch at the surgical site due to irritation from the sutures, it is unlikely to bite its own cannula. However, accidental collisions with cage structures or entanglement of the cannula may occur, posing a risk of severe brain injury. To mitigate this, plastic enrichment tunnels are replaced with cardboard shelters featuring enlarged openings, allowing easy access while maintaining environmental enrichment. Furthermore, during the postoperative period, it is essential to regularly verify that the protective cap remains securely fastened to the cannula. The mouse may inadvertently unscrew the cap while grooming or scratching its head. In case of loss, the cap should be replaced with a sterile one to ensure proper sealing of the cannula guide and to protect the intracerebral environment.
10. Freshly thawed cells intended for inoculation must be cultured and passed at least once prior to use. To ensure optimal viability and engraftment efficiency, cells should be in the exponential growth phase and not allowed to reach confluency before detachment. During the inoculation procedure in mice, cell suspensions can be maintained at room temperature, preferably over storage on ice, to preserve cell viability. Due to the high cell density (25,000 cells/µL), the suspension must be gently homogenized between injections by pipetting up and down to prevent sedimentation and ensure consistent dosing. The inoculation volume should be limited to 2–3 µL, as the brain parenchyma represents a confined and pressurized environment. Between two injections, the syringe needle can be briefly rinsed in PBS, followed by a superficial cleaning with 70% ethanol (by dipping the needle tip only, without aspirating the ethanol), to reduce the risk of contamination while preserving needle integrity.
Troubleshooting
Problem 1: Loss of cannula cap after implantation.
Possible cause: Grooming or scratching behavior by the mouse.
Solution: Replace the lost cap with a new sterile one. Reusing a cap that has fallen into the cage is not recommended, as it may introduce contaminants into the cannula guide, increasing the risk of infection and inflammation.
Problem 2: Clogging of the cannula guide.
Possible cause: Presence of blood within the guide, for example, following an intracerebral infusion.
Solution: Rinse the cannula guide using a PBS solution supplemented with heparin to prevent clot formation and restore patency.
Problem 3: Difficulty unscrewing the cannula cap at the time of infusion.
Possible cause: The cap was overtightened during or after surgery.
Solution: Avoid excessive tightening of the cap during implantation. Perform routine checks to ensure the cap remains properly positioned without being too tight, to facilitate future access and minimize handling stress.
Acknowledgments
The authors thank RWD® for providing high-quality surgical instruments as well as for the on-site demonstration of the stereotaxic frame. They also acknowledge GC Europe NV for their valuable recommendations regarding the selection of an appropriate dental cement.
This protocol was further refined based on the expertise and experience of Andrée Lapierre, who is also a contributing author of this work. The graphical abstract was created using Biorender.com. Created in BioRender. IT, S. (2025) https://BioRender.com/ynkkrrv and ChatGPT for adaptation from real pictures.
This protocol was adapted from a French version of our work published in STAL review (Henry et al, 2025) [12].
Competing interests
The authors declare no conflicts of interest.
Ethical considerations
PS-2024-NOV-006: Pilot study and surgery for the placement of a cannula in the cerebral ventricle in mice. Application accepted on April 25, 2024.
CE_BIOTEC_A_12V03: Evaluation of the efficacy of therapeutic or prophylactic molecules in mice or rats in a tumor cell injection model. Application accepted on March 21, 2024.
References
- Panorama of cancers in France – Edition 2024 – Edited by Institute national of cancer (INCa). https://www.cancer.fr/catalogue-des-publications/panorama-des-cancers-en-france-edition-2024
- Belgian, Cancer Registry, consulted in February 2025. https://kankerregister.org/fr
- Harvey, K., Madsen, P. J., Smith, T., Griffin, C., Patterson, L., Vitanza, N. A., Storm, P. B., Resnick, A. C. and Foster, J. B. (2023). Intracranial Cannula Implantation for Serial Locoregional Chimeric Antigen Receptor (CAR) T Cell Infusions in Mice. J Visualized Exp. 192: e3791/64886. https://doi.org/10.3791/64886
- Agterberg, M. J. H., Spoelstra, E. N., Van Der Wijst, S., Brakkee, J. H., Wiegant, V. M., Hamelink, R., Brouns, K., Westerink, B. H. and Remie, R. (2010). Evaluation of temperature rise and bonding strength in cements used for permanent head attachments in rats and mice. Lab Anim. 44(3): 264–270. https://doi.org/10.1258/la.2010.009083
- Sike, Ã., Wengenroth, J., Upīte, J., Brüning, T., Eiriz, I., Sántha, P., Biverstål, H., Jansone, B., Haugen, H. J., Krohn, M., et al. (2017). Improved method for cannula fixation for long-term intracerebral brain infusion. J Neurosci Methods. 290: 145–150. https://doi.org/10.1016/j.jneumeth.2017.07.026
- Paxinos, G. and Keith B.J. F. (2001). The mouse brain in stereotaxic coordinates: hard cover edition. Access Online via Elsevier. Online tool developed by Matt Gaidica. https://labs.gaidi.ca/mouse-brain-atlas/
- Schulz, J. A., Rodgers, L. T., Kryscio, R. J., Hartz, A. M. and Bauer, B. (2022). Characterization and comparison of human glioblastoma models. BMC Cancer. 22(1): e1186/s12885–022–09910–9. https://doi.org/10.1186/s12885-022-09910-9
- Pointer, K. B., Clark, P. A., Schroeder, A. B., Salamat, M. S., Eliceiri, K. W. and Kuo, J. S. (2016). Association of collagen architecture with glioblastoma patient survival. J Neurosurg. 126(6): 1812–1821. https://doi.org/10.3171/2016.6.jns152797
- Vannini, E., Maltese, F., Olimpico, F., Fabbri, A., Costa, M., Caleo, M. and Baroncelli, L. (2017). Progression of motor deficits in glioma-bearing mice: impact of CNF1 therapy at symptomatic stages. Oncotarget. 8(14): 23539–23550. https://doi.org/10.18632/oncotarget.15328
- Helgers, S. O. A., Talbot, S. R., Riedesel, A. K., Wassermann, L., Wu, Z., Krauss, J. K., Häger, C., Bleich, A. and Schwabe, K. (2020). Body weight algorithm predicts humane endpoint in an intracranial rat glioma model. Sci Rep. 10(1): e1038/s41598–020–65783–7. https://doi.org/10.1038/s41598-020-65783-7
- Candolfi, M., Curtin, J. F., Nichols, W. S., Muhammad, A. G., King, G. D., Pluhar, G. E., McNiel, E. A., Ohlfest, J. R., Freese, A. B., Moore, P. F., et al. (2007). Intracranial glioblastoma models in preclinical neuro-oncology: neuropathological characterization and tumor progression. J Neuro-Oncol. 85(2): 133–148. https://doi.org/10.1007/s11060-007-9400-9
- Henry A., Stordeur P., Lapierre A., Lefevre M., Dehuy M., Noelanders M., Mottart C., Buttenaers C., Delincé L., Destiné S., Stoquart V., Etienne Q., Nijskens C. and Thirion G. (2023). Développement d’un modèle d’implantation de canule intracérébrale chez la souris permettant la délivrance sériée de produits thérapeutiques dans l’environnement cérébral. STAL Revue des Sciences et Techniques de l’Animal de Laboratoire. 54(3): 13–21.
Article Information
Publication history
Received: Aug 27, 2025
Accepted: Oct 8, 2025
Available online: Oct 22, 2025
Published: Nov 20, 2025
Copyright
© 2025 The Author(s); This is an open access article under the CC BY-NC license (https://creativecommons.org/licenses/by-nc/4.0/).
How to cite
Henry, A., Stordeur, P., Lapierre, A., Buttenaers, C., Lefevre, M., Noelanders, M., Mottart, C., Delincé, L., Destiné, S., Etienne, Q., Nijskens, C., Filee, P. and Thirion, G. (2025). Intracerebral Cannula Implantation in Mouse: A Proposed Method to Assess Glioblastoma Invasiveness and Serial Locoregional Treatment. Bio-protocol 15(22): e5503. DOI: 10.21769/BioProtoc.5503.
Category
Neuroscience > Nervous system disorders > Brain tumor > Glioblastoma multiforme
Cancer Biology > Invasion & metastasis > Cancer therapy
Do you have any questions about this protocol?
Post your question to gather feedback from the community. We will also invite the authors of this article to respond.