- Protocols

- Articles and Issues
- For Authors
- About
- Become a Reviewer

Spheroid Sheets: A Scalable Platform for Producing Tissue Membrane Constructs
(§ Technical contact) Published: Vol 15, Iss 22, Nov 20, 2025 DOI: 10.21769/BioProtoc.5501 Views: 1540
Reviewed by: Elena A. OstrakhovitchAnonymous reviewer(s)
Original research article
The authors used this protocol in:
Apr 2025

Protocol Collections
Comprehensive collections of detailed, peer-reviewed protocols focusing on specific topics


Related protocols
Abstract
Bottom-up tissue engineering using cell spheroids offers many advantages in recapitulating native cell–cell and cell–matrix interactions. Many tissues, such as cartilage, bone, cardiac muscle, intestine, and neural tissues, have been tissue-engineered using cell spheroids. However, previous methods for spheroid assembling, such as mold casting, hydrogel-based bioprinting, or needle array, either lack control over final tissue geometry or face challenges in scalability and throughput. In this protocol, we describe a robust and scalable tissue engineering method for assembling cell spheroids into a thin, planar spheroid sheet. The spheroids are sandwiched between two flexible meshes held by a frame, facilitating uniform spheroid fusion while ensuring nutrient exchange and ease of handling. We demonstrate this method by producing thin cartilage tissue from human mesenchymal stem cells undergoing chondrogenic differentiation. This approach offers a practical platform for producing thin membrane-like tissue constructs for many research and therapeutic applications.
Key features
• Spheroid-based tissue engineering: Utilizing cell spheroids to build various membrane-like tissues.
• Controlled tissue thickness: Frame and mesh constrain thickness and guide lateral fusion of spheroids, enabling uniform and thin tissue for efficient nutrient diffusion.
• Scaffold-free construct: After the thin tissue membrane is formed, the frame and mesh can be removed.
• Mechanical support: Meshes enable easy handling and can aid in transplantation of the constructs, for example, by allowing them to be wrapped or sutured.
Keywords: Cell spheroidsGraphical overview
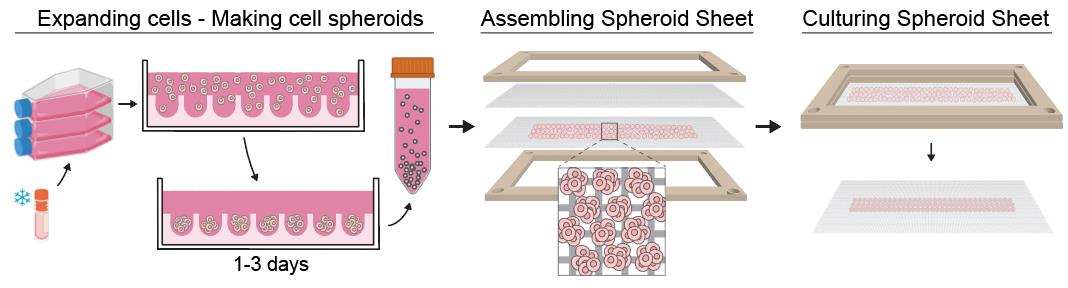
Workflow for producing a spheroid sheet. Cell spheroids of a specific size are made using microwell plates. Next, the spheroids are harvested and seeded in a thin homogenous layer on a mesh, followed by placement of a second mesh to sandwich the spheroids in between. The two meshes are secured using a frame, which maintains the assembly during in vitro culture. Spheroids fuse laterally into a thin tissue, allowing efficient nutrient and growth factor diffusion during culture.
Background
Tissue engineering (TE) is an interdisciplinary field that aims to grow functional tissue constructs in the laboratory for the repair, replacement, or enhancement of damaged tissue or organs in human patients. Within TE, two broad strategies are commonly employed. The top-down approach involves seeding cells, often single cells, onto a biomimetic scaffold, which is designed to mimic key structural and mechanical features of the target tissue. In contrast, the bottom-up approach assembles tissues from modular building blocks, such as cell spheroids, leveraging their self-assembly to form larger and more complex tissue constructs [1].
Three main methods for assembling cell spheroids have been described in the literature: (i) placing spheroids in contact within a mold (mold-based assembly), (ii) bioprinting with spheroids or positioning spheroids within a hydrogel matrix using bioprinting (hydrogel-assisted bioprinting), and (iii) physically securing spheroids on a fine needle array (Kenzan method) [2,3]. The mold-based approach is most common but often fails to achieve the intended size and shape of the tissue construct due to uncontrolled fusion of the spheroids into a larger mass [4]. Hydrogel-assisted bioprinting allows precise placement but can reduce direct spheroid-spheroid contact, leading to incomplete fusion. The Kenzan method is an elegant technique, but its throughput and scalability are limited [5].
Our spheroid assembly method involves using two meshes to constrain the cell spheroids within a thin layer, facilitating their fusion into a membrane-like tissue, which we term a spheroid sheet [6]. A rigid frame keeps the spheroid sheet flat and thin during culture. By maintaining a thin layer, we enhance the diffusion of medium and growth factors, thereby promoting the formation of a thin and uniform tissue membrane. The mesh should be made of bioinert material to promote spheroid self-assembly, be mechanically strong to be kept under tension during culture, and be highly porous for optimal diffusion.
This protocol describes detailed steps for making cartilage tissue membranes from human mesenchymal stem cell (hMSC) spheroids undergoing chondrogenic differentiation in vitro. Researchers can adapt this spheroid sheet protocol by using other cell types and differentiation media to produce a variety of tissue types with the thin membrane form factor.
Materials and reagents
Biological materials
Human mesenchymal stem cells (hMSC) can be purchased from cell banks such as Lonza (catalog number: PT-2501), PromoCell (catalog number: C-12977), or RoosterBio (catalog number: MSC-031). hMSCs can be derived from either bone marrow, adipose, or umbilical cord tissue. Researchers should obtain a certificate of analysis from the cell bank, showing successful trilineage differentiation for the purchased lot of hMSCs.
Reagents
1. Sodium phosphate dibasic (Sigma-Aldrich, Merck, catalog number: 255793)
2. Heparin sodium salt from porcine intestinal mucosa (Sigma-Aldrich, Merck, catalog number: H3149)
3. Bovine serum albumin (BSA) (Sigma-Aldrich, Merck, catalog number: A9418)
4. Human FGF-acidic (FGF-1) protein (Thermo Fisher Scientific, catalog number: 100-17A-500)
5. Citric acid (Sigma-Aldrich, Merck, catalog number: C2404)
6. 2-Phospho-L-ascorbic acid trisodium salt (ascorbic acid) (Sigma-Aldrich, Merck, catalog number: 49752)
7. L-Proline (Sigma-Aldrich, Merck, catalog number: P5607)
8. Dexamethasone (Sigma-Aldrich, Merck, catalog number: D4902)
9. Human TGF-beta 1 (TGF-β1) protein (Thermo Fisher Scientific, catalog number: 100-21-500)
10. DPBS, no calcium, no magnesium (Thermo Fisher Scientific, Gibco, catalog number: 14190144)
11. TrypLE Express enzyme (1×), no phenol red (Thermo Fisher Scientific, Gibco, catalog number: 12604013)
12. Fetal bovine serum (FBS) (Thermo Fisher Scientific, Gibco, catalog number: A3160502)
13. Penicillin-streptomycin (Thermo Fisher Scientific, Gibco, catalog number: 15140122)
14. DMEM, low glucose (Thermo Fisher Scientific, Gibco, catalog number: 10567014)
15. DMEM, high glucose (Thermo Fisher Scientific, Gibco, catalog number: 10569010)
16. Insulin-transferrin-selenium-ethanolamine (ITS-X) (Thermo Fisher Scientific, Gibco, catalog number: 51500056)
Solutions
1. Expansion medium for hMSCs (see Recipes)
a. FGF-heparin (1,000×) stock
2. Chondrogenic medium for hMSCs (see Recipes)
a. Ascorbic acid (500×) stock
b. Proline (1,000×) stock
c. Dexamethasone (1,000×) stock
d. TGF-β1 (1,000×) stock
Recipes
1. Expansion medium for hMSCs
| Reagent | Final concentration | Volume |
|---|---|---|
| DMEM, low glucose | n/a | 500 mL |
| Penicillin-streptomycin | Penicillin 90 U/mL; streptomycin 90 μg/mL | 5 mL |
| FBS | 9% (v/v) | 50 mL |
| FGF-heparin (1,000×) (see below) | [FGF-1] = 9 ng/mL; [heparin] = 4.5 μg/mL | 0.5 mL |
a. FGF-heparin (1,000×) stock
| Step | Reagent and amount | Concentration | Procedure note |
| 1. Prepare sodium phosphate buffer | 3.55 mg of sodium phosphate dibasic + 5 mL of distilled water | [Na2HPO4] = 5 mM | Adjust pH to 8.0, filter through a 0.22 μm filter |
| 2. Prepare heparin-BSA buffer | 250 mg of heparin + 50 mg of BSA + 50 mL of DPBS | [Heparin] = 5 mg/mL, [BSA] = 0.1% w/v | Filter through a 0.22 μm filter |
| 3. Dissolve FGF-1 with sodium phosphate buffer | 1 mL of sodium phosphate buffer + FGF-1 (500 μg) | [FGF-1] = 500 μg/mL in Na2HPO4 | Aseptically add 1 mL of Na2HPO4 to the FGF-1 vial (500 μg) and pipette to completely dissolve the powder |
| 4. Dilute FGF-1 with heparin-BSA buffer; aliquot | 1 mL of FGF-1 (500 μg/mL) + 49 mL of heparin-BSA buffer | [FGF-1] = 10 μg/mL, [heparin] = ~5 mg/mL | Mix thoroughly and rest for 15 min at room temperature. Aseptically aliquot (550 μL) and store at -80 °C. |
2. Chondrogenic medium for hMSCs
| Reagent | Final concentration | Volume |
| DMEM high glucose | n/a | 488 mL |
| Penicillin-streptomycin | Penicillin 100 U/mL; streptomycin 100 μg/mL | 5 mL |
| ITS-X (100×) | 1× | 5 mL |
| Ascorbic acid (500×) (see below) | 0.2 mM | 1 mL |
| Proline (1,000×) (see below) | 40 μg/mL | 0.5 mL |
| Dexamethasone (1,000×) (see below) | 100 nM | 0.5 mL |
| *TGF-β1 (1,000×) (see below) | 10 ng/mL | Dilute 1,000 times in medium |
*Except for TGF-β1, all other components of the chondrogenic medium can be combined and stored at 4 °C. Immediately before use, freshly thawed TGF-β1 is added to the required volume of medium to make the complete chondrogenic medium.
a. Ascorbic acid (500×) stock
| Step | Reagent and amount | Concentration | Procedure note |
|---|---|---|---|
| Dissolve ascorbic acid, filter, and aliquot | 644 mg of ascorbic acid + 20 mL of distilled water | [Ascorbic acid] = 32.2 mg/mL (100 mM) | Filter through a 0.22 μm filter, aliquot (1 mL), and store at -80 °C |
b. Proline (1,000×) stock
| Step | Reagent and amount | Concentration | Procedure note |
|---|---|---|---|
| Dissolve proline, filter, and aliquot | 400 mg of L-proline + 20 mL of distilled water | [L-Proline] = 20 mg/mL | Filter through a 0.22 μm filter, aliquot (0.5 mL), and store at -80 °C |
c. Dexamethasone (1,000×) stock
| Step | Reagent and amount | Concentration | Procedure note |
|---|---|---|---|
| 1. Dissolve dexamethasone | 25 mg of dexamethasone + 25 mL of 100% ethanol | [Dexamethasone] = 1 mg/mL or 2.55 mM | Store this solution at -80 °C for subsequent uses |
| 2. Dilute dexamethasone, aliquot | 392 μL of dexamethasone (2.55 mM) + 9.6 mL of 100% ethanol | [Dexamethasone] = 0.1 mM | Filter through a 0.22 μm filter, aliquot (0.5 mL), and store at -80 °C |
d. TGF-β1 (1,000×) stock
| Step | Reagent and amount | Concentration | Procedure note |
|---|---|---|---|
| 1. Prepare citric acid buffer | 9.6 mg of citric acid + 5 mL of distilled water | [Citric acid] = 10 mM | Adjust pH to 3.0, filter through a 0.22 μm filter |
| 2. Prepare BSA buffer | 50 mg of BSA + 50 mL of DPBS | [BSA] = 0.1% w/v | Filter through a 0.22 μm filter |
| 3. Dissolve TGB-β1 with citric acid buffer | 1 mL of citric acid buffer + TGF-β1 (500 μg) | [TGF-β1] = 500 μg/mL in citric acid buffer | Aseptically add 1 mL of citric acid buffer to the TGF-β1 vial and pipette to completely dissolve the powder |
| 4. Dilute TGF-β1 with BSA buffer, aliquot | 1 mL of TGF-β1 (500 μg/mL) + 49 mL of BSA buffer | [TGF-β1] = 10 μg/mL | Mix thoroughly and rest for 15 min at room temperature. Aseptically aliquot (100 μL) and store at -80 °C. |
Laboratory supplies
1. Cell culture flasks with surface treated for adherence cells
2. 6-well plates or 10-cm Petri dishes
3. Microwell plates for making cell spheroids (e.g., Corning, catalog number: 4440 or Stemcell Technologies, catalog number: 34821). Alternatively, researchers can make agarose microwell plates using molds, such as MicroTissues 3D (Sigma-Aldrich, Merck, catalog number: Z764000)
4. Meshes can be obtained commercially or fabricated in-house. In this protocol, we use nylon meshes punched from biopsy bags (Simport Scientific, catalog number: M478), with inner pore dimensions of 150 μm × 200 μm. Circular meshes were cut using a Dumbbell Cutter (model SDL-100, ø 22-mm cutting die, Dumbbell Co., Japan)
5. Stainless-steel forceps, micro spatula with flat end, scalpel blade, ruler
6. Whatman filter paper (Sigma-Aldrich, Merck, catalog number: WHA1001090)
7. Frame for spheroid sheet assembly; this can be 3D-printed and consists of two parts (bottom and top) that, when clamped together, apply tension to the meshes to keep them flat (Figure 1). Design recommendations:
a. Dimensions: For spheroid sheets up to 2 cm × 2 cm, the frame can be designed to fit a standard 6-well plate by keeping the outer diameter ≤3 cm. A minimum thickness of 2 mm is recommended for adequate stiffness. The spheroid sheet window can be customized to the desired size and shape (e.g., circular or rectangular) and may include a chamfered edge to facilitate the removal of trapped bubbles beneath the mesh. For larger spheroid sheets, the design can be scaled up to fit a standard 10-cm Petri dish or larger.
b. Locking mechanism: The two parts may be secured using either a friction fit or a latch mechanism. For the latch design, extend portions of the bottom part’s wall inward by 0.5–1 mm with a 50° overhang to enable printing without support. The latch thickness should be at least 2 mm for adequate strength, and the top edge should be chamfered to allow the top part to slide over easily. For larger constructs, screws can be used to provide uniform pressure on the mesh.
c. Handling features: Incorporate small holes or protrusions in the frame to facilitate aseptic handling with forceps/tweezers (e.g., opening/closing the two parts, lifting the frame within a 6-well plate)
d. Low-profile design: Keep the frame low profile so minimal medium is required to submerge it; position the spheroid-sheet window lower to enable easy microscopic observation.
e. Standoffs (legs): Add short protrusions on the underside to slightly elevate the frame, preventing a tight seal with the well bottom and ensuring medium access beneath the mesh. In our design (Figure 1), the latches double as the legs, since the frame is flipped before being placed into the 6-well plate.
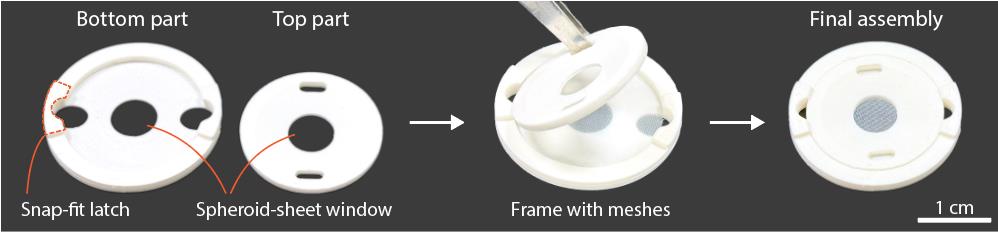
Figure 1. Example of a frame for spheroid-sheet assembly. The frame is designed to secure the meshes and spheroid construct, maintaining them in a flat configuration to keep the spheroid layer thin for efficient diffusion.
Equipment
1. Cell incubator (5% CO2, 100% humidity)
2. Biosafety cabinet (BSC) for aseptic handling
3. Benchtop centrifuge with adaptor for well plates
4. 3D printer, such as a fused deposition modeling (FDM) printer
Procedure
A. Expansion of hMSC
1. Culture the original vials of hMSCs purchased from cell banks (Passage 2, P2) in expansion medium and cryopreserve them at P4 for subsequent experiments.
2. From a frozen vial (P4), culture hMSCs in expansion medium until P6 or P7 before starting chondrogenic differentiation.
3. The seeding density is 5,000–6,000 live cells/cm2 after thawing and 3,000–4,000 live cells/cm2 after passaging. Refresh medium every 2–3 days, with 50% of the medium volume changed. Cells should be passaged when reaching 90% confluency.
Note: The doubling time of hMSCs is calculated as (t × ln2)/ln(Nt/N0), where t is the culture duration in hours, N0 is the live cell count at seeding, and Nt is the live cell count at harvest. For hMSCs derived from young donors (under 40 years old), a doubling time of less than 50 h (approximately one division every 2 days) is expected. In cases where the doubling time is unusually slow (e.g., >70 h), removing the antibiotic (penicillin-streptomycin) from the expansion medium can help accelerate cell proliferation.
B. Production of cell spheroids
Note: To produce uniform cell spheroids of a specific size, microwell plates should be used. The U/V-shaped bottoms of the microwells bring cells into close proximity, effectively promoting aggregation and spheroid formation. This approach is highly reproducible, provides sufficient throughput, yields homogeneous spheroid sizes, and imposes less stress on the cells compared to other methods such as shaking, spinner flasks, or microfluidics. These microwell plates are commercially available and ready to use, such as the Elplasia or AggreWell plates. Alternatively, researchers can make agarose microwell plates using molds such as the MicroTissues 3D molds.
1. Determine the cell seeding density per well: Select the desired number of cells per spheroid and multiply this by the total number of microwells in a single well.
Example: If 2,000 cells per spheroid are required, and a Corning Elplasia 6-well plate is used, which contains 2,885 microwells per well, then 8.88 million cells should be seeded per well.
Notes:
1. On day 1 of spheroid formation, spheroid diameters typically range from ~200 (for 1,000 cells/spheroid) to ~350 μm (for 5,000 cells/spheroid). The Elplasia plate can only support spheroids with a maximum diameter of 250 μm. Thus, the number of cells per spheroid must be adjusted according to the microwell constraint.
2. The spheroid diameter should be larger than the smallest dimension of the mesh pore. The nylon mesh from Simport Scientific has inner pore dimensions of 150 μm × 200 μm; therefore, spheroids must be larger than 150 μm in diameter to be retained by the mesh.
2. Prepare the microwell plates to remove air bubbles:
a. Add 1 mL of complete chondrogenic medium to each well, wrap the plate with parafilm, and centrifuge the plate at 300× g for 1 min.
b. Keep the plates in the incubator at 37 °C until use.
3. Harvest hMSC from culture flasks using a gentle trypsinization protocol (e.g., TrypLE Express reagents). Strict adherence to the manufacturer’s instructions is critical, as over-trypsinization may impair the cells’ ability to form spheroids. A simplified protocol is provided below:
a. Wash the cell layer with 5 mL of prewarmed DPBS (Ca2+/Mg2+-free), aspirate, and discard.
b. Add prewarmed TrypLE solution to flasks (5 mL in a T75), ensuring complete coverage of the cell layer. Incubate at 37 °C for 3–5 min.
c. After 3–5 min, check for detachment under a microscope; gently tap flasks to dislodge cells if needed.
d. Add 5–10 mL of prewarmed expansion medium to neutralize TrypLE; rinse the flask and collect the cell suspension into a 50 mL conical tube.
e. (Optional but recommended) Add another 5 mL of prewarmed medium to rinse the flask a second time and collect the cell suspension into the same tube. Centrifuge at 300× g for 3–5 min.
4. After centrifugation, immediately resuspend the cell pellet in complete chondrogenic medium. Count the cells, then adjust the cell suspension to the required seeding density (see step B1) in 1 mL of medium.
Example: For seeding 8.88 million cells per well in a 6-well plate, prepare the suspension at a concentration of 8.88 million cells per mL.
5. Transfer the prewarmed microwell plates to the BSC. Using a 1 mL pipette, promptly add 1 mL of the prepared cell suspension dropwise into each well, ensuring even distribution across the microwell surface.
6. Wrap the plate with parafilm and centrifuge at 100× g for 1 min, using slow acceleration (speed 1) and braking (speed 1).
7. Return the plate to the BSC. Carefully top up each well with 3 mL of complete chondrogenic medium, dispensing along the well edge to prevent disruption of the cells within the microwells.
8. Culture the plate at 37 °C; cell spheroids are ready for harvest after overnight incubation and up to 3 days. Extended culture inside the microwell plate is not recommended, as medium change will dislodge spheroids from the microwells, leading to random spheroid fusion within the wells.
C. Assembling and culture of spheroid sheet
Note: Researchers can determine the optimal time to harvest spheroids for assembly. Spheroids typically form as early as 12 h after seeding on the microwell plates. Newly formed spheroids are more pliable and readily fuse with one another to form larger tissue constructs, whereas extending culture time allows greater exposure to biological factors, potentially enhancing differentiation. The initial thickness of the spheroid sheet is determined by both the spheroid size and the seeding density on the mesh and can be optimized experimentally. Alternatively, a spacer may be placed between the two meshes to define the spheroid layer thickness. Such a spacer may be fabricated from materials such as PDMS and shaped into an open mold (without top or bottom) into which spheroids are seeded. The height of the spacer corresponds to the desired initial thickness of the spheroid sheet. It should be noted that ongoing spheroid fusion and cell proliferation will alter the thickness of the tissue membrane over time (see General notes).
1. Prepare tools and consumables for spheroid sheet assembly (one day in advance):
a. Frames: 3D-print, rinse with deionized (DI) water, and sterilize by submersion in 70% ethanol for ~1 h; then aseptically wash twice with sterile DPBS and store in sterile DPBS until use.
b. Nylon meshes: Cut or punch to the required dimensions, rinse with DI water, and sterilize by autoclaving.
c. Whatman filter paper: Sterilize by autoclaving.
d. Stainless-steel forceps, spatulas, and ruler: Rinse with DI water and sterilize by autoclaving.
2. Harvest cell spheroids: Transfer the microwell plates to the BSC, using a 1 mL pipette, repeatedly pipette to flush the spheroids out of their microwells, and collect them into a 50 mL conical tube.
Notes:
1. Use the same culture medium in the wells to flush and collect spheroids; after transferring into the conical tube, spheroids settle at the bottom within 10–20 s (Figure 2a), allowing the supernatant medium to be reused for additional flushing of the well.
2. For efficient harvesting, tilt the plate toward the operator, then flush the upper region of the well first; these spheroids settle at the lower region, where they can be collected. Repeat the flushing and collecting 2–3 times to ensure complete harvesting.

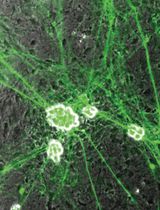
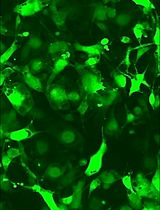
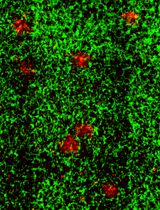
Figure 2. Assembly and chondrogenic differentiation of human mesenchymal stem cell (hMSC)-derived spheroid sheets in vitro. (A) After 1–3 days of spheroid formation, hMSC spheroids were harvested and collected in a 50 mL tube. (B) Spheroids were transferred using a 1 mL pipette tip for seeding onto the mesh. (C) Spheroid sheet immediately after seeding and sandwiching between two nylon meshes; scale bar = 5 mm. (D) Spheroid sheet after 14 days of chondrogenic differentiation and removal from the frame; scale bar = 5 mm. (E) High-magnification stereomicroscope image of the fused spheroid sheet on day 14; scale bar = 1 mm. (F–H) Histological cross-sections of spheroid sheets after 14 days of chondrogenic differentiation, stained with (F) H&E, (G) Alcian blue, and (H) collagen type II; scale bars = 500 μm.
3. Prepare aliquots of spheroids for seeding
a. The seeding density of spheroids on the mesh should be optimized experimentally to achieve the desired spheroid sheet thickness. For example, with an average hMSC spheroid diameter of ~300 μm, a density of approximately 500 spheroids/cm2 produces a packed monolayer, thus ~300 μm thick.
b. Using a 1 mL pipette, transfer the required number of spheroids per mesh into individual conical tubes.
Note: As spheroids settle much faster than single cells, the suspension should be mixed thoroughly to ensure even distribution before aliquoting into each tube.
4. Prepare the mesh for seeding
a. Work aseptically inside the BSC. Use a sterile Petri dish as a working surface; place one sheet of Whatman filter paper on the dish, and then one single nylon mesh on top of the filter paper.
b. Pipette 500 μL of complete chondrogenic medium onto the center of the nylon mesh, using the pipette tip to gently press on the mesh and allowing the medium to pass through and get absorbed by the filter paper beneath. To confirm proper flow, pipette an additional 500 μL of medium onto the mesh; the medium should pass through readily.
Note: A seeding mask of the required dimensions can be prepared by cutting Whatman paper with a sterile scalpel and ruler. The mask is placed over the mesh to guide spheroid seeding. Alternatively, a custom mold can be fabricated for precise seeding.
5. Seed spheroids on mesh
a. Using a 1 mL pipette, aspirate all the spheroids at the bottom of the conical tube in a single draw (Figure 2b).
b. Evenly dispense the spheroid suspension onto the mesh within the seeding mask/mold; the medium will pass through, leaving the spheroids deposited on the mesh.
c. Use a spatula to adjust the spheroid layer as needed.
d. Remove the seeding mask/mold and place a second nylon mesh over the spheroid layer.
Note: For a visual demonstration of spheroid seeding on the mesh, readers may refer to Supplementary Video 1 provided in [6].
6. Secure the assembly for culture
a. Use forceps to transfer the nylon mesh assembly (Figure 2c) onto the frame and secure it with the designed mechanism (friction fit, latch, or screws).
b. Place the secured device into a 6-well plate or 10-cm Petri dish and add sufficient chondrogenic medium to fully submerge the spheroid layer.
c. Culture the device for 14–21 days with medium change every 2–3 days to induce chondrogenic differentiation of the hMSCs. After the culture period, the mesh assembly can be removed from the frame (Figure 2d–e) for downstream applications such as analysis or implantation (Figure 2f–h).
Notes:
1. For a visual demonstration of harvesting the spheroid sheet (including the mesh) at the end of culture, readers may refer to Supplementary Video 2 in [6].
2. The spheroid layer fuses into a tissue construct within 2–3 days. However, only after adequate extracellular matrix deposition, typically after day 10, the spheroid sheet is sufficiently robust to be detached from the mesh and handled without additional support.
Validation of protocol
This protocol has been used and validated in the following research article(s):
• Le et al. [6]. A platform for Bioengineering Tissue Membranes from cell spheroids. Mater Today Bio (Figures 1–6, Supplementary Videos 1–3)
General notes and troubleshooting
General notes
1. Scaffold-free construct: The nylon meshes used in this protocol serve as scaffolds during in vitro culture but can be peeled off at the end, leaving a fused spheroid sheet that is scaffold-free and suitable for subsequent applications such as in vivo implantation. With our nylon mesh (pore size 150 × 200 μm), spheroids initially cannot pass through the mesh; however, as cells dynamically rearrange during fusion and especially proliferation, they eventually cross the pores and form an additional tissue layer outside the mesh boundary. Prolonged culture increases this outgrowth, making mesh removal more difficult, though still feasible. In our experience, removal of the nylon mesh is very straightforward before 14 days of culture, whereas at 14–21 days it remains feasible by carefully peeling with forceps, yielding a scaffold-free tissue membrane. To reduce cell crossover, researchers may fabricate in-house meshes with smaller pores, though this may compromise medium diffusion. Alternatively, the mesh can be retained as part of the final construct to provide additional mechanical strength and facilitate implantation by enabling suturing or wrapping at the target site. Researchers may also fabricate biodegradable meshes in-house using techniques such as freeze-drying or electrospinning to produce a degradable mesh with smaller pore sizes and adequate mechanical strength.
2. Thickness of the construct over time: The thickness of the spheroid sheet changes dynamically during culture. While spheroids can initially be assembled at a defined thickness, subsequent spheroid fusion and cell proliferation often lead to a net increase in thickness over time. This thickening increases the diffusion gradients, which further influence not only cell viability but also differentiation potential, as oxygen, nutrient, and growth factor distributions collectively shape tissue development. Researchers should account for this dynamic behavior when aiming to produce tissue membranes of a specific thickness at the end of the culture period.
Troubleshooting
| Problem | Possible cause | Solution |
|---|---|---|
| 1. Cell spheroids do not form or form with large variations in size. | • Over-trypsinization, low cell viability • Air bubbles trapped inside the microwells • Uneven seeding of the cell suspension | • Follow manufacturer’s trypsinization protocol to avoid overdigestion of cell surface adhesion molecules and ensure high viability (>90%) before use. • Prepare the microwell plate (step B2) to remove all air bubbles prior to seeding. • Distribute the cell suspension evenly across the plate rather than dispensing in a single spot. |
| 2. Spheroids stick to the inside of pipette tips during harvest or transfer | Newly formed spheroids (<24 h) tend to stick to the inner wall of pipette tips | Pre-wet the pipette tip by aspirating and dispensing culture medium (~10 times) before handling spheroids; this reduces adhesion to the tip and minimizes spheroid loss. |
| 3. Medium does not flow through the mesh during assembly; spheroids remain suspended in a pool of medium instead of settling onto the mesh. | • The Whatman paper is oversaturated with medium and unable to absorb additional liquid • The Whatman paper is not in good contact with the mesh. | • After autoclaving, aseptically dry the Whatman papers in a 60 °C oven overnight before use. Use a fresh piece of paper for each assembly. • Ensure that both the Whatman paper and mesh are flat and in good contact with each other; test medium flow through the mesh (step C4) prior to seeding spheroids. |
Acknowledgments
Author contribution: Conceptualization, L.Q.B.; Investigation, L.Q.B., C.W.W., H.E.; Writing—Original Draft, L.Q.B., H.E.; Writing—Review & Editing, D.C.; Funding acquisition, L.Q.B., D.C.
Funding sources that supported the work: (1) Agency for Science, Technology and Research (A*STAR), Singapore, Career Development Fund (Grant no. C210812040) awarded to L.Q.B.; (2) National Medical Research Council (NMRC), Singapore, Open Fund Individual Research Grant (Grant no. MOH-OFIRG24jul-0017), awarded to D.C.; (3) The authors gratefully acknowledge the Bioprocessing Technology Institute (BTI, A*STAR) for their core support.
Original research paper in which the protocol was described and validated: Le et al. [6]. Mater Today Bio, 31, 101526.
Competing interests
The method for constructing tissue membranes from cell spheroids (spheroid sheet), along with the membrane holding device, is the subject of a patent application (WO 2025/063900 A1), with Q.B.L., D.C., and W.W.C. listed as inventors. The authors declare no other competing interests.
References
- Moroni, L., Burdick, J. A., Highley, C., Lee, S. J., Morimoto, Y., Takeuchi, S. and Yoo, J. J. (2018). Biofabrication strategies for 3D in vitro models and regenerative medicine. Nat Rev Mater. 3(5): 21–37. https://doi.org/10.1038/s41578-018-0006-y
- Kim, S., Kim, E. M., Yamamoto, M., Park, H. and Shin, H. (2020). Engineering Multi‐Cellular Spheroids for Tissue Engineering and Regenerative Medicine. Adv Healthcare Mater. 9(23): e202000608. https://doi.org/10.1002/adhm.202000608
- Caprio, N. D. and Burdick, J. A. (2023). Engineered biomaterials to guide spheroid formation, function, and fabrication into 3D tissue constructs. Acta Biomater. 165: 4–18. https://doi.org/10.1016/j.actbio.2022.09.052
- Czajka, C. A., Mehesz, A. N., Trusk, T. C., Yost, M. J. and Drake, C. J. (2014). Scaffold-Free Tissue Engineering: Organization of the Tissue Cytoskeleton and Its Effects on Tissue Shape. Ann Biomed Eng. 42(5): 1049–1061. https://doi.org/10.1007/s10439-014-0986-8
- Yamasaki, A., Kunitomi, Y., Murata, D., Sunaga, T., Kuramoto, T., Sogawa, T. and Misumi, K. (2019). Osteochondral regeneration using constructs of mesenchymal stem cells made by bio three‐dimensional printing in mini‐pigs. J Orthop Res. 37(6): 1398–1408. https://doi.org/10.1002/jor.24206
- Le, Q. B., Ezhilarasu, H., Chan, W. W., Patra, A. T., Murugan, P., Venkatesh, S. A., Tay, Y. K., Lim, S. R., Abdul Rahim, A. A., Lee, J. S. Z., et al. (2025). A platform for Bioengineering Tissue Membranes from cell spheroids. Mater Today Bio. 31: 101526. https://doi.org/10.1016/j.mtbio.2025.101526
Article Information
Publication history
Received: Aug 26, 2025
Accepted: Oct 8, 2025
Available online: Oct 17, 2025
Published: Nov 20, 2025
Copyright
© 2025 The Author(s); This is an open access article under the CC BY-NC license (https://creativecommons.org/licenses/by-nc/4.0/).
How to cite
Le, Q. B., Ezhilarasu, H., Chan, W. W. and Choudhury, D. (2025). Spheroid Sheets: A Scalable Platform for Producing Tissue Membrane Constructs. Bio-protocol 15(22): e5501. DOI: 10.21769/BioProtoc.5501.
Category
Biological Engineering > Biomedical engineering
Cell Biology > Cell engineering > Tissue engineering
Stem Cell > Adult stem cell > Mesenchymal stem cell
Do you have any questions about this protocol?
Post your question to gather feedback from the community. We will also invite the authors of this article to respond.