- Protocols

- Articles and Issues
- For Authors
- About
- Become a Reviewer

Optimized Protocol for the Collection, Cryopreservation, and In Vitro Cultivation of Human Gut Microbiota for Toxicomicrobiomics Applications

Published: Vol 15, Iss 21, Nov 5, 2025 DOI: 10.21769/BioProtoc.5498 Views: 1951
Reviewed by: Alba BlesaAnonymous reviewer(s)
Original research article
The authors used this protocol in:

Dec 2024

Protocol Collections
Comprehensive collections of detailed, peer-reviewed protocols focusing on specific topics


Abstract
Xenobiotics, including environmental pollutants such as bisphenols, phthalates, and parabens, are widely present in food, cosmetics, packaging, and water. These compounds can reach the gastrointestinal tract and interact with the gut microbiota (GM), a complex microbial community that plays a key role in host immunity, metabolism, and barrier function. The GM engages in bidirectional communication with the host via the production of bioactive metabolites, including short-chain fatty acids, neurotransmitter precursors, and bile acid derivatives. Dysbiosis induced by xenobiotics can disrupt microbial metabolite production, impair gut barrier integrity, and contribute to the development of systemic disorders affecting distant organs such as the liver or brain. On the other hand, the GM can biotransform xenobiotics into metabolites with altered bioactivity or toxicity. In vitro models of the human GM offer a valuable tool to complement population-based and in vivo studies, enabling controlled investigation of causative effects and underlying mechanisms. Here, we present an optimized protocol for the collection, cryopreservation, and cultivation of human GM under strictly anaerobic conditions for toxicomicrobiomics applications. The method allows the assessment of xenobiotic–GM interactions in a cost-effective and ethically sustainable way. It is compatible with a wide range of downstream applications, including 16S rDNA sequencing, metabolomics, and endocrine activity assays. The protocol has been optimized to minimize oxygen exposure to less than 2 min, ensuring the viability of obligate anaerobes that dominate the gut ecosystem. This approach facilitates reproducible, mechanistic studies on the impact of environmental xenobiotics on human GM.
Key features
• Strict anaerobic handling of human fecal samples: The protocol maintains anaerobic conditions from collection to cultivation, with oxygen exposure limited to less than 2 min.
• Pooled-sample inoculum for reproducibility: Cryopreserved inoculum derived from pooled donor samples reduces inter-individual variability and ensures high reproducibility across experiments.
• Compatibility with diverse downstream applications: The protocol supports a wide range of analyses, including 16S rDNA sequencing, untargeted metabolomics, SCFA profiling, and host–GM interaction studies.
• High-throughput capacity: Up to 192 samples can be cultured simultaneously, enabling efficient large-scale experiments.
Keywords: Gut microbiotaGraphical overview

Background
In vitro models of gut microbiota (GM) cultures provide a valuable tool alongside in vivo studies and population-based research, as they enable the investigation of causal relationships and molecular mechanisms linking xenobiotic exposure and gut dysbiosis to disease development [1]. These methods are also essential for the comprehensive toxicological assessment of xenobiotics, including endocrine-disrupting chemicals (EDCs), a major class of environmental contaminants with potential health risks [2]. EDCs can enter the body not only through ingestion with food and water but also via inhalation or dermal absorption. Once in the gastrointestinal tract, xenobiotics interact with the GM before being absorbed and detoxified in the liver. Some may be excreted or return to the gut via bile, allowing further interaction with the GM [3].
Xenobiotics can directly affect the taxonomic structure of the GM, leading to alterations in microbial diversity and the abundance of specific bacterial species [4]. Changes in microbial metabolite production, including short-chain fatty acids (SCFAs) and tryptophan derivatives, may impact both gut and systemic host functions, including the gut–brain axis [5–7]. Thus, xenobiotics may impact a broad range of host physiological functions through GM-mediated metabolic activity [5,8].
Gut microorganisms can directly interact with xenobiotics, affecting both their metabolism and elimination and modulating their biological activity [9]. The GM possesses a broad enzymatic repertoire capable of transforming xenobiotics into less toxic metabolites; however, in some cases, microbial metabolism may produce compounds with increased toxicity compared to the parent compound [10]. In addition to enzymatic activity, xenobiotics may also be passively inactivated by adsorption to bacterial cell walls, a process that reduces their intestinal absorption and bioavailability [11].
This protocol enables the preparation of cryopreserved inocula from pooled human fecal samples that can be used further in a wide range of toxicomicrobiomics studies focused on GM–xenobiotic interactions. By combining samples from multiple donors into a single, well-characterized inoculum and cryopreserving it, researchers can reduce inter-individual variability, improve reproducibility, and streamline comparative studies across different conditions or compounds. The resulting material can be used repeatedly, enabling long-term storage and controlled experimental design without the need for repeated donor recruitment and processing. Importantly, our cryopreservation and standardized inoculum preparation protocol preserves approximately 60% of the unique bacterial taxa and ~75% of the overall microbial community complexity in the viable fraction after thawing, ensuring sufficient representativeness for downstream applications.
However, it must be noted that ~40% of unique taxa are not recovered after thawing. A likely explanation is that many bacteria are already non-viable by the time they reach the end of the gastrointestinal tract [12]. Other contributing factors may include limitations of current handling procedures or damage caused by the freeze–thaw process. Currently, no cryopreservation method enables the complete recovery of all gut microbes. Our protocol aims to preserve and propagate the viable and metabolically active portion of the community, providing a reproducible and representative inoculum for in vitro studies within current technical limitations. The method is particularly well-suited for high-throughput screening of various compound classes that interact with the gut microbiota, including xenobiotics (e.g., pharmaceuticals, endocrine disruptors), food additives, dietary components (e.g., polyphenols, fibers), and probiotics. Our team has successfully applied this approach to investigate the impact of EDCs, such as bisphenols, on the GM [2], to evaluate the effect of different culture media compositions [13], and to explore the GM's response to biogenic amines and ice cream formulations (unpublished data). In addition to GM cultivation, this method is compatible with a broad range of downstream applications, including 16S rRNA gene sequencing, shotgun metagenomics, untargeted metabolomics, and targeted analysis of microbial metabolites, such as SCFAs. Moreover, the culture supernatants obtained using this standardized inoculum can be used to study GM–host interactions, such as the effects of microbial metabolites on epithelial cells in vitro. In our studies, we have successfully applied post-fermentation fluids to investigate the impact of GM-derived compounds on intestinal epithelial cell viability [2]. This approach provides a versatile and scalable model for exploring microbial activity under controlled and reproducible conditions.
Materials and reagents
Biological materials
1. Fecal samples; these should be collected directly into a sterile stool container filled with transport medium (see Solutions). Samples should be stored at 4 °C and processed within a defined time window (preferably within 4 h of collection).
Donors are classified as healthy based on a pre-screening questionnaire (see Supplementary Material S1). Key exclusion criteria include (i) antibiotic or probiotic use within the last 3 months, (ii) reported gastrointestinal disorders within the last 3 months, (iii) diarrhea or vomiting within the past 2 weeks, and (iv) any chronic diseases or regular medication use. All procedures involving human-derived material must be approved by the relevant Institutional Ethics Committee before collection.
Reagents
1. Ultrapure type I water, generated by a Milli-Q system or similar
2. Oxyrase for broth (Sigma-Aldrich, catalog number: SAE0013-50ML)
3. Peptone-buffered water (Oxoid, catalog number: T0000041)
4. L-cysteine hydrochloride (Merck, catalog number: 2430-100GM)
5. Resazurin sodium salt (Merck, catalog number: R7017-1G)
6. Glycerol (Merck, catalog number: G7893)
7. Resazurin (Merck, catalog number: R7017)
8. NaOH (Warchem, catalog number: 56992)
9. HCl (Warchem, catalog number: 45771)
10. Vitamine K3 (Pol-Aura, catalog number: PA-03-3614-V#25G)
11. Defibrynated sterile sheep blood (GRASO Biotech, catalog number: 1000)
12. Schaedler broth (GRASO Biotech, catalog number: 139)
13. PMAxxTM Dye, 20 mM in H2O (Biotum, catalog number: 40069-1ML)
14. Benzalkonium chloride (Merck, catalog number: 12060)
15. Ethanol 99.8% (Pol-Aura, catalog number: 113964800)
Solutions
1. Benzalkonium chloride (see Recipes)
2. Resazurin stock solution (see Recipes)
3. Vitamin K3 stock solution (see Recipes)
4. Transport medium (see Recipes)
5. Cryopreservation medium (see Recipes)
6. Culture medium (see Recipes)
Recipes
1. Benzalkonium chloride
| Reagent | Final concentration | Quantity or volume |
|---|---|---|
| Benzalkonium chloride | 0.13% | 1.33 g |
| Distilled water | n/a | Fill up to 1,000 mL |
Note: Store the solution in a squeeze bottle inside the anaerobic chamber.
2. Resazurin stock solution
| Reagent | Final concentration | Quantity or volume |
|---|---|---|
| Resazurin | 0.25 mg/mL | 2.5 mg |
| Distilled water | n/a | 10 mL |
Note: Sterilize the solution by filtration through a 0.45 μm sterile syringe filter and transfer it to a light-protected amber glass bottle or wrap in aluminum foil to prevent photodegradation. Store at 4 °C in the refrigerator.
3. Vitamin K3 stock solution
| Reagent | Final concentration | Quantity or volume |
|---|---|---|
| Vitamin K3 | 1.5 mg/mL | 150 mg |
| Ethanol 99.8% | n/a | 10 mL |
Note: The compound dissolves slowly; to aid dissolution, vortex briefly and place the solution on a HulaMixer for about 10 min. Filter the solution through a 0.45 μm sterile syringe filter. Store in an amber glass vial at 4 °C. Protect from light.
4. Transport medium
| Reagent | Final concentration | Quantity or volume |
|---|---|---|
| Peptone-buffered water | 0.8% w/v | 8 g |
| L-cysteine hydrochloride | 0.5 g/L | 0.5 g |
| Resazurin stock solution | 1 mg/L | 4 mL |
| Distilled water | n/a | Fill up to 1,000 mL |
Note: Adjust the pH to 7.0 ± 0.2 using sterile 1 M HCl or NaOH, if necessary. Dispense into heat-resistant bottles with loose caps and autoclave at 121 °C for 15 min. After autoclaving, tighten the caps while the bottles are still warm to minimize oxygen diffusion during cooling. When still warm, bring to an anaerobic chamber to deoxygenate overnight and close with bromobutyl stoppers. Store the medium at 4 °C. Under anaerobic conditions, the medium should appear colorless.
5. Cryopreservation medium
| Reagent | Final concentration | Quantity or volume |
|---|---|---|
| Peptone-buffered water | 0.8% w/v | 8 g |
| L-cysteine hydrochloride | 0.5 g/L | 0.5 g |
| Resazurin stock solution | 1 mg/L | 4 mL |
| Glycerol | 20% w/v | 200 g |
| Distilled water | n/a | Fill up to 1,000 mL |
Note: Autoclave at 121 °C for 15 min. After autoclaving, tighten the caps while the bottles are still warm to minimize oxygen diffusion during cooling. When still warm, bring to an anaerobic chamber to deoxygenate overnight and close with bromobutyl stoppers. Store the medium at 4 °C. Under anaerobic conditions, the medium should appear colorless or faintly yellow (Figure 1A).
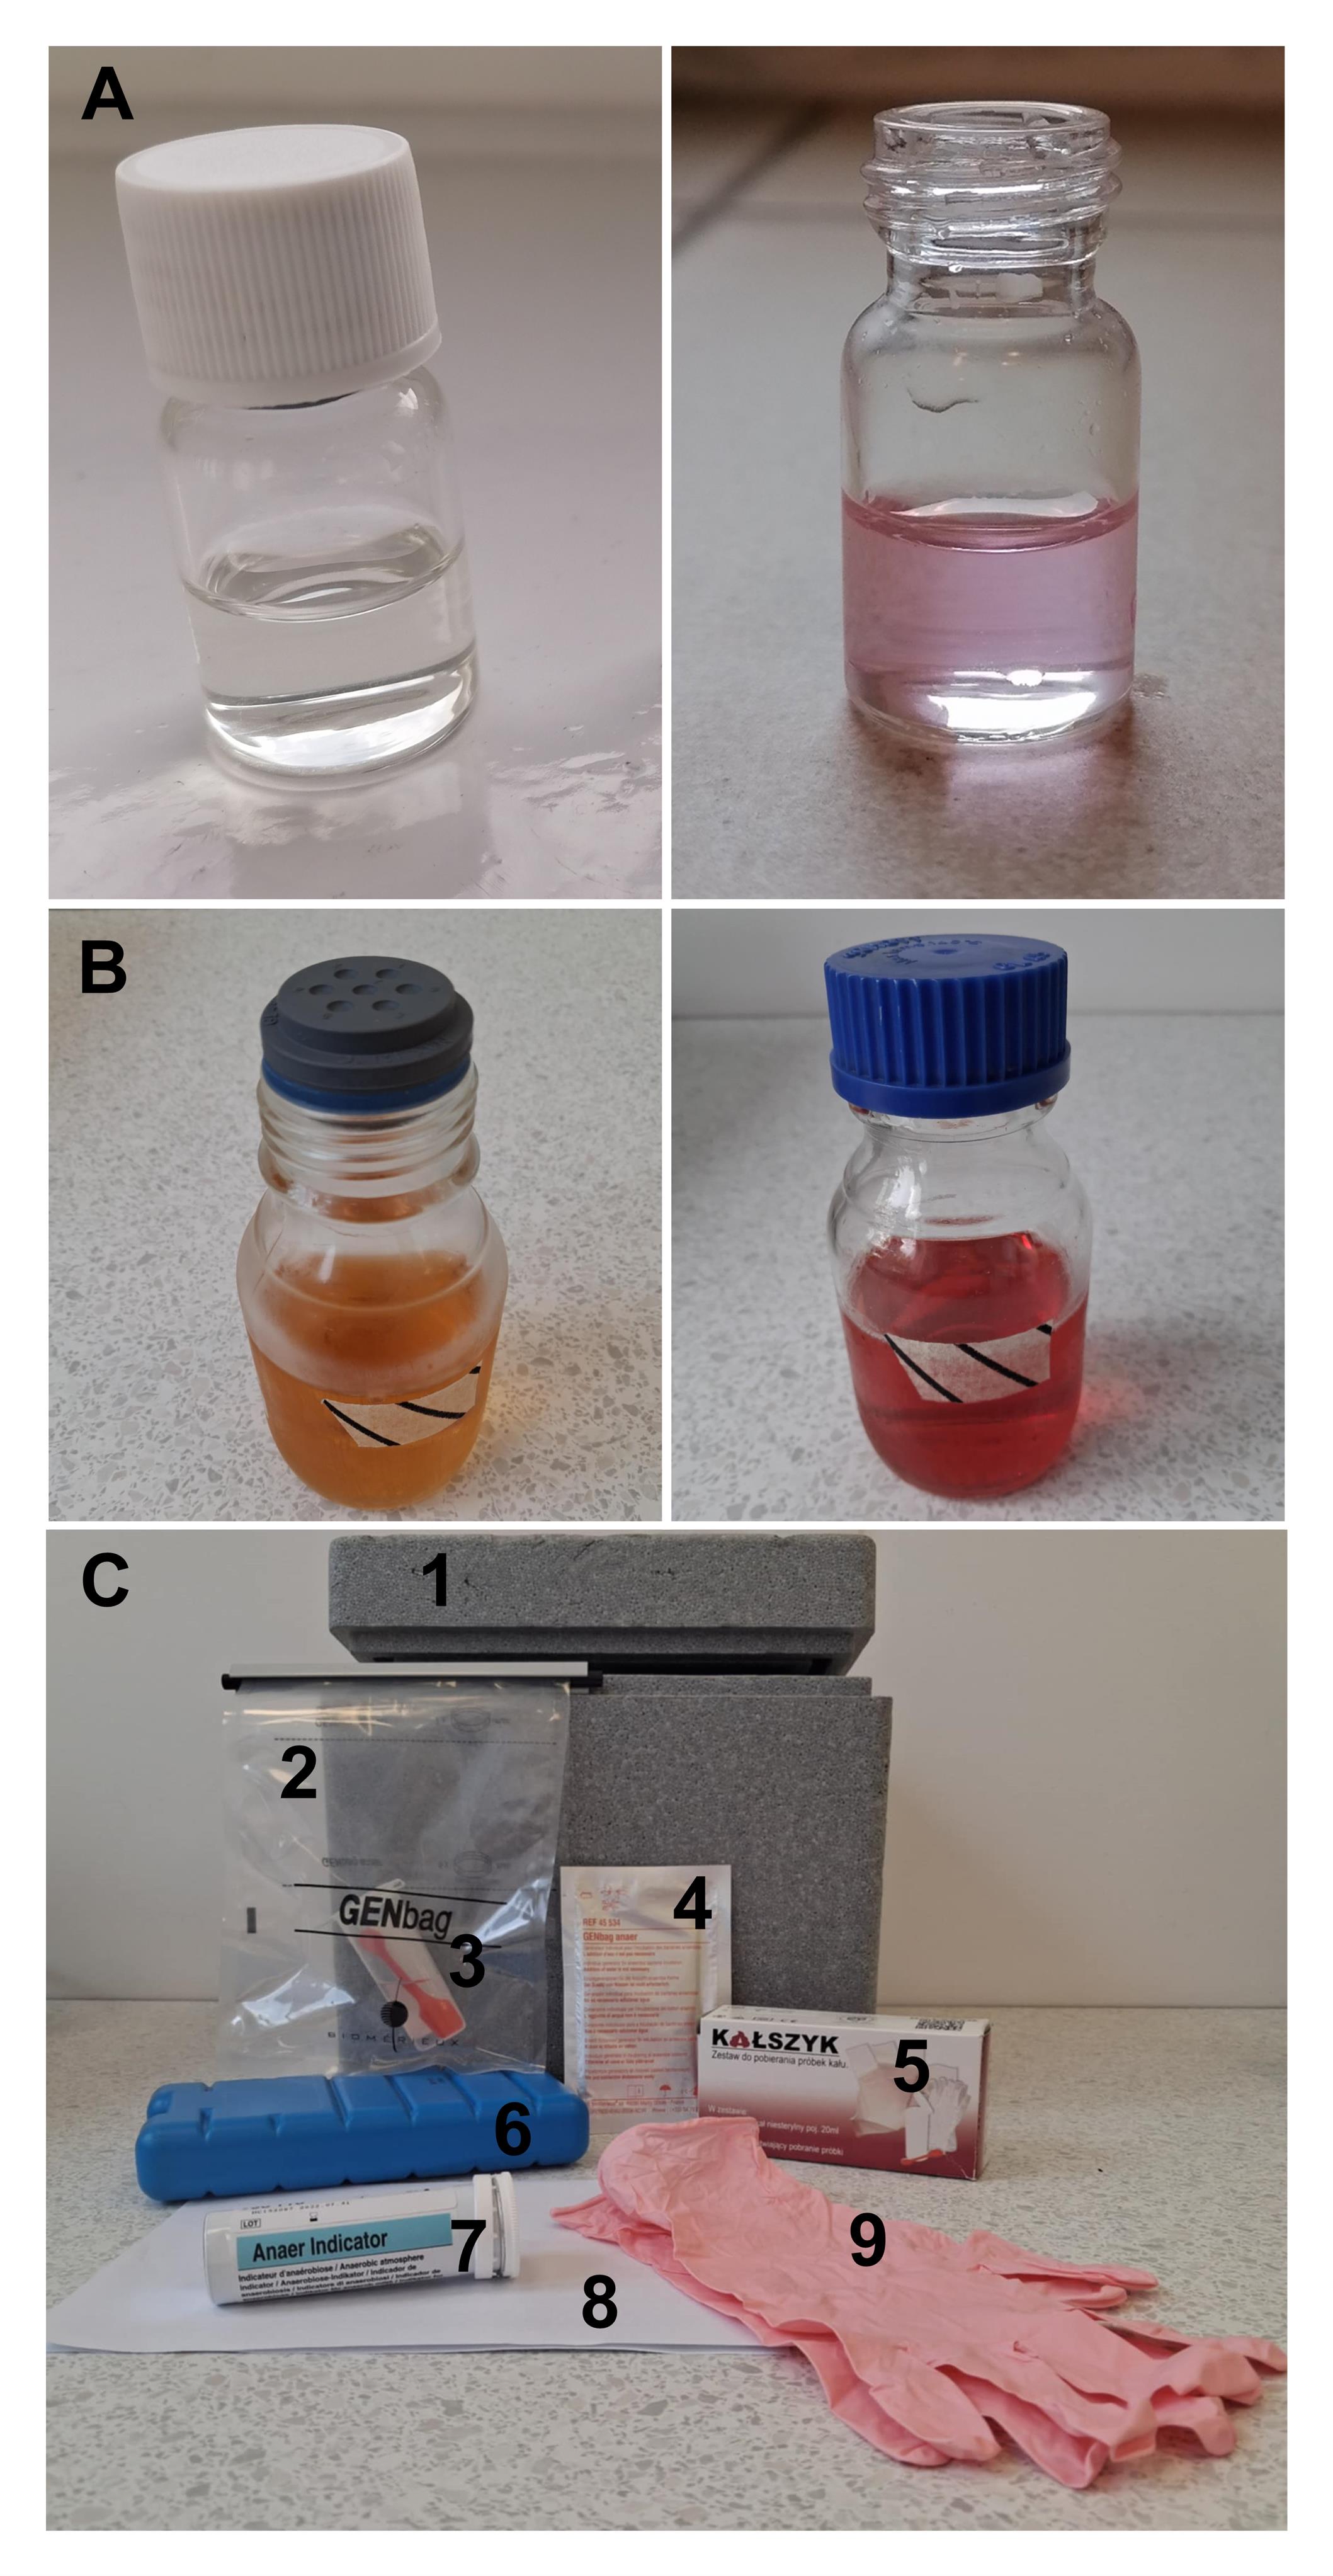
Figure 1. Materials used for stool sample processing and anaerobic preparation of reagents. (A) Cryopreservation buffer in vial: deoxygenated (left) vs. oxygenated (right); (B) Culture medium (Schaedler broth): deoxygenated and sealed with bromobutyl stopper (left) vs. oxygenated (right); (C) Stool sample collection kit including (1) insulated box, (2) GENbag airtight bag with clip, (3) stool container with spatula filled with 10 mL of transport medium, (4) GENbag anaerobic atmosphere generator, (5) flushable stool collection sheet, (6) ice pack, (7) anaerobic indicator, (8) health status declaration form with written instructions and informed consent, (9) gloves.
6. Culture medium
| Reagent | Final concentration | Quantity or volume |
|---|---|---|
| Schaedler broth | n/a | 29,7 g |
| Distilled water | n/a | Fill up to 1,000 mL |
Note: Mix thoroughly until completely dissolved. Measure the pH and adjust to 7.2 ± 0.2 using 1 M HCl or 1 M NaOH, if necessary. Autoclave at 121 °C for 15 min and tightly seal the bottle immediately after to prevent re-entry of oxygen. While the medium is still warm (but not hot), place the bottle into the anaerobic chamber via the airlock. In the airlock, loosen the caps by a quarter-turn. Once inside the chamber, unscrew the caps halfway to facilitate full deoxygenation of the medium. Leave the bottle overnight (at least 4 h) to ensure proper reduction. After deoxygenation, seal the bottle tightly with a bromobutyl stopper, remove from the chamber, and store at 4 °C. Directly before use, add necessary supplements under anaerobic conditions. For Schaedler broth, this includes vitamin K3 (1.5 mg/L) and defibrinated sheep blood, final concentration 10% v/v. After supplementation, the medium should be allowed to deoxygenate again for 4 h to overnight before use. If supplements are not pre-equilibrated in the anaerobic chamber, they may introduce residual oxygen into the medium, as they typically do not contain reducing agents. In such cases, allow the supplemented medium to deoxygenate again for 4 h to overnight, depending on the volume and oxygen load of the additives.
Laboratory supplies
1. Deep-well plates (2.2 mL 96-Well Deep Well Plate, U-Bottom, Square Well, catalog number: 503002)
2. Stomacher bags (Interscience, BagFilter® Pipet, catalog number: K-1385)
3. Sterile stool container 20 mL with a spatula (Syntesys, catalog number: 313316)
4. Flushable stool sample collection sheets (NEUCA S.A., catalog number: 91609)
5. Borosilicate lyophilization glass vials, 5 mL with threaded caps (Wheaton, Vacule vial, catalog number: 651905), equipped with bromobutyl rubber stoppers (Wheaton, catalog number: 700006G)
6. 250 mL glass bottle with blue GL45 screw cap (Merck, catalog number: DWK218013651)
7. DURANTM grey bromobutyl rubber stopper, straight plug, for GL 45 laboratory bottles (DWK Life Sciences, catalog number: 292062803)
8. DURANTM open-topped screw cap, central aperture, GL45 (DWK Life Sciences, catalog number: 292271007)
9. BagTips® (Interscience, catalog number: K-1088)
10. Insulated box, 30 × 400 × 24 cm (DIZ, catalog number: ST10)
11. Icepack (Merck, mPAGE® Freezer Pack, catalog number: FP2)
12. Sterile tips with filter 0.1–10 μL, 2–200 μL, 100–1,000 μL (Th. Geyer, Labsolute, catalog numbers: 7695880, 7695884, and 7695886)
13. Microcentrifuge tubes, 2 mL with lid (BRAND, catalog number: Z628034-500EA)
14. GENbag anaer: transparent airtight bags and clips, anaerobic atmosphere generators (bioMérieux, catalog number: 97067-042)
15. Chlorine-based wipe (Medilab, Chlor-Clean Wipes, catalog number: 4817333)
16. Metal tweezers (Bionovo, catalog number: 1-1811)
17. Sterilization pouch (Bionovo, catalog number: B-0403)
18. Aluminum foil (Bionovo, catalog number: B-1051)
19. Glass petri dishes, 90 mm (Duran, catalog number: G-3264)
20. Anaerobic indicator (for anaerobic chamber: Thermo Fisher Scientific, Oxoid Resazurin Anaerobic Indicator, catalog number: 10371053; for stool collection kit: Biomeriux, Anaer indicator, catalog number: 230-096118)
21. Amber glass reagent bottles with screw cap, 20 mL (WHEATON, LAB FILE, catalog number: W224604)
22. 0.45 μm membrane filters, sterile (Satorius, Minisart, catalog number: 16533-Q)
23. Centrifuge tubes (15–50 mL), depending on culture volume (Corning, catalog numbers: CLS430790 and CLS430829)
24. 250 mL squeeze bottle (LP Italiana, LDPE squeeze bottle with scale, catalog number: L-1000)
Equipment
1. Anaerobic chamber with integrated incubator (Sheldon Manufacturing Inc., BACTRON 300, catalog number: BAA30023)
2. Gas cylinders: Nitrogen (N2) and anaerobic gas mixture (90% N2, 5% CO2, 5% H2), equipped with appropriate pressure regulators
3. Laminar flow cabinet, class BSL2 (ESCO, Streamline SC2-4E1, catalog number: 2010655)
4. Autoclave (SMS, ASL 80 MSV, catalog number: 272-ASL80MSV)
5. BagPipet (Interscience, catalog number: 251091)
6. Vortexer (IKA, Vortex 2, catalog number: 0025000258)
7. Pipette, P1000 (Eppendorf Research® plus, catalog number: 3123000063)
8. Pipette, P200 (Eppendorf Research® plus, catalog number: 3123000055)
9. Pipette, P10 (Eppendorf Research® plus, catalog number: 3123000020)
10. Laboratory shaker (IKA, MS 3 basic, catalog number: 0003617000) with plate adapter (IKA, MS 3.4 Microtiter attachment, catalog number: 0003426400)
11. pH-meter (Elmetron, model: CP-315)
12. Analytical balance (Radwag, model: WAA 210/C/1)
13. Laboratory centrifuge (Eppendorf, model: 5804, catalog number: 5804000010) with rotor for 1.5 mL (Eppendorf, Rotor FA-45-30-11, catalog number: 5804726006) and 15–50 mL tubes (Eppendorf, FA-45-30-11, catalog number: 5820715006), depending on desired culture volume
14. Ultra-pure water system (Polwater, model: DL2-100)
15. -80 °C freezer (Haier Biomedical, model: DW-86L579)
16. Water bath (37 °C) (WSL, model: LWT 2/150)
17. Racks (GenoPlast Biotech S.A., catalog number: 90-8009)
18. Tube-compatible shaker (Thermo Fisher Scientific, HulaMixerTM, catalog number: 15920D)
19. PMA-LiteTM 2.0 LED Photolysis Device (Biotum, catalog number: E90006)
Software and datasets
1. QIIME2 Amplicon (v2025.7)
2. GraphPad Prism (v9.5.1, Dotmatics)
3. RStudio (Build 446, Posit PBC), with R packages: phyloseq (v1.44.0), qiime2R (v0.99.6), and vegan (v2.6-4)
Procedure
A. Collection and cryopreservation of human gut microbiota
A summary of the experimental workflow, including key time points and critical handling steps, is provided in Supplementary Material S2.
Day 0: Palladium catalyst activation
1. Heat treatment of palladium catalyst: Place the palladium catalyst in a drying oven and bake it at 200 °C for 8 h to remove moisture and reactivate its oxygen-scavenging capacity. Allow the catalyst to cool to room temperature before placing it in the anaerobic chamber. This heat activation step should be performed before each experiment to ensure optimal anaerobic conditions.
Day 1: Preparation of the anaerobic chamber
2. Cleaning and equipment placement: Wipe all internal surfaces of the anaerobic chamber with a benzalkonium chloride solution to disinfect the workspace. After disinfection, place any large equipment that cannot be passed through the airlock. This may include benchtop vortex mixers, orbital or rocking shakers, pipette stands, micropipettes (P1000, P200, P10), BagPipet dispenser, 250 mL squeeze wash bottle with benzalkonium chloride solution, disposable paper towels, permanent ethanol-resistant laboratory marker, waste bin and waste bags, anaerobic indicators, and the palladium catalyst. Ensure that all equipment has been cleaned and, if necessary, decontaminated before placing it inside the chamber.
Note: All media, plasticware, and equipment introduced into the chamber should be left inside overnight to allow complete deoxygenation by the palladium catalyst and anaerobic gas mixture before any experimental procedures are initiated.
3. Commission cycle: After placing the equipment, initiate the commissioning cycle to purge the atmospheric air and replace it with an anaerobic gas mixture (commonly 90% N2, 5% CO2, and 5% H2). This process typically takes approximately 8 h, depending on the chamber model and gas exchange rate.
Day 2: Preparation of anaerobic media
4. Prepare the following anaerobic media using a 250 mL glass bottle with a blue GL45 screw cap: transport medium, cryopreservation medium, and culture medium (Schaedler broth) (see Recipes). Weigh the reagents and dissolve them in distilled water. Adjust pH to 7.0 ± 0.2 using HCl or NaOH. Loosely cap each bottle to equalize pressure during autoclaving. Autoclave the media at 121 °C for 15 min. Also, place the following items in the autoclave: GL45 bottle stoppers and open-topped GL45 sterile screw caps, each wrapped individually in aluminum foil; borosilicate glass lyophilization vials with threaded caps, along with matching bromobutyl rubber septa, placed between glass Petri dishes to facilitate sterile handling with tweezers; and a sterilization pouch containing metal tweezers. Immediately after the autoclave cycle ends, carefully tighten the caps on the hot bottles while wearing protective gloves to prevent atmospheric oxygen from dissolving into the medium during cooling. Transport and cryopreservation media should appear colorless or faintly amber, indicating anaerobic conditions (loss of resazurin pink color) (Figure 1A). Culture media containing resazurin should also lose their pink coloration if proper oxygen removal has occurred (Figure 1B).
Note: An important advantage of this protocol is that it allows for the preparation of anaerobic culture media without the need for nitrogen gas purging, which is often time-consuming and carries a risk of contamination. By combining autoclaving with post-sterilization deoxygenation inside the anaerobic chamber, oxygen can be effectively removed without the need for specialized degassing equipment such as an autoclave able to sterilize solutions in closed vessels (autoclaves equipped with a temperature sensor and rapid recooling with support pressure).
Critical: The preparation of anaerobic media, along with the establishment of strictly anoxic conditions, is a critical step in this protocol, as GM comprises a majority of obligate anaerobes that are extremely sensitive to oxygen exposure. Even brief contact with atmospheric oxygen can result in reduced viability and significant shifts in community composition.
5. Placement in the anaerobic chamber: Once bottles are cool enough to handle (warm but safe to touch), transfer them to the anaerobic chamber via the airlock. Include the following items in the same pass-through: sterile bottle stoppers GL45, sterile open-topped screw caps, sterile pipette tips with filter (P100), straws, GENbag airtight bags, and clips. Purge the airlock with nitrogen gas three times to remove residual oxygen.
Note: Maintaining sterility in an anaerobic chamber is more challenging than in laminar flow hoods due to the inability to use UV sterilization (which can damage plexiglass) and the lack of HEPA filtration. Strict aseptic technique is essential. All tools and materials must be pre-sterilized, and unnecessary handling should be avoided. Sterile items (e.g., pipette tips, media) should only be introduced as needed and not stored inside for long periods. Alcohol-based disinfectants are not recommended; instead, use non-alcohol disinfectants like benzalkonium chloride or compatible sporicidal wipes. A compact HEPA/UV-C air unit can be optionally added to improve air quality.
6. Overnight oxygen removal: Always verify anaerobic conditions inside the chamber using an anaerobic indicator strip before starting any procedures. If anaerobic conditions are not confirmed, stop the procedure immediately and restore appropriate conditions before continuing (see Troubleshooting). Inside the chamber, unscrew all media bottle caps halfway to allow remaining headspace oxygen to be removed by the palladium catalyst and anaerobic gas mixture overnight (Figure 2). This step is critical to ensure complete deoxygenation of plastic surfaces and the bottle interior. Media should be ready for use the following day.
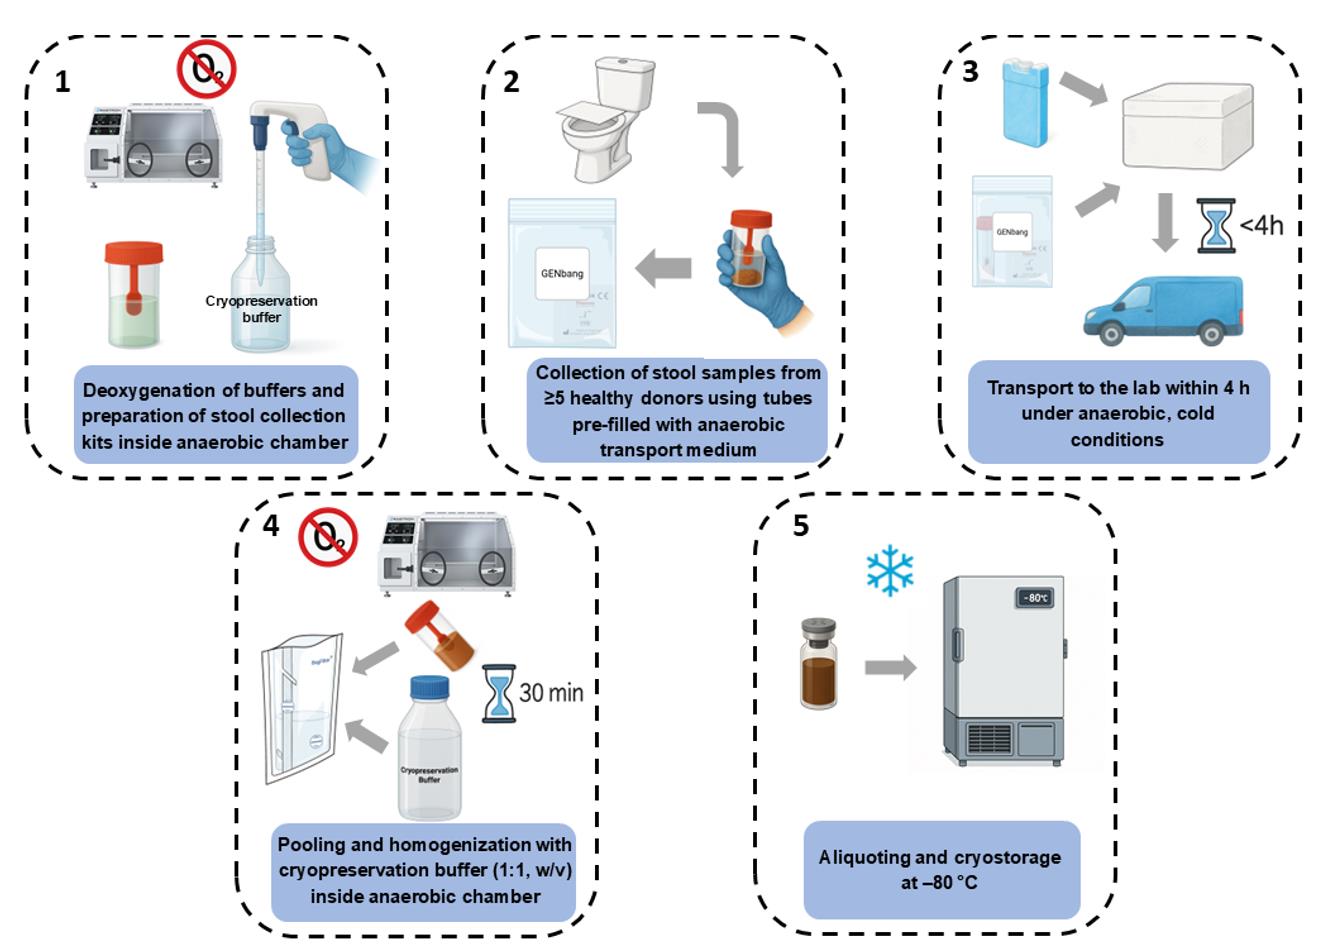
Figure 2. Workflow for anaerobic collection, pooling, and cryopreservation of human stool samples for in vitro microbiota studies
Day 3: Preparation of stool collection kits
7. Supplementing transport medium with Oxyrase: Thaw the Oxyrase reagent and introduce it into the anaerobic chamber. Supplement the transport medium with Oxyrase 0.1 mL per 5 mL of medium. Only the required volume of medium should be prepared (10 mL per donor). Perform supplementation after aliquoting the required volume (e.g., into a 50 mL Falcon tube), then mix gently.
Note: Oxyrase is a membrane-bound enzymatic system with strong oxygen-reducing activity that enzymatically scavenges dissolved and trapped oxygen within the sample and the headspace of the collection tube, rapidly creating and sustaining anaerobic conditions. Upon first use, thaw the stock bottle on ice. Immediately aliquot 1 mL portions into sterile 1.5 mL Eppendorf tubes under aseptic conditions. Aliquots should be refrozen promptly at -20 °C. Oxyrase can be repeatedly frozen and thawed up to 5 times without significant loss of enzymatic activity. When added to the medium, Oxyrase is capable of reducing residual oxygen within approximately 30 min, effectively minimizing oxygen exposure immediately upon stool contact. The resulting anaerobic environment is maintained for up to 16 days in sealed tubes, ensuring sample stability during transport or temporary storage. By suspending the fecal sample directly in this oxygen-scavenging medium, we are able to limit oxygen exposure to under 2 min, a critical threshold reported to preserve high viability of strict anaerobes [14].
8. Aliquot 10 mL of the supplemented transport medium into sterile stool collection tubes. Seal the tubes tightly and place them inside GENbag bags, which provide an oxygen-impermeable barrier and maintain anaerobic conditions upon closure. Seal the bags with a clip and remove them from the anaerobic chamber.
9. Any excess medium not immediately used (and not supplemented) can be stored. Seal the bottle with a GL45 stopper and an open-topped screw cap, and refrigerate at 4 °C. Before reuse, check the color (resazurin indicator) and turbidity to confirm that the medium remains anaerobic and uncontaminated.
10. Assembly of stool collection kits: Place the following items into an insulated transport box: ice pack, disposable gloves, a stool collection tube pre-filled with transport medium, sealed inside a GENbag airtight bag with a clip, flushable stool collection sheet, an anaerobic indicator strip, an anaerobic gas generator, a health status declaration form and written instructions for stool sample collection (S1), and an informed consent form (Figure 1C). Distribute the stool collection kits to the donors and provide clear instructions and training to ensure safe and hygienic sample collection. Stool collection kits should be stored in a refrigerator (4 °C), and the ice pack should be kept in a freezer (-20 °C) until use.
Note: Resazurin is included in the transport medium as a redox indicator, allowing for simple visual confirmation of anaerobic conditions. The absence of a pink hue indicates that oxygen has been effectively removed and that the medium is safe for stool collection. Following collection, the sample tube is placed inside a GENbag airtight bag containing a chemical oxygen scavenger and an anaerobic indicator strip. While the GENbag anaer system is commonly used in stool collection protocols, it presents an important limitation: it typically requires up to 30 min to establish anaerobic conditions after sealing. This delay can be detrimental for extremely oxygen-sensitive bacterial taxa, potentially compromising viability and downstream analysis. By contrast, the combination of Oxyrase and resazurin in our medium ensures that the sample is protected immediately upon contact and remains anaerobic during transport, with GENbag anaer serving as an additional barrier against reoxygenation.
Day 4: Stool sample collection by donors and cryopreservation
11. Sample collection: Donors should collect stool samples in the morning, if possible. Use flushable stool collection sheets placed over the toilet bowl to facilitate hygienic sample collection. While wearing disposable gloves, donors should use the integrated spatula attached to the tube cap to transfer stool into the collection tube containing 10 mL of transport medium supplemented with Oxyrase. The amount of stool should be sufficient to raise the liquid level to the 15 mL mark on the tube. Given the average density of stool (~1.06 g/mL) [14], this results in an approximate 1:2 dilution. The presence of Oxyrase provides immediate protection from oxygen exposure. Place the sealed collection tube into a GENbag airtight bag together with an anaerobic gas generator and an anaerobic indicator strip. Close the airtight bag tightly using a clip. Anaerobic conditions will be established inside the airtight bag within ~30 min. Immediately place the sealed GENbag into the insulated transport box with an ice pack. Donors should complete the accompanying documentation, including the health declaration and informed consent form. Samples must be delivered to the laboratory within 4 h of collection to ensure microbial viability.
Notes:
1. Fecal samples from a minimum of five healthy donors should be pooled to generate a standardized inoculum. Pooling improves microbial representativeness and reduces donor-specific bias.
2. Sample delivery should be coordinated with donors in advance to ensure that all fecal samples are collected and received on the same day. This minimizes variability due to storage time differences and facilitates immediate processing.
12. Transfer of samples into the anaerobic chamber: Immediately before introduction, place the sealed GENbag airtight bags containing the stool collection tubes directly into the chamber’s airlock. Flush the airlock three times with nitrogen gas to remove residual oxygen. Once inside the chamber, inspect anaerobic conditions with an anaerobic indicator and then open the GENbags and retrieve the collection tubes for further processing.
13. Inoculum preparation: Inside the anaerobic chamber, open each stool collection tube and transfer its contents into a filter-equipped stomacher bag. After pooling all samples, add an equal volume of pre-prepared cryopreservation medium (containing 20% glycerol), yielding a final 1:4 dilution (initial 1:2 dilution in the tube plus a 1:1 cryopreservation medium addition). Mix the contents thoroughly by hand-massaging the bag to achieve a uniform suspension and to disperse large particulates. Using a sterile straw with a BagPipet system, aspirate the clarified suspension from the post-filter compartment, carefully avoiding visible particulate matter. Aliquot 1 mL of the filtered suspension into borosilicate lyophilization vials. Seal each vial with a bromobutyl rubber septum using sterile forceps, then close it with the corresponding plastic screw cap.
Critical: Allow the sealed vials to stand at room temperature for 30 min to allow glycerol to penetrate the bacterial cells to ensure post-thaw viability of the gut microbiota.
14. After equilibration, transfer the vials to a -80 °C freezer for long-term storage.
Notes:
1. Borosilicate glass vials are well-suited for cryopreservation due to their autoclavability, low gas permeability, and high resistance to thermal shock during freezing. We recommend using bromobutyl rubber septa to seal cryovials, as they exhibit low oxygen permeability, ensuring the maintenance of anaerobic conditions during long-term storage. While it is often assumed that strict anaerobes are no longer sensitive to oxygen once frozen, exposure during the thawing phase can still compromise viability and community structure. The use of glass vials with gas-impermeable septa provides an added level of protection.
2. To reduce inter-individual variability and ensure reproducibility, we recommend generating a cryopreserved inoculum by pooling fecal samples from multiple healthy donors. This inoculum can be aliquoted and stored at -80 °C, allowing consistent experimental conditions across multiple batches.
B. Thawing and cultivation of cryopreserved gut microbiota
Note: The following procedures can be performed at a later time point, depending on the experimental design and intended downstream applications.
Day 1: Preparation of materials in the anaerobic chamber
1. Prepare concentrated stock solutions of test compounds in an appropriate solvent (e.g., DMSO, ethanol) according to their solubility and stability. Always include solvent-only controls at equivalent final concentrations in parallel experiments. Store stock solutions in glass vials with airtight screw caps or crimp caps with bromobutyl septa, preferably in amber glass to protect from light. Before use, deoxygenate the stocks in the anaerobic chamber. After deoxygenation, they may be sealed inside an airtight bag, closed tightly with a clip, and stored at 4 or -20 °C, depending on compound stability. This minimizes oxygen exposure during storage. To ensure accurate interpretation of experimental outcomes, the following control conditions are recommended:
Medium-only control (sterility control): contains only the culture medium without any inoculum. This control verifies the absence of contamination in the medium or plasticware.
Inoculum-only control (growth control): contains fecal inoculum and culture medium, without any added compounds. This control provides a reference for baseline microbial growth, composition, and metabolic activity under the tested cultivation conditions.
Vehicle control: contains inoculum, culture medium, and the solvent used to dissolve the test compound (e.g., DMSO, ethanol). This control is used to determine whether the solvent alone has any effect on microbial viability, composition, or metabolism. The final concentration of solvent does not exceed 1% v/v in the culture, as higher concentrations may interfere with microbial viability or metabolic activity.
Abiotic control: contains the test compound suspended in culture medium, without fecal inoculum. This control is essential when assessing microbial degradation of xenobiotics, as it determines the chemical stability of the compound under incubation conditions. A comparison between abiotic and test cultures allows researchers to distinguish between microbial transformation and non-biological processes such as spontaneous hydrolysis, oxidation, or adsorption to plasticware.
2. Before starting the cultivation process, introduce the following items into the anaerobic chamber via the airlock: a pre-activated palladium catalyst (heated at 200 °C for 8 h before use), sterile deep-well plates covered with aluminum foil or sterile Falcon tubes, depending on the desired culture volume, sterile, deoxygenated culture media and any required supplements (e.g., vitamins, blood, antibiotics), and sterile filter pipette tips. If your anaerobic media are stored in glass bottles sealed with stoppers, also include autoclaved GL45 blue screw caps, wrapped in foil, to allow resealing after dispensing or supplementation. Flush the airlock three times with nitrogen gas to ensure the removal of residual oxygen before transferring items into the chamber. Once inside, verify anaerobic conditions using an anaerobic indicator strip before proceeding.
Note: Any substance intended for addition to GM cultures, such as xenobiotics, pharmaceuticals, or food matrices, should be placed in the anaerobic chamber the day before use (at least 4 h in advance) to allow for adequate deoxygenation before use.
3. Supplementation of culture media (if applicable): If the selected culture medium requires supplementation, add the necessary components at this stage under anaerobic conditions. For example, when using Schaedler broth, supplement with 10% defibrinated sheep blood and vitamin K3. Note that the medium may temporarily change color due to residual oxygen introduced with the supplements. However, if the medium contains a reducing agent (e.g., L-cysteine hydrochloride), the oxygen will typically be neutralized within a few hours inside the anaerobic chamber. After supplementation, media bottles should be closed with loosely fitted screw caps (not rubber stoppers) to allow residual oxygen to be reduced under anaerobic conditions. Media intended for use can be placed overnight in a turned-off incubator.
Note: Media can be left in the chamber overnight; however, we do not recommend storing them inside the anaerobic chamber for more than 2–3 days, as this significantly increases the risk of contamination. Sterile pipette tips should not be stored inside the anaerobic chamber for more than one week, as prolonged exposure increases the risk of contamination and compromise of sterility.
Day 2: Inoculation and start of cultivation
4. Prewarming media: Turn on the incubator and set it to 37 °C. Use culture media that were previously placed in the incubator and allow them to equilibrate to the temperature for at least 1 h before inoculation.
5. Dispensing media: Under anaerobic conditions, dispense the supplemented culture media into the desired vessels for cultivation—either sterile deep-well plates or Falcon tubes, depending on the experimental setup. At this stage, you can add any test compounds (e.g., xenobiotics, drugs, food matrices, or probiotic strains) as per the experimental design.
Note: Culture media should be prepared and dispensed into the cultivation vessels in advance of inoculation to minimize the time that thawed GM remains in contact with glycerol. This is particularly important when processing a large number of samples, as it helps maintain microbial viability and ensures consistency across experimental conditions.
Optional: To simulate exposure during active microbial growth, test substances can be added after a short pre-incubation period (e.g., 2–4 h), allowing the GM to transition into the logarithmic growth phase. This approach may better reflect microbial metabolic activity at the time of exposure.
6. Thawing the microbiota inoculum: Retrieve the cryopreserved GM samples from the -80 °C freezer and rapidly immerse the cryovial in a 37 °C water bath, agitating gently until a small chunk of ice remains. Gently mix by hand while holding the vial to ensure even thawing. Immediately transfer the vials to the anaerobic chamber via the airlock, flushing the airlock three times with nitrogen gas.
Notes:
1. To avoid unnecessary exits from the anaerobic chamber and to conserve anaerobic gas, it is advisable to involve a second person to thaw the GM and pass the vials through the airlock as needed.
2. This protocol was validated in a previous study by assessing the viability and taxonomic diversity of cryopreserved human GM after thawing [13]. Propidium monoazide (PMA) treatment prior to 16S rRNA gene sequencing was used to selectively analyze viable bacterial cells. Despite a moderate decrease in alpha diversity metrics (Shannon effective count and richness), the post-thaw GM community retained substantial complexity and representativeness (Figure 3). Specifically, approximately 60% of unique bacterial taxa and ~75% of overall community complexity were preserved in the viable fraction after cryopreservation. It is worth noting that part of the apparent diversity loss may be due to the natural presence of non-viable or dead bacterial cells in the stool at the time of collection. Some microbial taxa are known to die before reaching the end of the gastrointestinal tract and are excreted in a non-culturable state [12]. These results are consistent with findings by Bellali et al. [15] who reported ~62% viability of gut microbiota following optimized cryopreservation, as determined by flow cytometry.
7. Inoculation: Once inside the chamber, gently resuspend the thawed GM and inoculate the culture media in deep-well plates or Falcon tubes. Alternatively, inoculate the full volume of media first and then dispense into individual wells or tubes. We recommend a final inoculum concentration of 2% v/v. This low inoculum level is appropriate for eutrophic culture media, which are rich in nutrients and support microbial growth without requiring a high biomass input [16]. The chosen concentration is consistent with previous studies using similar in vitro gut fermentation models [17].
8. Incubation: For deep-well plates, place them on an IKA MS 3 (or equivalent) orbital shaker. Up to two 96-well deep-well plates can be stacked and secured using aluminum foil covers and two rubber bands, allowing for up to 192 parallel cultivation wells per incubation run. This setup is ideal for high-throughput screening, enabling simultaneous testing of multiple variables such as donors, compounds, doses, or up to three time points (e.g., 0, 24, and 48 h). Incubate the plates inside the chamber or incubator at 37 °C with shaking at 300 rpm. For Falcon tubes, use a tube-compatible shaker placed inside a 37 °C incubator (10–20 cultures can be incubated per batch).
Note: The cultivation step is compatible with different scales depending on the experimental needs: 96-deep-well plates can be used for high-throughput screening of multiple conditions, while larger-volume cultures in Falcon tubes may be preferred for obtaining sufficient biomass or supernatant for biochemical or cellular assays. Experimental variables such as compound concentration, exposure time, or culture volume can be adjusted accordingly.
9. Sampling and downstream processing: Plates or tubes can be removed from the anaerobic chamber at designated time points (e.g., 24 or 48 h) depending on the experimental schedule.
a. For metabolomic analyses, it is recommended to stop microbial activity inside the anaerobic chamber to avoid oxygen-induced stress that may alter the metabolic profile. This can be achieved by adding ice-cold, HPLC-grade methanol (e.g., at a final concentration of 50%–80%) or a validated quenching solution directly to the culture wells or tubes before removal. Samples should then be stored at -80 °C and sonicated for 30 min in an ultrasonic bath before analysis to ensure complete homogenization.
b. For quantitative assessment of xenobiotic degradation by the GM, mix culture samples 1:1 (v/v) with acetonitrile immediately after incubation and store at -80 °C. Before analysis, sonicate samples for 30 min in an ultrasonic bath to ensure complete homogenization.
c. For microbiome sequencing, cultures can be removed from the chamber without prior inactivation. Transfer the culture fluid into 2 mL microcentrifuge tubes, then centrifuge at 10,000× g for 10 min at 4 °C. Separate the pellet (for DNA extraction and sequencing) from the supernatant, which can be used for, e.g., SCFA analysis or other assays of extracellular metabolites. Store samples in a -80 °C freezer.
d. To investigate GM–host interactions, particularly the effects of extracellular microbial metabolites and other secreted compounds on cells of choice, e.g., Caco-2, prepare post-culture supernatants. Centrifuge the post-culture samples at 10,000×g for 10 min at 4 °C and discard the pellet. Filter the supernatant through a 0.22 μm syringe filter to remove residual bacteria, then aliquot and store at -80 °C until use. For downstream experiments, thaw the filtered supernatant and dilute it in the appropriate cell culture medium (e.g., DMEM or RPMI) at ratios such as 1:6 or 1:10, depending on the sensitivity of the target cell line. The final dilution should be empirically determined using a viability assay (e.g., MTT or alamarBlue) to ensure that the treatment does not negatively impact cell survival. Filtered culture supernatants can be applied to intestinal epithelial cells, immune cells, or organoid models to evaluate the impact of microbial metabolites on cell viability, barrier integrity, cytokine production, gene expression, and inflammatory responses. This approach enables mechanistic studies linking GM activity to host physiology and disease-relevant pathways.
e. For endocrine activity assays, post-culture supernatants can be used to assess hormonal effects of xenobiotics and their metabolites using yeast-based estrogen (YES) and androgen (YAS) bioassays. Transfer supernatants to a clean tube and extract using ethyl acetate (1:1, v/v). Shake vigorously by hand, add magnesium sulfate to remove residual water, and centrifuge at 10,000× g for 10 min. Transfer the upper (organic) phase into a polypropylene 96-well plate and allow it to evaporate overnight at room temperature. Reconstitute the dried samples in 1% DMSO and inoculate with yeast strains expressing human estrogen or androgen receptors. After overnight incubation at 30 °C, assess colorimetric activity using CPRG substrate and calculate EC20 values. Each experiment should include the following controls to account for potential background hormonal activity: medium-only control (e.g., Schaedler broth and defibrinated sheep blood), vehicle control (e.g., solvent used in study), and microbiota-only control (medium and gut microbiota without xenobiotic). We recommend validating all media components used in culturing (e.g., Schaedler broth, sheep blood) in the yeast assay system to exclude potential endogenous hormonal activity that could confound results.
C. Viability assessment of the GM inoculum
1. To evaluate the viability of the gut microbiota inoculum after cryopreservation and/or in vitro cultivation, viability PCR using PMA is recommended. PMA selectively penetrates cells with compromised membranes (i.e., dead cells) and covalently binds their DNA upon photoactivation, preventing its amplification during downstream 16S rRNA gene sequencing.
2. Retrieve the cryopreserved GM samples from the -80 °C freezer and rapidly immerse the cryovial in a 37 °C water bath, agitating gently until a small chunk of ice remains. Gently mix by hand while holding the vial to ensure even thawing. Immediately transfer the vials to the anaerobic chamber via the airlock, flushing the airlock three times with nitrogen gas.
3. Transfer an aliquot of the culture to a sterile microcentrifuge tube. Add 20 mM PMAxxTM to reach a final concentration of 50 μM.
4. Vortex for 20 s and incubate in the dark at 37 °C for 20 min, vortexing briefly every 5 min.
5. Next, expose the samples to strong LED light using a PMA-Lite photolysis device for 20 min, vortexing every 5 min to ensure even exposure.
6. Centrifuge the samples at 5,000× g for 10 min, discard the supernatant, and store the pellet at -80 °C for DNA extraction.
7. For negative control (non-PMA-treated aliquots), incubate in parallel at room temperature without light exposure.
8. Extract DNA from PMA-treated and untreated pellets using a validated method (e.g., bead-beating and commercial kit).
9. Proceed with 16S rRNA gene sequencing to assess viable community diversity and composition.
Data analysis
1. Prepare a manifest file listing file paths and sample IDs and import raw sequencing data (single-end or paired-end FASTQ files) using QIIME 2 (v2025.7).
2. Perform primer trimming using the cutadapt plugin. For single-end reads, trim the forward primer (e.g., CCTACGGGNGGCWGCAG). For paired-end reads, trim both forward and reverse primers. Optionally discard untrimmed reads.
3. Generate quality plots using demux summarize to inspect read quality and determine truncation parameters.
4. Denoise the trimmed sequences using Deblur with a fixed trimming length. The outputs include a feature table (.qza), representative sequences (.qza), and denoising statistics (.qzv).
5. Filter rare ASVs using feature-table filter-features-conditionally, applying thresholds for minimum relative abundance (e.g., ≥0.25%) and presence in at least three samples.
6. Align representative sequences with MAFFT, mask hypervariable regions, and construct a phylogenetic tree with FastTree. Root the tree at its midpoint using midpoint-root.
7. Compute alpha and beta diversity metrics using diversity core-metrics-phylogenetic, specifying a rarefaction depth optimized per dataset. Compute Bray–Curtis dissimilarity and visualize it using Principal Coordinates analysis (PCoA). Perform PERMANOVA for statistical testing of group differences, including pairwise comparisons. Visualize PCoA results using the Emperor plugin.
8. Import the filtered feature table (table.qza), rooted tree (rooted-tree.qza), taxonomy file (taxonomy.qza), and sample metadata (metadata.tsv) into R using the qza_to_phyloseq() function (qiime2R package).Rarefy the dataset with rarefy_even_depth() to normalize sequencing depth across samples.
9. Calculate the Shannon effective count by exponentiating the Shannon diversity index in R using the phyloseq package. Export the resulting table for statistical analysis. Conduct group-wise comparisons using the Mann–Whitney U test.
10. Calculate observed richness (i.e., the number of unique ASVs per sample) in R using the phyloseq package. Export the resulting table for statistical analysis. Conduct group-wise comparisons using the Mann–Whitney U test.
11. Cryopreservation is considered successful when both of the following criteria are met:
a. At least 70% of the Shannon effective count was retained in cryopreserved samples compared to untreated aliquots.
b. At least 60% of observed ASV richness was preserved following thawing.
These viability thresholds were derived from the current dataset (see Figure 3) and are consistent with prior literature benchmarks. Specifically, we adopted the ~60%–65% viability range reported by Bellali et al. [15].
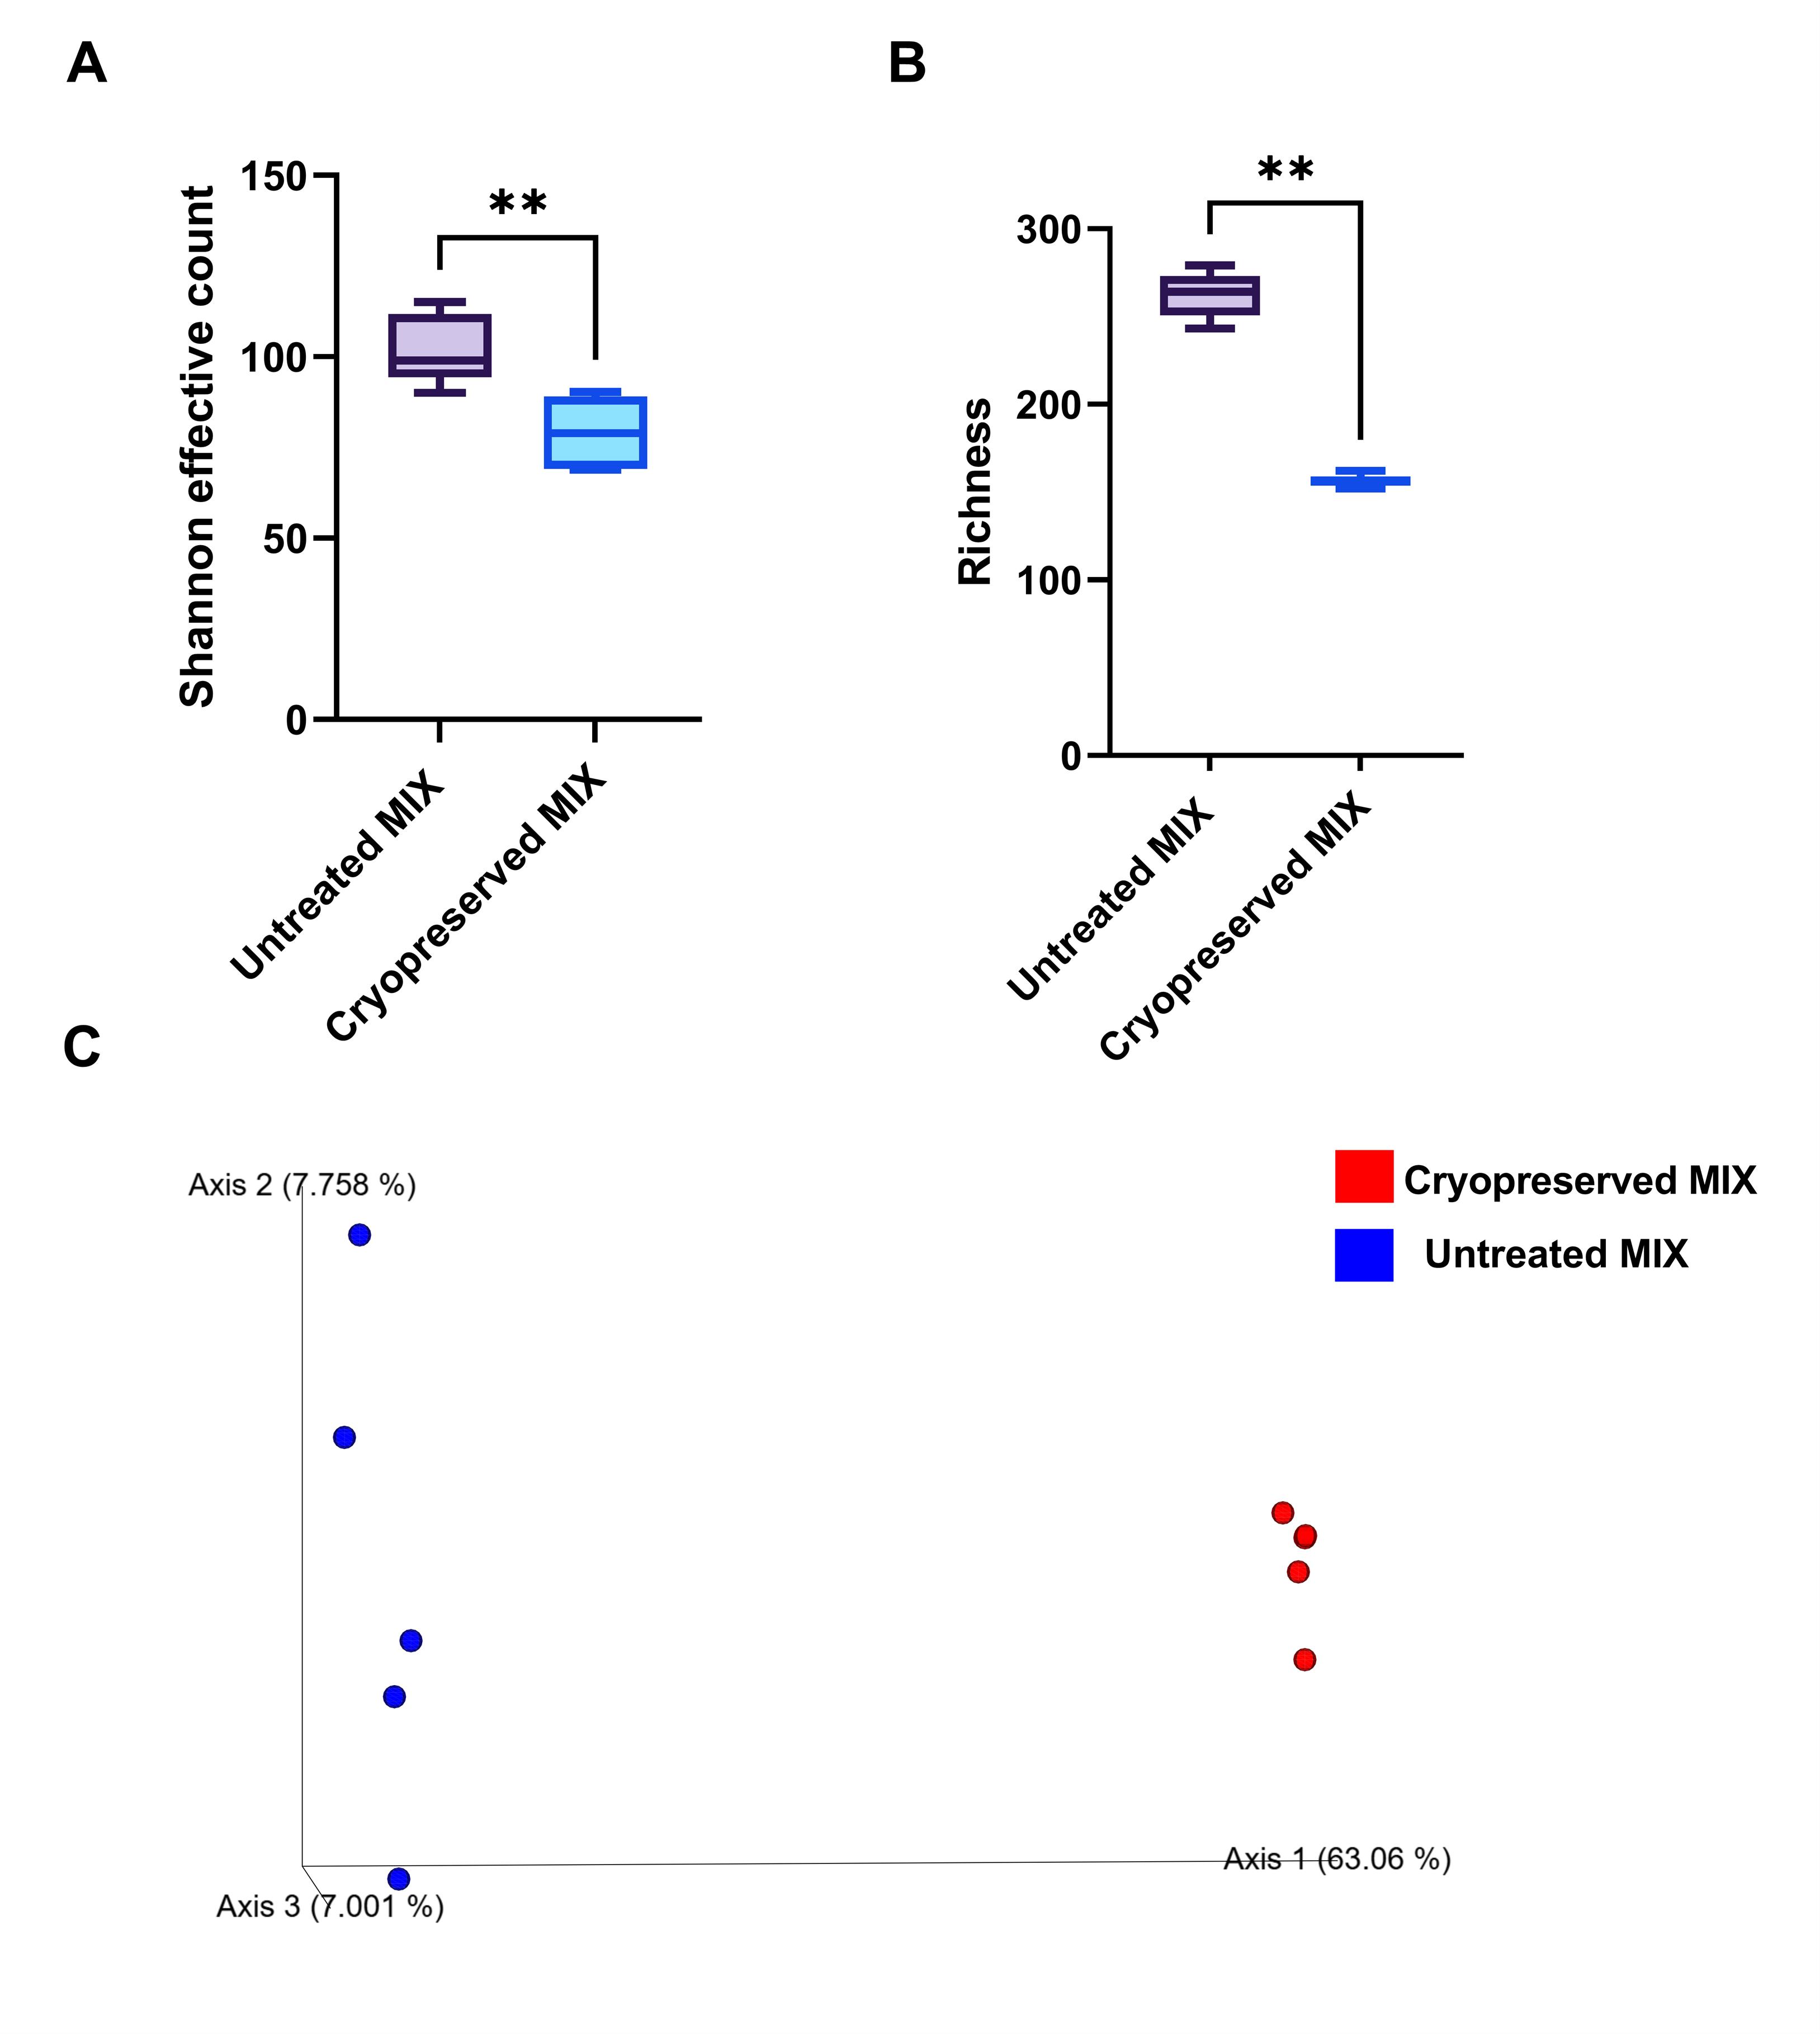
Figure 3. Viability and diversity of gut microbiota (GM) inoculum after cryopreservation. (A) Shannon effective count and (B) observed richness were assessed in two conditions: the original, untreated GM inoculum (Untreated MIX) and the same inoculum after cryopreservation and thawing, with viability assessed using PMA (Cryopreserved MIX). (C) Principal coordinates analysis (PCoA) based on Bray–Curtis dissimilarity illustrates beta diversity differences between viable bacterial communities in untreated and cryopreserved samples. Statistical analysis: Mann–Whitney U test for alpha diversity (P < 0.01; n = 5); PERMANOVA for beta diversity (P = 0.006, n = 5). Panels A and B were adapted from Średnicka et al. [13].
Validation of protocol
This protocol (or parts of it) has been used and validated in the following research articles:
Średnicka et al. [2]. Influence of bisphenol A and its analogues on human gut microbiota composition and metabolic activity: Insights from an in vitro model. Science of The Total Environment.
Średnicka et al. [13]. Effect of in vitro cultivation on human gut microbiota composition using 16S rDNA amplicon sequencing and metabolomics approach. Scientific Reports (Figure 3)
General notes and troubleshooting
General notes
1. Never place dry ice inside the anaerobic chamber. Sublimation of CO2 in a sealed environment can lead to dangerous overpressurization, potentially resulting in chamber damage or rupture. Instead, use ice packs or regular ice for cooling purposes inside the chamber.
2. Always keep spare gas cylinders (nitrogen and anaerobic gas mix) and a wrench for quick replacement. Running out of gas during an experiment can compromise anaerobic conditions and lead to the loss of valuable samples.
Troubleshooting
| Problem | Possible reason | Solution |
| Anaerobic conditions not maintained in the chamber—pink coloration of the anaerobic indicator | 1. Leaks in the system 2. Introduction of residual oxygen with equipment or media 3. Glove sleeves worn over clothing, leading to loss of airtight seal 4. Punctured or loose gloves | 1. Check whether the airlock door is properly sealed and the glove ports are airtight. 2. Inspect the gloves for damage. A punctured glove may cause pressure loss, often visible as deflated gloves. If this occurs, close the glove port valves and replace the gloves before continuing. 3. Always wear the gloves directly on bare skin. Wearing them over clothing sleeves can compromise the airtight seal, preventing proper chamber function. 4. Introducing a large volume of equipment or media may inadvertently introduce residual oxygen. 5. If the anaerobic indicator turns light pink, leave the chamber closed and unoccupied to allow the palladium catalyst to scavenge oxygen. 5. If the indicator is dark pink, indicating high oxygen levels, and no leaks are detected, initiate a commissioning cycle (~4 h) to restore anaerobic conditions. 6. Reactivate palladium catalyst. |
| Frequent gas injection cycles/unstable chamber pressure | 1. Thermal expansion of gases due to increased temperature inside the chamber 2. Small leaks (e.g., around gloves or airlock door) 3. Low water level in the chamber manometer | 1. A slight increase in chamber temperature can cause gas expansion, leading to pressure fluctuations. This is a normal phenomenon and not a cause for concern. 2. Check glove ports and airlock seals for leaks. Even minor leaks can trigger frequent gas injections. Repair or replace components as needed. 3. Inspect the chamber manometer inside the chamber. If the water level is too low, the system may not maintain back pressure properly, causing excessive gas injection. Refill the water trap to the recommended level using distilled water. |
| Cracked or damaged O-rings on glove ports | 1. UV degradation of plastic components due to prolonged sunlight exposure | 1. Prolonged exposure to direct sunlight can damage the plastic parts, making them fragile and likely to crack. 2. To prevent this, minimize exposure of the chamber to direct sunlight and, if possible, use UV-blocking covers or window films. Replace O-rings regularly as part of preventive maintenance. Always keep spare O-rings and gloves on hand to enable immediate replacement in case of damage or leaks. |
| Excessive gas release from the chamber during use | 1. Sudden or forceful arm movements create rapid pressure changes, leading to unnecessary gas loss | 1. Avoid abrupt movements when inserting or withdrawing hands from the glove ports. Always insert one arm slowly while simultaneously withdrawing the other, maintaining pressure balance. Observe the chamber manometer; if bubbles are continuously released during use, this indicates inefficient handling. Smooth, controlled movements minimize gas consumption and help maintain stable anaerobic conditions. |
| Contamination—turbidity in culture media or blank controls | 1. Contaminated media or poor aseptic technique 2. Old or exposed pipette tips 3. Inadequate surface disinfection | 1. Always inspect media visually for turbidity or discoloration before use. Never inoculate media from a suspicious batch. 2. Always include a blank medium control in each experiment to detect contamination. 3. Do not store sterile pipette tips in the anaerobic chamber for longer than one week, as prolonged exposure may compromise sterility. 4. Disinfect all surfaces inside the chamber with benzalkonium chloride solution before and after use. Periodically, use a chlorine-based wipe for deep cleaning. 5. Do not store waste under the chamber, as it may serve as a contamination source. 6. Maintain strict aseptic technique when working with media and samples. 7. If your anaerobic chamber is not equipped with a built-in HEPA filtration system, consider using an external UV air sterilization unit to reduce airborne microbial contamination. |
| Pink coloration of resazurin-containing media and buffers | 1. Presence of dissolved oxygen due to insufficient deoxygenation time 2. Addition of supplements containing residual oxygen 3. Lack of reducing agents in the medium (e.g., L-cysteine hydrochloride) 4. Inadequate anaerobic conditions in the chamber 5. Alkaline pH of the medium or buffer | 1. Allow media to deoxygenate for at least 4 h, preferably overnight, in the anaerobic chamber before use. 2. After adding oxygenated supplements (e.g., blood, vitamins), wait several hours for full reduction to occur. 3. Ensure the medium formulation includes a reducing agent (e.g., L-cysteine hydrochloride, sodium thioglycolate). 4. Verify anaerobic conditions in the chamber with an indicator strip; troubleshoot leaks or system failure if the indicator remains pink. 5. Confirm that the pH is within the optimal range (7.0 ± 0.2) before autoclaving. Alkaline pH can cause resazurin to appear intensely pink even under anaerobic conditions. |
| Condensed water accumulates in deep-well plate wells after autoclaving | 1. Steam condensation during cooling, especially in sealed or foil-covered plates | 1. After autoclaving, place the plates in a drying oven at 60–70 °C for 15–30 min with the foil slightly lifted to allow evaporation of residual moisture. Ensure plates are completely dry before use to avoid unwanted dilution of media and inconsistent culture volumes. |
Supplementary information
The following supporting information can be downloaded here:
1. Supplementary material S1. Stool sample collection guidelines and donor questionnaire
2. Supplementary material S2. Summary sheet of experimental workflow
Acknowledgments
All authors contributed to the development and optimization of the methods described in this protocol. P.Ś. wrote the manuscript with input and critical revisions from P.E. and M.W. Figures were prepared by P.Ś. and P.E. This work was supported by Prof. Wacław Dąbrowski Institute of Agricultural and Food Biotechnology—State Research Institute, Project No. ZM-142-01. Figures were prepared using a combination of original and AI-assisted graphic elements (OpenAI DALL·E), assembled in Microsoft PowerPoint.
Competing interests
The authors declare that they have no competing interests. No author has received any financial support or other benefits from any organization or entity that may have an interest in the subject matter of this article.
Ethical considerations
This protocol was approved by the Research Ethics Committee with Human Participation at the Warsaw University of Life Sciences (SGGW), Poland (No. 23/2021). All donors gave written informed consent before participation. Samples were anonymized and handled in line with international ethical guidelines [18].
References
- Qi, Y., Yu, L., Tian, F., Zhao, J. and Zhai, Q. (2023). In vitro models to study human gut-microbiota interactions: Applications, advances, and limitations. Microbiol Res. 270: 127336. https://doi.org/10.1016/j.micres.2023.127336
- Średnicka, P., Roszko, M., Emanowicz, P., Wójcicki, M., Popowski, D., Kanabus, J. and Juszczuk-Kubiak, E. (2024). Influence of bisphenol A and its analogues on human gut microbiota composition and metabolic activity: Insights from an in vitro model. Sci Total Environ. 956: 177323. https://doi.org/10.1016/j.scitotenv.2024.177323
- Giambò, F., Costa, C., Teodoro, M. and Fenga, C. (2022). Role-Playing Between Environmental Pollutants and Human Gut Microbiota: A Complex Bidirectional Interaction. Front Med. 9: e810397. https://doi.org/10.3389/fmed.2022.810397
- Collins, S. L. and Patterson, A. D. (2020). The gut microbiome: an orchestrator of xenobiotic metabolism. Acta Pharmaceutica Sinica B 10(1): 19–32. https://doi.org/10.1016/j.apsb.2019.12.001
- Jin, Y., Chi, J., LoMonaco, K., Boon, A. and Gu, H. (2023). Recent review on selected xenobiotics and their impacts on gut microbiome and metabolome. TrAC, Trends Anal Chem. 166: 117155. https://doi.org/10.1016/j.trac.2023.117155
- Clarke, G., Sandhu, K. V., Griffin, B. T., Dinan, T. G., Cryan, J. F. and Hyland, N. P. (2019). Gut Reactions: Breaking Down Xenobiotic–Microbiome Interactions. Pharmacol Res. 71(2): 198–224. https://doi.org/10.1124/pr.118.015768
- Matsuzaki, R., Gunnigle, E., Geissen, V., Clarke, G., Nagpal, J. and Cryan, J. F. (2023). Pesticide exposure and the microbiota-gut-brain axis. ISME J. 17(8): 1153–1166. https://doi.org/10.1038/s41396-023-01450-9
- Zhang, Y., Chen, R., Zhang, D., Qi, S. and Liu, Y. (2023). Metabolite interactions between host and microbiota during health and disease: Which feeds the other?. Biomed Pharmacother. 160: 114295. https://doi.org/10.1016/j.biopha.2023.114295
- Emanowicz, P., Średnicka, P., Wójcicki, M., Roszko, M. and Juszczuk-Kubiak, E. (2024). Mitigating Dietary Bisphenol Exposure Through the Gut Microbiota: The Role of Next-Generation Probiotics in Bacterial Detoxification. Nutrients. 16(21): 3757. https://doi.org/10.3390/nu16213757
- De Filippis, F., Valentino, V., Sequino, G., Borriello, G., Riccardi, M. G., Pierri, B., Cerino, P., Pizzolante, A., Pasolli, E., Esposito, M., et al. (2024). Exposure to environmental pollutants selects for xenobiotic-degrading functions in the human gut microbiome. Nat Commun. 15(1): 4482. https://doi.org/10.1038/s41467-024-48739-7
- Średnicka, P., Juszczuk-Kubiak, E., Wójcicki, M., Akimowicz, M. and Roszko, M. Å. (2021). Probiotics as a biological detoxification tool of food chemical contamination: A review. Food Chem Toxicol. 153: 112306. https://doi.org/10.1016/j.fct.2021.112306
- Bellali, S., Lagier, J. C., Million, M., Anani, H., Haddad, G., Francis, R., Kuete Yimagou, E., Khelaifia, S., Levasseur, A., Raoult, D., et al. (2021). Running after ghosts: are dead bacteria the dark matter of the human gut microbiota?. Gut Microbes. 13(1): e1897208. https://doi.org/10.1080/19490976.2021.1897208
- Średnicka, P., Roszko, M. Å., Popowski, D., Kowalczyk, M., Wójcicki, M., Emanowicz, P., Szczepańska, M., Kotyrba, D. and Juszczuk-Kubiak, E. (2023). Effect of in vitro cultivation on human gut microbiota composition using 16S rDNA amplicon sequencing and metabolomics approach. Sci Rep. 13(1): 3026. https://doi.org/10.1038/s41598-023-29637-2
- Brown, D. M., Butler, D., Orman, N. R. and Davies, J. W. (1996). Gross solids transport in small diameter sewers. Water Sci Technol. 33(9): 25–30. https://doi.org/10.2166/wst.1996.0168
- Bellali, S., Lagier, J. C., Raoult, D. and Bou Khalil, J. (2019). RETRACTED: Among Live and Dead Bacteria, the Optimization of Sample Collection and Processing Remains Essential in Recovering Gut Microbiota Components. Front Microbiol. 10: e01606. https://doi.org/10.3389/fmicb.2019.01606
- Pérez-Burillo, S., Molino, S., Navajas-Porras, B., Valverde-Moya, Ã. J., Hinojosa-Nogueira, D., López-Maldonado, A., Pastoriza, S. and Rufián-Henares, J. Ã. (2021). An in vitro batch fermentation protocol for studying the contribution of food to gut microbiota composition and functionality. Nat Protoc. 16(7): 3186–3209. https://doi.org/10.1038/s41596-021-00537-x
- Li, L., Abou-Samra, E., Ning, Z., Zhang, X., Mayne, J., Wang, J., Cheng, K., Walker, K., Stintzi, A., Figeys, D., et al. (2019). An in vitro model maintaining taxon-specific functional activities of the gut microbiome. Nat Commun. 10(1): e1038/s41467–019–12087–8. https://doi.org/10.1038/s41467-019-12087-8
- Council for International Organizations of Medical Sciences (CIOMS) International Ethical Guidelines for Health-Related Research Involving Humans. 8. CIOMS; 2016.
Article Information
Publication history
Received: Jul 29, 2025
Accepted: Sep 29, 2025
Available online: Oct 17, 2025
Published: Nov 5, 2025
Copyright
© 2025 The Author(s); This is an open access article under the CC BY-NC license (https://creativecommons.org/licenses/by-nc/4.0/).
How to cite
Średnicka, P., Emanowicz, P. and Wójcicki, M. (2025). Optimized Protocol for the Collection, Cryopreservation, and In Vitro Cultivation of Human Gut Microbiota for Toxicomicrobiomics Applications. Bio-protocol 15(21): e5498. DOI: 10.21769/BioProtoc.5498.
Category
Microbiology > Community analysis > Gnotobiotic system
Biological Sciences > Microbiology > Microbial communities > Microbiome
Systems Biology > Microbiomics
Do you have any questions about this protocol?
Post your question to gather feedback from the community. We will also invite the authors of this article to respond.