- Protocols

- Articles and Issues
- For Authors
- About
- Become a Reviewer

Surgical Implantation of a Telemetry-Based Pressure Sensor in the Internal Jugular Vein to Monitor Respiration Wirelessly
Published: Vol 15, Iss 12, Jun 20, 2025 DOI: 10.21769/BioProtoc.5343 Views: 1707
Reviewed by: Anonymous reviewer(s)
Original research article
The authors used this protocol in:

Jul 2024
Advertisement


Protocol Collections
Comprehensive collections of detailed, peer-reviewed protocols focusing on specific topics


Abstract
Active sampling, such as respiration, is known to play a major role in modulating how sensory information is perceived and encoded in the field of olfaction. Hence, monitoring respiration is crucial for understanding olfactory-guided behavior and physiology. Several methods used to measure respiration, such as infrared cameras, piezoelectric sensors, video monitoring, temperature probes, intubation, and intranasal cannula, require the animal or at least its head to be fixed. However, telemetry-based sensors can be used wirelessly, allowing animals to move freely. Here, we describe the surgical protocol to implant a telemetry pressure sensor in the internal jugular vein to detect changes in thoracic pressure. The sensor can thus help in monitoring respiration by transmitting the signal wirelessly. We describe a way of inserting the probe into the right jugular vein aseptically while housing the transmitter underneath the skin on the back of the animal. Next, based on the optimal spot for the best signal, we secure the position of the probe and suture the skin. The animal then undergoes regular post-operative care with painkillers and soft diets for up to a week. The method offers two main advantages; first, it uses a strategy similar to the jugular vein catheterization, which is widely established in rodents. Second, it minimizes the need for extensive post-operative care, including not having to shift to a liquid diet post-recovery. This makes the animals fit for most behavioral experiments requiring water or food restrictions.
Key features
• Based on Dasgupta et al. [1], this protocol describes the surgical procedure involved in the aseptic implantation of the telemetry-based pressure sensor in the internal jugular vein.
• Reduces the need for extensive post-operative care and eliminates dietary restrictions post-recovery.
• The procedure helps in obtaining mice with an implanted sensor for wireless respiration recording.
Keywords: Wireless respiration recordingGraphical overview
Background
Breathing patterns have been linked to rhythms occurring at different regions of the brain [2] and have been associated with distinct physiological states, e.g., sleeping [1] and attention [3], and diseased states [4], e.g., Parkinson's disease [4–6] and Alzheimer's disease [7–9]. Given that respiration has been observed to be coupled with such different behavioral states, it is important to monitor it simultaneously while estimating other behavioral and physiological parameters. Different methods have been developed to monitor respiration in different model organisms [10]. In rodents, some of those methods [11] are whole-body plethysmography [12], infrared cameras [13], piezoelectric sensors [14–16], video monitoring [17], temperature probes [18], intubation [19], intranasal cannula for flow/pressure sensing [19], face masks [20,21], and telemetry-based sensing [1,22]. However, only a few can be used for freely behaving animals, which is critical during ethologically relevant tasks like navigation.
The mammalian olfactory system has been observed to be capable of perceiving and encoding odors with a high temporal bandwidth [23–26], which gets multiplexed with the sampling rate, which is controlled by the respiration frequency [27–29]. Navigation is a critical feature in animals, and the use of the sense of smell in navigation has been observed in different organisms [30–32], including humans [33–35]. Monitoring respiration during such odor-guided tasks is critical, as active sampling has been observed to be crucial in modulating sensory perception [1,29,36–40]. These experiments would require unrestrained movement of the animal, thus requiring an untethered method of monitoring respiration. Most of the usual respiration monitoring methods require the animal to be restricted at least to the extent of head fixation and hence are not suitable for tasks involving freely moving mice.
In 2014, Reisert et al. came up with a novel method that required implanting a telemetry pressure sensor in the thoracic cavity alongside the wall of the esophagus [22]. However, this method required intensive post-operative care and switching to a liquid diet post-surgery. This can be a problem for behavioral training protocols requiring water restriction. Here, we describe a protocol that uses a novel surgical approach that reduces post-operative care and the need for a liquid diet after surgery. We established a way to implant the pressure sensor tip of the probe through the internal jugular vein into the thoracic cavity while securing the transmitter on the back of the animal underneath the skin. After recovery, the animal can lead a normal life without any diet restrictions and hence can be used for regular behavioral assays.
Materials and reagents
Biological materials
1. 6–8 weeks old mice (C57/Bl6) (males and females)
Reagents
Pre-surgery
1. Meloxicam oral suspension (1.5 mg/mL) (Metacam, Boehringer Ingelheim Animal Health USA Inc., Item code: NDC:0010-6015)
2. Meloxicam for injection (5 mg/mL) (Metacam, Boehringer Ingelheim Animal Health USA Inc., Item code: NDC:0010-6013)
3. Fentanyl (Hameln Pharma, ATC code: N01AH01)
4. Midazolam (Hameln Pharma, ATC code: N05CD08)
5. Medetomidine (Virbac, CAS No.: 86347-14-0)
6. Chlorhexidine (Merck, CAS No.: 55-56-1)
7. Chloramphenicol (eye ointment) (Ethypharm, ATC code: S01AA01)
8. Egg custard (for babies) (Cowgate)
9. Buprenorphine (Reckitt & Colman, CAS No.: 52485-79-7)
10. Trigene/Anistel (Ceva Animal Health Pty Ltd, catalog number: APVMA59998)
Surgery
1. NaCl (Merck, CAS No.: 7647-14-5)
Post-surgery
1. Naloxone (Hameln Pharma, ATC code: V03AB15)
2. Flumazenil (Hameln Pharma, ATC code: V03AB25)
3. Atipamezole (Dechra, product code: 0DEA070)
4. Emla cream (Aspen, ATC code: N01BB20)
Solutions
1. Sterile saline solution (see Recipes)
2. Anesthesia mix solution (see Recipes)
3. Wake mix solution (see Recipes)
4. Oral analgesic (see Recipes)
5. Chlorhexidine solution (see Recipes)
Recipes
1. Sterile saline solution
| Reagent | Final concentration | Quantity or volume |
| NaCl | 0.9% (w/v) | 8.5g |
| Distilled water | - | 1 L |
| Total | - | 1 L |
2. Anesthesia mix solution
| Reagent | Final concentration | Quantity or volume |
| Water for injection (sterile) | - | 15 mL |
| Fentanyl | 50 μg/mL | 2 mL |
| Midazolam | 5 mg/mL | 2 mL |
| Medetomidine | 1 mg/mL | 1 mL |
| Total | - | 20 mL |
Notes:
1. Anesthesia mix working dose is 0.05 mg/kg fentanyl + 5 mg/kg midazolam + 0.5 mg/kg medetomidine.
2. Inject 0.1 mL of anesthesia mix per 10 g of mouse body weight.
3. Wake mix solution
| Reagent | Final concentration | Quantity or volume |
| Flumazenil | 0.1 mg/mL | 10 mL |
| Naloxone | 400 μg/mL | 6 mL |
| Water for injection (sterile) | - | 3 mL |
| Atipamezole | 5 mg/mL | 1 mL |
| Total | - | 20 mL |
Notes:
1. Wake mix working dose is 1.2 mg/kg naloxone + 0.5 mg/kg flumazenil + 2.5 mg/kg atipamezole.
2. Inject 0.1 mL of wake mix per 10 g of mouse body weight.
4. Oral analgesic
| Reagent | Final concentration | Quantity or volume |
| Metacam oral suspension | 1.5 mg/mL | 1 mL |
| Egg custard | - | 1 mL |
| Total | - | 2 mL |
5. Chlorhexidine solution (25% v/v)
| Reagent | Final concentration | Quantity or volume |
| Chlorhexidine | - | 25 mL |
| Water | - | 75 mL |
| Total Volume | - | 100 mL |
Laboratory supplies
1. 500 mL plastic beaker (Merck, catalog number: BR90224)
2. 50 mL glass beaker (Merck, catalog number: CLS100050)
3. 50 mL centrifuge tubes (Merck, catalog number: CLS430829)
4. Sterile drape non-absorbent 35 × 50 cm (Vet Direct, catalog number: DRP005)
5. Syringe, 1 and 3 mL (BD microfine, catalog number: 00382903096244 and 00382903096565)
6. Transparent film (Glad Press N Seal) (The Glad Products Company, catalog number: TMMDH)
7. Suture thread (6-O silk) (Ethicon, Johnson & Johnson, USA, catalog number: NW5029)
8. Sterile cotton buds (Medline Scientific, SKU: 300230S)
9. Face mask (MediSupplies, catalog number: AEC8720)
10. Sterile gloves (MediSupplies, catalog number: PMC3066)
11. Non-sterile gloves (Merck, catalog number: Z412392)
12. Non-woven swabs (MediSupplies, catalog number: PMC1987)
Equipment
Pre-surgery
1. Mice hair shaver (Wella Professionals, model: Contura Hair Clipper)
2. Weighing scale (Merck, model: CR221)
Surgery
1. Stereomicroscope (Leica Microsystems, model: M80)
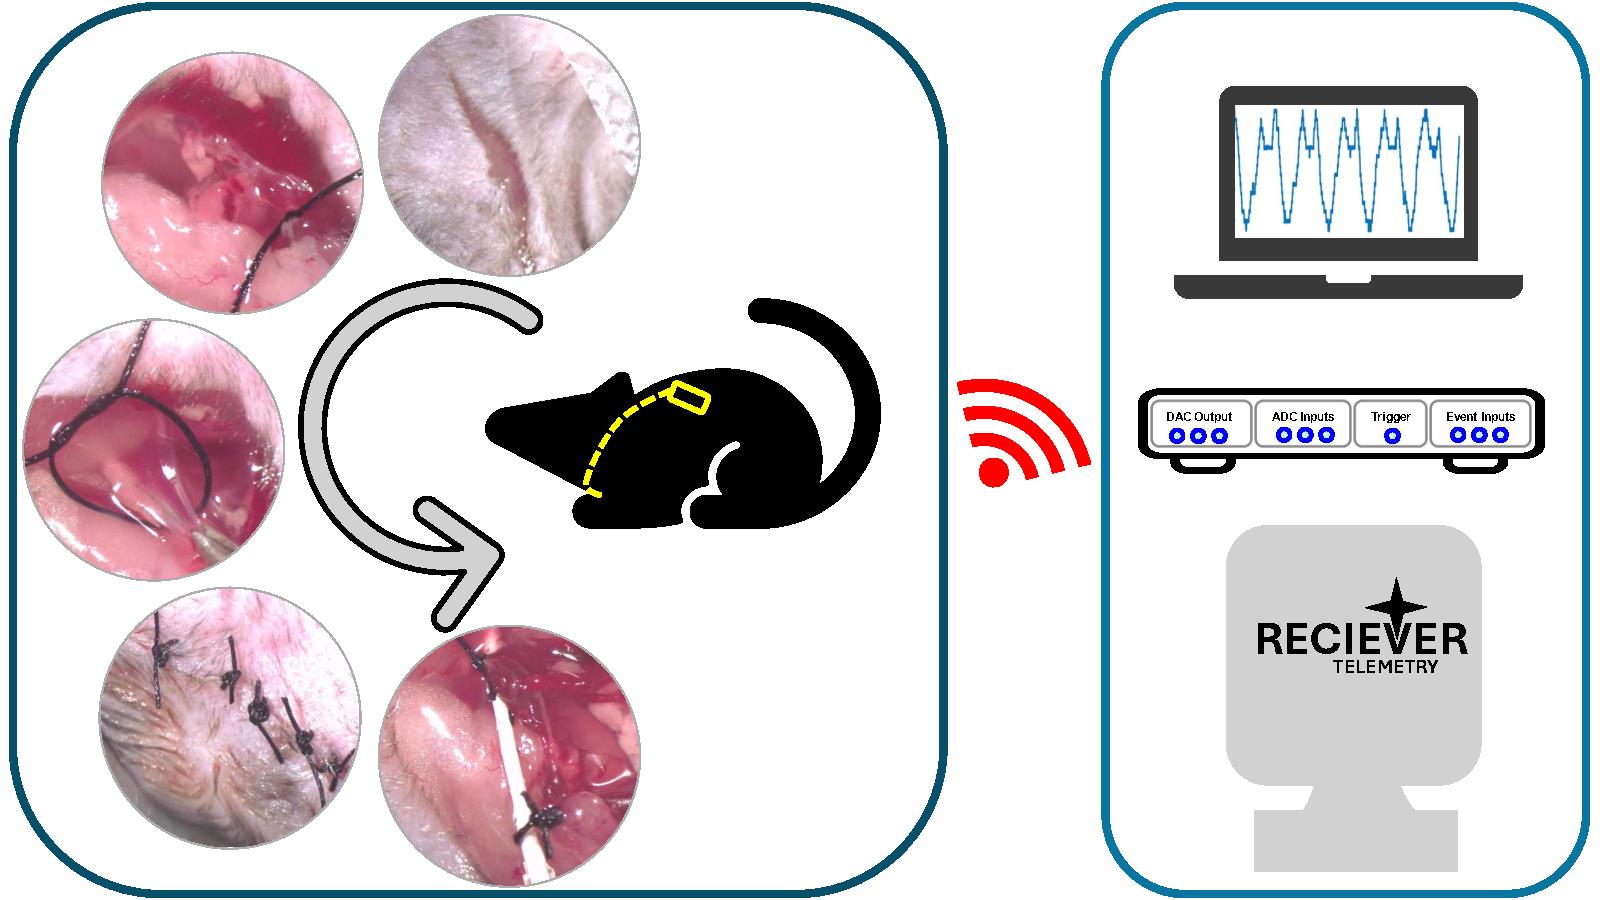
2. Micro Serrefines (venous clips) (Fine Science Tools, catalog number: 18055-01) (Figure 1A7).
3. Extra fine Graefe forceps (Fine Science Tools, catalog number: 11151-10) (Figure 1A4).
4. Adson tissue forceps, 12.0 cm, 1 × 2 teeth, with suture platform, 2 stoppings, 0.8 mm (blunt forceps) (Harvard Apparatus, catalog number: ST2 72-8573) (Figure 1A2).
5. Jeweler’s forceps, titanium, 11.0 cm, No. 4, extra delicate tips, 45°angle (Harvard Apparatus, catalog number: ST2 72-0461) (Figure 1A3).
6. Probe, double-ended (Harvard Apparatus, catalog number: ST2 72-8913) (Figure 1A8).
7. Eye scissors, 11.5 cm, straight (Harvard Apparatus, catalog number: ST2 72-8428) (Figure 1A5).
8. Olsen-Hegar needle holders with scissors and tungsten carbide jaws straight, serrated (mosquito scissor) (Harvard Apparatus, catalog number: ST2 72-88980)
9. Analogue to digital converter (Cambridge Electronic Design Limited, model: CED Micro1401 with ADC12 expansion)
10. Computer
11. Stellar implantable transmitter for mice (10× normal gain, TSE Systems, catalog number: E-430001-IMP-22) (Figure 1B).
12. Stellar receiver and antenna (TSE Systems, catalog number: 430001-REC-01)
13. Temperature monitor probe (FHC, catalog number: 40-90-5D-02)
14. Heating pad (FHC, catalog number: 40-90-2-07)
15. Mice temperature controller (FHC, catalog number: 40-90-8D-DC)
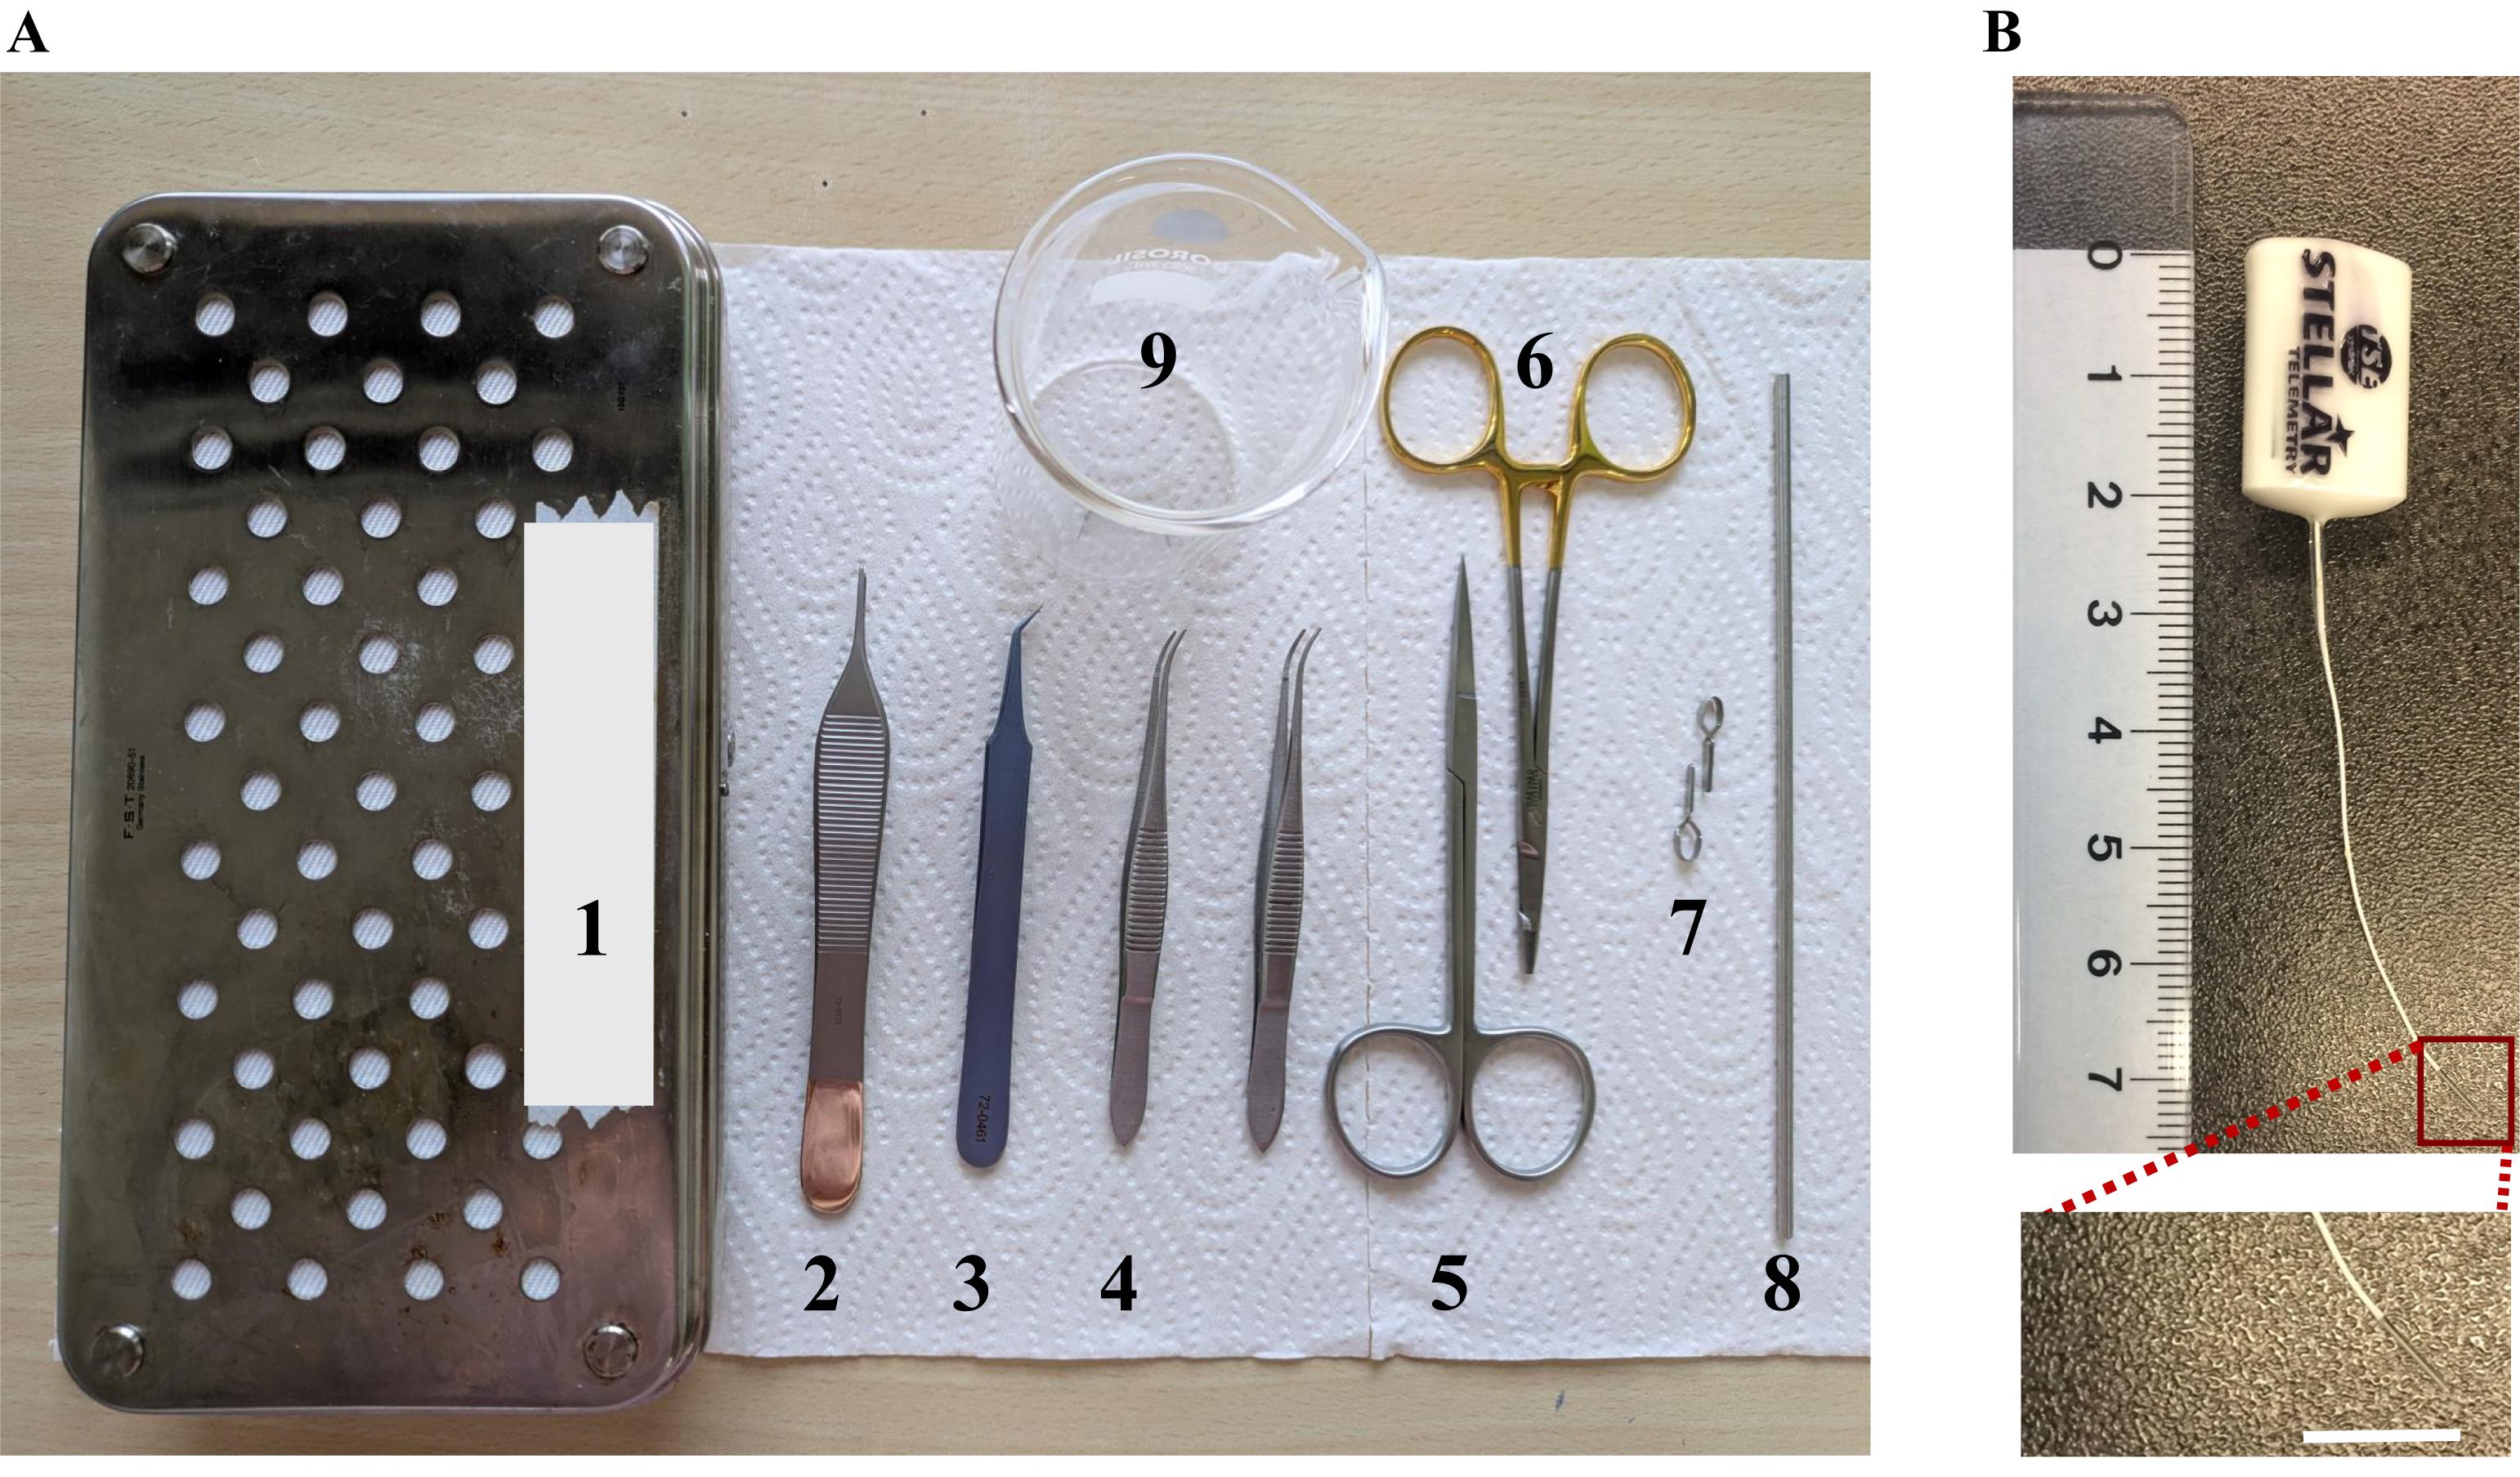
Figure 1. Dissection kit and sensor. (A) Dissection kit. 1. Dissection box. 2. Adson tissue forceps. 3. Jeweler’s forceps. 4. Extra fine Graefe forceps. 5. Eye scissors. 6. Mosquito scissors. 7. Micro Serrefines (venous clips). 8. Double-ended probe. 9. 50 mL glass beaker. (B) Steller telemetry pressure sensor.
Post-surgery
1. Recovery chamber (Tecniplast, IVC recovery rack)
Software and datasets
1. Spike2 (Cambridge Electronic Design Limited, UK, Version 7)
Procedure
A. Pre-surgical preparation of mice
1. To acclimatize, put the mice in separate cages for 2 days before the surgery.
a. Offer egg custard (meant for babies) in a small Petri dish (0.4 mL/mouse) (Day -2).
b. Twenty-four hours pre-surgery, give oral analgesic (see Recipe 4) in a small Petri dish (0.2 mL/mouse) (Day -1).
2. Pre-sterilize the surgery dissection kit, glass beaker, aluminum foil, implant, and cotton swabs.
B. Surgery setup
1. Disinfect all the surgical areas using Trigene/Anistel.
Note: You can use any other disinfectant—whichever is easily available.
2. Turn on the heating pad to maintain the animal’s body temperature during surgery.
3. Open two sterile drapes from the corners and place them on the dissection table as required, taking care not to touch the sterile face of the drape.
Note: The first drape has the heating pad underneath for animal placement, and the second drape is used to organize all other sterile surgical accessories.
4. Open all the items from their sterile covers and drop them on one of the sterile drapes (first drape) (Figure 1A).
Note: Make sure not to touch the sterile objects directly.
5. Weigh the animal on which the surgery will be performed.
6. Inject Metacam (10 mg/kg) + Buprenorphine (0.1 mg/kg) subcutaneously.
Note: Do not inject more than 0.2 mL per 10 g of body weight into a conscious animal.
7. Put the animal on the heat pad, apply eye ointment, and shave off its hair from the center of its chest to the edge of the back and from its neck to the middle of its body. Clear up all the loose hair with the cotton wipe.
Note: Shaving approximately 2 cm from the incision site is better.
8. Disinfect the naked skin of the animal using 25% (vol/vol) chlorhexidine solution (see Recipe 5). The wiping needs to be done from the center to the periphery of the shaved area.
9. Tear a piece of the sterile transparent film (approximately the size of the surgical drape) carefully so that the sterile surfaces of the foil are not touched.
10. Place this film on top of the paper towel (Figure 2A), place the anesthetized animal on top of the transparent film, and insert the rectal temperature probe (Figure 2B).
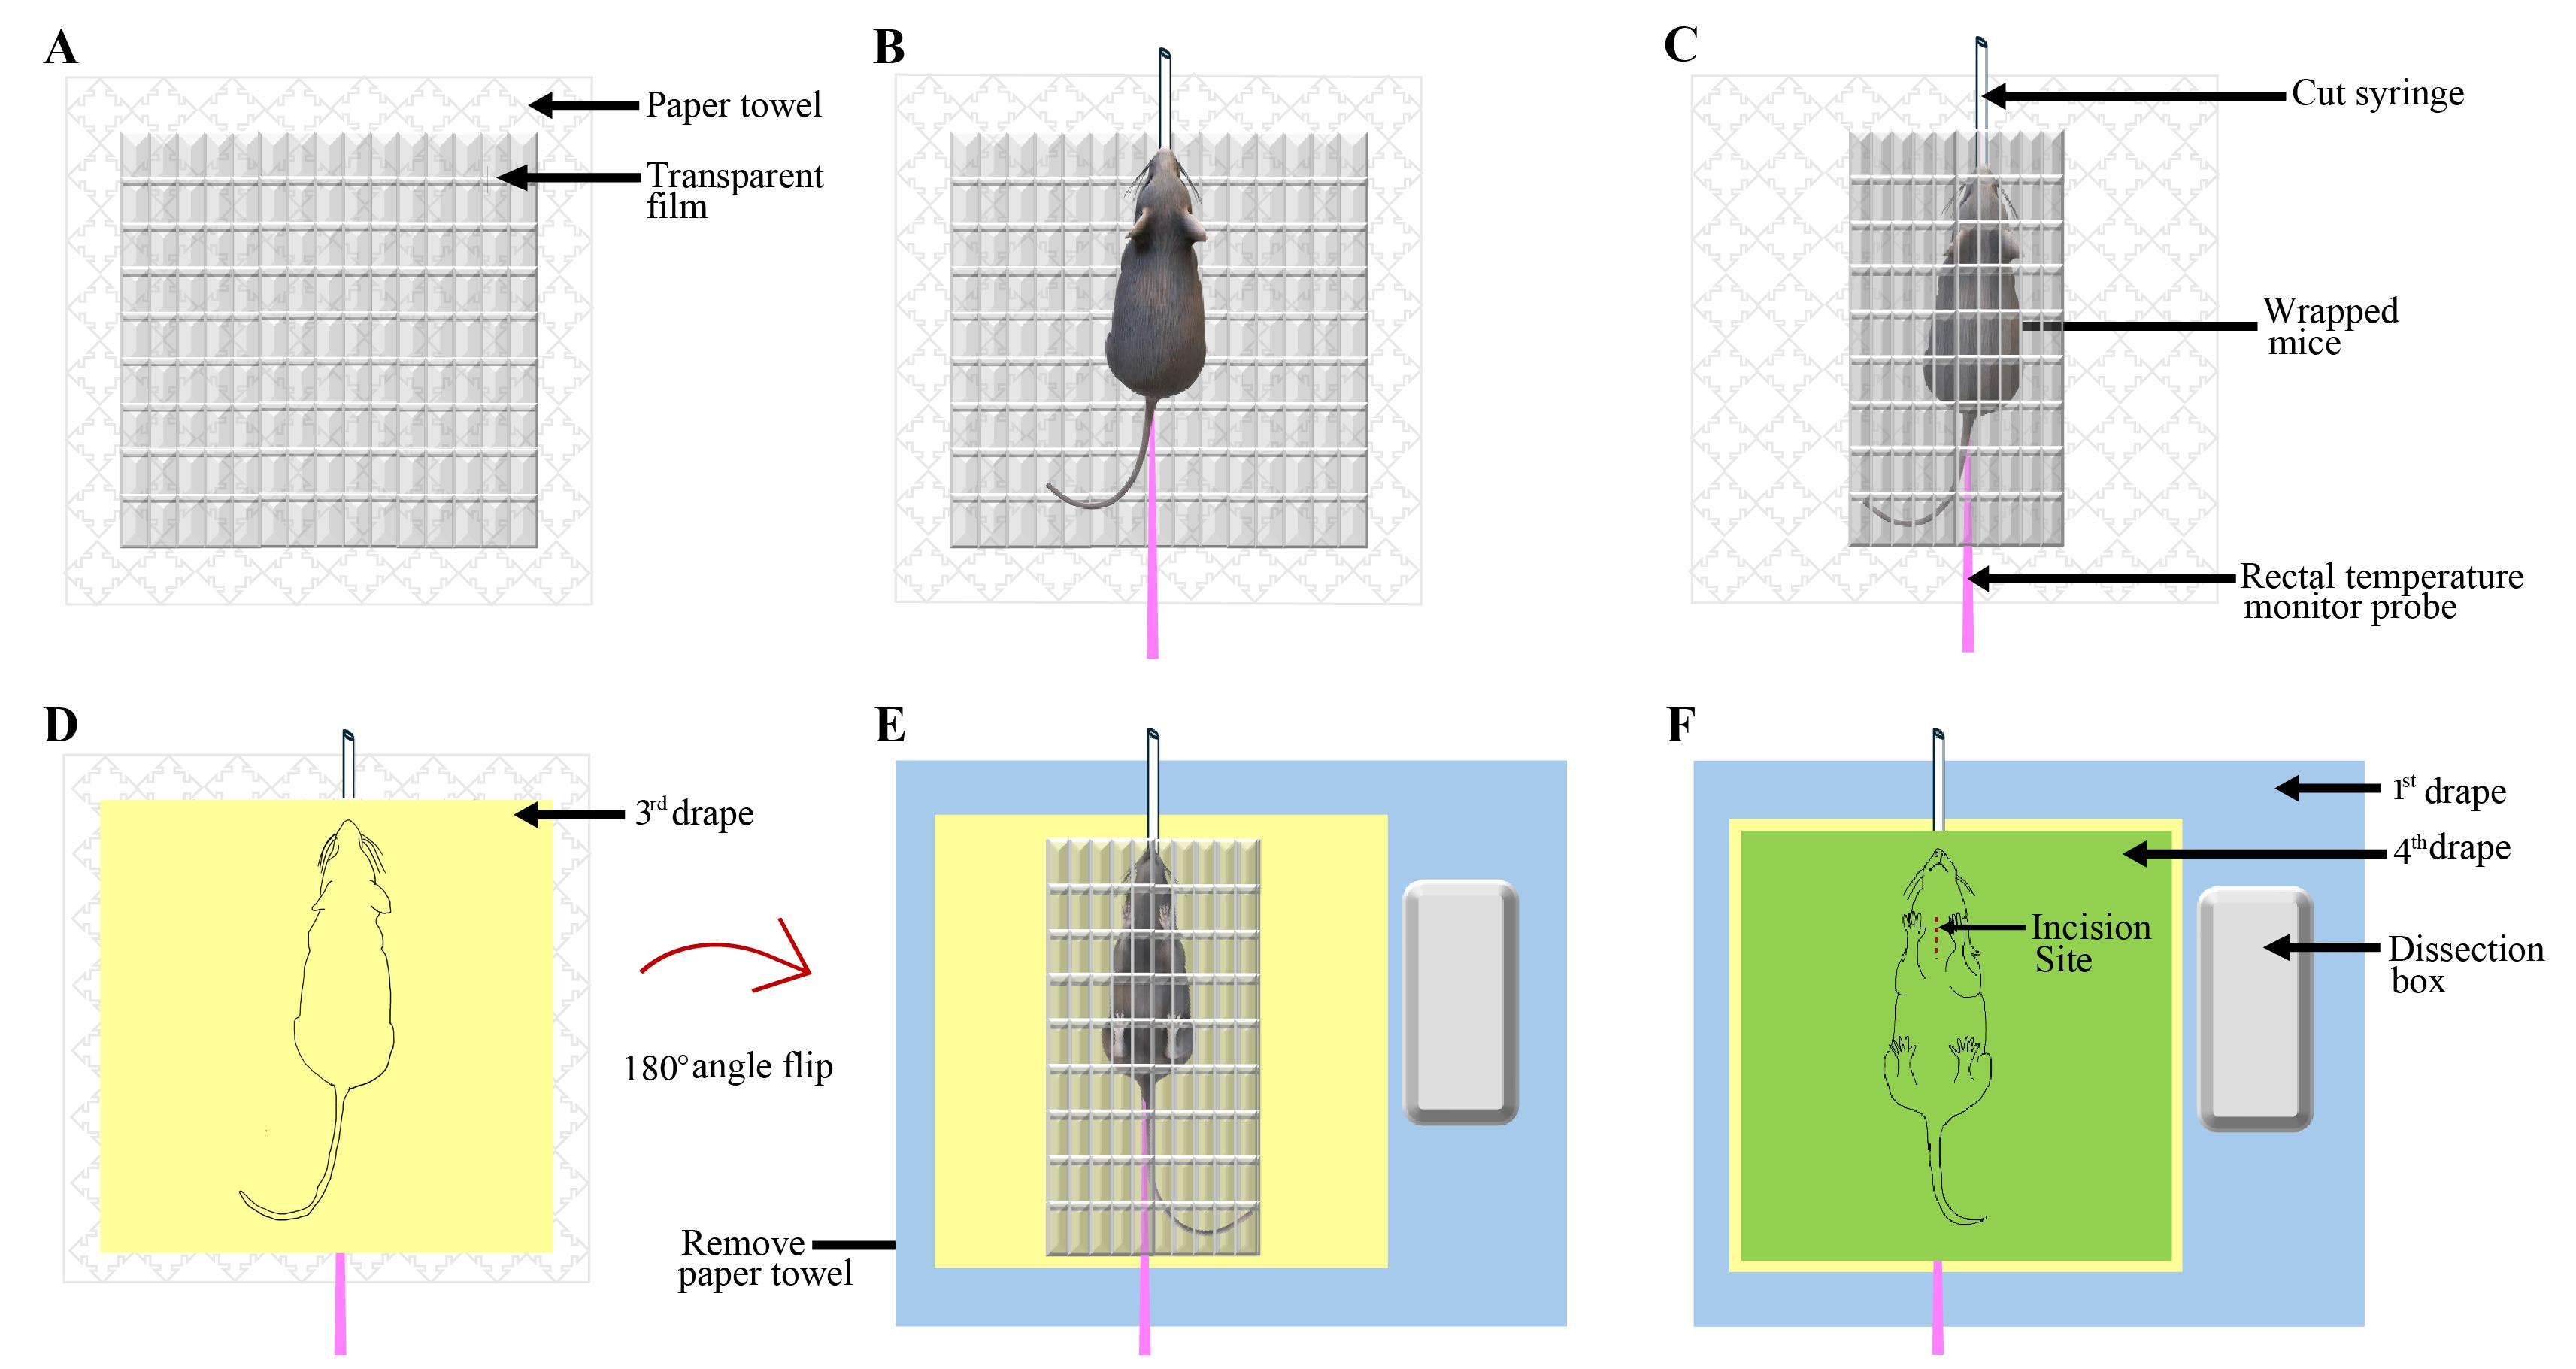
Figure 2. Preparing the anesthetized mouse for surgery. (A) Transparent film placed on top of the paper towel. (B) Anesthetized mouse placed on the transparent sheet, placement of a cut 3 mL syringe on its snout, and a rectal temperature probe. (C) Wrapped mouse in the transparent film. Note that the open end of the syringe is out of the transparent film. (D) The third drape is placed on top of the wrapped mouse. (E) The mouse is flipped 180° and placed on the first drape. (F) The fourth drape is placed on top of the wrapped animal lying on its back.
11. Place a cut 3 mL syringe onto the mouse’s snout and tape it to the film, ensuring a substantial amount of its length protrudes out of the film (Figure 2B). Be careful to touch the sterile film as minimally as possible.
Note: Putting the cut 3 mL syringe in place is required to allow mice to breathe normally during the surgery.
12. Wrap the film over the animal completely (Figure 2C)
13. Open another (third) drape on top of the film such that the sterile face of the drape covers the film (Figure 2D). Next, place one hand on top of the third drape (the outside surface) and the other hand on the bottom of the paper towel on which the animal is lying, and flip the animal upside down so it finally lies on its back. Remove the paper towel (Figure 2E).
14. Place the wrapped animal onto the sterile drape (first drape) on the heating pad (Figure 2E).
15. Switch on the heating pad and set the temperature to 37 ± 0.5 °C.
Note: Regularly check the mice's body temperature during the surgery. Maintain the body temperature of mice at 37 ± 0.5 °C.
16. Put the fourth sterile drape on top of the animal (Figure 2F).
17. Wear a face mask.
18. Switch on the stereomicroscope and adjust the light source to point it appropriately at the dissection area.
Note: Keep some sterile gauge or cotton to do fine adjustments of the gooseneck during the surgery.
19. Open the sterile surgical gloves and keep them ready for wearing.
20. Wash your hands, wipe off extra water, and wear sterile surgical gloves.
Note: Keep in mind that parts of the gloves that will remain outside of the hand should be sterile.
C. Mice surgery and insertion of the pressure sensor probe
1. Cut and open the topmost drape enough to view up to the abdomen of the animal (which is wrapped in the transparent drape).
Note: The animal is lying on its back with its head toward the surgeon.
2. Make an incision on the transparent drape to expose the area around the right jugular vein (Figure 3A).
Note: Ensure that the body parts with fur are still enclosed in the drape.
3. Make a small ~2 cm incision on the skin in the area over the jugular vein (Figure 3A).
Note: To identify a suitable spot, either look for the vein under the skin or cut it at the intersection of the line connecting the underarms to the ears.
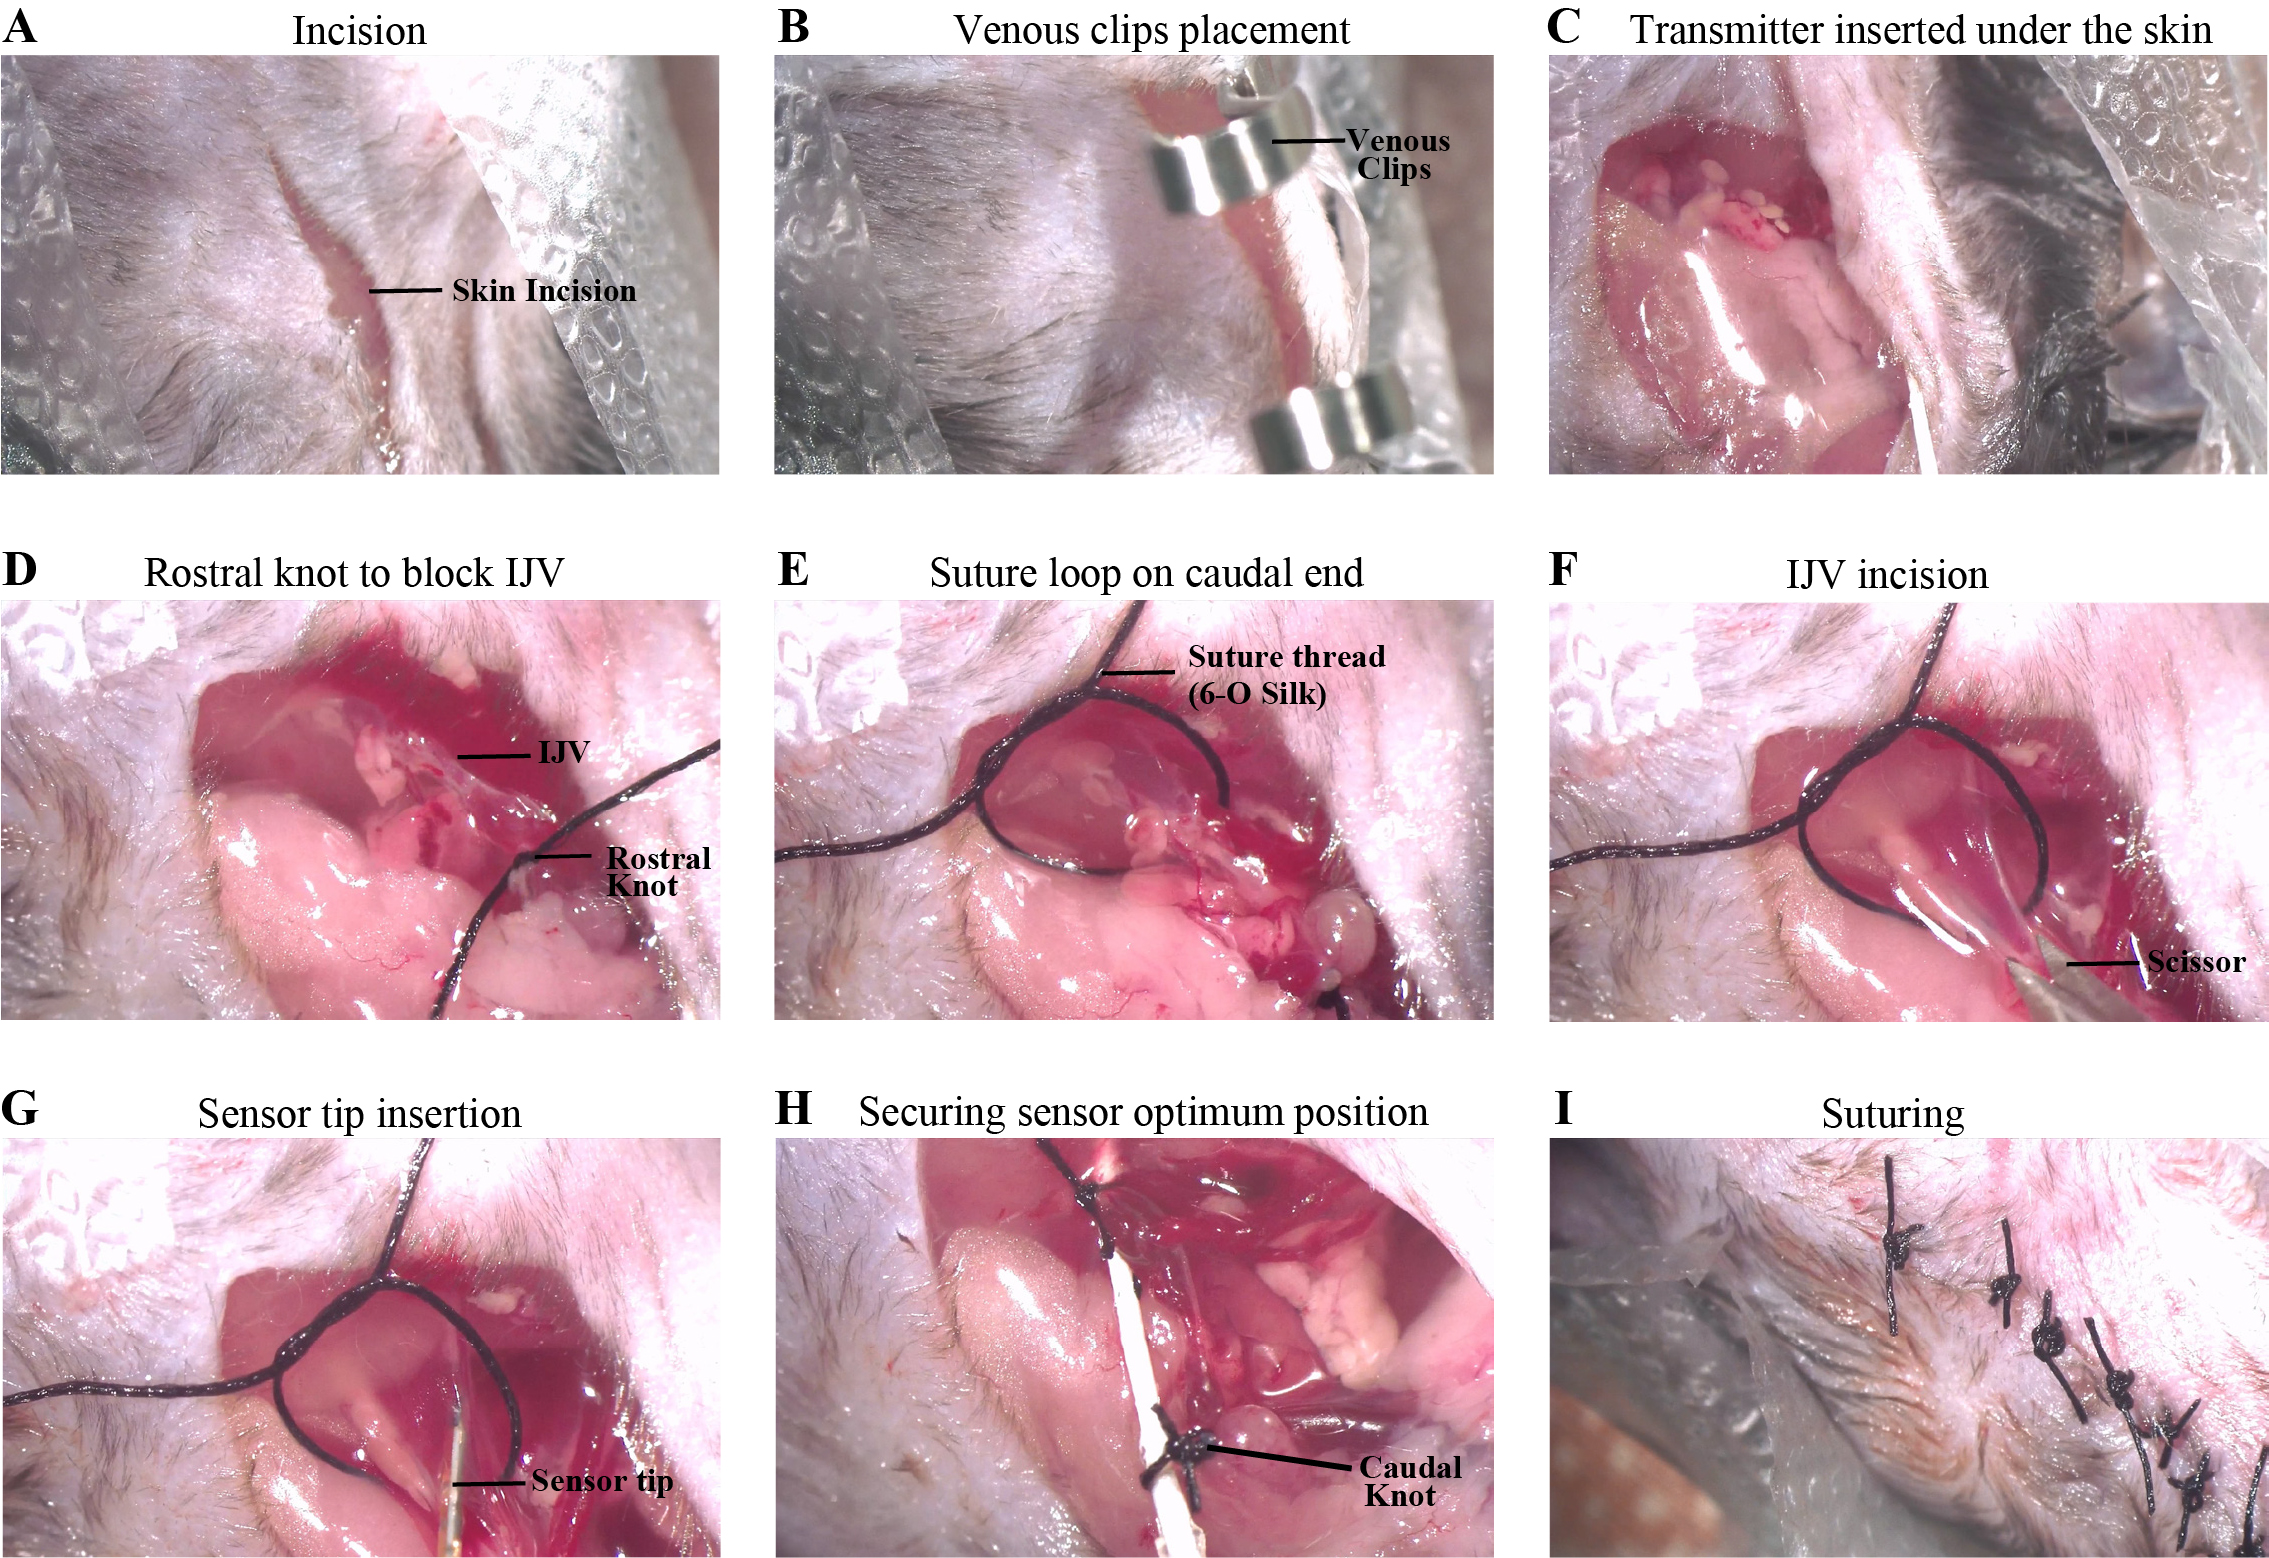
Figure 3. Key steps of the surgery. (A) Skin incision. (B) Clipped open skin with the transparent film using a pair of Venous clips. (C) Transmitter inserted under the skin. (D) Knot tied on the rostral end of the internal jugular vein (IJV). (E) Suture loop placed on the caudal end of the IJV. (F) Small incision made on the IJV using a pair of eye scissors. (G) Sensor tip inserted inside the IJV. (H) The sensor is secured in position using a knot on the caudal end of the IJV with the probe wire. (I) The wound is closed with the appropriate number of 2-2-1 suture knots.
4. Open the skin toward the heart.
Note: Try to make the incision as smooth and straight as possible for good wound closure and healing.
5. Use a pair of venous clips to keep the open skin and the transparent film together (Figure 3B). This ensures a good passageway for placing the transmitter under the skin.
6. Clear the space between the skin and the subcutaneous tissue using blunt forceps and a double-ended probe.
7. Place the transmitter under the skin while keeping the probe (which will be inserted in the vein) outside and remove the clips (Figure 3C).
8. Find the internal jugular vein and isolate it from the tissue using the Jeweler’s forceps and angled forceps.
9. Tie a 1-1-1 knot using a 6-O silk suture thread on the rostral-most portion of the exposed vein to block the blood flow in the vein. Place a venous clip on the free end of the thread, which can help manipulate the position of the vein during the later steps (Figure 3D).
10. Place another piece of the same suture thread caudally and make a loose loop to keep it ready for the final knot (Figure 3E).
11. Make a small incision on the vein using microdissection scissors (Figure 3F).
Note: Use sterile cotton buds to soak residual blood in the vein.
12. Insert the sensor tip of the catheter into the vein (Figure 3G).
Note: Please refer to the Probe insertion in the IJV video (Video S1).
13. Find the best position for the sensor tip of the catheter:
a. Start the spike2 software on the computer and initiate a new data recording document.
b. Find the best spot for the probe where you get the best amplitude and shape of the signal in spike2 (Figure 4).
c. Secure the probe at the best spot by tying the second knot on the vein and the probe wire (Figure 3H).
Critical: Ensure the knot is tight enough to secure the probe from any movement, as that can lead to artifacts in the recorded signal.
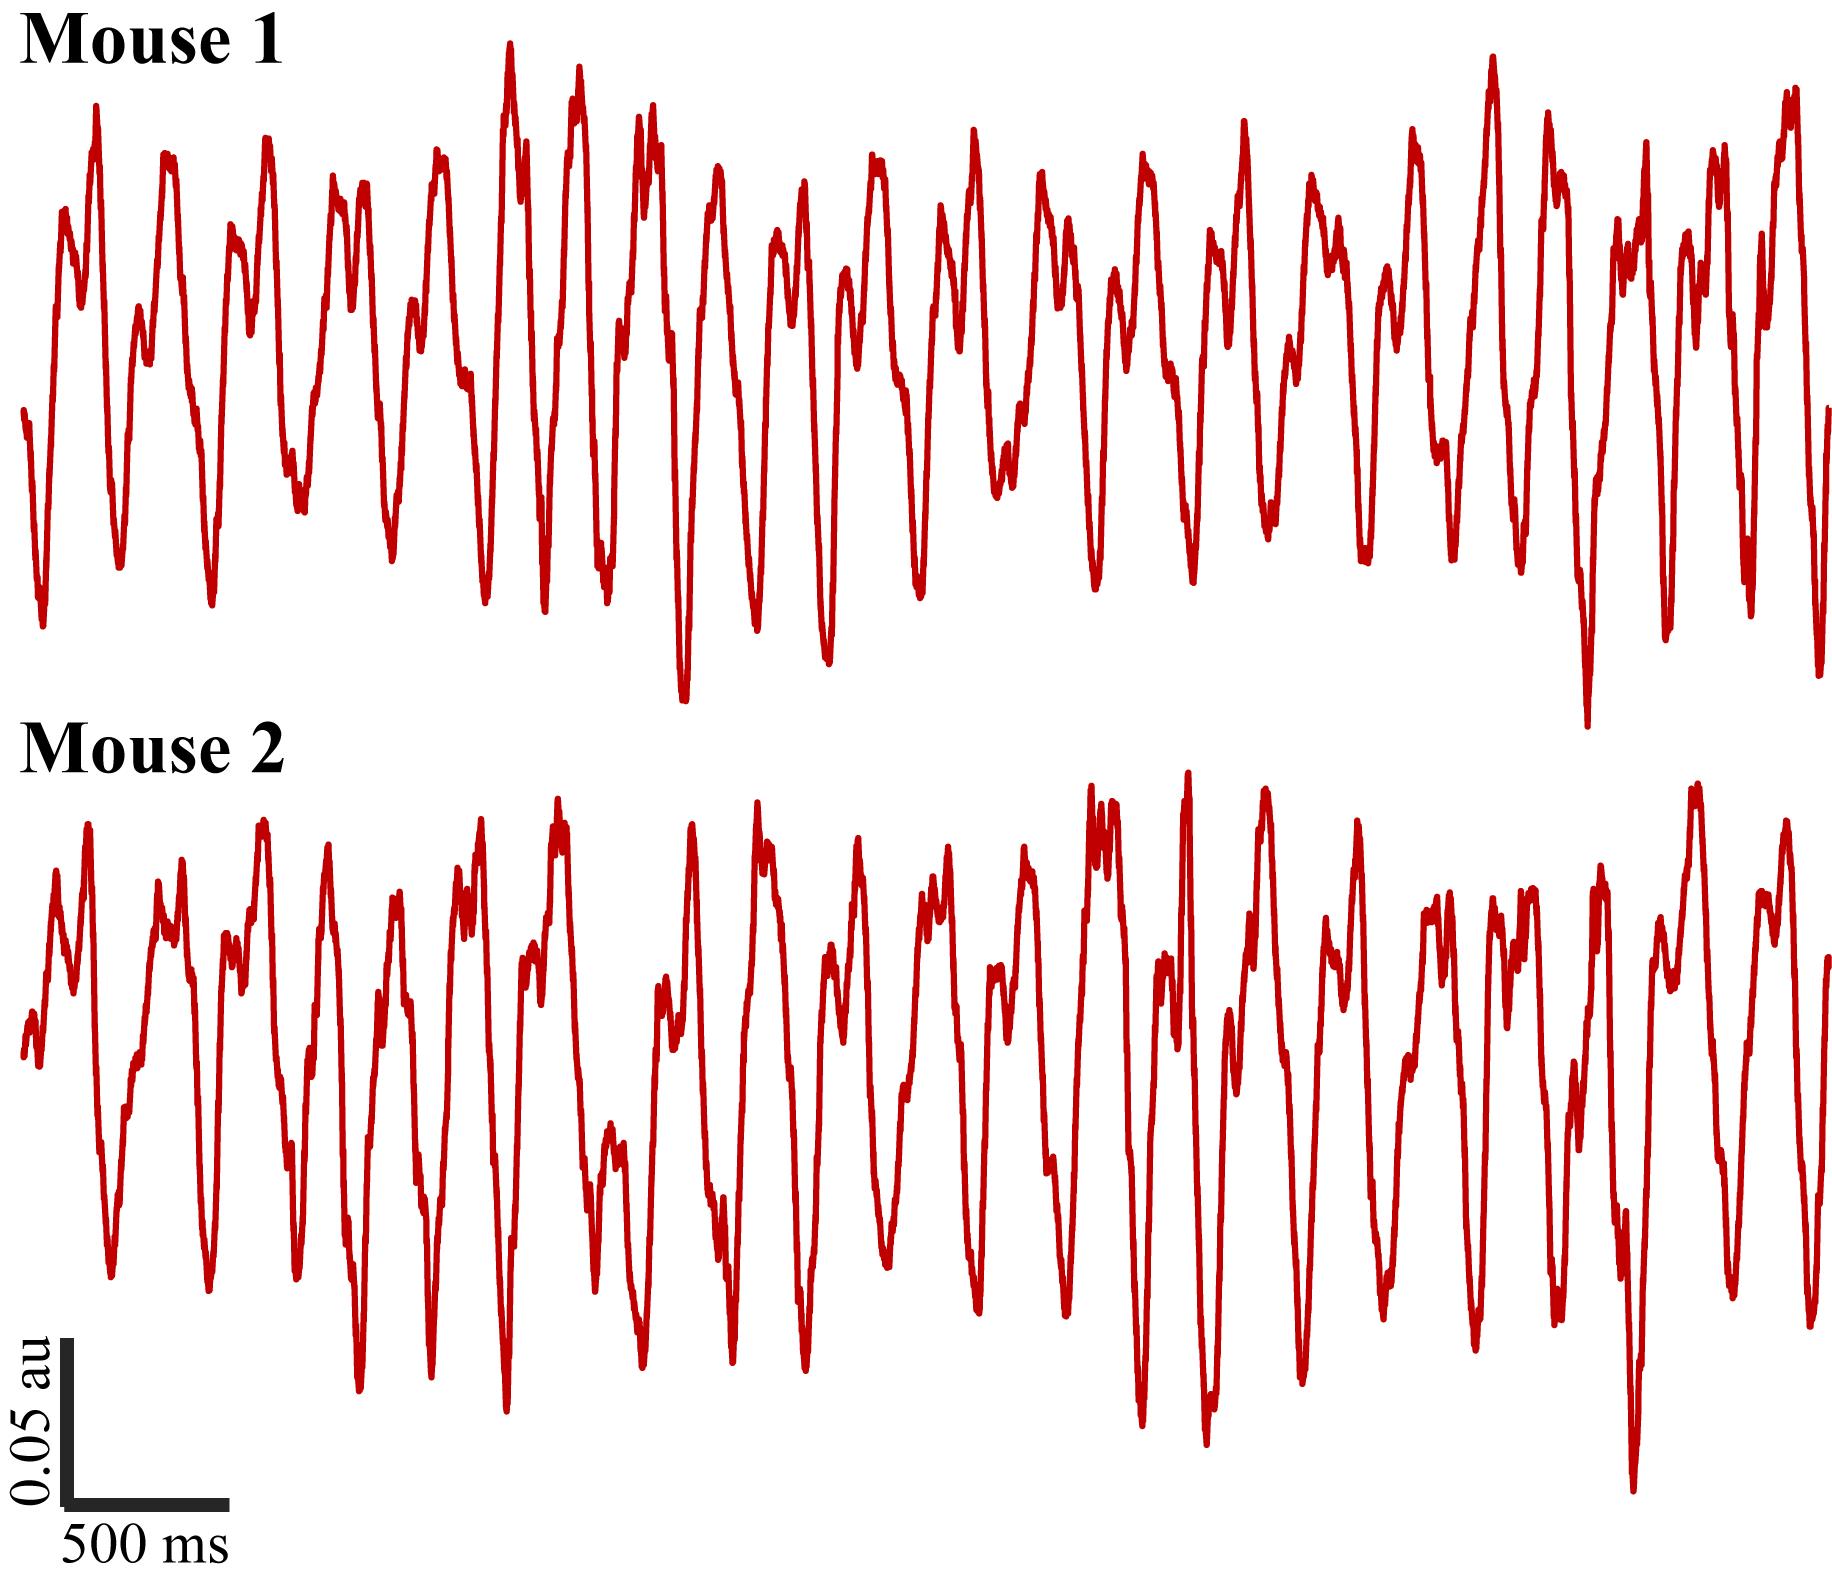
Figure 4. Five-second respiration signal recordings from two mice
14. Remove the clips and close the skin using a 6-O silk suture.
15. Tie 2-2-1 knots on the incision to ensure proper wound closure (Figure 3I).
D. Post-surgery
1. Remove the drape and temperature probe from the animal.
2. Inject 1 mL of saline solution (see Recipe 1) subcutaneously immediately after the surgery.
3. Apply Emla cream over the incision site.
4. Anesthesia reversal: Inject the wake mix solution intraperitoneally at 0.1 mL per 10 g of body weight (see Recipe 3).
Note: Do not inject more than 0.2 mL per 10 g of body weight into an animal.
Critical: The wake mix solution must be used only to reverse the anesthesia induced with the anesthesia mix.
5. Put the animal in the recovery chamber maintained at a temperature of ~25–27 °C and 60% relative humidity.
6. Offer a wet diet to the recovering animal.
7. On the day after the surgery, inject Meloxicam 1–2 mg/kg with saline.
8. Offer custard and a wet diet as well.
Validation of protocol
This protocol has been used and validated in Dasgupta et al. [1]. Wireless monitoring of respiration with EEG reveals relationships between sniffing, behavior and brain activity in freely moving mice. Journal of Neurophysiology (Figures 2B and 3).
General notes and troubleshooting
General notes
1. Ensure regular irrigation of the open wound to maintain an optimum hydration level.
2. A regular dose of saline (i.p.) is recommended during the entire duration of anesthesia to keep the animal properly hydrated. In our experience, this also helps with quicker recovery and wound healing.
3. Regular monitoring of the body temperature and the foot reflex to check for the level of anesthesia is critical, as the surgery can last long enough to require a top-up dose of the anesthesia mix.
Troubleshooting
Problem 1: During insertion of the probe, the animal shows choking-type symptoms.
Possible cause: Most probably, the probe has been inserted too far (can be up to the heart).
Solution: There is a huge chance that the animal will succumb; hence, it is better to restart the surgery with a fresh animal. As such, it is recommended to start with at least two animals.
Problem 2: The animal shows sluggish and slow recovery, even a few hours after anesthesia reversal.
Possible cause: Most probably, the animal is dehydrated and in pain. The animal might have refused the custard with the oral analgesic.
Solution: Administer Meloxicam (Metacam) at 1–2 mg/kg with saline (total volume: 0.4–0.5 mL) (i.p.).
Supplementary information
The following supporting information can be downloaded here:
1. Video S1. Probe insertion in the IJV.
Acknowledgments
Conceptualization, D.D. & N.K.; Writing—Original Draft, N.K.; Writing—Review & Editing, N.K. & D.D.; Supervision, D.D.
D.D. is supported by a Ramalingaswami Fellowship from the Department of Biotechnology, India (BT/HRD/35/02/2006) and by Indian Institute of Technology, Kanpur. N.K. receives a Junior Research Fellowship from the Department of Biotechnology, India.
The original research was conducted by the authors of Dasgupta et al. [1] at The Francis Crick Institute, London (UK). We thank all the authors mentioned in the original article. The Francis Crick Institute receives its core funding from Cancer Research UK (CC2036), the UK Medical Research Council (CC2036), and the Wellcome Trust (CC2036), and by the UK Medical Research Council (grant reference MC_UP_1202/5). We thank Yolanda Saavedra Torres and Rene Remie for helping in the standardization process of the surgical procedure. We thank the animal facilities at the National Institute for Medical Research and the Francis Crick Institute for animal care and technical assistance.
Competing interests
The authors declare no conflicts of interest.
Ethical considerations
All animal procedures performed in this study were regulated and approved by the Institutional Animal Welfare Ethical Review Panel and the UK government (Home Office) under license PA2F6DA12.
References
- Dasgupta, D., Schneider-Luftman, D., Schaefer, A. T. and Harris, J. J. (2024). Wireless monitoring of respiration with EEG reveals relationships between respiration, behaviour and brain activity in freely moving mice. J Neurophysiol. 132(1): 290–307. https://doi.org/10.1152/jn.00330.2023
- Dias, A. L., Drieskens, D., Belo, J. A., Duarte, E. H., Laplagne, D. A. and Tort, A. B. (2024). Breathing modulates network activity in frontal brain regions during anxiety. bioRxiv: e600015. https://doi.org/10.1101/2024.06.21.600015
- Nashiro, K., Yoo, H. J., Cho, C., Kim, A. J., Nasseri, P., Min, J., Dahl, M. J., Mercer, N., Choupan, J., Choi, P., et al. (2024). Heart rate and breathing effects on attention and memory (HeartBEAM): study protocol for a randomized controlled trial in older adults. Trials. 25(1): 190. https://doi.org/10.1186/s13063-024-07943-y
- Vanneste, S., Song, J. J. and De Ridder, D. (2018). Thalamocortical dysrhythmia detected by machine learning. Nat Commun. 9(1): 1103. https://doi.org/10.1038/s41467-018-02820-0
- Farmer, S. (2002). Neural rhythms in Parkinson’s disease. Brain. 125(6): 1175–1176. https://doi.org/10.1093/brain/awf144
- Grahn, J. A. and Brett, M. (2009). Impairment of beat-based rhythm discrimination in Parkinson's disease. Cortex. 45(1): 54–61. https://doi.org/10.1016/j.cortex.2008.01.005
- Traikapi, A. and Konstantinou, N. (2021). Gamma Oscillations in Alzheimer’s Disease and Their Potential Therapeutic Role. Front Syst Neurosci. 15: e782399. https://doi.org/10.3389/fnsys.2021.782399
- Babiloni, C., Ferri, R., Moretti, D. V., Strambi, A., Binetti, G., Dal Forno, G., Ferreri, F., Lanuzza, B., Bonato, C., Nobili, F., et al. (2004). Abnormal fronto‐parietal coupling of brain rhythms in mild Alzheimer's disease: a multicentric EEG study. Eur J Neurosci. 19(9): 2583–2590. https://doi.org/10.1111/j.0953-816x.2004.03333.x
- Berridge, M. J. (2013). Calcium regulation of neural rhythms, memory and Alzheimer's disease. J Physiol. 592(2): 281–293. https://doi.org/10.1113/jphysiol.2013.257527
- Handa, D. and Peschel, J. M. (2022). A Review of Monitoring Techniques for Livestock Respiration and Sounds. Front Anim Sci. 3: e904834. https://doi.org/10.3389/fanim.2022.904834
- Grimaud, J. and Murthy, V. N. (2018). How to monitor breathing in laboratory rodents: a review of the current methods. J Neurophysiol. 120(2): 624–632. https://doi.org/10.1152/jn.00708.2017
- Prada-Dacasa, P., Urpi, A., Sánchez-Benito, L., Bianchi, P. and Quintana, A. (2020). Measuring Breathing Patterns in Mice Using Whole-body Plethysmography. Bio Protoc. 10(17): e3741. https://doi.org/10.21769/bioprotoc.3741
- Esquivelzeta Rabell, J., Mutlu, K., Noutel, J., Martin del Olmo, P. and Haesler, S. (2017). Spontaneous Rapid Odor Source Localization Behavior Requires Interhemispheric Communication. Curr Biol. 27(10): 1542–1548.e4. https://doi.org/10.1016/j.cub.2017.04.027
- Flores, A., Flores, J., Deshpande, H., Picazo, J., Xinmin Xie, Franken, P., Heller, H., Grahn, D. and O'Hara, B. (2007). Pattern Recognition of Sleep in Rodents Using Piezoelectric Signals Generated by Gross Body Movements. IEEE Trans Biomed Eng. 54(2): 225–233. https://doi.org/10.1109/tbme.2006.886938
- McAfee, S. S., Ogg, M. C., Ross, J. M., Liu, Y., Fletcher, M. L. and Heck, D. H. (2016). Minimally invasive highly precise monitoring of respiratory rhythm in the mouse using an epithelial temperature probe. J Neurosci Methods. 263: 89–94. https://doi.org/10.1016/j.jneumeth.2016.02.007
- Kapoor, V., Provost, A. C., Agarwal, P. and Murthy, V. N. (2016). Activation of raphe nuclei triggers rapid and distinct effects on parallel olfactory bulb output channels. Nat Neurosci. 19(2): 271–282. https://doi.org/10.1038/nn.4219
- Welker, W. (1964). Analysis of Sniffing of the Albino Rat 1). Behaviour. 22: 223–244. https://doi.org/10.1163/156853964x00030
- Crossland, N., Horsfall, G., Oxenham, S., Shaw, J. and Turnbull, M. (1977). A simple device for measurement of respiratory rate in the mouse [proceedings]. Br J Pharmacol. 61(3): 490P.
- Vandivort, T. C., An, D. and Parks, W. C. (2016). An Improved Method for Rapid Intubation of the Trachea in Mice. J Visualized Exp.: e3791/53771. https://doi.org/10.3791/53771
- Bolding, K. A. and Franks, K. M. (2017). Complementary codes for odor identity and intensity in olfactory cortex. eLife. 6: e22630. https://doi.org/10.7554/elife.22630
- Youngentob, S. L., Mozell, M. M., Sheehe, P. R. and Hornung, D. E. (1987). A quantitative analysis of sniffing strategies in rats performing odor detection tasks. Physiol Behav. 41(1): 59–69. https://doi.org/10.1016/0031-9384(87)90131-4
- Reisert, J., Golden, G. J., Matsumura, K., Smear, M., Rinberg, D. and Gelperin, A. (2014). Comparing thoracic and intra-nasal pressure transients to monitor active odor sampling during odor-guided decision making in the mouse. J Neurosci Methods. 221: 8–14. https://doi.org/10.1016/j.jneumeth.2013.09.006
- Ackels, T., Erskine, A., Dasgupta, D., Marin, A. C., Warner, T. P. A., Tootoonian, S., Fukunaga, I., Harris, J. J. and Schaefer, A. T. (2021). Fast odour dynamics are encoded in the olfactory system and guide behaviour. Nature. 593(7860): 558–563. https://doi.org/10.1038/s41586-021-03514-2
- Dasgupta, D., Warner, T. P. A., Erskine, A. and Schaefer, A. T. (2022). Coupling of Mouse Olfactory Bulb Projection Neurons to Fluctuating Odor Pulses. J Neurosci. 42(21): 4278–4296. https://doi.org/10.1523/jneurosci.1422-21.2022
- Smear, M., Shusterman, R., O’Connor, R., Bozza, T. and Rinberg, D. (2011). Perception of sniff phase in mouse olfaction. Nature. 479(7373): 397–400. https://doi.org/10.1038/nature10521
- Karimimehr, S. and Rinberg, D. (2024). Timing matters in olfaction. Nat Hum Behav. 8(11): 2092–2093. https://doi.org/10.1038/s41562-024-02008-1
- Kepecs, A., Uchida, N. and Mainen, Z. F. (2006). The sniff as a unit of olfactory processing. Chem Senses. 31(2): 167–179. https://doi.org/10.1093/chemse/bjj016
- Verhagen, J. V., Wesson, D. W., Netoff, T. I., White, J. A. and Wachowiak, M. (2007). Sniffing controls an adaptive filter of sensory input to the olfactory bulb. Nat Neurosci. 10(5): 631–639. https://doi.org/10.1038/nn1892
- Spencer, T. L., Clark, A., Fonollosa, J., Virot, E. and Hu, D. L. (2021). Sniffing speeds up chemical detection by controlling air-flows near sensors. Nat Commun. 12(1): 1232. https://doi.org/10.1038/s41467-021-21405-y
- Tariq, M. F., Sterrett, S. C., Moore, S., Lane, Perkel, D. J. and Gire, D. H. (2024). Dynamics of odor-source localization: Insights from real-time odor plume recordings and head-motion tracking in freely moving mice. PLoS One. 19(9): e0310254. https://doi.org/10.1371/journal.pone.0310254
- Vickers, N. J. and Baker, T. C. (1994). Reiterative responses to single strands of odor promote sustained upwind flight and odor source location by moths. Proc Natl Acad Sci USA. 91(13): 5756–5760. https://doi.org/10.1073/pnas.91.13.5756
- Baker, K. L., Dickinson, M., Findley, T. M., Gire, D. H., Louis, M., Suver, M. P., Verhagen, J. V., Nagel, K. I. and Smear, M. C. (2018). Algorithms for Olfactory Search across Species. J Neurosci. 38(44): 9383–9389. https://doi.org/10.1523/JNEUROSCI.1668-18.2018
- Jacobs, L. F. (2012). From chemotaxis to the cognitive map: The function of olfaction. Proc Natl Acad Sci USA. 109: 10693–10700. https://doi.org/10.1073/pnas.1201880109
- Wu, Y., Chen, K., Ye, Y., Zhang, T. and Zhou, W. (2020). Humans navigate with stereo olfaction. Proc Natl Acad Sci USA. 117(27): 16065–16071. https://doi.org/10.1073/pnas.2004642117
- Porter, J., Anand, T., Johnson, B., Khan, R. M. and Sobel, N. (2005). Brain mechanisms for extracting spatial information from smell. Neuron. 47(4): 581–592. https://doi.org/10.1016/j.neuron.2005.06.028
- Jordan, R., Kollo, M. and Schaefer, A. T. (2018). Sniffing Fast: Paradoxical Effects on Odor Concentration Discrimination at the Levels of Olfactory Bulb Output and Behavior. eNeuro. 5(5): ENEURO.0148–18.2018. https://doi.org/10.1523/eneuro.0148-18.2018
- Cenier, T., McGann, J. P., Tsuno, Y., Verhagen, J. V. and Wachowiak, M. (2013). Testing the Sorption Hypothesis in Olfaction: A Limited Role for Sniff Strength in Shaping Primary Odor Representations During Behavior. J Neurosci. 33(1): 79–92. https://doi.org/10.1523/jneurosci.4101-12.2013
- Kepecs, A., Uchida, N. and Mainen, Z. F. (2005). The Sniff as a Unit of Olfactory Processing. Chem Senses. 31(2): 167–179. https://doi.org/10.1093/chemse/bjj016
- Verhagen, J. V., Wesson, D. W., Netoff, T. I., White, J. A. and Wachowiak, M. (2007). Sniffing controls an adaptive filter of sensory input to the olfactory bulb. Nat Neurosci. 10(5): 631–639. https://doi.org/10.1038/nn1892
- Rygg, A. D., Van Valkenburgh, B. and Craven, B. A. (2017). The Influence of Sniffing on Airflow and Odorant Deposition in the Canine Nasal Cavity. Chem Senses. 42(8): 683–698. https://doi.org/10.1093/chemse/bjx053
Article Information
Publication history
Received: Feb 15, 2025
Accepted: May 13, 2025
Available online: Jun 5, 2025
Published: Jun 20, 2025
Copyright
© 2025 The Author(s); This is an open access article under the CC BY-NC license (https://creativecommons.org/licenses/by-nc/4.0/).
How to cite
Kushwaha, N. and Dasgupta, D. (2025). Surgical Implantation of a Telemetry-Based Pressure Sensor in the Internal Jugular Vein to Monitor Respiration Wirelessly. Bio-protocol 15(12): e5343. DOI: 10.21769/BioProtoc.5343.
Category
Neuroscience > Behavioral neuroscience > Sensorimotor response
Neuroscience > Neuroanatomy and circuitry
Do you have any questions about this protocol?
Post your question to gather feedback from the community. We will also invite the authors of this article to respond.