- Protocols

- Articles and Issues
- For Authors
- About
- Become a Reviewer

Generation of FECD Phenotypes in the Mouse Cornea by UVA Exposure and Surgical Removal of its Corneal Endothelial Layer
Published: Vol 15, Iss 6, Mar 20, 2025 DOI: 10.21769/BioProtoc.5249 Views: 2930
Reviewed by: Pilar Villacampa AlcubierreDogan Can KirmanGülçin ÇAKAN AKDOĞAN
Original research article
The authors used this protocol in:
Feb 2025
Advertisement


Protocol Collections
Comprehensive collections of detailed, peer-reviewed protocols focusing on specific topics


Related protocols
Abstract
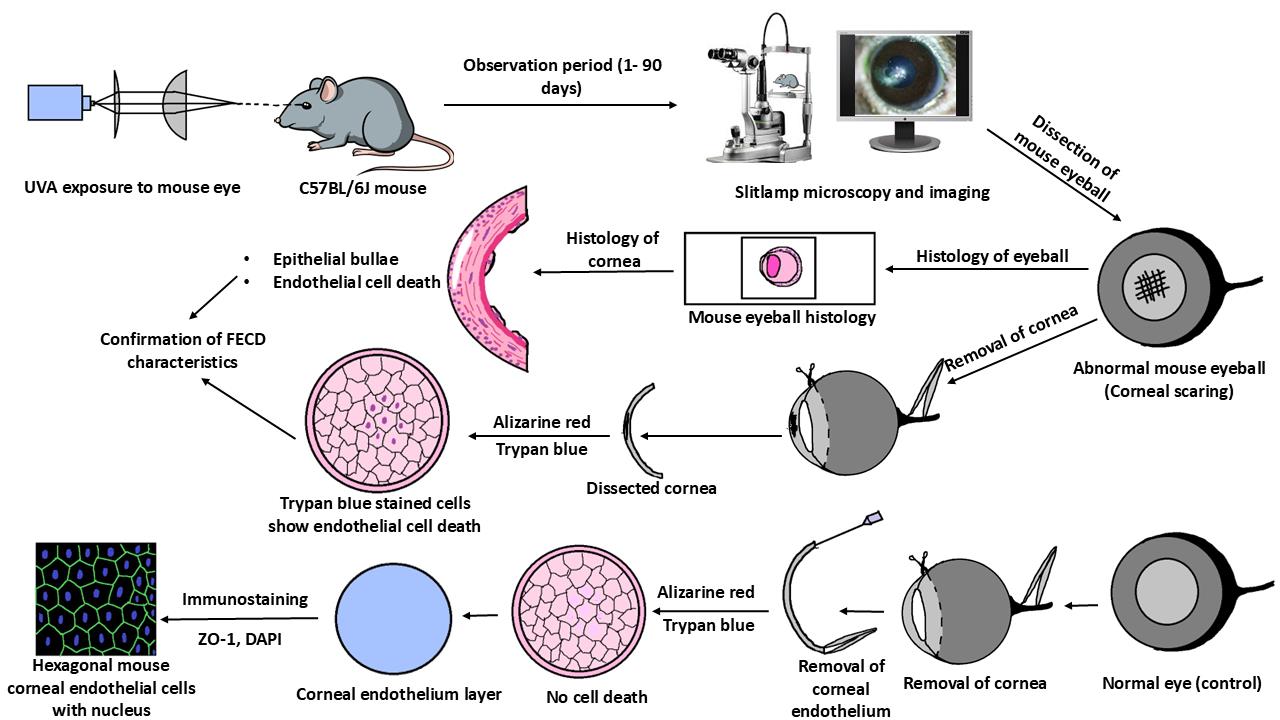
Fuchs endothelial corneal dystrophy (FECD) is a rare and multifactorial disorder leading to cell death in the innermost layer of the cornea, i.e., the endothelium; UV radiation is reported as the major environmental risk for the disease. Establishing an animal model for this disease has remained challenging in FECD research. We have developed a detailed protocol for the establishment of a UVA-induced FECD mouse model and removal of corneal endothelium from the eye for further molecular and histological studies by taking references from previous studies. UVA light of 500 J/cm2 was focused on the C57BL/6J female mouse cornea and kept for an observation period of 90 days. The animal developed corneal scarring by the end of three months. Slit-lamp microscopy and alizarin red–trypan blue staining confirmed endothelial cell death and formation of corneal guttae in the endothelium. Surgical removal of the endothelial layer was successfully done in the diseased mouse, and the result was confirmed by immunofluorescence. This study is relevant for in-depth research using a FECD mouse model, which will surpass the limitation of human tissue scarcity and can be used for in vivo drug targeting to develop therapeutics to cure FECD.
Key features
• UVA radiation induces FECD only in the exposed eye of female mice.
• Females are more affected and develop the FECD phenotype.
• This protocol will help dissect the endothelium layer with Descemet’s membrane (DM) from the mouse cornea, which is equivalent to human surgical tissue.
Keywords: CorneaGraphical overview
Background
Fuchs endothelial corneal dystrophy (FECD) is an age-related, rare corneal disease resulting in the loss of corneal endothelial cells from the cornea's innermost layer. As the cornea is avascular, these endothelial cells aid in the transport of nutrients and water between the corneal stroma and the aqueous humor of the eye [1]. Loss of these cells leads to various FECD phenotypes such as guttae formation, thickening of Descemet’s membrane (DM) due to extracellular matrix protein (ECM) deposition, disruption of stromal collagen fibers due to water retention, and, in severe cases, epithelial bullae formation [2,3].
As per the age of onset, the disease is of two types, i.e., early-onset form (<40 years of age) and late-onset form (>40 years of age). As per its rare status, the late-onset form is more common than the early-onset form [4]. Moreover, the disease pervasiveness varies in different populations. The highest percentage of diseased individuals was reported in the Caucasian population (3.9% of Americans, 11.0% of women and 7.0% of men in Iceland, 3.7% of Japanese, and 6.6% of the Chinese Singaporean population). The LV Prasad Eye Institute (LVPEI), in Hyderabad, operated 7.5%–10.4% of FECD cases within a period of 5 years, i.e., from 2007–2011 [5–9]. The rare status of the FECD disease acts as a limitation for in-depth research in this field to better understand the disease pathology and develop a drug to treat the disease. This limitation can be overcome by generating an animal model for FECD. Albert S. Jun and his group generated a mouse model for early-onset FECD with a point mutation substituting glutamine for lysine (Q455K) [10]. Subhashree Murugan and collaborators developed a mouse model with a Q455K mutation along with SLC4A11 knockdown, which showed the phenotypes of FECD [11]. Liu et al., for the first time in 2020, developed a mouse model for late-onset FECD by exposing the mouse eye to ultraviolet A (UVA) radiation and validated the model with further experiments, but the detailed procedure is unavailable [12]. Hongmin Yun and collaborators developed a dissection method to separate the retina from the mouse eye to study innervation [13].
No specific studies describe the dissection method of mouse cornea from the eyeball and the further removal of the corneal endothelium layer from it. Our study details the process of generating a nongenetic FECD mouse model with UVA exposure, highly inspired by the study conducted by Liu et al., as UVA acts as an environmental risk factor for FECD causation. Further, we have adapted the initial technique from Yun et al. to separate the cornea and retina from the mouse eyeball and developed a new technique to remove the endothelium layer from the cornea. The model presented here will enable researchers to explore disease mechanisms and effects of various perturbations during FECD disease progression, using an in vivo model that replicates the disease phenotypes well. As the disease initially targets corneal endothelium, its removal from the cornea can be used in various molecular and biochemical experiments to answer many unknown and unrevealed questions in FECD pathogenesis and progression.
Materials and reagents
Biological material
1. C57BL/6J mouse (Nucleus breeding stock, The Jackson Laboratory, IMSR_JAX:000664)
Reagents
1. Carboxymethyl cellulose eye drop (Refresh Tears, catalog number: 119573)
2. Fluorescein powder (Himedia, catalog number: GRM374-100G)
3. PBS (Himedia, catalog number: TL1101)
4. Dimethyl sulfoxide (DMSO) (Himedia, catalog number: GRM5856)
5. Isoflurane I. P. (Sorsane®, catalog number: LUNP700K)
6. Trypan blue solution (Himedia, catalog number: TCL046)
7. Alizarin red (Himedia, catalog number: GRM894)
8. Paraformaldehyde (PFA) powder (Himedia, catalog number: TC703)
9. 100% ethanol (Himedia, catalog number: MB228)
10. Glacial acetic acid (SRL, catalog number: 85801)
11. Paraffin wax (Himedia, catalog number: GRM1042)
12. Xylene (SRL, catalog number: 90998)
13. Hematoxylin solution (Himedia, catalog number: S034)
14. Eosin solution (Himedia, catalog number: S0007)
15. ZO-1 antibody (Santa Cruz, catalog number: sc-10804)
16. Fluoromount G (Southern Biotech, catalog number: 0100–01)
17. Mili-Q water
18. RNAlater (Invitrogen, catalog number: AM7020)
19. 4', 6-Diamidine-2'-phenylindole dihydrochloride (DAPI) (Sigma, catalog number: 350 10236276001)
20. Normal horse serum (Thermo Scientific, catalog number: 31874)
21. Formaldehyde solution (Sigma-Aldrich, catalog number: 252549)
22. Alexa Fluor conjugated secondary antibody (Invitrogen, catalog number: A48254)
23. Triton X-100 (Sigma-Aldrich, catalog number: T8787)
24. Amrut feed (Krishna Valley Agrotech, catalog number: Breeding AF-6000B)
Solutions
1. 0.5% Fluorescein dye (see Recipes)
2. 4% PFA solution (see Recipes)
3. Hartman’s fixative solution (see Recipes)
4. 1% Alizarin Red solution (see Recipes)
Recipes
1. 0.5% Fluorescein dye (10 mL)
Note: This solution can be stored at room temperature for up to 15 days.
| Reagents | Final concentration | Final quantity or volume |
|---|---|---|
| Fluorescein | 5 mg/mL | 0.05 g |
| DMSO | NA | 10 mL |
2. 4% PFA solution (100 mL)
Note: This solution is prepared by dissolving PFA powder at 95 °C in a thermomixer. It can be stored for up to 7 days at 4 °C and up to 1 month at -20 °C.
| Reagents | Final concentration | Final quantity or volume |
|---|---|---|
| PFA | 40 mg/mL | 4 g |
| 1× PBS | NA | 100 mL |
3. Hartman’s fixative solution (20 mL)
Note: This solution can be stored for up to 1 month at 4 °C.
| Reagents | Final concentration | Final quantity or volume |
|---|---|---|
| Formaldehyde, 37% | 3 M | 4.44 mL |
| Glacial acetic acid, 99% | 2.22 mL | |
| Ethanol, 95% | 6.66 mL | |
| Mili-Q water | NA | 6.66 mL |
4. 1% Alizarin red solution (100 mL)
Note: Filter the solution and use it immediately with a 0.45 μm syringe filter.
| Reagents | Final concentration | Final quantity or volume |
|---|---|---|
| Alizarin red | 10 mg/mL | 1 g |
| 1× PBS | NA | 100 mL |
Laboratory supplies
1. Petri dish (Tarsons, catalog number: 460090)
2. Pasteur pipette (Tarsons, catalog number: 940050)
3. Syringe filter (filtration rating: 0.45 μm; diameter: 33 mm) (Axiva, catalog number: SFNY33XB)
4. 5 mL syringe with needle (Dispovan, catalog number: 13483)
5. 10 mL syringe with needle (Dispovan, catalog number: 13484)
6. Glass slide (Himedia, catalog number: BG003)
7. Coverslip (Himedia, catalog number: BG011C)
8. 50 mL Falcon tube (Tarsons, catalog number: 339652)
9. 15 mL Falcon tube (Tarsons, catalog number: 546021)
10. 1.5 mL tubes (Tarsons, catalog number: 500010)
11. Glass bottle with screw cap (Borosil, catalog number: 1506)
12. Zero-size painting brush (Camlin, catalog number: Round-66 series)
13. Pointed forceps (Medsor Impex)
14. Curved-end micro-dissecting forceps, 13 × 1 × 2 cm, 200 g (Medsor Impex, catalog number: 8903554956729, Amazon Standard Identification Number: B07FZWR13X)
15. Micro-suture cutting scissors, 1 × 1 × 1 cm, 0.28 g (Addler CE, model: DSCF2465, Amazon Standard Identification Number: B06X988149)
Equipment
1. LED light source 365 nm (Thorlabs, catalog number: M365LP1)
2. Stand for the light source (PHYWE, catalog number: 02002–55)
3. Optical collimator (Thorlabs, catalog number: SM1U25)
4. Planoconvex lens 1(Thorlabs, catalog number: LA1951-A)
5. Planoconvex lens 2 (Thorlabs, catalog number: LA1229-A)
6. Lens mount (Thorlabs, catalog number: LMR1)
7. Lens mount base (Thorlabs, catalog number: BA1L/M)
8. Lens stand holder (Thorlabs, catalog number: UPH50/M-P5)
9. Power meter with laser sensor (Ophir, catalog number: JUNO ROHS, part number: 7Z01250)
10. LED driver (Thorlabs, catalog number: DC2200)
11. Optical breadboard (Gaussian Optics, catalog number: 90019010)
12. UV/VIS detector card, 250–540 nm (Thorlabs, catalog number: VRC1)
13. UV protection glasses (Thorlabs, catalog number: LG6)
14. Laboratory jack (Labpro, catalog number: 756578)
15. Slit-lamp microscope with a digital imaging system (Appasamy Associates, catalog number: ICCM-1dynamIQ AIA- 11- 5)
16. Anesthesia system for isoflurane (VetEquip, catalog number: 161010)
17. Light microscope (Nikon, catalog number: SMZ25)
18. Confocal microscope (Leica, catalog number: SP8)
19. Microtome (Radical Scientific, catalog number: RMT-35)
20. Hot air oven (Remi, catalog number: RHI-80)
21. Gyro twister (Labnet, catalog number: S1000, A-B-230)
22. Thermomixer (Eppendorf, catalog number: 5382)
23. Individually ventilated caging (IVC) system (Orchid Scientific, model: US- Y- UV)
Procedure
A. UVA exposure setup
1. Place the entire setup on a firm table with a granite top to restrict any disturbances or movements (Figure 1A, B).
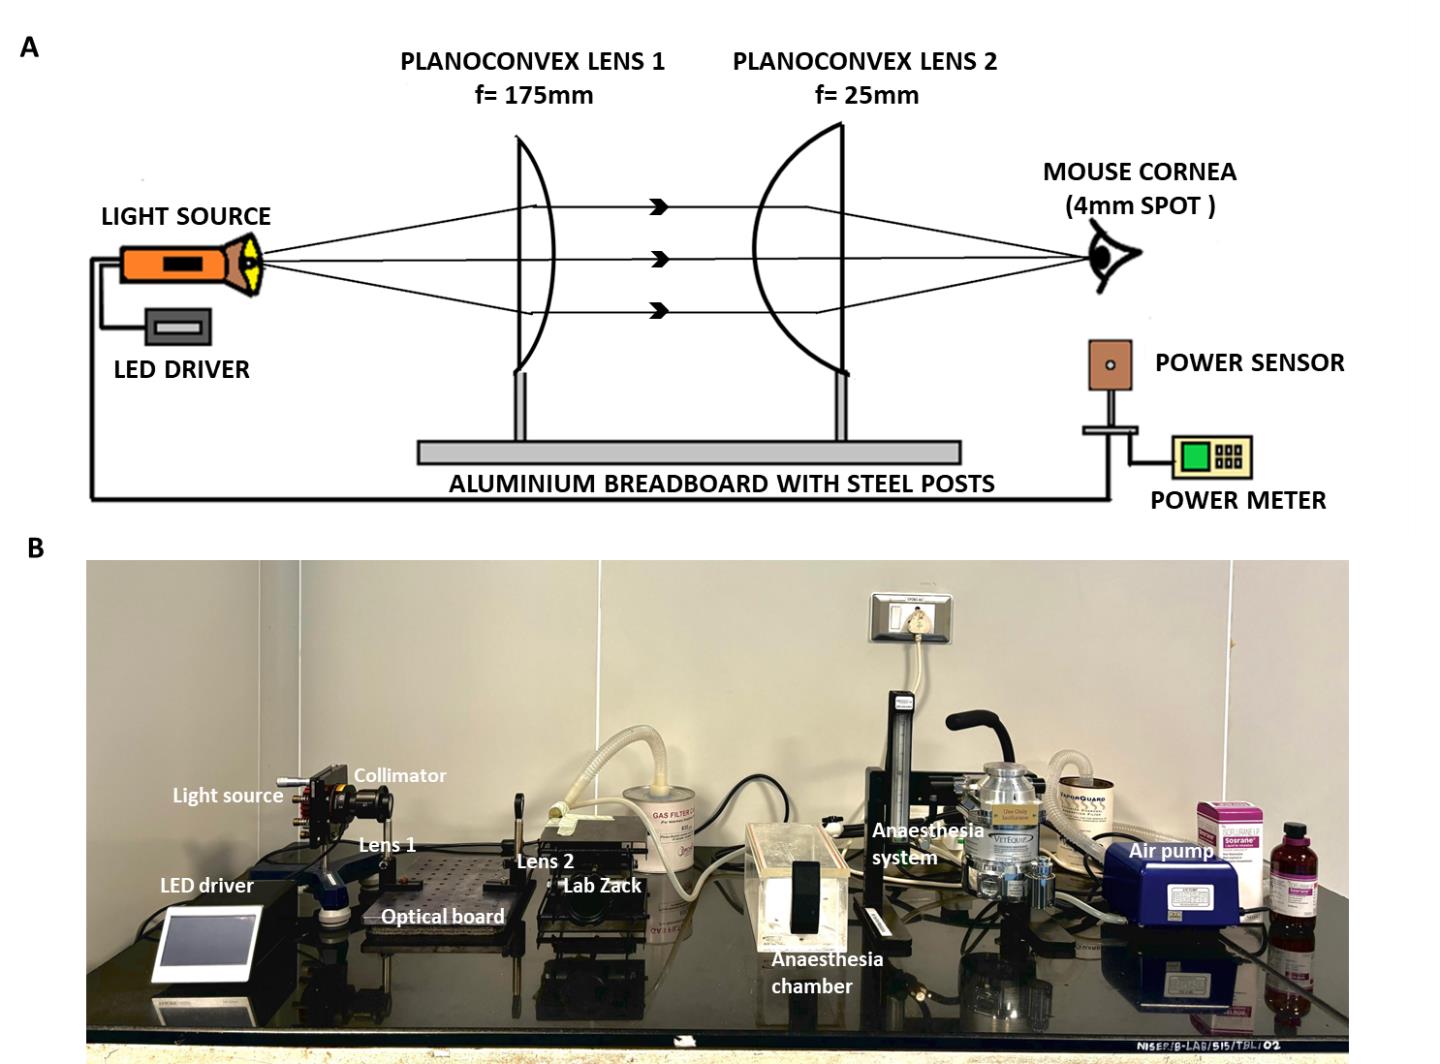
Figure 1. UVA exposure setup. A. Design for UVA exposure setup. B. Different parts of the UVA exposure setup with the isoflurane anesthesia system.
2. Use an LED light with 365 nm as a source for UVA light.
3. Place the LED source on a Y-shaped stand/holder, which holds it firmly at the required height.
4. Connect an LED driver to the light source to supply and regulate the current during the exposure period.
5. Use an optical collimator to narrow the diverging light from the LED source into a parallel beam.
6. Place two planoconvex lenses of focal lengths 25 and 175 mm at a distance of 18 cm to narrow down the parallel beam further and focus the light at a point of 3–4 mm in diameter.
Note: The lens was mounted with a lens mount fixed with a lens holder and mount base.
Caution: The emergent beam from the second lens should entirely focus on the mouse cornea.
7. Fix the collimator and the lenses with the holder on an optical breadboard.
8. Provide continuous isoflurane supply to the mouse’s nostril; place the mouse on a lab jack and adjust its height accordingly.
9. Place the light source, collimator, lens, and the animal’s eye in a straight line and at equal height.
10. Calculate the distance between both lenses and between the second lens and the mouse eye so that the final beam focuses on a 3–4 mm diameter spot.
Note: The application of isoflurane as an anesthesia system is safe as it keeps the eye of the animal open throughout the exposure time and also reduces the number of animal deaths.
11. During the exposure period, switch off all external light sources to stop the interference of any light other than the UVA radiation. This will ensure any effects are due to UVA light only.
B. Before exposure
1. In this study, we used C57BL/6J wild-type mice, 6–8 weeks old, both females and males (Figure 2A). Healthy specific pathogen-free mice were bred and raised under barrier-maintained conditions.
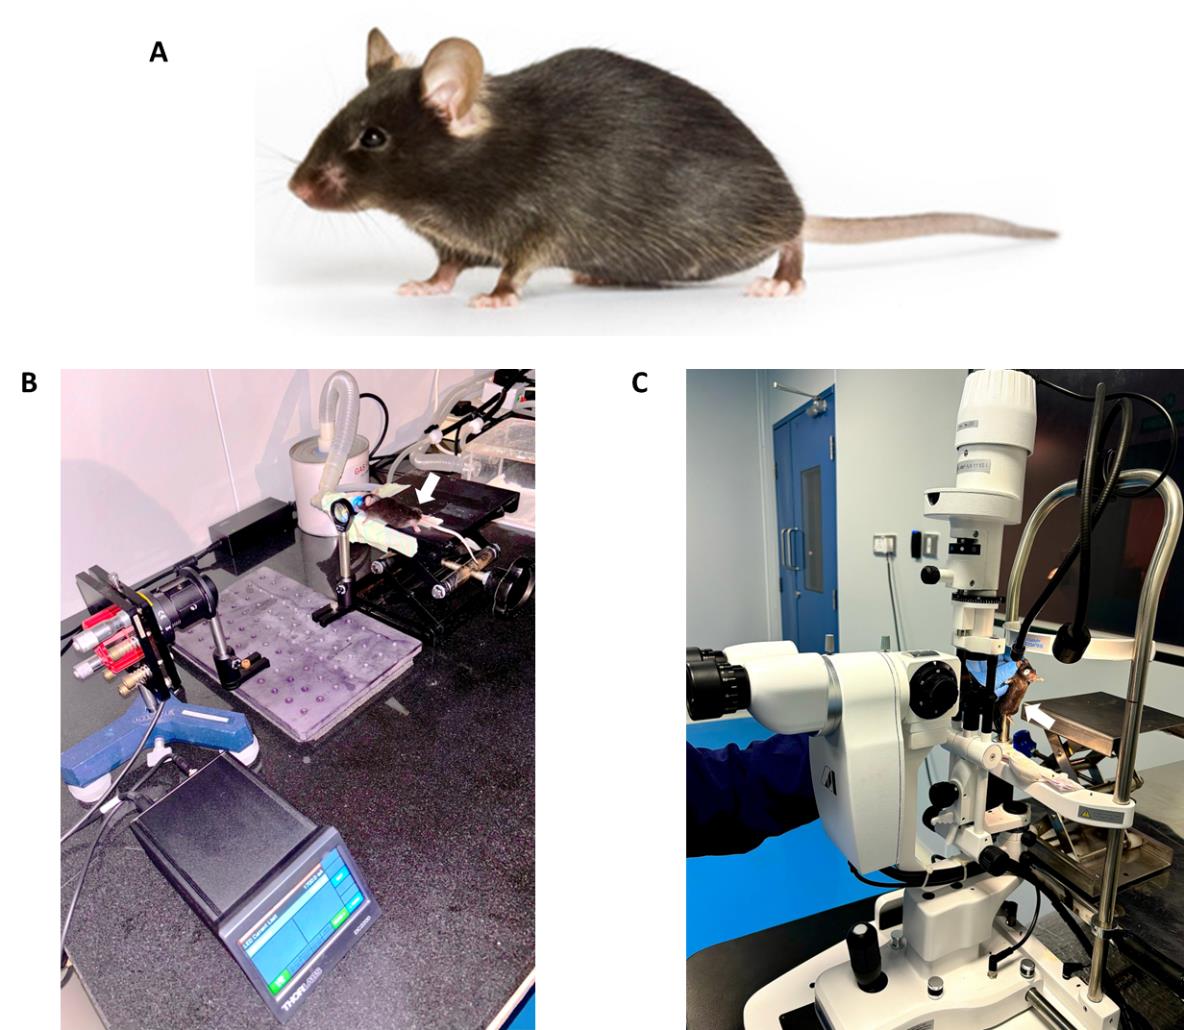
Figure 2. Irradiation of mice’s eyes with UVA. A. C57BL/6J mice were used in the experiment. B. The mouse was positioned on the lab jack with a continuous supply of isoflurane during UVA exposure to the left eye. The experiment was done in dark room conditions. C. Slit-lamp microscopic examination of the mouse eye by an animal handling expert.
2. The animals were housed in an individually ventilated caging (IVC) system, with commercially available pelleted feed (Amrut feed) and clean drinking water provided ad libitum, with a 12/12 h light/dark cycle. Temperature was controlled at 23 ± 2 °C, and humidity was maintained between 30% and 70%.
3. The animals were grouped with 4–5 mice of the same sex per cage and acclimatized for 7 days before the exposure. The animals were observed for any signs of disease or behavioral abnormality during this period. Caution: Use littermates in a single cage while grouping the animals whenever possible. Avoid overcrowding or housing a single animal in a cage to minimize stress and behavioral abnormalities.
4. The identification method used was ear punching using a stainless-steel ear punch.
5. Before the UVA exposure, choose healthy mice and examine both eyes with a slit-lamp microscope to check for any existing corneal abnormalities.
C. Exposure to UV light
1. Before exposure to UVA radiation, anesthetize the mouse by isoflurane inhalation (4%–5% for induction and 2% maximum for maintenance) using the isoflurane anesthesia system. Perform slit-lamp microscopic examination of both eyes to confirm the good condition of the cornea before and after anesthetic exposure (Figure 2B).
2. Use artificial tear solution (carboxymethyl cellulose sodium eye drops IP 0.5% w/v) on both eyes to avoid dry eyes (as the eyes remain open throughout the exposure period).
3. Position the mouse in ventral recumbency on a lab jack with continuous anesthesia supply to its nostrils throughout the exposure time.
4. Use the left eye for exposure; the right eye of the same mouse is used as control.
Note: We chose this solely based on the convenience of our experimental setup.
5. Perform UVA irradiation with a fluence of 500 J/cm2 (irradiance= 368 mW/cm2, time= 23 min) on a 3–4 mm diameter spot of the left eye that completely covers the mouse cornea (Figure 2B).
Note: The typical diameter of a mouse cornea is 2.6 mm. The corneal part covered by the eyelid is protected from exposure, i.e., the central part of the cornea was exposed to UVA light.
Caution: Keep a continuous check on the oxygen level, isoflurane level, and breathing pattern of the animal.
Critical: Keep the isoflurane supply at a very low level (1.5%) with oxygen flow (1–1.5 L) to prevent the death of animals during the long exposure time.
6. After anesthesia exposure, image both eyes with white and blue light by applying fluorescein dye to check for any epithelial damage from the UVA exposure.
7. Clean the eye immediately with PBS with the help of a dropper.
Note: Do the examining and imaging immediately after the exposure, when the animal is still under anesthesia before it gains consciousness, and while it is unmoving. This way, no extra anesthesia is needed during imaging.
8. Place the mouse on a heating pad set at 38 °C to prevent hypothermia and ensure smooth recovery; subsequently, move it to its cage for observation.
D. Slit-lamp imaging and observation period
1. Keep the mouse under observation for 90 days, i.e., 3 months from the date of UVA exposure at a barrier facility with a 12/12 h light/dark cycle.
2. At the end of each month, perform eye examination using a slit-lamp microscope.
3. Carefully observe to detect phenotypes in the exposed eye as well as the control eye.
4. Then, stain the eyes with fluorescein dye to check whether the damage was on the epithelium.
5. Take slit-lamp images to confirm that damages are present on the inner layer of the cornea.
E. Fluorescein staining of mouse eye
1. Prepare 0.5% fluorescein dye (see Recipes).
2. Place one drop of fluorescein dye on the mouse eyeball for 2–3 min.
Note: Apply the stain to the mouse’s eye while under anesthesia.
3. Wash the eyeball properly with PBS by adding it dropwise with a dropper.
4. Gently absorb the remaining fluorescein dye or PBS solution with clean, lint-free tissue paper to avoid reflection and unnecessary fluorescein signals from the eye.
5. Image the mouse eye in the slit-lamp microscope by exposing it to blue light.
F. Sacrificing the experimental animal and dissection of the eyeball
1. Upon completion of 3 months, sacrifice the mice using CO2 asphyxiation by placing them in a euthanasia chamber.
2. After death, remove the eyeball immediately with the help of pointed forceps and fine scissors (Figure 3A).
Note: Remove the eyeballs immediately, as the body will become stiff, and it will become hard to hold the eyeball with forceps.
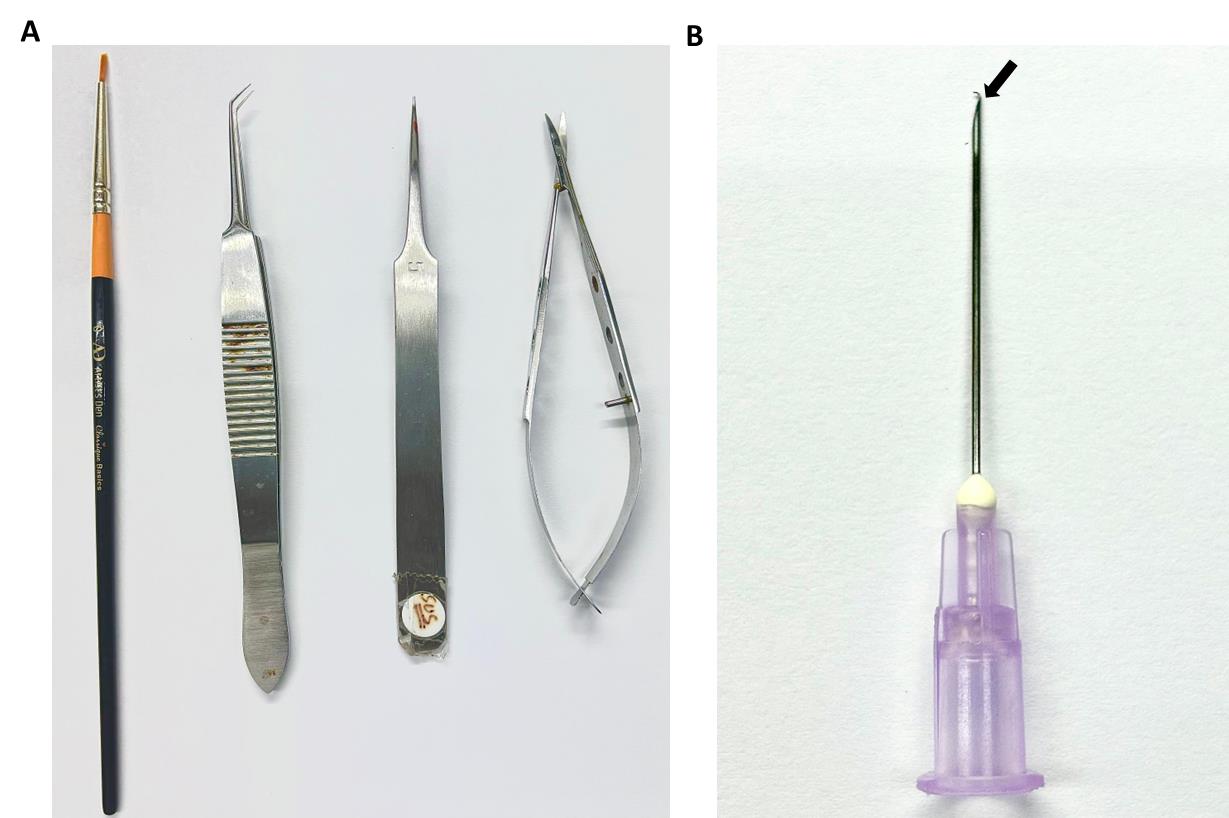
Figure 3. Surgical instruments used for the dissection of the cornea from the eyeball. A. A zero-size brush, curved-end micro-dissecting forceps, pointed-end forceps, and micro-suture cutting scissors were used to remove the cornea. B. A 10 mL syringe needle with the end slightly bent was used to remove the corneal endothelium from the cornea.
3. Hold the eyeball properly with pointed forceps and detach it along with the optic nerve by using scissors.
Note: Leave the optic nerve attached to the eyeball, as it will be used to hold the eyeball during further dissection.
4. After removal, place the eyeball in chilled PBS at 4 °C for a short period until completing the dissection of the cornea (5–6 min). Then, fix the dissected tissue with PFA.
Note: Store the eyeball in ideal conditions for future use. Store in PBS after fixation with PFA/formalin/70% alcohol at 4 °C for up to 1 month for histological experiments.
G. Alizarin red and trypan blue experiment
1. Dissect the eyeball and keep it in a Petri dish with fresh PBS under a light microscope.
Note: This should be done immediately after removing the eyeball from the mouse.
2. With one hand, hold the eyeball with a forceps with a bent pointed end. With the other end, simultaneously remove extracellular tissues using another pointed forceps (Video 1).

3. After cleaning the eyeball by flushing with PBS to remove the iris part, the demarcation between the corneal and retinal parts is clearly seen.
4. Make a small cut at this demarcation point using micro-suture cutting scissors. Then, slowly progress the cut along the demarcation line throughout the eyeball, separating the corneal part from the retinal part.
5. Gently remove the iris and lens from the corneal cup with a zero-size brush.
6. Then, cut the remaining retinal part from the cornea (if present), which will give a thick, clear corneal cup.
7. The convex side of the corneal cup is the outer side and contains stratified epithelial cells. The concave side, i.e., the inner side of the corneal cup, contains the single layer of corneal endothelium (Figure 4A).
Caution: Hold the corneal cup gently with the pointed forceps to reduce the chances of endothelial injury.

Figure 4. Dissection of the mouse eyeball. A. Dissected transparent corneal cup from the mouse eyeball. B. The dissected mouse cornea is stained with trypan blue. C. Dissected corneal endothelium layer and the corneal cup without endothelium layer. The central portion of the corneal cup appears without the endothelium layer (marked with an arrow). D. Corneal endothelium layer at 40× magnification.
8. Place the corneal cup on a glass slide.
9. Pour one drop of trypan blue solution on the concave side of the corneal cup and leave it undisturbed for 5 min. Then, wash the trypan blue solution with PBS. Soak extra PBS in lint-free tissue paper.
Note: By this time, the cup appears blue (Figure 4B).
10. Add 2–3 drops of 1.0% alizarin red solution to the cup and leave for 7–8 min. Then, wash with PBS.
Note: Add the reagents slowly and dropwise using a dropper. By this time, the cup appears dark brown.
11. Make four minor cuts at the edge/periphery of the corneal cup (each cut at 90° to the other and the center portion remains uncut), which helps in the flat mounting of the cornea.
12. Add a few drops of PBS to the corneal cup and spread on the slide. Place the coverslip on the cup gently and observe the corneal endothelium under the light microscope.
Caution: Do not put pressure on the coverslip/corneal cup.
13. Perform the whole procedure at room temperature.
H. Processing for microtomy
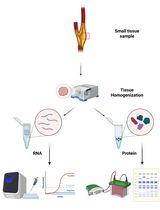
1. Sample preparation and processing:
a. The steps for sample preparation and processing were adapted from Pang et al [14].
b. Slides with the mouse's whole eye section were stained with hematoxylin and eosin to check the endothelial cell death and other abnormalities that occur in the case of FECD.
c. Images were taken with a light microscope.
I. Separation of corneal endothelium from the cornea
1. For fresh tissue, continue until step G8.
2. For fixed tissue, continue until step G7. Then, place the tissue in 70% alcohol and store at 4 °C.
3. Add one or two drops of trypan blue solution to the corneal cup and keep for 2–3 min (Figure 4B).
Note: The sole purpose of adding trypan blue is to color the corneal endothelium blue, which will help detect CE easily during removal.
4. Using a syringe needle of size 10 mL, slightly bend its tip with the help of pointed forceps, as shown in Figure 3B.
Caution: Do not excessively bend the needle tip.
5. Hold the corneal cup at a specific point with pointed forceps.
Caution: Do not move the forceps to different points on the cup, which will lead to the loss of endothelial cells on the DM.
6. Use the bent end of the needle to make a very thin cut in the endothelium layer near the extreme peripheral portion.
7. From that particular point, slowly pull the endothelium with the DM toward the outside. Gradually pull the complete endothelial layer with the DM and remove it from the corneal cup. All the procedures should be done under a light microscope.
Caution: Try to completely remove the endothelium without tearing the tissue.
Note: As the tissue is very thin and small, blue coloration due to trypan blue application will help locate the tissue. To check whether the endothelium has been removed, try to see the cup at higher magnification and also by touching the cup with a needle; one can feel the jelly-like stromal part (Figure 4C, D).
8. Store the endothelium (removed from the fresh corneal cup) in RNAlater at -80 °C for further molecular biology experiments or fix it with 4% PFA for staining purposes.
Note: Removed endothelium from fixed tissue can be processed for immunofluorescence directly.
J. Immunofluorescence with ZO-1
1. Perform the immunofluorescence experiment in a 24-well plate. During the entire procedure, the tissue must be immersed in the solution present in the well.
2. Wash the removed corneal endothelium with DM twice with PBS for 5 min each to remove excess trypan blue (if freshly extracted) or RNA later (if stored at -80 °C).
3. Then, fix the tissue with 4% PFA for 20 min.
Note: Perform all processes on a slow-moving rocker. Always use freshly prepared 4% PFA stored at 4 °C.
4. Wash the tissue with PBS three times for 5 min each to remove excess PFA.
5. Then, treat the tissue with 0.5% PBST solution (PBS with 0.5% Triton X-100) for 30 min to achieve tissue permeabilization. After each 10 min, change the solution to a fresh 0.5% PBST solution.
6. Perform blocking with blocking solution, i.e., 10% normal horse serum (NHS) in 0.5% PBST for 1 h.
7. Then, treat the tissue with ZO-1 primary antibody and mix with blocking solution overnight.
8. Treat the tissue again with 0.5% PBST (3 times, 10 min each).
9. Treat with Alexa Fluor conjugated secondary antibody for 2 h in the dark, followed by washing with PBS (3 times, 5 min each).
10. Treat the tissue with 0.5% PBST (3 times, 5 min each).
11. Counterstain the tissue with DAPI by incubating for 20 min in a dark condition.
12. Wash the tissue with PBS for 5 min.
13. Then, spread the tissue on a glass slide with the help of a very thin brush and needle and mount with Fluoromount G and a coverslip.
14. Dry the slide for three days and image under a confocal microscope.
15. Conduct the whole procedure at room temperature.
Data analysis
FECD phenotypes were developed in the UVA-exposed eye of female mice within 90 days
During the observation period of three months, it was observed that 1 or 2 out of the 4/5 female mice (per cage) developed corneal scarring within the first two months of UVA exposure. All the female mice developed corneal scarring at the end of the 3 months. Slit-lamp microscope images confirmed the gradual increment of the scar and confirmed that the scar was present on the corneal endothelium layer (Figure 5). The control (right side) eye was normal, and no abnormalities were observed during the observation period. Moreover, male mice showed no abnormalities in the UVA-exposed eye within three months.
Corneal endothelial cell death was validated with histopathology and alizarin red–trypan blue staining
The whole eyeballs (right eyeball = control and left eyeball = UVA-exposed) of mice after three months of UVA exposure were subjected to the microtomy procedure. Imaging of the tissue sections revealed that UVA affected the different corneal layers of the eye. FECD characteristics such as corneal endothelial cell death, thickening of the DM, and epithelial bullae formation were observed. In contrast, the cornea of the control eye did not show any abnormalities (Figure 6A–C).
Alizarin red stains the intercellular border of the corneal endothelium, and trypan blue stains the dead cells. This dual staining of UVA-exposed cornea revealed that endothelial cell death occurred near the area of corneal scar formation (Figure 6D–F).
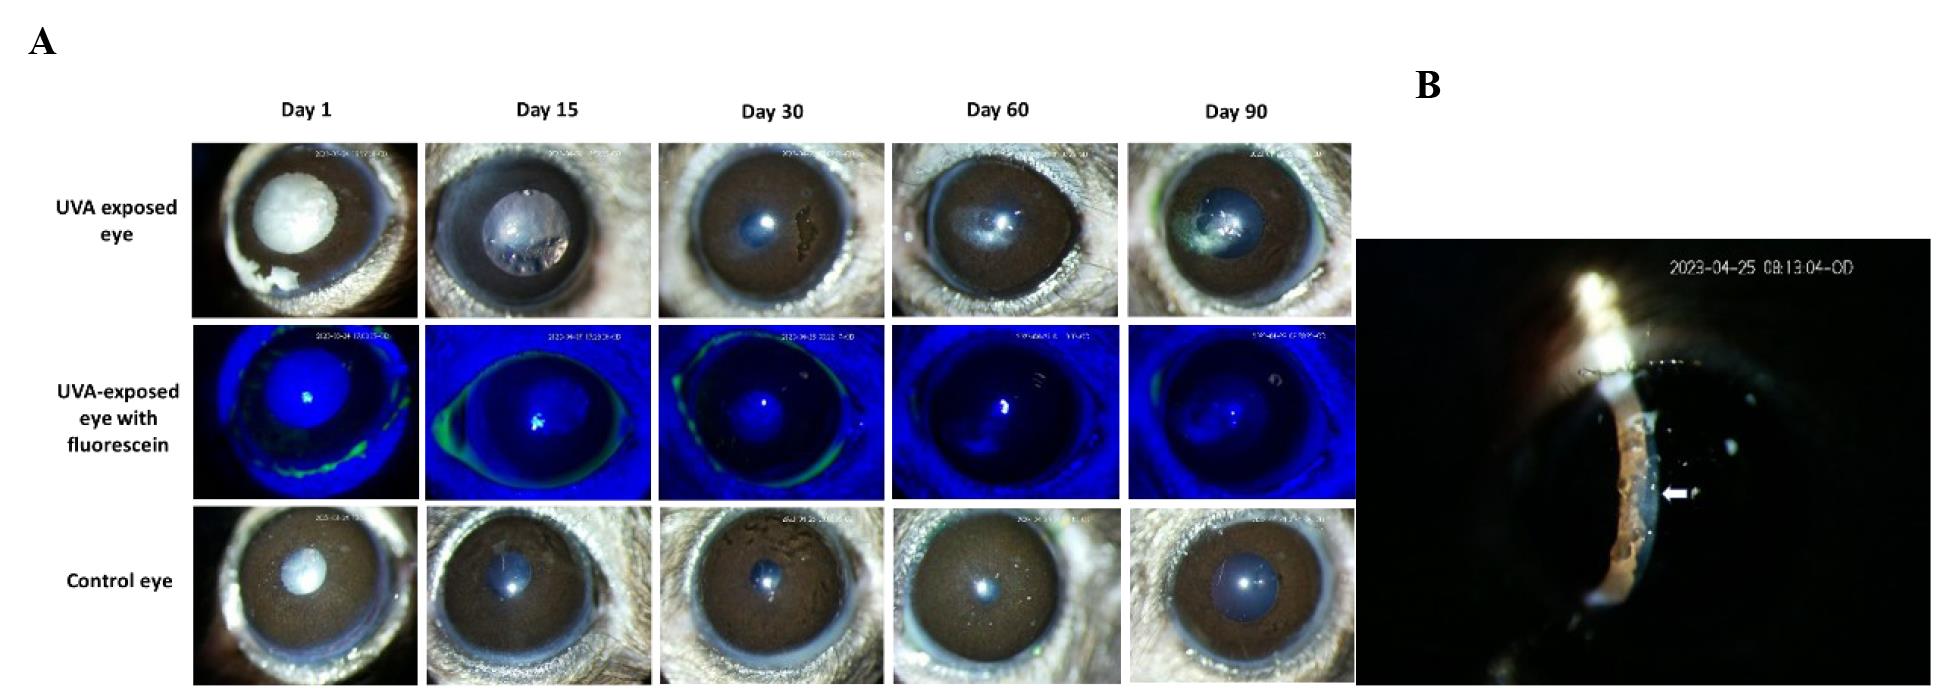
Figure 5. Effect of UVA exposure on female mice. A. After UVA exposure, both eyes of the mice were examined by slit-lamp microscope at regular periodic intervals for three months. Images show that the female mice developed corneal scarring in the UVA-exposed left eye, whereas the control right eye was in a healthy condition. Fluorescein staining of the exposed eye confirmed the unaffected corneal epithelium. B. The slit image taken on day 30 confirmed that the scar is on the corneal endothelium.
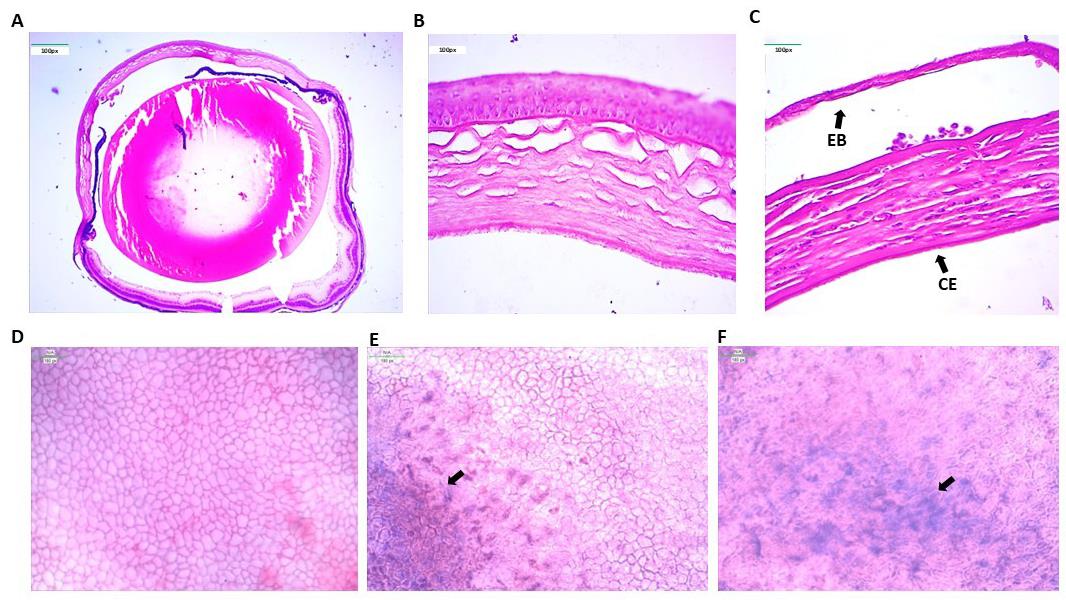
Figure 6. Fuchs endothelial corneal dystrophy (FECD) phenotypes in the mouse cornea. A. Histological image of a whole control mouse eyeball. B. The control eye shows a healthy cornea. The corneal endothelium layer is intact with no cell death. C. UVA-exposed eye shows severe FECD phenotypes such as loss of endothelial cells (CE) due to cell death and epithelial bullae (EB) formation due to detachment of corneal epithelium from the stroma. D. Alizarin red and trypan blue staining of the control corneal cup shows a hexagonal sheet of corneal endothelial cells with no abnormalities. E. Trypan blue staining of dead corneal endothelium cells in the corneal cup of the exposed eye. F. Higher magnification shows that the hexagonal corneal endothelial cells lost their shape and integrity.
ZO-1 immunofluorescence confirms the presence of the endothelial cell layer
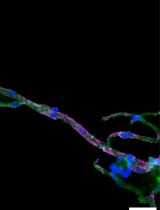
The endothelium layer was removed from the corneal endothelium and subjected to immunostaining with ZO-1 antibody. ZO-1 is present in the tight junction, so its antibody stains the border of the corneal endothelium and the superficial layer of the corneal epithelium [15]. Confocal microscopy images showed the hexagonal cells forming the corneal endothelial layer (Figure 7).
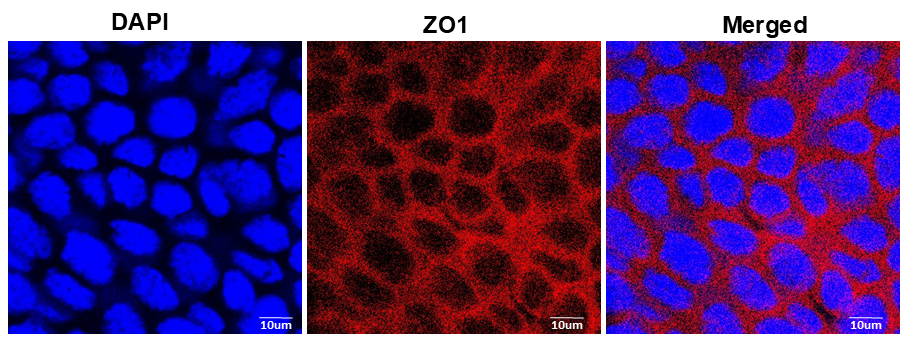
Figure 7. Mouse corneal endothelium with ZO-1 staining. ZO-1 is present exclusively in the tight junctions of epithelial and endothelial cells. The immunofluorescence image reveals the presence of ZO-1 at the cellular junctions of the corneal endothelial cells, which shows the morphology of the cell. The endothelium appears as a single sheet of nearly hexagonal cells. This experiment is only done with the corneal endothelium of the control eye of the mouse.
Validation of protocol
For the validation of the phenotype developed with this protocol, images obtained from the tissue sections after microtomy of control and UVA-induced eyes were subjected to quantitative analysis of different phenotypes reported in FECD, i.e., thickening of the DM, loss of corneal endothelial cells and formation of epithelial bullae in the cornea. The results showed that the thickness of the DM in the UVA-exposed eye (0.16 ± 0.02 μm) is significantly higher (p = 9.84 × 10⁻⁵) than that of the control eye (0.08 ± 0.01 μm). The number of endothelial cells present on the surface of the DM is significantly reduced in the cornea of the exposed eye (p= 2.92 × 10⁻⁶) (Figure 8A, B). The UVA-exposed cornea developed epithelial bullae with an average thickness of 1.8 μm, which is absent in the control eye.
To study the progression of the phenotype throughout the observation period of 3 months, we sacrificed one female mouse (with corneal scarring) at the end of each month. After sacrificing the animal and dissecting the affected eyeball, we performed a histopathological analysis of the eye. Results showed the presence of a normal cornea in the control eyeball. After the first month of UVA exposure, collagen fiber disruption begins in the corneal stroma, a characteristic feature of the FECD condition. Epithelial bullae formation starts in the cornea after the second month, with a disruption of the stroma in the central cornea. Prominent epithelial bullae formation with severe stromal fiber disruption occurs at the end of the third month (Figure 9).
This protocol or parts of it have been used and validated in the original research article “Characterisation of the role played by ELMO1, GPR141 and the intergenic polymorphism rs918980 in Fuchs' dystrophy in the Indian population” [16].
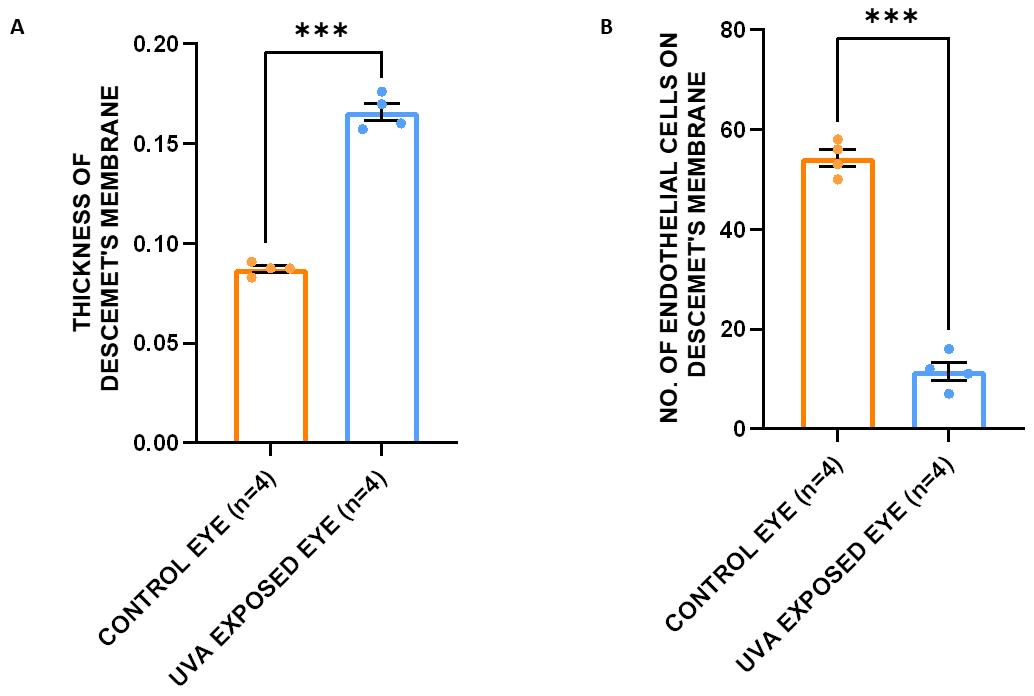
Figure 8. Quantification of histopathology data, namely the thickness of the Descemet’s membrane (DM) and the number of endothelial cells, to access phenotype development. A. The thickness of the DM in the UVA-exposed eye (0.16 ± 0.02 μm) is significantly higher (p = 9.84 × 10⁻⁵) than that of the control eye (0.08 ± 0.01 μm). B. The number of endothelial cells present in the DM is significantly reduced in the cornea of the exposed eye (p = 2.92 × 10⁻⁶). A t-test was used to measure the statistical significance level. ***p < 0.005.
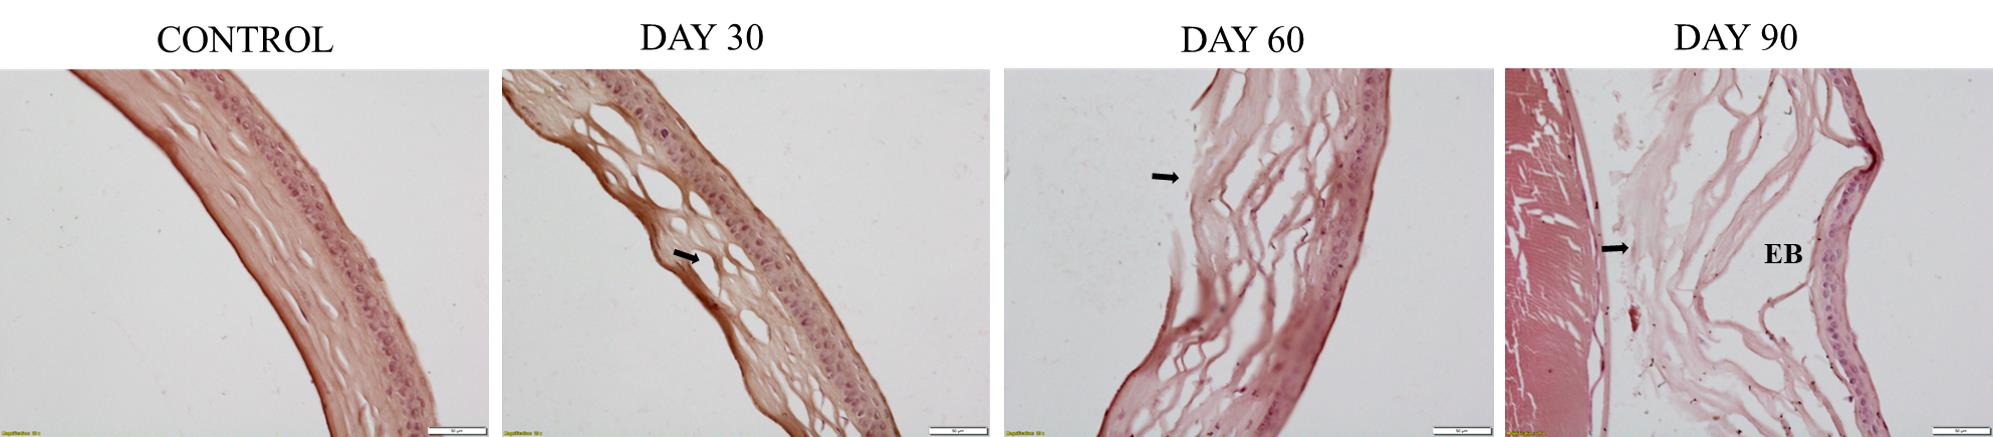
Figure 9. Histopathological analysis of the progression of abnormalities in the cornea of UVA-exposed mice for three months. Results show normal cornea in the control eyeball. After the first month of UVA exposure, the disruption of collagen fibers begins. Epithelial bullae formation starts in the cornea after the second month, disrupting the stroma in the central cornea. Prominent epithelial bullae formation with severe stromal fiber disruption occurs at the end of the third month. The stromal disruption area is marked with a black arrow mark. EB, epithelial bullae.
General notes and troubleshooting
Troubleshooting
Problem 1: Most male mice do not develop the FECD phenotype within three months of UVA exposure with a fluence of 500 J/cm2.
Possible cause: It has been reported that FECD shows female bias, with a male-to-female ratio of 1:2. Male mice may require higher UVA exposure to develop the phenotypes.
Solution: A higher dose of UVA radiation (>500 J/cm2 and <1,000 J/cm2) can be used to develop the FECD phenotype in male mice.
Acknowledgments
This work is financed by research grants (5/4/6/9/OPH/2020-NCD-II) from the Indian Council of Medical Research (ICMR), India and, intramural grant (RIN-4002-SBS) from the National Institute of Science Education and Research (NISER) an autonomous organization under the Department of Atomic Energy, Government of India.
The authors thank the staff of the NISER Animal House facility, i.e., the National Center for Animal Research and Experimentation (NCARE), for their help in maintaining the animals. We thank Dr. Santosh Babu Gunda, Scientific Officer, School of Physical Sciences, NISER, for helping with the experimental setup design for UVA exposure.
Competing interests
The authors declare no competing interests.
Ethical considerations
This study involving animals was approved (NISER/SBS/AH-268) by the Institutional Animal Ethics Committee, NISER, in accordance with CCSEA norms and guidelines.
References
- Bonanno, J. (2003). Identity and regulation of ion transport mechanisms in the corneal endothelium. Prog Retin Eye Res. 22(1): 69–94. https://doi.org/10.1016/s1350-9462(02)00059-9
- Elhalis, H., Azizi, B. and Jurkunas, U. V. (2010). Fuchs endothelial corneal dystrophy. Ocul Surf. 8:173–84. https://www.ncbi.nlm.nih.gov/books/NBK545248/
- Ong Tone, S., Kocaba, V., Böhm, M., Wylegala, A., White, T. L. and Jurkunas, U. V. (2021). Fuchs endothelial corneal dystrophy: The vicious cycle of Fuchs pathogenesis. Prog Retin Eye Res. 80: 100863. https://doi.org/10.1016/j.preteyeres.2020.100863
- Nanda, G. G. and Alone, D. P. (2019). REVIEW: Current understanding of the pathogenesis of Fuchs’ endothelial corneal dystrophy. Mol Vis. 25:295–310. https://doi.org/10.1016/j.exer.2014.10.023
- Adamis, A. P., Filatov, V., Tripathi, B. J. and Tripathi, R. C. (1993). Fuchs' endothelial dystrophy of the cornea. Surv Ophthalmol. 38(2): 149–168. https://doi.org/10.1016/0039-6257(93)90099-s
- Zoega, G. M., Fujisawa, A., Sasaki, H., Kubota, A., Sasaki, K., Kitagawa, K. and Jonasson, F. (2006). Prevalence and Risk Factors for Cornea Guttata in the Reykjavik Eye Study. Ophthalmology. 113(4): 565–569. https://doi.org/10.1016/j.ophtha.2005.12.014
- Eghrari, A. O., McGlumphy, E. J., Iliff, B. W., Wang, J., Emmert, D., Riazuddin, S. A., Katsanis, N. and Gottsch, J. D. (2012). Prevalence and Severity of Fuchs Corneal Dystrophy in Tangier Island. Am J Ophthalmol. 153(6): 1067–1072. https://doi.org/10.1016/j.ajo.2011.11.033
- Kitagawa, K., Kojima, M., Sasaki, H., Shui, Y. B., Chew, S. J., Cheng, H. M., Ono, M., Morikawa, Y. and Sasaki, K. (2002). Prevalence of Primary Cornea guttata and Morphology of Corneal Endothelium in Aging Japanese and Singaporean Subjects. Ophthalmic Res. 34(3): 135–138. https://doi.org/10.1159/000063656
- Mohamed, A., Chaurasia, S., Murthy, S. I., Ramappa, M., Vaddavalli, P. K., Taneja, M., Garg, P., Chinta, S., Basu, S., Rathi, V. M., et al. (2014). Endothelial Keratoplasty. Asia Pac J Ophthalmol. 3(4): 207–210. https://doi.org/10.1097/apo.0b013e3182a75304
- Jun, A. S., Meng, H., Ramanan, N., Matthaei, M., Chakravarti, S., Bonshek, R., Black, G. C. M., Grebe, R. and Kimos, M. (2011). An alpha 2 collagen VIII transgenic knock-in mouse model of Fuchs endothelial corneal dystrophy shows early endothelial cell unfolded protein response and apoptosis. Hum Mol Genet. 21(2): 384–393. https://doi.org/10.1093/hmg/ddr473
- Murugan, S., de Campos, V. S., Ghag, S. A., Ng, M. and Shyam, R. (2024). Characterization of a Novel Mouse Model for Fuchs Endothelial Corneal Dystrophy. Invest Ophthalmol Vis Sci. 65(4): 18. https://doi.org/10.1167/iovs.65.4.18
- Liu, C., Miyajima, T., Melangath, G., Miyai, T., Vasanth, S., Deshpande, N., Kumar, V., Ong Tone, S., Gupta, R., Zhu, S., et al. (2019). Ultraviolet A light induces DNA damage and estrogen-DNA adducts in Fuchs endothelial corneal dystrophy causing females to be more affected. Proc Natl Acad Sci USA. 117(1): 573–583. https://doi.org/10.1073/pnas.1912546116
- Yun, H., Lathrop, K. L. and St. Leger, A. J. (2021). A whole-mount immunohistochemistry protocol for detection of mouse corneal nerves. STAR Protoc. 2(3): 100734. https://doi.org/10.1016/j.xpro.2021.100734
- Pang, J., Thomas, N., Tsuchiya, D., Parmely, T., Yan, D., Xie, T. and Wang, Y. (2021). Step-by-step preparation of mouse eye sections for routine histology, immunofluorescence, and RNA in situ hybridization multiplexing. STAR Protoc. 2(4): 100879. https://doi.org/10.1016/j.xpro.2021.100879
- Chen, W., Hu, J., Zhang, Z., Chen, L., Xie, H., Dong, N., Chen, Y. and Liu, Z. (2012). Localization and Expression of Zonula Occludins-1 in the Rabbit Corneal Epithelium following Exposure to Benzalkonium Chloride. PLoS One. 7(7): e40893. https://doi.org/10.1371/journal.pone.0040893
- Sharma, S., Basak, S. K., Das, S., Alone, D. P. (2025). Characterisation of the role played by ELMO1, GPR141 and the intergenic polymorphism rs918980 in Fuchs' dystrophy in the Indian population. FEBS Open Bio. https://doi.org/10.1002/2211-5463.70006
Article Information
Publication history
Received: Nov 15, 2024
Accepted: Feb 12, 2025
Available online: Mar 9, 2025
Published: Mar 20, 2025
Copyright
© 2025 The Author(s); This is an open access article under the CC BY-NC license (https://creativecommons.org/licenses/by-nc/4.0/).
How to cite
Sharma, S., Sahoo, R., Chawla, S., Das, S. and Alone, D. P. (2025). Generation of FECD Phenotypes in the Mouse Cornea by UVA Exposure and Surgical Removal of its Corneal Endothelial Layer. Bio-protocol 15(6): e5249. DOI: 10.21769/BioProtoc.5249.
Category
Cell Biology > Tissue analysis > Tissue isolation
Medicine > Ophthalmology
Do you have any questions about this protocol?
Post your question to gather feedback from the community. We will also invite the authors of this article to respond.