- Protocols

- Articles and Issues
- For Authors
- About
- Become a Reviewer

Isolation and Biophysical Characterization of Extracellular Vesicles From Hairy Root Cultures

(*contributed equally to this work) Published: Vol 15, Iss 5, Mar 5, 2025 DOI: 10.21769/BioProtoc.5225 Views: 2514
Reviewed by: Noelia ForesiAnonymous reviewer(s)
Original research article
The authors used this protocol in:

Aug 2022

Protocol Collections
Comprehensive collections of detailed, peer-reviewed protocols focusing on specific topics


Related protocols

Abstract
Extracellular vesicles (EVs) are membrane-bound, non-replicating particles released by virtually all types of cells. EVs concentrate and deliver a plethora of biomolecules driving very important biological functions, including intercellular communication not only between cells of the same organism but also across different kingdoms. Plant extracellular vesicles (PEVs) are a promising alternative to mammalian EVs in biomedical applications. Here, we present an optimized and reproducible protocol for isolating PEVs from the hairy root (HR) cultures of medicinal plants Salvia dominica and S. sclarea. Our methodological approach introduces a significant advancement in the standardization of HR-EVs purification processes from plant biotechnological platforms, paving the way for their broader application across various sectors, including agriculture, pharmaceuticals, and nutraceuticals.
Key features
• Hairy roots serve as a plant biotechnological platform for the production of bioactive compounds.
• Plant extracellular vesicles (EVs) provide a safer alternative to mammalian EVs for biomedical applications.
• This protocol represents a significant advancement in the standardization of plant EV purification.
Keywords: Plant biotechnological platformsGraphical overview
Background
Extracellular vesicles (EVs) are membrane-bound, nano- to micro-sized particles released by cells in various physiological and pathological settings. These vesicles transport proteins, lipids, nucleic acids, and metabolites, facilitating the exchange of molecular information and influencing biological functions in recipient cells [1]. EVs play a critical role in establishing complex networks of intercellular communication, extending their impact across different species and even between biological kingdoms [2]. Owing to their intrinsic features, such as cargo bioactivity and efficient cell uptake, EVs hold significant potential for therapeutic applications. However, the use of mammalian-derived EVs in therapeutic development faces significant challenges, including high production costs, complex isolation protocols, and safety concerns related to immune responses and reproducibility [3]. These limitations have driven interest in plant extracellular vesicles (PEVs), which offer a safer, more sustainable, and cost-effective solution [4,5]. PEVs are non-toxic, demonstrate minimal immunogenicity, and are less likely to provoke adverse reactions in humans, making them a valuable alternative to mammalian EVs in biomedical applications [4]. Interestingly, PEVs carry a wide variety of bioactive molecules that support tissue regeneration and exhibit anti-cancer and anti-inflammatory properties [6,7].
However, PEVs are usually obtained from plant tissues and organs using destructive extraction methods. As a result, the preparations often contain a mixture of EVs alongside other vesicles, including intracellular and artificially generated nano- and microvesicles. Furthermore, isolating EVs from fresh fruits and vegetables poses challenges in standardizing EV preparations, as they can vary significantly between batches due to factors such as genetic diversity within the species, seasonal variations, agricultural treatments, soil composition, and geographical origin.
To address these limitations, we recently adopted hairy root (HR) cultures as biotechnological biofactories for EV production [8,9]. Generated through Agrobacterium rhizogenes–mediated transformation, HRs have a long history of being used to produce high-value bioactive compounds [10]. HR cultures grow continuously under controlled conditions without the need for hormones, ensuring the consistent quality of HR-EVs, a peculiar type of PEV, which have shown interesting therapeutic bioactivity. HRs also provide economic and environmental advantages, as they require minimal inputs and sustainable growth conditions and do not rely on animal-derived materials. Their scalability further enhances their appeal as a cost-effective solution for both clinical and industrial EV production [11].
Herein, we present a robust and reproducible procedure for purifying and characterizing EVs from the conditioned media of HR cultures of the medicinal plants Salvia dominica and Salvia sclarea. This methodological approach, initially developed by Boccia et al. [8] and later refined by Vestuto et al. [9], can be adapted for isolating PEVs from other HR cultures and plant cell suspension cultures.
Materials and reagents
Biological materials
1. Salvia sclarea seeds (Lot # 2494) were purchased from B&T World Seeds, France
2. Salvia dominica seeds were kindly provided by Prof. Ammar Bader (Faculty of Pharmacy Umm Al-Qura University Makkah, Saudi Arabia). A voucher specimen number JO/IT-2022/1 has been deposited in the Herbarium of Laboratory of Pharmacognosy at Umm Al-Qura University, Makkah, Saudi Arabia
3. Agrobacterium rhizogenes virulent strain (ATCC 15834)
Reagents
1. Ethanol (Carlo Erba, catalog number: 414608)
2. Milli-Q water
3. Sodium hypochlorite solution (Supelco, catalog number: 1.05614)
4. Murashige & Skoog salt mixture including vitamins (Duchefa, catalog number: M0221)
5. Microagar (Duchefa, catalog number: M1002)
6. Yeast extract (AppliChem, catalog number: A1553)
7. Beef extract (Sigma-Aldrich, catalog number: B4888)
8. Peptone (AppliChem, catalog number: A2210)
9. Sucrose (Thermo Scientific, catalog number: A15583.0C)
10. MgSO4 (AppliChem, catalog number: A6414)
11. Cefotaxime (Sigma-Aldrich, catalog number: C7039)
12. NaCl (HiMedia, catalog number: GRM031)
13. KCl (Sigma-Aldrich, catalog number: P9333)
14. Na2HPO4 (Sigma-Aldrich, catalog number: S3264)
15. KH2PO4 (Sigma-Aldrich, catalog number: P5655)
16. NaOH (AppliChem, catalog number: A3910)
17. HCl (Sigma-Aldrich, catalog number: 30721-M)
18. Phire Plant Direct PCR kit (Thermo Fischer Scientific, catalog number: F130WH)
19. Agarose (Euroclone, catalog number: EMR900)
20. SYBR Safe DNA gel stain (Thermo Fisher Scientific, catalog number: S33102)
21. EDTA (Sigma-Aldrich, catalog number: ED2SS)
22. Sodium dodecyl sulfate (SDS) (SAFC, catalog number: 8.17034)
23. 30% Acrylamide/Bis Solution, 29:1 (Bio-Rad, catalog number: 1610156)
24. Tris-HCl (Sigma-Aldrich, catalog number: T3253)
25. Ammonium persulfate (APS) (Bio-Rad, catalog number: 1610700)
26. N,N,N',N'-Tetramethyl ethylenediamine (TEMED) (Sigma-Aldrich, catalog number: T2, 250-0)
27. Glycine (Sigma-Aldrich, catalog number: G8898)
28. Trizma base (Invitrogen, catalog number: 15504-20)
29. DTT (Dithiothreitol) (Thermo Fischer Scientific, catalog number: R0861) or β-mercaptoethanol (Sigma-Aldrich, catalog number: M3148)
30. Bromophenol blue (AppliChem, catalog number: A2331)
31. Methanol (Carlo Erba, catalog number: 414816)
32. Glacial acetic acid (Sigma-Aldrich, catalog number: 71251)
33. Sodium thiosulfate (Sigma-Aldrich, catalog number: 7772-98-7)
34. AgNO3 (Thermo Fisher, catalog number: 197680050)
35. Sodium carbonate (J.T. Baker, catalog number: 3602-01)
36. Paraformaldehyde (Sigma-Aldrich, catalog number: 158127)
37. Formaldehyde (Sigma-Aldrich, catalog number: F8775)
38. Glutaraldehyde solution (Sigma-Aldrich, catalog number: 354400)
39. Methylamine Vanadate (NanoVan) (Nanoprobes, catalog number: NC0659245)
40. Primers (5'→3'):
rolB (Forward, Fw) GATTCAACCATATCGGAGCG
rolB (Reverse, Rv) TGAGCATGTGCTGTTTTTGG
rolC (Fw) CGACCTGTGTTCTCTTTTTCAAGC
rolC (Rv) GCACTCGCCATGCCTCACCAACTCACC
virD2 (Fw) ATGCCCGATCGAGCTCAAGT
virD2 (Rv) CCTGACCCAAACATCTCGGCT
Actin (Fw) GGTGCCCTGAGGTCCTGTT
Actin (Rv) GAGCCACCACTGAGGACAAT
Solutions
1. YEB medium (see Recipes)
2. MS30 medium (see Recipes)
3. 50× TAE (see Recipes)
4. 10× PBS (see Recipes)
5. 10% resolving gel (see Recipes)
6. 4% stacking gel (see Recipes)
7. 4× Laemmli buffer (see Recipes)
8. 10× Tris-glycine-SDS (TGS) Buffer (see Recipes)
9. Fixing solution (see Recipes)
10. Washing 1 (see Recipes)
11. Sensitizing solution (see Recipes)
12. Silver solution (see Recipes)
13. Developing solution (see Recipes)
Recipes
1. YEB medium
Yeast extract 0.1%
Beef extract 0.5%
Peptone 0.5%
Sucrose 0.5%
MgSO4 0.04%
Autoclave and store at 4 °C.
Prepare with distilled water.
2. MS30 medium
Murashige & Skoog salt mixture + vitamins 4.3 g/L
Sucrose 30 g/L
Cefotaxime 100 mg/L or 50 mg/L
Microagar 9 g/L (for solid media only)
Prepare with distilled water. Adjust pH to 5.8 and autoclave. Antibiotics should be added after autoclaving when the medium has cooled down to 40–50 °C to avoid degradation. Use a pre-prepared antibiotic stock solution (e.g., 50 mg/mL or 100 mg/L) for accurate dosing. Once prepared, store the medium at 4 °C for optimal stability.
To prepare MS30 solid medium, add 9 g/L of Microagar to MS30 before autoclaving. After autoclaving, allow the medium to cool down to 40–50 °C before adding the antibiotic. Then, immediately pour the medium into 100 mm × 15 mm Petri dishes under a sterile hood. Leave the dishes uncovered until the medium is completely solidified to prevent condensation. Once solidified, cover the plates and ensure they are sealed appropriately. The medium can be stored at 4 °C for up to two weeks.
3. 50× TAE
EDTA disodium salt 50 mM
Trizma base 2 M
Glacial/acetic acid 1 M
Prepare with Milli-Q water.
4. 10× PBS
NaCl 1.37 M
KCl 27 mM
Na2HPO4 100 mM
KH2PO4 18 mM
Adjust pH to 7.4, autoclave, and store at room temperature.
Prepare with Milli-Q water.
5. 10% resolving gel
Tris-HCl (pH 8.8) 375 mM
SDS 0.1%
Acrylamide 10%
TEMED 0.01%
APS 0.1%
Prepare with Milli-Q water.
6. 4% stacking gel
Tris-HCl (pH 6.8) 125 mM
SDS 0.1%
Acrylamide 4%
TEMED 0.01%
APS 0.1%
Prepare with Milli-Q water.
7. 4× Laemmli buffer
Tris-HCl (pH 6.8) 1.0 M
SDS 40% (w/v)
DTT or β-mercaptoethanol 0.2 M
Bromophenol blue 0.8% (w/v)
Prepare with Milli-Q water.
8. 10× TGS buffer
Trizma base 0.25 M
Glycine 1.92 M
SDS 1%
Prepare with Milli-Q water.
9. Fixing solution
Methanol 50%
Acetic acid 12%
Prepare fresh with Milli-Q water.
10. Washing 1
Methanol 50%
Prepare fresh with Milli-Q water.
11. Sensitizing solution
Sodium thiosulfate 0.04%
Prepare fresh with Milli-Q water.
12. Silver solution
Silver nitrate (AgNO3) 0.1%
Prepare fresh, keep in the dark, and use Milli-Q water.
13. Developing solution
Sodium carbonate 3%
Formaldehyde 0.05%
Prepare fresh with Milli-Q water.
Laboratory supplies
1. Micropipettes (Gilson, catalog number: F167360)
2. Pipette tips (Sarstedt, catalog numbers: 70.3010.100, 70.3030.200, 70.3050.205)
3. DeckWorks low binding tips (Corning, catalog numbers: 4150, 4148, 4149)
4. 50 mL conical tubes (Euroclone, catalog number: CC430828)
5. 1.5 mL microcentrifuge tubes (Euroclone, catalog number: ET3415)
6. Petri dishes (Thermo Fisher Scientific, catalog number: 172931)
7. Borosilicate glass jars (VWR, catalog number: 214-1132)
8. Tweezers (VWR, catalog number: OUTI0-AXAL)
9. Scalpels (VWR, catalog number: 233-0047)
10. Mortar and pestle (VWR, catalog numbers: 410-0112, 410-0119)
11. Syringes (Euroclone, catalog number: LC11352017R)
12. 0.45 μm pore size membrane filters (Euroclone, catalog number: EPSPE4530)
13. Carbon SEM stubs (Agar Scientific, catalog number: AGG399F)
Equipment
1. Autoclave (PB International)
2. Sterile laminar flow hood (HeraguardTM)
3. pH meter (XS instruments)
4. Grow chamber
5. Spectrophotometer (Thermo Fischer Scientific, model: Multiskan spectrum)
6. PCR thermocycler (Applied Biosystem, model: GeneAmpTM PCR System 9700)
7. Microcentrifuge (Eppendorf, model: 5415R)
8. Orbital shaker incubator (ZetaLab, model: Universal table shaker 709)
9. Ultracentrifuge (Beckman Coulter, model: OptimaTM L-90K)
10. Beckman Type 70 Ti fixed angle titanium rotor (Beckman Coulter)
11. Polypropylene open-top ultracentrifuge tubes (Beckman Coulter, catalog number: 326823)
12. -80 °C fridge (Thermo Fischer Scientific)
13. Mini-PROTEAN Tetra Vertical Electrophoresis Cell (Bio-Rad)
14. PowerPac Universal power (Bio-Rad)
15. NanoSight NS300 Instrument (Marvel Panalytical)
16. Scanning electron microscope (SEM) (Tescan Solaris)
17. Transmission electron microscope (TEM) (FEI Tecnai T20)
Software and datasets
1. EM-MENU software
2. NanoSight NTA 3.4 software
3. Mascot software (v2.5, Matrix Science)
4. Zetasizer software (v7.01, Malvern Instrument)
5. BioRender (https://www.biorender.com/) and SMART - Servier Medical ART (https://smart.servier.com/). The following figures were created using BioRender: Graphical overview, https://BioRender.com/g49p506; Figure 2, https://BioRender.com/l06m694.
Procedure
A. Hairy roots production
1. Seed sterilization
a. Place S. sclarea and S. dominica seeds in a 50 mL tube.
b. Add enough 70% ethanol to cover the seeds completely and stir gently for 2 min.
c. Carefully decant the ethanol and allow the seeds to air dry for a few seconds.
d. Transfer the seeds to a 10% sodium hypochlorite solution, ensuring they are fully submerged. Stir gently for 10 min.
e. Decant the sodium hypochlorite solution.
f. Wash the seeds thoroughly with sterile water by transferring them to fresh sterile water 10 times to remove any residual bleach.
2. Seed sowing and germination
a. Using sterile tweezers, transfer the sterilized seeds onto the prepared MS30 solid medium (see Recipes).
b. Place the Petri dishes in a growth chamber set to 23 °C with a 16/8 h light/dark photoperiod at a light intensity of 130 μmol m·s.
3. Hairy roots induction
a. After 20 days of growth, excise 20–30 leaf explants (~1 cm2 each) from the seedlings using a sterile scalpel (Figure 1A, B).
b. Prepare an Agrobacterium rhizogenes suspension in liquid MS30 medium and adjust the optical density (OD) to 0.6 using a spectrophotometer.
c. Inoculate the leaf explants in the bacterial suspension for 30 min (Figure 1C).
d. Remove the explants from the suspension and place them on sterile filter paper to dry briefly.
e. Transfer the explants onto antibiotic-free solid MS30 medium and incubate at 26 °C in the dark for 3 days (Figure 1D).
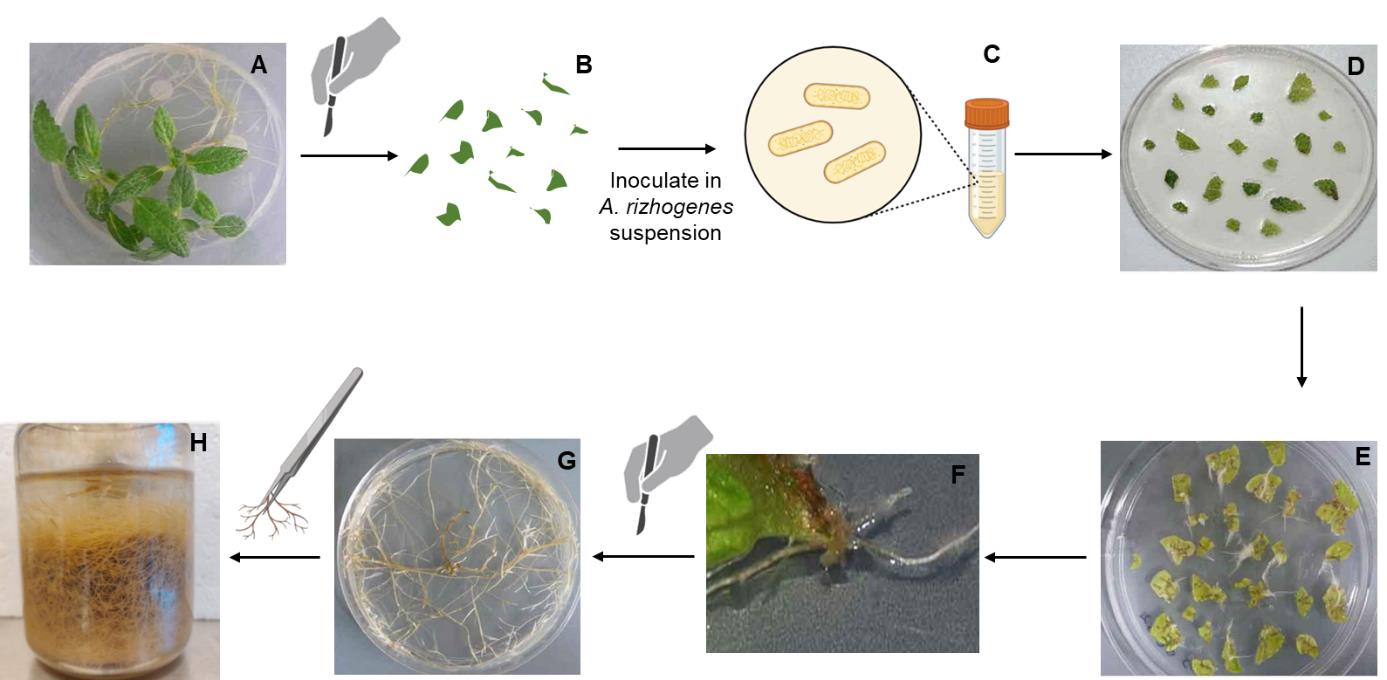
Figure 1. A. rhizogenes–mediated infection of leaf explants to induce hairy root formation. (A) In vitro-grown plantlets used as the source of explants. (B) Leaf explants excised from in vitro plantlets. (C) A. rhizogenes-mediated transformation, showing bacterial culture containing Ri plasmids. (D) Infected leaf explants cultured on selection medium. (E) Callus formation and initial root induction from transformed explants. (F) Emergence of hairy roots from transformed explants. (G) Actively growing hairy root culture on solid medium. (H) Hairy roots in liquid medium.
4. Eradication of Agrobacterium rhizogenes
a. After 3 days, transfer the explants to fresh MS30 solid medium containing 100 mg/L cefotaxime. Incubate the explants at 23 °C in the dark.
b. Perform weekly transfers to new MS30 medium with cefotaxime for 3 weeks, reducing the cefotaxime concentration to 50 mg/L in the last week.
5. Hairy root maintenance
a. Once healthy and differentiated hairy roots appear, excise them from the explants (Figure 1E, F).
b. Culture the hairy roots on solid MS medium containing 50 mg/L cefotaxime. Each plate (100 mm × 115 mm) can initially accommodate 10–15 small hairy roots. However, to promote better development, the number of roots per plate should be gradually reduced up to a single HR during subsequent subculture cycles (15–21 days each). These plates serve as stab cultures, which are used to inoculate liquid media when initiating a new culture for EV production.
c. Transfer the well-developed hairy roots (as those shown in Figure 1G) to hormone-free liquid MS30 medium (25 mL) in sterile 250 mL glass jars containing 50 mg/L cefotaxime (Figure 1H).
Note: Hairy roots can be transferred to larger jars to accommodate their growth. In this case, the volume of the medium should be adjusted to completely cover the hairy roots.
d. Place the jars in a shaking incubator set in a range of 25–28 °C and 100 rpm for continuous culture.
Note: Shaking speed can be adjusted based on the characteristics of the jars (e.g., cylindrical jars require a higher shaking speed compared to conical ones). The culture can be maintained as long as the hairy roots appear clear and healthy, without dark or necrotic areas. Typically, for Salvia species, cultures can last up to two months in a 250 mL jar (as shown in Figure 1H). Larger flasks allow for longer maintenance of the hairy roots.
6. Confirmation of hairy roots via polymerase chain reaction (PCR) analysis
a. Extract DNA from three independent hairy root lines using the Phire Plant Direct PCR kit following the manufacturer’s protocol. Typically, a small fragment (approximately 2 mm in length) of a tiny hairy root is sufficient. Prepare PCR reactions using gene-specific primers for the following bacterial genes: rolB, rolC, VirD2, and Actin.
b. Set up the PCR reactions using the following cycling conditions:
Initial denaturation: 98 °C for 5 min
40 cycles of:
Denaturation: 98 °C for 15 s
Annealing: 55 °C for 15 s
Extension: 72 °C for 45 s
Final extension: 72 °C for 5 min
c. Analyze the PCR products by running them on a 1% agarose gel stained with SYBR Safe DNA gel stain.
d. Visualize the gel under UV light to confirm the presence of the expected amplicons for rolB (590 bp), rolC (514 bp), and Actin (142 bp), and the absence of the virD2 amplicon (317 bp).
Note: The pRi15834 plasmid can be purified from A. rhizogenes and used as a positive control in PCR reactions.
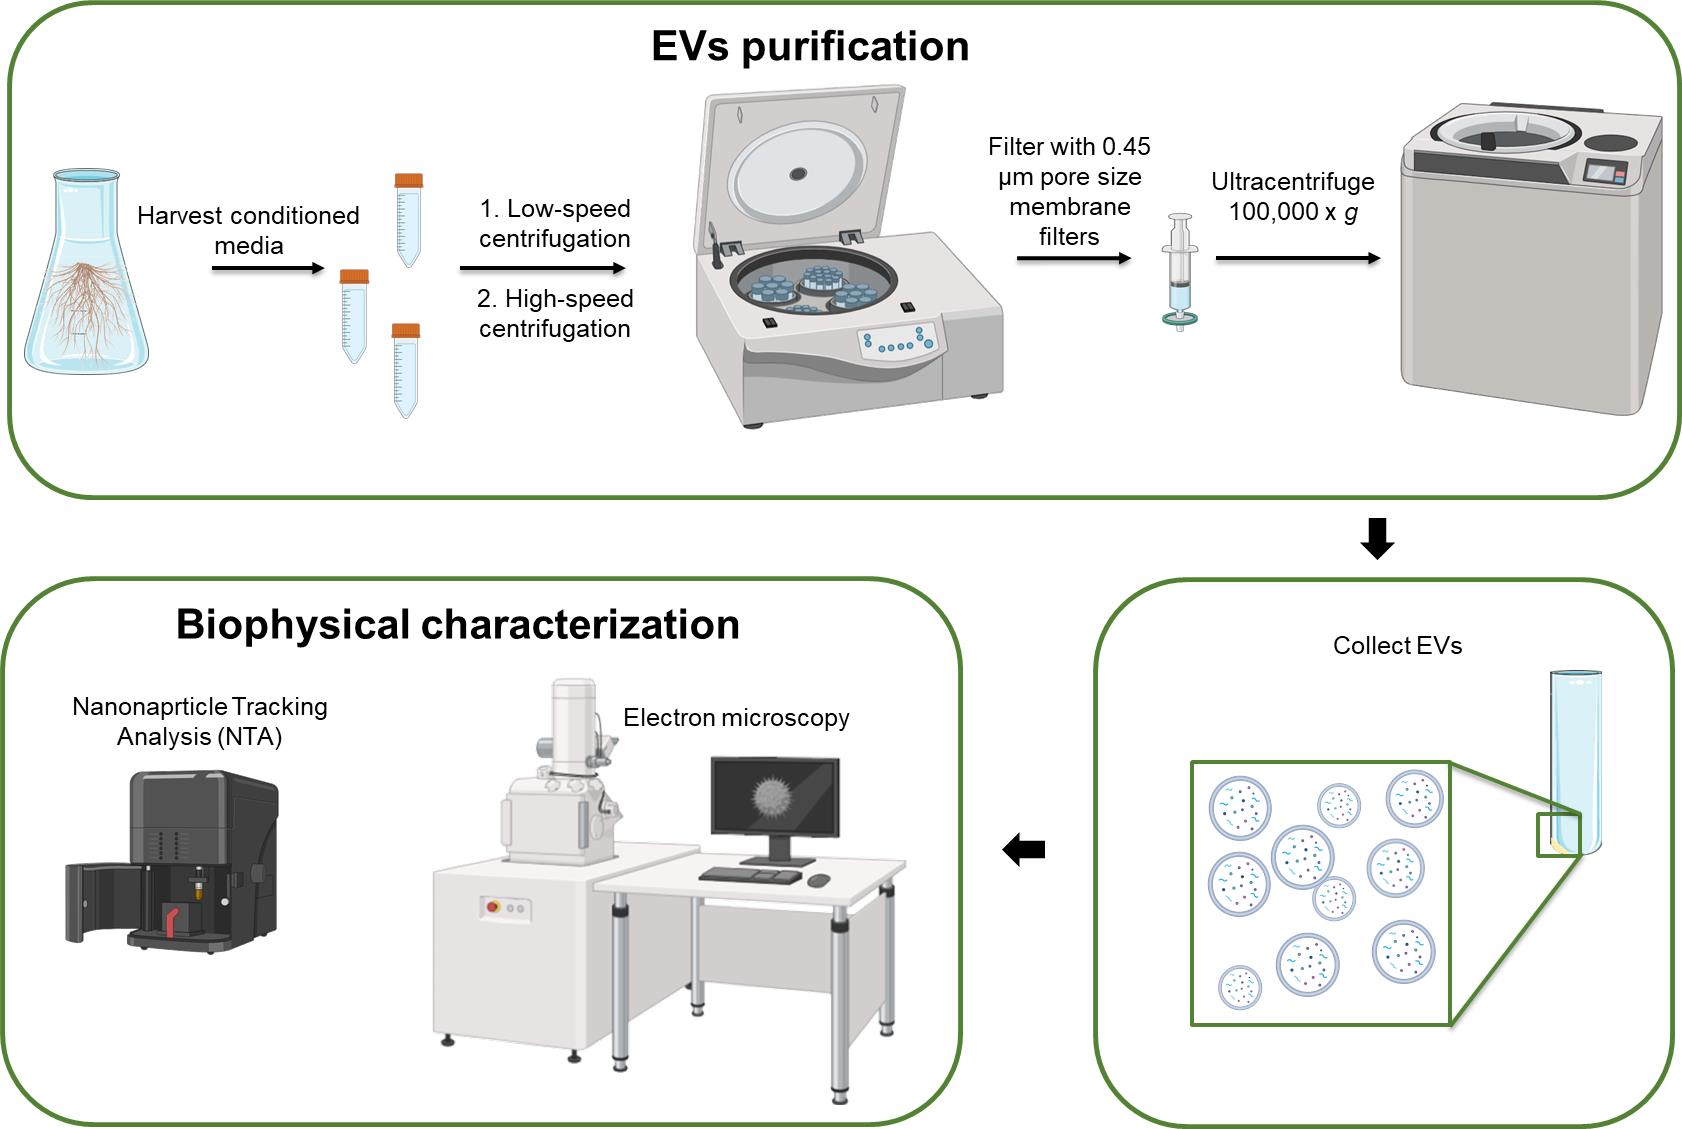
B. Isolation of EVs from hairy root–conditioned media by differential ultracentrifugation (dUC)
An overview of the dUC protocol for HR-derived EVs is presented in Figure 2.
Caution: All steps, particularly those involving the handling of samples and filtration, should be conducted under a sterile laminar flow hood to maintain sterility of the plant source and of EV preparations. Use pre-chilled equipment and reagents where specified to preserve the integrity of HR-EVs.
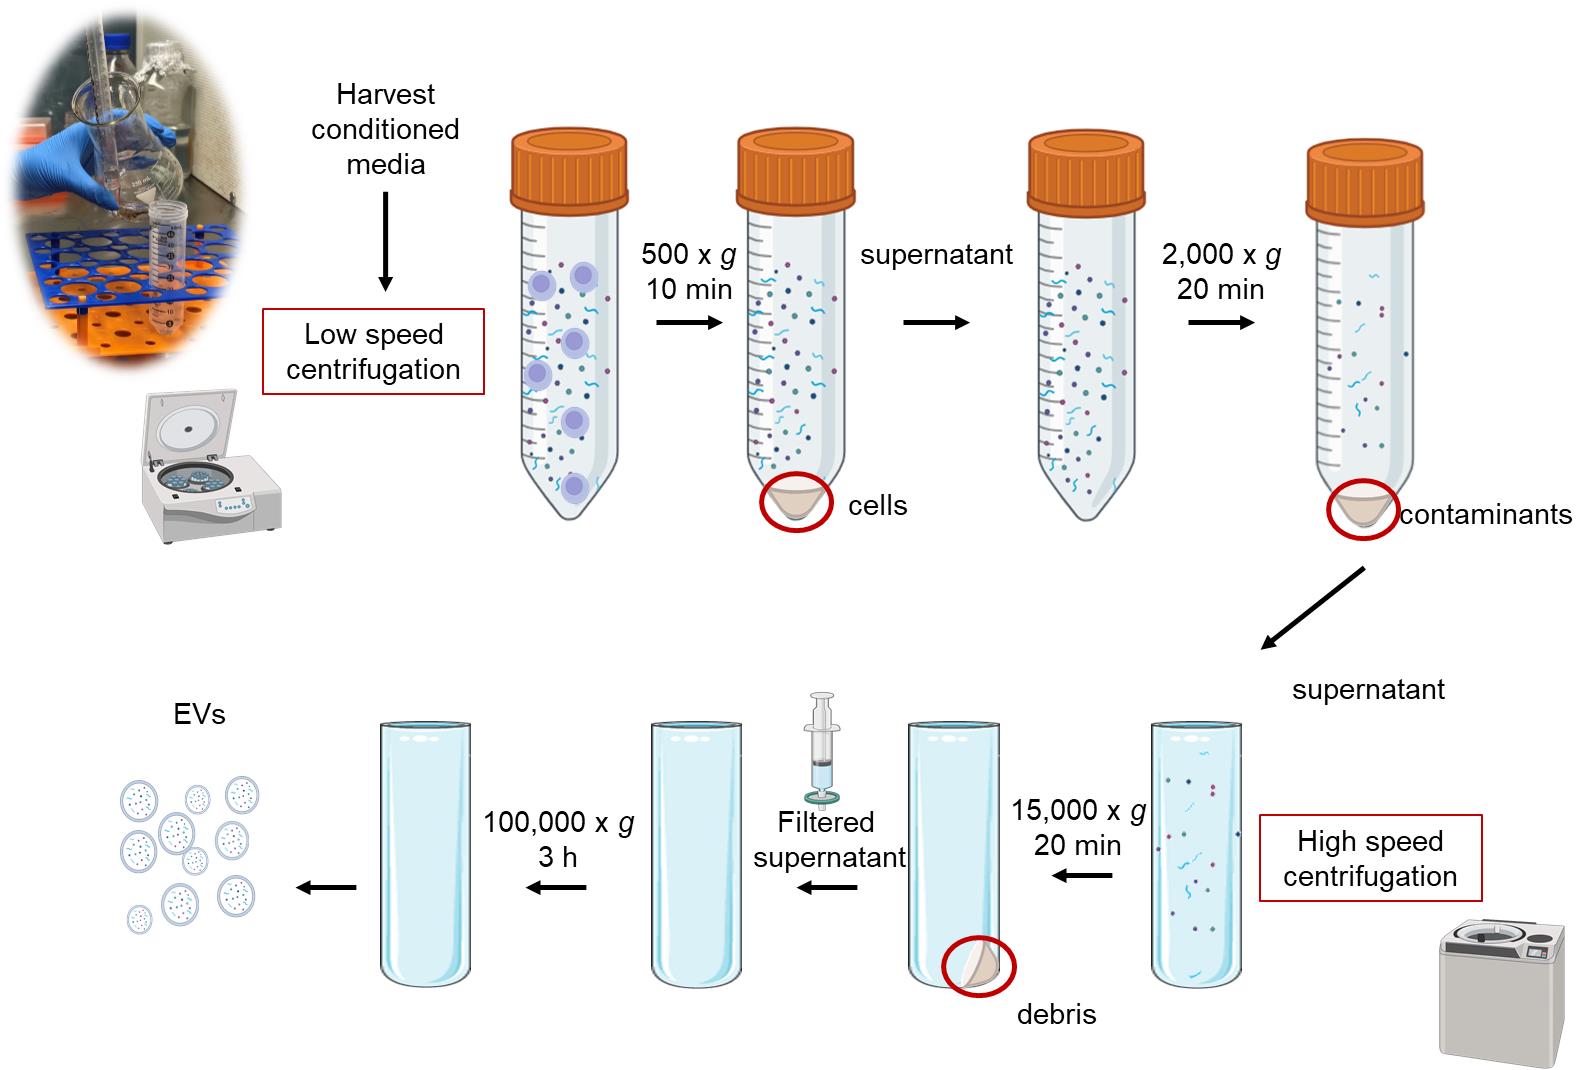
Figure 2. Overview of dUC protocol for hairy root (HR)-derived extracellular vesicles (EVs)
1. Collection of conditioned medium
a. After 3 weeks of subculture, carefully collect approximately 40 mL of conditioned culture medium for every 2 g of hairy roots.
b. Transfer the medium to sterile 50 mL centrifuge tubes.
Critical: Ensure that the hairy roots are healthy and free of contamination before harvesting the medium. The roots should appear clear and free of dark or necrotic areas.
2. Handling of conditioned media
a. Processing for immediate use: If proceeding directly with EV isolation, go immediately to step B3.
b. Storage of conditioned medium (pause point): If not used immediately, aliquot the medium into sterile 50 mL tubes and store at -80 °C for up to one month, ensuring the integrity of the extracellular vesicles. To proceed with EV extraction, the frozen samples should be allowed to thaw overnight at 4 °C.
3. Low-speed centrifugation
a. First centrifugation: Centrifuge the media at 500× g for 10 min at 4 °C to remove large cells and debris. This initial centrifugation helps eliminate larger contaminants, ensuring cleaner downstream processing.
b. Transfer the supernatant: Carefully transfer the supernatant to new tubes.
c. Second centrifugation: Centrifuge the supernatant at 2,000× g for 20 min at 4 °C. This step further removes any remaining cells that may have been released from the roots into the culture medium.
4. High-speed centrifugation
a. Transfer the supernatant: Transfer the supernatant to 50 mL Beckman polypropylene tubes compatible with high-speed centrifugation.
b. Centrifugation at 15,000× g: Centrifuge the supernatant at 15,000× g for 20 min using a Beckman Type 70 Ti rotor. This step is designed to pellet larger particles (typically >300 nm), such as cellular debris, apoptotic bodies, and some larger vesicles, but not necessarily microvesicles.
Critical: After this step, handle the samples carefully to prevent resuspending any pelleted material that could contaminate the EV preparation.
c. Filtration: Filter the supernatant using 0.45 μm pore size membrane filters to eliminate any remaining cellular debris and organelles.
5. Ultracentrifugation
a. Prepare for ultracentrifugation: Transfer the filtered supernatant to new polypropylene tubes. Label the tubes clearly to avoid confusion in later steps.
Caution: Thoroughly wash the tubes and rotor with 70% ethanol to prevent contamination and maintain sterility.
b. Ultracentrifuge at 100,000× g: Ultracentrifuge the samples at 100,000× g for 3 h at 4 °C to isolate extracellular vesicles. During this process, EVs will sediment to form a pellet at the bottom of the tube.
Critical: Balance all tubes accurately by weighing them before placing them in the rotor to avoid damage to the equipment and ensure effective centrifugation.
c. Remove the supernatant: After ultracentrifugation, carefully remove the supernatant without disturbing the EV pellet, which may be invisible or faintly visible depending on the sample (e.g., PEV concentration, plant source features).
d. Resuspend the HR-EV pellet: Gently resuspend the pellet containing the EVs in 50 μL of autoclaved Milli-Q water.
Note: The pellet can be resuspended in sterile PBS if needed for downstream experiments. Our comparisons of the size and morphology of PEVs resuspended in PBS vs. water showed no differences over time.
Pause point: The resuspended HR-EVs can be stored at -80 °C for future use. Aliquot the sample if repeated freezing and thawing is expected, as this may negatively impact on PEVs and biocargo stability. When needed, allow the EV preparation to thaw at room temperature and immediately transfer them into the ice basket.
C. Characterization of HR-EVs
1. SDS-PAGE and silver staining (Optional)
Note: While silver staining is not an essential step, we recommend it as part of routine analyses for the initial screening of EV preparations. This method helps identify and exclude suboptimal samples that may exhibit issues such as faint or missing bands, low band intensity, or noticeable smearing, which are indicative of preparation inconsistencies.
a. Dispense 10 μL of each EV sample in 1.5 mL tubes.
b. Add the appropriate amount of gel Laemmli buffer (see Recipes) to the samples.
c. Heat the samples at 95 °C for 5 min to denature the proteins.
d. Load the prepared samples onto a 10% polyacrylamide gel (see Recipes).
Note: It is recommended to clean the wells with 1× TGS using a syringe to remove residual acrylamide for optimal results.
e. Run the samples in 1× TGS running buffer until the dye front reaches the bottom of the gel.
Note: To ensure good separation of the bands, run the sample at 50–60 V through the stacking gel (20–30 min) to ensure proper stacking of the proteins. Then, increase the voltage and run the resolving gel at 100 V.
f. Gel fixation: Immerse the gel in the fixative solution (50% methanol and 12% acetic acid) for 30 min with gentle agitation. Discard the fixative solution and wash the gel with distilled water for 10 min to remove excess fixative.
g. Gel sensitization: Immerse the gel in the sensitizing solution for 30 min with gentle agitation. Wash the gel with distilled water for 10 min to remove excess sensitizer.
h. Silver staining: Immerse the gel in the silver staining solution for 20–30 min in the dark, with gentle agitation.
Critical: Ensure that the gel is covered to avoid exposure to light.
Rinse the gel gently with distilled water for a brief period (10–20 s) to remove any excess silver stain.
i. Developing the gel: Put the gel in the developing solution until protein bands become visible, usually within 2–10 min. Monitor the development carefully to avoid over-development.
Note: This may take varying amounts of time depending on the protein concentration and gel composition.
Wash the gel with distilled water to remove any residual staining reagents.
2. Assessment of A. rhizogenes contamination
To confirm the absence of A. rhizogenes contamination in the HR-EV preparations, PCRs were performed as described in step A6 using 5 μL of HR-EV preparations as templates.
3. Determination of EV size and concentration by nanoparticle tracking analysis
a. Sample preparation: Dilute the EV samples in Milli-Q water.
Note: The dilution should ensure that the number of particles per frame is between 20 and 120, which is optimal for accurate nanoparticle tracking analysis (NTA) measurements. Usually, a dilution of 1:100 is optimal for hairy root–derived EVs isolated using the procedure described above.
Critical: Filter Milli-Q water through a 0.22 μm filter, as any contaminant particles could affect the accuracy of the analysis.
b. Turn on the workstation and the instrument. Start the NanoSight NTA Software. The connection status is displayed in the Hardware Information window (located at the bottom left).
c. Select the green laser and the sCMOS camera from the hardware tab at the top of the screen.
d. Select Capture.
e. Set the Camera level to 15.
f. Click Start camera.
Caution: The reported parameters are specifically optimized for EVs derived from hairy roots of S. sclarea and S. dominica but can be adjusted as needed. Set the Camera level so that all particles in the sample are clearly visible while keeping the saturation low (indicated by colored pixels), generally below 20%.
g. Fill a 1 mL syringe with the sample, ensuring all air bubbles are removed. Insert the syringe into the inlet port and gently push the fluid through. After approximately 0.5 mL, an increase in particle count should be visible. Continue adding the sample until the particle count stabilizes but avoid using the entire sample to ensure consistent results.
h. Click and drag with the left mouse button (or turning the focusing knob on the instrument) to adjust the Laser Beam Position and center the image. Ensure the illuminated particles are in focus and fill the entire field of view.
i. Set up a measurement from the Measurement Selection window at the bottom center of the screen. Click the SOP tab.
Note: The software provides three options: Recent Measurement for repeating a setup from a previous experiment, Quick Measurement for a streamlined process with fewer options and a single measurement, and Standard Measurement, offering a broader range of options, including the ability to perform multiple measurements on a single sample.
j. Select standard measurement. Set the number of captures to 3 and the capture duration to 60 s.
Note: The measurement settings can be modified as needed. Typically, the default number and duration of video captures are suitable for most samples.
k. Click the Hardware tab from Measurement Selection to adjust the syringe pump settings. Click the Syringe pump tab to set the infusion rate to 30 for consistent flow during analysis.
l. Choose the name and destination for the captured video files in Base Filename.
m. Click Advanced to adjust dilution and viscosity settings. Enter the sample dilution factor. If the diluent is not water, the solvent viscosity must also be specified. Click OK.
n. Go back to the SOP tab and click Create and Run script.
o. After data collection is complete, the camera screen will display the first frame of the initial measurement and a message to adjust the process settings. These settings can be modified in the Process settings tab, located in the upper left window.
Note: The Screen Gain adjusts the brightness of the collected data without impacting the measurement. The Detection Threshold controls the sensitivity of the particle-detection algorithm. Red crosses indicate highly reliable particle detections, while blue crosses represent less certain detections. Set the threshold between 4 and 7 for optimal reliability.
p. Click OK to run the measurement. You will see the software track individual particles and the data will appear in the windows.
q. Upon completing processing, the software automatically opens the Export Settings options window. The default settings include PDF graphs and batch summaries.
4. Electron microscopy analysis
a. Scanning electron microscopy (SEM)
i. Dilute 1 × 10¹⁰ particles/mL with equal amount of 4% paraformaldehyde solution.
ii. Incubate the mixture at 4 °C for a minimum of 2 h to allow proper fixation of the EVs.
iii. Apply and evenly distribute 5 μL of the fixed EV suspension to carbon-coated electron microscopy stubs.
iv. Allow the samples to dry under a nitrogen flux in a chemical fume hood.
v. Capture SEM images using the available equipment.
Note: Ensure that the drying process is performed in a controlled environment to avoid contamination.
vi. Perform imaging at low voltages, preferably 1.5–5 keV.
Note: Using high voltages may damage the EV sample. It is recommended to use the lowest effective voltage for imaging to minimize potential damage.
b. Transmission electron microscopy (TEM)
i. All these steps were performed at room temperature and all the solutions were filtered by 0.22 μm filters.
ii. Perform a glow discharge on the carbon film–supported 300 mesh copper grid for 30 s at 15 mA to increase the grid's hydrophilicity.
iii. Fix 1010 particles/mL using 2.5% glutaraldehyde in PBS.
iv. Deposit the fixed EVs on parafilm for 5 min.
v. Place the grid on the drop of the fixed EV suspension for 5 min.
vi. Wash the grid with distilled water for 1 min to remove excess glutaraldehyde.
vii. Incubate the grid in a drop of 3 μL of 2% Methylamine Vanadate (NanoVan), diluted in water, for 1 min.
viii. Wash the grid with distilled water for 1 min to remove excess staining agent. Grids are air-dried at the end of the preparation protocol.
ix. Collect TEM images using the available equipment. In our studies, grids were observed using TEM at an operating voltage of 80 kV.
x. Begin by scanning the sample grids at a lower magnification to obtain an overview of the heterogeneity in the EV preparation.
xi. Identify areas of interest based on characteristic EV morphology, including vesicle size, shape, and uniformity.
xii. Capture images at low magnification (<50,000×) to provide an overview of the sample background and EV size/morphology heterogeneity.
xiii. Capture high-magnification images (100,000–150,000×) to focus on individual vesicles and provide detailed visualization of EV morphology.
Data analysis
Figure 3 illustrates the typical data analysis workflow for extracellular vesicles (EVs) derived from hairy roots, comprising the following steps:
1. Silver staining documentation (Figure 3A): Document the silver-stained gel using a high-resolution imaging system or scanner. Ensure that the imaging conditions preserve the quality and contrast of the stained bands for accurate analysis.
2. NanoSight NTA analysis (Figure 3B and C): Analyze the recorded videos using the NanoSight NTA 3.4 software. Perform tracking analysis to determine the size distribution and concentration of the EVs. The software calculates the hydrodynamic diameter of each particle based on the relationship between Brownian motion and particle size, as described by the Stokes–Einstein equation. Report the size distribution as a function of intensity-weighted concentration (particles/mL), reflecting the range of EV sizes in the sample. Conduct at least three replicate measurements per sample to ensure consistency and reproducibility of the data. In Table 1, the representative values of mean size and concentration from three independent replicates are reported.
3. Electron microscopy imaging: SEM (Figure 3D) and TEM (Figure 3E) provide complementary insights that improve the characterization of EV preparations. Acquire high-resolution images of the sample using both SEM and TEM at multiple magnifications. According to the equipment available and EV sample characteristics that may vary in plant species, optimize imaging parameters, including accelerating voltage, focus, working distance, beam spot size, and objective aperture, to achieve optimal resolution and contrast suited to the sample type. Capture images from various regions and fields of view to accurately represent the structural variability of the sample, the integrity of EVs, and the presence of non-vesicular extracellular particles. Acquired images with the scale bar embedded can be analyzed using ImageJ software to confirm EV size distribution.
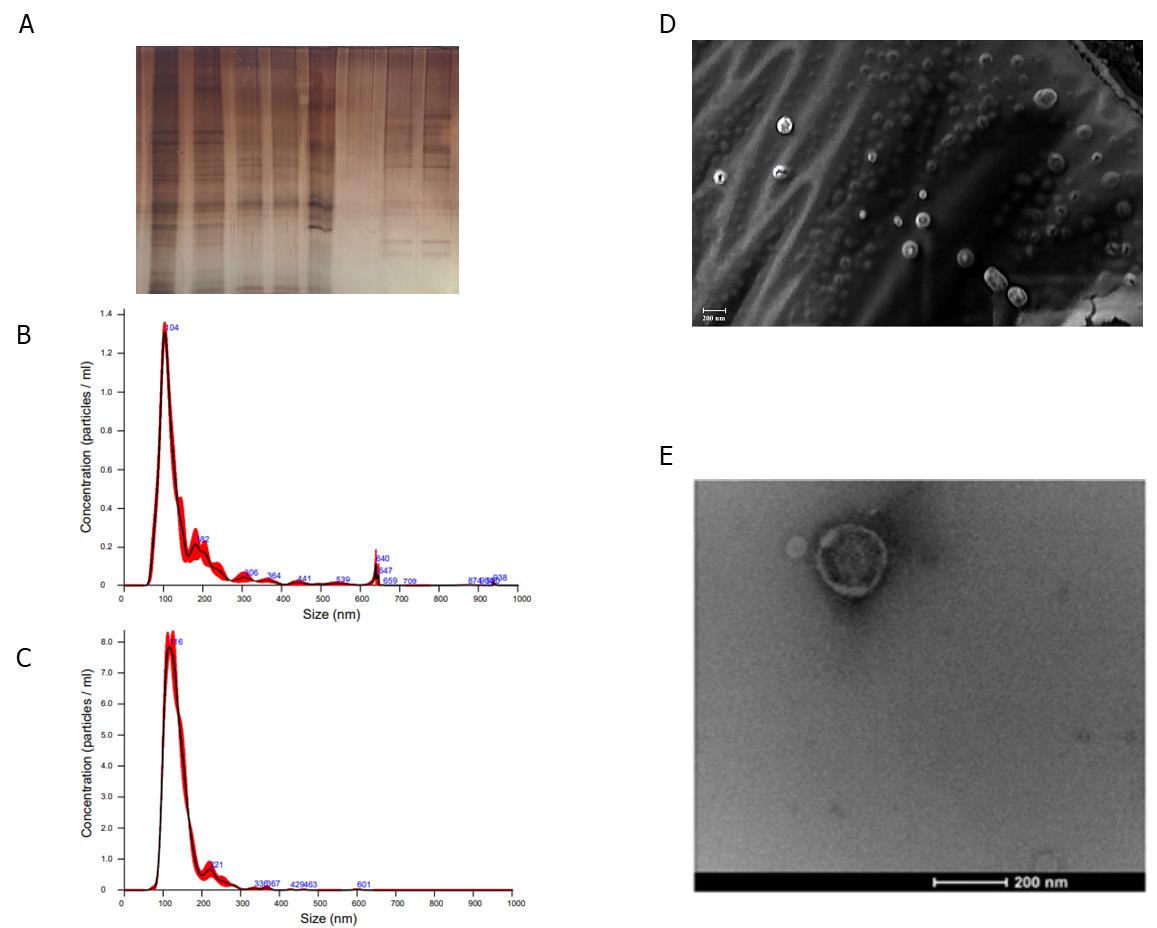
Figure 3. Example of purified extracellular vesicle (EV) downstream analysis. Data generated from experiments presented by Vestuto et al. [9]. A. Representative protein profile analysis of hairy root (HR)-derived EVs. B. Representative NTA profile of Salvia sclarea HR-EVs. C. Representative NTA profile of Salvia dominica HR-EVs. D. SEM and E. TEM images of HR-EVs.
Table 1. Representative values of mean size and concentration from three independent NTA analysis replicates
| S. dominica | S. sclarea | |||||
| Rep 1 | Rep 2 | Rep 3 | Rep 1 | Rep 2 | Rep 3 | |
| Particle/mL | 1.49 × 10¹¹ ±6.59 × 10⁶ | 1.48 × 10¹¹± 1.34 × 10⁷ | 4.4 × 10¹¹ ± 4.44 × 10⁷ | 5.4 × 10¹⁰ ± 1.50 × 10⁷ | 7.80 × 10⁹ ± 1.80 × 10⁷ | 8.3 × 10⁹ ± 2.59 × 10⁷ |
| Mean size (nm) | 139.7 | 114.0 | 116.1 | 154.4 | 152.6 | 136.8 |
Validation of protocol
This protocol has been used, validated, and improved in the following research article(s):
• Boccia et al. [8]. Plant hairy roots for the production of extracellular vesicles with antitumor bioactivity. Communications Biology.
• Vestuto et al. [9]. Multiomic Profiling and Neuroprotective Bioactivity of Salvia Hairy Root-Derived Extracellular Vesicles in a Cellular Model of Parkinson's Disease. International Journal of Nanomedicine.
General notes and troubleshooting
Troubleshooting
| Problem | Possible Cause | Solution |
| Microbiological contamination of extracted EVs | Improper sample transfers or handling | Perform all transfers under a sterile laminar flow hood; ensure all equipment and reagents are pre-chilled and sterilized; use sterile gloves and minimize exposure to open air. |
| Inefficient sterilization of ultracentrifuge tubes and/or rotors | Use capped ultracentrifuge tubes (e.g., Polycarbonate bottle with cap assembly, catalog number: 355618). | |
| Inefficient removal of large contaminants | Insufficient centrifugation speed or time | Adjust low-speed centrifugation based on sample features that may vary according to plant species and biomass/volume ratio; extend time or increase speed if necessary. |
| Inefficient filtration of samples | Blockage of 0.45 μm filters due to high particle concentration or large debris | Adjust low-speed centrifugation parameters; pre-filter the supernatant using a larger pore size filter (e.g., 0.8 μm) before passing through the 0.45 μm filter. |
| Pellet loss during ultracentrifugation | Incorrect handling of tubes post-ultracentrifugation | Use serological pipettes to carefully remove the supernatant without disturbing the EV pellet; minimize handling to prevent pellet loss. |
| Low yield of EVs | Loss of EVs during transfer between tubes | Use gentle pipetting techniques and appropriate size tips; consider using low-retention pipette tips. |
| Small hairy root size | The production of EVs is related to biomass. To improve the EV yield, use mature and well-developed HRs. | |
| EV degradation or rupture | Improper storage or handling of purified EVs | Immediately after resuspension, aliquot the EVs and store them at -80 °C. Avoid repeated freeze-thaw cycles. Overall, minimize storage time. |
Acknowledgments
We would like to express our sincere gratitude to all the co-authors and collaborators who have contributed to the development and improvement of these protocols in the original research papers (Boccia et al. [8]; Vestuto et al. [9]). Their expertise, dedication, and invaluable feedback have been instrumental in refining our methodologies and advancing our research. We also thank the SecrEVome project (Grant number: 202224M943), funded under the PRIN 2022 program of the Italian Ministry of University and Research and supported by the European Union’s NextGenerationEU initiative.
Competing interests
The authors declare that there are no financial or non-financial competing interests related to this work.
Ethical considerations
This study does not involve human or animal subjects; therefore, there are no ethical concerns related to the protocols described.
References
- Welsh, J. A., Goberdhan, D. C. I., O'Driscoll, L., Buzas, E. I., Blenkiron, C., Bussolati, B., Cai, H., Di Vizio, D., Driedonks, T. A. P., Erdbrügger, U., et al. (2024). Minimal information for studies of extracellular vesicles (MISEV2023): From basic to advanced approaches. J Extracell Vesicles. 13(2): e12404. https://doi.org/10.1002/jev2.12404
- Yáñez-Mó, M., Siljander, P. M., Andreu, Z., Bedina Zavec, A., Borràs, F. E., Buzas, E. I., Buzas, K., Casal, E., Cappello, F., Carvalho, J., et al. (2015). Biological properties of extracellular vesicles and their physiological functions. J Extracell Vesicles. 4(1): 27066. https://doi.org/10.3402/jev.v4.27066
- Kennedy, T. L., Russell, A. J. and Riley, P. (2020). Experimental limitations of extracellular vesicle-based therapies for the treatment of myocardial infarction. Trends Cardiovasc Med. 31(7): 405–15. https://doi.org/10.1016/j.tcm.2020.08.003
- Lian, M. Q., Chng, W. H., Liang, J., Yeo, H. Q., Lee, C. K., Belaid, M., Tollemeto, M., Wacker, M. G., Czarny, B., Pastorin, G., et al. (2022). Plant‐derived extracellular vesicles: Recent advancements and current challenges on their use for biomedical applications. J Extracell Vesicles. 11(12): e12283. https://doi.org/10.1002/jev2.12283
- Ambrosone, A., Barbulova, A., Cappetta, E., Cillo, F., De Palma, M., Ruocco, M. and Pocsfalvi, G. (2023). Plant Extracellular Vesicles: Current Landscape and Future Directions. Plants. 12(24): 4141. https://doi.org/10.3390/plants12244141
- Alfieri, M., Leone, A. and Ambrosone, A. (2021). Plant-Derived Nano and Microvesicles for Human Health and Therapeutic Potential in Nanomedicine. Pharmaceutics. 13(4): 498. https://doi.org/10.3390/pharmaceutics13040498
- Stanly, C., Alfieri, M., Ambrosone, A., Leone, A., Fiume, I. and Pocsfalvi, G. (2020). Grapefruit-Derived Micro and Nanovesicles Show Distinct Metabolome Profiles and Anticancer Activities in the A375 Human Melanoma Cell Line. Cells. 9(12): 2722. https://doi.org/10.3390/cells9122722
- Boccia, E., Alfieri, M., Belvedere, R., Santoro, V., Colella, M., Del Gaudio, P., Moros, M., Dal Piaz, F., Petrella, A., Leone, A., et al. (2022). Plant hairy roots for the production of extracellular vesicles with antitumor bioactivity. Commun Biol. 5(1): 848. https://doi.org/10.1038/s42003-022-03781-3
- Vestuto, V., Conte, M., Vietri, M., Mensitieri, F., Santoro, V., Di Muro, A., Alfieri, M., Moros, M., Miranda, M. R., Amante, C., et al. (2024). Multiomic Profiling and Neuroprotective Bioactivity of Salvia Hairy Root-Derived Extracellular Vesicles in a Cellular Model of Parkinson’s Disease. Int J Nanomed. 19: 9373–9393. https://doi.org/10.2147/ijn.s479959
- Li, C. and Wang, M. (2021). Application of Hairy Root Culture for Bioactive Compounds Production in Medicinal Plants. Current Pharm Biotechnol. 22(5): 592–608. https://doi.org/10.2174/1389201021666200516155146
- Mishra, B. N. and Ranjan, R. (2008). Growth of hairy‐root cultures in various bioreactors for the production of secondary metabolites. Biotechnol Appl Biochem. 49(1): 1–10. https://doi.org/10.1042/ba20070103
Article Information
Publication history
Received: Nov 1, 2024
Accepted: Jan 20, 2025
Available online: Feb 16, 2025
Published: Mar 5, 2025
Copyright
© 2025 The Author(s); This is an open access article under the CC BY-NC license (https://creativecommons.org/licenses/by-nc/4.0/).
How to cite
Conte, M., Cappetta, E., Alfieri, M., Bifolco, M., Boccia, E., Vietri, M. and Ambrosone, A. (2025). Isolation and Biophysical Characterization of Extracellular Vesicles From Hairy Root Cultures. Bio-protocol 15(5): e5225. DOI: 10.21769/BioProtoc.5225.
Category
Plant Science > Plant cell biology > Organelle isolation
Biological Sciences > Biological techniques
Do you have any questions about this protocol?
Post your question to gather feedback from the community. We will also invite the authors of this article to respond.