- Protocols

- Articles and Issues
- For Authors
- About
- Become a Reviewer

Versatile Click Chemistry-based Approaches to Illuminate DNA and RNA G-Quadruplexes in Human Cells
Published: Vol 15, Iss 3, Feb 5, 2025 DOI: 10.21769/BioProtoc.5209 Views: 2548
Reviewed by: Emilie BesnardAnonymous reviewer(s)
Original research article
The authors used this protocol in:

May 2023
Advertisement


Protocol Collections
Comprehensive collections of detailed, peer-reviewed protocols focusing on specific topics


Abstract
The existence and functional relevance of DNA and RNA G-quadruplexes (G4s) in human cells is now beyond debate, but how did we reach such a level of confidence? Thanks to a panoply of molecular tools and techniques that are now routinely implemented in wet labs. Among them, G4 imaging ranks high because of its reliability and practical convenience, which now makes cellular G4 detection quick and easy; also, because this technique is sensitive and responsive to any G4 modulations in cells, which thus allows gaining precious insights into G4 biology. Herein, we briefly explain what a G4 is and how they can be visualized in human cells; then, we present the strategy we have been developing for several years now for in situ click G4 imaging, which relies on the use of biomimetic G4 ligands referred to as TASQs (for template-assembled synthetic G-quartets) and is far more straightforward and modular than classically used immunodetection methods. We thus show why and how to illuminate G4s with TASQs and provide a detailed, step-by-step methodology (including the preparation of the materials, the methodology per se, and a series of notes to address any possible pitfalls that may arise during the experiments) to make G4 imaging ever easier to operate.
Key features
• MultiTASQs are clickable probes usable for the detection of cellular DNA and RNA G-quadruplex (G4).
• In situ click chemistry relies on the labeling of G4 by clickable probes once in their cellular binding sites.
• Experiments can be performed by incubating the clickable probe either in live cells or in fixed cells.
• The published but unoptimized protocol is now totally revised to allow for reliable G4 detection in human cells.
Keywords: DNA/RNA G-quadruplex (G4)Graphical overview
Background
Guanine (G)-rich DNA and RNA sequences are being studied for their ability to fold into G-quadruplex (G4) structures [1–3]. G4-prone sequences are widespread in our genome and transcriptome; it has now been established that G4s are key players in virtually all genomic transactions, from the regulation of genetic and epigenetic events to chromatin organization [1–8]. G4-prone sequences have been identified in silico by various methods [9], which showed that >1 million sequences can fold into G4s in our genome [10] and transcriptome [11] (referred to as G4s and rG4s for DNA and RNA G4s, respectively). This formation has been demonstrated at both genome-wide and transcriptome-wide scales using methods being classified as in vitro (that is, using purified DNA and RNA samples: G4-seq [12] and G4DP-seq [13] for G4s, rG4-seq [14] for rG4s) or in vivo (that is, in a functional cellular context: G4 ChIP-seq [15], G4 CUT&Tag [16], and G4access [17] for G4s, G4RP-seq [18] for rG4s). These sequencing-based methods confirmed the prevalence of G4 landscapes in human cells, with the identification of hundreds of thousands in vitro G4s and tenths of thousands in vivo G4s [19].
The cellular roles of G4s are beyond the scope of the present article; interested readers are invited to consult recent reviews on this topic (for G4s, see [1,2,7]; for rG4s, see [3–6,8]). We would like to report here on a convergent strategy we have been developing for several years now, based on the use of smart molecular tools named template-assembled synthetic G-quartets (TASQs) (Figure 1) [20]. Our aims are to i) select the best-suited TASQs among those now available as a function of the intended application and ii) use this tool for addressing more than one chemical biology challenge (optical imaging, affinity purification, chemoproteomics, etc.). TASQs are structurally dynamic molecules comprising a central template surrounded by four flexible arms ending with a G unit; they are thus biomimetic ligands that stabilize G4s by interacting between two G-quartets, one from the G4, and one from the TASQ. We developed the smart PNADOTASQ [21], twice-as-smart PyroTASQ [22] and NaphthoTASQ (or N-TASQ) [23], biotinylated BioTASQ [24], BioCyTASQ [25] and BioTriazoTASQ [26], and multivalent MultiTASQ and azMultiTASQ [27]. These TASQs fold into their G4-affinic closed conformation only upon interaction with G4s (that is, only when a G-rich sequence folds into a G4 structure), which makes them uniquely actively selective for their G4 targets [20,21].
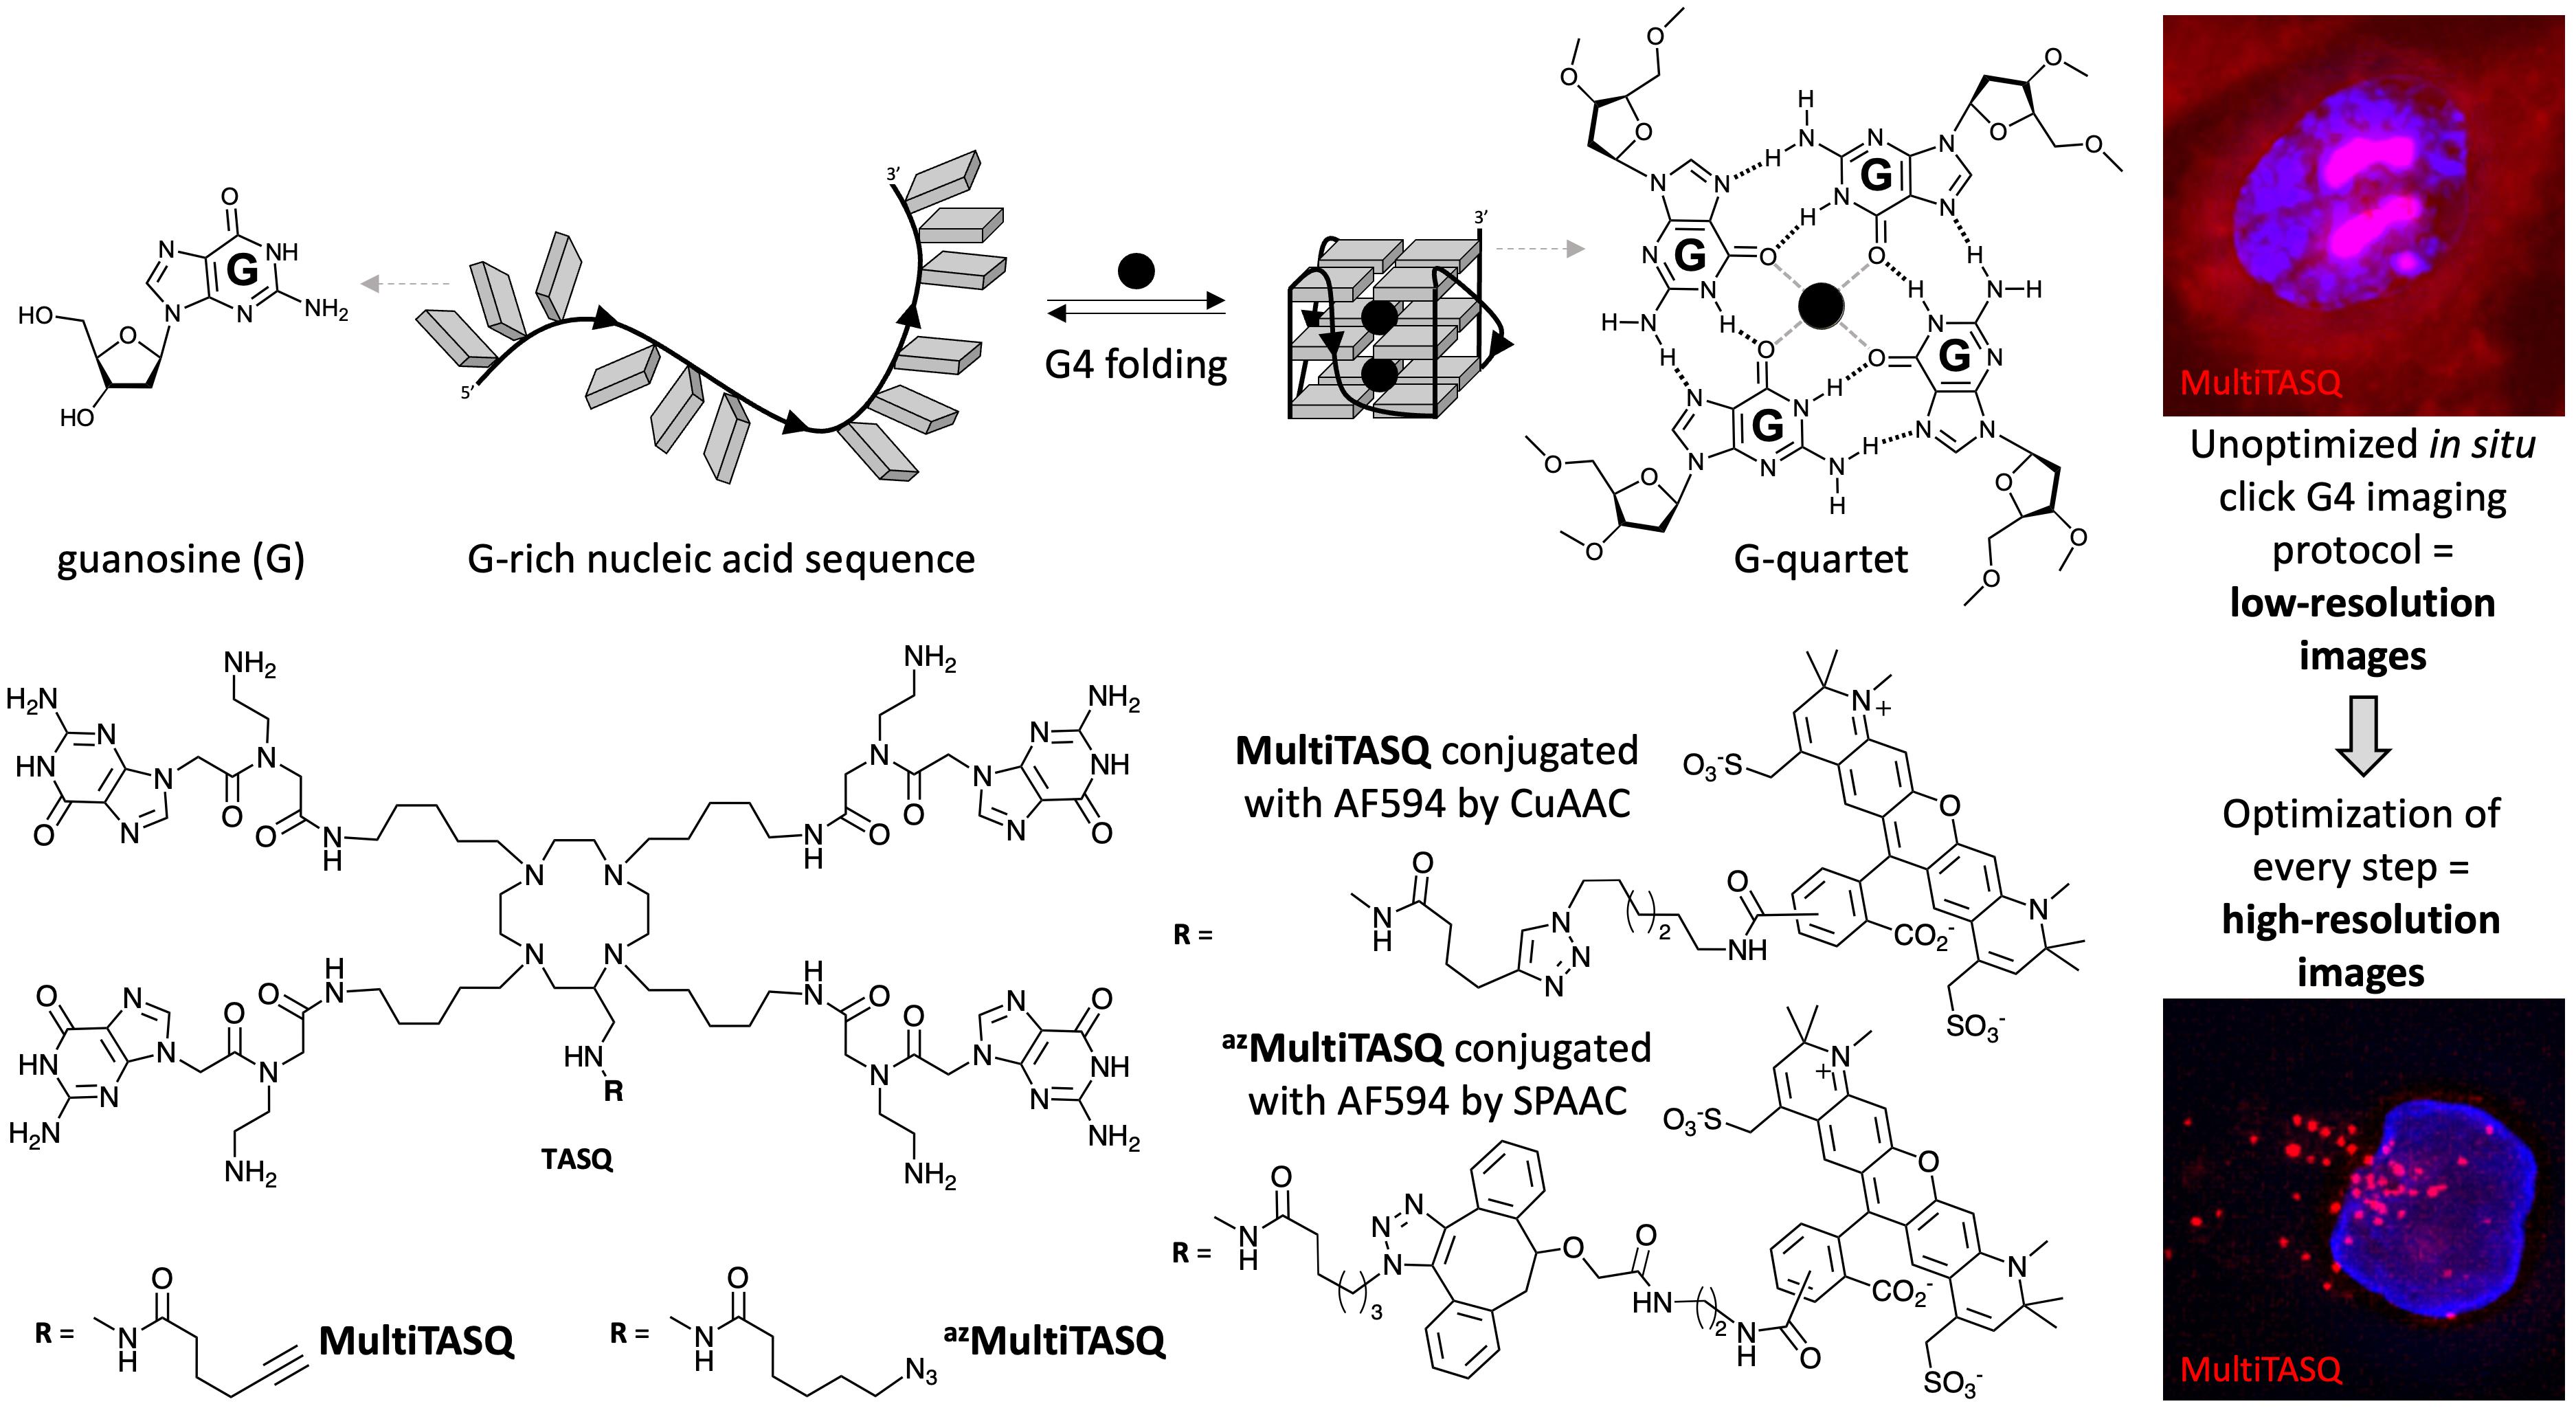
Figure 1. Schematic representation of the folding of a G-quadruplex (G4) structure from a guanine (G)-rich DNA sequence. Chemical structure of TASQs, either MultiTASQ or azMultiTASQ, and of their derivatives after click chemistry (CuAAC or SPAAC)-based coupling with a fluorophore; the resulting conjugate aimed at being used to visualize G4s in human cells.
Here, we report on the use of MultiTASQs to illuminate G4s, given that MultiTASQ and azMultiTASQ are the sole clickable TASQs from this family of compounds. Several strategies have been pursued to visualize G4s in cells [28–30], but we are particularly interested in a quite efficient two-step methodology based on the fluorescent tagging of chemical ligands once in their genomic binding site by in situ click chemistry [31]. This yet indirect approach allows for better control of the fluorescence readout, which makes it more versatile. This approach, pioneered in the G4 field by Rodriguez et al. in 2012 [32], is here extended using now commercially available clickable TASQs. We thus provide all necessary technical details for performing in situ click G4 imaging using MultiTASQs, focusing on the step-by-step methodology and all possible cell manipulations to increase the quality of the collected images and all necessary controls to exploit the obtained results in a reliable manner.
Materials and reagents
Note: Caution must be exercised when performing TASQs staining experiments; the most important features are gathered in the different notes below (see General notes 1–4), which must be read before preparing the materials needed for the experiments. All solutions must be prepared (unless otherwise stated) in ultrapure water (resistivity ≥ 18 MΩ·cm at 25 °C), and molecular biology and/or analytical grade reagents must be used. Solutions can be prepared and stored at room temperature (unless otherwise stated); some of them need to be prepared under a sterile environment in the biological safety cabinet (BSC) and/or to be filtered (PES 0.22 μm bottle-top vacuum filter system or syringe filter system, depending on volume).
Biological materials
1. HeLa cell line (ATCC, catalog number: CCL-2)
Reagents
Note: As not all reagents and/or solutions are absolutely required (see General notes 1–4) and some are mutually exclusive, we strongly recommend reading the procedure in its entirety to determine if they should be used.
Note: We provide the list of reagents we used, but reagents from alternative suppliers are acceptable as long as they are molecular biology and/or analytical-grade reagents.
1. Dulbecco’s modified Eagle medium (DMEM) containing sodium pyruvate, high glucose, and GlutaMAX (Gibco, catalog number: 31966021); store at 4 °C
2. Fetal bovine serum (FBS) 100% (Dutscher, catalog number: on request); store at -80 °C
3. Penicillin/streptomycin 10,000 U/mL (Gibco, catalog number: 15140122); store at -20 °C
4. Trypsin-EDTA (0.25%), phenol red (Gibco, catalog number: 25200056); once thawed, store at 4 °C
5. PBS 10× (Eurobio, catalog number: ET330A)
6. Pyridostatin hydrochloride (PDS) (Sigma-Aldrich, catalog number: SML2690-5MG)
7. Dulbecco’s PBS 10× (DPBS) (Dutscher, catalog number: X0515-500)
8. TBS 10× (Euromedex, catalog number: ET220-B)
9. Triton X-100 (Sigma-Aldrich, catalog number: X100-100ML); store at 4 °C
10. Tween-20 (Fisher BioReagents, catalog number: BP337-500)
11. 1,4-Piperazinediethanesulfonic acid (PIPES) (Sigma-Aldrich, catalog number: P8203)
12. Sodium chloride (NaCl) (Sigma-Aldrich, catalog number: 71376-1KG)
13. Sucrose (Sigma-Aldrich, catalog number: S0389)
14. Magnesium chloride (MgCl2) (Sigma-Aldrich, catalog number: M8266)
15. RNase A 10 mg/mL (Thermo Scientific, catalog number: EN0531); store at -20 °C
16. TURBOTM DNase kit 2 U/μL containing TURBOTM DNase and 10× TURBOTM DNase buffer (Invitrogen, catalog number: AM2238); store at -20 °C
17. Methanol (MeOH) (Carlo Erba Reagents, catalog number: 412383); store at -20 °C
18. Paraformaldehyde (PFA) 16% w/v aqueous solution, methanol free (Thermo Scientific, catalog number: 28908); once opened, store in a 15 mL Falcon tube at 4 °C
19. Bovine serum albumin (BSA) (Seqens, catalog number: 1000-70); store at 4 °C
20. Fish gelatin (Sigma-Aldrich, catalog number: G7041); store at 4 °C
21. MultiTASQ (Merck, catalog number: SCT247); store at -20 °C
22. azMultiTASQ (not commercially available, contact D. Monchaud); store at -20 °C
23. Alexa FluorTM 594 azide (AF-az) 1 mM in DMSO [Alexa FluorTM 594 carboxamido-(6-azidohexanyl), triethylammonium salt], mixed isomers (Invitrogen, catalog number: A10270); store at -20 °C, avoid light
24. Click-iTTM Alexa FluorTM 594 sDIBO alkyne (DIBO-AF) 5 mM in DMSO (Invitrogen, catalog number: C10407); store at -20 °C, avoid light
25. Copper(II) sulfate (CuSO4) (Sigma-Aldrich, catalog number: C7631-250G)
26. IGEPAL CA-630 (Sigma-Aldrich, catalog number: I8896)
27. Sodium ascorbate (NaAsc) (Sigma-Aldrich, catalog number: 11140)
28. 4',6-Diamidino-2-phenylindole dihydrochloride (DAPI) (Sigma-Aldrich, catalog number: D9542)
29. VECTASHIELD® antifade mounting medium (VectorLab, catalog number: H1900); store at 4 °C
30. Transparent nail polish
Solutions
Note: Filtered solutions must be aliquoted to avoid cross-contamination and/or bacterial counterstaining with DNA intercalating dyes. Solutions with adjusted pH must be prepared with a sufficient volume of ultrapure water (ca. 90% of final volume) to resuspend powder by mixing, then pH must be adjusted, and finally, the solution can be completed with ultrapure water to final volume.
1. PDS 20 mM in DMSO
Note: Please refer to the manufacturer’s certificate of analysis to obtain the molecular weight of PDS with the number (y) of molecules of HCl as counterion and with the number (z) of molecules of water [final molecular weight (g/mol) = 596.64 + y × 36.46 + z × 18.02]. Store at -80 °C.
2. MultiTASQ or azMultiTASQ 10 mM in nuclease-free water
Note: Molecular weight of MultiTASQ: 1801.12 g/mol. Molecular weight of azMultiTASQ: 1846.16 g/mol. To avoid batch-to-batch variations in concentrations of stock solution of TASQ, we recommend measuring the absorbance of TASQ’s guanines at λ = 246 nm (see section A. Preparation of TASQ). Store at -20 °C.
3. AF-az 1 mM in DMSO
Note: Please refer to the manufacturer’s molecular weight depending on the number of triethylammonium molecules as counterion (molecular weight should be around 1,050 g/mol for 2 counterions). Store at -20 °C, avoid light.
4. DIBO-AF 5 mM in DMSO
Note: Please refer to the manufacturer’s molecular weight depending on the number of triethylammonium molecules as counterion (molecular weight should be around 1,200 g/mol for 2 counterions). Store at -20 °C, avoid light. Intermediate dilution of 0.5 mM of DIBO-AF in water (10% final concentration of DMSO) is more handful for SPAAC mix.
5. DAPI 1 mg/mL in water
Note: Store at 4 °C, avoid light.
6. Sterile PBS 1× (see Recipes)
7. Sterile supplemented DMEM (see Recipes)
8. Filtered DPBS 1× (see Recipes)
9. Filtered DPBS-Tx (see Recipes)
10. Filtered TBS-Tw (see Recipes)
11. PIPES 100 mM, pH 7.0 (see Recipes)
12. NaCl 1 M (see Recipes)
13. MgCl2 1 M (see Recipes)
14. Filtered sucrose 1 M (see Recipes)
15. Filtered cytoskeletal pre-extraction (CSK) buffer (see Recipes)
16. Filtered BSA blocking buffer (see Recipes)
17. Filtered FBS blocking buffer (see Recipes)
18. MultiTASQ 20 μM (200 μL) for post-fixation staining (see Recipes)
19. azMultiTASQ 20 μM (200 μL) for post-fixation staining (see Recipes)
20. CuSO4 100 mM (see Recipes)
21. IGEPAL CA-630 10% (see Recipes)
22. NaAsc 300 mg/mL (150×) (see Recipes)
23. CuAAC mix (see Recipes)
24. SPAAC mix (see Recipes)
Recipes
1. Sterile PBS 1× (500 mL)
Note: Prepare for cell culture (sterilize by filtration or autoclaving) and open only under sterile conditions.
| Reagent | Final concentration | Quantity or Volume |
|---|---|---|
| PBS (10×) | 1× | 50 mL |
| H2O | n/a | 450 mL |
| Total | n/a | 500 mL |
2. Sterile supplemented DMEM (555 mL)
Note: Prepare directly in a DMEM bottle (from the manufacturer) and open only under sterile conditions.
| Reagent | Final concentration | Quantity or Volume |
|---|---|---|
| DMEM (1×) | n/a | 500 mL |
| FBS (100%) | 10% | 55 mL |
| Penicillin/Streptomycin (100%) | 1% | 5.5 mL |
| Total | n/a | ca. 555 mL |
3. Filtered DPBS 1× (500 mL)
Note: Filter and aliquot 50 mL for use. Keep a 50 mL aliquot at 4 °C as cold DPBS.
| Reagent | Final concentration | Quantity or Volume |
|---|---|---|
| DPBS (10×) | 1× | 50 mL |
| H2O | n/a | 450 mL |
| Total | n/a | 500 mL |
4. Filtered DPBS-Tx (500 mL)
Note: Filter and aliquot 50 mL for use.
| Reagent | Final concentration | Quantity or Volume |
|---|---|---|
| DPBS (10×) | 1× | 50 mL |
| H2O | n/a | 450 mL |
| Triton X-100 (100%) | 0.1% | 500 μL* |
| Total | n/a | ca. 500 mL |
*Tip needs to be cut due to Triton X-100 viscosity.
5. Filtered TBS-Tw (500 mL)
Note: Filter and aliquot 50 mL for use.
| Reagent | Final concentration | Quantity or Volume |
|---|---|---|
| TBS (10×) | 1× | 50 mL |
| H2O | n/a | 450 mL |
| Tween-20 (100%) | 0.1% | 500 μL* |
| Total | n/a | ca. 500 mL |
*Tip needs to be cut due to Tween-20 viscosity.
6. PIPES 100 mM, pH 7.0 (50 mL)
Note: Store at 4 °C up to a year. We recommend controlling pH if PIPES has not been used in the past 3 months.
| Reagent | Final concentration | Quantity or Volume |
|---|---|---|
| PIPES | 100 mM | 1.51 g |
| H2O | n/a | n/a* |
| NaOH 10 M | n/a | Until reaching pH 7.0** |
| Total | n/a | 50 mL |
*Add 40 mL of ultrapure water before adjusting pH. Once pH is adjusted, complete with water to obtain 50 mL of solution.
**pH equilibration with NaOH 10 M is necessary to dissolve PIPES; adjust pH to 7.0 by adding dropwise NaOH in solution under stirring.
7. NaCl 1 M (50 mL)
Note: Store at 4 °C for up to a year.
| Reagent | Final concentration | Quantity or Volume |
|---|---|---|
| NaCl | 1 M | 2.92 g |
| H2O | n/a | n/a* |
| Total | n/a | 50 mL |
*Add 40 mL of ultrapure water and allow the solution to mix completely before adding any more water.
8. MgCl2 1 M (50 mL)
Note: Store at 4 °C for up to a year, avoid light.
| Reagent | Final concentration | Quantity or Volume |
|---|---|---|
| MgCl2 | 1 M | 4.76 g |
| H2O | n/a | n/a* |
| Total | n/a | 50 mL |
*Add 40 mL of ultrapure water and allow the solution to mix completely before adding any more water.
9. Filtered sucrose 1 M (50 mL)
Note: Filter and store at -20 °C to avoid contamination.
| Reagent | Final concentration | Quantity or Volume |
|---|---|---|
| Sucrose | 1 M | 17.1 g |
| H2O | n/a | n/a* |
| Total | n/a | 50 mL |
*Add 30 mL of ultrapure water and allow the solution to mix completely before adding any more water as sucrose will take a substantial volume when fully dissolved.
10. Filtered cytoskeletal pre-extraction (CSK) buffer (50 mL)
Note: Filter with a 0.22 μm PES filter for a syringe and aliquot 5–10 mL of CSK in vials under sterile conditions. Store aliquoted vials at -20 °C. Avoid freeze/thaw cycles of aliquoted vials (2–3 cycles maximum).
| Reagent | Final concentration | Quantity or Volume |
|---|---|---|
| PIPES (100 mM, pH 7.0) | 10 mM | 5 mL |
| NaCl (1 M) | 100 mM | 5 mL |
| Sucrose (1 M) | 300 mM | 15 mL |
| MgCl2 (1 M) | 3 mM | 150 μL |
| H2O | n/a | 24.5 mL |
| Triton X-100 (100 %) | 0.7% | 350 μL* |
| Total | n/a | 50 mL |
*Tip needs to be cut due to Triton X-100 viscosity. Homogenize before adding Triton X-100 to avoid foaming.
11. Filtered BSA blocking buffer (500 mL)
Note: We found that the appropriate blocking buffer for MultiTASQ is BSA blocking buffer, and that for azMultiTASQ is FBS blocking buffer (see Troubleshooting 4; see Figure 10).
Filter and aliquot 50 mL of blocking buffer in vials under sterile conditions. Store aliquoted vials at -20 °C. Once a vial is thawed, store at 4 °C for 2–3 months maximum.
| Reagent | Final concentration | Quantity or Volume |
|---|---|---|
| BSA | 1% (w/v) | 5 g |
| Fish gelatin | 0.2% (w/v) | 1 g |
| DPBS (10×) | 1× | 50 mL |
| H2O | n/a | n/a |
| Triton X-100 (100 %) | 0.1% | 500 μL* |
| Total | n/a | ca. 500 mL |
*Add 300 mL of water, allow BSA and fish gelatin to dissolve, and complete to 500 mL before addition of Triton X-100. The tip needs to be cut due to Triton X-100 viscosity. Homogenize before adding Triton X-100 to avoid foaming.
12. Filtered FBS blocking buffer (50 mL)
Note. We found that the appropriate blocking buffer for MultiTASQ is BSA blocking buffer, and that for azMultiTASQ is FBS blocking buffer (see Troubleshooting 4; see Figure 10).
Prepare and filter under sterile conditions with a 0.22 μm PES filter for a syringe. Store at 4 °C for 1–2 months maximum.
| Reagent | Final concentration | Quantity or Volume |
|---|---|---|
| FBS (100 %) | 2% | 1 mL |
| DPBS-Tx | n/a | 49 mL |
| Total | n/a | 50 mL |
13. MultiTASQ 20 μM (200 μL) for post-fixation staining
Note: Prepare just before incubation with MultiTASQ (see Procedure for post-fixation staining). This volume corresponds to the volume required for a well (see General note 5). This solution cannot be stored.
| Reagent | Final concentration | Quantity or Volume |
|---|---|---|
| MultiTASQ (2 mM, see section A) | 20 μM | 2 μL |
| Filtered BSA blocking buffer | n/a | 198 μL |
| Total | n/a | 200 μL |
14. azMultiTASQ 20 μM (200 μL) for post-fixation staining
Note: Prepare just before incubation with azMultiTASQ (see Procedure for post-fixation staining). This volume corresponds to the volume required for a well (see General note 5). This solution cannot be stored.
| Reagent | Final concentration | Quantity or Volume |
|---|---|---|
| azMultiTASQ (2 mM, see section A) | 20 μM | 2 μL |
| Filtered FBS blocking buffer | n/a | 198 μL |
| Total | n/a | 200 μL |
15. CuSO4 100 mM (1 mL)
Note: Store at 4 °C and avoid light.
| Reagent | Final concentration | Quantity or Volume |
|---|---|---|
| CuSO4 | 100 mM | 24.97 mg |
| H2O | n/a | 1 mL |
| Total | n/a | ca. 1 mL |
16. IGEPAL CA-630 10% (1 mL)
Note: Store at 4 °C.
| Reagent | Final concentration | Quantity or Volume |
|---|---|---|
| IGEPAL CA-630 (100%) | 10 % | 100 μL* |
| H2O | n/a | 900 μL |
| Total | n/a | 1 mL |
*Tip needs to be cut due to IGEPAL CA-630 viscosity.
17. NaAsc 300 mg/mL (150×) (300 μL)
Note: Aliquot vials of 30 μL and store at -20 °C. Avoid freeze/thaw cycle as NaAsc is sensitive to oxidation.
| Reagent | Final concentration | Quantity or Volume |
|---|---|---|
| NaAsc | 300 mg/mL | 90 mg |
| H2O | n/a | 300 μL |
| Total | n/a | ca. 300 μL |
18. CuAAC mix (200 μL)
Note: Prepare just before “click” chemistry step with MultiTASQ (see Procedure). This volume corresponds to the volume required for a well (see General note 5). Add reagents in the order listed below. This solution cannot be stored.
NaAsc 30 mg/mL (or 15×) should be prepared in nuclease-free ultra-pure water before CuAAC mix; for 15 μL, add 1.5 μL of NaAsc 300 mg/mL to 13.5 μL of nuclease-free ultra-pure water.
| Reagent | Final concentration | Quantity or Volume |
|---|---|---|
| PBS (1×) | n/a | 184 μL |
| IGEPAL (10%) | 0.05% | 1 μL |
| CuSO4 (100 mM) | 1 mM | 2 μL |
| AF-az (1 mM) | 1 μM | 0.2 μL |
| NaAsc (30 mg/mL or 15×) | 2 mg/mL or 1× | 13.3 μL |
| Total | n/a | ca. 200 μL |
19. SPAAC mix (200 μL)
Note: Prepare just before “click” chemistry step with azMultiTASQ (see Procedure). This volume corresponds to the volume required for a well (see General note 5). This solution cannot be stored.
| Reagent | Final concentration | Quantity or Volume |
|---|---|---|
| DIBO-AF (0.5 mM) | 0.5 μM | 0.2 μL |
| FBS blocking buffer (1×) | n/a | 200 μL |
| Total | n/a | ca. 200 μL |
Laboratory supplies
1. PES filter 0.22 μm Stericup system (Sigma-Aldrich, catalog number: S2GPU10RE)
2. OmnifixTM solo 50 mL single-use syringe (Braun, catalog number: 4613503F)
3. PES filter 0.2 μm (MinisartTM high flow) for syringe (Sartorius, catalog number: 16532----------K)
4. Tissue culture treated flask (75 cm2) (Falcon, catalog number: 353136)
5. Glass coverslips 13 mm, #1.5 (VWR, catalog number: 631-0150)
6. Microscope glass slides 26 × 76 × 1 mm (ISO8037/I) (Epredia, catalog number: AA00000112E01MNZ10)
7. 24-well polystyrene microplate (2 cm2) (Falcon, catalog number: 353047) or 4-well polystyrene microplate (2 cm2) (SPL Life Science, catalog number: 30004)
Equipment
1. pH meter
2. Spectrophotometer (UV5Nano)
3. Biological safety cabinet
4. 37 °C, 5% CO2 incubator
Note: Equipment is dedicated to mammalian cell culture to avoid any bacterial contamination.
5. Aspiration system
Note: The aspiration system allows hazardous biological fluids (cell debris, fixative reagent, DAPI, etc.) to be disposed of.
6. Counting chamber (Malassez pattern)
7. Phase-contrast or brightfield microscope
8. Widefield microscope (Olympus, model: IX83)
a. DAPI filter set (Chroma, catalog number 49000)
b. TexasRed filter set (Chroma, catalog number 49306)
c. Optional for multiplexing: GFP filter set (Chroma, catalog number 49002) and/or Cy5 filter set (Chroma, catalog number 49009) and/or Cy7 filter set (Chroma, catalog number 49007)
Software and datasets
1. CellSens Dimension (Olympus, v3.2)
2. FIJI (ImageJ, v2.14.0)
3. Excel (Microsoft, v16.77.1)
4. Prism (GraphPad, v10.3.1)
5. Code has been deposited to GitHub (see Data analysis)
Procedure
Note: The described protocol is optimized for HeLa cells seeded in a 24-well plate and treated 24 h after seeding. For this type of protocol, be fast (but not furious): do not allow cells to dry but do not rush to prevent them from detaching.
A. Preparation of TASQs
1. After resuspension of TASQ (MultiTASQ and/or azMultiTASQ) at 10 mM in nuclease-free ultra-pure water, measure the absorbance of TASQ’s guanines with a spectrophotometer at λ = 246 nm.
a. Concentration is calculated as follows: , taking into account the optical path length of the spectrophotometer used (l) and the molar absorption coefficient corresponding to four guanines (4 × 10,700), according to Beer-Lambert formula.
Caution: Determination of blank value has to be done with the same water as the one used to resuspend TASQ.
Caution: Serial dilutions might be needed in particular if the absorbance values are out of the linear range of the spectrophotometer used and/or for a better correction of concentration.
Critical: We would like to stress that this molar extinction coefficient value is an approximation and, therefore, the corrected concentration does not represent absolute concentration but a standard for obtaining reproducible experiments from different production batches as the number of TFA molecules can vary (one molecule of TFA representing ca. 6.2% of TASQs molecular weight).
2. Adjust the concentration value of the TASQ stock solution.
3. Prepare a 2 mM dilution of TASQ in nuclease-free ultra-pure water.
Critical: Amines from guanines of TASQ can be degraded with time and repeated freeze/thaw cycles.
Note: Prepare aliquots with appropriate volume for staining experiments (2–5 μL of TASQs are needed per well, depending on live-cell or post-fixation staining). Keep at -20 °C for up to a year.
Note: If TASQ staining starts to fade and/or be unexpected, measure absorbance at λ = 246 nm to be sure of the integrity and concentration of the stock solution and prepare a new 2 mM dilution.
B. Cell seeding
1. Grow cells to reach ca. 70%–75% confluency on the day of seeding.
Note: A high confluency could impair doubling time and therefore processes (such as replication) allowing G4 detection.
2. Prepare sterile coverslips.
Note: A quick and efficient way to sterilize coverslips is to microwave them (dry, in a glass Petri dish) with a beaker of water aside for 5–10 min at maximal power.
3. Put one sterile coverslip per well in a 24-well plate, add 500 μL of supplemented DMEM per well, and incubate for at least 10 min at 37 °C.
Caution: To keep the coverslips sterile, we recommend using a sterile Pasteur or aspiration pipette to aspirate it and pinch the pipe to release it within the well.
Note: We observed that incubation of plates and coverslips with cell culture medium avoids central “halo-like” repartition of cells in the well, which ensures better conditions for treatments and imaging.
4. After trypsin-mediated harvesting of cells (performed according to standard protocols), count cells with a counting chamber.
Caution: Avoid leaving the cells for too long in trypsin alone as it could impact cell viability.
Note: Dilution of trypsin with supplemented DMEM is sufficient to abolish the deleterious impact of trypsin onto HeLa cells; no further centrifugation is required.
5. Prepare a solution of cells diluted in supplemented DMEM at 200,000 cells/mL.
Critical: We highly recommend optimizing the number of cells per well before using TASQ (see Troubleshooting 1 and 2). Indeed, several features of the cell line (including morphology, size, and doubling time) can influence the final confluency before the pre-fixation or fixation step. We observed for some cell lines that a high confluency could be deleterious for CSK pre-extraction, which leads to the loss of a high number of cells.
6. Add 500 μL/well of solution of diluted cells to obtain 100,000 cells/well corresponding to ca. 70% confluency after 24 h of incubation at 37 °C.
Note: We recommend treating after 24–48 h (that is, when cells recover their normal morphology) and monitoring the confluency during long live treatments (>4 h).
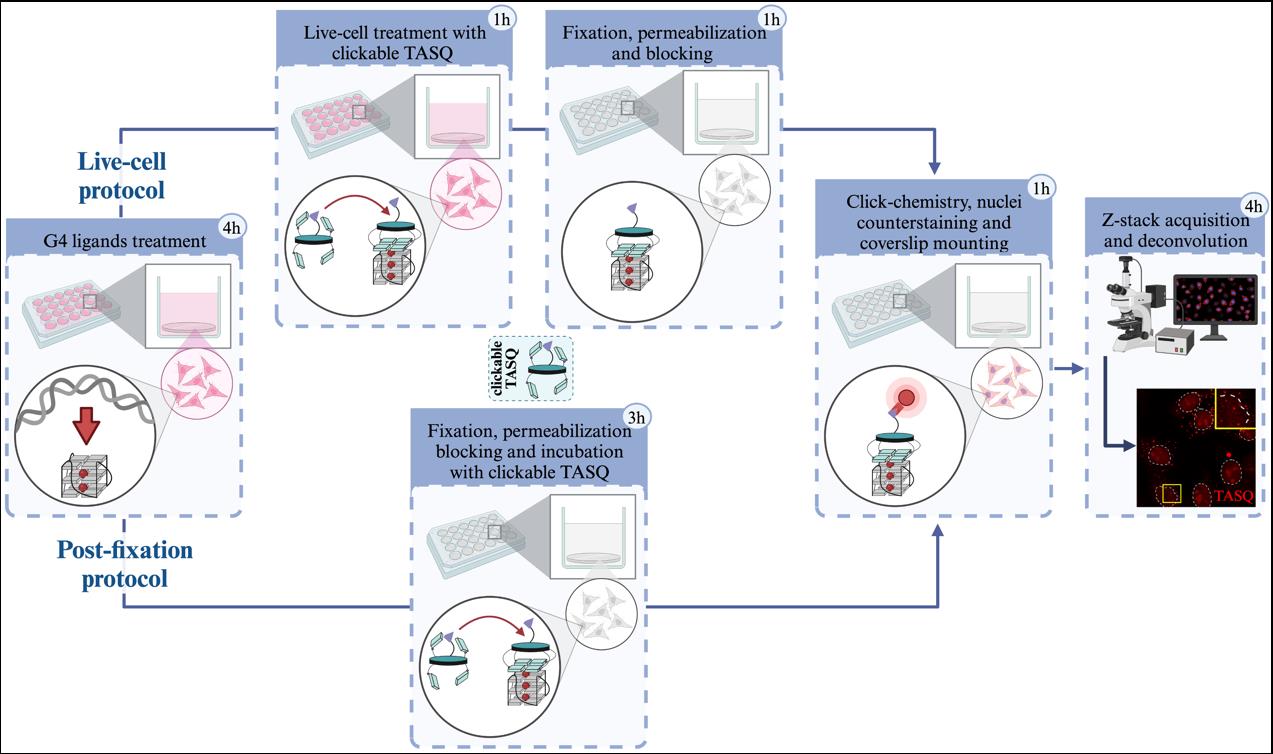
7. After 24 h, replace the medium with 500 μL of fresh medium. At this step, you can treat cells with drugs [e.g., Pyridostatin (PDS) [32,33] 10 μM for 4 h] and use TASQ as a post-fixation G4 probe (Figure 2A, see Procedure section D) or as a G4 ligand for live-cell experiments (Figure 2B, see Procedure section E).
Critical: We highly recommend using a well-established G4 ligand (such as PDS) as a positive control; PDS is herein used to stabilize cellular G4s and thus to increase the number of G4 foci (referred to as positive control herein; see the Validation section below), which is important notably during the optimization of TASQs staining.
Note: If you plan to treat several wells, see General note 5.
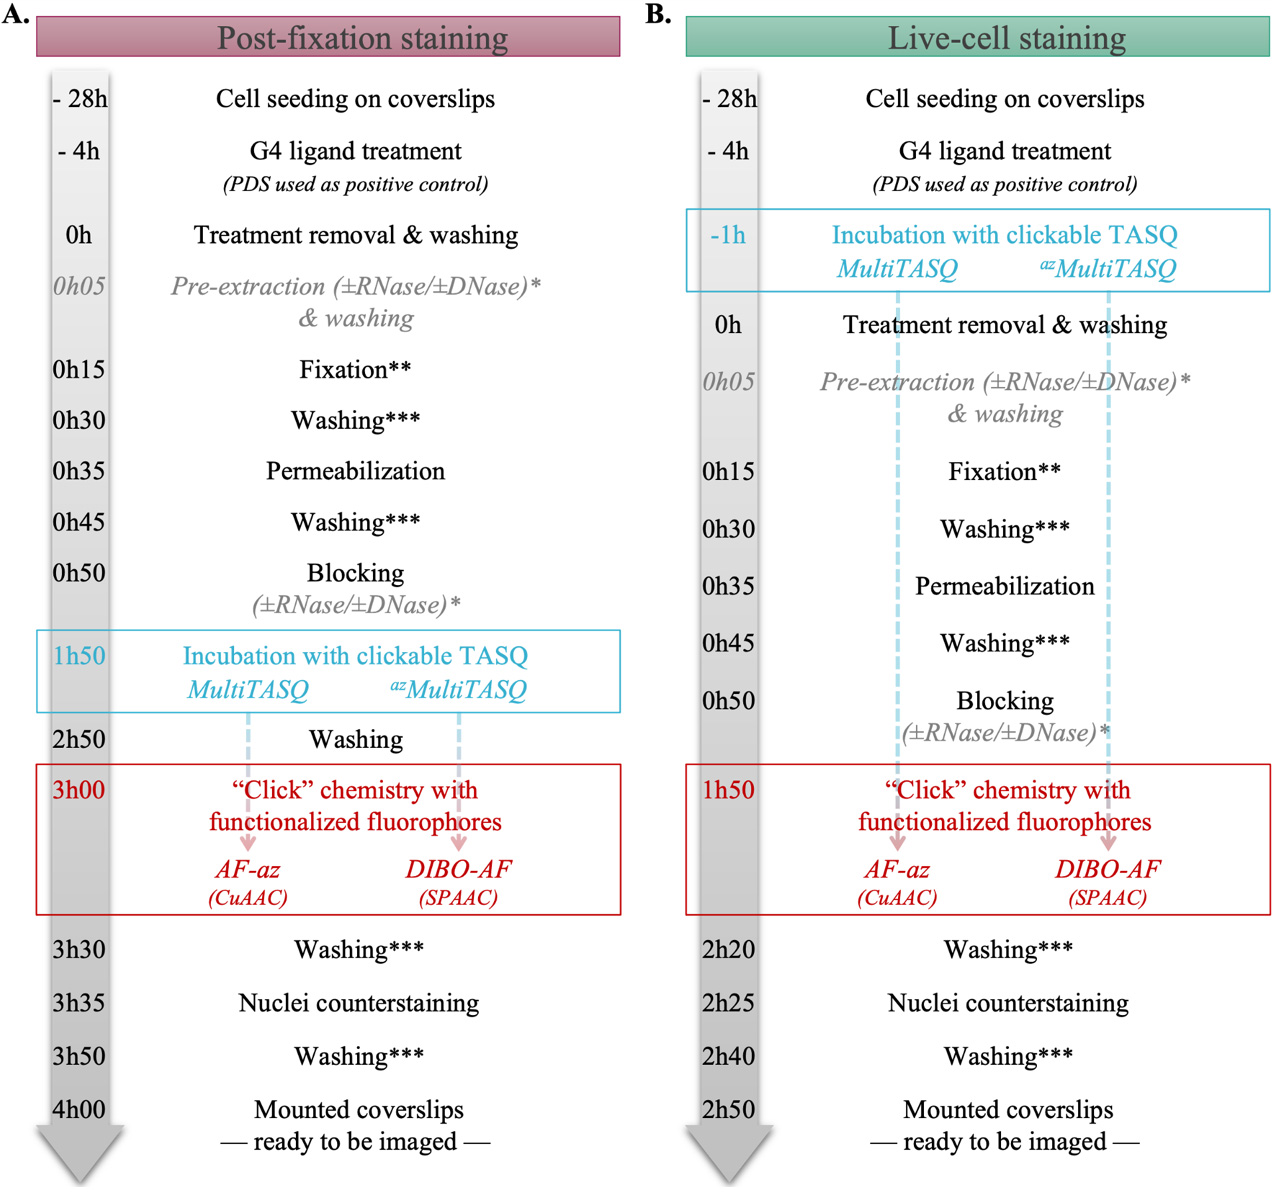
Figure 2. Workflow of (A) post-fixation or (B) live-cell TASQs staining. *: These steps (pre-extraction and/or nuclease treatment) are optional. **: Fixation duration is based on longest fixation (i.e., 15 min for PFA fixation vs. 5 min for methanol fixation). ***: When extensive washing is not required, the washing time is fixed at 5 min (please refer to the protocol for washing buffer used).
C. Preparation of nucleases treatment (if needed)
Note: Nucleases treatment might be needed to show if the TASQ staining induced by G4 ligand is G4- or rG4-specific. If nucleases treatment is required and CSK pre-extraction is possible, we recommend treating with nucleases during both pre-extraction and blocking steps (see General notes 1–4). Nevertheless, nucleases treatment is possible during the blocking step only.
1. If nuclease treatment is required during the pre-extraction step, prepare nucleases-supplemented CSK buffer (400 μL per well to be treated, as CSK treatment is performed twice) as follows (see General note 5):
a. For RNase-treated conditions, prepare CSK buffer supplemented with 0.3 mg/mL of RNase A.
b. For DNase-treated conditions, prepare CSK buffer supplemented with 1× TURBOTM DNase buffer and 10 U of TURBOTM DNase (final concentration 0.025 U/μL).
Caution: see General note 6.
2. If nuclease treatment is required during the blocking step, prepare the appropriate blocking buffer supplemented with nucleases (200 μL per well to be treated) as follows (see General note 5):
a. For RNase-treated conditions, prepare the appropriate blocking buffer supplemented with 0.3 mg/mL of RNase A.
b. For DNase-treated conditions, prepare the appropriate blocking buffer supplemented with 1× TURBOTM DNase buffer and 5 U of TURBOTM DNase (final concentration 0.025 U/μL).
Caution: We found that the appropriate blocking buffer (detailed in Materials) for MultiTASQ is BSA blocking buffer, and that for azMultiTASQ is FBS blocking buffer (see Troubleshooting 4, Figure 10).
Caution: See General note 6.
D. Post-fixation staining (Figure 3)
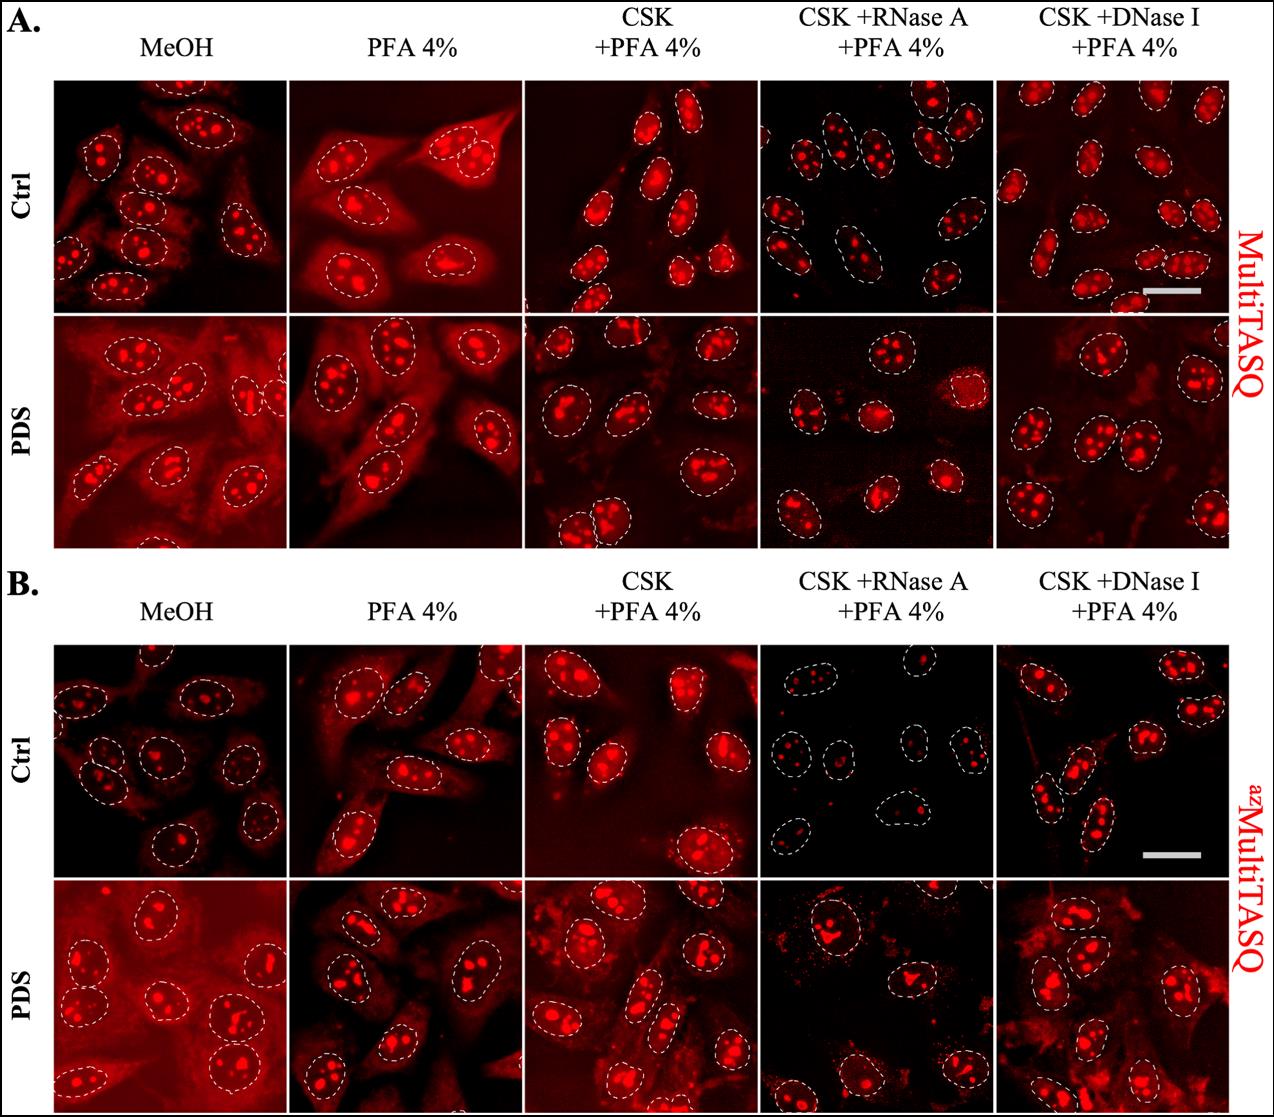
Figure 3. Representative images of MultiTASQ (A) and azMultiTASQ (B) clicked with AF594 (in red) as post-fixation G4 probes in HeLa cells treated or not for 4 h with 10 μM of pyridostatin (PDS), a well-characterized G4 ligand. Several conditions of fixative (MeOH or PFA) and pre-fixative (CSK supplemented or not with nucleases) techniques are represented to show versatility of TASQs staining (see General notes 1–4). Representative images are maximal z-projection of 10 deconvoluted z-stacks (total z = 3 μm). Similar brightness and contrast settings were applied for control and for PDS-treated images independently of fixative and pre-fixative conditions, allowing comparison between ctrl and PDS and optimization of signal pattern that can be observed. White dotted lines outline nuclei and scale bar (in light grey) stands for 20 μm in all images. Images were acquired with 60× oil-objective; experiments without TASQ (as exemplified in Figure 6) were performed as controls but not shown here.
1. After PDS treatment, remove medium (with aspiration system) and wash cells three times with 500 μL/well of cold DPBS (see General note 7).
Caution: If you plan to use pre-extraction (CSK) treatment with or without nuclease, follow steps D2–4, otherwise go to step D5.
Critical: All along the protocol, addition of buffers and compounds should be done with a low flow rate and on the edge of the well (especially before fixation) to avoid loss of cells.
Note: Removal of medium, buffers, and compounds should be done with an aspiration system to allow timeliness.
Note: We noticed that washing with cold DPBS (stored at 4 °C) before the fixation step allowed us to keep cells adherent.
Note: See General note 8.
See Troubleshooting 1.
2. Place the plate with the coverslips on ice. Remove DPBS and add 200 μL/well of ice-cold CSK (supplemented or not with nuclease) (see General note 2).
a. Incubate for 3 min on ice.
Critical: Inappropriate percentage of Triton X-100 in CSK buffer, time of incubation, and temperature of incubation could lead to loss of cells and should be optimized in a cell type–dependent manner (see Troubleshooting 2).
Note: In order to keep incubation times as accurate as possible, we recommend spacing the addition of CSK from 5–10 s apart between each well.
3. Gently remove the CSK (supplemented or not with nuclease) and repeat step D2.
Critical: Removal and addition of CSK could lead to cell detachment (see Troubleshooting 2).
4. Gently remove the CSK (supplemented or not with nuclease) and wash the cells once with 500 μL/well of cold DPBS.
Critical: After washing, fixation must be done as soon as possible.
5. If PFA-based fixation is used (see General note 2), prepare 4% PFA in DPBS (200 μL per well to be fixed) while cells are being washed in cold DPBS.
Critical: Solutions must be freshly prepared for each experiment from 16% PFA (see General notes 5 and 6).
Note: The percentage of PFA can be changed (typically 2%–4% PFA) if more suitable with previous experiments and/or immunodetection.
6. Gently remove the DPBS and fix the cells (see General note 2):
a. For 15 min at room temperature with 200 μL/well of 4% PFA solution, or
b. For 5 min on ice with 200 μL/well of 100% methanol.
Note: PFA fixation is mainly used after CSK pre-extraction.
Note: See General note 8.
7. Remove the fixative solution (with an aspiration system) and wash the cells three times with 500 μL/well of DPBS.
Pause point: After fixation and washing steps, you can keep the plate at 4 °C with 1 mL/well of DPBS for up to several days.
Note: See General note 8.
8. Remove the DPBS and permeabilize the cells (see General note 3):
a. For 10 min at room temperature with 200 μL/well of DPBS-Tx.
Note: If you have chosen the CSK pre-extraction protocol, permeabilization is not mandatory as Triton X-100 contained in CSK buffer already permeabilized cell membranes.
Note: See General note 8.
9. Remove the permeabilization solution and wash the cells three times with 500 μL/well of DPBS.
10. Remove DPBS and add 200 μL/well of the appropriate blocking buffer (supplemented or not with nuclease) (see General notes 5 and 6).
a. Incubate for 1 h at 37 °C.
Note: Preparation of blocking buffer supplemented with nuclease is detailed in section C.
11. Prepare a solution of 20 μM of TASQ in the appropriate blocking buffer (200 μL per well to be stained) (see General notes 5 and 6 and Recipes).
Caution: Supplementation with nuclease is not required at this step.
Note: Primary antibody can be diluted in this blocking buffer as immunodetection and TASQ incubation can be performed at the same time.
See Troubleshooting 4.
12. Remove the blocking buffer and add 200 μL/well of 20 μM of TASQ solution.
a. Incubate for 1 h at 37 °C.
Note: At this point, immunodetection is compatible; an incubation with primary antibody is possible in TASQ solution. However, we highly recommend testing if the blocking buffer allows for normal immunostaining.
13. Remove TASQ solution and wash five times with 500 μL/well of TBS-Tw.
Note: If TASQ staining is too low, reducing the number of washing steps is possible; however, background noise can be increased (see Troubleshooting 4).
14. Prepare the “click” solution (200 μL per well to be stained) (see General notes 5 and 6):
a. For MultiTASQ (for CuAAC) (see CuAAC mix Recipes).
b. For azMultiTASQ (for SPAAC) (see SPAAC mix Recipes).
Note: CuAAC “click” reaction with azMultiTASQ is also possible, but it requires alkyne-functionalized fluorophore; the selection of either TASQ depends on their availability given that MultiTASQ is readily accessible (being commercially available) while azMultiTASQ could be obtained upon request only.
15. Remove TBS-Tw and add 200 μL/well of “click” solution.
a. Incubate for 30 min at room temperature in the dark.
Caution: From this step, avoid exposure to light by keeping under an aluminum foil.
16. Remove the “click” solution and wash twice with 500 μL/well of TBS-Tw.
Note: After washing steps with TBS-Tw, incubation with a secondary antibody for immunodetection is possible.
Caution: After this step, follow section F for the end of the procedure.
E. Live TASQ staining (Figure 4)

Figure 4. Representative images of MultiTASQ (A) and azMultiTASQ (B) clicked with Alexa-Fluor 594 (in red) as live-cell treatment (1 h, 20 μM) after a 4 h treatment without (ctrl) or with 10 μM of pyridostatin (PDS), a well-characterized G4 ligand. Several conditions of fixative (MeOH or PFA) and pre-fixative (CSK supplemented or not with nucleases) techniques are represented to show the versatility of TASQs staining (see General notes 1–4). Representative images are maximal z-projection of 10 deconvoluted z-stacks (total z = 3 μm). Similar brightness and contrast settings were applied for control and PDS-treated images independently on fixation/pre-fixation conditions. The background was determined in extracellular spaces (three measurements), and background subtraction was applied to MeOH-fixed conditions (in A and B). White dotted lines outline nuclei, and scale bar (in light grey) stands for 20 μm for all images. Images were acquired with a 60× oil objective; experiments without TASQ (as exemplified in Figure 6 below) were performed as controls but are not shown here.
1. One hour before the end of the PDS treatment, treat each well with a final concentration of TASQ of 20 μM [i.e., add 5 μL of working solution of TASQ at 2 mM (see section A: Preparation of TASQs) directly in 500 μL/well DMEM (with or without PDS treatment)].
a. Incubate for 1 h at 37 °C.
Critical: Do not forget to keep TASQ-untreated wells for negative controls.
Note: Make sure the solution in the well is homogenous by gentle up-down pipetting.
Note: See General notes 7 and 8.
See Troubleshooting 1.
2. At the end of treatment, remove the medium and wash gently the cells three times with 500 μL/well of cold DPBS.
Caution: If you plan to use pre-extraction (CSK) treatment with or without nuclease, follow steps E3–5; otherwise, go to step E6.
Critical: All along the protocol, the addition of buffers and compounds should be done with a low flow rate and on the edge of the well (especially before fixation) to avoid loss of cells.
Note: Removal of medium, buffers, and compounds should be done with an aspiration system to allow timeliness.
Note: We noticed that washing with cold DPBS (stored at 4 °C) before the fixation step allowed us to keep cells adherent.
3. Place the plate with the coverslips on ice. Remove DPBS and add 200 μL/well of ice-cold CSK (supplemented or not with nuclease) (see General note 2).
a. Incubate for 3 min on ice.
Critical: Inappropriate percentage of Triton X-100 in CSK buffer, time of incubation, and temperature of incubation could lead to loss of cells and should be optimized in a cell type-dependent manner (see Troubleshooting 2).
Note: In order to keep incubation times as accurate as possible, we recommend spacing the addition of CSK from 5–10 s apart between each well.
4. Gently remove the CSK (supplemented or not with nuclease) and repeat step E3.
Critical: Removal and addition of CSK could lead to cell detachment (see Troubleshooting 2).
5. Gently remove the CSK (supplemented or not with nuclease) and wash the cells once with 500 μL/well of cold DPBS.
Critical: After washing, fixation must be done as soon as possible.
6. If PFA-based fixation is used (see General note 2), prepare 4% PFA in DPBS (200 μL per well to be fixed) while cells are being washed in cold DPBS.
Critical: Solutions must be freshly prepared for each experiment from 16% PFA (see General notes 5 and 6).
Note: The percentage of PFA can be changed (typically 2%–4% PFA) if more suitable with previous experiments and/or immunodetection.
7. Gently remove the DPBS and fix the cells:
a. For 15 min at room temperature with 200 μL/well of 4% PFA solution, or
b. For 5 min on ice with 200 μL/well of 100% methanol.
Note: PFA fixation is mainly used after CSK pre-extraction.
Note: See General note 8.
8. Remove the fixative solution (with aspiration system) and wash the cells three times with 500 μL/well of DPBS.
Pause point: After fixation and washing steps, you can keep the plate at 4 °C with 1 mL/well of DPBS for up to several days.
Note: See General note 8.
9. Remove the DPBS and permeabilize the cells (see General note 3):
a. For 10 min at room temperature with 200 μL/well of DPBS-Tx.
Note: If you have chosen the CSK pre-extraction protocol, permeabilization is not mandatory as Triton X-100 contained in CSK buffer already permeabilized cell membranes.
Note: See General note 8.
10. Remove DPBS and add 200 μL/well of the appropriate blocking buffer (supplemented or not with nuclease) (see General notes 5 and 6).
a. Incubate for 1 h at 37 °C.
Note: Preparation of blocking buffer supplemented with nuclease is detailed in section C.
11. Prepare the “click” solution (200 μL per well to be stained) (see General notes 5 and 6):
a. For MultiTASQ (for CuAAC) (see CuAAC mix Recipes).
b. For azMultiTASQ (for SPAAC) (see SPAAC mix Recipes).
Note: CuAAC “click” reaction with azMultiTASQ is also possible, but it requires an alkyne-functionalized fluorophore.
12. Remove TBS-Tw and add 200 μL/well of “click” solution.
a. Incubate for 30 min at room temperature in the dark.
Caution: From this step, avoid exposure to light by keeping under an aluminum foil.
13. Remove the “click” solution and wash twice with 500 μL/well of TBS-Tw.
Note: After washing steps with TBS-Tw, an incubation with a primary and secondary antibody for immunodetection is possible.
Caution: After this step, follow section F for the end of the procedure.
F. Nuclei counterstaining
1. Prepare the DAPI-staining solution (200 μL per well) with 1 μg/mL of DAPI in DPBS-Tx (see General notes 5 and 6).
2. Remove TBS-Tw and add 200 μL/well of the DAPI-staining solution.
a. Incubate for 15 min in the dark at room temperature.
3. Remove DAPI-staining solution and wash twice with 500 μL/well of TBS-Tw.
4. Keep coverslips in TBS-Tw in the dark until mounting.
Pause point: Stained coverslips can be kept in 1 mL of DPBS up to 24 h, in sealed wells, at 4 °C covered with aluminum foil before being mounted on a microscope glass slide.
G. Mounting coverslip on a microscope glass slide (Figure 5)
Note: Mounting coverslips can be tricky because of the risk of coverslip breakage, flip-over, air bubbles between the coverslip and the glass slide, etc. Here are a few tips.
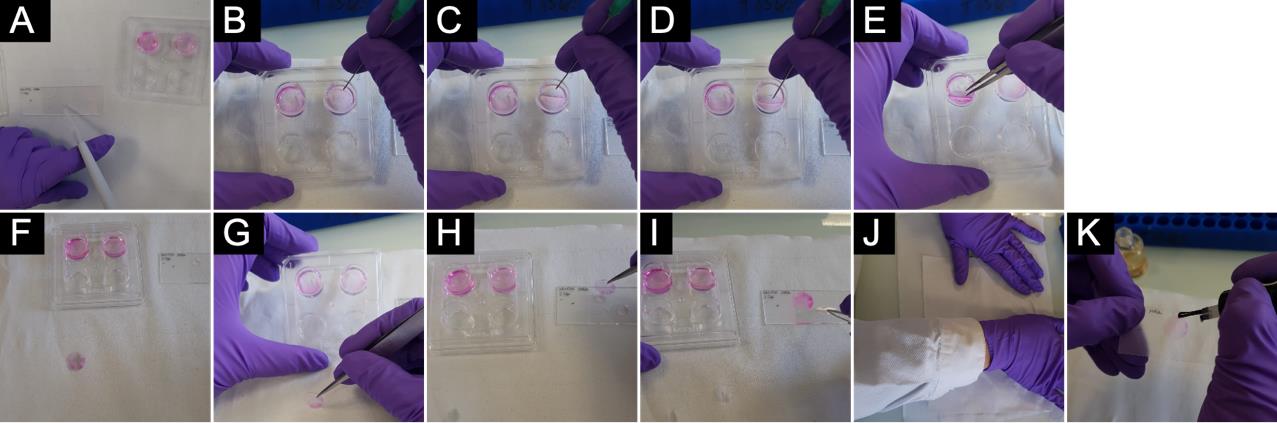
Figure 5. Mounting of coverslips on a microscope glass slide. Cells were stained for 10 min with 0.057% of sulforhodamine B in order to give a better visualization of the mounting process (this should not be done to perform TASQs staining experiment). A. Vectashield mounting medium placed on microscope glass slide. B–E. Coverslip taken out of well. F–I. Coverslip placed on Vectashield with cells (F) facing upward, (G–H) facing toward, and (I) in mounting medium between the glass slide and coverslip. J. Excess of mounting medium wiped out. K. Coverslip sealed with nail polish.
1. Note the experiment ID (date, name, and place for each sample, fluorophores used, etc.) on the frosted part of the microscope glass slide.
2. Place a drop of Vectashield mounting medium (ca. 5–7 μL) for each coverslip to be mounted on the microscope glass slide.
Note: Tip needs to be cut due to Vectashield mounting medium viscosity.
Caution: Mounting medium not supplemented with DAPI provides better specific signal/noise ratio.
3. Take the coverslip out of the well (by pushing with a needle on one side of the well until the coverslip is vertical, or almost) and use a tweezer to put it on a paper towel with cells facing upward.
Note: To avoid breakage, do not push with the needle right in the middle.
4. Gently wipe the edge of the coverslip to remove the excess of buffer and put the coverslip with cells facing downward onto the Vectashield mounting medium.
Note: With a 13-mm diameter glass coverslip, up to four coverslips can be sealed on a classic microscope slide (26 × 76 × 1 mm).
Note: If the coverslip flips over and you do not know on which side of the coverslip the cells are, try to scrap with a needle (next to the edge of the coverslip) to see a scar indicating the side where cells are.
Note: To avoid air bubbles, we recommend placing one edge of the coverslip in the mounting medium and gently guiding it down rather than dropping it onto the glass slide.
5. Once all coverslips are mounted on the microscope glass slide, gently press on it with a paper towel to remove the excess of mounting medium and seal the edges of the coverslip with a small amount of transparent nail polish.
Pause point: Microscope glass slides can be kept at 4 °C in the dark before acquisition.
H. General guidelines for acquisition
Note: The type of microscope used for acquisition can also impact the quality of images. Even if the confocal laser scanning microscope (CLSM) is a golden standard, especially for colocalization studies, a wide-field microscope coupled with a deconvolution program can produce accurate images at a lower cost (e.g., we use Olympus IX83 with 60× oil objective).
Caution: The thickness of coverslips is also important for the quality of images; this feature is dependent on the microscope used (please refer to the manufacturer’s guide).
1. The focal point is easier to find with DAPI staining.
See Troubleshooting 3.
2. You have to set a negative control condition [e.g., without TASQ incubation but with fluorophore to be clicked (AF-az or DIBO-AF), Figure 6] to ensure the specificity of your staining and to set key features for acquisition (% excitation and exposure).
Note: If settings chosen for acquisition are too high, you will have nonspecific staining, thus enhancing background noise.
See Troubleshooting 4.
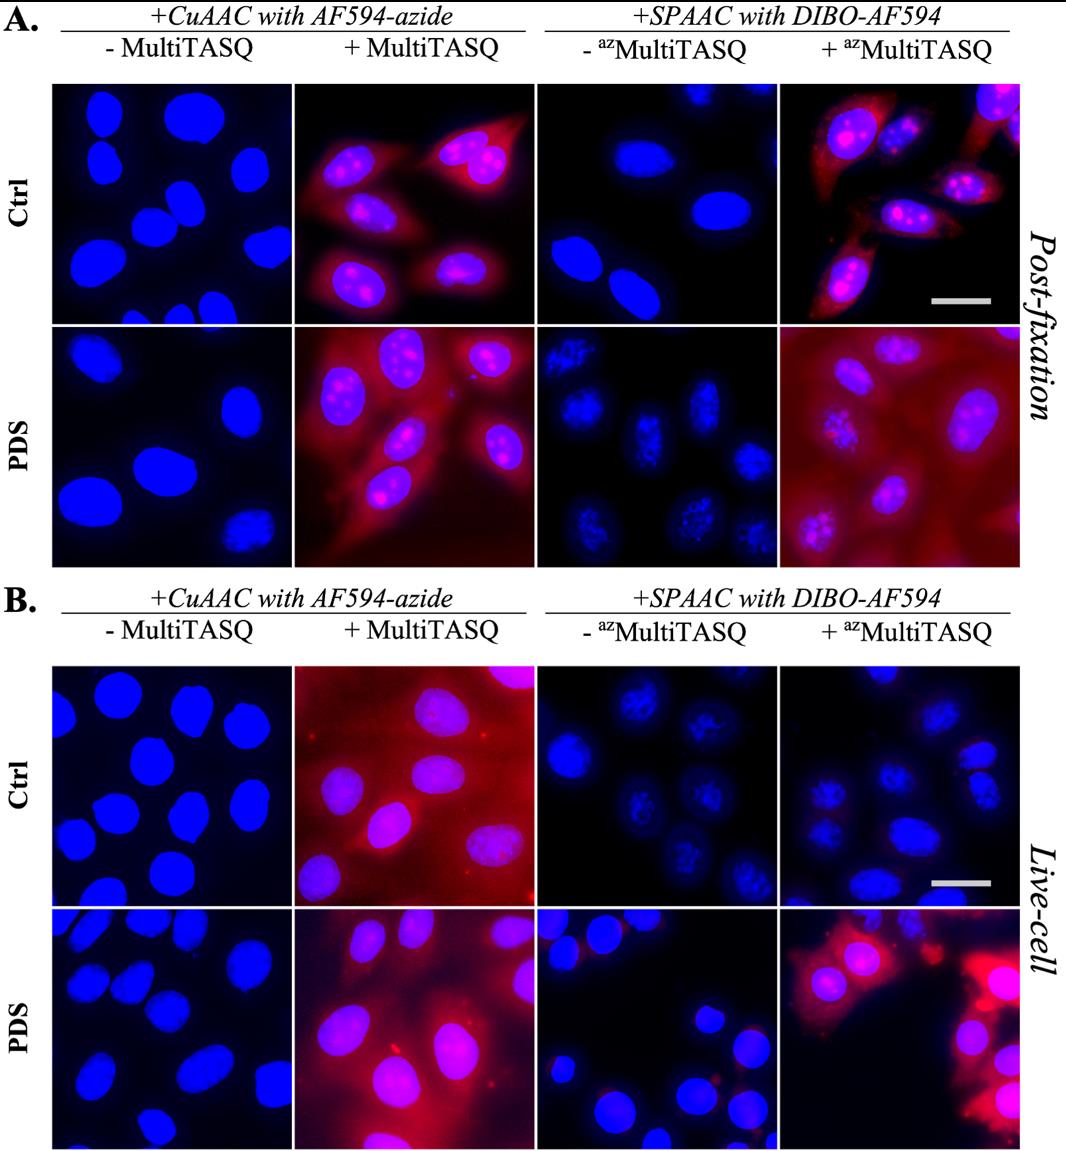
Figure 6. Determination of acquisition settings with negative control in post-fixation (A) or live-cell (B) TASQs staining. Staining with Alexa Fluor 594 (in red, without or with TASQs) was performed in HeLa cells treated or not with PDS and fixed with 4% PFA. Nuclei were counterstained with DAPI (in blue). Merged representative images are maximal z-projections of 10 raw z-stacks (total z = 3 μm). Similar brightness and contrast settings were applied to all images with the same fluorophore staining. Scale bar (in light grey) stands for 20 μm for all images. Images were acquired with a 60× oil objective.
3. A positive control must be chosen (e.g., with G4 ligand) where staining is maximal to set the optimal features of the acquisition (Figure 4B with azMultiTASQ).
Note: If these settings are too high, the signal will be saturated, which will not allow for proper quantification.
See Troubleshooting 4.
4. The same acquisition settings must be kept throughout all tested conditions to ensure a reliable comparison between the conditions.
5. For the same acquisition time, a choice must be made between quantity and quality: a high-throughput analysis (with a 20× air objective for example) with many cells to quantify does not allow for an accurate detection, while a high-resolution analysis (with a 60× oil objective for example) limits the number of images acquired (i.e., the number of cells to be analyzed).
6. Some of the technical limitations of the microscope can be bypassed using a deconvolution program that enhances the quality of your images (Figure 7); however, great care must be taken to ensure that this process does not create artifacts. We highly recommend referring to the supplier information sheet and reading this review for a better understanding of how convolution and deconvolution work [34].
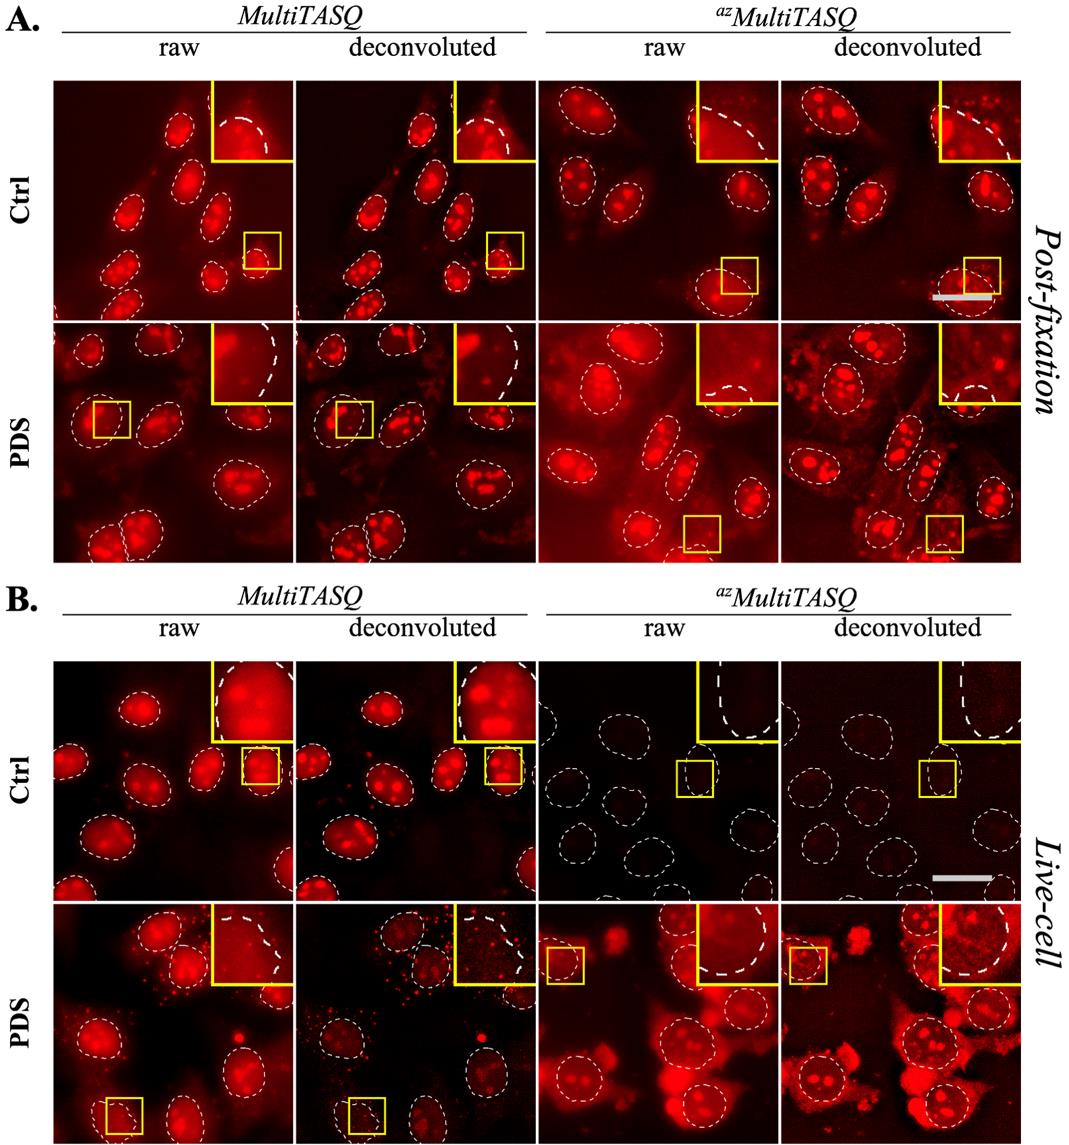
Figure 7. Comparison of raw and deconvoluted images in post-fixation (A) or live-cell (B) TASQs staining. Staining with Alexa Fluor 594 (in red) was performed in HeLa cells treated or not with PDS, pre-extracted with CSK, and fixed with 4% PFA. Representative images are maximal z-projections of 10 z-stacks (total z = 3 μm). Similar brightness and contrast settings were applied for control and PDS-treated images. White dotted lines outline nuclei; scale bar (in light grey) stands for 20 μm. Images were acquired with a 60× oil objective; experiments without TASQ (as exemplified in Figure 6 above) were performed as controls but are not shown here.
Data analysis
We have written a user-friendly and open-access macro now available on GitHub (https://github.com/ICMUB/clickable-TASQ) that works with ImageJ [35] (or FIJI software, also in open-access) [36].
Note: Explanations of the different features used in the macro are available and described in the folder to be downloaded on GitHub.
Validation of protocol
This protocol was partially (unoptimized) used and validated in the following research article:
Rota Sperti et al. [27]. The multivalent G-quadruplex (G4)-ligands MultiTASQs allow for versatile click chemistry-based investigations. RSC Chem Biol 4: 456–465. DOI: 10.1039/d3cb00009e.
Another example of application, presented in Figure 8, shows how this protocol can be used to assess whether a candidate ligand modulates the G4 landscape in treated cells. We studied here the way PDS affects nuclear G4 foci in light of its established ability to stabilize DNA G4s (vide supra). To this end, HeLa cells were treated with 10 μM PDS for 4 h, and the quantification of the G4 foci was performed with MultiTASQ treatment either post-fixation (A–C) or upon live-cell incubation (D–F). The staining was performed by click chemistry (CuAAC) with AF-az after CSK pre-extraction and 4% PFA fixation. The images were then collected (A and D) and quantified using the developed macro (B, C, E, and F).
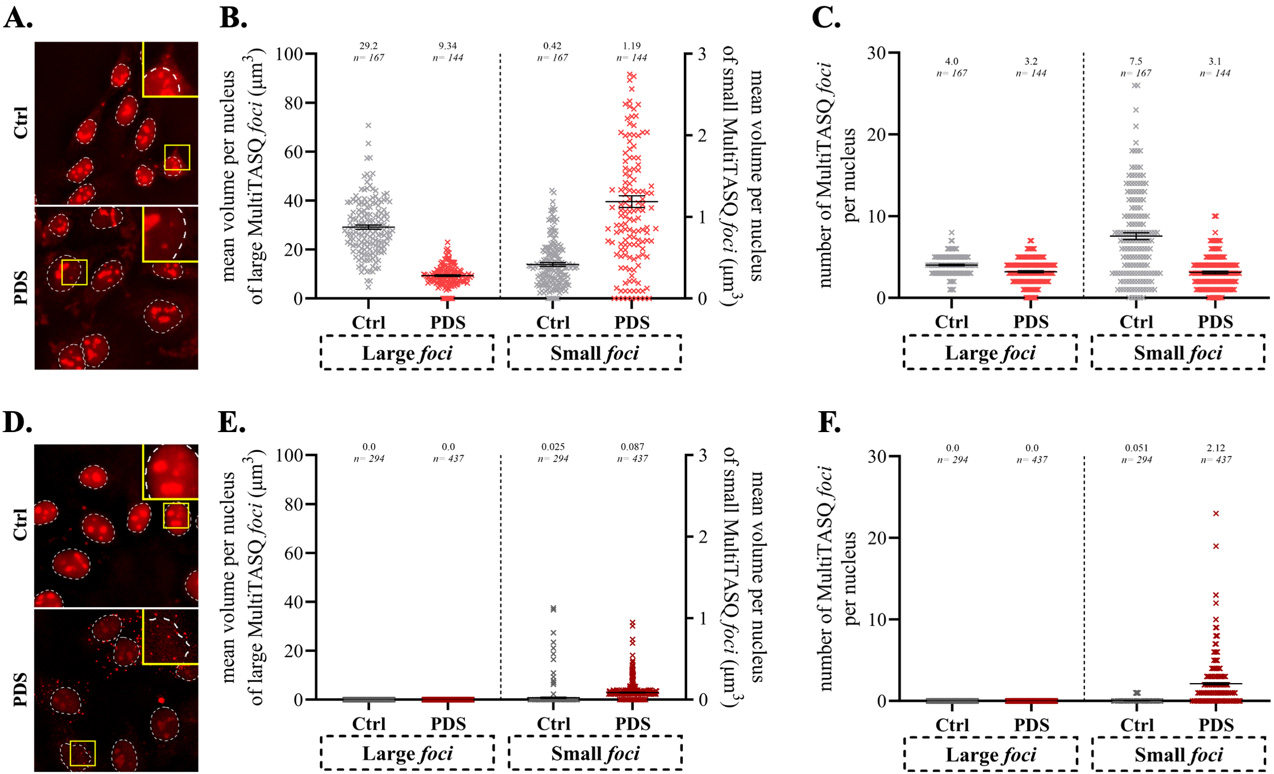
Figure 8. Quantification of MultiTASQ signal after treatment with 10 μM of PDS for 4 h or without (Ctrl), in either post-fixation (A–C) or live-cell treatment protocol (D–F); staining was performed after CSK pre-extraction and 4% PFA fixation. A and D. Representative field of quantified images (acquired with 60× oil objective and deconvoluted). B and E. Quantification of mean volume (per nucleus; in μm3) of MultiTASQ foci segmented with macro (large foci > 150 voxels; small foci ≤ 150 voxels; 150-voxels volume is determined to decipher nucleoli staining from other foci). Note: Different threshold values were used for segmentation as post-fixation and live-cell images have different intensities. C and F. Quantification of mean number (per nucleus) of MultiTASQ foci segmented with macro and with the same threshold values as for quantification of volume. B, C, E, and F. Mean values (lines and written on top of graph) and error bars (SEM) stand for one experiment with a number of nuclei analyzed n ≥ 144 (each nucleus is represented by a point). Note: We decided to quantify only nuclear staining as cytoplasmic staining was too faint.
These results were interpreted as follows: The post-fixation protocol showed that PDS was found to decrease the volume of nucleolar G4 foci (or large foci, B) without affecting their number (C) and to increase the volume of isolated G4 sites (or small foci, B) concomitantly decreasing their number (C). These mixed results were attributable to a rather elevated background fluorescence (grey dots in B, C), which originates in the widespread accumulation of MultiTASQ and/or of AF-az in fixed and permeabilized cells, and made it complicated to draw reliable conclusions. In contrast, the live-cell treatment protocol provided images in which the background was strongly decreased (E, F), which made the analysis of isolated G4 foci easier. The lack of large foci favors the detection of small foci: here, both the volume (ca. 4-fold) and number (ca. 40-fold) of the small foci increased upon PDS treatment, which is interpreted as a direct visualization of its ability to stabilize G4s and/or promote G4 folding in human cells.
General notes and troubleshooting
General notes
1. Some key features need to be optimized as they could impact TASQ staining:
a. This protocol is optimized for adherent cells; if you are using cells in suspension, technical adjustments must be done [37].
b. Type of cells: some cells are more fragile than others and need optimization for pre-fixation treatments and/or fixation protocols (see Troubleshooting 1 and 2).
2. Fixation
a. Pre-fixation techniques: this technique, as well as fixation techniques, can either increase the quality of visualization or induce artifacts.
• CSK pre-extraction improves staining by removal of soluble proteins [38]; only proteins attached to macro-molecular structures (such as cytoskeleton, chromatin, etc.) are maintained, which decreases the background noise. However, this technique has some limitations (see Troubleshooting 2).
• Nuclease (DNase and/or RNase) supplemented pre-fixation treatment, whenever possible, improves the efficiency of DNA and/or RNA digestion compared to post-fixation treatment.
b. Fixation techniques: a poor fixation can lead to loss of material/signal while an over-fixation can lead to artifacts [39].
• Paraformaldehyde (PFA) is a crosslinking fixative reagent commonly used at 4%; however, nuclear proteins are more efficiently fixed with 2% and a longer fixation time. The formation of intermolecular bridges by PFA allows for the fixation of soluble proteins but can also mask some antigenic sites.
• Methanol is a dehydrating fixative reagent that should be used at low temperature to avoid artifacts due to denaturation and/or precipitation of biomolecules. This technique is not suitable for fixation of soluble or state-modified (such as phosphorylation) targets.
3. Permeabilization techniques: methanol and various detergents (such as Triton X-100 and Tween 20) are used to create different sizes of pores in the plasma membrane, but it can also lead to loss of membrane proteins and organelles targets for live-cell staining experiments.
4. The selection of TASQs and related fluorophores:
a. TASQ staining: versatile “clickable” TASQ can be used as a live-cell G4 probe for the detection of G4s in a cellular context. During live-cell treatment, the concentration of TASQ, duration of treatment, and competition with other G4 ligands (such as PDS) with a better affinity than TASQ (APPKD in the μM range, determined by fluorescence quenching assay) [27,40] may displace TASQs if the order of co-treatment is not properly conducted; it should be optimized to avoid misinterpretations.
b. Using TASQ as a post-fixation probe allows for more intense G4 staining, which is not related to TASQ availability issues but to the fact that post-fixation staining allows for the detection of fixed native and PDS-induced G4s. These differences between post-fixation and live-cell staining could explain the differences between the images seen in Figures 3 and 4. Additionally, a short-time live-cell TASQ incubation can lead to high extracellular background noise, which can be computationally removed after image acquisition.
c. We recommend the use of Alexa-Fluor (AF) fluorescent compounds (for “click” reactions and, if needed, for immunodetection with secondary antibody) as bleaching is reduced with these fluorophores, thus increasing the quality of their detection. However, the use of AF594 is not mandatory and could be adapted, particularly when immunodetection is performed given that the same results were obtained with other AF fluorophores (including AF488 and AF647).
d. Co-immunostaining: if co-immunostaining is required, be sure fluorophore multiplexing is possible and the fixation protocol is compatible with antibody recognition of targeted antigen. Fluorescence overlapping is still possible (resulting in noise); therefore, appropriate controls (i.e., the fluorophore to be clicked without TASQ incubation and the secondary antibody without primary antibody) must be performed to ascertain the specificity of the observed signals.
5. We recommend preparing a mix with an extra volume (typical example of mix: required volume per well × number of well to be treated + 100 μL).
6. We highly recommend preparing fresh dilutions for some compounds [e.g., buffers supplemented with nucleases (if needed), PFA solutions, TASQs in recommended buffers (20 μM), buffers for click chemistry].
7. Agitation during any washing steps is not recommended as it can lead to loss of cells (especially before fixation), and it does not improve signal/noise ratio.
8. We highly recommend following the morphology of cells (Figure 9) after critical steps of pre-extraction, fixation, and permeabilization with a brightfield or phase-contrast microscope. These steps are not sensitive to light exposure and therefore can be done without any impact on TASQ-mediated G4 detection.
a. During fixation, you can check on the morphology of cells after CSK pre-extraction with a brightfield or phase-contrast microscope. It is important to note that this can be done only during fixation to avoid cell detachment with plate movements. Cells look smaller and cell membranes have (almost) disappeared, and only nucleus membranes are visible.
b. If you used only PFA (without pre-extraction), you will be able to see a difference before and after permeabilization on the morphology of fixed cells, particularly on cell membranes.
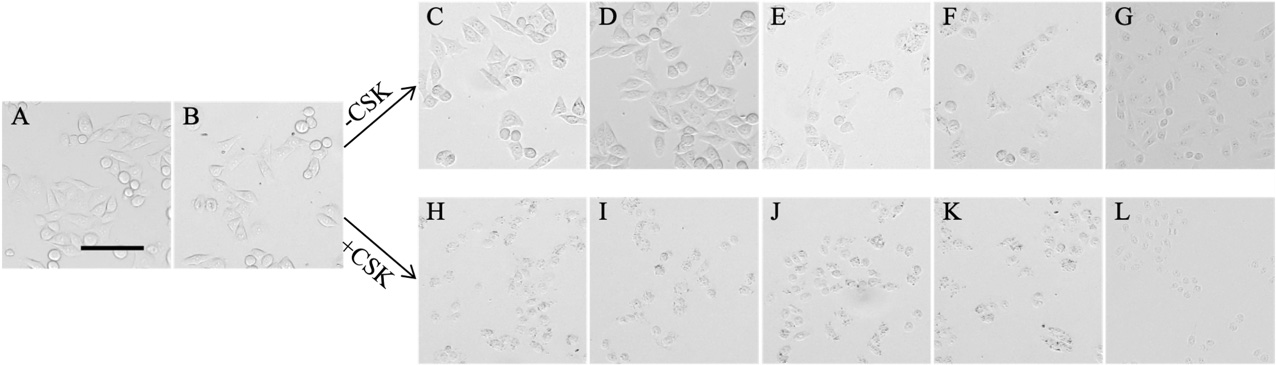
Figure 9. Following morphology (with brightfield microscopy) of HeLa cells before Alexa Fluor staining. A. In DMEM, before the first PBS washing step. B. After the first PBS washing step, before fixation. C–G. Without pre-extraction; H–L. after pre-extraction with CSK buffer. C and H. Two minutes after the beginning of PFA 4% fixation. D and I. After fixation and washing with PBS. E and J. Two minutes after the beginning of permeabilization. F and K. After permeabilization and washing with PBS. G and L. In mounted coverslips. Representative images are one z-stack acquired with a 10× air objective. Scale bar (in black) stands for 100 μm.
Troubleshooting
Problem 1: Low number of cells at the end of treatment (i.e., before pre-extraction or fixation).
Possible cause: Not enough cells seeded.
Solution: Try several dilutions; the number of cells can be based on confluency in a T75 flask, i.e., confluency, number of cells, doubling time, and the surface of seeding can be used to have an idea of the number of cells to be seeded.
For example, if you have 12 × 106 cells with 70% confluency in a T75 flask (surface of flask: 75 cm2), you will have 70% confluency with 300,000 cells per well in a 24-well plate (surface per well: 1.9 cm2). To seed cells 24 h before treatment (with short-time treatment ≤ 4 h) with a doubling time of 16 h and obtain 70% confluency on the day of treatment, you will need: cells per well.
Possible cause: Cells are not adherent to glass coverslips.
Solution: Try to seed cells for a longer time before treatment; we tried for 40 h before treatment with MCF7 (cell type used only in Figure 10) to allow them to recover adhesion and normal phenotype.
Solution: Try with coated coverslips to increase cell adhesion.
Possible cause: Treatment is too cytotoxic and induces cell death and/or limits cellular adhesion.
Solution: Try with a lower dose or duration of treatment to reduce cytotoxicity; if you cannot change these, try with coated coverslips.
Problem 2: Loss of cells after pre-extraction or fixation.
Possible cause: Washing steps before fixation were too harsh.
Solution: Aspirate and dispense washing buffer on the edge of the wells to avoid high flow pressure. As liquid velocity (therefore fluid pressure) is inversely proportional to the diameter, use bigger tips (for instance, to dispense 200 μL, it is better to use a P1000 than a P200) or cut the end of tips.
Solution: Dispensing the washing buffer on the edge of wells also avoids drops falling in the middle of the well, where the most interesting area to look at is likely to be.
Possible cause: Pre-extraction is too harmful for cells.
Solution: As CSK buffer is highly hypotonic and detergent, we highly recommend being accurate with incubation times with this buffer; even 30 s too long on each incubation can be detrimental.
Solution: If there is still a loss of cells during this step, then the incubation time and the number of incubations with CSK buffer can be decreased to avoid cells’ detachment.
Solution: The percentage of Triton X-100 must be optimized depending on the cell line: a reduction of up to 0.3% of Triton X-100 does not affect the quality of the pre-extraction (observed with MCF7 and MIA PaCa-2 cell lines, data not shown).
Solution: If all these solutions do not work, it might happen that cells need more time to recover an unstressed state and normal phenotype; try to seed cells for a longer time before treatment.
Note: Seeding more cells is not a good solution as entire patches of cells can be detached if adhesion between cells is stronger than the adhesion of cells to the glass coverslip.
Possible cause: Methanol fixation has decreased the number of cells.
Solution: Methanol has to be cold: keep it at -20 °C. If methanol is the only fixative technique used, you can place the plate at -20 °C during fixation (which is not compatible with PFA fixation).
Solution: Shortened time of fixation with methanol.
Problem 3: DAPI staining is blurry, or nuclei are overlapping
Possible cause: Too many cells seeded (confluency on microscope field ≥ 80 %).
Solution: Decrease the number of cells.
Possible cause: Several layers of cells or aggregates of cells (see Figure 10).
Solution: Before seeding, use trypsin for a longer time (but without any effect on cell viability) and make sure cells are perfectly resuspended. If not, it can be seen during counting.
Solution: For seeding, prepare an intermediate dilution to allow the dislocation of cell aggregates.
Solution: Vortex solution containing cells to be seeded for 5–10 s (if vortex can be used with your cell line; using vortex is compatible with HeLa cells) and directly seed cells.
Solution: Be gentle with the homogenization of cells in your plate to avoid having all cells localized at one edge of the well.
Possible cause: Cells above coverslips (trapped between the coverslip and plastic plate during incubation at 37 °C and fixed on coverslip).
Possible cause: Condensation when returning to room temperature after storage at 4 °C.
Solution: Gently wipe the top of coverslips with Kimwipes without disturbing the sealing with nail polish (once mounted and sealed on microscope glass slide).
Problem 4: Signal/noise ratio enhancement
Possible cause: Nonspecific localization of clickable Alexa Fluor.
Solution: Increase the number of washing steps and/or wash with a more stringent buffer (increasing detergent percentage).
Solution: Decrease the concentration of Alexa Fluor used for click reaction.
Solution: Change the blocking buffer (see Figure 10).
Possible cause: TASQ staining has faded from one experiment to another (from reproducible experiments or from post-fixation to live cell experiments)
Solution: Prepare a new 2 mM dilution of TASQ from the stock solution of TASQ (10 mM) to ensure TASQ integrity.
Solution: For live staining, the time of TASQ incubation can be increased in order to maximize the entry of compounds.
Note: We highly recommend setting all technical considerations on post-fixation experiments as staining is easier to observe in this condition.
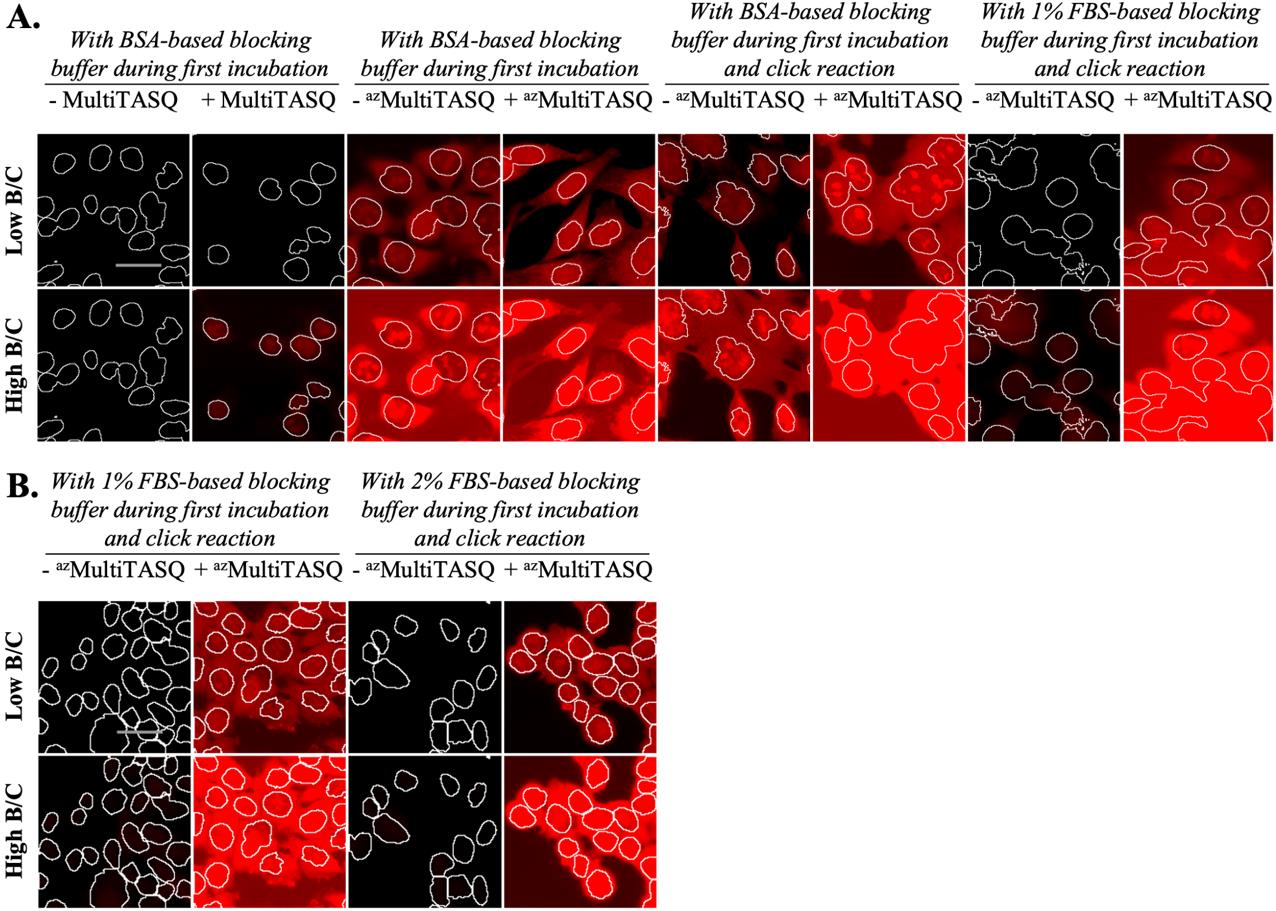
Figure 10. Optimization of background noise induced by the use of DIBO-AF594 for azMultiTASQ staining in post-fixation. Staining with Alexa Fluor 594 (in red) was performed in MCF7 cells fixed with PFA 4%. Representative raw images were acquired with a 20× objective with the same acquisition parameters for all conditions (independently in A and B, from two independent experiments). The same brightness and contrast (B/C) settings (either low or high B/C) were applied for all conditions. White lines outline nuclei, and scale bar (in light grey) stands for 20 μm. A. Comparison of click reaction in order to decrease nonspecific cellular AF594 staining: with AF-az (for MultiTASQ) and with DIBO-AF (for azMultiTASQ) performed in the same conditions (with BSA-based blocking buffer only during first incubation ± TASQs and PBS as click reaction buffer), with DIBO-AF click reaction performed in BSA-based blocking buffer and with DIBO-AF click reaction performed in 1% FBS-based blocking buffer (with 1% FBS-based blocking buffer for first incubation ± TASQs). B. Comparison of click reaction in order to decrease nonspecific extracellular AF594 staining with 1% or 2% FBS-based blocking buffer, consistent with the protocol we recommended.
Acknowledgments
This work was supported by the CNRS and the Agence Nationale de la Recherche (ANR-22-CE44-0039-01, InJUNCTION). The authors are grateful to Francesco Rota Sperti, Sandy Raevens, and Dr. Ibai E. Valverde (ICMUB, Dijon, France) for the preparation of TASQ tools. This protocol was adapted and modified from Rota Sperti et al. [27], DOI: 10.1039/d3cb00009e.
Competing interests
The CNRS has licensed MultiTASQ to Merck KGaA for commercialization.
References
- Varshney, D., Spiegel, J., Zyner, K., Tannahill, D. and Balasubramanian, S. (2020). The regulation and functions of DNA and RNA G-quadruplexes. Nat Rev Mol Cell Biol. 21(8): 459–474.
- Spiegel, J., Adhikari, S. and Balasubramanian, S. (2020). The Structure and Function of DNA G-Quadruplexes. Trends Chem. 2(2): 123–136.
- Lyu, K., Chow, E. C., Mou, X., Chan, T. F. and Kwok, C. K. (2021). RNA G-quadruplexes (rG4s): genomics and biological functions. Nucleic Acids Res. 49(10): 5426–5450.
- Dumas, L., Herviou, P., Dassi, E., Cammas, A. and Millevoi, S. (2021). G-Quadruplexes in RNA Biology: Recent Advances and Future Directions. Trends Biochem Sci. 46(4): 270–283.
- Tassinari, M., Richter, S. N. and Gandellini, P. (2021). Biological relevance and therapeutic potential of G-quadruplex structures in the human noncoding transcriptome. Nucleic Acids Res. 49(7): 3617–3633.
- Li, F. and Zhou, J. (2023). G-quadruplexes from non-coding RNAs. J Mol Med. 101(6): 621–635.
- Robinson, J., Raguseo, F., Nuccio, S. P., Liano, D. and Di Antonio, M. (2021). DNA G-quadruplex structures: more than simple roadblocks to transcription? Nucleic Acids Res. 49(15): 8419–8431.
- Kharel, P. and Ivanov, P. (2024). RNA G-quadruplexes and stress: emerging mechanisms and functions. Trends Cell Biol. 34(9): 771–784.
- Puig Lombardi, E. and Londoño-Vallejo, A. (2019). A guide to computational methods for G-quadruplex prediction. Nucleic Acids Res. 48(1): 1–15.
- Bedrat, A., Lacroix, L. and Mergny, J. L. (2016). Re-evaluation of G-quadruplex propensity with G4Hunter. Nucleic Acids Res. 44(4): 1746–1759.
- Vannutelli, A., Belhamiti, S., Garant, J. M., Ouangraoua, A. and Perreault, J. P. (2020). Where are G-quadruplexes located in the human transcriptome? NAR Genomics Bioinf. 2(2): e1093/nargab/lqaa035.
- Chambers, V. S., Marsico, G., Boutell, J. M., Di Antonio, M., Smith, G. P. and Balasubramanian, S. (2015). High-throughput sequencing of DNA G-quadruplex structures in the human genome. Nat Biotechnol. 33(8): 877–881.
- Feng, Y., He, Z., Luo, Z., Sperti, F. R., Valverde, I. E., Zhang, W. and Monchaud, D. (2023). Side-by-side comparison of G-quadruplex (G4) capture efficiency of the antibody BG4 versus the small-molecule ligands TASQs. iScience. 26(6): 106846.
- Kwok, C. K., Marsico, G., Sahakyan, A. B., Chambers, V. S. and Balasubramanian, S. (2016). rG4-seq reveals widespread formation of G-quadruplex structures in the human transcriptome. Nat Methods. 13(10): 841–844.
- Hänsel-Hertsch, R., Beraldi, D., Lensing, S. V., Marsico, G., Zyner, K., Parry, A., Di Antonio, M., Pike, J., Kimura, H., Narita, M., et al. (2016). G-quadruplex structures mark human regulatory chromatin. Nat Genet. 48(10): 1267–1272.
- Lyu, J., Shao, R., Kwong Yung, P. Y. and Elsässer, S. J. (2021). Genome-wide mapping of G-quadruplex structures with CUT&Tag. Nucleic Acids Res. 50(3): e13–e13.
- Esnault, C., Magat, T., Zine El Aabidine, A., Garcia-Oliver, E., Cucchiarini, A., Bouchouika, S., Lleres, D., Goerke, L., Luo, Y., Verga, D., et al. (2023). G4access identifies G-quadruplexes and their associations with open chromatin and imprinting control regions. Nat Genet. 55(8): 1359–1369.
- Yang, S. Y., Lejault, P., Chevrier, S., Boidot, R., Robertson, A. G., Wong, J. M. Y. and Monchaud, D. (2018). Transcriptome-wide identification of transient RNA G-quadruplexes in human cells. Nat Commun. 9(1): 4730.
- Galli, S., Flint, G., Růžičková, L. and Di Antonio, M. (2024). Genome-wide mapping of G-quadruplex DNA: a step-by-step guide to select the most effective method. RSC Chem Biol. 5(5): 426–438.
- Monchaud, D. (2023). Template-Assembled Synthetic G-Quartets (TASQs): multiTASQing Molecular Tools for Investigating DNA and RNA G-Quadruplex Biology. Acc Chem Res. 56(3): 350–362.
- Haudecoeur, R., Stefan, L., Denat, F. and Monchaud, D. (2013). A Model of Smart G-Quadruplex Ligand. J Am Chem Soc. 135(2): 550–553.
- Laguerre, A., Stefan, L., Larrouy, M., Genest, D., Novotna, J., Pirrotta, M. and Monchaud, D. (2014). A Twice-As-Smart Synthetic G-Quartet: PyroTASQ Is Both a Smart Quadruplex Ligand and a Smart Fluorescent Probe. J Am Chem Soc. 136(35): 12406–12414.
- Laguerre, A., Hukezalie, K., Winckler, P., Katranji, F., Chanteloup, G., Pirrotta, M., Perrier-Cornet, J. M., Wong, J. M. Y. and Monchaud, D. (2015). Visualization of RNA-Quadruplexes in Live Cells. J Am Chem Soc. 137(26): 8521–8525.
- Renard, I., Grandmougin, M., Roux, A., Yang, S. Y., Lejault, P., Pirrotta, M., Wong, J. M. Y. and Monchaud, D. (2019). Small-molecule affinity capture of DNA/RNA quadruplexes and their identification in vitro and in vivo through the G4RP protocol. Nucleic Acids Res. 47(11): 5502–5510.
- Rota Sperti, F., Charbonnier, T., Lejault, P., Zell, J., Bernhard, C., Valverde, I. E. and Monchaud, D. (2021). Biomimetic, Smart, and Multivalent Ligands for G-Quadruplex Isolation and Bioorthogonal Imaging. ACS Chem Biol. 16(5): 905–914.
- Rota Sperti, F., Dupouy, B., Mitteaux, J., Pipier, A., Pirrotta, M., Chéron, N., Valverde, I. E. and Monchaud, D. (2022). Click-Chemistry-Based Biomimetic Ligands Efficiently Capture G-Quadruplexes In Vitro and Help Localize Them at DNA Damage Sites in Human Cells. JACS Au. 2(7): 1588–1595.
- Rota Sperti, F., Mitteaux, J., Zell, J., Pipier, A., Valverde, I. E. and Monchaud, D. (2023). The multivalent G-quadruplex (G4)-ligands MultiTASQs allow for versatile click chemistry-based investigations. RSC Chem Biol. 4(7): 456–465.
- Ganegamage, S. K. and Heagy, M. D. (2022). Illuminating the G-Quadruplex: A Review on Fluorescent Probes for Detecting Polymorphic G-Quartet DNA Structures. Curr Org Chem. 26(11): 1004–1054.
- Berrones Reyes, J., Kuimova, M. K. and Vilar, R. (2021). Metal complexes as optical probes for DNA sensing and imaging. Curr Opin Chem Biol. 61: 179–190.
- Han, J., Ge, M., Chen, P., Kuang, S. and Nie, Z. (2022). Advances in G‐quadruplexes‐based fluorescent imaging. Biopolymers. 113(12): e23528.
- Cañeque, T., Müller, S. and Rodriguez, R. (2018). Visualizing biologically active small molecules in cells using click chemistry. Nat Rev Chem. 2(9): 202–215.
- Rodriguez, R., Miller, K. M., Forment, J. V., Bradshaw, C. R., Nikan, M., Britton, S., Oelschlaegel, T., Xhemalce, B., Balasubramanian, S., Jackson, S. P., et al. (2012). Small-molecule–induced DNA damage identifies alternative DNA structures in human genes. Nat Chem Biol. 8(3): 301–310.
- Rodriguez, R., Müller, S., Yeoman, J. A., Trentesaux, C., Riou, J. F. and Balasubramanian, S. (2008). A Novel Small Molecule That Alters Shelterin Integrity and Triggers a DNA-Damage Response at Telomeres. J Am Chem Soc. 130(47): 15758–15759.
- Cannell, M. B., McMorland, A. and Soeller, C. (2006). Image Enhancement by Deconvolution. In: Pawley, J. B. (Ed.). Handbook Of Biological Confocal Microscopy. Springer US, 488–500.
- Schneider, C. A., Rasband, W. S. and Eliceiri, K. W. (2012). NIH Image to ImageJ: 25 years of image analysis. Nat Methods. 9(7): 671–675.
- Schindelin, J., Arganda-Carreras, I., Frise, E., Kaynig, V., Longair, M., Pietzsch, T., Preibisch, S., Rueden, C., Saalfeld, S., Schmid, B., et al. (2012). Fiji: an open-source platform for biological-image analysis. Nat Methods. 9(7): 676–682.
- Osei-Amponsa, V., Magidson, V. and Walters, K. J. (2024). Protocol for cytoskeleton staining of the semi-adherent multiple myeloma cell line RPMI 8226 by immunofluorescence. STAR Protoc. 5(2): 103060.
- Britton, S., Coates, J. and Jackson, S. P. (2013). A new method for high-resolution imaging of Ku foci to decipher mechanisms of DNA double-strand break repair. J Cell Biol. 202(3): 579–595.
- Jamur, M. C. and Oliver, C. (2009). Cell Fixatives for Immunostaining. In: Oliver, C. and Jamur, M. C. (Eds.). Immunocytochemical Methods and Protocols. Humana Press, 55–61.
- Le, D. D., Di Antonio, M., Chan, L. K. M. and Balasubramanian, S. (2015). G-quadruplex ligands exhibit differential G-tetrad selectivity. Chem Commun. 51(38): 8048–8050.
Article Information
Publication history
Received: Oct 25, 2024
Accepted: Dec 18, 2024
Available online: Jan 19, 2025
Published: Feb 5, 2025
Copyright
© 2025 The Author(s); This is an open access article under the CC BY-NC license (https://creativecommons.org/licenses/by-nc/4.0/).
How to cite
Pipier, A. and Monchaud, D. (2025). Versatile Click Chemistry-based Approaches to Illuminate DNA and RNA G-Quadruplexes in Human Cells. Bio-protocol 15(3): e5209. DOI: 10.21769/BioProtoc.5209.
Category
Molecular Biology > DNA > DNA labeling
Molecular Biology > RNA > RNA labeling
Cell Biology > Cell imaging > Live-cell imaging
Do you have any questions about this protocol?
Post your question to gather feedback from the community. We will also invite the authors of this article to respond.