- Protocols

- Articles and Issues
- For Authors
- About
- Become a Reviewer

Closed Systems to Study Plant–Filamentous Fungi Associations: Emphasis on Microscopic Analyses
Published: Vol 15, Iss 4, Feb 20, 2025 DOI: 10.21769/BioProtoc.5186 Views: 2912
Reviewed by: Shweta PanchalAnonymous reviewer(s)
Original research article
The authors used this protocol in:

Jun 2019
Advertisement


Protocol Collections
Comprehensive collections of detailed, peer-reviewed protocols focusing on specific topics


Related protocols


Abstract
In nature, filamentous fungi interact with plants. These fungi are characterized by rapid growth in numerous substrates and under minimal nutrient requirements. Investigating the interaction of these fungi with their plant hosts under controlled conditions is of importance for many researchers aiming to proceed with molecular or microscopical investigations of their favorite plant–fungus interaction system. The speed of growth of these fungi complicates transferring plant–fungal interaction systems in laboratory conditions. The issue is more complicated when monoxenic conditions are desired, to ensure that only two members (a fungus and a plant) are present in the system under study. Here, two simple closed systems for investigating plant–filamentous fungi associations under laboratory, monoxenic conditions are described, along with their limitations. The plant and fungal growth conditions, methods for sampling, staining, sectioning, and subsequent microscopical imaging of colonized plant tissues with affordable, common laboratory tools are described.
Key features
• Setting up closed systems for microscopical observations of plant–filamentous fungi (emphasis on model legumes–Fusaria) associations and temporal in vivo observations of the association(s).
• Preparing root samples for microscopical observations: staining, sectioning, and mounting on microscopical slides.
• Using low-cost equipment for performing microscopical observations and imaging.
• Using fluorescence microscopy: provision of common fluorophores to highlight specific plant and fungal tissues, compartments, and structures.
Keywords: Plant–microbe interactionsGraphical overview
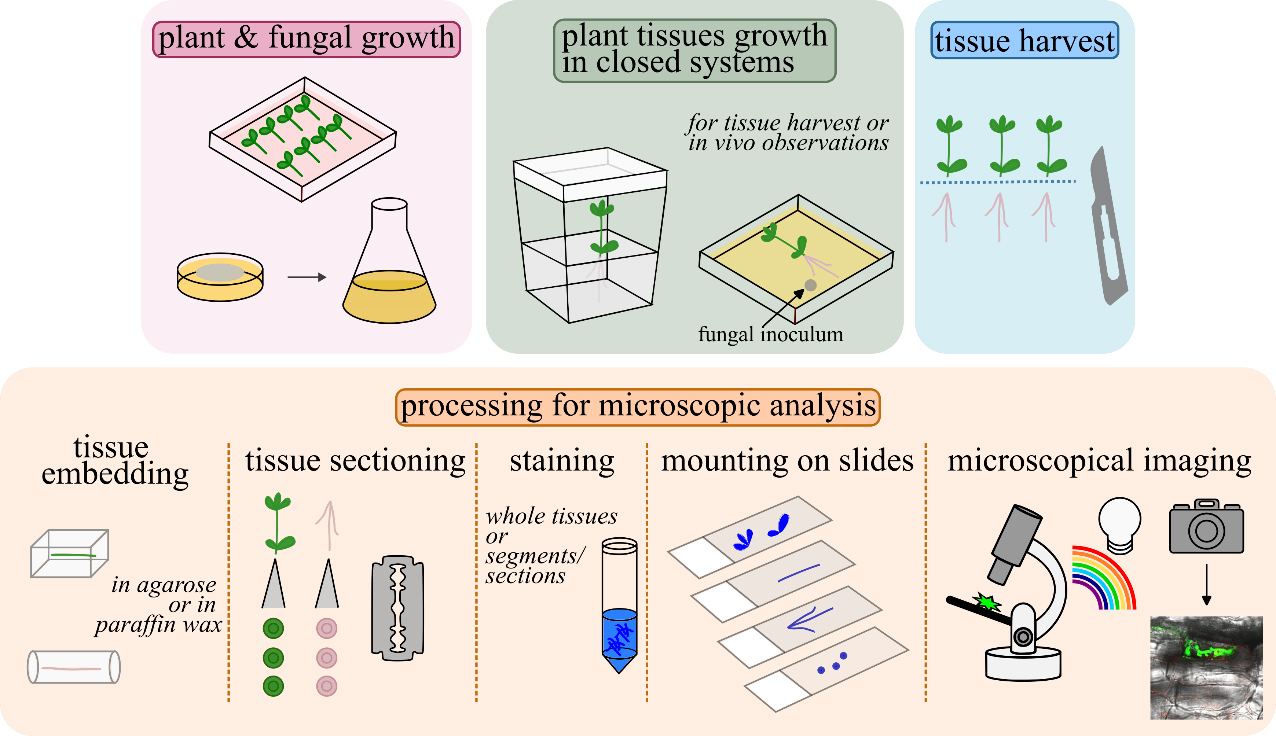
Graphical overview of closed systems used to study plant–filamentous fungi associations and subsequent tissue processing for microscopic analyses. Lotus japonicus seeds are scarified, decontaminated, and germinated in Petri dishes. A Fusarium strain of choice is grown to collect propagules for plant inoculations. L. japonicus plantlets are transplanted in magenta boxes/glass jars or in square Petri dishes and inoculated with the fungus. Square Petri dishes are recommended for in vivo observations. For further tissue(s) processing, root/stem/leaf tissues are collected, embedded in agarose or in paraffin wax, and sectioned by hand, in cases where sectioning is necessary. Either whole root/stem/leaf tissues or tissue sections are stained to highlight inter- and/or intracellular fungal structures. Stained tissues are mounted on slides and observed using a compound microscope. An epifluorescence microscope is used when tissues are stained with fluorescent dyes to highlight specific plant tissues and compartments, fungal cells, and structures. A confocal system is used, if accessible, for sharper images and/or for live cell imaging.
Background
Plant–microbe interactions (PMIs) are of fundamental importance and occur everywhere in nature. Multiple microbial partners interact with root tissues and some of them will simultaneously colonize plant tissues. PMI research greatly benefits from the ability to grow plants in axenic (sterile) conditions [1]. Even in simplified systems, difficulties arise in distinguishing the partner responsible for a given response. Investigating individual, simplified, bipartite associations of the plant with a single microbial partner aids in understanding the reciprocal impact and deciphering specific mechanisms of response. Transferring PMIs in controlled laboratory conditions is of importance, especially when basic biological questions either related to molecular or cellular biology are to be answered. To perform and investigate PMIs under gnotobiotic conditions, model systems are necessary. The construction of model systems where plant roots associate with one or more selected microbial species allows researchers to investigate interactions in simpler systems than those occurring in nature [2].
In monoxenic conditions, for example, a plant species associates with only one microbial partner. Several closed systems have been reported, including agar plates, which have been used extensively in mycorrhizal research [3]. Here, we focus on the interaction of model plants with filamentous fungi. When investigating plant–filamentous fungi associations at the molecular and cellular level, setting up a model, closed system where the interaction will occur is important. The adjustment of several parameters that depend on the organism under investigation and the research questions posed should be considered. In any given model system, further processing of infected plant tissues depends on the research aim. For many studies, determining the degree of root colonization by fungi is necessary, as correlations to benefits for the plants may be inferred, such as promotion of growth and seed yield as well as tolerance against biotic and abiotic stress, or even correlations to loss of benefits, in cases of fungal over-colonization. In this respect, powerful staining techniques are required to visualize and estimate fungal growth within the roots [4].
Sectioning of plant tissues is also considered when a more detailed analysis is required, such as in determining the exact location of fungal cells or the infected plant cells and tissues, as well as revealing alterations on the plant/fungal side. Besides conventional microscopic analysis, the use of fluorescent dyes is also sometimes necessary to highlight specific colorless plant or fungal compartments, tissues, and/or deposition of plant substances, such as lignin and suberin [5–7].
Here, we describe in detail two closed, monoxenic systems of model legume plants with filamentous fungi by taking advantage of the previously described model interaction system of the legume Lotus japonicus with the endophytic, beneficial fungal strain Fusarium solani strain K (FsK) [8–10]. We emphasize the use of affordable tools and materials for performing these experiments. Furthermore, we describe the processing of tissues, including harvest, staining, and sectioning to visualize inter- and intracellular fungal structures to perform basic microscopic analysis. Finally, we present common fluorophores that one may consider if a more detailed microscopic analysis, using fluorescence microscopy, is required.
Materials and reagents
Biological materials
1. L. japonicus seeds (ecotype Gifu)
2. Fusarium strain [such as F. solani strain K (FsK), F. oxysporum forma specialis (f. sp.) medicaginis (Fom), Fusarium oxysporum f. sp. lycopersici (Fol); and Fusarium oxysporum f. sp. radicis-lycopersici (Forl) (see General note 1)]
Reagents
1. Deionized water
2. Sulfuric acid (H2SO4) (Sigma-Aldrich, catalog number: 258105)
3. Potato Dextrose Broth (Condalab, catalog number: 1261)
4. Commercial bleach (non-concentrated, containing ~5% w/v sodium hypochlorite, generic)
5. Murashige and Skoog (MS) medium including vitamins (Duchefa Biochemie, catalog number: M022)
6. Bacteriological Agar (Condalab, catalog number: 1800)
7. Sodium chloride (NaCl) (Sigma-Aldrich, catalog number: S9888)
8. Potassium nitrate (KNO3) (Chem-Lab NV, catalog number: CL00.1164)
9. Calcium nitrate tetrahydrate [Ca(NO3)2·4H2O] (Chem-Lab NV, catalog number: CL00.0340)
10. Potassium dihydrogen phosphate (KH2PO4) (Chem-Lab NV, catalog number: CL00.1146)
11. Magnesium sulfate heptahydrate (MgSO4·7H2O) (Chem-Lab NV, catalog number: CL00.1324)
12. Boric acid (H3BO3) (Chem-Lab NV, catalog number: CL00.0216)
13. Manganese(II) chloride tetrahydrate (MnCl2·4H2O) (Chem-Lab NV, catalog number: CL00.1328)
14. Zinc sulfate heptahydrate (ZnSO4·7H2O) (Chem-Lab NV, catalog number: CL00.2629)
15. Copper sulfate pentahydrate (CuSO4·5H2O) (Chem-Lab NV, catalog number: CL00.1127)
16. Molybdic acid (MoO3·H2O) (Supelco, catalog number: 100400)
17. Potassium chloride (KCl) (Chem-Lab NV, catalog number: CL00.1133)
18. Sodium ferric ethylenediaminetetraacetic acid (NaFeEDTA) (Sigma-Aldrich, catalog number: E6760)
19. Potassium iodide (KI) (Chem-Lab, catalog number: CL00.1134)
20. Sodium molybdate dihydrate (Na2MoO4·2H2O) (Applichem, catalog number: 131701)
21. Glycine (Duchefa Biochemie, catalog number: G0709)
22. Thiamine hydrochloride (Duchefa Biochemie, catalog number: T0614)
23. Pyridoxine Hydrochloride (Duchefa Biochemie, catalog number: P0612)
24. Nicotinic acid (Duchefa Biochemie, catalog number: N0611)
25. Myo inositol (Duchefa Biochemie, catalog number: I0609)
26. Agarose (low melt, Carl Roth, catalog number: 6351)
27. Ethanol (PanReac Applichem, catalog number: 147194)
28. Potassium hydroxide (KOH) (pellets, Chem-Lab, catalog number: CL00.1135)
29. Hydrochloric acid (HCl) (37+% HCl, Chem-Lab, catalog number: CL00.0310)
30. Chlorazol black (CB) (Sigma-Aldrich, catalog number: C1144)
31. Glycerol (PanReac Applichem, catalog number: 131339)
32. Lactic acid (PanReac Applichem, catalog number: 141034)
33. Trypan blue (TB) (Sigma-Aldrich, catalog number: T6146)
34. Black ink (Sheaffer, catalog number: 94231)
35. Acetic acid (BioChemica, catalog number: 131008)
36. Polyvinyl acetate (PVA) (Carl Roth, catalog number: 9154)
37. Liquid nitrogen (to collect tissues for subsequent molecular analysis, e.g., gene expression) (generic)
38. Paraffin wax flakes (generic)
Solutions
1. Potato dextrose broth medium (PDB) (prepared as per purchased product instructions)
2. Commercial bleach (containing ~5% w/v sodium hypochlorite) solution (20% v/v) (see Recipes)
3. Half-strength Murashige and Skoog (MS) medium including vitamins (see Recipes)
4. Isotonic solution (NaCl 0.85% w/v) (see Recipes)
5. Hoagland medium (see Recipes)
6. M medium (see Recipes)
7. Low melting temperature agarose solution (0.4% w/v) (see Recipes)
8. Ethanol solution (70% v/v) (see Recipes)
9. KOH (10% w/v) (see Recipes)
10. HCl (1 N) (see Recipes)
11. CB stain solution (0.05% w/v in water:glycerol:lactic acid 1:1:1) (see Recipes)
12. TB stain solution (0.05% w/v in water:glycerol:lactic acid 1:1:1) (see recipes)
13. Black ink (5% v/v in 5% v/v acetic acid) (see Recipes)
14. Agarose solution (6%–8% w/v) (see Recipes)
15. Polyvinyl-Lacto-Glycerol (PVLG) (see Recipes)
16. Glycerol (50%–90% v/v) (see Recipes)
Recipes
1. Commercial bleach solution (20% v/v)
| Reagent | Final concentration | Quantity or Volume |
| Commercial bleach (containing ~5% w/v sodium hypochlorite) | 20% | 10 mL |
| H2O | n/a | 40 mL |
| Total | n/a | 50 mL |
2. Half-strength MS medium including vitamins [11]
| Reagent | Final concentration | Quantity or Volume |
| MS medium | 0.5× | 2.2 g |
| Agar | 1% | 10 g |
| Total | n/a | 1,000 mL |
Adjust the pH of the medium to 5.5 before sterilization. Sterilize at 121 °C for 15 min.
3. Isotonic solution (NaCl 0.85% w/v)
| Reagent | Final concentration | Quantity or Volume |
| NaCl | 0.85% | 0.85 g |
| Total | n/a | 100 mL |
Sterilize at 121 °C for 15 min.
4. Hoagland medium [12,13]
| Reagent | Final concentration | Quantity or Volume |
| KNO3 | 5 mM | 5 mL of 1 M |
| Ca(NO3)2·4H2O | 5 mM | 5 mL of 1 M |
| KH2PO4 | 1 mM | 1 mL of 1 M |
| MgSO4·7H2O | 2 mM | 2 mL of 1 M |
| FeEDTA | 1–5 mg/L | 1–5 mL of 1,000 mg/L |
| Micronutrient stock solution* | - | 1 mL |
| Total | n/a | 1,000 mL |
*Micronutrient stock solution for Hoagland medium
| Reagent | Final concentration | Quantity or Volume |
| H3BO3 | - | 2.86 g |
| MnCl2·4H2O | - | 1.81 g |
| ZnSO4·7H2O | - | 0.22 g |
| CuSO4·5H2O | - | 0.08 g |
| MoO3·H2O | - | 0.02 g |
| Total | n/a | 1,000 mL |
If necessary, sterilize the medium at 121 °C for 15 min.
5. M medium [14]
| Reagent | Final concentration | Quantity or Volume |
| MgSO4·7H2O | - | 731 mg |
| KNO3 | - | 80 mg |
| KCl | - | 65 mg |
| KH2PO4 | - | 4.8 mg |
| Ca(NO3)2·4H2O | - | 288 mg |
| NaFeEDTA | - | 8 mg |
| KI | - | 0.75 mg |
| MnCl2·4H2O | - | 6 mg |
| ZnSO4·7H2O | - | 2.65 mg |
| H3BO3 | - | 1.5 mg |
| CuSO4·5H2O | - | 0.13 mg |
| Na2MoO4·2H2O | - | 0.0024 mg |
| Glycine | - | 3 mg |
| Thiamine hydrochloride | - | 0.1 mg |
| Pyridoxine Hydrochloride | - | 0.1 mg |
| Nicotinic acid | - | 0.5 mg |
| Myo inositol | - | 50 mg |
| Agar | 0.4%–0.8% | 4–8 g |
| Total | n/a | 1,000 mL |
Adjust the pH of the medium to 5.5 before sterilization. Sterilize at 121 °C for 15 min.
6. Low melting temperature agarose solution (0.4% w/v)
| Reagent | Final concentration | Quantity or Volume |
| Agarose | 0.4% | 0.1 g |
| Total | n/a | 25 mL |
7. Ethanol solution (70% v/v)
| Reagent | Final concentration | Quantity or Volume |
| EtOH | 70% | 70 mL |
| Total | n/a | 100 mL |
8. KOH (10% w/v)
| Reagent | Final concentration | Quantity or Volume |
| KOH | 10% | 10 g |
| Total | n/a | 100 mL |
9. HCl (1 N)
| Reagent | Final concentration | Quantity or Volume |
| HCl (37% w/v, 12.08 N) | 1 N | 8.28 mL |
| Total | n/a | 100 mL |
10. CB stain solution (0.05% w/v in water:glycerol:lactic acid 1:1:1)
| Reagent | Final concentration | Quantity or Volume |
| Chlorazol black | 0.05% | 0.075 g |
| H2O | - | 50 mL |
| Glycerol | - | 50 mL |
| Lactic acid | - | 50 mL |
| Total | n/a | 150 mL |
11. TB stain solution (0.05% w/v in water:glycerol:lactic acid 1:1:1)
| Reagent | Final concentration | Quantity or Volume |
| Trypan blue | 0.05% | 0.075 g |
| H2O | - | 50 mL |
| Glycerol | - | 50 mL |
| Lactic acid | - | 50 mL |
| Total | n/a | 150 mL |
12. Black ink stain solution (5% v/v in 5% v/v acetic acid) [15]
| Reagent | Final concentration | Quantity or Volume |
| Black ink (Sheaffer) | 5% | 5 mL |
| Acetic acid | 5% | 5 mL |
| H2O | - | 90 mL |
| Total | n/a | 100 mL |
13. Agarose solution (6%–8% w/v)
| Reagent | Final concentration | Quantity or Volume |
| Agarose | 6%–8% | 6–8 g |
| Total | n/a | 100 mL |
14. PVLG
| Reagent | Final concentration | Quantity or Volume |
| Water | - | 100 mL |
| Lactic acid | - | 100 mL |
| Glycerol | - | 10 mL |
| PVA | - | 16.6 g |
| Total | n/a | 210 mL |
15. Glycerol (50%–90% v/v)
| Reagent | Final concentration | Quantity or Volume |
| Glycerol | 50%–90% | 15–27 mL |
| Total | n/a | 30 mL |
Laboratory supplies
1. Eppendorf tubes (1.5 and 2.0 mL) (D. Dutscher, catalog numbers: 033511 and 033297)
2. Glass Pasteur pipette(s) (D. Dutscher, catalog number: 251564)
3. Rubber teat (pipetting aid for Pasteur pipettes) (Sigma-Aldrich, catalog number: Z111597)
4. Pipette tips (Kisker, catalog numbers: VL700G and VL004G for 1-200 and 100-1000μl, respectively)
5. Pipette(s) (Gilson, catalog number: F144058M and F144059M for Pipetman P200 and P1000, respectively)
6. Forceps (generic)
7. Petri dishes (94/16 mm, Greiner Bio-One, catalog number: 633181)
8. Square Petri dishes (120/120/17 mm, Greiner Bio-One, catalog number: 688102)
9. Aluminum foil (generic)
10. Scalpel (generic)
11. Parafilm (D. Dutscher, catalog number: 090260)
12. Sterile cheesecloth (generic)
13. Sterile glass funnel (Boro Simax)
14. Sterile Falcon tubes (Sarstedt, catalog number: 62.547.254)
15. Neubauer chamber (hemacytometer) (Marienfeld Superior, catalog number: 0640030)
16. Cover glass for Neubauer chamber (20x26mm, Marienfeld Superior, catalog number: 0350000)
17. Magenta boxes (Phyta Jar, 74 × 71 × 98 mm, HIMEDIA, catalog number: PW1138-50NO), or
18. Glass jars with lid (~370 mL) (generic)
19. Substrate (sand:vermiculite mixture, 2:1) (generic)
20. Injection syringe & needle (generic)
21. Dissecting (inoculation) needle (generic)
22. Gas permeable plastic film (25-μm) (Film 25, Lumox, Sarstedt, catalog number: 94.6077.316)
23. Filter paper (generic)
24. Small plastic zip bags, Falcon tubes, or similar item(s) for tissue storage
25. Small strainer (generic)
26. Razor blades (generic)
27. Plastic Pasteur pipette (with cut end) (Biosigma, catalog number: BSV136)
28. Conical flask or beaker (Boro Simax)
29. Silicone rubber flat embedding mold (Agar Scientific, AGG3530), or
30. Molds made of aluminum foil
31. Microscope slides (Knittel, 76x26mm, catalog number: 303160)
32. Coverslips (Knittel, 24x50mm, catalog number: VD12450Y1A.01)
33. Nut (generic)
34. Bolt (~2 cm in depth) (generic)
35. Fine point forceps, or brush (generic)
36. Gloves (generic)
37. Lab coat (generic)
Equipment
1. Tube vortex mixer (Velp Scientifica)
2. Fume hood (Equip LaboTM Fume Hood)
3. Laminar flow hood (Telstar, Bio II Advance Plus 4)
4. Shaking incubator (Labtech)
5. Autoclave (Raypa, AES-50)
6. Refrigerator (4 °C) (generic)
7. Plant growth chamber (grow tent for indoor cultivation of plants, custom-made)
8. Centrifuge (Hermle)
9. Water bath (JP Selecta)
10. Hot plate stirrer (for agarose melting) (Agimatic-E)
11. Stereoscope (Novex Holland)
12. Oven (JP Selecta)
13. Compound light microscope (Novex Holland)
14. Fluorescence microscope (Olympus BX53 upright microscope)
15. Confocal microscope system (Zeiss LSM800 system)
16. Camera for imaging (Olympus DP74)
Software and datasets
1. Appropriate software for image acquisition (here, the cellSens imaging software was used)
Procedure
A. Seed scarification, decontamination, and germination
1. Scarify and decontaminate L. japonicus seeds: Briefly, chemically scarify L. japonicus seeds with a ~12–20 min sulfuric acid treatment (by shaking the Eppendorf tube containing the seeds and sulfuric acid on a tube vortex mixer), wash thoroughly with deionized water, surface sterilize seeds for 20 min in a 20% v/v NaOCl solution, and wash 6× with sterile deionized water (see General note 2).
2. Keep seeds in water at 4 °C overnight in an Eppendorf tube covered with aluminum foil to promote seed germination. Afterward, place them in Petri dishes containing half-strength (1/2) MS medium [11] and transfer the Petri dishes to a growth chamber with a 16/8 h light/dark photoperiod at 22 °C. In the following experimental procedures, 6–12-days-old L. japonicus plantlets are used.
B. Fungal inoculum preparation
1. Perform routine culture of the selected Fusarium strain by inoculating a fresh potato dextrose agar plate with a small fungal plug from a previous fungal culture on the same medium.
2. Isolate fungal asexual reproductive spores (conidia) as follows. Inoculate a flask containing potato dextrose broth (100 mL) with a fungal plug from the periphery of the fungal colony of the routine culture of step 1. Allow the culture to grow for ~5 days (26–28 °C, 160 rpm). Filter the culture through a sterile cheesecloth (using a sterile glass funnel) to separate the fungal mycelium from fungal conidia. Centrifuge the culture filtrate containing the fungal conidia (4,000× g), remove the supernatant, and resuspend the recovered conidia in a few milliliters of isotonic solution (0.85% w/v NaCl).
3. Dilute the suspension of fungal conidia appropriately and determine conidia concentration by using a Neubauer chamber and a compound light microscope [8] (see General note 3).
Note: For FsK, conidia collected are initially diluted in ~5 mL of isotonic solution, and conidia concentration is determined in this solution using a Neubauer chamber. Conidia are further diluted to a working concentration of 100 conidia per 200 μL of isotonic solution (i.e., 500 conidia/mL).
C. Preparation of the closed system(s) and plant inoculation
C1. Closed systems in magenta boxes
Use magenta boxes or glass jars when a closed system that mimics growth in pots is desired (see Figure 1) (see General notes 4 and 5).
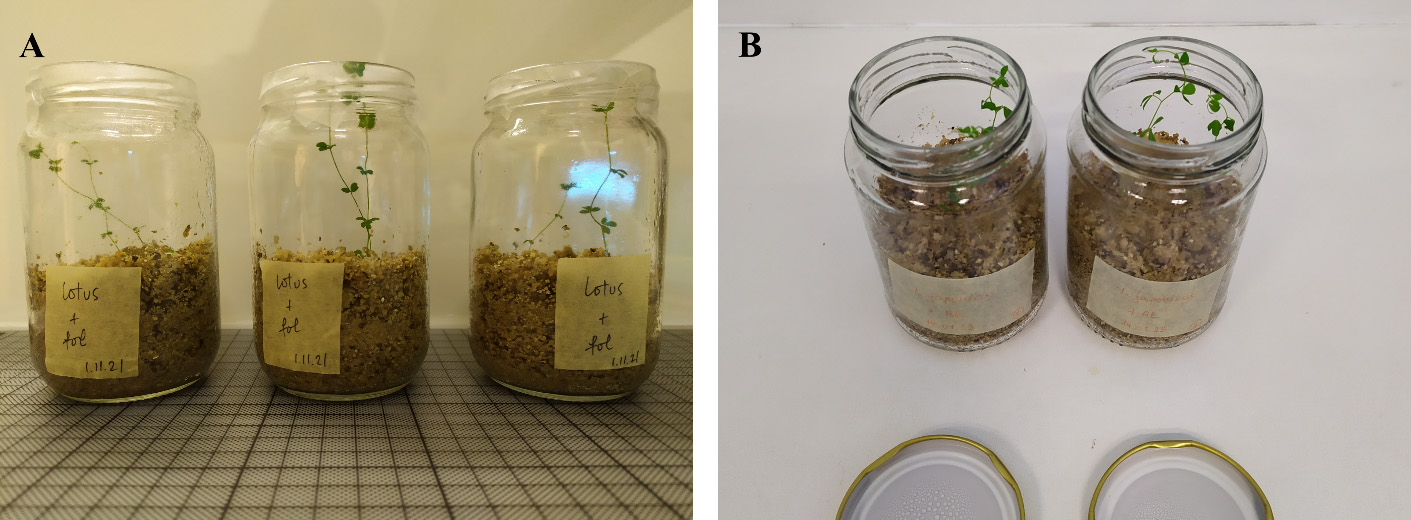
Figure 1. Lotus japonicus plants inoculated with (A) Fusarium oxysporum f. sp. lycopersici (Fol) and (B) F. solani strain K (FsK) and grown in glass jars purchased from glassware stores. In (A), the non-transparent lid of the jar is omitted, and a square piece of Parafilm is used instead to cover the jar mouth, allowing uniform light diffusion toward plants and gas exchange.
1. Place approximately 150–200 mL of substrate (sand/vermiculite mixture, 2:1) in magenta boxes/jars.
2. Autoclave containers filled with the substrate (121 °C for 60 min) prior to use to ensure aseptic conditions.
3. Perform plant transplantation under the laminar flow hood. Use Hoagland nutrient medium [12,13] to irrigate the substrate, prior to plant transplantation, when normal conditions for plant growth are desired. Use ~50 mL of nutrient medium per ~150–200 mL of substrate (see General note 6 and Troubleshooting 1). Transplant ~7–12-days-old L. japonicus plants into magenta boxes by using sterile forceps. Transplant 2–3 healthy plants per magenta box. Consider each magenta box as a biological replicate.
4. Close the containers with their lids and transfer them to the growth chamber until further handling (see General notes 7 and 8).
5. Perform fungal inoculation in the laminar flow hood to avoid contamination. Use fungal conidia as inoculum (as prepared in section B) in this closed system. Fungal conidia are easily quantified with the use of a Neubauer chamber (see General note 9 and Troubleshooting 2).
Note: For plant inoculations, a working concentration of 500 conidia/mL is used. Plants are inoculated by applying directly to the root 200 μL of inoculum (i.e., 100 conidia per root system).
6. Post fungal inoculation, close containers with their lids in the laminar flow hood and return them to the growth chamber until further experimental processing.
C2. Closed system in Petri dishes
Set the interaction system in square Petri dishes (see General note 10 and 11).
1. Perform plant transplantation under the laminar flow hood. Transfer ~7–12-day-old plants in square Petri dishes containing M medium (see General note 12) solidified with 0.4%–0.8% w/v agar under the laminar flow hood. Place Petri dishes containing the plants in the growth chamber at a ~45° angle (see General note 8).
2. Perform fungal inoculation in the laminar flow hood to avoid contamination from other microorganisms. In this closed system, use fungal hyphae from a previous fresh culture of the fungus in a PDA plate to inoculate the plants. Perform inoculations with a small fungal plug from a previous fresh fungal culture or a few fungal hyphae by scraping the surface of a previous fungal culture with a sharp sterile object such as the needle of a syringe. Inoculate at a spot close to the root, e.g., 1 cm underneath or close to the root tip (see Figure 2) (see General note 13).
Note: It is recommended to avoid inoculation with a large number of fungal propagules.
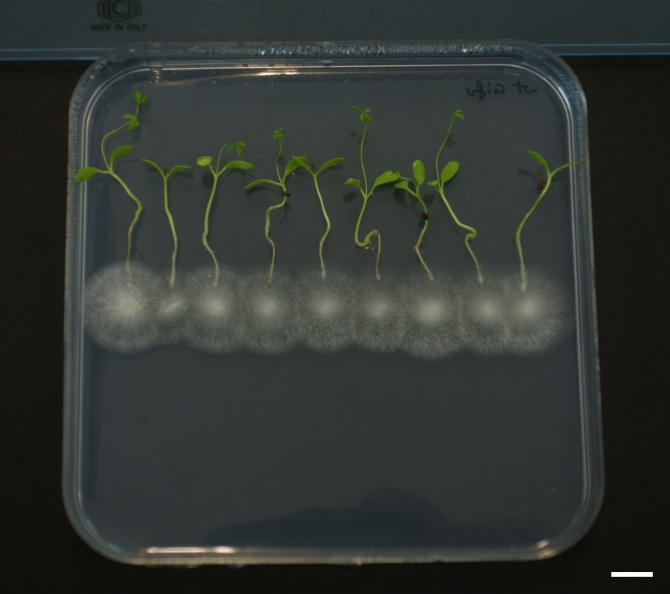
Figure 2. Square Petri dishes containing Lotus japonicus plants inoculated with Fusarium solani strain K (FsK). A few fungal hyphae from a previous routine fungal culture on solid medium was used to inoculate plants underneath the root tip using a sterile needle of a syringe. Scale bar: 1 cm.
3. Post fungal inoculation, close Petri dishes, seal them with Parafilm in the laminar flow hood, and return them to the growth chamber until further experimental processing. Place Petri dishes in a vertical position on the growth chamber shelves for optimal root growth.
C3. Closed system to perform temporal, in vivo observations
This section describes a non-destructive method for microscopical observations of colonized plants, appropriate for in vivo observations and cellular studies of the plant–fungal system using confocal microscopy (see Figure S1).
Set the plant–fungal interaction in square Petri dishes, underneath a thin (25 μm) gas-permeable membrane that allows prolonged microscopical observations (see General note 14). Perform all manipulations for system setup in the laminar flow hood to avoid contamination from other microorganisms.
1. Transfer pre-grown L. japonicus plants (~7–12 days old) to square Petri dishes containing M medium solidified with 0.4% w/v agar.
2. Remove a small portion of the solidified medium close to the root tip with a sterile needle from a syringe. In the space created, place a few hyphae from a previous fresh fungal culture grown on solid medium with a sterile needle from a syringe.
3. Fix the inoculum under 1–3 drops of a 0.4% w/v low melting temperature agarose solution.
Note: Allow the agarose solution to cool down before use.
4. Leave the agarose to solidify to ensure fixation of the inoculum (see Troubleshooting 3).
5. Pipette sterile water (~1 mL) around the roots and carefully cover the roots and the fungus with the gas-permeable plastic film, avoiding the entrapment of air bubbles underneath the film.
6. Seal Petri dishes with parafilm and wrap their lower part in aluminum foil to protect root tissues from light.
7. Place Petri dishes at a ~45° angle in a growth chamber (16/8 h light/dark photoperiod, 22 °C) until further handling.
8. Perform in vivo, temporal, and prolonged observations of the plant–fungal interaction directly on the Petri dish, using an upright (fluorescence) microscope by simply removing the Petri dish lid. No coverslip is needed for imaging. Tissues are directly observed underneath the gas-permeable plastic film [10,16] (see General notes 15 and 16).
D. Sampling plant tissues
1. Collect tissues for further processing, e.g., for staining and microscopical analysis. Collect plants at ~20 days post inoculation (dpi) to test for intraradical fungal colonization by different Fusaria strains. Explant plants and wash root tissues with water to remove substrate particles.
2. Stain tissues right after harvest or store them temporarily (at 4 °C, in water) for up to 2–3 days until staining or store them in ethanol solution for long-term storage (see General notes 17 and 18).
E. Staining of whole root/stem/leaf tissues to highlight fungal structures and mounting on microscope slides
This section describes how to examine Fusarium fungal colonization in L. japonicus root/stem/leaves. For this purpose, a similar staining protocol as that used for staining arbuscular mycorrhizal (AM) fungi colonized roots is described [17,18].
1. Prepare the stain by mixing the appropriate quantity of TB or CB with water, glycerol, and lactic acid (1:1:1 by volume).
Caution: Wear protective gloves/protective clothing/personal protective equipment during all steps of handling the above-mentioned dyes. Ensure adequate ventilation and avoid dust formation.
2. Clear tissues (i.e., remove cytoplasmic contents from roots) at the beginning of the staining process: cut roots into 1–5 cm segments and clear them with 10% w/v KOH for 10–30 min at 95 °C in a water bath (see General note 19).
3. Rinse roots 4× with deionized water, acidify roots with 1 N HCl for 20 min at RT, and subsequently stain the root segments either with 0.05% w/v TB or 0.05% w/v CB for 3–4 min at 95 °C and for extra ~20 min at RT (see General notes 20 and 21).
4. Wash tissues 4–5× with deionized water and place them at 4 °C in water overnight to remove excess dye.
5. Place tissues/tissue segments on a microscope slide using fine forceps, making sure that tissue segments do not overlap. Add a drop (or the necessary amount) of Polyvinyl-Lacto-Glycerol (PVLG) or glycerol (50% v/v) right before the left edge of the specimen. Place the left edge of the coverslip over the left edge of the sample and carefully lower the coverslip, covering the whole sample and avoiding air bubbles.
6. Observe prepared slides immediately or, preferably, place PVLG-mounted slides in an oven at 40 °C for 24–36 h or at 60 °C overnight to harden sufficiently and create a permanently mounted specimen [19,20] prior to microscopical observations (see Figure 3) (see General notes 22 and 23).

Figure 3. Lotus japonicus roots inoculated with different Fusaria strains and stained using three different stains: trypan blue (TB), chlorazol black (CB), and ink. The staining process for each stain is described in section E. (A–C) L. japonicus roots colonized by Fusarium solani strain K (FsK) at 27 dpi and stained with TB. The yellow triangles indicate FsK structures interacting with root hair or root epidermal cells. (D–F) L. japonicus roots colonized by Fusarium oxysporum f. sp. radicis-lycopersici (Forl) at 23 dpi and stained with CB. The yellow triangles indicate Forl spore-like structures on root epidermal cells. (G–I) L. japonicus roots colonized by Fusarium oxysporum f. sp. lycopersici (Fol) (G–H) or Forl (I) at 27 dpi and stained using the ink and vinegar method. The yellow triangles indicate (G) Fol propagules-like structures in a root hair cell, (H) Fol structures and propagules in a root cell, and (I) Forl hyphae on the epidermis of L. japonicus roots. Scale bars: 25 μm.
F. Embedding in agarose and sectioning
Prepare root and/or stem sections (transverse or longitudinal) to investigate the exact microbial location and progression within plant tissues and the changes occurring in either partner. Fungal location within delicate leaf tissues can be observed on intact tissues.
Prepare sections for microscopic analysis using a free-hand method. Pre-treat tissues for free-hand sectioning: soft and delicate tissues are easily destroyed if not embedded on a medium that acts as a scaffold, thus providing mechanical support and allowing maintenance of tissues/structures integrity. Such media can be agarose or paraffin (see General note 24).
This section describes how to perform sections by embedding tissues in agarose and performing sections by hand (see General note 25) (see Figure S2).
1. Prepare a 6%–8% w/v agarose solution. Melt the agarose solution and place it in a hot water bath until use.
2. Use commercial silicone rubber flat embedding molds (see General note 26). Segment roots/stems and place them in the mold cavities (one segment per cavity) with forceps.
Note: Align roots/stems in the center of each cavity (parallel to the length of the cavity), because after pouring the agarose, it is difficult to make further adjustments.
3. Allow the agarose solution to cool down near the point of solidification prior to embedding. Cover tissues with agarose by using a plastic Pasteur pipette cut at its end to ensure a larger opening, since the solution is viscous.
Note: Pay attention not to introduce air bubbles while pouring the agarose into the cavities containing the roots. Allow the agarose to solidify at room temperature.
4. After the agarose has solidified, remove agarose blocks from cavities and start sectioning the blocks containing the tissue segments using a sharp razor blade (see General notes 27 and 28).
5. Maintain sections until immediate use in deionized water (e.g., in a small Petri dish or on a microscope slide in 1–2 drops of water).
6. Place (stained) sections (see General notes 29 and 30) on a microscope slide with a drop of water or glycerol (50%–90% v/v) (see General note 31) and cover with a cover slip for observations under the microscope.
G. Embedding in paraffin wax and sectioning
This section describes how to perform sections by embedding tissues in paraffin wax and performing sections using a hand microtome (see General notes 32–34) (see Figure S3). To build a hand microtome, use a bolt and nut (~2 cm in depth).
1. Cut root/stem tissues in segments (making sure segments are a bit longer than the length of the nut) and maintain them in water until use.
2. Screw the bolt in the nut just for a few turns so that a space with closed bottom (a well) is created inside the nut.
3. Place some flakes of paraffin wax in 2 mL Eppendorf tubes and place tubes in a water bath at ~55 °C to melt the paraffin wax (see General note 35) (see Figure S3).
4. Position the hand microtome vertically (with the head of the bolt on the bottom) at a straight surface close to the water bath. Place a segment of root/stem tissue inside the nut and keep it with forceps (or with the aid of the forefinger) at its center and parallel to the longitudinal axis of the nut.
5. Quickly drop the melted wax inside the hand microtome. If necessary, place more melted wax to completely cover the well inside the nut. Allow the paraffin wax to harden at room temperature.
Note: Perform this step fast because melted wax hardens quickly at room temperature.
6. After the wax is solidified, use a sharp razor blade to remove and throw the excess wax from the upper top of the hand microtome (see Figure S3).
7. Turn the bolt slightly clockwise (less than a quarter of a full turn) to expose a small portion of the wax cylinder containing the root at its center. Perform a quick and precise section with a sharp razor blade by holding the blade perpendicularly to the wax cylinder containing the tissue (see Troubleshooting 4).
Note: Consider that the smaller the turn of the bolt, the thinner the section of the tissue. Perform a second section by slightly turning the bolt clockwise once again and so on.
8. Add 1–2 drops of water in a microscope slide and collect sections directly on the slide using fine point forceps or a pre-wet brush.
9. If necessary, remove the excess wax to expose the tissue section. This can be done with the aid of a dissecting (inoculation) needle under the stereoscope, as sections (especially root sections) are rather small and cannot be easily handled with the naked eye.
10. Stain tissues after embedding in paraffin and sectioning (see General note 30).
11. Place stained sections on a microscope slide with a drop of water or glycerol (50%–90% v/v) (see General note 31), and cover with a cover slip for observations under the microscope.
H. Microscopy
1. Observe prepared specimens under a compound light microscope and proceed with imaging using a microscope-mounted camera and the appropriate computer software for image acquisition (see Figure 3).
2. Use an epifluorescence microscope when fluorescent dyes are used to highlight specific plant tissues and compartments, fungal cells, and structures.
3. If accessible, use a confocal microscope to reject out-of-focus light from the image, for sharper images of cells and cellular structures without background fluorescence (see Figure 4) and for in vivo cellular studies.
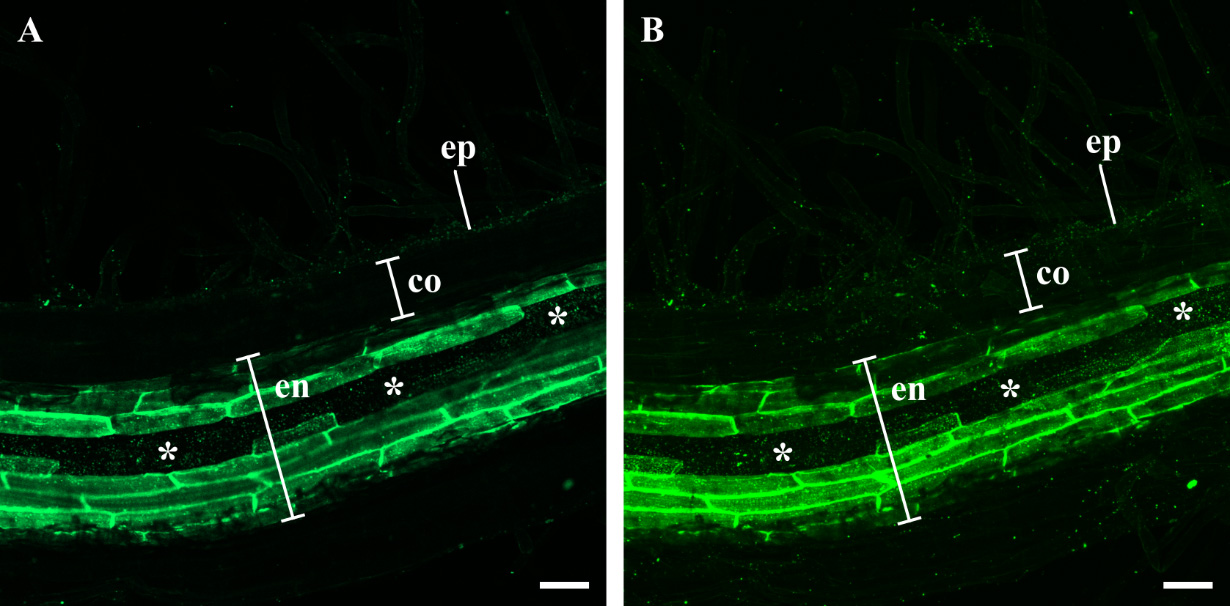
Figure 4. Staining of endodermal suberization in Lotus japonicus root tissues inoculated with a Fusarium strain using the suberin-specific Fluorol Yellow (FY) stain. (A) FY-stained L. japonicus whole mount roots inoculated with the green fluorescent protein (GFP)-transformed isolate of Fusarium solani strain K (strain F9a) [10]. A single optical section is shown. (B) Maximum intensity z-axis projection of serial optical sections of the same root tissues shown in (A). L. japonicus plants (6 days old) were inoculated with F9a strain. Root tissues were harvested at 6 days post fungal inoculation and stained with FY using a lactic acid–based protocol, as described in Barberon et al. [21] and Shukla et al. [22]. Optical sections were collected using a Zeiss LSM800 system. Root tissues were imaged using the Ar laser band at 488 nm and a 500–550 nm emission window for FY fluorescence. Ep: epidermis; co: parenchymatic cortex; en: endodermis; white asterisks: passage cells. Scale bars: 50 μm.
I. Preparation of samples for fluorescence microscopy
Most cellular components are colorless; most molecules making up the cell do not absorb any specific wavelength of light, and therefore cannot be distinguished under the compound light microscope. A fluorescence microscope is an optical microscope that takes advantage of the physical properties of fluorophores (or fluorochromes): molecules that absorb light energy at a specific wavelength and re-emit it at higher wavelengths. This property of these molecules is called fluorescence, which can be visualized, recorded, and analyzed. Because the excitation and emission wavelengths differ, the absorbed and emitted by the fluorophore light are detectable in different areas (and therefore colors) of the spectrum and can thus be distinguished.
In a fluorescence microscope, the specimen is illuminated with a specific wavelength of light; the fluorophores within the specimen absorb the light and emit it at a longer wavelength, which typically falls within the visible or near-visible range of the spectrum. Specific filters separate the excitation light (high energy light) from the emission light (lower energy light) which is seen by the eye or captured by the detector. The detected fluorescence enables researchers to obtain spatial and functional information on cells/cellular components that have been stained/tagged with the fluorophore(s), among non-fluorescing material [23]. Some common types of fluorophores are:
• Many autofluorescent compounds, naturally occurring in plants, especially plant cell wall substances (examples of autofluorescent compounds in plants are phenols, lignin, suberin, etc.).
• Synthetic organic dyes (such as fluorescein)
• Biological fluorophores [fluorescent proteins such as green fluorescent protein (GFP)]
• Fluorescent dyes conjugated to target molecules (such as antibodies, proteins, peptides, etc.), which are used to label specific cellular components/compartments
• Quantum dots (nanocrystals that when excited, emit fluorescence at a wavelength based on the size of the particle) [23–25]
In this respect, in case experimental aims require the use of fluorophores to highlight specific plant tissues and compartments, fungal cells, and structures, a fluorescence microscope should be used (see Figure 4 and Troubleshooting 5).
In Table 1, a brief summary of common fluorophores used in the literature is presented, which may be used to highlight specific plant tissues and compartments, fungal cells, and structures.
Table 1. Commonly used fluorophores list. Brief summary of fluorophores commonly used in plant–microbe interactions (PMIs) to stain plant and fungal cells, compartments, and structures. *Solution preparations are indicatively given using information from only some of the citations corresponding to each fluorophore presented (**, the article from which information is drawn).
| Fluorophore | Use | Solution preparation* | Reference(s) |
|---|---|---|---|
| Acid fuchsin | To stain fungal structures of Serendipita indica (Piriformospora indica) in barley roots. To stain fungal structures of S. indica (P. indica) in Arabidopsis thaliana roots. | 0.01% w/v in lactic acid | [4] [26] ** [27] ** |
| Wheat germ agglutinin (WGA)-Alexa Fluor 488 conjugate | To stain chitin in the infection structures of Magnaporthe oryzae on rice leaf sheaths. To stain fungal chitin and visualize S. indica (P. indica) structures in colonized barley roots. | 10 μg/mL in 1× PBS (pH 7.4) containing 0.1% Triton X-100 | [27] [28] ** [29] |
| Calcofluor white | To visualize septa of S. indica (P. indica); specific dye for β-glucans and chitin. In plants, it is able to bind cellulose in cell walls. It exhibits selective binding to the cell walls of plants and fungi. | 1.5 μg/mL | [30] ** [31] |
| Propidium iodide | It outlines cells in living plant tissue. Used to assess root cell viability. It stains the nuclei of non-viable cells lacking intact plasma membrane (it penetrates the plasma membrane of non-intact plant cells, where it binds to DNA). Used as a counterstain. | 10 μg/mL in water | [10] [28] [32] ** |
| SYTOX green, orange, and blue | To assess plant cell viability in living plant tissues. The dyes are selective for non-viable cells. | 250 nM in water | [32] ** |
| SynaptoRed C2 (FM4-64) | Endocytosis marker. Membrane stain commonly used for dissecting vesicles trafficking in living plant cells. To assess putative plant-derived membrane invagination events upon fungal accommodation. Living cells internalize the dye into endomembrane structures. | 3 μM in water | [10] ** [16] [29] ** |
| Fluorol Yellow 088 | To stain suberin lamellae in plant root tissue. To quantify suberized exodermal cells in cross sections. | 0.01% w/v in lactic acid for sections; 0.05% w/v in methanol for whole roots | [33] [34] [35] ** |
| Auramine O | To stain suberin. | 0.5% w/v | [7] ** |
| Berberine hemisulfate | To stain Casparian bands. | 0.1% w/v in lactic acid | [36] [33] ** |
| Nile red | To stain suberin lamellae. | 0.01% w/v in lactic acid (85%) saturated with chloral hydrate | [37] ** |
| Basic fuchsin | To stain lignin. | 0.2% w/v | [7] ** |
| Safranin O | Used as counterstain to color lignified cell walls in botanical samples. To stain lignified tissues such as the xylem. To quantify lignin content. | 0.2% w/v in 50% ethanol | [33] [38] [39] ** |
| Acriflavine | To stain lignin. Stains lignified cell walls green and unlignified cell walls red. | 0.01% w/v aqueous solution | [40] ** |
Validation of protocol
This protocol or parts of it has been used and validated in the following research article(s):
• Skiada et al. [10] Colonization of legumes by an endophytic Fusarium solani strain FsK reveals common features to symbionts or pathogens. Fungal Genetics and Biology 127: 60–74. (Figure 2, Figure 3, Figure 4, Supplementary Figure 3).
• Parts of the protocol have also been validated within the frames of the present manuscript. (Figures 1, 2, 3, 4, Supplementary Figures 1, 2, and 3).
General notes and troubleshooting
General notes
1. Alternatively, the plant material of choice may be used for examination (preferably a small-sized plant with a short life cycle). A filamentous fungus of choice may also be used as the microbial partner.
2. The duration of sulfuric acid treatment depends on seed age. Freshly harvested seeds require less scarification time.
3. In case a different fungal strain is used, modify accordingly the routine fungal culture and inoculum preparation.
4. In case magenta boxes are not an option, you may use common glass jars. These are relatively inexpensive and can be easily purchased in glassware stores.
5. Glass jars with a capacity of ~370 mL are a suitable choice for small plants such as L. japonicus. Keep plants in such containers for approximately one month. Afterward, stems reach the lid and space limitations occur.
6. Alternatively, M medium [14] or a nutrient medium of choice can be used.
7. In the case of jars, the lid may be loosely closed and further sealed with Parafilm to allow for gas exchange. If the light that reaches the plants is not sufficient due to the non-transparent lid, the lid may be omitted, and a square Parafilm piece may instead be used as cover (see Figure 1).
8. It is recommended to allow transplanted plants to rest for 2–3 days prior to fungal inoculation.
9. You may also use other types of inoculum such as fresh mycelium.
10. Chose Petri dishes as your closed system when, for example, you want (1) to examine the early stages of the plant–fungal interaction, (2) to visually record the exact time point of the interaction, (3) to visually inspect root system changes in relation to fungal inoculation, and/or (4) to perform in vivo microscopical observations in relation to time.
11. A drawback of the closed system in Petri dishes is that it does not allow prolonged maintenance of the plant–filamentous fungus interaction due to space limitations and overgrowth of the fungus to the detriment of the plant partner.
12. Alternatively, instead of M medium, a medium of choice may be used.
13. Inoculations with fungal propagules may be performed close to the plant at a spot of choice.
14. This system has been developed by Chabaud et al. [41] as a targeted arbuscular mycorrhizal (AM) fungi inoculation technique and has been adapted for confocal microscopy by Genre et al. [16]. It has been further modified by Skiada et al. [10] to meet the requirements of a targeted inoculation technique for plant–filamentous fungi interactions for temporal confocal microscopy observations.
15. A confocal microscope should be used for sharper images of cells and cellular structures.
16. Staining plant tissues for fluorescence microscopy may be performed directly on the Petri dish where the bipartite interaction is taking place. Excess stain is removed; no washing with water is performed afterward.
17. If you wish to stain tissues for microscopical imaging at a later time point due to time limitations, preserve tissues in 70% v/v ethanol solution, e.g., in labeled Falcon tubes at 4 °C. Rehydration of tissues is recommended prior to staining. Rehydrate tissues by simply immersing them in descending ethanol series for a few minutes and then in deionized water for a few extra minutes.
18. Tissues may be collected at the time point of choice, e.g., to test for intraradical fungal progression or for gene expression analyses. Tissues may also be collected and flash-frozen in liquid nitrogen for subsequent molecular analyses (e.g., for total RNA isolation and gene expression analysis). For such a type of analysis, store tissues at -80 °C until further processing.
19. Clearing time clearly depends on the tissue processed. Attention should be paid to leaf tissues, as these are delicate and can be easily destroyed in hot KOH. For L. japonicus root tissues, ~10 min in KOH at 95 °C is enough to clear tissues. Stem tissues require a longer clearing step; change KOH solution 2–3 times during this step.
20. Both TB and CB give good results in terms of intraradical staining of fungal cells. Chlamydospore-like structures of Fusarium, as described in Skiada et al. [10], are adequately stained. The ink and vinegar method as described in Vierheilig et al. [42] and Kosuta et al. [15] can also be used to stain Fusarium hyphae and structures in their interaction with L. japonicus root tissues. Spore-like structures of Fusaria are adequately highlighted with TB or CB. The thin Fusarium hyphae are better highlighted with the ink and vinegar method and are adequately observed under higher magnification (see Figure 3).
21. Santana et al. [43] proposed alternative, low-cost, and safer dyes as staining agents for the observation of AM fungi in root tissues. They proposed the use of organic food dyes, namely blue and red food coloring (5% v/v in commercial vinegar). Blue food dye gave better contrast between plant and fungal tissues and acted similarly in terms of color intensity and contrast to TB. Though these dyes work well with AM fungi, their efficacy for filamentous fungi staining is not investigated herein.
22. If time is limited, specimens may be observed immediately after preparation. It is recommended though to place PVLG-mounted specimens in an oven to harden completely before microscopical observations. This not only removes air bubbles from the specimen but also prevents residues from the mounting medium on microscope lenses.
23. PVLG mounting medium creates a permanent specimen, whereas glycerol mounting medium creates a semi-permanent specimen. A coverslip sealant is recommended to preserve slides over extended periods [44].
24. Free-hand sections, if prepared carefully, can be adequate not only for routine microscopical examination but also for microscopical imaging. It is advised to mount tissues before hand-sectioning in embedding media such as agarose and paraffin wax. Agarose is among the most common laboratory reagents, and paraffin wax can easily be purchased from local craft stores (e.g., in the form of flakes).
25. The process of embedding tissues in agarose and sectioning them is also described in Zelko et al. [36].
26. Small molds can also be created using aluminum foil as a cheap alternative to commercial flat embedding molds. Commercial flat embedding molds have the advantage of containing numbered cavities that are imprinted on agarose post-solidification.
27. If time is limited and sectioning of agarose blocks containing tissue segments is not feasible within the same day, blocks can be kept at 4 °C, in water, for a few days.
28. More sophisticated and expensive equipment such as a vibratome may be used to section agarose-embedded plant tissues, which allows for thinner and better-quality sections.
29. Tissues can be stained for fungal detection post embedding and sectioning since clearing and staining of root tissues result in fragile roots, which may collapse with further processing.
30. Tissues can be stained to label specific root elements such as the xylem, Casparian bands, etc., in case a more detailed analysis of the topology of fungal cells is required (see section I).
31. Adding more water to the glycerol solution mounting medium lowers the refractive index. In that way, you can adjust the refractive index of the mounting medium [44].
32. The method presented in Section G is commonly described in botany laboratory textbooks. A description of the procedure may also be found at:
https://gtac.edu.au/wp-content/uploads/2016/01/StainPlantStem_Sections_LabPreparation.pdf
33. This method is easier to use for L. japonicus stem sections, as root tissues are rather thin, though with proper and repeated practice, sections of root sections can also be achieved.
34. All materials for this technique can be purchased in local stores. Nuts and bolts can be purchased in local tool stores whereas paraffin wax can be purchased in local craft stores.
35. The melting temperature of paraffin wax is 54 °C, or it depends on the purchased product.
Troubleshooting
Problem 1: Increased humidity within the closed system used to grow the plant(s) and the fungal partner.
Possible cause: The substrate may be oversaturated if excess medium is added to the substrate. This will increase the humidity within the closed system, and plants will show overwatering signs.
Solution: We have observed that ~50 mL of volume of nutrient medium per 150–200 mL of volume of substrate ensures good humidity conditions within the closed system. Attention should be given to the nutrient(s) concentration and to the duration of plant growth within the closed system. The above depend on contextually experimental conditions and research questions.
Problem 2: Filamentous fungi used for plant inoculation may overgrow in closed systems (such as magenta boxes), and artificial adverse effects may be observed in plant(s).
Possible cause: Filamentous fungi tend to grow easily and fast in various substrates.
Solution: Avoiding inoculation with a high concentration of fungal propagules is recommended. For Fusarium, we propose inoculation with ~100 conidia per individual plant (per root system).
Problem 3: Fungal propagules dispersal may occur underneath the membrane, and the targeted inoculation is not ensured.
Possible cause: The water added underneath the membrane may entrain fungal propagules far from the inoculation point.
Solution: Avoiding inoculation with filamentous fungi by simply placing the inoculum in the vicinity of roots is recommended. Securing the inoculum with agarose prevents fungal propagules’ dispersal on the medium.
Problem 4: The first few sections performed with the hand microtome may not be of use.
Possible cause: The irregular wax shape and the position of the plant tissue at the edge of the bolt may contribute to a non-intact sectioning.
Solution: The following sections should be of use. The number of performed sections depends on the tissue length used and the “step size” of the turn of the bolt. The integrity of the sections is observed under the compound light microscope.
Problem 5: Some plant tissues may have strong background fluorescence, leading to difficulties during fluorescence imaging.
Possible cause: This may be attributed to certain autofluorescent compounds, naturally occurring in plant tissues.
Solution: Optimizing the excitation wavelength and emission window during fluorescence acquisition is recommended.
Supplementary information
The following supporting information can be downloaded here:
1. Figure S1. Setting up a closed system to perform temporal, in vivo observations of Lotus japonicus plants infected with a Fusarium strain.
2. Figure S2. Experimental procedure of embedding in agarose Lotus japonicus tissues infected with a Fusarium strain and sectioning the embedded tissues afterward.
3. Figure S3. Experimental procedure of embedding in paraffin wax Lotus japonicus tissues infected with a Fusarium strain and sectioning the embedded tissues afterward.
Acknowledgments
This work was supported by the Hellenic Foundation for Research and Innovation (H.F.R.I.) under the “3rd call for H.F.R.I. Research Projects to support Post-Doctoral Researchers” (Proposal Number: 07885) (to VS) and by the Research Committee of UTH (Programme No: 7322) (to KKP).
The authors would like to thank Constantinos Ehaliotis for the provision of facilities (Department of Natural Resources and Agricultural Engineering, Soil Science and Agricultural Chemistry Lab, Agricultural University of Athens, 75 Iera Odos, 11855, Athens, Greece), and Christina Nikolaou for aiding in picture taking of some of the images provided in supporting information.
This work has been partially validated in Skiada et al. [10] Colonization of legumes by an endophytic Fusarium solani strain FsK reveals common features to symbionts or pathogens. Fungal Genetics and Biology 127: 60–74.
Competing interests
Authors declare no competing interests.
References
- Henry, A., Doucette, W., Norton, J., Jones, S., Chard, J. and Bugbee, B. (2006). An Axenic Plant Culture System for Optimal Growth in Long‐Term Studies. J Environ Qual. 35(2): 590–598.
- Hale, M. G., Lindsey, D. L. and Hameed, K. M. (1973). Gnotobiotic culture of plants and related research. Bot Rev. 39(3): 261–273.
- Voets, L., Dupré de Boulois, H., Renard, L., Strullu, D. G. and Declerck, S. (2005). Development of an autotrophic culture system for the in vitro mycorrhization of potato plantlets. FEMS Microbiol Lett. 248(1): 111–118.
- Vahabi, K., Johnson, J. M. and Oelmüller, R. (2011). Technical note: Fungal staining tools to study the interaction between the beneficial endophyte Piriformospora indica with Arabidopsis thaliana roots. J Endocytobiosis Cell Res. 21: 77–88.
- Brundrett, M. C., Enstone, D. E. and Peterson, C. A. (1988). A berberine-aniline blue fluorescent staining procedure for suberin, lignin, and callose in plant tissue. Protoplasma. 146: 133–142.
- Brundrett, M. C., Kendrick, B. and Peterson, C. A. (1991). Efficient Lipid Staining in Plant Material with Sudan Red 7B or Fluoral Yellow 088 in Polyethylene Glycol-Glycerol. Biotech Histochem. 66(3): 111–116.
- Martínez-Soto, D., Yu, H., Allen, K. S. and Ma, L. J. (2023). Differential Colonization of the Plant Vasculature Between Endophytic Versus Pathogenic Fusarium oxysporum Strains. Mol Plant Microbe Interact. 36(1): 4–13.
- Kavroulakis, N., Ntougias, S., Zervakis, G. I., Ehaliotis, C., Haralampidis, K. and Papadopoulou, K. K. (2007). Role of ethylene in the protection of tomato plants against soil-borne fungal pathogens conferred by an endophytic Fusarium solani strain. J Exp Bot. 58(14): 3853–3864.
- Skiada, V., Avramidou, M., Bonfante, P., Genre, A. and Papadopoulou, K. K. (2020). An endophytic Fusarium–legume association is partially dependent on the common symbiotic signalling pathway. New Phytol. 226(5): 1429–1444.
- Skiada, V., Faccio, A., Kavroulakis, N., Genre, A., Bonfante, P. and Papadopoulou, K. K. (2019). Colonization of legumes by an endophytic Fusarium solani strain FsK reveals common features to symbionts or pathogens. Fungal Genet Biol. 127: 60–74.
- Murashige, T. and Skoog, F. (1962). A Revised Medium for Rapid Growth and Bio Assays with Tobacco Tissue Cultures. Physiol Plant. 15(3): 473–497.
- Hoagland, D. R. and Arnon, D. I. (1950). The water-culture method for growing plants without soil. Circular. 347: 1–32.
- Rajan, P., Lada, R. R. and MacDonald, M. T. (2019). Advancement in Indoor Vertical Farming for Microgreen Production. Am J Plant Sci. 10(8): 1397–1408.
- Bécard, G. and Fortin, J. A. (1988). Early events of vesicular–arbuscular mycorrhiza formation on Ri T‐DNA transformed roots. New Phytol. 108(2): 211–218.
- Kosuta, S., Winzer, T. and Parniske, M. (2005). Arbuscular mycorrhiza. In: Marquez, A. J. (Ed.). Lotus japonicus Handbook (pp.87–95).
- Genre, A., Chabaud, M., Timmers, T., Bonfante, P. and Barker, D. G. (2005). Arbuscular Mycorrhizal Fungi Elicit a Novel Intracellular Apparatus inMedicago truncatulaRoot Epidermal Cells before Infection[W]. Plant Cell. 17(12): 3489–3499.
- Koske, R. and Gemma, J. (1989). A modified procedure for staining roots to detect VA mycorrhizas. Mycol Res. 92(4): 486–488.
- McGonigle, T. P., Miller, M. H., Evans, D. G., Fairchild, G. L. and Swan, J. A. (1990). A new method which gives an objective measure of colonization of roots by vesicular—arbuscular mycorrhizal fungi. New Phytol. 115(3): 495–501.
- Omar, M. B., Bolland, L. and Heather, W. A. (1978). A permanent mounting medium for fungi. Stain Technol. 53(5): 293–294.
- Kowal, j., Arrigoni, E. and Lane, S. (2020). Acidified Blue Ink-staining Procedure for the Observation of Fungal Structures Inside Roots of Two Disparate Plant Lineages. Bio Protoc. 10(20): e3786.
- Barberon, M., Vermeer, J. E. M., De Bellis, D., Wang, P., Naseer, S., Andersen, T. G., Humbel, B. M., Nawrath, C., Takano, J., Salt, D. E., et al. (2016). Adaptation of Root Function by Nutrient-Induced Plasticity of Endodermal Differentiation. Cell. 164(3): 447–459.
- Shukla, V., Han, J. P., Cléard, F., Lefebvre-Legendre, L., Gully, K., Flis, P., Berhin, A., Andersen, T. G., Salt, D. E., Nawrath, C., et al. (2021). Suberin plasticity to developmental and exogenous cues is regulated by a set of MYB transcription factors. Proc Natl Acad Sci USA. 118(39): e2101730118.
- Jensen, E. C. (2012). Types of Imaging, Part 2: An Overview of Fluorescence Microscopy. Anat Rec. 295(10): 1621–1627.
- Genre, A. (2008). Confocal microscopy and plant cell biology: A perfect match. Plant Biosyst. 142(2): 348–354.
- Barroso, M. M. (2011). Quantum Dots in Cell Biology. J Histochem Cytochem. 59(3): 237–251.
- Waller, F., Achatz, B., Baltruschat, H., Fodor, J., Becker, K., Fischer, M., Heier, T., Hückelhoven, R., Neumann, C., von Wettstein, D., et al. (2005). The endophytic fungus Piriformospora indica reprograms barley to salt-stress tolerance, disease resistance, and higher yield. Proc Natl Acad Sci USA. 102(38): 13386–13391.
- Deshmukh, S., Hückelhoven, R., Schäfer, P., Imani, J., Sharma, M., Weiss, M., Waller, F. and Kogel, K. H. (2006). The root endophytic fungus Piriformospora indica requires host cell death for proliferation during mutualistic symbiosis with barley. Proc Natl Acad Sci USA. 103(49): 18450–18457.
- Mochizuki, S., Saitoh, K. i., Minami, E. and Nishizawa, Y. (2011). Localization of probe-accessible chitin and characterization of genes encoding chitin-binding domains during rice–Magnaporthe oryzae interactions. J Gen Plant Pathol. 77(3): 163–173.
- Zuccaro, A., Lahrmann, U., Güldener, U., Langen, G., Pfiffi, S., Biedenkopf, D., Wong, P., Samans, B., Grimm, C., Basiewicz, M., et al. (2011). Endophytic Life Strategies Decoded by Genome and Transcriptome Analyses of the Mutualistic Root Symbiont Piriformospora indica. PLoS Pathog. 7(10): e1002290.
- Verma, S., Varma, A., Rexer, K. H., Hassel, A., Kost, G., Sarbhoy, A., Bisen, P., Bütehorn, B. and Franken, P. (1998). Piriformospora indica, gen. et sp. nov., a new root-colonizing fungus. Mycologia. 90(5): 896–903.
- Flores-Félix, J., Menéndez, E., Marcos-García, M., Celador-Lera, L. and Rivas, R. (2015). Calcofluor white, an Alternative to Propidium Iodide for Plant Tissues Staining in Studies of Root Colonization by Fluorescent-tagged Rhizobia. J Adv Biol Biotechnol. 2(1): 65–70.
- Truernit, E. and Haseloff, J. (2008). A simple way to identify non-viable cells within living plant tissue using confocal microscopy. Plant Methods. 4(1): 15.
- Lux, A., Morita, S., Abe, J. and Ito, K. (2005). An Improved Method for Clearing and Staining Free-hand Sections and Whole-mount Samples. Ann Bot. 96(6): 989–996.
- Kajala, K., Gouran, M., Shaar-Moshe, L., Mason, G. A., Rodriguez-Medina, J., Kawa, D., Pauluzzi, G., Reynoso, M., Canto-Pastor, A., Manzano, C., et al. (2021). Innovation, conservation, and repurposing of gene function in root cell type development. Cell. 184(12): 3333–3348.e19.
- Cantó-Pastor, A., Kajala, K., Shaar-Moshe, L., Manzano, C., Timilsena, P., De Bellis, D., Gray, S., Holbein, J., Yang, H., Mohammad, S., et al. (2024). A suberized exodermis is required for tomato drought tolerance. Nat Plants. 10(1): 118–130.
- Zelko, I., Lux, A., Sterckeman, T., Martinka, M., Kollárová, K. and Lišková, D. (2012). An easy method for cutting and fluorescent staining of thin roots. Ann Bot. 110(2): 475–478.
- Waduwara, C. I., Walcott, S. E. and Peterson, C. A. (2008). Suberin lamellae of the onion root endodermis: their pattern of development and continuity. Botany. 86(6): 623–632.
- Bond, J., Donaldson, L., Hill, S. and Hitchcock, K. (2008). Safranine fluorescent staining of wood cell walls. Biotech Histochem. 83(3–4): 161–171.
- Baldacci‐Cresp, F., Spriet, C., Twyffels, L., Blervacq, A., Neutelings, G., Baucher, M. and Hawkins, S. (2020). A rapid and quantitative safranin‐based fluorescent microscopy method to evaluate cell wall lignification. Plant J. 102(5): 1074–1089.
- Donaldson, L. A. (2002). Abnormal lignin distribution in wood from severely drought stressed Pinus radiata trees. IAWA J. 23(2): 161–178.
- Chabaud, M., Venard, C., Defaux‐Petras, A., Bécard, G. and Barker, D. G. (2002). Targeted inoculation of Medicago truncatula in vitro root cultures reveals MtENOD11 expression during early stages of infection by arbuscular mycorrhizal fungi. New Phytol. 156(2): 265–273.
- Vierheilig, H., Coughlan, A. P., Wyss, U. and Piché, Y. (1998). Ink and Vinegar, a Simple Staining Technique for Arbuscular-Mycorrhizal Fungi. Appl Environ Microbiol. 64(12): 5004–5007.
- Santana, M. D. F., Lara, T. S. and Couceiro, S. R. M. (2020). Alternative and safe dyes for staining Arbuscular Mycorrhizal fungi. Revista Ibero-Americana de Ciências Ambientais. 11(7): 400–408.
- Saify, F. and Tiwari, N. (2020). Mounting Media - An Untouched Aspect. Oral Maxillofac Path J. 11(1): 20–24.
Article Information
Publication history
Received: Sep 12, 2024
Accepted: Nov 21, 2024
Available online: Jan 5, 2025
Published: Feb 20, 2025
Copyright
© 2025 The Author(s); This is an open access article under the CC BY-NC license (https://creativecommons.org/licenses/by-nc/4.0/).
How to cite
Skiada, V. and Papadopoulou, K. K. (2025). Closed Systems to Study Plant–Filamentous Fungi Associations: Emphasis on Microscopic Analyses. Bio-protocol 15(4): e5186. DOI: 10.21769/BioProtoc.5186.
Category
Plant Science > Plant cell biology > Tissue analysis
Plant Science > Plant immunity > Host-microbe interactions
Cell Biology > Tissue analysis > Tissue imaging
Do you have any questions about this protocol?
Post your question to gather feedback from the community. We will also invite the authors of this article to respond.