- Protocols

- Articles and Issues
- For Authors
- About
- Become a Reviewer

FlashTag-mediated Labeling for Intraventricular Macrophages in the Embryonic Brain
Published: Vol 15, Iss 2, Jan 20, 2025 DOI: 10.21769/BioProtoc.5166 Views: 2241
Reviewed by: Miao HeKeiko MorimotoFereshteh Azedi
Original research article
The authors used this protocol in:
Feb 2023
Advertisement


Protocol Collections
Comprehensive collections of detailed, peer-reviewed protocols focusing on specific topics


Related protocols
Abstract
The fate mapping technique is essential for understanding how cells differentiate and organize into complex structures. Various methods are used in fate mapping, including dye injections, genetic labeling (e.g., Cre-lox recombination systems), and molecular markers to label cells and track their progeny. One such method, the FlashTag system, was originally developed to label neural progenitors. This technique involves injecting carboxyfluorescein diacetate succinimidyl ester (CFSE) into the lateral ventricles of mouse embryos, relying on the direct uptake of dye by cells. The injection of CFSE into the lateral ventricle allows for the pulse labeling of mitotic (M-phase) neural progenitors in the ventricular zone and their progeny throughout the brain. This approach enables us to trace the future locations and differentiation paths of neural progenitors. In our previous study, we adapted this method to selectively label central nervous system–associated macrophages (CAMs) in the lateral ventricle by using a lower concentration of CFSE compared to the original protocol. Microglia, the brain's immune cells, which play pivotal roles in both physiological and pathological contexts, begin colonizing the brain around embryonic day (E) 9.5 in mice, with their population expanding as development progresses. The modified FlashTag technique allowed us to trace the fate of intraventricular CAMs, revealing that certain populations of microglia are derived from these cells. The optimized approach offers deeper insights into the developmental trajectories of microglia. This protocol outlines the modified FlashTag method for labeling intraventricular CAMs, detailing the CFSE injection procedure, evaluation of CFSE dilution, and preparation of tissue for immunohistochemistry.
Key features
• This protocol builds upon the method developed by Govindan et al. and extends its application to intraventricular CAMs.
• This protocol allows for the cell fate tracking of intraventricular CAMs within 24 h.
• This protocol requires the technique of intraventricular injection of CFSE into embryonic brains.
Keywords: MicrogliaGraphical overview
FlashTag-mediated labeling for intraventricular macrophages
Background
The fate mapping technique is crucial for deciphering how cells differentiate and organize into complex structures. Various methods, such as dye injections, Cre-lox genetic labeling, and molecular markers, are used to track the progeny of cells. One of the earliest and most widely used techniques is BrdU (5-bromo-2'-deoxyuridine) birth dating, which labels newborn neural lineage cells at a specific time point [1,2]. BrdU is incorporated into cells during the S phase of DNA synthesis. When administered to pregnant dams either via intraperitoneal injection or drinking water, it leads to systemic labeling of all S-phase cells in the embryo. This results in no spatial restriction, meaning all cells born across all regions are labeled. Another technique, in utero electroporation, is used to label newborn neural progenitors. In this method, a plasmid encoding a reporter protein is injected into the lateral ventricle of an embryonic mouse, and electrical pulses are applied to facilitate its entry into the cells [3,4]. This method primarily targets M-phase cells but can also label S-phase cells, allowing for the labeling of a wide range of unsynchronized progenitors. However, the detection of labeled cells only occurs after the reporter protein is expressed, typically about 10 h later, making it challenging to study immediate events post-transduction [5].
To overcome the limitations of traditional birth-dating techniques, the FlashTag method was developed to track isochronic cohorts of ventricular zone (VZ)-born cells in the developing central nervous system (CNS) [6,7]. This method uses carboxyfluorescein diacetate succinimidyl ester (CFSE), a dye that fluoresces only after being processed within the cell. It allows for the specific labeling of M-phase neural progenitors lining the VZ, with intracellular fluorescence detectable within 20 min of injection. In the developing pallium, the labeling window is narrow, restricted to 1–2 h post-injection [7].
Notably, the FlashTag method can be optimized to label CNS-associated macrophages (CAMs), which reside in the ventricular space. Our previous research showed that intraventricular CAMs, which frequently infiltrate the developing pallium at embryonic day 12.5 (E12.5), differentiate into microglia after their infiltration in mice [8]. Microglia, the immune cells of the CNS, play essential roles throughout various life stages. For example, microglia shape neuronal circuits by pruning synapses and maintain homeostasis by clearing apoptotic cells and debris in the postnatal and adult brain, while contributing to neurogenesis by regulating differentiation and cell number [9-13]. Genetic fate mapping studies in mice have shown that microglia and CAMs share a common origin from erythromyeloid progenitors (EMPs), which are generated in the yolk sac between E7.5 and E8.5 and colonize the brain around E9.5 [14,15].
In our previous study, we optimized the FlashTag method by using a lower concentration of CFSE, enabling us to trace the fate of intraventricular CAMs. We discovered that certain microglia populations originate from these CAMs, which infiltrate the pallium around E12.5. This protocol is particularly useful for tracking the fate and behavior of intraventricular CAMs within a limited time window.
Materials and reagents
Biological materials
1. ICR mice (purchased from Japan SLC)
Reagents
1. CellTraceTM CFSE Cell Proliferation kit (for flow cytometry) (Thermo Fisher Scientific, catalog number: C34554)
2. Fast Green FCF (FUJIFILM Wako Pure Chemical Corp., catalog number: 061-00031)
3. Otsuka normal saline (Otsuka Pharmaceutical Factory, Inc., catalog number: 035-081517)
4. Sodium azide (FUJIFILM Wako Pure Chemical Corp., catalog number: 195-11091)
5. NaCl (sodium chloride) (FUJIFILM Wako Pure Chemical Corp., catalog number: 191-01665)
6. KCl (potassium chloride) (Sigma-Aldrich, catalog number: 24-4290-5)
7. Na2HPO4-12H2O (FUJIFILM Wako Pure Chemical Corp., catalog number: 196-02835)
8. NaH2PO4-2H2O (FUJIFILM Wako Pure Chemical Corp., catalog number: 192-02815)
9. KH2PO4 (FUJIFILM Wako Pure Chemical Corp., catalog number: 167-04241)
10. HCl (Sigma-Aldrich, catalog number: 13-1640-5)
11. NaOH (FUJIFILM Wako Pure Chemical Corp., catalog number: 194-18865)
12. Triton X-100 (Thermo Scientific, catalog number: A16046-0F)
13. Bovine serum albumin (Sigma-Aldrich, catalog number: A9418-50G)
14. Tissue-Tek O.C.T. compound (Sakura Finetek Japan Co., Ltd., catalog number: 4583)
15. Goat anti-CD206 pAb (1:300) (R&D systems, Minneapolis, catalog number: AF2535, RRID: AB_2063012)
16. Mouse anti-FITC mAb (1:400) (BioLegend, catalog number: 408301, RRID: AB_528900)
17. Rabbit anti-IBA1 pAb (1:1000) (FUJIFILM Wako Pure Chemical Corp., catalog number: 019-19741, RRID: AB_839504)
18. Rabbit anti-P2RY12 pAb (1:500) (AnaSpec, catalog number: 55043A, RRID: AB_2298886)
19. Donkey anti-Mouse IgG (H+L) highly cross-adsorbed secondary antibody, Alexa FluorTM 488 (1:1000) (Thermo Fisher Scientific, catalog number: A-21202, RRID: AB_141607)
20. Donkey anti-Rabbit IgG (H+L) highly cross-adsorbed secondary antibody, Alexa FluorTM 546 (1:1000) (Thermo Fisher Scientific, catalog number: A-10040, RRID: AB_2534016)
21. Donkey anti-Rabbit IgG (H+L) highly cross-adsorbed secondary antibody, Alexa FluorTM 647 (1:1000) (Thermo Fisher Scientific, catalog number: A-31573, RRID: AB_2536183)
22. Donkey anti-Goat IgG (H+L) cross-adsorbed secondary antibody, Alexa FluorTM 546 (1:1000) (Thermo Fisher Scientific, catalog number: A-11056, RRID: AB_2534103)
23. Donkey anti-Goat IgG (H+L) cross-adsorbed secondary antibody, Alexa FluorTM 647 (1:1000) (Thermo Fisher Scientific, catalog number: A-21447, RRID: AB_2535864)
24. Paraformaldehyde (Sigma-Aldrich, Merck, catalog number: 818715)
25. Sucrose (FUJIFILM Wako Pure Chemical Corp., catalog number: 190-00015)
26. Medetomidine hydrochloride (Nippon Zenyaku Kogyo Co., Ltd., catalog number: N.A.)
27. Midazolam (FUJIFILM Wako Pure Chemical Corp., catalog number: 135-13791)
28. Butorphanol tartrate (Meiji Animal Health Co., Ltd., catalog number: N.A.)
29. Atipamezole hydrochloride (Kyoritsu Seiyaku Corporation., catalog number: N.A.)
30. Fluoromount-G(R) (Cosmo Bio Co Ltd., catalog number: 0100-01)
31. 70% ethanol
Solutions
1. CFSE stock solution (see Recipes)
2. 0.3% Fast Green solution (see Recipes)
3. 10× PBS, pH 7.4 (see Recipes)
4. 1× PBS sterile, pH 7.4 (see Recipes)
5. 1× PBS with sodium azide, pH 7.4 (see Recipes)
6. Sodium azide solution (1% (w/v)) (see Recipes)
7. 2.5% CFSE working solution (see Recipes)
8. 5% CFSE working solution (see Recipes)
9. 10% CFSE working solution (see Recipes)
10. Three types of mixed anesthetic agents (see Recipes)
11. Anesthetic antagonist solution (see Recipes)
12. 0.2M phosphate buffer, pH 7.4 (see Recipes)
13. 8% PFA solution, pH 7.4 (see Recipes)
14. 4% PFA solution, pH 7.4 (see Recipes)
15. 20% sucrose solution (see Recipes)
16. Antibody diluent solution (see Recipes)
Recipes
1. CFSE stock solution (8 μL)
| Reagent | Final concentration | Quantity or Volume |
|---|---|---|
| CellTraceTM CFSE (#C34554A) | 6.25 mg/mL | 50 μg |
| DMSO (attached in the kit; thaw if frozen) | n/a | 8 μL |
| Total | n/a | 8 μL |
CFSE stock solution should be stored at -30 °C.
2. 0.3% Fast Green solution (100 mL)
| Reagent | Final concentration | Quantity or Volume |
|---|---|---|
| Fast Green FCF | 0.3% (w/v) | 0.03 g |
| H2O (MilliQ water) | n/a | 10 mL |
| Total | n/a | 10 mL |
0.3% Fast Green solution should be filtered through Millex-GV 0.22 μm filter and then stored in a 1.5 mL tube at 4 °C.
3. 10× PBS, pH 7.4 (2 L)
| Reagent | Final concentration | Quantity or Volume |
|---|---|---|
| NaCl | n/a | 160 g |
| KCl | n/a | 4 g |
| Na2HPO4-12H2O | n/a | 58 g |
| KH2PO4 | n/a | 4 g |
| H2O (MilliQ water) | n/a | see note* |
| Total | n/a | 2 L |
*Note: Allow the solution to mix completely and adjust the pH of the solution to 7.4 by adding 1M HCl and 1M NaOH while measuring with a pH meter. Then, bring the volume up to 2 L with MilliQ water.
4. 1× PBS sterile, pH 7.4 (500 mL)
| Reagent | Final concentration | Quantity or Volume |
|---|---|---|
| 10× PBS, pH 7.4 (Recipe 3) | n/a | 50 mL |
| H2O (MilliQ water) | n/a | 450 mL |
| Total | n/a | 500 mL see note* |
*Note: Confirm that the pH of the solution is 7.4 using a pH meter. If it deviates, adjust it by adding 1M HCl or 1M NaOH. Then, bring the volume up to 500 mL with MilliQ water. The solution should be autoclaved for 20 min at 121 °C.
5. 1× PBS with sodium azide, pH 7.4 (500 mL)
| Reagent | Final concentration | Quantity or Volume |
|---|---|---|
| 1× PBS sterile, pH 7.4 (Recipe 4) | n/a | 500 mL |
| Sodium azide solution (1% w/v) (Recipe 6) | 0.002% (w/v) | 1 mL |
| Total | n/a | 501 mL |
6. Sodium azide solution (1% w/v) (100 mL)
| Reagent | Final concentration | Quantity or Volume |
|---|---|---|
| Sodium azide | 1 g | n/a |
| H2O (MilliQ water) | n/a | 100 mL |
| Total | n/a | n/a |
The prepared solution should be stored at room temperature (RT).
7. 2.5% CFSE working solution (10 μL)
| Reagent | Final concentration | Quantity or Volume |
|---|---|---|
| CFSE stock solution (Recipe 1) | 2.5% (w/v) (156 μg/mL) | 0.25 μL |
| 1× PBS sterile, pH 7.4 (Recipe 4) | n/a | 8.75 μL |
| Fast Green solution (0.3% w/v) (Recipe 2) | 0.03% (w/v) | 1 μL |
| Total | n/a | 10 μL |
8. 5% CFSE working solution (10 μL)
| Reagent | Final concentration | Quantity or Volume |
|---|---|---|
| CFSE stock solution (Recipe 1) | 5% (w/v) (313 μg/mL) | 0.5 μL |
| 1× PBS sterile, pH 7.4 (Recipe 4) | n/a | 8.5 μL |
| Fast Green solution (0.3% w/v) (Recipe 2) | 0.03% (w/v) | 1 μL |
| Total | n/a | 10 µL |
9. 10% CFSE working solution (10 μL)
| Reagent | Final concentration | Quantity or Volume |
|---|---|---|
| CFSE stock solution (Recipe 1) | 10% (w/v) (625 µg/ml) | 1 μL |
| 1× PBS sterile, pH 7.4 (Recipe 4) | n/a | 8 μL |
Fast Green Solution (0.3% w/v) (Recipe 2) | 0.03% (w/v) | 1 μL |
| Total | n/a | 10 µL |
10. Three types of mixed anesthetic agents (35 mL)
| Reagent | Final concentration | Quantity or Volume |
|---|---|---|
| Midazolam | n/a | 40 mg |
| HCl (0.1M) | n/a | 2 mL see note* |
Medetomidine hydrochloride (1.0 mg/mL) | n/a | 3 mL |
| Butorphanol tartrate (5.0 mg/mL) | n/a | 10 mL |
| Otsuka normal saline | n/a | 20 mL |
| Total | n/a | 35 mL |
*Note: Midazolam needs to be diluted first using HCI (0.1M). After that, other reagents should be added.
Aliquot the prepared solution into 2 mL portions and store at 4 °C. Only the tube being used is stored at RT.
11. Anesthetic antagonist solution (20 mL)
| Reagent | Final concentration | Quantity or Volume |
|---|---|---|
Atipamezole hydrochloride (5.0 mg/mL) | n/a | 0.3 mL |
| Otsuka normal saline | n/a | 19.7 mL |
| Total | n/a | 20 mL |
The prepared solution is aliquoted into 2 ml portions and stored at 4 °C. Only the tube being used is stored at RT.
12. 0.2 M phosphate buffer, pH 7.4 (1 L)
| Reagent | Final concentration | Quantity or Volume |
|---|---|---|
| Na2HPO4-12H2O | n/a | 58 g |
| NaH2PO4-2H2O | n/a | 5.9 g |
| H2O (MilliQ water) | n/a | see note* |
| Total | n/a | 1 L |
*Note: Allow the solution to mix completely and adjust the pH of the solution to 7.4 by adding 1M HCl and 1M NaOH while measuring with a pH meter. Then, bring the volume up to 1 L with MilliQ water.
13. 8% PFA solution, pH 7.4 (400 mL)
| Reagent | Final concentration | Quantity or Volume |
|---|---|---|
| Paraformaldehyde | 8% (w/v) | 32 g |
| H2O (MilliQ water) | n/a | 365 mL see note* |
| 10N NaOH | n/a | 90 μL see note** |
| H2O (MilliQ water) | n/a | see note** |
| Total | n/a | 400 mL |
*Note: Add 32 g of paraformaldehyde to 365 mL of MilliQ water and dissolve it by heating it with a hot stirrer.
**Note: Add 90 μL of 10N NaOH at a temperature higher than 60 °C. When the cloudiness disappears and the solution becomes transparent, MilliQ water should be added. Confirm that the pH of the solution is 7.4 using a pH meter. If it deviates, adjust it by adding 1M HCl or 1M NaOH. Then, bring the volume up to 400 mL with MilliQ water and filter the solution with filter paper.
The prepared solution should be stored at 4 °C.
14. 4% PFA solution, pH 7.4 (200 mL)
| Reagent | Final concentration | Quantity or Volume |
|---|---|---|
| 8% PFA solution, pH 7.4 (Recipe 13) | 4% (w/v) | 100 mL |
| 0.2M phosphate buffer, pH 7.4 (Recipe 12) | n/a | 100 mL |
| Total | n/a | 200 mL |
The prepared solution should be stored at 4 °C.
15. 20% sucrose solution (250 mL)
| Reagent | Final concentration | Quantity or Volume |
|---|---|---|
| 1×PBS with sodium azide, pH 7.4 (Recipe 5) | n/a | 220 mL |
| Sucrose | 20% | 50 g |
| Total | n/a | 250 mL |
The prepared solution should be stored at 4 °C.
16. Antibody diluent solution (100 mL)
| Reagent | Final concentration | Quantity or Volume |
|---|---|---|
| 1× PBS sterile, pH 7.4 (Recipe 4) | n/a | 100 mL |
| Triton X-100 | 0.1% (v/v) | 100 μL |
| Sodium azide | 0.1% (w/v) | 0.1 g |
| Bovine serum albumin | 3 mg/mL | 0.3 g |
| Total | n/a | n/a |
Filter the solution using Millex-HV 0.45 μm filter and store at 4 °C.
Laboratory supplies
1. Glass capillary with filament (NARISHIGE Group, catalog number: GD-1)
2. Eppendorf microloader (Merck, catalog number: EP5242956003)
3. Aspirator tube assembly (Drummondo, catalog number: 2-040-000)
4. Dropper silicone rubber for 2 mL (AZ ONE, catalog number: 6-356-02)
5. Heating pad (Koizumi, catalog number: N.A.)
6. Flat-bottom micro tube 1.5 mL large box of 500 × 20 bags (BIO-BIK, catalog number: CF-0150)
7. Corning 100 mm non-treated culture dish (Corning, catalog number: 430591)
8. Transfer pipette 2.3 mL (BM Equipment Co., Ltd., catalog number: 262-20S)
9. Extra fine Graefe forceps (Fine Science Tools, catalog number: 11151-10)
10. Fine Iris scissors (Fine Science Tools, catalog number: 14094-11)
11. Dumont #55 fine forceps (Fine Science Tools, catalog number: 11255-20)
12. Paper filter (As ONE, catalog number: 65-0426-67)
13. Millex-GV 0.22 μm filter (Millipore, catalog number: SLGVJ13SL)
14. Millex-HV 0.45 μm filter (Millipore, catalog number: SLHVR33RS)
15. Nipro Flomax hypodermic 26G (S.B) needle (Nipro, catalog number: 01046)
16. Terumo 1 mL syringe (Terumo, catalog number: SS-01T)
17. Nylon suture needles with thread (BEAR Medic Corporation, catalog number: SP15A05H-45)
18. MAS coat slide glass (Matsunami Glass Ind., Ltd., catalog number: SMAS-01)
19. NEO micro cover glass (Matsunami Glass Ind., Ltd., catalog number: C024501)
Equipment
1. Magnetic glass microelectrode horizontal puller (Narishige, model: PN-30)
2. Micro grinder (Narishige, model: EG-400)
3. e-HeatingBucket (Miracle beads bath, TAITEC Corp, model: BMB-17)
4. Confocal microscopy (Nikon, model: AXR)
5. Confocal microscopy (Nikon, model: TiE-A1R)
6. Cryostat (Leica Biosystems, model: CM1520)
Procedure
A. Fabrication of glass capillaries
1. Set the glass capillary in the magnetic glass microelectrode horizontal puller and pull it while heating to create two sharp-tipped capillaries from a single one (Figure 1A, B).
2. Break the tip of the glass capillary using forceps (Dumont #55 fine forceps) (Figure 1C, D).
3. Set the glass capillary in the micro grinder and adjust it to an angle of approximately 35° (Figure 1E).
4. Polish the tip of the glass capillary by touching it to the grinder surface several times (Figure 1F, G; Video 1).

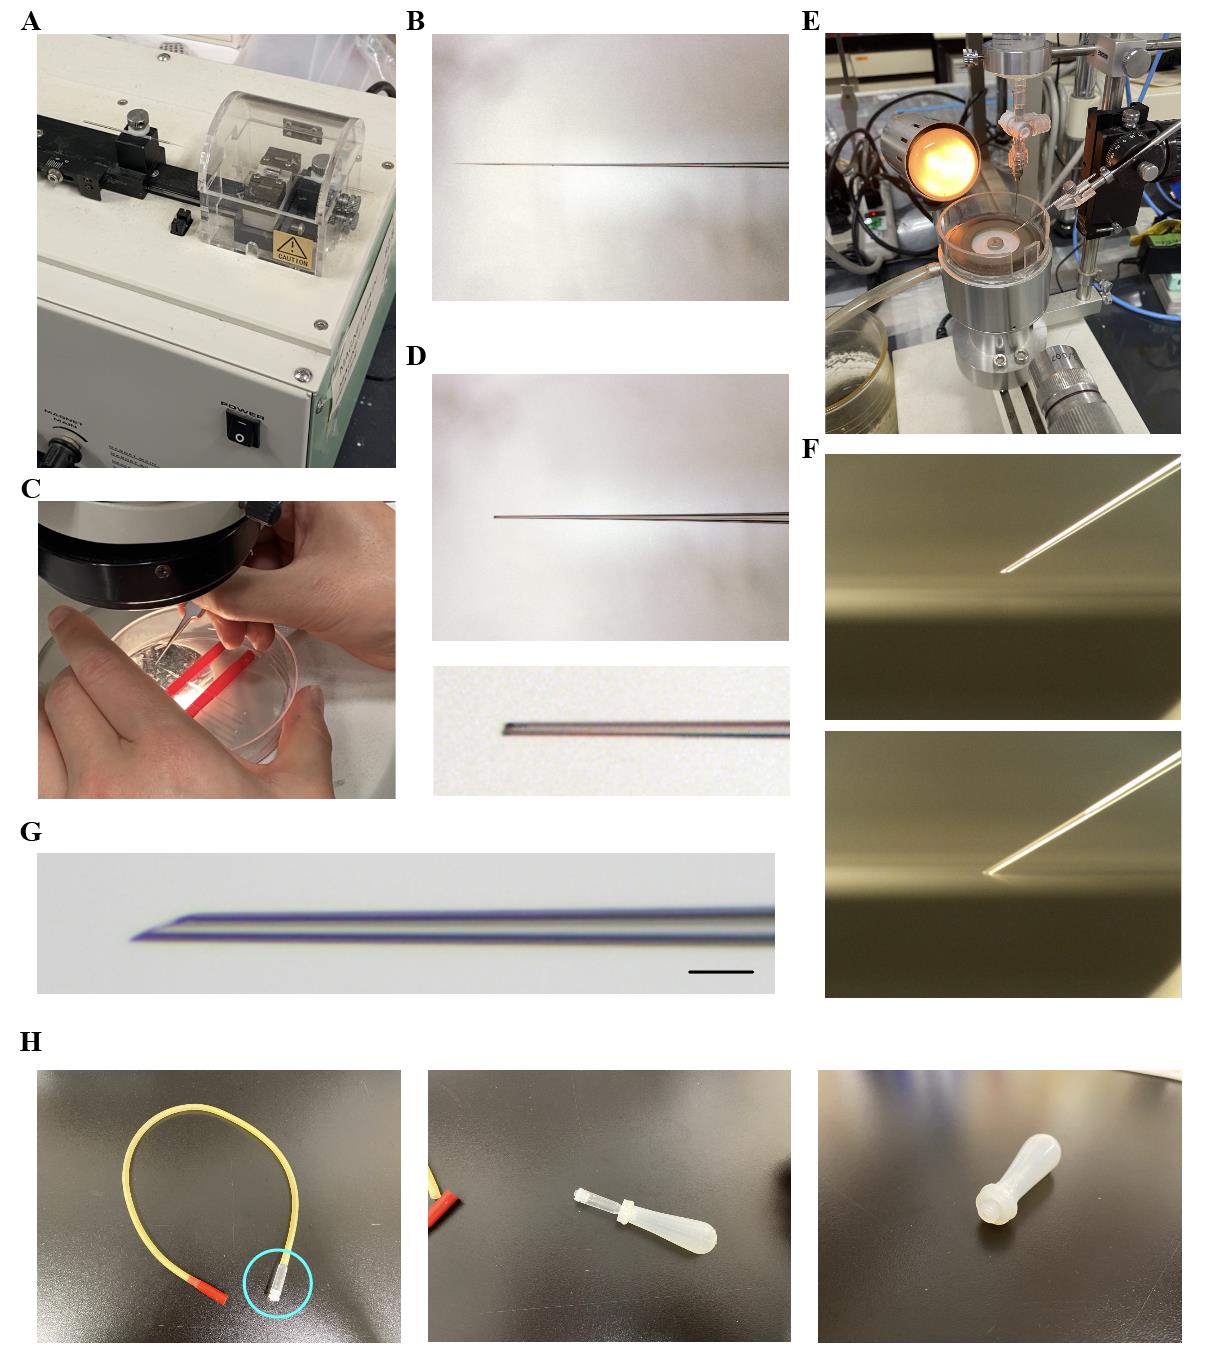
Figure 1. How to prepare glass capillaries and homemade pipette. A. The magnetic glass microelectrode horizontal puller is used to heat and pull a single glass capillary, creating two sharp-tipped capillaries. B. The glass capillary immediately after being processed with the puller. C. Picture showing how to cut the tip of the glass capillary using forceps. D. The glass capillary after the tip has been cut. The bottom image shows a magnified view of the cut tip. E. A glass capillary set in the micro grinder, with the angle adjusted to 35°. F. Polishing the tip of the glass capillary using the micro grinder. This process can be seen in Video 1. G. A magnified view of the completed glass capillary after all processing steps. Scale bar, 100 μm. H. Pictures demonstrating the process of creating the homemade pipette. The part of the aspirator tube assembly (indicated by the cyan circle in the left image) was removed and then inserted into the dropper silicone rubber for 2 mL (shown in the middle and right images).
B. Assembling the homemade pipette
1. Remove the part shown within the cyan circle in the left photo in Figure 1H from the aspirator tube assembly (Figure 1H).
2. Insert the removed part into the dropper silicone rubber for 2 mL (see the middle and right photos in Figure 1H).
C. Stock reagent preparation
1. Prepare the CFSE stock solution (see Recipe 1).
2. Prepare 0.3% Fast Green solution (See Recipe 2).
D. Preparation of CFSE working solutions
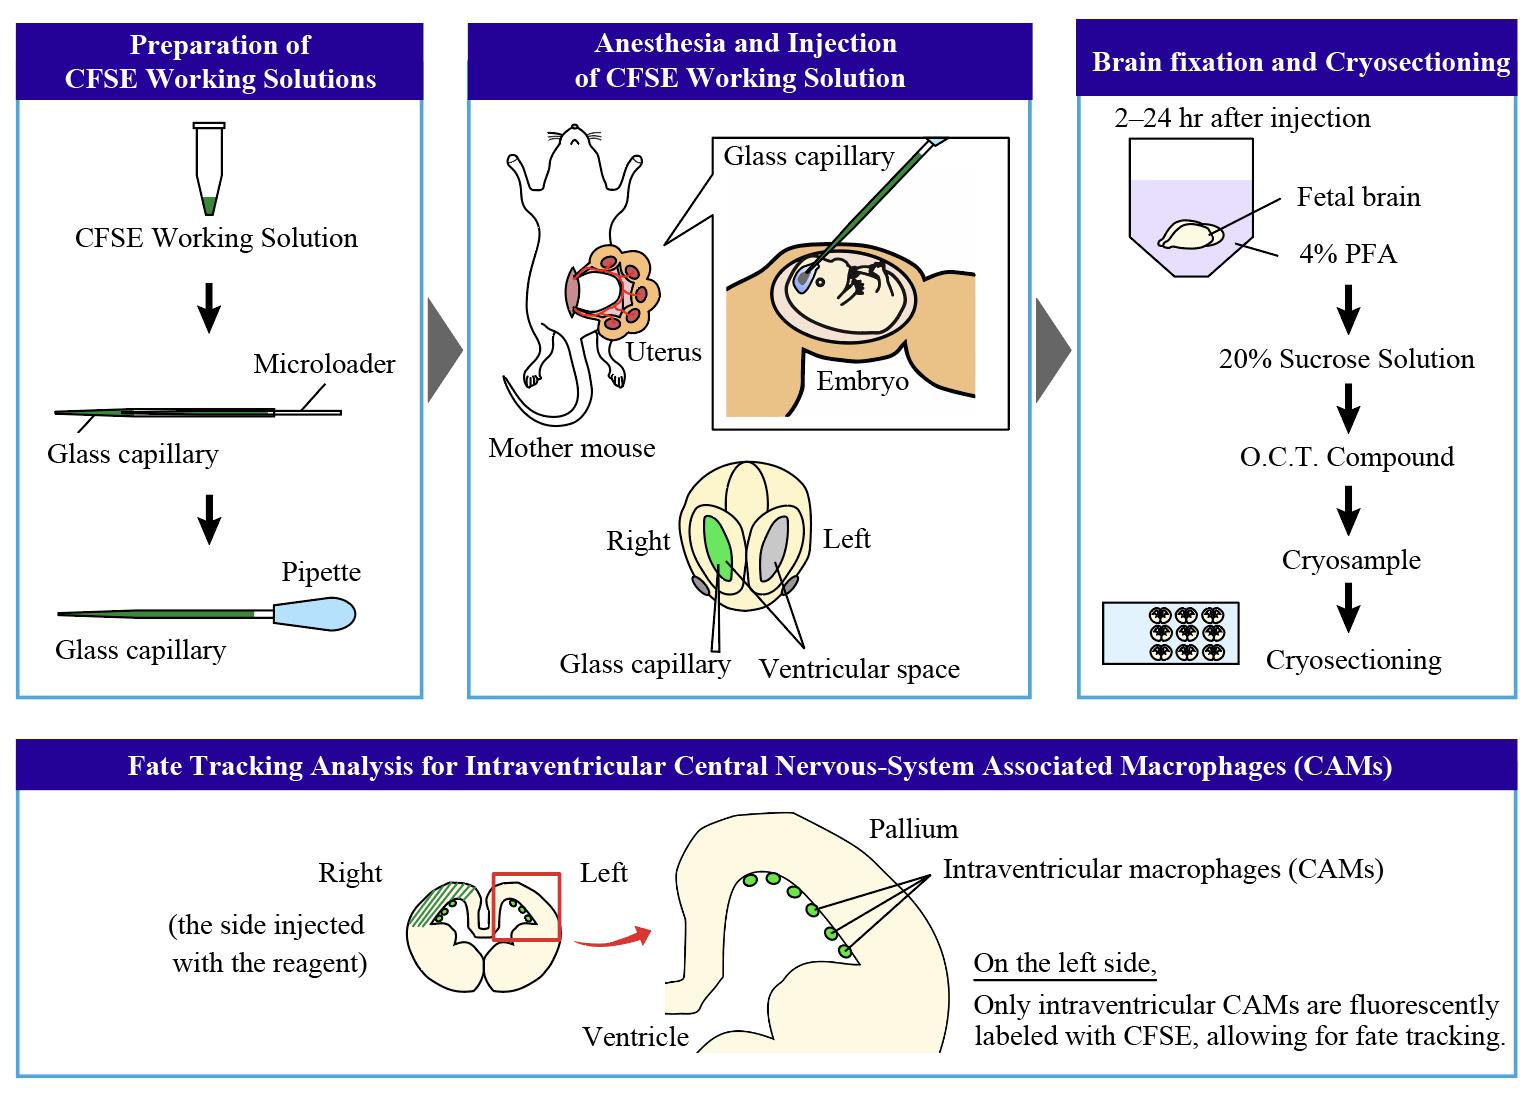
1. For labeling intraventricular CAMs, prepare the 2.5% CFSE working solution in a 1.5 mL tube and mix by pipetting (total 10 μL) (see Recipe 7) (Figure 2A, B). The solution should be prepared just before use.
2. Mark the glass capillaries. To measure 1 μL, mark 3.5 mm from the thickest part of the glass capillary, away from the tip, with an inner diameter of 0.6 mm (3.5 mm = 1 μL; 0.3 mm × 0.3 mm × 3.14 × 3.5 mm = 1.0 μL) (Figure 2C).
3. Using a microloader pipette, fill the marked glass capillaries with the 2.5% CFSE working solution (Figure 2D).
4. Attach the glass capillary filled with solution to the homemade pipette (Figure 2E).
Note: In this protocol paper, we prepared not only 2.5% but also 5% and 10% CFSE working solutions to examine concentration conditions to specifically label intraventricular macrophages. We found that 2.5% CFSE working solution can specifically label intraventricular macrophages in the left hemisphere [8]. The 10% solution matches the condition used in Govindan et al. [7].
E. Preparation for surgery
1. Warm saline to 37–40 °C in the beads bath.
2. Prepare surgical instruments (scissors, forceps).
3. Prepare three types of mixed anesthetic agents (see Recipe 10) and anesthetic antagonist solution (see Recipe 11).
F. Injection of the CFSE working solution
1. Anesthetize a pregnant ICR mouse at gestational day 12. Administer 80 μL of three types of mixed anesthetic agents (see Recipe 10) intraperitoneally using a 26G needle and a 1 mL syringe.
2. Wait 10 min for stable anesthesia.
3. Place the animal on the animal heating pad. After disinfecting the abdomen with 70% ethanol, dissect the abdomen of the dam using scissors, cutting the skin and then the peritoneum.
4. Extract the uterus and check the number and condition of the embryos.
5. Return the non-injected side of the uterus into the abdomen, exposing only the side for treatment (Figure 2F). Prevent drying by applying warmed saline as needed.
6. Confirm the fetal head orientation. Position the glass capillary filled with the CFSE working solution to pierce through the uterine wall, fetal skin, and into the brain ventricles.
7. After piercing the fetal brain, inject 1 μL of the CFSE working solution into the right lateral ventricle of each embryo using a glass capillary with the homemade pipette, guided by the 1 µL marking as a reference. Slight leakage into the left ventricle is acceptable (Figure 2G–I; Video 2).
8. Note the position of the treated embryo in the uterus in the log.
9. After injection, return the uterus to the abdomen and keep moist with saline.
10. If necessary, exteriorize the other uterus and perform the same procedure according to steps F4–9.
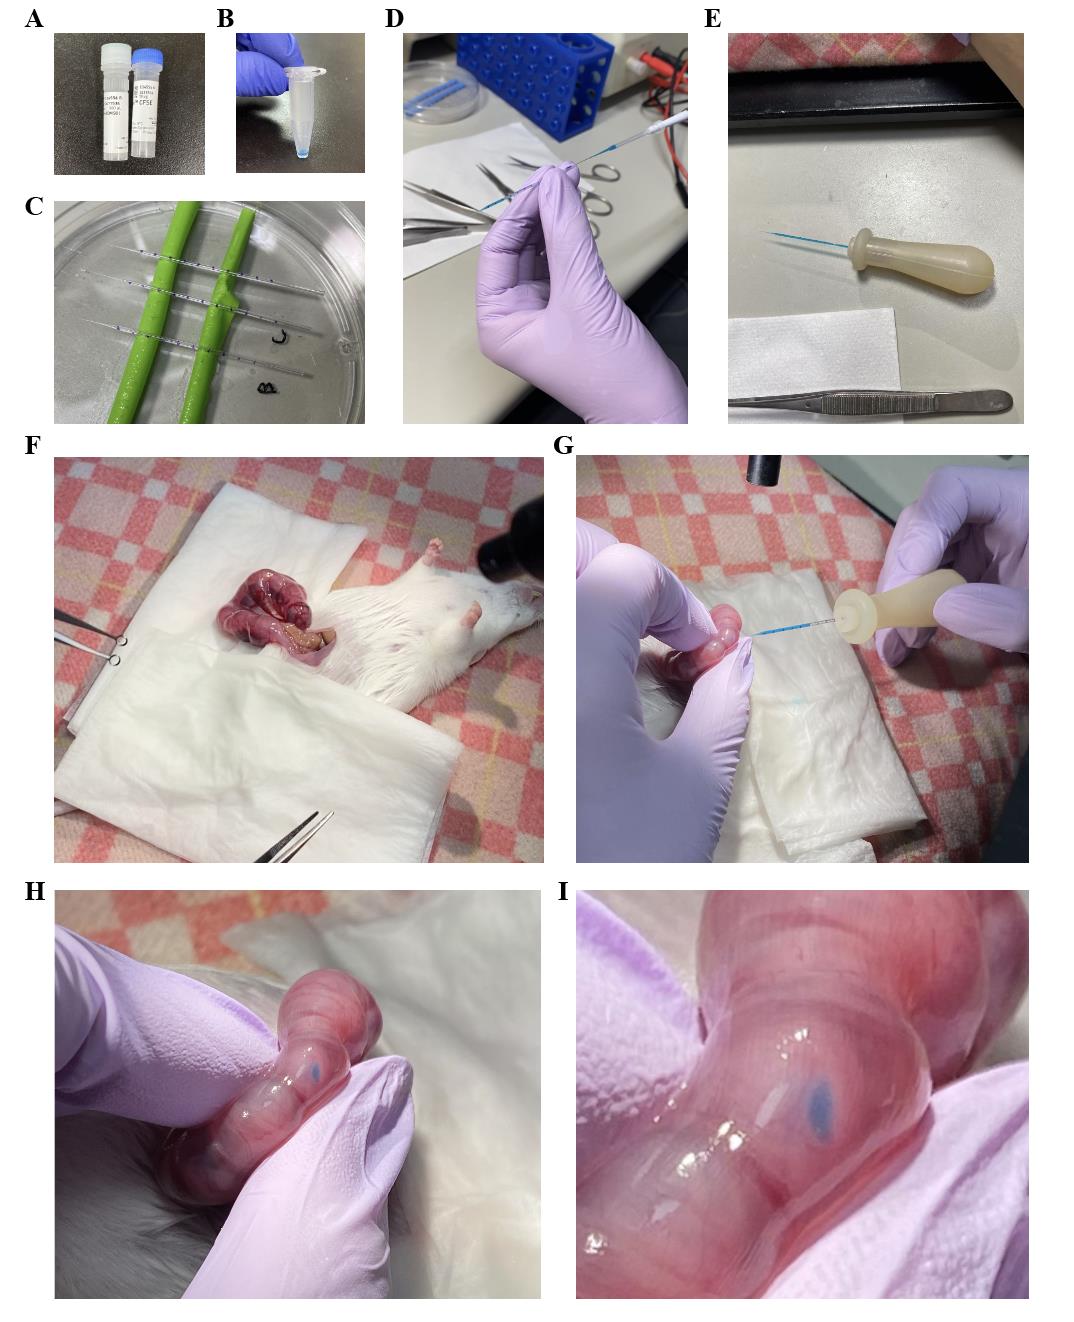
Figure 2. Injection of carboxyfluorescein diacetate succinimidyl ester (CFSE) working solution into the lateral ventricle of the embryonic mouse. A. The CFSE stock solution was prepared by dissolving the CFSE provided in the kit using the attached DMSO. B. The 2.5% CFSE working solution was prepared in a 1.5 mL tube. C. Glass capillaries marked every 3.5 mm to measure out 1 μL of CFSE working solution. D. The CFSE working solution was loaded into the glass capillary using a microloader pipette. E. The glass capillary filled with the solution was attached to the homemade pipette holder. F. After anesthetizing the mother, one side of the uterus was exposed. G. 1 μL of the CFSE working solution was injected into the right lateral ventricle of the embryo located inside the uterus. H. An image taken immediately after the solution was injected into the right lateral ventricle of the embryo. The space in the right lateral ventricle was visualized by the green color of the Fast Green. A small amount of the solution leaked into the left lateral ventricle. I. A magnified image of the fetal head shown in H.
G. Suturing and recovery from anesthesia
1. Suture the peritoneum first and then the skin using Nylon suture needles with thread.
2. Administer 400 μL of anesthetic antagonist solution (see Recipe 11) to the dam intraperitoneally and place the mother mouse in a cage on a heated pad to recover.
H. Brain fixation
1. Two to twenty-four hours after injection, perform cervical dislocation of the mother mouse. Confirm maternal death, open the uterus and amniotic membrane, collect fetal heads or brains using forceps (Dumont #55 fine forceps), and rinse with 1× PBS sterile, pH 7.4.
2. Fix the fetal heads or brains in 4% PFA solution, pH 7.4 (see Recipe 14). For brains, immerse them in 4% PFA solution on ice for 1–1.5 h. For heads, immerse them in 4% PFA solution on ice for 2–3 h.
3. Transfer to 20% sucrose solution (see Recipe 15) on ice. Leave until the brain sinks (approximately 2 h).
4. Rinse lightly with O.C.T. compound to remove 20% sucrose solution.
5. Embed in O.C.T. compound in an appropriate mold, orient the brain under a microscope, and rapidly freeze with liquid nitrogen.
6. Store the embedded brain at -30 °C.
I. Cryosectioning, immunostaining, and observation
1. Prepare 16 μm cryosections of fetal brain tissue onto the slide glass (MAS coat slide glass) using a cryostat.
2. Dry sections as needed (store unused sections at -30 °C).
3. Incubate slides with cryosections in 1×PBS with sodium azide, pH 7.4 (see Recipe 5) to remove the O.C.T. compound (RT, 10 min).
4. Incubate with primary antibodies (4 °C, overnight).
5. Wash slides with 1× PBS with sodium azide, pH 7.4 (RT, 10 min, three times).
6. Incubate with secondary antibodies (RT, 1 h).
7. Wash slides with 1× PBS with sodium azide, pH 7.4 (RT, 10 min, three times).
8. Mount with mounting media [Fluoromount-G(R)] and coverslips (NEO micro cover glass).
9. Observe using confocal microscopy.
10. Evaluation of cell fate should be performed on the left hemisphere, where only intraventricular CAMs are labeled with CFSE (Figure 3, 4).
Note: For the detection of CFSE, the signal was enhanced by using mouse anti-FITC mAb as the primary antibody and donkey anti-mouse IgG (H+L) highly cross-adsorbed secondary antibody, Alexa FluorTM 488 as the secondary antibody.
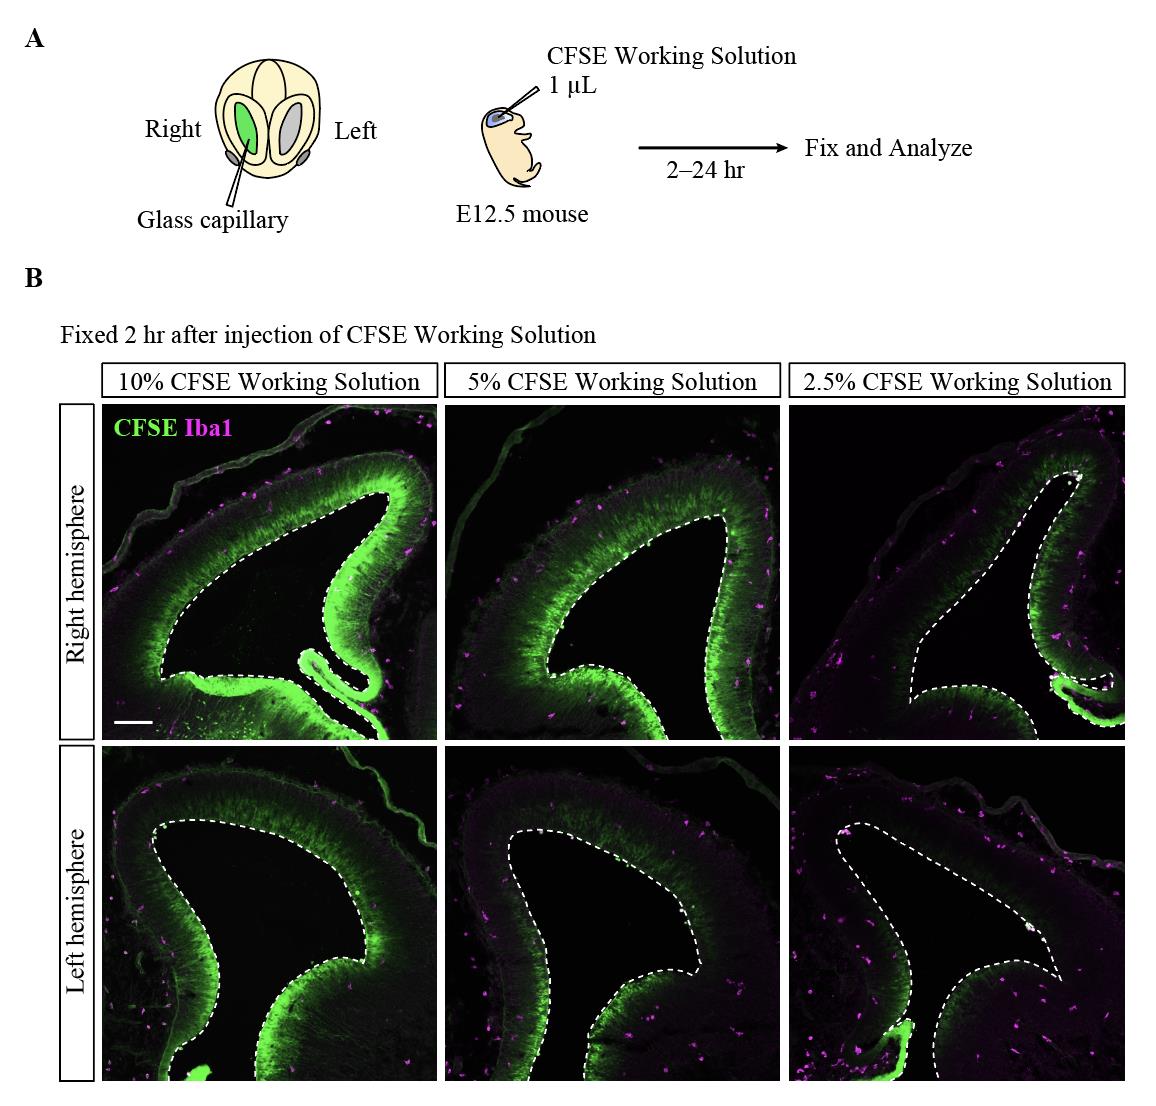
Figure 3. Optimization of concentration conditions for carboxyfluorescein diacetate succinimidyl ester (CFSE) working solution. A. Image illustrating the experimental procedure for the FlashTag-based cell fate analysis for intraventricular central nervous system–associated macrophages (CAMs) for the E12.5 ICR mice. B. Immunostaining for FITC (to detect CFSE) and Iba1 (a marker for CAMs and microglia) in the brain of embryos 2 h after injecting the CFSE working solution into the right lateral ventricles. White dotted line, ventricular surface contour of the pallium. Scale bar, 100 μm.

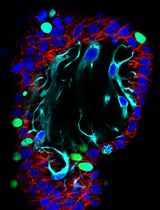
Figure 4. FlashTag-based cell fate trace analysis of infiltrated intraventricular central nervous system–associated macrophages (CAMs) into microglia (DOI: 10.1016/j.celrep.2023.112092) A. Triple-fluorescence picture [CFSE, Iba1, and CD206 (a marker for CAMs)] of an E12.5 brain that was fixed 3 h after intraventricular injection with carboxyfluorescein diacetate succinimidyl ester (CFSE). The intraventricular CD206+Iba1+ cells on the inner surface of the pallium (yellow arrowhead) were CFSE+, whereas the pallial Iba1+CD206– cells (preexisting microglia) were negative for CFSE. B. Graph showing the proportion of the CFSE+Iba1+ cells per total Iba1+ cells comparing the ventricle and the pallium (two-sided Mann–Whitney U test; N = six male and female mice; the average value of six sections from each animal is plotted; P = 0.002). C–H. FlashTag-based analysis of the transition from the CAMs toward microglia, with immunofluorescence for CFSE and Iba1 (C) or P2RY12 (a marker for microglia) and CD206 (D) 2 h and 24 h after injection. Graphs showing the proportions of CFSE+Iba1+ cells among Iba1+ cells (E) and the CFSE+ cells that were also P2RY12+ (F), CD206+ (G), or CD206+P2RY12+ (H) [two-sided Steel–Dwass test; N = six male and female mice; the average value of six sections from each animal is plotted; P = 0.032, 0.032 in E, 0.031, 0.032 in F, 0.027, 0.031 in G, and 0.032, 0.051 in H (left-to-right)]. White broken line, ventricular surface contour of the pallium. Scale bar, 100 μm.
Data analysis
Quantitative data are presented as the mean value ± S.D. of representative experiments. Statistical differences between groups were analyzed using R software by the Mann–Whitney U test for two-group comparisons or the Steel–Dwass test for multiple comparisons. All the statistical tests were two-tailed, and P < 0.05 was considered to indicate statistical significance. The P value is shown in each graph (n.s., not significant). Individual values are plotted as circles in the bar graphs. The number of samples examined in each analysis is shown in the corresponding figure legend. No randomization was used, and no samples were excluded from the analysis. No statistical methods were used to predetermine the sample size owing to experimental limitations.
Validation of protocol
The protocol has been validated using multiple biological replicates (e.g., N = six mice per condition) to ensure reproducibility. Statistical analysis was performed using the Mann–Whitney U test for two-group comparisons or the Steel–Dwass test for multiple comparisons. The results confirm the reliability of this protocol and are detailed in the Data analysis section and the corresponding figure legend (refer to Figure 4).
This protocol or parts of it has been used and validated in the following research article:
Hattori et al. [8] CD206(+) macrophages transventricularly infiltrate the early embryonic cerebral wall to differentiate into microglia. Cell Reports (Figure 4, panel A–I)
General notes and troubleshooting
General notes
FlashTag was originally developed to trace the fate of neural progenitors. We modified this method by diluting the CFSE working solution to about one-fourth of its original concentration (2.5%), allowing us to specifically label intraventricular CAMs in the embryonic mouse brain. Since the injection is targeted into the right ventricle, the dye is taken up by not only the intraventricular CAMs but also the neural progenitors in the pallium on the right hemisphere. However, on the opposite side (the left, non-injected side), the dye selectively stains intraventricular CAMs, likely due to their higher phagocytic activity compared to other cells. We confirmed that almost all CAMs present in the left lateral ventricle were labeled with CFSE (Figure 4B). Similar staining has also been successfully performed at other stages (e.g., E13.5, E14.5). Since the infiltration of intraventricular CAMs frequently occurs at E12.5 in mice, we believe that labeling intraventricular CAMs at E12.5 is crucial for conducting fate mapping. By leveraging this feature, we successfully traced the fate of the intraventricular CAMs. However, as the dye is metabolized relatively quickly, tracking beyond 24 h appears challenging, though it is effective for tracing within that timeframe.
Troubleshooting
Problem 1: The CFSE working solution leaks out of the ventricle in the fetal mouse brain.
Possible cause(s): The tip of the glass capillary might not be inserted at the correct position. It could either be too shallow, causing the solution to enter subcutaneously, or inserted too deeply, resulting in injection outside the ventricle.
Solution(s): If the solution is properly injected into the ventricle, it will accumulate in the shape of the ventricular space, so confirming this clarity is an indicator of accuracy.
Problem 2: Even when using the 2.5% CFSE working solution, cells other than intraventricular CAMs are being labeled.
Possible cause(s): There may be variability in the amount of CFSE working solution administered.
Solution(s): Since our analysis is based on the left hemisphere at this concentration, please confirm that you are analyzing the left hemisphere. In the right hemisphere, other cells are also labeled. Additionally, there may be variations in the solution volume due to the tools used, so ensure accurate measurement. It may also be necessary to optimize the injection volume.
Problem 3: The embryos are dying.
Possible cause(s): The surgical procedure may be causing excessive stress.
Solution(s): Perform the procedure quickly to minimize the burden on the mouse. Experienced individuals can complete the procedure, from the incision to the final suturing, in approximately 20–30 min. Additionally, it is also necessary to handle the embryos with care.
Acknowledgments
We thank Makoto Masaoka, Namiko Noguchi, and Ikuko Mizuno (Department of Anatomy and Cell Biology, Nagoya University Graduate School of Medicine) for their technical assistance. We wish to acknowledge the Division for Medical Research Engineering, Nagoya University Graduate School of Medicine, for technical support. This work was supported by JSPS Grants-in-Aid for Scientific Research (B) [JP21H02656 (T.M.), JP23H02658 (Y.H.)], Grants-in-Aid for Transformative Research Areas (A) [JP23H04161 (Y.H.)], and JST FOREST [JPMJFR214C (Y.H.)]. This study was also supported by grants from The Uehara Memorial Foundation, Takeda Science Foundation, Inoue Foundation for Science, Tokai Pathways to Global Excellence (T-GEx), and AMED-ASPIRE program [JP23jf0126004 (Y.H.)]. This protocol was described and validated in Hattori et al., Cell Reports (2023) (DOI: 10.1016/j.celrep.2023.112092).
Competing interests
The authors declare no competing interests.
Ethical considerations
1. The animal experiments were conducted according to the Japanese Act on Welfare and Management of Animals, Guidelines for Proper Conduct of Animal Experiments (published by the Science Council of Japan), and Fundamental Guidelines for Proper Conduct of Animal Experiment and Related Activities in Academic Research Institutions (published by the Ministry of Education, Culture, Sports, Science and Technology, Japan).
2. All protocols for animal experiments were approved by the Institutional Animal Care and Use Committee of Nagoya University (No. 29006).
References
- Cheng, X., Li, Y., Huang, Y., Feng, X., Feng, G. and Xiong, Z. Q. (2011). Pulse labeling and long-term tracing of newborn neurons in the adult subgranular zone. Cell Res. 21(2): 338-349. https://doi.org/10.1038/cr.2010.141.
- Rochefort, C., Gheusi, G., Vincent, J. D. and Lledo, P. M. (2002). Enriched odor exposure increases the number of newborn neurons in the adult olfactory bulb and improves odor memory. J Neurosci. 22(7): 2679-2689. https://doi.org/10.1523/JNEUROSCI.22-07-02679.2002.
- Tabata, H. and Nakajima, K. (2001). Efficient in utero gene transfer system to the developing mouse brain using electroporation: visualization of neuronal migration in the developing cortex. Neuroscience. 103(4): 865-872. https://doi.org/10.1016/s0306-4522(01)00016-1.
- LoTurco, J., Manent, J. B. and Sidiqi, F. (2009). New and improved tools for in utero electroporation studies of developing cerebral cortex. Cereb Cortex. 19 Suppl 1(Suppl 1): i120-125. https://doi.org/10.1093/cercor/bhp033.
- Stancik, E. K., Navarro-Quiroga, I., Sellke, R. and Haydar, T. F. (2010). Heterogeneity in ventricular zone neural precursors contributes to neuronal fate diversity in the postnatal neocortex. J Neurosci. 30(20): 7028-7036. https://doi.org/10.1523/JNEUROSCI.6131-09.2010.
- Telley, L., Govindan, S., Prados, J., Stevant, I., Nef, S., Dermitzakis, E., Dayer, A. and Jabaudon, D. (2016). Sequential transcriptional waves direct the differentiation of newborn neurons in the mouse neocortex. Science 351(6280): 1443-1446. https://doi.org/10.1126/science.aad8361.
- Govindan, S., Oberst, P. and Jabaudon, D. (2018). In vivo pulse labeling of isochronic cohorts of cells in the central nervous system using FlashTag. Nat Protoc. 13(10): 2297-2311. https://doi.org/10.1038/s41596-018-0038-1.
- Hattori, Y., Kato, D., Murayama, F., Koike, S., Asai, H., Yamasaki, A., Naito, Y., Kawaguchi, A., Konishi, H., Prinz, M., et al. (2023). CD206(+) macrophages transventricularly infiltrate the early embryonic cerebral wall to differentiate into microglia. Cell Rep. 42(2): 112092. https://doi.org/10.1016/j.celrep.2023.112092.
- Li, Q. and Barres, B. A. (2018). Microglia and macrophages in brain homeostasis and disease. Nat Rev Immunol 18(4): 225-242. https://doi.org/10.1038/nri.2017.125.
- Paolicelli, R. C., Bolasco, G., Pagani, F., Maggi, L., Scianni, M., Panzanelli, P., Giustetto, M., Ferreira, T. A., Guiducci, E., Dumas, L., et al. (2011). Synaptic pruning by microglia is necessary for normal brain development. Science. 333(6048): 1456-1458. https://doi.org/10.1126/science.1202529.
- Hattori, Y. (2021). The behavior and functions of embryonic microglia. Anat Sci Int. https://doi.org/10.1007/s12565-021-00631-w.
- Hattori, Y. and Miyata, T. (2018). Microglia extensively survey the developing cortex via the CXCL12/CXCR4 system to help neural progenitors to acquire differentiated properties. Genes Cells. 23(10): 915-922. https://doi.org/10.1111/gtc.12632.
- Parkhurst, C. N., Yang, G., Ninan, I., Savas, J. N., Yates, J. R., 3rd, Lafaille, J. J., Hempstead, B. L., Littman, D. R. and Gan, W. B. (2013). Microglia promote learning-dependent synapse formation through brain-derived neurotrophic factor. Cell. 155(7): 1596-1609. https://doi.org/10.1016/j.cell.2013.11.030.
- Ginhoux, F., Greter, M., Leboeuf, M., Nandi, S., See, P., Gokhan, S., Mehler, M. F., Conway, S. J., Ng, L. G., Stanley, E. R., et al. (2010). Fate mapping analysis reveals that adult microglia derive from primitive macrophages. Science. 330(6005): 841-845. https://doi.org/10.1126/science.1194637.
- Prinz, M., Erny, D. and Hagemeyer, N. (2017). Ontogeny and homeostasis of CNS myeloid cells. Nat Immunol. 18(4): 385-392. https://doi.org/10.1038/ni.3703.
Article Information
Publication history
Received: Sep 22, 2024
Accepted: Nov 28, 2024
Available online: Dec 12, 2024
Published: Jan 20, 2025
Copyright
© 2025 The Author(s); This is an open access article under the CC BY-NC license (https://creativecommons.org/licenses/by-nc/4.0/).
How to cite
Asai, H., Ono, M., Miyata, T. and Hattori, Y. (2025). FlashTag-mediated Labeling for Intraventricular Macrophages in the Embryonic Brain. Bio-protocol 15(2): e5166. DOI: 10.21769/BioProtoc.5166.
Category
Neuroscience > Development > Neuron
Developmental Biology > Cell growth and fate > Differentiation
Immunology > Immune cell function > Macrophage
Do you have any questions about this protocol?
Post your question to gather feedback from the community. We will also invite the authors of this article to respond.