- Protocols

- Articles and Issues
- For Authors
- About
- Become a Reviewer

Protocol for Immune Cell Isolation, Organoid Generation, and Co-culture Establishment from Cryopreserved Whole Human Intestine
(*contributed equally to this work) Published: Vol 15, Iss 1, Jan 5, 2025 DOI: 10.21769/BioProtoc.5157 Views: 3792
Reviewed by: Andrea GramaticaPhilipp WörsdörferAnonymous reviewer(s)
Original research article
The authors used this protocol in:
Mar 2024

Protocol Collections
Comprehensive collections of detailed, peer-reviewed protocols focusing on specific topics


Abstract
The human intestine plays a pivotal role in nutrient absorption and immune system regulation. Along the longitudinal axis, cell-type composition changes to meet the varying functional requirements. Therefore, our protocol focuses on the processing of the whole human intestine to facilitate the analysis of region-specific characteristics such as tissue architecture and changes in cell populations. We describe how to generate a biobank that can be used to isolate specific immune cell subtypes, generate organoid lines, and establish autologous immune cell-organoid co-cultures.
Key features
• Dissection and tissue analysis of whole human intestines.
• Cryopreservation for biobank generation.
• Optimized protocols for the isolation of epithelial and immune cells.
• Autologous co-culture of organoids and lamina propria–derived immune cells.
Keywords: Whole gut collectionGraphical overview
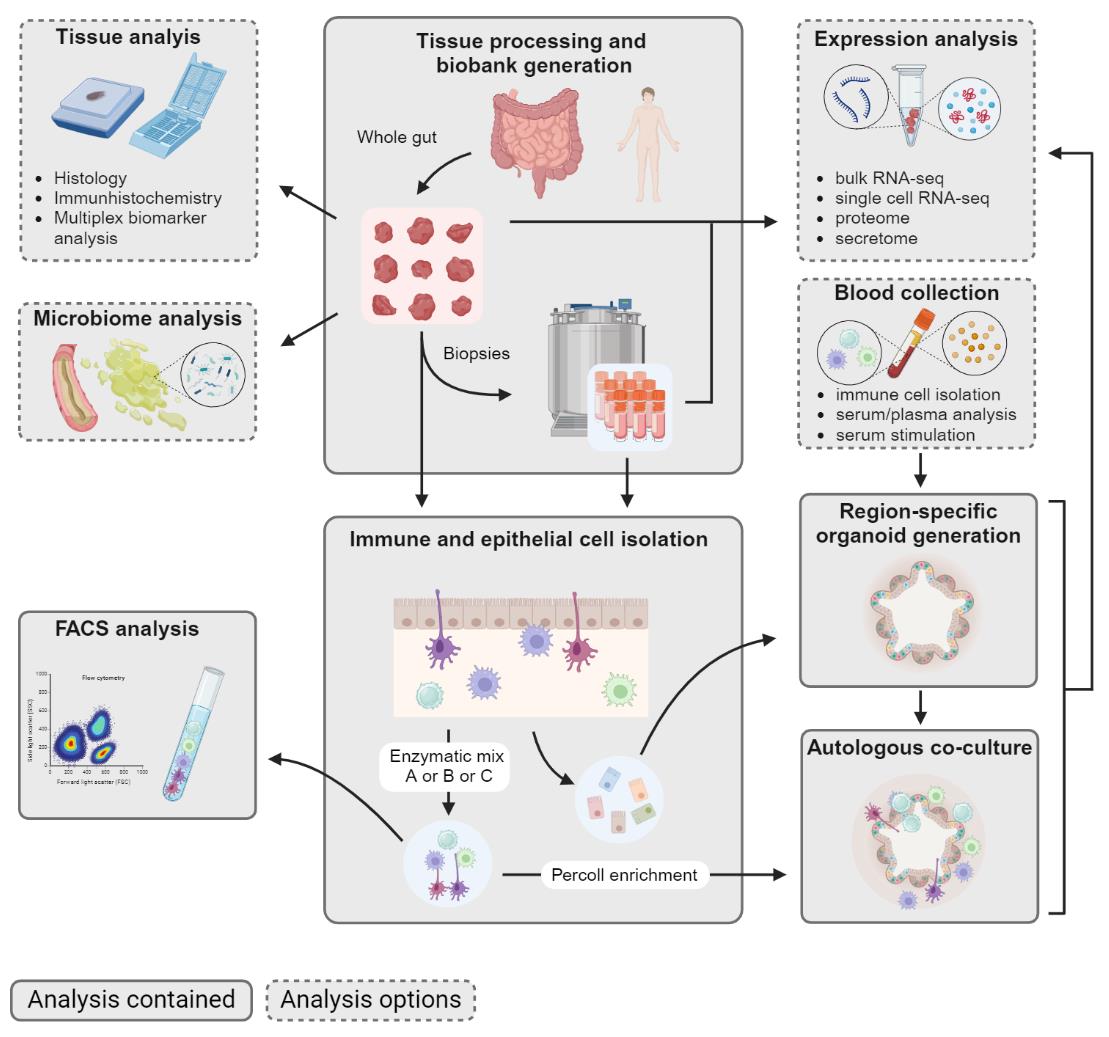
Human intestine processing to cryopreserve biopsies, isolate epithelial and immune cells, and generate organoids and autologous co-culture. Created with BioRender.com.
Background
The intestine is the longest organ of the human body and possesses the largest surface area, being also constantly exposed to commensal and pathogenic bacteria. Thus, maintaining barrier integrity and accurate immune surveillance is crucial to preserve its function and homeostasis. A dysfunction in the epithelial barrier or in the immune cell composition of the intestine can lead to severe and chronic diseases, from cancer to autoimmune diseases. Therefore, it is essential to understand the interaction between the epithelial barrier and the immune cells as well as to identify region-specific immune cell subpopulations.
Access to intestinal tissue is limited, and most research relies on small biopsies (<5 cm) or intestinal resections (<40 cm long) [1–3]. However, to fully understand the complexity and regional variations, studying the intestine in its entirety is necessary. Additionally, this allows the analysis of the jejunum and ileum, which are particularly difficult to address with biopsies or resections.
Processing such a large organ requires a stringent protocol that focuses on the cryopreservation and time-independent analysis of the samples. Moreover, the focus of most cryopreservation methods is on the recovery of a specific cell population [4,5], but they do not address the isolation of cells from different intestinal regions or simultaneous epithelial and immune cell isolation [3,6].
Our protocol closes this gap by describing a cryopreservation method that supports the preservation of both immune and epithelial cells of various intestinal regions while additionally being applicable to cell isolations from fresh tissue. It serves as an essential and versatile guideline for the preservation and cell isolation of the whole human intestine while providing additional options for tissue analysis.
We give a detailed description of an optimized and refined protocol that describes how to process the whole intestine, generate a biobank, and perform cell isolation from fresh and cryopreserved tissue. In particular, techniques for the generation of intestinal organoids and the isolation of epithelium and immune cells with enrichment of specific cell fractions depending on the enzyme digestion carried out are presented. Finally, we provide a protocol to establish an autologous immune cell-organoid co-culture, which can be further modified to study one specific intestinal region or immune cell subtype.
Materials and reagents
Biological materials
1. Human whole intestinal tissues (Novobiosis, I3PT biobank, DTI Foundation)
2. R-Spondin 1 cell line, stably transfected HEK293T cells (kindly provided by Hugo de Jonge)
Reagents
General buffers and media
1. Sodium chloride (NaCl) (Carl Roth, catalog number: 3957.2)
2. Potassium di-hydrogen phosphate (KH2PO4) (Carl Roth, catalog number: P018.2)
3. Di-sodium hydrogen phosphate dihydrate (Na2HPO4·2H2O) (Carl Roth, catalog number: T877.1)
4. Heat-inactivated FBS (Capricorn Scientific, catalog number: FBS-HI-11A)
5. PBS-/- (Capricorn Scientific, catalog number: PBS-1A)
6. HEPES (Capricorn Scientific, catalog number: HEP-B)
7. 0.5 M EDTA pH 8.0 (Fisher Scientific, catalog number: 46-034-CI)
8. Sucrose for molecular biology, ≥99.5% (GC) (Sigma-Aldrich, catalog number: S0389-500G)
9. RPMI 1640 medium, 500 mL (Thermo Fisher Scientific, catalog number: 21875034)
10. Custodiol (Dr. Franz Köhler Chemie)
11. DTT (1,4-Dithiothreitol) (Carl Roth, catalog number: 6908.3)
12. Ethanol Rotipuran ≥99.8% p.a. (Carl Roth, catalog number: 9065.05)
13. Methanol (Carl Roth, catalog number: 8388.6)
Buffers and media for cryopreservation
1. Isopropanol 99.8% (neoLab Migge, catalog number: 2-3701)
2. CryoSure-DMSO USP grade (WAK-Chemie Medical, catalog number: WAK-DMSO-10)
3. Ethylene glycol anhydrous, 99.8% (Sigma-Aldrich, catalog number: 324558-100ml)
4. D-(+)-trehalose dihydrate (Sigma-Aldrich, catalog number: T0167-25G)
5. RNA later stabilization solution (Qiagen, Fisher Scientific, catalog number: AM7021)
6. CryoStor® CS10 (STEMCELL Technologies, catalog number: 07930)
Chemicals for histology
1. FSC 22 frozen section media, blue, 9 × 118 mL (Leica, catalog number: 3801481)
2. Paraformaldehyde solution 4% in PBS (Santa Cruz Biotechnology, catalog number: sc-281692)
3. Paraplast (Paraffin) (Carl Roth, catalog number: X880.2)
4. Xylene (Sigma-Aldrich, catalog number: 534056)
5. Tissue freezing medium (Leica, catalog number: 14020108926)
Buffers and media for organoid generation
1. Matrigel growth factor reduced (GFR) basement membrane matrix, phenol red-free, LDEV-free (Corning, Fisher Scientific, catalog number: 356231)
2. StemProTM AccutaseTM cell dissociation reagent (Thermo Fisher, Gibco, catalog number: A1110501)
3. Advanced DMEM/F12 medium (Fisher Scientific, Gibco, catalog number: 12634010)
4. GlutaMAX (Thermo Fisher Scientific, catalog number: 35050038)
5. Primocin (Invivogen, catalog number: ant-pm-1)
6. B-27 supplement (Thermo Fisher Scientific, catalog number: 17504044)
7. WNT surrogate-Fc fusion protein (ImmunoPrecise, catalog number: N001)
8. R-Spondin 1-conditioned medium (produced by R-Spondin 1 cell line)
9. n-Acetyl-cysteine (Sigma-Aldrich, catalog number: A7250)
10. Nicotinamide (Sigma-Aldrich, catalog number: N0636-500G)
11. Recombinant murine EGF (PeproTech, catalog number: 315-09)
12. Murine noggin (Peprotech, catalog number: 250-38)
13. Recombinant human IGF-1 (PeproTech, catalog number: 100-11)
14. Recombinant human FGF-2 (PeproTech, catalog number: 100-18C)
15. Human Leu[15]-Gastrin I (Sigma-Aldrich, catalog number: G9145)
16. A83-01 (Sigma-Aldrich, catalog number: SML0788)
17. SB202190 (Tocris, catalog number: 1264)
18. Y-27632 (Hölzel Diagnostika, catalog number: HY-10583)
Buffers and media for cell isolation
1. HBSS without Ca2+/Mg2+ (Thermo Fisher Scientific, catalog number: 14175129)
2. Multi Tissue Dissociation kit (Miltenyi BioTec, catalog number: 130-110-201)
3. Collagenase type IV (Fisher Scientific, catalog number: 17104019)
4. DNase I (Sigma-Aldrich, Chemie, catalog number: 10104159001)
5. LiberaseTM TL research grade (Sigma-Aldrich, catalog number: 5401020001)
Flow cytometric analysis
1. CD45 BV510 (BD Biosciences, catalog number: 563204)
2. EPCAM (CD326) PE (BioLegend, catalog number: 324206)
3. CD3 BUV496 (BD Biosciences, catalog number: 612940)
4. CD19 BV750 (BioLegend, catalog number: 302262)
5. HLADR BUV395 (BD Biosciences, catalog number: 564040)
6. CD11c BB515 (BD Biosciences, catalog number: 564490)
7. CD14 BUV737 (BD Biosciences, catalog number: 612763)
8. CD56 APC/Cy7 (BioLegend, catalog number: 318332)
9. CD103 APC (BioLegend, catalog number: 350216)
10. 7AAD (BioLegend, catalog number: 420404)
Supplies for co-culture
1. Percoll (Thermo Fisher Scientific, catalog number: 17-0891-01)
2. Glutaraldehyde 50% (Sigma-Aldrich, Chemie, catalog number: G7776-10ML)
3. Formaldehyde solution 37% (Carl Roth, catalog number: CP10.1)
Solutions
1. 10× phosphate-buffered saline (PBS) (see Recipes)
2. Cryopreservation buffer (see Recipes)
3. Complete Roswell Park Memorial Institute medium (cRPMI) (see Recipes)
4. Mucus removal solution (see Recipes)
5. 30% ethanol (see Recipes)
6. 50% ethanol (see Recipes)
7. 70% ethanol (see Recipes)
8. 80% ethanol (see Recipes)
9. 5% sucrose (see Recipes)
10. 15% sucrose (see Recipes)
11. 30% sucrose (see Recipes)
12. Dissociation solution (see Recipes)
13. Base medium (see Recipes)
14. Growth medium (see Recipes)
15. Expansion medium (see Recipes)
16. 0.75 M sucrose (see Recipes)
17. 0.375 M sucrose (see Recipes)
18. 0.125 M sucrose (see Recipes)
19. 10% FBS/PBS (see Recipes)
20. Epithelial cell removal media (see Recipes)
21. Enzymatic mixture A (see Recipes)
22. Enzymatic mixture B (see Recipes)
23. Enzymatic mixture C (see Recipes)
24. 80% Percoll (see Recipes)
25. 40% Percoll (see Recipes)
26. Co-culture fixative (see Recipes)
Recipes
All buffers can be stored at room temperature unless otherwise specified. All sucrose buffers can be stored at 4 °C and used within 4 weeks.
1. 10× phosphate-buffered saline (PBS)
| Reagent | Final concentration | Amount |
|---|---|---|
| NaCl | 1.37 M | 80.063 g |
| KH2PO4 | 0.018 M | 2.45 g |
| Na2HPO4·2H2O | 0.103 M | 18.333 g |
| H2O | n/a | 900 mL |
| Total | 1 L |
Adjust the pH of 1× PBS to 7.4.
2. Cryopreservation buffer
Adapted from Hughes et al. [4]. Store at 4 °C and use within 72 h.
| Reagent | Final concentration | Amount |
|---|---|---|
| D-(+)-Trehalose dihydrate | 50 mM | 3.78 g |
| CryoSure-DMSO USP grade | 6% | 12 mL |
| Ethylene glycol anhydrous, 99.8% | 5% | 10 mL |
| Heat-inactivated FBS | 178 mL | |
| Total | 200 mL |
3. Complete Roswell Park Memorial Institute medium (cRPMI)
Store at 4 °C and use within 4 weeks.
| Reagent | Final concentration | Amount |
|---|---|---|
| RPMI | n/a | 450 mL |
| FBS | 5% | 50 mL |
| Total | 500 mL |
4. Mucus removal solution
Store at 4 °C and use within 12 h.
| Reagent | Final concentration | Amount |
|---|---|---|
| RPMI | n/a | 450 mL |
| FBS | 5% | 50 mL |
| DTT (100%) | 4 mM | 0.3 g |
| Total | 500 mL |
5. 30% ethanol
| Reagent | Final concentration | Amount |
|---|---|---|
| Ethanol (absolute) | 30% | 300 mL |
| H2O | n/a | 700 mL |
| Total | 1,000 mL |
6. 50% ethanol
| Reagent | Final concentration | Amount |
|---|---|---|
| Ethanol (absolute) | 50% | 500 mL |
| H2O | n/a | 500 mL |
| Total | 1,000 mL |
7. 70% ethanol
| Reagent | Final concentration | Amount |
|---|---|---|
| Ethanol (absolute) | 70% | 700 mL |
| H2O | n/a | 300 mL |
| Total | 1,000 mL |
8. 80% ethanol
| Reagent | Final concentration | Amount |
|---|---|---|
| Ethanol (absolute) | 80% | 800 mL |
| H2O | n/a | 200 mL |
| Total | 1,000 mL |
9. 5% sucrose
| Reagent | Final concentration | Amount |
|---|---|---|
| Sucrose | 5% | 5 g |
| PBS | n/a | 100 mL |
| Total | 100 mL |
10. 15% sucrose
| Reagent | Final concentration | Amount |
|---|---|---|
| Sucrose | 15% | 15 g |
| PBS | n/a | 100 mL |
| Total | 100 mL |
11. 30% sucrose
| Reagent | Final concentration | Amount |
|---|---|---|
| Sucrose | 30% | 30 g |
| PBS | n/a | 100 mL |
| Total | 100 mL |
12. Dissociation solution
| Reagent | Final concentration | Amount |
|---|---|---|
| PBS-/- | n/a | 9.8 mL |
| EDTA (0.5 M) | 10 mM | 200 μL |
| Total | 10 mL |
13. Base medium
Store at 4 °C and use within 4 weeks.
| Reagent | Final concentration | Amount |
|---|---|---|
| Advanced DMEM/F12 | n/a | 489 mL |
| HEPES | 10 mM | 5 mL |
| GlutaMAX (100×) | 1× | 5 mL |
| Primocin | 100 μg/mL | 1 mL |
| Total | 500 mL |
14. Growth medium
Store at 4 °C and use within 2 weeks.
| Reagent | Final concentration | Amount |
|---|---|---|
| Advanced DMEM/F12 | n/a | 6.5379 mL |
| R-Spondin 1-conditioned medium | 20% | 2 mL |
| B-27 supplement | 1× | 200 μL |
| HEPES | 10 mM | 100 μL |
| GlutaMAX (100×) | 1× | 100 μL |
| Nicotinamide | 10 mM | 100 μL |
| Murine noggin | 100 ng/mL | 50 μL |
| N-acetyl-cysteine | 1.25 mM | 25 μL |
| Primocin | 100 μg/mL | 20 μL |
| Surrogate WNT | 0.5 nM | 10 μL |
| EGF | 50 ng/mL | 10 μL |
| SB202190 | 10 μM | 3.3 μL |
| A83-01 | 500 nM | 1 μL |
| Human Leu[15]-Gastrin I | 10 nM | 1 μL |
| Y-27632* | 10 μM | 1 μL |
| Total | 10 mL |
*First 2–3 days after isolation or expansion.
15. Expansion medium
Store at 4 °C and use within 2 weeks.
| Reagent | Final concentration | Amount |
|---|---|---|
| Advanced DMEM/F12 | n/a | 7.472 mL |
| R-Spondin 1-conditioned medium | 20% | 2 mL |
| B-27 supplement | 1× | 200 μL |
| HEPES | 10 mM | 100 μL |
| GlutaMAX (100×) | 1× | 100 μL |
| Murine noggin | 100 ng/mL | 50 μL |
| N-acetyl-cysteine | 1 mM | 20 μL |
| Primocin | 100 μg/mL | 20 μL |
| Surrogate WNT | 0.5 nM | 10 μL |
| EGF | 50 ng/mL | 10 μL |
| Recombinant human IGF-1 | 100 ng/mL | 10 μL |
| Recombinant human FGF-2 | 50 ng/mL | 5 μL |
| A83-01 | 500 nM | 1 μL |
| Human Leu[15]-Gastrin I | 10 nM | 1 μL |
| Y-27632* | 10 μM | 1 μL |
| Total | 10 mL |
*First 2–3 days after isolation or expansion.
16. 0.75 M sucrose
| Reagent | Final concentration | Amount |
|---|---|---|
| Sucrose | 0.75 M | 5.13 g |
| PBS | 90% | 18 mL |
| FBS | 10% | 2 mL |
| Total | 20 mL |
17. 0.375 M sucrose
| Reagent | Final concentration | Amount |
|---|---|---|
| Sucrose | 0.375 M | 2.6 g |
| PBS | 90% | 18 mL |
| FBS | 10% | 2 mL |
| Total | 20 mL |
18. 0.125 M sucrose
| Reagent | Final concentration | Amount |
|---|---|---|
| Sucrose | 0.125 M | 0.9 g |
| PBS | 90% | 18 mL |
| FBS | 10% | 2 mL |
| Total | 20mL |
19. 10% FBS/PBS
Store at 4 °C and use within 72 h.
| Reagent | Final concentration | Amount |
|---|---|---|
| PBS | 90% | 36 mL |
| FBS | 10% | 4 mL |
| Total | 40 mL |
20. Epithelial cell removal media
Store at 4 °C and use within 72 h.
| Reagent | Final concentration | Amount |
|---|---|---|
| HBSS (-/-) | n/a | 39.5 mL |
| HEPES (1 M) | 100 mM | 5 mL |
| FBS | 10% | 5 mL |
| EDTA (0.5 M) | 5 mM | 500 μL |
| Total | 50 mL |
21. Enzymatic mixture A
Prepare directly before use.
| Reagent | Final concentration | Amount |
|---|---|---|
| cRPMI | n/a | 4.725 mL |
| Liberase (2.5 mg/mL) | 100 μg/mL | 200 μL |
| DNase (10 mg/mL) | 150 μg/mL | 75 μL |
| Total | 5 mL |
22. Enzymatic mixture B
Prepare directly before use.
| Reagent | Final concentration | Amount |
|---|---|---|
| cRPMI | n/a | 4.89 mL |
| Collagenase IV (0.327 g/mL) | 2 mg/mL | 31 μL |
| DNase (10 mg/mL) | 150 μg/mL | 75 μL |
| Total | 5 mL |
23. Enzymatic mixture C (Multi Tissue Dissociation kit 1: MTKD1)
Prepare directly before use.
| Reagent | Final concentration | Amount |
|---|---|---|
| cRPMI | n/a | 4.675 mL |
| Enzyme A (MTDK1) | n/a | 25 μL |
| Enzyme R (MTDK1) | n/a | 100 μL |
| Enzyme D (MTDK1) | n/a | 200 μL |
| Total | 5 mL |
24. 80% Percoll
Store at 4 °C and use within 4 weeks.
| Reagent | Final concentration | Amount |
|---|---|---|
| Percoll (100%) | 80% | 72 mL |
| 10× PBS | n/a | 8 mL |
| PBS-/- | n/a | 20 mL |
| Total | 100 mL |
25. 40% Percoll
Store at 4 °C and use within 4 weeks.
| Reagent | Final concentration | Amount |
|---|---|---|
| Percoll (100%) | 80% | 54 mL |
| 10× PBS | n/a | 6 mL |
| PBS-/- | n/a | 40 mL |
| Total | 100 mL |
26. Co-culture fixative
Prepare on the day of use.
| Reagent | Final concentration | Amount |
|---|---|---|
| Paraformaldehyde solution 37% in PBS | 3.7% | 1 mL |
| Glutaraldehyde 50% | 0.1% | 20 μL |
| PBS-/- | 8.98 mL | |
| Total | 10 mL |
Laboratory supplies
General
1. 15 mL tubes (neoLab Migge, catalog number: 352096)
2. 50 mL tubes (neoLab Migge, catalog number: 352070)
3. 5 mL serological pipette (Falcon, neoLab Migge, catalog number: 357543)
4. 10 mL serological pipette (Falcon, neoLab Migge, catalog number: 357551)
5. 25 mL serological pipette (Falcon, neoLab Migge, catalog number: 357525)
6. Cell strainer 100 μm (Greiner Bio-One, catalog number: 542000)
7. Cell strainer 70 μm (Greiner Bio-One, catalog number: 542070)
8. FACS tubes, Falcon 5 mL round-bottom polystyrene test tube, with cell strainer snap cap (Fisher Scientific, catalog number: 352235)
9. SafeSeal tubes 1.5 mL (Sarstedt, catalog number: 72.706)
Supplies for lab preparation
1. Autoclaving bags, large size (Greiner Bio-One, catalog number: 649201)
2. Labeling tape (neoLab Migge, catalog number: 2-6101)
3. Sterile drape Absorba-II, 200 × 320 cm (Integra, catalog number: 2206-3114)
4. Plastic tray (neoLab Migge, catalog number: 2-3853)
5. Forceps, small (Vubu Medical Instruments, catalog number: VUBU-02-45911 and VUBU-02-8911)
6. Forceps, big (Vubu Medical Instruments, catalog number: VUBU-02-21921 and VUBU-02-67920)
7. Intestine scissors (Vubu Medical Instruments, catalog number: VUBU-03-30521)
8. Scissors, curved (Vubu Medical Instruments, catalog number: VUBU-03-16114)
9. Scissor small (Vubu Medical Instruments, catalog number: VUBU-03-44908)
10. Petri dish 9 cm (Carl Roth, catalog number: N221.2)
11. Cooling element, Va-Q-accu 27L +05G (Va-Q-tec, catalog number: AK000295)
12. Ice bucket with lid (neoLab, catalog number: 2-6002)
13. Dry ice nuggets (CLEANGAS)
14. Measuring tape (Amazon, BLAMT, Stanley, catalog number: 0-34-295)
15. Safety pin 4.5 cm (Amazon, TK Gruppe Timo Kringler, catalog number: B082ZQZTDQ)
16. Wide metal dish 29 × 23 × 4 cm (Rewe, catalog number: 32420)
17. Bench cover, Foliodrape protect cover cloth 45 × 75 cm (Medpex, catalog number: 798179)
18. Labcoat (neoLab Migge, catalog number: 4-1482)
19. Protective gowns (Carl Roth, catalog number: CAL9.1)
20. Sleeves Medi-Inn (Carl Roth, catalog number: 1PP4.1)
21. Plastic box 15.7 × 11.8 × 10.0 cm, 1 L (Amazon, Rotho, catalog number: 6116705070)
Supplies for tissue collection
1. Freezing container, 18 × 1–2 mL (neoLab Migge, catalog number: 2-3701)
2. Barcoded cryovials, 2 mL (Greiner Bio-One, catalog number: 122280-2DG)
3. Scanner (CSL-Computer, catalog number: 722304674722 via Amazon)
4. Black cryo rack (Greiner Bio-One, catalog number: 802576)
5. White cryo rack (Greiner Bio-One, catalog number: 802202)
6. Beaker 800 mL (neoLab Migge, catalog number: E1052)
7. Sealing film parafilm M, 100 mm, 38 m (Carl Roth, catalog number: H666.1)
8. S-Monovette Serum-Gel 7.5 mL (Sarstedt AG & Co. KG, catalog number: 01.1602)
9. Cotton swaps, sterile (P+W Medizintechnik Platz & Co Handels GmbH, catalog number: 10724)
Supplies for histology
1. Histology cassettes (neoLab Migge, catalog number: 70012)
2. TT Cryomold intermediate, 15 × 15 × 15 mm (Science Service, catalog number: SA62534-15)
3. BD Microlance 3 Nr. 20, 27 G needle (MSG Medizinische Geräte, Handel und Service, catalog number: BD302200)
Supplies for organoid generation
1. 24-well plate (Greiner Bio-One, catalog number: 662160)
2. 200 μL pipette tips without filter (Sarstedt, catalog number: 70.760.202)
Supplies for immune cell isolation
1. Cell strainer 40 μm (Greiner Bio-One, neoLab Migge, catalog number: 352340)
2. 35 mL GosselinTM X500 FIOLE DROSO 25X95MM VRAC PS PS (Fisher Scientific, catalog number: 11773303)
3. Magnetic stirring bar, PTFE, cylindrical (BRAND, Merck Chemicals, catalog number: Z328723-10EA)
4. Neubauer counting chamber (neoLab Migge, catalog number: 191844172)
5. Duran crystallizing beaker (Merck Chemicals GmbH, catalog number: Z231754)
6. C-tubes for gentleMACS (Miltenyi BioTec, catalog number: 130-093-237)
7. Round-bottom 96-well plates (neoLab Migge, catalog number: C-8207)
Equipment
1. Pipet boy acu 2 (Integra BioscienceTM, catalog number: 10060262)
2. Cell culture incubator (Heracell, catalog number: 51032720)
3. Herasafe 2030i biosafety hood (Thermo Fisher Scientific, catalog number: 51032324)
4. Forced convection laboratory incubator (ScanCell, catalog number: 37)
5. 5810 R centrifuge (Eppendorf, catalog number: 5811000420)
6. Fluorescence microscope (Nikon, model: Eclipse Ti2)
7. Microscope stage incubator (Tokai Hit)
8. Rocker shaker 2D series (Carl Roth GmbH+Co. KG, catalog number: XT47.1)
9. IKA 4011000 Roller shaker (IKA, catalog number: EW-04304-05)
10. CryoStar NX50 (Thermo Fisher Scientific, EprediaTM, catalog number: 13435949)
11. HM 340E Microtome (Thermo Fischer Scientific, catalog number: 26370735)
12. gentleMACS Octo Dissociator with Heaters (Miltenyi Biotec B.V., catalog number: 130-096-427)
13. Spectral Analyzer (SONY, model: ID7000TM)
14. Electrothermal Paraffin section flotation bath (Cole-Parmer, catalog number: MH8517)
15. Orbital shaker (Sunlab, catalog number: SU1030)
16. Scale (Sartorious, catalog number: CP32025-OCE)
17. Vortexer (Neolab, catalog number: D6012)
18. -80 °C freezer
19. -20 °C freezer
20. 4 °C fridge
21. N2 tank
22. Paraffin processing station: Leica, ASP 300S Tissue Processor
23. Casting station: Leica, HistoCore Arcadia H Embedding Center
24. Magnetic stirrer with heater (IKA, model: RCT5 digital)
Software and datasets
1. FlowJo v10.8.1
2. GraphPad Prism v.10.0.0
3. Fiji (ImageJ)
4. Microsoft Excel
Procedure
The protocol below describes the processing and generation of a tissue biobank as well as the isolation of immune and epithelial cells from both fresh and cryopreserved tissue. More specifically, it describes the downstream analysis of the tissue itself, including histology, RNA, and protein isolation. It addresses the in-depth analysis of immune cell subtypes using flow cytometry and cell sorting. Additionally, it provides a guide for establishing region-specific organoids, which can be combined with isolated immune cells to generate an autologous co-culture. Possible readouts of the co-culture include cell interaction studies, cytokine release assays, and single-cell RNA sequencing. This extensive protocol can be customized to individual requirements, e.g., the number and location of collected biopsies, as well as the choice of specific downstream applications.
A. Protocol for surgeons
This section describes the established protocol for organ procurement.
1. Whole organ processing prior to shipment
a. After excising the whole intestine distal to the pylorus and at the rectum, separate the small and large intestine at the ileocecal valve.
b. Label the proximal and distal sides.
Note: Several options can be applied to improve tissue integrity. A small incision can be made along the longitudinal axis, the mesentery removed, and the intestine cut open. Additionally, Custodiol can be used to flush and remove luminal content.
c. Transfer the organ to Custodiol and package and store it on ice similar to any other donor organ.
d. Draw blood and store it in a serum or plasma tube, depending on the desired readout.
e. Send it to the recipient.
B. Region definition
This section describes how the intestinal regions are defined.
Extensive literature research was performed to define the different small and large intestinal regions. Since the absolute length of the intestine varies between individuals, we decided to standardize the sampling location based on relative values. We performed a meta-analysis to define average values for total length and to identify the different gut regions [7–12]. Based on these values, we calculated relative values for the beginning and end of the six regions: duodenum, jejunum, and ileum, as well as the ascending, transverse, and descending colon, defining the proximal and the distal end as 100% for either the small or large intestine, respectively. Figure 1 shows the six chosen regions and their definition with the ileocecal valve as a reference. Small intestinal regions are marked with negative relative values and large intestinal regions with positive values. The absolute values can then be calculated for the individual intestine using the total length of the small and large intestine, respectively (Supplemental Excel file).
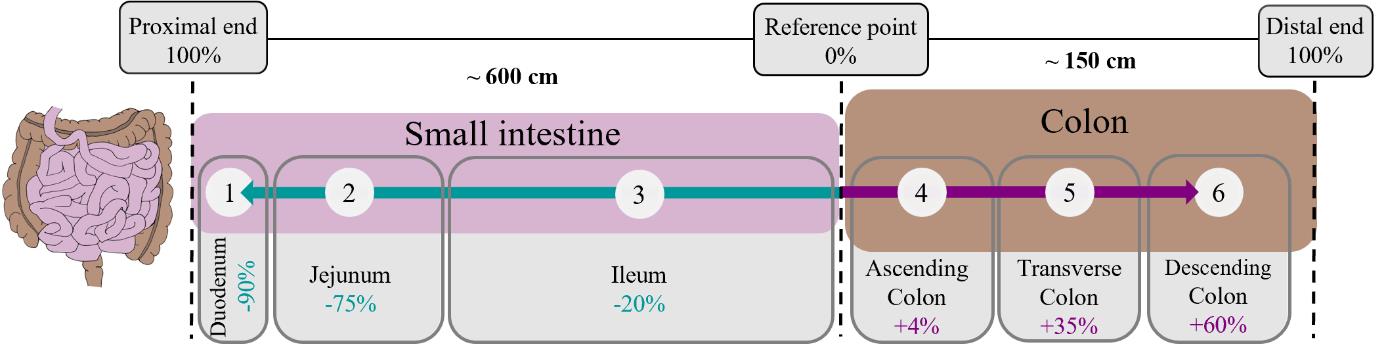
Figure 1. Regional description of the human gut. Small intestine (pink) and colon (brown) are separated by regions depending on their relative distance to the ileocecal valve (reference point 0%) as a reference point. Approximate lengths of the small and large intestine are shown [10,12]. Percentages use the total length of either the small or large intestine as a reference. A negative percentage indicates the distal to proximal orientation in the case of the small intestine.
C. Lab preparation
This section gives details about required lab preparations, the establishment of a biobank file, and workflow. The following steps should be carried out a day before receiving the gut.
1. Biobank preparation
a. Generate a biobank file using the template (Supplemental Excel file) containing information on the date, patient age, sex, and medical history if provided. Adjust the file according to the regions sampled, number of tubes collected, and types of storage (biobank, RNA, protein, or histology).
b. Label white cryo racks according to the gut ID.
c. Label the freezing containers according to each gut region and, if necessary, number them inside to track the tube order easily (Figure 2A). Fill it with isopropanol to the indicated level.
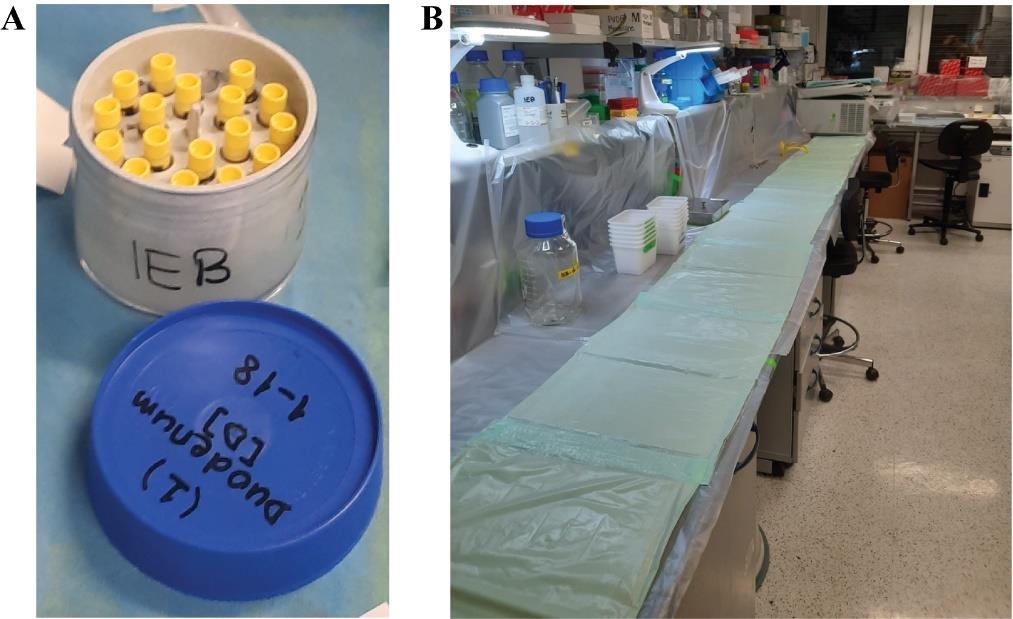
Figure 2. Laboratory preparation a day before the arrival of the organ. (A) Freezing containers labeled per gut region and filled with barcoded cryotubes. (B) An example of bench coverage using autoclavable bags and drapes.
d. Transfer the barcoded cryovials to the freezing container.
Note: Regular cryovials can be used if no biobank is generated or tubes are labeled instead of the barcode.
e. Prepare the cryopreservation buffer. The final volume required can be calculated by the total number of tubes × 1 mL/tube.
f. Pipette 1 mL of the cryopreservation buffer to each 2 mL cryovial using a 10 mL pipette.
g. Enter the barcode of each tube in the biobank file according to its location in the freezing container. This can be done using a barcode scanner.
h. Transfer the freezing containers to 4 °C (Figure 2A).
2. Tubes for mucosal sampling, blood, RNA, and protein isolation
a. For mucosal sampling, prepare empty cryovials by labeling them with M1–M6.
b. For blood (serum/plasma) storage, prepare the desired number of empty tubes labeled with B1–X.
c. For RNA isolation, fill a barcoded cryovial with 1 mL of RNA later stabilization solution.
d. Prepare empty barcoded cryovials for protein isolation.
e. Transfer all of them to a black cryo rack labeled accordingly (e.g., Box 3).
Note: Since the tubes will be taken out of the box for sample transferal, it is advisable to label the lid with the region number and type of storage (RNA or protein) to ease the sampling process.
f. Enter the barcode of each tube in the biobank file according to its location in the cryo rack.
Note: Print a hard copy of the biobank file to make it easy to track the barcode back to the intestinal region during tissue processing.
g. Label two beakers with paraffin or sucrose, respectively, and fill them with 300 mL of 4% PFA. Seal with Parafilm and store at 4 °C.
h. Label the histology cassettes and cryomolds.
i. If a larger tissue should be fixed as a Swiss roll, label 27 G needles accordingly.
3. Laboratory preparation
Note: It is advisable to remove any equipment and material from the workbenches beforehand.
a. Cover benches with plastic cover (e.g., cut-open large autoclaving bags) and fix them on the benches (Figure 2B).
b. Use the sterile drape to add another protective layer on the benches (Figure 2B).
c. Prepare one tray with all the equipment required to dissect the tissue, including scissors, tweezers, two 27 G needles, one rack for cryovials, and one Petri dish. The workspace can be optionally equipped with a lamp.
d. Prepare a tray with measuring tape, dissecting scissors, and safety pins necessary for initial tissue measurement and labeling.
d. Print a workflow for each region containing all the steps that need to be followed.
Note: This will help you go through the sampling process and allow you to take notes on tissue integrity.
e. Transfer the cooling elements to -20 °C.
f. Prepare two bins with autoclaving bags—one for general waste and one designated only for intestinal tissue waste.
Note: Any residual tissue needs to be discarded following the rules for human tissue disposal.
D. Whole gut tissue processing
This section describes the processing of the procured gut tissue and how it is divided into smaller pieces for the respective intestinal regions.
1. Gut receival.
One hour before
a. Prepare one ice box per region to be sampled.
b. In case isolation from fresh tissue for either immune or epithelial cells is desired, prepare a 15 mL tube containing Custodiol or RPMI and place it on ice.
c. Transfer the barcoded cryovials for RNA and protein samples prepared the day before to the ice box for each region, respectively.
d. Prepare a box with dry ice and place the empty cryo rack inside for RNA and protein sampling.
e. Prewarm the mucus removal solution and the cRPMI at 37 °C.
Upon delivery
Critical: You are handling human material. Therefore, it is important to wear personal safety equipment. The staff handling the tissue are advised to use extra impermeable sleeves.
Note: The tasks should be distributed beforehand amongst the team members and should be carried out side-by-side.
f. Prepare an empty big plastic tray located next to the sink.
Note: Depending on the delivery conditions, the ice contained in the box can be completely melted. Be aware that there can be water spillage.
g. Open the carton, cut open the first plastic bag, and retrieve the Styrofoam box. The intestine will be packed in two additional plastic bags or containers.
Note: The tissue will often come separated by small intestine and colon. If not, the first step would be to separate them by cutting through the ileocecal valve (Figure 1). Then, you should start with the region of interest while the other can stand in Custodiol until it is ready for processing (usually after step H10).
h. Place the plastic bag containing the intestine in the plastic tray and cut it open.
i. Remove any residual liquid.
j. Rinse the tissue with cold PBS if intestinal content has spilled. Large quantities of stool can be removed manually.
Note: Steps D1j depend on the individual preprocessing of the gut. If little or no intestinal content is present or if the intestine is cut open, move to the next step.
2. Measurement, region identification, and tissue section preparation
a. Place the tissue on the prepared bench and identify the proximal and distal ends (Figure 3A).
Note: Depending on the preprocessing, missing part of the intestine or a lack of labeling of the openings can be challenging. Familiarize yourself beforehand with the anatomical features of the small and large intestines. The duodenum is free of mesentery, and the folding of the mucosa is more pronounced compared to the other intestinal segments. Additionally, the entry of the bile duct might be identifiable. The color of the mucosal lining is more pinkish red in the ileum than in the duodenum when directly compared to each other. For the large intestine, the appendix and cecum can be used as hallmarks to identify the proximal end. Additionally, depending on the excision site, the rectum can be identified at the distal end by longitudinal striation.
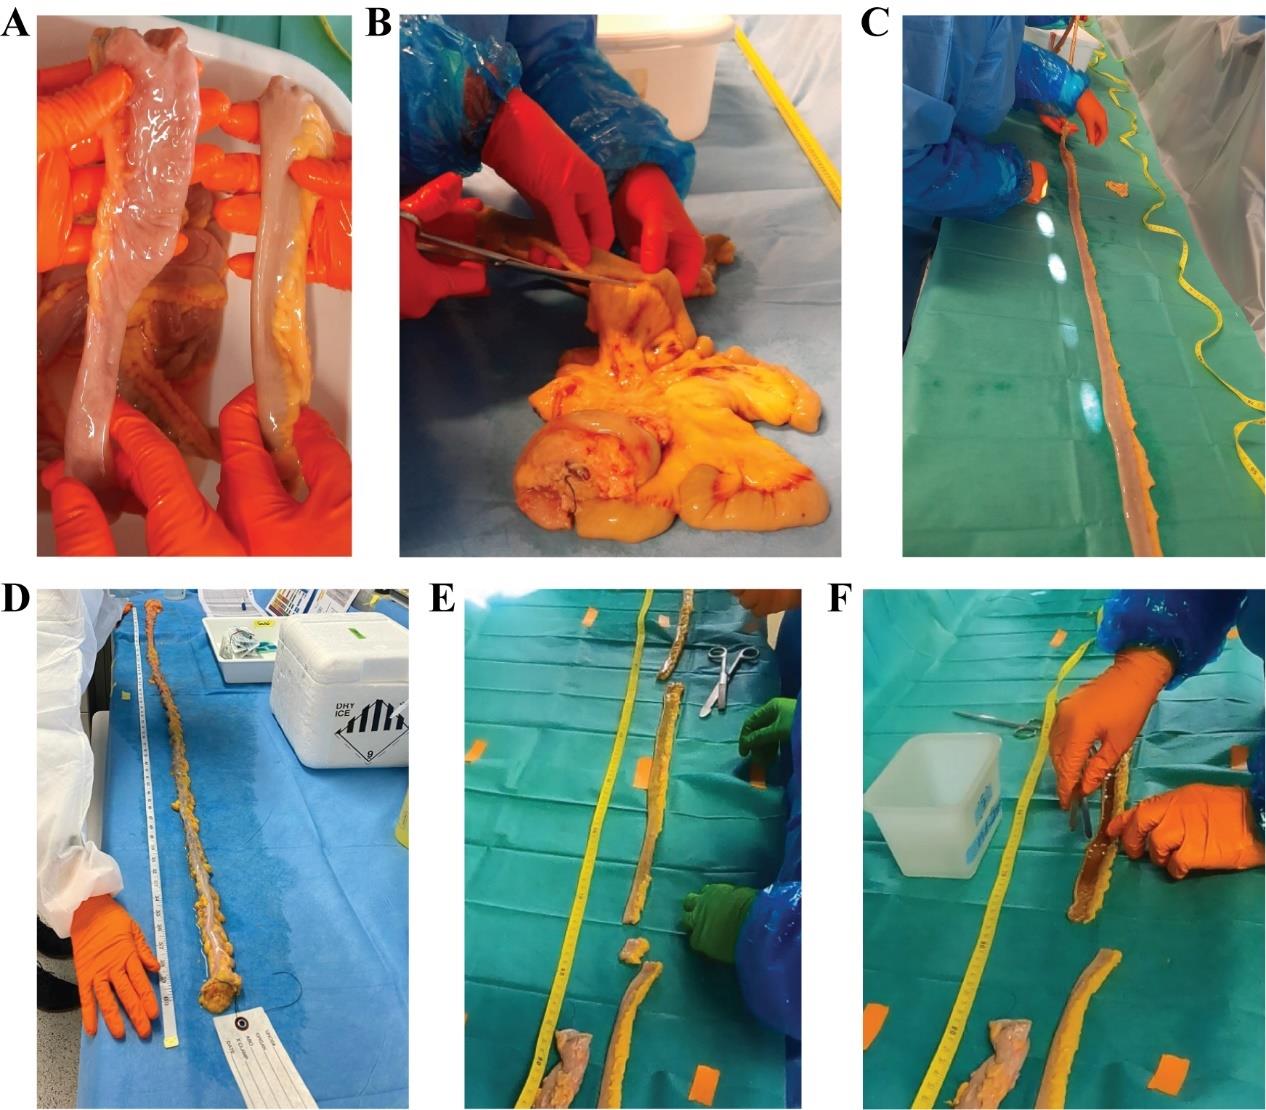
Figure 3. Gut processing and dissection. (A) Comparison of the proximal and distal ends of the small intestinal segments: ileum (left) and duodenum (right). (B) Removing the mesentery, cutting it as close to the tissue as possible to allow proper measurements. (C) Spreading the tissue on the table to avoid wrinkles or stretches to measure its length. (D) Measurement of the large intestine. (E) Example of the excision of a 40 cm piece of ileum for biopsy collection and a 1 cm piece for histology. (F) Longitudinal opening of the 40 cm ileal piece for further dissection.
b. Once the proximal and distal ends are identified, the mesentery is removed (Figure 3B).
Note: Excise as close to the mucosal tissue as possible. This will facilitate tissue spreading to its full length.
c. Spread out the tissue to its full length without stretching it (Figure 3C).
d. Measure the total length of the tissue using a measuring tape and document it in the biobank file (Figure 3D).
Note: In the template, the incision sites will be calculated in centimeters once the total length is added.
e. Make an incision at the calculated length and make another incision 20–30 cm toward the proximal (small intestine) or distal (large intestine) opening (Figure 3E).
f. Mark the distal end with a safety pin.
g. Cut one 1 cm piece of the proximal side for histology and follow step G1 (Figure 3E).
h. Open the intestinal piece longitudinally by cutting following the mesentery (Figure 3F).
i. Continue on section H.
E. Blood preparation for storage
This section below is optional and depends on the individual biobanking desires. The blood is collected in serum or plasma tubes from the patient by the surgeon. The collected blood needs to be processed according to the desired downstream experiments. Potentially blood-derived immune cells could be isolated, analyzed, or used as an alternative source for co-culture. The protocol below describes the collection of serum from blood collected in serum tubes that promote blood coagulation.
1. Place the tube containing the blood into the pre-cooled centrifuge and spin down at 750× g for 15 min.
2. Transfer the supernatant-containing serum to 1.5 mL tubes labeled B1–X.
3. Transfer the tubes to the designated box on dry ice and store them at -80 °C.
Note: After organoid establishment, it can then be used in an organoid-serum stimulation assay, as shown in a novel Systemic Lupus Erythematosus (SLE) model [13].
F. Mucus collection for microbiome analysis
This is an optional step that can be performed if microbiome analysis is desired.
1. Make sure the mucosal side of the tissue is facing upward.
2. Use a sterile cotton swap and sample the mucus by wiping and rolling it over the tissue piece.
3. Transfer the swap to an empty 1.5 mL tube labeled with M1–M6 and break off the handle.
4. Transfer the tube to the designated box on dry ice and store at -80 °C.
G. Tissue collection for histology
This section gives a detailed description of tissue processing if histological staining is desired.
1. Tissue fixation
a. Cut the tissue from step D2g into pieces of the desired size and rinse with Custodiol. If a Swiss roll is desired, open the tissue longitudinally, roll the tissue, and fix it with a needle.
b. Transfer the tissues into the tissue cassettes and drop them into the respective prepared beaker containing 4% PFA (prepared on step C2g).
Critical: Make sure that the tissue is placed flat into the cassette and that the lid does not squeeze the tissue to ensure undisturbed tissue integrity.
Note: Best villi preservation is obtained if the intestinal biopsy is not open and remains closed.
Note: Swiss rolls are a good alternative if tissue has been cut open. Consider fixing it in a 50 mL tube and then transferring it into the cassette after fixation to improve villi and tissue histology.
c. Fix the tissue overnight at 4 °C.
2. Embedding of fixed tissue for paraffin sections
Note: All following steps are performed at room temperature except stated otherwise.
a. Transfer the cassettes with tissue to 30% ethanol for 1 h.
b. Transfer the cassettes to 50% ethanol for 1 h.
c. Transfer the cassettes to 70% ethanol for 1 h.
Note: Cassettes can be kept in 70% ethanol at 4 °C for up to a month before continuing to the next steps.
d. Transfer the cassettes to 80% ethanol for 1 h.
e. Transfer the cassettes to 90% ethanol for 30 min.
f. Transfer the cassettes to 100% ethanol for 90 min.
Note: If slower dehydration is desired, more intermediate steps can be added using 95% and 98% ethanol.
g. Transfer the cassettes to xylene for 1 h.
h. Transfer the cassettes to fresh xylene for 1 h.
i. Transfer the cassettes to melted paraffin for 1 h at 65 °C.
j. Transfer the cassettes to fresh melted paraffin for at least 3 h at 65 °C.
Note: Steps G2a–j can be performed in an automated paraffin processing station.
k. Remove the tissue from the cassettes and embed them using a casting station to ensure the desired histology orientation.
l. Let the cassettes cool down and store them at either room temperature or at 4 °C.
3. Embedding of fixed tissue for cryosections
Note: All following steps are performed at room temperature except stated otherwise.
a. Transfer the cassettes to 5% sucrose for 1 h.
b. Transfer the cassettes to 15% sucrose for 1 h.
c. Transfer the cassettes to 30% sucrose for 1 h.
Note: It is recommended to leave the tissue in 30% sucrose overnight at 4 °C. The tissue can be stored in 30% sucrose indefinitely, but it is recommended to be processed fast since contamination may appear.
d. Transfer the cassettes to a mix of 50:50 of tissue freezing medium and 30% sucrose for 1 h.
e. Place the tissues in cryomolds filled with tissue freezing medium and position the tissue.
f. Freeze the cryomolds containing the tissue by dropping them on liquid nitrogen or in a methanol-dry ice bath.
g. Wrap the cryomolds in aluminum foil and store at -80 °C.
H. Mucus removal
This section describes how to remove the secreted mucus from the underlying tissue. This step is essential to improve cell recovery yields.
Note: Continue from step D2i.
1. Transfer the tissue piece to a plastic box labeled with the designated intestinal area and containing 150 mL of Custodiol.
2. Transfer it to an ice box.
Note: The transfer to Custodiol and ice is necessary to both add a cleaning step to remove debris and to ensure the tissue is preserved during further processing.
3. Add 100 mL of prewarmed mucus removal solution into a wide metal or plastic flat-bottom dish at room temperature.
Note: Depending on the container size, a larger volume of solution may be needed. Ensure that the tissue is fully covered.
4. Transfer the open and clean piece of tissue into the wide metal or plastic flat bottom dish with the mucosa facing toward the bottom of the dish.
Note: It is recommended to use pieces of 20 cm to avoid excessive or uneven treatment. If larger pieces are desired, it is better to do it sequentially, 20 cm at a time.
5. Gently press and shake the tissue with forceps against the bottom of the dish for 10 min.
Note: This step is important since the gentle friction against the bottom of the container will help the mucus to detach.
Critical: Too much pressure will lead to tissue damage, while too little will not remove big pieces of mucus effectively.
6. Remove the mucus removal solution and add 100 mL of prewarmed mucus removal solution to the tissue.
7. Press and shake the tissue for another 10 min.
Note: Steps H6 and 7 can be repeated if necessary. The time of incubation will depend on the specimen, the mucus, and feces amount. In contrast, if the tissue is rather clean before starting the mucus removal step, one wash step might be sufficient.
Critical: Excessive incubation with mucus removal solution will lead to villi loss. Therefore, the tissue should be washed until the mucus is eliminated (Figure 4). If villi are observed detached in solution, the incubation must be stopped, and the tissue must be immediately transferred to cRPMI (step H8).
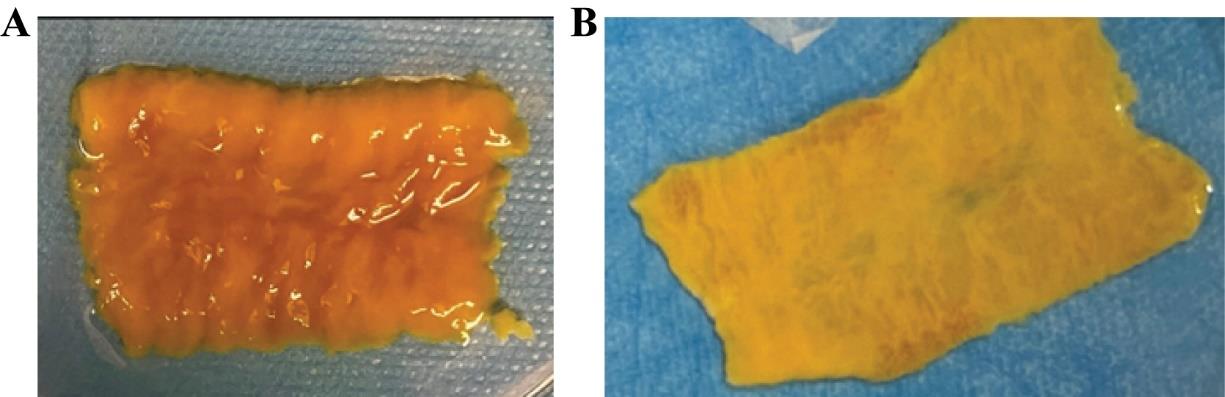
Figure 4. Incubation with mucus removal media. (A) An ileal piece of 10 cm open longitudinally previous to mucus removal treatment. (B) Ileal piece after incubation with a mucus removal solution.
8. Add 100 mL of prewarmed cRPMI to the tissue.
9. Press and shake for 10 min.
10. After sufficient mucus removal, transfer the clean tissue to a labeled box containing 150 mL of fresh Custodiol and proceed with the following processing step.
I. Biopsy collection and cryopreservation
This section describes the biopsy collection for RNA, protein isolation, cell isolation, and cryopreservation.
Note: The top layer of the bench protection can be removed to have a clean workspace for the following steps.
1. Place the cooling element on the bench and cover it with a surgical mat or drape.
2. Add Custodiol to your Petri dish and place it on the cooling element.
3. Cut a piece from the proximal side of your tissue piece and transfer it to the Petri dish (Figure 5A).
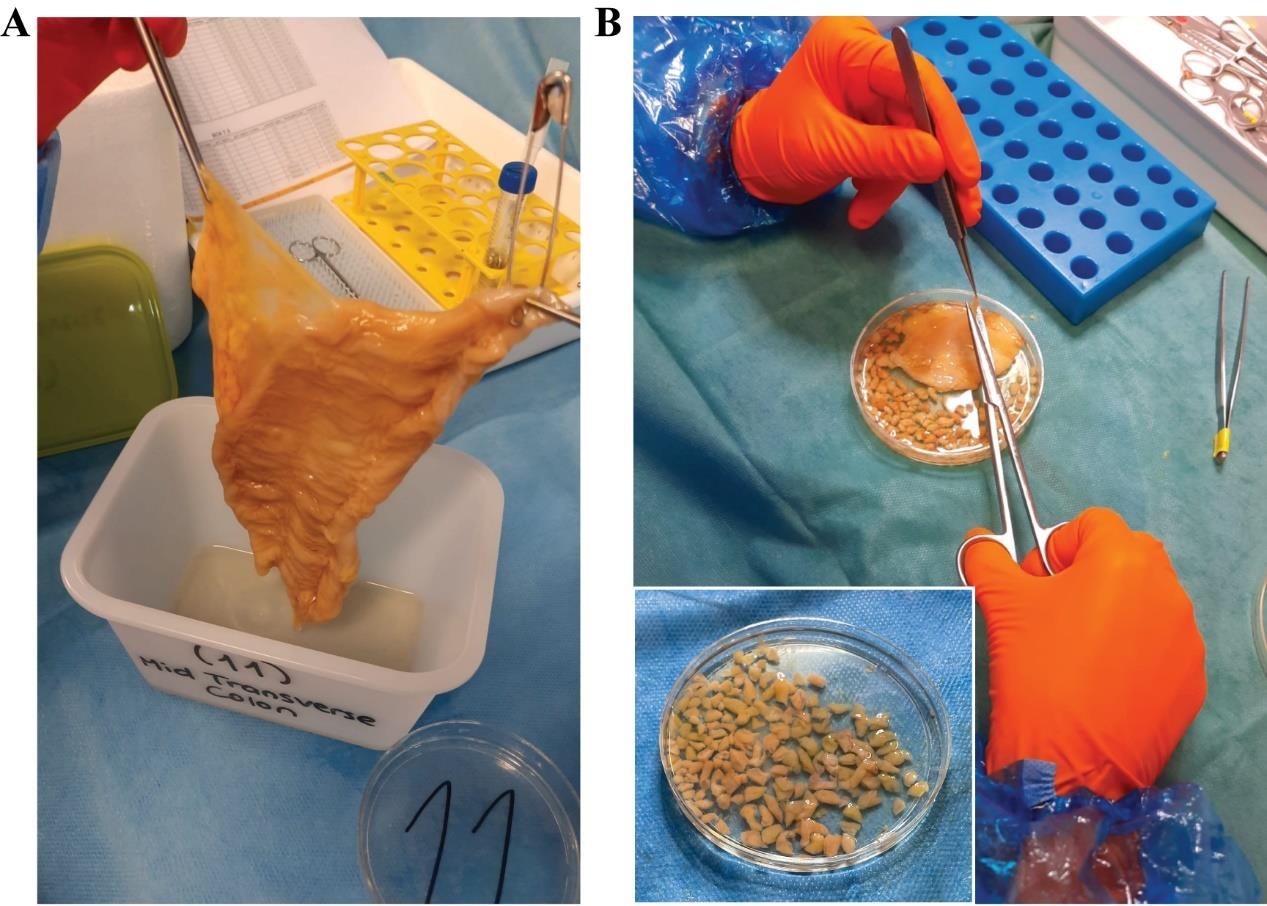
Figure 5. Example of biopsy tissue collection. (A) Full piece of colon after mucus removal. (B) Example of biopsy collection, where tissue is pinched with tweezers, and 5 mm2 biopsies are taken.
Note: Make sure that you keep the residual tissue submerged and on ice.
Critical: The biopsies should be devoid of any muscle layer and contain only the lamina propria and the mucosal layer. If the tissue is spread, this can be easily achieved by holding the mucosal tissue with the tweezers and cutting it just below. Scissors with curved tips can help to avoid pinching the muscular layer. Biopsy sizes should be approximately 0.5 × 0.5 cm (Figure 5B). Sometimes, it might be easier to first cut a long strip of tissue and then cut it into smaller pieces. If accurate separation of mucosa and submucosa or specific isolation of GALTs is needed, this should be performed under a stereoscope. However, this will delay tissue collection, and redistribution of tasks may be necessary.
Note: The rigidity of the tissue and the characteristics of the mucosal tissue vary along the longitudinal axis of the intestine. While in the small intestine it is easier to cut bigger tissue pieces containing small portions of underlying muscle layer due to the folding, it might be easier to cut small pieces devoid of any muscle layer in the colon.
4. If immune or epithelial cells are to be isolated, start by cutting biopsies for the isolation. Transfer 2 g of tissue or up to 30 pieces of 5 mm2 biopsies to each of the prepared canonical tubes. Continue with section K or M.
5. For protein isolation, cut 8 biopsies and transfer one biopsy to each of the eight tubes prepared for that. Then, transfer them to the box on the dry ice. The box is transferred to liquid nitrogen for long-term storage after all biopsies are collected.
6. For RNA isolation, cut 9 biopsies and transfer three biopsies to each of the three tubes prepared for that. Then, transfer them to the box on the dry ice. The box is transferred to liquid nitrogen for long-term storage after all biopsies are collected.
7. For the collection of samples for biobanking, cut and transfer 10–15 biopsies to each tube and make sure they are submerged in the buffer. Once all the cryovials are filled, transfer the freezing container to 4 °C and incubate it for 1 h. Then, transfer the freezing container to -80 °C. After 24–72 h, transfer the tubes from the freezing container to the white cryo racks prepared in step C1b.
J. Gut disposal
1. Transfer any residual tissue to an autoclaving bag, seal it, and cover it with another autoclaving bag before autoclaving.
2. Dispose of the human tissue in accordance with local regulations.
K. Organoid generation from fresh or cryopreserved tissue
This section describes the generation of region-specific organoids from fresh or cryopreserved tissue. Organoids can be generated directly from fresh tissue (section I) or from thawed cryopreserved tissue (section L). While intact crypt structures and cell clusters can be expected from fresh tissue, crypt isolation from cryopreserved tissue will yield less intact crypt structures and rather cell clusters and single cells.
Critical: The plastic needs to be coated with FBS to avoid any tissue or cells sticking to the plastic.
Note: When generating organoids from cryopreserved tissue, the organoid yield is expected to be lower, and it is more likely that organoids will grow from single cells rather than crypts or cell clusters. Therefore, the time for organoid generation might be 8–12 days instead of 5–7 days. The organoids are then expected to be more sensitive to the dissociation required for expansion. Thus, a low splitting ratio is advised.
1. Organoid line establishment
a. Prepare two 15 mL tubes and one 10 mL pipette per region beforehand by coating them with FBS.
b. Add 10 mL of the dissociation solution to one of the tubes. Keep both tubes on ice.
c. Transfer 15 biopsies to the tube containing the dissociation solution.
d. Incubate it for 30 min (small intestine) or 60 min (large intestine) at 4 °C on a rotating shaker.
e. Remove the dissociation solution.
f. Add 5 mL of ice-cold PBS.
g. Use the coated 10 mL pipette (step K1a) to aspirate and dispense the full volume 20 times.
h. Let the biopsies settle and transfer the supernatant to the FBS-coated 15 mL tube (step K1a).
i. Repeat steps K1f, h, e, g two more times to have a total of 15 mL of cell suspension.
Note: In case of small intestinal cell isolation from fresh tissue, it might be beneficial to use a pre-wet 70 μm strainer to remove villus structures. In order to check if that is necessary, 200 μL of the cell suspension can be added to a microscopy slide and checked under the microscope. If no big structures are visible, this step can be skipped.
i. Centrifuge the suspension at 250× g for 5 min at 4 °C.
Note: A slow break should be used to avoid disturbances to the pellet. In case no pellet has formed, the centrifugation can be repeated.
j. Discard the supernatant and gently resuspend the pellet in a 10 mL of base medium. Repeat the centrifugation step.
k. Resuspend the pellet in the appropriate volume expansion medium containing Y-27632.
Note: The volume added should be equivalent to 2× the pellet size.
l. Mix 10 μL of the cell suspension and 40 μL of Matrigel and seed the full volume to one well of a 24-well plate.
Note: Ideally, 4–6 wells should be plated.
m. Invert the plate and let it polymerize in the cell culture incubator (37 °C, 5% CO2 atmosphere, humidified) for a minimum of 30 min standing on the lid.
Note: By inverting the plate, the settling of cells to the plate bottom is reduced, which improves media diffusion to the organoid and 2D growth.
n. Reinvert the plate to add 500 μL of expansion medium containing Y-27632.
Note: Cell density should not be too low (Figure 6A). A higher cell density (Figure 6B) will support organoid formation (Figure 6C). Dead cells will shrink, whereas viable cells forming organoids present with a sharp cell border (Figure 6D).
o. Change the medium every 2–3 days using expansion medium.
2. Organoid line maintenance and expansion: Once organoids reach 200–300 μm in diameter (Figure 6E, F) they can be expanded.
a. Add 5 mL of cold base medium to a 15 mL tube.
b. Remove the medium from all wells containing organoids without disturbing the Matrigel pellet.
c. Add 1 mL of cold base medium and aspirate and dispense the full volume to release organoids from the Matrigel.
Note: Up to six wells can be pooled in 1 mL of base medium.
d. Transfer the organoid suspension to the 15 mL tube prepared in step K2a.
e. Then, equip a 10 mL pipette with a 200 μL pipette tip and aspirate and dispense the organoid suspension three times.
Note: This step helps to dissolve and dilute the extracellular matrix.
f. Centrifuge the cell suspension at 150× g for 5 min at 4 °C.
g. Remove the supernatant and resuspend the pellet in 50 μL of Accutase per well.
h. Incubate at 37 °C for 45 s.
i. Add 6 mL of cold base medium.
j. Equip a 10 mL pipette with a 200 μL pipette tip and aspirate and dispense the organoid suspension 5–20 times.
Note: The exact number needed depends on the organoid line and needs to be adjusted accordingly. The dissociation should result in a cell suspension containing mostly cell clusters instead of single cells or intact organoids. The success of the dissociation can be checked by microscopy using 10 μL of suspension.
k. Repeat step K2f.
l. Remove the supernatant and resuspend the pellet in a defined volume of expansion medium and Matrigel.
m. Resuspension volume = # wells (pooled for dissociation) × expansion ratio × 45 μL × 0.2 (20% of total volume)
Note: The expansion ratio depends on the density and age of the culture. Directly after isolation, a low expansion should be chosen, e.g., 1:1–1:2, while at later passages, a ratio of 1:6–1:8 can be used. This depends on the individual growth dynamics of each organoid line and needs to be determined.
n. Organoid suspension volume = # wells (desired) × 45 μL × 0.2
o. Matrigel volume = # wells (desired) × 45 μL × 0.8
p. Add 45 μL of the cell suspension Matrigel mix to one well of a 24-well plate.
q. Invert the plate and let it polymerize in the cell culture incubator (37 °C, 5% CO2 atmosphere, humidified) for a minimum of 30 min.
r. Add 500 μL of expansion medium containing Y-27632.
s. Change the medium every 2–3 days with new expansion medium.
t. Repeat step K2a–r every 5–7 days.
Note: The time period between organoid dissociation is dependent on the organoid line as well as the intestinal region. Small intestinal organoids expand slightly slower than colon organoids, which leads to a longer growth period between the dissociations. Organoids can be maintained in culture indefinitely.
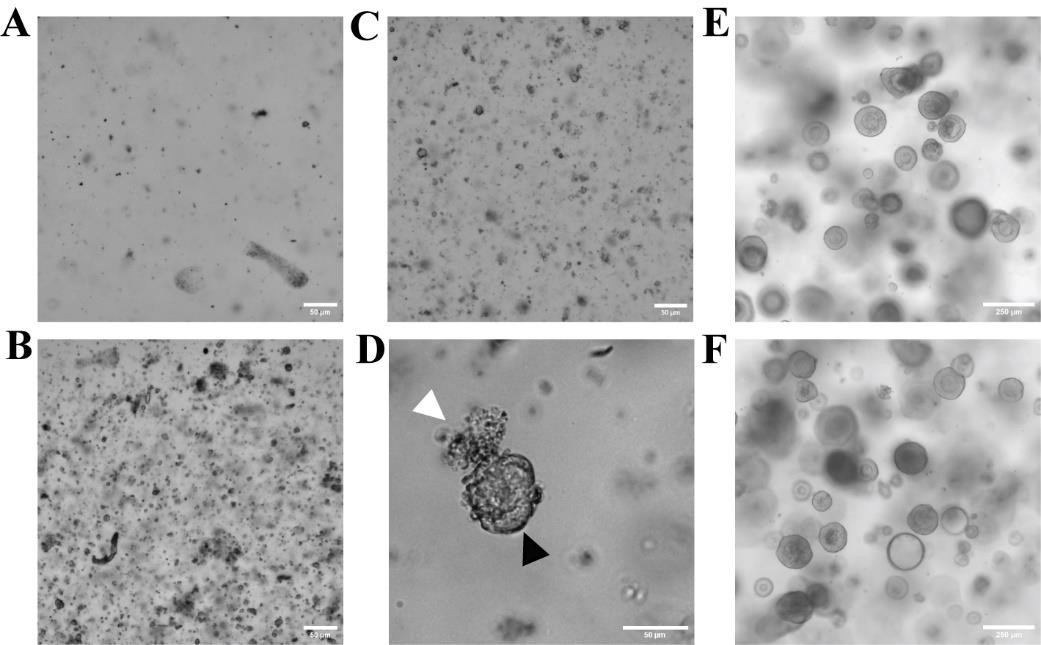
Figure 6. Isolation of stem cell–containing crypts and cell suspension for organoid generation. (A) A low and not ideal cell density of single cells in Matrigel dome is shown. (B) A high and optimal cell density of single cells in Matrigel dome is shown. (C) Epithelial cells start to form organoid structures two days after cell isolation. (D) Viable cells and forming organoids show sharp cell boundaries (black arrow), whereas dead cells shrink (white arrow). (E) Organoids derived from fresh descending colon tissue on day four of the fourth passage. (F) Organoids derived from cryopreserved descending colon tissue on day four of the sixth passage. Scale bars are 50 μm (A–D) and 250 μm (E, F). Images A–D show cells isolated from cryopreserved tissue.
L. Thawing of cryopreserved tissue
This section describes how to thaw the cryopreserved tissue biopsies while preserving tissue integrity.
Note: Cryopreservation will reduce the total number of isolated cells 10-fold compared to cell isolation from fresh tissue. However, general population distributions are unaffected, and cells remain functional after cryopreservation. This allows us to study cell isolates at a different time point than the day of tissue processing, to perform sequential analysis of the same region, and to generate autologous co-cultures.
1. Prepare three 50 mL tubes with 20 mL of 0.75 M, 0.375 M, and 0.125 M sucrose and two 50 mL tubes containing 20 mL of 10% FBS/PBS. Keep the tubes at room temperature.
2. Retrieve cryovials containing biopsies from liquid nitrogen and place them on dry ice for transportation.
3. Incubate vials in a water bath at 37 °C until samples are thawed (1–2 min).
Note: Make sure to incubate the biopsies as quickly as possible. Transfer the biopsies before they are fully thawed to avoid cell loss.
4. Pour the content of the vial onto a 100 μm strainer.
5. Collect the biopsies from the strainer and add them to the 50 mL tube containing 20 mL of 0.75 M sucrose.
6. Incubate for 15 min on a horizontal shaker (50–100 rpm) at room temperature.
Note: To minimize cell loss, a low rpm is recommended. Upon thawing, the tissue is fragile. Thus, shear stress should be kept at a minimum while making sure the tissue is in motion.
7. Pour the content of the 50 mL tube onto a 100 μm strainer.
8. Collect the biopsies and add them to the 50 mL tube containing 20 mL of 0.375 M sucrose.
9. Incubate for 15 min on a shaker (50–100 rpm) at room temperature.
10. Pour the content of the 50 mL tube onto a 100 μm strainer.
11. Collect the biopsies and add them to the 50 mL tube containing 20 mL of 0.125 M sucrose.
12. Incubate for 15 min on a shaker (50–100 rpm) at room temperature.
13. Pour the content of the 50 mL tube onto a 100 μm strainer.
14. Collect the biopsies and add them to the 50 mL tube containing 20 mL of 10% FBS/PBS.
15. Incubate for 10 min on a shaker (50–100 rpm) at room temperature.
16. Repeat steps L13–15.
17. Pour the content of the 50 mL tube onto a 100 μm strainer.
18. Collect the biopsies and proceed with desired cell isolation (section K, M–O).
M. Epithelial cell isolation for FACS analysis or epithelial cell removal prior to immune cell isolation
This section describes how to either isolate epithelial cells for downstream analysis or remove epithelial cells from the tissue biopsies to allow for purer immune cell isolation.
Note: Starting material can be freshly taken (section I) or thawed cryopreserved biopsies (section L).
Note: If a co-culture is the aim of immune cell isolation, the addition of primocin (100 μg/mL) to epithelial cell removal media is recommended to avoid possible contaminations at later stages.
1. Prepare tubes:
a. Tube 1: 50 mL tube with 25 mL of epithelial cell removal medium.
b. Tube 2: 50 mL tube with 25 mL of epithelial cell removal medium.
c. Tube 3: 50 mL tube with 25 mL of cRPMI.
d. Tube 4: Empty collection 50 mL tube labeled as an epithelial fraction.
2. Prewarm tubes 1, 2, and 3 (steps M1a–c).
3. Place tube 4 on ice (step M1d).
4. Transfer the biopsies to tube 1 (step M1a) containing 25 mL of epithelial removal medium.
5. Incubate for 20 min at 37 °C on a horizontal shaker (350 rpm).
Note: In this step, the sheer stress should be strong to allow epithelial cell detachment.
6. Vortex the tube with biopsies vigorously for 30 s.
7. Pre-wet a 70 μm strainer with 5 mL of cRPMI.
8. Pour the content of tube 1 onto the 70 μm strainer and collect the flowthrough in tube 4 (step M1d) placed on ice.
9. Collect the biopsies from the strainer and add them to tube 2 (step M1b) containing 25 mL of epithelial cell removal medium.
10. Incubate for 20 min at 37 °C on a shaker (350 rpm).
11. Pour the content onto the 70 μm strainer and collect the flowthrough in tube 4.
12. Collect the biopsies from the strainer and add them to tube 3 (step M1c) containing 25 mL of cRPMI.
13. Discard the flowthrough (enriched on fibroblasts), transfer the biopsies for immune cell isolation (section N), or discard them if the interest is in the epithelial fraction.
14. To recover the epithelial cells, centrifuge tube 4 at 400× g for 10 min at 4 °C.
15. Discard the supernatant and resuspend the pellet in 1 mL of cRPMI.
Note: Centrifugation of tube 4 and resuspension on cRPMI can be done after the first collection (step M6) or at the end (step M9).
Note: Two incubations with epithelial cell removal media are the most efficient way to remove epithelial cells. While further incubations will remove more epithelial cells, it is not time efficient. However, further incubations can be done if the purpose is to obtain high amounts of epithelial cells.
Note: The epithelial fraction can then be used for downstream experiments, such as FACS characterization, sorting, or RNA-seq. For organoid generation, epithelial cells as single-cell suspension should be processed immediately, and depending on the assay, the addition of Y-27632 should be considered.
Note: If done with fresh biopsies, cells from the epithelial fraction can also be frozen for later use by resuspending 106–107 cells in 1 mL of CryoStor buffer.
N. Immune cell isolation for FACS analysis or organoid-immune cell co-culture establishment
This section describes three different digestion methods for immune cell isolation that support the isolation of different immune cell populations (see Validation).
Note: For immune cell isolation, the biopsies from section M are used. Even if the focus is on immune cells, the epithelial cell isolation step (section M) should be performed to reduce the number of contaminating epithelial cells and allow for better tissue digestion.
1. Prewarm 5 mL of cRPMI per gram of tissue to be digested at 37 °C.
2. Fill and prewarm a Duran crystallizing beaker with water on a magnetic stirrer at 37 °C.
Note: Depending on the enzymes used, specific immune cell populations will be enriched (see Validation). Since there is a wide range of downstream applications, factors such as cell number, enrichment, relative amount of immune cell populations, or contamination with epithelial cells may be considered to get the optimal required output (see Validation). If only a general overview of general immune cell populations is desired, it is recommended that enzymatic mixture B (collagenase IV and DNaseI) is used.
Note: For enzymatic mixtures A and B, 35 mL tubes are used, whereas for enzymatic mixture C, c-tubes are required.
Note: Be aware that depending on the collagenase blend, specific cell receptors can be cleaved, and this should be taken into account when designing the experiment [2].
3. Weigh the biopsies from section M and add 0.5–1 g of tissue into a 35 mL tube containing 5 mL of prewarmed cRPMI (Figure 7A).
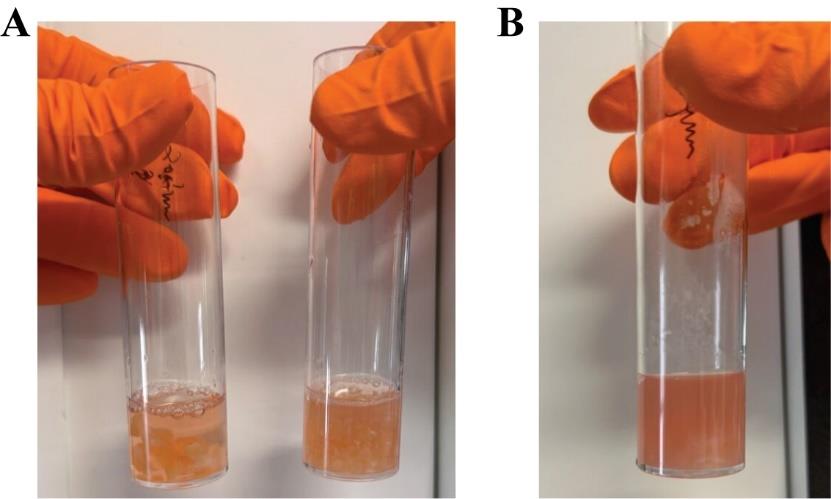
Figure 7. Example of biopsy handling for immune cell isolation. (A) Biopsies before (left) and after (right) being cut into tiny fragments with scissors. (B) Result of biopsy digestion after incubation with enzymatic mixtures.
4. Cut the tissue into tiny fragments using scissors (Figure 7A).
5. Add the enzymes to the corresponding tube (see Recipes 21–23).
Note: Fresh preparation of these enzymes is recommended; stock dilutions with higher concentrations can be prepared beforehand and stored at -20 °C in small aliquots to avoid refreezing or enzyme loss.
6. For enzymatic mixtures A and B, add a magnetic stirrer into each tube.
7. Transfer the tubes to the water bath prepared in step N2 and incubate them for 45 min under constant agitation at 350 rpm.
Note: Using different-sized magnetic stirrers will affect cell recovery. It is important to use magnetic stirrers of the same size (15 mm length and 6 mm diameter) and ensure that there are no ridges to avoid cell loss.
8. For enzymatic mixture C, place the c-tube in the gentleMACS Octo Dissociator and run protocol MultiB for 1 h at 37 °C.
Note: From this step onward, the samples are processed in the same way, independently of the enzyme mixture used.
9. Pre-wet a 40 μm strainer with 5 mL of cRPMI.
Note: Other strainers, such as 70 or 100 μm, can be used. However, in our experience, large-size strainers do not increase immune cell recovery; instead, they allow the recovery of more epithelial and dead cells.
10. After incubation, pour the content of the tube onto the pre-wetted 40 μm strainer into a fresh collection tube.
11. Wash tube and magnetic stirrer with 5 mL of cRPMI and transfer the full volume onto the 40 μm strainer.
12. Wash the 40 μm strainer with another 5 mL of cRPMI.
13. Collect both washes in the same tube as the isolated cells.
Note: Isolated cells will be in the flowthrough.
14. Centrifuge the cells at 400× g for 10 min at 4 °C.
15. Discard the supernatant and resuspend the pellet containing the isolated immune cells in 1 mL of cRPMI.
16. Keep it on ice and use it for characterization, co-culture, or any other application.
Note: Ensure that the digestion is complete (Figure 7B). If digestion is not complete (tissue pieces are still visible), place the undigested tissue and repeat the protocol starting at step N5. This will increase the time for isolation and the final number of total isolated cells. If the tissue is not completely digested even after the second digestion, the biopsies will not be sufficiently minced, or the muscular layer will be carried over when taking the biopsy. Alternative methods to facilitate complete digestion can also be applied, such as vigorously pipetting the solution regularly or using a homogenizer to disrupt the tissue.
O. Co-culture of organoids and lamina propria immune cells
Note: To generate a co-culture of organoids and lamina propria immune cells, organoid generation needs to be performed in advance, which takes approximately 4 weeks. Organoids should be expanded at least two times or until the desired number of wells is reached. Immune cells are isolated from fresh (section I + section M and N) or cryopreserved tissue (section L + section M and N) on the day of the co-culture experiment. If an autologous co-culture is desired, immune cells must be isolated from cryopreserved tissue of the same donor as used for organoid generation.
1. Organoid culture
Note: Grow organoids from fresh or cryopreserved tissue as described above (section K). Passage organoids at least 2–3 times before using them for co-culture establishment.
a. Three days prior to the planned immune cell isolation, seed the desired number of wells for co-culture and let the organoids grow for 3 days in a growth medium (see step K2 for further details).
Note: On day 3 of the culture, the organoids are harvested and co-cultured with freshly isolated immune cells (see step O2).
2. Immune cell enrichment with gradient centrifugation
Note: This step is critical to remove unwanted cell types such as fibroblasts, epithelial cells, and dead cells while enriching for total lamina propria immune cells. Specific immune cell types may be isolated depending on the individual needs using FACS or MACS.
Note: This step is performed directly after immune cell isolation, as described in section N. The addition of primocin (100 μg/mL) to epithelial cell removal media is recommended to avoid possible contaminations in co-culture.
Note: Thaw Matrigel on ice. Ensure Percoll buffers and centrifuge are at room temperature.
a. Centrifuge isolated cells from step N16 in a 15 mL tube at 400× g for 5 min at room temperature.
b. Prepare a new 15 mL tube filled with 5 mL of 80% Percoll.
c. Resuspend the cell pellet in 1 mL of 40% Percoll.
d. Then, add 9 mL of 40% Percoll to a total volume of 10 mL.
e. Mix the cell suspension by slowly pipetting up and down three times using a 10 mL pipette.
f. Transfer the cell suspension with a 10 mL pipette to a tube containing 5 mL of 80% Percoll prepared in step O2b.
Critical: To avoid mixing the two density layers, add the cell suspension dropwise on top of the 80% Percoll layer while holding the tube at a 45° angle. This will minimize the mixing of the layers and ensure sufficient gradient centrifugation.
Critical: Slow pipetting of the cell suspension is critical to avoid mixing of both gradients. Mixing of the gradients will result in reduced numbers of immune cells.
g. Immediately centrifuge the cell suspension at 1,360× g for 20 min at room temperature with reduced acceleration and without a break (acceleration = 2, deceleration = 0).
Critical: Excessive acceleration or abrupt stopping of the centrifuge will mix the gradients and result in cell loss.
h. Carefully remove the tube from the centrifuge and check successful separation.
Note: A white immune cell layer will be visible between the two layers at the 5 mL position. Depending on the cell number, the layer might be more transparent or not clearly visible.
i. Remove the upper Percoll layer without harming the immune cell layer.
j. Carefully take up the white immune cell layer at the 5 mL position using a P1000 pipette.
Note: Take up as little as possible Percoll, as it may reduce the overall cell yield and may increase the risk of contamination of other cell types. In case the immune cell layer is not clearly visible, take up 1 mL of Percoll at a 5 mL position.
k. Transfer the cells to a 50 mL tube and add 29 mL of PBS-/-.
l. Slowly invert the tube three times and centrifuge at 400× g for 10 min at 4 °C.
Note: From now on, no specific break is required (acceleration = 9, deceleration = 9) during centrifugation.
m Discard the supernatant and resuspend the pellet in 1 mL of PBS-/-.
n. Repeat the wash step (steps O2k–m).
o. Use 10 μL of cell suspension to count the cells.
p. Distribute the volume to 15 mL tubes so that each has 0.6 × 10⁶ cells.
Note: Each tube contains the immune cells that will be combined with organoids from one well of a 24-well plate. Depending on your experimental design and the immune cells yield, you can either set up several wells containing co-cultures, or you can include controls containing only immune cells.
q. Centrifuge the cells at 400× g for 10 min at 4 °C.
r. Discard the supernatant and keep cells on ice until mixing with organoids.
3. Organoid harvest
a. On day 3 of culture, the organoids are harvested by adding 1 mL of ice-cold base medium to one well containing organoids. Pipette up and down to release the organoids from the Matrigel.
b. Transfer the organoids of one well of a 24-well plate to a 15 mL tube filled with 5 mL of base medium.
c. Remove Matrigel by pipetting up and down three times with a 10 mL pipette equipped with a 200 μL pipette tip.
d. Centrifuge the organoid suspension at 150× g for 5 min at 4 °C.
e. Remove the supernatant and place it on ice.
4. Co-culture setup
a. Remove any remaining supernatant of the immune cells (step 2r) and organoid pellet (step 3e) placed on ice before.
b. Thoroughly resuspend the immune cells (0.6 × 10⁶ cells) in 50 μL of ice-cold Matrigel by pipetting 10 times up and down.
Critical: For immune cell movement and migration, it is detrimental to resuspend them in an extracellular matrix.
c. Thoroughly resuspend the organoid pellet using 45 μL of immune cells in Matrigel by pipetting up and down three times while pushing the tip toward the tube bottom.
d. Distribute the 45 μL Matrigel containing immune cells and organoids into three drops in one well of a 24-well plate. The density of the organoids and immune cells is shown in Figure 8A.
Note: Depending on the reading, the plating of the co-culture may be adjusted, e.g., seeding into a flat dome.
e. Transfer the plate to the incubator (37 °C, 5% CO2 atmosphere, humidified) and let it polymerize for 1 h.
f. Then, add 500 μL of growth medium and place it back in the cell culture incubator.
5. Live imaging of co-culture
Note: This step is used to monitor how the immune cells move and to identify how the cells interact with the organoids, as shown in Figure 8B.
a. Prewarm the stage incubator to 37 °C and 5% CO2.
b. Place the co-culture plate on the microscope and focus on the area of interest.
c. Acquire images every 1–5 min for at least 30 min.
6. Fixation of co-culture
a. Carefully remove the medium by tilting the plate without touching the Matrigel dome.
Note: Medium can be sampled to measure cytokine release.
b. Add 500 μL of co-culture fixative to the plate and incubate it for 20 min at room temperature.
Critical: To maintain the 3D structure of the Matrigel dome, the fixative needs to contain 0.1% glutaraldehyde.
c. Remove the fixative and wash two times with 500 μL of PBS-/- for 5 min.
d. Add PBS-/- and proceed with downstream experiments.
Note: Fixed co-culture can be stored up to 24 h at 4 °C until embedding or whole-mount staining.
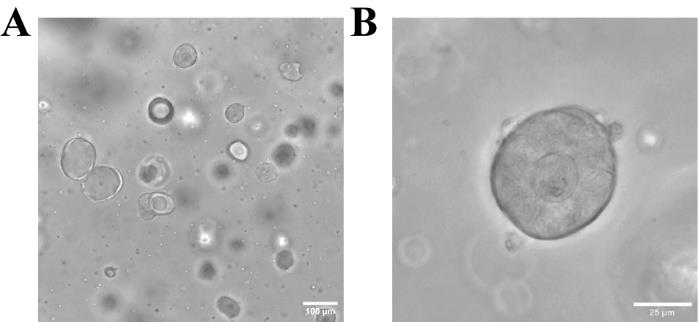
Figure 8. Representative brightfield images of lamina propria–derived immune cells co-cultured with intestinal organoids. (A) Expected cell and organoid density when following the protocol. Scale bar: 100 μm. (B) Interaction of immune cells with the organoids, which can be expected to be observed when performing live cell imaging. Scale bar: 25 μm.
Data analysis
Statistical tests
GraphPad Prism v10.0.0 was used for plotting and statistical calculation. 2-way ANOVA and Tukey multiple comparison tests were performed to test for significance. Significance was achieved when p-value < 0.05.
Validation of protocol
A. Comparison of different immune cell isolation protocols
In the following section, the three different enzymatic digestion methods were compared using tissue from three different patients. Cryopreserved tissue from mid jejunum was analyzed by flow cytometry using a general panel for immune cells and epithelial identification (Table 1).
Table 1. Panel used for immunostaining and flow cytometry analysis
| Marker | Label cell of interest | Company | Clone | Conjugate | Cat # | Volume (μL) |
|---|---|---|---|---|---|---|
| CD45 | All immune cells | BD Biosciences | HI30 | BV510 | 563204 | 5 |
| 7AAD | Viability | BioLegend | 420404 | 1 | ||
| EPCAM | Epithelial cells | BioLegend | 9C4 | PE | 324206 | 1.5 |
| CD3 | T cells | BD Biosciences | UCTH1 | BUV496 | 612940 | 5 |
| CD19 | B cells | BioLegend | HIB29 | BV750 | 302262 | 5 |
| HLA-DR | Antigen-presenting cells | BD Biosciences | G46-6 | BUV395 | 564040 | 1 |
| CD14 | Macrophages | BD Biosciences | M5E2 | BUV737 | 612763 | 2.5 |
| CD11c | Dendritic cells | BD Biosciences | B-Ly6 | BB515 | 564490 | 1 |
| CD56 | NK cells | BioLegend | HCD56 | APC/Cy7 | 318332 | 5 |
| CD103 | Intra-epithelial lymphocytes | BioLegend | Ber-ACT8 | APC | 350216 | 2.5 |
Figures 9A and 9B show that extraction can vary between human samples. However, if the interest is in epithelial cells, collecting the epithelial fraction isolated with the removal media (section M) is the most efficient method. If immune cells are the focus, then enzymatic mixtures are the best approach, especially enzymatic mixture B (ColIV + DNaseI), which manages the isolation of approximately 5 million immune cells per gram of tissue. Data also show that each enzymatic mixture enriches different immune cell subtypes; while enzymatic mixture B (ColIV + DNaseI) allows for a higher retrieval of general immune cells as well as enrichment of B cells (Figure 9A, C), the enzymatic mixture A (Liberase + DNaseI) is best if NK cells are the object of the study (Figure 9D). Both enzymatic mixtures A and B show similar ability to obtain T cells, dendritic cells, and macrophages (Figure 9E–G). In contrast, enzymatic mixture C (MTKD1) leads to a high overall immune cell loss (Figure 9A). However, immune cells are present in a higher proportion (Figure 9H), which could be useful for certain applications such as bulk RNAseq.
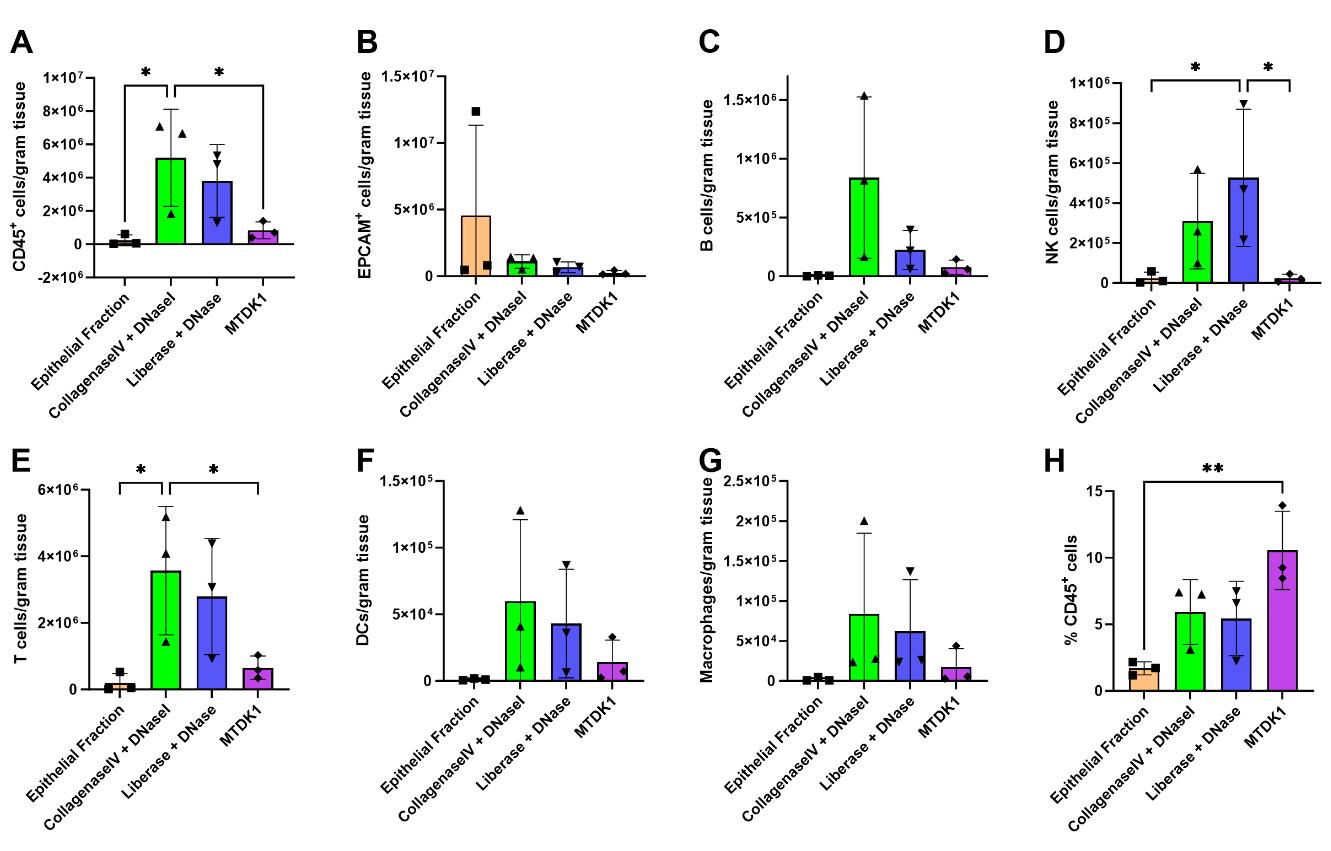
Figure 9. Comparison of different enzymatic mixtures for cell isolation using cryopreserved jejunal samples from three different human donors. (A) Total number of immune cells isolated per gram of tissue. (B) Total number of epithelial cells isolated per gram of tissue. (C) Number of B cells isolated per gram of tissue. (D) Number of NK cells per gram of tissue. (E) Number of T cells per gram of tissue. (F) Number of dendritic cells per gram of tissue. (G) Number of macrophages per gram of tissue. (H) Immune cell enrichment normalized to the total amount of isolated cells. *p < 0.05.
B. Validation in other published research articles
This protocol or parts of it have been used and validated in the following research articles:
Hensel et al. [13]. SLE serum induces altered goblet cell differentiation and leakiness in human intestinal organoids. EMBO Molecular Medicine.
Hensel et al. [14]. Protocol for generating and analyzing organ-on-chip using human and mouse intestinal organoids. STAR Protocols.
Supplementary information
The following supporting information can be downloaded here:
1. Excel file for biobank
Acknowledgments
We would like to thank Hugo de Jonge for providing the R-Spondin 1 cell line. We also thank Dr. Stephanie Muenchau for her help setting up the experiment and their input during the organoid generation from frozen biopsies. We also express our gratitude to Thomas Rückle and Christian Tidona for their invaluable help. Special recognition goes to the tissue donors, the surgeons, Novabiosis, the DTI Foundation, and the I3PT Biobank, who made this study possible. We specifically thank Joaquim Albiol, Fernando Mosteiro, and his team for their dedication. We thank Richard Fairless (Department of Neurology at the University Heidelberg) and specifically Katharina Schmitz for her help with tissue processing and Stefan Fritz (Dr. Franz Köhler Chemie) for the generous donation of Custodiol for research purposes. Christoph Becker and Daigen Xu's critical feedback and guidance significantly improved the quality of our work. This research was funded by Merck KGaA, Darmstadt, Germany (M.R.D., I.V.H., M.S., I.M.S., B.S., S.D., and S.D.) and by Johnson & Johnson Innovative Medicine, USA (K.K., E.G.E., O.M., and E.S.). This protocol was adapted and modified from Hensel et al. [13,14].
Competing interests
The authors declare no conflict of interest.
Ethical considerations
Human whole intestinal tissue samples were procured from donors via the following: 1) Novabiosis, Inc. (Research Triangle Park, Durham, North Carolina, USA) following ethical committee approval from the Organ Procurement Organizations (OPO), in line with the consent and deidentification guidelines established by the OPOs and the United Network for Organ Sharing (UNOS), under the US transplantation network framework. Immediate family members of the donors granted permission for organ donation while preserving the donor’s privacy. This donation approval is according to the guidelines provided by the federal organization UNOS and the Federal Drug Administration (FDA). 2) I3PT Biobank and the DTI Foundation (Barcelona, Spain). The tissue donations were processed following standard operating procedures with the appropriate approval of the Ethics and Scientific Committees.
All research procedures were conducted adhering to the principles specified in the WMA Declaration of Helsinki.
References
- Bujko, A., Atlasy, N., Landsverk, O. J., Richter, L., Yaqub, S., Horneland, R., Øyen, O., Aandahl, E. M., Aabakken, L., Stunnenberg, H. G., et al. (2018). Transcriptional and functional profiling defines human small intestinal macrophage subsets. J Exp Med. 215(2): 441–458.
- Doyle, C. M., Fewings, N. L., Ctercteko, G., Byrne, S. N., Harman, A. N. and Bertram, K. M. (2022). OMIP 082: A 25‐color phenotyping to define human innate lymphoid cells, natural killer cells, mucosal‐associated invariant T cells, and γδ T cells from freshly isolated human intestinal tissue. Cytometry Part A. 101(3): 196–202.
- Uronen-Hansson, H., Persson, E., Nilsson, P. and Agace, W. (2014). Isolation of Cells from Human Intestinal Tissue. Bio Protoc. 4(7): e1092.
- Hughes, S. M., Shu, Z., Levy, C. N., Ferre, A. L., Hartig, H., Fang, C., Lentz, G., Fialkow, M., Kirby, A. C., Adams Waldorf, K. M., et al. (2016). Cryopreservation of Human Mucosal Leukocytes. PLoS One. 11(5): e0156293.
- Hughes, S. M., Ferre, A. L., Yandura, S. E., Shetler, C., Baker, C. A. R., Calienes, F., Levy, C. N., Astronomo, R. D., Shu, Z., Lentz, G. M., et al. (2018). Cryopreservation of human mucosal tissues. PLoS One. 13(7): e0200653.
- Urbano, P. C. M., Angus, H. C. K., Gadeock, S., Schultz, M. and Kemp, R. A. (2022). Assessment of source material for human intestinal organoid culture for research and clinical use. BMC Res Notes. 15(1): 1–8.
- Campbell, J., Berry, J. and Liang, Y. (2019). Anatomy and Physiology of the Small Intestine. In: Shackelford's Surgery of the Alimentary Tract, 2 Volume Set (8th Edition, pp. 817–841). Elsevier Inc.
- Ma, Z. F. and Lee, Y. Y. (2020). Small intestine anatomy and physiology. In: Clinical and Basic Neurogastroenterology and Motility. (pp. 101–111). Elsevier Inc.
- Phillips, M., Patel, A., Meredith, P., Will, O. and Brassett, C. (2015). Segmental colonic length and mobility. Ann R Coll Surg Engl. 97(6): 439–444.
- Rubin, D. C. and Shaker, A. (2009). Small Intestine: Anatomy and Structural Anomalies. In: Podolosky, D., Camilleri, M., Fitz, J., Kalloo, A., Shanahan, F. and Wang, T. (Eds.). Textbook of Gastroenterology (6th Edition, Vol. 1, pp. 1085–1107). Wiley.
- Treuting, P. M., Valasek, M. A. and Dintzis, S. M. (2012). Upper Gastrointestinal Tract. In: Comparative Anatomy and Histology (1st Edition, Issue Figure 5, pp. 155–175). Elsevier Inc.
- Umanskiy, K. and Matthews, J. (2008). Colon: Anatomy and Structural Anomalies. In: Podolosky, D., Camilleri, M., Fitz, J., Kalloo, A., Shanahan, F. and Wang, T. (Eds.). Textbook of Gastroenterology (6th Edition, Vol. 1, pp. 1369–1385). Wiley.
- Hensel, I. V., Éliás, S., Steinhauer, M., Stoll, B., Benfatto, S., Merkt, W., Krienke, S., Lorenz, H. M., Haas, J., Wildemann, B., et al. (2024). SLE serum induces altered goblet cell differentiation and leakiness in human intestinal organoids. EMBO Mol Med. 16(3): 547–574.
- Hensel, I. V., Steinhauer, M., Fairless, R. and Resnik-Docampo, M. (2024). Protocol for generating and analyzing organ-on-chip using human and mouse intestinal organoids. STAR Protoc. 5(2): 103037.
Article Information
Publication history
Received: Jun 20, 2024
Accepted: Oct 28, 2024
Available online: Nov 20, 2024
Published: Jan 5, 2025
Copyright
© 2025 The Author(s); This is an open access article under the CC BY-NC license (https://creativecommons.org/licenses/by-nc/4.0/).
How to cite
Gamero-Estevez, E., Hensel, I. V., Steinhauer, M., Müllertz, O., Savochkina, E., Sektioglu, I. M., Stoll, B., Derakhshani, S., Devriese, S., Kim, K. and Resnik-Docampo, M. (2025). Protocol for Immune Cell Isolation, Organoid Generation, and Co-culture Establishment from Cryopreserved Whole Human Intestine. Bio-protocol 15(1): e5157. DOI: 10.21769/BioProtoc.5157.
Category
Cell Biology > Cell isolation and culture > Co-culture
Cell Biology > Cell isolation and culture > Organ culture
Stem Cell > Organoid culture
Do you have any questions about this protocol?
Post your question to gather feedback from the community. We will also invite the authors of this article to respond.