- Protocols

- Articles and Issues
- For Authors
- About
- Become a Reviewer

In Vitro Assay to Examine Osteoclast Resorptive Activity Under Estrogen Withdrawal
(*contributed equally to this work) Published: Vol 15, Iss 1, Jan 5, 2025 DOI: 10.21769/BioProtoc.5155 Views: 1663
Reviewed by: Athanas GuzhaWei DaiJaira Ferreira de VasconcellosAnonymous reviewer(s)
Original research article
The authors used this protocol in:

Jun 2024
Advertisement


Protocol Collections
Comprehensive collections of detailed, peer-reviewed protocols focusing on specific topics


Abstract
The bone is a highly dynamic organ that undergoes continuous remodeling through an intricate balance of bone formation and degradation. Hyperactivation of the bone-degrading cells, the osteoclasts (OCs), occurs in disease conditions and hormonal changes in females, resulting in osteoporosis, a disease characterized by altered microarchitecture of the bone tissue, and increased bone fragility. Thus, building robust assays to quantify OC resorptive activity to examine the molecular mechanisms underlying bone degradation is critical. Here, we establish an in vitro model to investigate the effect of estrogen withdrawal on OCs derived from the mouse macrophage RAW 264.7 cell line in a bone biomimetic microenvironment. This simple and robust model can also be adapted to examine the effect of drugs and genetic factors influencing OC resorptive activity in addition to being compatible with fluorescent imaging.
Key features
• A robust in vitro protocol that allows molecular and functional studies of mature osteoclasts in response to estrogen and its withdrawal.
• Generation of inorganic bone-mimetic substrates for culturing and examining osteoclast resorptive behavior.
• This quantitative image-based approach is compatible with brightfield and fluorescence microscopy to assess osteoclast resorptive activity.
Keywords: Estrogen withdrawalGraphical overview
Background
Osteoclasts (OCs) are specialized, multinucleated cells responsible for the selective resorption of bone matrix [1,2]. In vivo osteoclast-driven resorption is followed by osteoblast (OB) matrix deposition, resulting in the continuous remodeling of bone [2,3]. The coordination between OC and OB activation relies on signaling from mechano-sensing osteocytes [2,3]. Disruption in this dynamic equilibrium produces disease states like osteoporosis [4,5]. Postmenopausal estrogen deficiency is a disrupting factor that shifts this equilibrium toward unregulated OC activity [3,6,7].
Estrogen (E2) deficiency de-regulates bone homeostasis; OB activity and lifespan are impaired, while increased osteoclast formation, resorptive activity, and lifespan contribute to net bone loss [3,7]. The effects of estrogen loss on OC formation and function have previously been studied using ovariectomized mouse models and bone marrow–derived osteoclasts in vitro [8,9]. Primary macrophages and OCs are challenging to work with and place limits on the biochemical and molecular analyses one can perform [10]. In vitro models of estrogen deficiency using OB and osteocyte cell lines exist [11–13]; however, this protocol establishes a simple and reproducible in vitro system to examine the effect of estrogen presence and withdrawal on OCs [14]. In contrast to existing models, using the murine RAW 264.7 cell line produces a large and consistent source of OCs, avoiding complicated extraction and propagation in favor of greater research output. This simple, robust method is a powerful tool to study osteoclast activation and function under postmenopausal conditions.
To measure OC activity, resorptive capacity can be assayed using coverslips coated with a thin layer of inorganic calcium phosphate. Maria et al. [15] thoroughly characterized and validated biomimetic calcium phosphate coating to study OC activity. Our protocol outlines the production of the coating and includes the culturing, staining, and subsequent imaging and analysis that can be performed. We provide this method as an alternative to using standard animal bone and dentine slices [16,17]. While suitable for resorption pit studies, bone and dentine slices do not allow for easy visualization of OCs remaining on the substrate [18]. In addition to quantifying OC resorptive activity, our lab has used biomimetic bone-coated coverslips combined with immunofluorescence to examine cytoskeletal elements, including F-actin ring morphology, the microtubule network, and centrosome de-clustering through inhibitor studies [14,19].
Materials and reagents
Biological materials
1. RAW 264.7 mouse macrophage cell line (American Type Culture Collection, catalog number: TIB-71)
Note: To maintain consistency across replicates, we recommend using RAW cells between passages 3 and 13. We have observed reduced OC formation in older passages.
Reagents
A. Bone mimetic production and staining reagents
1. Tris base (BioShop, catalog number: TRS001)
2. Hydrochloric acid solution, 1 N (HCl) (Thermo Fisher Scientific, catalog number: FLSA481)
3. Sodium hydroxide solution, 1 N (NaOH) (Thermo Fisher Scientific, catalog number: 124260010)
4. Calcium chloride dihydrate (CaCl2·2H2O) (BioShop, catalog number: CCL302)
5. Sodium chloride (NaCl) (BioShop, catalog number: CCL302)
6. Magnesium chloride hexahydrate (MgCl2·6H2O) (BioShop, catalog number: MAG510)
7. Disodium hydrogen phosphate dihydrate (Na2HPO4·2H2O) (MilliporeSigma, catalog number: 71643)
8. Sodium bicarbonate (NaHCO3) (BioShop, catalog number: SOB999)
9. Distilled water; provided by facility
10. Milli-Q water
11. 70% ethanol prepared from anhydrous or 95% ethyl alcohol
12. Sodium nitrate solution, 2.5% (AgNO3) (MilliporeSigma, catalog number: 85193)
13. Triton X-100 (BioShop, catalog number: TRX506)
B. Cell culture reagents
1. Dulbecco’s modified Eagle medium (DMEM) (Wisent Inc., catalog number: 319-005-CL)
2. Fetal bovine serum (FBS) (Wisent Inc., catalog number: 085-450)
3. Phosphate-buffered saline (PBS) (Wisent Inc., catalog number: 311-010-CL)
C. OC differentiation reagents
1. Alpha modified Eagle medium (AMEM) (Thermo Fisher Scientific, catalog number: 12571063)
2. 17β-estradiol (MilliporeSigma, catalog number: E8875)
3. Dimethyl sulfoxide (DMSO) (BioShop, catalog number: DMS555.250)
4. Recombinant receptor activator of nuclear factor kappa-B ligand (RANKL) was produced from BL21 Escherichia coli transformed with a pGEX-GST-hRANKL vector (a gift from Morris Manolson, Faculty of Dentistry, University of Toronto).
Commercial alternative: Mouse TRANCE recombinant protein (Thermo Fisher Scientific, catalog number: 315-11-10UG)
D. Osteoclast fixation and staining reagents
1. Paraformaldehyde (PFA) (Electron Microscopy, catalog number: 15710-S)
2. Permeabilization buffer (0.1% Triton X-100, 100 mM glycine in PBS) (BioShop, catalog number: GLN001)
3. Alexa Fluor 488 Phalloidin (Thermo Fisher Scientific, catalog number: 12379)
4. DAPI (Thermo Fisher Scientific, catalog number: D1306)
Solutions
Solutions required to prepare bone mimetic:
1. 50 mM Tris base stock solution, pH 7.4 (see Recipes)
2. Calcium stock solution (see Recipes)
3. Phosphate stock solution (see Recipes)
4. Calcium phosphate solution (see Recipes)
5. Simulated body fluid solution (SBF) (see Recipes)
6. Cell removal solution (see Recipes)
Recipes
1. Tris base stock solution (500 mL)
| Reagent | Final concentration | Quantity or Volume |
|---|---|---|
| Tris base | 50 mM | 3.03 g |
| 1 N HCl | n/a | see note* |
| Milli-Q water | n/a | see note* |
| Total | n/a | 500 mL |
*Note: Add Tris base to 400 mL of Milli-Q water and 20 mL of 1 N HCl. Once dissolved, bring pH to 7.4 by slowly adding 0.05 mL increments of 1 N HCl. Bring the final buffer volume to 500 mL using Milli-Q water.
Store at room temperature for 1 month.
2. Calcium stock solution (100 mL)
| Reagent | Final concentration | Quantity or Volume |
|---|---|---|
| CaCl2·2H2O | 25 mM | 0.37 g |
| NaCl | 1.37 M | 8.00 g |
| MgCl2·6H2O | 15 mM | 0.30 g |
| Tris base stock solution | 50 mM | see note* |
| Total | n/a | 100 mL |
*Note: Add reagents to 90 mL of Tris base stock solution. Once dissolved, measure pH. Adjust to pH 7.38–7.4, if required, by slowly adding 0.05 mL increments of 1 N HCl or 1 N NaOH. Bring the final volume to 100 mL using Tris base stock solution.
Store at room temperature for 1 month.
3. Phosphate stock solution (100 mL)
| Reagent | Final concentration | Quantity or Volume |
|---|---|---|
| Na2HPO4·2H2O | 11.1 mM | 0.20 g |
| NaHCO3 | 42 mM | 0.35 g |
| Tris base stock solution | 50 mM | see note* |
| Total | n/a | 100 mL |
*Note: Add reagents to 90 mL of Tris base stock solution. Once dissolved, measure pH. Adjust to pH 7.38–7.4, if required, by slowly adding 0.05 mL increments of 1 N HCl or 1 N NaOH. Bring the final volume to 100 mL using Tris base stock solution.
Store at room temperature for 1 month.
4. Calcium phosphate solution (250 mL)
| Reagent | Final concentration | Quantity or Volume |
|---|---|---|
| Na2HPO4·2H2O | 2.25 mM | 0.10 g |
| CaCl2·2H2O | 4 mM | 0.15 g |
| NaCl | 0.14 M | 2.05 g |
| Tris base | 50 mM | 1.51 g |
| 1 N HCl | n/a | see note* |
| Milli-Q water | n/a | see note* |
| Total | n/a | 250 mL |
*Note: Add reagents to 200 mL of Milli-Q water and 10 mL of 1 N HCl. Once dissolved, bring pH to 7.4 by slowly adding 0.05 mL increments of 1 N HCl. Bring the final buffer volume to 250 mL.
Store at room temperature for 1 month.
5. Simulated body fluid solution (SBF)
| Reagent | Final concentration | Quantity or Volume |
|---|---|---|
| Tris base stock solution | n/a | 25 mL |
| Calcium stock solution | n/a | 12.5 mL |
| Phosphate stock solution | n/a | 12.5 mL |
| Total | n/a | 50 mL; see note* |
*Note: Make SBF immediately before adding to coverslips/wells. Maintain a ratio of 2:1:1 for Tris base:calcium:phosphate stock solutions and adjust the total volume as required for your experiment.
Make fresh and use immediately.
6. Cell removal solution
| Reagent | Final concentration | Quantity or Volume |
|---|---|---|
| NaCl | 1 M | 5.84 g |
| Triton X-100 | 0.20 % | 0.2 mL; see note* |
| Distilled water | n/a | 100 mL |
| Total | n/a | see note* |
*Note: Prepare 1 M NaCl before adding the Triton X-100. Sterile-filtered 1 M NaCl can be prepared separately and stored at room temperature for 1 month.
Make fresh and use immediately.
Laboratory supplies
1. 12-well 18R glass coverslips (Electron Microscopy Sciences, catalog number: 72290-08)
2. 12-well tissue culture plates (Sarstedt, catalog number: 83.3921)
3. Parafilm (MilliporeSigma, catalog number: P7668)
4. 0.22 μm sterile bottle top filter (Sarstedt, catalog number: 83.3941.511)
5. T-75 cell culture flasks (Sarstedt, catalog number: 83.3911.002)
6. 5 and 10 mL disposable serological pipettes (Sarstedt, catalog number: 86.1253.001 and 86.1254.001, respectively)
7. 10, 200, 1,000 μL standard micropipette disposable tips
8. 1.5 mL standard microcentrifuge tubes
9. Cell scrapers (Sarstedt, catalog number: 83.3951)
10. 15 mL conical tubes (Sarstedt, catalog number: 62.554.205)
11. Microscope slides (Thermo Fisher Scientific, catalog number: 22037294)
12. DAKO (Agilent Technologies, catalog number: S302380-2)
13. Zeiss Immersion Oil 518F (Thermo Fisher Scientific, catalog number: 12-624-66A)
14. Slide folder (Thermo Fisher Scientific, catalog number: 12-587-10)
Equipment
1. Analytical balance (Mettler Toledo, catalog number: MS204S)
2. Magnetic stir plate (Thermo Fisher Scientific, catalog number: 1160049H)
3. 37 °C non-humidified incubator (Thermo Fisher Scientific, model: 637D)
4. 37 °C, 5% CO2 humidified incubator (Thermo Electron Corporation, model: HERACELL VIOS 160i)
5. 37 °C water bath (Thermo Fisher Scientific, model: ISOTEMP 110)
6. Vacuum aspirator (Integra-biosciences, catalog number: 158320)
7. Pipetman 2, 20, 200, and 1,000 μL (Gilson)
8. Autoclave; provided by research facility
9. Milli-Q Integral Water Purification System supplemented with Millipak® Express 0.22 μm membrane filter (Millipore, catalog number: MPGP04001)
10. pH meter (Thermo Fisher Scientific, model: AB150)
11. 500 and 1,000 mL glass beakers
12. 50 and 500 mL graduated cylinders
13. 250 and 500 mL glass bottles
14. Brightline hemacytometer (Electron Microscopy Sciences, catalog number: 100498-504)
15. Fine tip tweezers (Excelta, catalog number: 3C-SA-SE)
16. Inverted epifluorescence microscope with differential interference contrast (DIC) at 20× and 40× (Zeiss, model: AxioObserver Z1)
17. Inverted spinning disk confocal microscope with DIC at 40× 1.4 NA oil immersion lens (Quorum Technologies Inc., model: Quorum WaveFX-X1)
18. BSL-2 biosafety cabinet (Thermo Fisher Scientific, model: 1375 Series Class II)
Software and datasets
1. Zeiss Zen (3.1, blue edition, June 2012); license required
2. MetaMorph; license required
3. Fiji/ImageJ (2.3.0, May 2017); freely available
4. Prism GraphPad Software (7.03, March 2017); license required
Procedure
A. Preparation of a bone biomimetic microenvironment
Preparation of biomimetic bone substrate was first reported by Maria et al. [15] and Patntirapong et al. [20]. The inorganic bone layer produced using this protocol is chemically and structurally similar to in vivo bone mineral. This two-step method produces a stable, consistent crystal structure that is suitable for both OC differentiation and bone resorption [15,20]. Our method includes a maximum recommended shelf-life for the stock solutions and coated coverslips, in addition to a change in the preparation of the coverslips for cell culturing. A visual of the workflow involved is provided in Figure 1A.
Figure 1. Preparing biomimetic bone coverslips. A. This process involves the preparation of a biomimetic bone substrate following protocols adapted from Maria et al. [15] and Patntirapong et al. [20]. Key steps are (1) making stock solutions with precise pH requirements; (2) establishing a pre-calcification layer on coverslips using simulated body fluid (SBF); (3) producing the calcium phosphate top layer; and (4) sterilization and storage of coated coverslips for future experiments. B. Representative images of a growing nucleation layer (Day 2 and 3) and a completed calcium phosphate–coated coverslip. Images were acquired using DIC with a 20× objective. Scale bar = 100 μm.
1. Making stock solutions
Critical: The key to successfully preparing the final (SBF) solution is to ensure that all stock solutions have the correct pH. Adjust pH slowly and only use Milli-Q water when water is a required reagent.
Note: Choose an analytical balance with 100 mg minimum weight and 0.1 mg readability. A balance with a draft shield is recommended.
a. Autoclave three 250 mL bottles and one 500 mL bottle.
Note: Allow bottles to fully cool before adding solutions.
b. Prepare Tris base stock buffer solution in a 1,000 mL beaker using a magnetic stir rod and plate (see Recipe 1).
c. Keep Tris base stock solution in the beaker while preparing the calcium and phosphate stock solutions.
d. Prepare calcium stock solution using 90 mL of Tris base stock solution in a 500 mL beaker using a magnetic stir rod and plate (see Recipe 2).
e. Set aside the calcium stock solution, leaving it in the beaker.
f. Prepare phosphate stock solution in 90 mL of Tris base stock solution in a 500 mL beaker using a magnetic stir rod and plate (see Recipe 3).
g. Set aside the phosphate stock solution, leaving it in the beaker.
h. Prepare the calcium phosphate solution in a 500 mL beaker using a magnetic stir rod and plate (see Recipe 4).
i. Transfer each solution into a labeled and pre-sterilized glass bottle using a 0.22 μm bottle top filter.
Note 1: Use a vacuum aspirator to aid filtration. Attach aspirator tubing to the tapered connector of the bottle top filter.
Note 2: Performing this step in a BSL-2 biosafety cabinet is recommended to ensure sterility.
j. All sterile solutions should be kept at room temperature. Use within 1 month.
2. Establishing a pre-calcification/nucleation layer on coverslips with simulated body fluid
a. Prepare 12-well tissue culture plates with 18 mm coverslips.
Optional: Coverslips can be pre-sterilized in 70% ethanol and washed with sterile distilled water before addition to the tissue culture wells. This step can be prepared in advance.
b. Prepare simulated body fluid (SBF) in a 50 or 100 mL graduated cylinder according to recipe 5.
c. Seal the graduated cylinder with parafilm and mix with gentle inversion. Mix five times.
Note: The solution should remain clear after mixing. If the mixed solution appears cloudy or has a visible precipitate, then recheck the pH of each solution.
d. Add 1.0 mL of SBF to each well.
Note 1: Add the solution slowly to the side of the well.
Note 2: To achieve an even biomimetic layer across the coverslip, avoid circular movements with the plate, as this can cause mineral accumulation at the center of the well. Instead, employ a gentle side-to-side or up-and-down motion to evenly distribute the minerals.
e. Leave the tissue culture plates undisturbed at room temperature for 24 h.
f. Aspirate the SBF solution from each well carefully.
Note: Remove the solution from the side of the well, paying attention to avoid disturbing the amorphous calcification layer.
g. Repeat steps A2b–f for two additional days. A representative image of the nucleation layer on Day 2 and 3 of the process is provided in Figure 1B.
3. Production of the calcium phosphate top layer on coverslips
a. Aspirate the SBF solution from each well carefully and then add 1.0 mL of calcium phosphate solution (see Recipe 4) to the side of each well.
b. Leave the tissue culture plates undisturbed at room temperature for 24 h.
c. Slowly aspirate the calcium phosphate solution from the side of each well. A representative image of the completed top layer of calcium phosphate is provided in Figure 1B.
4. Sterilization and storage of coated coverslips housed within tissue culture plates
Note: Biomimetic substrate production is complete, and the following steps prepare the substrate for cell culture. Perform all remaining steps in a BSL-2 biosafety cabinet to maintain sterility.
a. Add 1.0 mL of 70% ethanol to the side of each well for 20 min to sterilize the substrate.
b. Aspirate the 70% ethanol from the side of each well and allow any remaining ethanol to evaporate for 1 h.
c. Wash the substrate-coated coverslips twice with autoclaved distilled water under sterile conditions.
d. Transfer the tissue culture plates to a 37 °C non-humidified incubator for 24 h.
e. Tissue culture plates with substrate-coated coverslips can be used for experiments immediately or stored at room temperature for later use. For long-term storage, seal the sides of the tissue culture plates with thin strips of parafilm to prevent contamination and stack the plates in a sealable bag. Use within 3 months.
B. Osteoclast culturing and estrogen withdrawal treatment
A simplified visual showing the timeline of events for osteoclast formation and estrogen treatment is provided in Figure 2A.
Figure 2. Protocol for osteoclast formation and treatment of cells under 17β-estradiol (E2) and E2-withdrawal (E2-WD) conditions. A. On Day 1, RAW 264.7 cells are seeded on biomimetic calcium phosphate–coated coverslips in AMEM + 10% FBS under the following conditions: 50 ng/mL RANKL for control and 50 ng/mL RANKL + 10 nM of 17β-estradiol for E2 and E2-WD. For the E2 condition, 10 nM of 17β-estradiol is added daily from Days 1 to 4. For E2-WD, 10 nM of 17β-estradiol is added daily on Days 1–2. On Day 3, AMEM + 50 ng/mL RANKL is replaced for all three conditions. On Day 5, the experiment is terminated for all conditions. B. Representative DIC images of the cell population from each day of treatment. Scale bar = 100 μm.
1. Passaging RAW 264.7 cells
Note 1: Perform all steps under sterile conditions, in a BSL-2 biosafety cabinet.
Note 2: RAW 264.7 cells are cultured and differentiated using medium supplemented with heat-inactivated FBS.
a. Maintain RAW 264.7 cells in T-75 cell culture flasks in DMEM supplemented with 10% FBS at 37 °C and 5% CO2 in a humidified incubator.
Note: Passage RAW cells twice a week as the flask population reaches 80%–90% confluency.
b. Remove old medium and add 10 mL of fresh prewarmed DMEM + 10% FBS medium. Using a sterile cell scraper, gently harvest cells from the tissue culture flask and, using a 5 or 10 mL disposable serological pipette, break cell clumps through gentle pipetting.
c. Transfer 1 mL of harvested RAW cells into a fresh flask containing 9 mL of prewarmed DMEM + 10% FBS. Mix by gentle pipetting to avoid creating bubbles before returning the flask to a 37 °C, 5% CO2, humidified incubator.
2. Prepare substrate-coated coverslips for cell culturing
a. Under sterile conditions, prepare a stock solution of 50% heat-inactivated FBS with AMEM.
b. Add 1 mL/well to tissue culture plates containing substrate-coated coverslips.
c. Place tissue culture plates in a 37 °C, 5% CO2, humidified incubator for 18–24 h.
3. Cell plating density and osteoclast differentiation medium
a. Transfer 2 mL of cells from Step B1 to a 15 mL conical tube containing 8 mL of prewarmed AMEM +10% FBS. Mix cells through gentle pipetting. For cell counting, use a sterile pipette tip to transfer 10 μL of cell suspension to a hemocytometer. Using a light microscope, focus on the grid lines of the hemocytometer using a 10× objective.
b. For cell seeding in a 12-well plate, prepare three labeled 15 mL conical tubes each containing 6 × 10⁴ cells/mL in prewarmed AMEM supplemented with 10% FBS. Tube 1 is for the control (untreated osteoclasts) group, Tube 2 is for the continuous 17β-estradiol (E2) group, and Tube 3 is for E2-withdrawal (E2-WD) group.
Note 1: The total volume for each tube depends on the number of wells needed for each experimental condition.
Note 2: The number of cells used in seeding will change with the size of the well. For 24-well plates, we recommend using 10,000–15,000 cells/mL.
Note 3: To maintain consistency across replicates, using RAW cells between passage 3 and 13 is recommended. We have observed reduced osteoclast formation in older passages.
Note 4: Prepare three biological replicates for each condition.
c. For all three tubes, add RANKL to a final concentration of 50 ng/mL using fully thawed stock RANKL. Mix thoroughly with a 10 mL serological pipette.
Note: Maintain a master stock of 100 μg/mL RANKL in 50 μL aliquots at -20 °C. Thaw a single aliquot each week and store at 4 °C. Discard any remaining aliquot after 7 days. We find this avoids any potential challenges with RANKL degradation and loss of potency.
4. Estrogen withdrawal treatment
a. For the continuous E2 and E2-WD group, add 10 nM of thawed E2 to the previously prepared 15 mL conical tubes (step B3b), a concentration within the physiological range in mouse serum [21]. Mix thoroughly with a 10 mL pipette to evenly distribute the E2.
Note: E2 is dissolved in DMSO as a stock solution of 100 mM, divided into 100 μL aliquots, and stored at -20 °C. Use the resuspended E2 stock solution within 6 months. Before each experiment, prepare a working stock of 10 μM in DMSO. The working stock is used for the duration of a single experiment and is stored at -20 °C.
b. Remove tissue culture plates containing substrate-coated coverslips from the humidified incubator and aspirate the 50% heat-inactivated FBS with AMEM. Label tissue culture wells prior to the addition of appropriate cell suspension + treatment.
c. Add 1 mL of cell suspension + treatment/well (Day 1) and incubate the plates in a 37 °C, 5% CO2 humidified incubator.
d. For the E2 group, add 10 nM of E2 every day (Days 1–4). For cells in the E2-WD group, add 10 nM of E2 for Day 1 and 2.
Note: For all conditions, remove medium and replace with fresh AMEM supplemented with 10% FBS and 50 ng/mL of RANKL on Day 3.
e. On Day 3, for the E2-WD group, wash cells with 1 mL of AMEM three times to remove residual traces of E2. Add fresh AMEM + RANKL and continue to grow cells in the absence of E2 until Day 5. Representative DIC images of the OC population on each day of the experiment are provided in Figure 2B.
f. On Day 5, terminate the experiment by cell removal from the substrate (see below; section C) or by cell fixation, followed by permeabilization and fluorescent staining (see below; section D).
C. Osteoclast removal and calcium phosphate (modified Von Kossa) staining
1. Osteoclast removal from biomimetic bone substrate
a. Prepare cell removal solution according to Recipe 6.
b. Aspirate media from the 12-well plate.
c. Wash each well twice with 1.0 mL of distilled water.
d. Add 1 mL/well of cell removal solution. Leave for 5 min.
e. Aspirate the cell removal solution and wash each well with 1.0 mL of distilled water twice.
2. Calcium phosphate staining with silver nitrate (AgNO3) solution
a. In a fume hood, add 0.5 mL of 2.5% AgNO3 solution to each well.
Caution: AgNO3 solution is an eye and skin irritant. Perform all work in a fume hood.
b. Keep plates treated with 2.5% AgNO3 solution under direct light for 30 min to 1 h or until a dark-brown-to-black stain (see Figure 3A) has developed.
Figure 3. Steps to mount calcium phosphate-coated coverslip. A. Calcium phosphate–coated coverslip treated with 2.5% AgNO3 solution. Image shows a coated coverslip placed under direct light before (i) and after (ii) a 1 h incubation with 2.5% AgNO3 solution, developing a visible dark-brown-to-black stain. B. To mount the biomimetic-coated coverslip, apply a single drop of mounting medium to the glass slide surface before gently lowering the coated coverslip with the calcium phosphate–coated side up and away from the slide, then applying another drop of mounting medium and covering with a second clean coverslip.
c. In a fume hood, remove 2.5% AgNO3 solution with a pipette and dispose of it in a designated waste container.
Caution: AgNO3 is an acute and chronic aquatic hazard. Do not wash down drains. Identify the designated waste container with an Environmental Health and Safety–recognized chemical waste label and store the container according to directions from the facility’s Environmental Protection Services department.
d. Wash each well with 1.0 mL of distilled water twice. Pipette the wash volume into the designated waste container.
3. Imaging resorption pits
a. In a pop-up slide folder, place labeled glass slides and apply a small amount of DAKO mounting medium to the surface of the slide. Using fine-tip tweezers, place the edge of the coverslip over the mounting medium and carefully lower the coverslip to avoid creating bubbles.
Note: For improved resolution of the resorption pits, face the calcium phosphate–coated side away from the slide glass surface (Figure 3B). Apply a drop of mounting media on top of the calcium phosphate material and carefully mount another coverslip on top, so that the calcium phosphate–coated coverslip is sandwiched as depicted in Figure 3B. Let the assembly dry inside a closed folder for 24 h.
b. Using a 20× or 40× objective, image 5–10 sections of the coverslip with brightfield microscopy.
D. Osteoclast fixation and actin cytoskeleton staining
1. OC fixation and permeabilization
a. Aspirate media from the 12-well plate.
b. Wash each well twice with 1.0 mL of room-temperature PBS.
c. Add 0.5 mL/well of 4% PFA. Add the PFA to the side of the well. Leave the plate covered in darkness at room temperature for 20 min.
d. Aspirate the PFA from each well and wash each well twice with 1.0 mL of PBS.
Pause point: The plate can be sealed with parafilm and placed at 4 °C to continue staining at a later time. Store the plate at 4 °C with 1.0 mL of PBS/well and stain cells within one week of fixation.
e. Add 0.5 mL of permeabilization buffer to each well. Leave the plate covered in darkness at room temperature for 15 min.
f. Wash each well twice with 1.0 mL of room-temperature PBS.
2. Blocking non-specific binding
a. In a 15 mL conical tube, prepare a solution of 5% FBS in PBS.
b. Aspirate the PBS from each well. Add 0.5 mL of 5% FBS block to each well and incubate for 1 h at room temperature. Cover the 12-well plate with a box to prevent direct light exposure.
3. Actin and nuclei staining
Note: Prepare and store Phalloidin and DAPI according to the manufacturer’s instructions.
a. In a 15 mL conical tube, prepare the staining buffer as a solution of 2% FBS in PBS. Calculate the total volume of staining buffer needed. For a 12-well plate, use 0.5 mL/well.
Note: Include an extra sample in the total volume calculation to accommodate for pipetting errors. For example, prepare 6.5 mL of staining buffer for 12 wells.
b. Add a 1:250–1:500 dilution of Phalloidin 488 to the staining buffer prepared in step D3a.
c. Add 0.5 mL/well of Phalloidin staining solution, cover the plate, and leave for 1 h at room temperature. Avoid direct light exposure.
d. Aspirate the staining buffer and wash each well twice with 1.0 mL of room-temperature PBS and once with 1.0 mL of double-distilled water.
e. In a 15 mL conical tube, prepare a 1:1,000 dilution of DAPI (final concentration of 1–2 μg/mL) in double-distilled water.
f. Add 1 mL/well of DAPI staining solution, cover the plate, and leave for 10 min at room temperature. Avoid direct light exposure.
g. Aspirate the DAPI staining solution and wash the wells twice with 1.0 mL of double-distilled water.
4. Imaging osteoclasts
a. In a pop-up slide folder, place labeled glass slides and mount each coverslip using the method shown in Figure 3B.
b. Using a 40×–63× objective, image 5–10 sections of the coverslip with a fluorescence microscope that contains excitation and emission filters suitable for imaging the fluorescent probes, DAPI and Phalloidin 488. Examples of osteoclasts stained on calcium phosphate–coated coverslips and imaged with a fluorescence microscope are provided in Figure 4.
Figure 4. Osteoclasts in control conditions, fixed and stained on calcium phosphate–coated coverslips. Representative confocal images of OCs on each day of treatment. Actin (Phalloidin) and nuclei (DAPI) are shown. Inset, the biomimetic substrate is shown with DIC. Day 2 and 3 populations are mostly mononuclear cells. Osteoclasts (cells with 3 or more nuclei) are observed on Day 4 and 5. Scale bar = 100 μm.
Data analysis
Resorption pit analysis
1. Upload the resorption pit image into Fiji (Figure 5A).
Note: To download Fiji, go to the website (https://imagej.net/software/fiji/downloads). Fiji package is supported in MAC, Windows, or Linux. To install Fiji, select the appropriate file compatible with your machine. Once the download is complete, extract the compressed Fiji file and select the Fiji icon. No additional plugins are required for this analysis. Fiji will recognize most file extensions of microscope imaging software. However, should any problems arise, images can first be converted to TIF using the microscope imaging software.

Figure 5. Resorption pit analysis using Fiji software. A. Brightfield image of resorption pits converted to 8-bit in Fiji. B. Representative snapshot of the Threshold window with appropriate details selected in Fiji. Threshold sliders are adjusted until the resorption pits appear bright red and there is minimal red visible in the image background. C. Brightfield image with thresholding applied. Scale bar for A and C = 50 μm. D. Representative snapshot of Analyze Particles window with appropriate details selected in Fiji. The smallest allowable pit size is set by adjusting the size value (x-Infinity). The range should capture smaller resorption pits while excluding small variations (gaps) that are present in the substrate. A coverslip without cells can be used to estimate the size of the gaps. E. Outline of resorption pits with 5-Infinity chosen as size threshold. F. Outline of resorption pits with 50-Infinity chosen as size threshold. Notice that 50-Infinity compared to 5-Infinity avoids mistaking small variations in the substrate for resorption pits in the final measurement.
2. Convert the image to 8-bit (Image → Type → 8-bit).
3. Set the scale for the image using a known distance (as in a scale bar previously applied with the microscope imaging software). This will allow the user to present collected data in calibrated units like square micrometers (μm2). Use the line selection tool to draw a line along the scale bar. Choose Analyze → Set Scale. Adjust the values for “known distance” and “unit of length” according to the scale bar. Check the “Global” box to use this scale on subsequent images in the analysis set.
Note: This step applies if images do not contain embedded metadata.
4. Set the lower and upper threshold values for grayscale images using Image → Adjust → Threshold (Figure 5B and C). Use the “Default” method for thresholding. Adjust the sliders until the pits are completely red and minimal red is visible in the image background. “Dark background” remains checked since the pits are lighter than the background.
5. Analyze the pits using Analyze → Analyze Particles (Figure 5D). Begin with “set size” as 50-Infinity. The lower value is adjusted according to the smallest allowable pit size determined by the experimenter. Once decided, the lower value is maintained across all images.
Note: Select “Bare outlines” under the “show” dropdown to display the detected objects for visual verification (Figure 5D). An example of 5-Infinity (Figure 5E) and 50-Infinity (Figure 5F) is provided for comparison. Select the “Display results” option to collect readings on individual objects.
6. A summary table provides the number of resorption pits, total pit area, average size of pits, and the percentage area covered by the resorption pits. Transfer relevant data to a Microsoft Excel sheet. Record values from 10–15 fields/images per experimental condition.
7. Use Prism to plot measurements from the summary table into column data format and view the data as a graph (Figure 6). Alternatively, use Microsoft Excel to plot data. Depending on the number of conditions and data distribution, apply appropriate statistical tests.
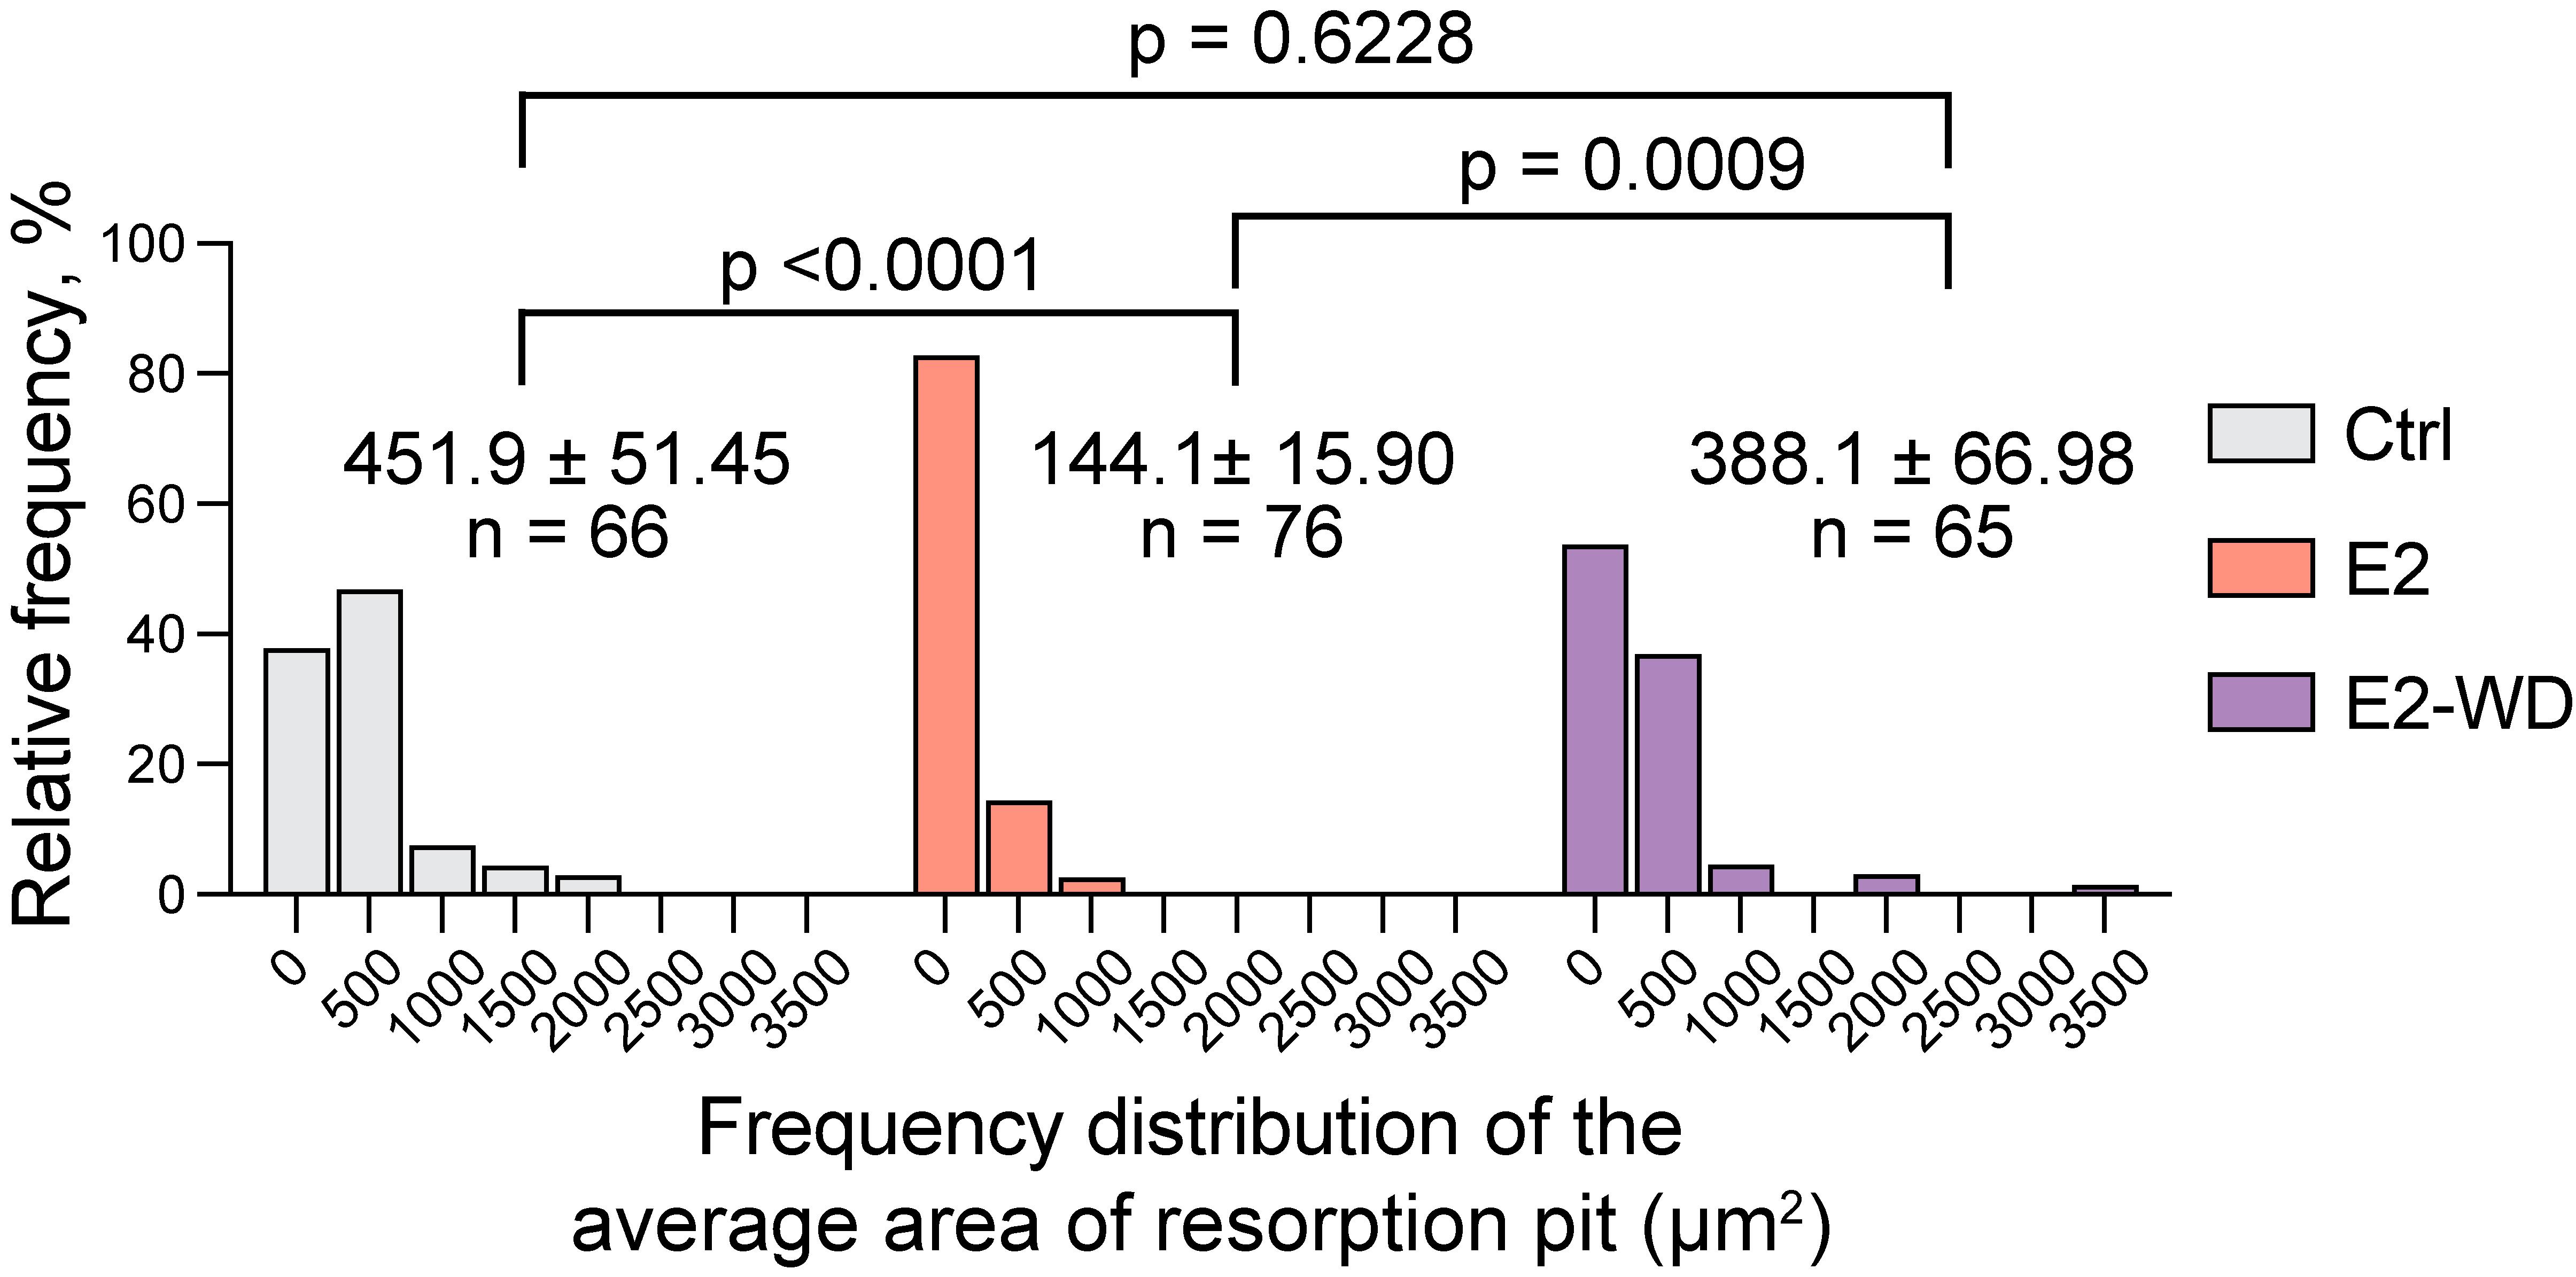
Figure 6. Quantification of osteoclasts under E2-WD condition shows enhanced mineral resorption compared to resorption by osteoclasts treated continuously with E2. Graphs displaying the frequency distribution of the average number of resorption pits per field of view. Data are presented as the mean ± SEM from three biological replicates. p-values were calculated using the one-way ANOVA test followed by Tukey’s multiple comparison test. The high prevalence of smaller-sized pits indicates that estrogen suppresses osteoclast resorptive activity. Upon withdrawal of E2, osteoclasts regain their resorptive activity, resulting in more pits with larger areas, reaching levels similar to control cells. These findings align with a model where E2 withdrawal enhances bone degradation, similar to observations in postmenopausal females.
Validation of protocol
This protocol or parts of it has been used and validated in the following research article(s):
Gandhi et al. [14]. In vitro cell culture model for osteoclast activation during estrogen withdrawal. International Journal of Molecular Sciences (Figures 1 and 2).
Philip et al. [19]. Terminally differentiated osteoclasts organize centrosomes into large clusters for microtubule nucleation and bone resorption. Molecular Biology of the Cell (Figure 1B; 2B; 5A and D; 7A; 8).
Maria et al. [15]. Reproducible quantification of osteoclastic activity: Characterization of a biomimetic calcium phosphate assay. Journal of Biomedical Materials Research B: Applied Biomaterials (Figures 2, 4, 5 and 6).
General notes and troubleshooting
General notes
1. Commercially available murine RANKL (Thermo Fisher Scientific, catalog number: 315-11C-10UG) can be substituted for RANKL produced in-lab. Use the commercial RANKL at a final concentration of 100 ng/mL.
2. Perform serial dilution experiments whenever a new lab-prepared RANKL batch is used to confirm the optimal concentration for osteoclast formation. We suggest testing a range of 25–100 ng/mL.
3. Biomimetic-coated coverslips can be used with primary cells. We have successfully transferred osteoclasts produced from murine bone marrow–derived macrophages (BMDMs) onto biomimetic substrate for immunostaining purposes [19].
4. Distilled water and tap water are not appropriate for the creation of stock solutions. Our lab has tried both with no success. Milli-Q water is a critical reagent for the production of the calcium phosphate substrate.
5. Fluorescent staining can also be accomplished through methanol fixation. Apply 100% ice-cold methanol to coverslips and transfer the plates to the -20 °C for 7 min. Perform washes with 4 °C PBS before proceeding with blocking and staining at room temperature, while avoiding direct light exposure.
Troubleshooting
Problem 1: Poor osteoclast formation.
Possible cause(s): Cell passage, RANKL potency, and inaccurate cell density.
Solution 1: Confirm that RAW cells are between passage 3 and 13.
Solution 2: Use a fresh aliquot of RANKL or perform a serial dilution with a different RANKL lot.
Solution 3: Consider seeding cells at higher densities. For example, seed RAWs at 60,000, 70,000, and 80,000 cells/well to account for differences in cell counting accuracy.
Problem 2: Substrate lifts during silver nitrate staining.
Possible cause(s): Inappropriate washing before the addition of cell removal solution and 2.5% AgNO3 solution. Inappropriate storage of coated coverslips.
Solution 1: Wash cells and substrate with distilled water. Do not use PBS. We found that PBS can react with the silver nitrate solution and cause the substrate to lift.
Solution 2: Ensure that the coated coverslips are sealed during protracted storage. Changes in humidity can negatively impact substrate stability.
Problem 3: High background after staining.
Possible cause(s): Off-target binding to biomimetic coating.
Solution 1: Try blocking the coated coverslips with 5% FBS overnight at 4 °C. Additionally, wash coverslips thoroughly after antibody incubation. Gently rocking the plate may improve washing.
Solution 2: Try 2%–5% bovine serum albumin (BSA) as a blocking agent instead of FBS.
Acknowledgments
Graphics were created with BioRender and Adobe® Illustrator and Photoshop software. We thank Anisa Mazraeh and Anahita Karimzadeh for assistance in generating Figure 4. The biomimetic bone coating protocol is adapted from the original research paper by Maria et al. [15]. The combined estrogen withdrawal and bone microenvironment protocol is described and validated in the original research paper by Gandhi et al. [14]. S.O. is a recipient of a University of Toronto Provosts Postdoctoral Award and a Canadian Institutes of Health Research (CIHR)-REDI award (ED6-190720). R.E.H. is supported by a grant from CIHR (PJT-166084).
Competing interests
The authors declare no competing interests.
References
- Boyle, W. J., Simonet, W. S. and Lacey, D. L. (2003). Osteoclast differentiation and activation. Nature. 423(6937): 337–342.
- Kenkre, J. and Bassett, J. (2018). The bone remodelling cycle. Ann Clin Biochem. 55(3): 308–327.
- Manolagas, S. C., (2000). Birth and Death of Bone Cells: Basic Regulatory Mechanisms and Implications for the Pathogenesis and Treatment of Osteoporosis. Endocr Rev. 21(2): 115–137.
- Garnero, P., Sornay-Rendu, E., Chapuy, M. C. and Delmas, P. D. (1996). Increased bone turnover in late postmenopausal women is a major determinant of osteoporosis. J Bone Miner Res. 11(3): 337–349.
- Raisz, L. G., (2005). Pathogenesis of osteoporosis: concepts, conflicts, and prospects. J Clin Invest. 115(12): 3318–3325.
- Matsuo, K. and Irie, N. (2008). Osteoclast–osteoblast communication. Arch Biochem Biophys. 473(2): 201–209.
- Weitzmann, M. N., (2006). Estrogen deficiency and bone loss: an inflammatory tale. J Clin Invest. 116(5): 1186–1194.
- Chen, F., OuYang, Y., Ye, T., Ni, B. and Chen, A. (2014). Estrogen Inhibits RANKL-Induced Osteoclastic Differentiation by Increasing the Expression of TRPV5 Channel. J Cell Biochem. 115(4): 651–658.
- Shevde, N. K., Bendixen, A. C., Dienger, K. M. and Pike, J. W. (2000). Estrogens suppress RANK ligand-induced osteoclast differentiation via a stromal cell independent mechanism involving c-Jun repression. Proc Natl Acad Sci USA. 97(14): 7829–7834.
- Cuetara, B. L., Crotti, T. N., O'Donoghue, A. J. and McHugh, K. P. (2006). Cloning and characterization of osteoclast precursors from the RAW264.7 cell line. In Vitro Cell Dev Biol Anim. 42(7): 182–188.
- Brennan, M. A., Haugh, M. G., O'Brien, F. J. and McNamara, L. M. (2014). Estrogen withdrawal from osteoblasts and osteocytes causes increased mineralization and apoptosis. Horm Metab Res. 46(8): 537–545.
- Geoghegan, I. P., Hoey, D. A. and McNamara, L. M. (2019). Estrogen deficiency impairs integrin alpha(v)beta(3)-mediated mechanosensation by osteocytes and alters osteoclastogenic paracrine signalling. Sci Rep. 9(1): 4654.
- Geoghegan, I. P., McNamara, L. M. and Hoey, D. A. (2021). Estrogen withdrawal alters cytoskeletal and primary ciliary dynamics resulting in increased Hedgehog and osteoclastogenic paracrine signalling in osteocytes. Sci Rep. 11(1): 9272.
- Gandhi, N., Omer, S. and Harrison, R. E. (2024). In Vitro Cell Culture Model for Osteoclast Activation during Estrogen Withdrawal. Int J Mol Sci. 25(11): 6134.
- Maria, S. M., Prukner, C., Sheikh, Z., Mueller, F., Barralet, J. E. and Komarova, S. V. (2014). Reproducible quantification of osteoclastic activity: characterization of a biomimetic calcium phosphate assay. J Biomed Mater Res B Appl Biomater. 102(5): 903–912.
- Everts, V., Korper, W., Jansen, D. C., Steinfort, J., Lammerse, I., Heera, S., Docherty, A. J. and Beertsen, W. (1999). Functional heterogeneity of osteoclasts: matrix metalloproteinases participate in osteoclastic resorption of calvarial bone but not in resorption of long bone. FASEB J. 13(10): 1219–1230.
- Jones, S. J., Boyde, A. and Ali, N. N. (1984). The resorption of biological and non-biological substrates by cultured avian and mammalian osteoclasts. Anat Embryol(Berl). 170(3): 247–256.
- Boyde, A. and Jones, S. J. (1991). Pitfalls in pit measurement. Calcif Tissue Int. 49(2): 65–70.
- Philip, R., Fiorino, C. and Harrison, R. E. (2022). Terminally differentiated osteoclasts organize centrosomes into large clusters for microtubule nucleation and bone resorption. Mol Biol Cell. 33(8): ar68.
- Patntirapong, S., Habibovic, P. and Hauschka, P. V. (2009). Effects of soluble cobalt and cobalt incorporated into calcium phosphate layers on osteoclast differentiation and activation. Biomaterials. 30(4): 548–555.
- Haisenleder, D. J., Schoenfelder, A. H., Marcinko, E. S., Geddis, L. M. and Marshall, J. C. (2011). Estimation of estradiol in mouse serum samples: evaluation of commercial estradiol immunoassays. Endocrinology. 152(11): 4443–4447.
Article Information
Publication history
Received: Aug 21, 2024
Accepted: Nov 3, 2024
Available online: Nov 20, 2024
Published: Jan 5, 2025
Copyright
© 2025 The Author(s); This is an open access article under the CC BY-NC license (https://creativecommons.org/licenses/by-nc/4.0/).
How to cite
Fiorino, C., Omer, S., Gandhi, N. and Harrison, R. E. (2025). In Vitro Assay to Examine Osteoclast Resorptive Activity Under Estrogen Withdrawal. Bio-protocol 15(1): e5155. DOI: 10.21769/BioProtoc.5155.
Category
Cell Biology > Cell-based analysis > Extracellular microenvironment
Medicine
Do you have any questions about this protocol?
Post your question to gather feedback from the community. We will also invite the authors of this article to respond.