- Protocols

- Articles and Issues
- For Authors
- About
- Become a Reviewer

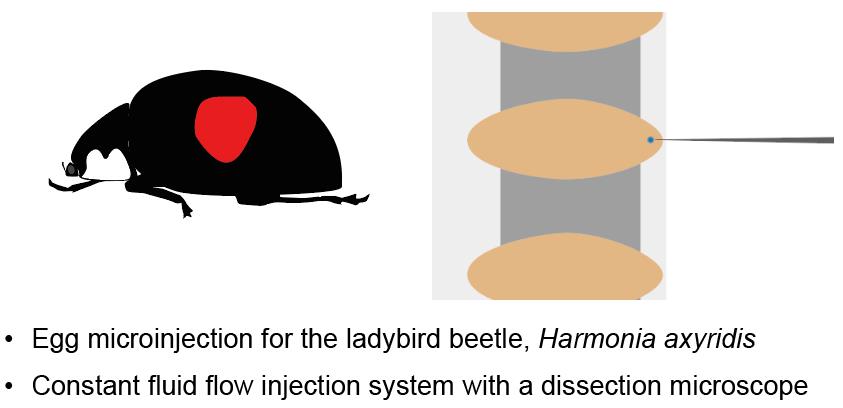
Egg Microinjection for the Ladybird Beetle Harmonia axyridis
Published: Vol 14, Iss 24, Dec 20, 2024 DOI: 10.21769/BioProtoc.5136 Views: 2084
Reviewed by: Alberto RissoneKai YuanAnonymous reviewer(s)
Original research article
The authors used this protocol in:

Jun 2014
Advertisement


Protocol Collections
Comprehensive collections of detailed, peer-reviewed protocols focusing on specific topics


Abstract
In this paper, we present a detailed protocol for microinjecting DNA, RNA, or protein solutions into fertilized eggs of the multicolored Asian ladybird beetle, Harmonia axyridis, under a stereomicroscope equipped with an injection apparatus. H. axyridis is an emerging model organism for studying various biological fields, showing intraspecific polymorphisms exhibiting highly diverse color patterns on the elytra. Here, we describe how to rear ladybird beetles in a laboratory and obtain fertilized eggs for microinjection experiments. We also provide a constant fluid flow injection method, which enhances the efficiency of microinjection and improves throughput. Our step-by-step protocol is applicable to generating transgenic or genome-edited ladybird beetles, facilitating functional genetics in H. axyridis; the microinjection method should be applicable to other insect eggs.
Key features
• Egg microinjection for the multicolored Asian ladybird beetle Harmonia axyridis under a stereomicroscope with injection equipment.
• Detailed procedures for post-injection care, including rearing Harmonia axyridis.
• Step-by-step guide for the efficient collection of Harmonia axyridis eggs.
Keywords: Egg microinjectionGraphical overview
Background
Ladybird beetles belong to the order Coleoptera and encompass approximately 6,000 species worldwide, with around 190 species being described in Japan [1,2]. These beetles display diverse color patterns on their elytra, primarily black and red, which are not only species-specific but also display a high degree of diversity within species (intraspecific polymorphism) (reviewed in Ando and Niimi [3]). Of ladybird beetles, Harmonia axyridis has become an emerging model organism in diverse biological fields, such as color patterning [4,5], population genetics of intraspecific polymorphism [6,7], biological insecticides [8], and phenotypic plasticity [9]. H. axyridis possesses desirable characteristics as an experimental animal, such as the availability of an artificial diet, long-term storage of adults at low temperatures (up to 2 years and 8 months; personal observation), commercially available adults, high fecundity, easy access to fertilized eggs, and ease of sexing in adults based on morphology and at any stage by PCR-based techniques [10]. The ladybird beetle's lifecycle is relatively short—approximately 3 days for embryogenesis, around 11 days for larval development through three molts, 4.5 days for pupal development, and a lifespan of 2–3 months for adults (Figure 1). Furthermore, modern experimental techniques, including high-quality genome data [11,12], cryopreservation of the gonad [13], and numerous useful transgenic lines and mutant strains [14–16] including flightless mutants [17], and modern functional genomics, including RNAi, transgenics, and genome editing, have been developed for this species [4,14,15,18–20].
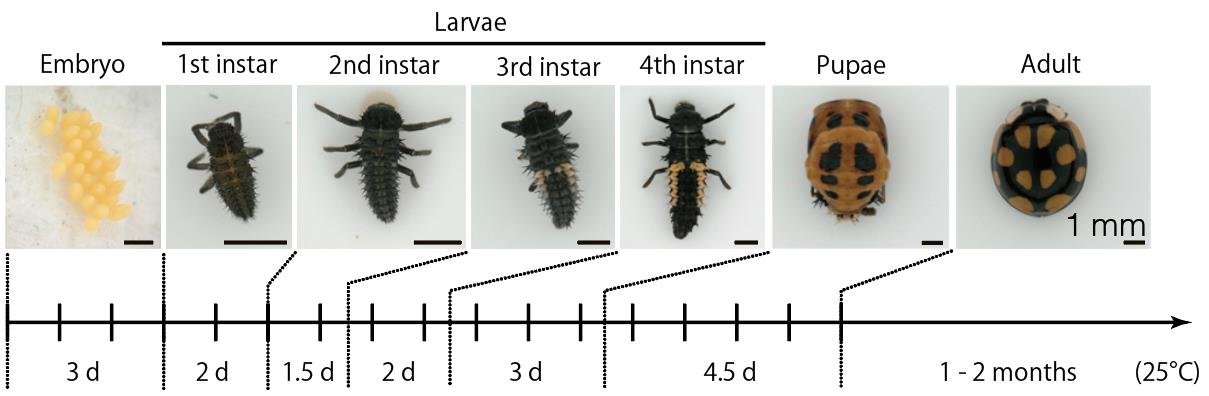
Figure 1. Life stages of Harmonia axyridis. The developmental period for each stage under laboratory conditions at 25 °C is indicated at the bottom. The period shown for adults represents the time during which they lay eggs after mating. It takes approximately one week after eclosion for adults to reach sexual maturity. Scale bar: 1 mm.
Fertilized egg microinjection is an essential approach for functional genomics including transgenesis and genome editing, being the most commonly used method in insects. While there are several methods for delivering reagents into eggs—including electroporation [21–23] and particle guns [24–26], which enable simultaneous treatment of multiple eggs—microinjection is the most widely used method for introducing nucleic acids, proteins, and chemicals into insect eggs. This method, however, has problems such as frequent clogging due to the backflow of egg contents, which prevents efficient injection. To overcome this problem, we developed an injection method using constant fluid flow (i.e., constant pressure during injection). This method not only prevents needle clogging but also contributes to increased injection throughput because it allows the delivery of the injection solution without egg-by-egg manual injection. However, this microinjection system is not able to control a precise injection volume, but the injection volume can be controlled by adjusting the time the needle is kept inside the egg. Our injection system is performed under a stereomicroscope with a micromanipulator and an injection needle holder, making the construction of an injection system more affordable than systems with compound microscopes. This paper describes the methodology of microinjection into the multicolored Asian ladybird beetle embryos using constant fluid flow injection with a stereomicroscope.
Materials and reagents
Biological materials
Harmonia axyridis (young-adult female and male beetles). Ladybird beetles are commercially available as biopesticides in Japan (Tentop, Agrisect, Japan) and possibly other countries. We used established lab culture lines once they had been collected in Aichi, Japan from the outside environment in the spring.
Pea aphid, Acyrthosiphon pisum (feeding source, important for high egg productivity)
Note: Live pea aphids are not commercially available. Pea aphids are found all over the world and can be self-fertilized. Aphids can be maintained on broad bean plants and are easily reared as they are asexual to ensure a steady food supply for the beetles.
Laboratory supplies
Micro-loading tip (Eppendorf, catalog number: 5242956003)
Paper towel (laid on the bottom of the rearing case)
Double-sided tape (Nitoms, catalog number: J0820 or equivalent)
Slide glass (Matsunami, catalog number: S1111)
Artist’s brush (00 number painting brush)
Glass capillary (NARISHIGE, catalog number: GD-1)
Equipment
FemtoJet 4i (Eppendorf, catalog number: 5252000021)
Dissection/stereomicroscope (Zeiss or equivalent)
Micromanipulator (Narishige, catalog number: MMO-202ND)
Micromanipulator stand (Narishige, catalog number: GJ-1)
Micromanipulator stand base (Narishige, catalog number: IP)
Needle holder (Narishige, catalog number: HI-7)
Micropipette puller (Sutter Instruments, catalog number: P-1000)
Box filament (FB245B, 2.5 mm × 4.5 mm)
Microcentrifuge (TOMY, model: MX-307)
Pipetman [GILSON, catalog numbers: F123602 (P1000), F123601 (P200), F123600 (P20), and F144801 (P2)]
Vortex mixer (LMS, model: VTX-3000L)
Insect breeding case (SPL Life Sciences, catalog number: SPL-310102)
Water container (see Figure 2; Umano Kagaku Youki Kabushiki Gaisya, Pla tsubo 20 mL) with a hole (3 mm diameter) on a lid
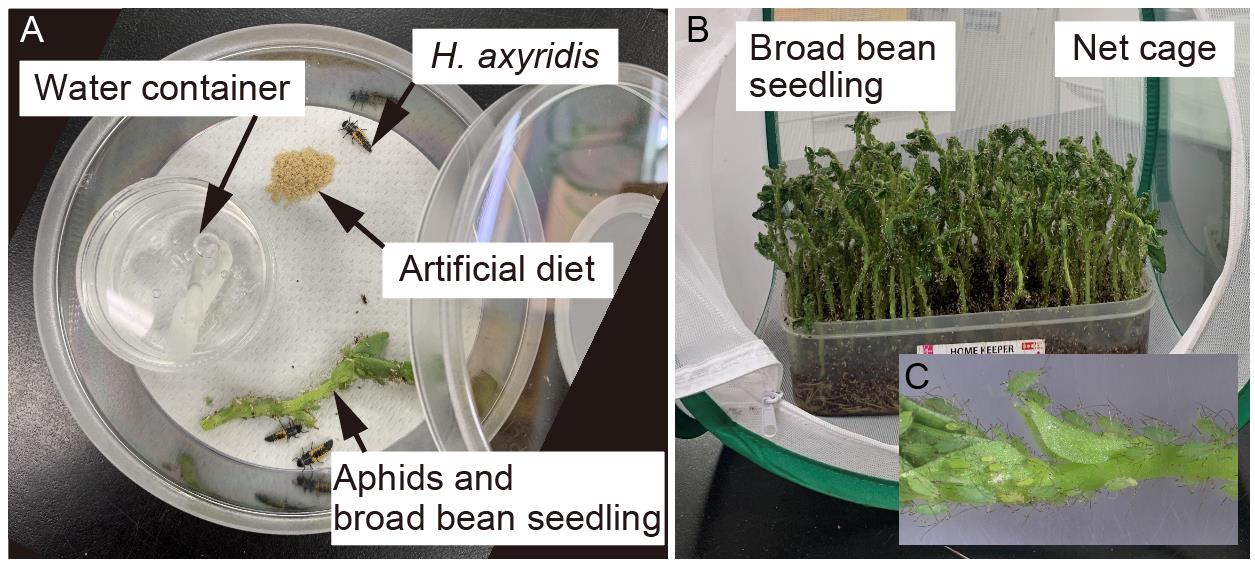
Figure 2. Post-injection care. (A) Overview of the H. axyridis rearing system. (B) Overview of the aphid rearing. Aphids are reared on the broad bean seedlings in a net cage. (C) Magnified view for aphids.Paper-based string for water supply (see Figure 2; Morioto Co., Ltd. 2 mm wide) cut at 4 cm long and placed in the water container
Hairdryer (Koizumi, catalog number: KHD-1430 or equivalent)
Clamp for holding hairdryer (Sibata Scientific Technology or equivalent)
Slide glass case (to keep premade egg holder slide clean)
Humid chamber (see Figure 3H)
Procedure
Preparation of an egg holder plate (Figure 3A)
Cut the double-sided tape approximately 1 mm in width and a slightly shorter length than that of a slide glass.
Attach the tape to the edge of the slide glass.
Press down on the tape from above to ensure it adheres evenly.
Peel off the liner from one side.
Store the prepared plate in a slide glass holder to prevent dust accumulation until use.
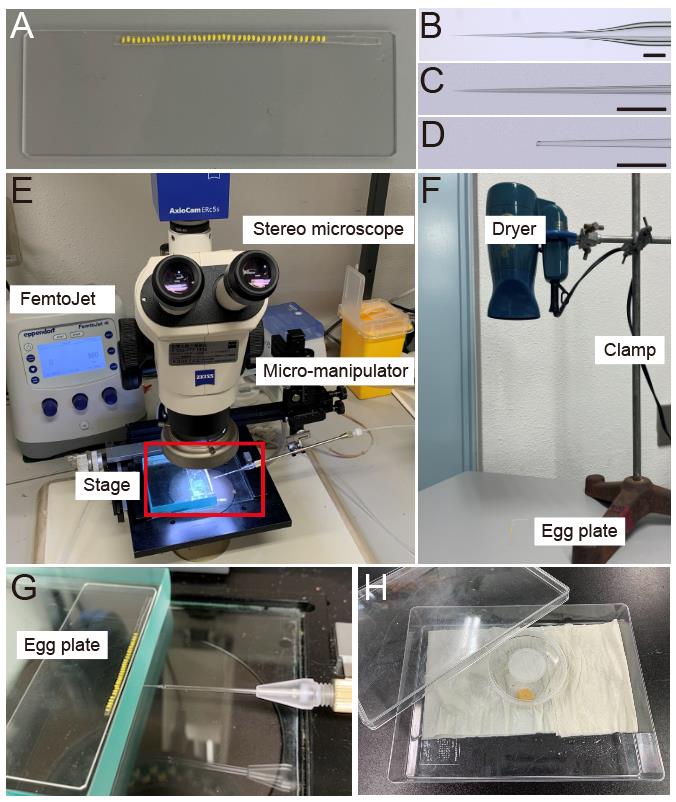
Figure 3. Injection setup. (A) Alignment of eggs on the double-sided tape of an egg holder plate. (B) Shape of an injection needle. (C and D) Magnified tip of the needle before (C) and after (D) opening. (E) Overview of the microinjection system. The red rectangle highlights the area shown in G. (F) Desiccation system using a hair dryer and adjusting the height with a clamp 20 cm apart from an egg plate positioned underneath. (G) An enlarged view of the microscope stage shows the adjustment of the egg plate height to the injection needle with a glass plate. (H) Overview of the humid chamber. Place a moist paper towel inside. Scale bars in B–D: 100 µm.Preparation for breeding H. axyridis
Prepare approximately 10 pairs of young ladybird beetles and separate them by one pair per case.
Note: Do not place several pairs in the same case; otherwise, they will compete for mating and will not produce many eggs.
Feed the beetles with plenty of available aphids; they will begin laying eggs after a week of adult emergence. Replace the breeding cases every two days.
Note: While the ladybird beetle can be fed on an artificial diet, a daily supply of fresh aphids is essential for the regular production of eggs.
Microinjection is carried out using eggs from pairs that have been confirmed to lay fertilized eggs.
Preparation of microinjection needle
Injection needles are made by pulling the glass capillary with the following settings (ramp value: 713). This two-step pulling allows the needle to have a longer taper region (Figure 3B).
HEAT 740, PULL 40, VEL 50, TIME 220;
HEAT 740, PULL 40, VEL 60, TIME 220
Store the prepared needles on a needle holder until use.
Egg collection and alignment on the egg holder plate (Figure 3A, Video 1)
On the morning of the day of injection, clean the rearing cases and check for egg laying every 3 h. Microinjection should be done within 3 h after egg laying.
Note: Based on our experience, ladybird beetles like to lay batches of eggs on the back side of the folded pieces of paper or a pea sprig. Eggs laid in these places are easy to collect and handle. The ladybird beetle lays its eggs with their anterior end oriented upward against the surface (paper in the rearing case and leaves in nature), securing them in place using a natural adhesive secreted by the mother onto the posterior end of each egg during oviposition. When enough feeding with aphids is provided, beetles should lay approximately 20–40 eggs per day, even though the timing and location of egg laying are not predictable.
Gently pick up the eggs one by one by softening the egg glue with a moistened paintbrush. Align the eggs on the double-sided tape with the glue side facing outward and spacing them one egg width from each other (Video 1).
Note: The posterior end of the egg is likely to be tougher than the rest of the egg surface, and the egg glue helps to seal the hole made by the injection, contributing to a high survival rate. Furthermore, previous genome editing research using TALEN in Harmonia axyridis has shown that the hatching rate varies significantly depending on the injection site. When injected anteriorly, the hatching rate is 38% (55 out of 144), whereas posterior injection results in a hatching rate of 77% (161 out of 209) [18].
 Video 1. Preparation of the egg on a glass slide
Desiccate the eggs with a hair dryer placed 20 cm above in a cool setting for 5 min (Figure 3F).
Preparation of the injection solution and loading it into the injection needle
Centrifuge an injection solution at maximum speed at 4 °C for 3 min. Phosphate-buttered saline or pure water is sufficient for the injection buffer. We recommend avoiding buffers that contain ethylenediaminetetraacetic acid (EDTA), such as Tris-EDTA buffer.
Note: This step is critical for avoiding clogging needle tips during injection.
Carefully load 1.0–1.5 µL of the injection solution from the opposite side of the injection needle with the microloader; 1 µL of injection solution is sufficient to inject approximately 100 eggs.
Note: Make sure the needle does not contain air bubbles. If present, air bubbles could be removed by gently flicking the injection needle.
Set the injection needle to the injection holder and attach the holder to the micromanipulator (Figure 3E), taking care not to damage the needle tip.
Egg microinjection
Set the injection parameter of FemtoJet to a constant pressure (Pc) of 600–700 hPa and an injection pressure of 0 hPa.
Note: In our injection system, the injection solution is constantly leaking from the tip during injection. This is beneficial for preventing the clogging of the needle tips by backflow from the egg yolk or surrounding substrate.
Place the slide glass with aligned eggs onto the stage of the microscope.
The position and height of the needle holder should be adjusted so that the glass needle is almost parallel to the egg holder plate.
Note: Parallel injection is preferred because it ensures that both the needle tip and the egg are focused properly and that an accurate injection is made in the most appropriate location.
Adjust the field of view so that the edge of the egg slide and the needle tip are in the same field of view.
Open the needle tip by gently touching the edge of the slide glass under the microscope; the injection solution will leak out. This process will break the fine end of the needle to be approximately 5–7 µm in diameter (Figure 3C and D, Video 2).
Notes:
After opening the tip, Pc should be adjusted so that a droplet of the leaked injection solution forms at the tip of the needle (Video 3). If the tip is too large, a droplet will not form. This step is critical since injection volume cannot be precisely controlled with this method. We have not measured the maximum volume tolerated by the eggs. It is advisable to first test the needle tip size and duration for which the needle is injected into the eggs to determine the optimal injection conditions.
If the broken tip is too large, it is better to prepare a new needle. Otherwise, such needles will cause significant damage to the egg, leading to reduced survival rates.
Video 2. Preparation of the needle, opening the tip by gently touching the side wall of the glass Video 3. Microinjecting the solution into the egg of Harmonia axyridisUnder the microscope, move the needle to the center of the field of view and focus on the needle tip; 3–4 eggs fill the field of view.
Move the stage so that the needle is facing the first egg to be injected. It is recommended that injections begin at the end side of the aligned eggs.
Bring the tip of the needle close to the egg surface.
Attach the needle tip to the egg glue, which is localized at the posterior end of the egg, and soften the egg glue by the injection solution leaking out from the tip, allowing the needle tip to penetrate through both the glue and egg membrane into the cytoplasm (Video 3).
Notes:
Once the needle is inserted into the cytoplasm, the injected solution will automatically flow into the cytoplasm. In our experimental setting, we leave the needle for a moment to ensure the solution is flown out into the egg (Video 3). Since the microinjection system cannot precisely control the injection volume, it is important to determine the optimal timing for inserting the needle. Inserting the needle for too long can result in developmental failure.
To provide a better understanding of the approximate injection volume and flow rate, we have recorded a video of the microinjection procedure using a colored injection solution (Video 3). This video allows for a more visual representation of the microinjection process, demonstrating the flow rate and technique more clearly. For first-time microinjections, to better visualize injected eggs, monitor injection and leakage volumes (as shown in Video 3), and ensure accurate injections, we recommend mixing a dye tracer—such as food dye, fluorescent rhodamine, or phenol red—into the injection solution.
Eject the injection needle from the egg and leave the tip of the needle for a moment in the droplet of injection solution outside of the eggshell to prevent the clogging of the solidified yolk.
Continue to use the same needle and repeat the injection with as many eggs as possible. Usually, one needle is used for several glass slides. To obtain the transformant, 100–150 eggs per construct would be enough with appropriate injection skills.
Note: If the needle clogs during injection, pull the needle from the egg and press the CLEAR function or the injection button on the FemtoJet to remove the debris. When the needle tip breaks, enlarging the opening, readjust the Pc value to accommodate the change and maintain proper flow. If this does not work, you may further break the tip or replace it with a new one.
After injection, remove the eggs that were not injected or not properly injected (yolk leakage).
Store the injected eggs with a slide glass in the humid chamber (Figure 3H); then, store the chamber in the incubator at 25 °C just before they hatch.
Note: When we inject water/PBS into the egg using this method, the hatching rate of larvae depends on the injection proficiency, but embryo survival rates typically range from 50% to 80%. Of the hatched larvae, usually approximately 70% develop into adults.
Post-injection care
Just before hatching (approximately 3 days after injection), transfer the glass slide with the injected embryos to an insect case (Figure 2A) and put some frozen H. axyridis eggs as food.
Note: In the insect container, we put a water-absorbing sponge for first- and second-instar larvae and a water container for the remaining stages. For the water container, we use a drill to make a hole in the cap and fill the container with water, inserting twisted paper into the hole.
Feed enough frozen H. axyridis eggs to the hatchling larvae until they reach the second instar, which usually takes three days after hatching (Figure 1).
Note: H. axyridis larvae have an intense cannibalistic habit, so it is important to provide sufficient food after hatching to prevent the loss of injected larvae.
Once larvae reach the third instar (Figure 1; 6–7 days after hatching), separate them into five larvae per case and feed them with frozen or fresh aphids daily (Figure 2).
From the fourth instar onward, the larvae can be reared on artificial food.
Note: Once the larvae have reached the fourth-instar stage, they should be separated into one larva per case to prevent them from cannibalizing each other.
Validation of protocol
This protocol or parts of it has been used and validated in the following research articles:
Kuwayama et al. [15]. Germ‐line transformation and RNAi of the ladybird beetle, Harmonia axyridis. Insect Mol Biol. (Figure 2)
Kuwayama et al. [14]. Establishment of Transgenic Lines for Jumpstarter Method Using a Composite Transposon Vector in the Ladybird Beetle, Harmonia axyridis. PLoS One. (Figure 1)
Osanai-Futahashi et al. [16]. A visible dominant marker for insect transgenesis. Nat Commun. (Figure 6c)
Hatakeyama et al. [18]. Knockout of a transgene by transcription activator‐like effector nucleases (TALENs) in the sawfly, Athalia rosae (Hymenoptera) and the ladybird beetle, Harmonia axyridis (Coleoptera). Insect Mol Biol. (Figure 3B)
Acknowledgments
We extend our gratitude to the Emerging Model Organisms Facility of NIBB Trans-Scale Biology Center for technical assistance. This protocol was adapted from Kuwayama et al. [14,15], Osanai-Futahashi et al. [16], and Hatakeyama et al. [18]. This work was supported by JSPS KAKENHI Grant Numbers 21H02211 to T. Nakamura, 22K15131 to Y. Matsuoka, and 16H02596, 19H01004, and 23H02227 to T. Niimi.
Competing interests
No conflict of interest is declared with regard to this article.
Ethical considerations
No ethical requirements are needed with regard to this article.
References
- Komai, T. (1956). Genetics of Ladybeetles. In: Demerec, M. (Ed.). Advances in Genetics (Vol. 8, pp. 155–188). Academic Press.
- Sasaji, H. (Ed.). (1998). [The heredity and the problems of elytral color polymorphism in Cheilomenes sexmaculata (Coleoptera: Coccinellidae)]. In: Sasaji, H. (Ed.) [Natural History of the Ladybirds] (In Japanese). University of Tokyo Press.
- Ando, T. and Niimi, T. (2019). Development and evolution of color patterns in ladybird beetles: A case study in Harmonia axyridis. Dev Growth Differ. 61(1): 73–84.
- Ando, T., Matsuda, T., Goto, K., Hara, K., Ito, A., Hirata, J., Yatomi, J., Kajitani, R., Okuno, M., Yamaguchi, K., et al. (2018). Repeated inversions within a pannier intron drive diversification of intraspecific colour patterns of ladybird beetles. Nat Commun. 9(1): 3843.
- Gautier, M., Yamaguchi, J., Foucaud, J., Loiseau, A., Ausset, A., Facon, B., Gschloessl, B., Lagnel, J., Loire, E., Parrinello, H., et al. (2018). The Genomic Basis of Color Pattern Polymorphism in the Harlequin Ladybird. Curr Biol. 28(20): 3296–3302.e7.
- Dobzhansky, T. (1933). Geographical Variation in Lady-Beetles. Am Nat. 67(709): 97–126.
- Tan, C. C. (1946). Mosaic dominance in the inheritance of color patterns in the lady-bird beetle, harmonia axyridis. Genetics. 31(2): 195–210.
- Roy, H. E., Brown, P. M. J., Adriaens, T., Berkvens, N., Borges, I., Clusella-Trullas, S., Comont, R. F., De Clercq, P., Eschen, R., Estoup, A., et al. (2016). The harlequin ladybird, Harmonia axyridis: global perspectives on invasion history and ecology. Biol Invasions. 18(4): 997–1044.
- Zhang, Y., Wang, X. X., Feng, Z. J., Cong, H. S., Chen, Z. S., Li, Y. D., Yang, W. M., Zhang, S. Q., Shen, L. F., Tian, H. G., et al. (2020). Superficially Similar Adaptation Within One Species Exhibits Similar Morphological Specialization but Different Physiological Regulations and Origins. Front Cell Dev Biol. 8: e00300.
- Gotoh, H., Nishikawa, H., Sahara, K., Yaginuma, T. and Niimi, T. (2015). A new molecular technique for determining the sex of Harmonia axyridis. J Insect Biotechnol Sericol. 84(1): 1_009-1_015.
- Boyes, D., Crowley, L. M. and University of Oxford and Wytham Woods Genome Acquisition Lab et al. (2024). The genome sequence of the harlequin ladybird, Harmonia axyridis (Pallas, 1773). Wellcome Open Res. 6: 300.
- Chen, M., Mei, Y., Chen, X., Chen, X., Xiao, D., He, K., Li, Q., Wu, M., Wang, S., Zhang, F., et al. (2021). A chromosome‐level assembly of the harlequin ladybird Harmonia axyridis as a genomic resource to study beetle and invasion biology. Mol Ecol Resour. 21(4): 1318–1332.
- Kawaguchi, H. and Niimi, T. (2018). A method for cryopreservation of ovaries of the ladybird beetle, Harmonia axyridis. J Insect Biotechnol Sericology. 87(2): 2_035-2_044.
- Kuwayama, H., Gotoh, H., Konishi, Y., Nishikawa, H., Yaginuma, T. and Niimi, T. (2014). Establishment of Transgenic Lines for Jumpstarter Method Using a Composite Transposon Vector in the Ladybird Beetle, Harmonia axyridis. PLoS One. 9(6): e100804.
- Kuwayama, H., Yaginuma, T., Yamashita, O. and Niimi, T. (2006). Germ‐line transformation and RNAi of the ladybird beetle, Harmonia axyridis. Insect Mol Biol. 15(4): 507–512.
- Osanai-Futahashi, M., Ohde, T., Hirata, J., Uchino, K., Futahashi, R., Tamura, T., Niimi, T. and Sezutsu, H. (2012). A visible dominant marker for insect transgenesis. Nat Commun. 3(1): 1295.
- Seko, T., Yamashita, K. i. and Miura, K. (2008). Residence period of a flightless strain of the ladybird beetle Harmonia axyridis Pallas (Coleoptera: Coccinellidae) in open fields. Biol Control. 47(2): 194–198.
- Hatakeyama, M., Yatomi, J., Sumitani, M., Takasu, Y., Sekiné, K., Niimi, T. and Sezutsu, H. (2016). Knockout of a transgene by transcription activator‐like effector nucleases (TALENs) in the sawfly, Athalia rosae (Hymenoptera) and the ladybird beetle, Harmonia axyridis (Coleoptera). Insect Mol Biol. 25(1): 24–31.
- Partosh, T., Davidovitz, M., Firer, N. and Pines, G. (2023). CRISPR-Based Genome Editing inHarmonia Axyridis. bioRxiv. doi.org/10.1101/2023.07.27.550814.
- Wu, M. m., Chen, X., Xu, Q. X., Zang, L. s., Wang, S., Li, M. and Xiao, D. (2022). Melanin Synthesis Pathway Interruption: CRISPR/Cas9-mediated Knockout of dopa decarboxylase (DDC) in Harmonia axyridis (Coleoptera: Coccinellidae). J Insect Sci. 22(5): 1.
- Kamdar, K. P., Wagner, T. N. and Finnerty, V. (1995). Electroporation of Drosophila Embryos. In: Nickoloff, J. A. (Ed.). Animal Cell Electroporation and Electrofusion Protocols (pp. 239–243). Humana Press.
- Guo, X. Y., Dong, L., Wang, S. P., Guo, T. Q., Wang, J. Y. and Lu, C. D. (2004). Introduction of Foreign Genes into Silkworm Eggs by Electroporation and Its Application in Transgenic Vector Test. Acta Biochim Biophys Sin. 36(5): 323–330.
- Xu, Q., Guerrero, F. D., Palavesam, A. and Pérez de León, A. A. (2016). Use of electroporation as an option to transform the horn fly, Haematobia irritans: a species recalcitrant to microinjection. Insect Sci. 23(4): 621–629.
- Sanford, J. C., Klein, T. M., Wolf, E. D. and Allen, N. (1987). Delivery of substances into cells and tissues using a particle bombardment process. Part Sci Technol. 5(1): 27–37.
- Horard, B., Mangé, A., Pelissier, B. and Couble, P. (1994). Bombyx gene promoter analysis in transplanted silk gland transformed by particle delivery system. Insect Mol Biol. 3(4): 261–265.
- Lule‐Chávez, A. N., Carballar‐Lejarazú, R., Cabrera‐Ponce, J. L., Lanz‐Mendoza, H. and Ibarra, J. E. (2020). Genetic transformation of mosquitoes by microparticle bombardment. Insect Mol Biol. 30(1): 30–41.
Article Information
Publication history
Received: May 24, 2024
Accepted: Oct 10, 2024
Available online: Oct 30, 2024
Published: Dec 20, 2024
Copyright
© 2024 The Author(s); This is an open access article under the CC BY-NC license (https://creativecommons.org/licenses/by-nc/4.0/).
How to cite
Nakamura, T., Matsuoka, Y. and Niimi, T. (2024). Egg Microinjection for the Ladybird Beetle Harmonia axyridis. Bio-protocol 14(24): e5136. DOI: 10.21769/BioProtoc.5136.
Category
Developmental Biology > Genome editing
Environmental science
Molecular Biology > DNA > Gene expression
Do you have any questions about this protocol?
Post your question to gather feedback from the community. We will also invite the authors of this article to respond.