- Protocols

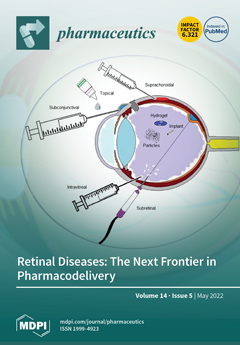
- Articles and Issues
- For Authors
- About
- Become a Reviewer

Mouse Renal Artery Catheterization for Local Delivery of Drugs in Capsulated or Free Forms
Published: Vol 14, Iss 18, Sep 20, 2024 DOI: 10.21769/BioProtoc.5070 Views: 1690
Reviewed by: Olga KopachKomuraiah MyakalaAnonymous reviewer(s)
Original research article
The authors used this protocol in:
May 2022
Advertisement


Protocol Collections
Comprehensive collections of detailed, peer-reviewed protocols focusing on specific topics


Abstract
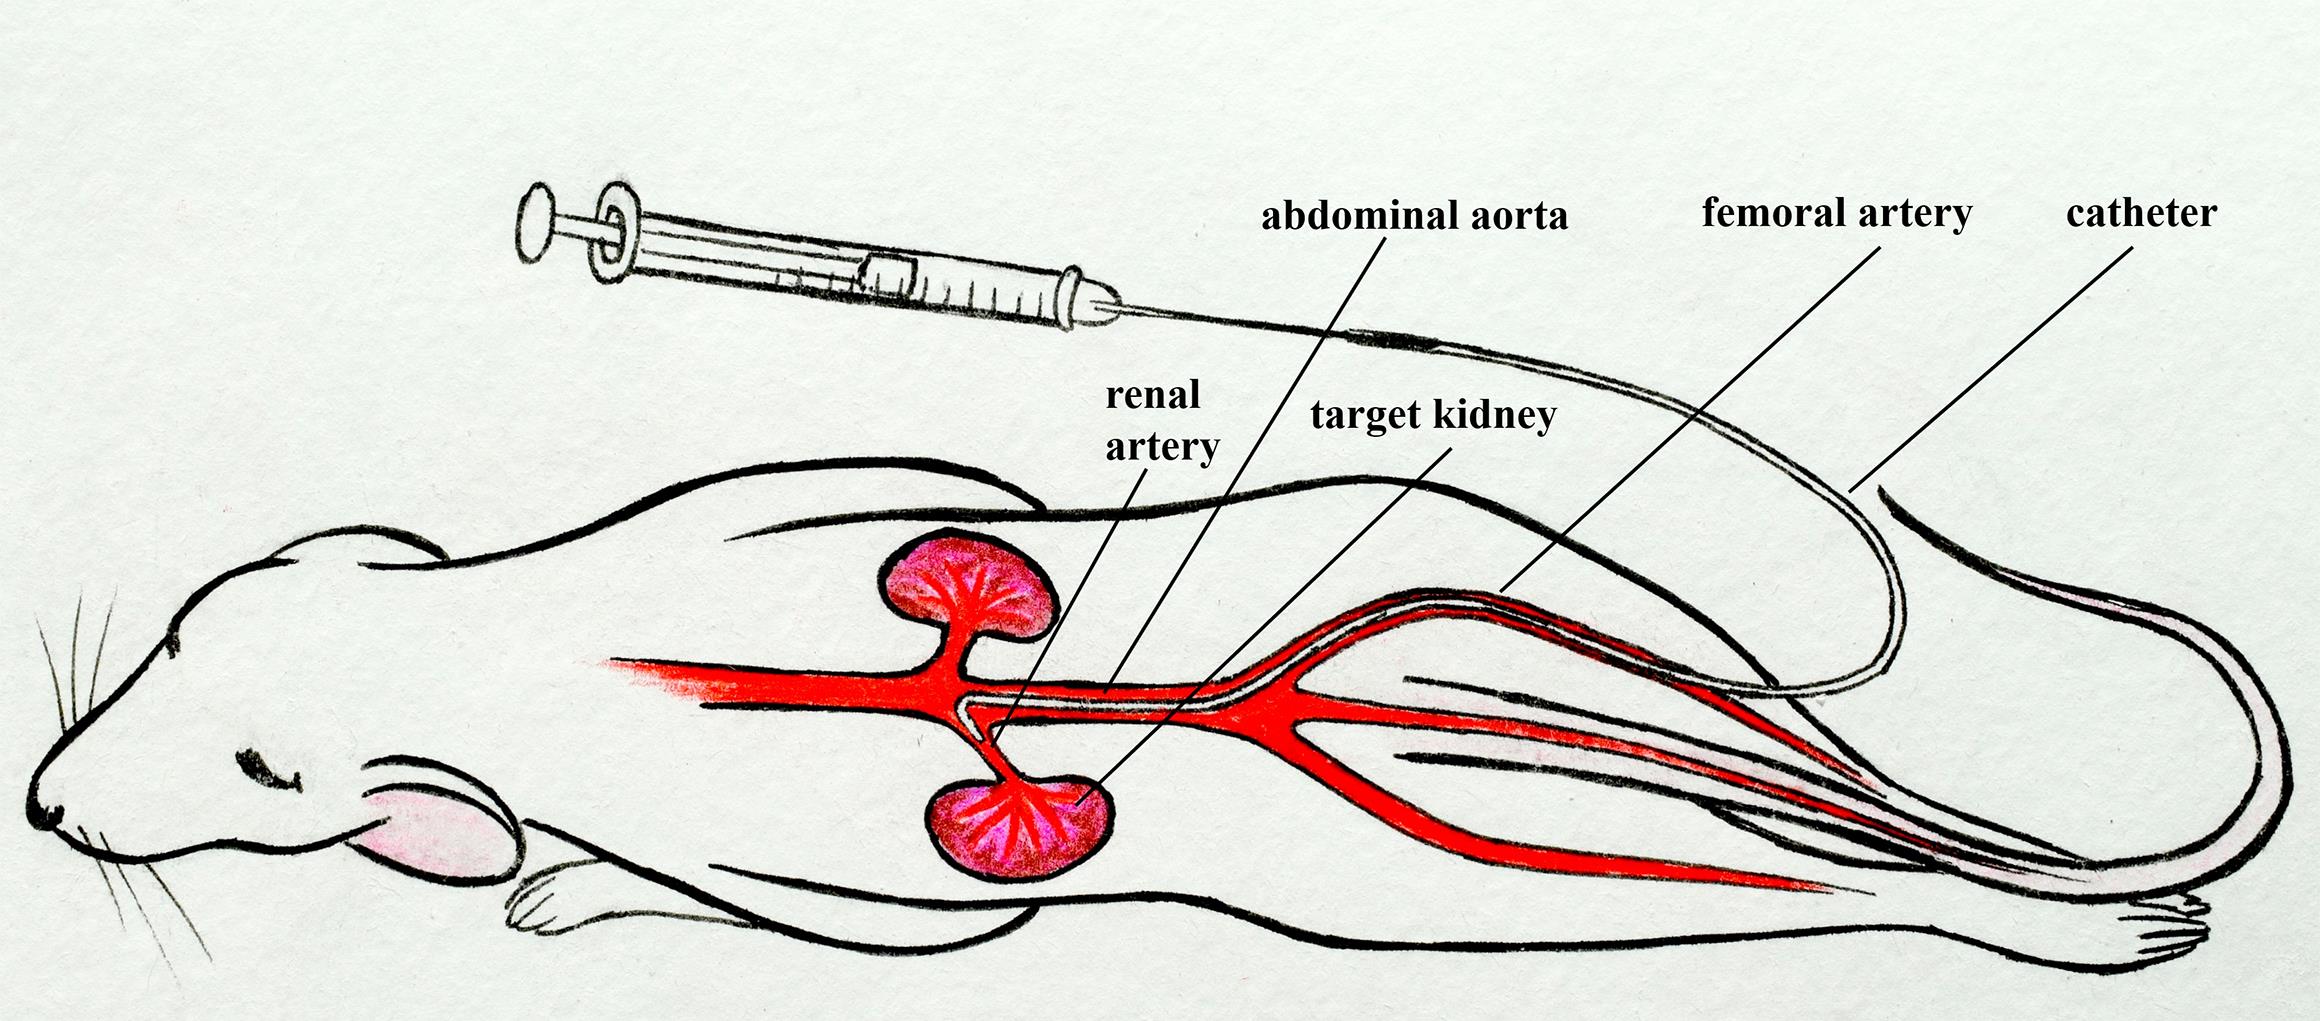
Arterial delivery to the kidney offers significant potential for targeted accumulation and retention of cells, genetic material, and drugs, both in free and encapsulated forms, because the entire dose passes through the vessels feeding this organ during the first circulation of blood. At the same time, a detailed study on the safety and effectiveness of developed therapies in a large number of experimental animals is required. Small laboratory animals, especially mice, are the most sought-after in experimental and preclinical testing due to their cost-effectiveness. Most of the described manipulations in mice involve puncturing the walls of the abdominal aorta or renal artery for direct administration of solutions and suspensions. Such manipulations are temporary and, in some cases, result in long-term occlusion of the aorta. Ultimately, this can lead to disruption of blood flow as well as functional and morphological changes to the kidneys. In addition, few of these protocols describe targeted delivery to the kidney. The presented protocol involves the injection of test substances or suspensions through the renal artery into one of the kidneys. The catheter is implanted into the femoral artery and then advanced into the abdominal aorta and renal artery within the vessels. In this case, the integrity violation of the renal artery or abdominal aorta is absent. Occlusion of the renal artery is necessary only immediately at the time of injection to minimize the entry of the injected substance into the aorta. This protocol is similar to the clinical procedure for delivering a catheter into the renal artery and is designed for real-world operating conditions.
Key features
• The protocol involves implantation of a catheter into the vascular system through a puncture of the femoral artery, similar to the clinical procedure.
• The catheter is moved inside the vessels without puncture or ligation to the aorta or renal artery.
• The protocol involves only a short-term block of the blood supply to the target kidney (the time required for direct administration of the drug).
• Suitable for chronic experiments on mice, since the catheter is removed from the vascular system immediately after drug administration.
Keywords: Femoral artery catheterizationGraphical overview
Mouse renal artery catheterization through the femoral artery
Background
Arterial delivery of drugs to the kidneys in free and encapsulated forms has enormous potential to increase local drug concentrations and reduce the side effects of therapy on other organs. The choice of therapy parameters (active substance, pharmaceutical form, dosage regimen, volume, etc.), as well as understanding drug accumulation and retention in the kidneys during arterial delivery, requires a wide range of complex studies on animals. In this regard, small laboratory animals, especially mice, are the most attractive and economical.
The success of the study directly depends on the correctness of the arterial delivery procedure, which is especially difficult for mice due to their small size. Incorrectly performed injections in the renal artery could disrupt the kidney blood supply and lead to tissue damage. The vast majority of drug delivery protocols through the renal artery are based on ligation and direct injection into the abdominal aorta [1]. Chen et al. reported that direct injection of the rAAV2-GFP vector into the rat abdominal aorta using 45 min ligation of renal vein and abdominal aorta led not only to successful transfection of tubular epithelial cells but also to focal areas of chronic interstitial infiltration with mononuclear cells, tubular atrophy, and scar formation [2]. Authors suggested that these changes are most likely the result of ischemic injury inherent in the procedure and not a consequence of recombinant adeno-associated viral vector administration or an adverse immune response to it or the transgene. A similar protocol for mice with short-term occlusion (several minutes) and puncture of the abdominal aorta was presented by Dahlqvist et al. [3]. Zaw Thin et al. developed a percutaneous minimally invasive ultrasound-guided renal artery injection to enhance cell delivery to mice kidneys [4]. This procedure appears to be less invasive (only puncture of muscles and skin with a syringe) than the others but requires a special ultrasound imaging system. In addition, in this protocol, the renal artery wall is punctured with a 29-gauge needle (0.33 mm diameter). Note that the diameter of the mouse renal artery is in the range of 0.3–0.4 mm [5], which determines a high risk of significant blood loss after injection without the ability to stop bleeding. At the same time, the authors reported 70% success.
In our protocol, we describe the catheterization of the mouse renal artery by inserting a thin catheter into a small puncture in the femoral artery and then approaching the left renal artery through the abdominal aorta [6–8]. This protocol is similar to the standard clinical approach [9–11]. It does not require blockade of the target kidney blood flow, disruption of the integrity, and ligation of the renal artery or abdominal aorta, unlike other described methods [1–4, 12, 13]. This protocol requires microsurgery skills but can be extremely useful for studies in which maintaining a normal blood supply to the target kidney as well as vascular integrity is critical.
Materials and reagents
Biological materials
Balb/c mice 8–10 weeks old (20–25 g weight) were obtained from the vivarium of the Saratov State Medical University. Other mouse strains could also be used in this protocol.
Reagents
Corneregel 5% (Dr. Gerhard Mann, catalog number: 4030571000075)
Zoletil 100 Virbac SA (Valdepharm / Delpharm Tours, catalog number: SAGARPA Q-0042-306)
Xyla (Xylazine 2%) 50 mL (Interchemie werken, catalog number: IX2)
Iodine alcohol solution for external use, alcohol 5% (Pharmaks, catalog number: 322645 or Rigas Farmfabrika, catalog number: 110004)
Sodium chloride solution (saline) for injection 0.9% 5 mL (Grotex LLC, catalog number: 250309 or Hameln, UK, catalog number: SC005)
Evans Blue (Sigma-Aldrich, catalog number: E2129)
70% alcohol antiseptic solution (BioPharmKombinat, catalog number: N1x1)
Solutions
5% Evans Blue solution in saline (see Recipes)
Recipes
5% Evans Blue solution in saline (1 mL)
Reagent Final concentration Quantity or Volume Evans Blue 5% (w/v) 5 mg Sodium chloride solution (0.9%) 0.9% (w/v) 1 mL Total (optional) 5% (w/v) 1 mL
Laboratory supplies
Nylon surgical threads (USP: 5/0, EP: 1) (Mosnitki, catalog number: 5/0(1))
Cotton pads, cleanic soft & сomfort (Harper Hygienics, catalog number: 96190075)
Cotton buds (Harper Hygienics, catalog number: 96190075)
Fixing adhesive plaster 2.5 cm × 5 m (Nordeplast, catalog number: 1145541)
Sterile surgical cotton wool 100 g (Hygrovata, catalog number: GOST 5556-81)
Hair removal cream for sensitive skin Veet (Reckitt Benckiser, catalog number: BP_29060)
Suture material Prolene 5-0 (Ethicon, Johnson & Johnson, catalog number: W8310)
BD Micro-Fine Plus Demi insulin syringes with sterile interior 0.3 mm (30G) × 8 mm, 0.3 mL (Becton Dickinson, catalog number: 320829)
Polyurethane intravascular tubing 32ga/0.8Fr, 0.13 mm × 0.25 mm (Instech Laboratories, Inc., catalog number: BTPU-010)
Polyethylene tubing PE-10, 0.28 mm × 0.61 mm (BD Intramedic, catalog number: 22-204008)
Equipment
Dressing forceps 10 cm (Figure 1A)
Tweezers 11 cm (Figure 1B)
Angle tweezers 10.5 cm (Figure 1C)
Toothed tweezers 14 cm (Figure 1D)
Tweezers 14 cm (Figure 1E)
Micro scissors 14 cm (Figure 1F)
Microneedle holder 14 cm (Figure 1G)
Stereomicroscope (Nexcope, model: NSZ-608)
LED ring light (Lomo-microsystems, model: LED-144A)
Digital camera MS-8.3 USB 3.0 with matrix 1/1.2" SONY (Lomo-microsystems, model: MS-8.3)
Analytical balance (OHAUS, model: Pioneer PR224)
Trimmer Wahl Micro Lithium (Wahl GhbH, model: 5640)
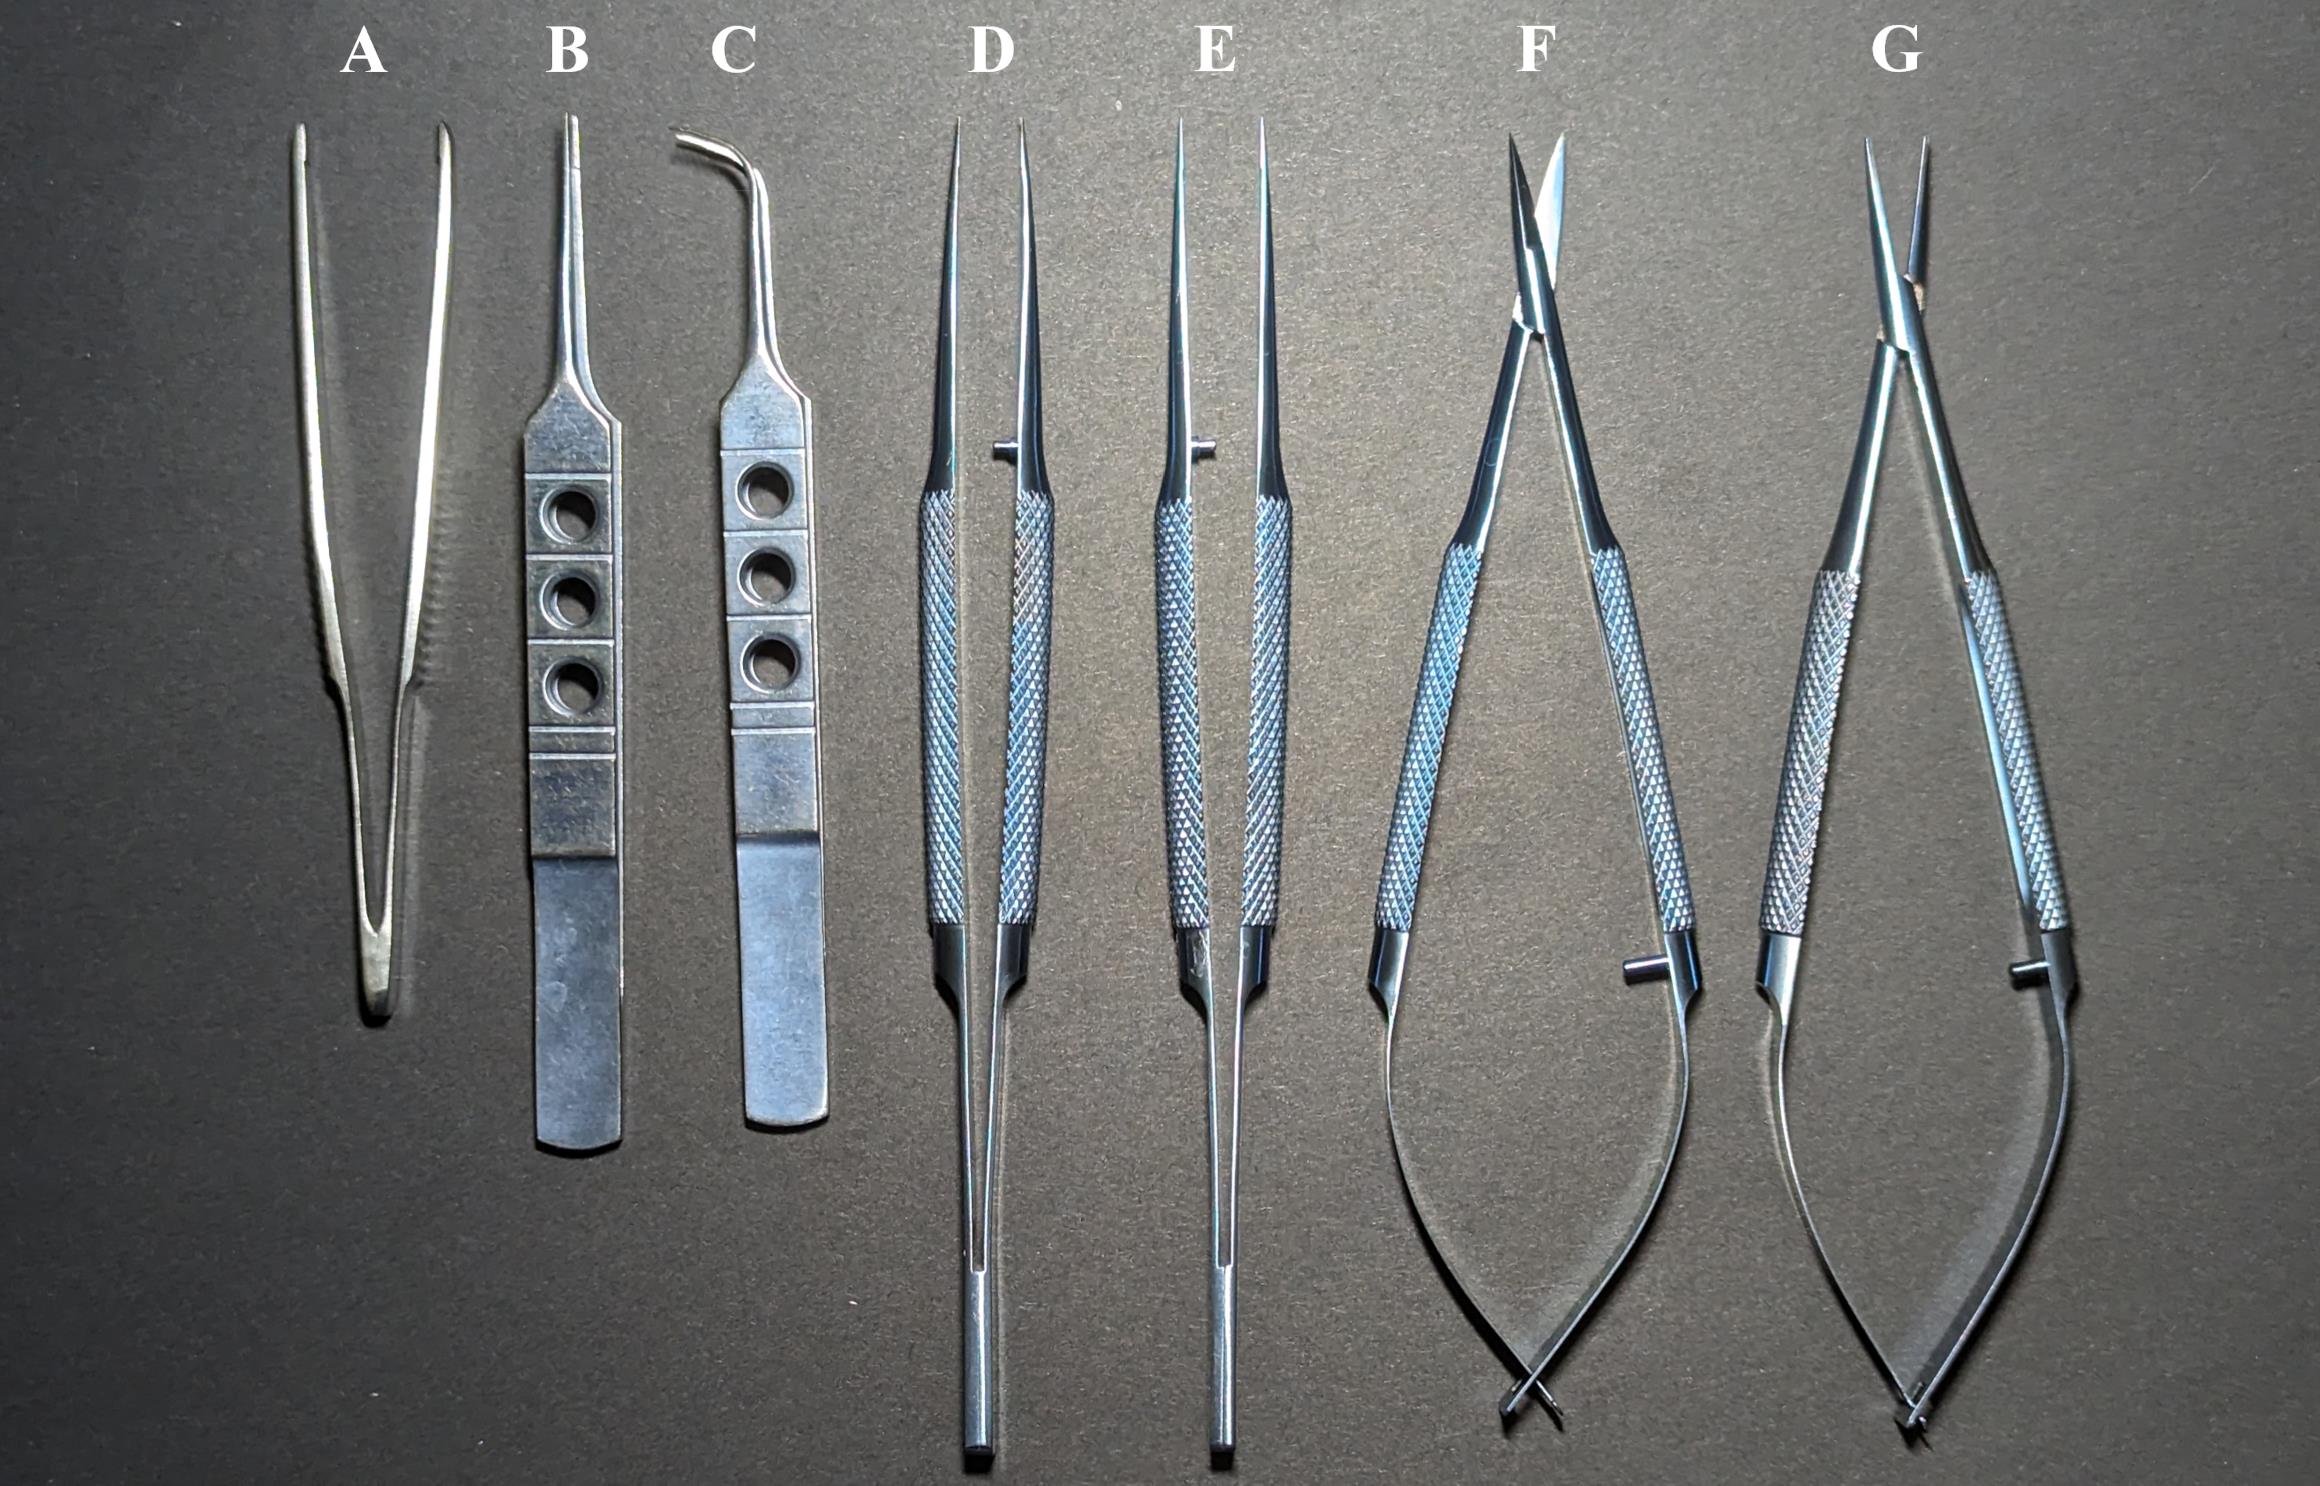
Figure 1. Catheterization tools. Dressing forceps 10 cm (A), tweezers 11 cm (B), angle tweezers 10.5 cm (C), toothed tweezers 14 cm (D), tweezers 14 cm (E), micro scissors 14 cm (F), and microneedle holder 14 cm (G).
Software and datasets
For video recording: Pylon Viewer (6.3.0.23157, 02.11.2021)
For video processing: Shotcut (24.02.29, 29.02.2024)
Procedure
Preparation of catheter for the renal artery catheterization
Prepare the components of the catheter (Figure 2A):
Unwind the nylon surgical threads and take one of the three fibers as a ligature (10–12 cm).
Cut 5 cm of Polyurethane (PU) intravascular tubing 32ga/.8Fr, 0.13 mm × 0.25 mm (thin catheter).
Cut 7 cm of Polyethylene tubing PE-10, 0.28 mm × 0.61 mm (thick catheter).
Insert the thin catheter into the thick one to a depth of 0.5 cm (Figure 2B).
Tie a ligature tightly to secure the thin catheter. The patency of the catheter should not be impaired.
Cut the tip of the thin catheter at a 45° angle (Figure 2C).
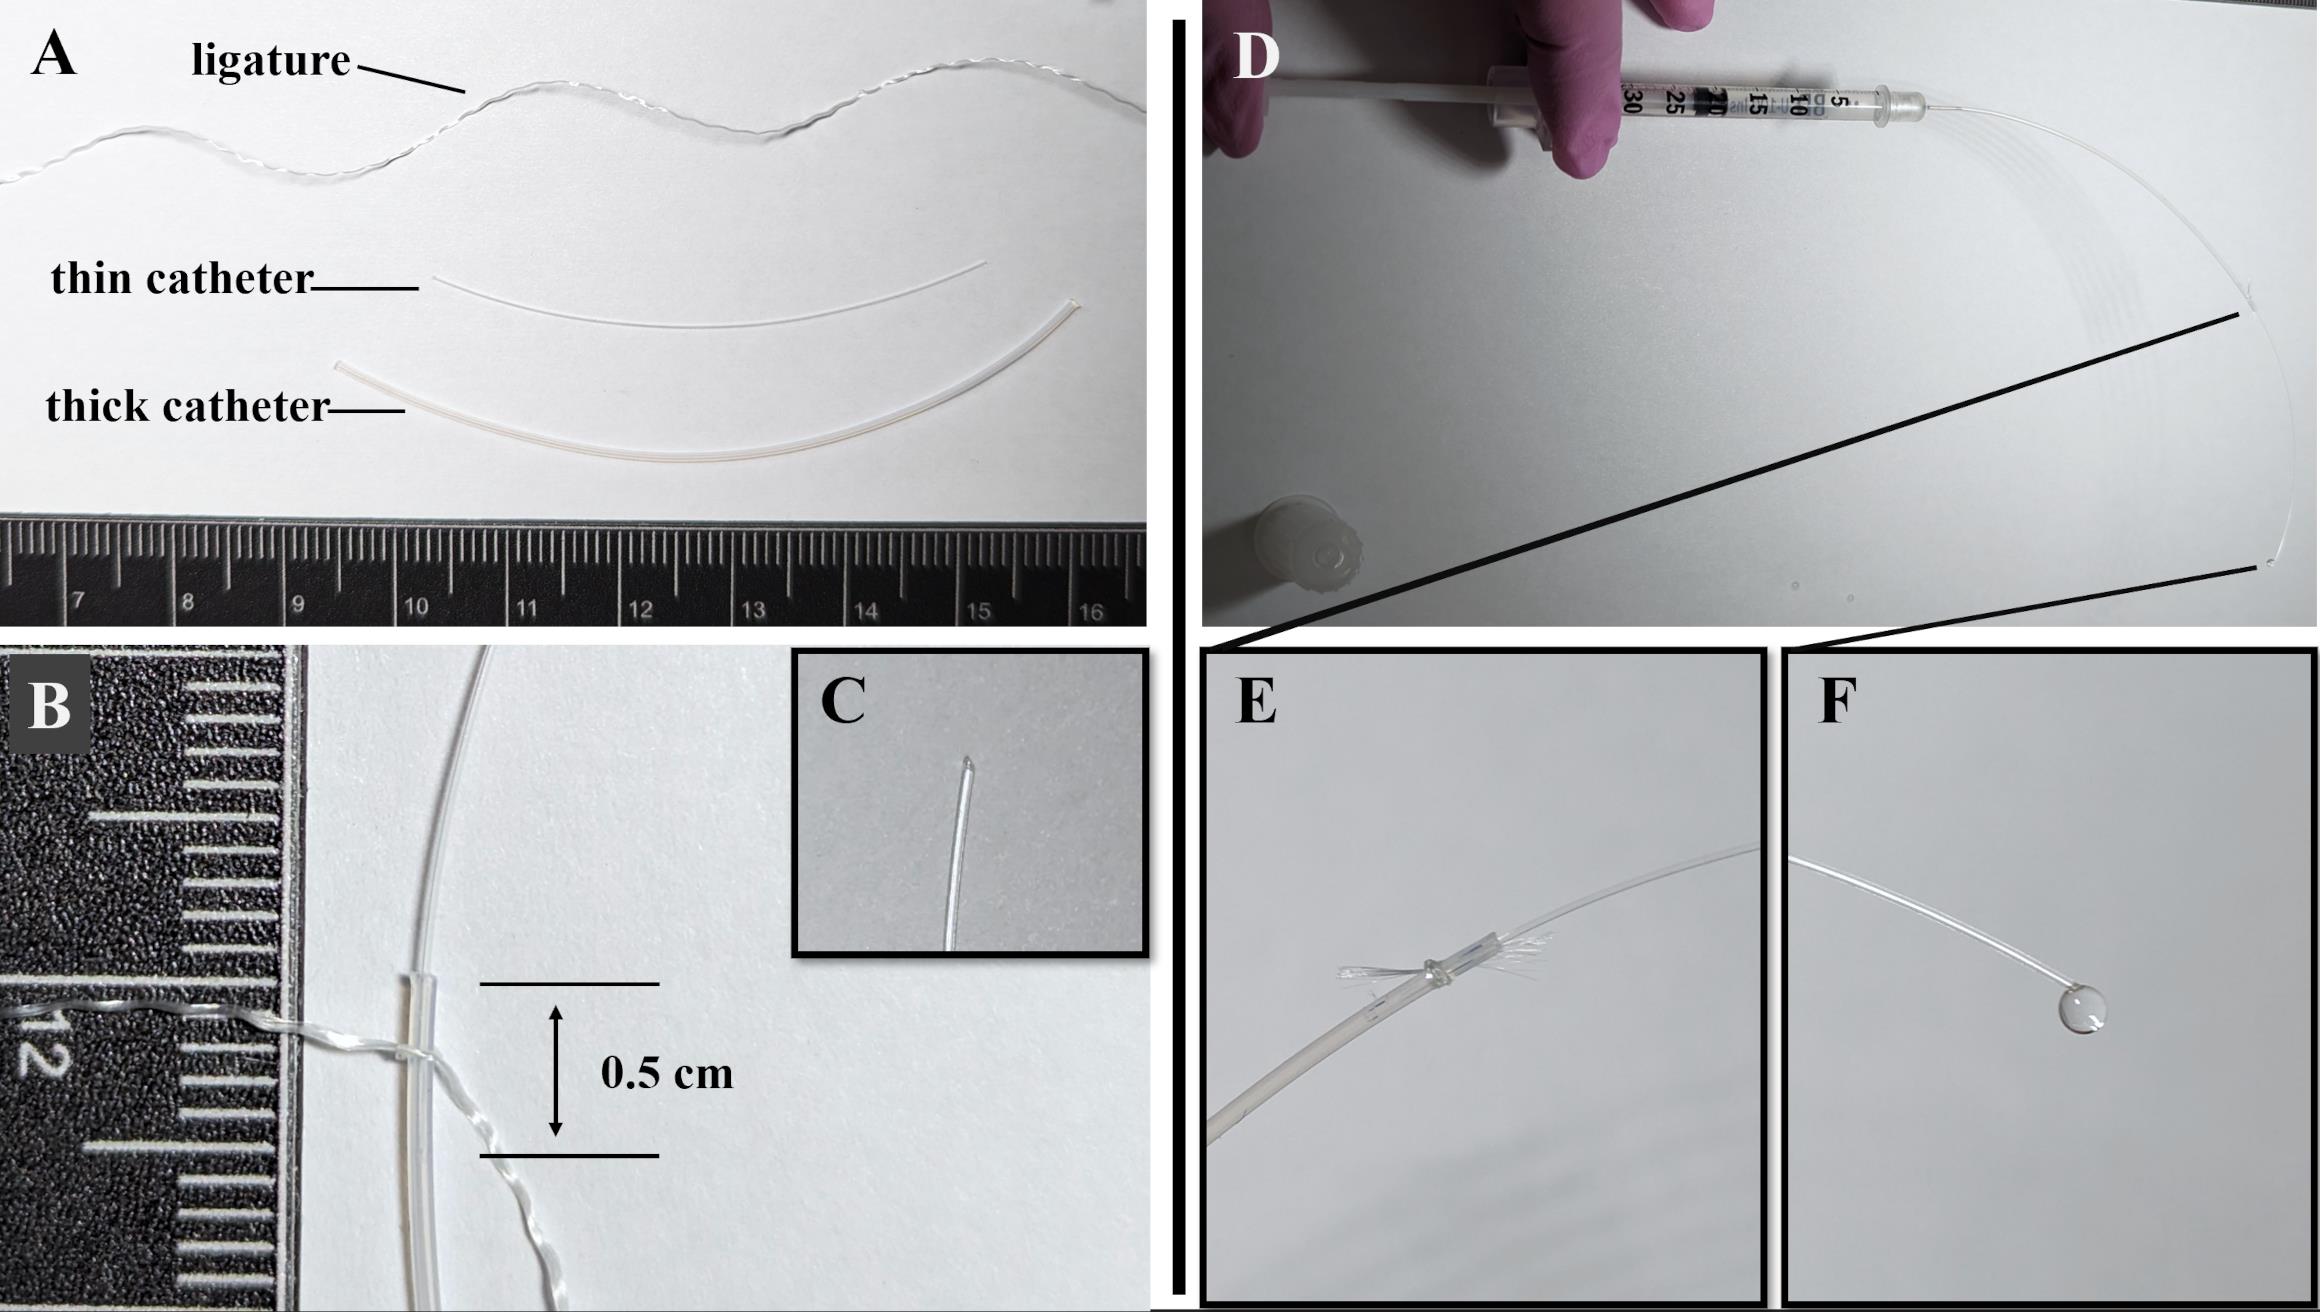
Figure 2. Preparation of catheter for the renal artery catheterization. (A) Components of the catheter: ligature, thin catheter (5 cm)—Polyurethane intravascular tubing 32ga/.8Fr, 0.13 mm × 0.25 mm; thick catheter (7 cm)—Polyethylene tubing PE-10, 0.28 mm × 0.61mm. (B) A thin catheter is inserted into a thick catheter to a depth of 0.5 mm and fixed with a ligature. (С) The tip of the thin catheter is cut at a 45° angle. (D) Checking the tightness and patency of the catheter using saline solution. (E) Saline solution does not flow at the junction of the thin and thick catheters. (F) Saline solution flows from the tip of a thin catheter.Check the tightness and patency of the catheter by injecting saline solution into it using an insulin syringe with sterile interior and needle 0.3 mm (30G) × 8 mm (Figure 2D):
Check that saline solution does not leak at the junction of the thin and thick parts of the catheter (Figure 2E).
Check that the saline solution leaks at the tip of the thin catheter (Figure 2F).
The internal volume of the catheter, manufactured according to the described method, is 5 μL. This must be considered when administering the drugs. If other tubes are used to create the catheter, the internal volume should be measured or calculated based on internal diameter and length.
Mouse preparation for catheterization
Prepare a cotton roll for the mouse:
Take three cotton pads (Figure 3A).
Take 3 cm of fixing adhesive plaster 2.5 cm × 5 m (Figure 3B).
Prepare a roll of cotton pads and adhesive plaster (Figure 3С).

Figure 3. Preparation of cotton roll for mouse. (A) Three cotton pads, (B) fixing adhesive plaster 2.5 cm × 5 m, (C) and cotton roll for mouse.Inject general anesthesia into the mouse intraperitoneally [Zoletil mixture (40 mg per kg) and 2% Xylazine (10 mg per kg)]. Instead of Xylazine, 2% Rometar can be used.
Wait 5–7 min and check the hind limb reflex. If there is no hind limb reflex, begin the operation; otherwise, wait a few more minutes.
Apply Corneregel 5% or other protective gel to mouse eyes.
Place the mouse on the cotton roll and remove hair from the left side of the body using a trimmer and then hair removal cream for sensitive skin (Figure 4A). Remove the cream thoroughly using cotton pads and saline or water. Do not apply the cream for more than 30–60 s to avoid damaging the skin.
Place the animal on its back and secure its paws using adhesive plaster (Figure 4B).
Remove hair on the inner side of the left paw using a trimmer and then hair removal cream (Figure 4С).
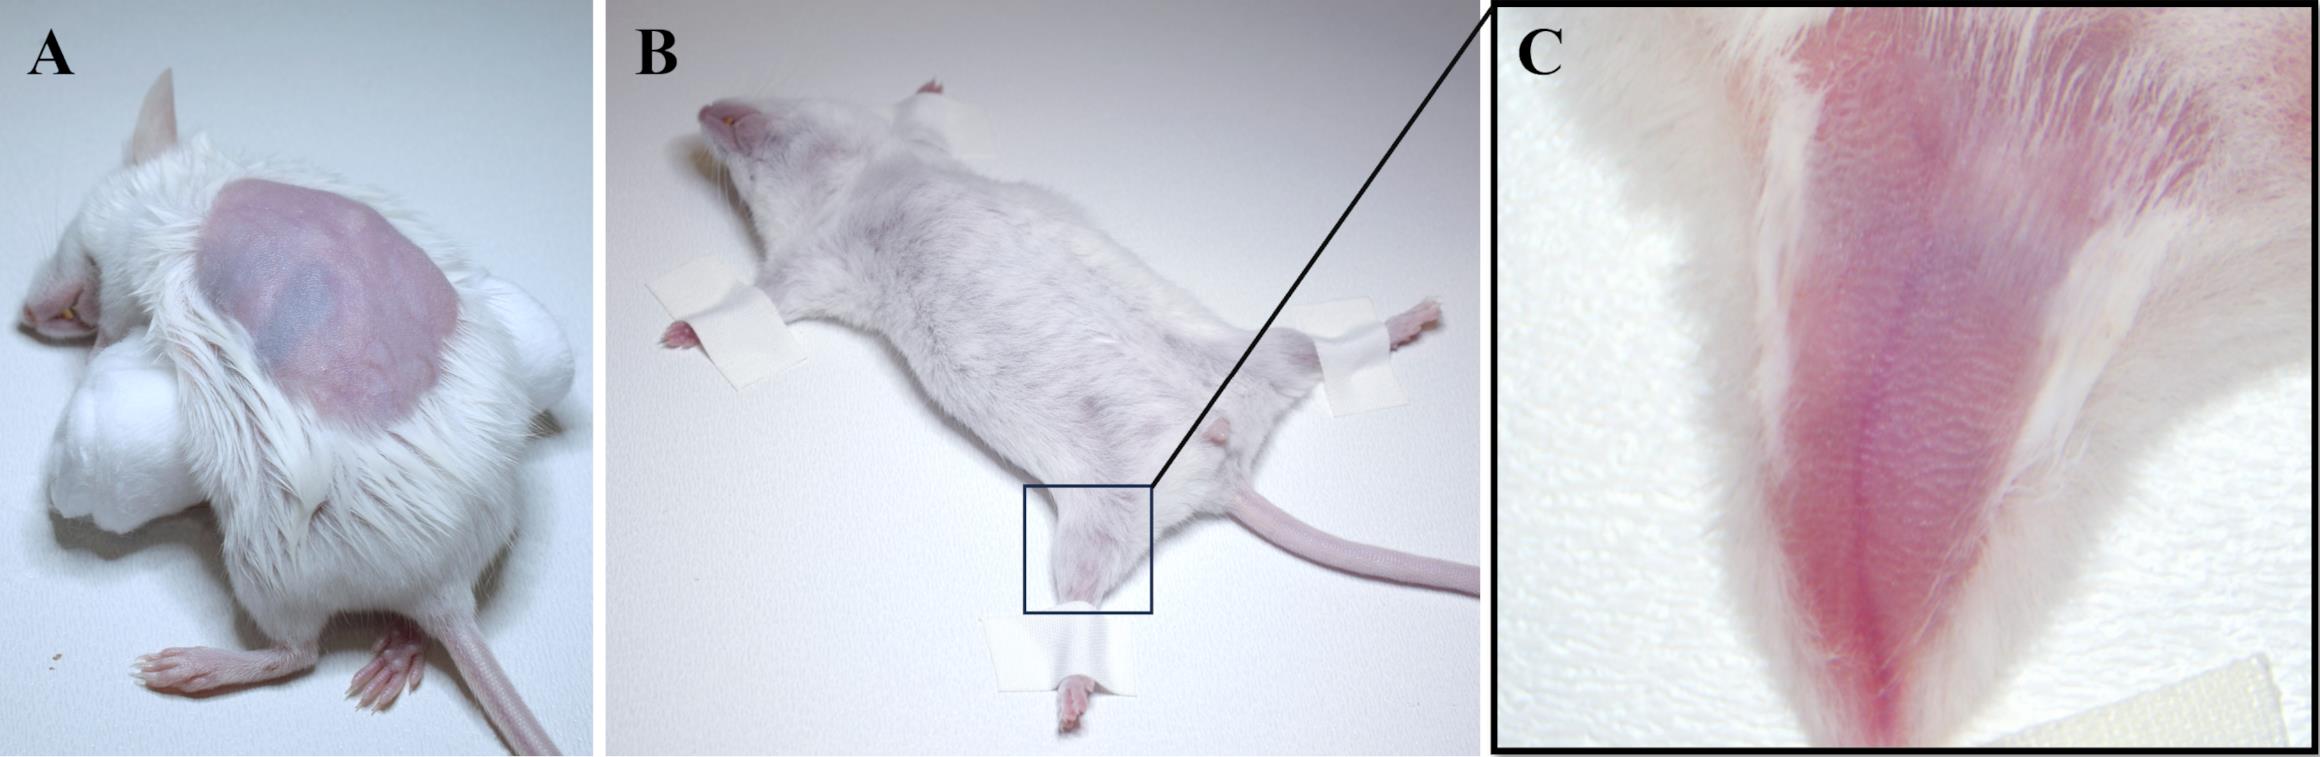
Figure 4. Mouse preparation for catheterization. (A) Hair is removed from the left side of the mouse body above the left kidney. (B) The mouse is fixed lying on its back, and (C) the hair on the inner side of the left paw is removed.
Catheter implantation into the left femoral artery and abdominal aorta
Treat the mouse's left paw skin with 70% alcohol antiseptic solution.
Cut the skin over the femoral vein and artery of the mouse's left paw using micro scissors and toothed tweezers (Figure 5A). Do not allow the vessels to dry out during the entire operation. Moisten them periodically with saline.
Separate the vessels from the connective tissue on the right side using a 30 G needle (Figure 5B).
Place the angle tweezers under the vessels on the right side (Figure 5C) and completely separate them from the connective tissue and muscle (Figure 5D).
Carefully separate the nerve and femoral vein from the femoral artery using tweezers (Figure 5E).
Place two ligatures under the femoral artery (Figure 5F).
Tie the lower ligature, stretch it, and secure it using a plaster.
Prepare an upper ligature to quickly secure the catheter, but do not tie it at this stage.
Puncture the femoral artery using a 30G needle (Figure 5G).
Insert the tip of the thin catheter (cut side up) through the puncture into the femoral artery using two tweezers, as shown in Figure 5H. The catheter should first be connected to a syringe with a 30G needle and completely filled with saline solution without air bubbles (Figure 2D).
Inject a small amount (20–30 µL) of saline through the catheter into the artery to inflate it.
Slowly advance the catheter through the femoral artery using two tweezers (Figure 5I) until the junction of thin and thick catheters (Figure 5J). At this point, the tip of a thin catheter will be positioned in the abdominal aorta. Be careful not to squeeze the catheter too hard to avoid deformation.
Check that the catheter is inside the artery. Pull the plunger of the syringe toward you so that arterial blood enters the catheter (Figure 5K). Then, inject saline into the catheter (Figure 5I).
Secure the catheter with an upper ligature, but do not tie it completely (Figure 5L). The ability to move the catheter inside the vessel must be maintained.
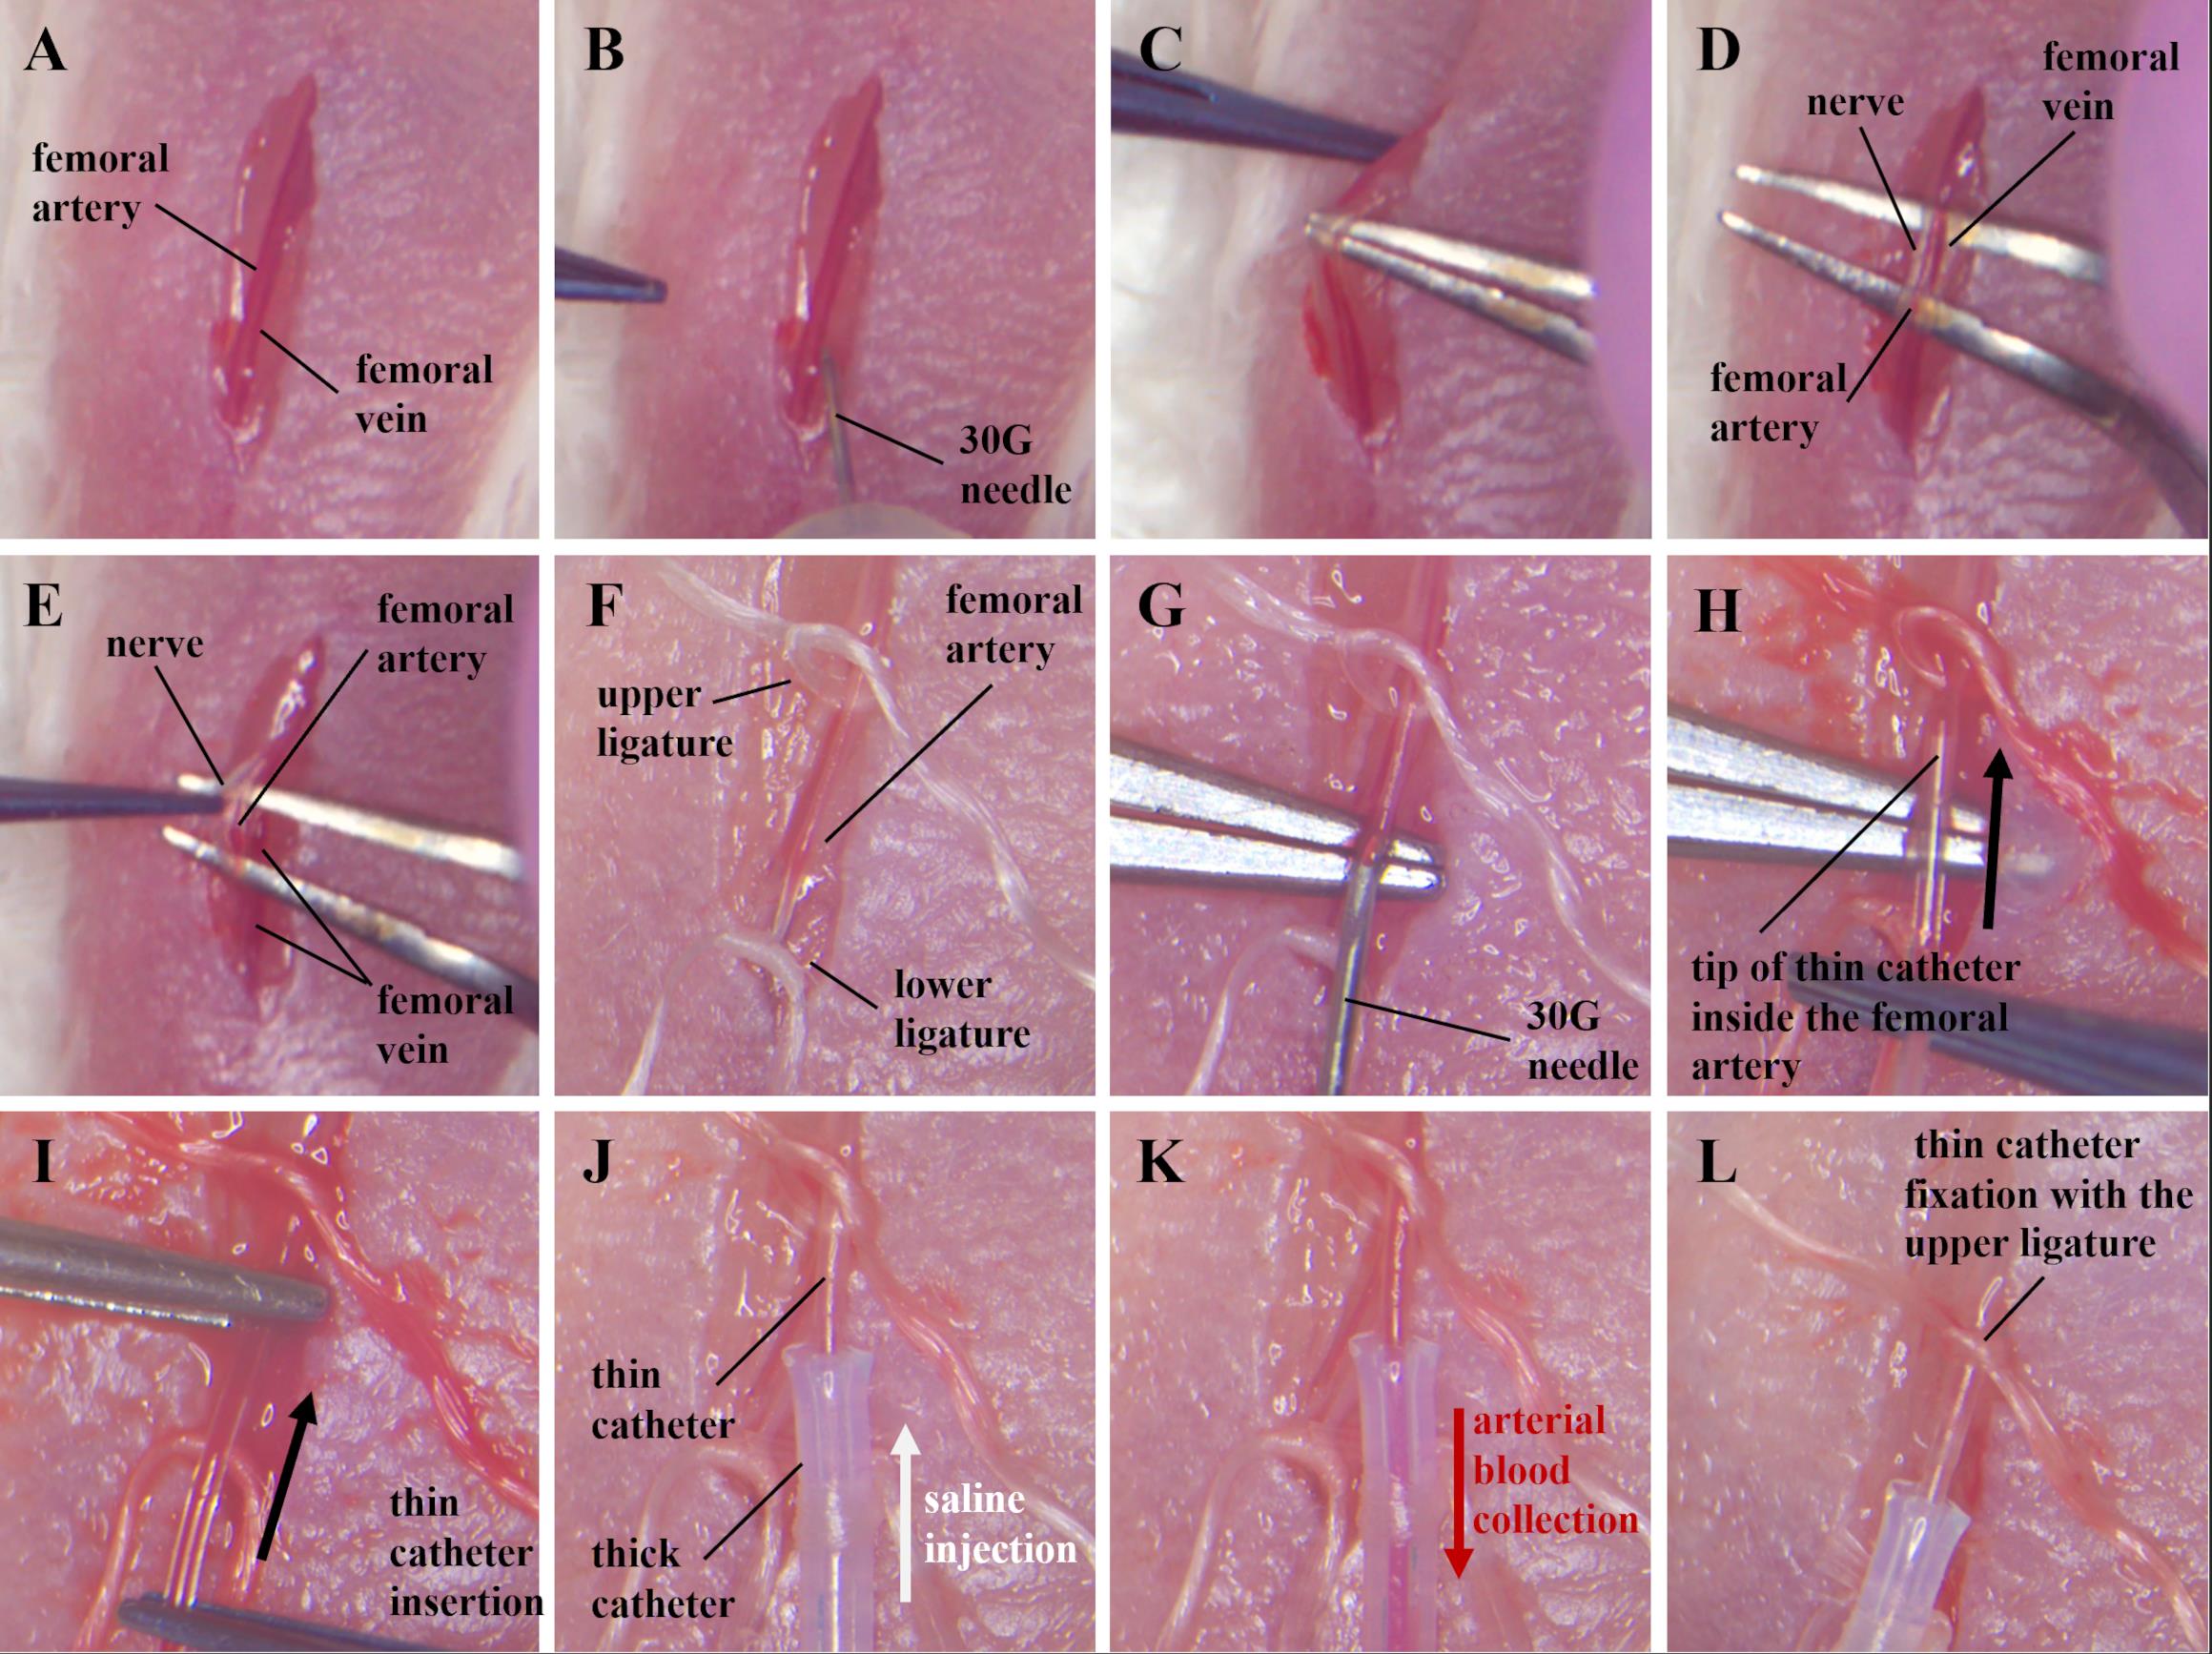
Figure 5. Catheter implantation into the left femoral artery and abdominal aorta. (A) Skin incision over the femoral vein and artery. (B) Separation of vessels from connective tissue on the right with a 30 G needle. (C, D) Separation of nerve and vessels from connective tissue using angle tweezers. (E) Separation of the nerve from the femoral artery. (F) Ligation of the femoral artery. (G) Femoral artery puncture. (H) Inserting the tip of a thin catheter through a puncture of the femoral artery. (I) Pushing a thin catheter into the femoral artery, (J) until the junction of thin and thick catheters. (K) Checking the location of the catheter in the artery. Arterial blood flows into the catheter when the syringe plunger is pulled back. (L) Fixation of the catheter in the femoral artery with an upper ligature.
Catheter implantation into the left renal artery
Remove the fixing adhesive plaster from the mouse's paws and lower ligature.
Turn the mouse over, being careful not to pull on the catheter. Place the mouse on the cotton roll in the same position as shown in Figure 4A.
Treat mouse's skin with 70% alcohol antiseptic solution.
Pull back the skin to the right of the kidney using toothed tweezers (Figure 6A) and make a 1 cm long incision parallel to the spine (Figure 6В).
Pull back the muscle to the right of the kidney using toothed tweezers and make a 1 cm incision (Figure 6C).
Pull apart the connective and fatty tissue to visualize the kidney (Figure 6D).
Gently spread the muscle and tissue using dressing forceps to visualize the renal vein (Figure 6E). The renal artery is closely adjacent to the renal vein to its left, but the location of the vessels may differ slightly in different animals.
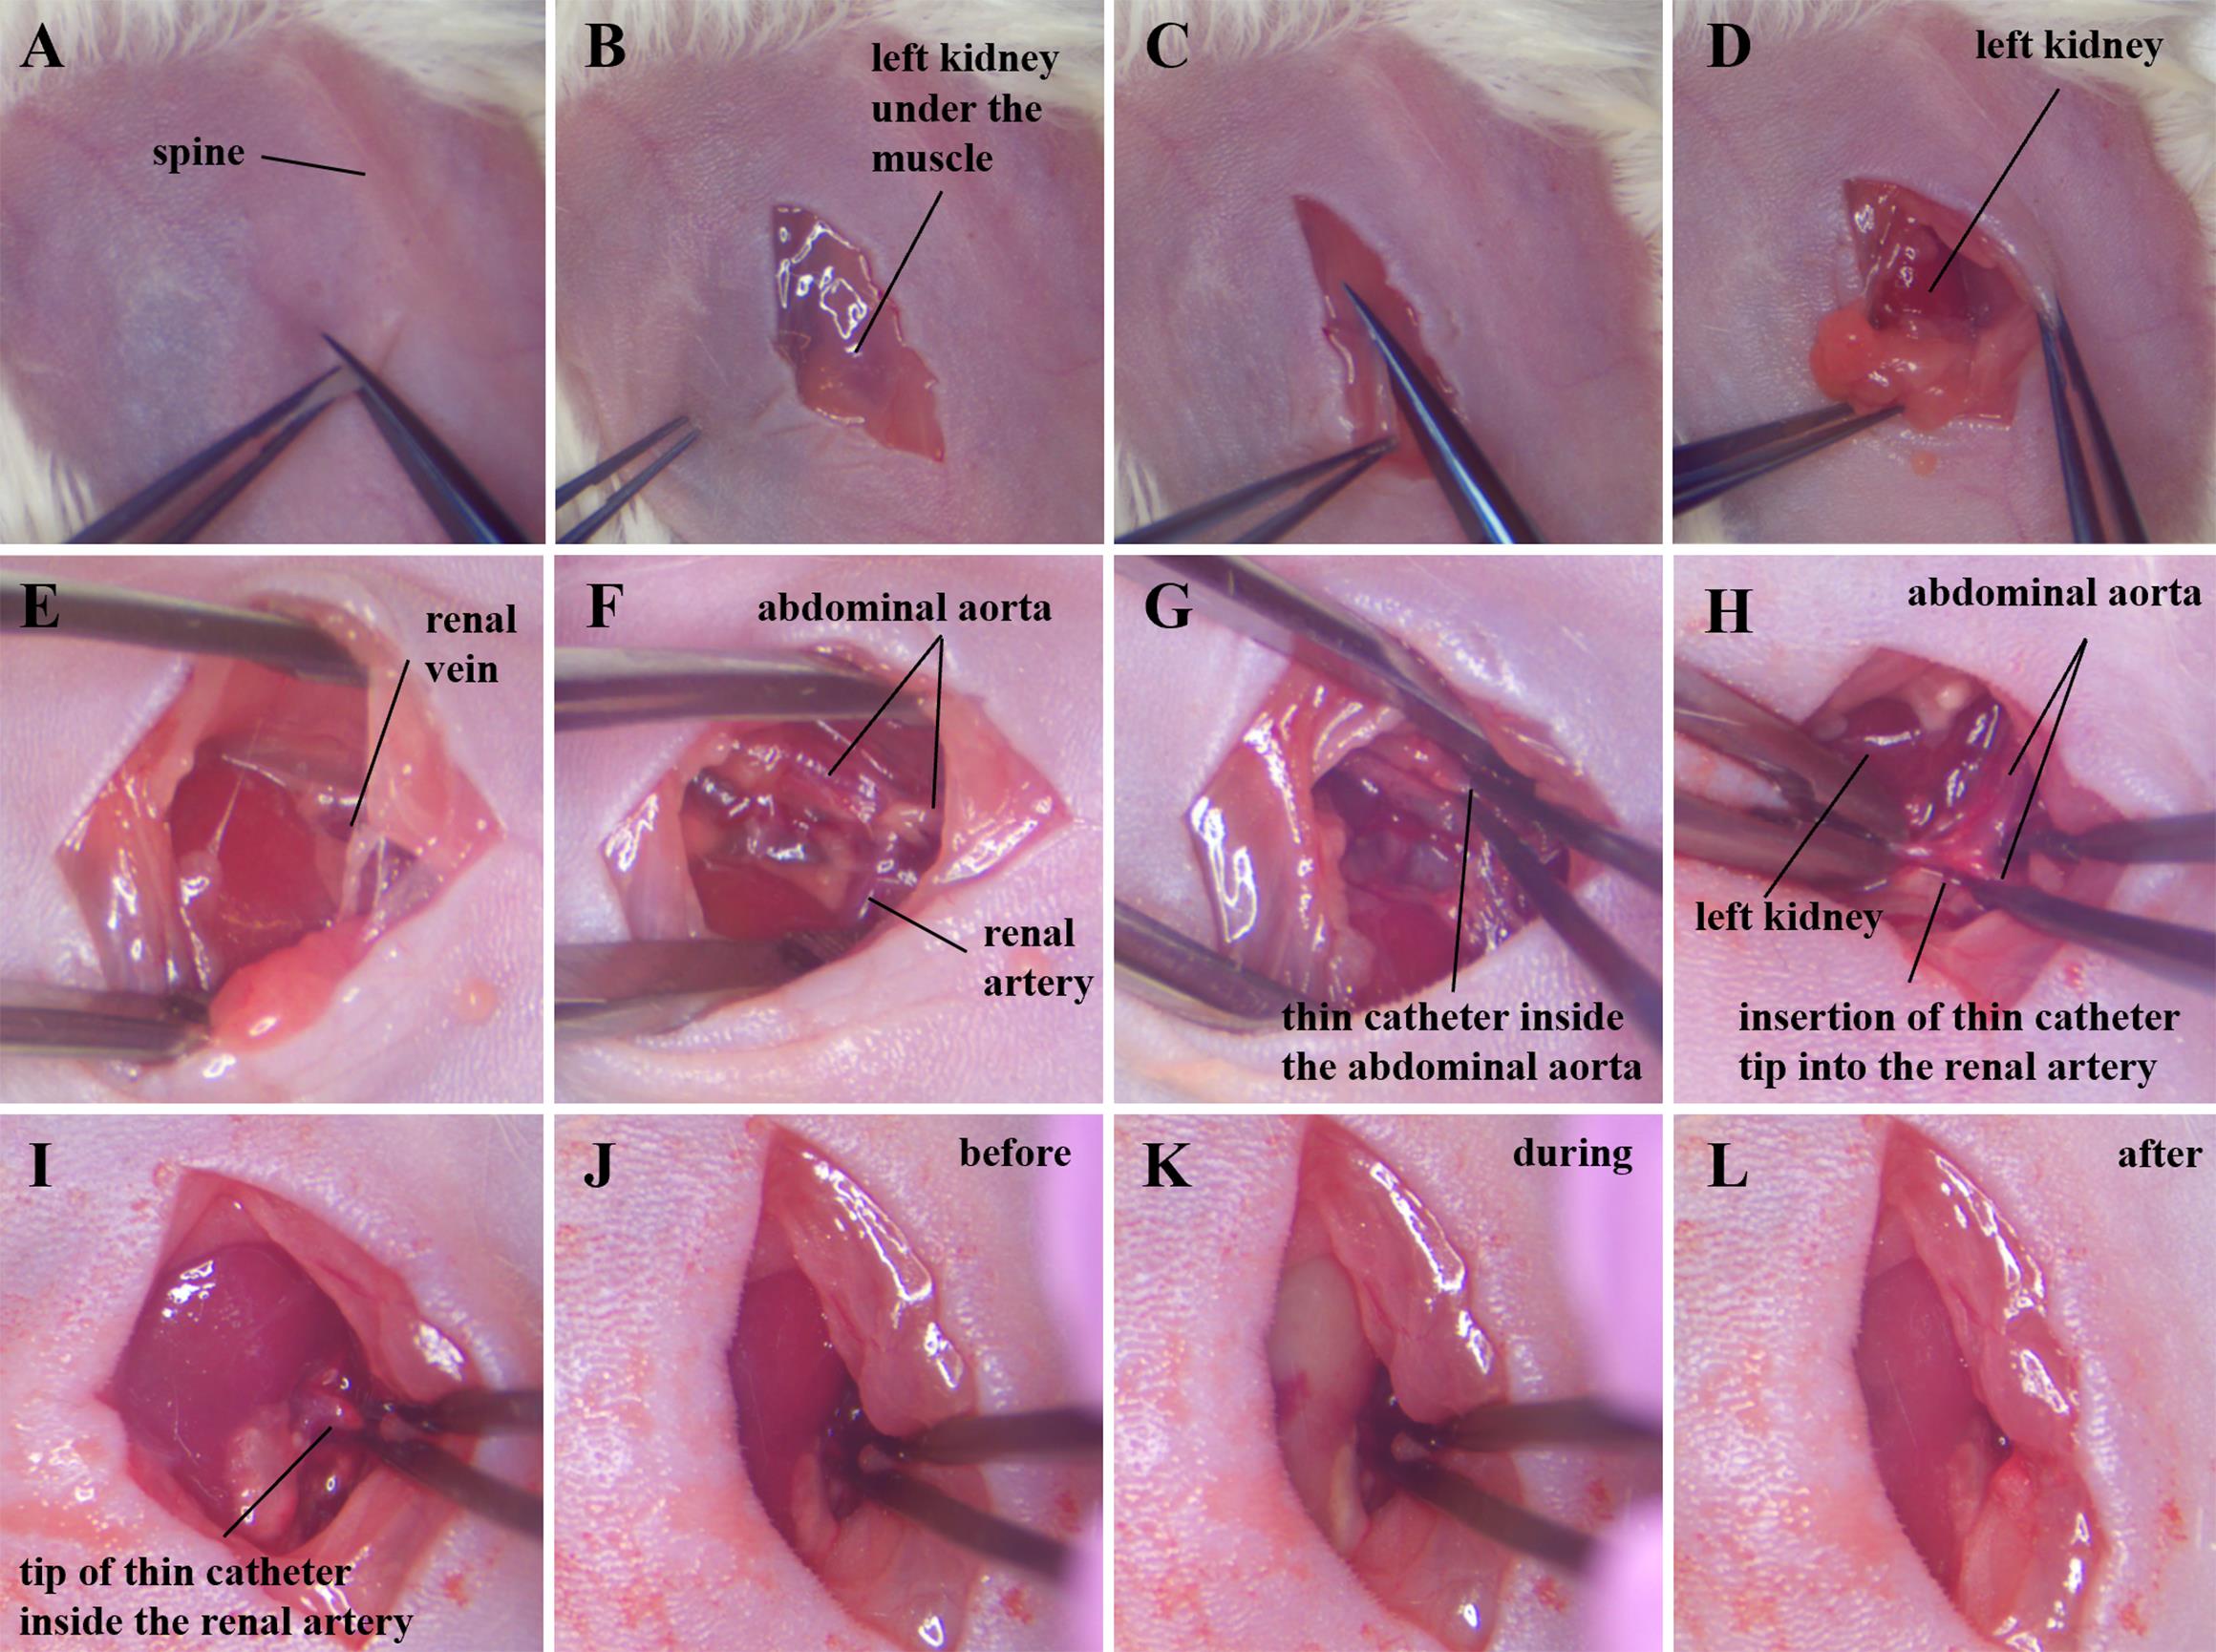
Figure 6. Catheter implantation into the left renal artery. (A, B) Skin incision along the spine over the kidney. (C) Muscle incision over the kidney. (D) Removal of connective and fatty tissue to reveal the kidney. (E) Renal vein. (F) Abdominal aorta and renal artery cleared of connective and fatty tissues. (G) Palpation of a thin catheter inside the abdominal aorta, searching for the tip of the catheter. (H) Transferring the tip of a thin catheter from the abdominal aorta to the renal artery. (I) The tip of a thin catheter inside the renal artery. (J) Target kidney before, (K) during, and (L) after saline injection.Carefully clean the junction of the renal arteries and the abdominal aorta using tweezers and sterilized cotton buds (Figure 6F). Cotton buds should be moistened with saline solution. Try to minimize the duration of this procedure to avoid damage to the vessels due to repeated mechanical pressure on them.
Locate the tip of the thin catheter in the abdominal aorta by palpating its entire length with tweezers (Figure 6G). If the catheter is palpable throughout the visualized portion of the abdominal aorta, gently pull the 2–3 mm catheter out of the femoral artery. Then palpate the aorta again with forceps. Pull the catheter, preferably holding the thin part with tweezers.
Gradually pull out the catheter until its tip is in the aorta 2–3 mm above the renal artery.
The saline syringe should be replaced with a drug syringe immediately prior to implantation of the catheter tip into the left renal artery.
Turn the mouse in front of you so that its spine is perpendicular to you and its kidney is on the left (Figure 6H).
Move the kidney upward (closer to the liver) using wetted cotton buds to increase the angle between the renal artery and the abdominal aorta.
Stretch the area of the abdominal aorta and renal artery at the junction of these vessels using two forceps. Transfer the tip of the catheter from the aorta to the renal artery within the vessels (Figure 6H).
Try to position the tip of the catheter at the beginning of the renal artery before the bifurcation (Figure 6I) to avoid filling half of the kidney during injection. The kidney should maintain its normal color and blood supply at all stages of the operation, before catheter insertion into the renal artery and solution administration.
When the catheter is inserted into the renal artery, the color of the kidney will change slightly due to incomplete occlusion of the renal artery by the catheter (Figure 6J). Note that the blood continues to flow into the kidney before injection. Minimize blockade of kidney blood flow as much as possible during all procedures.
During drug solution administration, the catheter should be held with tweezers, pressing the walls of the arteries against it, in order to minimize the entry of the injected solution into the abdominal aorta (Figure 6K).
Inject 10–20 µL of solution at a rate of 2–3 µL/s through the catheter. In this case, the kidney should become uniformly light (Figure 6K).
Open the tweezers to allow blood to flow into the kidney (Figure 6L).
Removing the catheter from the vascular system and applying sutures
Return the mouse to its back.
Moisten the femoral artery with saline solution using wet cotton buds.
Remove the catheter from the vessels (Figure 7A). Be careful not to tear the femoral artery.
Pull the upper ligature (to block bleeding), tie it above the puncture, and cut off the excess part of the ligature, leaving 3–4 mm from the knot (Figure 7B).
Inject an antibiotic solution (broad spectrum, for example, penicillin 100 mg/kg) into the abdominal cavity to prevent peritonitis, if the experimental plan allows this.
Sew up the skin on the left hind paw using a continuous suture (Figure 7С).
Place the mouse on the cotton roll in the same way as shown in Figure 4A.
Sew up the muscle above the kidney using a continuous suture (Figure 7D).
Sew up the skin using an interrupted suture (Figure 7E).
Treat surgical sutures with antiseptic, for example, 5% iodine alcohol solution.
Place the mouse in a cage and wait until it recovers from anesthesia.
Place half the cage on top of a heat source to facilitate the maintenance of average normal body temperature.
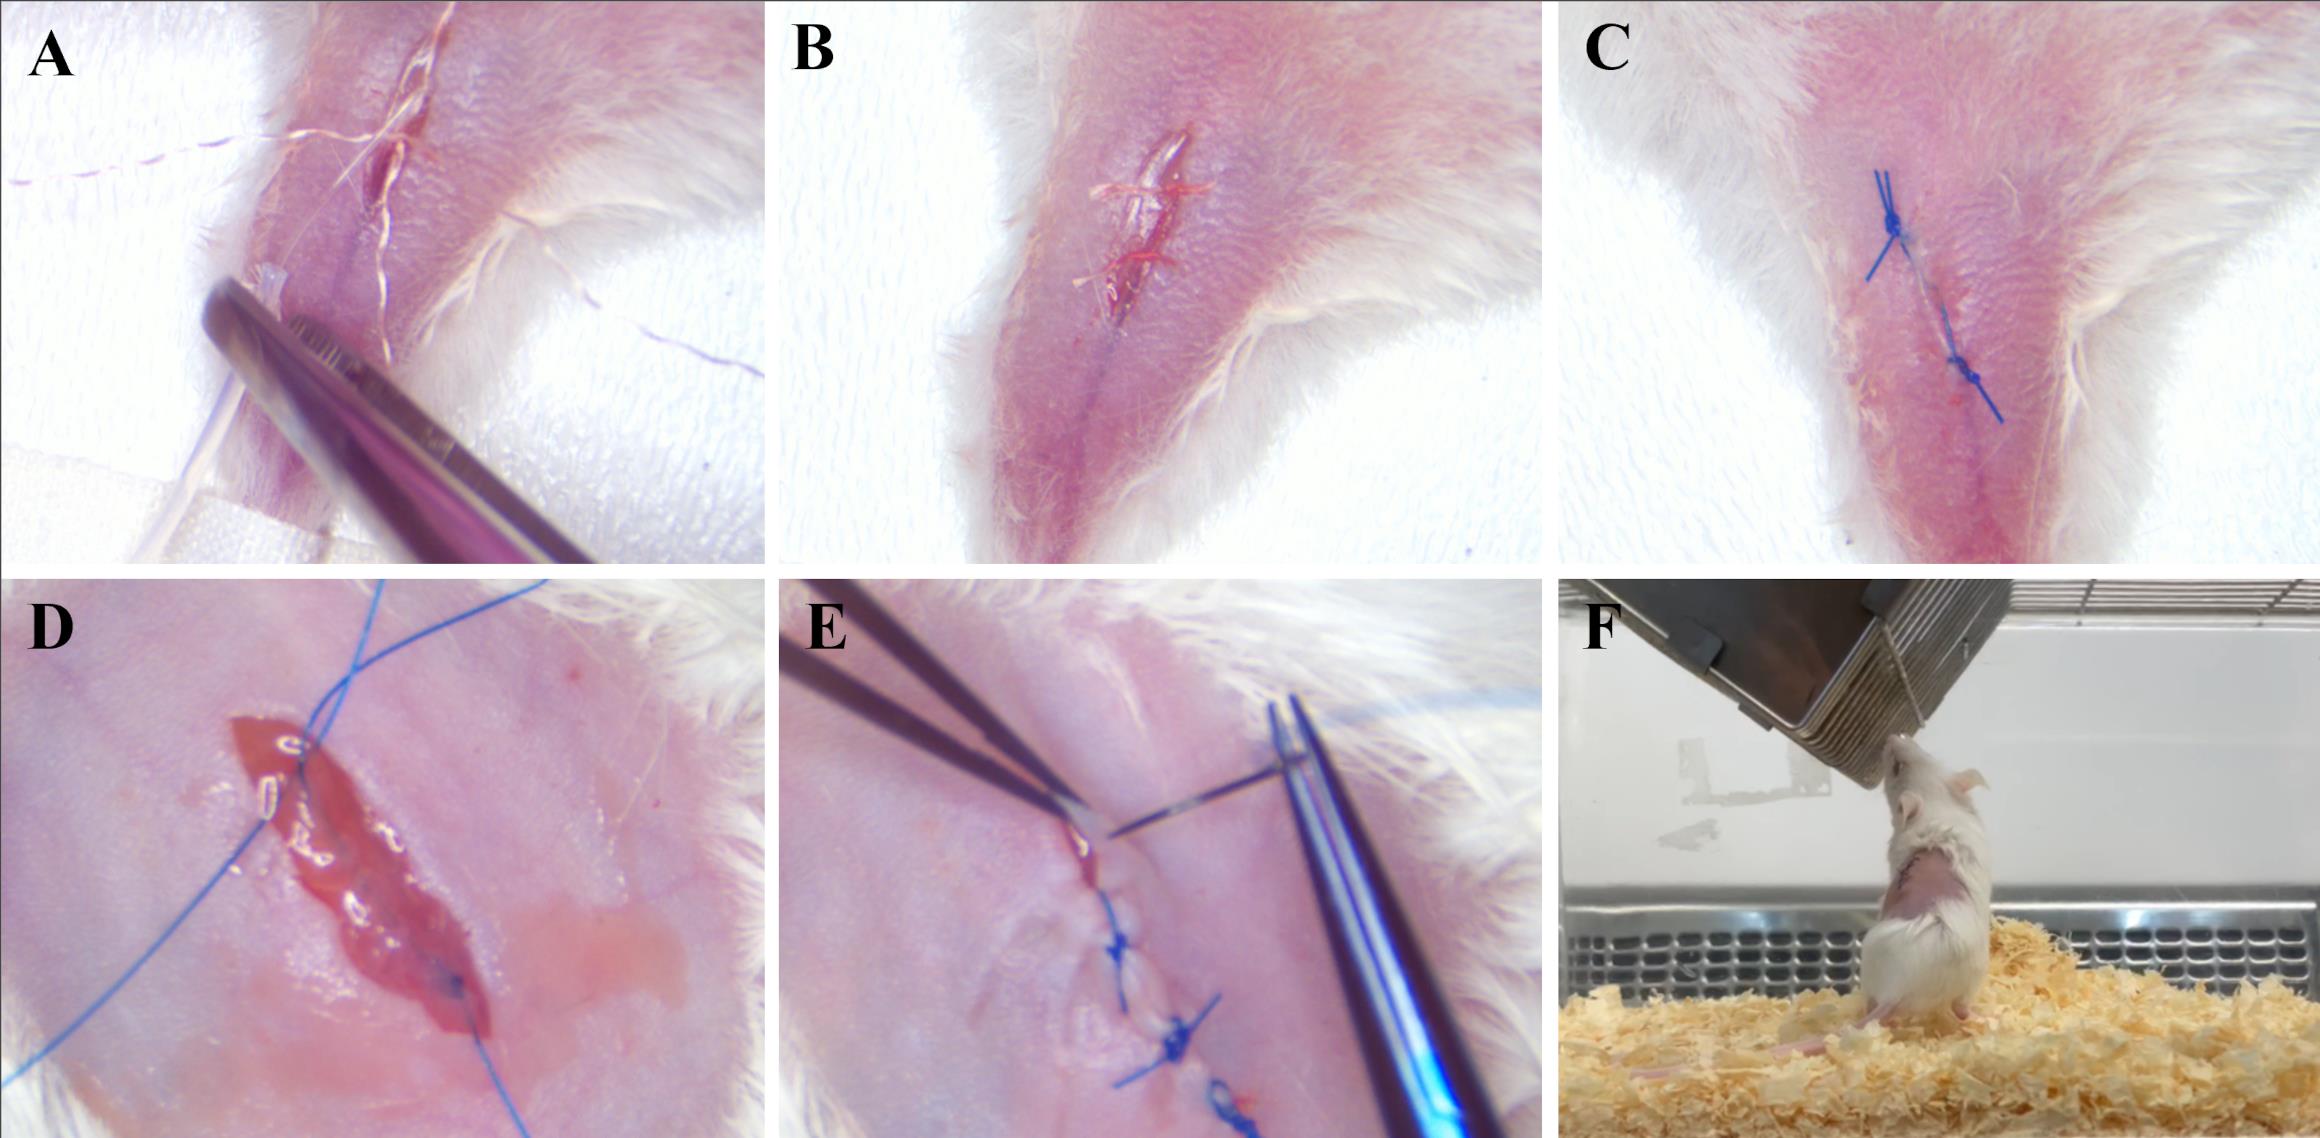
Figure 7. Removing the catheter from the vascular system and applying sutures. (A) Removing the catheter. (B) Tying the upper ligature. (C) Applying a continuous suture to the skin of the left hind paw. (D) Applying a continuous suture to the muscles above the kidney. (E) Applying an interrupted suture to the skin above the kidney. (F) Active mouse 24 h after surgery.Until the blinking reflex has returned, eye lubricant (Corneregel 5%) should be provided.
Check the mouse 24 h after surgery. It should maintain normal activity and mobility (Figure 7F).
Examine the animal daily for signs of grooming, general appearance, posture, and locomotor activity.
The main stages of the mouse renal artery catheterization through the femoral artery, as described in sections B, С, D, and E, are presented in Video 1.
 Video 1. Main stages of the mouse renal artery catheterization through the femoral artery
Validation of protocol
We initially validated this protocol by renal artery injection of 5% Evans Blue solution using more than three technical replicates. As a result, we obtained stable staining of the target kidney (Figure 8A, B). This effect was particularly noticeable when compared with the contralateral kidney (Figure 8C).
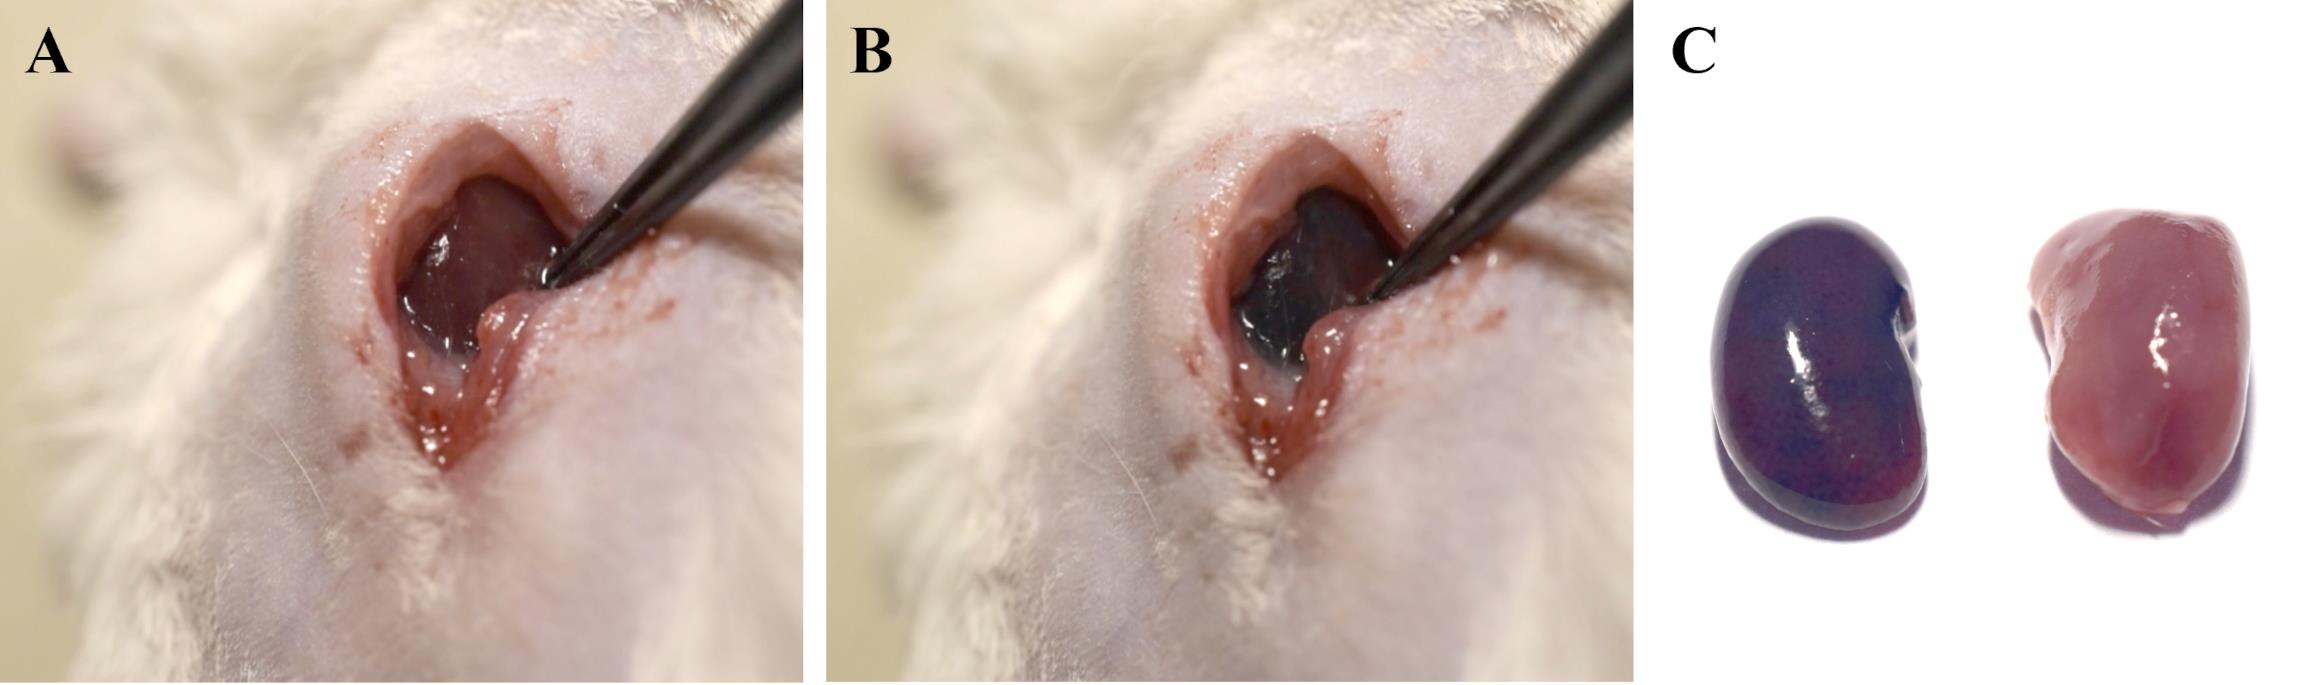
Figure 8. Targeted delivery of 5% Evans Blue solution in saline to the kidney using a renal artery catheterization protocol. (A) Target kidney before and (B) right after renal artery injection of 5% Evans Blue solution in saline. (C) Target and contralateral kidney 5 min after injection.
This protocol has been also validated in the following research articles:
Prikhozhdenko et al. [6]. Target delivery of drug carriers in mice kidney glomeruli via renal artery. Balance between efficiency and safety. Journal of Controlled Release.
Abdurashitov et al. [7]. Optical coherence microangiography of the mouse kidney for diagnosis of circulatory disorders. Biomedical Optics Express.
Gusliakova et al. [8]. Renal Artery Catheterization for Microcapsules’ Targeted Delivery to the Mouse Kidney. Pharmaceutics.
The injection of microcapsule suspensions according to the presented protocol was accompanied by local accumulation of 20% of the entire administered dose of capsules in the target kidney. Most capsules accumulated in the glomeruli of the kidneys [6] but were washed out of the capillary network over time [8]. In this case, a high fluorescent signal remained in the target kidney for several days, most likely due to the diffusion of the encapsulated fluorescent cargo through the polymer walls of the containers into the tissue in the first hours after injection [6,8]. Moreover, the accumulation of the substance in the target kidney in encapsulated form was significantly more effective than in free form. Using a laser speckle contrast analysis system and optical coherence tomography, it was shown that a correctly selected dosage of containers did not lead to irreversible changes in the blood flow of the target kidney, as well as simulating surgery with the introduction of saline [6–8]. In this case, not only the number of capsules administered but also their size is of particular importance when choosing the dosage [8]. Histological analysis also did not reveal morphological changes in the renal tissue after administration of the microcapsule suspension at the correct dose.
General notes and troubleshooting
General notes
The protocol requires the experimenter to have experience in microsurgery.
All experimental procedures on animals must be performed under general anesthesia. The depth of anesthesia should be periodically monitored by the hind limb reflex.
The vessels should be regularly moistened with saline solution at all stages of the operation. Do not let them dry out.
The total duration of the operation should not exceed 45–60 min to avoid the risk of developing thrombosis of the hind limbs.
Do not stretch the thin catheter (Polyurethane intravascular tubing 32ga/.8Fr, 0.13 mm × 0.25 mm) and avoid contact with organic solvents such as alcohol-based antiseptic solutions (at all stages of surgery and catheter preparation). This significantly changes the mechanical properties of the catheter and prevents it from being pushed into the vessels.
The process of catheter removal requires ligation of the femoral artery, and re-catheterization of this artery further upstream is possible, but difficult. At the same time, access to the aorta and renal artery can also be obtained through the right femoral artery if it is necessary to repeat the operation. Nevertheless, it is worth considering that each subsequent operation has a significant impact on the mouse’s organism. Therefore, repeat surgery is not recommended unless there is a significant need.
Troubleshooting
Problem 1: The catheter is stuck and cannot be moved further along the femoral artery into the abdominal aorta.
Possible cause: The catheter rested on or pierced the bend of the artery.
Solution: Do not try to force the catheter through. This will puncture the arterial wall and cause the catheter to exit into the surrounding tissue. The catheter should move smoothly, perhaps with little pressure. If movement is difficult, use one or more of the solutions listed:
Make sure that the mouse's left hind paw and lower ligature are tight enough. The artery must be well straightened to reduce the number of bends. Inject a small volume of saline (30–40 µL) into the artery at a pressure. Then, carefully push the catheter again.
Extend the left hind paw along the body and secure the paw and ligature to reduce the number of bends.
Carefully pull the thin catheter out of the artery 2–4 mm (hold it with tweezers as close to the artery puncture site as possible without squeezing or deforming it). Inject a small volume of saline (30–40 µL) into the artery at a pressure of 20–30 µL. Then, pull the plunger of the syringe back slightly to ensure that arterial blood is entering the catheter, and the tip of the catheter is in the artery. If blood does not flow, continue to gently pull out the catheter until blood flows into it when you pull the plunger of the syringe. Then, inject the solution and push the catheter again as needed.
Problem 2: Blood does not flow into the catheter when the syringe plunger is pulled out.
Possible cause: Most likely, the catheter pierced the artery and exited into the surrounding tissue as a result of excessive pressure on the artery wall in the bend.
Solutions:
Try to clear the tissue along the catheter and find the puncture site of the artery.
If the puncture occurs deep in the abdominal cavity, the animal must be sacrificed straightaway.
If the puncture occurs before the abdominal cavity, you can pull out the catheter, tie a second lower ligature next to the puncture, and try to catheterize the femoral artery again.
Problem 3: The catheter cannot be pushed into the femoral artery; it wrinkles.
Possible cause: Most likely, you slightly stretched the thin catheter during surgery, pulled the catheter out of the femoral artery, or squeezed it hard with tweezers and deformed it.
Solution: Remove the catheter completely from the vessels and replace it with a new one. The catheter must have sufficient mechanical rigidity to navigate arterial bends.
Acknowledgments
This research was supported by the Russian Science Foundation (project no. 23-75-10070, https://rscf.ru/project/23-75-10070/).
Competing interests
The authors declare no competing interest.
Ethical considerations
The laboratory animal studies were performed according to the rules of Saratov State Medical University (Ethics Committee Protocol No. 7, dated 2 February 2021).
References
- Takabatake, Y., Isaka, Y. and Imai, E. (2008). Renal artery injection for delivery of biological materials to the glomerulus (Methods in Renal Research Paper). Nephrology. 13(1): 23–26.
- Chen, S., Agarwal, A., Glushakova, O. Y., Jorgensen, M. S., Salgar, S. K., Poirier, A., Flotte, T. R., Croker, B. P., Madsen, K. M., Atkinson, M. A., et al. (2003). Gene Delivery in Renal Tubular Epithelial Cells Using Recombinant Adeno-Associated Viral Vectors. J Am Soc Nephrol. 14(4): 947–958.
- Dahlqvist, U., Tomic, T. T., Söderberg, M., Stubbe, J., Enggaard, C., Ericsson, A., Zhou, A. X., Björnson Granqvist, A. and William-Olsson, L. (2021). Direct Drug Delivery to Kidney via the Renal Artery. J Visualized Exp.: e3791/61932–v.
- Zaw Thin, M., Ogunlade, O., Comenge, J., Patrick, P. S., Stuckey, D. J., David, A. L., Lythgoe, M. F., Beard, P. and Kalber, T. L. (2020). Stem cell delivery to kidney via minimally invasive ultrasound-guided renal artery injection in mice. Sci Rep. 10(1): 7514.
- Lorenz, J. N., Lasko, V. M., Nieman, M. L., Damhoff, T., Prasad, V., Beierwaltes, W. H. and Lingrel, J. B. (2011). Renovascular hypertension using a modified two-kidney, one-clip approach in mice is not dependent on the α1 or α2 Na-K-ATPase ouabain-binding site. Am J Physiol-Renal Physiol. 301(3): F615–F621.
- Prikhozhdenko, E. S., Gusliakova, O. I., Kulikov, O. A., Mayorova, O. A., Shushunova, N. A., Abdurashitov, A. S., Bratashov, D. N., Pyataev, N. A., Tuchin, V. V., Gorin, D. A., et al. (2021). Target delivery of drug carriers in mice kidney glomeruli via renal artery. Balance between efficiency and safety. J Controlled Release. 329: 175–190.
- Abdurashitov, A. S., Prikhozhdenko, E. S., Mayorova, O. A., Plastun, V. O., Gusliakova, O. I., Shushunova, N. A., Kulikov, O. A., Tuchin, V. V., Sukhorukov, G. B., Sindeeva, O. A., et al. (2021). Optical coherence microangiography of the mouse kidney for diagnosis of circulatory disorders. Biomed Opt Express. 12(7): 4467.
- Gusliakova, O. I., Prikhozhdenko, E. S., Plastun, V. O., Mayorova, O. A., Shushunova, N. A., Abdurashitov, A. S., Kulikov, O. A., Abakumov, M. A., Gorin, D. A., Sukhorukov, G. B., et al. (2022). Renal Artery Catheterization for Microcapsules’ Targeted Delivery to the Mouse Kidney. Pharmaceutics. 14(5): 1056.
- Siqueira, D. E. D. and Guillaumon, A. T. (2019). Angiography for Renal Artery Diseases. In: Angiography. IntechOpen. doi: 10.5772/intechopen.79232.
- Ruggiero, N. J. and Jaff, M. R. (2009). Renal artery stenting—which patients will benefit? Nat Rev Cardiol. 6(11): 675–676.
- Lu, T., Lin, B., Zhang, Y. p., Zhang, J. h., Luo, J. W., Tang, Y. and Fang, Z. T. (2023). Eighteen cases of renal aneurysms: Clinical retrospective analysis and experience of endovascular interventional treatment. Front Surg. 10: e1106682.
- Lai, L. W., Moeckel, G. and Lien, Y. H. (1997). Kidney-targeted liposome-mediated gene transfer in mice. Gene Ther. 4(5): 426–431.
- Ullah, M., Liu, D. D., Rai, S., Razavi, M., Choi, J., Wang, J., Concepcion, W. and Thakor, A. S. (2020). A Novel Approach to Deliver Therapeutic Extracellular Vesicles Directly into the Mouse Kidney via Its Arterial Blood Supply. Cells. 9(4): 937.
Article Information
Publication history
Received: Mar 31, 2024
Accepted: Jul 29, 2024
Available online: Aug 16, 2024
Published: Sep 20, 2024
Copyright
© 2024 The Author(s); This is an open access article under the CC BY-NC license (https://creativecommons.org/licenses/by-nc/4.0/).
How to cite
Sindeeva, O. A., Gusliakova, O. I., Prikhozhdenko, E. S., Shushunova, N. A. and Sukhorukov, G. B. (2024). Mouse Renal Artery Catheterization for Local Delivery of Drugs in Capsulated or Free Forms. Bio-protocol 14(18): e5070. DOI: 10.21769/BioProtoc.5070.
Category
Medicine
Biological Sciences > Biological techniques
Do you have any questions about this protocol?
Post your question to gather feedback from the community. We will also invite the authors of this article to respond.