- Protocols

- Articles and Issues
- For Authors
- About
- Become a Reviewer

Laser-Assisted Microdissection and High-Throughput RNA Sequencing of the Arabidopsis Gynoecium Medial and Lateral Domains
Published: Vol 14, Iss 17, Sep 5, 2024 DOI: 10.21769/BioProtoc.5056 Views: 2268
Reviewed by: Samik BhattacharyaShengze Yao
Original research article
The authors used this protocol in:
May 2024
Advertisement


Protocol Collections
Comprehensive collections of detailed, peer-reviewed protocols focusing on specific topics


Abstract
For obtaining insights into gene networks during plant reproductive development, having transcriptomes of specific cells from developmental stages as starting points is very useful. During development, there is a balance between cell proliferation and differentiation, and many cell and tissue types are formed. While there is a wealth of transcriptome data available, it is mostly at the organ level and not at specific cell or tissue type level. Therefore, methods to isolate specific cell and tissue types are needed. One method is fluorescent activated cell sorting (FACS), but it has limitations such as requiring marker lines and protoplasting. Recently, single-cell/nuclei isolation methods have been developed; however, a minimum amount of genetic information (marker genes) is needed to annotate/predict the resulting cell clusters in these experiments. Another technique that has been known for some time is laser-assisted microdissection (LAM), where specific cells are microdissected and collected using a laser mounted on a microscope platform. This technique has advantages over the others because no fluorescent marker lines must be made, no marker genes must be known, and no protoplasting must be done. The LAM technique consists in tissue fixation, tissue embedding and sectioning using a microtome, microdissection and collection of the cells of interest on the microscope, and finally RNA extraction, library preparation, and RNA sequencing. In this protocol, we implement the use of normal slides instead of the membrane slides commonly used for LAM. We applied this protocol to obtain the transcriptomes of specific tissues during the development of the gynoecium of Arabidopsis.
Key features
• Laser-assisted microdissection (LAM) allows the isolation of specific cells or tissues.
• Normal slides can be used for LAM.
• It allows the identification of the transcriptional profiles of specific tissues of the Arabidopsis gynoecium.
Keywords: Laser-assisted microdissectionGraphical overview
Laser-assisted microdissection (LAM) procedure of gynoecium tissues in Arabidopsis
Background
Multicellular organisms, such as animals and plants, are made up of many cells, which are grouped together to form different tissues and organs. Proper development requires complex molecular regulation, ranging from changes in gene expression and signaling events to hormonal activity. Despite the efforts made to understand these mechanisms that regulate development, the great morphological complexity of tissues or organs represents a limitation to creating tissue-specific expression profiles [1–4]. However, in recent years, several techniques have been successfully developed and implemented to isolate and characterize the transcriptomic profiles of specific cell populations, such as fluorescent activated cell sorting (FACS), single-cell isolation, single-nuclei isolation, and laser-assisted microdissection (LAM) [5]. LAM is a microscopy-based technique that has established itself as a good technique for isolating and collecting specific cell populations from their tissue context [6–11]. The LAM technique is distinguished from others for not requiring the generation of marker lines or protoplasts or previous information on a large number of marker genes; it only requires knowing the morphology of the tissues to be collected. These characteristics have allowed expanding LAM implementation to different organs of different plant species such as tomato fruit [12, 13], rice [14], California poppy [15], and Arabidopsis [16–18]. Here, we describe a protocol, built on previous work by Chávez Montes et al., 2016 [10], to perform LAM and RNA-seq of four tissue types from the Arabidopsis gynoecium: carpel marginal meristem (CMM) and septum (SEP), both tissues of the medial domain of the gynoecium, and the presumptive carpel wall (PC) and valves (VV), two tissues that make up the lateral domain of the gynoecium [19]. The aim was to identify the transcriptomic profiles that regulate their development. In the implementation of this protocol, the use of slides without the membrane was chosen instead of the commercially available slides (MembraneSlides) for LAM, which was better for the collection of the tissues of interest. Furthermore, we briefly describe the data analysis and gene expression visualization. This protocol should also be applicable for other plant species.
Materials and reagents
Biological materials
Arabidopsis thaliana plants (inflorescence tissue)
Reagents
Absolute ethyl alcohol for molecular biology (ethanol) (Karal, catalog number: 2003)
Glacial acetic acid (Fermont, catalog number: 03015)
Histo-Clear II (Electron Microscopy Sciences, catalog number: 64111-04)
Paraplast Plus® (paraffin) (Sigma-Aldrich, catalog number: P3683)
Methyl alcohol (Karal, catalog number: 2010)
Direct-zol RNA Microprep (Zymo Research, catalog number: R2063)
Solutions
Fixation solution (see Recipes)
Note: We do not recommend using formaldehyde (FDA; paraformaldehyde) as the fixation solution, because a cross-link reversal step would be needed for RNA extraction. Some discussion on fixation solutions is given in Chávez Montes et al. [10].
Recipes
Fixation solution
Reagent Final concentration Quantity or Volume Ethanol (absolute) 75% (v/v) 3 mL Glacial acetic acid 25% (v/v) 1 mL Total n/a 4 mL
Laboratory supplies
Sterile falcon tubes
Beakers
Dissecting forceps
Steel inclusion molds 15 mm × 15 mm (Citotest)
Embedding cassettes without lid, color white (Simport Scientific, catalog number: M480-2)
Microscope slides 26 × 76 mm, thickness of 1 mm (LAUKA)
Low-profile disposable blades (Leica, model: 819)
Slide rack and glass staining dish with lid (LaboLan, catalog number: 29600001XL)
TubeCollector 2×200 CM II (Zeiss, catalog number: 415101-2000-410)
AdhesiveCap 200 clear (Zeiss, catalog number: 415190-9191-000)
MembraneSlide 1.0 OPEN (Zeiss, catalog number: 415101-4401-000)
Equipment
Vacuum pump (Gast, model: DOA-P704-AA)
Vacuum desiccator
Mini-rotator, 2–80 rpm w/disk & clamps (Glas-Col, catalog number: 099A MR1512)
Convection incubator (Binder, model: BD 23)
Paraffin dispenser (Leica, model: EG 1120)
Microtome (Leica, model: RM2035)
Slide warmer (Lab-Line Instruments, model: 26005)
PALM MicroBeam IV microscope with motorized RoboMover and CapMover (Zeiss, series number: 1214000156)
NanoDrop (optional)
Covaris S2 ultrasonicator (optional)
Qubit 4 fluorometer (optional)
Bioanalyzer 2100 (optional)
Software and datasets
PALM Robo software (Zeiss, v4)
Optional: R studio for RNA-seq data analysis
Procedure
Embedding inflorescence tissues in paraffin
Tissue fixation
Day 1. Collect inflorescence tissue (use dissecting forceps) and place the tissue directly into the fixation solution [ethanol: glacial acetic acid 3:1 (v/v)] on ice.
Notes:
i. Prepare the fixation solution fresh and keep cold.
ii. As a guideline, for 15–20 Arabidopsis inflorescences in a 50 mL Falcon tube or beaker, 10 mL of each solution (for this and the next steps) is needed. The tissue should always be covered with solution.
iii. Tissues of different genotypes or treatments should be maintained separated and always labeled.
Caution: RNA integrity should be conserved. Work clean and use gloves.
Apply vacuum for 15 min using a vacuum desiccator.
Notes:
i. The open Falcon tube or beaker is on ice in the vacuum desiccator.
ii. In our work, we use the maximum force of the vacuum pump, which is around -0.6 bar.
Replace the fixation solution and repeat the vacuum step for 15 min.
Leave the samples in fixation solution overnight at 4 °C.
Notes:
i. The tissue should sink during the vacuum steps. If not, repeat vacuum step.
ii. It is most practical to use a 50 mL Falcon tube(s) with cap from this point onward.
Dehydration
Day 2. Dehydrate the tissue samples using five steps of ethanol concentrations (70%, 80%, 90%, 100%, 100%). For each step, incubate the samples for 1 h at 4 °C. Constant agitation of 10 rpm may be used.
Leave samples in 100% ethanol at 4 °C overnight.
Pause point: Samples may be stored at 4 °C for more days if needed.
Histo-Clear II incubation
Day 3. Incubate the samples in a series of three steps with ethanol:Histo-Clear II (v/v) solutions [3:1, 1:1, 1:3 (v/v)]. For each step, incubate the samples for 1 h.
Note: Histo-Clear II is a replacement for the use of xylene, which is toxic.
Place the samples in 100% Histo-Clear II for 1 h.
Remove half of the Histo-Clear II volume by decanting and replace this volume with paraffin wax pellets (Paraplast Plus®). Leave overnight at room temperature.
Note: We recommend transferring the samples and solution to a small beaker(s), although Falcon tubes also work.
Paraffin incubation
Day 4. Place the beaker(s) with samples from the previous step in an incubator at 58 °C for 15–20 min (or until the Histo-Clear and paraffin mixture becomes liquid). During this step, all paraffin wax pellets will melt.
Notes:
i. We recommend the use of a convection incubator. Do not leave the door open too much time to avoid a drop in temperature. The use of a bigger incubator helps to maintain the temperature.
ii. The temperature of melting the paraffin is crucial and must be maintained according to the brand of paraffin in use.
Once the mixture is homogenized, decant a quarter of the total volume and replace this same volume with liquid paraffin at 58 °C. Incubate for 1 h at 58 °C in the incubator.
Note: For a correct homogenization of liquid paraffin, the paraffin dispenser should be turned on between 1 and 2 days prior to use; this depends on the type of paraffin dispenser and the amount of paraffin it contains. If no paraffin dispenser is available, Falcon tubes with melted paraffin stored at 58 °C may be used; these can be in the same incubator.
After 1 h, decant half of the total volume, replace this same volume with liquid paraffin at 58 °C, and place immediately back in the incubator at 58 °C for 1 h.
After 1 h, decant three-quarters of the total volume and replace this same volume with liquid paraffin at 58 °C. Incubate for 1 h at 58 °C in the incubator.
Note: From this step onward, the mixture is likely to start solidifying faster than in the previous steps; therefore, the work should be done as fast as possible to avoid solidification.
In the fourth wash, decant the whole mixture and replace it with liquid paraffin. Incubate again for 1 h at 58 °C in the incubator. Additional time may be needed depending on whether the paraffin is completely liquid; if not, incubate longer.
Repeat step A4e once or twice. If the smell of Histo-Clear II is no longer perceived, it is not necessary to continue with paraffin replacements.
After paraffin replacement steps, leave the samples in paraffin and incubate at 58 °C overnight in the incubator.
Embedding the tissue in paraffin blocks
Day 5. Prepare the paraffin blocks with the tissue (Figure 1). First, remove the beaker with inflorescences from the incubator and transfer the tissue with liquid paraffin to a hot plate (~58 °C), to maintain the liquid state of the paraffin.
Note: Some paraffin dispensers come coupled with a plate, but if you do not have this model, you can use any other hot plate. Practical tip: The plate can be covered with aluminum foil for easier cleaning afterward.
Place the steel inclusion molds also on top of the hot plate (~58 °C) to warm them; this helps for better handling of the melted paraffin during the generation of the blocks.
Next, add a small amount of liquid paraffin to the well of the inclusion mold. Subsequently, place the inflorescences (from 1 to 4 inflorescences per block) in the position you want to obtain the histological section (transverse or longitudinal). Then, place the plastic embedding cassette on top of the mold and fill the mold completely with liquid paraffin, let it cool, and then let it solidify on ice. See Figure 1 for various parts of the preparation of a paraffin block.
Store the block(s) at 4 °C until use.
Critical: Maintain the blocks free of RNase.
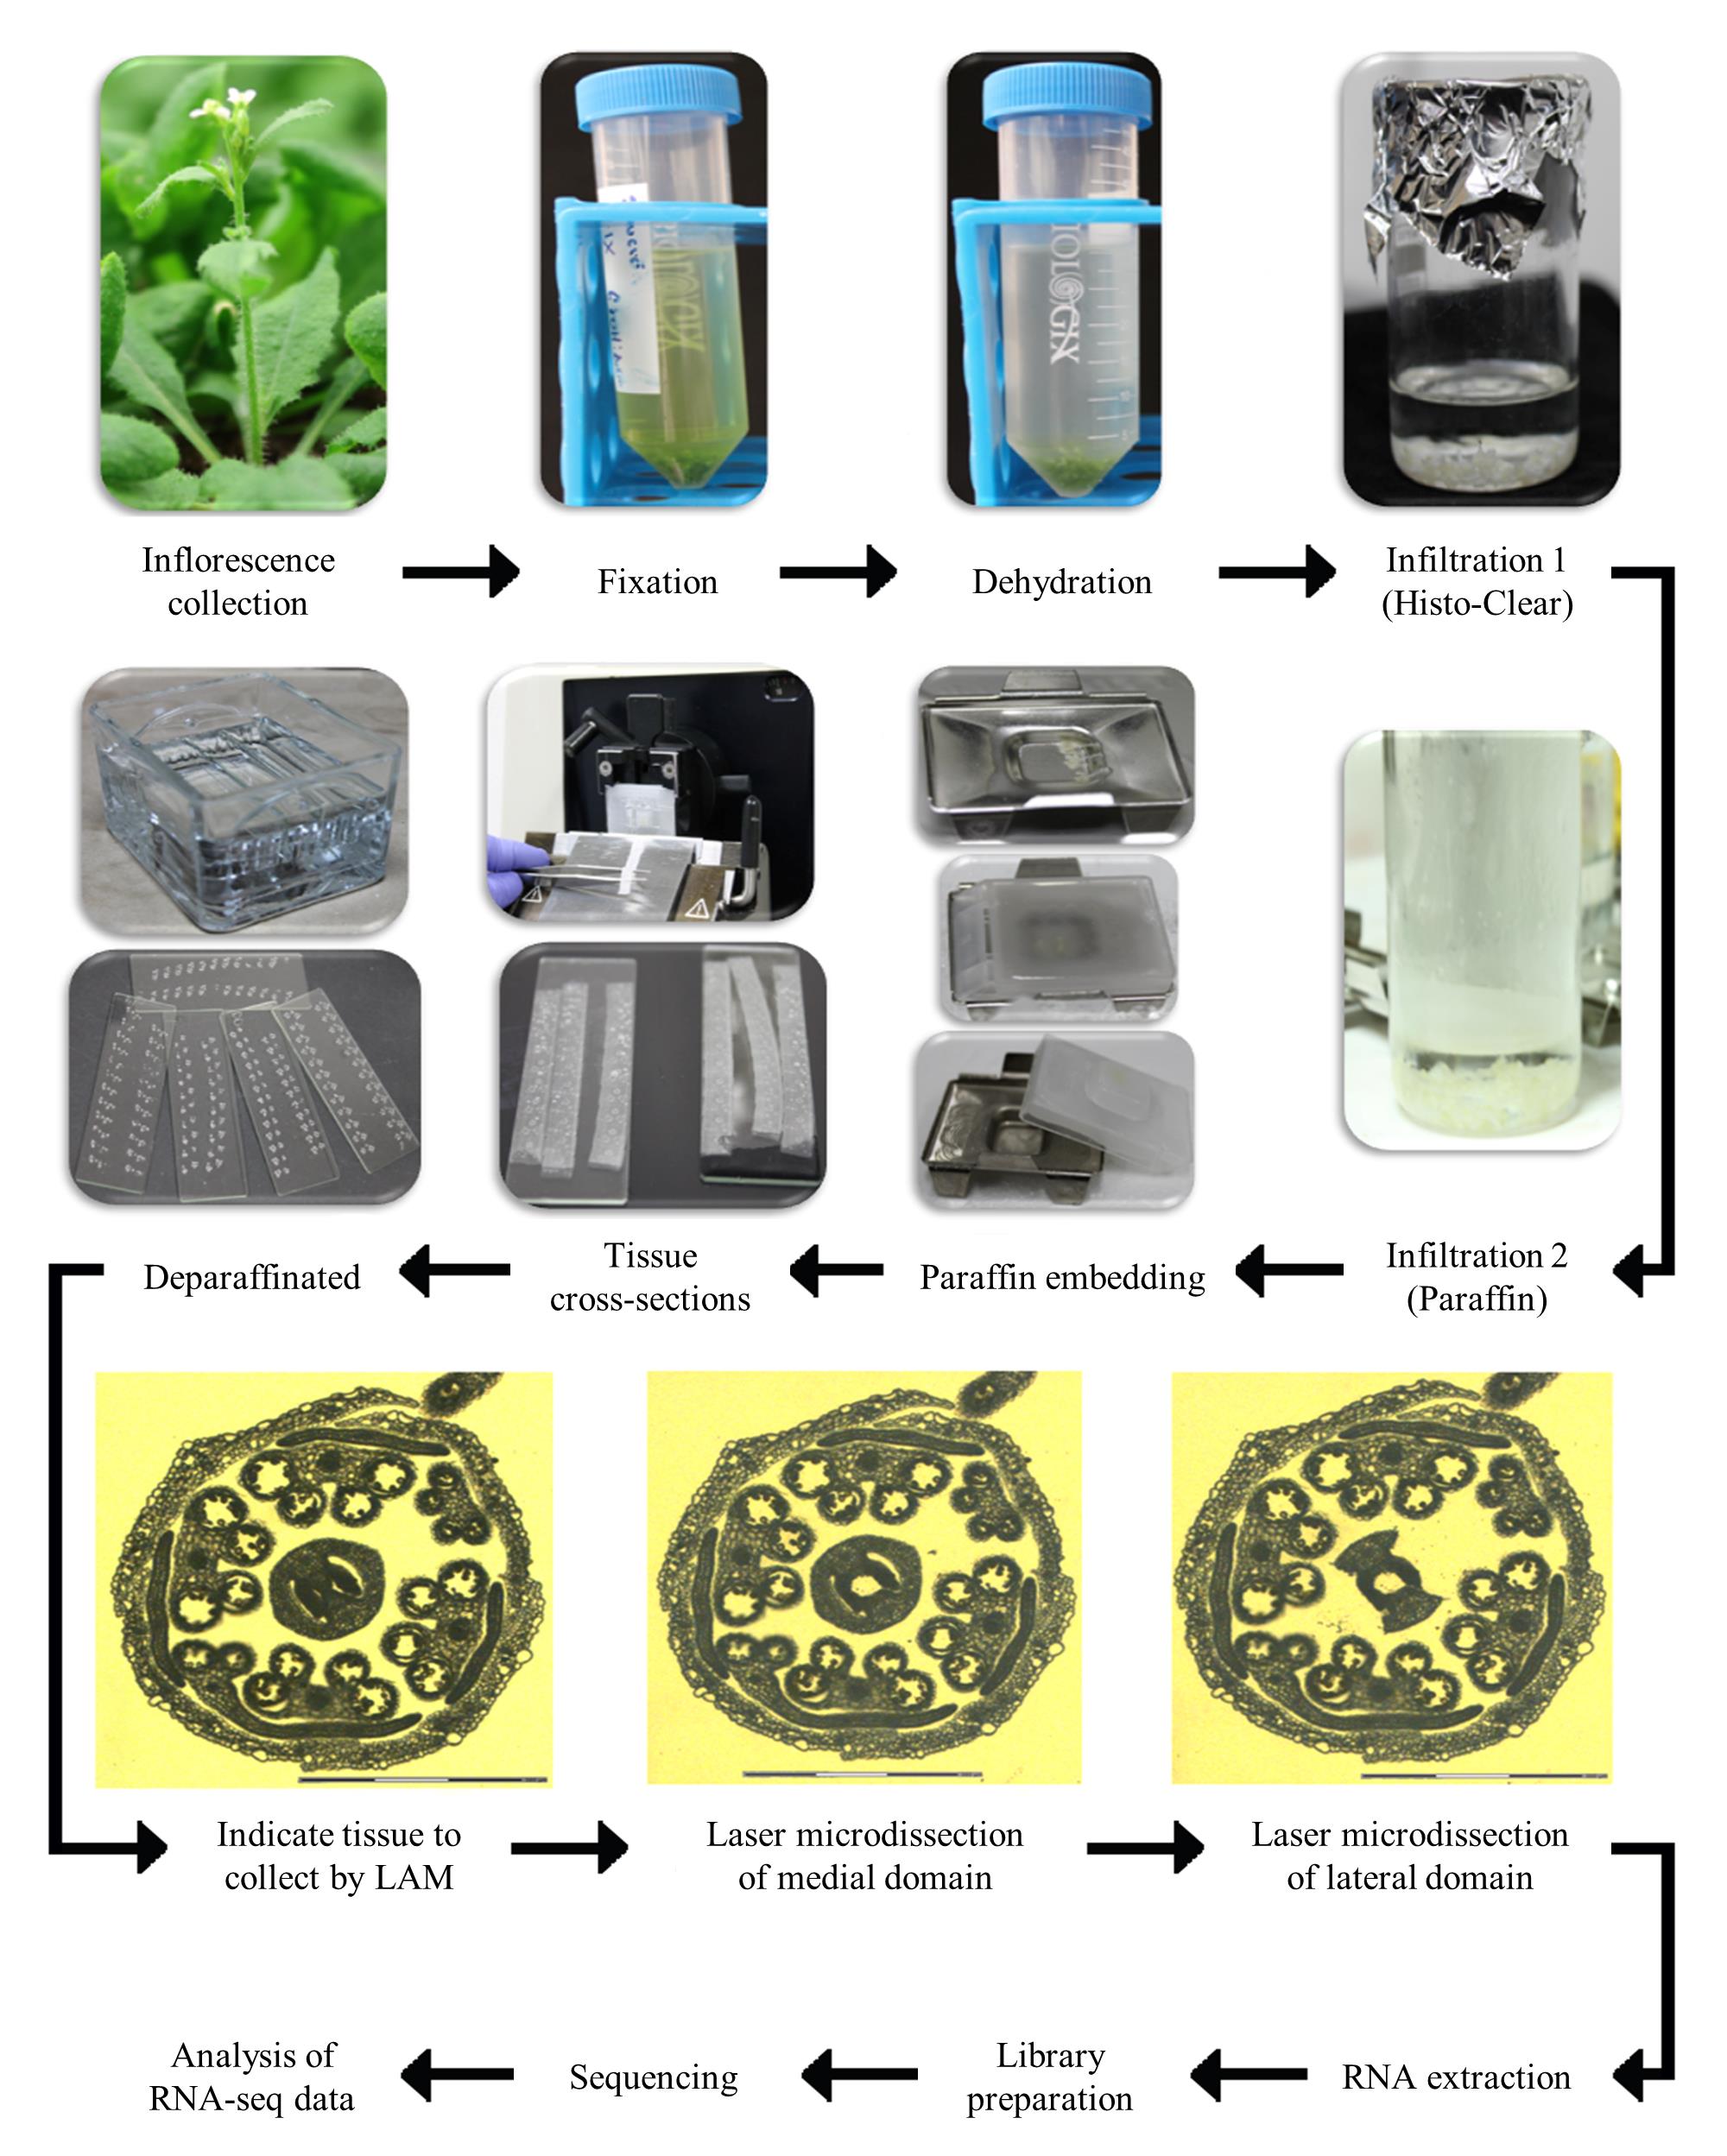
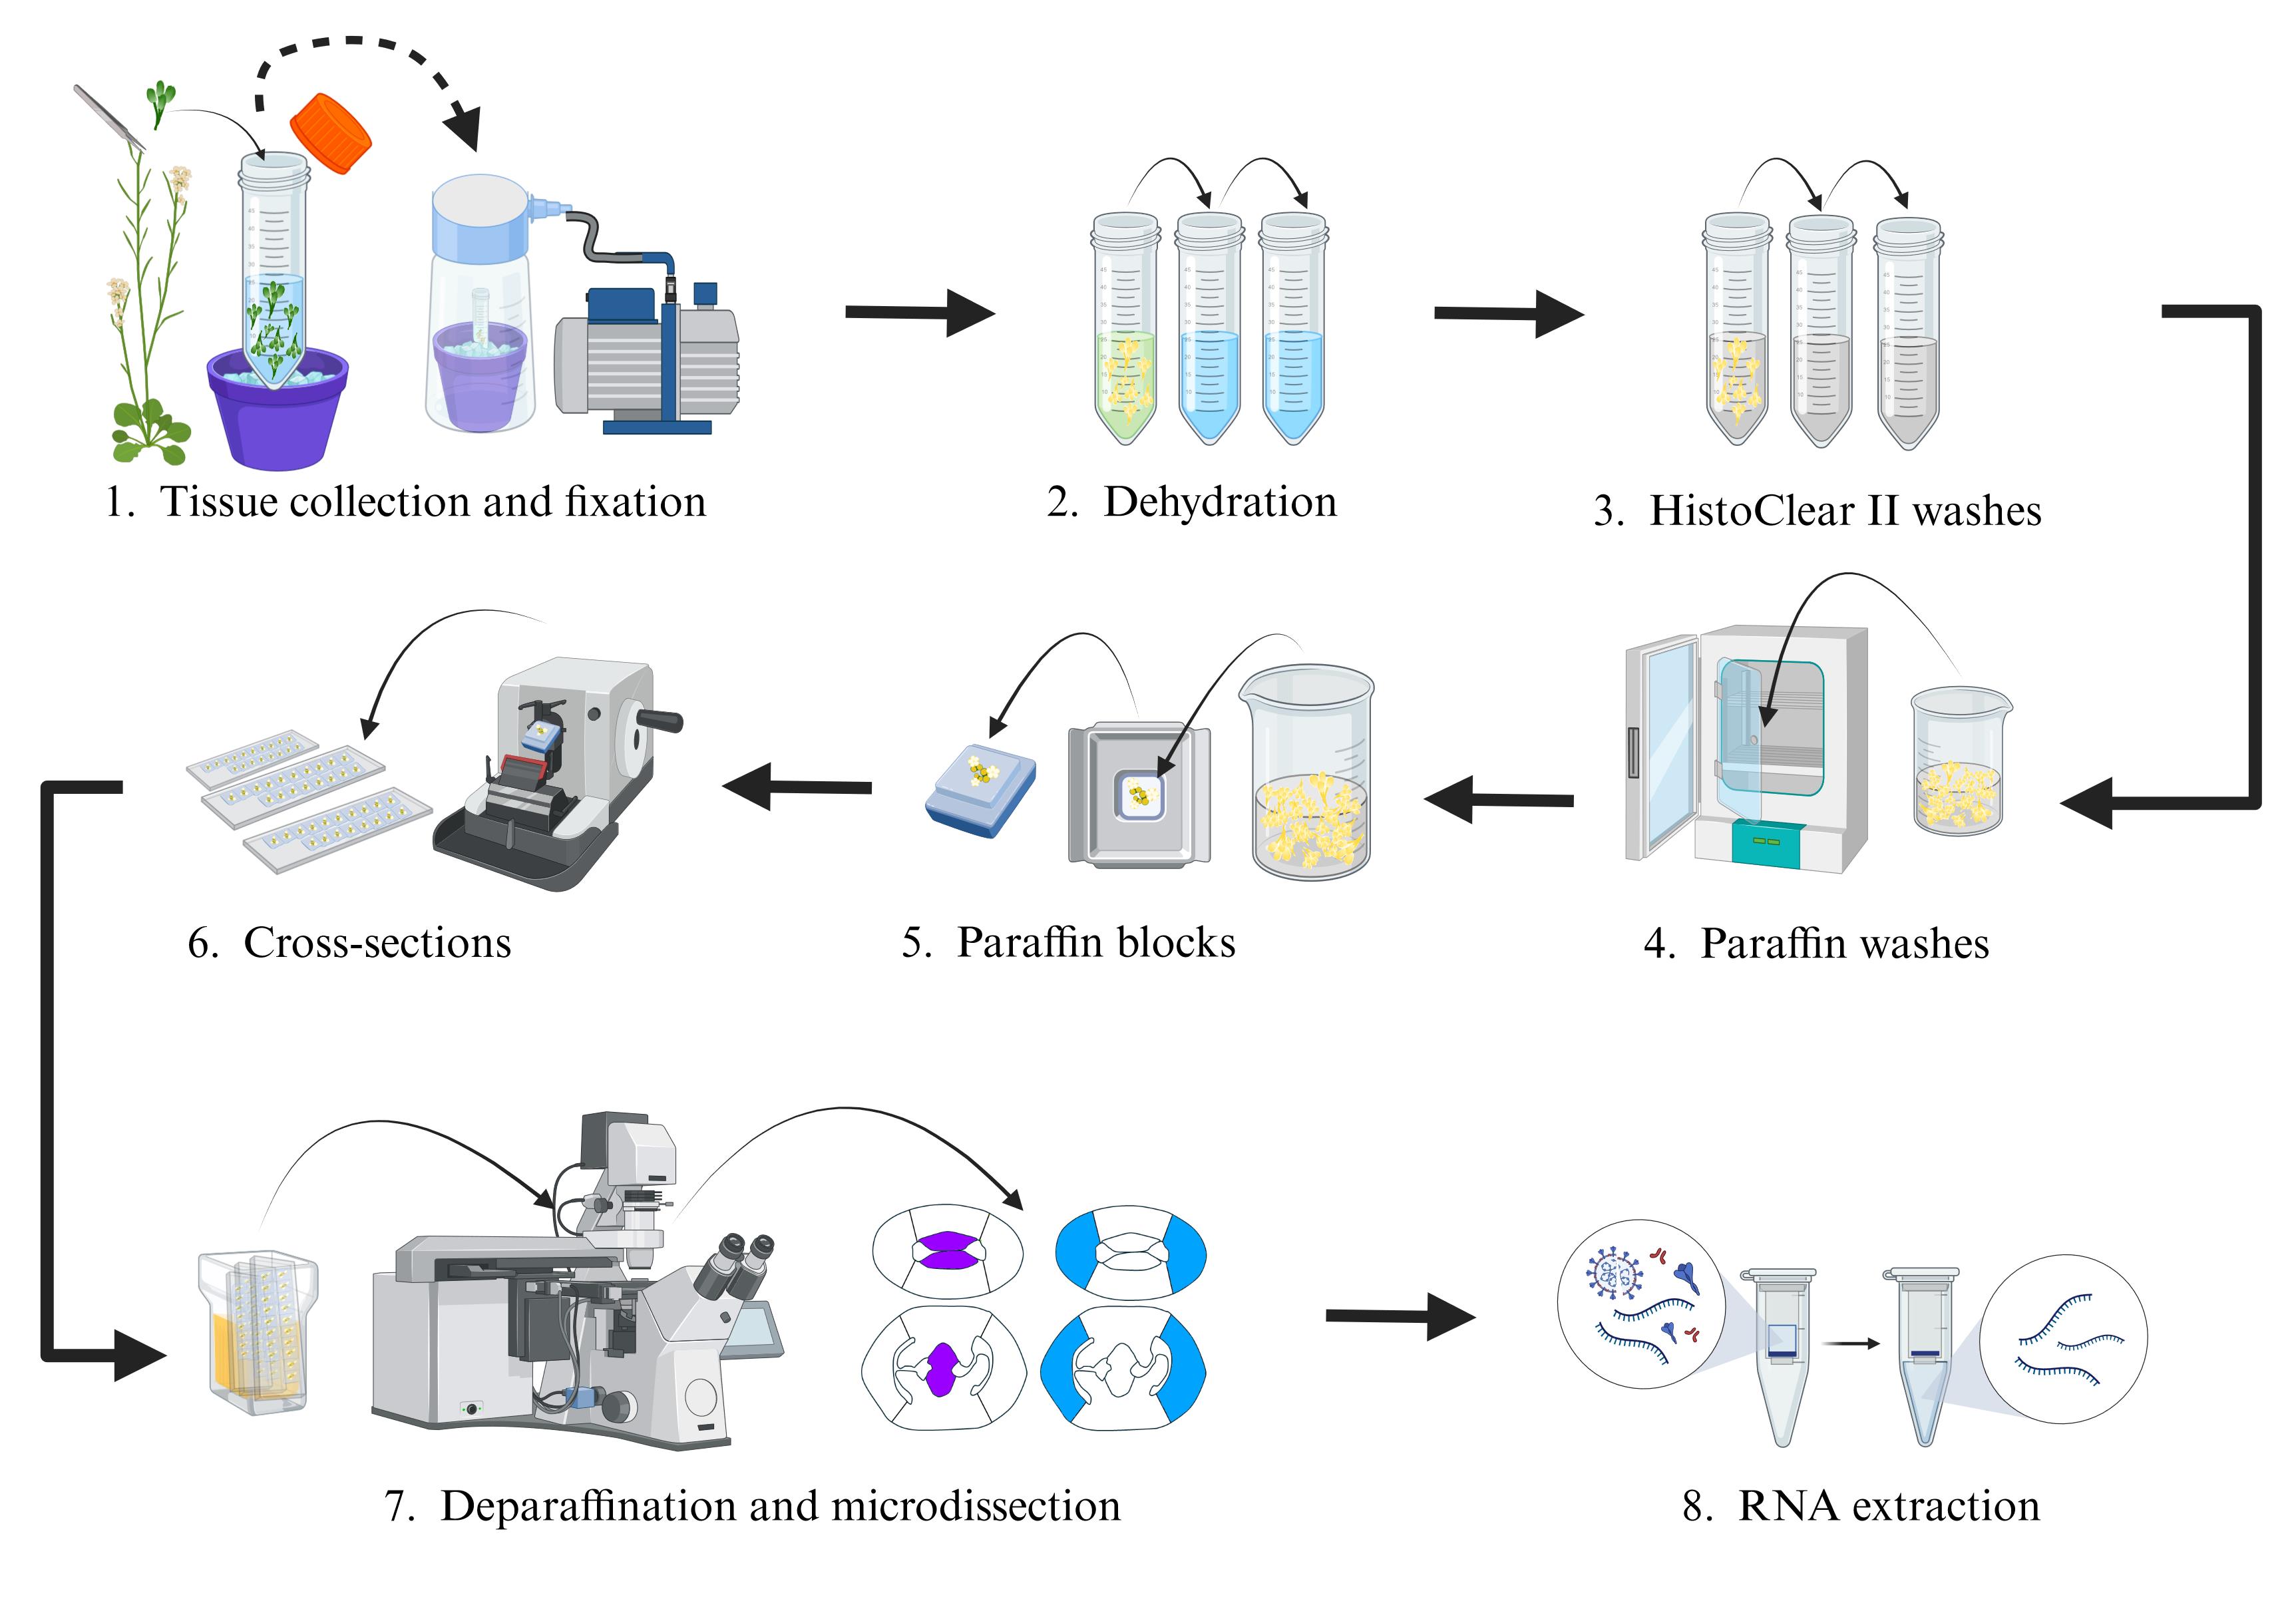
Figure 1. Overview of the complete laser-assisted microdissection (LAM) protocol. The protocol starts with plant tissue fixation, followed by tissue embedding in paraffin blocks, specific tissue/cell collection with the microscope, and finally RNA extraction, library preparation, and RNA sequencing. Taken from Luna-García et al. [19] (Supplementary Figure S1) with permission.
Histological sections
Day 6. Prepare the histological sections from the paraffin blocks with the tissue of interest using a microtome. In our experience, a thickness from 8 to 12 microns works well for the microdissection of Arabidopsis gynoecium tissues (Figure 1).
Notes:
The thickness of the histological sections can vary according to the tissue and the needs of each project.
Previous experience with a microtome is strongly advised.
Observe the cross sections with the help of an optical microscope; use only those sections in which the tissue of interest is present. Once the histological sections to be used have been identified, place them on a slide(s) as described in the next step.
Note: Slides with a membrane (typically used) to maintain cell integrity during LAM can be used, but for the development of this protocol with Arabidopsis inflorescences, slides without membrane were used since they allowed a better manipulation during microdissection.
Place slides on a slide warmer at ~42 °C. Add pure methanol to each slide surface. Place/float the selected paraffin sections (ribbons of paraffin sections; Figure 1) on the methanol, remove the excess methanol, and let the slides dry for ~45–60 min on the slide warmer. This will allow the fixation of the histological sections to the slides.
Notes:
The slides with fixed sections can be used directly in the next step of deparaffinization and LAM; alternatively, the non-deparaffinized slides can be stored for 1–2 days maximum at 4 °C.
We did not evaluate that but, when working with slides stored for longer times, the amount of extracted RNA from the LAM tissue decreased.
We use, as others do, pure methanol on the slide surface instead of water to minimize RNase activity.
Caution: Methanol is highly toxic.
Laser-assisted microdissection (LAM) of medial and lateral gynoecia tissues
Day 7. Deparaffinize the slides by placing them in a slide rack in a glass staining dish with 100% Histo-Clear II for 15 min (Figure 1). Subsequently, let the slides dry at room temperature for ~20–30 min. Afterward, start with the microdissection of the tissues of interest as described in the next steps.
Critical: Remember to keep everything free of RNase.
Laser-microdissection of tissue of interest
Turn on the PALM microscope (Figure 2A) and open the PALM Robo v4 software (Figure 3).
To place the slide(s) on the PALM stage (Figure 2B, C), click on button A (Load position) in the software (Figure 3A); the stage will move. Place slide(s) and click again on button A to let the stage return to the working position.
To locate the tissue of interest, select the appropriate objective by clicking on button B in the software (Figure 3A) where an objective, with which the PALM is equipped, can be selected (5×, 10×, 20×, 40×, 63×). With the help of the correct objective, locate the tissues of interest. Use button C to help focus (Autofocus; Figure 3A).
Note: In our work, depending on the gynoecium stage/size, we used either the 10× or the 20× objective.
To select the tissue to be isolated by LAM, first select the tissue to isolate with the drawing tool in the software by clicking on button D (Freehand; Figure 3A). The drawing tool can be manipulated with the mouse or with the special pencil on the touch-sensitive monitor. Start selecting the tissue to isolate by drawing with the pen a closed circle/region of interest on the screen (Figure 3B, indicated with a red line); the laser will later cut over this drawn line. Next, to mark the catapulting of the selected tissue, click on button E (Dot; Figure 3A) and, with the pencil, mark by dots (or single dot) inside the previously drawn region to be catapulted (Figure 3B, indicated with blue dots), toward the collecting tubes (Figure 2C, E). After this process, reactivate the selection option by clicking on button F (Pointer; Figure 3A).
Note: Many regions can be selected and collected by cutting and catapulting in series. In our work, per gynoecium, we collected the medial and lateral domains (in two different tubes); subsequently, we repeated it for the next gynoecium, and so on. In our hands, selecting regions in many gynoecia and then trying to collect all selected tissues did not work well, resulting, at a certain moment, in not properly cutting (not cutting completely through the section; probably loss of focus) or not accurately.
To collect the selected tissue, place the TubeCollector 2×200 CM II on the microscope CapMover with the collecting tube(s) placed (Figure 2D, E). Click on button G (Cap Check; Figure 3A); the collecting tube will travel from its initial position to the position a few millimeters above the slide with the sample to be collected. To isolate and catapult the tissue of interest, activate the laser by clicking the button H (Figure 3A) and then let the sequence of cutting and catapulting actions run by clicking the button I (Start Cutting Laser; Figure 3B, Video 1).
Notes:
i. Before starting the process of cutting and catapulting the tissues of interest, test the laser energy and thickness to find the ideal working parameters by modifying the parameters of the part of the software indicated by the letter J (Energy and Focus; Figure 3A). Do this by trial and error prior to a real experiment. In our experiment, as a guideline, we used the following settings: laser cut energy 50–70; speed 10–50; LPC energy 60–75. Cut Focus and LPC focus change when the focus of the microscope changes, so we did not adjust them manually. The number of cycles of laser cutting is normally one. The z-focus parameter was not changed manually.
ii. Use a single collection tube to collect a single tissue type of interest; you can perform this step as many times as necessary using the same tube to collect enough biological material for a good amount of RNA.
iii. For our experiment, for one tissue type (for one RNA-seq sample), it took three days to collect the tissue from 20–30 slides with inflorescence tissue (i.e., different gynoecia stages were present, and only specific stages were selected for our experiment).
iv. In general, microdissected material of around 80 gynoecia (sections of around 24 paraffin blocks with three or four embedded inflorescences) was pooled to result in one tissue sample (one replicate).
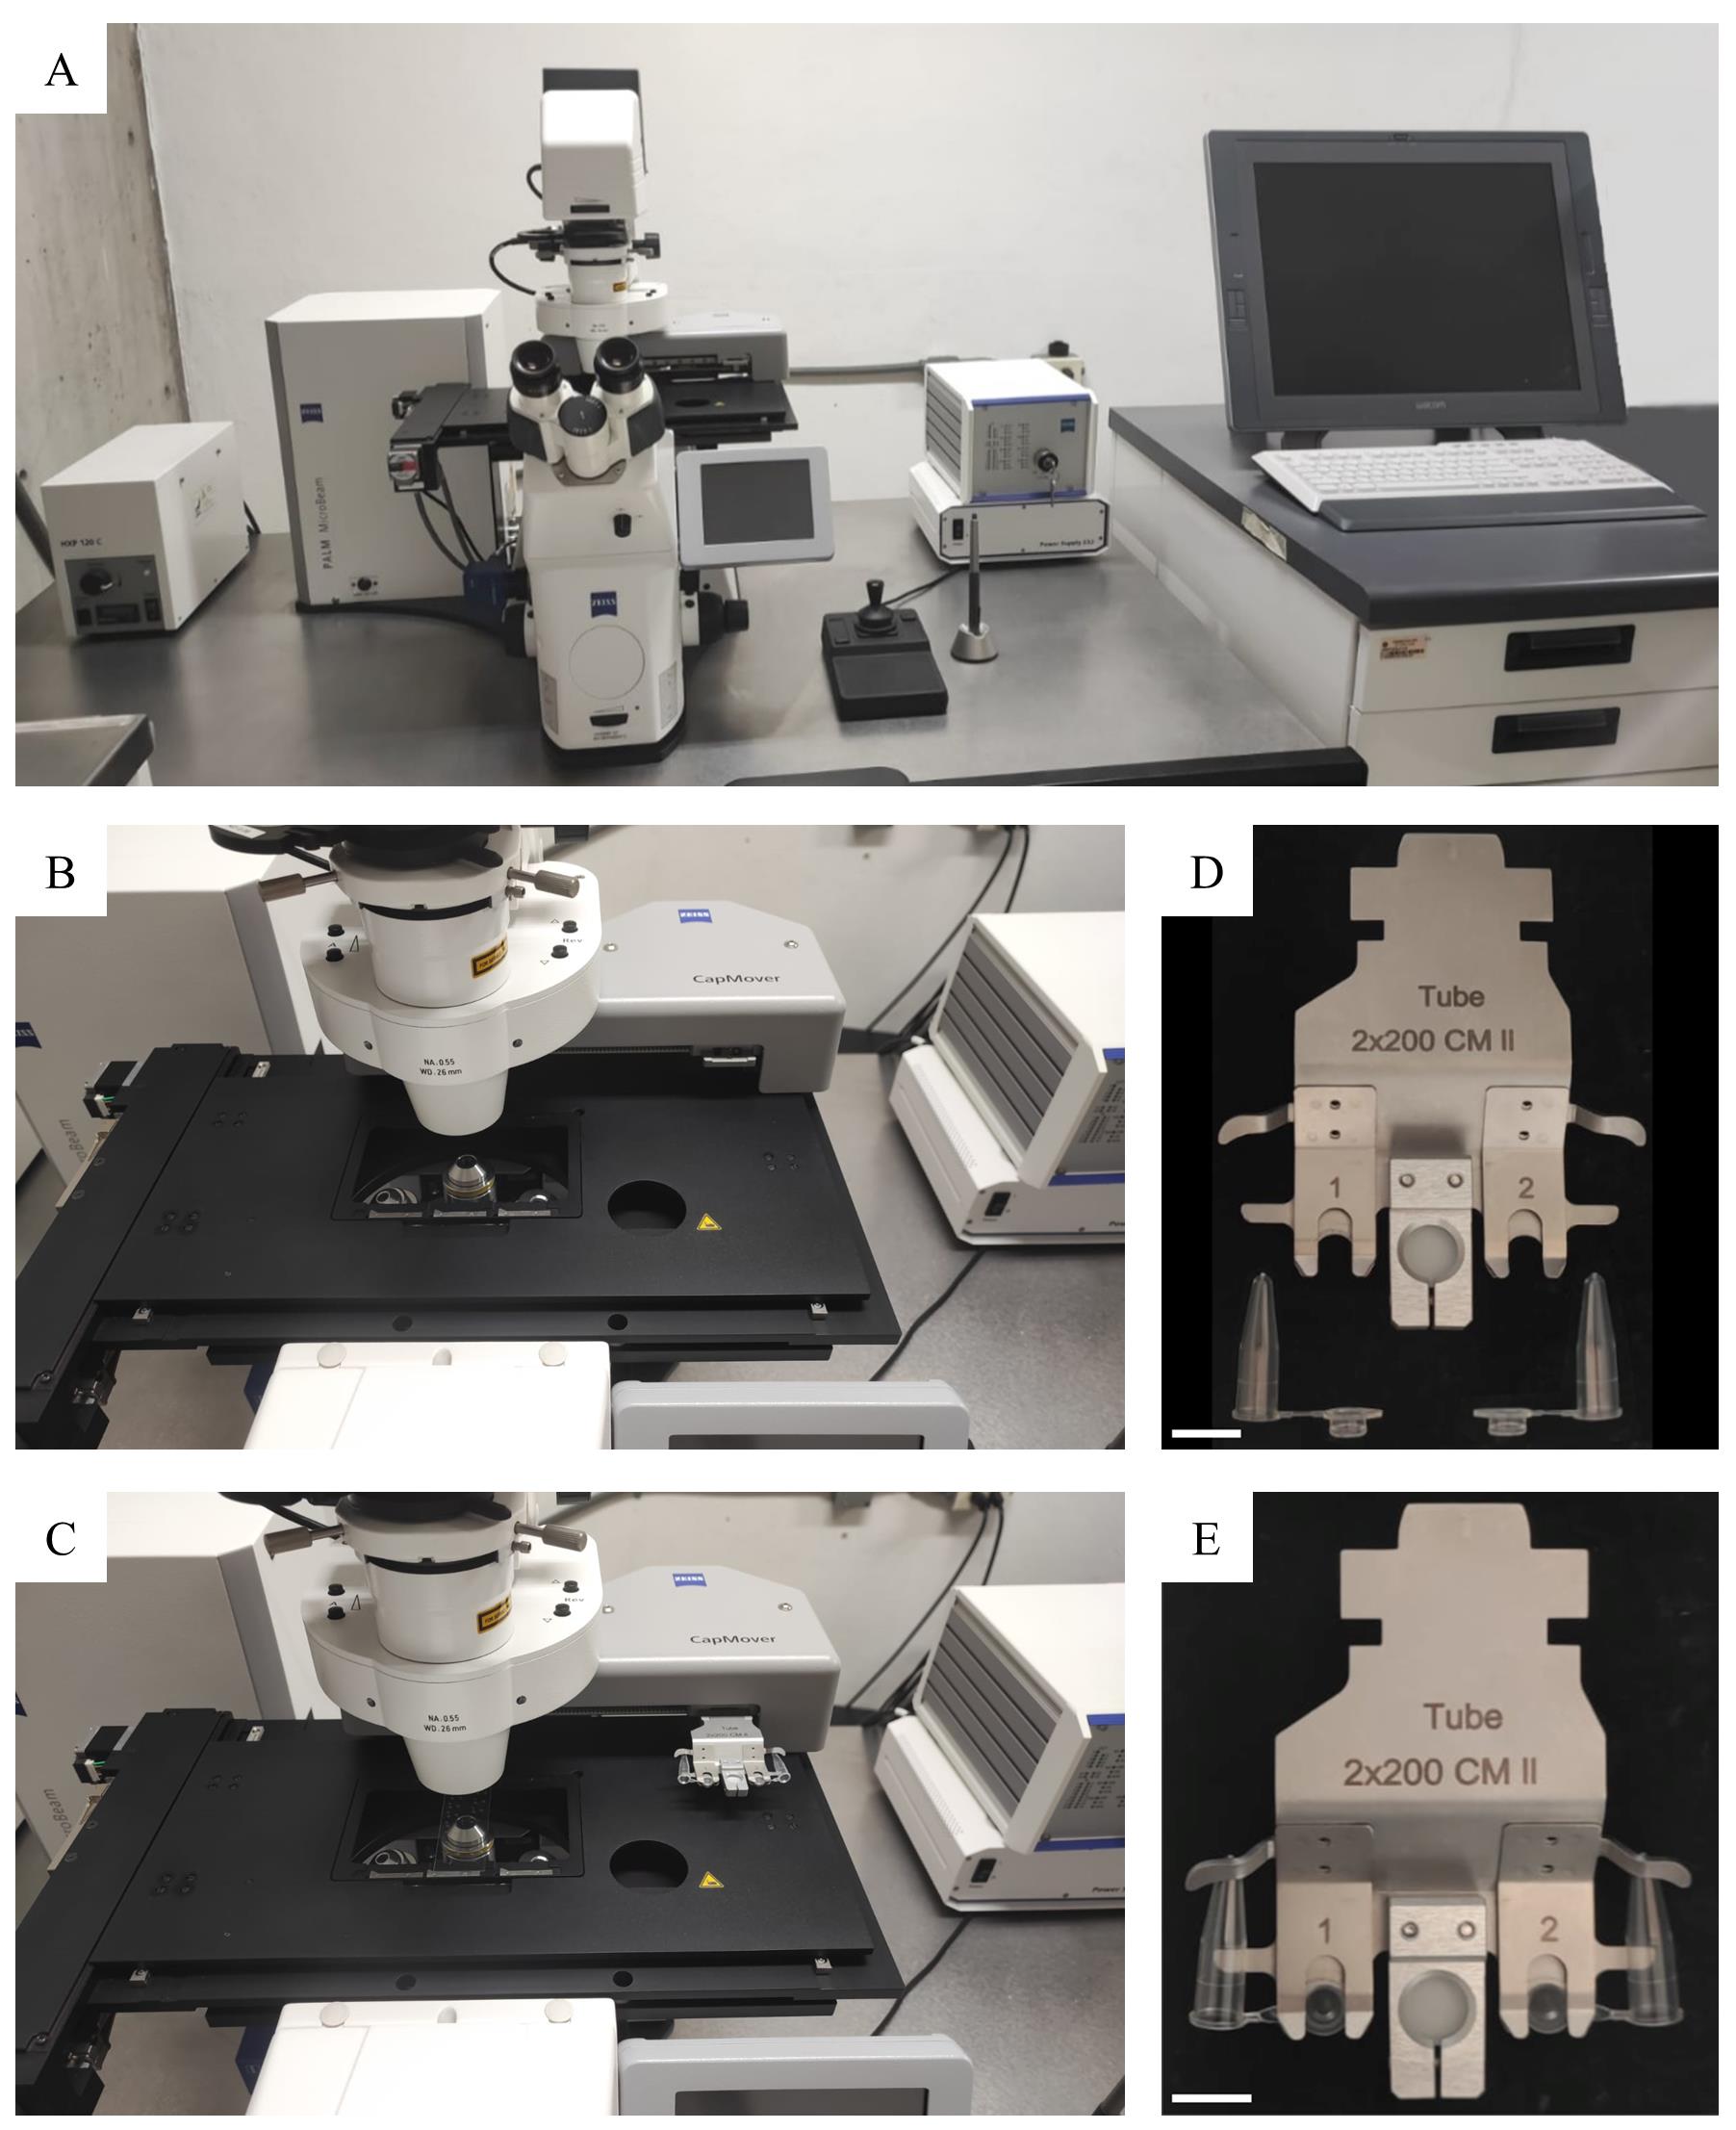
Figure 2. PALM microscope. A. PALM microscope, with which the laser-microdissection of the tissues of interest is performed. B, C. Area of the stage, where the slide with the transverse sections (previously deparaffinized), as well as the TubeCollector 2×200 CM II, are placed. D, E. TubeCollector 2×200 CM II and AdhesiveCap 200 clear tubes. Video 1. Laser-assisted microdissection (LAM) of medial and lateral gynoecium tissues
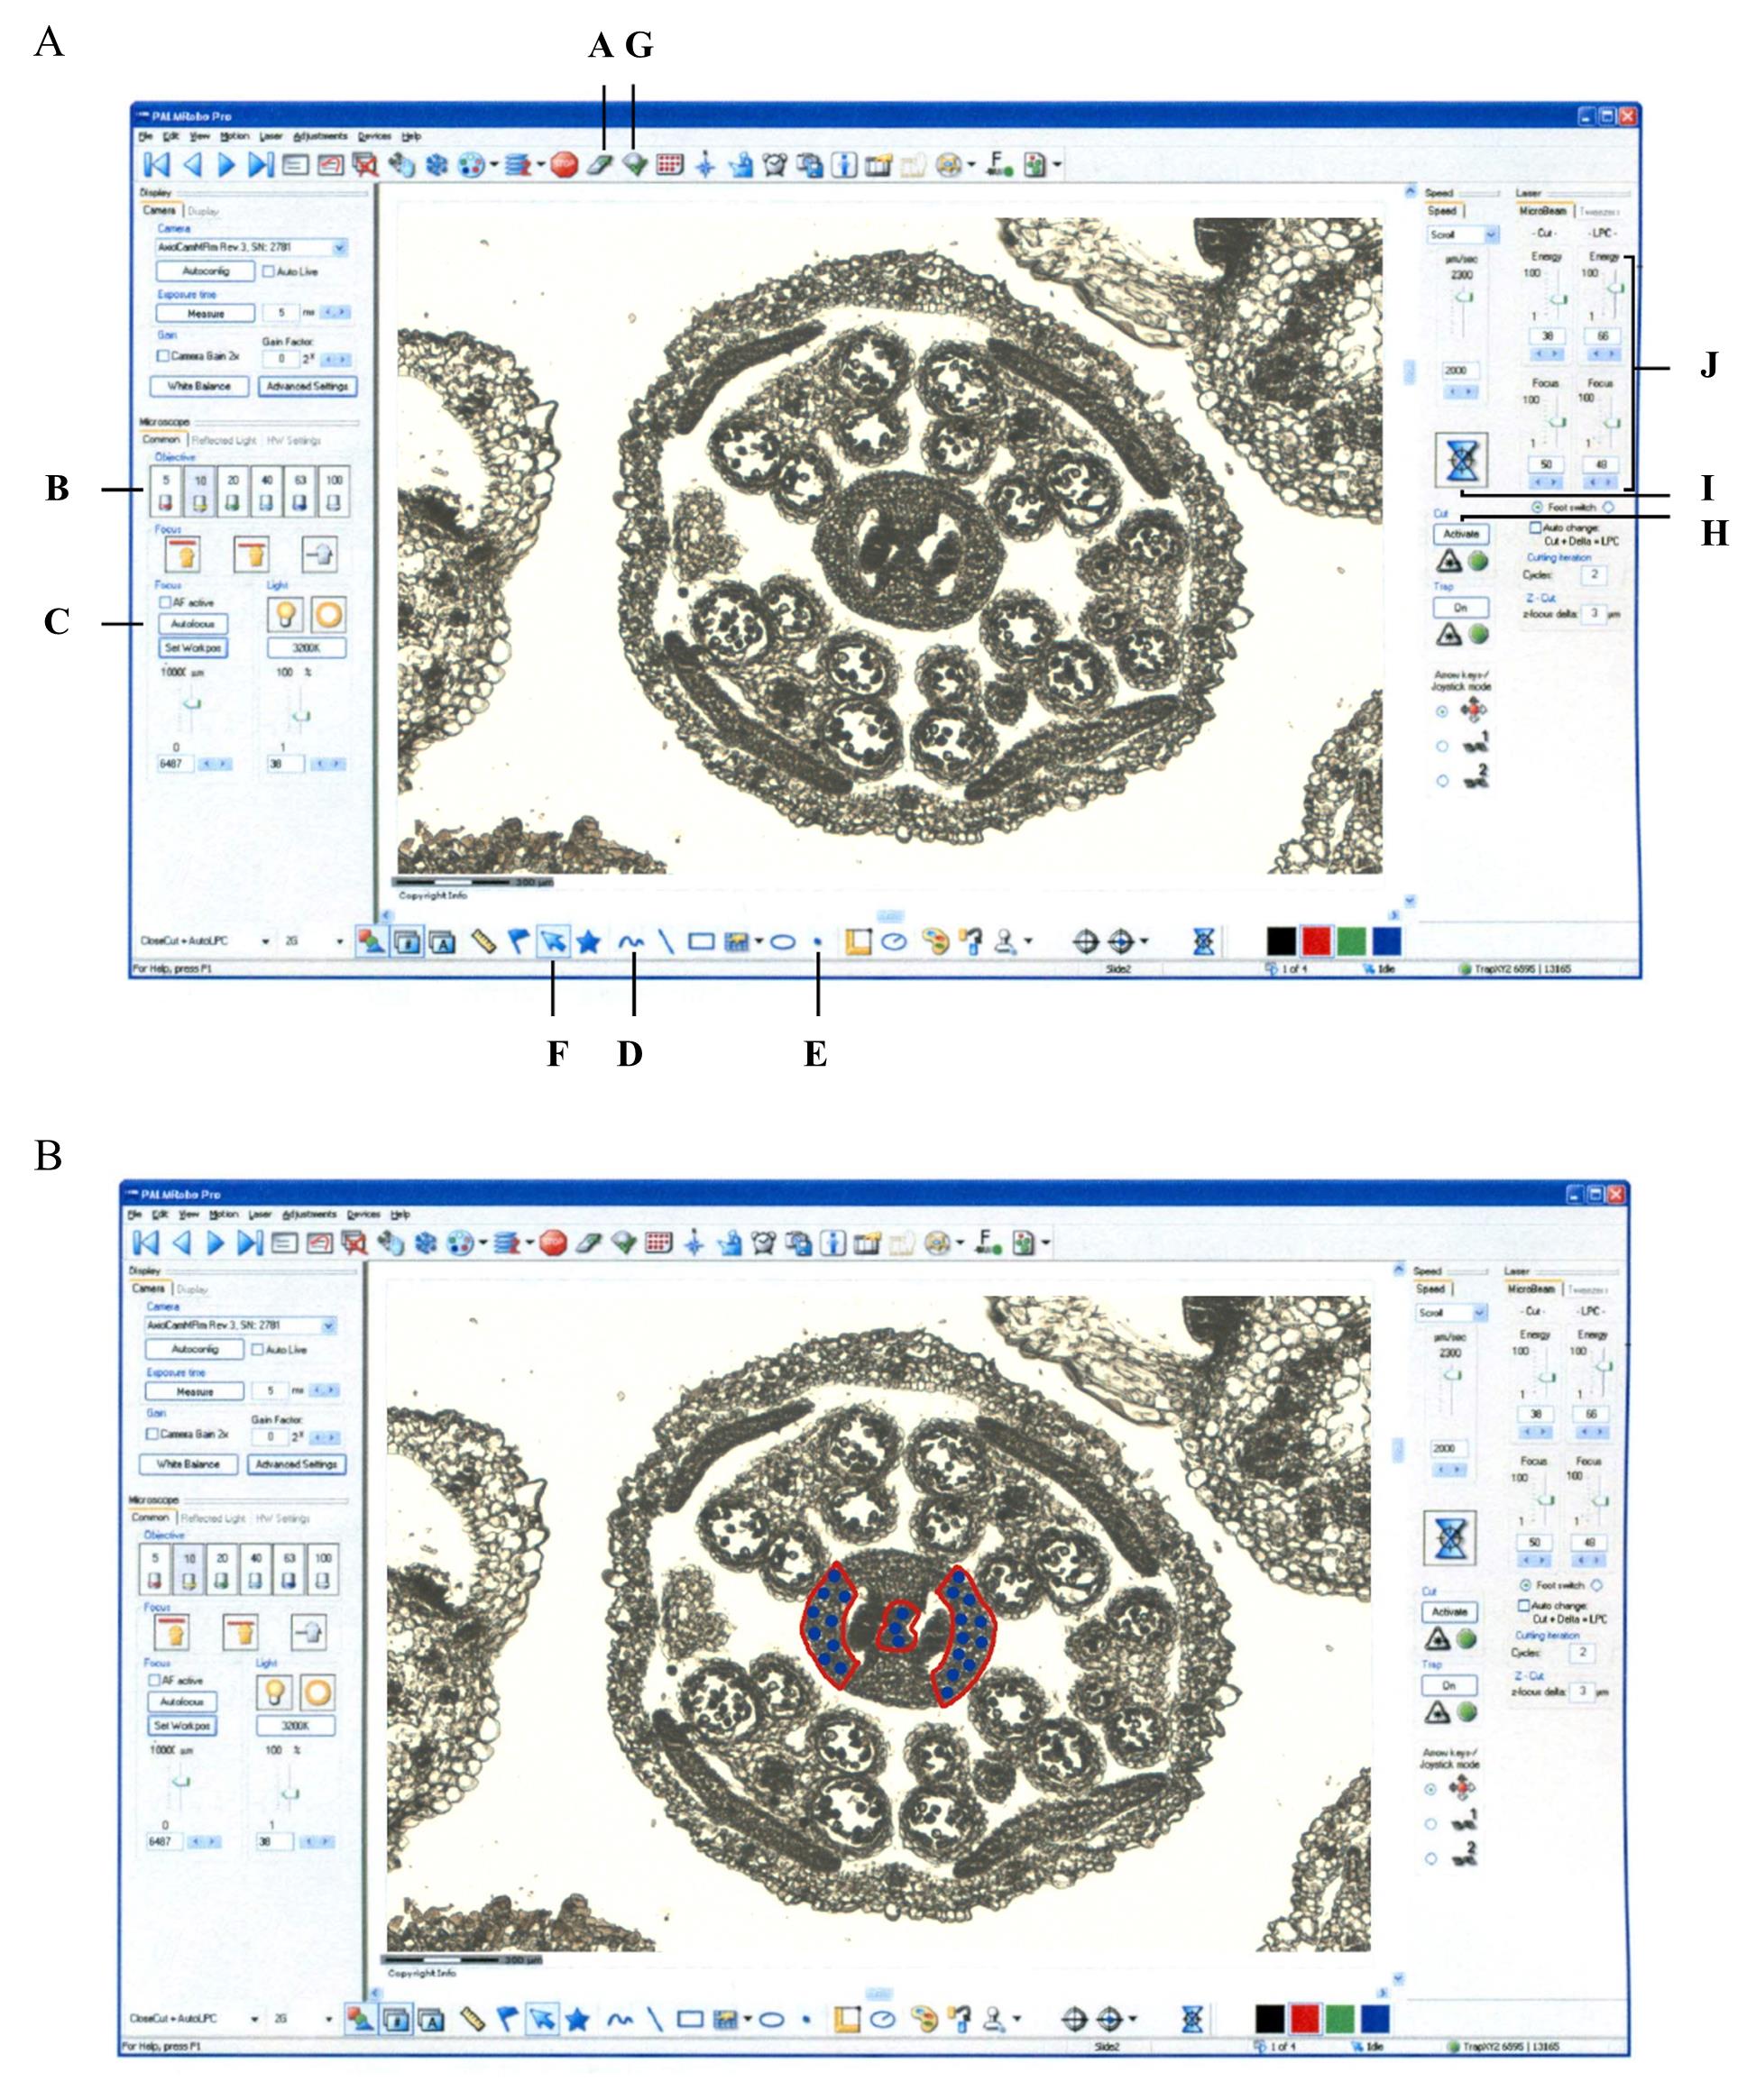
Figure 3. PALM software. A. PALM Robo v4 software and various parameters used for microdissection of tissues of interest. B. The area to be cut by the laser is in red and the amount of spot energy to be applied to catapult the tissues of interest into the collecting tubes is in blue. Letters in (A) indicate the important buttons in the menu and order of control for performing LAM, as written in section C of the protocol.Once the collection of the tissue of interest is completed, the collection tubes are placed in liquid nitrogen and stored at -80 °C until further use (RNA extraction).
Note: For our experiment, 12 h per day of LAM was performed, resulting in the collection of two tissue types (one from the medial and one from the lateral domain), collected in the 2 × 200 µL tubes in the TubeCollector. This process was repeated twice, so in total 18 h (6 h/tissue × 3 days) was needed for one sample of one tissue type.
To finalize the PALM work session, the reverse workflow is followed; close PALM software and close Windows software to turn off the computer, followed by turning off the microscope.
RNA Extraction and library preparation
After sufficient LAM of the tissue(s) of interest, perform RNA extraction. For this protocol, we used the Direct-zol RNA Microprep kit, which allows yields of ~100–200 ng of total RNA in a volume of 8–10 µL.
Note: For our experiment, we had three tubes with collected tissue that made up one library/RNA-seq sample. Tubes were retrieved from -80 °C storage and placed in liquid nitrogen. When RNA extraction started, tubes were taken out of the liquid nitrogen; 100 µL of Trizol was added to each tube (to the cap of the tube and the tube itself), followed by pooling the solution of the three tubes to one new Eppendorf tube. Subsequently, the instructions of the kit were followed. We did not perform any grinding of the samples.
Note: During the RNA extraction procedure, a DNase I treatment is performed on the column to remove genomic DNA.
Note: We use a NanoDrop spectrophotometer to check RNA quality and quantity.
For cDNA preparation, different kits are available. For cDNA synthesis, we use the SMART-Seq v4 Ultra Low Input RNA Kit for Sequencing (Takara Bio).
Notes:
For our experiment, we used a Covaris S2 ultrasonicator to shear the cDNA into around 100 bp fragments.
For our experiment, we analyzed the cDNA quality and quantity with a Qubit 4 fluorometer and a Bioanalyzer 2100.
For sequence library preparation, different kits are available. For library preparations, we use the NEBNext Ultra II DNA Library Prep Kit for Illumina (New England Biolabs) and the NEBNext Multiplex Oligos for Illumina (Index Primers Set 1; New England Biolabs).
Note: The sequence libraries normally can be prepared as part of the RNA sequence service, which will save time. For our experiment, we did it in-house to avoid sending low quantities of RNA and country-related complicated logistics.
RNA sequencing
Send samples/libraries to an RNA sequencing service. The data used in our publication was generated using a HiSeq2000 Illumina resulting in paired-end libraries with an average of 43 million reads (150 bp paired-end) after filtering adapters and low-quality reads.
RNA-seq data analysis can be requested as part of the sequencing service or can be done in-house. We refer to our publication or other literature available for information on data analysis.
Note: Expertise is required for data analysis when starting with raw reads.
Data analysis
Bioinformatic analysis may be solicited as part of the RNA sequence service. If so, lists with genes and their respective expression values in transcripts per million (TPM) are obtained. Depending on the experiment, one or more lists are provided with differentially expressed genes (DEGs) given in the log-transformed of the expression difference. Often, a cutoff is used, for instance, a log-transformed fold change (logFC) > 1 and an FDR < 0.05, although a more severe cutoff can also be used (e.g., logFC > 2). This depends on the aim. When using a cutoff of logFC > 2, a shorter list of DEGs will be obtained.
As with any RNA-seq experiment, nowadays, it is important to perform this in triplicate, meaning using biological replicates. A principal component analysis (PCA) can be performed to observe the reproducibility of the experiment. Furthermore, gene ontology (GO) analysis can be performed, among others.
When opting for in-house data analysis, some skills are necessary, and it is handy to know Linux and R. For a description of the data analyses, see our article Luna-García et al. [19]. In short, the quality of raw sequencing reads was analyzed using FASTQC v0.11.5 [20], and overrepresented sequences, low-quality reads, and adapters were removed using trimmomatic v0.39 [21] and cutadapt v2.8 [22]. The filtered sequencing reads (Phred Quality Score > 30) were mapped to the Arabidopsis thaliana reference transcriptome (Araport11) using Kallisto v0.46.1 [23]. Read counts and TPMs were generated using the R package tximport v1.0.3 and the lengthScaledTPM method [24]. For DEG analysis, use the files with extension.h5 (Hierarchical Data Format 5), generated in alignment with Kallisto, processed in RStudio with R packages tximport v1.12.3 [24] and edgeR v3.26.8 [25], following part of the workflow by Chen and collaborators [26].
Validation of protocol
This protocol has been used and validated in the following research article:
Luna-García et al. [19]. A high-resolution gene expression map of the medial and lateral domains of the gynoecium of Arabidopsis. Plant Physiology.
As presented in Luna-García et al. [19] (in Supplementary Figure S2), in Figure 4 here, the result of the PCA of our data is presented, where the replicates group nicely together, indicating the reproducibility of the experiment. Details on the RNA quality and the raw reads for each library can be found in Luna-García et al. [19] (in Supplementary Table S1).
Subsequently, possible data validation methods include searching public data to see if gene expression is similar/identical, for instance, in other RNA-seq data, RT-qPCR data of specific tissues, or published in situ hybridization results. In our article, we compared our data with 18 published in situ hybridization results of well-known transcription factors, which nicely confirmed our data [19] (in Supplementary Table S22). We presented a heatmap of these 18 well-known transcription factors, demonstrating the results and specificity of the data [19] (in Supplementary Table S22) and, in this protocol, Figure 4B.
Lastly, we would like to mention that data availability is very important. Besides presenting annotated (Excel) tables as part of a research article, depositing data in known databases such as the European Nucleotide Archive (ENA) is essential (data of Luna-García et al. [19] is stored in ENA under the accession number PRJEB65130). Furthermore, data from our work in collaboration with the Arabidopsis eFP Browser platform [27] is fully searchable in this publicly available tool (https://bar.utoronto.ca/efp_arabidopsis/cgi-bin/efpWeb.cgi?dataSource=Gynoecium); Figure 4C gives an example for how this looks like in the eFP browser for two genes.
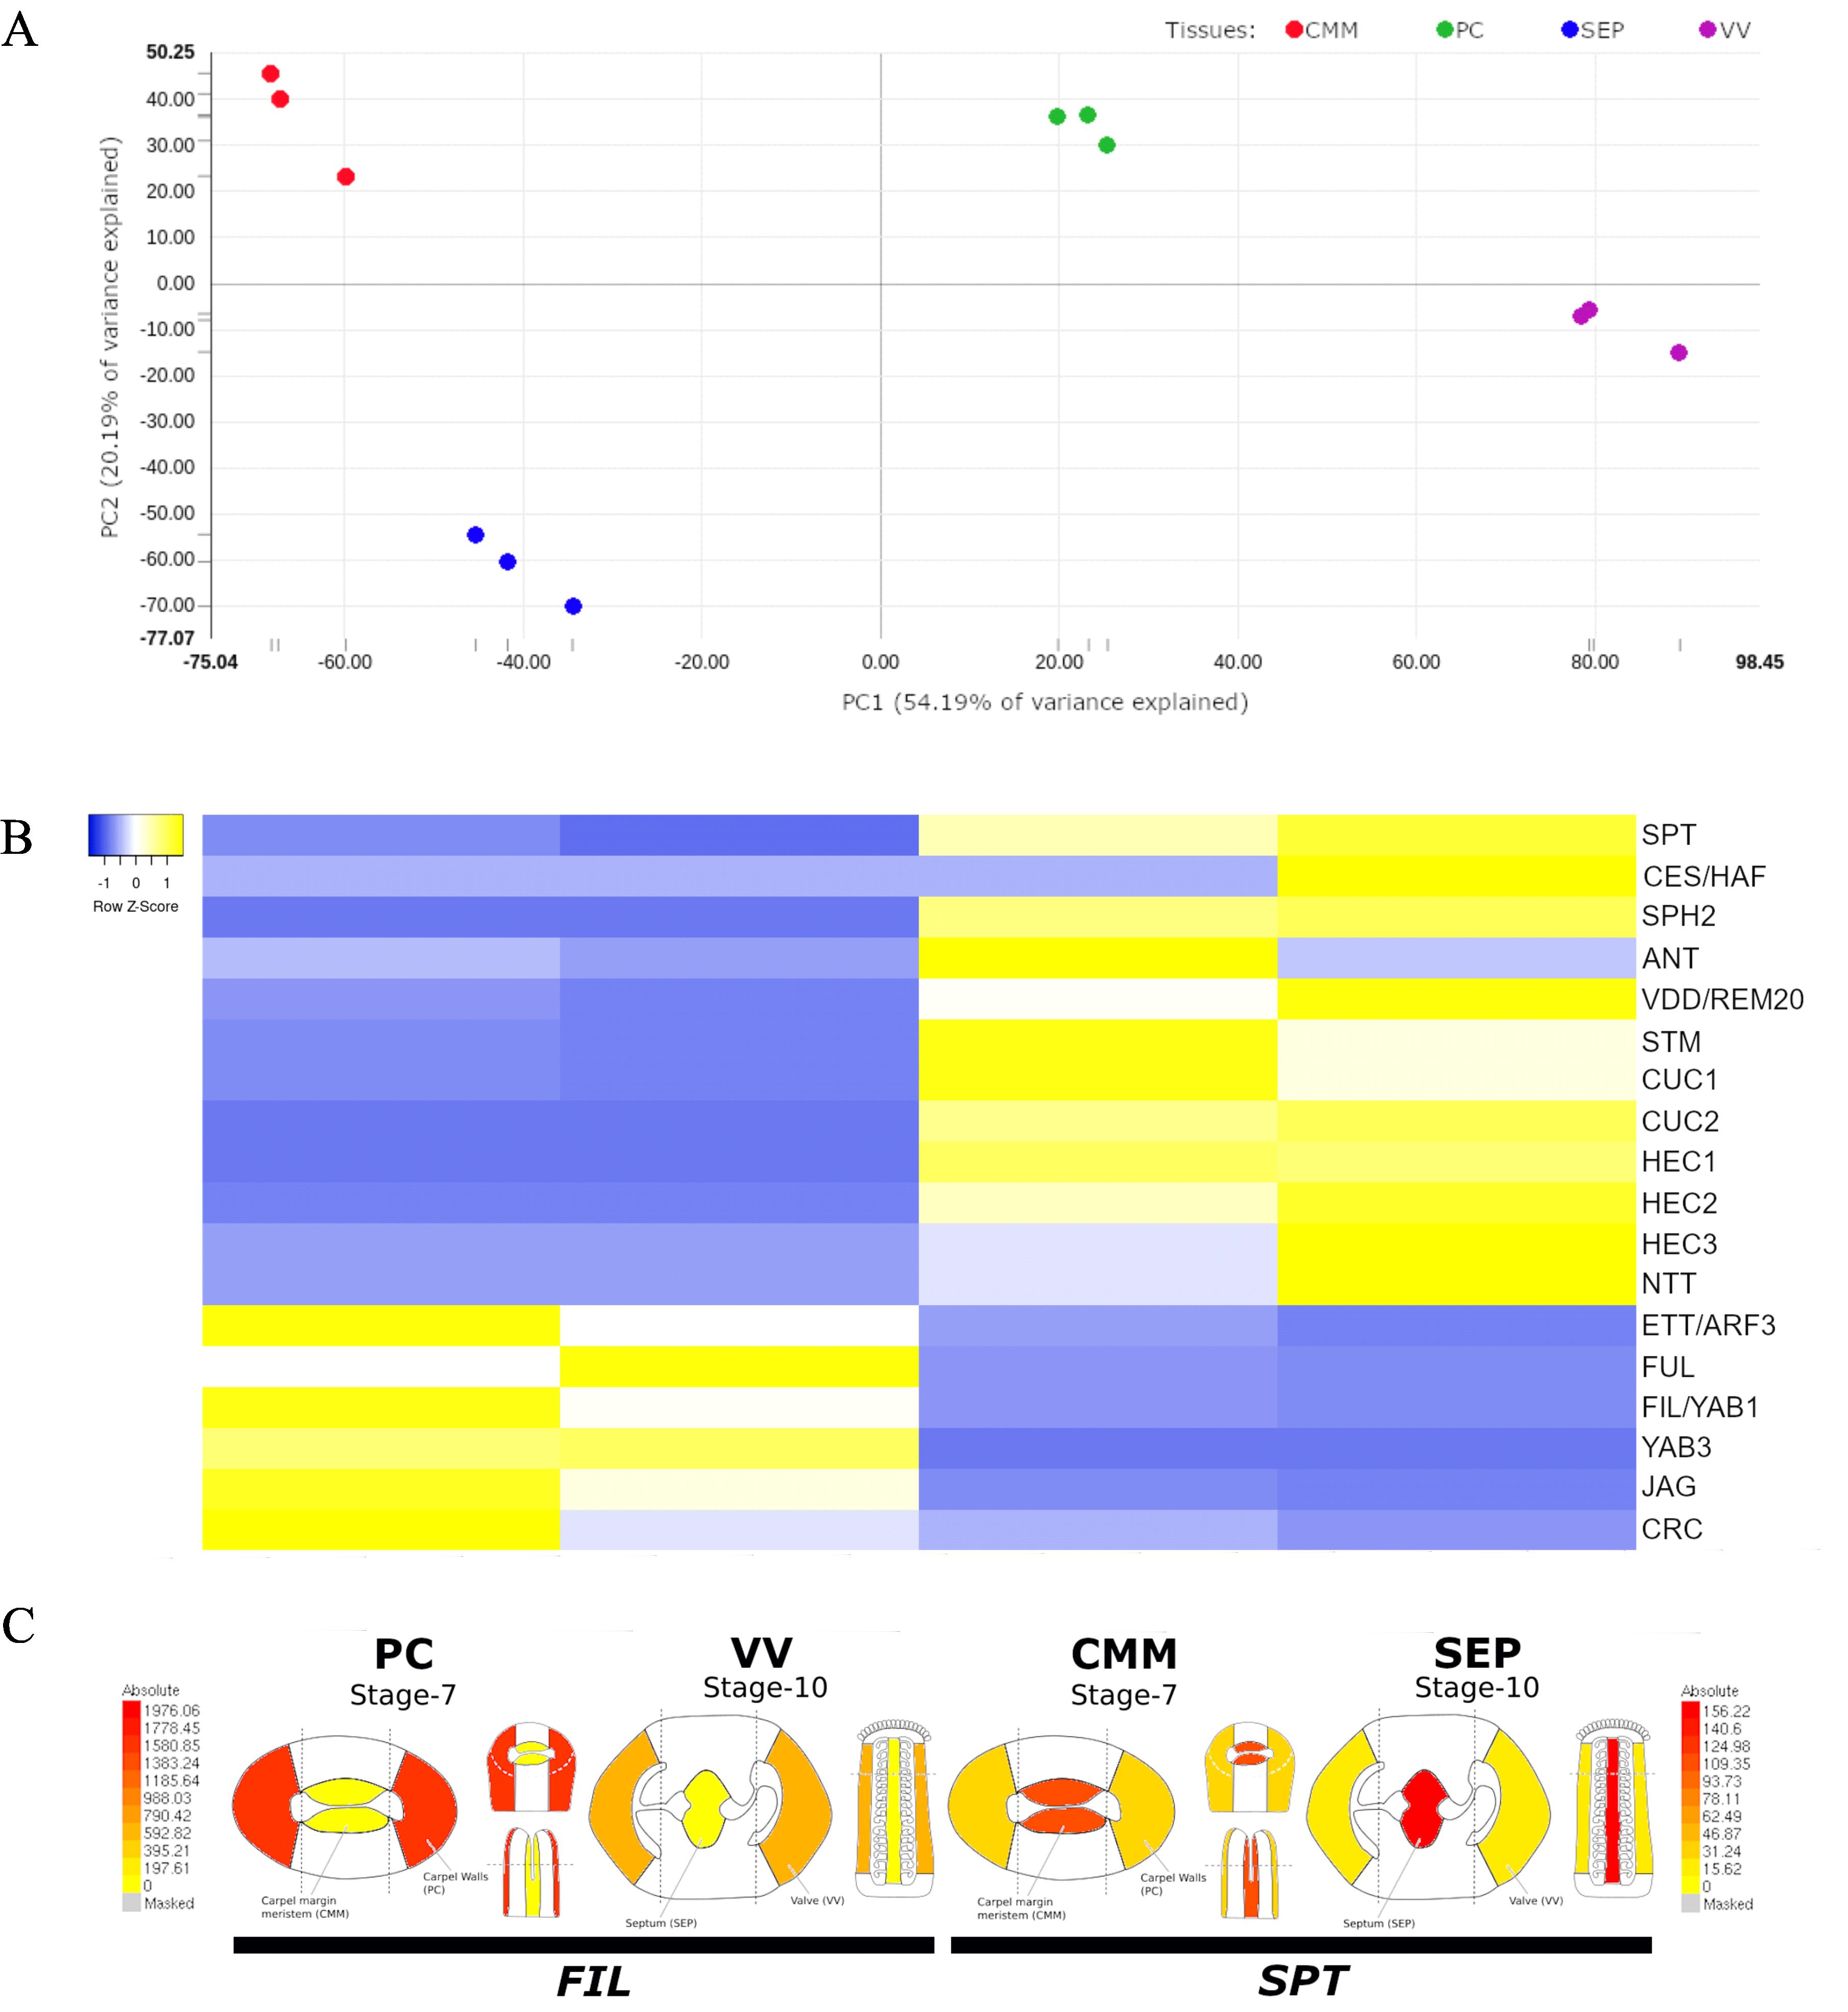
Figure 4. Examples of data analyses approaches. A. Results of the principal component analysis (PCA) of the article by Luna-García et al. [19]. Four different tissue types in triplicate have been isolated by LAM, followed by RNA-seq, where the replicates nicely group together. CMM, carpel margin meristem; PC, presumptive carpel wall; SEP, septum; VV, valves. B. Heatmap of the expression values of 18 well-known transcription factors. Values expressed in Z-score. Yellow means higher and blue means lower expression. These genes are also identified as DEGs in the tissues. C. eFP browser views of expression profiles for FILAMENTOUS FLOWER (FIL), a DEG of the lateral domain of the gynoecium, and SPATULA (SPT), a DEG of the medial domain of the gynoecium; these views exemplify the visualization of our data available in the Arabidopsis eFP Browser [27]. Red means high expression, and yellow means low expression. Modified from Luna-García et al. [19] (from Supplementary Figure S2 and Figure 4) with permission.
General notes and troubleshooting
General notes
Work RNase-free during all wet lab experiments. In our experiments, we use gloves; before starting work, we clean the table, pipettes, and centrifuge with ethanol, use sterilized pipette tips, lab coat, and general hygiene. Furthermore, during RNA extraction, use ice to keep samples cold. The aim is to isolate RNA to analyze the transcriptome of the tissue of interest.
Obtain previous experience with the microtome and all histological steps.
Obtain previous experience with the LAM microscope.
Consider that a LAM protocol is time-consuming.
The software manual can be downloaded for more detailed information on its use (PALM RoboSoftware 4.5 Quick Guide).
This protocol should also be applicable to other species. Verify if tissue fixation time should be increased or decreased because this is species-specific. Thicker tissue requires increased fixation time.
Troubleshooting
Problem 1: During paraffine block sectioning with the microtome, the tissue falls out.
Possible cause: Tissue is not well fixed.
Solution: Collect new tissue for fixation and prepare new paraffin blocks.
Problem 2: RNA extraction results in no or low RNA quantity.
Possible cause(s): RNA is degraded during slide preparation or problem during RNA extraction.
Solution(s): Work free of RNase during the complete protocol and divide the protocol into steps to find out where the problem of RNA degradation is.
Problem 3: Laser-assisted cutting or catapulting is not working well.
Possible cause(s): Incorrect settings in the PALM software (e.g., focus, energy, and speed).
Solution: Adjust settings in the PALM software.
Problem 4: Data analysis does not show reproducibility (e.g., in the PCA).
Possible cause(s): Different plant/tissue stages used, or lack of tissue-specificity collection during LAM.
Solution(s): Here, the possibilities may be limited. Depending on what is observed, a possible solution could be to not consider one replicate, or in the worst scenario, it probably means that you have to repeat the LAM and RNA-seq experiments.
Acknowledgments
V.L.G. was supported by the Consejo Nacional de Humanidades, Ciencias y Tecnologías (CONAHCYT, Mexico) with a PhD fellowship (487657). S.d.F. acknowledges UGA-Langebio intramural funds for the acquisition of the PALM microscope. The work in the S.d.F. laboratory was financed by the CONAHCYT grants CB-2012-177739, FC-2015-2/1061 and CB-2017-2018-A1-S-10126. S.d.F. is grateful for the participation in the European Union project H2020-MSCA-RISE-2020 EVOfruland (101007738). The protocol is modified from Chávez Montes et al. [10] and used in Luna-García et al. [19].
Competing interests
The authors declare no competing interests.
References
- Schnable, P. S., Hochholdinger, F. and Nakazono, M. (2004). Global expression profiling applied to plant development.Curr Opin Plant Biol. 7(1): 50–56.
- Taylor-Teeples, M., Ron, M. and Brady, S. M. (2011). Novel biological insights revealed from cell type-specific expression profiling. Curr Opin Plant Biol. 14(5): 601–607.
- Belmonte, M. F., Kirkbride, R. C., Stone, S. L., Pelletier, J. M., Bui, A. Q., Yeung, E. C., Hashimoto, M., Fei, J., Harada, C. M., Munoz, M. D., et al. (2013). Comprehensive developmental profiles of gene activity in regions and subregions of the Arabidopsis seed. Proc Natl Acad Sci USA. 110(5): E435–E444.
- Wuest, S. E., Schmid, M. W. and Grossniklaus, U. (2013). Cell-specific expression profiling of rare cell types as exemplified by its impact on our understanding of female gametophyte development.Curr Opin Plant Biol. 16(1): 41–49.
- Efroni, I. and Birnbaum, K. D. (2016). The potential of single-cell profiling in plants. Genome Biol. 17(1): 65.
- Kerk, N. M., Ceserani, T., Tausta, S. L., Sussex, I. M. and Nelson, T. M. (2003). Laser Capture Microdissection of Cells from Plant Tissues. Plant Physiol. 132(1): 27–35.
- Day, R. C., Grossniklaus, U. and Macknight, R. C. (2005). Be more specific! Laser-assisted microdissection of plant cells.Trends Plant Sci. 10(8): 397–406.
- Nelson, T., Tausta, S. L., Gandotra, N. and Liu, T. (2006). LASER MICRODISSECTION OF PLANT TISSUE: What You See Is What You Get. Annu Rev Plant Biol. 57(1): 181–201.
- Wuest, S. E. and Grossniklaus, U. (2014). Laser-assisted microdissection applied to floral tissues. In: Riechmann, J., Wellmer, F. (Eds.). Flower Development. Methods in Molecular Biology, vol 1110. Humana Press, New York, NY.
- Chávez Montes, R. A., Serwatowska, J. and de Folter, S. (2016). Laser-Assisted Microdissection to Study Global Transcriptional Changes During Plant Embryogenesis.In: Loyola-Vargas, V. and Ochoa-Alejo, N. (Eds.). Somatic Embryogenesis: Fundamental Aspects and Applications: 495–506.
- Florez Rueda, A. M., Grossniklaus, U. and Schmidt, A. (2016). Laser-assisted Microdissection (LAM) as a Tool for Transcriptional Profiling of Individual Cell Types. J Visualized Exp. doi.org/10.3791/53916.
- Matas, A. J., Yeats, T. H., Buda, G. J., Zheng, Y., Chatterjee, S., Tohge, T., Ponnala, L., Adato, A., Aharoni, A., Stark, R., et al. (2011). Tissue- and Cell-Type Specific Transcriptome Profiling of Expanding Tomato Fruit Provides Insights into Metabolic and Regulatory Specialization and Cuticle Formation. Plant Cell. 23(11): 3893–3910.
- Pattison, R. J., Csukasi, F., Zheng, Y., Fei, Z., van der Knaap, E. and Catalá, C. (2015). Comprehensive Tissue-Specific Transcriptome Analysis Reveals Distinct Regulatory Programs during Early Tomato Fruit Development. Plant Physiol. 168(4): 1684–1701.
- Harrop, T. W. R., Ud Din, I., Gregis, V., Osnato, M., Jouannic, S., Adam, H. and Kater, M. M. (2016). Gene expression profiling of reproductive meristem types in early rice inflorescences by laser microdissection. Plant J. 86(1): 75–88.
- Kivivirta, K., Herbert, D., Lange, M., Beuerlein, K., Altmüller, J. and Becker, A. (2019). A protocol for laser microdissection (LMD) followed by transcriptome analysis of plant reproductive tissue in phylogenetically distant angiosperms. Plant Methods. 15(1): 151.
- Brooks, L., Strable, J., Zhang, X., Ohtsu, K., Zhou, R., Sarkar, A., Hargreaves, S., Elshire, R. J., Eudy, D., Pawlowska, T., et al. (2009). Microdissection of Shoot Meristem Functional Domains. PLos Genet. 5(5): e1000476.
- Mantegazza, O., Gregis, V., Chiara, M., Selva, C., Leo, G., Horner, D. S. and Kater, M. M. (2014). Gene coexpression patterns during early development of the native Arabidopsis reproductive meristem: novel candidate developmental regulators and patterns of functional redundancy.Plant J. 79(5): 861–877.
- Kivivirta, K. I., Herbert, D., Roessner, C., de Folter, S., Marsch-Martinez, N. and Becker, A. (2020). Transcriptome analysis of gynoecium morphogenesis uncovers the chronology of gene regulatory network activity. Plant Physiol. 185(3): 1076–1090.
- Luna-García, V., Bernal Gallardo, J. J., Rethoret-Pasty, M., Pasha, A., Provart, N. J. and de Folter, S. (2024). A high-resolution gene expression map of the medial and lateral domains of the gynoecium of Arabidopsis. Plant Physiol. 195(1): 410–429.
- Andrews, S. (2010). FastQC - A quality control tool for high throughput sequence data. Babraham Bioinformatics.
- Bolger, A. M., Lohse, M. and Usadel, B. (2014). Trimmomatic: a flexible trimmer for Illumina sequence data.Bioinformatics 30(15): 2114–2120.
- Martin, M. (2011). Cutadapt removes adapter sequences from high-throughput sequencing reads. EMBnet J. 17(1): 10–12.
- Bray, N. L., Pimentel, H., Melsted, P. and Pachter, L. (2016). Near-optimal probabilistic RNA-seq quantification. Nat Biotechnol.34(5): 525–527.
- Soneson, C., Love, M. I. and Robinson, M. D. (2015). Differential analyses for RNA-seq: transcript-level estimates improve gene-level inferences. F1000Research. 4: 1521.
- Robinson, M. D., McCarthy, D. J. and Smyth, G. K. (2009). edgeR: a Bioconductor package for differential expression analysis of digital gene expression data. Bioinformatics 26(1): 139–140.
- Chen, Y., Lun, A. T. L. and Smyth, G. K. (2016). From reads to genes to pathways: differential expression analysis of RNA-Seq experiments using Rsubread and the edgeR quasi-likelihood pipeline. F1000Research. 5: 1438.
- Winter, D., Vinegar, B., Nahal, H., Ammar, R., Wilson, G. V. and Provart, N. J. (2007). An “Electronic Fluorescent Pictograph” Browser for Exploring and Analyzing Large-Scale Biological Data Sets. PLoS One. 2(8): e718.
Article Information
Publication history
Received: May 9, 2024
Accepted: Jul 22, 2024
Available online: Aug 2, 2024
Published: Sep 5, 2024
Copyright
© 2024 The Author(s); This is an open access article under the CC BY-NC license (https://creativecommons.org/licenses/by-nc/4.0/).
How to cite
Readers should cite both the Bio-protocol article and the original research article where this protocol was used:
- Luna-García, V. and de Folter, S. (2024). Laser-Assisted Microdissection and High-Throughput RNA Sequencing of the Arabidopsis Gynoecium Medial and Lateral Domains. Bio-protocol 14(17): e5056. DOI: 10.21769/BioProtoc.5056.
- Luna-García, V., Bernal Gallardo, J. J., Rethoret-Pasty, M., Pasha, A., Provart, N. J. and de Folter, S. (2024). A high-resolution gene expression map of the medial and lateral domains of the gynoecium of Arabidopsis. Plant Physiol. 195(1): 410–429.
Category
Plant Science > Plant molecular biology > RNA > Transcription
Molecular Biology > RNA > Transcription
Do you have any questions about this protocol?
Post your question to gather feedback from the community. We will also invite the authors of this article to respond.