- Protocols

- Articles and Issues
- For Authors
- About
- Become a Reviewer

Live Imaging of the Shoot Apical Meristem of Intact, Soil-Grown, Flowering Arabidopsis Plants
Published: Vol 14, Iss 12, Jun 20, 2024 DOI: 10.21769/BioProtoc.5015 Views: 2286
Reviewed by: Sarah C. PlechaJohn P PhelanAnonymous reviewer(s)
Advertisement


Protocol Collections
Comprehensive collections of detailed, peer-reviewed protocols focusing on specific topics


Related protocols
Abstract
All aerial organs in plants originate from the shoot apical meristem, a specialized tissue at the tip of a plant, enclosing a few stem cells. Understanding developmental dynamics within this tissue in relation to internal and external stimuli is of crucial importance. Imaging the meristem at the cellular level beyond very early stages requires the apex to be detached from the plant body, a procedure that does not allow studies in living, intact plants over longer periods. This protocol describes a new confocal microscopy method with the potential to image the shoot apical meristem of an intact, soil-grown, flowering Arabidopsis plant over several days. The setup opens new avenues to study apical stem cells, their interconnection with the whole plant, and their responses to environmental stimuli.
Key features
• Novel dissection and imaging method of the shoot apical meristem of Arabidopsis.
• Procedure performed with intact, soil-grown, flowering plants.
• Possibility of long-term live imaging of the shoot apical meristem.
• Protocol can be adapted to different plant species.
Keywords: Shoot apical meristemBackground
In plants, above-ground organs are continuously generated from stem cells in the shoot apical meristem (SAM). This process is best described in the dicot plant Arabidopsis thaliana (reviewed in Fuchs and Lohmann [1]; Holt et al. [2]; Hong and Fletcher [3]; Janocha and Lohmann [4]). The initial vegetative SAM produces only leaves but changes into a reproductive SAM after transition to flowering. A subset of cells within the SAM will eventually lead to the formation of gametes. Mature flowers and siliques are formed after bolting when the main stem emerges from the basal rosette and the SAM changes into an inflorescence meristem (IM). Following the fate of stem cells during these important transitions of the meristem is therefore of utmost importance to understand this developmental program.
Different approaches have delivered detailed information about meristem development [5–7]. However, most techniques require dissection, staining, or cell separation and are not compatible with the observation of dynamic processes. Live imaging of the SAM has overcome this limitation to some extent but is usually performed by detaching the shoot tip of a bolting plant, placing it in a microscopy-suited vessel filled with growth medium and submerging it in water, followed by removing flowers and buds before microscopy observation [8–11].
In an alternative setup, Grandjean et al. [12] recorded SAM development in intact plants using an inverted microscope, with the drawback of working against gravity. This was later overcome by Heisler et al. [13] and Tobin and Meyerowitz [14]. These authors proposed observing the SAM under physiological conditions, after removing surrounding flower buds from a plant prior to bolting without separating it from the plant body, keeping it completely underwater. However, this limited the observations to an early stage, and the complete submergence of the plant can cause hypoxia and corresponding side effects on the development [15]. These side effects could be reduced by placing only a water drop between the plant tip and the front lens of a water immersion objective [14], however, at the price of low stability and restricted time for the acquisition.
The protocol described here provides an innovative method to observe the SAM of bolting Arabidopsis plants without detaching it from the stem. An “easy-to-built” custom-made device allows the preparation of the main inflorescence of a soil-grown plant for subsequent observation with an upright confocal microscope. This system limits submergence to the very top and permits precise positioning of the exposed SAM in all dimensions. In addition, the observation of the living SAM can be extended over several days, while the plant grows in regular substrate, light, and oxygen supply. The setup allows further control and variation of environmental conditions like drought, salinity, light stress, hormone or drug application, and pathogen infections. The procedure can likely be modified to also study meristem development in species with similar size and growth architecture as Arabidopsis.
Materials and reagents
Biological material
Plants (Arabidopsis thaliana) in a suitable stage of inflorescence meristem development, e.g., three weeks grown at 8:16 h light/dark cycles followed by two weeks at 16:8 h light/dark cycles (short- and long-day regimes, respectively) at 21 °C with 60% relative humidity and 150 µmol m-2·s-1 light intensity), grown in soil in round 5 cm diameter pots
For proof of concept used in this protocol: a transgenic Arabidopsis plant carrying a stem cell–specific nuclear marker (ProCLV3:H2B-mCherry, Gutzat et al. [16]) in addition to the ubiquitously expressed nuclear marker ProHTR5:H2A-mNeonGreen (unpublished construct, assembled with modules described in Donà et al. [17])
Reagents
Low melting agarose (LMA) (Roth, catalog number: 6351)
Distilled water
Solutions
1.5% LMA in water. Aliquots can be stored in Eppendorf tubes at 4 °C
Laboratory Supplies
Sterilin Petri dishes 50 mm (Thermo Fisher Scientific, catalog number: 124-17)
FEP tubing (inner diameter 2.8 mm, outer diameter 3.2 mm, Wolf-Technik)
Sample tubes 0.6 mL, microcentrifuge tubes low retention (Thermo Fisher Scientific, catalog number: 3446) for LMA aliquots
Glass capillary Transferpettor, caps cert. 100 µL (Brand, catalog number: 701910)
Piston rod Transferpettor (Brand, catalog number: 701938)
Patafix glue pads (Uhu, catalog number: 64797)
Round plant pots with 5 cm diameter (e.g., singularized from trays, HerkuPlast HP D 60/5.5 R)
Standard soil (e.g., Profi Substrat, Gramoflor)
Equipment
Dissection desk (table with opening on the top, with appropriate height range for the lifting station (width 58 cm, depth 40 cm, height 38 cm; hole diameter 11 cm)
Stereomicroscope with opening on the stage (Leica MZ6)
Lifting station (e.g., Swiss Boy Lab jack)
Petri dish prepared with a central opening into which a 1.5 cm plastic tube is fixed (prepared in a workshop by drilling a central opening and gluing the plastic tube, e.g., with AL-FIX Füllstoff Noviqua glue)
Adjustable stem holder fitting the opening of the stereomicroscope stage and the modified Petri dish with a central tube [prepared in a workshop from laminated wood (light blue), plastic material (black disc), metal parts, and a screw for movement]
Thermoblock (Eppendorf Themomixer comfort) matching LMA sample tubes
Fine forceps (Ideal-tek 3C.SA or Dumont No. 5)
Needles (Sterican Gr.1: 0.90 mm × 40 mm, yellow)
Syringes (Tuberculin Luer. Chirana 1 mL CHTUB01) with attached plastic tube or pipette
Upright confocal microscope without condenser (Zeiss LSM700 Axio Imager 2)
Water dipping lenses (Zeiss W N-Achroplan 40×/0.75)
Plexiglass microscope stage insert with central opening (prepared in a workshop by drilling a central opening; width 15 cm, depth, 15 cm, height 0.5 cm; hole diameter 3 cm)
LED light illumination (Model TXD-6, GRENEBO)
Plant growth chamber (e.g., Photon System Instruments)
Software and datasets
Microscope software: ZEN 2010 Version 6.0
Visualization software: Imaris 10
Procedure
Preparation of the meristem under the stereomicroscope
Melt an LMA aliquot at 80 °C in the thermoblock, then keep it at 37 °C and use the aliquot within 1 h.
Place the stereomicroscope onto the dissection desk (Figure 1A, B).
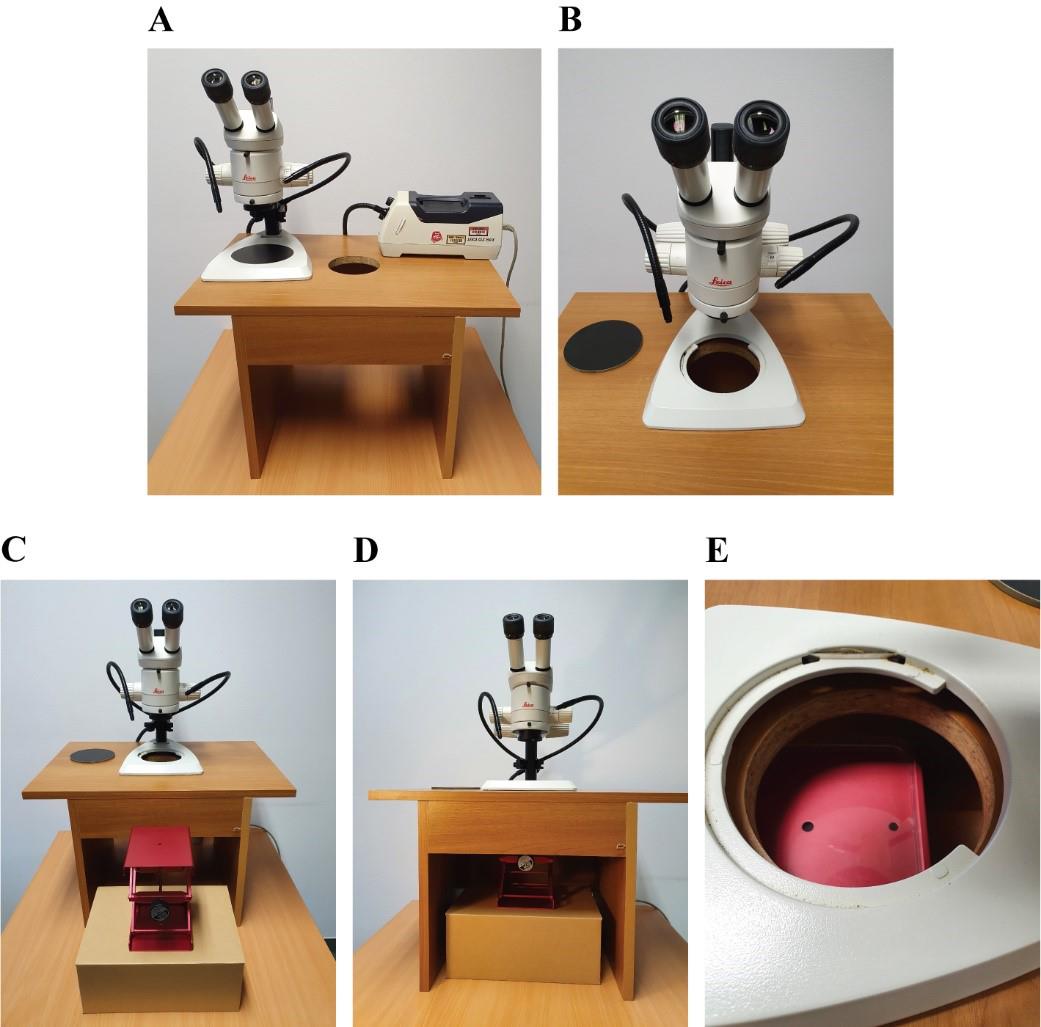
Figure 1. Setting up the dissection desk. A. Dissection desk with stereomicroscope on top. B. Stereomicroscope stage without lid on top of the dissection desk opening. C, D. Positioning of the lifting station under the dissection desk. E. Alignment of microscope stage opening, dissection desk opening, and lifting station.Place the lifting station under the dissection desk (Figure 1C–1E).
Remove siliques, flowers, and big flower buds from the main shoot of a plant with fine forceps (Figure 2A–2C).
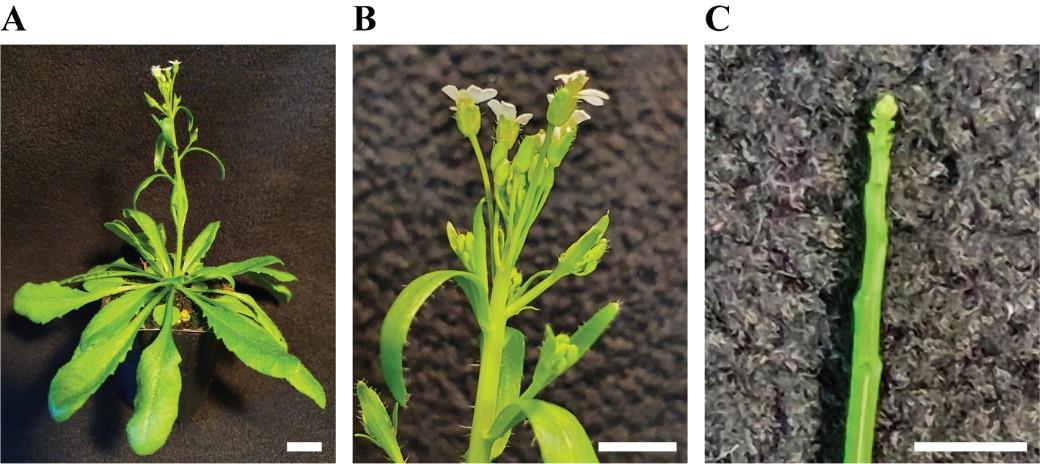
Figure 2. Manual dissection of the shoot apical meristem (SAM). A. Soil-grown, flowering Arabidopsis plant. B. Close-up of the shoot tip. C. Dissected apical stem. Scale bar = 4 mm.Place the plant pot onto the lifting station and adjust the height so that the plant tip comes out (approximately 1 cm) from the base of the stereomicroscope (Figure 3C, D).
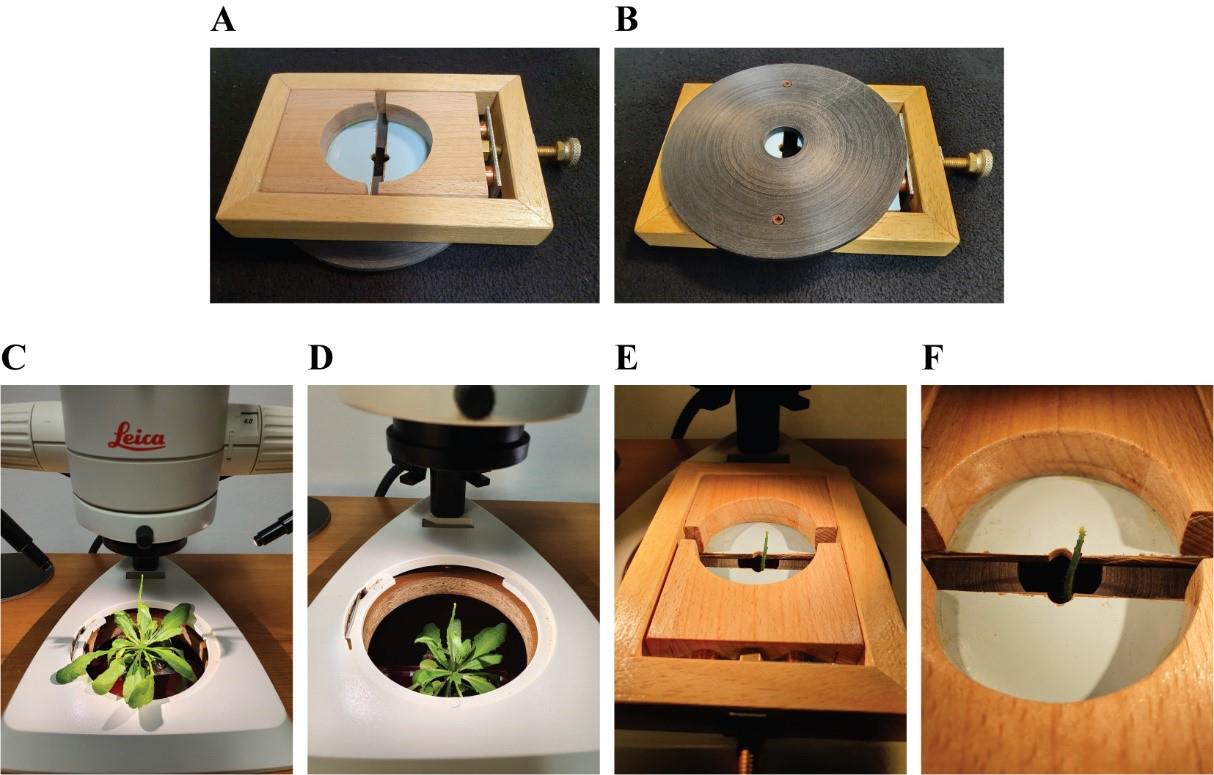
Figure 3. Positioning of the dissected plant and adjustable stem holder onto the dissection desk. A. Top view of the adjustable stem holder. B. Bottom view of the adjustable stem holder. C. Positioning of the dissected plant onto the lifting station. D. Lowering of the lifting station. E. Positioning of the adjustable stem holder onto the stereomicroscope stage. F. Close-up of the adjustable stem holder with the plant apex visible in the center.Open the adjustable stem holder to approximately 1 cm and insert it into the dissection desk opening of the stereomicroscope base so that the plant tip can go through it (Video 1; Figure 3A, B, E, F; Figure S1).
 Video 1. Adjusting the stem holder.This video shows how to operate the adjustable stem holder to stabilize the Petri dish before fine dissection of the shoot tip.
Insert a plunger into a glass capillary and then insert this capillary into the plastic tube of the modified Petri dish. Place the lower end of the plunger between the endpoints of the capillary and the plastic tube (Figure 4A, B; Video 2).

Figure 4. Fine dissection of the shoot apical meristem (SAM). A. Modified Petri dish with a tube connected at its center, plunger, and glass capillary. B. Plunger inserted into the capillary, further connected to the tube of the modified Petri dish. C. Removal of capillary and plunger after filling the tube with LMA. D. Syringe with needle for fine dissection of the apical meristem. E. Exposed SAM as seen from the stereomicroscope. The meristem dome is indicated by the black arrow. Scale bar = 100 µm. F. Disassembly of all the tools and plant release from the dissection desk. Video 2. Assembly of the modified Petri dish.This video shows how to assemble the plunger and capillary and how to connect them to the modified Petri dish. The plunger is inserted into the capillary, which is then inserted into the tube of the modified Petri dish.By moving the plunger upwards, fill the plastic tube with LMA (approximately 90 µL) from the Eppendorf tube, then remove the capillary and plunger simultaneously (Video 3; Figure 4C).
Video 3. Preparation of the modified Petri dish with LMA.This video shows how to fill the tube of the modified Petri dish with LMA by moving the plunger upwards.Immediately after removing the capillary and plunger and as long as the agarose plug is liquid, gently push the tip of the plant through the agarose to expose the apex in the air. If necessary, use forceps to perform this procedure (Video 4).
Video 4. Positioning of the modified Petri dish with LMA on the plant tip.This video shows how to handle the Petri dish filled with LMA and how to position it on the plant tip in the adjustable stem holder.Wait 5 min until the agarose is solidified.
Stabilize the Petri dish on the dissection desk by tightening the screw on the stem holder (Video 5).
Video 5. Securing the Petri dish on the adjustable stem holder.This video shows how to stabilize the Petri dish on the adjustable stem holder by rotating the outer screw.Fill the Petri dish with distilled water to cover the meristem (approximately 20 mL) (Video 6).
Video 6. Filling the Petri dish with water.This video shows how to fill the Petri dish with water once the LMA is solidified.Expose the meristem optimally under the stereomicroscope using needle and forceps. Stabilize the stem with forceps and use the needle to detach the flower buds from the inflorescence. Start by removing larger flower buds and then dissect the smaller ones, making sure to excise them at their connection with the main stem (Figure 4D, E).
Remove the water from the Petri dish with a tube connected to a syringe or with a pipette.
Release the Petri dish from the dissection desk insert and remove it from the plant stem (Figure 4F).
Remove residual agarose from the stem with forceps.
Imaging of the meristem under the confocal microscope
Remove the condenser from an upright confocal microscope (Figure 5A, B)
Insert the plant into the condenser holder (Figure 5C–5E).
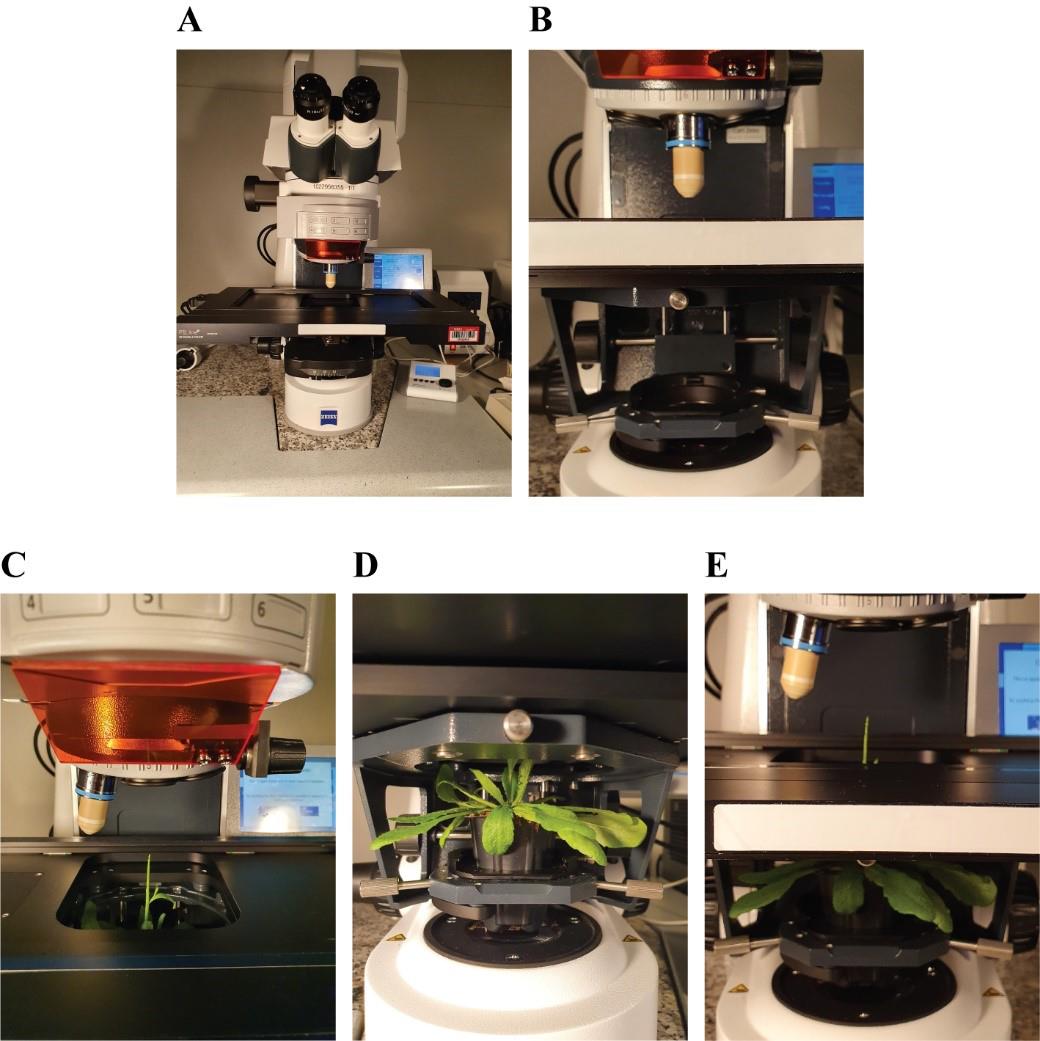
Figure 5. Positioning of the prepared plant under the microscope. A. Upright confocal microscope. B. Removal of the condenser. C, D, F. Positioning of the plant pot onto the condenser holder (top, bottom, and front view).Place the plexiglass insert onto the microscope stage and, by rotating the condenser knobs, bring the plant up so that the tip goes through the opening in the plexiglass insert (Figure 6A).
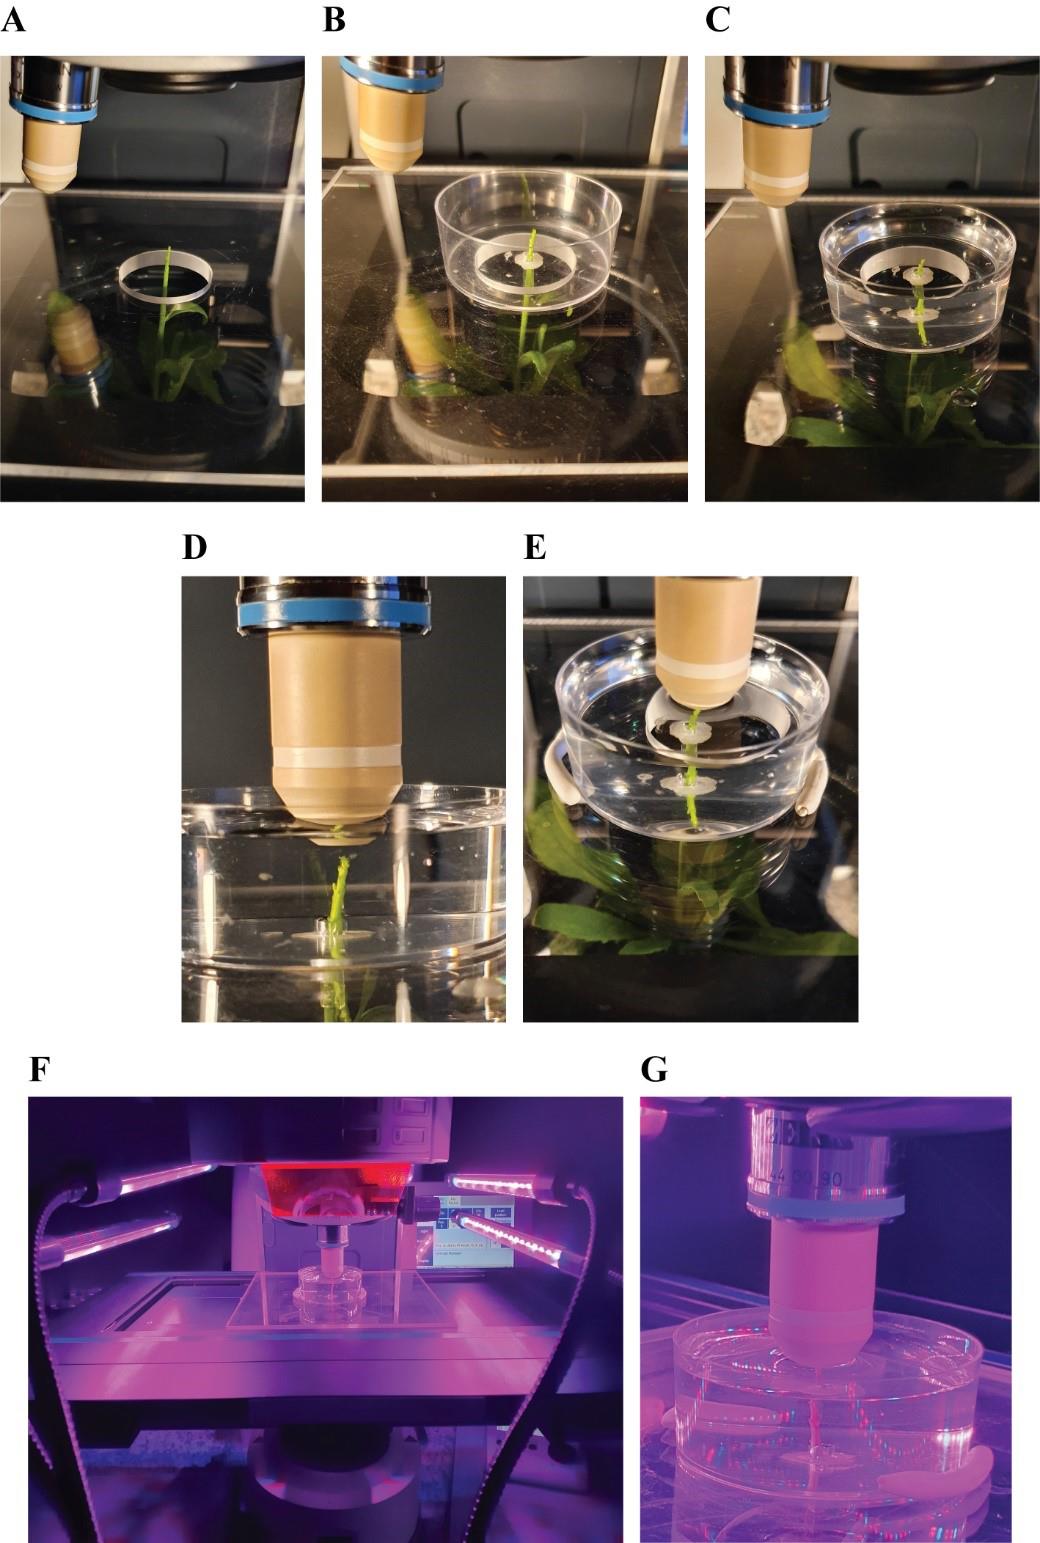
Figure 6. Plant preparation for imaging. A. Positioning of transparent plexiglass insert with central opening onto the microscope stage. B. Plant tip exposed in the Petri dish with the stem stabilized by solidified LMA C. Petri dish filled with water. D. Positioning of water immersion lenses on top of the plant tip. E. Petri dish stabilization with patafix at opposite sides. F. Illumination of the plant with LED. G. Close-up of meristem tip under LED illumination.Repeat steps A7–A10 as described above, this time on the microscope stage (Figure 6B).
Fill the Petri dish with distilled water (Figure 6C).
Align the plant tip with the objective (Figure 6D).
Stabilize the Petri dish on the plexiglass insert with small pieces of patafix at opposite sides (Figure 6E).
Acquire 3D acquisitions (Figure 7A, B) with water dipping lenses.
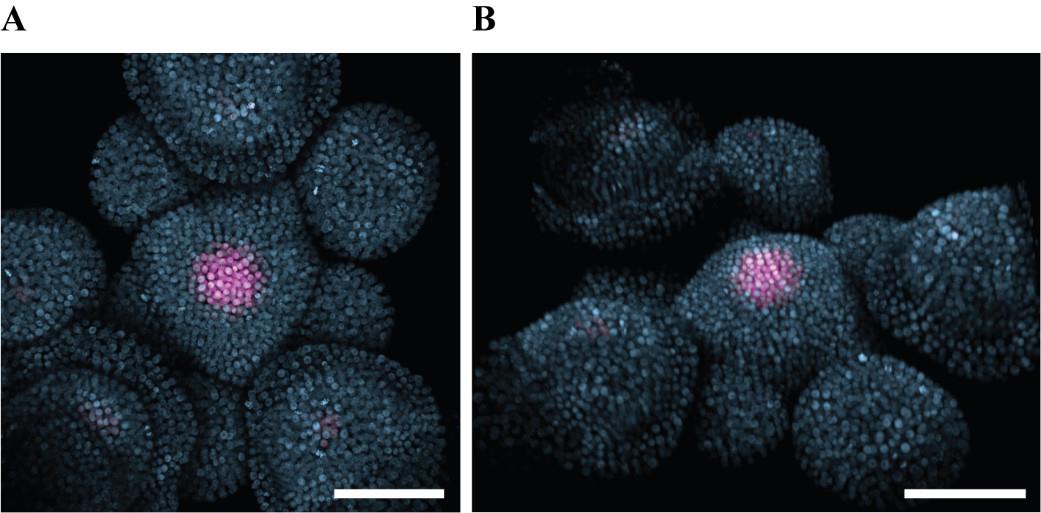
Figure 7. Confocal acquisition of an Arabidopsis shoot apical meristem (SAM). A. Maximum intensity projection of confocal image stacks viewed from the top. B. 3D rendering of the same stack. Two imaging tracks were used with 488 nm and 555 nm excitation lasers for mNeonGreen and mCherry, respectively. Z-stack of 1.12 µm step for a total of 97 slices. Magenta: stem cell nuclei (ProCLV3:H2B-mCherry). Light blue: ubiquitous nuclear marker (ProHTR5:H2A-mNeonGreen). Scale bar = 50 µm.
Validation of protocol
This protocol is validated by the figures and movies provided to show the functionality of the experimental setup. The images acquired by confocal acquisition of the dissected meristem, as presented in Figure 7, show that the plant apex with an intact SAM can be prepared in the described way and allow anybody to reproduce it step-by-step for studies of the dynamic processes in this organ.
General notes and troubleshooting
The adjustable stem holder does not necessarily need to be manufactured as presented in the equipment section (Figure 3A, B; Video 1; Figure S1). A simpler device keeping the Petri dish stable is sufficient.
The ideal length of the plant stem depends on plant growth conditions, the dimensions of the pot, and the space of the condenser holder. In the setup presented here, the plant stem has to be at least 3.5 cm long.
Aliquots are best stored in 0.6 mL tubes; refer to the laboratory supply section.
LMA in the tube of the modified Petri dish takes approximately 4 min to solidify at room temperature. If the agarose solidifies before the stem has gone through, it can be removed from the tube with the plunger.
Exposure to the air of the dissected meristem (between steps A4 and A11, and between steps A14 and B4) should be minimized. Once the step is completed, move directly to the next one.
Optional for long-term studies: place LED lights above the stage, on the side of the revolving nosepiece (Figure 6F, G).
XYZ drift correction tools (e.g., Huygens Object Stabilizer) might be applied to the 3D acquisition to correct minor plant movements occurring during acquisition.
Acknowledgments
The author is grateful to Ortrun Mittelsten Scheid for assistance and comments on the manuscript. He also appreciates the excellent support from Pawel Pasierbek and Alberto Moreno Cencerrado (BioOptics Core Facility). Many thanks go also to Martin Colombini from VBC workshop and Roberto Bradamante for manufacturing the necessary equipment.
Competing interests
The author declares not to have any conflict of interest.
References
- Fuchs, M. and Lohmann, J. U. (2020). Aiming for the top: non-cell autonomous control of shoot stem cells in Arabidopsis. J Plant Res. 133(3): 297–309.
- Holt, A. L., van Haperen, J. M., Groot, E. P. and Laux, T. (2014). Signaling in shoot and flower meristems of Arabidopsis thaliana. Curr Opin Plant Biol. 17: 96–102.
- Hong, L. and Fletcher, J. C. (2023). Stem Cells: Engines of Plant Growth and Development. Int J Mol Sci. 24(19): 14889.
- Janocha, D. and Lohmann, J. U. (2018). From signals to stem cells and back again. Curr Opin Plant Biol. 45: 136–142.
- Caggiano, M. P., Yu, X., Bhatia, N., Larsson, A., Ram, H., Ohno, C. K., Sappl, P., Meyerowitz, E. M., Jönsson, H., Heisler, M. G., et al. (2017). Cell type boundaries organize plant development. eLife. 6: e27421.
- Formosa-Jordan, P. and Landrein, B. (2023). Quantifying Gene Expression Domains in Plant Shoot Apical Meristems. Methods Mol Biol.: 537–551.
- Schlegel, J., Denay, G., Wink, R., Pinto, K. G., Stahl, Y., Schmid, J., Blümke, P. and Simon, R. G. (2021). Control of Arabidopsis shoot stem cell homeostasis by two antagonistic CLE peptide signalling pathways. eLife. 10: e70934.
- Du, F., Zhao, F., Traas, J. and Jiao, Y. (2021). Visualization of cortical microtubule networks in plant cells by live imaging and immunostaining. STAR Protoc. 2(1): 100301.
- Geng, Y. and Zhou, Y. (2019). Confocal Live Imaging of Shoot Apical Meristems from Different Plant Species. J Vis Exp. (145). doi:10.3791/59369.
- Liu, M., Yadav, R. K., Roy-Chowdhury, A. and Reddy, G. V. (2009). Automated tracking of stem cell lineages of Arabidopsis shoot apex using local graph matching. Plant J. 62(1): 135–147.
- Peng, Z., Jiao, Y. and Wang, Y. (2023). Live imaging of Arabidopsis shoot primordia via a confocal laser scanning microscope. STAR Protoc. 4(2): 102217.
- Grandjean, O., Vernoux, T., Laufs, P., Belcram, K., Mizukami, Y. and Traas, J. (2004). In Vivo Analysis of Cell Division, Cell Growth, and Differentiation at the Shoot Apical Meristem in Arabidopsis. Plant Cell. 16(1): 74–87.
- Heisler, M. G., Ohno, C., Das, P., Sieber, P., Reddy, G. V., Long, J. A. and Meyerowitz, E. M. (2005). Patterns of Auxin Transport and Gene Expression during Primordium Development Revealed by Live Imaging of the Arabidopsis Inflorescence Meristem. Curr Biol. 15(21): 1899–1911.
- Tobin, C. J. and Meyerowitz, E. M. (2016). Real-Time Lineage Analysis to Study Cell Division Orientation in the Arabidopsis Shoot Meristem. Methods Mol Biol. 1370: 147–167.
- Weits, D. A., van Dongen, J. T. and Licausi, F. (2020). Molecular oxygen as a signaling component in plant development. New Phytol. 229(1): 24–35.
- Gutzat, R., Rembart, K., Nussbaumer, T., Hofmann, F., Pisupati, R., Bradamante, G., Daubel, N., Gaidora, A., Lettner, N., Donà, M., et al. (2020). Arabidopsis shoot stem cells display dynamic transcription and DNA methylation patterns. EMBO J. 39(20): e103667.
- Donà, M., Bradamante, G., Bogojevic, Z., Gutzat, R., Streubel, S., Mosiolek, M., Dolan, L. and Scheid, O. M. (2023). A versatile CRISPR-based system for lineage tracing in living plants. Plant J. 115(5): 1169–1184.
Supplementary information
The following supporting information can be downloaded here:
- Figure S1. Schematics of the adjustable stem holder.
Article Information
Copyright
© 2024 The Author(s); This is an open access article under the CC BY-NC license (https://creativecommons.org/licenses/by-nc/4.0/).
How to cite
Bradamante, G. (2024). Live Imaging of the Shoot Apical Meristem of Intact, Soil-Grown, Flowering Arabidopsis Plants. Bio-protocol 14(12): e5015. DOI: 10.21769/BioProtoc.5015.
Category
Plant Science > Plant developmental biology > General
Cell Biology > Cell imaging > Live-cell imaging
Do you have any questions about this protocol?
Post your question to gather feedback from the community. We will also invite the authors of this article to respond.