- Protocols

- Articles and Issues
- For Authors
- About
- Become a Reviewer

Mesenteric Parametrial Fat Pad Surgery for in vivo Implantation of Hepatocytes in Nude Mice
(*contributed equally to this work) Published: Vol 14, Iss 2, Jan 20, 2024 DOI: 10.21769/BioProtoc.4925 Views: 2196
Reviewed by: Pilar Villacampa AlcubierreAras MattisWilliam C. W. Chen
Original research article
The authors used this protocol in:
Jul 2017
Advertisement


Protocol Collections
Comprehensive collections of detailed, peer-reviewed protocols focusing on specific topics


Related protocols
Abstract
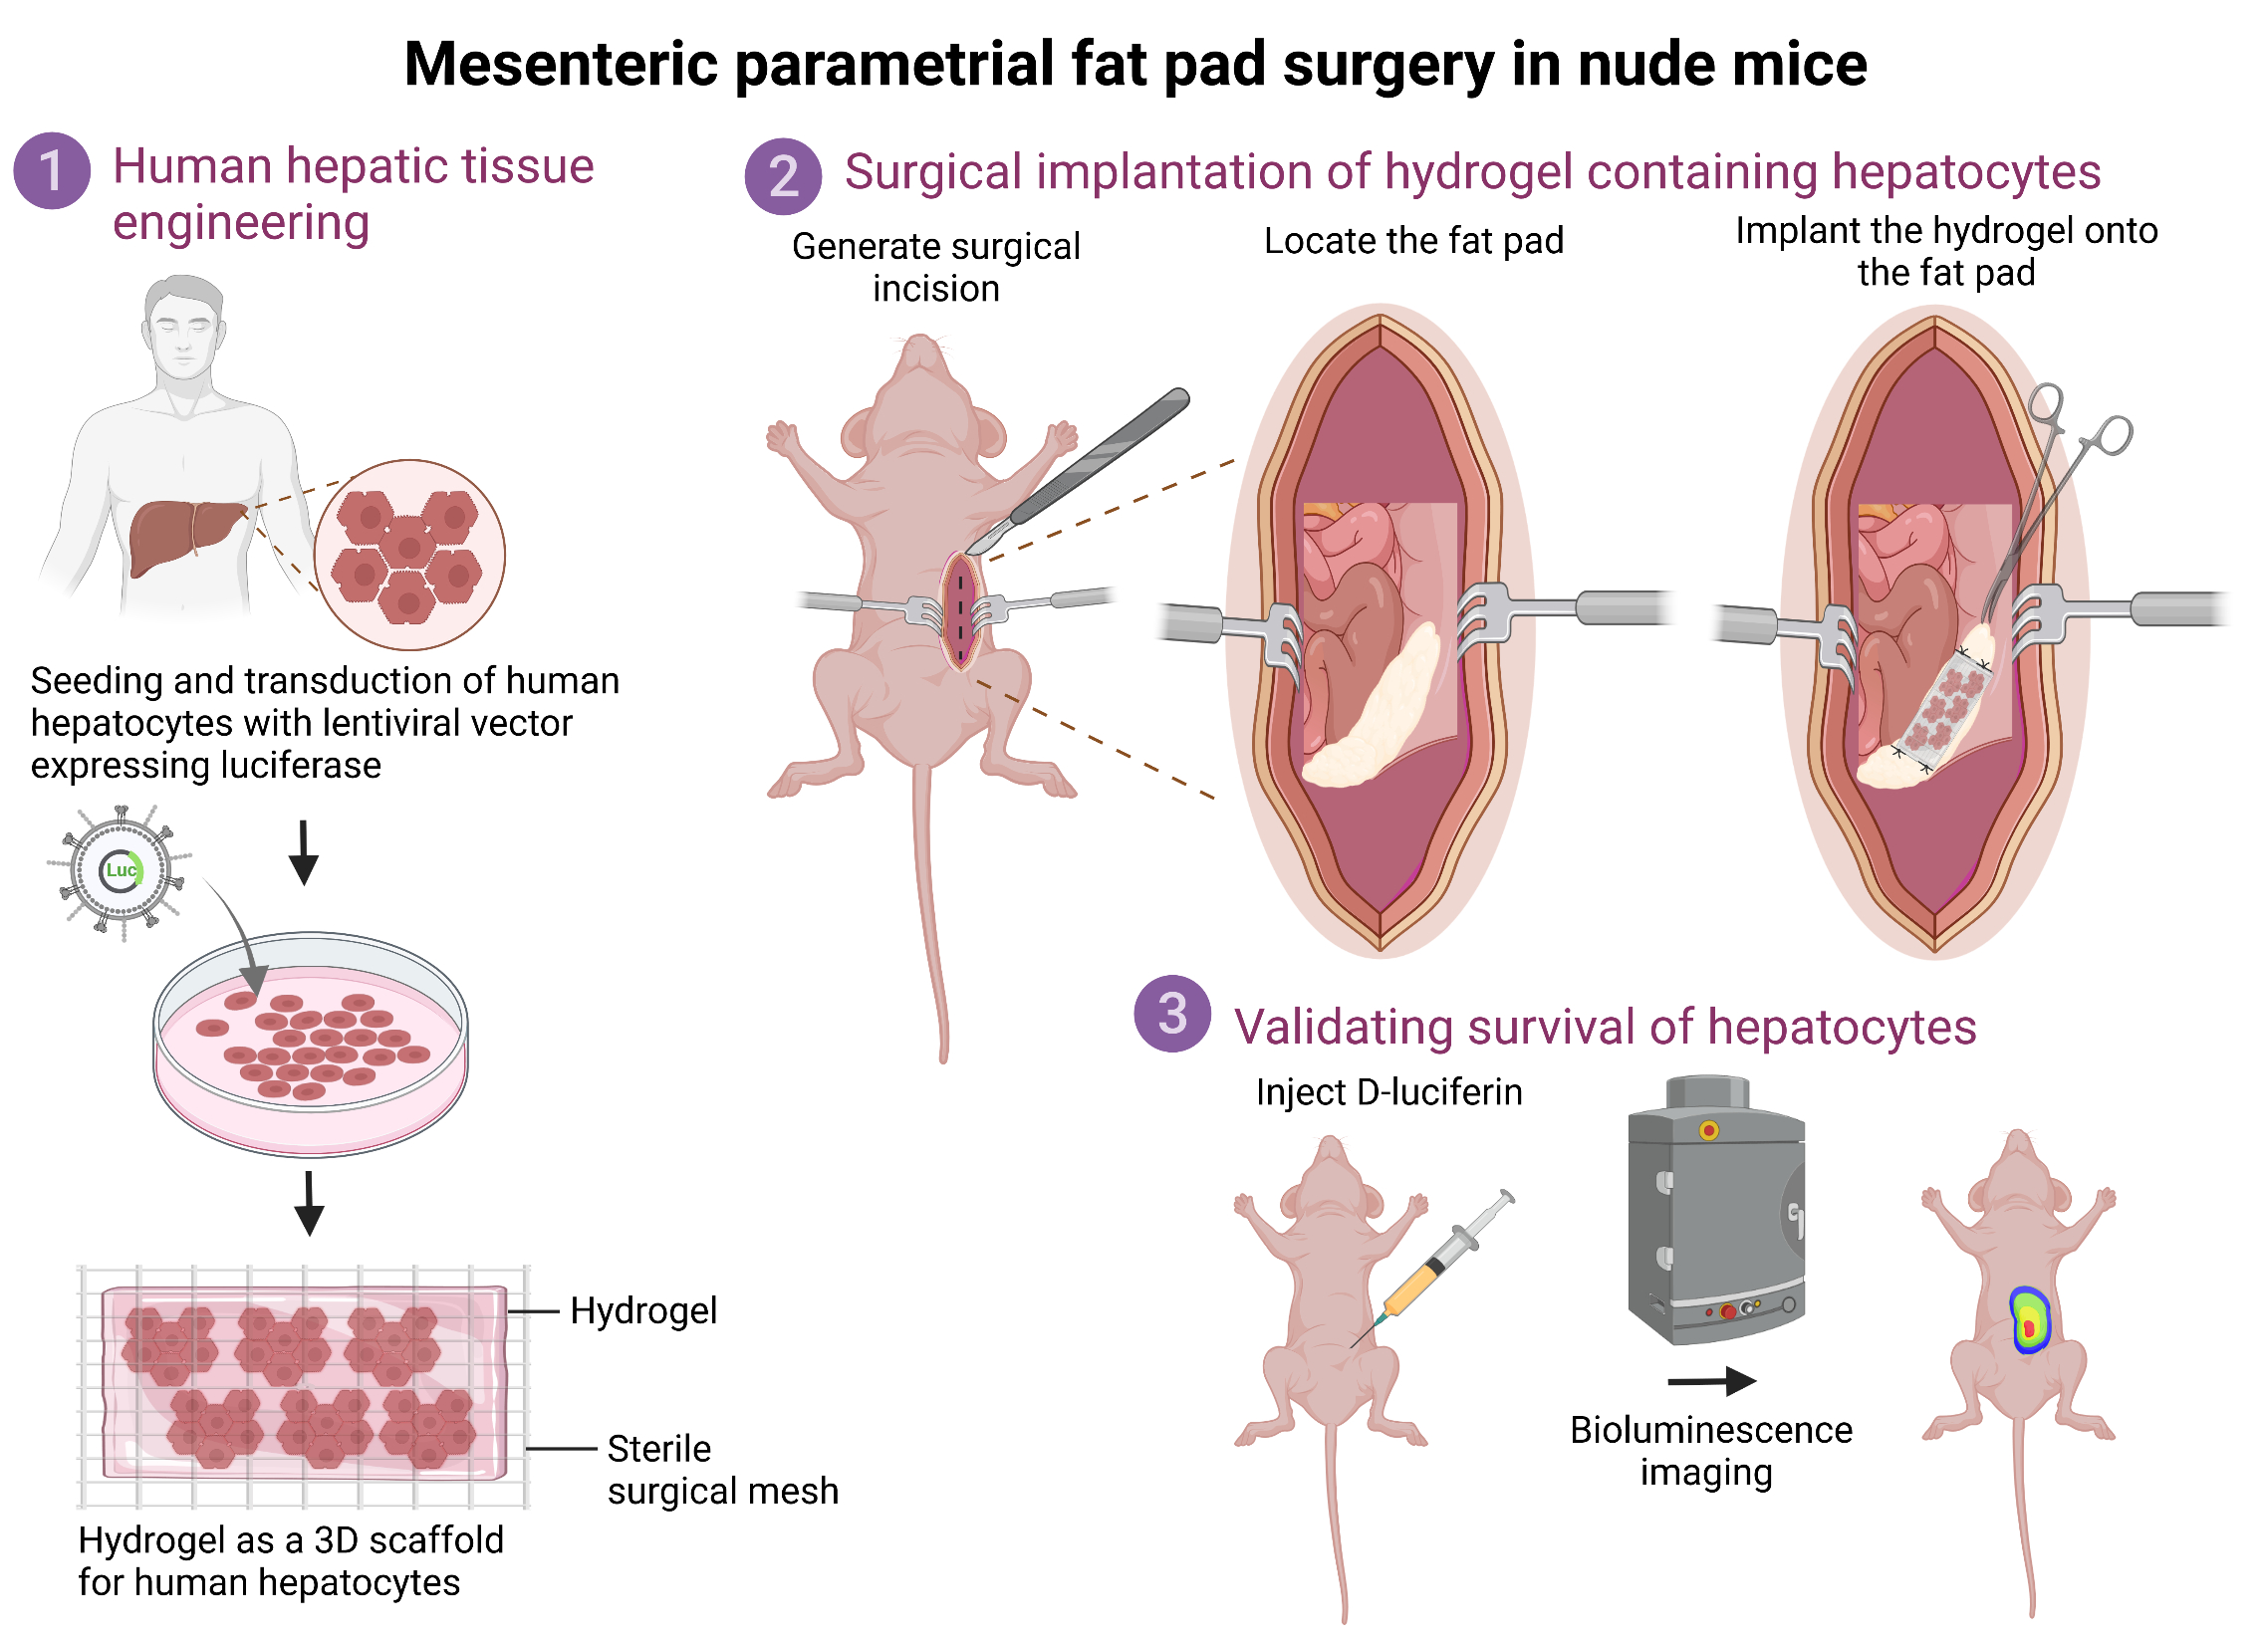
Cell-based liver therapies utilizing functionally stabilized engineered hepatic tissue hold promise in improving host liver functions and are emerging as a potential alternative to whole-organ transplantation. Owing to the ability to accommodate a large ex vivo engineered hepatocyte mass and dense vascularization, the mesenteric parametrial fat pad in female nude mice forms an ideal anatomic microenvironment for ectopic hepatocyte transplantation. However, the lack of any reported protocol detailing the presurgical preparation and construction of the engineered hepatic hydrogel, fat pad surgery, and postsurgical care and bioluminescence imaging to confirm in vivo hepatocyte implantation makes it challenging to reliably perform and test engraftment and integration with the host. In this report, we provide a step-by-step protocol for in vivo hepatocyte implantation, including preparation of hepatic tissue for implantation, the surgery process, and bioluminescence imaging to assess survival of functional hepatocytes. This will be a valuable protocol for researchers in the fields of tissue engineering, transplantation, and regenerative medicine.
Key features
• Primary human hepatocytes transduced ex vivo with a lentiviral vector carrying firefly luciferase are surgically implanted onto the fat pad.
• Bioluminescence helps monitor survival of transplanted hepatic tissue over time.
• Applicable for assessment of graft survival, graft-host integration, and liver regeneration.
Graphical overview
Background
The liver is the largest and an essential internal organ of the human body, as it performs a multitude of detoxification, metabolic, synthetic, and immunologic functions. Most importantly, the liver possesses a unique ability to spontaneously regenerate after being subjected to damaging insults or injuries. Owing to this regenerative potential, orthotopic liver transplantation offers a valuable treatment option for patients suffering from end-stage liver diseases [1]. However, this is the only curative treatment option and remains limited due to organ scarcity and to patients who are not at a very advanced age, do not have any significant comorbidities, and are able to undergo a surgical procedure. Additionally, financial challenges and the long-term immunosuppression required posttransplant often make liver transplantation a last resort. Given the current organ shortage and paucity of living donors, it is becoming increasingly challenging to tackle the burden of liver diseases such as nonalcoholic fatty liver disease, cirrhosis, and hepatocellular carcinoma, which account for ~2 million deaths per year worldwide [2]. Hence, cell-based therapies offer new therapeutic options to restore liver function in patients with chronic liver diseases [3].
The current protocol describes the detailed procedures to perform ectopic transplantation of human hepatic tissue onto the mesenteric parametrial fat pad in an immune-compromised mouse model. Specifically, in this protocol, primary human hepatocytes are transduced with a bioluminescent lentiviral vector and plated in 3D coculture with mouse fibroblasts to form hepatic aggregates. These aggregates are embedded inside a hydrogel to form a hepatic tissue, which is subsequently transplanted onto the mesenteric parametrial fat pad in nude mice. Bioluminescent signal from transplanted hepatic tissue allows monitoring of the tissue over time. This valuable ectopic human hepatocyte transplantation model can be used for understanding important aspects of liver tissue engineering such as graft survival, graft-host integration, and liver regeneration.
Materials and reagents
Biological materials
Plateable cryopreserved primary human hepatocytes (Lonza, catalog number: HUCPG)
Mouse 3T3-J2 fibroblasts (Kerafast, catalog number: EF3003)
Female nude mice, 8–10 weeks (Taconic Biosciences, catalog number: NCRNU)
Reagents
Reagents required for tissue culture
Fibrinogen from bovine plasma (Millipore Sigma, catalog number: F8630)
Thrombin from bovine plasma (Millipore Sigma, catalog number: T4648)
AggreWellTM 400 microwell plates (STEMCELL Technologies, catalog number: 34411)
DMEM, high glucose, pyruvate (Thermo Fisher Scientific, catalog number: 11995065)
Fetal bovine serum (FBS), premium select, heat inactivated (R&D Systems, catalog number: S11550H)
Penicillin-Streptomycin (10,000 U/mL) (Thermo Fisher Scientific, catalog number: 15140122)
CorningTM ITS+ premix universal culture supplement (Fisher Scientific, catalog number: CB-40352)
HEPES (1 M) (Thermo Fisher Scientific, catalog number: 15630080)
Dexamethasone (Millipore Sigma, catalog number: D4902)
Glucagon (Millipore Sigma, catalog number: G2044)
Polybrene, 10 mg/mL, liquid (EMD Millipore, catalog number: TR-1003-G)
CorningTM HepGoTM hepatocyte culture medium (Fisher Scientific, catalog number: MT454670)
Lentiviral vector expressing firefly luciferase under the human albumin promoter (pTRIP.Alb.IVSb.IRES.tagRFP-DEST) (a gift from Charles Rice, The Rockefeller University, New York)
Trypan Blue solution, 0.4%, sterile filtered, suitable for cell culture (Sigma-Aldrich, catalog number: T8154)
Reagents required for surgery
Isoflurane, 3% (vol/vol) (Covetrus, catalog number: 029405)
Puralube vet ointment (Patterson Veterinary, catalog number: 07-888-2572)
Betadine solution 10% (vol/vol) povidone-iodine (Amazon, model number: 104457)
0.25% bupivacaine hydrochloride injection, 2.5 mg/mL (Covetrus, catalog number: 061842)
Meloxicam injectable solution, 5 mg/mL (Covetrus, catalog number: 049755)
Phosphate-buffered saline (PBS) (10×) pH 7.4, RNase-free, 0.9% (wt/vol) (Fisher Scientific, catalog number: AM9625)
Dietgel recovery (ClearH2O, catalog number: 72-06-5022)
D-Luciferin, potassium salt (GoldBio, catalog number: 115144-35-9)
Prescription-only medicines
Ethiqa XR (buprenorphine) extended-release injectable suspension, 1.3 mg/mL, C3 (Covetrus, catalog number: 072117)
Solutions
1× Phosphate-buffered saline solution (see Recipes)
Hepatocyte culture media (see Recipes)
50 mg/mL fibrinogen solution (see Recipes)
200 U/mL thrombin solution (see Recipes)
15 mg/mL D-Luciferin solution (see Recipes)
Recipes
1× Phosphate-buffered saline (PBS) solution
100 mL of PBS (10×) pH 7.4, RNase-free, 0.9% (wt/vol)
900 mL of distilled H2O
Hepatocyte culture media
432 mL of DMEM
50 mL of FBS
5 mL of Penicillin-Streptomycin
5 mL of ITS premix universal culture supplement
7.5 mL of HEPES (1 M)
0.4 µg/mL Dexamethasone
7 ng/mL Glucagon
50 mg/mL fibrinogen solution
1 g of fibrinogen from bovine plasma
20 mL of 1× PBS
200 U/mL thrombin solution
1,000 U thrombin from bovine plasma
5 mL of 1× PBS
15 mg/mL D-Luciferin solution
Reconstitute sterile D-luciferin powder to a concentration of 15 mg/mL in sterile 1× PBS. Aliquot and store at -20 °C. Thaw at room temperature prior to injection.
Laboratory supplies
CytoOne 35 × 10 mm TC dish (USA Scientific Inc, catalog number: CC76823340)
1.7 mL microcentrifuge tubes, PP (VWR, catalog number: 87003-294)
M-fold paper towels (McKesson, catalog number: 858231)
Equipment
Equipment for tissue culture
CellGard® ES Class II type A2 biological safety cabinet (NuAire, Inc., model: NU-475)
HeracellTM 150i CO2 incubator (Thermo Fisher Scientific, catalog number: 50116047)
Equipment for surgery
Dual procedure circuit/anesthesia chamber (VetEquip Inc., catalog number: 921400)
VaporGuard activated charcoal filter (VetEquip Inc., catalog number: NC9270393)
Germinator 500, dry sterilizer (Braintree Scientific, Inc., catalog number: GER 5287-120V)
Gel heating pad (Fisher Scientific, catalog number: 14-370-223)
Round hood to scavenge waste anesthetic vapors (Alsident System, catalog number: 1-7528)
Surgical light source (Stryker Berchtold Chromophare F 300)
Stainless steel digital animal weighing scale (Kent Scientific Corporation, catalog number: SCL-4000)
Towel drape, sterile, 18 × 25 (Dynarex, catalog number: 4410)
Alcohol preps, medium, 2-ply (Webcol, catalog number: 6818)
Self-seal sterilization pouches (VWR, catalog number: 89140-800)
PI polyisoprene surgical gloves, sterile (Protexis, catalog number: 2D72PT80X)
Transparent surgical tape (MD Supplies, catalog number: MPR-62201)
Inguinal hernia repair mesh Bard® flat sheet nonabsorbable polypropylene monofilament 3 × 6 in. rectangle style white sterile (McKesson, catalog number: 413782)
Sterile cotton-tipped wood applicator sticks (Patterson Veterinary, catalog number: 07-847-3562)
1 mL insulin syringes (Fisher Scientific, catalog number: 14-841-31)
Surgical scissors, sharp (Fine Science Tools, catalog number: 14002-13)
Graefe forceps (Fine Science Tools, catalog number: 110049-10)
Flat, round tip tweezers (Electron Microscopy Sciences, catalog number: 78333-33A)
Colibri retractor (Fine Science Tools, catalog number: 17000-03)
Hemostat (Fine Science Tools, catalog number: 13008-12)
Monocryl (poliglecaprone 25) suture (Ethicon, catalog number: Y303H)
Reflex wound clips (7 mm) (Fine Science Tools, catalog number: 12032-07)
Reflex clip removing forceps (World Precision Instruments, catalog number: 500347)
IVIS spectrum CT in vivo imaging system (Perkin Elmer, catalog number: 128201)
Software and datasets
Living Image 3.2 software (IVIS Imaging Systems)
Procedure
Part I: Construction of hepatic hydrogel
Preparation of human hepatocyte and fibroblast aggregates
Thaw cryopreserved human hepatocytes as per manufacturer’s instructions. Immediately after thawing, check hepatocyte viability with 0.4% Trypan Blue. A viability of 70%–90% is acceptable.
Resuspend hepatocytes in basal DMEM medium at 1.0 × 10⁶ cells/mL along with lentiviral particles expressing firefly luciferase under human albumin promoter and 4 μg/mL polybrene in a 15 mL polypropylene conical tube by placing in the tissue culture incubator for 1 h. Place the conical tube horizontally inside the incubator and gently invert five times every 10 minutes to ensure proper mixing of hepatocytes and lentiviral particles.
Note: As hepatocytes quickly settle to the bottom of the tube if placed vertically in the incubator, it is important to place the 15 mL polypropylene tube on the side. Avoid constant shaking or inversion to minimize shear force and mechanical stress to hepatocytes.
Following transduction, spin hepatocytes at 50× g for 10 min and discard the supernatant. Wash cells with 10 mL of DMEM and spin at 50× g for 10 min. Repeat this step twice and resuspend cells in hepatocyte culture medium.
Note: Avoid spinning single-cell suspensions of hepatocytes above 50× g due to their sensitivity to mechanical stress, which could reduce viability.
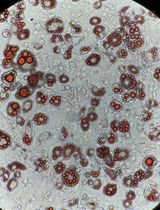
Resuspend 1.2 × 10⁵ transduced human hepatocytes and 0.6 × 10⁵ mouse embryonic fibroblast J2-3T3 cells in hepatocyte culture media. Plate 1 mL of this cell suspension in each well of the AggreWell microwell plates and culture at 37 °C with 5% CO2. Change media every two days. Aggregates generally form after four days. However, transplantation of aggregates is done seven days post coculture as they are compact and show better survival (Figure 1).
Note: The ability of hepatocytes to form compact aggregates varies depending on the donor background. However, plating hepatocytes with J2-3T3 cells at a ratio of 2:1 always forms aggregates regardless of the donor background.
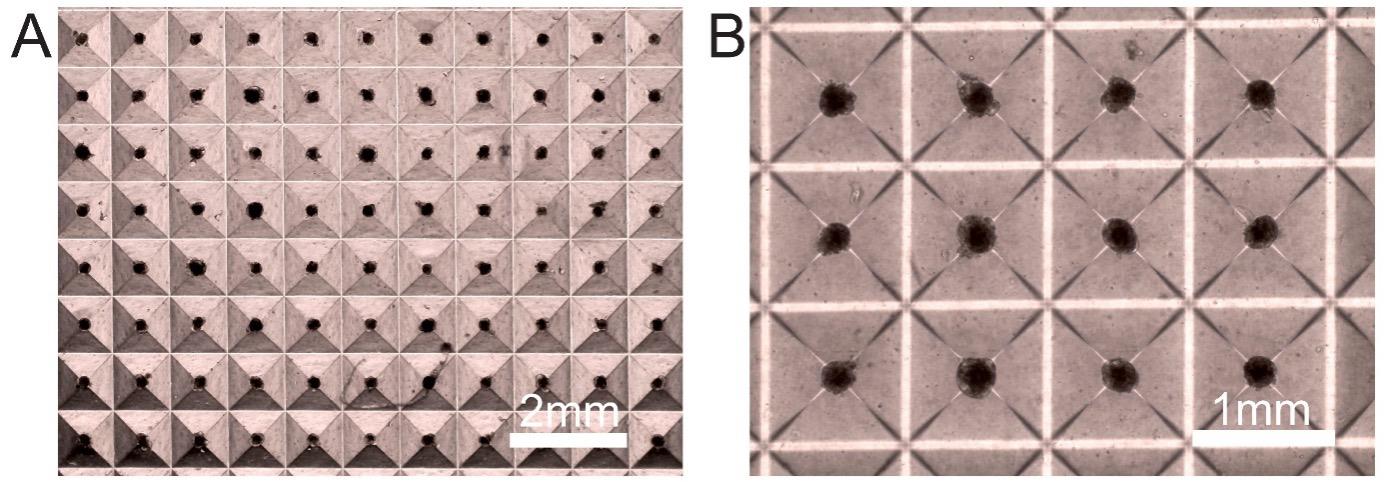
Figure 1. Hepatocyte–fibroblast aggregates in coculture after seven days. Representative (A) low (4×) and (B) high (10×) magnification images depicting consistent aggregate formation. The size of the aggregates is approximately 200 µm.
Preparation of hepatic hydrogel construct
Collect hepatocyte–fibroblast aggregates from the AggreWell microwell plates using P1000 pipette tips. Rinse the wells with DMEM basal medium twice to ensure all aggregates are collected. Transfer the collected aggregates to a 15 mL conical tube and spin down at 200× g. Remove the supernatant and resuspend the hepatocyte–fibroblast aggregates in DMEM basal medium. Each well of an AggreWell plate contains 1,200 hepatocyte–fibroblast aggregates and each aggregate contains 100 hepatocytes and 50 fibroblasts.
Note: Hepatocyte–fibroblast aggregates are less sensitive to mechanical stress as compared to hepatocytes in single-cell suspension. Hence, aggregates obtained seven days post coculture can be spun down at 200× g. Both P1000 and P200 pipette tips are well tolerated by aggregates.
Prepare the hydrogel by mixing fibrinogen (final concentration 10 mg/mL), thrombin (final concentration 1 U/mL), and the hepatocyte–fibroblast aggregates in DMEM to a total volume of 100 μL. Each hydrogel contains ~4,800 aggregates equivalent to four wells of an AggreWell plate. Thrombin must be added as the last component to trigger gelation of the fibrin gel. Mix quickly by pipetting and transfer to a sterile non-wettable parafilm sheet to form a bubble of the hepatic hydrogel construct.
Note: Avoid using medium containing FBS as it hinders gelation of fibrinogen after addition of thrombin into the gel mixture. We use fibrin as it is one of the many important extracellular matrix proteins present during wound healing to provide both structural support and angiogenic response of the host to enhance vascularization to the hepatic tissue posttransplantation.
Place the hepatic hydrogel construct immediately on a sterile mesh (~size of 5 mm × 5 mm) (Figure 2). Store the construct in a sterile Petri dish filled with hepatocyte culture medium and transport to the mouse facility for the surgical procedure.
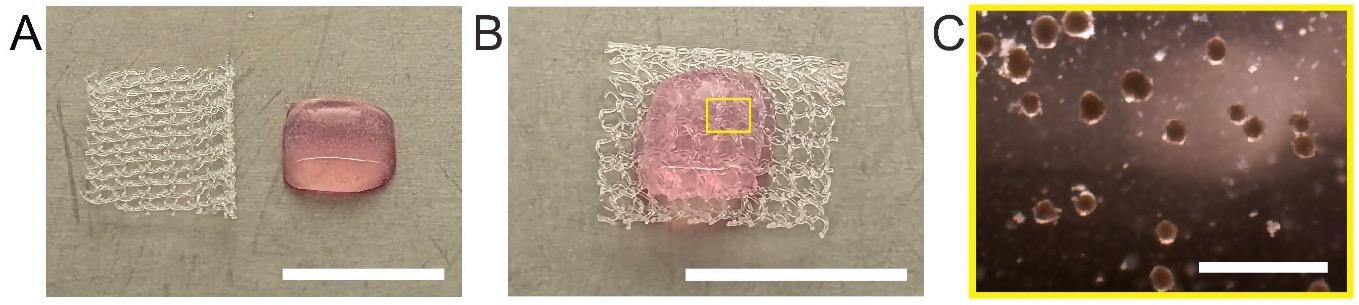
Figure 2. Hepatic hydrogel before transplantation. Images of the hepatic hydrogel (A) after preparation and (B) prior to transplantation where it is placed on a sterile surgical mesh (scale bar: 1 cm). C. Zoomed-in image of the hepatic hydrogel showing aggregates inside the hepatic hydrogel (scale bar: 1 mm).
Part II: Implantation of hepatic hydrogel onto mesenteric parametrial fat pad
Preoperative preparations
Autoclave all surgical instruments before use.
Clean the workspace before surgery using a chlorine dioxide (Clidox-S) or an alcohol-based cleaning agent. Prepare the surgical station with dedicated spaces for the anesthesia induction chamber, surgical workspace, sterile surgical instruments, equipment area, and adjustable lights. Place the sterile instruments on the dominant-hand side of the surgeon’s workspace and ensure the lighting is adequate (Figure 3).
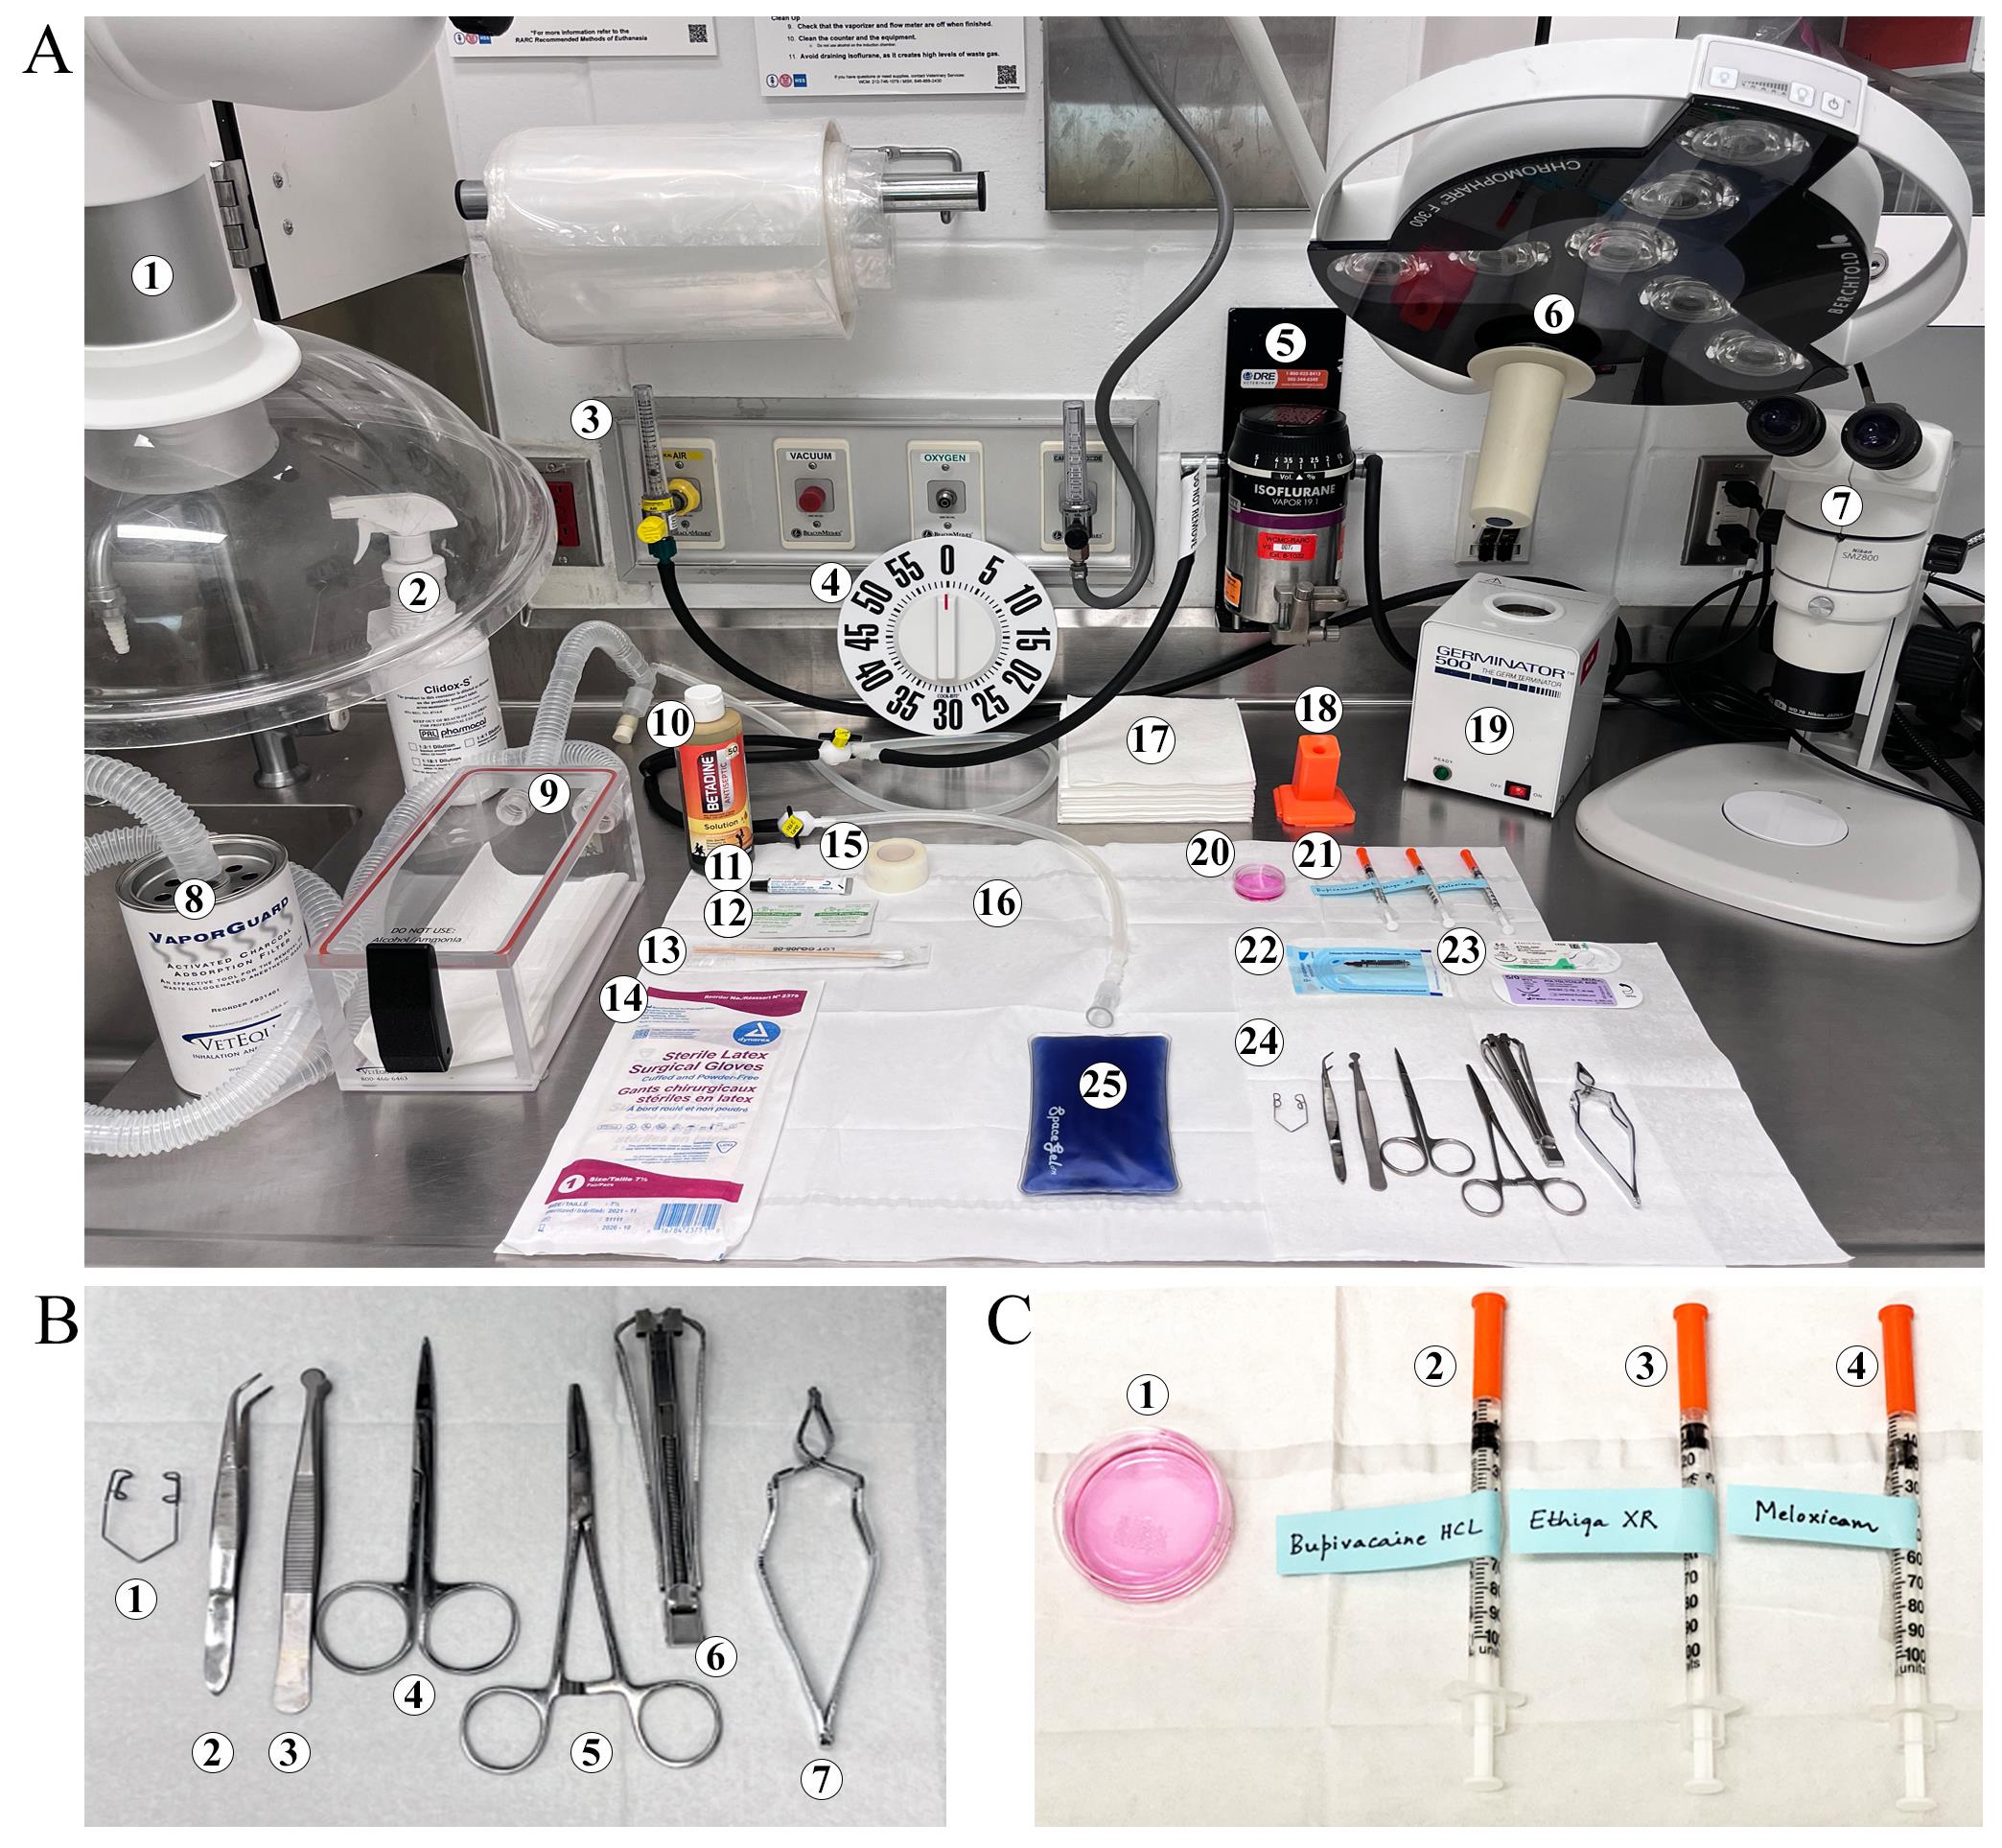
Figure 3. Surgical station setup for hepatic hydrogel implantation surgery. A. Surgical station setup. (1) Hood, (2) disinfectant (Clidox-S) spray bottle, (3) gas inlets, (4) timer, (5) isoflurane vaporizer, (6) spotlight, (7) microscope, (8) activated charcoal adsorption filter, (9) anesthesia chamber, (10) Betadine, (11) ophthalmic ointment, (12) alcohol pads, (13) cotton-tip applicators, (14) surgical gloves, (15) surgical tape, (16) towel drape, (17) paper towels, (18) needle uncapper, recapper, and syringe holder, (19) hot bead sterilizer, (20) hepatic hydrogel construct, (21) drug injections, (22) wound clips, (23) sutures, (24) sterile tools, (25) heating pad. B. Zoomed in view of sterile tools required for surgery. (1) Colibri retractor, (2) serrated tip forceps, (3) Graefe forceps, (4) surgical scissors, (5) hemostat, (6) wound clip applier, and (7) wound clip remover. C. Zoomed in view of drugs and supplies. (1) Hepatic hydrogel construct in a sterile Petri dish filled with hepatocyte culture medium and syringes for injecting (2) Bupivacaine hydrochloride, (3) Ethiqa XR, and (4) Meloxicam.Ensure there is sufficient medical oxygen in the tank to perform surgery and add isoflurane to small-animal anesthesia system vaporizer as required before each case. Set up the anesthetic scavenging machine.
Weigh animals and record weights. Prepare dosages of drugs according to the respective animal’s weight.
Note: For batch surgeries, place a glass bead sterilizer near the aseptic operating field and perform quick dry heat sterilization by inserting tips of tools into the heating chamber for 15 s in between surgeries.
Surgical procedure
Note: Implementation of this protocol requires prior surgical training. Time required for training depends on the ability of the surgeon. With practice, motivated investigators can readily acquire the required surgical expertise.
Induce general anesthesia using inhaled isoflurane vapors by placing the mouse in an induction chamber using 3% (vol/vol) isoflurane and an oxygen flow rate of 1 L/min.
Confirm mouse has reached the surgical plane of anesthesia by gentle toe pinch. Lubricate both eyes with an ophthalmic ointment to prevent drying of the cornea during surgery, place the nose cone of the anesthesia system over the animal’s snout, and lower isoflurane vapors to 2% (vol/vol).
Note: Monitor depth of anesthesia every 15 min throughout the procedure to ensure that there are no changes in respiratory rate associated with surgical manipulation and toe pinch to confirm no movement.
Place the mouse on a heating pad in a supine position with the tail towards the surgeon and secure the forelimbs and hindlimbs with surgical tape. Administer a small volume (0.1 mL) of a local anesthetic agent such as bupivacaine into the tissue adjacent to the intended incision line and subcutaneously inject 2 mg/kg meloxicam and 3.25 mg/kg Ethiqa XR for preemptive analgesia.
Disinfect the surgical site by performing three sets of alternating scrubs of 10% povidone-iodine and 70% ethanol or 70% isopropyl alcohol. Paint the skin with 10% povidone-iodine and cover the mouse with a sterile surgical drape over the intended incision site with a cut of ~2 cm2.
Note: Make sure to put on sterile surgical gloves during the surgery.
Hold the skin using the Graefe forceps and make a lateral abdominal skin and muscle incision (approximately 1–2 cm long) to expose the peritoneum. A sterilized Colibri retractor is used to hold open the peritoneal cavity (Figures 4A and 4B).
Use the scissors to snip open the peritoneum (~1–2 cm). Identify and expose the parametrial fat pad (Figures 4C and 4D).
Note: Perform the incision between the large blood vessels running through the peritoneum to avoid causing unintentional bleeding. Be careful not to damage the abdominal organs during the incision.
Carefully place the sterile mesh carrying the hepatic hydrogel on top of the parametrial fat pad (Figure 4E).
Use a 5-0 Monocryl suture to sandwich the hepatic hydrogel firmly between the parametrial fat pad and surgical mesh by suturing the four corners (Figure 4F). During the procedure, irrigate the area with sterile PBS to prevent dryness and soak any excess buffer using sterile cotton swabs.
Note: Handle the parametrial fat pad as gently as possible to avoid puncturing or tearing the tissue.
Once the hepatic hydrogel is firmly sutured onto the parametrial fat pad, use the Graefe forceps to gently return the fat pad inside the peritoneum cavity (Figure 4G).
Close the peritoneum using an absorbable 5-0 Monocryl suture (Figure 4H) and remove the retractor.
Close the skin using 7 mm wound clips and wipe the skin around the surgical site with betadine (Figure 4I).
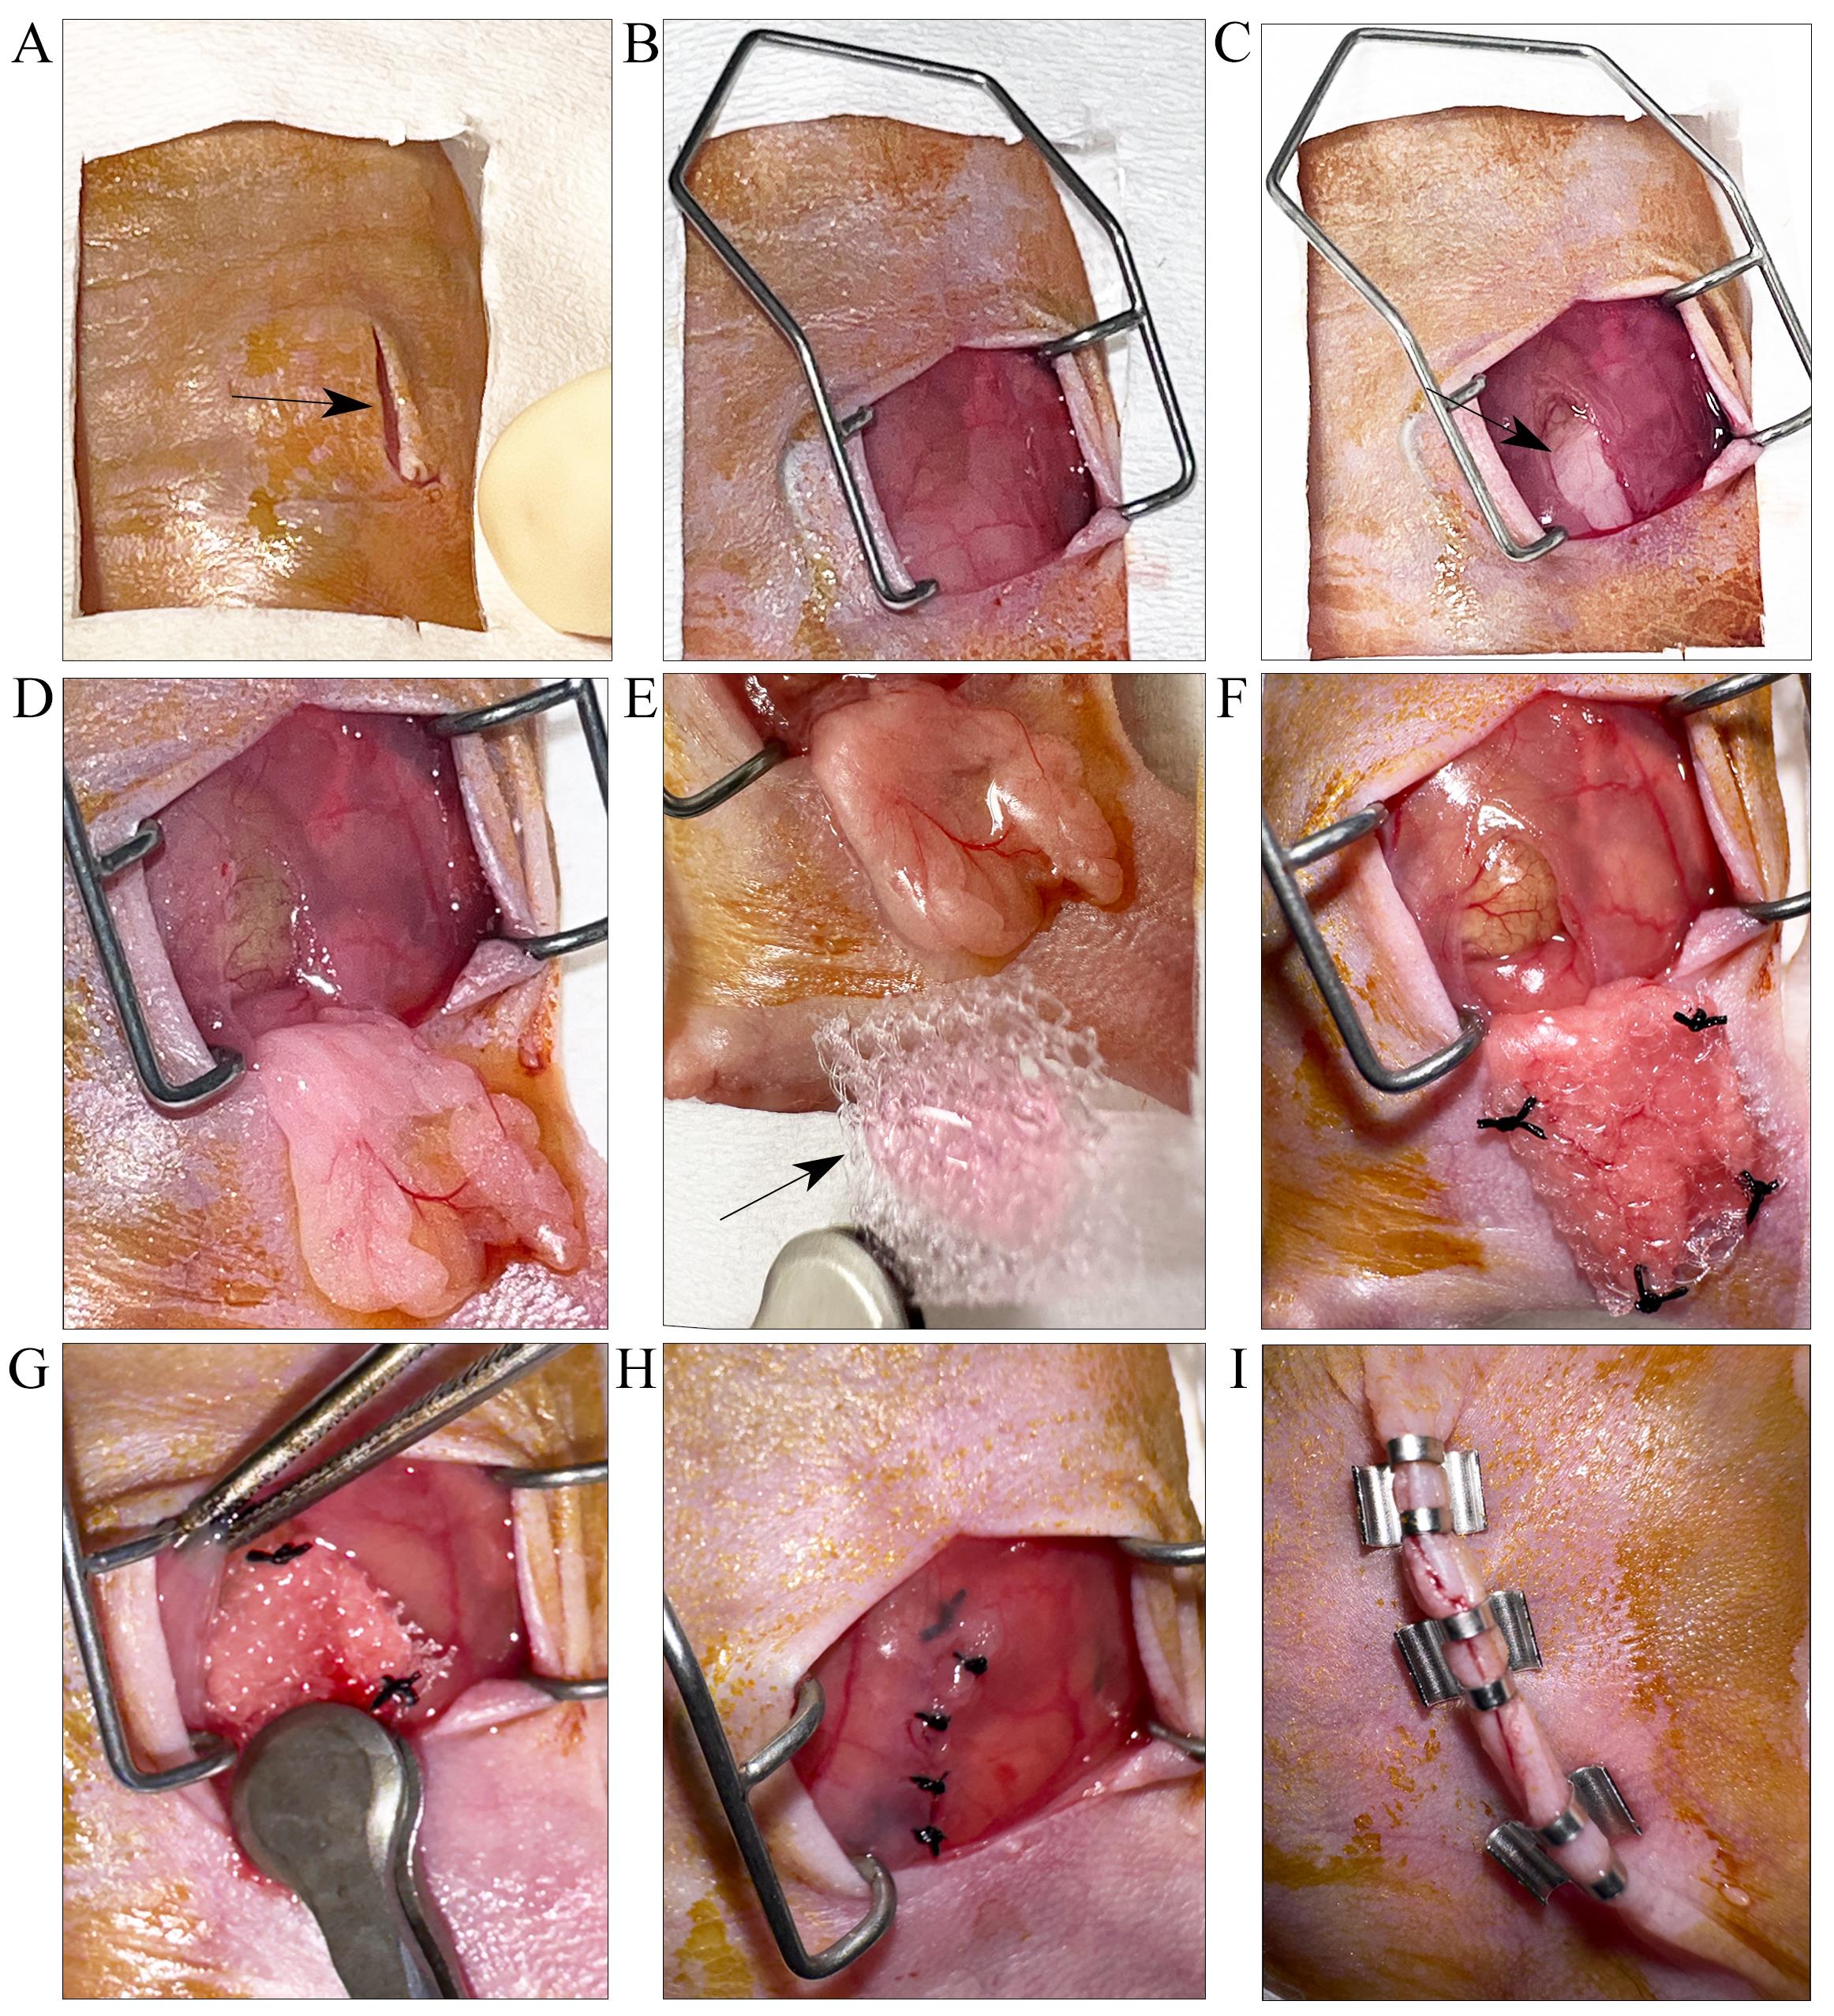
Figure 4. Step-by-step visual depiction of the hepatic hydrogel implantation technique for attachment to parametrial fat pad. A. A small incision is made through the skin (indicated by black arrow). B. Colibri retractor is placed to stretch open the skin. The peritoneum is opened by an incision (indicated by black arrow) to (C) locate and (D) expose the parametrial fat pad. E. The fat pad is gently spread out to prepare for implantation. Black arrow points to surgical mesh carrying the hepatic hydrogel. F. The edges of the surgical mesh are sutured on to the fat pad. G. The fat pad is carefully placed back into the peritoneal cavity using the Graefe forceps. H. The peritoneal opening is closed by suturing. I. Skin is closed by applying wound clips.
Postoperative procedures
Allow the mouse to recover in a clean cage by placing it on a warming pad and monitor until it regains consciousness. Check for return of a normal breathing pattern, normal blink reflex, and the beginning of ambulation. Add 2–4 moistened feed pellets to ensure the mouse is eating. Continue to intermittently monitor the condition of the mouse and the incision site for at least 30 min following the procedure and once more before the end of the day. Mice should be housed individually under standard laboratory conditions postsurgery, with food and water available ad libitum.
Fill out details on the surgery card and attach it to the mouse cage.
Administer meloxicam (2 mg/kg; subcutaneously) every 12 h for the next 48 h. Monitor mice at least twice a day for the next 72 h.
Part III. Validation through bioluminescence imaging
Intraperitoneally inject 250 µL of 15 mg/mL D-Luciferin dissolved in sterile 1× PBS into the mouse.
After 15 min, place the mouse in the anesthesia induction chamber with 2%–3% (vol/vol) isoflurane and an oxygen flow rate of 1 L/min (for ~5 min).
Lubricate both eyes with an ophthalmic ointment to prevent drying of the cornea during imaging and place anesthetized mouse in the supine position in the sample stage of the imaging chamber of the IVIS spectrum CT in vivo imaging system. This position helps in obtaining the highest bioluminescent signal.
Acquire images and quantify the bioluminescent signal on the IVIS spectrum CT in vivo imaging system using the Living Image software. Start image acquisition by setting luminescent exposure to 60 s and increment it as required.
Note: Bioluminescence imaging can be performed as early as 72 h posttransplantation and then weekly to monitor survival of the hepatic hydrogel in vivo.
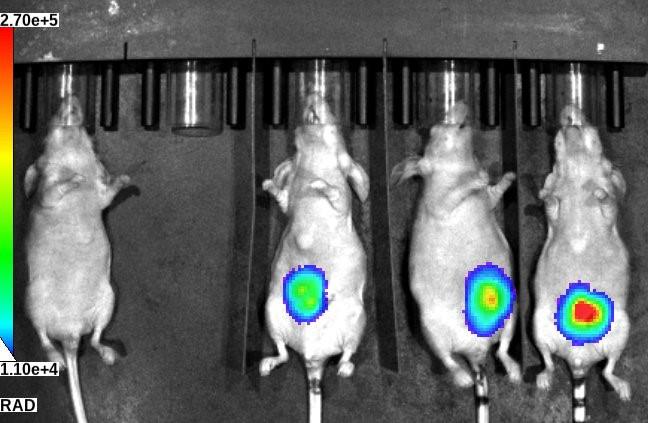
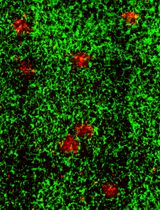
Figure 5. Bioluminescent image of implanted hepatic tissue in nude mice. Control mouse (left) without any hepatic tissue implant and mice with hepatic tissue implants imaged at day 7 posttransplantation.
Data analysis
Bioluminescent signals acquired by the IVIS spectrum CT in vivo imaging system can be quantified by the Living Image software. The intensity of bioluminescence corresponds to survival of engineered tissues and hepatic function. Refer to Stevens et al. [4] or Baranski et al. [5], for representative bioluminescence images.
Validation of protocol
Parts of this protocol have been used and validated in the following research articles:
Stevens et al. [4]. InVERT molding for scalable control of tissue microarchitecture. Nature Communications (Figure 4, panels e and f).
Baranski et al. [5]. Geometric control of vascular networks to enhance engineered tissue integration and function. Proceedings of the National Academy of Sciences (Figure 4, panel e).
Stevens et al. [6]. In situ expansion of engineered human liver tissue in a mouse model of chronic liver disease. Science Translational Medicine (Figure 1, panels a and d).
General notes and troubleshooting
General notes
All reagents are molecular biology grade and must be stored in accordance with the manufacturer’s instructions.
Female mice are used as they have larger fat pads than males.
Make sure to get the surgical procedure approved by the Institutional Animal Care and Use Committee and only use methods that minimize pain and suffering.
All surgery instruments should be sterilized before use.
The surgery takes approximately 20–25 min per mouse. Suturing all four corners of the hepatic hydrogel construct to the fat pad takes approximately 5–8 min. We strongly recommend being very patient while performing this step as the fat tissue is very delicate and one has to be extra careful to not rupture the tissue while suturing.
Additional wound clips and/or sutures can be used if incision is larger than 1–2 cm.
Mice must be monitored twice daily for at least 72 h after surgeries.
Labored breathing, depressed respiratory rate, and/or gasping are indications of a failed surgery.
Troubleshooting
Large blood vessels run across the peritoneum and are visible to the eye. While making the incision, avoid cutting through these vessels to prevent excessive bleeding. However, if any large blood vessels are accidentally cut while making the incision, use a dry sterile cotton swab to stop the bleeding and rehydrate the area afterward using sterile 1× PBS.
If the nude mouse does not have enough parametrial fat pad or the surgical mesh is too large to fit appropriately onto the parametrial fat pad, we recommend carefully trimming the edges of the surgical mesh using sterile scissors before suturing.
If the mouse takes a long time to recover properly from anesthesia, it is possible that the surgical procedure has taken longer than it should. Administer 200 µL of sterile PBS subcutaneously.
If the mouse pulls off the wound clips, it is possible that these were not executed properly. Briefly anesthetize with isoflurane (3% vol/vol for induction, 2% vol/vol for maintenance), wash the incision site with saline solution, and repeat the wound clipping. Disinfect with 10% povidone-iodine solution.
If there are signs of pain or distress (i.e., hunched posture, ruffled hair coat, lack of appetite, dehydration), place the mouse under a heat lamp and administer 1 mL of warm sterile saline subcutaneously and intraperitoneally. Additional analgesic should be administered and DietGel Recovery can be provided for a speedy improvement. Consult with the designated veterinarian if signs of stress persist.
Acknowledgments
This work is based on our previous work published in Stevens et al. (2013) [4] and we acknowledge the work of Baranski et al. (2013) [5], which served as the baseline for adaptation. The authors would like to thank the Research Animal Resource Center (RARC) at Weill Cornell Medicine. This work was supported in part by grants from the NIH to Robert E. Schwartz (R01CA234614, 2R01AI107301, R01AA027327, and R01DK121072), from the DOD W81XWH-21-1-0978, and from The Paul G. Allen Family Foundation UWSC13448. Figures were created with BioRender.com.
Competing interests
Robert E. Schwartz is on the scientific advisory board of Miromatrix Inc. and Lime Therapeutics and is a speaker and consultant for Alnylam Inc. The remaining authors have no conflict of interest to declare.
Ethical considerations
All animal experimental procedures performed were approved by the Institutional Animal Care and Use Committee of Weill Cornell Medicine under protocol #2023-0020.
References
- Starzl, T. E., Groth, C. G., Brettschneider, L., Penn, I., Fulginiti, V. A., Moon, J. B., Blanchard, H., Martin, A. J. and Porter, K. A. (1968). Orthotopic Homotransplantation of the Human Liver. Ann. Surg. 168(3): 392–415.
- Sinha, S., Hassan, N. and Schwartz, R. E. (2023). Organelle stress and alterations in interorganelle crosstalk during liver fibrosis. Hepatology: e0000000000000012.
- Li, T. T., Wang, Z. R., Yao, W. Q., Linghu, E. Q., Wang, F. S. and Shi, L. (2022). Stem Cell Therapies for Chronic Liver Diseases: Progress and Challenges. Stem Cells Transl. Med. 11(9): 900–911.
- Stevens, K. R., Ungrin, M. D., Schwartz, R. E., Ng, S., Carvalho, B., Christine, K. S., Chaturvedi, R. R., Li, C. Y., Zandstra, P. W., Chen, C. S., et al. (2013). InVERT molding for scalable control of tissue microarchitecture. Nat. Commun. 4(1): 1847.
- Baranski, J. D., Chaturvedi, R. R., Stevens, K. R., Eyckmans, J., Carvalho, B., Solorzano, R. D., Yang, M. T., Miller, J. S., Bhatia, S. N., Chen, C. S., et al. (2013). Geometric control of vascular networks to enhance engineered tissue integration and function. Proc. Natl. Acad. Sci. U.S.A. 110(19): 7586–7591.
- Stevens, K. R., Scull, M. A., Ramanan, V., Fortin, C. L., Chaturvedi, R. R., Knouse, K. A., Xiao, J. W., Fung, C., Mirabella, T., Chen, A. X., et al. (2017). In situ expansion of engineered human liver tissue in a mouse model of chronic liver disease. Sci. Transl. Med. 9(399): eaah5505.
Article Information
Copyright
© 2024 The Author(s); This is an open access article under the CC BY-NC license (https://creativecommons.org/licenses/by-nc/4.0/).
How to cite
Readers should cite both the Bio-protocol article and the original research article where this protocol was used:
- Sinha, S., Nguyen, D. T., Hassan, N., Ali, Q., Sethiadi, J., Tsoy, S. and Schwartz, R. E. (2024). Mesenteric Parametrial Fat Pad Surgery for in vivo Implantation of Hepatocytes in Nude Mice. Bio-protocol 14(2): e4925. DOI: 10.21769/BioProtoc.4925.
- Stevens, K. R., Scull, M. A., Ramanan, V., Fortin, C. L., Chaturvedi, R. R., Knouse, K. A., Xiao, J. W., Fung, C., Mirabella, T., Chen, A. X., et al. (2017). In situ expansion of engineered human liver tissue in a mouse model of chronic liver disease. Sci. Transl. Med. 9(399): eaah5505.
Category
Biological Engineering > Biomedical engineering
Cell Biology > Cell Transplantation > Xenograft
Do you have any questions about this protocol?
Post your question to gather feedback from the community. We will also invite the authors of this article to respond.