- Protocols

- Articles and Issues
- For Authors
- About
- Become a Reviewer

Live Imaging and Analysis of Meiotic Cytokinesis in Drosophila Testes
Published: Vol 14, Iss 2, Jan 20, 2024 DOI: 10.21769/BioProtoc.4918 Views: 3376
Reviewed by: Giansanti MariagraziaPradeep Kumar BhaskarAnonymous reviewer(s)
Original research article
The authors used this protocol in:

Sep 2022
Advertisement


Protocol Collections
Comprehensive collections of detailed, peer-reviewed protocols focusing on specific topics


Abstract
All living organisms require the division of a cell into daughter cells for their growth and maintenance. During cell division, both genetic and cytoplasmic contents are equally distributed between the two daughter cells. At the end of cell division, cytoplasmic contents and the plasma membrane are physically separated between the two daughter cells via a process known as cytokinesis. Hundreds of proteins and lipids involved in the cytokinetic process have been identified; however, much less is known about the mechanisms by which these molecules regulate cytokinesis, being therefore an intense area of current research. Male meiotic cytokinesis in Drosophila melanogaster testes has been shown to be an excellent model to study cytokinesis in vivo. Currently, several excellent protocols are available to study cytokinesis in Drosophila testes. However, improved methods are required to study cytokinesis under in vitro and ex vivo conditions. Here, we demonstrate a simple method to perform live imaging on individual spermatocyte cysts isolated from adult testes. We evaluate amenability of this in vitro method for treatment with pharmacological agents. We show that cytokinesis is strongly inhibited upon treatment with Dynasore, a dynamin inhibitor known to block clathrin-mediated endocytosis. In addition, we also demonstrate an ex vivo method to perform live imaging on whole mount adult testes on gas permeable membrane chambers. We believe the protocols described here are valuable tools to study cytokinetic mechanisms under various genetic and treatment conditions.
Key features
• In vitro method to study male meiotic cytokinesis in dissected spermatocyte cysts.
• In vitro method allows acute treatment with various pharmacological agents to study cytokinesis.
• Ex vivo method to image male meiosis cytokinesis in intact adult testes.
• Requires 15–60 min to set up and could be imaged up to 6–12 h.
Graphical overview
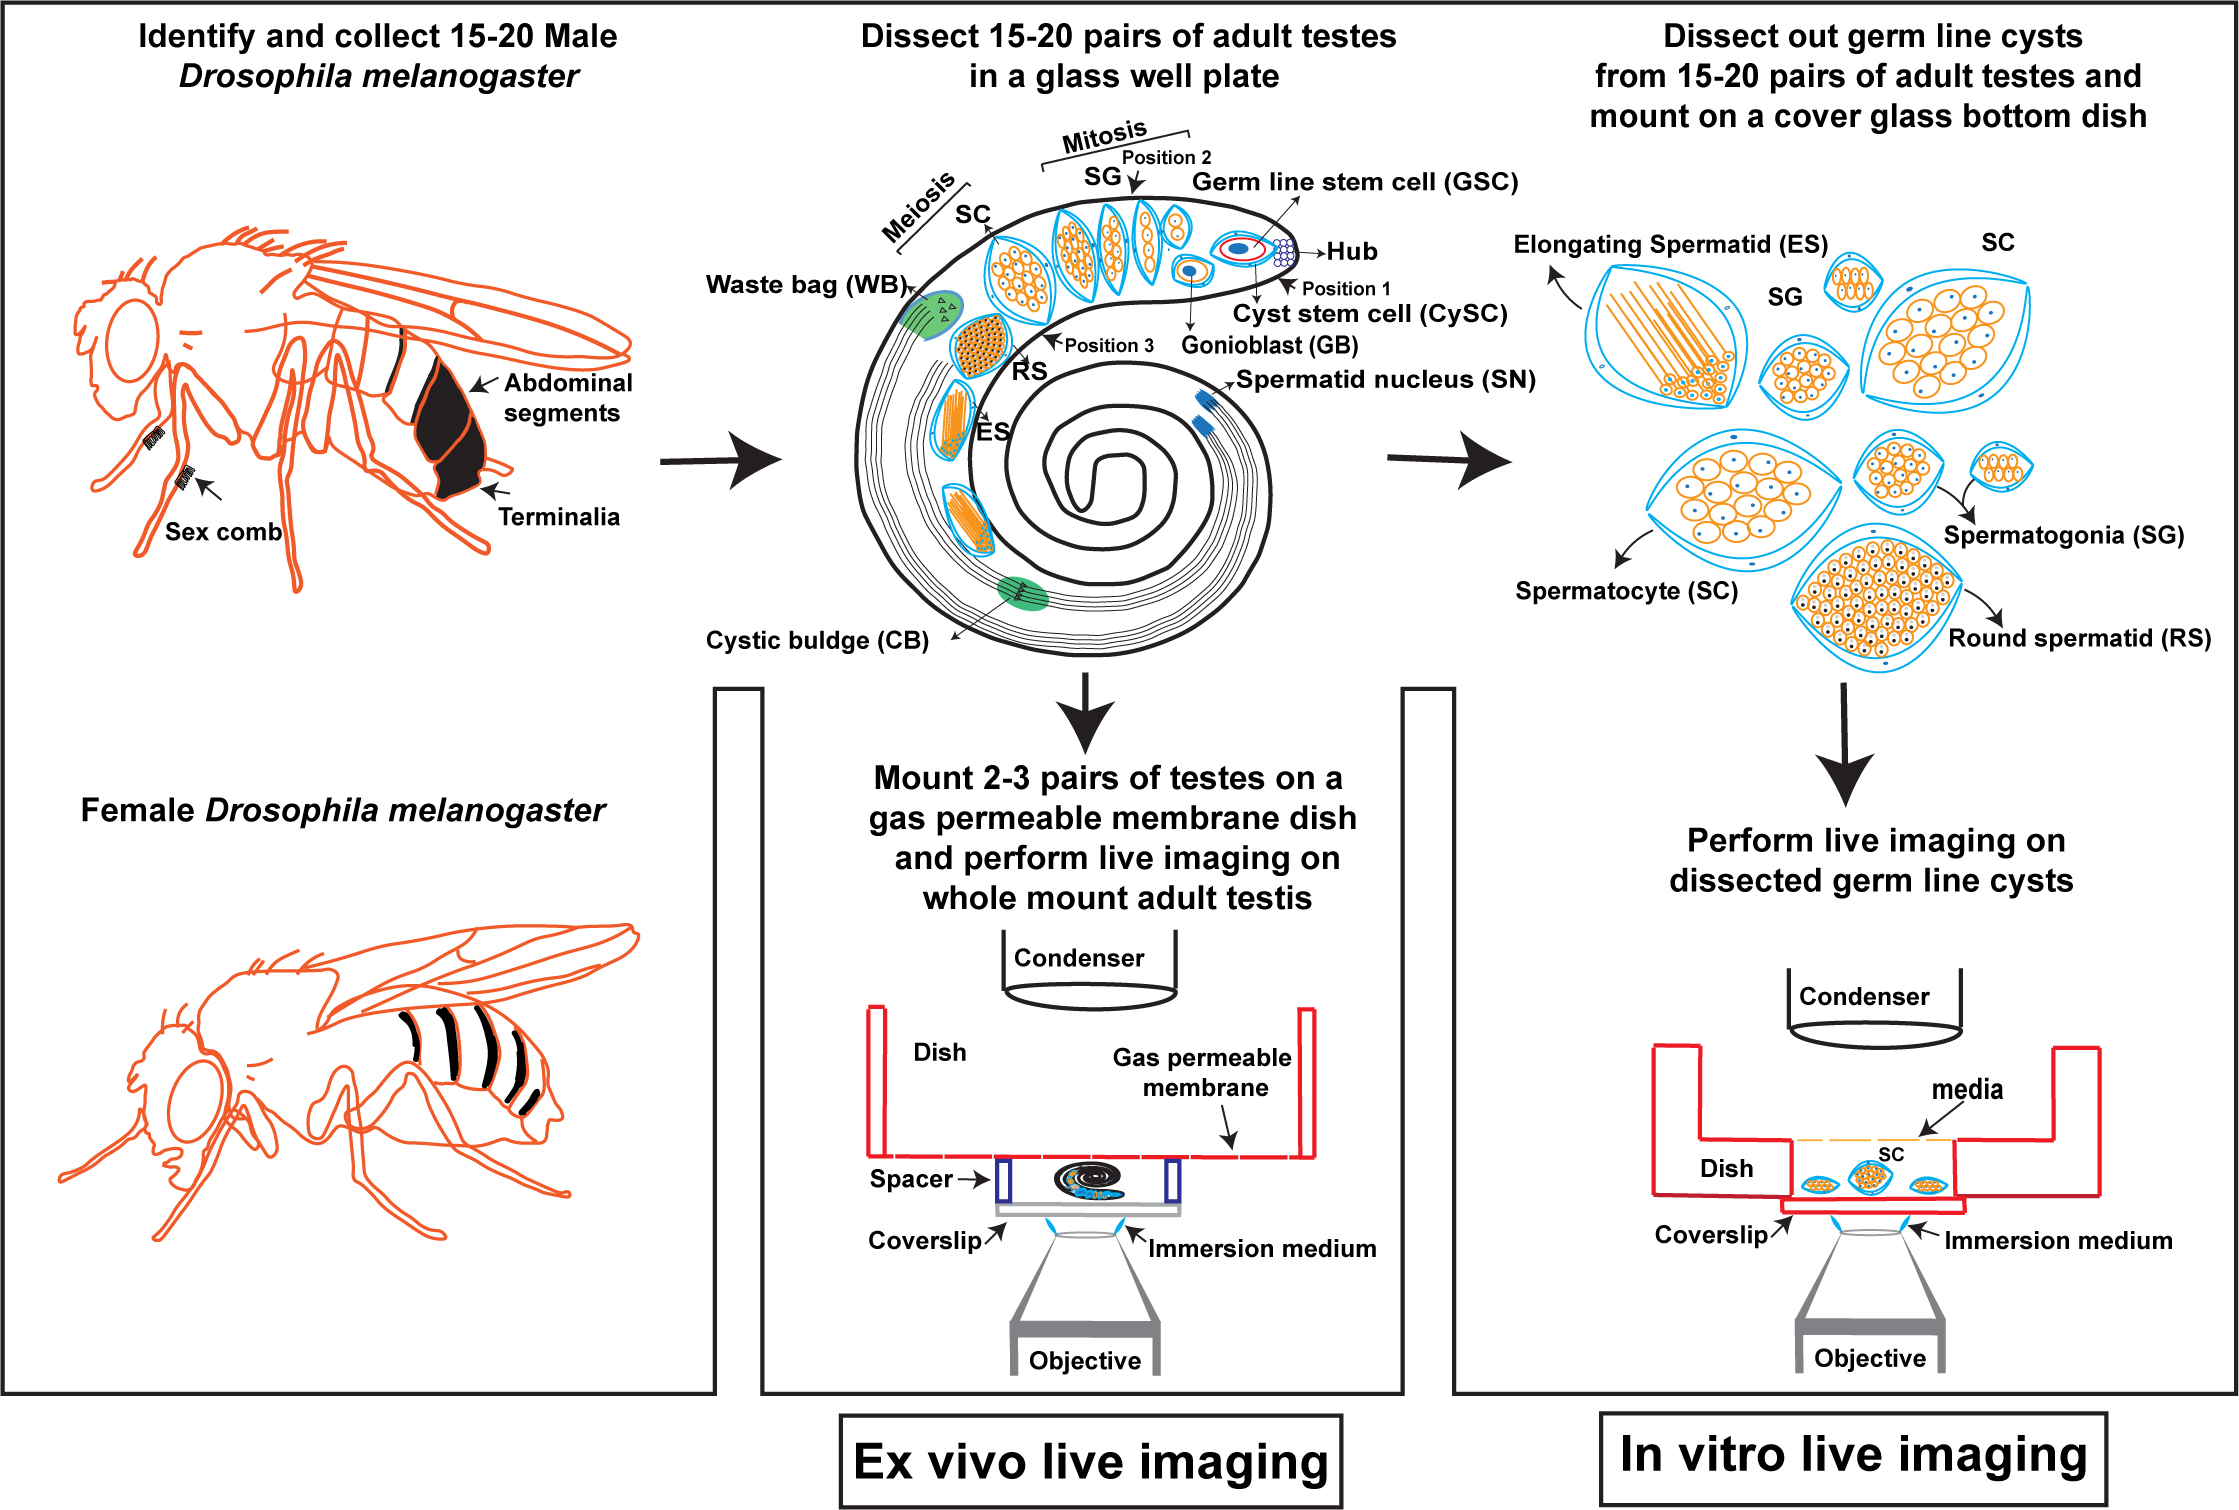
In vitro and ex vivo live imaging of male meiotic cytokinesis in adult Drosophila testes
Background
Cytokinesis is a final step of cell division wherein parent cell cytoplasmic contents and plasma membrane are physically divided between the two daughter cells. In animal cells, immediately after chromosomes are segregated to the poles, the spindle-mediated mechanisms determine the site of actomyosin ring assembly at the cell cortex. Subsequently, the actomyosin contractile ring that anchors the plasma membrane, and the central spindle begins to constrict, leading to the generation of cleavage furrow (Figure 1B). In mitotic cells, the plasma membrane between two daughter cells is pinched off in a process known as abscission, leading to the physical separation of daughter cells. However, unlike mitotic cells, in male germ cells abscission does not occur at the end of cytokinesis. As a result, all the daughter cells originating from the gonioblast are interconnected via their cytoplasmic bridges, known as ring canals. It is thought that the ring canals play an important role in intercellular communication and signaling [1]. All the cells in a cyst connected via cytoplasmic bridges undergo synchronous divisions [2, 3] (Video 1).

Video 1. In vitro live cell imaging of isolated adult Drosophila spermatocyte cyst undergoing meiosis I and meiosis II cytokinesis. The cysts are isolated from fly testes expressing GFP-tagged PH domain of Grp1/Step protein under the control of tubulin 84B promoter (tGPH) and mCherry tagged fascetto (feo) protein under the control of Ubi-p63E promoter (Feo-mCherry). The GFP-PH-Grp1/Step localizes to cytosol, plasma membrane, and cleavage furrow in cysts with intact cyst cell membrane. However, tGPH localizes only to the cytosol in cysts that have lost cyst cell membrane envelop. Feo-mCherry localizes to central spindle, independent of cyst cell membrane envelop. Live imaging was performed with the 63× water immersion objective and a pre-defined area of interest (AOI) size of 1024 × 1024 and at intervals of 2 min for 120 repeats. Video shown here represents 10 frames/second.
Drosophila melanogaster has been shown to be a valuable genetic model to study cytokinesis in vivo. Conventionally, Drosophila embryos undergoing cellularization [4, 5], proliferating larval neuroblasts [6, 7], and male meiotic spermatocytes [8, 9] have been used in cytokinesis studies. Meiotic spermatocytes in Drosophila testes offer several unique advantages over other systems to study cytokinesis. These include the relatively large size of meiotic spindle, weak spindle checkpoint, unambiguous identification of cytokinetic mutants due to characteristic morphological differences, and finally, live imaging of spermatocytes in isolated cysts or intact pupal testes. The relatively large size of male meiotic spindle is a favorable cytological feature in spermatocytes that allows precise localization of many cytokinetic proteins including microtubule and contractile ring–associated proteins. Male meiotic cells also show prominent central spindle (Figure 1B) (a bundle of antiparallel, interdigitating microtubules localizes to the center of segregating chromosomes where the assembly of contractile ring begins) [10, 11]. In neuroblasts, the presence of an abnormal spindle activates spindle checkpoint, which in turn arrests the cells in metaphase and precludes the observation of subsequent steps in cell division including cytokinesis [11–14]. However, due to weak spindle checkpoint, spermatocytes continue through the cell division stages despite the abnormal spindle. Thus, using meiotic cytokinesis, it is possible to ask whether a gene involved in spindle formation also has a role in later stages of cell division including cytokinesis. For instance, it was shown that mutations in the polo and abnormal spindle (asp) genes cause metaphase arrest in larval neuroblasts but produce frequent cytokinetic failures in spermatocytes [12–14]. Drosophila male meiosis is also an excellent model for cytokinesis due to the unique organization of mitochondria in round spermatids. During male meiotic cytokinesis, mitochondria is equally partitioned between the two daughter cells; immediately after cytokinesis, it aggregates to form a phase-dark structure known as Nebenkern. Failure in cytokinesis abrogates mitochondrial segregation; as a result, round spermatids show unusually large mitochondria associated with multiple nucleus (Figure S1) [15]. Thus, the presence of unusually large mitochondria with multiple nucleus is a characteristic feature of meiotic cytokinesis in spermatocytes (Figure S1) [3, 15].
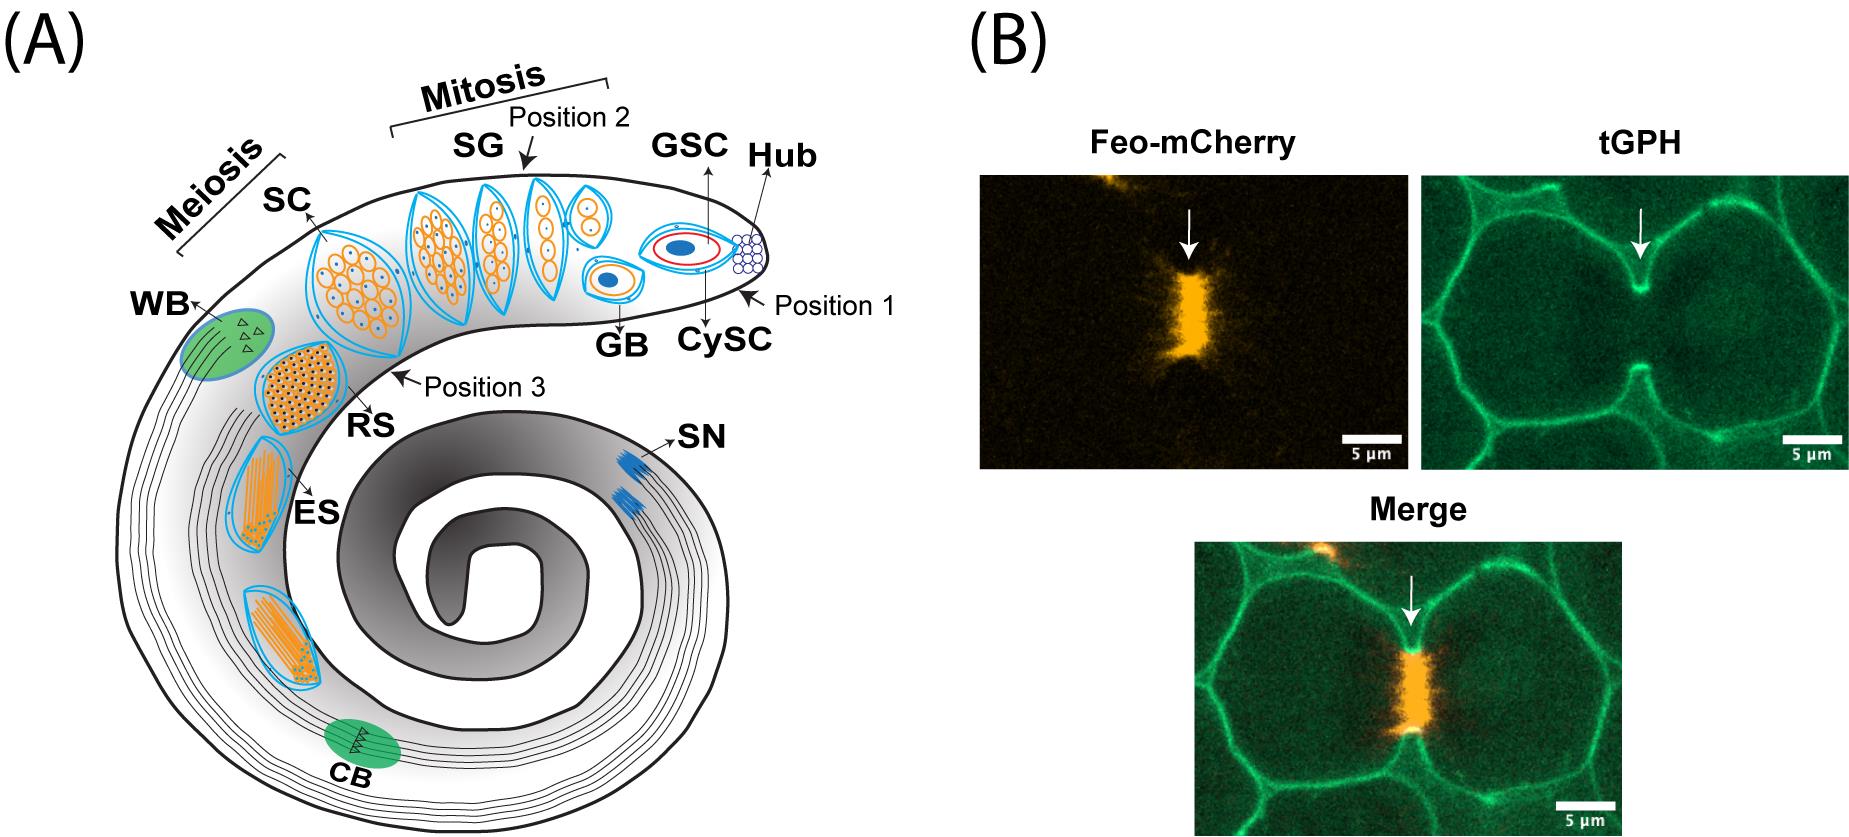
Figure 1. Male meiotic cytokinesis in adult Drosophila testis. (A) Cartoon representing dissected adult testis showing various stages of germ cell differentiation. Drosophila spermatogenesis shares a significant amount of similarity with the mammalian system. In many species, including Drosophila melanogaster, male germ cell differentiation is a sequential process. It begins with the germline stem cell (GSC) attached to the hub cells at the tip of the testis undergoing asymmetric division to yield one committed progenitor called gonioblast (GB). Two cyst stem cells (CySCs) that surround the GSC also undergo asymmetric division to produce two cyst cells that encase the GB. Subsequently, the GB undergoes four rounds of mitotic divisions, resulting in the 16-cell stage known as spermatogonia (SG). With the premeiotic S phase and an impressive growth during G2 phase due to robust transcriptional activity, spermatogonia become spermatocytes (SC), which in turn synchronously undergo two rounds of meiotic divisions (meiosis I & meiosis II) resulting in the haploid, 64-cell stage known as round spermatids (RS). Due to a lack of abscission step at the end of cytokinesis in germ cells, all cell divisions originating from a single GB are connected to each other via cytoplasmic bridges known as ring canals (RCs). After completion of meiosis, all the mitochondria in individual spermatids aggregate around the basal body at one end of the nucleus to form a unique structure called nebenkern. Subsequently, round spermatids elongate via complex morphological changes including polarization of spermatid nucleus, dramatic nuclear size reduction due to histamine to protamine switch, elongation of nebenkern, axoneme growth, and formation of acrosome, a membrane-bound organelle required for fertilization. Finally, the individual sperms are physically separated by a complex process known as individualization, wherein actin-based cones migrate from head to tail fashion with the concomitant removal of cytoplasmic contents [cystic bulge (CB) and waste bag (WB)] and wrapping each spermatozoon with its own plasma membrane. (B) Representative live images showing localization of central spindle–associated protein feo (fascetto tagged with mCherry) (left panel) and a plasma membrane–associated protein tGPH (PH domain of Grp1fused to GFP) (middle panel), during cytokinesis. Right panel shows the merge of both channels and arrow indicates the site of cleavage furrow.
Several excellent protocols have been described in the literature for the isolation of Drosophila testes from embryo to adult developmental stages and ex vivo imaging of whole mount pupal testes and isolated spermatocyte cysts [16–22]. However, detailed protocols focused on live imaging of male meiotic cytokinesis in dissected germ line cysts have not been described. Further, live imaging of male meiotic cytokinesis in whole mount adult testes has not been demonstrated. The protocols described here build upon the methods developed by Gartner et al. [18] and Karabasheva, G. and Smyth, J.T. [19], extending their application to male meiotic cytokinesis in adult Drosophila testes. Gartner et al. have standardized a method for live imaging of post-meiotic histone to protamine switch in intact pupal testes and dissected pupal germ line cysts [18]. Karabasheva, G. and Smyth J.T. established a method for live imaging of male meiotic cytokinesis in intact pupal testes [19]. Here, we demonstrate both in vitro and ex vivo methods to image male meiotic cytokinesis in adult testes. The in vitro method involves isolation of male germline cysts and imaging in a cover glass bottom dish. This in vitro method is of particular interest when the experimental settings require direct treatment of spermatocytes with external agents such as proteins, lipids, and pharmacological agents. Using this method, we show that treatment of spermatocytes with Dynasore, a dynamin inhibitor known to block clathrin-mediated endocytosis [23], also blocks male meiotic cytokinesis by preventing normal assembly of central spindle. The ex vivo method presented here involves dissection of adult testes and imaging on gas permeable membrane dish chambers. Both in vitro and ex vivo methods demonstrated here are extremely valuable to study male meiotic cytokinesis under various treatment conditions and genetic backgrounds.
Materials and reagents
Biological materials
Refer to Giansanti, G.M et al. [24], for a list of tagged proteins that can be used to mark central spindle/spindle midzone and cleavage furrow. For analysis of cytokinesis, a few examples of fly stocks are listed below (Table 1).
Table 1.List of fly stocks to label plasma membrane, central spindle, and actomyosin contractile ring .
| No | Protein | Localization | Fly stock number/reference |
|---|---|---|---|
| 1 | PH domain of Steppke/Grp1, expressed under the control of Tub84B promoter (tGPH), binds to PIP3 | Plasma membrane, enriched on early and late stage of cleavage furrow membranes | BDSC#8163 |
| 2 | Ubi-p63E-Feo-mCherry, mCherry-tagged feo protein is expressed under the control of ubiquitin regulatory sequence | Spindle midzone/central spindle | BDSC#59277 |
| 3 | Sqh-GFP.RLC, Myosin II regulatory light chain tagged to GFP is expressed under its own promoter control | Contractile ring | BDSC#57145 |
| 4 | UAS-mRFP-Scraps, PH domain containing Anillin protein tagged with mRFP expressed under UAS control | Cleavage furrow/contractile ring | BDSC#52220 |
| 5 | UAS-PLCdels-PH-EGFP, PH domain of human PLCD1 tagged with EGFP expressed under UAS control | Plasma membrane and cleavage furrow | BDSC#39693 |
Reagents
Shields and Sang M3 insect media (Sigma-Aldrich, catalog number: S8398-1L)
Heat-inactivated FBS suitable for insect cell culture (Thermo Fisher Scientific, catalog number: 10082147)
Penicillin-Streptomycin (10,000 U/mL) (Thermo Fisher Scientific, catalog number: 15140122)
Distilled water, 1,000 mL (Thermo Fisher Scientific, catalog number: 15230147)
Poly-D-Lysine hydrobromide (Sigma-Aldrich, catalog number: P0899)
Potassium bicarbonate (KHCO3) (Sigma-Aldrich, catalog number: 237205)
Dimethyl sulfoxide (DMSO) (Sigma-Aldrich, catalog number: D2650)
Dynasore hydrate (Sigma-Aldrich, catalog number: D7693)
Ethanol (70 %)
M3 media (see Recipes)
Solutions
200 μg/mL Poly-D-Lysine hydrobromide in distilled water
31 mM or 10 mg/mL Dynasore hydrate in DMSO
Recipes
M3 media
Prepare this recipe in a biological safety cabinet. Dispense one bottle of powdered media (Shields and Sang M3 insect media) into a 1 L beaker (caution: may cause irritation to eyes and skin) and add 0.5 g of KHCO3 and 800 mL of sterile distilled water. Dissolve the powder completely using a magnetic stirrer and a bar. Subsequently, add 100 mL of heat-inactivated FBS and 10 mL of penicillin/streptomycin solution and mix well on a magnetic stirrer. Make up the final volume to 1 L and filter sterilize by passing through a bottle-top filter unit with 0.2 μm pore sized membrane. Aliquot the filter-sterilized media into 50 mL Falcon tubes and store at -20 °C. On the day of experiment, thaw one aliquot of media in a 37 °C water bath and filter the media again into a fresh Falcon tube using a 0.2 μm syringe filter. When performing the experiment, media should be at room temperature. Excess media can be stored at 4 °C for up to 1–2 weeks.
Laboratory supplies
Glass-bottom cell culture dish, 15 mm (NEST, catalog number: 801002)
Glass well plate, 9 wells (Corning Life Sciences, catalog number: 7220-85)
Dumont#5 ceramic-coated forceps (Fine Science Tools, catalog number: 11252-50)
Dissection pins, tip diameter 0.0175 mm (Fine Science Tools, catalog number: 26002-15)
Pin holders (Fine Science Tools, catalog number: 26018-17)
Lumox® dish 50 (Sarstedt, catalog number: 94.6007.410)
SecureSeal imaging Spacers, 0.12 mm depth (Grace Bio-Labs, catalog number: 654008)
Disposable sterile filter units, 500 mL (Thermo Fisher Scientific, catalog number: 450-0020)
Syringe filters, sterile, 0.22 um (GenClone®, catalog number: 25-244)
BD 10 mL syringe, luer-lok tip (BD, catalog number: 302995)
Microtubes, clear 1.7 mL (Olympus plastics, catalog number: 24-281)
Falcon, 50 mL, sterile, polypropylene conical tube, (Corning, catalog number: 352098)
15 mL centrifuge tube, sterile polypropylene tube (Corning, catalog number: 430052)
Equipment
Zeiss SteREO Discovery microscope (Zeiss Group, model: V12)
Spinning disk confocal on Leica DMi8 microscope base (Andor)
Software and datasets
Andor Fusion (version 2.3.0.44) (https://andor.oxinst.com/downloads/view/fusion-release-2.3)
Imaris (version 10.0) (https://imaris.oxinst.com/)
Fiji/ImageJ (https://imagej.net/software/fiji/downloads)
Prism 9 (https://www.graphpad.com/features)
Procedure
In vitro live cell imaging of male meiotic cytokinesis in isolated spermatocyte cysts.
Dissection of adult Drosophila testes
Collect approximately 10–20 newly eclosed male flies on a CO2 pad.
Decapitate fly heads using razor blade and transfer flies to an Eppendorf.
Pipette 400 μL of M3 media into a glass well plate. We recommend using M3 media throughout the procedure. However, Schneiders’s media could be used as an alternate choice.
In a separate well, dispense decapitated flies and, using forceps, hold the fly thorax in such a way that the ventral side of the abdomen faces upward (Figure 2A–C and Video 2).
Immerse the fly in M3 cell culture media and, using another forceps, pinch the distal end of the ventral abdominal skin (Figure 2D and Video 2).
Using forceps, hold on to the male terminalia and slowly pull away, such that the whole male reproductive system is released into the media (Figure 2E, F and Video 2).
Using forceps, separate the testes from the rest of the reproductive system. Drosophila testes can be easily identified by their characteristic spiral shape (Figure 2 G, H and Video 2).
This procedure is repeated until 10–20 pairs of testes are dissected out in M3 cell culture media.
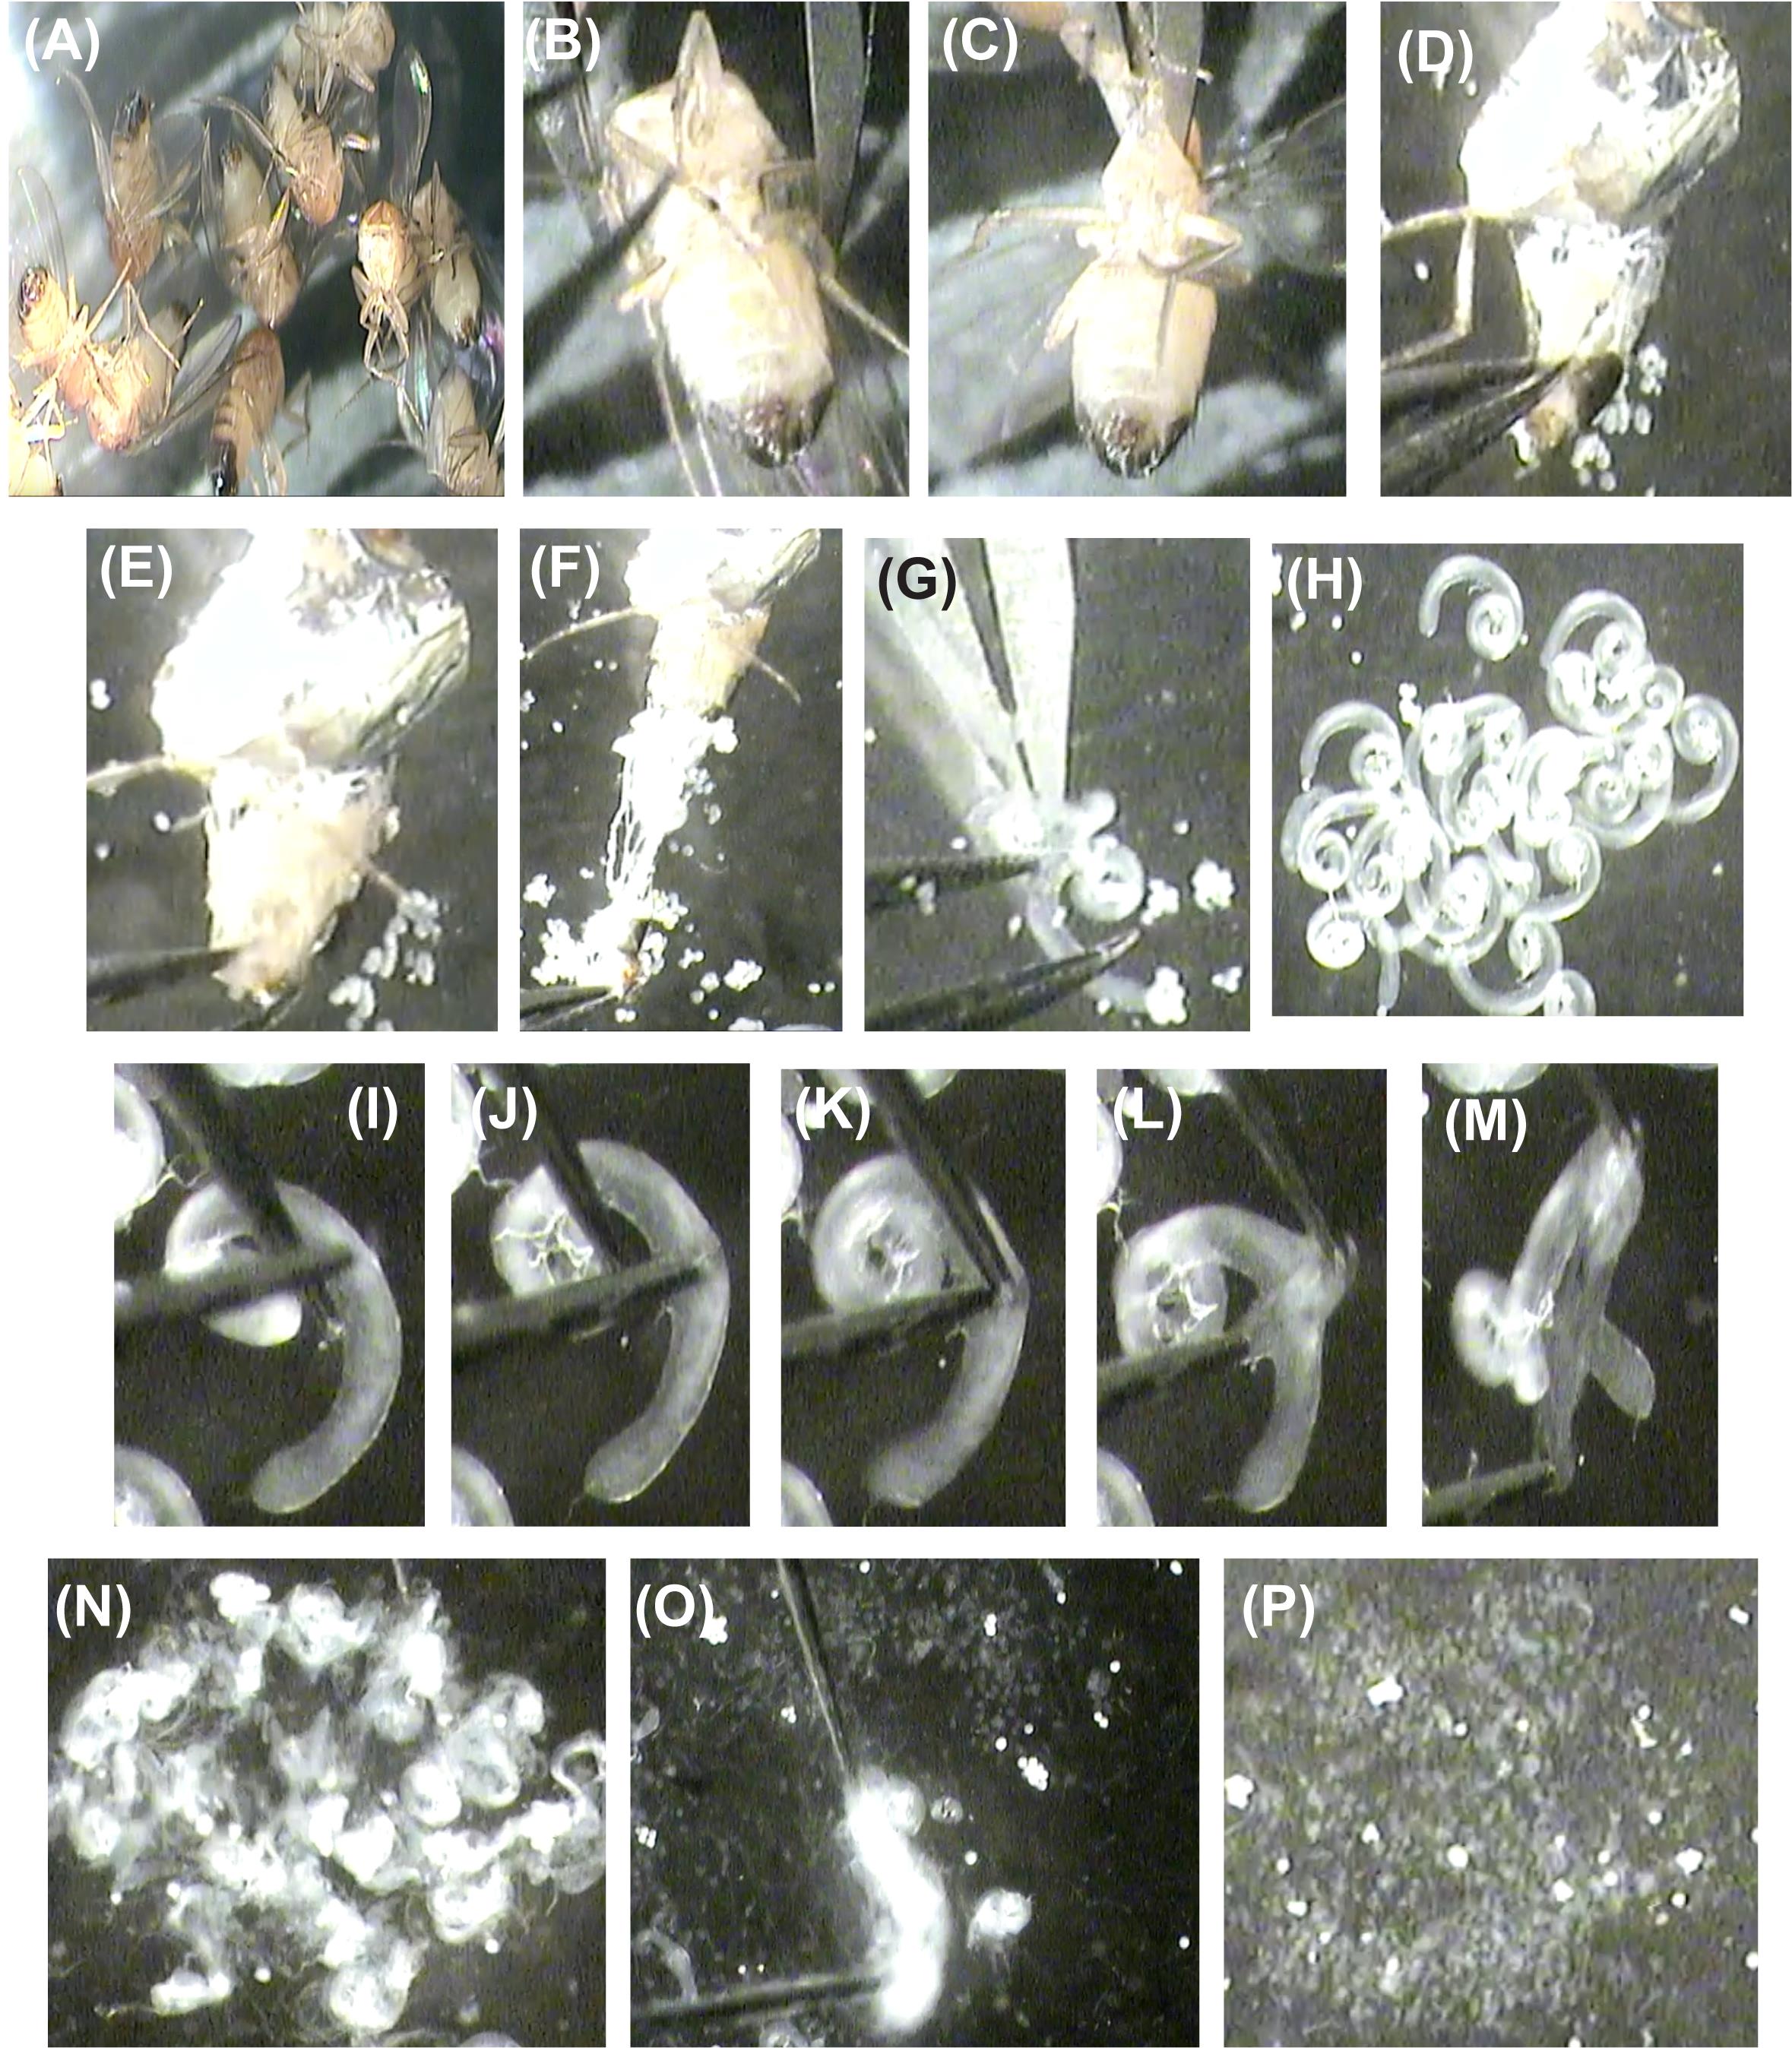
Figure 2. Dissection of testes and germ line cysts. (A) Decapitated male Drosophila flies. (B, C) Position the fly ventral side up and hold the thorax with forceps. (D) Pinch ventral abdominal skin with another forceps. (E) Hold male terminalia with forceps. (F) Slowly pull away male terminalia. (G) Separate the testis from the accessory glands and collecting ducts. (H) Wash the testes with M3 media. (I–M) Under high magnification, focus on individual testes and, using a pair of needles, tear open the testis muscle sheath. (N–O) All the torn open testes are gently agitated to release cysts into the media. (P) Cysts collected at the center of the dissection well. Video 2. Detailed procedure forDrosophila testes dissection, isolation of individual germline cysts, and mounting on cover glass bottom dish
Isolation of male meiotic spermatocyte cysts
Rinse the testes by replacing old media with fresh M3 media (400 μL each wash, repeat three times).
Cut the pipette tip with scissors and prewet it with M3 media by aspirating in and dispensing out.
Using the precut and prewetted pipette tip, transfer washed testes to a fresh well containing 400 μL of M3 media.
Adjust the SteRio V12 microscope to high magnification (63×) while focusing on the individual testes.
Using a pair of needle holders that carry tungsten needles with a tip diameter of 0.0175 mm, tear open the testis muscle sheath to release all of the differentiating germ cell cysts, including meiotic spermatocyte stages, into the media (Figure 2I–M and Video 2). Repeat this procedure until the rest of the testes are torn open (Figure 2N). Note that this is the most difficult part of the procedure, which could be mastered with practice. We recommend holding needles in a crisscross fashion adjacent to the site of dissection to get a grip on the testis, followed by poking and holding the testis with one pin and tearing with another pin (Figure 2I–M and Video 2).
All the torn open testes are bundled and, by gently agitating with needles, all the cysts that are loosely attached to testes muscle walls will fall into the media. Subsequently, remove all the other testes debris including spermatid bundles and muscle sheath by pushing them out of the media with needles (Figure 2N–O and Video 2).
Gently flush the germ cell cysts settled at the bottom of the glass well plate to the center of the plate by pipetting with fresh media (Figure 2P and Video 2). Wash the cysts concentrated at the center of the well with fresh media by replacing old media with fresh media three times (3× 400 μL). If an experiment requires treatment with a pharmacological agent, replace the old media with fresh media containing the appropriate drug and incubate for the desired time with gentle rocking. As an example, we have treated spermatocyte cysts with Dynasore, a dynamin inhibitor that blocks clathrin-mediated endocytosis [23], at a concentration of 80 μM/mL in M3 media and incubated for 1 h at room temperature with gentle rocking. For the control, we have used a similar volume of the vehicle used to dissolve the drug, in this case DMSO (2.5 μL/mL). As shown in Video 3, compared to control, Dynasore-treated spermatocytes show defects in the assembly of central spindle during early stages of cytokinesis, implicating a crucial role of dynamin activity and perhaps endocytosis in male meiotic cytokinesis.
Video 3. In vitro live imaging of isolated adultDrosophila spermatocyte cysts treated with vehicle DMSO or dynamin inhibitor Dynasore (80 μM/mL).Cysts are isolated from fly testes expressing tGPH (PH domain of Grp1/Step) and Feo-mCherry ubiquitously. The tGPH is predominantly localized to cytosol due to loss of cyst cell membrane envelop. Live imaging was performed with the 63× water immersion objective and an AOI of 1024 × 1024 and at intervals of 2 min for 120 repeats. Video shown here represents 10 frames/second.
Mounting cysts onto a cover glass bottom dish
Prewet a 200 μL pipette tip with M3 media by aspirating in and dispensing out.
Using the prewetted 200 μL pipette tip, aspirate cysts concentrated at the center of the glass well plate and dispense as a drop at the center of the cover glass bottom dish (Figure 3A, B and Video 2). Note: Poly L-Lysine was shown to be detrimental to male germline cysts (Gartner et al. 2014); therefore, we do not recommend coating glass bottom dish with Poly L-Lysine/Poly D-Lysine. In our hands, coating with low concentrations of Poly D-Lysine (50 μg/mL) followed by thorough washing with water did not show much effect on cytokinesis [3]. However, cytokinetic defects are apparent, particularly in the meiosis II cytokinesis, in glass-bottom dishes coated with higher concentrations of poly D-Lysine (200 μg/mL), even after thorough washing (Video 4).
>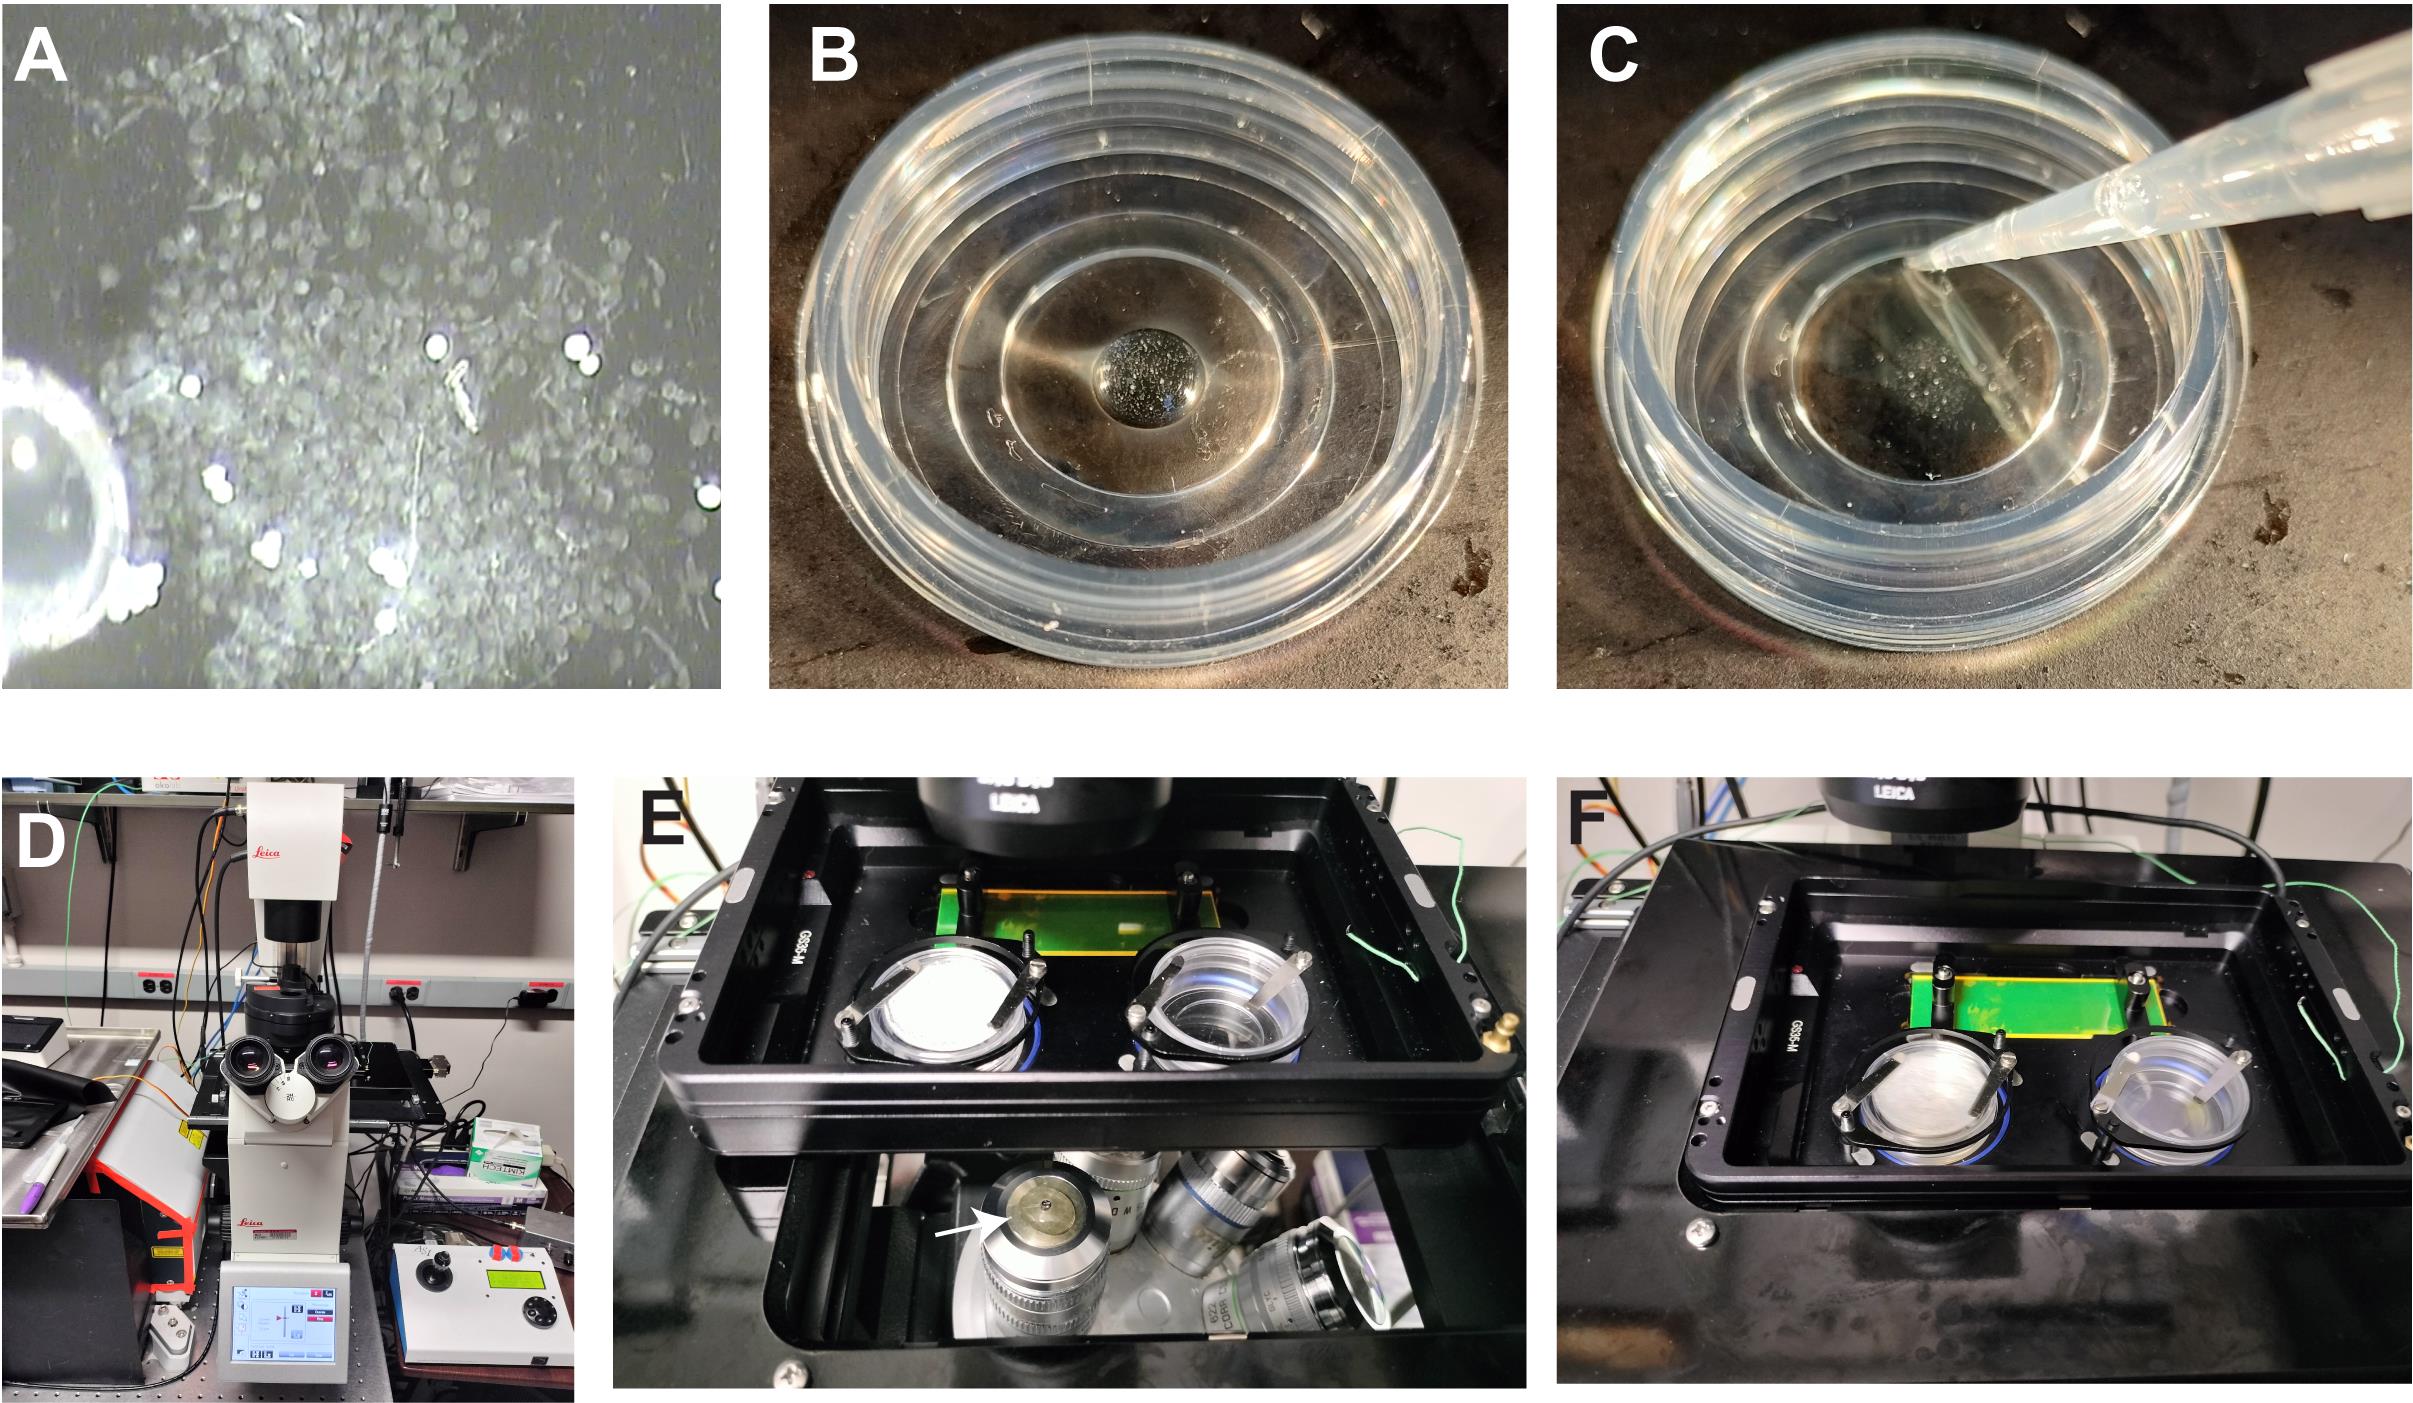
Figure 3. Mounting male germ line cysts in a cover glass bottom dish and moving onto spinning disk confocal microscope stage. (A) Prewashed male germ line cysts were aspirated with a prewetted pipette tip. (B) Cysts were dispensed at the center of a cover glass-bottom dish (Ø 15 mm). (C) Gently, 200 μL of M3 media was added without disturbing the cysts at the center. (D) Leica DMi8 microscope base setup. (E) Glass bottom dish mounted on a slide/dish holder with a magnetic clamp. A drop of water dispensed on 63× water immersion objective (arrow). (F) Slide/dish holder gently inserted on the microscope stage. Video 4. In vitro live imaging of dissected adultDrosophila spermatocyte cysts undergoing meiosis I and meiosis II cytokinesis in cover glass-bottom dish coated with poly-D-Lysine (200 μg/mL overnight at room temperature followed by 3× wash with distilled water). Cysts are isolated from fly testes expressing tGPH (PH domain of Grp1/Step) and Feo-mCherry ubiquitously. Live imaging was performed with the 63× water immersion objective and an AOI of 1024 × 1024 and at intervals of 2 min for 120 repeats. Video shown here represents 10 frames/second.Slowly add 200 μL of the fresh M3 media to the observation area of the cover glass bottom dish without disturbing the cysts from the center (Figure 3C and Video 2). (Note: The volume of media added could differ depending on the observation area of the cover glass bottom dish used in the experiment). Close the dish with the lid and gently move it to the confocal imaging station (Figure 3D and F). Make sure cysts remain at the center of the dish; cysts tend to spread to the corners if the media level is too low or too high.
If desired, cysts can be individually separated by gently pushing each cyst away from the pool with a needle, followed by aspirating it with the prewetted pipette tip and dispensing into a cover glass bottom 94-well plate containing 100 μL of media in each well. Individual cysts settled in each well could be examined under inverted confocal microscope to identify the differentiation stage of interest. This approach allows one to arrest the cyst at the desired differentiation stage by simply adding paraformaldehyde (PFA) to the well (final concentration should be 4%) [3].
Time-lapse imaging on a spinning disc confocal microscope
We use Andor spinning disk confocal microscope with the Leica DMi8 base for imaging; however, the protocol described below could be adapted to any other imaging setup. This microscope has Yokogawa CSU-W1 confocal scanner 8 laser lines and also provides epifluorescence, brightfield, and differential interface (DIC) imaging modalities. It also has a motorized XY stage with piezo Z scanner (ASI), Andor Zyla4.2 + sCMOS camera, and a range of objectives including 5× air, 10× air, 20× air/oil, 63× oil, 25× water, and 63× water (1.2 NA, WD 0.30 mm).
Turn on the spinning disc confocal microscope and the computer.
On the computer, click on ASI console app → select MS2000 → click Connect → set x, y, and z speed to 5 and exit from ASI console.
Double-click on Andor Fusion app to open the software.
Place the glass bottom dish in the slide/Petri dish holder and lock the dish with magnetic clamps (Figure 3D, F).
Return to Fusion software. In the Navigation window, enter image name and save location by clicking on the three dots as shown in Figure 4A with first arrow.
In the Protocol window, if a previously saved protocol exists, select and reload it as shown by the second arrow in Figure 4A.
In the Microscope window (arrow 3), select objective of interest. We normally select 10× air objective first. Go to Active channels window (arrow 4) and select Bright field eyes (BF eyes). Return to the microscope and, using the eyepiece, locate and focus on the isolated cysts (Figure 5A). Use the joystick to move the stage x and y positions and the fine/course adjustment for moving in z axis as desired (Figure 3D).
Return to Fusion. In the Active channels window from the drop-down list (arrow 4), select brightfield camera and press live mode (Figure 4B, arrow 6). Adjust the exposure time to 100 ms (below arrow 4) and adjust the contrast by pressing auto contrast (Figure 4B, arrow 7). Take a snap of the image (Figure 5A) if needed (Figure 4B, arrow 10).
Switch the objective to 63× water immersion on the Microscope window (Figure 4A, arrow 3) and select bright field eyes from the active channels drop-down list (arrow 4). Go to the microscope, gently lift up the slide/Petri dish holder, place one or two drops of double-distilled water on the objective lens, and return the dish holder to its original position (Figure 3D, F). Note that water on the objective tends to evaporate during longer hours of imaging (>4 h). Using brightfield and eyepiece, search for cysts undergoing cytokinesis or spermatocytes that are likely to undergo meiotic cytokinesis within the next 10–15 min. Prophase/metaphase spermatocytes typically have a round nucleus in the brightfield (Figure 5B, C). Prophase spermatocytes have evenly distributed mCherry fascetto in the nucleus (Figure 5E, F) (Video 5). During metaphase, nuclear membrane is ruptured/perforated; as a result, mCherry fascetto translocate from nucleus to cytoplasm (Video 5). Anaphase cells typically appear as oval shaped, with the elongated nucleus surrounded by parafusorial membranes (Figure 5G, H).
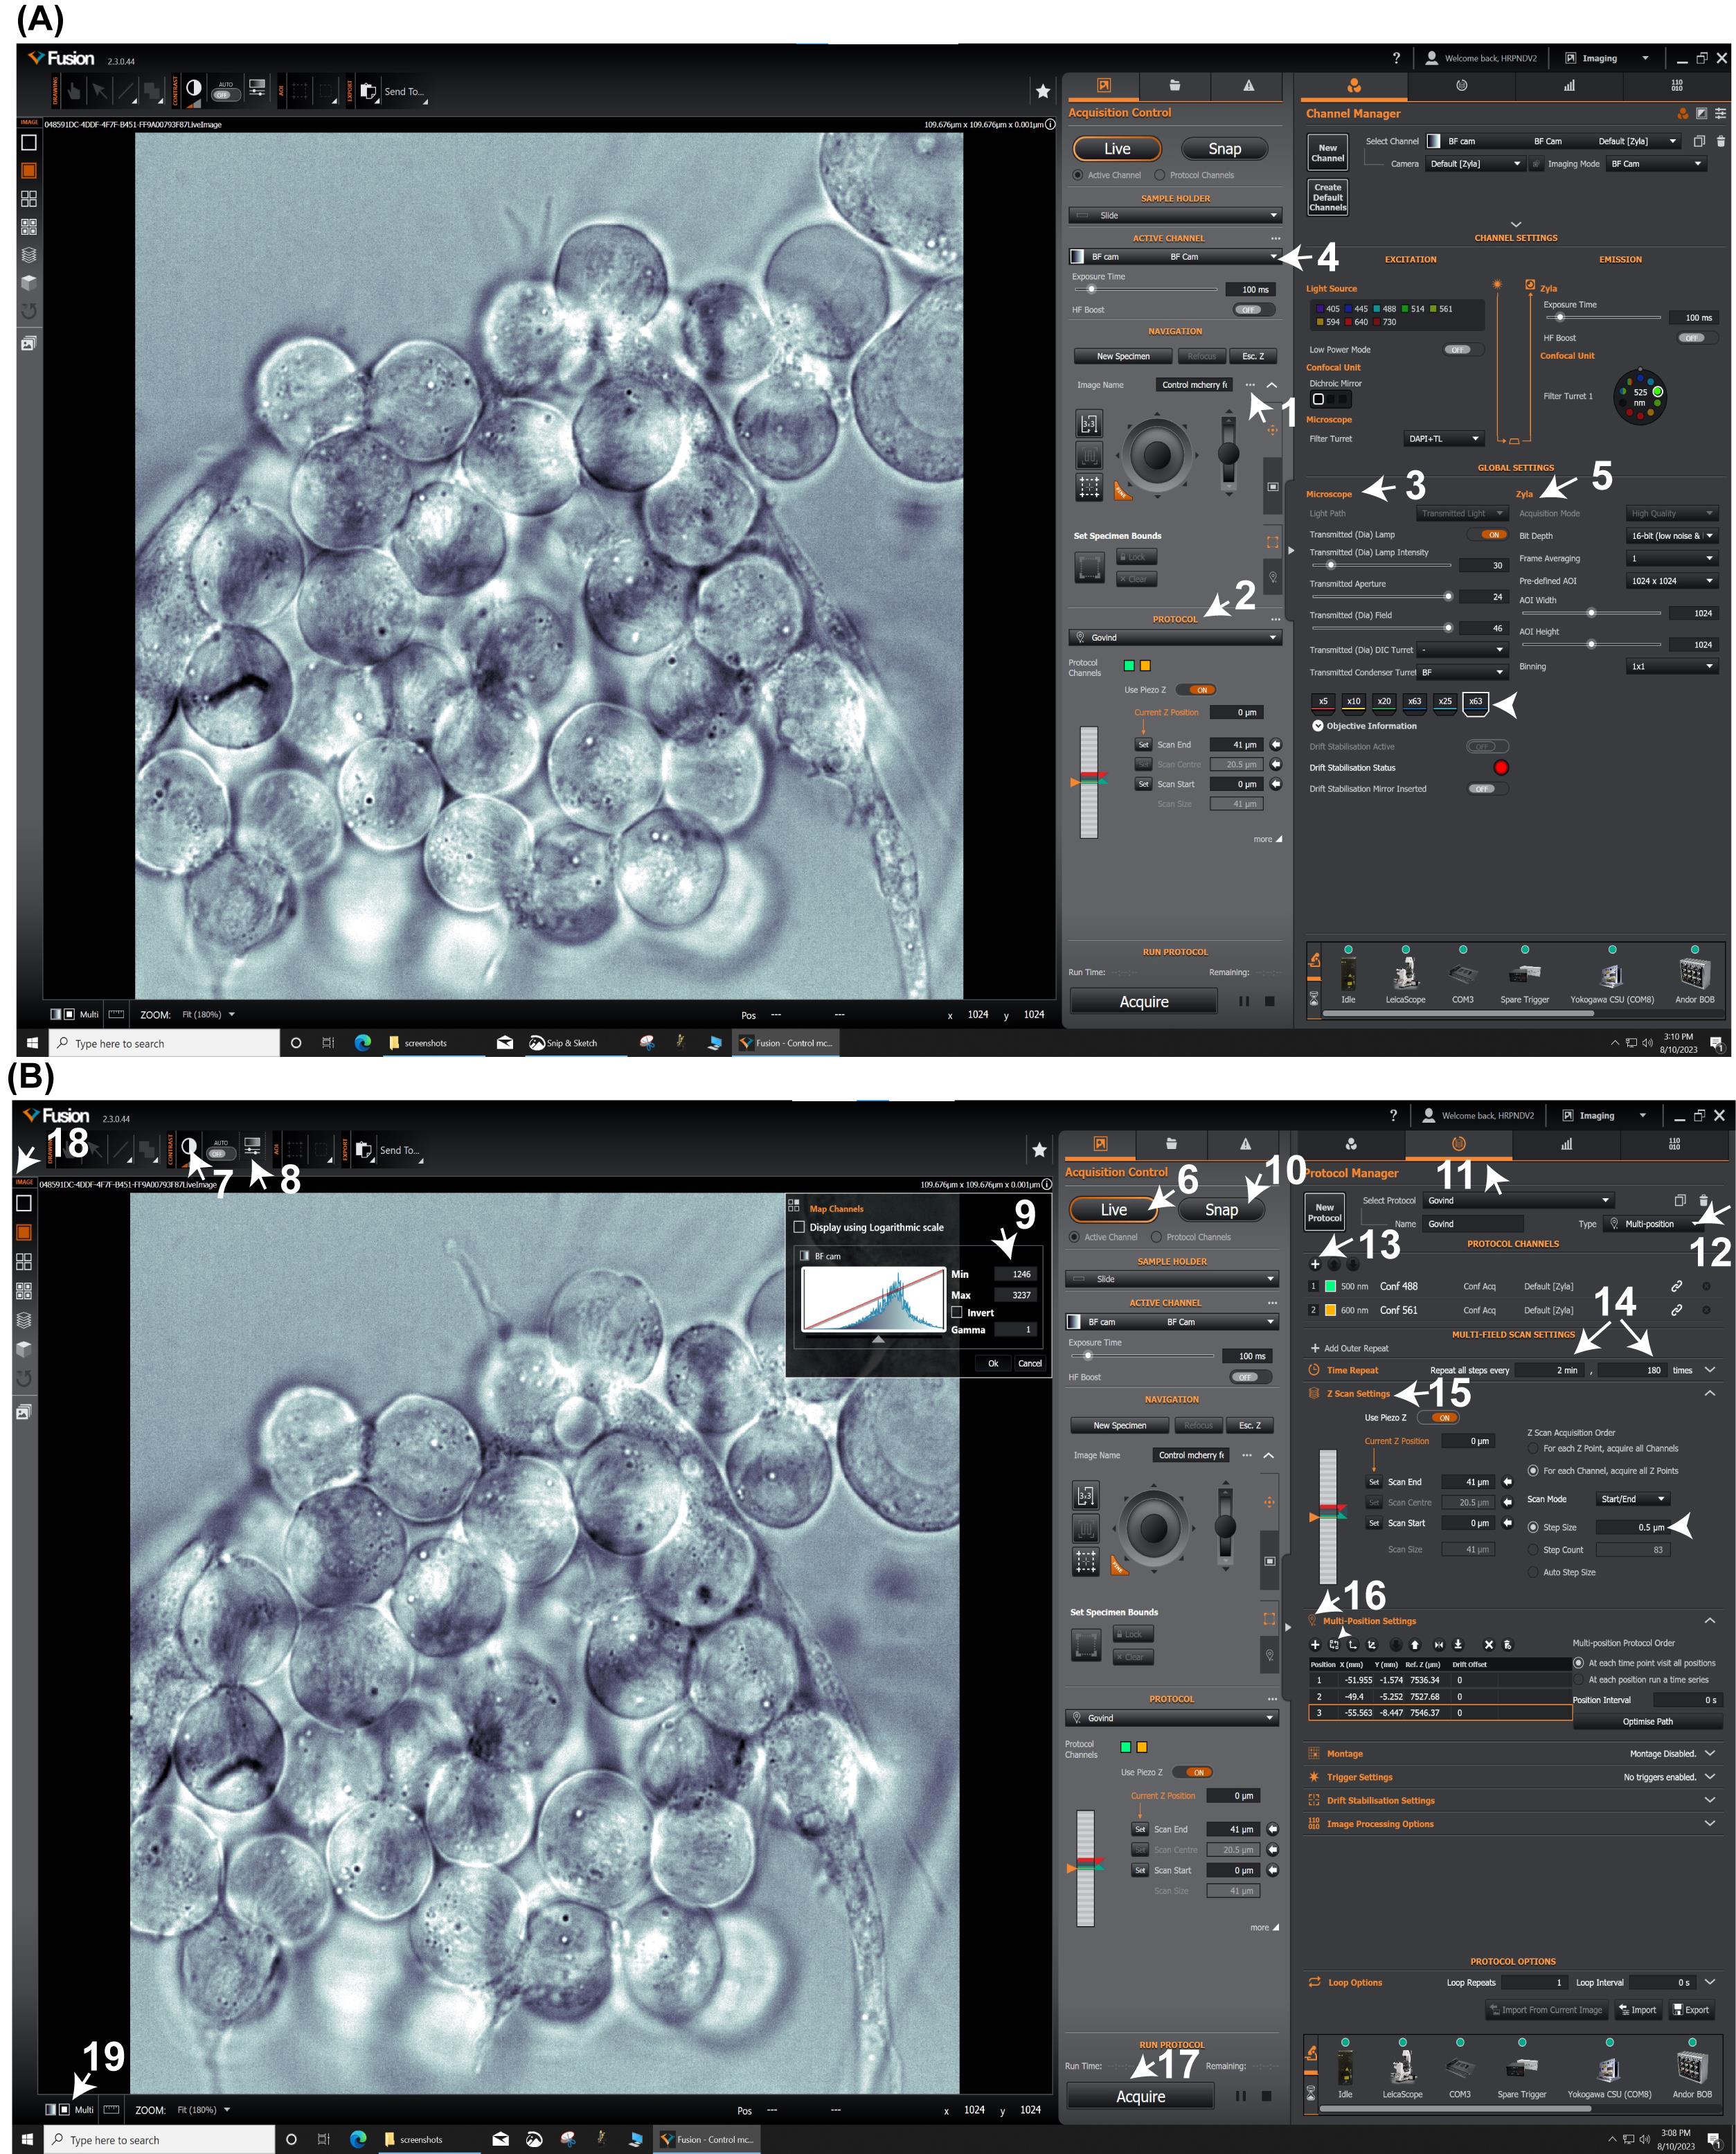
Figure 4. Time lapse imaging on Andor spinning disk confocal microscope. Andor Fusion software (2.3.0.48) workstation showing acquisition control, channel manager windows (A), and protocol manager window (B).Once identified, mark the cyst location of interest on the Multifield window in the Fusion software (Figure 4B, arrow 12 and 16). Find and add up to 2–4 cyst locations to the Multifield window.
Return to the Fusion software and switch to brightfield camera (BFC)/differential interphase mode (DIC) from the active channels menu (Figure 4A, arrow 4) and press live mode (Figure 4B, arrow 6). Locate and position the cysts of interest to the center of the field using the joystick and update the coordinates for each cyst of interest in the multi-position settings (Figure 4B, arrow 16, arrowhead).
Switch from brightfield camera mode to confocal preview mode (select from drop-down menu arrow 4 in Figure 4A) and select the appropriate laser channel. Adjust the laser power between 0.2% and 2% and the exposure time range from 50 to 300 ms to visualize fluorescence in the cysts (arrow 4). Adjust the contrast in Map channels window (Figure 4B, arrow 8 and 9) by setting up minimum (100) and maximum (150).
While in live mode, use fine adjustment on the microscope to scan through the Z-plane and identify the start z-position for each cyst of interest; set it as “0” in z-scan settings menu (Figure 4B, arrow 15) and update it on Multi position window (arrow 16, arrowhead). Add laser channels of interest to protocol channels (Figure 4B, arrow 13); Confocal 488 and Confocal 561 channels are selected in this example (Figure 4B, arrow 13). Select individual protocol channels from the active channels drop-down menu and adjust their laser power and exposure times. For instance, in our experiments, 488 laser power was set to 5% and the exposure time was set to 30 ms for tGPH. Similarly, 561 laser power was set to 10% and the exposure time was set to 30 ms for mCherry fascetto.
Go to Time repeat window (Figure 4B, arrow 14) and setup time-lapse imaging to capture Z-stack of all positions every 2 min for 120 times (or any number of times of your interest).
Go to Z-scan settings (Figure 4B, arrow 15) and set up Z-scan thickness to 41 μm and the optical section step size to 0.5 μm.
Finally, go to the Run protocols window and press the acquire button (Figure 4B, arrow 17) to start imaging. Live data could be viewed in 3D or individual channels in 2D from options in the Image window (Figure 4B, arrow 18 and 19).
Under the above-described conditions, we were able to image three independent cysts simultaneously for up to 4 h without causing major phototoxicity.
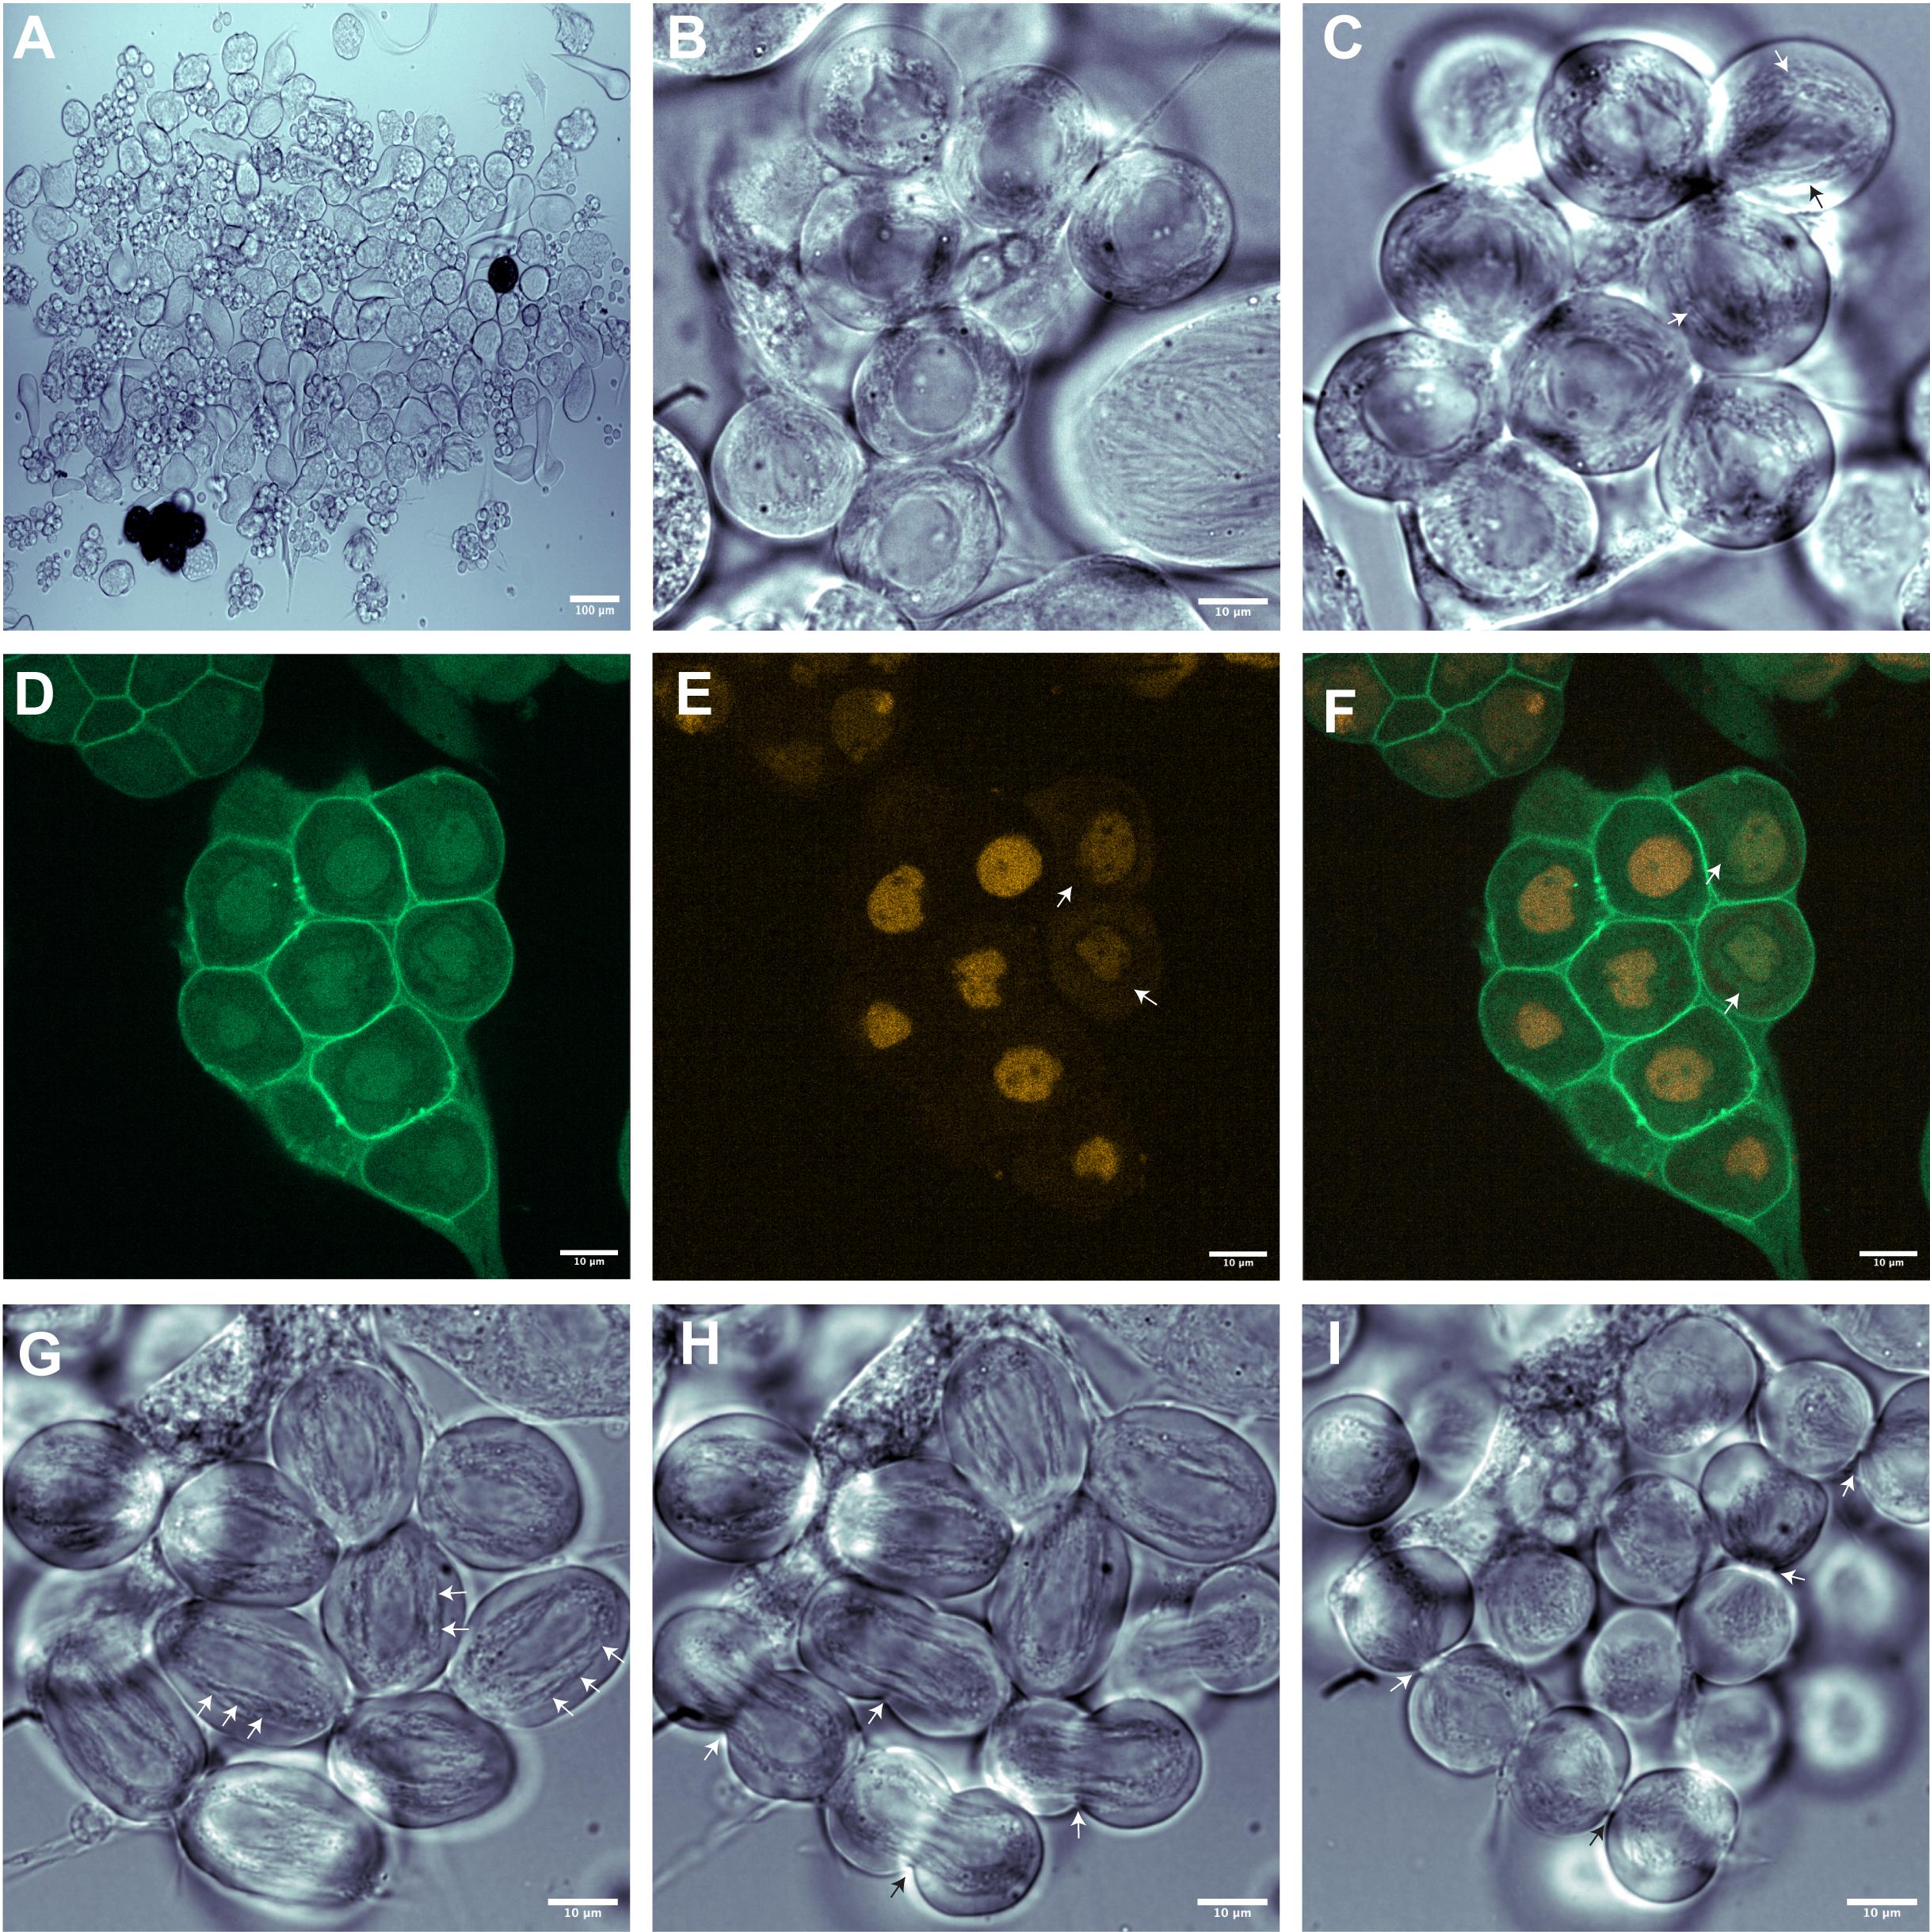
Figure 5. Identification of male germline cysts undergoing meiotic cytokinesis. (A) Low magnification brightfield image of isolated cysts (10×). (B, C) Brightfield image of spermatocytes likely to undergo cell division, at high magnification (63×). Note the spermatocytes with characteristic round nucleus in prophase (B) and spermatocytes with elongating nucleus in metaphase, shown with arrow (C). (D, F) Fluorescence image of prophase spermatocyte cyst showing GFP-tagged pleckstrin homology domain of Grp1that binds to phosphatidylinositol 3,4,5 triphosphate (PIP3) and localizes to plasma membrane expressed under the control of tubulin promoter (green) and central spindle binding protein fascetto tagged with mCherry expressed under the control of ubiquitin promoter (red). Note that mCherry-fascetto is uniformly distributed in the nucleus of prophase spermatocytes and, as the cells progress into metaphase, fascetto translocate to cytoplasm. As a result, net fluorescence reduces due to the diffusion of fascetto (arrow). (G-I) Brightfield images of spermatocytes undergoing cytokinesis. (G) Anaphase spermatocytes showing overall elongated cell shape and spindle envelope called parafusorial membranes around the separating chromosomes (arrow). (H) Spermatocytes in early telophase showing cleavage furrow (arrow) (I) Due to incomplete cytokinesis, spermatocytes in late telophase remain inter-connected with each other via cytoplasmic bridges (arrow). Video 5. Ex vivo live imaging of meiosis I and meiosis II cytokinesis in adultDrosophila testes. GFP-tagged PH domain of Grp1/Step (tGPH) and mCherry-tagged fascetto (feo) are expressed ubiquitously. Live imaging was performed with the 63× water immersion objective with an AOI of 1024 × 1024 and at intervals of 3 min for 100 repeats. Video shown here represents 10 frames/second.
Ex vivo live cell imaging of meiotic cytokinesis in whole mount adult testes
The protocol described in this section focuses on ex vivo imaging of whole mount adult testes; however, we believe this method could be adaptable to testes from all developmental stages and other tissue types of choice such as larval brain.
Prepare breathable membrane dish for imaging
Take 50 mm Lumox® Dish and turn it upside down so that its flat membrane base faces upward (Figure 6C).
Place SecureSeal imaging spacer sticker on the flat membrane base (Figure 6D) and keep it aside.
Dissection of adult testes
Refer to section A1 and Figure 2A–H and Video 2 for instructions on how to dissect adult testes. Microscope setup for dissection is shown in Figure 6A and B.
Mounting adult testes on breathable membrane dish
Using precut and prewetted pipette tip, aspirate 2–3 pairs of dissected testes and dispense at the center of spacer well, as shown in Figure 6E.
Gently place cover glass over the testes on the spacer well without creating an air bubble (Figure 6F).
Using forceps, gently apply pressure evenly around the cover glass (Figure 6G).
Carefully remove excess media between the cover glass and dish membrane using Kimwipe (Figure 6H). Note that excess media around the cover glass will be problematic, especially when water immersion objectives are used, as water tends to enter the space between cover glass and dish membrane by capillary action.
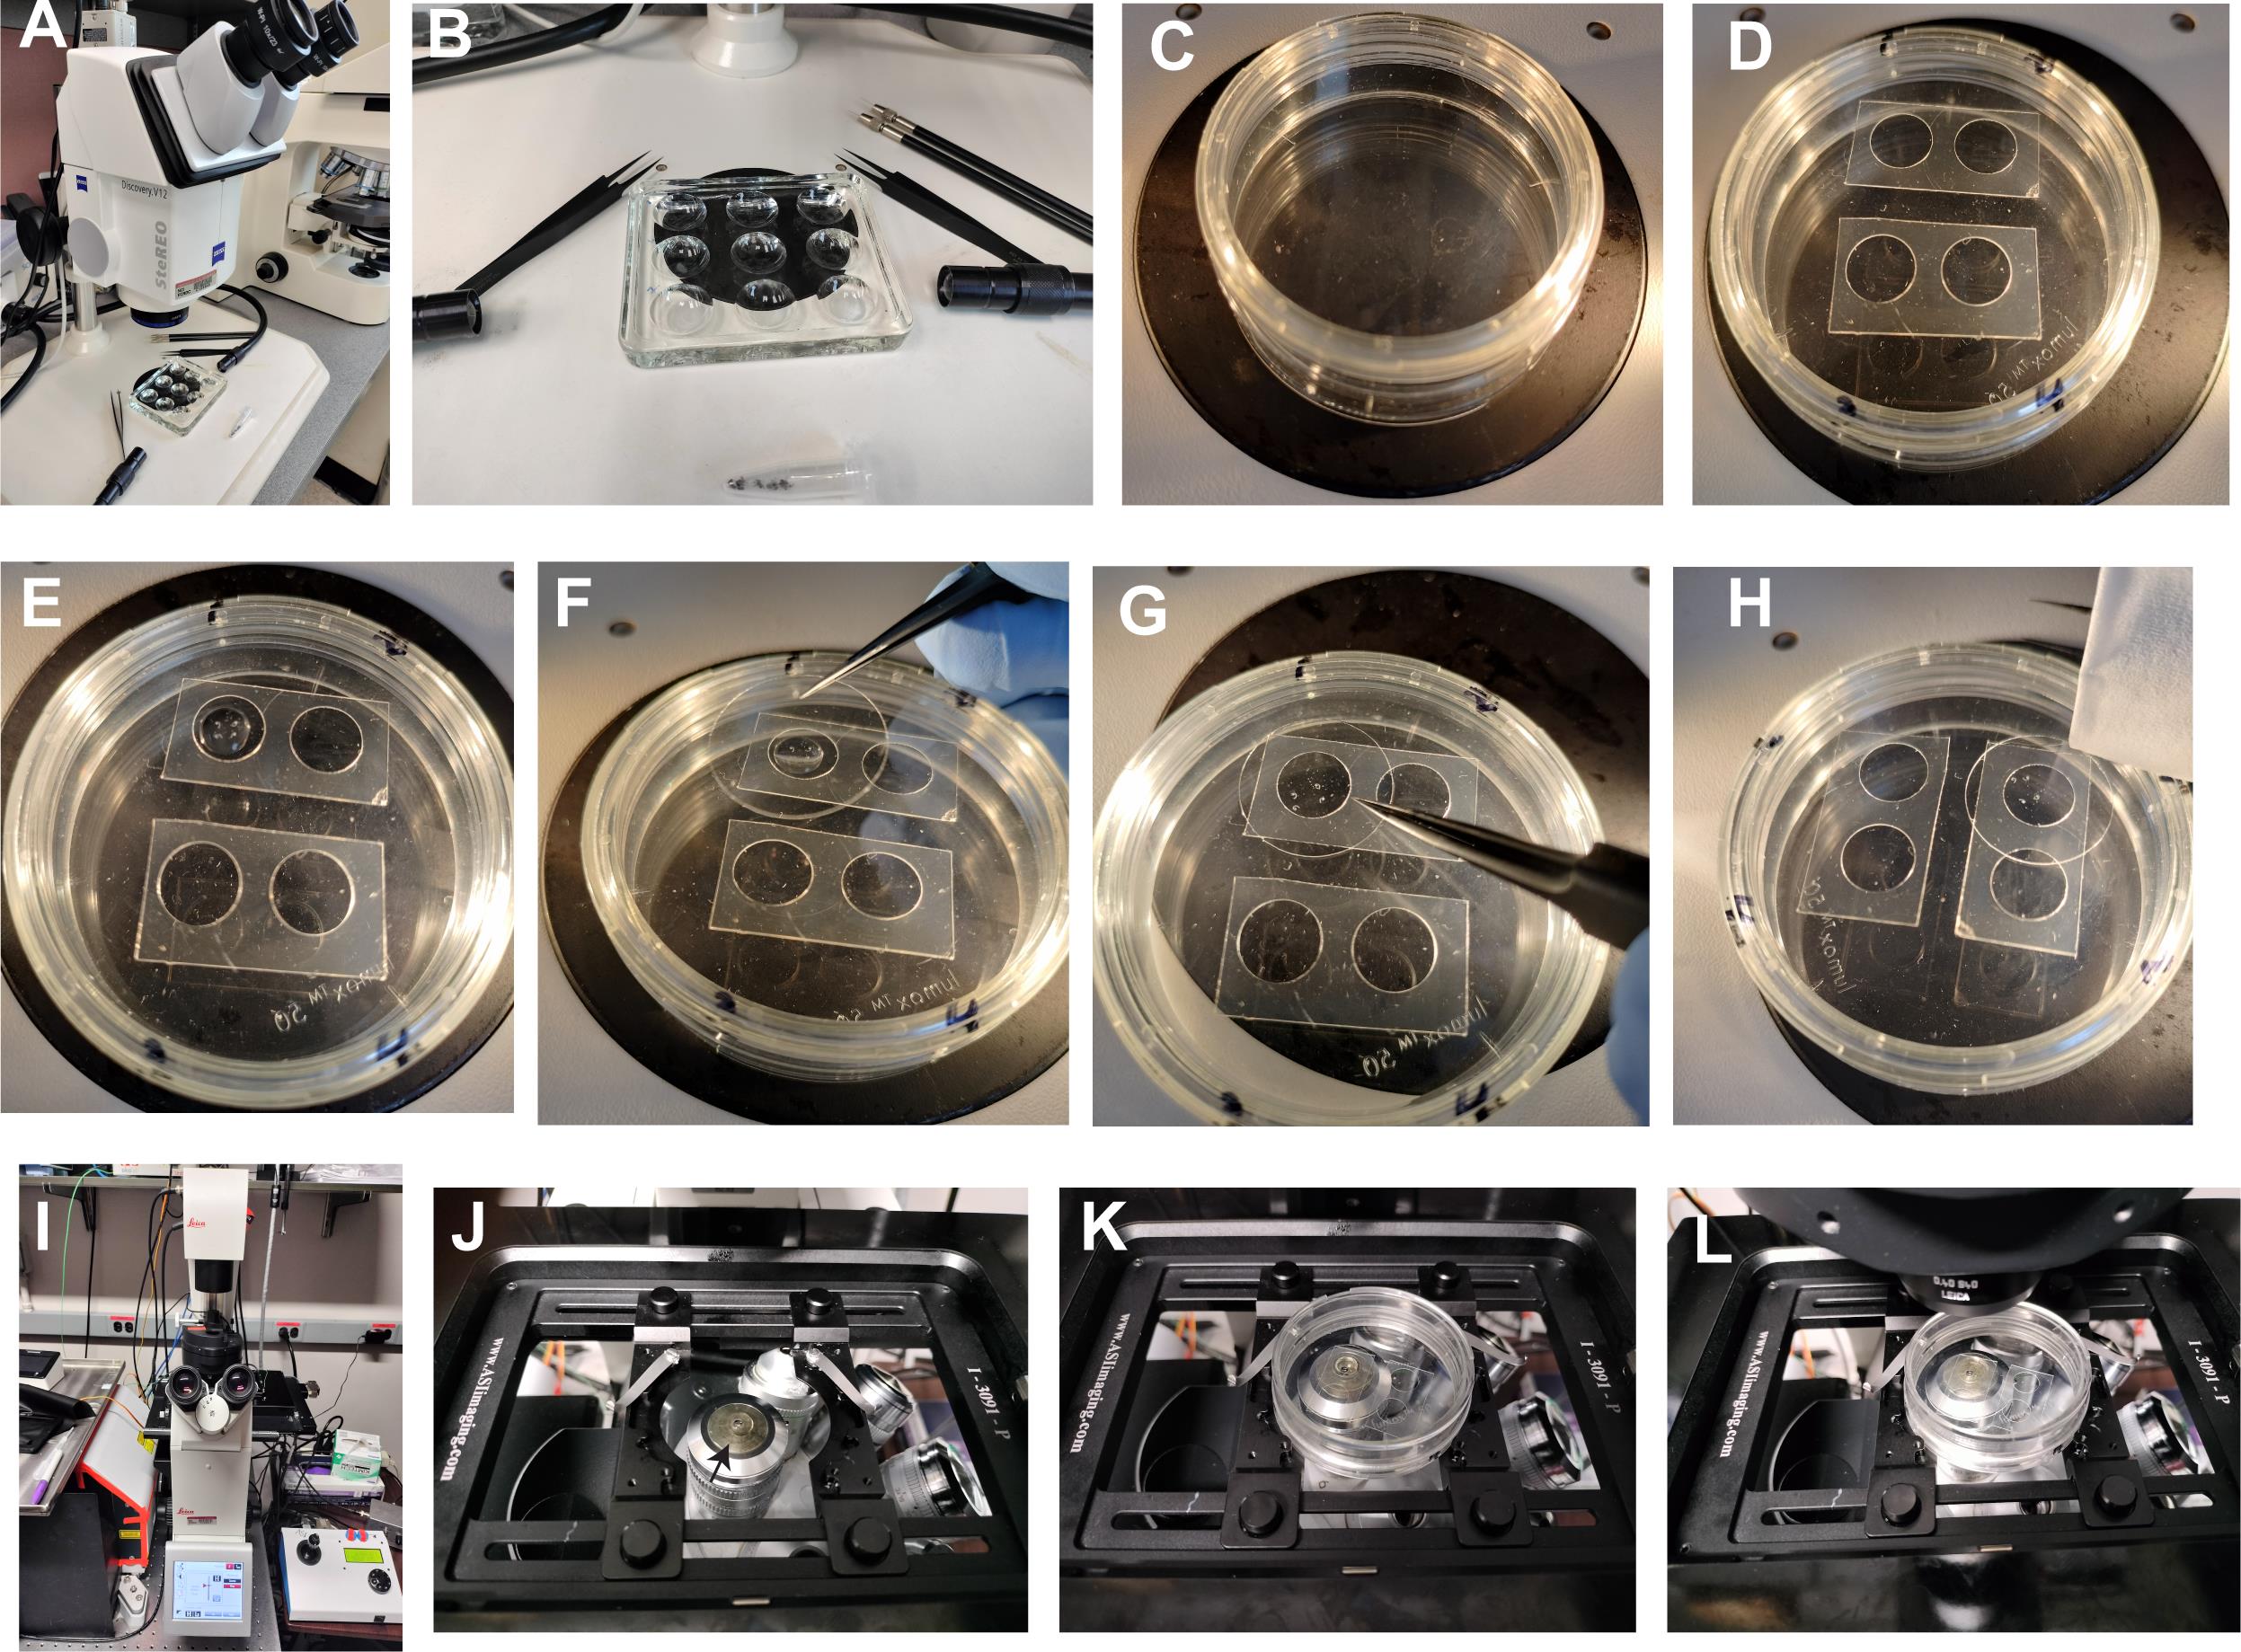
Figure 6. Ex vivo live imaging of male meiotic cytokinesis in adult testes. (A) Zeiss SteREO Discovery V12 microscope for dissection purposes. (B) Tools required for dissection are displayed, which include one pair of forceps, one pair of needle holders with needles, and a 9-well Pyrex glass plate. (C) Upside down view of 50 mm Lumox dish showing gas permeable membrane surface up. (D) SecureSeal imaging Spacers sticker fixed on gas permeable membrane (well diameter 8–9 mm and depth of 0.12 mm). (E) Mount two pairs of testes in a drop of M3 media (20–30 mL). (F) Gently place a coverslip without creating an air bubble. (G) Gently apply pressure around the well on the coverslip so that excess media comes out of the well and the coverslip firmly attaches to the spacer surface. (H) Gently remove excess media around the coverslip with Kimwipe. (I) Andor Spinning Disk confocal with Leica DMi8 microscope base. (J) Microscope stage showing slide/dish holder and a drop of deionized water (50–100 mL) on 63× water immersion objective (arrow). (K) Place 50 mm Lumox dish on slide/dish holder with the coverslip facing the objective and lock with sliders. (L) Push the condenser arm back to its position and, using brightfield, locate and focus on the spermatocyte cysts undergoing meiosis.
Imaging adult testes on spinning disc confocal microscopy
Place a drop of water on the 63× water immersion objective on confocal microscope (Figure 6I–J).
Mount 50 mm Lumox dish in slide/Petri dish holder with the cover glass facing the objective and lock the dish (Figure 6I–L).
Using brightfield, focus on position 3 of the testis (Figure 1A) and identify the cysts likely to undergo cytokinesis as described in section A4i [e.g., in the brightfield, prophase spermatocyte nucleus appears round (Figure 5B and C)]. Once identified, set up image acquisition as described in section A4. Note that cysts tend to move significantly in whole mount adult testes (Video 5); however, increasing area of interest (AOI) to 2048 × 2048 in Zyla window (Figure 4A, arrow 5, arrowhead) or changing the objectives to lower magnification will reduce the chance of meiotic cysts going out of imaging frame (Video 6).
Lumox dish can be reused several times. Remove the cover glass and testes from the Lumox dish by immersing and rinsing the dish in deionized water, followed by wiping the surface with the 70% ethanol.
Video 6. Ex vivo live imaging of meiosis I and meiosis II cytokinesis in adultDrosophila testes. GFP-tagged PH domain of Grp1/Step (tGPH) and mCherry-tagged fascetto (feo) are expressed ubiquitously. Live imaging was performed with the 63× water immersion objective and a pre-defined area of interest size of 2048 × 2048 and at intervals of 3 min for 140 repeats. Video shown here represents 10 frames/second.
Data analysis
Image processing
Andor Fusion saves data in Imaris image file (.ims) in the specified folder. Double-click on the image to open the Imaris software (license required).
When a time series image opens on Imaris with 3D view, adjust bright/contrast by setting up minimum/maximum values for each channel (e.g., min 100, max 150) (Edit → Display Adjustments). To crop time series to remove any unacquired time points or to trim overall time series: Edit → crop time → in a pop-up window, enter start and end time points → OK → Save). Similarly, to trim Z-slices go to Edit → delete slice → in a pop-up window enter which slices to delete → OK → Save. To combine two-time series, open first image series and then go to Edit → add time points → in a pop-up browser window select second.ims file and enter. To crop 3D volume of a time series, go to Edit → crop 3D → in a pop-up window select area to be cropped → OK → Save.
To save time series image as video, press record button (red button left to the time slider in 3D view). A pop-up window will appear; select 10 frames/sec and H264 Video (*.mp4) format.
To further process time series in ImageJ/FIJI, press record button → in a pop-up window select 10 frames/sec and Raw Video (*.avi) file format and save.
Measure cleavage furrow diameter at different time points
Open Raw Video.avi file on ImageJ/FIJI (Figure 7A).
To set up scale bar, draw a straight line on top of image scale bar using straight/segmented or freehand lines or arrows tool (Figure 7A), and go to Analyze → Set Scale → in a pop-up window enter the known distance and unit of length (e.g., “um” for micrometer) → Ok.
Identify the meiotic spermatocyte whose cleavage furrow diameter is to be determined. Using the straight-line tool, draw a line at the equatorial region of the elongated spermatocyte where central spindle will assemble (Figure 7B, C) and go to Analyze → Measure (in a pop-up window, the length of the furrow will be displayed, Figure 7D). Repeat the length measurement for each timepoint until the cleavage furrow reaches its minimum. Measure furrow length from at least three meiotic spermatocytes from three independent cysts.
Plot the cleavage furrow length/diameter as a function of time using XY, column, and statistical analysis in Prism 9. We have taken Dynasore- and DMSO-treated spermatocyte cysts as an example and determined the cleavage furrow diameter as a function of time, shown in Figure 7E, F.
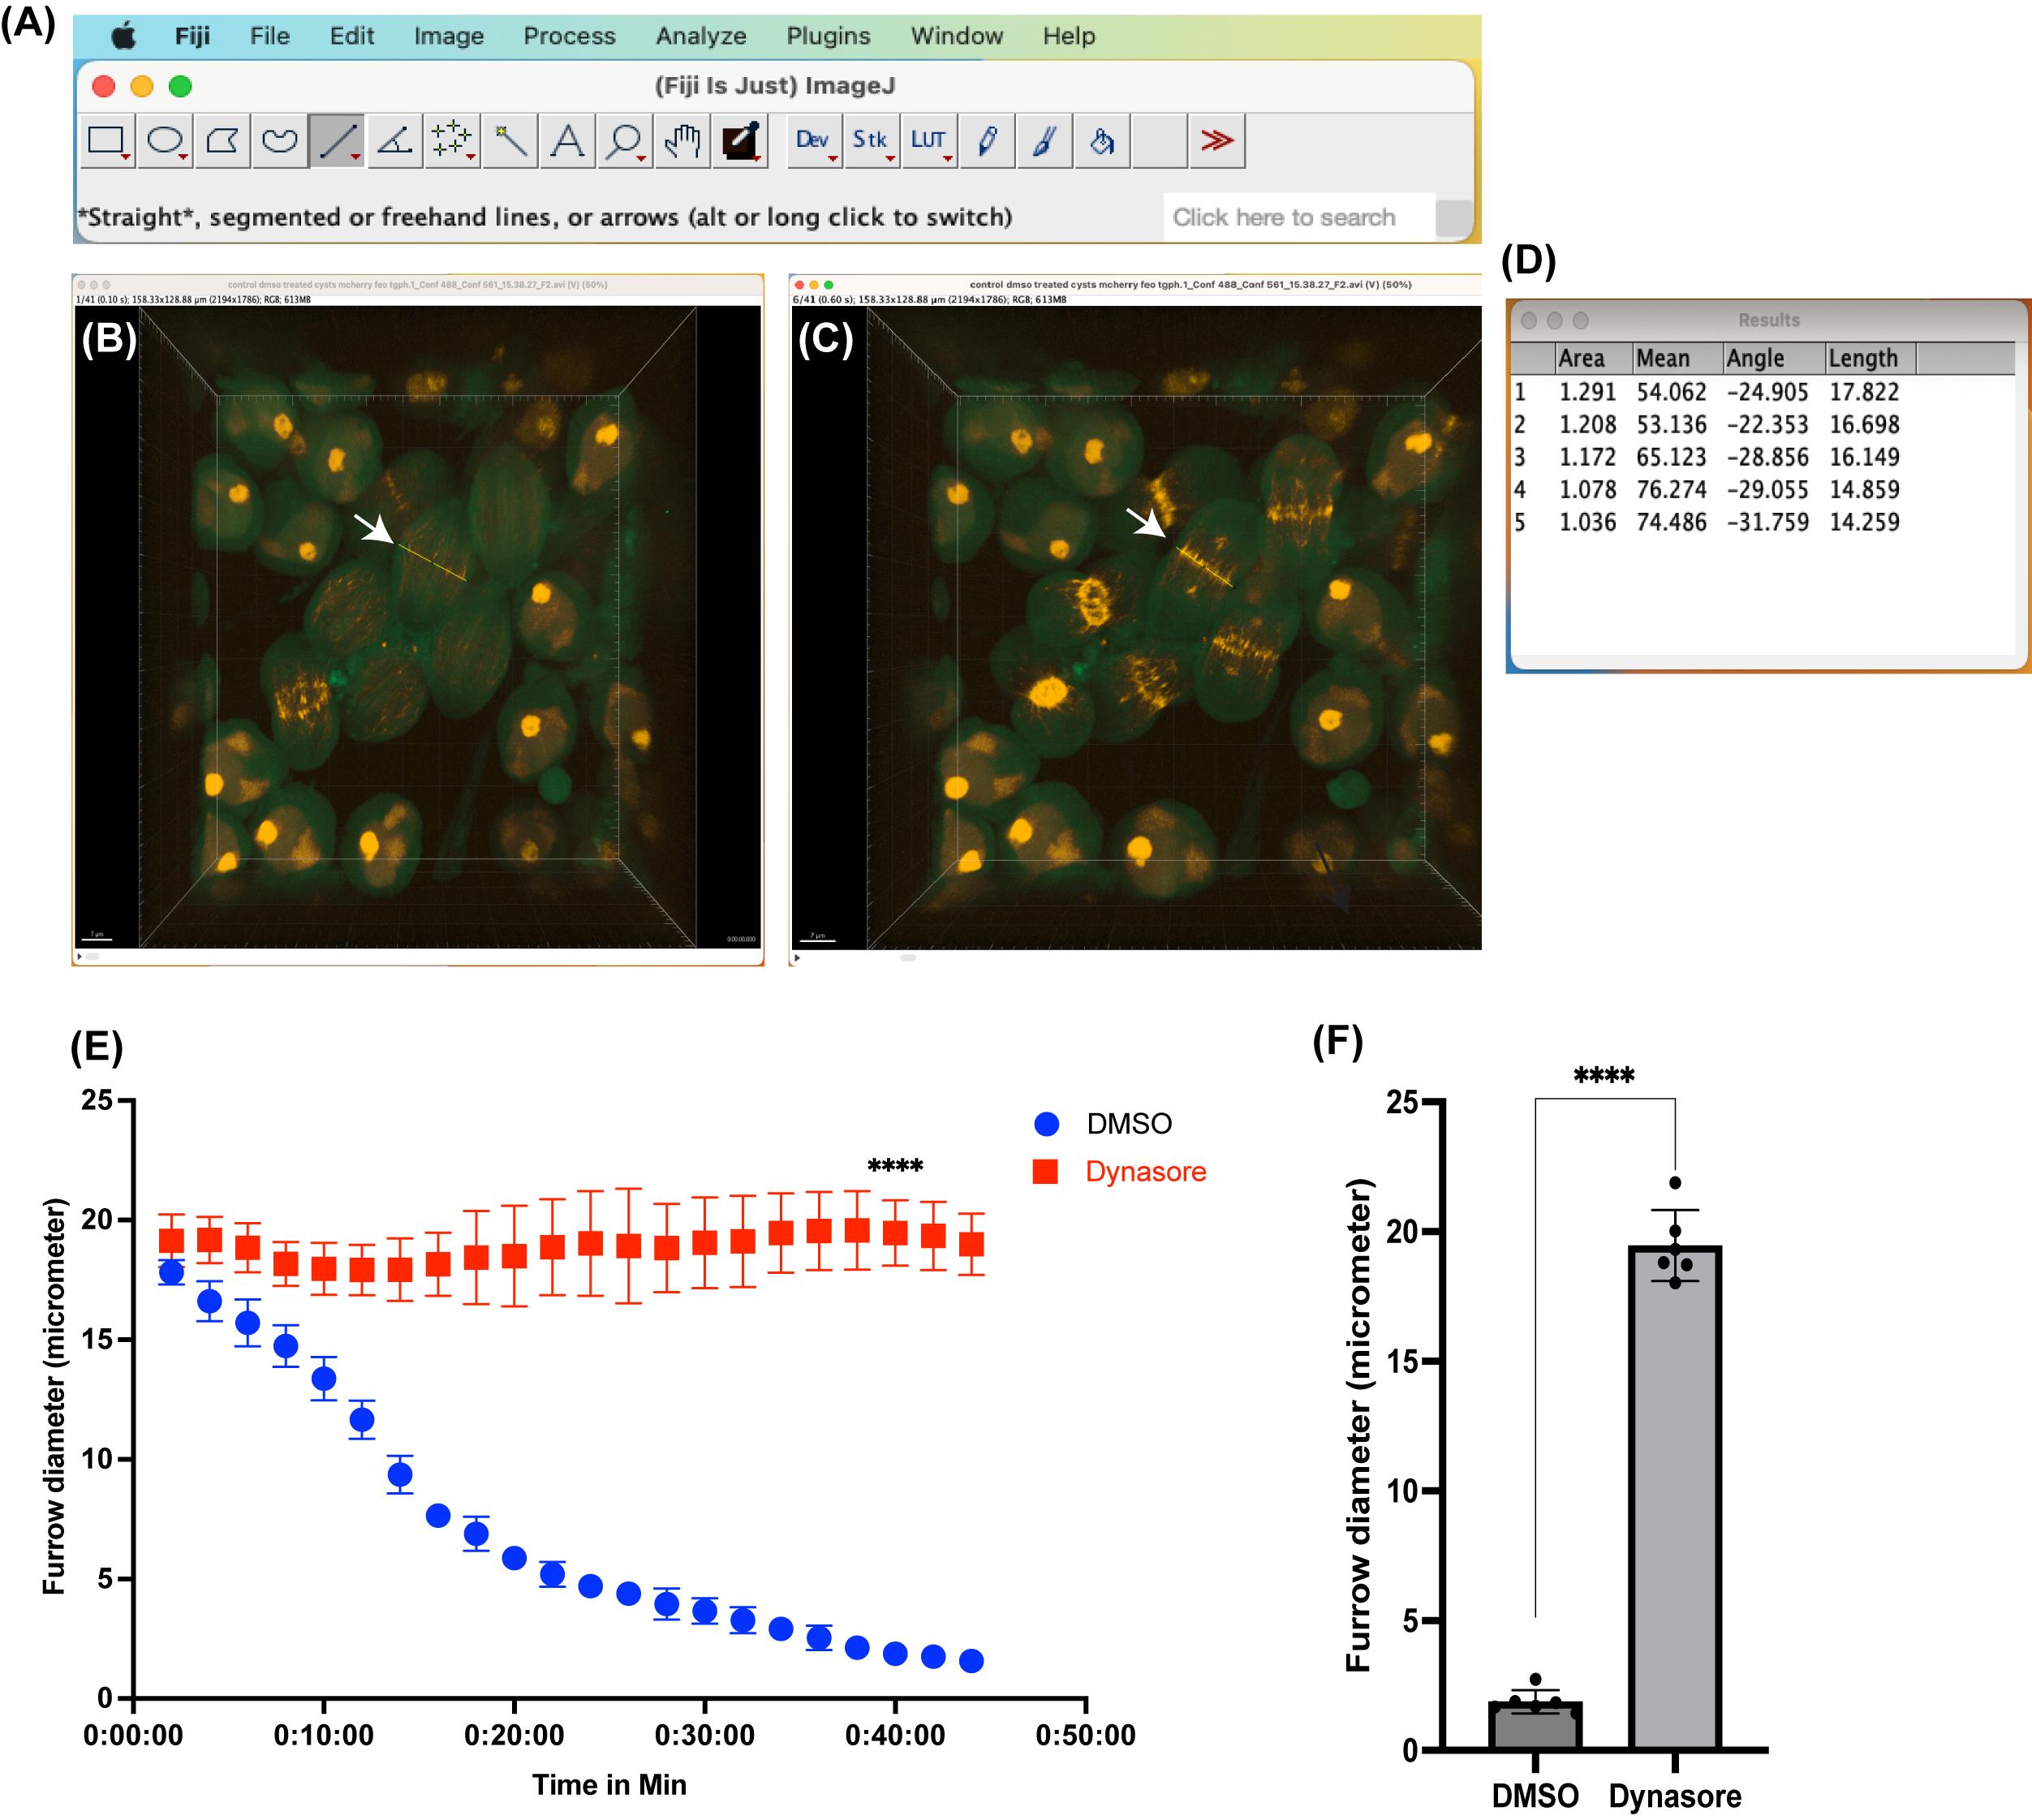
Figure 7. Measurement of cleavage furrow diameter at various time points . (A) Fiji/ImageJ software, showing straight line tool. (B, C) Example images with a straight line (yellow line) drawn at the equatorial region of spermatocyte undergoing cytokinesis (shown with arrow). (D) Example length measurement results shown for the first five-time frames of the video. (E) Comparison of cleavage furrow diameter as a function of time in spermatocytes treated with either vehicle alone (DMSO) or endocytosis inhibitor Dynasore (80 μM). Data represents length measurements from six spermatocytes from three independent cysts. (F) Comparison of furrow diameter at single timepoint (40 min). Each dot in the graph represents a single spermatocyte in a cyst undergoing cytokinesis. Spermatocytes from three independent cysts were used in analysis.
General notes and troubleshooting
General notes
The protocol for in vitro and ex vivo live imaging of the male meiotic cytokinesis described here can be applied to larval and pupal testes.
Water on the immersion objectives tends to dry out during imaging. When imaging for more than 4 h, pause the acquisition, add a drop of water to the objective, and resume the acquisition. However, special care should be taken to prevent the movement of cysts during this process.
The movement of male germ line cysts sets one of the limitations of this protocol, as they are not attached to the cover glass bottom dish and tend to go out of the imaging frame. Frequent monitoring of image acquisition may help prevent this possibility.
Dissected germ line cysts are sensitive to phototoxicity, and use of higher laser powers (>20% with longer exposure times >50 ms) may induce cytokinetic defects in control spermatocytes. Therefore, imaging samples with weaker fluorescence signals will be a challenge. Further, imaging cysts for longer than 6 h will be a problem, as the water in the media tends to evaporate and condense on the lid surface. As a result, the net concentration of media constituents will change, which in turn may affect cytokinesis.
Media conditions greatly affect the germ line cyst behavior during cytokinesis. Do not use the media if it is too old (>2 weeks from the time of thawing an aliquot). Measure the cytokinetic efficiency for the control cysts before going ahead with the treatment conditions.
Whole mount adult testes are relatively less sensitive to phototoxicity compared to dissected germ line cysts. Therefore, imaging whole mount adult testes will be of choice for the samples with weaker fluorescence signals; for the samples with strong fluorescence signals, it is possible to image for longer hours (we were able to image testes up to 7 h without causing any damage, see Video 6). Further, it will be of choice if the sample size is small; for instance, there are <5 male flies available to study cytokinesis. However, significant movement of cysts due to testis muscle contractions will be a limitation. This problem could be counteracted by increasing the image frame size (2024 × 2024) to cover a larger imaging area.
Ex vivo live imaging cannot be performed on wild-type testes containing yellow pigment cells. However, individual germ line cysts could be dissected from these testes and imaged in vitro.
Troubleshooting
Problem 1: Dissected testes look abnormal in the media.
Possible causes: Media pH or osmolarity may not be optimal, or media may be too old.
Solution: Make sure potassium bicarbonate is added during media preparation. Thaw a fresh aliquot of media and warm it to room temperature before using it for dissection.
Problem 2: Germ line cyst count is low.
Possible causes: Old flies were used for dissection; a smaller number of testes were used; or the testes’ muscle sheath was not fully torn open.
Solution(s): Use newly enclosed flies (<24 h) for testes dissection, increase testes number (15–20 pairs), and make sure the testes’ muscle sheath is fully torn to release all the cysts.
Problem 3: Testes or germ line cysts attached to pipette tip walls.
Possible causes: The pipette tip was not prewetted with M3 media containing 10% FBS.
Solution: Prewet the pipette tip with M3 media before aspirating testes or germ line cysts.
Problem 4: Cysts spread out in a cover glass bottom dish.
Possible causes: Media in the observation area of the cover glass bottom dish is not optimal, or the dish agitated excessively while shifting from the dissection area to the confocal imaging stage.
Solution: Make sure the media level in the observation area is flat (should not be convex or concave). In our experiments, a cover glass bottom dish with Ø15 mm area takes approximately 150–200 μL of media. Once cysts are mounted in the cover glass bottom dish, take extra care to prevent excessive movement. For instance, gently put the dish in a small tray and walk slowly while transporting it to the microscope for imaging. When all the cysts remain at the center, it will take much less time and increase the chances of finding the cysts undergoing cytokinesis.
Problem 5: Cysts move while imaging.
Possible causes: Excessive vibration on the microscope stage or media level is too high in the dish.
Solutions: Make sure the confocal microscope unit is on an anti-vibration table; avoid touching the microscope while imaging; make sure the media level in the observation area of the dish is flat (refer to Problem 4).
Problem 6: Difficulty in finding cysts undergoing cytokinesis.
Possible cause: Cysts were isolated from >2-day-old fly testes; or a low number of testes were used for dissection; or cyst count was low; or the cysts were spread out in the cover glass bottom dish.
Solutions: Use newly eclosed flies (<24 h) for dissecting testes; increase the number of testes (15–20 pairs); make sure the pipette tip is prewet when aspirating and dispensing cysts; make sure cysts remain at the center of the dish.
Problem 7: Cytokinetic defects seen in control spermatocytes.
Possible cause: Something went wrong with the media; the media is too old; a poly-L-lysine-coated cover glass bottom dish was used; higher laser powers were used for imaging.
Solutions: Make sure M3 media is prepared as described; discard old media and prepare fresh from frozen aliquots; make sure the cover glass bottom dish is not treated with high concentrations of poly L-Lysine; reduce laser power to image (preferably keep it to less than 10%).
Problem 8: Testes’ muscle sheath moves a lot while imaging ex vivo whole mount adult testes.
Possible cause: Testes are not properly mounted on a gas permeable dish; there is too much media around the cover glass and the spacer or water on the immersion objective entered the space between the cover glass and membrane.
Solutions: Make sure the cover glass is firmly sitting on the spacer and remove any excess media around the cover glass and membrane. Normally, testis muscle from newly eclosed flies tends to contract more than 2–3-day-old flies. If the problem persists, it may be a good idea to test testes from 2–3-day-old flies for imaging. However, in older flies, cysts undergoing cytokinesis are lower than the newly eclosed flies.
Validation of protocol
This protocol or parts of it has been used and validated in the following research article:
Kunduri et al. (2022). Delivery of ceramide phosphoethanolamine lipids to the cleavage furrow through the endocytic pathway is essential for male meiotic cytokinesis. PLOS BIOLOGY (Figure 4, panel C, D).
Acknowledgments
We thank Valentin Magidson (Staff, Optical Microscopy and Analysis Laboratory at NCI-Frederick) for technical assistance in imaging on Andor spinning disk confocal microscope. This study was funded by the intramural division of the National Cancer Institute, National Institutes of Health, Department of Health and Human Services. The content of this publication does not necessary reflect the views or policies of the Department of Health and Human Services, nor does mention of trade names, commercial products, or organizations imply endorsement by the U.S. Government.
Competing interests
The authors declare no conflicts of interest.
References
- Frappaolo, A., Piergentili, R. and Giansanti, M. G. (2022). Microtubule and Actin Cytoskeletal Dynamics in Male Meiotic Cells of Drosophila melanogaster. Cells 11(4): 695. doi: 10.3390/cells11040695
- Kunduri, G., Acharya, U., Acharya, J. K. Lipid Polarization during Cytokinesis. (2022) Cells 11(24): 3977. doi: 10.3390/cells11243977
- Kunduri, G., Le, S. H., Baena, V., Vijaykrishna, N., Harned, A., Nagashima, K., Blankenberg, D., Yoshihiro, I., Narayan, K., Bamba, T., et al. (2022). Delivery of ceramide phosphoethanolamine lipids to the cleavage furrow through the endocytic pathway is essential for male meiotic cytokinesis. PLoS Biol. 20(9): e3001599. doi: 10.1371/journal.pbio.3001599
- Adams, R. R., Tavares, A. A., Salzberg, A., Bellen, H.J. and Glover, D. M. (1998). pavarotti encodes a kinesin-like protein required to organize the central spindle and contractile ring for cytokinesis. Genes Dev. 12(10): 1483–1494. doi: 10.1101/gad.12.10.1483
- Prokopenko, S. N., Brumby, A., O’Keefe, L., Prior, L., He, Y., Saint, R. and Bellen, H. J. (1999). A putative exchange factor for Rho1 GTPase is required for initiation of cytokinesis in Drosophila. Genes Dev. 13(17): 2301–2314. doi: 10.1101/gad.13.17.2301
- Gatti, M. and Baker, B. S. (1989). Genes controlling essential cell-cycle functions in Drosophila melanogaster. Genes Dev. 3(4): 438–453. doi: 10.1101/gad.3.4.438
- Giansanti, M. G., Gatti, M. and Bonaccorsi, S. (2001). The role of centrosomes and astral microtubules during asymmetric division of Drosophila neuroblasts. Development 128(7): 1137–1145. doi: 10.1242/dev.128.7.1137
- Giansanti, M. G., Bonaccorsi, S., Williams, B., Williams, E. V., Santolamazza, C., Goldberg, M. L. and Gatti, M. (1998). Cooperative interactions between the central spindle and the contractile ring during Drosophila cytokinesis. Genes Dev. 12(3): 396–410. doi: 10.1101/gad.12.3.396
- Gunsalus, K. C., Bonaccorsi, S., Williams, E., Verni, F., Gatti, M. and Goldberg, M. L. (1995). Mutations in twinstar, a Drosophila gene encoding a cofilin/ADF homologue, result in defects in centrosome migration and cytokinesis. J Cell Biol. 131(5): 1243–1259. doi: 10.1083/jcb.131.5.1243
- Cenci, G., Bonaccorsi, S., Pisano, C., Verni, F. and Gatti, M. (1994). Chromatin and microtubule organization during premeiotic, meiotic and early postmeiotic stages of Drosophila melanogaster spermatogenesis. J. Cell Sci. 107(12): 3521–3534. doi: 10.1242/jcs.107.12.3521
- Giansanti, M. G., Bonaccorsi, S., Bucciarelli, E. and Gatti, M. (2001). Advances in Cytokinesis Research. Drosophila Male Meiosis as a Model System for the Study of Cytokinesis in Animal Cells. Cell Struct. Funct. 26(6): 609–617. doi: 10.1247/csf.26.609
- Carmena, M., Riparbelli, M. G., Minestrini, G., Tavares, Ã. M., Adams, R., Callaini, G. and Glover, D. M. (1998). Drosophila Polo Kinase Is Required for Cytokinesis. J Cell Biol. 143(3): 659–671. doi: 10.1083/jcb.143.3.659
- Herrmann, S., Amorim, I. and Sunkel, C. E. (1998). The POLO kinase is required at multiple stages during spermatogenesis in Drosophila melanogaster. Chromosoma 107: 440–451. doi: 10.1007/pl00013778
- Wakefield, J. G., Bonaccorsi, S. and Gatti, M. (2001). The Drosophila Protein AspIs Involved in Microtubule Organization during Spindle Formation and Cytokinesis. J Cell Biol.153(4): 637–648. doi: 10.1083/jcb.153.4.637
- Giansanti, M. G., Farkas, R. M., Bonaccorsi, S., Lindsley, D. L., Wakimoto, B. T., Fuller, M. T. and Gatti, M. (2004). Genetic Dissection of Meiotic Cytokinesis in Drosophila Males. Mol. Biol. Cell 15(5): 2509–2522. doi: 10.1091/mbc.e03-08-0603
- Bonaccorsi, S., Giansanti, M. G., Cenci, G., Gatti, M., Sullivan, W., and Ashburner, M. (2000). Cytological analysis of spermatocyte growth and male meiosis in Drosophila melanogaster. Drosophila Protoc.: 87–109.
- Cross, D. P. and R, D. L. S. (1979). The dynamics of Drosophila melanogaster spermatogenesis in in vitro cultures. Development 53(1): 345–351. doi: 10.1242/dev.53.1.345
- Gärtner, S. M. K., Rathke, C., Renkawitz-Pohl, R. and Awe, S. (2014). Ex vivo Culture of Drosophila Pupal Testis and Single Male Germ-line Cysts: Dissection, Imaging, and Pharmacological Treatment. J. Vis. Exp. (91): e51868. doi: 10.3791/51868
- Karabasheva, D. and Smyth, J. T. (2020). Preparation of Drosophila Larval and Pupal Testes for Analysis of Cell Division in Live, Intact Tissue. J. Vis. Exp. (159): e60961. doi: 10.3791/60961
- Nelson, K. A., Warder, B. N., DiNardo, S. and Anllo, L. (2020). Dissection and Live-Imaging of the Late Embryonic Drosophila Gonad. J. Vis. Exp. (164): e61872. doi: 10.3791/61872
- Sitaram, P., Hainline, S. G. and Lee, L. A. (2014). Cytological Analysis of Spermatogenesis: Live and Fixed Preparations of Drosophila Testes. J. Vis. Exp. (83): e51058. doi: 10.3791/51058
- Zamore, P. D., Ma S. Isolation of Drosophila melanogaster testes. (2011). J. Vis. Exp. (51): e2614. doi: 10.3791/2641
- Macia, E., Ehrlich, M., Massol, R., Boucrot, E., Brunner, C. and Kirchhausen, T. (2006). Dynasore, a Cell-Permeable Inhibitor of Dynamin. Dev. Cell 10(6): 839–850. doi: 10.1016/j.devcel.2006.04.002
- Giansanti, M. G., Sechi, S., Frappaolo, A., Belloni, G. and Piergentili, R. (2012). Cytokinesis in Drosophila male meiosis. Spermatogenesis 2(3): 185–196. doi: 10.4161/spmg.21711
Supplementary information
The following supporting information can be downloaded here:- Figure S1: Round spermatids from type and Ceramide phosphoethanolamine synthase (cpes) mutant testes
Article Information
Copyright
© 2024 The Author(s); This is an open access article under the CC BY-NC license (https://creativecommons.org/licenses/by-nc/4.0/).
How to cite
Kunduri, G. and Acharya, J. K. (2024). Live Imaging and Analysis of Meiotic Cytokinesis in Drosophila Testes. Bio-protocol 14(2): e4918. DOI: 10.21769/BioProtoc.4918.
Category
Developmental Biology > Cell growth and fate
Cell Biology > Cell imaging > Live-cell imaging
Do you have any questions about this protocol?
Post your question to gather feedback from the community. We will also invite the authors of this article to respond.