- Protocols

- Articles and Issues
- For Authors
- About
- Become a Reviewer

Intraperitoneal Injection of Neonatal Mice

(*contributed equally to this work) Published: Vol 13, Iss 18, Sep 20, 2023 DOI: 10.21769/BioProtoc.4826 Views: 4362
Reviewed by: Vivien J. Coulson-ThomasSudhir VermaAnonymous reviewer(s)
Original research article
The authors used this protocol in:

Mar 2023
Advertisement


Protocol Collections
Comprehensive collections of detailed, peer-reviewed protocols focusing on specific topics


Abstract
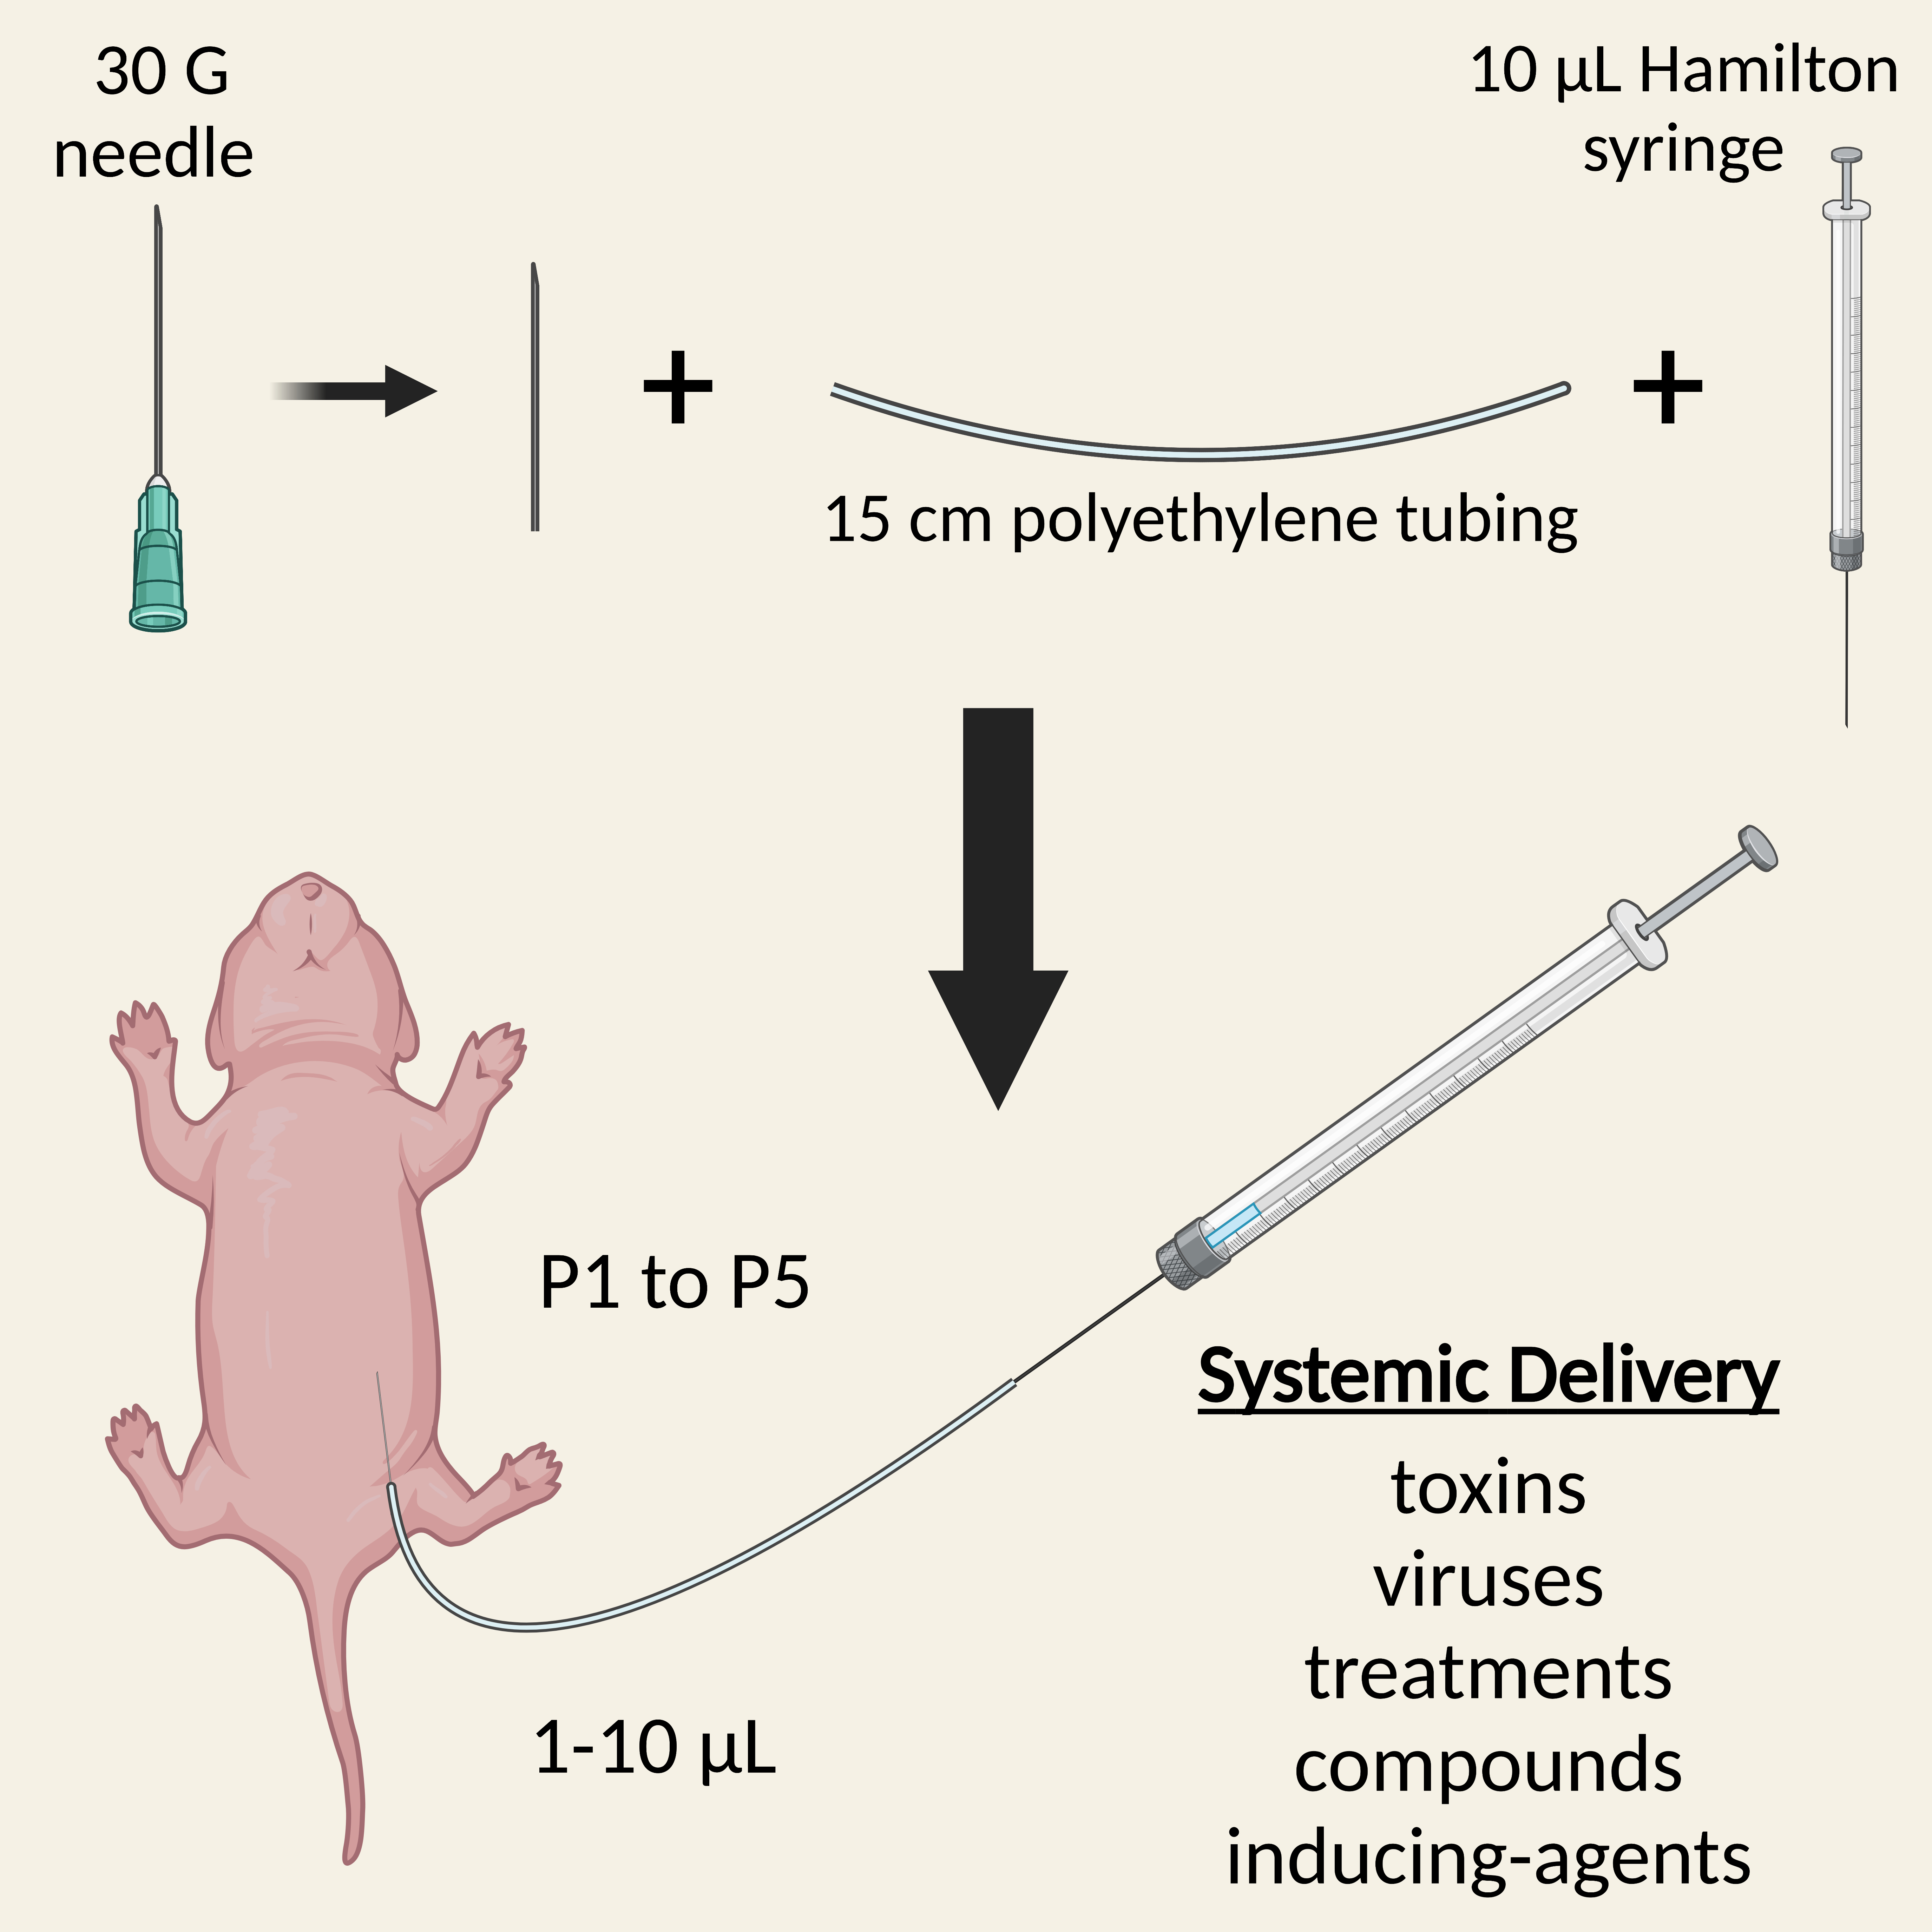
Administration of substances into neonatal mice is required for early treatment with pre-clinical therapeutics, delivery of recombination-inducing substances, and dosing with viruses or toxins, amongst other things. Several injection routes into mouse pups are possible, including intravenous and intracerebroventricular, each with their own advantages and limitations. Here, we describe a simple and rapid protocol for the intraperitoneal injection of neonatal mice for systemic dosing. By detaching a 30-gauge needle from its plastic hub and inserting it into polyethylene tubing attached to a Hamilton syringe, small volumes (1–10 μL) can be accurately injected into the peritoneal cavity of pups aged 1–5 days old. The procedure can be completed within a few minutes, is generally safe and well tolerated by both pups and parents, and can be used in combination with alternative administration routes.
Key features
• This protocol provides a simple description to rapidly and efficiently inject mouse pups aged 1–5 days for systemic dosing.
• Allows treatment of neonatal mice with substances such as viruses and compounds for research across disciplines.
Graphical overview
Background
The early post-natal injection of substances into rodents is required for several purposes, including the testing of pre-clinical therapeutics in disease models (Hua et al., 2011), delivering recombination-inducing substances such as tamoxifen (Pitulescu et al., 2010), and performing mechanistic studies with viruses or toxins (MacDonald et al., 2021). Several delivery routes into neonates are available, each with advantages and pitfalls. For instance, injection into the cerebral lateral ventricles (i.e., intracerebroventricular) can bypass the blood–brain barrier and deliver substances throughout the central nervous system via the cerebrospinal fluid, but this injection paradigm will not result in systemic delivery, is not suitable for repetitive treatments, and is technically challenging (Passini and Wolfe 2001). Alternatively, intravenous injections permit greater volumes (~50–100 μL) and result in a more systemic effect; however, this route is tricky to master (Sands and Barker 1999; Kienstra et al., 2007) and becomes more difficult in pups older than two days due to vein visualisation issues (Gombash Lampe et al., 2014). Subcutaneous injections are straightforward and enable larger dosing volumes if needed, but rates of substance absorption are slower compared to other delivery routes (Turner et al., 2011). Intraperitoneal neonatal injections also allow body-wide substance administration via transfer to the circulatory system (thus rapid absorption) and require less expertise and technical ability but are limited by injection volume and are not frequently used in a clinical setting (Al Shoyaib et al., 2019).
Nevertheless, different injection routes into neonatal rodents can result in distinct tissue targeting (Ohshima et al., 2015) and varied temporal pharmacodynamics post-injection (Statler et al., 2007; Foust et al., 2008); Therefore, it is important to master a variety of administration strategies. Indeed, depending on the dosing and targeting requirements, combining injection paradigms in pups is possible and can provide a superior therapeutic effect compared to single-route injections (Nizzardo et al., 2014).
Several published methods for the delivery of substances into neonates via intravenous (temporal/facial vein, jugular vein, or retro-orbitally) and intracerebroventricular routes are available (Sands and Barker 1999; Kienstra et al., 2007; Glascock et al., 2011; Yardeni et al., 2011; Gombash Lampe et al., 2014). However, a similar, detailed protocol for the intraperitoneal injection of mouse neonates is lacking, although approaches have been presented in brief (Ostermann et al., 2013; Xu et al., 2018; MacDonald et al., 2021).
Here, we describe a stepwise method for accurate injections into the peritoneal cavity of mouse pups, which has been used to successfully deliver adeno-associated viruses to drive transgene expression in 1–3-day-old mice (MacDonald et al., 2021; Sleigh et al., 2023). Intraperitoneal injections are highly reproducible and easy to master and can be used for repeated treatments. Success rates will depend on experimenter experience and the substances being injected, but our recent experiments suggest that a near 100% success rate is achievable.
Materials and reagents
Note: Similar materials, reagents, and equipment can be purchased from alternative sources. We note that alternative sourcing of 0.28 mm internal diameter tubing may lead to issues in creating a watertight seal with the 30 G needle (e.g., variance in actual vs. reported internal diameter).
Cannula fabrication
Disposable surgical scalpel (Swan Morton, VWR International, catalog number: 0505)
PE-10/10 Polyethylene tubing, 0.28 mm internal diameter, 0.61 mm external diameter (Warner Instruments, Multi-Channel Systems, catalog number: 64-0750)
30 G × 1/2" needle (BD, catalog number: 305106)
6-well plate, flat bottom (VWR International, catalog number: 734-2777)
Sterile water
10 mL syringe (Fisherbrand, Fisher Scientific, catalog number: 15879152)
10 μL syringe, 701 N, 26 G, 51 mm length, 0.47 mm external diameter (Hamilton, VWR International, catalog number: 549-1135)
Intraperitoneal injection
Disposable surgical drape, e.g., 30 cm × 45 cm (Millpledge, catalog number: SDT0100)
Large weigh boat (Fisherbrand, Fisher Scientific, catalog number: 15758187)
Biohazard sharps bin
Cannula (see above)
Substance(s) for injection (e.g., virus, toxin, compound) in 1.5 mL microfuge tube(s) on ice or disposable heating pad, as needed
Sterile cotton swab (Texwipe, Fisher Scientific, catalog number: 15823886)
Marker pen
P20 pipette tips
Parafilm (VWR International, catalog number: 291-0057)
Paper towel or surgical gauze
Optional:
50 mL centrifuge tube (Falcon, Fisher Scientific, catalog number: 10788561) with 20–40 mL of bleach (for viruses/toxins)
Insulin syringe (BD, Fisher Scientific, catalog number: 13161931) (for toe tattooing)
Tattoo ink (Ketchum, VWR International, catalog number: NASCC01885N) (for toe tattooing)
Equipment
Cannula fabrication
30 cm ruler or tape measure
Straight tip haemostat, Stainless steel, 5" (Newport Spectra-Physics, catalog number: LAB-17) (see Note 1)
Intraperitoneal injection
Animal heating pad (Tonkey Electrical Technology, catalog number: TK-HPP4030) or disposable heating pad (e.g., HotHands Hand Warmers) (see Note 2)
10 μL syringe, 701 N, 26 G, 51 mm length, 0.47 mm external diameter (Hamilton, VWR International, catalog number: 549-1135) (see Note 3)
P20 pipette
Optional:
Class II biosafety cabinet (for viruses/toxins)
Rack for 50 mL centrifuge tubes (for viruses/toxins)
Magnifying light (to aid injection accuracy)
Procedure
Note: Appropriate personal protective equipment should be used, and particular care should be taken when working with toxic/harmful substances.
Cannula fabrication (Figure 1 and Video 1)
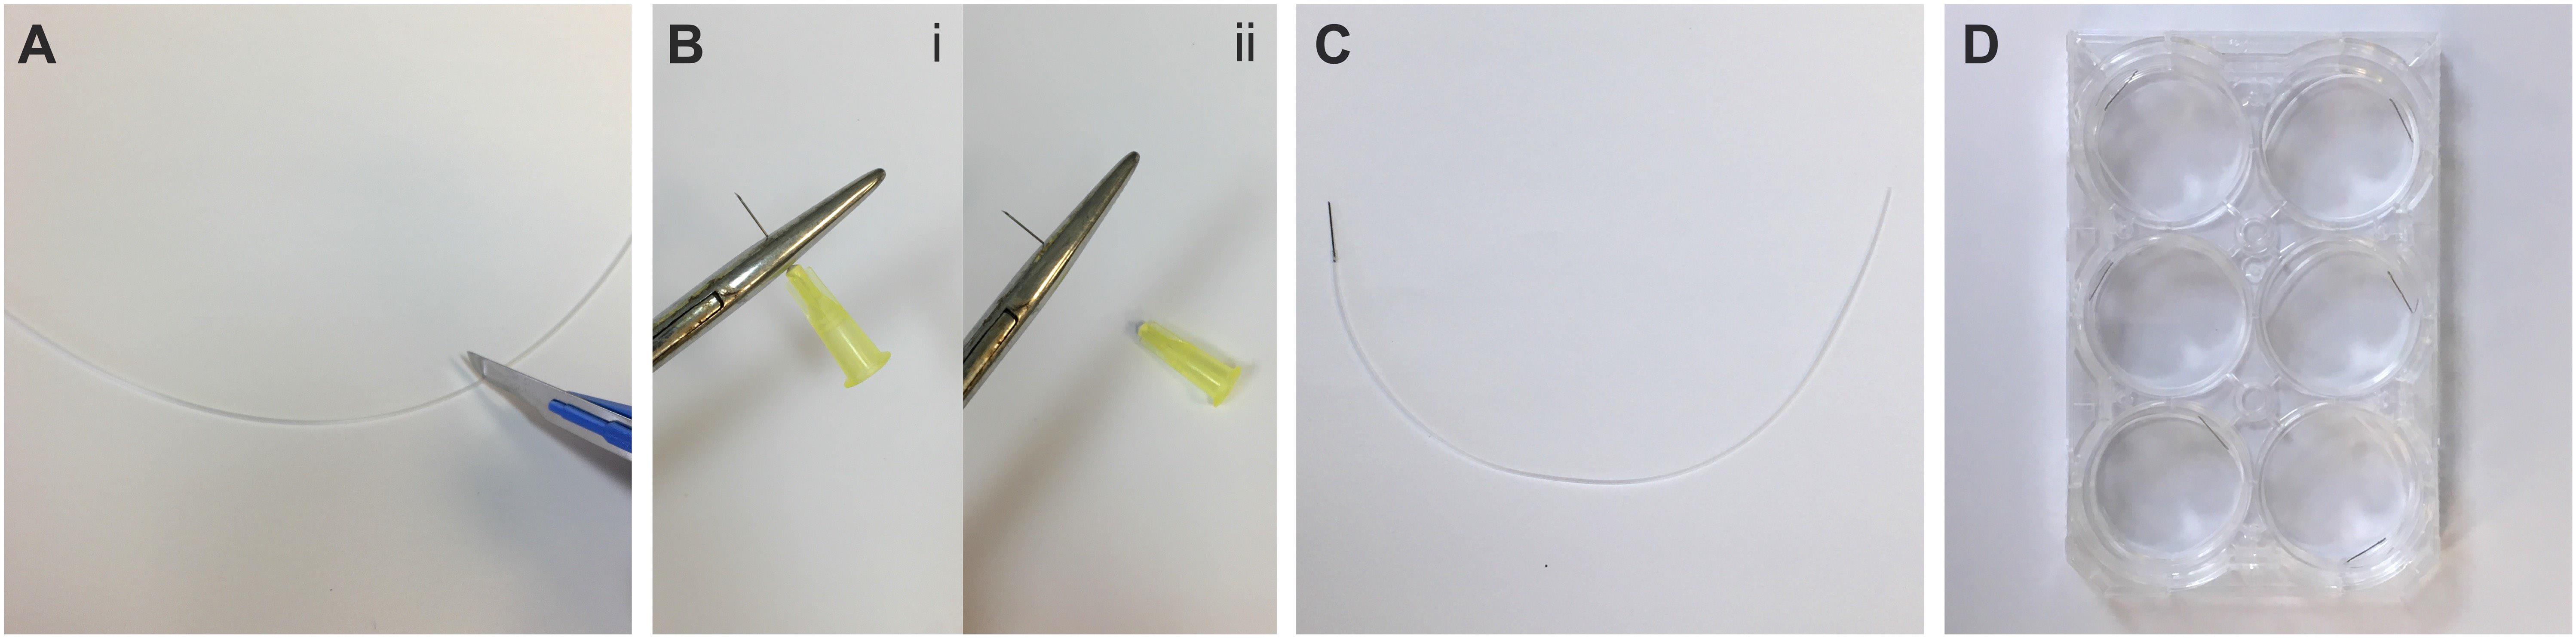
Figure 1. Fabrication of cannulas from 30 G needles. A) Cut an approximately 15 cm long piece of polyethylene tubing. B) Using a haemostat, remove the plastic hub from a 30 G needle and brush away any debris that remains on needle shaft. C) Insert ~2–3 mm of the detached needle shaft into the tubing. D) Store the fabricated cannulas in a 6-well plate. See also Video 1. Video 1. Cannula fabrication for intraperitoneal injection of neonatal mice. 00:00–00:11: Removal of plastic hub from 30 G needle. 00:11–00:27: Clearing away plastic hub debris from needle base. 00:27–00:39: Needle insertion into polyethylene tubing. 00:39–01:08: Testing the cannula seal. 01:08–01:31: Clearing water from the cannula. 01:31–01:44: Cannula storage in a 6-well plate.
Measure and then cut the polyethylene tubing with the scalpel blade into pieces ~15 cm long (Figure 1A). Ensure the blade is sharp to avoid crushing the tubing.
Using the haemostat, clamp the base of the 30 G needle where it attaches to the plastic hub. Grab the plastic hub of the needle with your fingers and quickly rotate it. The plastic hub should pop off with minimal force (see Note 4) (Figure 1B).
Brush away any plastic residue at the base of the needle and then inspect it for any physical damage that may have occurred during the needle extraction (e.g., crushed or bent hub).
Carefully insert ~2–3 mm of the newly exposed base of the needle into the tubing until firmly attached (Figure 1C). Based on our experience, the combined use of 0.28 mm internal diameter tubing with a 30 G needle creates a watertight seal without further modification.
To confirm that there are no leaks in the cannula seal, carefully attach the free end of the polyethylene tubing onto a 30 G needle fixed to a 10 mL syringe containing sterile water and expel a small volume of liquid (see Note 5). To clear the water from the cannula and air-dry it, fix the tubing onto a 30 G needle connected to an empty 10 mL syringe and expel the remaining water. Fresh sterile 10 mL syringes are used to avoid contamination of the Hamilton syringes used for intraperitoneal injections.
Store the cannulas in a 6-well plate until ready to use (Figure 1D) (Pause Point).
Intraperitoneal injection (Figure 2 and Video 2)
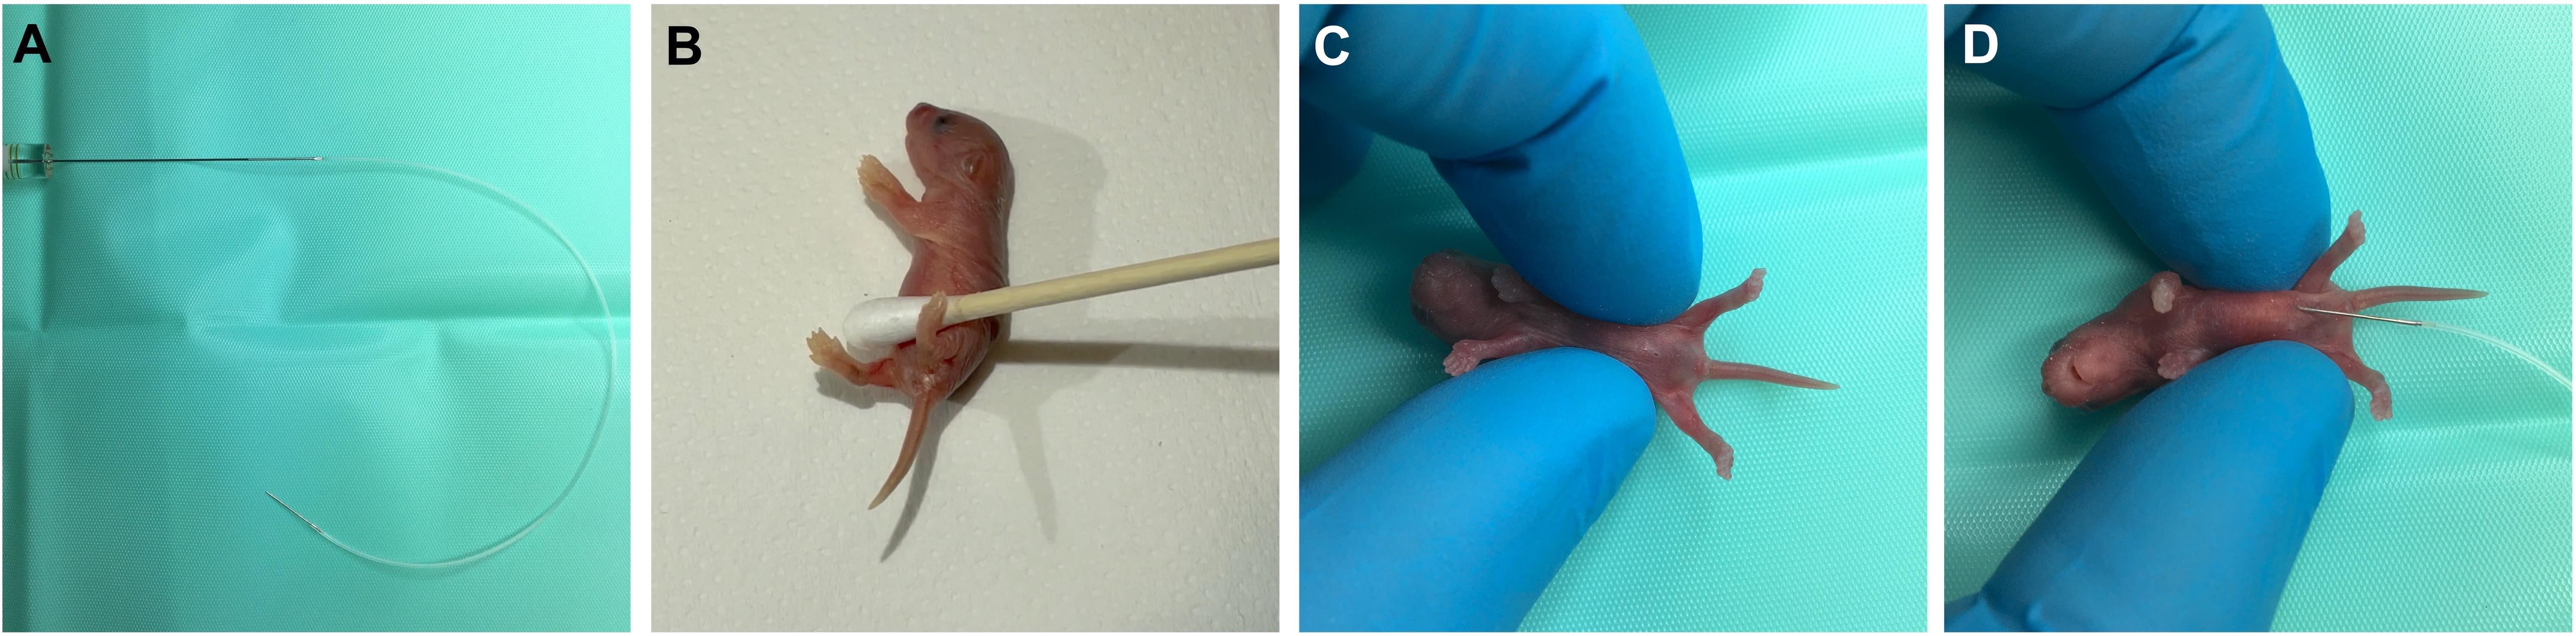
Figure 2. Intraperitoneal injection of neonatal mice. A) Insert the 10 μL Hamilton syringe into the open end of the tubing attached to the fabricated cannula. B) Away from the sterile injection area, wait until the pup urinates and then use a cotton-swab to dry the pup. C) Move to the sterile injection area and restrain the pup with the ventral-side facing upwards. D) With the bevel facing upwards, insert the cannula needle at a shallow angle into the peritoneal cavity, before slowly injecting. The animal in these images was aged P2. See also Video 2. Video 2. Encouragement of bladder voiding, intraperitoneal injection, and toe tattooing. 00:00–00:56: Encouraging voiding of the bladder (N.B., the mouse in the video has already voided). 00:56–01:19: Intraperitoneal injection. 01:19–01:52: Tattooing of the paw for identification. The animal in the video was aged P2.Optional: If working with viruses/toxins, turn on the class II biosafety cabinet.
Turn on the animal heating pad and allow to warm to 38–40 °C.
Clean the working surface and then place a sterile surgical drape on top.
Sprinkle some home bedding material into the large weigh boat and place the boat on the heating pad (to hold pups post-injection for acute monitoring).
Optional: If working with viruses/toxins, place the 50 mL centrifuge tube containing bleach in the rack and ensure that the biohazard sharps bin is available.
Optional: If tattooing the intraperitoneally injected pups for identification purposes, set aside an insulin syringe and tattoo ink.
When ready for the injections, transfer the parents to a separate cage and include a scattering of their home bedding. Also, ensure they have access to food, water, and cage enrichment. Ideally, the parent cage will be kept in a separate room while the injections are being performed in order to avoid exposure to any potentially distressing vocalisations from the pups.
Place the original home cage with the pups onto the pre-warmed heating pad.
Attach the cannula to the 10 μL Hamilton syringe and lay on the surgical drape (Figure 2A).
Load an appropriate volume of the substance to be injected into the cannula (Table 1). Care must be taken during this step, as the polyethylene tubing can be intractable due to rigidity. Place the cannula needle into the microfuge tube containing the substance to be injected. Provide stability to the polyethylene tubing by gently holding it against the side of the microfuge tube so that the cannula needle tip remains submerged in the substance as you draw up solution into the Hamilton syringe. If this proves tricky, the microfuge tube can be placed on its side (for small volumes in the tube) or, alternatively, a small amount (e.g., 5–10 μL) can be pipetted onto parafilm and loaded from there (see Note 6)—but be wary of evaporation. If pipetting viruses/toxins, dispose of the pipette tips and parafilm in the 50 mL centrifuge tube with bleach.
Table 1. Approximate maximum volumes for intraperitoneal injections using this method from post-natal day 1 (P1) to P5 (see Note 7). For mice older than P5, more conventional intraperitoneal injection methods may be used, even though the method outlined here can also be used (see Note 3). Greater injection volumes via neonatal intraperitoneal injections have been reported (Foust et al., 2008).
Post-natal age (day) Maximum injection volume (μL) 1 2–4 2 4–6 3 6–8 4 8–10 5 > 10 Scent your gloves with home bedding and then transfer a single pup to the sterile surgical drape.
To empty the bladder and thus create more space for injecting substances into the abdominal area, it is encouraged to induce the righting reflex response, which often elicits voiding (Video 2). This can be achieved by placing the pup on a paper towel adjacent to where you will perform the injection. Gently roll the pup on its back with your fingers. The pups will automatically begin rhythmic kicking of the forelimbs and hindlimbs, and this is often concomitant with involuntary voiding. Wipe away the urine using a sterile cotton swab (Figure 2B) and transfer the pup to the sterile injection area. P3 and older pups usually do not need to have their bladders voided prior to injections.
Gently restrain the pup using your thumb and index finger around the abdomen with the ventral side facing upwards (Figure 2C). Carefully gather excess skin between your digits to provide an injection site (see Note 8).
Insert the cannula needle (bevel side up) into the intraperitoneal cavity between the midline and the fat pads (when visible), avoiding the liver and milk-filled stomach (Figure 2D and Video 2). Aim to insert 2–3 mm of the needle and do so at a shallow angle to avoid puncturing any organs. Slowly inject the pup, then grab the base of the needle to hold it stable and wait for 5–10 s to ensure absorption before carefully removing the needle (see Note 9).
Monitor the pup and injection site for potential backflow. Clean the injection site with a new cotton swab if needed (see Note 10) and then transfer the injected pup to the weigh boat on the heating pad. Cover the pup with home bedding.
Optional: To tattoo pups for post-injection identification purposes, coat the tip of an insulin syringe needle with tattoo ink (do this sparingly, as it can get messy). Gently restrain the paw to be tattooed and transdermally insert the needle (Video 2). You should encounter little to no resistance during the needle insertion. Gently insert and retract (but not fully) the needle a few times to deposit the ink under the skin (see Note 11). Once done, dab the paw on a paper towel or surgical gauze to remove excess ink. There should be little to no blood at the insertion site. Tattooing should ideally be performed at P0–P2.
Optional: If injecting viruses/toxins, before disconnecting the cannula from the syringe, draw some of the bleach from the 50 mL centrifuge tube up into the polyethylene tubing. Detach the tubing and needle from the syringe and dip it into bleach for a few seconds before disposing of it in the biohazard sharps bin. Place any used cotton swabs to the side.
Repeat steps B9–B14 or B9–B16 for each pup that is to be injected.
Once all pups have been dosed, transfer the litter back to the home cage and cover with nesting material (see Note 12). After a few minutes, move the parents back to home cage.
To clean up, transfer any virus/toxin-contaminated tools (e.g., pipette tips and cotton swabs) to the centrifuge tube with bleach. Spray the working surface (including surgical drape and weigh boat) with bleach solution and then fold the drape inward to contain all bleach-treated materials. Dispose of materials in the biohazard sharps bin.
Validation of protocol
This protocol or parts of it has been used and validated in the following research article(s):
MacDonald et al. (2021). A central mechanism of analgesia in mice and humans lacking the sodium channel NaV1.7. Neuron 109(9): 1497–1512.e6 (Supplemental Figure 3 and 4).
Sleigh et al. (2023). Boosting peripheral BDNF rescues impaired in vivo axonal transport in CMT2D mice. JCI Insight 8(9): e157191 (Supplemental Figure 9, panels A–C).
Notes
Instead of a haemostat, a benchtop vice may be used to remove the needle hub.
In place of the electric animal heating pad, disposable heating pads (e.g., HotHands hand warmers) or rechargeable heating pads (e.g., Unigear Rechargeable Hand Warmer) can be used. Disposable heating pads can be reused multiple times if stored in Ziploc bags to avoid further air exposure.
Syringes with larger volumes are required if injecting more than 10 μL (see Table 1).
Keeping the needle stationary while twisting and pulling the plastic hub results in clean separation without crushing or bending the needle (Video 1). If the needle base is crushed or bent, there may be insufficient back pressure to draw up solution into the cannula.
An improper seal will result in poor loading of the water and accumulation of bubbles in the tubing, especially if handling viscous solutions.
Similar to when testing the cannula seal during fabrication, ensure that there is a smooth draw of the solution up into the tubing and that there are no bubbles. If this occurs, detach the cannula from the syringe and then try a new one.
P1 is designated as the day after a litter is born.
A magnifying light can aid the injection process. There is no need to pre-clean the injection site.
Sometimes, the cannula seal can fail after the substance to be injected has been loaded. To ensure that this does not occur without you noticing, take care to observe the small bulge that forms beneath the skin upon injection. After the injection, you may also manipulate the syringe plunger to check for residual liquid. If you note that the full volume was not dispensed during the injection, gently wiggle the needle while it is still inserted into the intraperitoneal cavity. We find that doing this relieves the internal pressure within the abdominal cavity to allow for the remaining solution to be absorbed. As an additional optional precaution to aid visualisation, a dye such as trypan blue or filtered green food dye can be pre-mixed with the substance to be injected (Glascock et al., 2011).
Make sure to keep the cotton swabs for urine and virus/toxin leakage separate; a marker pen can be used to aid identification.
For an informative video protocol of paw/toe tattooing, see the JoVE Science Education Database (2021) reference.
If needed and permitted, pups can receive multiple intraperitoneal injections on subsequent days.
Acknowledgments
This work was supported by European Molecular Biology Long-Term Fellowship (ALTF 495-2018 to A.M.P.), the Dystonia Medical Research Foundation (DMRFPRF-2022-3 to A.M.P.), the Medical Research Council (MR/S006990/1 to J.N.S.), and the Rosetrees Trust (M806 to J.N.S.). The graphic abstract was created with www.BioRender.com. The protocol described here has been performed in MacDonald et al. (2021) and Sleigh et al. (2023).
Competing interests
The authors have no competing interest to declare.
Ethical considerations
Experimentation involving mice was performed under license from the UK Home Office in accordance with the Animals (Scientific Procedures) Act (1986) and was approved by the UCL Queen Square Institute of Neurology Ethical Review Committee.
References
- Al Shoyaib, A., Archie, S. R. and Karamyan, V. T. (2019). Intraperitoneal Route of Drug Administration: Should it Be Used in Experimental Animal Studies? Pharm. Res. 37(1): e1007/s11095-019-2745-x.
- Foust, K. D., Poirier, A., Pacak, C. A., Mandel, R. J. and Flotte, T. R. (2008). Neonatal Intraperitoneal or Intravenous Injections of Recombinant Adeno-Associated Virus Type 8 Transduce Dorsal Root Ganglia and Lower Motor Neurons. Hum. Gene Ther. 19(1): 61–70.
- Glascock, J. J., Osman, E. Y., Coady, T. H., Rose, F. F., Shababi, M. and Lorson, C. L. (2011). Delivery of Therapeutic Agents Through Intracerebroventricular (ICV) and Intravenous (IV) Injection in Mice. J. Vis. Exp.: e3791/2968-v.
- Gombash Lampe, S. E., Kaspar, B. K. and Foust, K. D. (2014). Intravenous Injections in Neonatal Mice. J. Vis. Exp.: e3791/52037.
- Hua, Y., Sahashi, K., Rigo, F., Hung, G., Horev, G., Bennett, C. F. and Krainer, A. R. (2011). Peripheral SMN restoration is essential for long-term rescue of a severe spinal muscular atrophy mouse model. Nature 478(7367): 123–126.
- JoVE Science Education Database (2021). Lab Animal Research. Rodent Identification II. J Vis Exp.
- Kienstra, K. A., Freysdottir, D., Gonzales, N. M. and Hirschi, K. K. (2007). Murine neonatal intravascular injections: modeling newborn disease.J. Am. Assoc. Lab. Anim. Sci. 46(6): 50–54.
- MacDonald, D. I., Sikandar, S., Weiss, J., Pyrski, M., Luiz, A. P., Millet, Q., Emery, E. C., Mancini, F., Iannetti, G. D., Alles, S. R., et al. (2021). A central mechanism of analgesia in mice and humans lacking the sodium channel NaV1.7. Neuron 109(9): 1497–1512.e6.
- Nizzardo, M., Simone, C., Salani, S., Ruepp, M. D., Rizzo, F., Ruggieri, M., Zanetta, C., Brajkovic, S., Moulton, H. M., Müehlemann, O., et al. (2014). Effect of Combined Systemic and Local Morpholino Treatment on the Spinal Muscular Atrophy Δ7 Mouse Model Phenotype. Clin. Ther. 36(3): 340–356.e5.
- Ohshima, M., Taguchi, A., Tsuda, H., Sato, Y., Yamahara, K., Harada-Shiba, M., Miyazato, M., Ikeda, T., Iida, H., Tsuji, M., et al. (2015). Intraperitoneal and intravenous deliveries are not comparable in terms of drug efficacy and cell distribution in neonatal mice with hypoxia–ischemia. Brain Dev. 37(4): 376–386.
- Ostermann, E., Macquin, C., Bahram, S. and Georgel, P. (2013). Use of In vivo Imaging to Monitor the Progression of Experimental Mouse Cytomegalovirus Infection in Neonates. J. Vis. Exp.: e3791/50409.
- Passini, M. A. and Wolfe, J. H. (2001). Widespread Gene Delivery and Structure-Specific Patterns of Expression in the Brain after Intraventricular Injections of Neonatal Mice with an Adeno-Associated Virus Vector. J. Virol. 75(24): 12382–12392.
- Pitulescu, M. E., Schmidt, I., Benedito, R. and Adams, R. H. (2010). Inducible gene targeting in the neonatal vasculature and analysis of retinal angiogenesis in mice. Nat. Protoc. 5(9): 1518–1534.
- Sands, M. S. and Barker, J. E. (1999). Percutaneous intravenous injection in neonatal mice. Lab. Anim. Sci. 49(3): 328–330.
- Sleigh, J. N., Villarroel-Campos, D., Surana, S., Wickenden, T., Tong, Y., Simkin, R. L., Vargas, J. N. S., Rhymes, E. R., Tosolini, A. P., West, S. J., et al. (2023). Boosting peripheral BDNF rescues impaired in vivo axonal transport in CMT2D mice. JCI Insight 8(9): e157191.
- Statler, P. A., McPherson, R. J., Bauer, L. A., Kellert, B. A. and Juul, S. E. (2007). Pharmacokinetics of High-Dose Recombinant Erythropoietin in Plasma and Brain of Neonatal Rats. Pediatr. Res. 61(6): 671–675.
- Turner, P.V., Brabb, T., Pekow, C. and Vasbinder, M.A. (2011). Administration of substances to laboratory animals: Routes of administration and factors to consider. J. Am. Assoc. Lab. Anim. Sci. 50(5): 600–613.
- Yardeni, T., Eckhaus, M., Morris, H. D., Huizing, M. and Hoogstraten-Miller, S. (2011). Retro-orbital injections in mice. Lab Anim. 40(5): 155–160.
- Xu, L., Gao, Y., Lau, Y. S. and Han, R. (2018). Adeno-Associated Virus-Mediated Delivery of CRISPR for Cardiac Gene Editing in Mice. J. Vis. Exp.: e3791/57560-v.
Article Information
Copyright
© 2023 The Author(s); This is an open access article under the CC BY-NC license (https://creativecommons.org/licenses/by-nc/4.0/).
How to cite
Pocratsky, A. and Sleigh, J. N. (2023). Intraperitoneal Injection of Neonatal Mice. Bio-protocol 13(18): e4826. DOI: 10.21769/BioProtoc.4826.
Category
Biological Sciences > Biological techniques
Do you have any questions about this protocol?
Post your question to gather feedback from the community. We will also invite the authors of this article to respond.