- Protocols

- Articles and Issues
- For Authors
- About
- Become a Reviewer

Stereotactic Delivery of Helper-dependent Adenoviral Viral Vectors at Distinct Developmental Time Points to Perform Age-dependent Molecular Manipulations of the Mouse Calyx of Held
Published: Vol 13, Iss 16, Aug 20, 2023 DOI: 10.21769/BioProtoc.4793 Views: 1880
Reviewed by: David PaulOlga Kopach
Original research article
The authors used this protocol in:

Oct 2022
Advertisement


Protocol Collections
Comprehensive collections of detailed, peer-reviewed protocols focusing on specific topics


Related protocols
Abstract
Synapses are specialized structures that enable neuronal communication, which is essential for brain function and development. Alterations in synaptic proteins have been linked to various neurological and neuropsychiatric disorders. Therefore, manipulating synaptic proteins in vivo can provide insight into the molecular mechanisms underlying these disorders and aid in developing new therapeutic strategies. Previous methods such as constitutive knock-out animals are limited by developmental compensation and off-target effects. The current approach outlines procedures for age-dependent molecular manipulations in mice using helper-dependent adenovirus viral vectors (HdAd) at distinct developmental time points. Using stereotactic injection of HdAds in both newborn and juvenile mice, we demonstrate the versatility of this method to express Cre recombinase in globular bushy cells of juvenile Rac1fl/fl mice to ablate presynaptic Rac1 and study its role in synaptic transmission. Separately, we overexpress CaV2 α1 subunits at two distinct developmental time points to elucidate the mechanisms that determine presynaptic CaV2 channel abundance and preference. This method presents a reliable, cost-effective, and minimally invasive approach for controlling gene expression in specific regions of the mouse brain and will be a powerful tool to decipher brain function in health and disease.
Key features
• Virus-mediated genetic perturbation in neonatal and young adult mice.
• Stereotaxic injection allows targeting of brain structures at different developmental stages to study the impact of genetic perturbation throughout the development.
Keywords: Calyx of HeldBackground
The ability to manipulate specific neuronal populations at defined time points is critical for understanding the regulation of neural circuit function and for the creation of animal models of neurological disorders. Neurons interact via synapses, specialized structures that serve as points of neuronal communication. Synaptic dysfunction due to alterations or mutations in synaptic proteins has been linked to various neurological and neuropsychiatric disorders (Lepeta et al., 2016; Taoufik et al., 2018; Wang et al., 2018; Koopmans et al., 2019). Therefore, the ability to manipulate synaptic proteins in vivo can provide insight into the molecular mechanisms underlying these disorders and aid in the development of new therapeutic strategies. While constitutive knock-out animals have served as powerful tools in deciphering brain function, they are limited by potential developmental compensation, off-target effects, and embryonic or postnatal lethality (Sigmund, 2000; Eisener-Dorman et al., 2009; Navabpour et al., 2020; Suzuki et al., 2020; Sztretye et al., 2020). Furthermore, creating and establishing new genetic mouse lines can be time- and cost-prohibitive. Recombinant viral vector technology has emerged as an indispensable tool in neuroscience for manipulating neuronal function, in vivo and in vitro, at both the cellular and molecular levels (Lentz et al., 2012; S. H. Chen et al., 2019; Haery et al., 2019). The current approach outlined in this protocol uses helper-dependent adenoviral vectors (HdAd) for age-dependent protein ablation in mice. HdAds are third-generation Ad vectors that contain only the Ad viral inverted terminal repeats (ITRs) and packaging sequence. Due to their large packaging capacity of 37 kb compared to other viral vectors (adeno-associated virus: 5 kb, lentivirus: 9 kb), rapid and stable long-term gene expression, low toxicity, and the ability to enable long-term phenotypic correction in preclinical animal models (Vetrini and Ng, 2010; Brunetti-Pierri and Ng, 2017; Watanabe et al., 2021), they have emerged as a useful tool in studying neuronal circuit function (Z. Chen et al., 2013; Montesinos et al., 2015 and 2016; C. Chen et al., 2017a and 2017b; Lübbert et al., 2017 and 2019; Dong et al., 2018; Ostrovskaya et al., 2018; Sutton et al., 2018; Radulovic et al., 2020; Keine et al., 2022). The high packaging capacity of HdAds allows for the packaging of large promoters and large genes of interest such as calcium channels (e.g., 7 kb for CaV2.1 α1 subunit cDNA) (C. Chen et al., 2017a and 2017b; Lübbert et al., 2017; Ostrovskaya et al., 2018; Sutton et al., 2018; Lübbert et al., 2019) in combination with regulatory elements to enhance long-term gene expression and markers for fluorescence and electron microscopy imaging (Thomas et al., 2019). Using Cre-expressing viral vectors in combination with commercially available conditional knock-out mouse lines and the stereotactic injection procedure outlined here allows for targeted ablation of various proteins at distinct developmental time points to study synaptic function and development.
In this protocol, we demonstrate the versatility of this approach. Specifically, we expressed Cre recombinase in globular bushy cells of juvenile Rac1fl/fl mice, thereby specifically ablating Rac1 in the presynaptic calyx of Held to study its role in synaptic transmission (Keine et al., 2022). In another study, we used HdAd’s large packaging capacity and fast onset of gene expression to overexpress CaV2 α1 subunits at two distinct developmental time points [postnatal day 1 (P1) and P14] to elucidate the mechanisms that determine presynaptic CaV2 channel abundance and preference (Lübbert et al., 2019). While the combination of large packaging capacity and fast onset of gene expression is specific to HdAds, the many aspects of the protocol are applicable to adeno-associated (AAV) and lentiviral vectors (LVV) within the limitations of expression timelines and packaging of large constructs.
In summary, this method presents a reliable, cost-effective, and minimally invasive approach for manipulating gene and protein expression in specific mouse brain regions. Finally, this protocol can be adapted to study other genes and brain regions of interest, making it a valuable and broadly applicable tool for neuroscience research.
Materials and reagents
Biological materials
Helper-dependent adenovirus prepared as in Montesinos et al. (2016) or from the University of Iowa Viral Vector Core (catalog number: VVC-Young-6896)
Reagents
HEPES (Sigma-Aldrich, catalog number: H3375)
Magnesium chloride solution, 1 M (MgCl2) (Sigma-Aldrich, catalog number: M1028)
Saccharose/sucrose (Sigma-Aldrich, catalog number: S7903)
HCl 1 N (Carl-Roth, catalog number: K025.1)
NaOH 1 N (Carl-Roth, catalog number: K021.1)
D-Mannitol (Sigma-Aldrich, catalog number: M4125)
Povidone-iodine solution, 10% (Betadine)
Ethanol 70% solution (Fisher Scientific, catalog number: BP82031GAL)
Lidocaine hydrochloride solution, 0.5%
Bupivacaine solution 0.25%
Meloxicam-SR solution 2 mg/mL (ZooPharm, IZ-800000-191903)
Hydrogen peroxide solution 3% (CVS)
Fluorescent dye of high molecular weight (e.g., Tetramethylrhodamine, Thermo Fisher, catalog number: D1817)
Fluorescent microspheres (e.g., Fluoresbrite, Polysciences, catalog number: 16662-10)
Solutions
Storage buffer (see Recipes)
Mannitol solution (20%) (see Recipes)
Virus injection solution (see Recipes)
Recipes
Storage buffer
Reagent Final concentration Amount Sucrose 250 mM 428 mg HEPES 10 mM 12 mg MgCl2 (1 M) 1 mM 5 μL H2O n/a 4.995 mL Total n/a 5 mL
Dissolve sucrose and HEPES in 4 mL of ultrapure water while stirring and add MgCl2.
Adjust pH to 7.4 with 1 N HCl and 1 N NaOH.
Bring up to a final volume of 5 mL.
Filter and aliquot in 50 μL aliquots and store at -20 °C.
Mannitol solution (20%)
| Reagent | Final concentration | Amount |
|---|---|---|
| Mannitol | 20% | 2 g |
| H2O | n/a | 10 mL |
| Total | n/a | 10 mL |
Dissolve mannitol in 9 mL of ultrapure water while stirring.
Bring up to a final volume of 10 mL.
Filter and aliquot in 10 μL aliquots and store at -20 °C.
Virus injection solution
Reagent Final concentration Amount Mannitol solution (20%) 6.7% 10 μL Storage buffer n/a 17 μL Virus stock solution
(3 × 10¹² vp/mL)
3 × 10¹¹ vp/mL 3 μL Total n/a 30 μL
Laboratory supplies
Eppendorf safe-lock tubes 0.5 mL (Eppendorf, catalog number: 0030121023)
Glass beaker 400 mL (Fisher Scientific, DWK Life Science, catalog number: 09-841-102)
Glass capillaries 3.5” (Drummond)
Micropipettes (Blaubrand, intraMark, catalog number: 708707)
Microliter syringe (Hamilton, 700 series, catalog number: 80600)
Autoclaved cotton swabs (Q-tips)
Parafilm wrapping film (Fisher Scientific, catalog number: S37441)
Ceramic scoring wafer (Restek, catalog number: 20116)
Absorption spears (Fine Science Tools, catalog number: 18105-01)
Ophthalmic ointment (Altaire Pharmaceuticals, Puralube Vet Ointment, NDC: 17033-211-38)
Hair remover lotion (Church & Dwight, Nair)
Mineral oil (Sigma-Aldrich, catalog number: M5904)
Reverse-cutting needle and suture thread (Surgical Specialties, C17, 5-0, catalog number: 1013B)
Equipment
Foot-pedal drill (Foredom, MH-170)
Micro drill burrs 0.7 mm (Fine Science Tools, catalog number: 19008-07)
Nanoliter injector (Neurostar, NanoW)
Infusion pump (Chemyx, Fusion 100)
Mechanical pipette 0.5–10 μL (Eppendorf, Research Plus, catalog number: 3123000071)
Mechanical pipette 10–100 μL (Eppendorf, Research Plus, catalog number: 3123000047)
Robot stereotaxic instrument (Neurostar)
Stereotaxic frame (David Kopf Instruments, model: 940)
Horizontal micropipette puller (Sutter Instrument, P-1000 Micropipette Puller)
Angled probe (Fine Science Tools, catalog number: 10140-02)
Homeothermic monitoring system (Harvard Apparatus, catalog number: 55-7020)
Software
StereoDrive (Neurostar, v3.1.5, https://neurostar.de/)
Procedure
Manufacture of injection pipettes
NOTE: In the following protocol, injection pipettes are manufactured from Blaubrand or Drummond glass capillaries for P1 and P14 injections, respectively. While for P1 injections a syringe-pump is used, P14 injections are performed using a computer-controlled nano-injector, which offers more control of injection speed and volume. However, both types of injections can be performed with either injection method.
For injections at P1, pull glass pipettes from Blaubrand intraMark glass micropipettes using a P-1000 horizontal micropipette puller (2.5 mm box filament) with the following settings:
Sutter Pipette Cookbook Type B protocol (microinjection or sharp electrode):
Heat: ramp; pull: 55–60; velocity: 70–75; time: 120; pressure: 500
For injections at P14 and older, pull the injection pipettes from 3.5” Drummond glass capillaries using a P-1000 horizontal micropipette puller (2.5 mm box filament) with the following settings:
Sutter pipette Cookbook Type A Protocol:
Heat: ramp; pull: 18–20; velocity: 32–35; time: 250; pressure: 500
Carefully cut the tip of the pipette using a ceramic scoring wafer, ceramic razor blade, or another glass pipette. Hold the pipette in one hand and carefully slide the ceramic scoring wafer perpendicular to the pipette axis to cut the pipette to a tip opening of 25–50 μm. Using fine forceps to cut the pipette tip is possible but might result in broken and uneven edges, which could impair viral delivery results and cause tissue damage.
Confirm that the pipette tip is cut smoothly and not broken using a standard laboratory microscope (Figure 1).
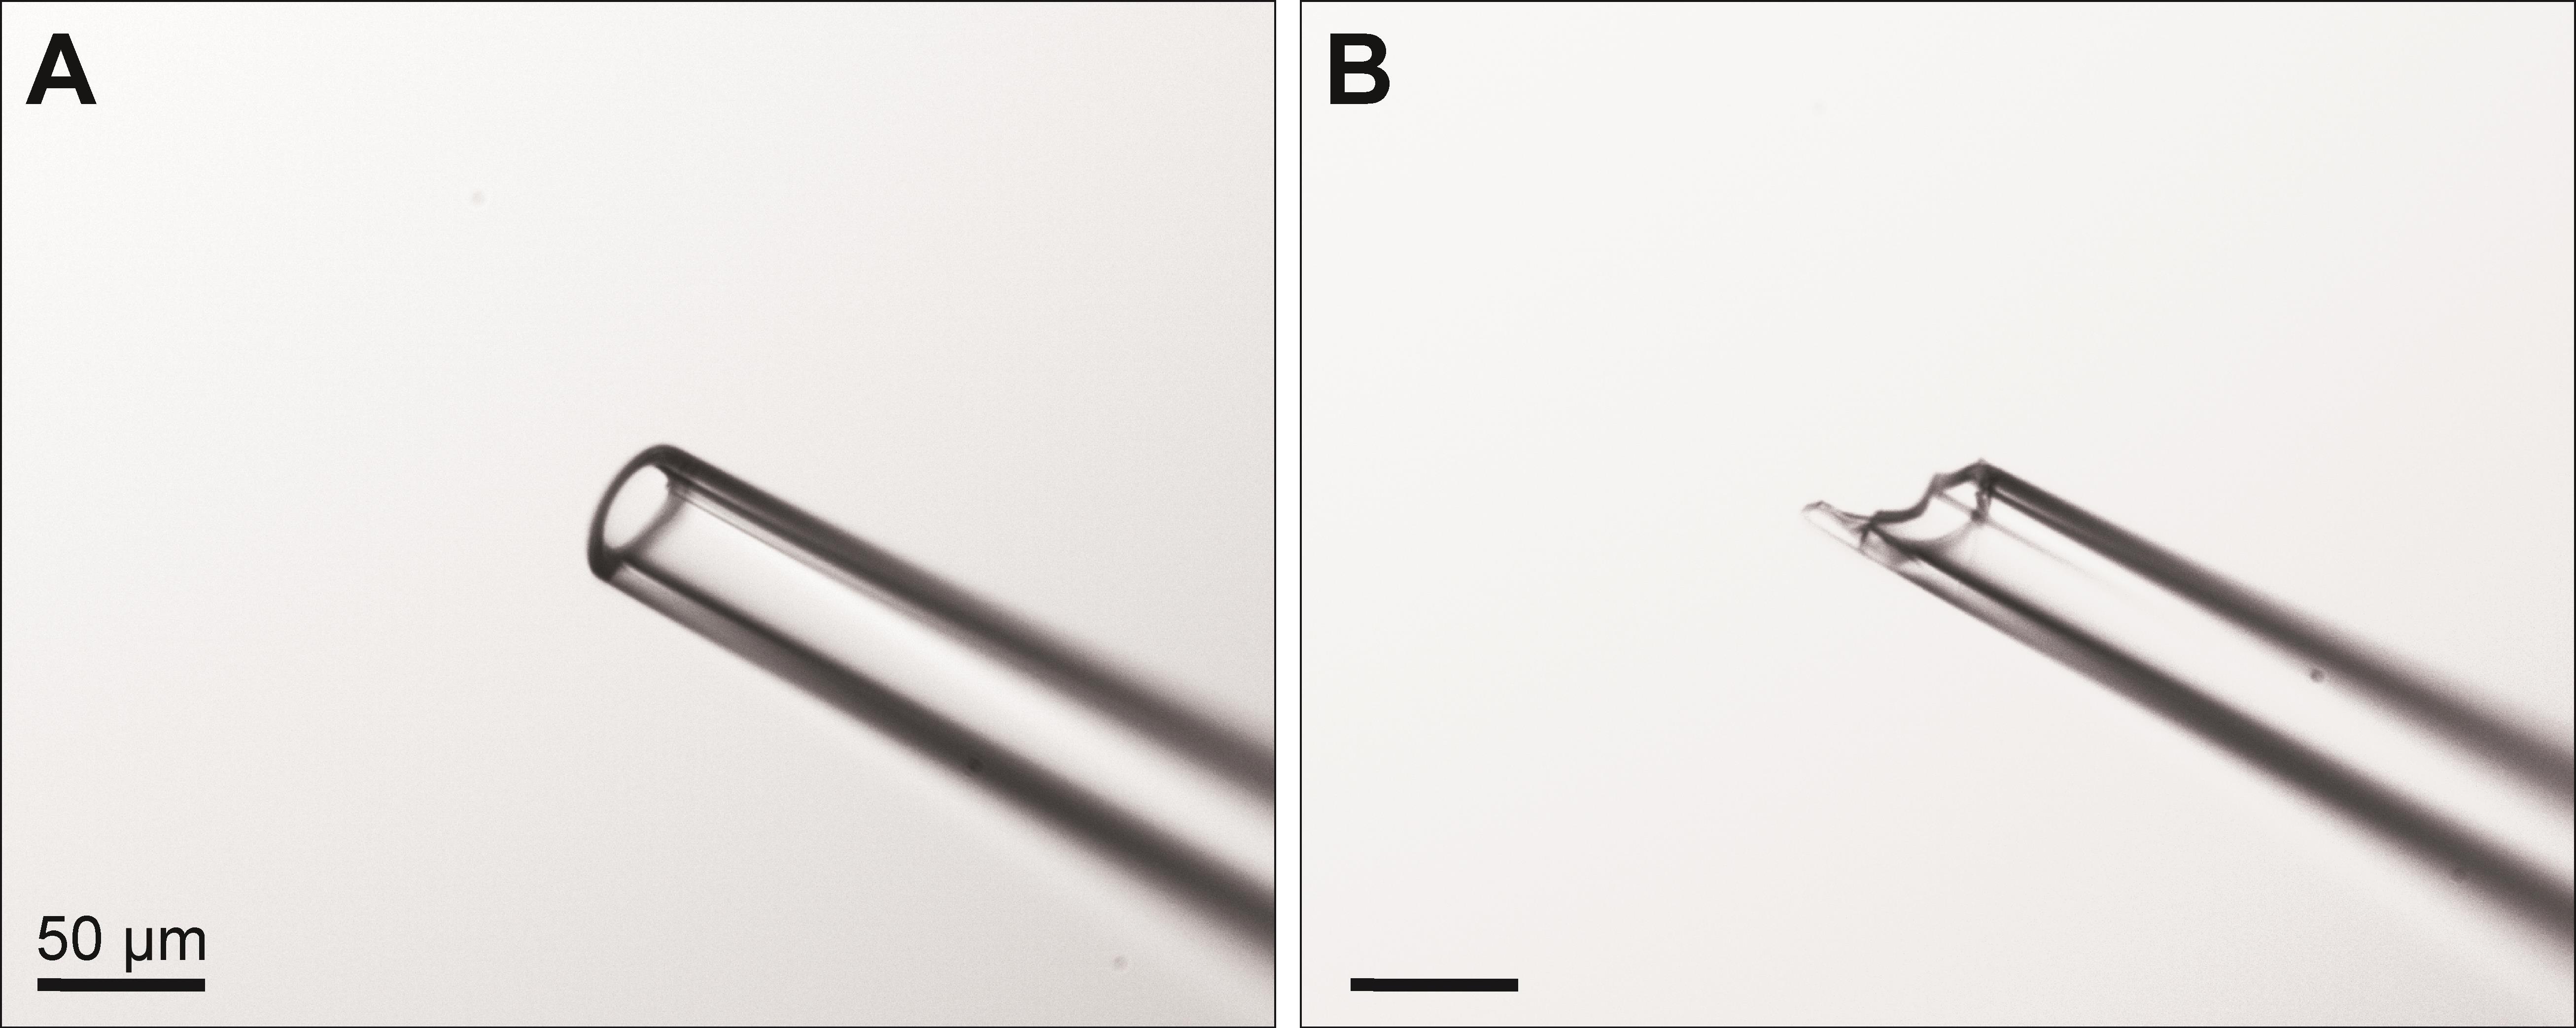
Figure 1. Tip of injection pipette after cutting with a ceramic scoring wafer. A. The tip should be cut to an approximate diameter of 25–50 μm and appear smooth and without major irregularities. B. A broken tip might result in poor injection results and tissue damage. Images were acquired using a 10× objective. Scale bars: 50 μm.
Virus injection in P1 mice
Slowly thaw the virus solution on ice.
Add mannitol and storage buffer to the desired concentration of viral particles and keep the solution on ice. Ensure that the final number of injected virus particles is < 1 × 10⁹:
If the stock concentration of the virus is 3 × 10¹² virus particles per milliliter (vp/mL), use the dilution as in Recipe 3.
Carefully mix the solution and keep it on ice for the rest of the experiment. When injecting 1 μL of this solution, a total number of 3 × 10⁸ virus particles will be delivered at the injection site. The total injection volume might be adjusted depending on the size of the target structure. Adjust the dilution in accordance with the virus particle concentration of the stock solution.
Fill the Hamilton syringe with mineral oil and place it into the infusion pump. Ensure to remove any air bubbles from the solution. Attach a tightly fitting plastic tube to the Hamilton syringe and fill it with mineral oil.
To fill the injection pipette, first fill 1–2 μL of virus solution into a Blaumark glass capillary. Using a small piece of silicon tubing, connect the glass capillary containing the virus solution to the back of the injection pipette so that the virus solution can flow between the glass capillary and injection pipette. Connect the other side of the glass capillary to the oil-filled tubing of the Hamilton syringe.
Use the syringe pump to push the virus solution from the glass capillary into the tip of the injection pipette, trying to minimize the amount of air in the system.
Anesthetize the mouse pups with cryoanesthesia (deep hypothermia): place one pup at a time, tail first, into the cut-off finger of a laboratory glove. Fill a 400 mL glass beaker with 70% crushed ice and 30% ice-cold water. Attach the glove finger to the inside wall of the glass beaker using a binder clip or clothespin so that the pup is immersed in ice water. Make sure that the glove opening is above the water level so that water does not enter the glove and the pup is not in direct contact with ice or water. Remove pups from the ice bath after a maximum period of 5 min to avoid any damage by hypothermia. The following steps should be performed swiftly, as the duration of cryoanesthesia is limited to 10–15 min.
Check the mouse pup for pedal reflex indicating proper anesthesia. Place the mouse pup in the stereotactic frame in a prone position and use soft ear bars to hold the head in place. Position the mouse as straight as possible and tighten the ear bars sufficiently to prevent head movement when slight pressure is applied.
Clean the skin on the head with alternating swaps of Betadine and 70% ethanol (three repetitions each).
Locate the superior sagittal sinus and identify the position of the bregma and lambda points beneath the skin. A light source next to the head might aid in identifying the sagittal sinus.
Position the injection pipette on top of the bregma point and set stereotaxic coordinates to zero. This point will be used as the zero reference for all future coordinates.
Lift the pipette and move 5.2 mm caudally and 1.5 mm laterally to mark the injection site. These coordinates might vary depending on the animal’s size.
Carefully lift the skin with forceps and make a small incision using sharp scissors at the previously marked injection site.
Penetrate the soft skull with the injection pipette and lower it to a depth of 2.9 mm below the surface of the skull. Move the pipette quickly to pinch through the skull but slowly once the pipette enters the brain.
Slowly inject the virus solution (< 1 μL) at a speed of 500 nL/min.
After the injection, leave the injection pipette in place for one minute to allow any pressure to dissipate.
Slowly remove the injection pipette.
Place the pup under a heating lamp or a heat-controlled cage maintained at 33–36 °C and allow it to recover. Remove any leftover blood from the skin with water.
When pups are awake and actively mobile, move them back to their home cage with their mother. Cover the pups with bedding material from the cage so they acquire a familiar smell, which helps to minimize cannibalism.
Virus injection in P14 mice
Slowly thaw the virus solution on ice.
Add mannitol and storage buffer to the desired concentration of viral particles and keep the solution on ice. Ensure that the final number of injected virus particles is < 1 × 10⁹.
If the stock concentration of the virus is 3 × 10¹² vp/mL, use the dilution as in Recipe 3.
Carefully mix the solution by slowly pipetting up and down; then, keep it on ice for the rest of the experiment. When injecting 1 μL of this solution, a total number of 3 × 10⁸ virus particles will be delivered at the injection site. The total injection volume might be adjusted depending on the size of the target structure. Adjust the dilution in accordance with the virus particle concentration of the stock solution.
Anesthetize the animal using 5% isoflurane in oxygen for induction; then, maintain at 1%–2% isoflurane and ensure proper anesthesia throughout the procedure by testing for the absence of the pedal reflex.
Inject Meloxicam subcutaneously (6 mg/kg body weight).
Apply ophthalmic ointment to the animal’s eyes.
Carefully remove hair from the animal’s head using hair remover lotion. Remove all the remaining lotion with water as the smell might disturb the mother when returning the animals after the procedure.
Place the animal in the stereotaxic frame and fixate with ear bars. Gently pull out the mouse’s tongue to facilitate breathing.
Clean the skin with alternating swipes of betadine and ethanol (70%), three times each.
Subcutaneously inject lidocaine/bupivacaine solution at the prospective incision site on top of the skull.
Cut the skin on the head at the midline along the anterior-posterior axis and expose the skull so that lambda and bregma marks are visible. Bregma is located at the intersection of the rostral-caudal fissure and the second major medial-lateral fissure. One drop of 3% hydrogen peroxide applied to the skull may aid in the visualization of sutures. After one minute, rinse thoroughly with water.
Using the Neurostar Stereotaxic software, determine the head size, orientation, and tilt. If necessary, re-adjust the head to minimize lateral tilt and improve reproducibility. When injecting into the cochlear nucleus, the head should be slightly tilted rostrally, with lambda approximately 1 mm higher than bregma. This prevents the injection pipette from damaging the superior sagittal sinus when vertically penetrating the brain.
Select the injection site in the Neurostar Stereotaxic software (e.g., cochlear nucleus) and determine the entry site. If needed, gently push the occipital muscle further caudal.
Using the foot-pedal-controlled drill equipped with a micro drill burr, drill a hole (1 mm diameter) into the skull, taking care not to damage underlying blood vessels and brain tissue. Remove any remaining debris from the drill site and pinch through the meninges with a pointy angled hook.
Mount the glass injection pipette into the nano-inject device and lower the plunger to the lowest possible position without damaging the glass pipette.
Pipette a drop of mineral oil onto parafilm. With the pipette tip immersed in the mineral oil, retract the plunger to tip-fill the injection pipette with 50–100 nL of mineral oil. This mineral oil layer will help to keep the plunger separated from the virus solution.
Tip-fill the rest of the pipette by pipetting a drop of virus solution onto parafilm. With the pipette tip in the solution, retract the plunger of the nanoliter injector until the plunger is completely retracted and the pipette is filled with virus solution.
Place the injection pipette above the drill hole and make sure the hole is clear of any debris and the pipette tip is intact.
Slowly lower the injection pipette into the target region.
Inject pipette solution (< 1 μL) at slow speed (100 nL/min); then, leave the pipette in place for another minute.
Slowly retract the pipette and repeat steps C17–C19 to proceed to another injection site. Note that the injection pipette must be removed completely from the brain before another injection area can be targeted.
After completing all injections, clean the drill hole and suture the skin above the skull with a sterile reverse-cutting needle and suture thread (5-0).
Place the animal under a heating lamp or a heat-controlled cage maintained at 33–36 °C to recover until the anesthesia wears off and the animal is fully mobile, alert, and shows no signs of pain.
Return the animal to its home cage with its mother and provide liquid gel for additional support.
Data analysis
The virus injected into the mouse brain expressed the target protein (e.g., Cre recombinase) together with a fluorescent reporter (e.g., EGFP) to verify viral transfection and protein expression (Figure 2). During patch-clamp experiments, the EGFP expression was used to visualize target neurons, and data were acquired from EGFP-positive neurons and EGFP-negative controls. For new preparations, it is important to validate that virus injection alone does not influence the parameter of interest. To test this, a separate control group should be used in which only the EGFP-expressing virus is injected and compared to non-injected control animals.
For statistical analysis, individual calyx terminals were considered independent samples. Statistical analysis was performed in MATLAB (RRID:SCR_001622) using a two-tailed unpaired Student’s t-test with Welch’s correction or a two-tailed Mann-Whitney U test, depending on the data distribution, but other statistical software (e.g., GraphPad Prism, SPSS) may be used. Effect sizes were calculated using the MES toolbox in MATLAB (Hentschke and Stüttgen, 2011). Calyx terminals in treatment and control mice should be sampled from the same region of the medial nucleus of the trapezoid body (MNTB) to minimize location bias.
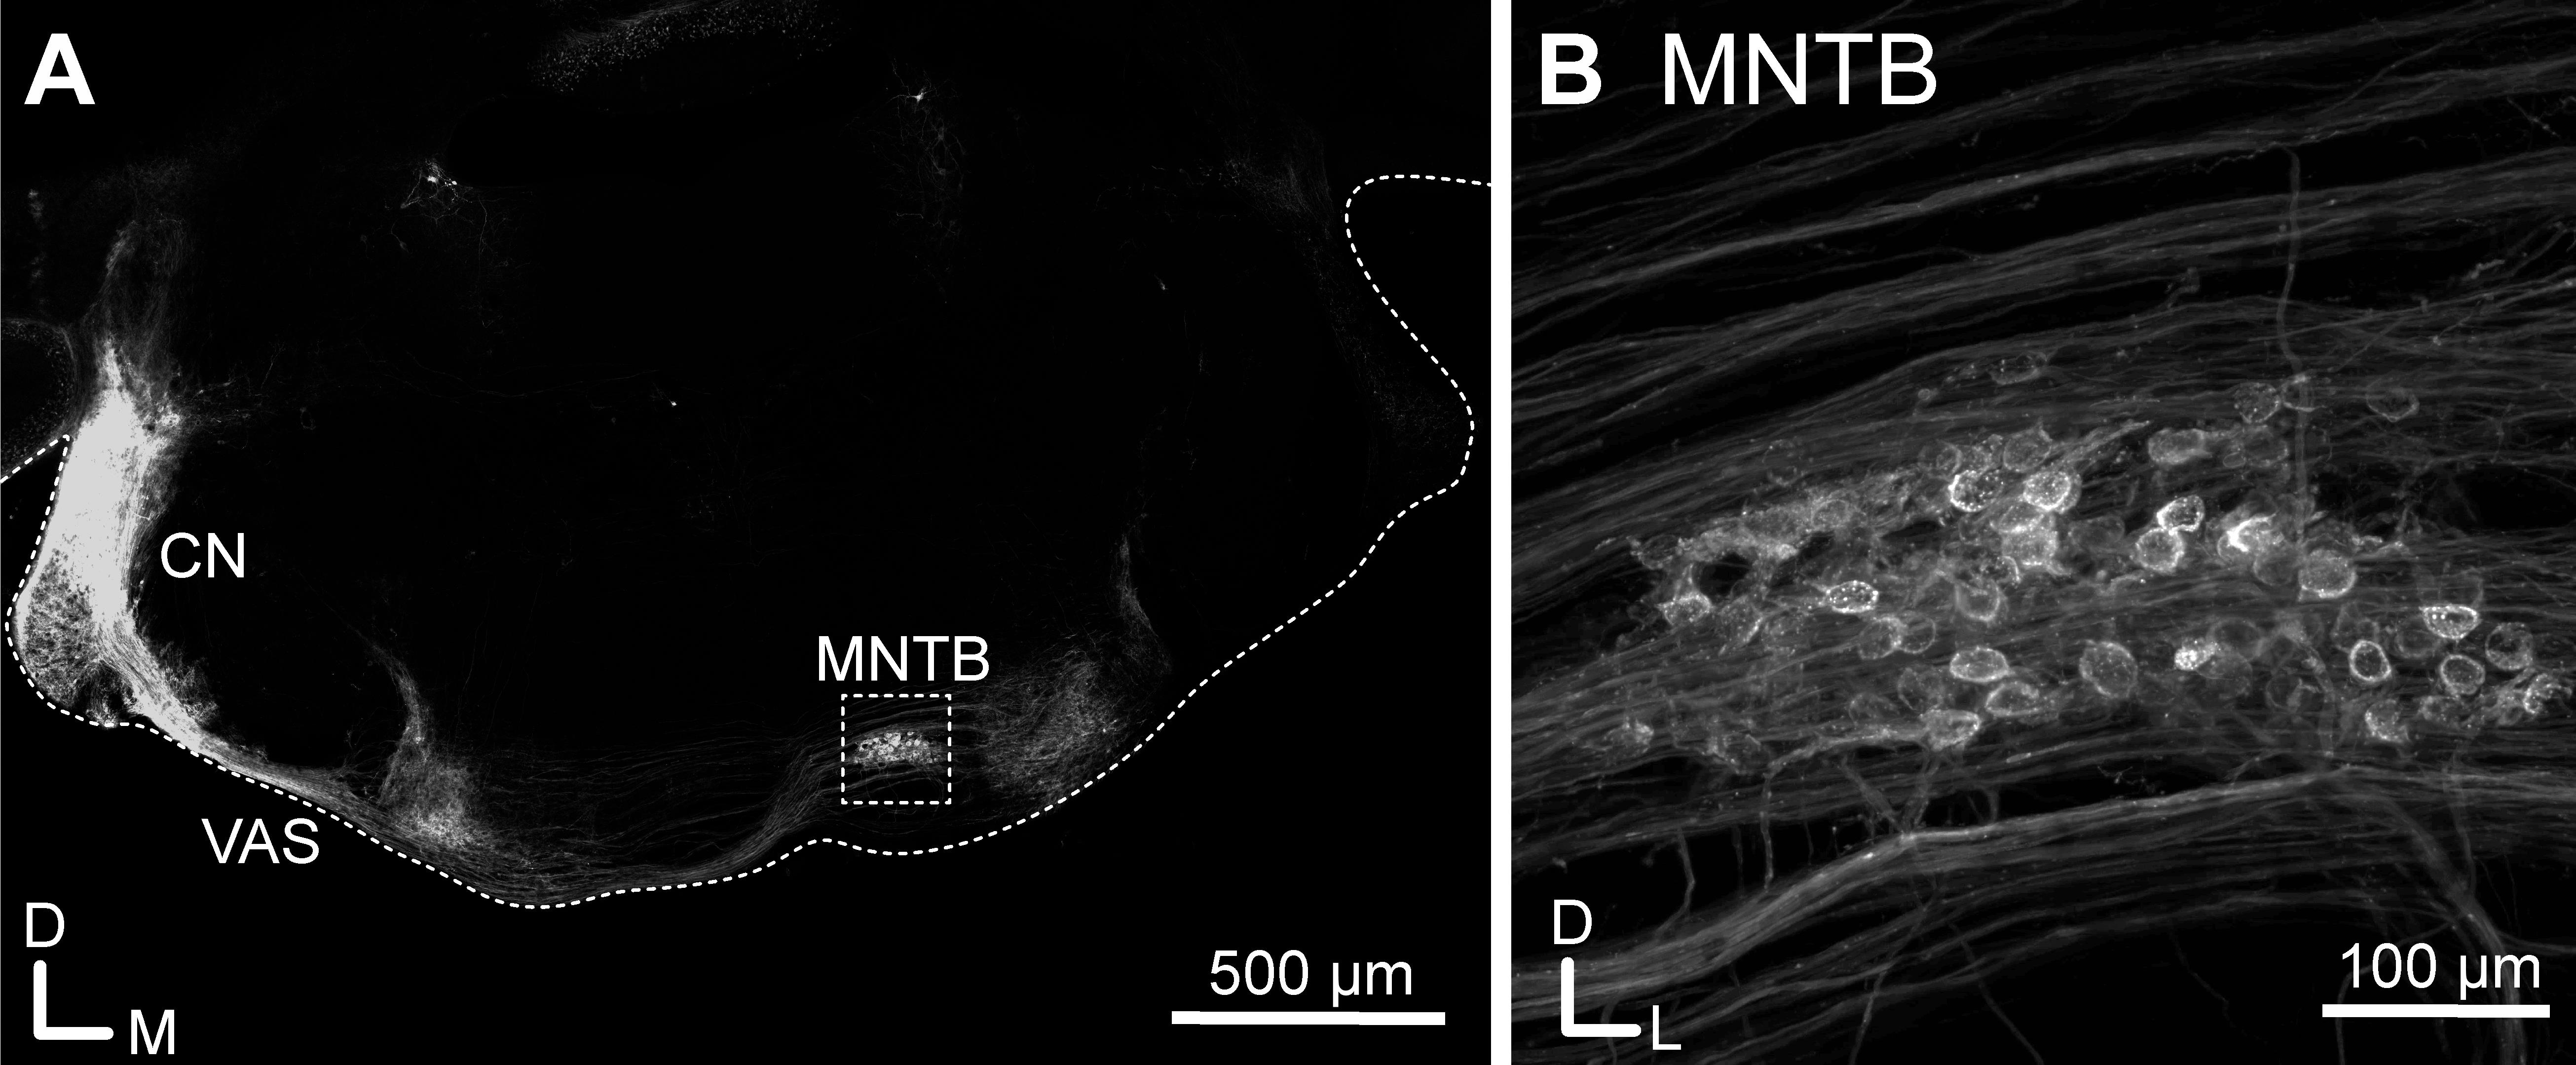
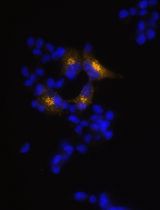
Figure 2. Injection of EGFP-expressing helper-dependent adenovirus viral vectors (HdAds) into the cochlear nucleus of a juvenile mouse. A. Confocal tile scan of a P28 mouse brain slice. EGFP-expressing HdAd was injected in the cochlear nucleus (CN) at P14. Note the strong fluorescence signal at the injection site and the fibers forming the ventral acoustic stria (VAS), terminating in the contralateral superior olivary complex including the medial nucleus of the trapezoid body (MNTB) (rectangle). The ipsilateral MNTB and the contralateral CN show no fluorescence signal, indicating targeted expression in the contralateral calyx of Held. For better orientation, the borders of the brain slice are indicated with a dotted line. For display purposes, brain slices were cut at a 30° dorsoventral angle to preserve the nerve connections between the CN and MNTB. Scale bar: 500 μm. B. Confocal maximum projection image of the MNTB region from the rectangle in A, showing passing fluorescent fibers and calyx of Held presynaptic terminals. Scale bar: 100 μm.
Validation of protocol
This protocol has been validated for viral injections at both P0/P1 (Montesinos et al., 2015 and 2016; Lübbert et al., 2017; Dong et al., 2018; Thomas et al., 2019; Radulovic et al., 2020) and P14 (Lübbert et al., 2019; Keine et al., 2022), and results have been reported in peer-review publications. To verify the coordinates for injection, the virus solution can be replaced with a fluorescent dye of high molecular weight or fluorescent microspheres. Brain slices can then be imaged using a standard fluorescent microscope and injection coordinates adjusted if needed.
Successful virus transfection can be verified by co-expression of a fluorescent marker (e.g., EGFP). Expression of Cre-recombinase can be validated by injecting the virus into a suitable Cre-reporter mouse line (e.g., B6.Cg-Gt(ROSA)26Sortm9(CAG-tdTomato)Hze/J, RRID:IMSR_JAX:007909) with Cre-dependent expression of a fluorescent protein. To quantify the effectivity and time course of Cre-mediated protein ablation, mRNA or protein levels should be measured with qRT-PCR, Western plot, or immunohistochemistry in either cell cultures or brain slices.
General notes and troubleshooting
General notes
All surgical procedures should be carried out in accordance with a protocol approved by the Institutional Animal Care and Use Committee (IACUC). Variations in anesthesia, surgical procedures, pain management, and post-operative care and follow-up may be necessary. Consult with IACUC before performing any procedure and make sure to use only methods that minimize the animal’s pain and suffering. All stereotaxic surgery instruments should be sterilized before use. All reagents are molecular biology grade and should be stored in accordance with the manufacturer's instructions. Virus solutions should be kept in aliquots (10 μL) at -80 °C for long-term storage and multiple freeze-thaw cycles should be avoided. All solutions are prepared using ultrapure water (> 18 MΩ·cm at 25 °C) unless noted otherwise.
Troubleshooting (see Table 1)
Table 1. Troubleshooting
Problem observed | Possible reason | Solution |
Virus solution does not flow out of the pipette | Pipette tip clogged | Make sure mannitol is fully dissolved, remove air bubbles from injection system |
Target region damaged or destroyed after injection | Too high injection pressure or injection volume
| • Reduce injection speed to 100 nL/min • Reduce injection volume to 1 μL per injection site • After injection, leave the pipette in place for one minute to dissipate the pressure |
Pipette movement to fast | Reduce pipette movement speed to 1 mm/min | |
Little to no EGFP expression after injection | Virus injected in ventricle or liquor | Correct injection coordinates |
Virus not functional/suitable | • Validate viral expression in cell cultures • Verify that virus/serotype can transfect target cells | |
Site of EGFP expression not reproducible | Animal head size varies between animals
| • Use animals with similar size/weight • Correct injection coordinates for differences in animal head size |
Animals not positioned correctly in stereotaxic frame | verify correct positioning of the animal’s head; small deviations between animals can have huge effect on injection coordinates |
Acknowledgments
We thank the members of the Young lab for their comments on the manuscript. This protocol was derived from original research papers (Lübbert et al., 2019; Keine et al., 2022). The work has been supported by grants from NIDCD (R01 DC014093), NINDS (R01 NS110742) and NCATS R03TR004161-0) to S.M.Y. and a postdoctoral fellowship from the German Research Foundation (DFG, 420075000) to C.K.
Competing interests
The authors declare no competing interests. The funders had no role in study design, data collection and interpretation, or the decision to submit the work for publication.
Ethics considerations
All experiments were performed following animal welfare laws and approved by the Institutional Committee for Care and Use of Animals at the University of Iowa PHS Assurance No. D16- 00009 (A3021- 01) (Animal Protocol 0021952) and complied with accepted ethical best practices.
References
- Brunetti-Pierri, N. and Ng, P. (2017). Gene therapy with helper-dependent adenoviral vectors: lessons from studies in large animal models. Virus Genes 53(5): 684–691.
- Chen, C., Satterfield, R., Young, S. M. and Jonas, P. (2017a). Triple Function of Synaptotagmin 7 Ensures Efficiency of High-Frequency Transmission at Central GABAergic Synapses. Cell Rep. 21(8): 2082–2089.
- Chen, C., Arai, I., Satterfield, R., Young, S. M. and Jonas, P. (2017b). Synaptotagmin 2 Is the Fast Ca2+ Sensor at a Central Inhibitory Synapse. Cell Rep. 18(3): 723–736.
- Chen, S. H., Haam, J., Walker, M., Scappini, E., Naughton, J. and Martin, N. P. (2019). Recombinant Viral Vectors as Neuroscience Tools. Curr. Protoc. Neurosci. 87(1): e67.
- Chen, Z., Cooper, B., Kalla, S., Varoqueaux, F. and Young, S. M. (2013). The Munc13 Proteins Differentially Regulate Readily Releasable Pool Dynamics and Calcium-Dependent Recovery at a Central Synapse. J. Neurosci. 33(19): 8336–8351.
- Dong, W., Radulovic, T., Goral, R. O., Thomas, C., Suarez Montesinos, M., Guerrero-Given, D., Hagiwara, A., Putzke, T., Hida, Y., Abe, M., et al. (2018). CAST/ELKS Proteins Control Voltage-Gated Ca2+ Channel Density and Synaptic Release Probability at a Mammalian Central Synapse. Cell Rep. 24(2): 284–293.e6.
- Eisener-Dorman, A. F., Lawrence, D. A. and Bolivar, V. J. (2009). Cautionary insights on knockout mouse studies: The gene or not the gene?. Brain, Behavior, and Immunity 23(3): 318–324.
- Haery, L., Deverman, B. E., Matho, K. S., Cetin, A., Woodard, K., Cepko, C., Guerin, K. I., Rego, M. A., Ersing, I., Bachle, S. M., et al. (2019). Adeno-Associated Virus Technologies and Methods for Targeted Neuronal Manipulation. Front. Neuroanat. 13: e00093.
- Hentschke, H. and Stüttgen, M. C. (2011). Computation of measures of effect size for neuroscience data sets. Eur. J. Neurosci. 34(12): 1887–1894.
- Keine, C., Al-Yaari, M., Radulovic, T., Thomas, C. I., Ramos, P. V., Guerrero-Given, D., Ranjan, M., Taschenberger, H., Kamasawa, N., Young, S. M., et al. (2022). Presynaptic Rac1 controls synaptic strength through the regulation of synaptic vesicle priming. eLife 11: e81505.
- Koopmans, F., van Nierop, P., Andres-Alonso, M., Byrnes, A., Cijsouw, T., Coba, M. P., Cornelisse, L. N., Farrell, R. J., Goldschmidt, H. L., Howrigan, D. P., et al. (2019). SynGO: An Evidence-Based, Expert-Curated Knowledge Base for the Synapse. Neuron 103(2): 217–234.e4.
- Lentz, T. B., Gray, S. J. and Samulski, R. J. (2012). Viral vectors for gene delivery to the central nervous system. Neurobiol. Dis. 48(2): 179–188.
- Lepeta, K., Lourenco, M. V., Schweitzer, B. C., Martino Adami, P. V., Banerjee, P., Catuara-Solarz, S., de La Fuente Revenga, M., Guillem, A. M., Haidar, M., Ijomone, O. M., et al. (2016). Synaptopathies: synaptic dysfunction in neurological disorders - A review from students to students. J. Neurochem. 138(6): 785–805.
- Lübbert, M., Goral, R. O., Satterfield, R., Putzke, T., van den Maagdenberg, A. M., Kamasawa, N. and Young, S. M. (2017). A novel region in the CaV2.1 α1 subunit C-terminus regulates fast synaptic vesicle fusion and vesicle docking at the mammalian presynaptic active zone. eLife 6: e28412.
- Lübbert, M., Goral, R. O., Keine, C., Thomas, C., Guerrero-Given, D., Putzke, T., Satterfield, R., Kamasawa, N. and Young, S. M. (2019). CaV2.1 α1 Subunit Expression Regulates Presynaptic CaV2.1 Abundance and Synaptic Strength at a Central Synapse. Neuron 101(2): 260–273.e6.
- Montesinos, M. S., Satterfield, R. and Young, S. M. (2016). Helper-Dependent Adenoviral Vectors and Their Use for Neuroscience Applications. In: Schwartzbach, S., Skalli, O. and Schikorski, T. (Eds.). High-Resolution Imaging of Cellular Proteins (pp. 73–90). Methods in Molecular Biology. Humana Press, New York.
- Montesinos, M. S., Dong, W., Goff, K., Das, B., Guerrero-Given, D., Schmalzigaug, R., Premont, R. T., Satterfield, R., Kamasawa, N., Young, S. M., et al. (2015). Presynaptic Deletion of GIT Proteins Results in Increased Synaptic Strength at a Mammalian Central Synapse. Neuron 88(5): 918–925.
- Navabpour, S., Kwapis, J. L. and Jarome, T. J. (2020). A neuroscientist’s guide to transgenic mice and other genetic tools. Neuroscience & Biobehavioral Reviews 108: 732–748.
- Ostrovskaya, O. I., Orlandi, C., Fajardo-Serrano, A., Young, S. M., Lujan, R. and Martemyanov, K. A. (2018). Inhibitory Signaling to Ion Channels in Hippocampal Neurons Is Differentially Regulated by Alternative Macromolecular Complexes of RGS7. J. Neurosci. 38(46): 10002–10015.
- Radulovic, T., Dong, W., Goral, R. O., Thomas, C. I., Veeraraghavan, P., Montesinos, M. S., Guerrero-Given, D., Goff, K., Lübbert, M., Kamasawa, N., et al. (2020). Presynaptic development is controlled by the core active zone proteins CAST/ELKS. J. Physiol. 598(12): 2431–2452.
- Sigmund, C. D. (2000). Viewpoint: Are Studies in Genetically Altered Mice Out of Control?. Arterioscler., Thromb., Vasc. Biol. 20(6): 1425–1429.
- Sutton, L. P., Orlandi, C., Song, C., Oh, W. C., Muntean, B. S., Xie, K., Filippini, A., Xie, X., Satterfield, R., Yaeger, J. D. W., et al. (2018). Orphan receptor GPR158 controls stress-induced depression. eLife 7: e33273.
- Suzuki, J., Inada, H., Han, C., Kim, M. J., Kimura, R., Takata, Y., Honkura, Y., Owada, Y., Kawase, T., Katori, Y., et al. (2020). “Passenger gene” problem in transgenic C57BL/6 mice used in hearing research. Neurosci. Res. 158: 6–15.
- Sztretye, M., Szabó, L., Dobrosi, N., Fodor, J., Szentesi, P., Almássy, J., Magyar, Z. Ã., Dienes, B. and Csernoch, L. (2020). From Mice to Humans: An Overview of the Potentials and Limitations of Current Transgenic Mouse Models of Major Muscular Dystrophies and Congenital Myopathies. Int. J. Mol. Sci. 21(23): 8935.
- Taoufik, E., Kouroupi, G., Zygogianni, O. and Matsas, R. (2018). Synaptic dysfunction in neurodegenerative and neurodevelopmental diseases: an overview of induced pluripotent stem-cell-based disease models. Open Biol. 8(9): e180138.
- Thomas, C. I., Keine, C., Okayama, S., Satterfield, R., Musgrove, M., Guerrero-Given, D., Kamasawa, N. and Young, S. M. (2019). Presynaptic Mitochondria Volume and Abundance Increase during Development of a High-Fidelity Synapse. J. Neurosci. 39(41): 7994–8012.
- Vetrini, F. and Ng, P. (2010). Gene Therapy with Helper-Dependent Adenoviral Vectors: Current Advances and Future Perspectives. Viruses 2(9): 1886–1917.
- Wang, X., Christian, K. M., Song, H. and Ming, G. L. (2018). Synaptic dysfunction in complex psychiatric disorders: from genetics to mechanisms. Genome Med. 10(1): e1186/s13073-018-0518-5.
- Watanabe, M., Nishikawaji, Y., Kawakami, H. and Kosai, K. I. (2021). Adenovirus Biology, Recombinant Adenovirus, and Adenovirus Usage in Gene Therapy. Viruses 13(12): 2502.
Article Information
Copyright
© 2023 The Author(s); This is an open access article under the CC BY license (https://creativecommons.org/licenses/by/4.0/).
How to cite
Readers should cite both the Bio-protocol article and the original research article where this protocol was used:
- Keine, C., Al-Yaari, M., Radulovic, T. and Young, S. M. J. (2023). Stereotactic Delivery of Helper-dependent Adenoviral Viral Vectors at Distinct Developmental Time Points to Perform Age-dependent Molecular Manipulations of the Mouse Calyx of Held. Bio-protocol 13(16): e4793. DOI: 10.21769/BioProtoc.4793.
- Keine, C., Al-Yaari, M., Radulovic, T., Thomas, C. I., Ramos, P. V., Guerrero-Given, D., Ranjan, M., Taschenberger, H., Kamasawa, N., Young, S. M., et al. (2022). Presynaptic Rac1 controls synaptic strength through the regulation of synaptic vesicle priming. eLife 11: e81505.
Category
Cell Biology > Cell engineering > CRISPR-cas9
Developmental Biology > Genome editing
Do you have any questions about this protocol?
Post your question to gather feedback from the community. We will also invite the authors of this article to respond.