- Protocols

- Articles and Issues
- For Authors
- About
- Become a Reviewer

Long-term in toto Imaging of Cellular Behavior during Nerve Injury and Regeneration
Published: Vol 13, Iss 9, May 5, 2023 DOI: 10.21769/BioProtoc.4665 Views: 2586
Reviewed by: Nafisa M. JadavjiXiaochen SunWenyang Li
Original research article
The authors used this protocol in:

Mar 2021
Advertisement


Protocol Collections
Comprehensive collections of detailed, peer-reviewed protocols focusing on specific topics


Related protocols

Abstract
Accidental wounding of the peripheral nervous system leads to acute neural dysfunction. Normally, chronic deficits are overcome because peripheral nerves naturally regenerate. However, various genetic and metabolic defects can impair their natural regenerative capacity, which may be due to neuron-extrinsic mechanisms. Therefore, characterizing the behavior of multiple cells during nerve injury and repair in vivo is a pressing need in regenerative medicine. Here, we detail a method for precise wounding of sensory axons in zebrafish, followed by high-resolution in toto long-term quantitative videomicroscopy of neurons, Schwann cells, and macrophages. This protocol can be easily adapted to study the effects of targeted genetic or metabolic disruptions in zebrafish and other suitable organisms, as well as for screening pharmacological agents with therapeutic potential.
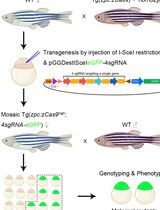
Graphical overview

Background
The peripheral nervous system communicates sensory cues to the brain. It therefore mediates organismal responses to changes in the body’s internal and external environments (Handler and Ginty, 2021; Elias and Abdus-Saboor, 2022; Prescott and Liberles, 2022). Sensory neurons must maintain functionality throughout the life of the organism despite stress and trauma. Although acute loss of integrity of these neurons occurs persistently, animals normally overcome chronic neurological dysfunctions via effective repair (Johnson et al., 2005). By contrast, repair is normally extremely limited in the central nervous system (Varadarajan et al., 2022). Peripheral nerve wounding triggers dynamic changes in the behavior of Schwann cells as well as the recruitment of other cells including macrophages, which together resolve injury, initiate repair, and enhance regeneration (Abdo et al., 2019). In recent studies, we have combined genetic and chemical perturbations, transgenic markers, and high-resolution live imaging to characterize nerve injury and regeneration in larval zebrafish (Lozano-Ortega et al., 2018; Tian and López-Schier, 2020; Xiao et al., 2015a). Furthermore, we discovered that Schwann cells are important but not essential for sensory nerve regeneration (Tian et al., 2020b; Xiao et al., 2015b). Moreover, we revealed fast recruitment of macrophages to the wound (Tian et al., 2020). We have also discovered that blocking the degradation of axons severed from the neuronal cell body has no significant impact on nerve repair (Tian et al., 2020). Our finding that loss of the pro-degenerative protein Sarm1 accelerates axonal regeneration may have important implications for the development of therapies aimed at improving neural repair in humans.
The zebrafish larva is a powerful vertebrate experimental system for studies of neuronal wounding and regeneration (Rieger and Sagasti, 2011; Cardozo et al., 2017; Cigliola et al., 2020; González and Allende, 2021). Spatial and temporal control of injury can be done by laser-mediated axon transection or neuronal ablation. Axonal injury triggers fast degeneration of the part of the axon detached from the cell body, followed by regenerative growth of the proximal stump. In several previous studies, we used the mechanosensory lateral line in larval zebrafish to perform nerve wounding using an ultraviolet laser, and live microscopy in transgenic animals expressing fluorescent markers to track relevant cellular populations during injury resolution and repair (Figures 1 and 2). Of note, laser-mediated axon severing is a powerful technique but it suffers from the fact that both proximal and distal axon fragments are immediately cauterized. This is unlikely to occur during physical injury, when axoplasmic spillage may trigger different responses from the Schwann cells situated in proximity to the damaged nerve. Nevertheless, the precise spatiotemporal control of injury and simultaneous live imaging that this protocol allows vastly overcome this potential shortcoming. Therefore, we present a detailed protocol for facile implementation of laser-mediated microsurgery of sensory axons and in toto imaging of subsequent responses by axons, glia, and macrophages (Figure 3 and 4, and Videos 1 and 2). This protocol uses 5-day-post-fertilization (5 dpf) zebrafish Danio, but it can be equally used in older animals and other specimens of similar characteristics, including Oryzias, Astyanax, or Danionella.
An ultraviolet laser is directed to the target through a high numerical aperture objective lens mounted on a spinning-disk confocal microscope. However, a point-scanning single- or two-photon confocal microscope will be useful. Targeting is guided by the fluorescence from stable expression of EGFP or RFP using a lateralis afferent neuron-specific enhancer. However, mosaic expression of a fluorescent protein using pan-neuronal genetic control elements, for instance the widely employed NeuroD, Ngn1, or HuC, is also suitable.
Materials and Reagents
Cover glass–bottomed mini dish (MatTek, catalog number: p35G-1.0-14-c)
Petri dishes (Greiner Bio-One, catalog number: G180535A/01889)
Plastic strainer (ZM Systems, Product code: teastrain15)
Plastic Pasteur pipettes
Tricaine (MS-222) (25× stock solution) (PharmQ, UK)
Low-melting agarose (1% M/V) (Sigma-Aldrich, catalog number: A9414-100G)
Sodium chloride (NaCl) (Merck KGaA, catalog number: 1.06404.5000)
Potassium chloride (KCl) (Sigma-Aldrich, P9541-500G)
Calcium chloride dihydrate (CaCl2·2H2O) (Sigma-Aldrich, catalog number: C3306-250G)
Magnesium sulfate (MgSO4) (Sigma-Aldrich, catalog number: M5921 500G)
Trizma (Tris base) (Sigma-Aldrich, catalog number: T1503-1KG)
HCl (Sigma-Aldrich, catalog number: H1758-500ML)
Plasmids UAS:EGFP, SILL:mCherry; mfap4:EGFP
Fish lines: Casper, Tg[UAS:EGFP], Tg[SILL:mCherry], Tg[gSAGFF202A], Tg[ mfap4:EGFP]
E3 embryo medium (10×) (see Recipes)
Tris-HCl (1 M pH 9.0) (see Recipes)
Tricaine (MS-222) (25×) (see Recipes)
Low-melting agarose (1% w/v) (see Recipes)
Equipment
Incubator set at 28.5 °C
Fine forceps
Optically-clear polystyrene 90 mm Petri dishes
Plastic transfer pipettes
Microwave oven
100 mL glass bottle
Handmade 1-eyelash brush
Microinjection system
Microscopes:
Upright stereomicroscope (e.g., ZEISS Stemi SV 11) equipped with fluorescent-light source and a filter set for GFP and RFP/Cherry.
Spinning-disk microscope confocal microscope (ZEISS) with an iLasPulse laser system (Roper Scientific SAS) and a temperature-control system.
Procedure
Prepare zebrafish larva (Tg[gSAGFF202A:UAS-EGFP; Tg[SILL-mCherry] line for imaging Schwann cells and afferent neurons, or Tg[mfap4:EGFP; Tg[SILL:mCherry] line for imaging macrophages and afferent neurons)
Collect embryos and keep them in the incubator at 28.5 °C for standard development to the 5–6 days-post-fertilization (dpf) larval stage. Embryos should be kept in 90 mm Petri dishes. For optimal survival, keep around 50 embryos per dish.
At 4 dpf, screen specimens using a fluorescence stereomicroscope (Figures 1 and 2).
Using a transfer pipette, isolate the positive larva expressing the mCherry (red) in the lateralis neurons and EGFP (green) in Schwann cells or macrophages.
Note: Plastic materials intended for single use can be washed and re-used. This includes Petri dishes and transfer pipettes.
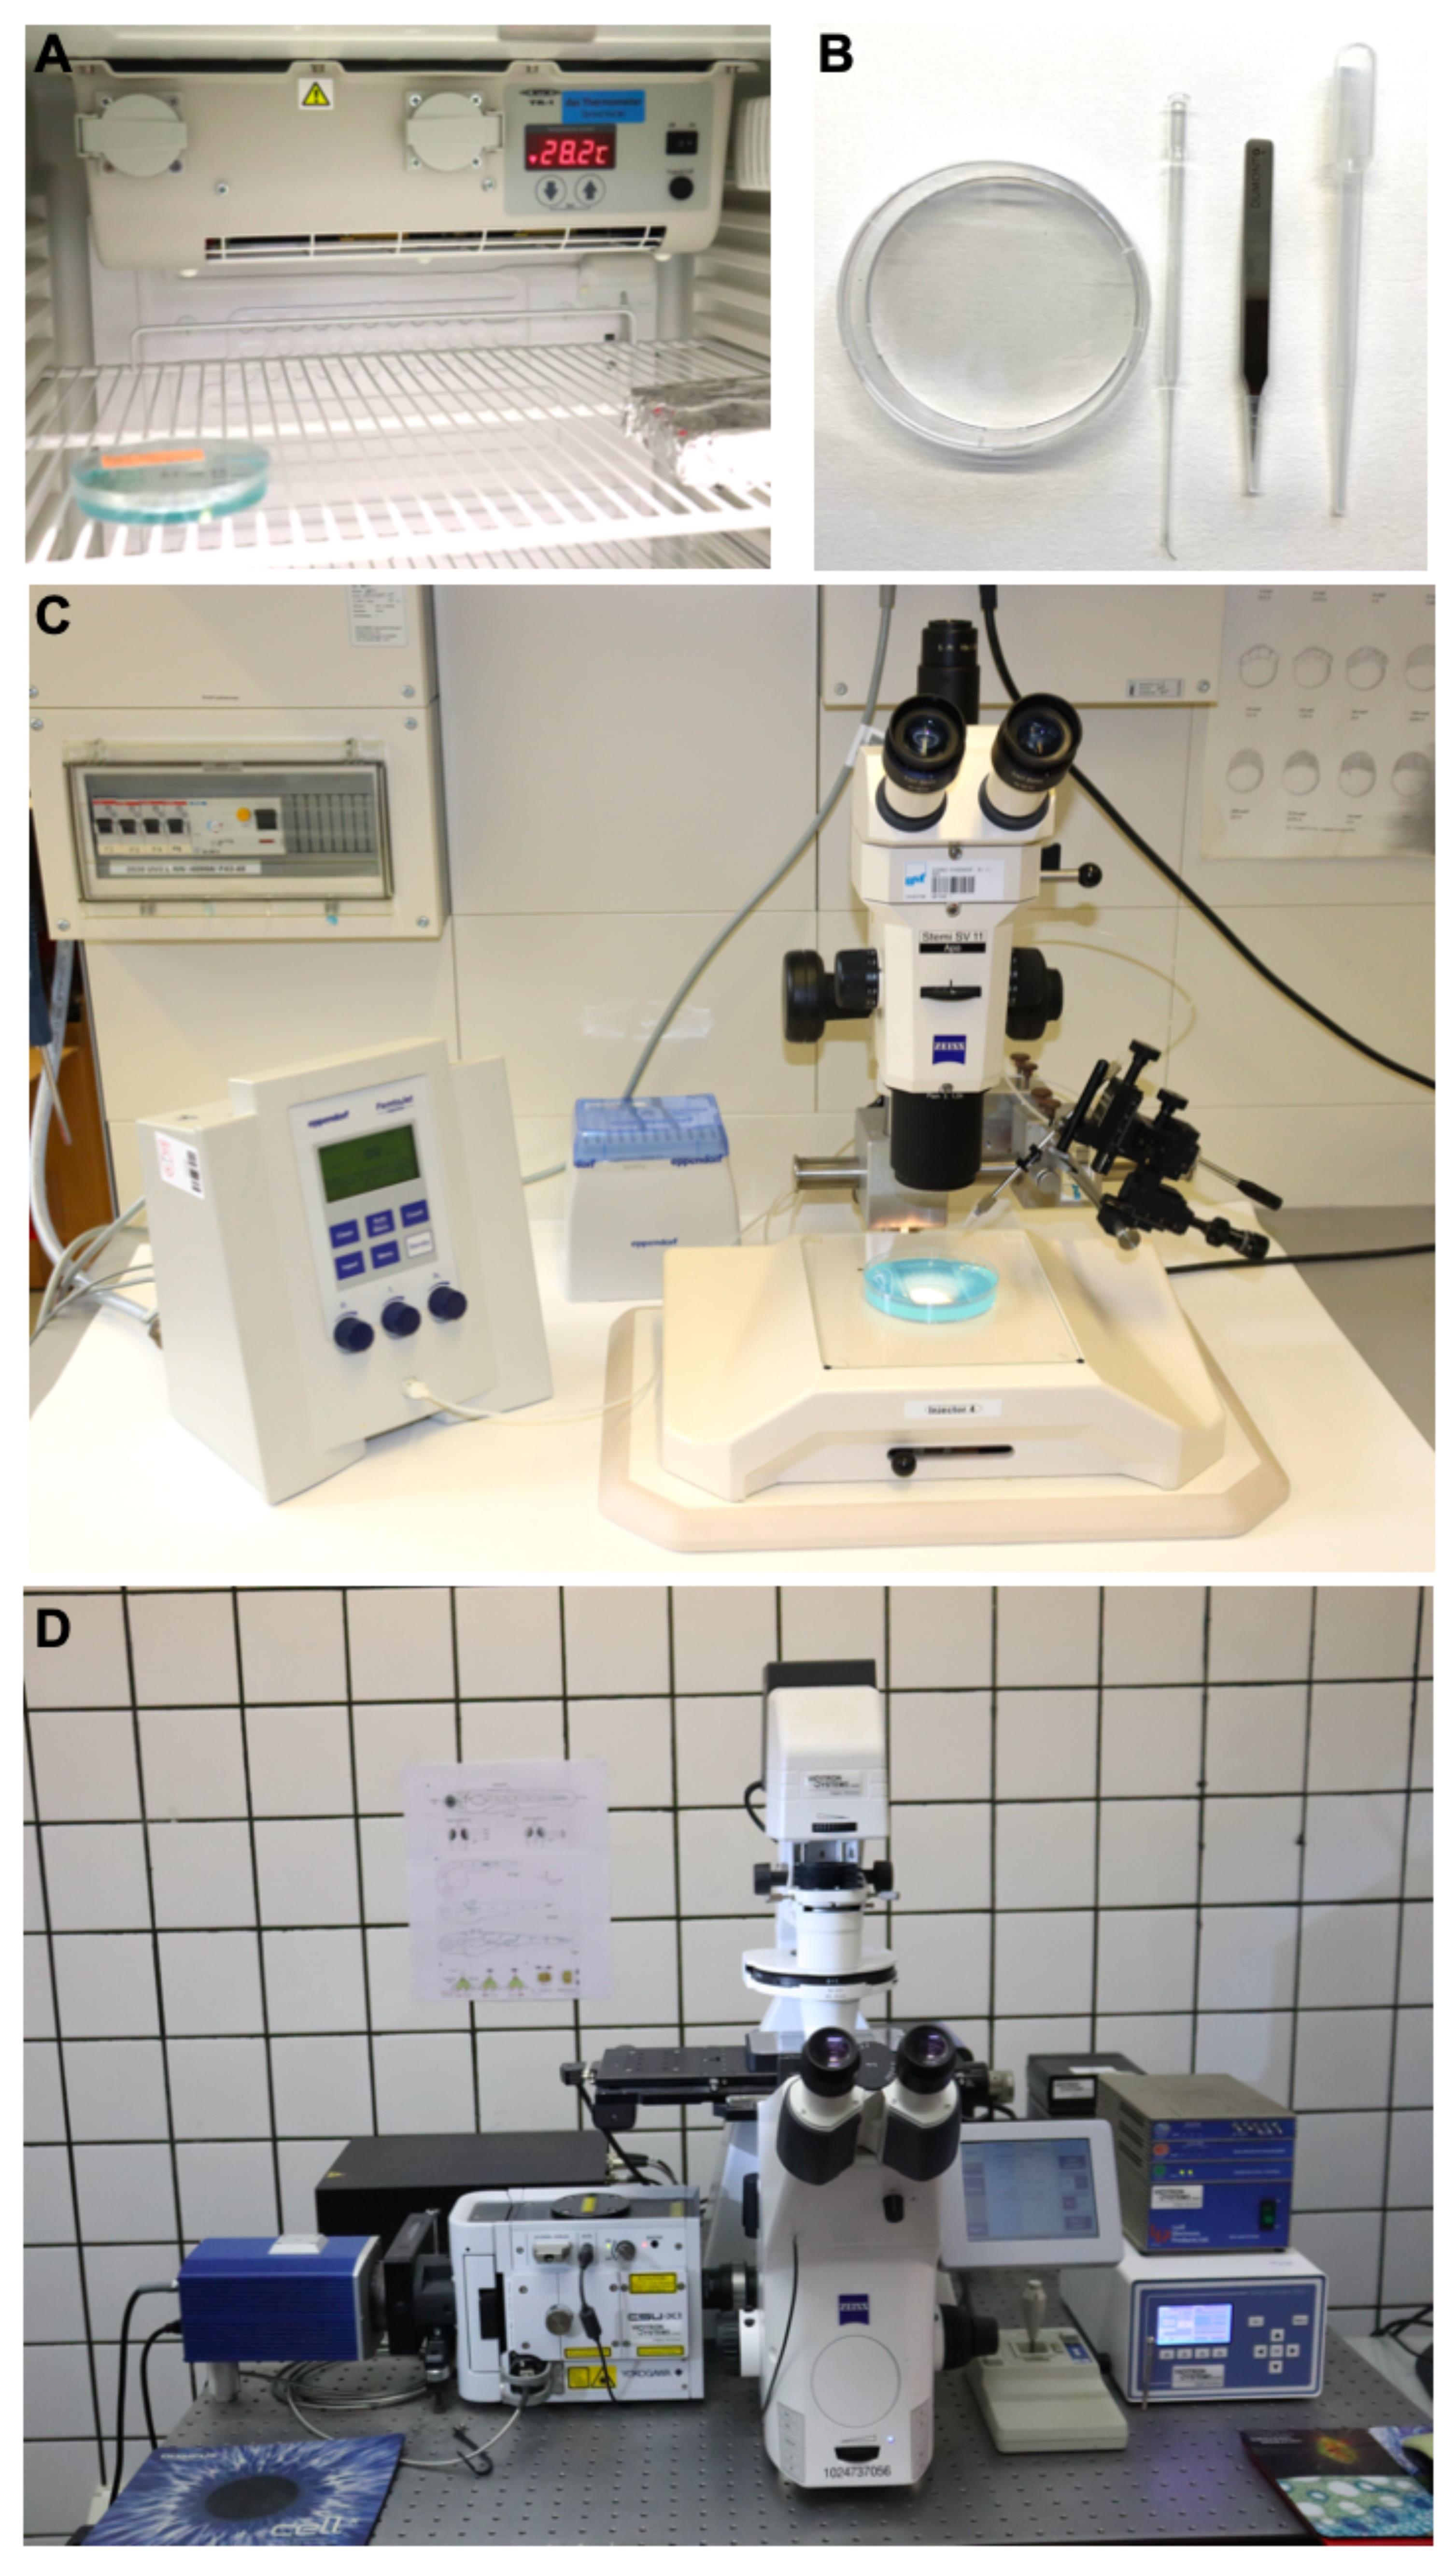
Figure 1. Main tools for the protocol. A. Photograph exemplifying the placement of a plastic Petri dish containing eggs into an incubator. B. Photograph of a standard Petri dish, glass pipette with a hair loop attached to its tip, a forceps and a plastic transfer pipette. C. Example of a stereomicroscope with a typical microinjection apparatus. D. Photograph of an inverted spinning-disc microscope for long-term imaging.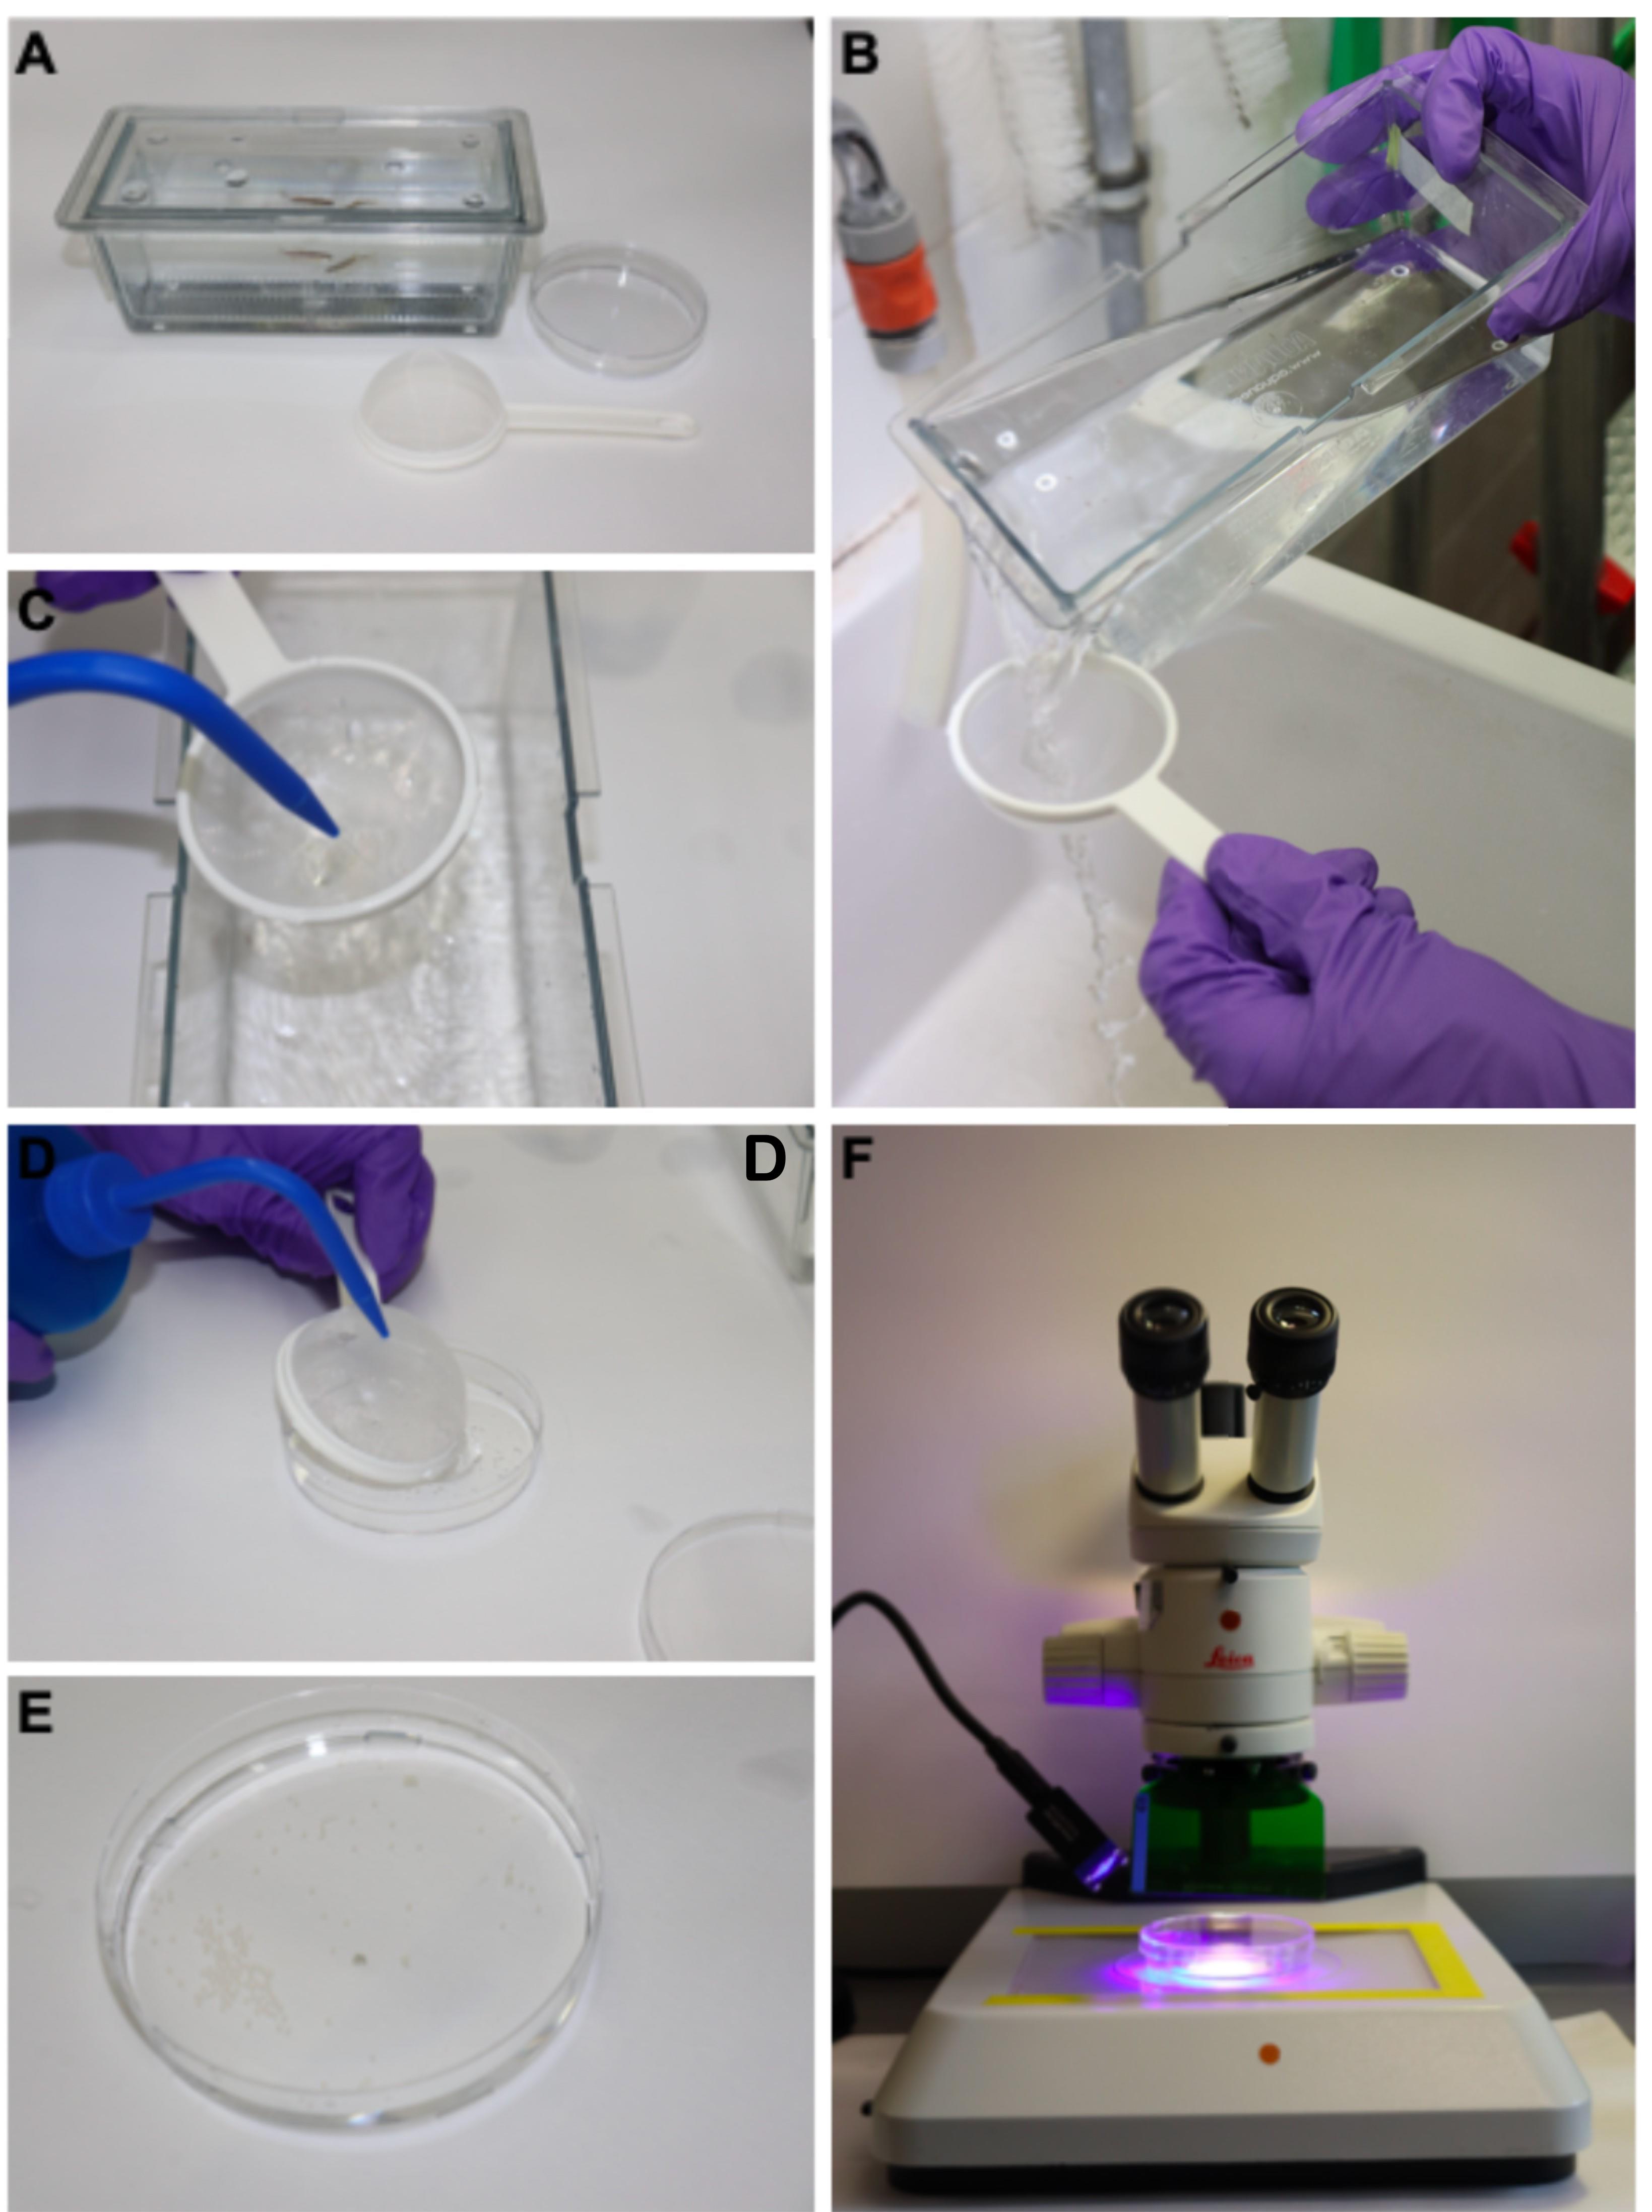
Figure 2. Procedures for collecting eggs and raising specimens. A. Photograph of a breeding tank, with a bottom grid to enable eggs to fall outside the reach of adult fish (which may otherwise eat them), a Petri dish and an egg-harvesting strainer. B. Once the inner container is removed with the breeding adults, the water with the eggs contained in the breeding tank is gently poured through the strainer to collect eggs. C. The eggs are gently and briefly washed with clean water from the facility system. D. The strainer is then placed inside down onto the inner (bottom) part of the Petri dish and eggs are flushed into this dish applying a gently flow of water using a plastic bottle. E. The eggs will now be visible in the dish. F. The dish with the eggs can then be moved to a stereomicroscope of fluorescence for screening and cleaning.
Mosaic-labelling, an alternative to stable transgenics lines for marking a selected population of neurons and Schwann cells or macrophages
Prepare Casper zebrafish eggs from the Tg[gSAGFF202A] driver line for Schwann cells.
Prepare the plasmids for injection. Mix well 20 ng/μL each of the UAS:EGFP and SILL:mCherry plasmids before loading into the capillary for injection.
For macrophage and neurons, mix mfap4:EGFP and SILL:mCherry constructs for injection (10 ng/μL of each plasmids).
Inject around 1–2 nL plasmids into the one-cell stage embryos.
Screen the injected eggs that have developed as morphologically normal larva at 4 dpf and pick the EGFP and mCherry double-positives under a stereomicroscope of fluorescence. Then, transfer the positive larva to a new plate for growth to desired stage (Figure 2).
Laser-mediated nerve transection and imaging
Anesthetizing and mounting the larva
Anesthetize the larva with 1× MS-222 solution (0.016% w/v) diluting with E3 medium. The E3 embryo medium is prepared as a stock solution (10×) from which a working solution (1×) is freshly made (see Recipe 1). Put one large drop (around 100 μL) of 1% low melting agarose (melted at no more than 37 °C) onto the cover glass–bottomed dish. Move the anesthetized larva into the agarose drop using a transfer pipette with the minimal amount of water possible, to prevent too much dilution of the agarose. Using a hair loop glued to the tip of a glass pipette, gently push the larva to the bottom of the dish so that it touches the glass. Then, orient and position the specimen as desired. Generally, the resulting ~1% low melting agarose will allow enough time (30–45 s) for the procedure. With practice, up to three fish can be mounted almost simultaneously.
After 5 min at room temperature, cover the now solidified agarose with E3 embryo medium containing MS-222.
Move the dish with extreme care because, if shaken, the agarose block could detach from the glass, rendering the preparation unusable.
Note: We noticed a significant drop of survival during imaging when more than three fish are mounted on the same dish.
Put the dish containing fish on a holder adapted to the microscope stage. Put the heating system at 28.5 °C (or the ideal temperature for the specific experiment). Use the 20× objective to adjust the position of the dish by looking at the red or green fluorescence.
Transect the axons with a laser beam by using a water-immersion 63× objective (see Notes). It is important to avoid oil-immersion objectives because they will prevent repeating the procedure on multiple fish mounted on the same dish, and also significantly complicate later imaging using lower magnification objectives.
For transection, we use the iLas-Pulse ultraviolet laser system, controlled by VISION software. A 350 nm laser with 400 ps/2.5 μJ per pulse and adjusted to power of 27 mW is used for nerve transections.
Using the VISION software, draw a line or a rectangle to mark the region to be targeted by the laser beam. This can be saved in the system for subsequent equivalent samples. To fully sever the axons, the laser pulses should be applied repeatedly until there is a clear gap in the rectangle region (see Notes). We normally set the pulse at 0.05 ms and hit three times per mouse click. If needed to generate a larger damage, move the line/rectangle to the next position for a new transection. We normally use a distance of 40 µm between multiple transections of the same nerve (Figure 5).
Set up the parameters for intravital imaging
After ensuring the axons are completely severed, select a 40× (air) or 63× (water) objective for live imaging. Put the region of interest in the center of the field of view and focus to the plane of interest. When Z-stacks’ parameters are fixed, the intervals of one stack can be set to 0.8–1.3 μm. The intervals of imaging are set to 5–10 min.
If long-term imaging (more than 1 h) will be performed, replace the 63× water-immersion objective by an equivalent objective that can tolerate an immersion medium that will not evaporate. Given that high-grade low-melting-point agarose has a refractive index (RI) of 1.33 (similar to water) and that borosilicate glass has a RI of 1.47, the use of 100% glycerol with a RI of 1.47 is optimal.
Image quantification
The live imaging raw data is sent to Fiji (https://imagej.net/software/fiji/) for analysis.
Use the plugin “Tracking” to analyze the dynamics of nerve repair and the behavior of Schwann cells or macrophages. Open Plugins – Tracking – Manual Tracking.
Select the cell(s) of interest at the starting point for tracing over the course of the time series. This can be done from a single focal plane or a maximal projection of the entire or partial Z-stack.
With information we got from tracking, we can make conclusions on how many Schwann cells were attracted to the damaged site and how long these cells stayed (Tian et al., 2020b; Figures 3–5, Videos 1 and 2).
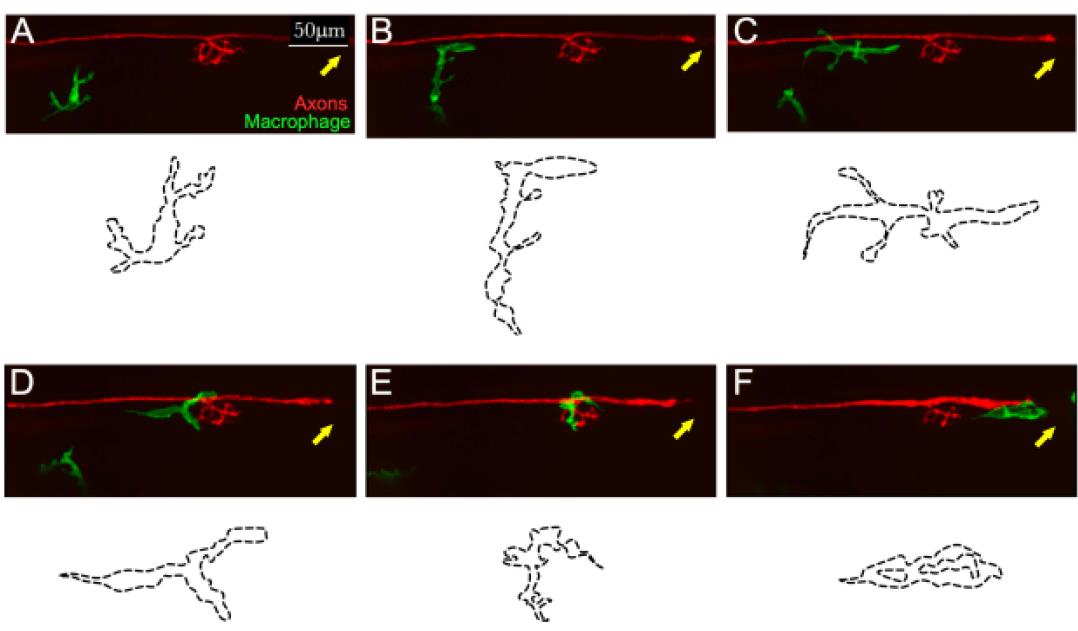
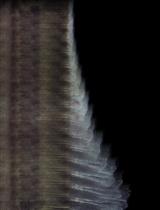
Figure 3. Example of in toto videomicroscopy of axons and macrophages. A–F. Still images from a high-resolution time-lapse recording of a macrophage (green) and a lateralis sensory nerve (red) in the trunk of a larval zebrafish. A single macrophage is seen migrating towards the nerve immediately after it has been severed with a laser. A second macrophage is seen below, which never makes contact with the nerve. Over time, the macrophage moves along the nerve, surveilling damage (which can be seen as a discontinuity of the nerve on the left-hand side of the panels (C and D). The drawings below each panel (dotted lines) describe the two-dimensional shape changes ofthis single macrophage during the course of videomicroscopic imaging. Scale bars is 50 μm.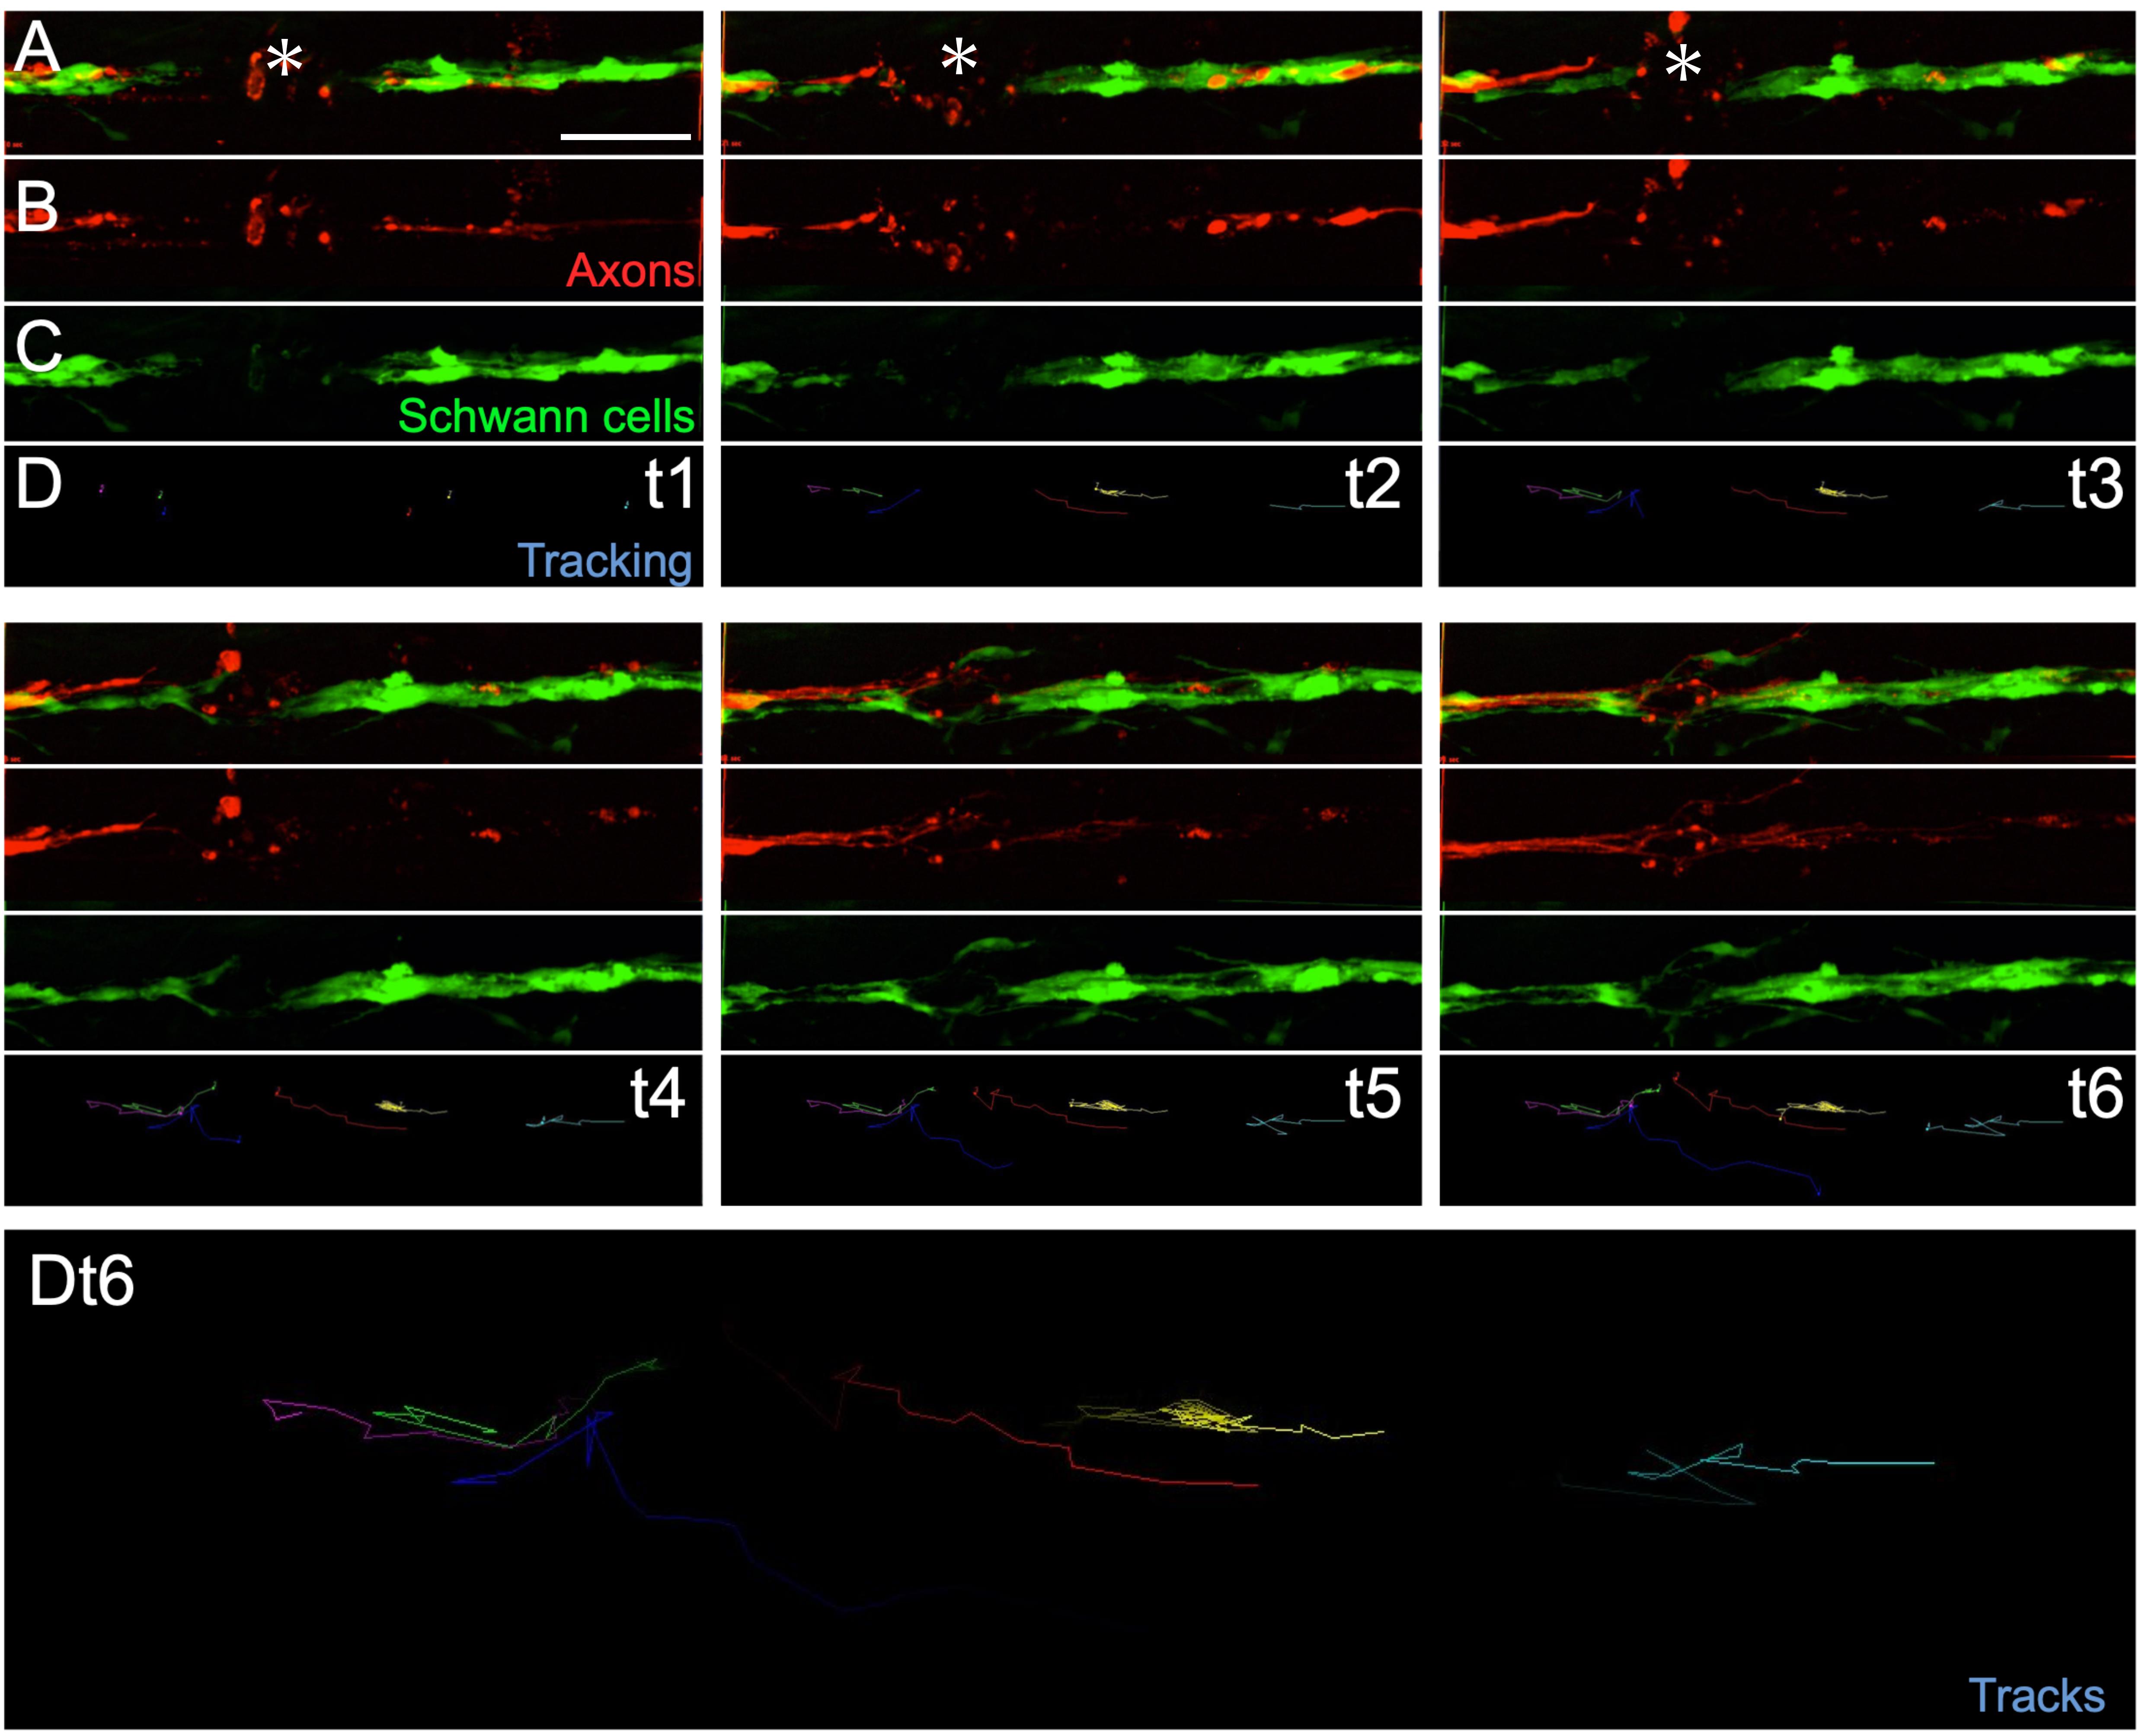
Figure 4. Example of in toto videomicroscopy of axons and Schwann cells. A–C. Fluorescence images from a high-resolution time-lapse recording of the movement of Schwann cells (green) and the regeneration of a lateralis afferent nerve (red) after transection. A shows the merge of the two fluorescence channels, labelling the sensory nerve (Red) and the Schwann cells (green).The respective individual channels are show in B and C. D shows the tracks of the moving Schwann cells. t1, t2, t3, t4, t5, t6 indicate different time points extracted from the time-lapse. Dt6. It a zoom-in of the entire track of Schwann cells of at t6.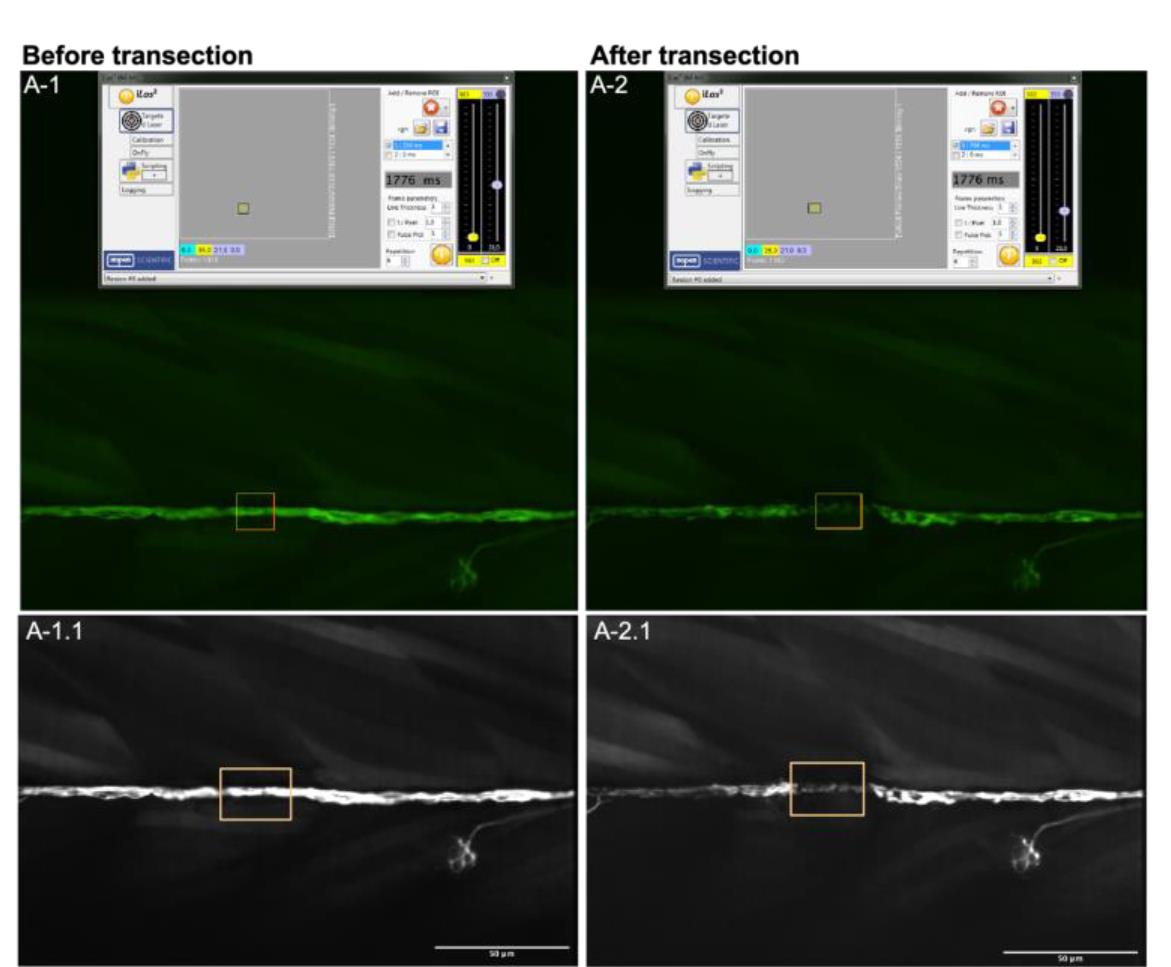
Figure 5. Example laser-mediated nerve transection. A-1 and A-2. Screenshots from the transection, before and after laser-mediated wounding, respectively. Images show the VISION software settings used during this procedure, as well as the targeted region within the nerve axon (yellow rectangle). A-1.1 and A2.1. Spinning-disk images render the nerve axon targeted by the bean laser (yellow rectangle), from before and after transection. Video 1. Intravital videomicroscopy of neurons and macrophages Video 2. Intravital videomicroscopy of neurons and Schwann cells
Notes
Prepare fresh plasmids and check the quality of the DNA one day before the injections. Plasmid DNA quality needs to be check first by analysis of its correct nucleotide sequence data using a bio-tool software (e.g., snapgene, https://www.snapgene.com/). The plasmids were extracted from fresh overnight-cultured transformed DH5alpha. The quality of plasmids should be confirmed with Nanodrop. The 260/280 ranges from 1.8–2.0. The same plasmid preparation, kept in cold storage, can be used for 1–2 consecutive days if no sign of degradation is seen.
Keep the low-melting-point agarose in a small glass Erlenmeyer partially submerged in a water bath set at 40–42 °C.
Aim the laser beam to the axons. Ensure full transection by looking at a gap along the axons and evident signs of peripheral axon degradation (pearling) between 10 and 30 min after exposure to the laser.
For long-term live imaging, the laser power must be adjusted to around 10 mW. Higher power or more frequent imaging intervals cause tissue damage and decrease fish survival.
After imaging, check the condition of fish. Only data from healthy fish with no signs of physical injury and that can swim after being released from the agarose should be used. This, of course, is not applicable if the experiment itself must result in a behavioral dysfunction, for instance if transecting the spinal cord.
In case images are shifting within the imaging plane, use the Template matching plugin in Fiji to re-align the images.
Recipes
E3 embryo medium (10×)
50 mM NaCl
1.7 mM KCl
3.3 mM CaCl2·2H2O
3.3 mM MgSO4, dissolved in 1 L deionized water
Tris-HCl (1 M pH 9.0)
12.1 g of Tris base dissolved in 80 mL of deionized water. Adjust the pH to 7.0 with HCl and then make the final volume to 100 mL.
Tricaine (MS-222) (25×)
2 g of MS-222 in 480 mL of deionized water; adjust the pH to 7.0 with 1 M Tris-HCl (pH 9.0) and then make the final volume to 500 mL. Store at 4 °C.
Low-melting agarose (1% w/v)
30 mg of low-melting agarose dissolved in 30 mL of 1× E3 medium by heating in microwave oven. Keep in a 40–42 °C water bath.
Acknowledgments
This work was supported by the Helmholtz Association and BMBF grant 01GQ1904.
This protocol has been adapted from previous work by our laboratory (Xiao et al., 2015a and 2015b; Lozano-Ortega et al., 2018; Tian and Lopez-Schier, 2020; Tian et al., 2020; Asgharsharghi et al., 2021).
Competing interests
HL-S is scientific advisor and paid consultant for Sensorion (France). The company had no role in this study. No competing interests exist with any vendor cited in this work.
Ethics
Procedures were conducted in accordance with the Ethical Committee of Animal Experimentation of the Helmholtz Zentrum München, the German Animal Welfare act Tierschutzgesetz §11, Abs. 1, Nr. 1, Haltungserlaubnis, to European Union animal welfare, and to protocols number Gz.:55.2-1-54-2532-202-2014 and Gz.:55.2-2532.Vet_02-17-187 from the “Regierung von Oberbayern”, Germany.
References
- Abdo, H., Calvo-Enrique, L., Lopez, J. M., Song, J., Zhang, M. D., Usoskin, D., El Manira, A., Adameyko, I., Hjerling-Leffler, J. and Ernfors, P. (2019). Specialized cutaneous Schwann cells initiate pain sensation. Science 365(6454): 695-699.
- Asgharsharghi, A., Tian, W., Haehnel-Taguchi, M. and López-Schier, H. (2021). Sarm1 is dispensable for mechanosensory-motor transformations in zebrafish. MicroPubl Biol. DOI: 10.17912/micropub.biology.000369
- Cardozo, M. J., Mysiak, K. S., Becker, T. and Becker, C. G. (2017). Reduce, reuse, recycle - Developmental signals in spinal cord regeneration. Dev Biol 432(1): 53-62.
- Cigliola, V., Becker, C. J. and Poss, K. D. (2020). Building bridges, not walls: spinal cord regeneration in zebrafish. Dis Model Mech 13(5). doi: 10.1242/dmm.044131.
- Elias, L. J. and Abdus-Saboor, I. (2022). Bridging skin, brain, and behavior to understand pleasurable social touch. Curr Opin Neurobiol 73: 102527.
- González, D. and Allende, M. L. (2021). Current Advances in Comprehending Dynamics of Regenerating Axons and Axon-Glia Interactions after Peripheral Nerve Injury in Zebrafish. Int J Mol Sci 22(5).
- Handler, A. and Ginty, D. D. (2021). The mechanosensory neurons of touch and their mechanisms of activation. Nat Rev Neurosci 22(9): 521-537.
- Johnson, E. O., Zoubos, A. B. and Soucacos, P. N. (2005). Regeneration and repair of peripheral nerves. Injury 36 Suppl 4: S24-29.
- Lozano-Ortega, M., Valera, G., Xiao, Y., Faucherre, A. and Lopez-Schier, H. (2018). Hair cell identity establishes labeled lines of directional mechanosensation. PLoS Biol 16(7): e2004404.
- Prescott, S. L. and Liberles, S. D. (2022). Internal senses of the vagus nerve. Neuron 110(4): 579-599.
- Rieger, S. and Sagasti, A. (2011). Hydrogen peroxide promotes injury-induced peripheral sensory axon regeneration in the zebrafish skin. PLoS Biol 9(5): e1000621.
- Tian, W. and Lopez-Schier, H. (2020). Blocking Wallerian degeneration by loss of Sarm1 does not promote axon resealing in zebrafish. MicroPubl Biol 2020.
- Tian, W., Czopka, T. and Lopez-Schier, H. (2020). Systemic loss of Sarm1 protects Schwann cells from chemotoxicity by delaying axon degeneration. Commun Biol 3(1): 49.
- Varadarajan, S. G., Hunyara, J. L., Hamilton, N. R., Kolodkin, A. L. and Huberman, A. D. (2022). Central nervous system regeneration. Cell 185(1): 77-94.
- Xiao, Y., Tian, W. and Lopez-Schier, H. (2015a). Optogenetic stimulation of neuronal repair. Curr Biol 25(22): R1068-1069.
- Xiao, Y., Faucherre, A., Pola-Morell, L., Heddleston, J. M., Liu, T. L., Chew, T. L., Sato, F., Sehara-Fujisawa, A., Kawakami, K. and Lopez-Schier, H. (2015b). High-resolution live imaging reveals axon-glia interactions during peripheral nerve injury and repair in zebrafish. Dis Model Mech 8(6): 553-564.
Article Information
Copyright
© 2023 The Authors; exclusive licensee Bio-protocol LLC.
How to cite
Readers should cite both the Bio-protocol article and the original research article where this protocol was used:
- Tian, W., González-Suarez, A. and López-Schier, H. (2023). Long-term in toto Imaging of Cellular Behavior during Nerve Injury and Regeneration. Bio-protocol 13(9): e4665. DOI: 10.21769/BioProtoc.4665.
- Asgharsharghi, A., Tian, W., Haehnel-Taguchi, M. and López-Schier, H. (2021). Sarm1 is dispensable for mechanosensory-motor transformations in zebrafish. MicroPubl Biol. DOI: 10.17912/micropub.biology.000369
Category
Neuroscience > Cellular mechanisms
Developmental Biology > Cell growth and fate > Regeneration
Cell Biology > Cell imaging > Fluorescence
Do you have any questions about this protocol?
Post your question to gather feedback from the community. We will also invite the authors of this article to respond.