- Protocols

- Articles and Issues
- For Authors
- About
- Become a Reviewer

Protocol for the Splinted, Human-like Excisional Wound Model in Mice
Published: Vol 13, Iss 3, Feb 5, 2023 DOI: 10.21769/BioProtoc.4606 Views: 3553
Reviewed by: Alak MannaPriyanka BanerjeeAnonymous reviewer(s)
Original research article
The authors used this protocol in:
Dec 2021
Advertisement


Protocol Collections
Comprehensive collections of detailed, peer-reviewed protocols focusing on specific topics


Related protocols
Abstract
While wound healing in humans occurs primarily through re-epithelization, in rodents it also occurs through contraction of the panniculus carnosus, an underlying muscle layer that humans do not possess. Murine experimental models are by far the most convenient and inexpensive research model to study wound healing, as they offer great variability in genetic alterations and disease models. To overcome the obstacle of contraction biasing wound healing kinetics, our group invented the splinted excisional wound model. While other rodent wound healing models have been used in the past, the splinted excisional wound model has persisted as the most used model in the field of wound healing. Here, we present a detailed protocol of updated and refined techniques necessary to utilize this model, generate results with high validity, and accurately analyze the collected data. This model is simple to conduct and provides an easy, standardizable, and replicable model of human-like wound healing.
Keywords: Excisional wound modelBackground
The normal biological process of wound healing is a complex dynamic composition of four different phases: hemostasis, inflammation, proliferation, and remodeling. Proper interactions between these different phases are necessary for the wound to heal sufficiently and successfully. Impaired wound healing occurs when these phases do not integrate correctly with one another. Dysfunctional wound healing is currently a major burden in our healthcare system, and 6.5 million people per year suffer from this condition (Sen, 2021). Often, chronic diseases, such as diabetes mellitus, chronic venous insufficiency, or age-associated diseases, are underlying issues behind dysfunctional healing. The healthcare costs of non-healing wounds are high since there are no highly effective therapies currently available (Alexiadou and Doupis, 2012). For example, over the past fifteen years, the success rate for therapeutic trials in wound healing has been zero percent, resulting in no approved therapeutics for wound healing in that time frame (Thomas et al., 2016).
Studying the molecular mechanisms involved in these processes is essential to discover new therapeutic applications to promote healing. Many different species are currently being studied in the field of wound healing research, such as pigs, rats, rabbits, and mice. Pigs have the most similar physiological, anatomical, and functional skin conditions to humans (Ibrahim et al., 2017), but are exceedingly expensive to house and hard to maintain. Rat and rabbit models have been used extensively in the past but with decreasing frequency in recent times. The evolution of various knock-out lineages has made the use of murine models more attractive for studying the effects of various gene targets on healing. The most significant difference between murine and human wound healing is the presence of the panniculus carnosus, an underlying muscle layer that causes wound healing to occur not only through re-epithelization but also through contraction. In rodents, contraction can account for up to 40%–60% of wound closure (Chen et al., 2015), so rodent models are often critiqued for not being translationally applicable to human wound healing kinetics. To overcome this issue, our group invented the splinted excisional wound model in 2004 (Galiano et al., 2004). In this model, silicone splints are sutured around excisional wounds to prevent contraction and instead promote healing through re-epithelialization. This model has become a commonly used wound healing model due to its simplicity and feasibility (Michaels et al., 2007; Nauta et al., 2013; Cho et al., 2016; Chong et al., 2017; Cogan et al., 2018; Hu et al., 2018; Kurt et al., 2018; Dallas et al., 2019; Rhea and Dunnwald, 2020; Liu et al., 2020; Kosaric et al., 2020; Hu et al., 2021; Lintel et al., 2022; Maschalidi et al., 2022; K. Chen et al., 2022b).
Specifically, this wound healing model has been established to test multiple different therapies for wound healing. Several studies have used different wound dressings incorporating various hydrogel compositions. Our group has used the excisional wound model to compare the ability to promote wound healing of four different types of wound dressings made from biocompatible hydrogels (K. Chen et al., 2022b). Casado-Diaz et al. (2022) have used the excisional wound model to evaluate the efficacy of a novel Olea europaea–based hydrogel matrix as a wound dressing. Cell-based therapies can also be studied with the excisional wound model. Our group has shown that treating excisional wounds with Trem2+ macrophages in a hydrogel-based wound dressing enhances angiogenesis and accelerates wound healing (Henn et al., 2021). Our group has also applied an adipose-derived stromal cell-seeded hydrogel wound dressing to excisional burn wounds to evaluate its effect on wound closure (Barrera, 2021). Another application of this model is to evaluate the effect of drug-based therapies on wound healing. For example, adding a recombinant Agrin fragment on excisional wounds has been shown to promote healing (Chakraborty et al., 2021). By utilizing the excisional wound model as well as a burn wound model, our group has shown that wounds treated with the small molecule focal adhesion kinase inhibitor (FAKI) imbued with pullulan hydrogel heal significantly faster than untreated wounds (Ma et al., 2018), establishing the relevance of FAKI therapy to reduce inflammation and fibrosis in rodent models (K. Chen et al., 2021,2022a).
Other wound healing models have been described in mice. One is the dorsal skin fold chamber (Michael et al., 2013), which has been previously used to study burn wounds in rodents. This model also prevents wound healing by contracture by having a titanium frame fixated around the wound. In comparison to that model, our excisional wound model utilizes commercially available silicone sheets as splints to prevent contraction, and the splints necessary to prevent wound contraction are easily manufactured. These important steps allow this model to be easily incorporated at low cost for any research group across the world.
In this protocol, we describe the exact methods of the excisional wound model and how they can be applied to different mouse strains. The wound healing in normal wildtype mice is compared to wound healing in a diabetic mouse strain with a mutation on the leptin gene (db/db). While previous papers have used this model, their methods are usually described vaguely and do not comment on the exact methods necessary to perform this surgery, hindering the reproducibility of the model. Furthermore, methods have become outdated due to improvements in materials and documentation techniques, and our lab has significantly improved our methods compared to our first publication on the model in Galiano et al. (2004). Here, we provide a detailed protocol of this important humanized model to promote reproducibility and present several common troubleshooting situations while performing the surgeries and during post-operative wound care. Additionally, we provide a precise guide on how to perform the main analysis of wound healing curve analysis.
Materials and Reagents
CorningTM FalconTM 50 mL conical centrifuge tubes (Fisher Scientific, catalog number: 14-432-22)
Covidien sterile gauze (Fisher Scientific, catalog number: 2187)
BD brand isopropyl alcohol swabs (Fisher Scientific, catalog number: 13-680-63)
Betadine solution swab stick (Fisher Scientific, catalog number: 19065534)
Covidien TelfaTM non-adherent pads (Fisher Scientific, Covidien, 1961)
Tegaderm, 3 M, 1626W (VWR, catalog number: 56222-191)
Dental surgical ruler (DoWell Dental Products, catalog number: S1070)
C57/BL6 females (6–8 weeks old) (The Jackson Laboratory, catalog number: 000664)
B6.BKS(D)-Leprdb/J females (6–8 weeks old) (The Jackson Laboratory, catalog number: 000697)
Buprenorphine SR (0.5 mg/mL) (Buprenex, Indivior Inc., catalog number: 12496-0757-1)
Isoflurane, USP (Dechra Veterinary Products, catalog number: 17033-094-25)
Puralube® ophthalmic ointment (Dechra, NDC, catalog number: 17033-211-38)
Vetbond (3 M) (Saint Paul, MN, catalog number: 1469SB)
Depilatory cream (Nair Hair Remover Lotion, Church&Dwight, CVS, catalog number: 339823)
Ethanol 70% solution (Fisher Scientific, catalog number: 64-17-5)
Medequip Depot Silk Black Braided Sutr 6-0 Rx (Medequip Depot D707N, Fisher Scientific, catalog number: NCO835822)
Equipment
Tissue forceps 4¾ in. stainless 1 × 2 teeth (Mckesson, catalog number: 43-2-775)
Iris scissors 4½ in. stainless (McKesson, catalog number: 43-2-104)
Disposable biopsy punch 8 mm (Integra Miltex, catalog number: 33-37)
Needle holder 5 in. with serrated jaws (McKesson, catalog number: 43-2-842)
Keyes cutaneous punch 16 mm (Delasco, catalog number: KP-16)
Keyes cutaneous punch 10 mm (Delasco, catalog number: KP-10)
Silicone sheet 0.5 mm, no PSA (Sigma-Aldrich, Grace Bio-Labs CultureWell, GBL664581-5EA)
Liquid repellent drape 75 × 90 cm with adhesive hole 6 × 9 cm (Omnia S.p.A., catalog number: 12.T4362)
Inhalation anesthesia system (VetEquip, catalog number: 922130)
Aesculap Exacta mini trimmer (Aesculap)
Thermo-peep heating pad (K&H, Amazon)
Surgical skin marker (McKesson, 19-1451_BX)
Software
ImageJ (ImageJ, Wayne Rasband, imagej.net)
Prism 9 (GraphPad Holdings, LLC, graphpad.com)
R studio Desktop (RStudio PBC, rstudio.com, open-source software)
Excel (Microsoft Cooperation, Microsoft.com)
Procedure
Making splints (equipment shown in Figure 1A) (Table 1)
Time: Each splint takes approximately 30 s to make.
Remove the sticky coverings from both sides of the silicone sheets.
Place the silicone sheet on a soft base (e.g., folded cloth).
First, punch out the outer circle with the 16 mm cutaneous punch using circular movements and applying pressure on the silicone sheet.
Punch out the inner circle with the 10 mm cutaneous punch, also using circular movements and applying pressure on the silicone sheet.
Place splints in a 70% ethanol bath in a conical tube for disinfection (leave in the 70% ethanol solution until use).
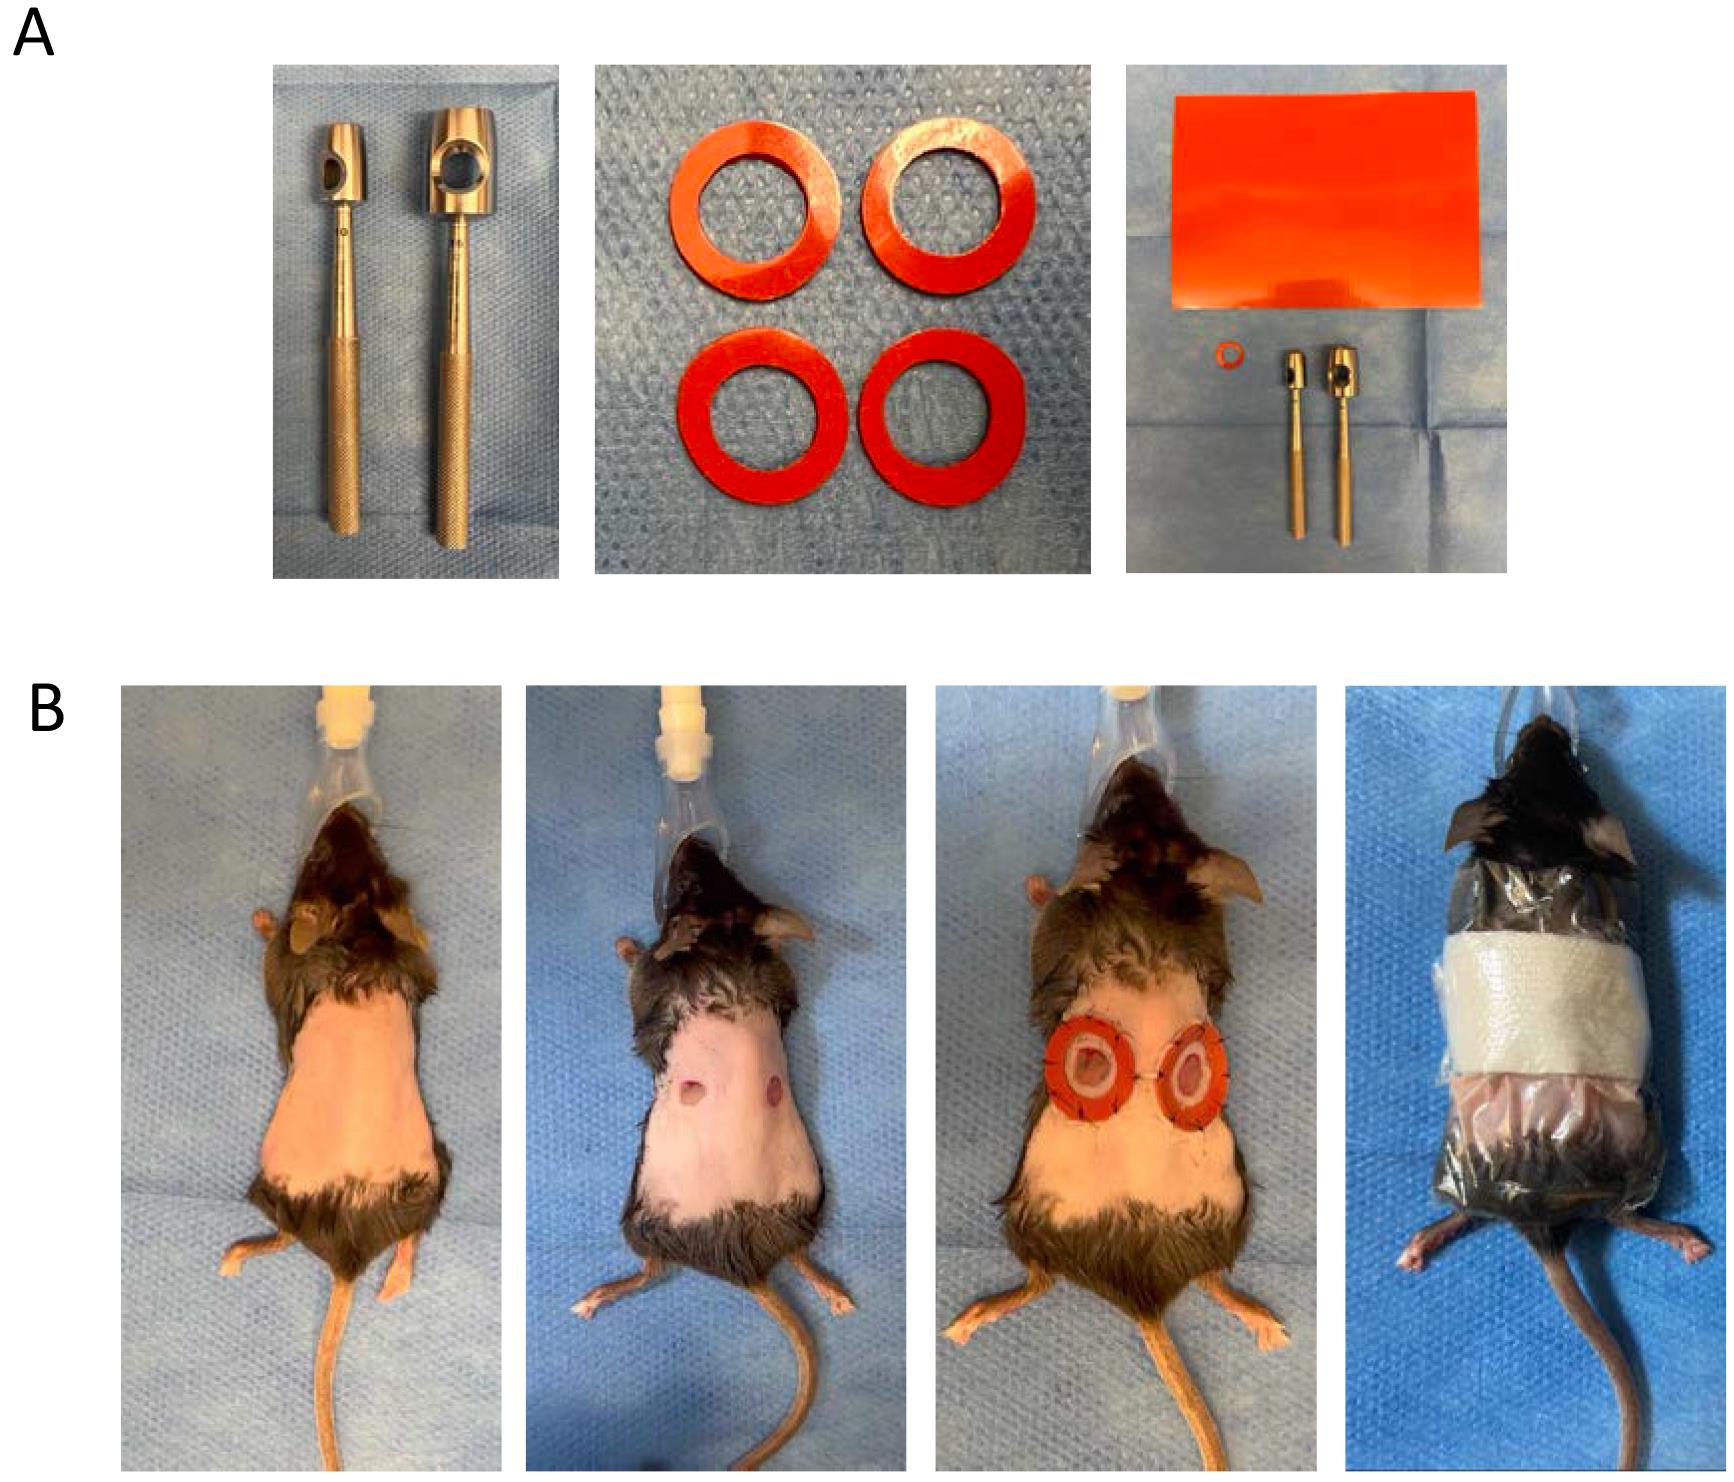
Figure 1. Splints and Excisional Wounds. A. From left to right: biopsy punches used to make splints [10 mm (left) and 16 mm cutaneous punch (right)]; splints; all material necessary to make splints, with the silicone sheet on top. B. From left to right: shaved and depilated dorsum of mouse; excisional wounds on mouse dorsum; excisional wounds with splints; wound dressing (Telfa + Tegaderm).Table 1. Making splints
Step Procedure Troubleshooting 1 Remove sticky coverings from both sides of the silicone sheets. 2 Place the silicone sheet on a soft base. Folded cloth works best, as it has high resistance to punching forces. 3 First, punch out the outer circle with a 16 mm punch using circular movements and applying pressure on the silicone sheet. 4 Punch out the inner circle with a 10 mm punch, also using circular movements and applying pressure on the silicone sheet. 5 Place splints in a 70% ethanol bath in a conical tube for disinfection (leave in the 70% ethanol solution until use). Replace ethanol bath regularly.
Excisional wounding (Table 2)
Time: 12–30 min per mouse (after sufficient practice), time varies depending on operator’s skills and mouse line. Diabetic mice (high BMI) tend to be easier to handle during surgery than thin wildtype mice.
Prepare surgical field with heating pad set at 40°C, surgical drape, and anesthesia system.
Anesthetize mouse with isoflurane at a flow rate of 5% in 100% oxygen (flow rate 1 L/min).
Inject buprenorphine SR 0.5 mg/kg subcutaneously 5 min prior to incision and apply ophthalmic ointment on both eyes.
Maintain anesthetized state with 1%–1.5% isoflurane; monitor mouse every 90 s for changes in breathing rate.
Place mouse in a prone position on the prepared surgical table.
Shave complete dorsum of mouse from the neck to the root of the tail and to the sides; shave until the beginning of all four extremities.
Apply depilatory cream on the shaved area for 30 s. Use wet gauze swabs to remove all remaining cream and fur.
Disinfect skin with three alternating betadine and alcohol wipes in a circular fashion.
Place sterile drape over the mouse, leaving the surgical area free.
Use the biopsy punch to outline the pattern for excision of skin on the dorsum of the mice (Figure 1B).
Create two wounds on the dorsum of the mice with the biopsy punch.
Push the biopsy punch firmly onto the skin and then twist fairly quickly in swift circulating motions to cut through the dermis.
Notes:
Fixate skin between fingers to create tension on the skin in order to excise biopsy.
Do not push too hard or you will wound the underlying muscle.
Wet the skin with an alcohol swab to ease friction force from the biopsy punch.
Excise skin (with the aid of scissors if necessary).
Take out the splint from ethanol bath and let it dry on sterile surgical area.
Apply minimal amounts of Vetbond to the splint and place it carefully around the wound.
Notes:
Leave an area of the splint without Vetbond for forceps to grab. Otherwise, the splint will be glued to the forceps.
Make sure to apply enough Vetbond on the silicone splints so that the splint sticks well to the skin, but care must be taken to not apply Vetbond onto the wound.
Use 6-0 sutures to apply eight interrupted sutures fixating the splint to the surrounding skin (Figure 1B).
Take a picture of the wound with a ruler for documentation and baseline for analysis of wound closure.
Note: Be sure to try to always take the images from the same angle, orientation, and distance from each wound to promote consistency.
Table 2. Excisional wounding
Step Procedure Troubleshooting 1 Prepare surgical field with heating pad set at 40 °C, surgical drape, and anesthesia system. To limit anesthesia time for mice, accurate preparation is essential. 2 Anesthetize mouse with isoflurane at a flow rate of 5% in 100% oxygen (flow rate 1 L/min).
Monitor mouse carefully and take out of anesthesia box immediately when sufficient level of anesthesia has been reached. Exposure to high flow rates of isoflurane for too long can cause death. 3 Inject buprenorphine SR 0.5 mg/kg subcutaneously 5 min prior to incision and apply ophthalmic ointment on both eyes. Do not start surgery immediately after injecting buprenorphine, as activation period needs to be accounted for. 4 Maintain anesthetized state with 1%–1.5% isoflurane; monitor mouse every 90 s for changes in breathing rate. Maintaining flow rate as low as possible, but as high as necessary is imperative. An insufficient flow rate will cause peri-surgical awakening; however, an excessive flow rate will cause death during anesthesia. 5 Place mouse in a prone position on prepared surgical table. 6 Shave complete dorsum of mouse from the neck to the root of the tail and to the sides; shave until the beginning of all four extremities. Make sure to shave a sufficient area, as Vetbond will not stick to unshaved skin. 7 Apply depilatory cream on the shaved area for 30 s. Use wet gauze swabs to remove all remaining cream and fur. Do not leave depilatory cream on for longer than 30 s. Leaving it on too long will cause skin irritations that will likely result in wound dehiscence in a later stage. 8 Disinfect skin with three alternating betadine and alcohol wipes in a circular fashion. 9 Place sterile drape over the mouse, leaving the surgical area free. 10 Use biopsy punch to outline pattern for excision of skin on the dorsum of the mice (Figure 1B).
11 Create two wounds on the dorsum of the mice with biopsy punch. 12 Push the biopsy punch firmly onto the skin and then twist fairly quickly in swift circulating motions to cut through the dermis. Fixate skin between fingers to create tension on the skin in order to excise biopsy. Do not push too hard or you will wound the underlying muscle.
Wet the skin with an alcohol swab to ease friction forces from the biopsy punch.
13 Excise skin.
Scissors can be used to aid excision of skin if necessary. 14 Take out the splint from ethanol bath and let it dry on sterile surgical area. Let splint fully dry before applying Vetbond. 15 Apply minimal amounts of Vetbond to the splint and place it carefully around the wound.
Leave an area of the split without Vetbond for forceps to grab. Otherwise, the splint will be glued to the forceps.
Make sure to apply enough Vetbond on the silicone splints, so the splint sticks well to skin, but care must be taken to not apply Vetbond onto the wound.
16 Use 6-0 sutures to apply eight interrupted sutures fixating the splint to the surrounding skin (Figure 1B).
17 Take a picture of the wound with a ruler for documentation and baseline for analysis of wound closure.
Be sure to try and always take the images at the same angle, orientation, and distance from each wound to promote consistency.
Therapeutics and dressings (Table 3)
Time: Varies on applied treatment (approximately 2–15 min per mouse).
Injecting therapeutic (e.g., cells, pharmacologic) or no treatment (if using hydrogels, skip to step C2)
Inject therapeutic or vehicle control around the wound edge.
Wrap the wounds with an initial layer of Telfa.
Skip to step C3.
Hydrogel therapy (Figure 2A)
Apply piece of circular hydrogel onto the wound (with or without therapeutic imbued) (Figure 2B).
Note: Hydrogel should be cut out so that it has the same measurements as the excisional wound.
Wrap the wounds with an initial layer of Tegaderm.
Note: Initial layer keeps hydrogel protected, moist, and pressed against wound to maximize delivery.
Next, cover the wound with Telfa dressing.
Proceed to step C3.
Cut Tegaderm sheets in half and use the halves to wrap around the mice (Figure 1B).
Monitor mouse until it is fully awake.
Place in cage—single housing is necessary now.
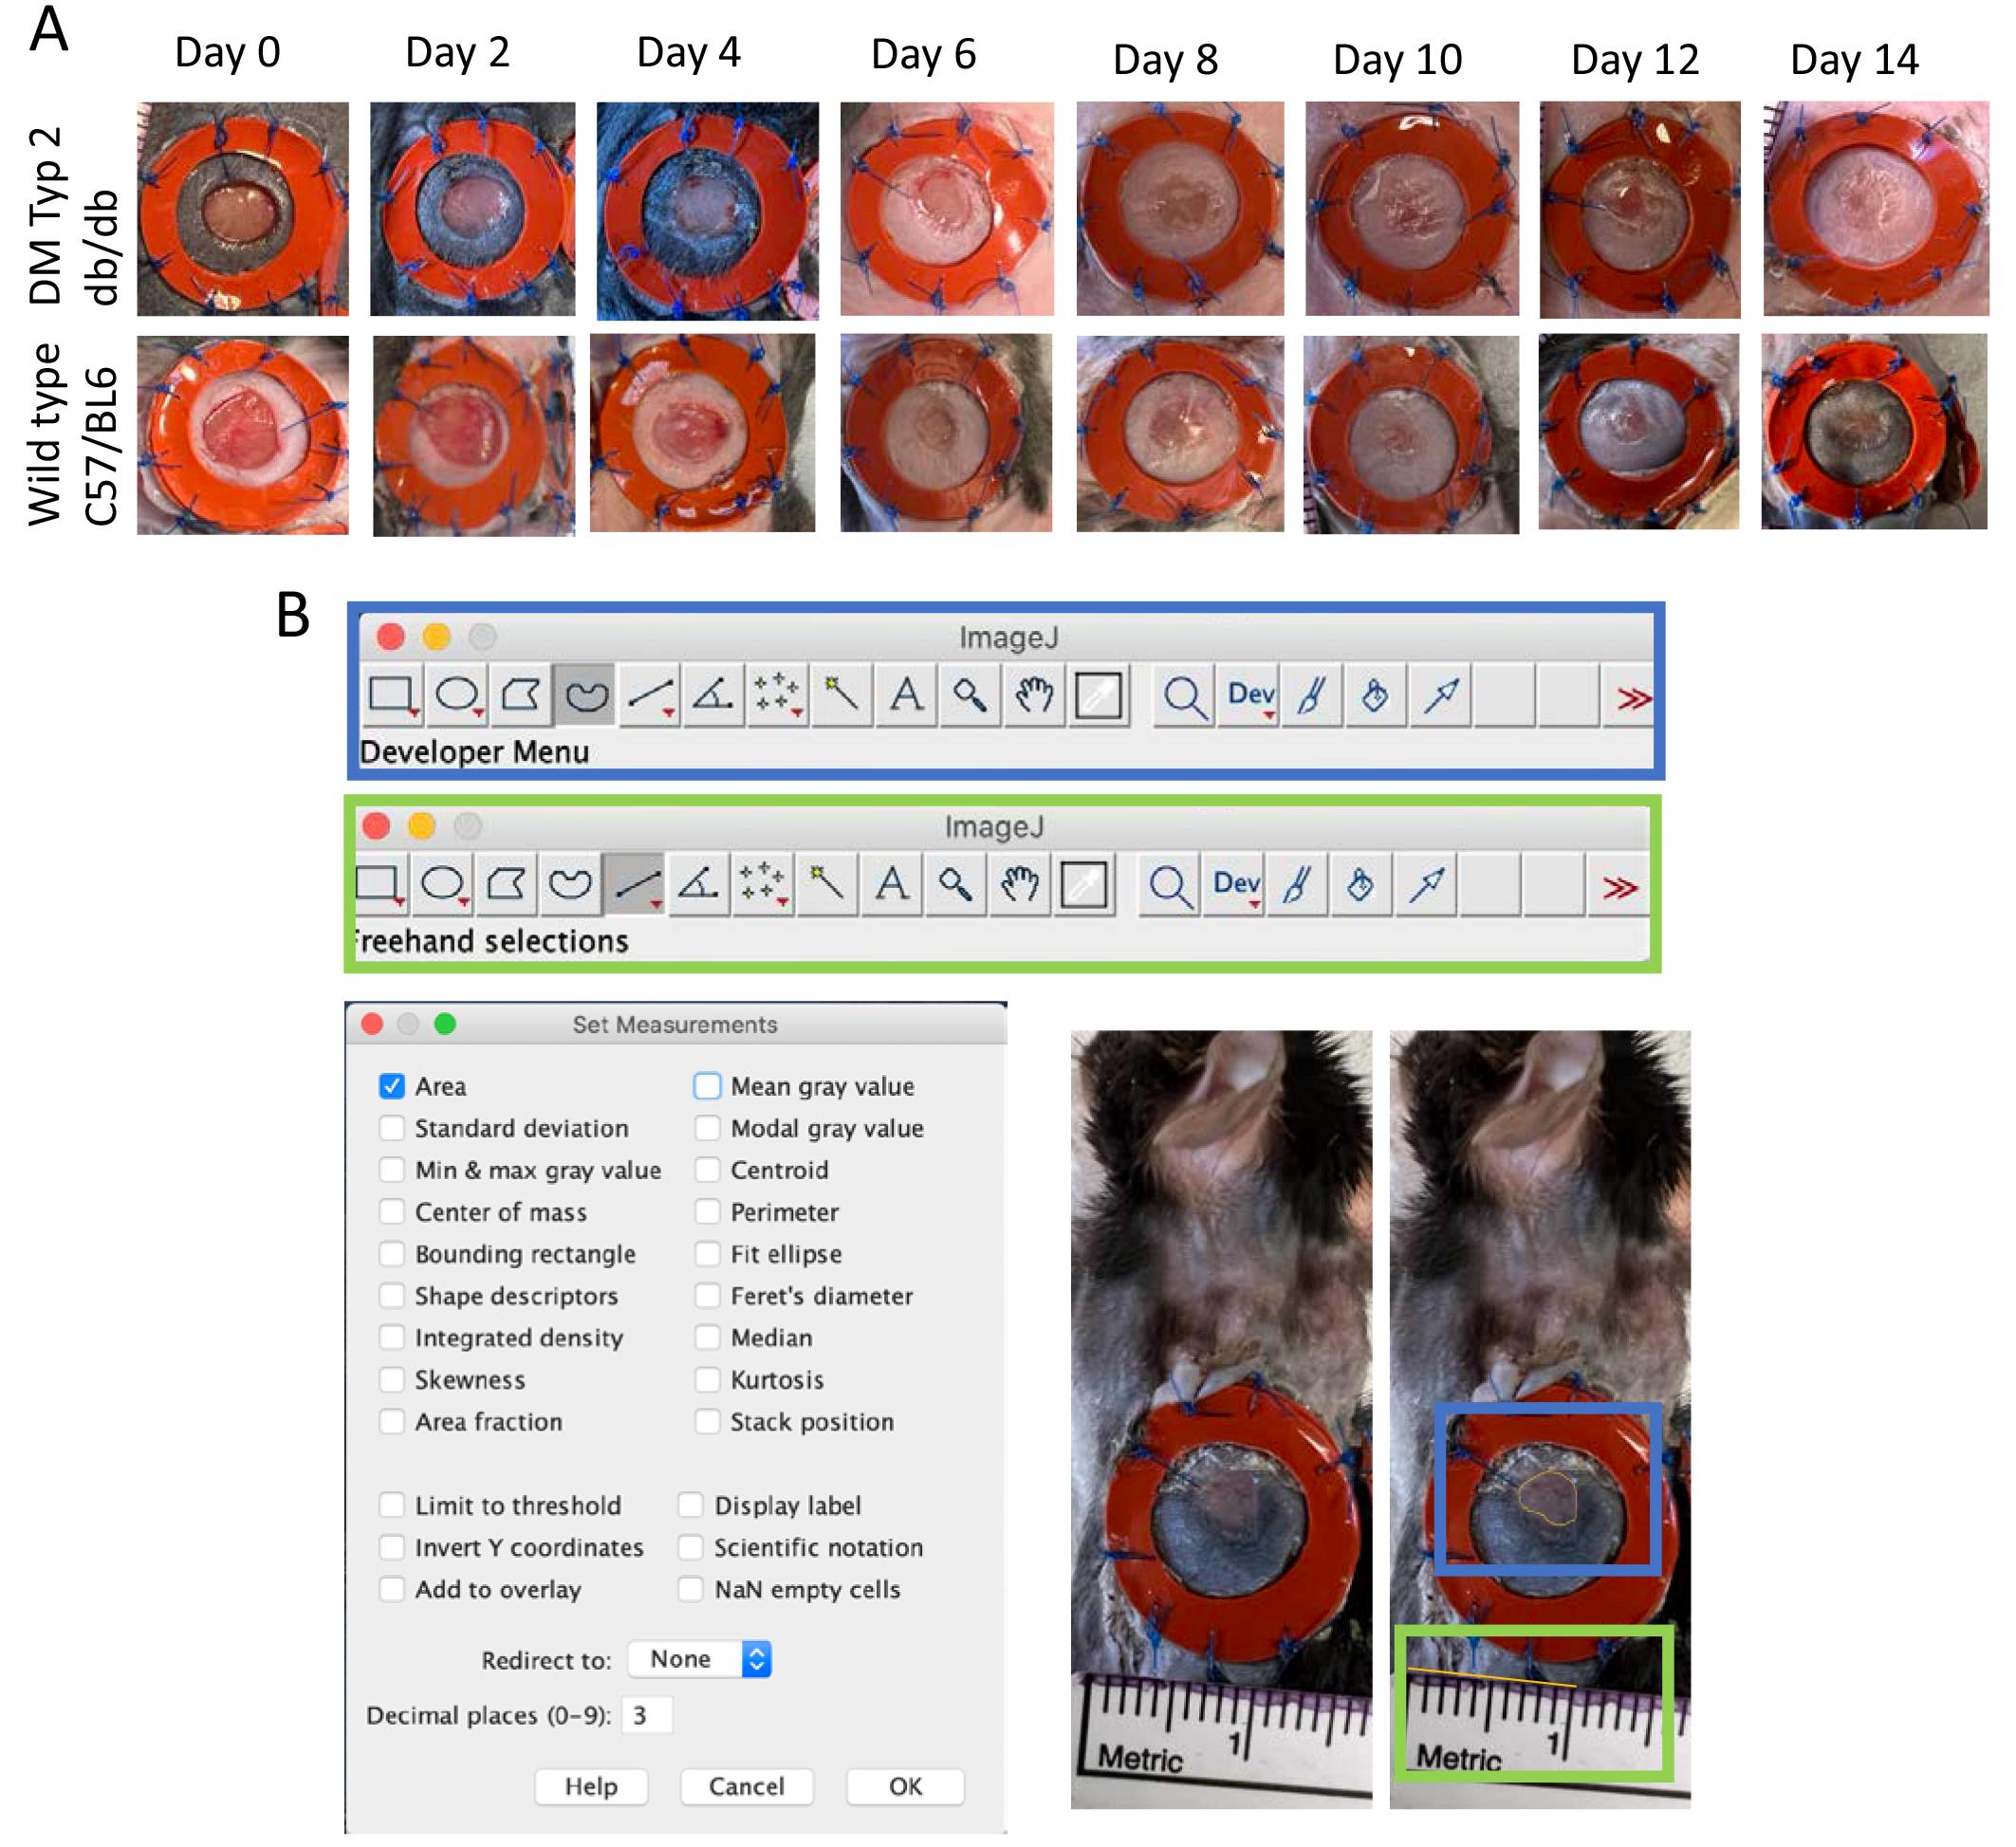
Figure 2. Wound healing analysis. A. Pictures of wound healing over time in wildtype (WT) and diabetic mice (db/db). B. ImageJ settings for analysis of wound closure. Blue boxes demonstrate settings and wound area, green boxes demonstrate settings and measurement of 1 cm as scale bar.
Table 3. Therapeutics and dressingsStep Procedure Troubleshooting 1 Injecting therapeutic (e.g., cells, pharmacologic) or no treatment (if using hydrogels, skip to step 2)
1a Inject therapeutic or vehicle control around the wound edge. 1b Wrap the wounds with an initial layer of Telfa.
1c Skip to step 3. 2 Hydrogel therapy (Figure 2A)
2a Apply piece of circular hydrogel onto the wound (with or without therapeutic imbued) (Figure 2B). Hydrogel should be cut out so that it has the same measurements as the excisional wound. 2b Wrap the wounds with an initial layer of Tegaderm.
Initial layer keeps hydrogel protected, moist, and pressed against wound to maximize delivery. 2c Next, cover the wound with Telfa dressing. 3 Cut Tegaderm sheets in half and use the halves to wrap around the mice (Figure 1B).
4 Monitor mouse until it is fully awake.
5 Place in cage—single housing is necessary now.
Monitoring and wound measurements (Table 4)
Time: Approximately 2–10 min per mouse (depending on status of splint; time increases if additional sutures have to be placed or treatment has to be applied).
Monitor mouse daily.
Every other day: measure wound using the following steps.
Anesthetize mouse as described in section B.
Carefully remove wound dressing (Tegaderm and Telfa).
Note: Be sure to remove the dressings carefully so as to not disturb the wound bed or tear off splints and sutures.
Take picture of wound for analysis as described in Step B17.
Check if splints are securely fixed to skin; otherwise, the wound will contract and cannot be used for analysis anymore.
If splint is not securely fixated to skin, reapply Vetbond and 6-0 interrupted suture(s).
Note: Examples of damaged splints and explanation on how to deal with them are shown in Figure 4A–F.
Re-apply dressings and/or therapeutics as described in section C.
Table 4. Monitoring and wound measurementsStep Procedure Troubleshooting 1 Monitor mouse daily. 2 Every other day: measure wound using the following steps. 3 Anesthetize mouse as described in section B. Monitor mouse carefully and take out of anesthesia box immediately when sufficient level of anesthesia has been reached. Exposure to high flow rates of isoflurane for too long can cause death. 4 Carefully remove wound dressing (Tegaderm and Telfa).
Be sure to remove the dressings carefully so as to not disturb the wound bed or tear off splints and sutures. 5 Take a picture of wound for analysis as described in Step B17. 6 Check if splints are securely fixed to skin; otherwise, the wound will contract and cannot be used for analysis anymore.
7 If splint is not securely fixated to skin, reapply Vetbond and 6-0 interrupted suture(s).
Examples of damaged splints and explanation on how to deal with them are shown in Figure 4A–F. 8 Re-apply dressings and/or therapeutics as described in section C.
Explant and analysis (Table 5)
Time: Approximately 10 min should be allocated for each mouse to excise the wounded skin (steps E1–7). Time for consecutive analyses varies according to analysis technique.
Anesthetize mouse as described in section B.
Take off wound dressing.
Take a picture of wound for analysis as described in Step B17.
Mark area of excisional wound with a surgical skin marker.
Remove splints from underlying skin by carefully cutting sutures and peeling off.
Euthanize mouse using neck dislocation while still under anesthesia.
Note: Other approved methods of mouse euthanasia may also be used, depending on institutional rules.
Immediately after euthanizing, excise skin within marked area of the wound.
Excised tissue can now be further processed for desired analysis techniques.
Further data analysis techniques of the tissue can include:
Histological staining (H&E, Trichrome, etc.)
Immunofluorescent staining for proteins
Single cell RNA-sequencing
Mechanical testing
Table 5.Explant and analysis
Step Procedure Troubleshooting 1 Anesthetize mouse as described in section B. 2 Take off wound dressing. 3 Take a picture of wound for analysis as described in Step B17. 4 Mark area of excisional wound with a surgical skin marker. 5 Remove splints from underlying skin by carefully cutting sutures and peeling off. Take care not to disturb wounded skin as this can lead to tissue damage. 6 Euthanize mouse using neck dislocation while still under anesthesia. 7 Immediately after euthanizing, excise skin within marked area of the wound. 8 Excised tissue can now be further processed for desired analysis techniques.
Further data analysis techniques of the tissue can include:
Histological staining (H&E, Trichrome, etc.)
Immunofluorescent staining for proteins
Single-cell RNA sequencing
Mechanical testing
Data analysis
N = 5 per experimental group is needed to obtain statistically significant results.
Note: Exclusion criteria for the wounds are severe displacement of the splint, infection, or auto-mutilation of the wound (Figure 4).
Upload images into ImageJ in a TIFF format.
Note: Use images until full re-epithelization has occurred.
Create table in Microsoft Excel.
Take measurement of 1 cm by tracing along the ruler with the fixed drawing tool in ImageJ.
Trace the outer linings of the wound with the freestyle or polygon drawing tool in ImageJ.
Transfer the two values to the excel sheet.
Convert area into cm2 with the following equation:
x cm2=(Wound Pixel Area)/(pixel length of 1 cm)2
Transfer data to GraphPad Prism 9.
Use an unpaired Student’s t-test for two experimental groups.
Use a 2-way ANOVA test for multiple (> two) groups.
Consider p < 0.05 as statistically significant.
Use a standard XY graph to create a wound healing curve [seen in figure 6H of the original publication (Henn et al., 2021) and Figure 3A of this protocol].
Multiple other comparisons can be performed using the same tests described in step 8:
Comparison of days until wound closure (Figure 3B).
Wound closure at specific post-operative days (POD) (Figure 3C and 3D).
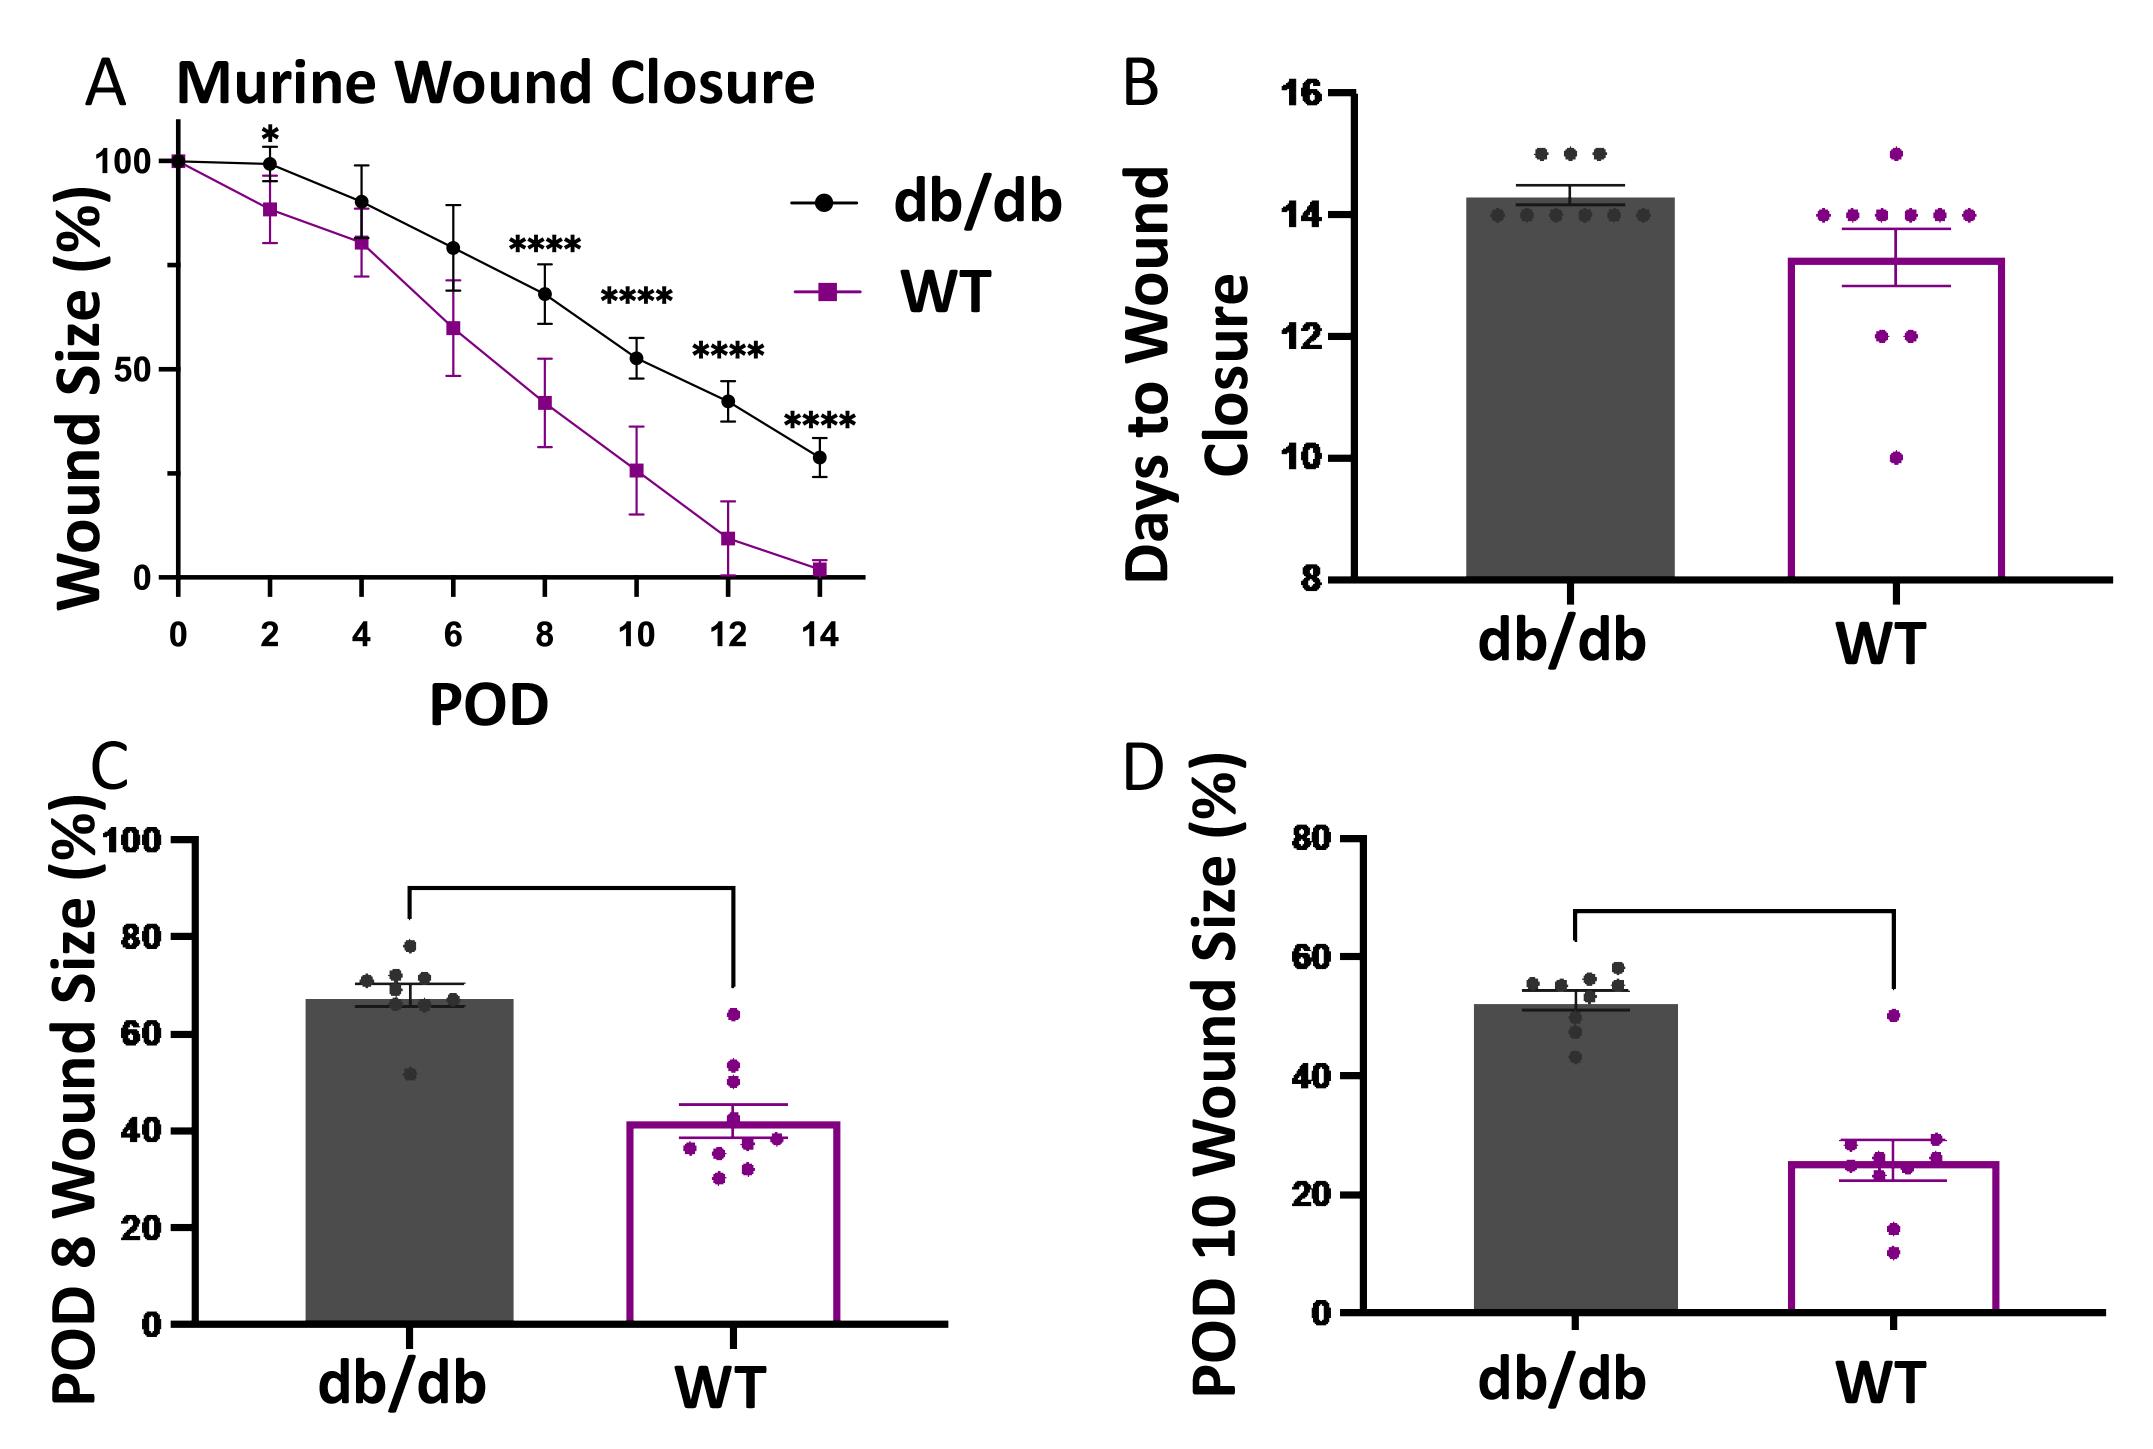
Figure 3. Statistical analysis of wound healing.A. Graph of wound size (closure) over time. Post-operative day (POD). x-axis represents the POD and y-axis the percentage of wound closure. B. Bar graph of days until wound closure. x-axis represents the experimental group and y-axis the days until wound closure. C. Bar graph of wound size at POD 8. x-axis represents the experimental group and y-axis the percentage of wound size to the initial wound size at POD 0. D. Bar graph of wound size at POD 10. x-axis represents the experimental group and y-axis the percentage of wound size to the initial wound size at POD 0.
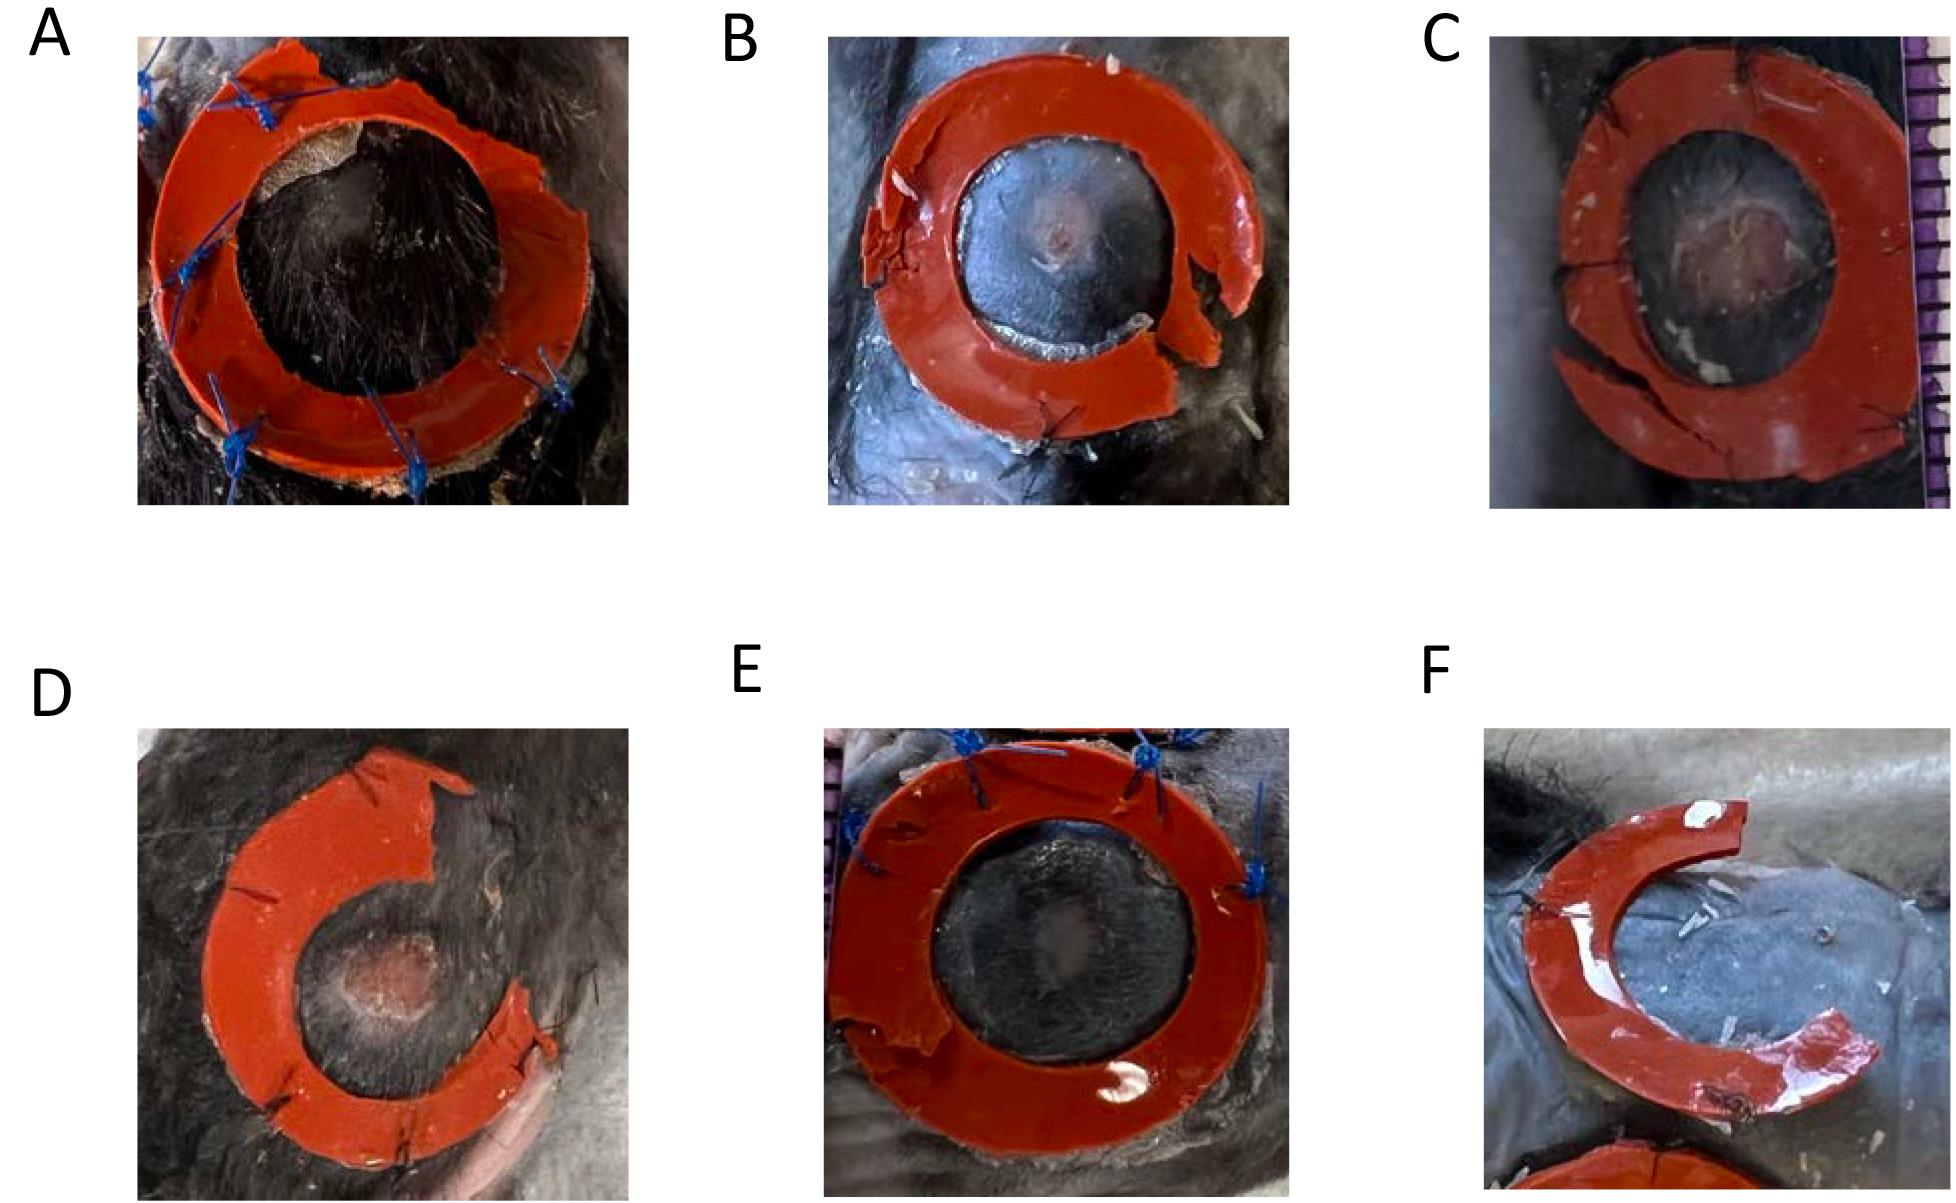
Figure 4. Troubleshooting images. A. Splint is partially broken. If the rest of the splint is still adherent to the skin, apply more Vetbond and interrupted sutures; wound can still be included in experimental analyses. B. Sutures have come off. If splint is still adherent to the skin, apply more Vetbond and interrupted sutures; wound can still be included. C. Splint is partially ripped. If the rest is still adherent to the skin, apply more Vetbond and interrupted sutures; wound can still be used. D. Splint is entirely broken on one side; wound has to be excluded from further analysis. E. Splint has ripped through the ring. If splint is still adherent to the skin, apply more Vetbond and interrupted sutures; wound can still be used. (F) Splint is entirely broken on one side; wound has to be excluded from further analysis.
Acknowledgments
We thank Theresa Carlomagno for administrative support. This work was supported by the National Institute of Health RO1 grant (DK074095). Schematic figures were created with BioRender.com. The original research paper to this protocol is found here (DOI: 10.1126/sciadv.abi4528) (Henn et al., 2021).
Competing interests
The authors declare no competing interests.
Ethics
All animal experiments were performed in accordance with both Stanford University and University of Arizona Institutional Animal Care and Use Committees (IACUC) and the National Institutes of Health (NIH) Guide for the Care and Use of Laboratory Animals. The study was approved by the Administrative Panel on Laboratory Animal Care (APLAC) at Stanford University (APLAC protocol number: 12080), as well at the University of Arizona under IACUC protocol 2021-0828.
References
- Alexiadou, K. and Doupis, J. (2012). Management of diabetic foot ulcers. Diabetes Ther 3(1): 4.
- Barrera, J. A. (2021). Adipose-Derived Stromal Cells Seeded in Pullulan-Collagen Hydrogels Improve Healing in Murine Burns. Tissue Engineering Part A 27(11-12): 844-856.
- Casado-Diaz, A., Moreno-Rojas, J. M., Verdú-Soriano, J., Lázaro-Martínez, J. L., Rodríguez-Mañas, L., Tunez, I., La Torre, M., Berenguer Pérez, M., Priego-Capote, F. and Pereira-Caro, G. (2022). Evaluation of Antioxidant and Wound-Healing Properties of EHO-85, a Novel Multifunctional Amorphous Hydrogel Containing Olea europaea Leaf Extract. Pharmaceutics 14(2).
- Chakraborty, S., Sampath, D., Yu Lin, M. O., Bilton, M., Huang, C. K., Nai, M. H., Njah, K., Goy, P. A., Wang, C. C., Guccione, E., et al. (2021). Agrin-Matrix Metalloproteinase-12 axis confers a mechanically competent microenvironment in skin wound healing. Nat Commun 12(1): 6349.
- Chen, K., Henn, D., Januszyk, M., Barrera, J. A., Noishiki, C., Bonham, C. A., Griffin, M., Tevlin, R., Carlomagno, T., Shannon, T. et al. (2022a). Disrupting mechanotransduction decreases fibrosis and contracture in split-thickness skin grafting. Sci Transl Med 14(645): eabj9152.
- Chen, K., Kwon, S. H., Henn, D., Kuehlmann, B. A., Tevlin, R., Bonham, C. A., Griffin, M., Trotsyuk, A. A., Borrelli, M. R., Noishiki, C. et al. (2021). Disrupting biological sensors of force promotes tissue regeneration in large organisms. Nature Communications 12(1): 5256.
- Chen, K., Sivaraj, D., Davitt, M. F., Leeolou, M. C., Henn, D., Steele, S. R., Huskins, S. L., Trotsyuk, A. A., Kussie, H. C., Greco, A. H., et al. (2022b). Pullulan-Collagen hydrogel wound dressing promotes dermal remodelling and wound healing compared to commercially available collagen dressings. Wound Repair Regen 30(3): 397-408.
- Chen, L., Mirza, R., Kwon, Y., DiPietro, L. A. and Koh, T. J. (2015). The murine excisional wound model: Contraction revisited.Wound Repair Regen 23(6): 874-877.
- Cho, H., Balaji, S., Hone, N. L., Moles, C. M., Sheikh, A. Q., Crombleholme, T. M., Keswani, S. G. and Narmoneva, D. A. (2016). Diabetic wound healing in a MMP9-/- mouse model. Wound Repair Regen 24(5): 829-840.
- Chong, K. K. L., Tay, W. H., Janela, B., Yong, A. M. H., Liew, T. H., Madden, L., Keogh, D., Barkham, T. M. S., Ginhoux, F., Becker, D. L., et al. (2017). Enterococcus faecalis Modulates Immune Activation and Slows Healing During Wound Infection. J Infect Dis 216(12): 1644-1654.
- Cogan, N. G., Mellers, A. P., Patel, B. N., Powell, B. D., Aggarwal, M., Harper, K. M. and Blaber, M. (2018). A mathematical model for the determination of mouse excisional wound healing parameters from photographic data. Wound Repair Regen 26(2): 136-143.
- Dallas, A., Trotsyuk, A., Ilves, H., Bonham, C. A., Rodrigues, M., Engel, K., Barrera, J. A., Kosaric, N., Stern-Buchbinder, Z. A., White, A., et al. (2019). Acceleration of Diabetic Wound Healing with PHD2- and miR-210-Targeting Oligonucleotides. Tissue Eng Part A 25(1-2): 44-54.
- Galiano, R. D., Michaels, J. t., Dobryansky, M., Levine, J. P. and Gurtner, G. C. (2004). Quantitative and reproducible murine model of excisional wound healing. Wound Repair Regen 485-492.
- Henn, D., Chen, K., Fehlmann, T., Trotsyuk, A. A., Sivaraj, D., Maan, Z. N., Bonham, C. A., Barrera, J. A., Mays, C. J., Greco, A. H., et al. (2021). Xenogeneic skin transplantation promotes angiogenesis and tissue regeneration through activated Trem2+ macrophages. Science Advances 7(49): eabi4528.
- Hu, M. S., Cheng, J., Borrelli, M. R., Leavitt, T., Walmsley, G. G., Zielins, E. R., Hong, W. X., Cheung, A. T. M., Duscher, D., Maan, Z. N., et al. (2018). An Improved Humanized Mouse Model for Excisional Wound Healing Using Double Transgenic Mice. Adv Wound Care (New Rochelle) 7(1): 11-17.
- Hu, M. S., Maan, Z. N., Leavitt, T., Hong, W. X., Rennert, R. C., Marshall, C. D., Borrelli, M. R., Zhu, T. N., Esquivel, M., Zimmermann, A., et al. (2021). Wounds Inhibit Tumor Growth In Vivo. Ann Surg 273(1): 173-180.
- Ibrahim, M., Bond, J., Medina, M. A., Chen, L., Quiles, C., Kokosis, G., Bashirov, L., Klitzman, B. and Levinson, H. (2017). Characterization of the Foreign Body Response to Common Surgical Biomaterials in a Murine Model. Eur J Plast Surg 40(5): 383-392.
- Kosaric, N., Srifa, W., Bonham, C. A., Kiwanuka, H., Chen, K., Kuehlmann, B. A., Maan, Z. N., Noishiki, C., Porteus, M. H., Longaker, M. T., et al. (2020). Macrophage Subpopulation Dynamics Shift following Intravenous Infusion of Mesenchymal Stromal Cells. Mol Ther 28(9): 2007-2022.
- Kurt, B., Bilge, N., Sözmen, M., Aydın, U., Önyay, T. and Özaydın, I. (2018). Effects of Plantago lanceolata L. extract on full-thickness excisional wound healing in a mouse model. Biotech Histochem 93(4): 249-257.
- Lintel, H., Abbas, D. B., Lavin, C. V., Griffin, M., Guo, J. L., Guardino, N., Churukian, A., Gurtner, G. C., Momeni, A., Longaker, M. T., et al. (2022). Transdermal deferoxamine administration improves excisional wound healing in chronically irradiated murine skin. J Transl Med 20(1): 274.
- Liu, P., Choi, J. W., Lee, M. K., Choi, Y. H. and Nam, T. J. (2020). Spirulina protein promotes skin wound repair in a mouse model of full-thickness dermal excisional wound. Int J Mol Med 46(1): 351-359.
- Ma, K., Kwon, S. H., Padmanabhan, J., Duscher, D., Trotsyuk, A. A., Dong, Y., Inayathullah, M., Rajadas, J. and Gurtner, G. C. (2018). Controlled Delivery of a Focal Adhesion Kinase Inhibitor Results in Accelerated Wound Closure with Decreased Scar Formation. J Invest Dermatol 138(11): 2452-2460.
- Maschalidi, S., Mehrotra, P., Keçeli, B. N., De Cleene, H. K. L., Lecomte, K., Van der Cruyssen, R., Janssen, P., Pinney, J., van Loo, G., Elewaut, D., et al. (2022). Targeting SLC7A11 improves efferocytosis by dendritic cells and wound healing in diabetes. Nature 606(7915): 776-784.
- Michael, S., Sorg, H., Peck, C. T., Reimers, K. and Vogt, P. M. (2013). The mouse dorsal skin fold chamber as a means for the analysis of tissue engineered skin. Burns 39(1): 82-88.
- Michaels, J. t., Churgin, S. S., Blechman, K. M., Greives, M. R., Aarabi, S., Galiano, R. D. and Gurtner, G. C. (2007). db/db mice exhibit severe wound-healing impairments compared with other murine diabetic strains in a silicone-splinted excisional wound model. Wound Repair Regen 15(5): 665-670.
- Nauta, A., Seidel, C., Deveza, L., Montoro, D., Grova, M., Ko, S. H., Hyun, J., Gurtner, G. C., Longaker, M. T. and Yang, F. (2013). Adipose-derived stromal cells overexpressing vascular endothelial growth factor accelerate mouse excisional wound healing. Mol Ther 21(2): 445-455.
- Rhea, L. and Dunnwald, M. (2020). Murine Excisional Wound Healing Model and Histological Morphometric Wound Analysis. J Vis Exp (162): 10.3791/61616.
- Sen, C. K. (2021). Human Wound and Its Burden: Updated 2020 Compendium of Estimates. Advances in Wound Care 10(5): 281-292.
- Thomas, D., Burns, J., Audette, J., Carroll, A., Dow-Hygelund, C. and Hay, M. (2016). Clinical Development Success Rates 2006-2015. Biomedtracker, Amplion, Biotechnology Innovation Organization (Accessed 15 June 2022).
Article Information
Copyright
© 2023 The Authors; exclusive licensee Bio-protocol LLC.
How to cite
Readers should cite both the Bio-protocol article and the original research article where this protocol was used:
- Fischer, K. S., Litmanovich, B., Sivaraj, D., Kussie, H. C., Hahn, W. W., Hostler, A. C., Chen, K. and Gurtner, G. C. (2023). Protocol for the Splinted, Human-like Excisional Wound Model in Mice. Bio-protocol 13(3): e4606. DOI: 10.21769/BioProtoc.4606.
- Henn, D., Chen, K., Fehlmann, T., Trotsyuk, A. A., Sivaraj, D., Maan, Z. N., Bonham, C. A., Barrera, J. A., Mays, C. J., Greco, A. H., et al. (2021). Xenogeneic skin transplantation promotes angiogenesis and tissue regeneration through activated Trem2+ macrophages. Science Advances 7(49): eabi4528.
Category
Cell Biology > Cell Transplantation > Xenograft
Biological Sciences > Biological techniques
Do you have any questions about this protocol?
Post your question to gather feedback from the community. We will also invite the authors of this article to respond.