- Protocols

- Articles and Issues
- For Authors
- About
- Become a Reviewer

A Simplified Paradigm of Late Gestation Transient Prenatal Hypoxia to Investigate Functional and Structural Outcomes from a Developmental Hypoxic Insult
Published: Vol 12, Iss 19, Oct 5, 2022 DOI: 10.21769/BioProtoc.4519 Views: 2205
Reviewed by: Oneil Girish BhalalaHélène LégerAnonymous reviewer(s)
Original research article
The authors used this protocol in:
Mar 2022
Advertisement


Protocol Collections
Comprehensive collections of detailed, peer-reviewed protocols focusing on specific topics


Related protocols
Abstract
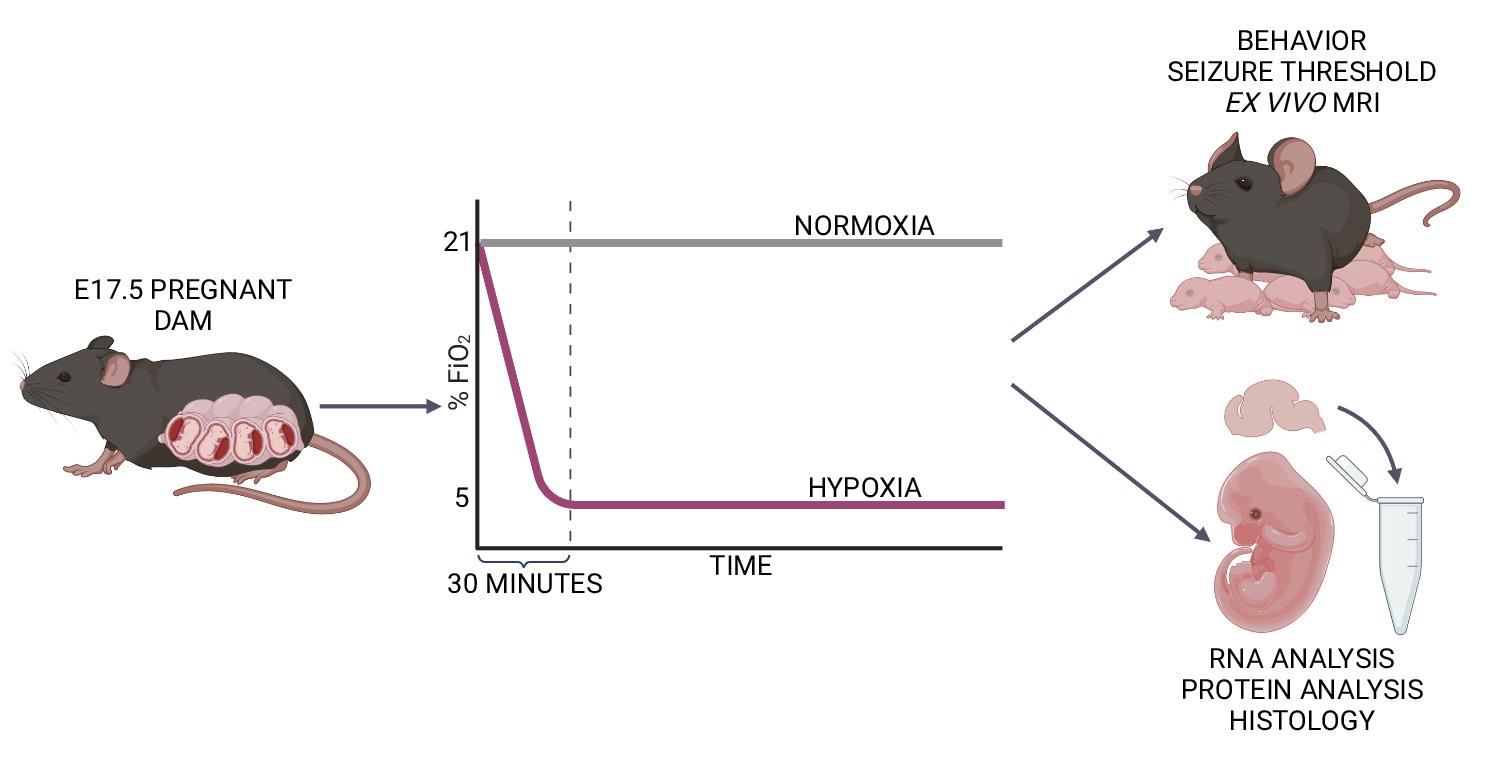
Late-gestation transient intrauterine hypoxia is a common cause of birth injury. It can lead to long-term neurodevelopmental disabilities even in the absence of gross anatomic injury. Currently, postnatal models of hypoxia–ischemia are most commonly used to study the effect of oxygen deprivation in the fetal brain. These models, however, are unable to take into account placental factors that influence the response to hypoxia, exhibit levels of cell death not seen in many human patients, and are unable to model preterm hypoxia. To address this gap in research, we have developed a protocol to induce transient hypoxia in fetal mice. A pregnant dam at gestational day 17.5 is placed into a hypoxia chamber. Over 30 min, the inspired oxygen is titrated from 21% (ambient air) to 5%. The dam remains in the chamber for up to 8 h, after which fetal brains can be collected or pups delivered for postnatal studies. This protocol recapitulates phenotypes seen in human patients exposed to transient in utero hypoxia and is readily reproducible by researchers.
Graphical abstract:
Background
Each year, millions of neonates are affected by intrauterine hypoxia, of which the most recognized form is hypoxic ischemic encephalopathy (HIE) in full-term infants (Lee et al., 2013; Stanaway et al., 2018). Prenatal hypoxia is one of the leading worldwide causes of long-term brain injury (Lee et al., 2013; Stanaway et al., 2018), and HIE is characterized by an intrapartum loss of oxygen and nutrients. Approximately 40% of affected children develop a neurodevelopmental disability (NDD), such as autism or epilepsy (Ferriero, 2004; Lee et al., 2013; Stanaway et al., 2018). Therapeutic hypothermia is the mainstay of current therapy but is only available to a fraction of children who have moderate to severe acute HIE and are near a facility capable of initiating it in the immediate perinatal period (Ahearne et al., 2016). Children initially classified as having mild HIE may still experience adverse outcomes (de Haan et al., 2006; van Kooij et al., 2010; Eunson, 2015; Reiss et al., 2019; Schreglmann et al., 2020; Finder et al., 2020). These mildly affected children do not qualify for therapeutic hypothermia. In addition to term infant HIE, HIE in preterm infants is a poorly understood entity that predisposes children to NDDs (Schmidt and Walsh, 2010; Gopagondanahalli et al., 2016). Preterm infants with HIE are also not eligible for therapeutic hypothermia. Given the need for targeted therapies, we must develop animal models that can recapitulate the full spectrum of phenotypes exhibited by children affected by prenatal hypoxia.
Existing models of transient hypoxia in rodents have focused primarily on its effect on the postnatal brain (postnatal day 7–10) (Rice et al., 1981; Sun et al., 2016) because this postnatal period is considered to correlate neuroanatomically to term human infants (Semple et al., 2013). Models such as the Vannucci model involve unilateral ligation of the carotid artery with subsequent exposure to hypoxia (Rice et al., 1981; Sun et al., 2016). In addition to recapitulating human neuroanatomy, this postnatal method makes studying the combined effects of hypoxia and ischemia more technically feasible.
While there are benefits to postnatal rodent models of transient hypoxia, these have limitations. Importantly, postnatal models do not account for maternal and placental factors that may modulate the fetal response to hypoxia. The in utero environment is hypoxic at baseline (Trollmann et al., 2008), and many studies investigating the hypoxic response have revealed complex interactions between oxygen control and injury outcome (Tomita et al., 2003; Chen et al., 2008; Sheldon et al., 2009; Sheldon et al., 2014; Arthuis et al., 2017; Xu et al., 2019; Peebles et al., 2020; Zhang et al., 2021). Additionally, postnatal models involving carotid artery ligation followed by hypoxia result in severe injury, characterized by significant levels of cell death (Rice et al., 1981), and not the milder injury seen in many human patients (Lee et al., 2013). Finally, while the postnatal rodent brain correlates anatomically with term human infants, some functional networks mature faster in postnatal rodents than in term infants (Feather-Schussler and Ferguson, 2016). At birth, mice exhibit neuroanatomy analogous to infants born at 23–26 weeks gestation (Semple et al., 2013). However, they do not display respiratory or feeding issues common in children born before 34 weeks gestation (Zhao et al., 2019). Additionally, mice are ambulatory around postnatal day 10, a milestone human children do not achieve until approximately 12 months old (Feather-Schussler and Ferguson, 2016; Aziz et al., 2018).
Although previous mouse models of prenatal hypoxia have been described (Baud et al., 2004; Mallard and Vexler, 2015), many are primarily used to study the effects of chronic hypoxia throughout gestation. Other prenatal models of transient injury are more challenging to execute (such as late gestation uterine artery ligation) (Kubo et al., 2017). Sheep models of transient and mild hypoxia-only injury require specialized equipment, ample resources, and are not amenable to genetic manipulation (McClendon et al., 2017; McClendon et al., 2019). Here, we characterize a protocol to induce transient, mild, hypoxic injury in prenatal mice.
Previously, we have used this model to characterize the effect of late gestation (embryonic day 17.5) transient prenatal hypoxia (5% FiO2) on long-term neurodevelopmental and anatomical features in mice (Cristancho et al., 2022). Our studies showed increased levels of hypoxia-inducible factor 1 alpha (a marker of hypoxic exposure) in the brains of fetal mice exposed to prenatal hypoxia. Mice exposed to hypoxia had decreased weights at postnatal day 2. Hypoxic exposure also led to decreased seizure threshold in mice. In addition, both male and female hypoxic mice showed abnormalities in grip strength and repetitive behaviors. Finally, male hypoxic mice had increased anxiety-like behaviors, while female hypoxic mice showed abnormalities in social interaction. We hope that future researchers may use this model to investigate the mechanisms underlying mild and preterm HIE and elucidate the maternal–placental–fetal factors underlying neurodevelopmental outcomes in preterm children exposed to transient hypoxia.
Materials and Reagents
Medical NF grade nitrogen, size 200 cylinder, CGA-580 (Airgas, NI NF200). Protect from light and store in a well-ventilated space; indefinite shelf life.
Soda lime, indicating (Thermo Fisher Scientific, catalog number: AA4478636). Store at room temperature; stored indefinitely in an airtight container (at least 3 years). Use fresh soda lime for each exposure.
Hydrogel (clear H2O, 70-01-5022). Store at room temperature; once opened, store in a sealed plastic bag and discard after one week or when dried out.
Laboratory rodent diet 5015 pellets (Lab Diet, catalog number: 001328). Store at room temperature in climate-controlled conditions; shelf life is at least nine months.
Nalgene VERSI-DRY lab table soakers (VWR, catalog number: 52857-104). Store at room temperature; indefinite shelf life.
VWR disposable Petri dishes, 10 cm, semi-stackable (VWR, catalog number: 25384-088). Store at room temperature; indefinite shelf life.
Alcohol 70% (ethyl alcohol), 4 L (Millipore Sigma, catalog number: 65350-85). Store at room temperature in flammables cabinet; will last multiple years if kept sealed away from light.
C57BL/6NCrl mice at embryonic day 17.5 were used for this protocol (Charles River)
We have also successfully used C57BL6/J (Jackson Laboratories) animals.
We have not tested other gestational time points of exposure but believe the protocol could be adapted depending on the experimental needs.
Equipment
ProOx 360 versatile high infusion rate O2 controller with oxygen sensor (Biospherix, model: E702)
Harris model 425-200-580 heavy duty argon, helium, and nitrogen single stage regulator, CGA-580 (Airgas, model: HCL3000773)
Animal cage enclosures with riser platform (Biospherix, A-Chamber)
Translucent plastic bins (to house animals during hypoxic exposures) [e.g., BINO plastic storage bins, deep large, The Handler Collection (Amazon, 12093-CLR)]
Cutting board or similar divider (to visually separate animals when performing two hypoxic exposures in one chamber) [e.g., Dexas superboard pastry board, 14 in. × 17 in. (Amazon, B000063SRL)]
Procedure
Oxygen Sensor Calibration
Calibrate the oxygen sensor once a month according to the manufacturer’s instructions (using parameters for low oxygen control).
Replace oxygen sensor as necessary (i.e., if calibration is unsuccessful, per manufacturer).
Mouse Enclosure Set up
Retrieve one plastic bin and clean it with 70% ethanol.
Wipe down with water on cloth and then with a dry cloth.
Line the bottom of the plastic bin with lab table soakers (shiny side down).
Place 10–15 Lab Diet 5015 pellets and ¼ contents of a Hydrogel cup in a 10 cm Petri dish.
Place the Petri dish in the back right corner of the plastic bin (see Figure 1).
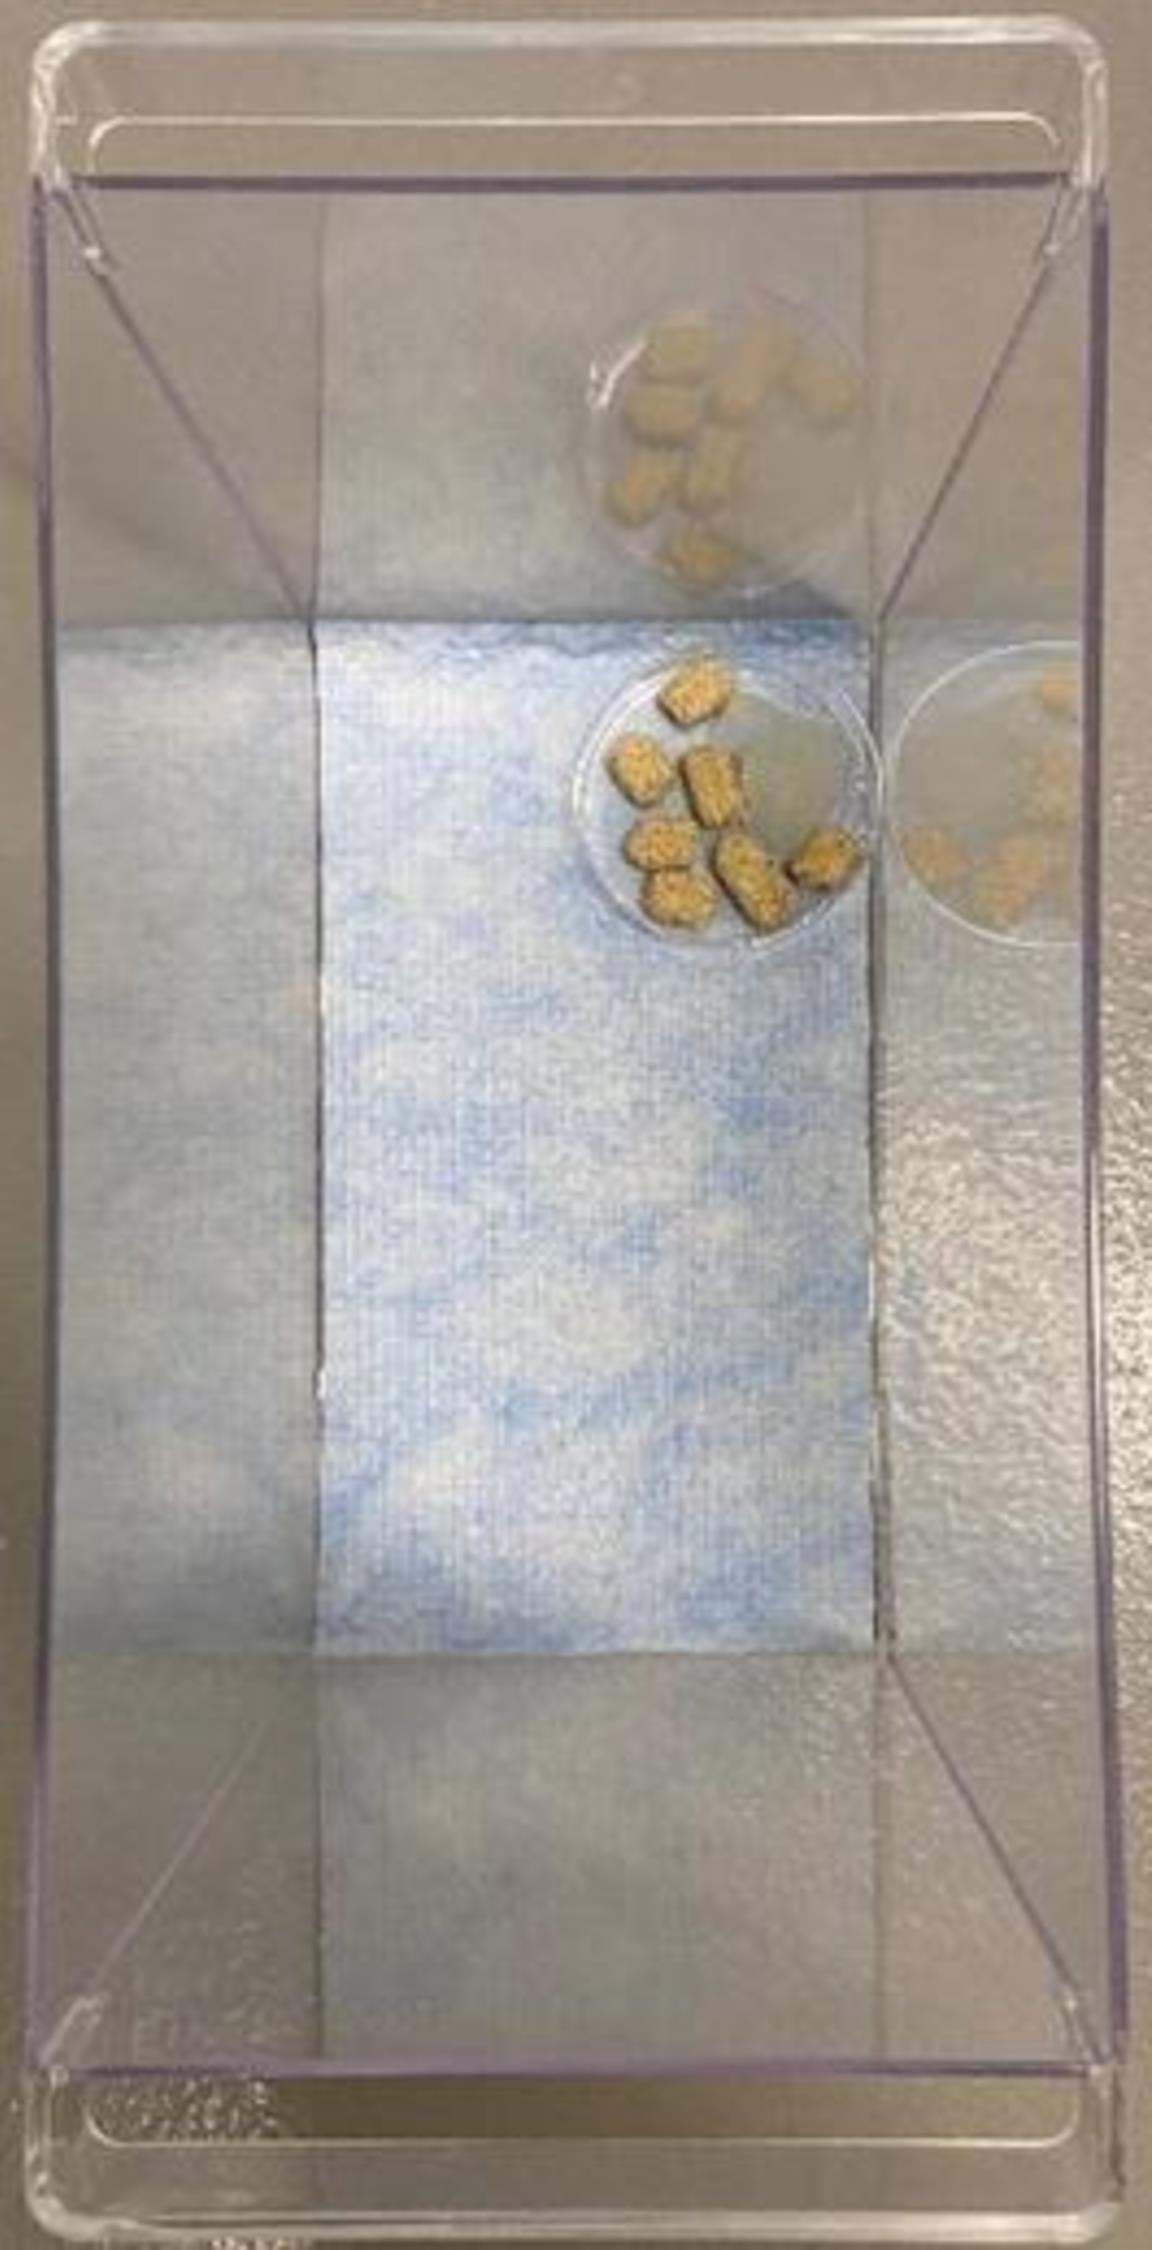
Figure 1. Mouse enclosure setup. Shows appropriate setup of mouse enclosure for hypoxic chamber. Plastic bin previously cleaned with 70% ethanol is lined with VERSI-DRY lab table soaker. A 10 cm Petri dish is filled with several food pellets and ¼ contents of a Hydrogel cup and placed in the back right corner.Chamber Set up
Place the mouse enclosure in the back right corner of the hypoxia chamber (see Figure 2A).
If performing two exposures in the same chamber, place a cutting board to the left of the first mouse enclosure, then place the second mouse closure to the left of the cutting board to prevent mice from visualizing each other.
Fill a 10 cm Petri dish with a liberal amount of fresh soda lime (around 15 g).
Use fresh soda lime in each exposure to maximize its absorptive ability.
Soda lime is added to scavenge for expired carbon dioxide (CO2) that may accumulate in the sealed chamber.
We have used this same amount of soda lime for two mice in the same chamber.
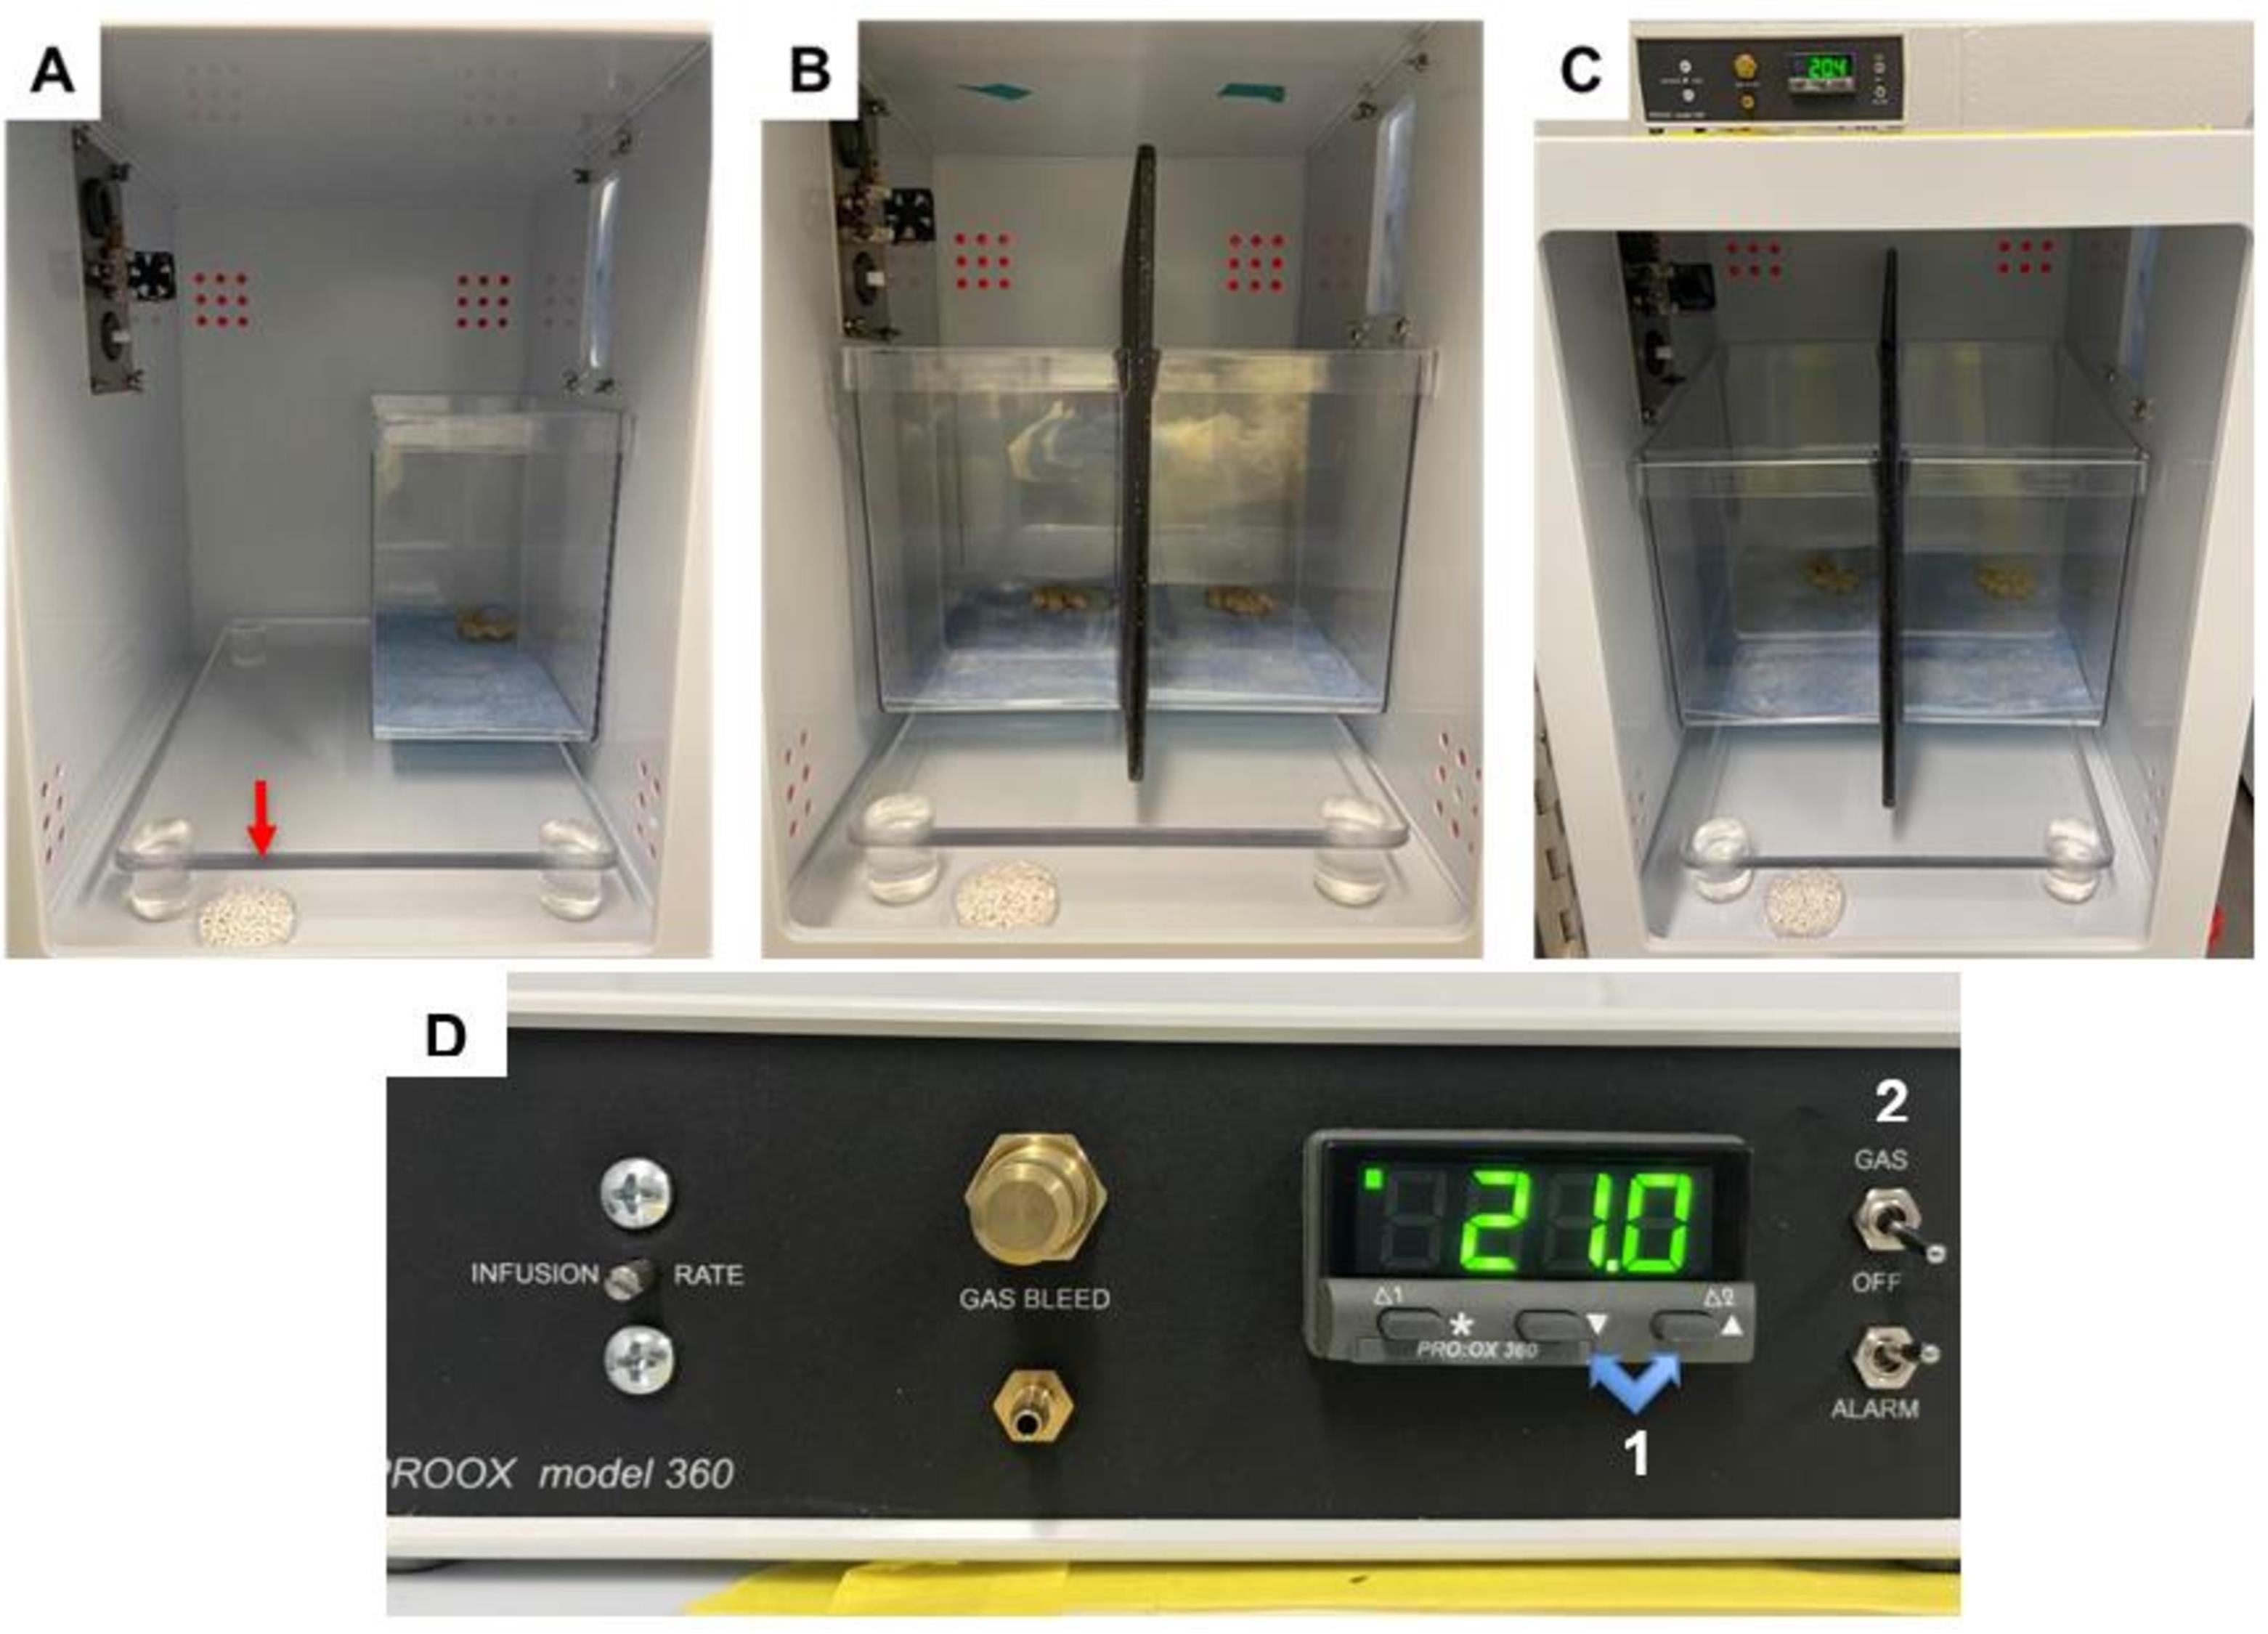
Figure 2. Hypoxia chamber setup. A. Appropriate setup for hypoxia chamber when one exposure is being performed. The enclosure setup is placed in the back right corner of the chamber. A liberal amount of soda lime is added to a Petri dish, which is placed on the floor of the chamber (indicated by red arrow). B. Appropriate setup for hypoxia chamber when two exposures are being performed. The enclosure setups are placed against the back wall of the chamber, side by side. A large cutting board is placed between chambers to prevent mice from visualizing each other. A liberal amount of soda lime is added to a Petri dish, which is placed on the floor of the chamber. C. Zoomed out view of appropriate setup for hypoxia chamber when two exposures are being performed, with oxygen controller on top of chamber. D. Oxygen controller. Highlighted are the buttons (1) for adjusting the inspired oxygen levels and the switch (2) for turning on the flow to the chambers. As pictured, the chamber is currently set to room air, 21%.Acclimation
Place the mouse in the prepared enclosure within the hypoxia chamber.
Close and seal the door to the hypoxia chamber.
Allow the mouse to roam freely within the enclosure for 1 min.
Normoxic Control (if performing hypoxia, jump to Section F)
Ensure the hypoxia chamber is closed and sealed correctly.
Ensure the ProOx 360 controller is powered on. If so, it will display the current percentage of inspired oxygen, also known as fraction of inspired oxygen (FiO2), in the chamber (it should be approximately 21%).
Ensure the switch on the right side of the sensor is set to “OFF,” not “GAS.”
If performing only normoxia, there is no need to open the gas canister; if performing both normoxia and hypoxia at once, the gas canister will be open. If “OFF” is selected, no nitrogen will flow to the chamber.
Start a timer for the desired normoxic exposure duration.
After the desired exposure time, continue to section L.
Starting the Hypoxic Exposure
Open the nitrogen canister and visualize the kPa nitrogen remaining using the meter on the right side of the regulator (see Figure 3).
Approximately 3,000 kPa is necessary for 8 h of 5% FiO2 in one chamber; if performing hypoxia in two chambers, approximately 6,000 kPa is necessary.
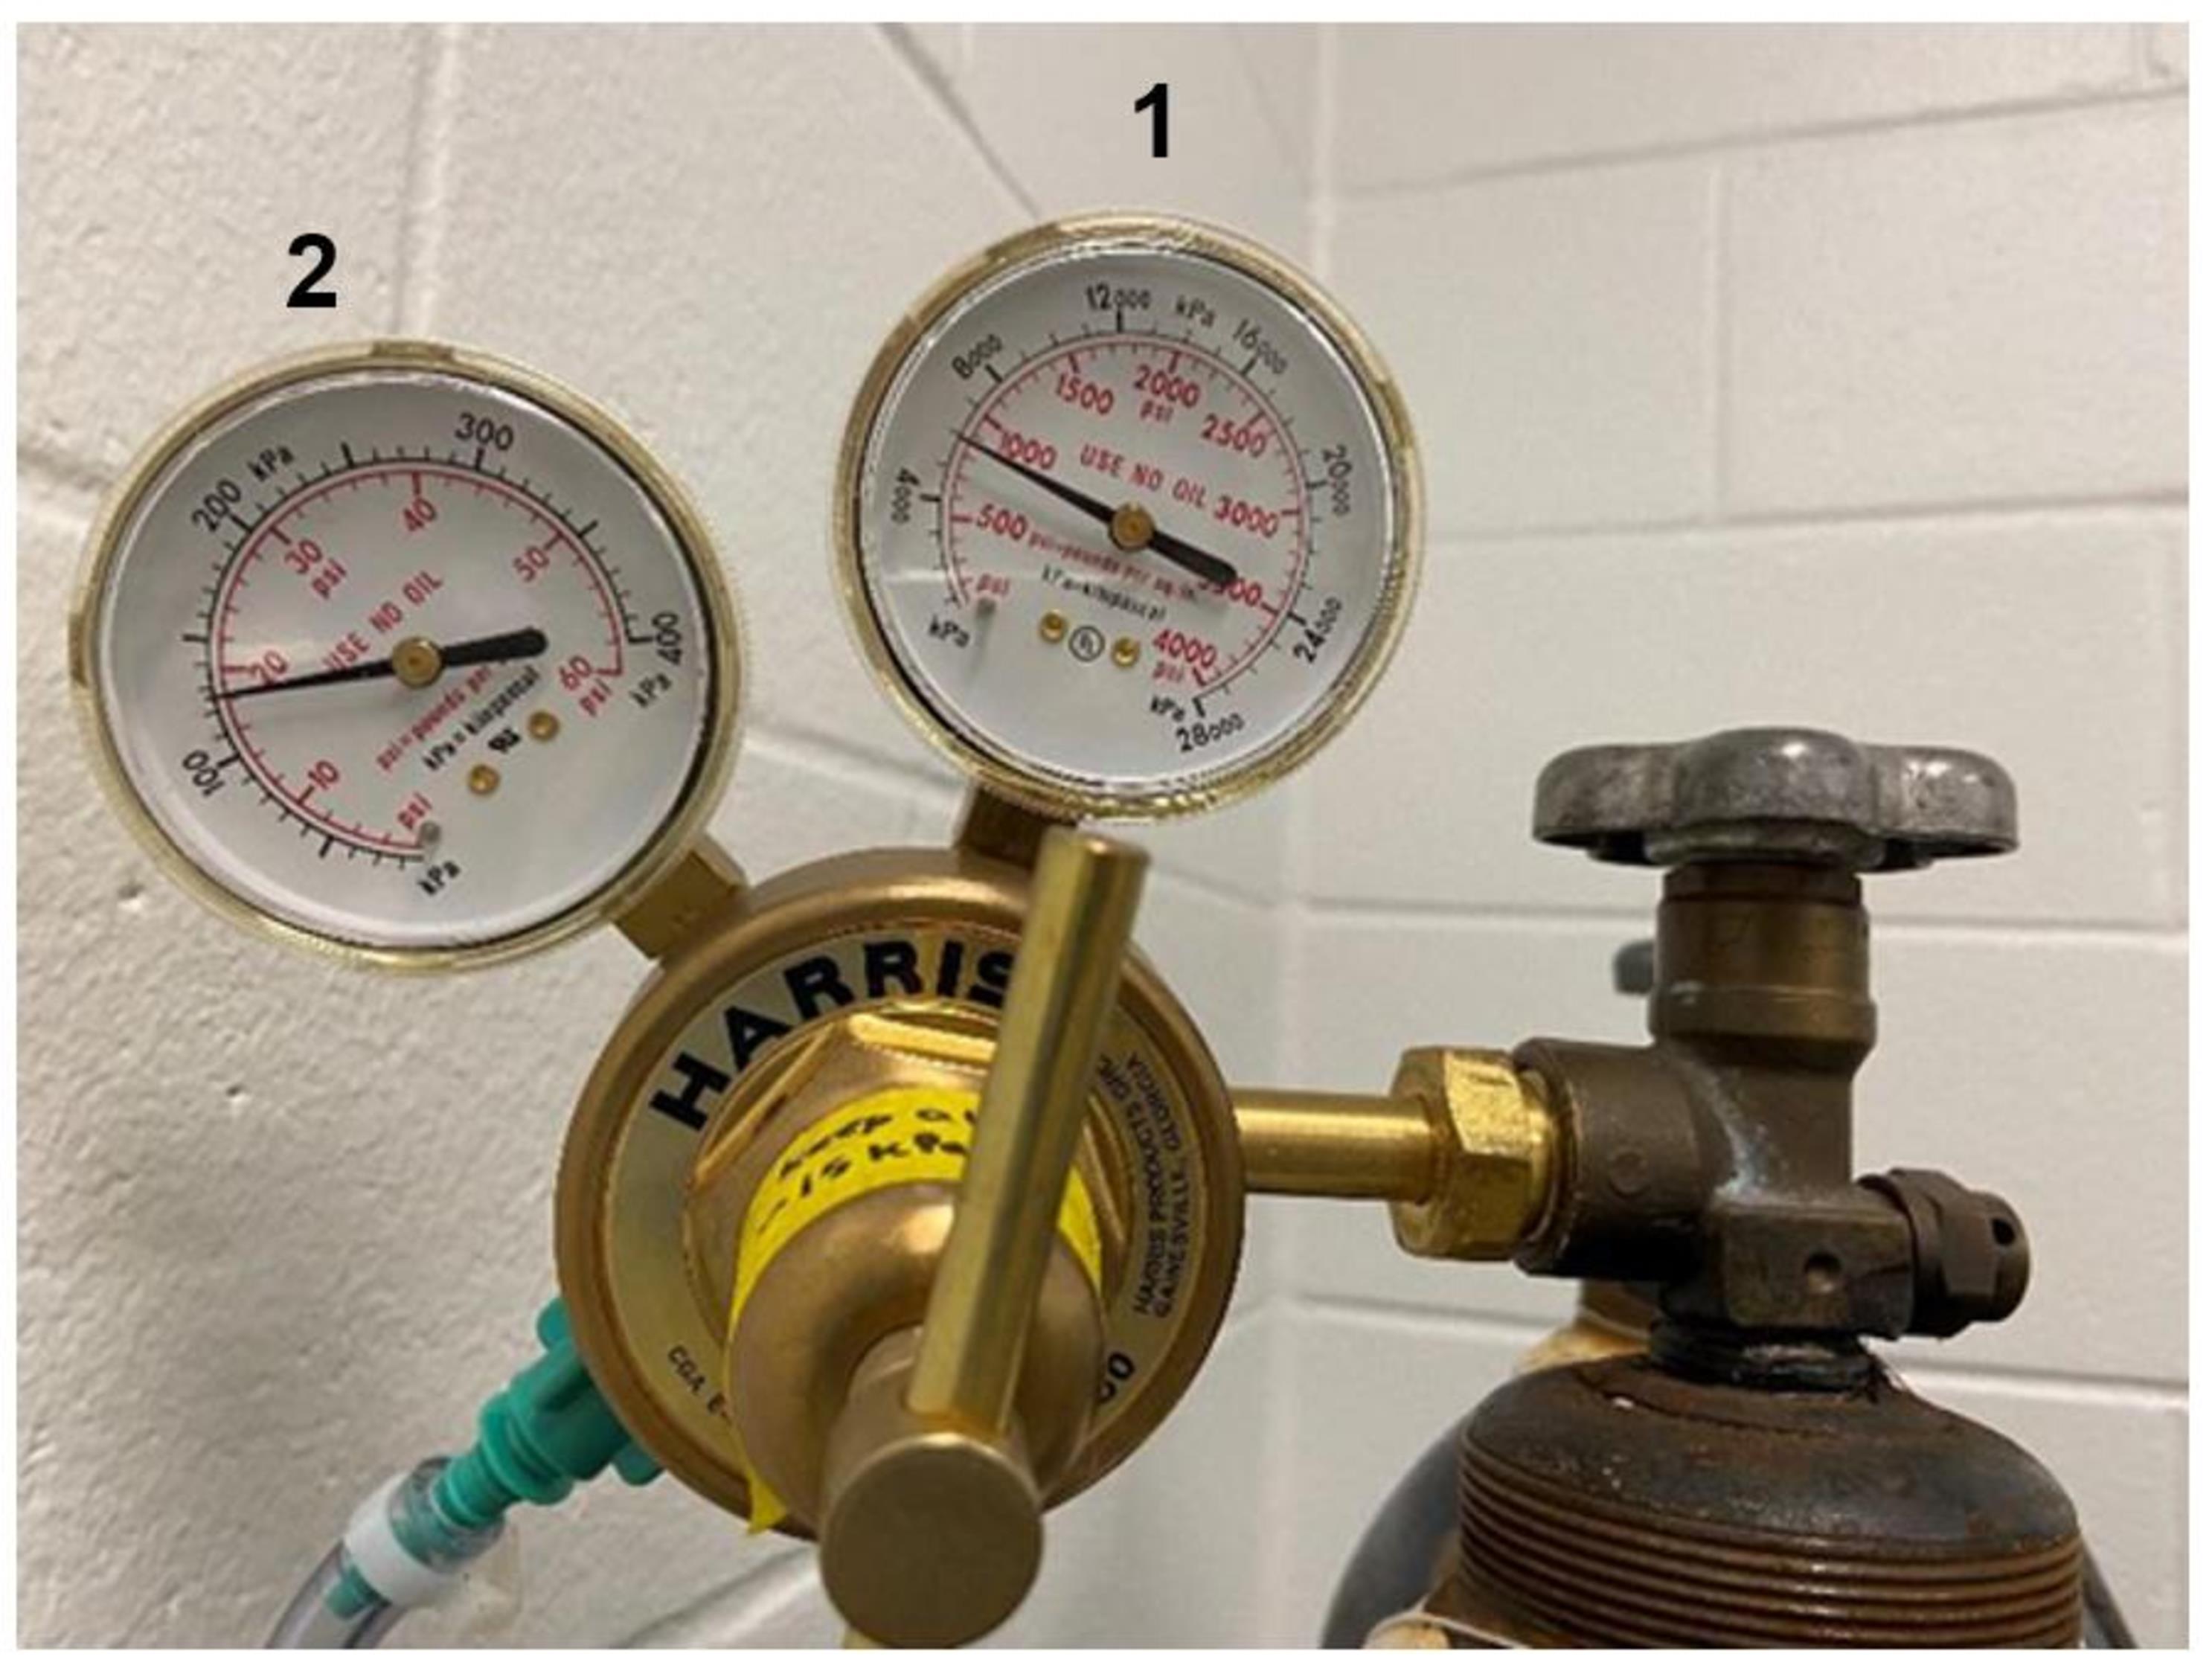
Figure 3. Gas regulator dials. The right dial (1) is the inlet pressure gauge and shows the amount of nitrogen left in the canister in kPa. The left dial (2) is the delivery pressure gauge and shows the flow rate, which should stay between 15 and 20 psi during an exposure.Ensure the ProOx 360 controller is on (if so, it will display the current FiO2 percentage in the chamber; it should be approximately 21%).
Ensure the switch on the right side of the sensor is set to “OFF,” not “GAS.”
Set initial FiO2 value by holding down the leftmost button labeled “*” under FiO2 reading, using the “▼” and “▲” buttons to navigate to the desired value, and then releasing all buttons.
Before turning the switch from “OFF” to “GAS,” change FiO2 setpoint to 19%.
Current FiO2 setpoint can be checked at any point by holding the “*” button.
Simultaneously start a timer (counting up) and turn the switch from “OFF” to “GAS.”
Nitrogen gas will start flowing:
If a loud, high-pitched, whining noise is heard, tighten the connection between the regulator and the nitrogen canister.
If the tubing is well connected to the canister, there will be a low, intermittent hissing noise when the controller is using nitrogen to regulate O2 levels.
Within the first 2 min, check the flow rate on the left meter of the regulator; it should be between 15 and 20 psi (see Figure 3).
If the flow rate is too high, decrease it by turning the gold lever counterclockwise.
If the flow rate is too low, increase it by turning the gold lever clockwise.
Titrating Oxygen from 21% to 5%
At the time points given in Table 1, change the FiO2 setpoint to the corresponding value by holding down the leftmost button labeled “*” under the FiO2 reading, using the “▼” to navigate to the desired value, and then releasing both buttons.
Regarding differing FiO2 setpoints and actual FiO2 readings, see Notes.
Table 1. Setpoints by time with expected FiO2.
Time after start (min) FiO2 setpoint (%) Actual FiO2 reading (%) 0 19 20–21 2 17.5 18.5–19 5 Keep at 17.5 17–17.5 7 15 16.5–17 10 Keep at 15 14.5–15 12 12.5 14–14.5 15 Keep at 12.5 12–12.5 17 10 12–12.5 20 Keep at 10 10.5–11 22 7.5 9.5–10 25 Keep at 7.5 or change to 5 if not at 7.5 8–8.5 26 5 7.5–8 30 Keep at 5 5–5.5
Reaching Steady State FiO2 at 5%
After the first 30 min of exposure, the FiO2 in the chamber will be around 5%.
The FiO2 reading typically fluctuates approximately 0.2% in any direction, i.e., from 4.8% to 5.2%; any fluctuation greater than 0.2% from the setpoint means the ProOx 360 controller should be recalibrated, or the hypoxia chamber should be inspected per manufacturer instructions.
Visualize the mouse inside the chamber, ensuring it is breathing.
Breaths will appear shallow and quick.
The mouse will often choose to sleep near or in the Petri dish for the duration of the exposure, exhibiting minimal movement.
Stay for an additional 10 min, ensuring that the equipment is working correctly, the flow rate is between 15 and 20 psi, and the FiO2 value remains constant (within 0.2% of the setpoint).
Checking on the Mouse During Exposure
Approximately 4 h into the exposure, check on the mouse, ensuring it is still breathing.
Check that the flow rate is between 15 and 20 psi (see Figure 3) and that the FiO2 reading remains constant (within 0.2% of the setpoint).
Changing the Nitrogen Canister During Exposure
If necessary, the nitrogen canister can be swapped for a new one during the exposure.
Avoid, if possible. Replace the canister before the exposure when the tank is at or below 3,000 kPa for one chamber and 6,000 kPa for two.
If changing the canister during the exposure, do not open the hypoxia chamber; the FiO2 value will remain relatively constant if the canister is changed quickly.
Change the nitrogen canister out quickly, moving the regulator to a new canister.
The process should not take more than 3–4 min.
After changing the canister, wait for nitrogen to flow into the chamber.
Adjust the flow rate as necessary, so it lies between 15 and 20 psi (see Figure 3).
Ending the Hypoxic Exposure
When the desired exposure time is reached, immediately open the door to the hypoxia chamber, allowing air to rush in.
Remove the mouse enclosure from the chamber and set it on a nearby surface.
Turn off the ProOx 360 controller and close the nitrogen canister completely.
Cleaning Up
Remove the mouse from the enclosure and place it into a clean new cage.
Visualize the mouse periodically while cleaning to ensure it is recovering well.
A normoxic mouse will be alert and moving around.
A hypoxic mouse will be cold and move slowly and sluggishly; it will recover within 5 min.
Remove all the materials from the mouse enclosure and discard.
Clean the mouse enclosure with 70% ethanol.
Throw out the soda lime.
If the soda lime is excessively purple, it is scavenging a lot of CO2; inspect the hypoxia chamber for issues and add more soda lime when performing the next exposure.
Notes
The oxygen sensor is calibrated for low oxygen control, as detailed by the ProOx 360 manual. Therefore, at higher FiO2 setpoints near the beginning of the exposure, it is normal and expected for actual FiO2 readings to be lower than the setpoint as one approaches the next setpoint. This discrepancy in setpoint and actual O2 reading will normalize as the setpoint is lowered; the actual FiO2 reading approaches the setpoint at lower values. Therefore, at a setpoint of 5% inspired oxygen, the actual oxygen reading will remain steady from a range of approximately 4.8%–5.2%.
Acknowledgments
The development of this protocol was supported by the National Institutes of Health (Grant: K08NS119797-01A1, 5K12HD043245-18, R01MH092535, R01MH092535-S1, and U54HD086984), and institutional grants from the Children’s Hospital of Philadelphia, including Neurology Black Tie Tailgate Fund, Foerderer Grant, and K-readiness Pilot award.
Competing interests
The authors have no competing interests to disclose.
Ethics
Studies involving animals were approved by the Institutional Animal Care and Use Committee (IACUC) at the Children’s Hospital of Philadelphia (Approved Number: IAC 22-000547).
References
- Ahearne, C. E., Boylan, G. B. and Murray, D. M. (2016). Short and long term prognosis in perinatal asphyxia: An update. World J Clin Pediatr 5(1): 67-74.
- Arthuis, C. J., Novell, A., Raes, F., Escoffre, J. M., Lerondel, S., Le Pape, A., Bouakaz, A. and Perrotin, F. (2017). Real-Time Monitoring of Placental Oxygenation during Maternal Hypoxia and Hyperoxygenation Using Photoacoustic Imaging. PLoS One 12(1): e0169850.
- Aziz, N. M., Guedj, F., Pennings, J. L. A., Olmos-Serrano, J. L., Siegel, A., Haydar, T. F. and Bianchi, D. W. (2018). Lifespan analysis of brain development, gene expression and behavioral phenotypes in the Ts1Cje, Ts65Dn and Dp(16)1/Yey mouse models of Down syndrome. Dis Model Mech 11(6): dmm031013.
- Baud, O., Daire, J. L., Dalmaz, Y., Fontaine, R. H., Krueger, R. C., Sebag, G., Evrard, P., Gressens, P. and Verney, C. (2004). Gestational hypoxia induces white matter damage in neonatal rats: a new model of periventricular leukomalacia. Brain Pathol 14(1): 1-10.
- Chen, W., Jadhav, V., Tang, J. and Zhang, J. H. (2008). HIF-1alpha inhibition ameliorates neonatal brain injury in a rat pup hypoxic-ischemic model. Neurobiol Dis 31(3): 433-441.
- Cristancho, A. G., Gadra, E. C., Samba, I. M., Zhao, C., Ouyang, M., Magnitsky, S., Huang, H., Viaene, A. N., Anderson, S. A. and Marsh, E. D. (2022). Deficits in seizure threshold and other behaviors in adult mice without gross neuroanatomic injury after late gestation transient prenatal hypoxia. Dev Neurosci.
- de Haan, M., Wyatt, J. S., Roth, S., Vargha-Khadem, F., Gadian, D. and Mishkin, M. (2006). Brain and cognitive-behavioural development after asphyxia at term birth. Dev Sci 9(4): 350-358.
- Eunson, P. (2015). The long-term health, social, and financial burden of hypoxic-ischaemic encephalopathy. Dev Med Child Neurol 57 Suppl 3: 48-50.
- Feather-Schussler, D. N. and Ferguson, T. S. (2016). A Battery of Motor Tests in a Neonatal Mouse Model of Cerebral Palsy. J Vis Exp (117): e53569-e53569.
- Ferriero, D. M. (2004). Neonatal brain injury. N Engl J Med 351(19): 1985-1995.
- Finder, M., Boylan, G. B., Twomey, D., Ahearne, C., Murray, D. M. and Hallberg, B. (2020). Two-Year Neurodevelopmental Outcomes After Mild Hypoxic Ischemic Encephalopathy in the Era of Therapeutic Hypothermia. JAMA Pediatr 174(1): 48-55.
- Gopagondanahalli, K. R., Li, J., Fahey, M. C., Hunt, R. W., Jenkin, G., Miller, S. L. and Malhotra, A. (2016). Preterm hypoxic-ischemic encephalopathy. Frontiers Media 4: 114-114.
- Kubo, K. I., Deguchi, K., Nagai, T., Ito, Y., Yoshida, K., Endo, T., Benner, S., Shan, W., Kitazawa, A., Aramaki, M., et al. (2017). Association of impaired neuronal migration with cognitive deficits in extremely preterm infants. JCI Insight 2(10): e88609.
- Lee, A. C., Kozuki, N., Blencowe, H., Vos, T., Bahalim, A., Darmstadt, G. L., Niermeyer, S., Ellis, M., Robertson, N. J., Cousens, S., et al. (2013). Intrapartum-related neonatal encephalopathy incidence and impairment at regional and global levels for 2010 with trends from 1990. Pediatr Res 74 Suppl 1(SUPPL. 1): 50-72.
- Mallard, C. and Vexler, Z. S. (2015). Modeling ischemia in the immature brain: How translational are animal models? Stroke 46(10): 3006-3011.
- McClendon, E., Shaver, D. C., Degener-O'Brien, K., Gong, X., Nguyen, T., Hoerder-Suabedissen, A., Molnar, Z., Mohr, C., Richardson, B. D., Rossi, D. J., et al. (2017). Transient Hypoxemia Chronically Disrupts Maturation of Preterm Fetal Ovine Subplate Neuron Arborization and Activity. J Neurosci 37(49): 11912-11929.
- McClendon, E., Wang, K., Degener-O'Brien, K., Hagen, M. W., Gong, X., Nguyen, T., Wu, W. W., Maylie, J. and Back, S. A. (2019). Transient Hypoxemia Disrupts Anatomical and Functional Maturation of Preterm Fetal Ovine CA1 Pyramidal Neurons. J Neurosci 39(40): 7853-7871.
- Peebles, P. J., Duello, T. M., Eickhoff, J. C. and McAdams, R. M. (2020). Antenatal and intrapartum risk factors for neonatal hypoxic ischemic encephalopathy. J Perinatol 40(1): 63-69.
- Reiss, J., Sinha, M., Gold, J., Bykowski, J. and Lawrence, S. M. (2019). Outcomes of Infants with Mild Hypoxic Ischemic Encephalopathy Who Did Not Receive Therapeutic Hypothermia. Biomed Hub 4(3): 1-9.
- Rice, J. E., 3rd, Vannucci, R. C. and Brierley, J. B. (1981). The influence of immaturity on hypoxic-ischemic brain damage in the rat. Ann Neurol 9(2): 131-141.
- Schmidt, J. W. and Walsh, W. F. (2010). Hypoxic-ischemic encephalopathy in preterm infants. J Neonatal-Perinat Med 3(4): 277-284.
- Schreglmann, M., Ground, A., Vollmer, B. and Johnson, M. J. (2020). Systematic review: long-term cognitive and behavioural outcomes of neonatal hypoxic-ischaemic encephalopathy in children without cerebral palsy. Acta Paediatr 109(1): 20-30.
- Semple, B. D., Blomgren, K., Gimlin, K., Ferriero, D. M. and Noble-Haeusslein, L. J. (2013). Brain development in rodents and humans: Identifying benchmarks of maturation and vulnerability to injury across species. Prog Neurobiol 106-107: 1-16.
- Sheldon, R. A., Lee, C. L., Jiang, X., Knox, R. N. and Ferriero, D. M. (2014). Hypoxic preconditioning protection is eliminated in HIF-1alpha knockout mice subjected to neonatal hypoxia-ischemia. Pediatr Res 76(1): 46-53.
- Sheldon, R. A., Osredkar, D., Lee, C. L., Jiang, X., Mu, D. and Ferriero, D. M. (2009). HIF-1 alpha-deficient mice have increased brain injury after neonatal hypoxia-ischemia. Dev Neurosci 31(5): 452-458.
- Stanaway, J. D., Afshin, A., Gakidou, E., Lim, S. S., Abate, D., Abate, K. H., Abbafati, C., Abbasi, N., Abbastabar, H., Abd-Allah, F. et al. (2018). Global, regional, and national comparative risk assessment of 84 behavioural, environmental and occupational, and metabolic risks or clusters of risks for 195 countries and territories, 1990–2017: a systematic analysis for the Global Burden of Disease Study 2017. Lancet 392(10159): 1923-1994.
- Sun, H., Juul, H. M. and Jensen, F. E. (2016). Models of hypoxia and ischemia-induced seizures. J Neurosci Methods 260: 252-260.
- Tomita, S., Ueno, M., Sakamoto, M., Kitahama, Y., Ueki, M., Maekawa, N., Sakamoto, H., Gassmann, M., Kageyama, R., Ueda, N., et al. (2003). Defective brain development in mice lacking the Hif-1alpha gene in neural cells. Mol Cell Biol 23(19): 6739-6749.
- Trollmann, R., Strasser, K., Keller, S., Antoniou, X., Grenacher, B., Ogunshola, O. O., Dotsch, J., Rascher, W. and Gassmann, M. (2008). Placental HIFs as markers of cerebral hypoxic distress in fetal mice. Am J Physiol Regul Integr Comp Physiol 295(6): R1973-1981.
- van Kooij, B. J., van Handel, M., Nievelstein, R. A., Groenendaal, F., Jongmans, M. J. and de Vries, L. S. (2010). Serial MRI and neurodevelopmental outcome in 9- to 10-year-old children with neonatal encephalopathy. J Pediatr 157(2): 221-227 e222.
- Xu, M. Y., Wang, Y. F., Wei, P. J., Gao, Y. Q. and Zhang, W. T. (2019). Hypoxic preconditioning improves long-term functional outcomes after neonatal hypoxia-ischemic injury by restoring white matter integrity and brain development. CNS Neurosci Ther 25(6): 734-747.
- Zhang, S., Wang, Y., Xu, J., Kim, B., Deng, W. and Guo, F. (2021). HIFalpha Regulates Developmental Myelination Independent of Autocrine Wnt Signaling. J Neurosci 41(2): 251-268.
- Zhao, T., Mishra, V., Jeon, T., Ouyang, M., Peng, Q., Chalak, L., Wisnowski, J. L., Heyne, R., Rollins, N., Shu, N., et al. (2019). Structural network maturation of the preterm human brain. Neuroimage 185: 699-710.
Article Information
Copyright
© 2022 The Authors; exclusive licensee Bio-protocol LLC.
How to cite
Gadra, E. C. and Cristancho, A. G. (2022). A Simplified Paradigm of Late Gestation Transient Prenatal Hypoxia to Investigate Functional and Structural Outcomes from a Developmental Hypoxic Insult. Bio-protocol 12(19): e4519. DOI: 10.21769/BioProtoc.4519.
Category
Neuroscience > Nervous system disorders > Animal model
Neuroscience > Nervous system disorders > Cellular mechanisms
Cell Biology > Tissue analysis > Injury model
Do you have any questions about this protocol?
Post your question to gather feedback from the community. We will also invite the authors of this article to respond.