- Protocols

- Articles and Issues
- For Authors
- About
- Become a Reviewer

Combination of Sterile Injury and Microbial Contamination to Model Post-surgical Peritoneal Adhesions in Mice
Published: Vol 12, Iss 16, Aug 20, 2022 DOI: 10.21769/BioProtoc.4491 Views: 3187
Reviewed by: Zinan ZhouFereshteh AzediDivya Murthy
Original research article
The authors used this protocol in:

Dec 2021

Protocol Collections
Comprehensive collections of detailed, peer-reviewed protocols focusing on specific topics


Abstract
Abdominal surgeries are frequently associated with the development of post-surgical adhesions. These are irreversible fibrotic scar bands that appear between abdominal organs and the abdominal wall. Patients suffering from adhesions are at risk of severe complications, such as small bowel obstruction, chronic pelvic pain, or infertility. To date, no cure exists, and the understanding of underlying molecular mechanisms of adhesion formation is incomplete. The current paradigm largely relies on sterile injury mouse models. However, abdominal surgeries in human patients are rarely completely sterile procedures. Here, we describe a modular surgical procedure for simultaneous or separate induction of sterile injury and microbial contamination. Combined, these insults synergistically lead to adhesion formation in the mouse peritoneal cavity. Surgical trauma is confined to a localized sterile injury of the peritoneum. Microbial contamination of the peritoneal cavity is induced by a limited perforation of the microbe-rich large intestine or by injection of fecal content. The presented protocol extends previous injury-based adhesion models by an additional insult through microbial contamination, which may more adequately model the clinical context of abdominal surgery.
Graphical abstract:

Background
Abdominal surgeries are lifesaving procedures. However, they can lead to post-surgical peritoneal adhesions, a fibrotic complication that arises from any insults within the peritoneal cavity. The peritoneal cavity and its organs are lined by the peritoneum, comprising a protective monolayer of mesothelial cells and subjacent connective tissue. Normally, the peritoneum provides a frictionless surface to ensure that intra-abdominal organs, such as the intestines, can move freely. However, the movement of organs is compromised in patients suffering from peritoneal adhesions. These are intra-abdominal scar bands forming between the abdominal wall and abdominal organs (Ellis et al., 1999; Hellebrekers and Kooistra, 2011; Zwicky et al., 2021). Peritoneal adhesions lead to severe adhesion-related complications, such as small bowel obstruction, chronic pelvic pain, and secondary infertility in women (Hellebrekers and Kooistra, 2011; Zwicky et al., 2021). This poses a major health burden for patients and challenges our health care systems (van Goor, 2007; ten Broek et al., 2013). Adhesion-related complications in the US health care system alone cost several billion dollars per year to treat (Sikirica et al., 2011). Currently, the only approved treatment for adhesions is the use of so-called anti-adhesive barriers. These are biocompatible barrier materials that can be inserted after abdominal surgery resulting in a slight reduction of adhesions. However, the beneficial effect of anti-adhesive barriers for patients is limited and does not rely on a specific molecular mechanism; thus, their regular use in daily practice is not supported (ten Broek et al., 2014; Huang and Ding, 2019; Strik et al., 2019; Fatehi Hassanabad et al., 2021). As such, it is essential to investigate the underlying molecular mechanisms of adhesion formation to develop specific prevention and treatment options in the future.
The current paradigm of adhesion formation states that peritoneal injury induces inflammation and coagulation, resulting in fibrin deposition (Hellebrekers and Kooistra, 2011). More recent results suggest that fibrin deposition may be accompanied by an aggregation reaction of GATA6+ peritoneal macrophages (Zindel et al., 2021b). The resulting clot of fibrin and macrophages is proposed to transform into stable adhesions by the process of extracellular matrix deposition by myofibroblasts (Fischer et al., 2020; Sandoval et al., 2016; Zindel et al., 2021a; Zwicky et al., 2021). This paradigm is largely based on results gained from research in rodents using surgical injury models. The most commonly used models have been described and reviewed elsewhere (Oncel et al., 2005; Whang et al., 2011; Kraemer et al., 2014; Bianchi et al., 2016; Sandoval et al., 2016; Tsai et al., 2018; Fischer et al., 2020; Zindel et al., 2021b). In mice, the predominant adhesion model includes the creation of a sterile, ischemic, button-shaped injury of the peritoneum. This model has been referred to as the peritoneal button (PB) model. Other models include the induction of peritoneal injury by abrasion, diathermia, or by introducing sterile foreign material. In summary, all these models rely on sterile peritoneal injuries to induce and study adhesion formation. However, peritoneal insult in clinical abdominal surgeries differs from those standardized, sterile mouse models. Most importantly, surgical trauma to the peritoneum may be accompanied by an acute microbial contamination. This frequently happens when small amounts of intestinal microbes are spilled during the resection and reconstruction phases of abdominal surgery procedures. In fact, a clinical study has linked bacterial peritonitis to an increased risk of subsequent admission due to post-surgical adhesions (Parker et al., 2005).
In a recent paper, we tested the hypothesis that sterile peritoneal injury and microbial contamination independently trigger adhesion formation (Zindel et al., 2021a). First, we confirmed that the PB model of sterile injury (Zindel et al., 2021b) reproducibly led to peritoneal adhesions. Interestingly, a similar amount of adhesions was induced using a modified cecal ligation and puncture (CLP) model. Unlike the standard CLP, which is widespread in sepsis research (Hubbard et al., 2005; Rittirsch et al., 2009; Dejager et al., 2011), in the modified CLP only a small part of the cecum was ligated. This decreased the amount of microbial contamination resulting in a non-lethal septic insult to the peritoneal compartment, which reproducibly led to the formation of peritoneal adhesions. Importantly, the combination of PB and CLP resulted in significantly more adhesions than each procedure alone, indicating that sterile injury and microbes synergistically trigger events that lead to adhesion formation. Surgical induction of bacterial contamination was further found to be interchangeable with administration of native or heat-inactivated cecal slurry (CS) (Starr et al., 2014) during laparotomy, resulting in comparable adhesion scores. In summary, we found that sterile injury and microbial contamination independently and synergistically cause peritoneal adhesions.
Here, we describe in detail the surgical procedures used in our previous publication (Zindel et al., 2021a). We show how adhesions can be caused by a modular system of surgically induced insults. These modules comprise peritoneal injury (PB), microbial contamination (CLP or CS), or a combination thereof (Figure 1A–C). We further describe how adhesions can be quantified using a clinical scoring system (Figure 1D, Table 1). Compared to preexisting methodologies of adhesion mouse models, the presented protocol is extended by the factor of intraperitoneal microbial contamination, an important driver of post-surgical adhesions (Zindel et al., 2021a). Apart from the use in post-surgical adhesion studies, we suggest that adapted forms of the presented modular mouse system could be applied in other research areas, such as abdominal infection or chronic pelvic pain research.
Table 1. Peritoneal adhesion index (PAI)
| Grade | Description | Explanation |
0 1 2 3 | None Flimsy Dense Fibrotic/Vascularized | Peritoneal button (PB) is free and covered with mesothelium Adhesion separates spontaneously when opening the peritoneal cavity Adhesion separates bluntly, without bleeding Adhesion needs sharp dissection, visible vascularization, bleeding occurs upon dissection |
| 4 | Complete | PB is completely covered by adhesion; dissection results in organ damage |

Figure 1. Overview of the proposed modular surgery model system for peritoneal adhesion induction in mice. A. Localized sterile surgical trauma is induced by generating one peritoneal button (PB) per abdominal quadrant. B. Polymicrobial contamination is surgically induced by cecal ligation and puncture (CLP). C. Polymicrobial contamination is alternatively induced by peritoneal administration of cecal slurry (CS). Combinations of the modular components PB (A), CLP (B), and CS (C) are used to synergistically induce adhesion formation in the mouse peritoneal cavity. D. Within seven days post-surgery, peritoneal adhesion severity is scored at six different locations for tenacity and vascularization (Table 1). These locations are: the four PB (1–4), the midline incision (5), and adhesions that occur between intestines (6). At each scoring location, peritoneal adhesions are assigned a grade between 0 (minimum) and 4 (maximum) according to the criteria (Table 1). The sum of the six scores yields the total peritoneal adhesion index (PAI).
Materials and Reagents
C57BL/6JRccHsd mice (Envigo, Netherlands)
Note: Female and male mice, 8–12 weeks of age. After arrival at the facility, the mice are given seven days of acclimation. Mice are housed in specific-pathogen-free (SPF) conditions with a 12 h day-night cycle and ad libitum access to drinking water and standard chow diet (3432 Maintenance Vitamin-fortified, irradiated > 25 kGy, KLIBA NAFAG, 3432.PX.V20). The ambient room temperature is 20 ± 2 °C, and humidity is kept at 50 ± 10%.
Saline 0.9% (B. Braun Medical AG, Swissmedic: 29554)
Storage at room temperature. See manufacturer instructions for shelf-life.
Eye ointment (Vitamin A Blache, Bausch & Lomb Swiss AG, Swissmedic: 22398)
Storage at room temperature. See manufacturer instructions for shelf-life.
Cecal slurry, prepared as previously described (Starr et al., 2014)
Storage at -80 °C. Bacterial viability is maintained at 99.5% for up to six months (Starr et al., 2014).
Isoflurane (AttaneTM, Isoflurane ad us. vet., Provet AG, Piramal Critical Care, Swissmedic: 56761002)
Storage at room temperature. See manufacturer instructions for shelf-life.
Buprenorphine 0.3 mg/1 mL (Temgesic®, Indivior Schweiz AG, Swissmedic: 41931)
Storage at room temperature. See manufacturer instructions for shelf-life.
Fentanyl 0.1 mg/2 mL (Sintetica SA, Swissmedic: 53987)
Storage at room temperature. See manufacturer instructions for shelf-life.
Medetomidine 1 mg/1 mL (Medetor® ad us. vet., Virbac AG, Swissmedic: 58407002)
Storage at room temperature. See manufacturer instructions for shelf-life.
Midazolam 15 mg/3 mL (Dormicum®, CPS Cito Pharma Services GmbH, Swissmedic: 44448)
Storage at room temperature. See manufacturer instructions for shelf-life.
Triple mix (see Recipes)
70% ethanol (see Recipes)
Storage at room temperature.
Buprenorphine working solution (see Recipes)
Equipment
Suture material
Polypropylene suture 4-0 (1.5 Ph. Eur.) with RB-1 needle (Ethicon, catalog number: 8871H)
Polypropylene suture 6-0 (0.7 Ph. Eur.) with P-1 needle (Ethicon, catalog number: MPP8697H)
Polyglactin 910 suture 4-0 (1.5 Ph Eur.), absorbable (Ethicon, catalog number: V1224)
Needles and syringes
26 G × 3/8’’ needle (BD MicrolanceTM 3, catalog number: 300300)
25 G × 5/8’’ needle (BD MicrolanceTM 3, catalog number: 300600)
1 mL Luer lock syringe (BD PlastiPakTM, catalog number: 303172)
0.5 mL Insulin-50 syringe, G30 0.3 × 0.8 mm (Omican®, B. Braun Medical AG, catalog number: 9151117S)
Retraction system
Small base plate (20 × 30 cm) (Fine Science Tools, catalog number: 18200-03)
2 short fixators (Fine Science Tools, catalog number: 18200-01)
2 tall fixators (Fine Science Tools, catalog number: 18200-02)
Elastomer (2 m roll) (Fine Science Tools, catalog number: 18200-07)
2 blunt retractors (2.5 mm wide) (Fine Science Tools, catalog number: 18200-10)
2 sharp retractors (0.5 mm wide) (Fine Science Tools, catalog number: 18200-08)
Surgical instruments
Surgical scissors – ToughCut® (Fine Science Tools, catalog number: 14054-13)
Student fine scissors (Fine Science Tools, catalog number: 91461-11)
Adson forceps (Fine Science Tools, catalog number: 11027-12)
Delicate suture tying forceps (Fine Science Tools, catalog number: 11063-07)
Graefe forceps, 1*2 teeth (Fine Science Tools, catalog number: 11054-10)
Blunted forceps (e.g., Fine Science Tools, catalog number: 11651-10)
Crile hemostats (Fine Science Tools, catalog number: 13004-14)
Needle holder – Durogrip® (Aesculap, catalog number: BM012R)
Additional equipment
Steam indicator tape (3M Health Care, catalog number: 1322-24MM)
Autoclave (MELAG, MELAtronic® 23)
Scale (Mettler Toledo, catalog number: PE 2000)
Aesculap Isis rodent shaver (AgnTho’s, catalog number: GT421)
Heating pad (Beurer GmbH, catalog number: HK 40)
Surgical microscope
Surgical tape
Veterinary operating table heated mat (Peco Services, Mediheat V500DVstat)
Surgical drape, 45 × 37 cm (3M Health Care, catalog number: 9067)
Cellulose swaps (Cosanum AG, catalog number: 630045212044)
Anesthesia system (Rothacher Medical GmbH, Combi-vet®)
Note: The techniques described here usually result in a bloodless surgical procedure. Therefore, no cautery devices are needed in experienced hands. For inexperienced small animal surgeons, we recommend having a cautery device (e.g., Low Temperature Cautery Kit, FST Fine Science Tools, 18019-00) ready.
Procedure
Preparation of surgical equipment
Autoclave surgical instruments.
Note: Alternatively, surgical instruments can be submerged in 70% ethanol (3 min) and ddH2O (3 min) subsequently.
Clean work surface, heating plate, and retraction system with 70% ethanol.
Cover heating plate with 1–2 surgical drapes and adjust heating plate temperature to 37 °C.
Prewarm buprenorphine (0.05 mg/mL working solution) to 37 °C on heating plate.
Arrange surgical equipment (Figure 2A–2C).
Note: Hemostat opening width is maximized to approximately 5 mm (tip distance). This facilitates generation of equally sized peritoneal buttons. The labels on Adson forceps’ handles assist in the formation of peritoneal buttons at distinct sites of the parietal peritoneum (Figure 2B).
Anesthesia and pre-surgical preparations
Weigh mouse and note down body weight.
Place the mouse into induction chamber for anesthesia with 5% v/v isoflurane in medical oxygen (1.2 L/min).
Place the anesthetized mouse on surgical drape/heating plate to prevent hypothermia and maintain anesthesia with 2.5% v/v isoflurane in medical oxygen (1.2 L/min) via the nose cone.
Note: Assess anesthetic depth by toe and eye reflex. If necessary, adjust percentage v/v isoflurane. Monitor the respiratory rate of the mouse during entire surgical procedure. If necessary, adjust percentage v/v isoflurane.
Apply 0.1 mg/kg body weight pre-warmed buprenorphine (0.05 mg/mL working solution) by subcutaneous (s.c.) femoral injection.
Apply eye ointment to prevent drying of the eyes.
Turn the mouse on its dorsal side and fixate the extremities with surgical tape to ensure proper tension and continuous anesthesia induction via the nose cone.
Place two cellulose swaps next to each side of the abdomen.
Shave the abdomen using the rodent shaver.
Remove the hair using the two cellulose swaps and remove additional hair using surgical tape.
Apply 70% ethanol to disinfect the shaved skin using cellulose swap.
Note: Apply ethanol sparingly on the shaved skin to reduce excessive heat loss.
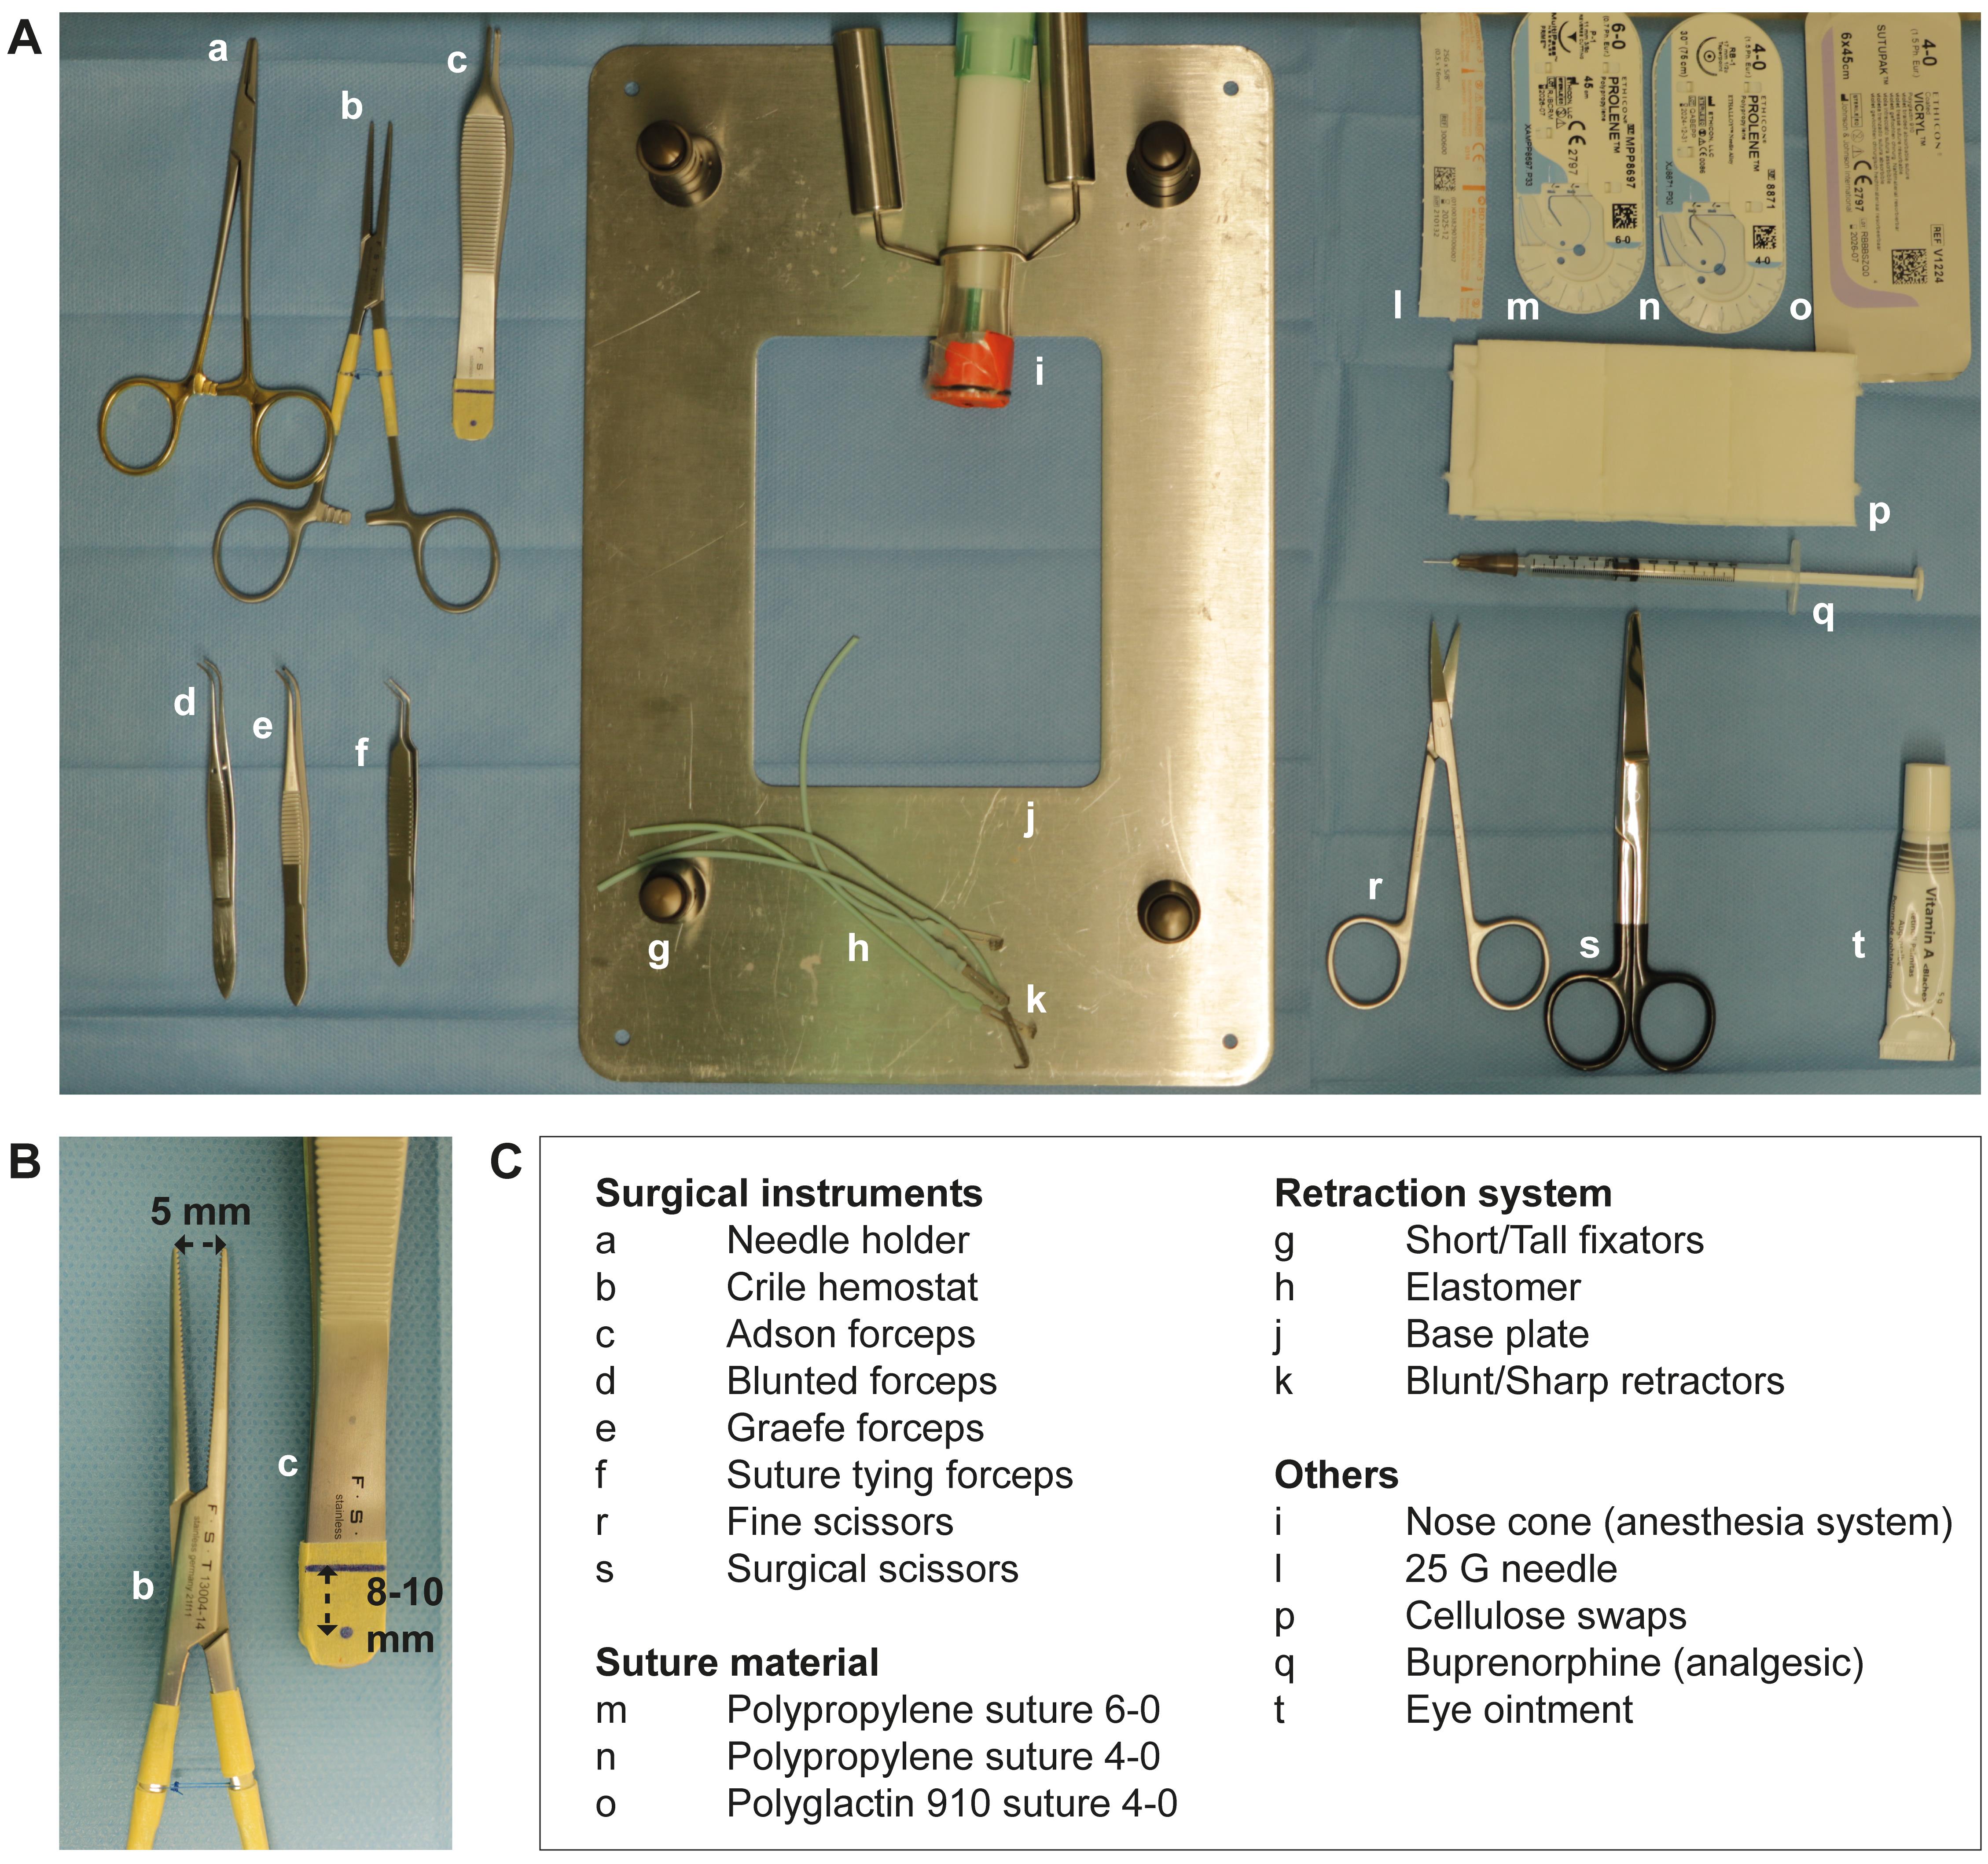
Figure 2. Equipment and pre-surgery set-up. A. Surgical instruments and materials are set up on a heating plate covered with a sterile surgical drape. B. Distance marks are indicated on the handle of the Adson forceps for assistance during peritoneal button creation. Maximum opening distance of the hemostat is restricted to approximately 5 mm for assistance during peritoneal button formation. C. Listed items correspond to the respective letters in (A) and (B).Surgical procedure
Laparotomy
Skin incision: perform a median vertical incision (approximately 25 mm) (Figure 3A):
Grasp the abdominal skin midline approximately 25 mm inferior to the xiphoid (Graefe forceps).
Extend the cut approximately towards, but no further than, the xiphoid (surgical scissors). Incision should be 25 mm or from pubic to xiphoid bone, whichever is shorter.
Note: Ensure not to penetrate into the peritoneal cavity at this step.
Perform a matching median vertical incision in the peritoneal wall (Figure 3B–3C):
Perforate the linea alba (e.g., by using fine scissors).
Note: Take care not to injure intra-abdominal organs. This can be achieved by pulling the abdominal wall up. As soon as the linea alba is perforated, air enters into the abdominal cavity, which separates the abdominal wall from the underlying organs.
The access through the linea alba is extended towards the symphysis and the xiphoid process to match the skin incision in length (fine scissors).
Notes:
1) Take care not to injure intra-abdominal organs. This can be ensured by pulling the peritoneal wall up while extending the cut.
2) The linea alba has no major blood vessels and this incision technique should not result in any visible bleeding. If bleeding occurs, one of the rectus abdomini muscles was likely injured. This can be salvaged by using diathermy. We use cellulose swabs only to clean the skin. We do not recommend using cellulose inside the peritoneal cavity at all, as this may influence adhesion formation that may be difficult to standardize.
After exposing the peritoneal cavity, place one retractor at each corner of the opening. Adjust distance of the fixators ensuring good access to the peritoneal cavity (Figure 3D).
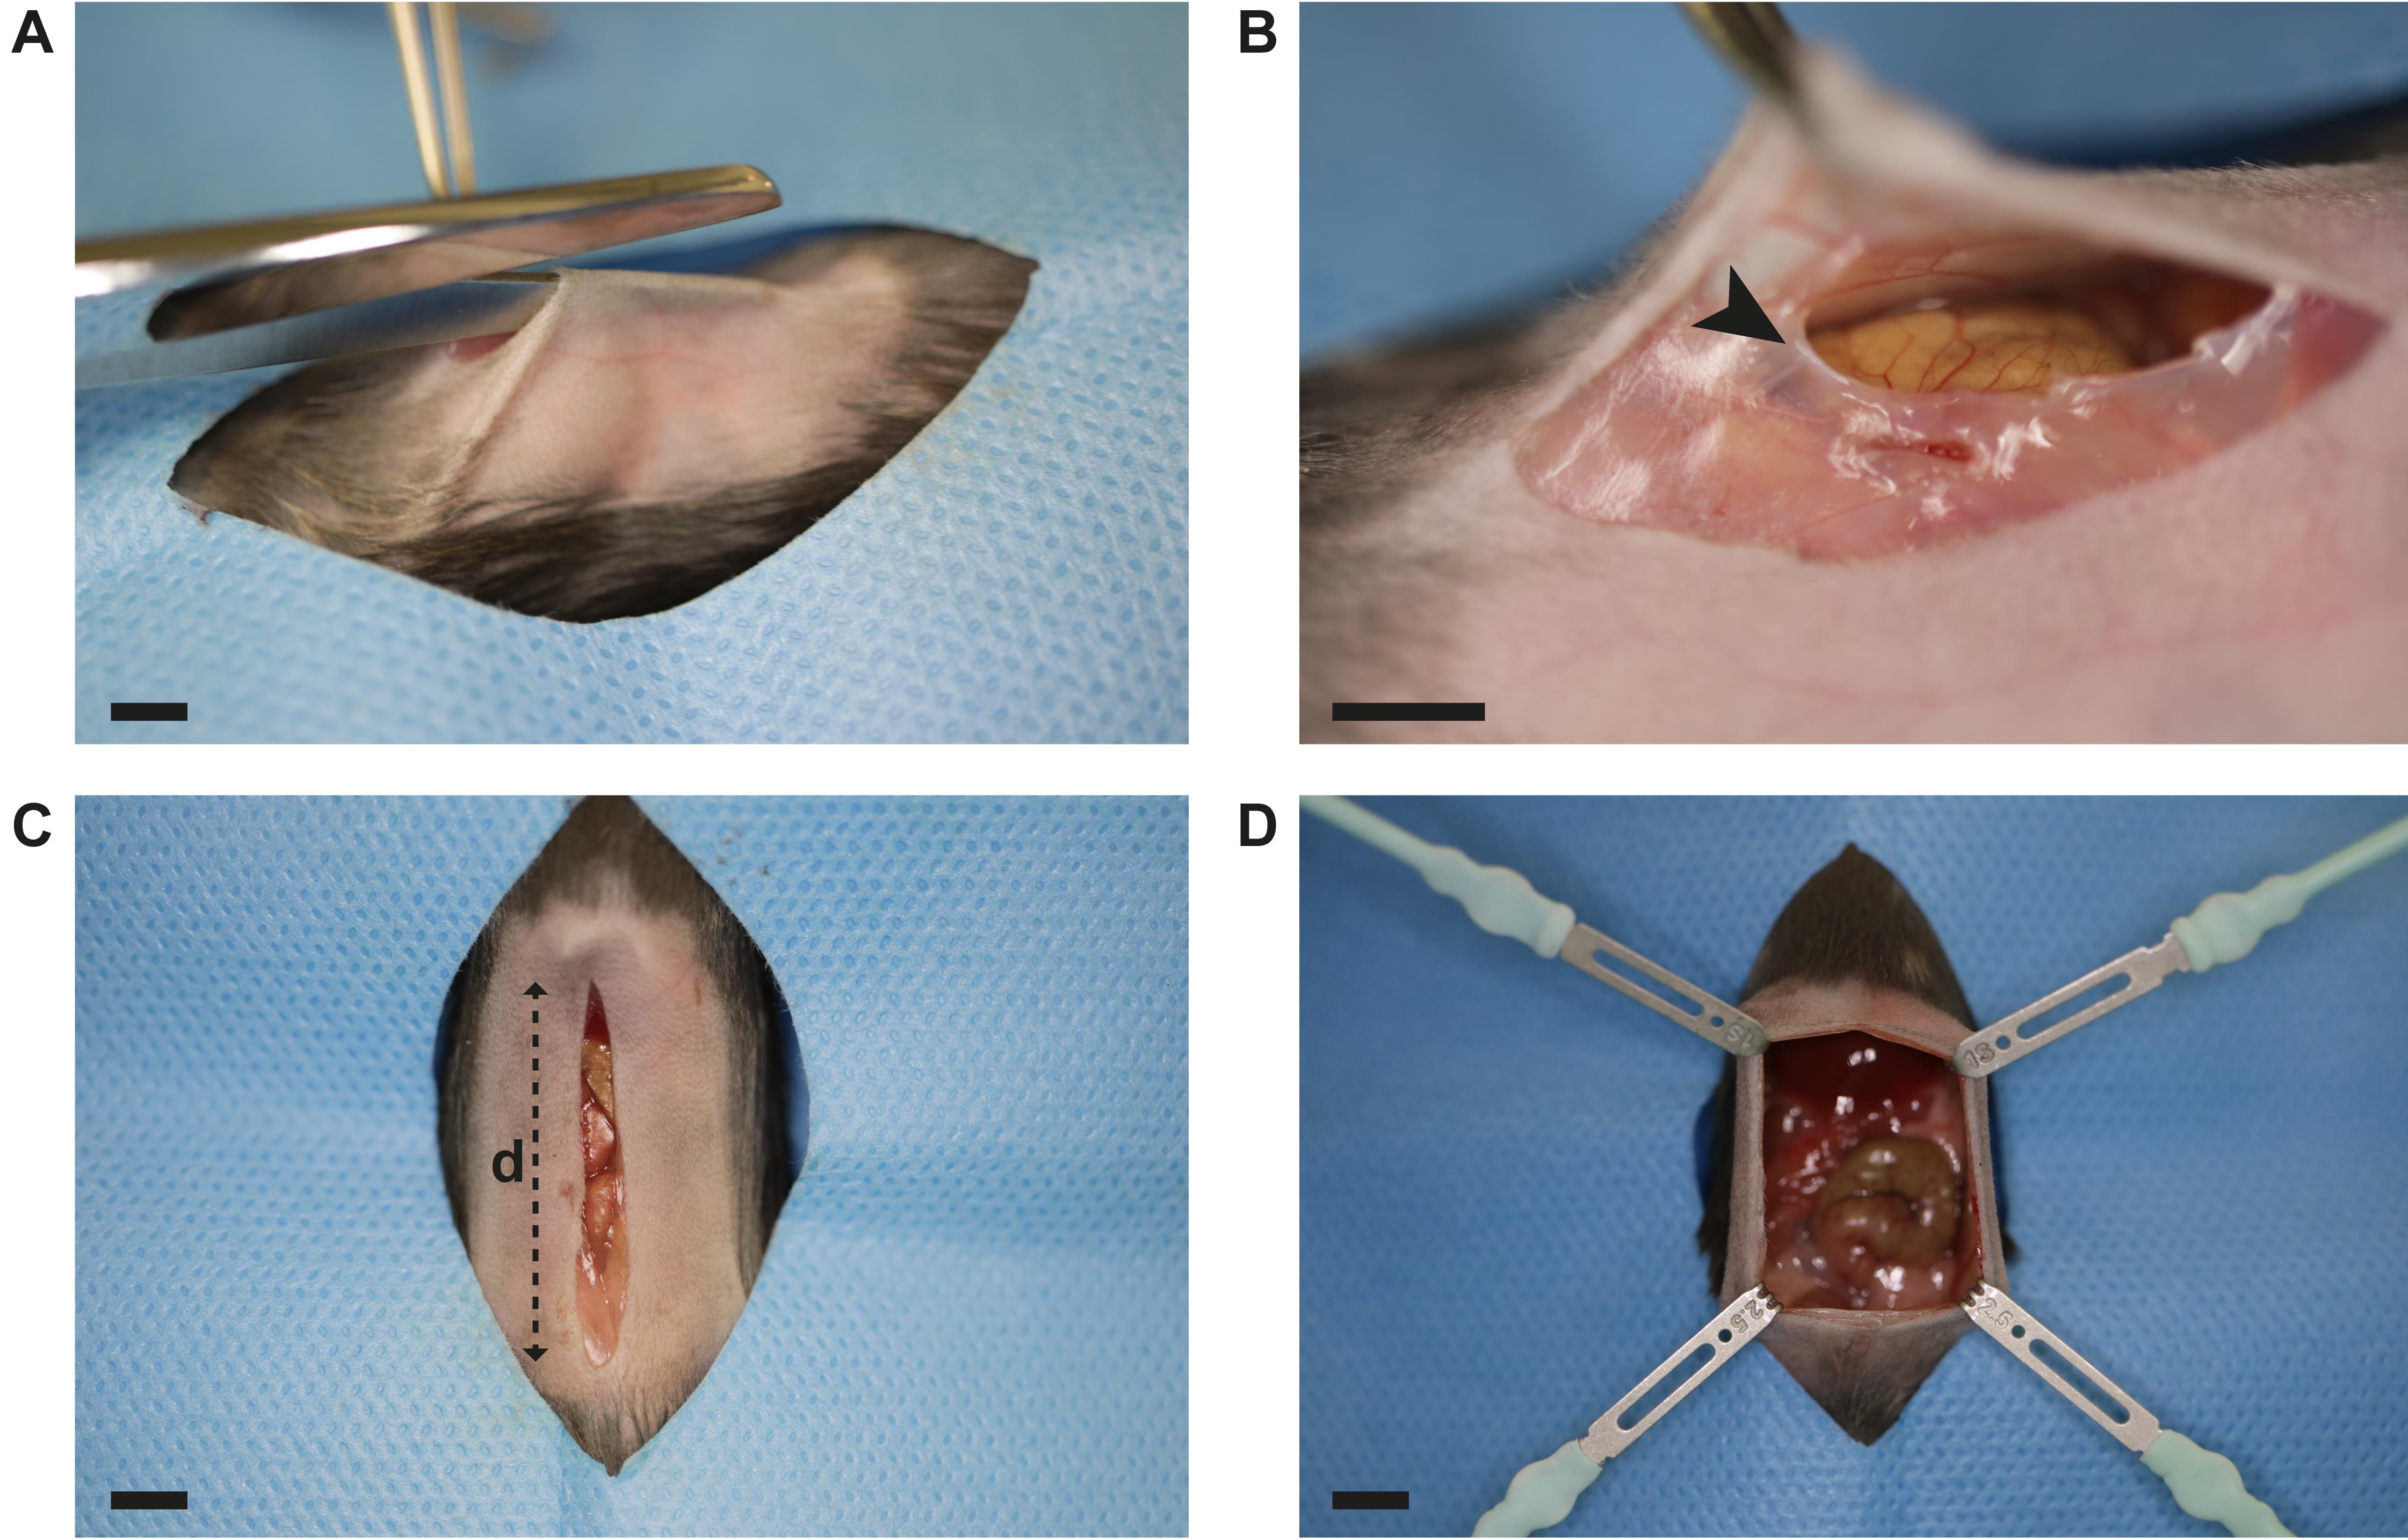
Figure 3. Laparotomy. A. Median vertical incision is performed in the abdominal skin using surgical scissors and forceps. B. The abdominal wall is perforated through the linea alba (black arrow) using fine scissors. Gently pulling the abdominal wall up prevents intraperitoneal organ damage. C. Incision measures 25 mm (distance d) or from pubic to xiphoid bone, whichever is shorter. D. The peritoneal cavity is exposed by placing four retractors as displayed. Scale bar (A–D): 5 mm.Adhesions are induced by three modular components (Figure 1A–C): Peritoneal buttons (PB), Cecal Ligation and Puncture (CLP), and Cecal Slurry (CS). Typical component combinations include: PB alone, PB + CLP, and PB + CS.
Module 1: Peritoneal button (PB) formation (Figure 1A)
Gently press the handle of the Adson forceps from outside to the peritoneal wall (Figure 4A).
Note: The assistance distance mark at the forceps handle is visible through the abdominal wall.
Clamp a portion (approximately 5 mm) of the parietal peritoneum 8–10 mm lateral from the incision in the first quadrant using the hemostat (Figure 4B–D).
Note: Labels at the forceps’ handle can help to standardize the location for the peritoneal button. Controlling maximum hemostat opening can facilitate formation of equally sized peritoneal buttons (see also Note A.5.).
Ligate the grasped portion with three subsequent surgical knots at its base using a polypropylene suture 4-0 (suture tying forceps, needle holder) (Figure 4E–F).
Carefully remove the hemostat (Figure 4G).
Repeat the described steps (C2a–d.) three additional times, resulting in one button in each peritoneal quadrant (Figure 4H).
Module 2: Cecal ligation and puncture (CLP) procedure (Figure 1B)
Carefully remove retractors.
Locate the cecum using blunt anatomic forceps or another blunt surgical tool (e.g., needle holder).
Note: The cecum is typically found in the left lower quadrant.
Gently mobilize the cecum and bring it in front of the abdominal wall (Figure 5A).
Ligate the cecum (2 mm) with a polyglactin 910 suture 4-0. Tie the suture tight with three subsequent surgical knots (suture tying forceps, needle holder) (Figure 5B–C).
Note: Severity grade could theoretically vary by ligating different lengths of the cecum. However, increasing the length of the ligated cecum portion should be explicitly stated in the research protocols submitted to the authorities, as this may result in significant morbidity and mortality for the animals.
Perforate the ligated cecum using a 25 G needle by a single through-and-through puncture (Figure 5D).
Remove the needle.
A small portion of feces from both puncture sides exits the ligated cecum.
Relocate the cecum into the abdominal cavity.
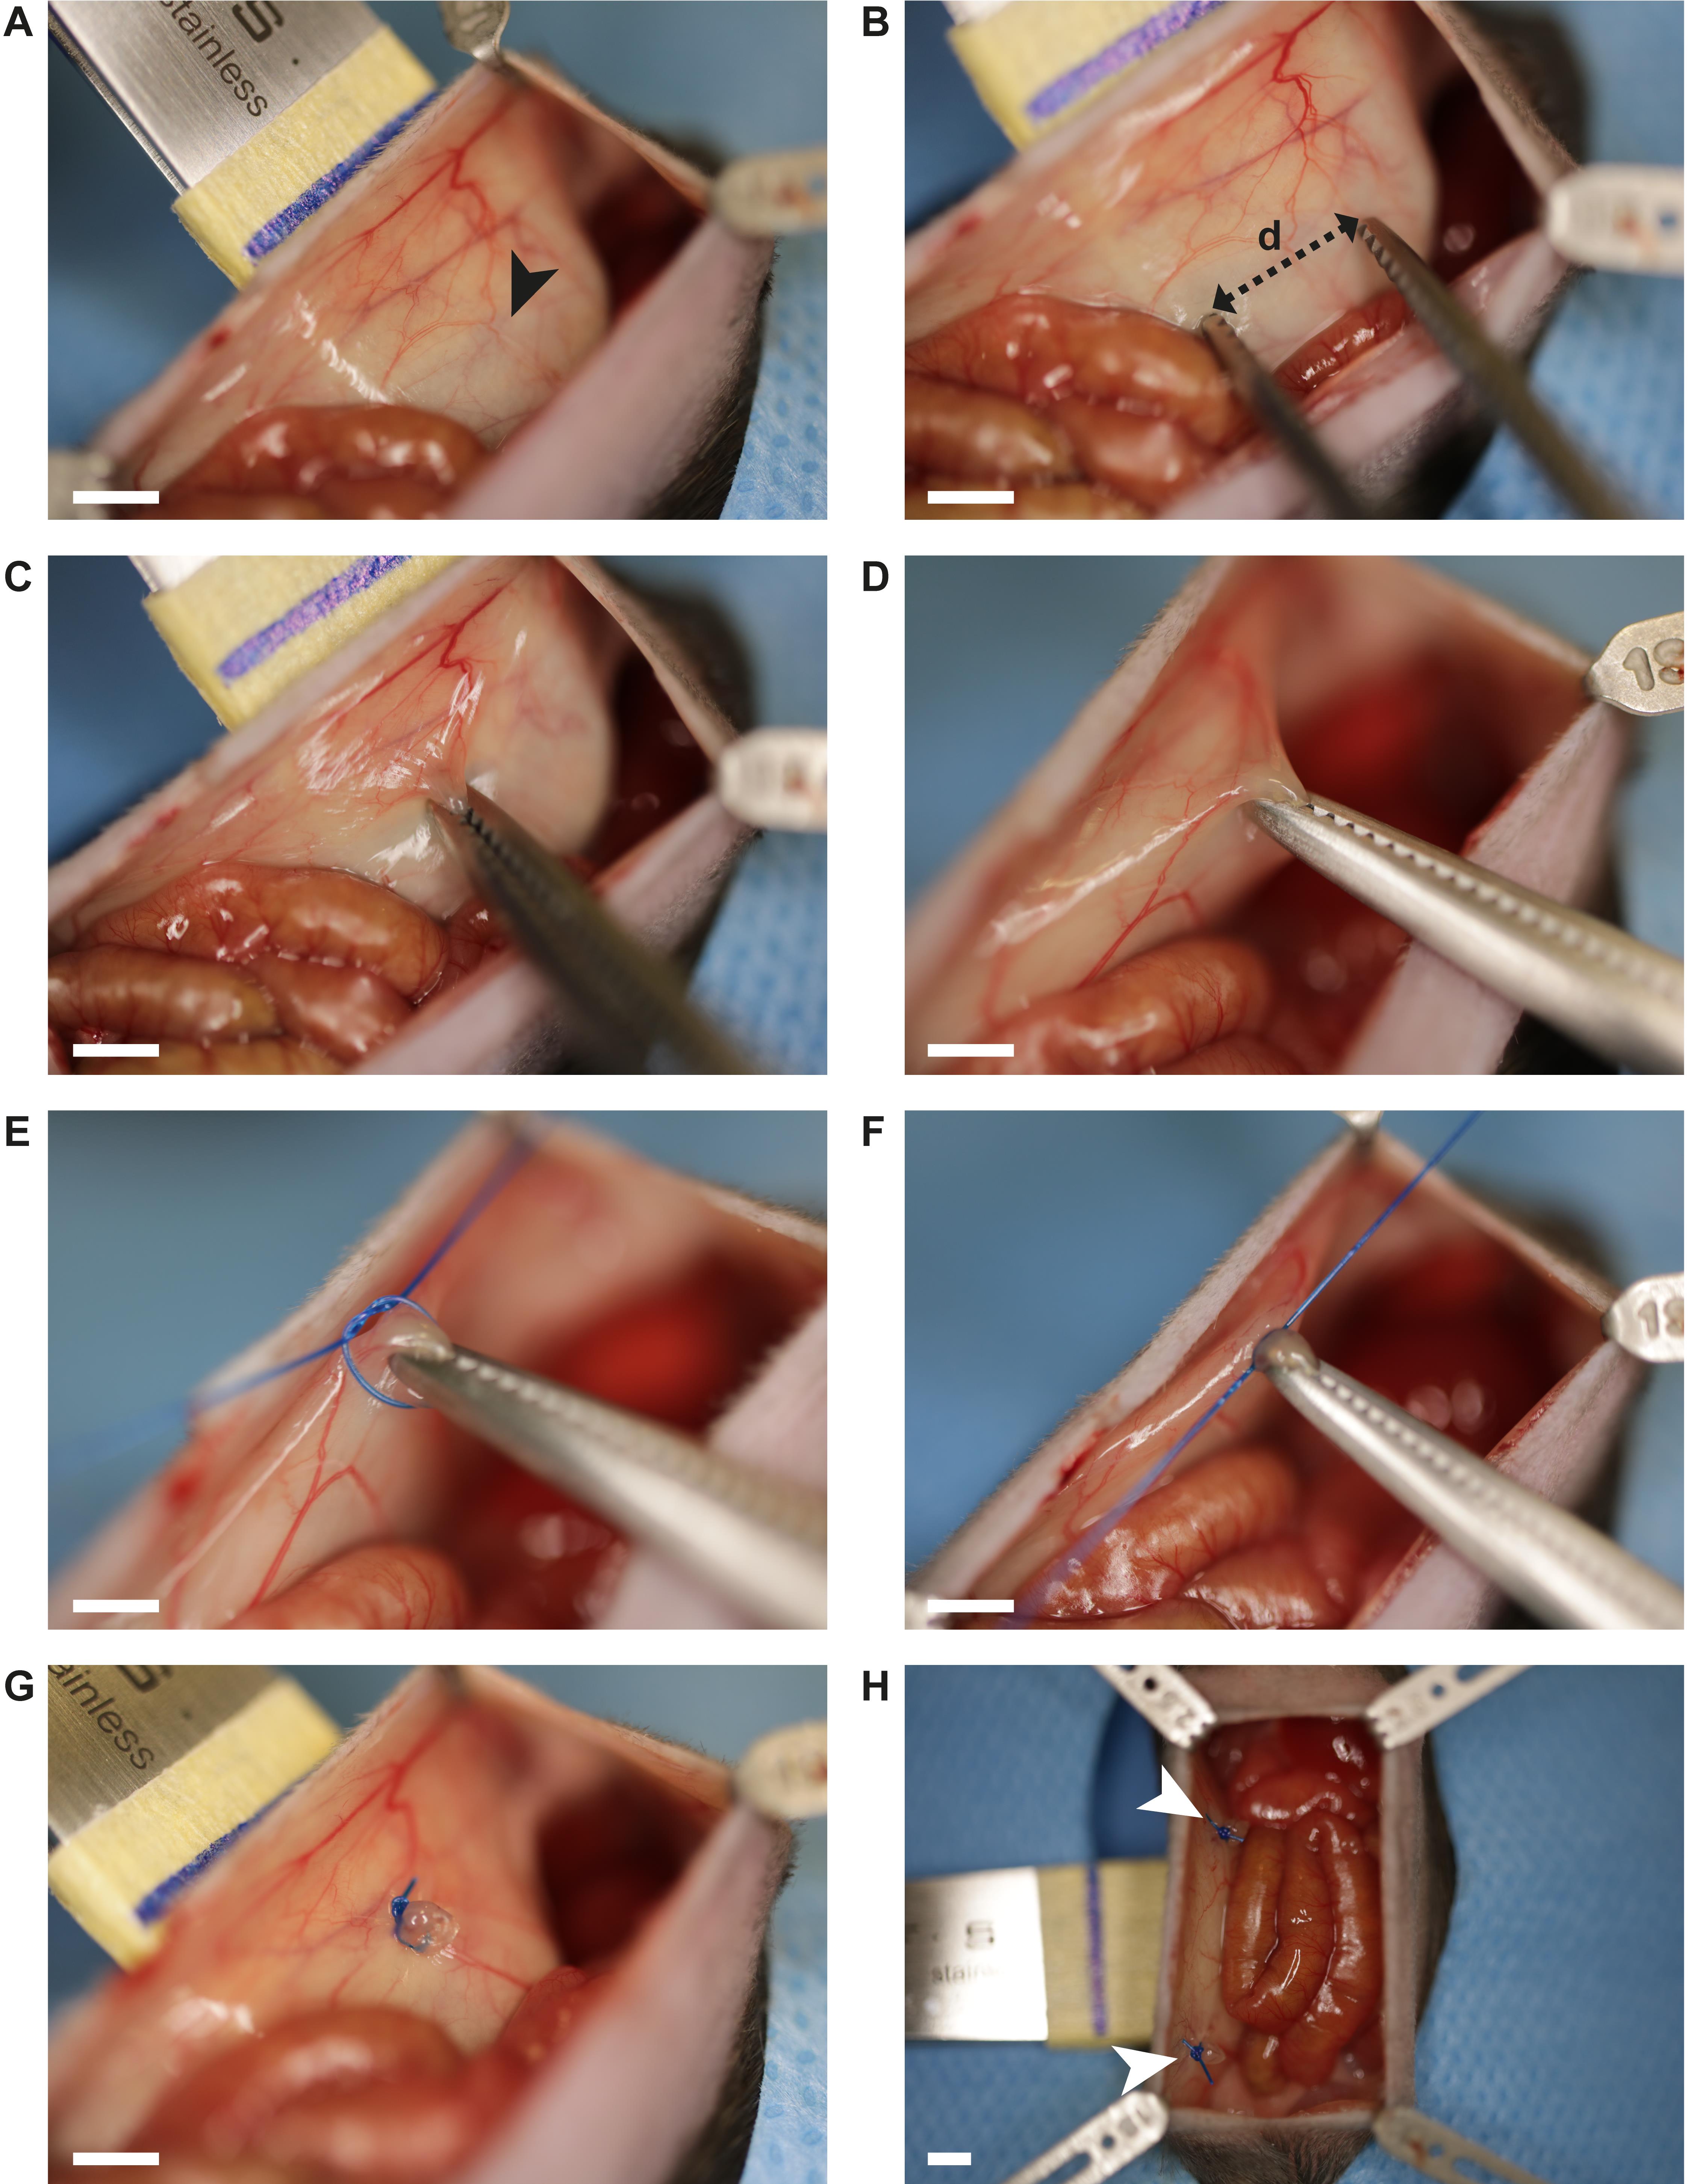
Figure 4. Surgical peritoneal button formation. A. Gently pressing the handle of the Adson forceps against the abdominal wall allows access to the peritoneum. Distance marks (black arrow, blue line) support standardized peritoneal button formation. B. The hemostat is used to clamp a 5 mm section (distance d) of the peritoneal wall. C. Clamped peritoneum portion. D. Gentle retraction of the hemostat ensures good access for suture tying. E–F. Three consecutive surgical knots are created at the base of the clamped peritoneum portion using a polypropylene suture 4-0. G. Peritoneal button in the upper right quadrant. H. Two out of four peritoneal buttons are displayed (white arrows). Scale bar (A–H): 2.5 mm.
Figure 5. Surgical cecal ligation and puncture. A. Exteriorized cecum. B–C. Cecal ligation is performed at 2 mm distance (distance d) from the apex ceci using a polyglactin 910 suture 4-0. Three consecutive surgical knots are utilized. D. Perforation of the ligated cecum portion is achieved by a single through-and-through puncture using a 25 G needle. Abbreviations: ce = cecum. Scale bar (A–D): 2 mm.Module 3: Cecal slurry (CS) administration (Figure 1C)
Thaw frozen CS in 37 °C water bath.
Mix CS thoroughly.
Optional: Heat inactivation of CS is performed by 20 min incubation at 72 °C.
Administer 100 μL CS (native or heat-inactivated) or the respective control directly into the open peritoneal cavity using a 1 mL syringe or a P200 pipette.
Note: Fluid volumes of up to 100 μL can usually be pipetted into the peritoneal cavity without compromising the subsequent closure of the abdominal cavity. If this approach leads to contamination of the surgical incision site, CS can also be administered using a 0.5 mL insulin-50 syringe after closing the abdominal wall.
Carefully remove retractors.
Wound closure
Close the muscular peritoneal wall and the skin with an all-layer running suture (polypropylene suture 6-0, (suture tying) forceps, needle holder).
Note: The integrity of this running suture and the respective knots is absolutely paramount. Suture failure can lead to wound infection or a burst abdomen resulting in significant suffering and death. We recommend formal small rodent surgery training for all investigators prior to commencing experiments.
Post-surgical monitoring
Carefully remove the fixation tape and the nose cone.
Place the mouse back in its cage, which is placed on a heating pad.
Monitor mice according to the protocol approved by authorities. In our hands, pre-surgically untreated mice (C57BL/6 background) did not develop sepsis. Nonetheless, since sepsis might occur in the hands of others or when mice are treated with immunocompromising regimens prior to surgery, we strongly recommend monitoring for signs of sepsis [e.g., murine sepsis score (Shrum et al., 2014)], in addition to a standard pain score sheet.
Adhesion assessment (post-surgical day 7)
Work space preparations:
Clean work surface with 70% ethanol.
Cover work surface with surgical drapes.
Prepare autoclaved surgical instruments, fresh cellulose swaps, and surgical tape.
Weigh mouse and note down body weight.
Anesthetize mouse by s.c. injection of Triple mix (see Recipes, dosage for terminal experiments 6 μL/g body weight) using a 0.5 mL insulin-50 syringe.
Assess anesthetic depth by toe and eye reflex approximately 15 min after injection. As soon as reflexes are lost, the mouse can be transferred to the surgical drape.
Turn the mouse on its dorsal side and fixate the extremities with surgical tape to ensure proper tension.
Apply 70% ethanol to disinfect the abdominal skin using cellulose swap.
Expose the peritoneum around the midline suture by removing the skin from the parietal side towards the midline with a U-shape incision (surgical scissors, Adson forceps).
Access the abdominal cavity using an inverted U-shape incision (fine scissors, blunted forceps).
Note: Use different sets of surgical instruments for steps E7 and E8 to keep the abdominal cavity free of hair.
Adhesions (Figure 6A–F) are scored by two different observers according to the selected adhesion scoring method, in this case the peritoneal adhesion index (PAI) scheme (Figure 1D, Table 1). The PAI score is a composite score based on previously published adhesion scores evaluating adhesion tenacity and vascularization (Mazuji, 1964; Nair, 1974; Zühlke et al., 1990; Coccolini et al., 2013). The total PAI aggregates the individual adhesion scores from six separate locations: PB 1st quadrant, PB 2nd quadrant, PB 3rd quadrant, PB 4th quadrant, midline incision, and interintestinal. Each location score ranges from grade 0 (minimum) to grade 4 (maximum). Consequently, the total PAI per mouse can attain values from 0 (minimum) to 24 (maximum). In Figure 6A–F examples of adhesions assessed at post-surgery day 7 are displayed:
Grade 0: no adhesion (Figure 6A)
Grade 1: flimsy adhesion (Figure 6B)
Grade 2: dense adhesion (Figure 6C)
Grade 3: fibrotic and vascularized adhesion (Figure 6D)
Grade 4: complete adhesion (Figure 6E–F)
If required, tissue biopsies, such as peritoneal buttons and peritoneal adhesions, can be collected for further investigation, for example histological analyses or flow cytometry.

Figure 6. Peritoneal adhesion assessment using the peritoneal adhesion index (PAI). A. Peritoneal button (white arrow) is free and covered with mesothelium. Corresponds to grade 0 of the PAI scale. B. A flimsy adhesion connects the peritoneal button (white arrow) to the omentum, but separates spontaneously during the process of peritoneal cavity opening. Corresponds to grade 1 of the PAI scale. C. A dense adhesion connects the peritoneal button (white arrow) to the omentum and separates bluntly without bleeding. Corresponds to grade 2 of the PAI scale. D. A fibrotic and slightly vascularized adhesion connects the peritoneal button (white arrow) to the omentum. Upon dissection, bleeding occurs. Corresponds to grade 3 of the PAI scale. E. The peritoneal button (white arrow) is completely covered (only the suture reveals its location) by the adhesion connecting the mesentery to the abdominal wall. Corresponds to grade 4 of the PAI scale. F. A complete adhesion connects parts of the midline incision (black arrow) to peritoneal cavity organs, including cecum and intestine. Dissection results in organ damage. Corresponds to grade 4 of the PAI scale. Abbreviations: adh = adhesion; aw = abdominal wall; ce = cecum; in = intestine; me = mesentery; om = omentum. Scale bar (A-F): 1.5 mm.
Data analysis
Detailed information on data analyses are provided in the original, open-access publication (Zindel et al., 2021a). In brief, adhesions in mice that underwent the herein described surgical procedures (PB alone, CLP alone, PB + CLP, PB + CS) were assessed according to the PAI at post-surgical day 7. As shown in Figure 1d of the original research article, PB alone as well as CLP alone successfully induced peritoneal adhesions to similar extent. The combination of the two surgical procedures, PB and CLP, led to significantly higher peritoneal adhesion scores compared to when each procedure was applied individually. In Supplemental Figure 1e of the original research article it is shown that the combinations PB + CLP and PB + CS result in comparable peritoneal adhesion scores. In our recent publication (Zindel et al., 2021a), data represent independent animals per group (n). We generally used non-parametric tests (Wilcoxon) with correction for multiple testing using R. Multiple testing was corrected using Holm’s sequential Bonferroni post-hoc test, and p = 0.05 was considered as the threshold of significance.
Notes
In the related paper (Zindel et al., 2021a), only female mice were used. However, since then, we have started to use both female and male mice. Our data do not suggest a systematic difference in adhesion formation between sexes using this model. To reduce bias, we recommend training the procedures until a steady state (i.e., low standard deviation) in surgery time, adhesion index, or other quality indicators is reached. Mean (± SD) operation time for experienced surgeons was 12.3 (± 1.5) min for PB + CLP procedure and 10.6 (± 1.0) min for PB + CS procedure (unpublished data, n = 46 and n = 18 independent mice per group). Some variability in the resulting adhesion formation (adhesion index) will remain even for well-standardized investigators. In our hands, median (IQR) adhesion index was 10 (3) for PB + CLP and 9 (3.25) for PB + CS [reported in Zindel et al. (2021a) Figure 1d-e, Figure S1e].
Recipes
70% ethanol
Reagent Final concentration Amount Ethanol (absolute) 70% 700 mL ddH2O n/a 300 mL Total n/a 1000 mL Buprenorphine working solution (dosage = 0.1 mg/kg body weight)
Reagent Final concentration Amount Buprenorphine (0.3 mg/mL) 0.05 mg/mL 1 mL NaCl 0.9% n/a 5 mL Total n/a 6 mL Triple mix (dosage for terminal experiment = 6 μL/g body weight)
Reagent Final concentration Amount Fentanyl (0.05 mg/mL) 0.017 mg/mL 1 mL Midazolam (5 mg/mL) 1.7 mg/mL 1 mL Medetomidine (1 mg/mL)
Saline 0.9%
Total
0.17 mg/mL
n/a
n/a
0.5 mL
0.5 mL
3 mL
Acknowledgments
This work is based on our previous publication in Nature Communications (Zindel et al., 2021a). Funding was provided by Swiss National Science Foundation (P1BEP3_181641) and by an early career grant by the Department of Teaching and Research, Insel Gruppe AG. We thank T. Nussbaumer and R. Tombolini for the breeding and husbandry of mice. We further thank R. Tombolini for lab management and technical support with surgical models. We thank F. Baier for providing us with specialized camera equipment and technical instruction for surgery documentation. We thank A. Keogh for his linguistic support.
Competing interests
The authors declare no competing interests.
Ethics
Animal experiments in Switzerland were carried out in accordance with Swiss federal regulations and were approved by the cantonal committee on animal experimentation in Bern, Switzerland (BE 18/17 and BE 55/18). Animal experiments conducted in Canada were in accordance with Canadian legislation and policies and approved by the institutional animal care committee of the University of Calgary in Calgary, Canada (AC19-0148 JZ-PA).
References
- Bianchi, E., Boekelheide, K., Sigman, M., Lamb, D. J., Hall, S. J. and Hwang, K. (2016). Ghrelin ameliorates adhesions in a postsurgical mouse model. J Surg Res 201(1): 226-234.
- Coccolini, F., Ansaloni, L., Manfredi, R., Campanati, L., Poiasina, E., Bertoli, P., Capponi, M. G., Sartelli, M., Di Saverio, S., Cucchi, M., et al. (2013). Peritoneal adhesion index (PAI): proposal of a score for the "ignored iceberg" of medicine and surgery. World J Emerg Surg 8(1): 6.
- Dejager, L., Pinheiro, I., Dejonckheere, E. and Libert, C. (2011). Cecal ligation and puncture: the gold standard model for polymicrobial sepsis? Trends Microbiol 19(4): 198-208.
- Ellis, H., Moran, B. J., Thompson, J. N., Parker, M. C., Wilson, M. S., Menzies, D., McGuire, A., Lower, A. M., Hawthorn, R. J., O'Brien, F., et al. (1999). Adhesion-related hospital readmissions after abdominal and pelvic surgery: a retrospective cohort study. Lancet 353(9163): 1476-1480.
- Fatehi Hassanabad, A., Zarzycki, A. N., Jeon, K., Dundas, J. A., Vasanthan, V., Deniset, J. F. and Fedak, P. W. M. (2021). Prevention of Post-Operative Adhesions: A Comprehensive Review of Present and Emerging Strategies. Biomolecules 11(7).
- Fischer, A., Koopmans, T., Ramesh, P., Christ, S., Strunz, M., Wannemacher, J., Aichler, M., Feuchtinger, A., Walch, A., Ansari, M., et al. (2020). Post-surgical adhesions are triggered by calcium-dependent membrane bridges between mesothelial surfaces. Nat Commun 11(1): 3068.
- Hellebrekers, B. W. and Kooistra, T. (2011). Pathogenesis of postoperative adhesion formation. Br J Surg 98(11): 1503-1516.
- Huang, C. and Ding, D. C. (2019). Outcomes of adhesion barriers in gynecologic surgeries: A retrospective study at a medical center. Medicine (Baltimore) 98(50): e18391.
- Hubbard, W. J., Choudhry, M., Schwacha, M. G., Kerby, J. D., Rue, L. W., 3rd, Bland, K. I. and Chaudry, I. H. (2005). Cecal ligation and puncture. Shock 24 Suppl 1: 52-57.
- Kraemer, B., Wallwiener, C., Rajab, T. K., Brochhausen, C., Wallwiener, M. and Rothmund, R. (2014). Standardised models for inducing experimental peritoneal adhesions in female rats. Biomed Res Int 2014: 435056.
- Mazuji, M. K., Kalambaheti, K. and Pawar, B. (1964). Prevention Of Adhesions with Polyvinylpyrrolidone. Preliminary Report. Arch Surg 89: 1011-1015.
- Nair, S. K., Bhat, I. K. and Aurora, A. L. (1974). Role of proteolytic enzyme in the prevention of postoperative intraperitoneal adhesions. Arch Surg 108(6): 849-853.
- Oncel, M., Remzi, F. H., Connor, J. and Fazio, V. W. (2005). Comparison of cecal abrasion and multiple-abrasion models in generating intra-abdominal adhesions for animal studies. Tech Coloproctol 9(1): 29-33.
- Parker, M. C., Wilson, M. S., Menzies, D., Sunderland, G., Clark, D. N., Knight, A. D., Crowe, A. M., Surgical and Clinical Adhesions Research, G. (2005). The SCAR-3 study: 5-year adhesion-related readmission risk following lower abdominal surgical procedures. Colorectal Dis 7(6): 551-558.
- Rittirsch, D., Huber-Lang, M. S., Flierl, M. A. and Ward, P. A. (2009). Immunodesign of experimental sepsis by cecal ligation and puncture. Nat Protoc 4(1): 31-36.
- Sandoval, P., Jimenez-Heffernan, J. A., Guerra-Azcona, G., Perez-Lozano, M. L., Rynne-Vidal, A., Albar-Vizcaino, P., Gil-Vera, F., Martin, P., Coronado, M. J., Barcena, C., et al. (2016). Mesothelial-to-mesenchymal transition in the pathogenesis of post-surgical peritoneal adhesions. J Pathol 239(1): 48-59.
- Shrum, B., Anantha, R. V., Xu, S. X., Donnelly, M., Haeryfar, S. M., McCormick, J. K. and Mele, T. (2014). A robust scoring system to evaluate sepsis severity in an animal model. BMC Res Notes 7: 233.
- Sikirica, V., Bapat, B., Candrilli, S. D., Davis, K. L., Wilson, M. and Johns, A. (2011). The inpatient burden of abdominal and gynecological adhesiolysis in the US. BMC Surg 11: 13.
- Starr, M. E., Steele, A. M., Saito, M., Hacker, B. J., Evers, B. M. and Saito, H. (2014). A new cecal slurry preparation protocol with improved long-term reproducibility for animal models of sepsis. PLoS One 9(12): e115705.
- Strik, C., Wever, K. E., Stommel, M. W. J., Goor, H. V. and Ten Broek, R. P. G. (2019). Adhesion reformation and the limited translational value of experiments with adhesion barriers: A systematic review and meta-analysis of animal models. Sci Rep 9(1): 18254.
- ten Broek, R. P., Issa, Y., van Santbrink, E. J., Bouvy, N. D., Kruitwagen, R. F., Jeekel, J., Bakkum, E. A., Rovers, M. M. and van Goor, H. (2013). Burden of adhesions in abdominal and pelvic surgery: systematic review and met-analysis. BMJ 347: f5588.
- ten Broek, R. P. G., Stommel, M. W. J., Strik, C., van Laarhoven, C., Keus, F. and van Goor, H. (2014). Benefits and harms of adhesion barriers for abdominal surgery: a systematic review and meta-analysis. Lancet 383(9911): 48-59.
- Tsai, J. M., Sinha, R., Seita, J., Fernhoff, N., Christ, S., Koopmans, T., Krampitz, G. W., McKenna, K. M., Xing, L., Sandholzer, M., et al. (2018). Surgical adhesions in mice are derived from mesothelial cells and can be targeted by antibodies against mesothelial markers. Sci Transl Med 10(469).
- van Goor, H. (2007). Consequences and complications of peritoneal adhesions. Colorectal Dis 9 Suppl 2: 25-34.
- Whang, S. H., Astudillo, J. A., Sporn, E., Bachman, S. L., Miedema, B. W., Davis, W. and Thaler, K. (2011). In search of the best peritoneal adhesion model: comparison of different techniques in a rat model. J Surg Res 167(2): 245-250.
- Zindel, J., Mittner, J., Bayer, J., April-Monn, S. L., Kohler, A., Nusse, Y., Dosch, M., Buchi, I., Sanchez-Taltavull, D., Dawson, H., et al. (2021a). Intraperitoneal microbial contamination drives post-surgical peritoneal adhesions by mesothelial EGFR-signaling. Nat Commun 12(1): 7316.
- Zindel, J., Peiseler, M., Hossain, M., Deppermann, C., Lee, W. Y., Haenni, B., Zuber, B., Deniset, J. F., Surewaard, B. G. J., Candinas, D., et al. (2021b). Primordial GATA6 macrophages function as extravascular platelets in sterile injury. Science 371(6533).
- Zühlke, H. V., Lorenz, E. M., Straub, E. M. and Savvas, V. (1990). [Pathophysiology and classification of adhesions]. Langenbecks Arch Chir Suppl II Verh Dtsch Ges Chir. 1009-16. German.
- Zwicky, S. N., Stroka, D. and Zindel, J. (2021). Sterile Injury Repair and Adhesion Formation at Serosal Surfaces. Front Immunol 12: 684967.
Article Information
Copyright
© 2022 The Authors; exclusive licensee Bio-protocol LLC.
How to cite
Bayer, J., Stroka, D., Kubes, P., Candinas, D. and Zindel, J. (2022). Combination of Sterile Injury and Microbial Contamination to Model Post-surgical Peritoneal Adhesions in Mice. Bio-protocol 12(16): e4491. DOI: 10.21769/BioProtoc.4491.
Category
Immunology > Animal model > Mouse
Biological Sciences > Biological techniques
Do you have any questions about this protocol?
Post your question to gather feedback from the community. We will also invite the authors of this article to respond.