


- Protocols

- Articles and Issues
- For Authors
- About
- Become a Reviewer


Versatile Dual Mounting Enables Larval Zebrafish Imaging Across Microscope Configurations

Published: Vol 16, Iss 11, Jun 5, 2026 DOI: 10.21769/BioProtoc.5709 Views: 293
Reviewed by: Alberto RissoneIvonne SehringAnonymous reviewer(s)
 PDF
PDF  Ask a question
Advertisement



Protocol Collections
Comprehensive collections of detailed, peer-reviewed protocols focusing on specific topics




Abstract
Larval zebrafish are often mounted laterally to ensure consistent anatomical positioning and to standardize imaging of body axes across early development. However, this conventional approach often tethers sample orientation to a single microscope configuration and limits optical accessibility. We present a mounting protocol for larval zebrafish that enables optical access from both dorsal and ventral orientations while preserving lateral sample position. This approach uses common laboratory consumables to establish a mounting platform that eliminates any need to remount samples between the use of upright and inverted microscopes. By establishing a hydrophobic seal, mounted embryos can be inverted with ease to access the sample from either orientation. A seamless transition here facilitates reliable identification and longitudinal tracking of the same biological region of interest across microscope configurations. This protocol is broadly applicable to live imaging experiments requiring flexibility in imaging geometry, minimal sample handling, and high reproducibility.
Key features
• Dual-configuration mounting setup can be established from standard, low-cost consumables in any laboratory setting.
• Preserves lateral mounting in agarose for consistent anatomical positioning and experimental continuity.
• Enables seamless transition between upright and inverted microscopes without the need for specimen remounting.
Keywords: Zebrafish Larvae
Mounting
Inverted
Upright
Microscopy
Larvae
Mounting
Inverted
Upright
Microscopy
Graphical overview
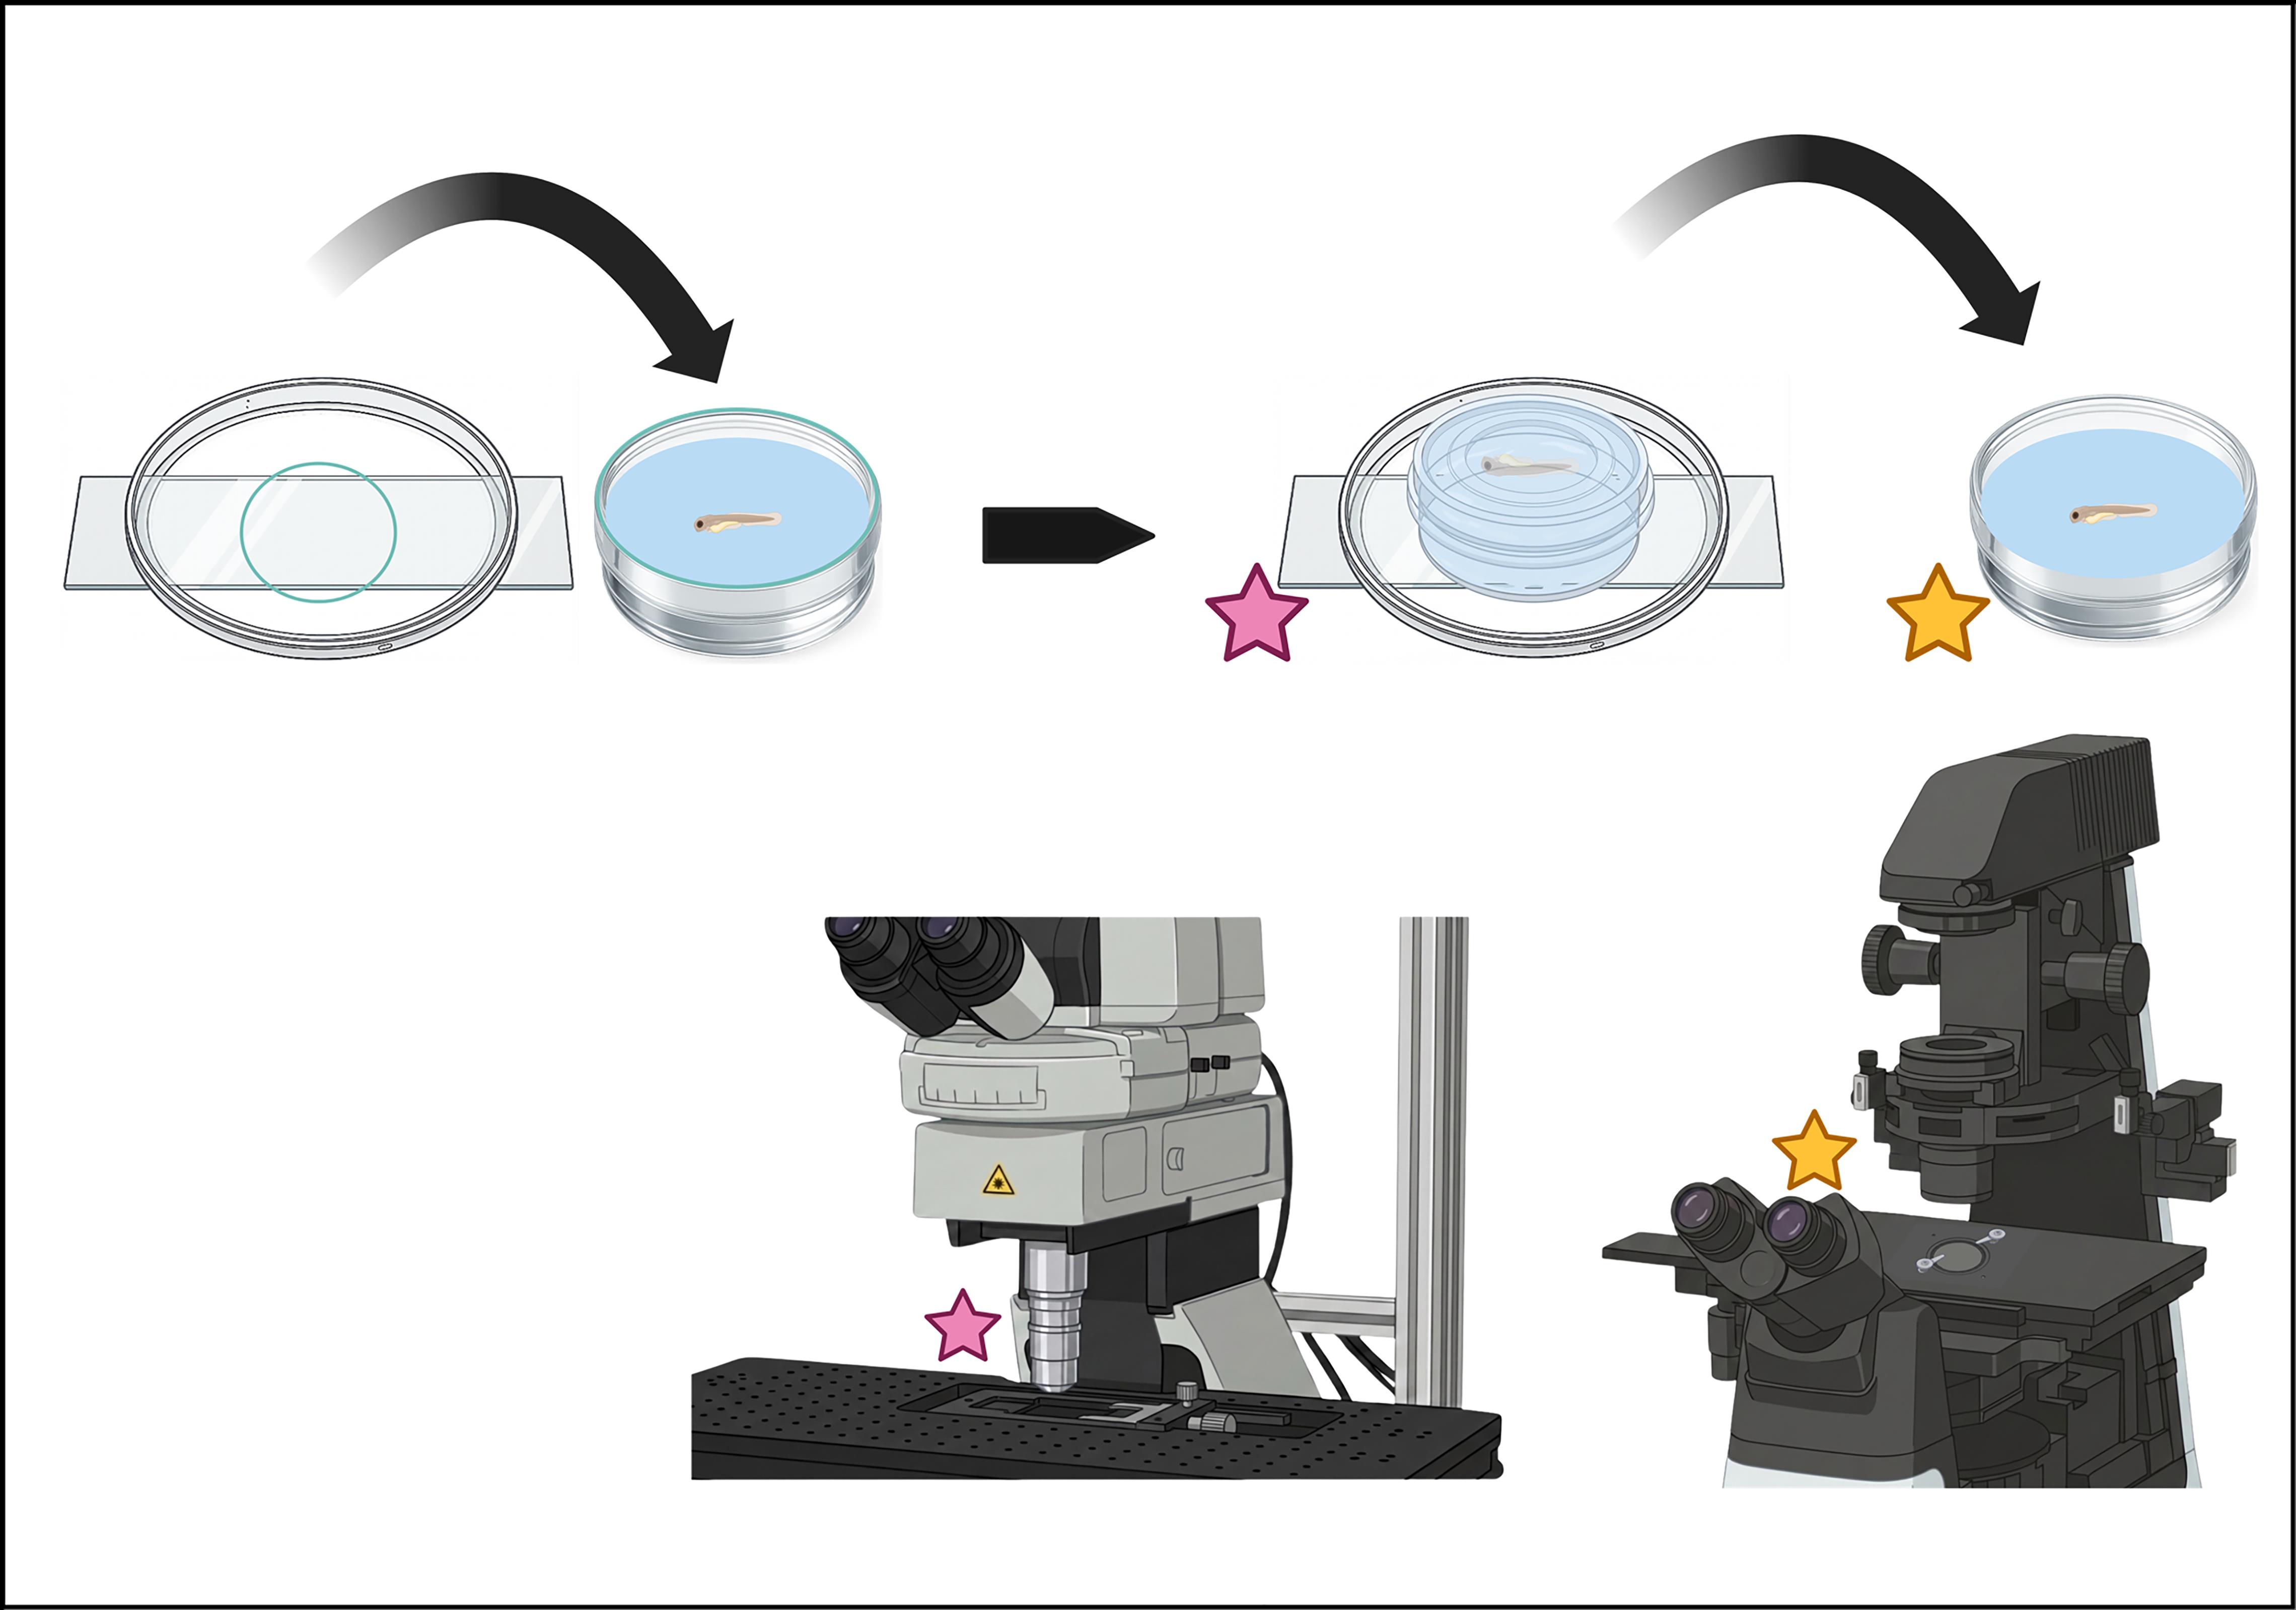
Dual-mounting configuration to transition between upright and inverted microscopes
Background
Zebrafish (Danio rerio) have become a widely popular vertebrate model organism given their early larval transparency, highly conserved genome with humans, external embryo fertilization, and rapid development compared to other vertebrates. These features position zebrafish as a well-suited model for in vivo observations across fields like developmental biology, neuroscience, genetics, and toxicology [1,2]. This has enabled their use as a robust predictive model for teratogenicity, with morphometric profiling of development offering insights into chemical-specific consequences and modes of action conserved across vertebrates [3]. More broadly, many modern experimental paradigms integrate different imaging modalities with genetic manipulations and behavioral assays to both influence and capture biological dynamics with larval zebrafish in real time [4]. However, fully exploiting these capabilities with non-invasive imaging techniques often depends on mounting orientation and optical accessibility.
These practical constraints become particularly important when selecting optical imaging modalities that differ in penetration depth, speed, and configuration. Techniques like calcium imaging, photochemical conversion of fluorophores via targeted stimulation, optogenetics, and photoinduced ablation benefit from the advantages of multiphoton microscopy, including deeper penetration than in linear techniques like confocal imaging [5]. A great example involves the increased engineering of in vivo indicators to exploit the nonlinear physics of multiphoton excitation. Recent advancements have leveraged rhodopsin and calcium-based sensors to establish genetically encoded calcium (GECI) and voltage (GEVI) indicators across wavelengths that maximize photon capture and signal-to-noise ratio in deep tissue [6,7]. On the other hand, the faster imaging speeds, greater ease of setup, and robust optical sectioning provided by linear microscopes, specifically confocal systems, are especially useful when imaging rapid biological dynamics where temporal resolution and precision in optical sectioning are required [8]. Combining both approaches can integrate the depth of multiphoton penetration while maintaining the rapid visualization and temporal resolution provided by confocal imaging, but the ease of use with larval embryos can be limited by opposing microscope objective orientations. Though varying modalities can be integrated into a single system, like the addition of a photostimulation laser to a spinning-disk confocal system, doing so often entails substantial cost and complexity.
Traditional lateral mounting for inverted imaging positions larval zebrafish against the bottom of a glass-bottom imaging dish, secured with a mound of agarose. This configuration allows for clear visibility of anterior–posterior axis development in zebrafish and helps to standardize anatomical positioning across samples. However, because the imaging dish is filled with liquid and embryos are fixed against the bottom of the dish, optimal accessibility is limited to imaging through the glass from below. Observation from above, as with top-down microscopes, is constrained by working distance limitations and obstruction from the mounting agar and anesthetic solution. This restricts flexibility across microscope geometries, as samples can only be imaged with the shortest optical distance from one side. Additionally, direct water immersion with the upright objective into the imaging dish risks damage to samples and mounting. The optical distance can be extended to target the region of interest across configurations without remounting, but this increases the limitations of multiphoton imaging in photobleaching, light scattering, and heat exposure [8]. Further, remounting samples can introduce variability in anatomical positioning, increase the required handling of anesthetized samples, and complicate the identification of the same biological region of interest for longitudinal assessment.
Here, we present a dual-configuration mounting model that enables easy transition across upright and inverted microscope geometries. This setup combines standard zebrafish mounting with a model constructed from common low-cost laboratory consumables to eliminate remounting across microscope configurations, supporting both upright and inverted imaging. Using a simple petroleum jelly assembly, we combine a 35 mm glass-bottom confocal imaging dish with a 60 mm Petri dish glued onto a microscope slide. This method successfully preserves the conventional lateral embryo positioning while enabling optical access from both upright and inverted perspectives to allow for rapid transition between imaging geometries. Ultimately, this configuration supports workflows that combine targeted interventions with long-term imaging and can be applied using any mounting orientation.
Materials and reagents
Biological materials
1. Tg(erbb3b:gal4)nkgsaizGFFD37A, Tg(UAS:eGFP)nkuasgfp1a, and Tg(olig2:dsRed2)vu19 zebrafish transgenic lines were used for mounting protocol validation [9,10].
Reagents
1. Instant Ocean salt (Instant Ocean, catalog number: 77780); store in an airtight container in a cool, dry place at room temperature (RT)
2. 3-Aminobenzoic acid ester (tricaine) (Pentair, catalog number: TRS1); store in an airtight container in a cool, dry place at RT
3. Tris (Tris[hydroxymethyl]aminomethane or Trimethamine) (Bio-Rad, catalog number: 1610716); store in an airtight container at RT
4. 1-Phenyl-2-thiourea (PTU) (Sigma, catalog number: P7629, CAS number: 103-85-5); store in an airtight container at RT, protected from light
5. Agarose, low gelling temperature (Sigma, catalog number: A94114); store in an airtight container at RT
Solutions
1. Egg water (see Recipes)
2. PTU stock solution (10×) (see Recipes)
3. PTU water (see Recipes)
4. Buffered tricaine methanesulfonate (MS-222) stock solution (see Recipes)
5. Anesthetic solution (see Recipes)
6. 0.8% low-gelling agarose (see Recipes)
Recipes
1. Egg water
| Reagent | Final concentration | Quantity or volume |
| Instant Ocean salt | 300 mg/L | 300 mg |
| Deionized H2O | – | 1 L |
2. PTU stock solution (10×)
| Reagent | Final concentration | Quantity or volume |
| PTU | 0.03% | 300 mg |
| Deionized H2O | – | 1 L |
3. PTU water
| Reagent | Final concentration | Quantity or volume |
| PTU 10× stock solution | 0.003% | 100 mL |
| Egg water | – | 900 mL |
4. MS-222 stock solution
| Reagent | Final concentration | Quantity or volume |
| Tricaine | 4 g/L | 4 g |
| Deionized H2O | – | up to 1 L |
| 1 M Tris (pH 9.0) | 21 mM | 21 mL |
5. Anesthetic solution
| Reagent | Final concentration | Quantity or volume |
| MS-222 stock solution | 4% | 400 μL |
| PTU water | 0.003% | 10 mL |
6. 0.8% low-gelling agarose
| Reagent | Final concentration | Quantity or volume |
| Low-gelling agarose | 0.8% | 8 mg |
| Egg water | – | 1 mL |
Laboratory supplies
1. Breeding tanks (Aquaneering, catalog number: ZHCT100)
2. Dumont Tweezers, pattern #5; 0.10 × 0.06 mm tip size (Roboz Surgical, catalog number: RS-5065)
3. 100 × 15 mm Petri dish (Falcon, catalog number: 351029)
4. 35 mm glass-bottom confocal dish, non-treated (Avantor, catalog number: 75856-746)
5. 60 mm Petri dish (Fisher, catalog number: FB0875713)
6. Disposable glass Pasteur pipettes (VWR, catalog number: 53283-916)
7. Pipette pump, 10 mL (Honbay, ASIN: B07P61YDXB)
8. Micro dissecting needle holder, 4 3/4’’ (Roboz Surgical, catalog number: RS-6061)
9. Insect pins 0.30 mm size 00 (Roboz Surgical, catalog number: RS-6081-30)
10. Glass microscope slides (Sail Brand, catalog number: 7105)
11. 50 mL borosilicate glass beaker (Maccx, catalog number: BKL050-012)
12. Borosilicate glass test tubes with autoclavable caps (ULAB, catalog number: UTT1009)
13. Petroleum jelly (Vaseline, catalog number: UNI34500)
14. Super glue (Krazy Glue, catalog number: KG58548R)
15. Wood applicator stick, 6” × 1/12” (Oxford Instruments, catalog number: ID 51-1625-0580)
16. Zeiss immersion W oil 2010 (Microscope World, catalog number: 444969-0000-000)
Equipment
1. Fisherbrand Basic 180 L Gravity Incubator (ThermoScientific)
2. ECLIPSE Ti2 (Nikon) equipped with a Dragonfly 200 high-speed confocal platform (Andor Oxford Instruments), a 40×/1.15 W APO LWD numerical aperture water immersion objective (Nikon), and a motorized stage (Applied Science Information)
3. Air-MP (Nikon), equipped with a 25×/1.10 W numerical aperture water immersion objective (Nikon), ProScan III motorized stage (Prior Scientific), Chameleon Vision II laser system (Coherent), and an HEC series Thermo-con cooling system (SMC)
Software and datasets
1. Fusion 2.6.0 (Andor Technology; 2026, license required)
2. Nikon Imaging Software, Elements Advanced Research 5.21.03 (Nikon; 2020, license required)
3. Imaris 11.0 (released 2025; license required)
Procedure
A. Obtain zebrafish embryos
Note: This section details the process of gathering embryos for use in microscopy experiments.
1. In the afternoon, prepare breeding tanks with a desired female-to-male ratio of 2:2.
2. The following morning, collect and store the freshly laid embryos in a Petri dish filled with egg water.
3. Rear embryos in a 28.7 °C incubator, replacing egg water with PTU at 24 h post-fertilization (hpf) to prevent the formation of pigmentation.
4. Manually dechorionate embryos with fine tip tweezers as needed by 48 hpf to preserve trunk linearity.
5. Keep embryos at 28.7 °C until the desired imaging time point, to ensure proper developmental pace [11].
B. Create mounting model
Note: This section outlines the creation of the dual-configuration mounting model for use across orientations with traditional mounting.
1. For compatibility with a standard microscope stage, use super glue to adhere the edge of a 60 mm Petri dish lid to a glass microscope slide (Figure 1). Let it cure for at least 10 min before use.
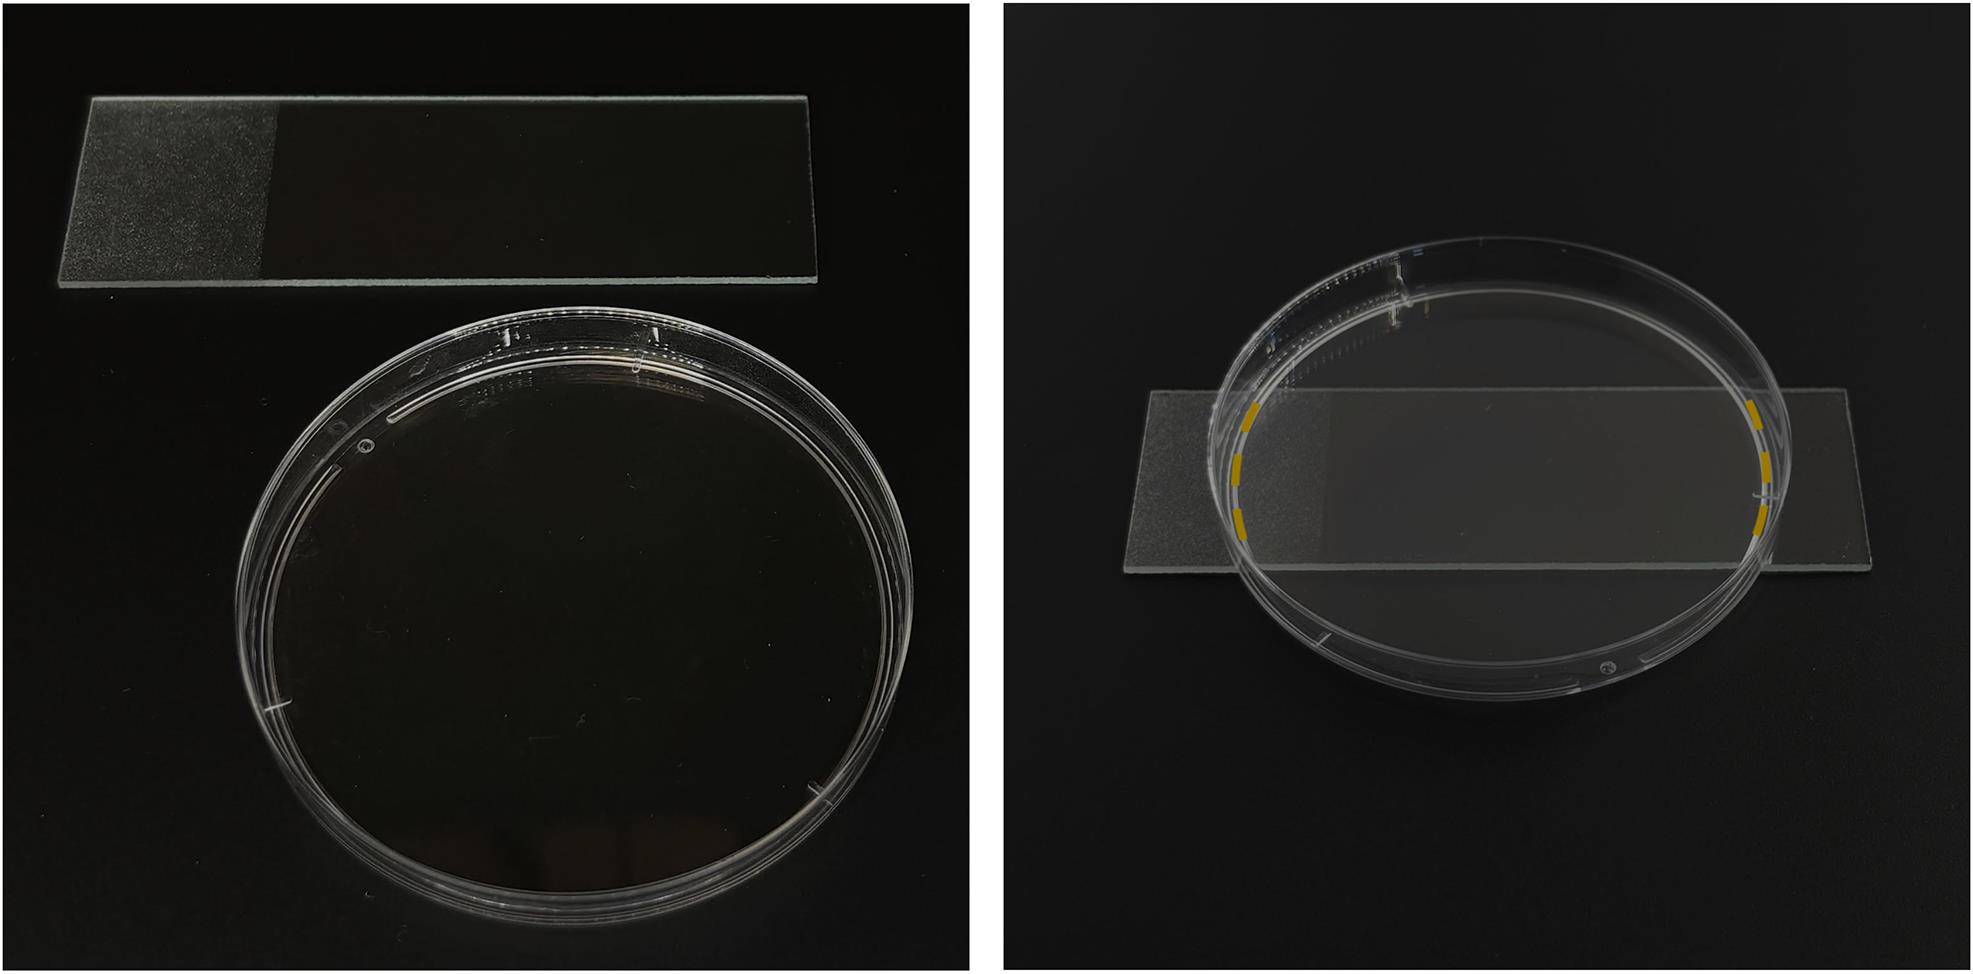
Figure 1. Assembly of the 60 mm Petri dish lid and glass slide (left) with super glue application along the dashed yellow lines (right)
Note: Modeling clay can be used as an alternative adaptation, ensuring that the Petri dish lies both as flat and as close to the glass slide as possible (Figure 2). However, if the microscope has an adjustable stage holder, the use of a glass slide is not necessary, and the 60 mm Petri dish lid can be directly accommodated.
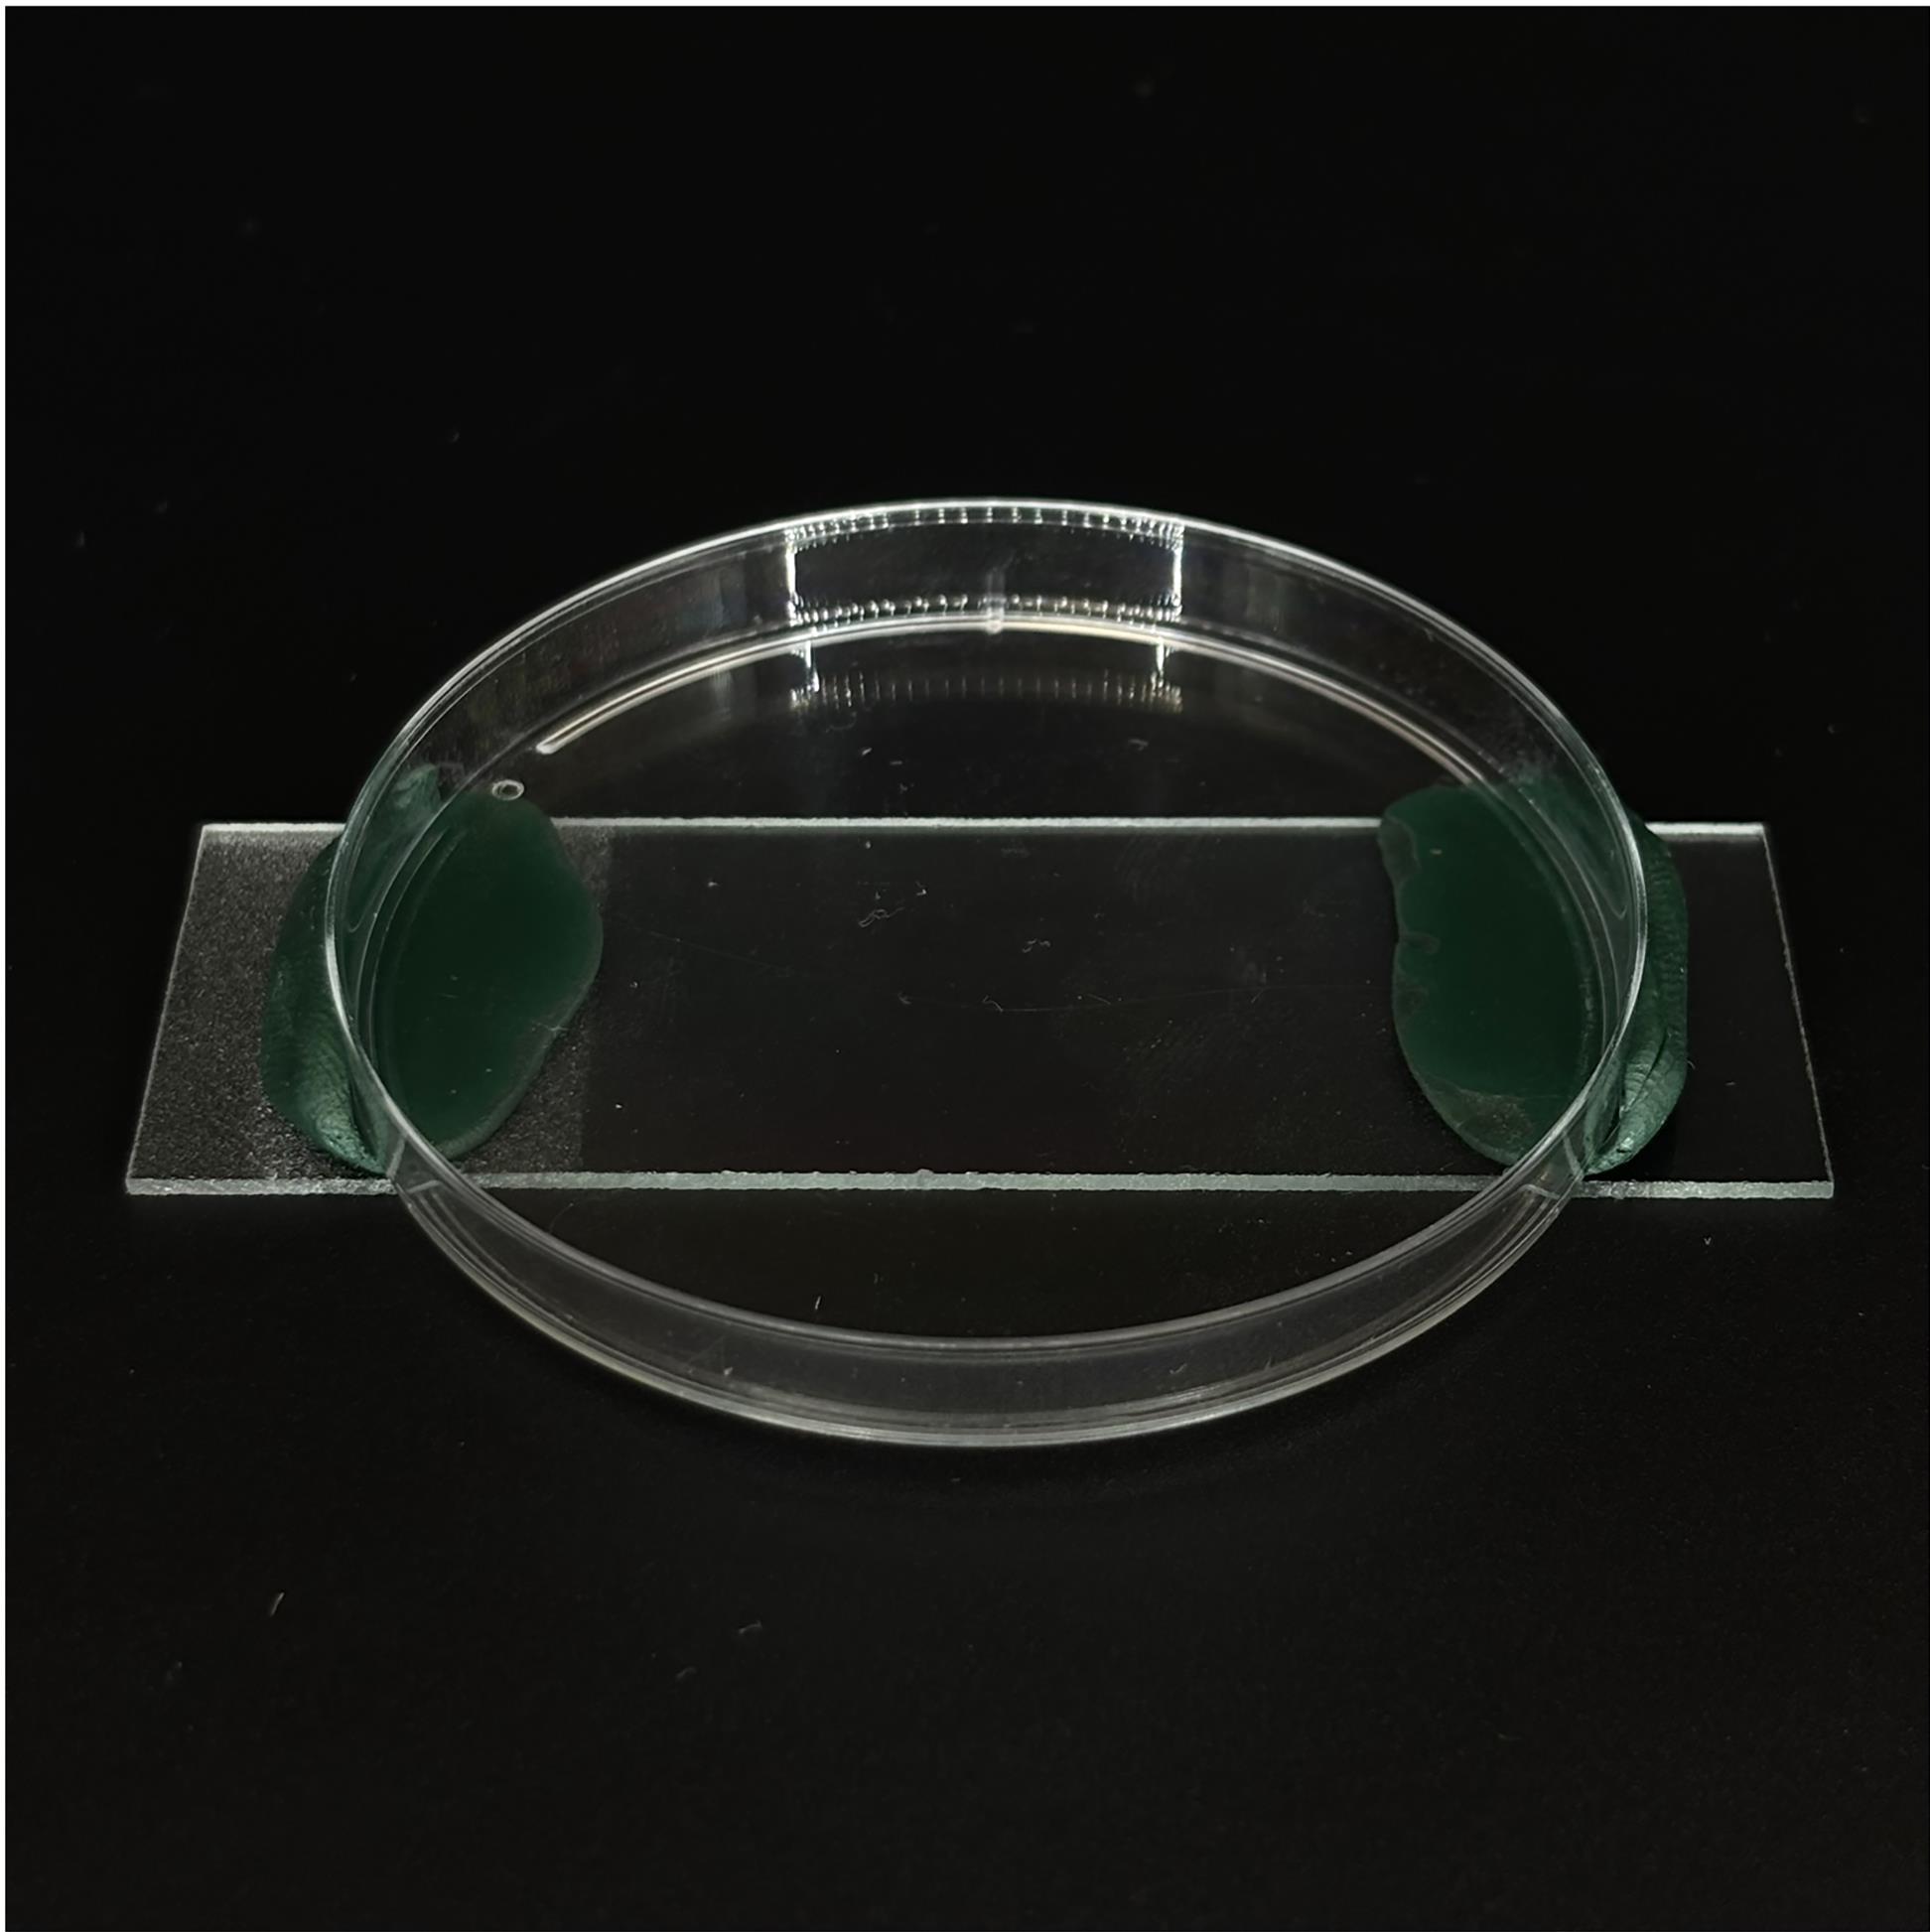
Figure 2. Alternative adherence of 60 mm Petri lid edges to a glass slide using modeling clay
2. Either by hand or with a wood applicator stick, line the rim of a 35 mm glass-bottom imaging dish to stamp a circle onto the 60 mm Petri dish lid (Figure 3). This will serve as a placement guide and reinforce the intended hydrophobic seal.
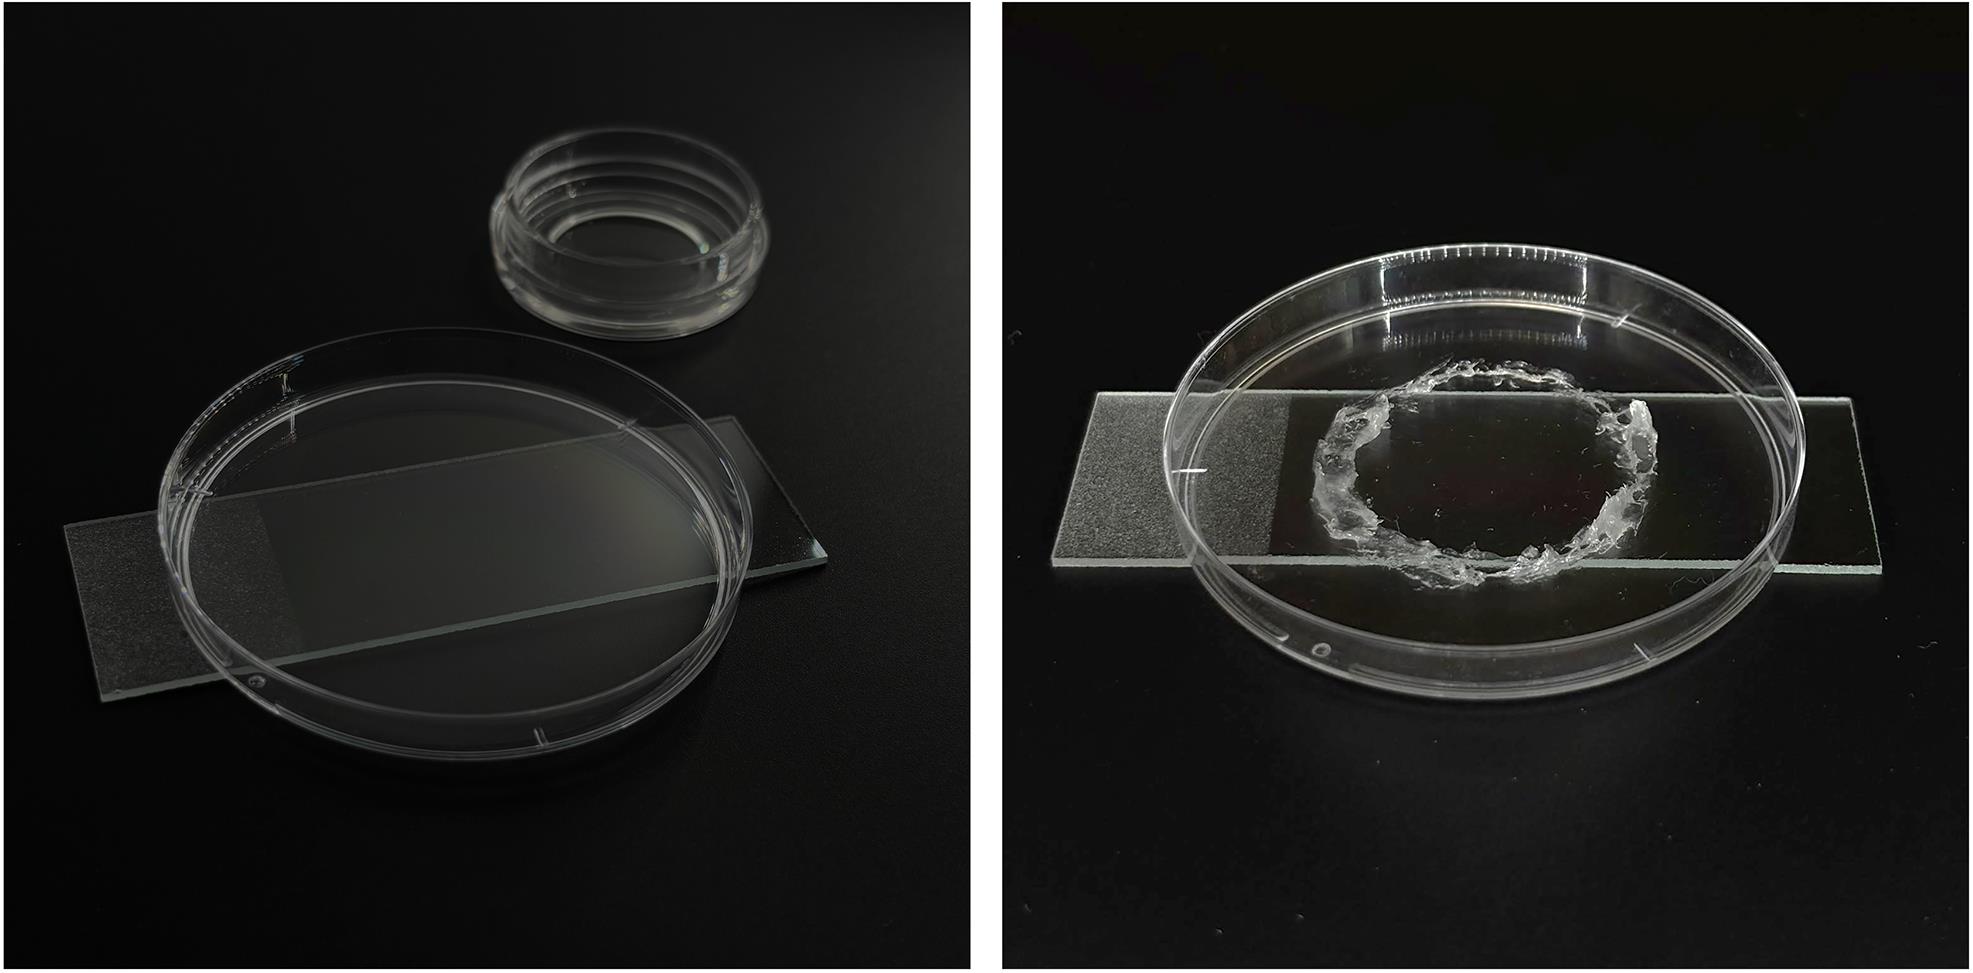
Figure 3. Mounting model and imaging dish (left) used to create a petroleum jelly reference stamp on the Petri dish lid (right)
C. Traditional mounting of embryos
Note: Here, the traditional mounting approach is detailed for the lateral orientation of zebrafish embryos.
1. Place embryos in a 4% anesthetic solution [12] for 5–10 min to ensure samples are immobilized.
2. Melt 0.8% low-gelling point agarose by heating the glass test tube in a water bath using a 50 mL beaker, microwaving in 15-s intervals.
3. Allow the agarose to cool until the glass tube can be held comfortably by hand but remains liquid.
4. Using a glass pipette attached to a pipette pump, transfer embryos into the cooled agarose and then to a 35 mm glass-bottom imaging dish.
5. Gently manipulate the embryos to a lateral orientation in the liquid agarose with a dissecting needle.
Note: Ensure that samples are flat against the glass surface to minimize the necessary working distance for imaging.
6. Allow agarose to set for 10–15 min.
7. Fill the 35 mm glass-bottom imaging dish to the very top with anesthetic solution.
D. Assemble with the mounting model
Note: The combination of the traditional mounting approach with the dual-configuration mounting model is outlined in this section.
1. Either by hand or with a wood applicator stick, line the rim of the 35 mm glass-bottom imaging dish with a thick layer of petroleum jelly (Figure 4).
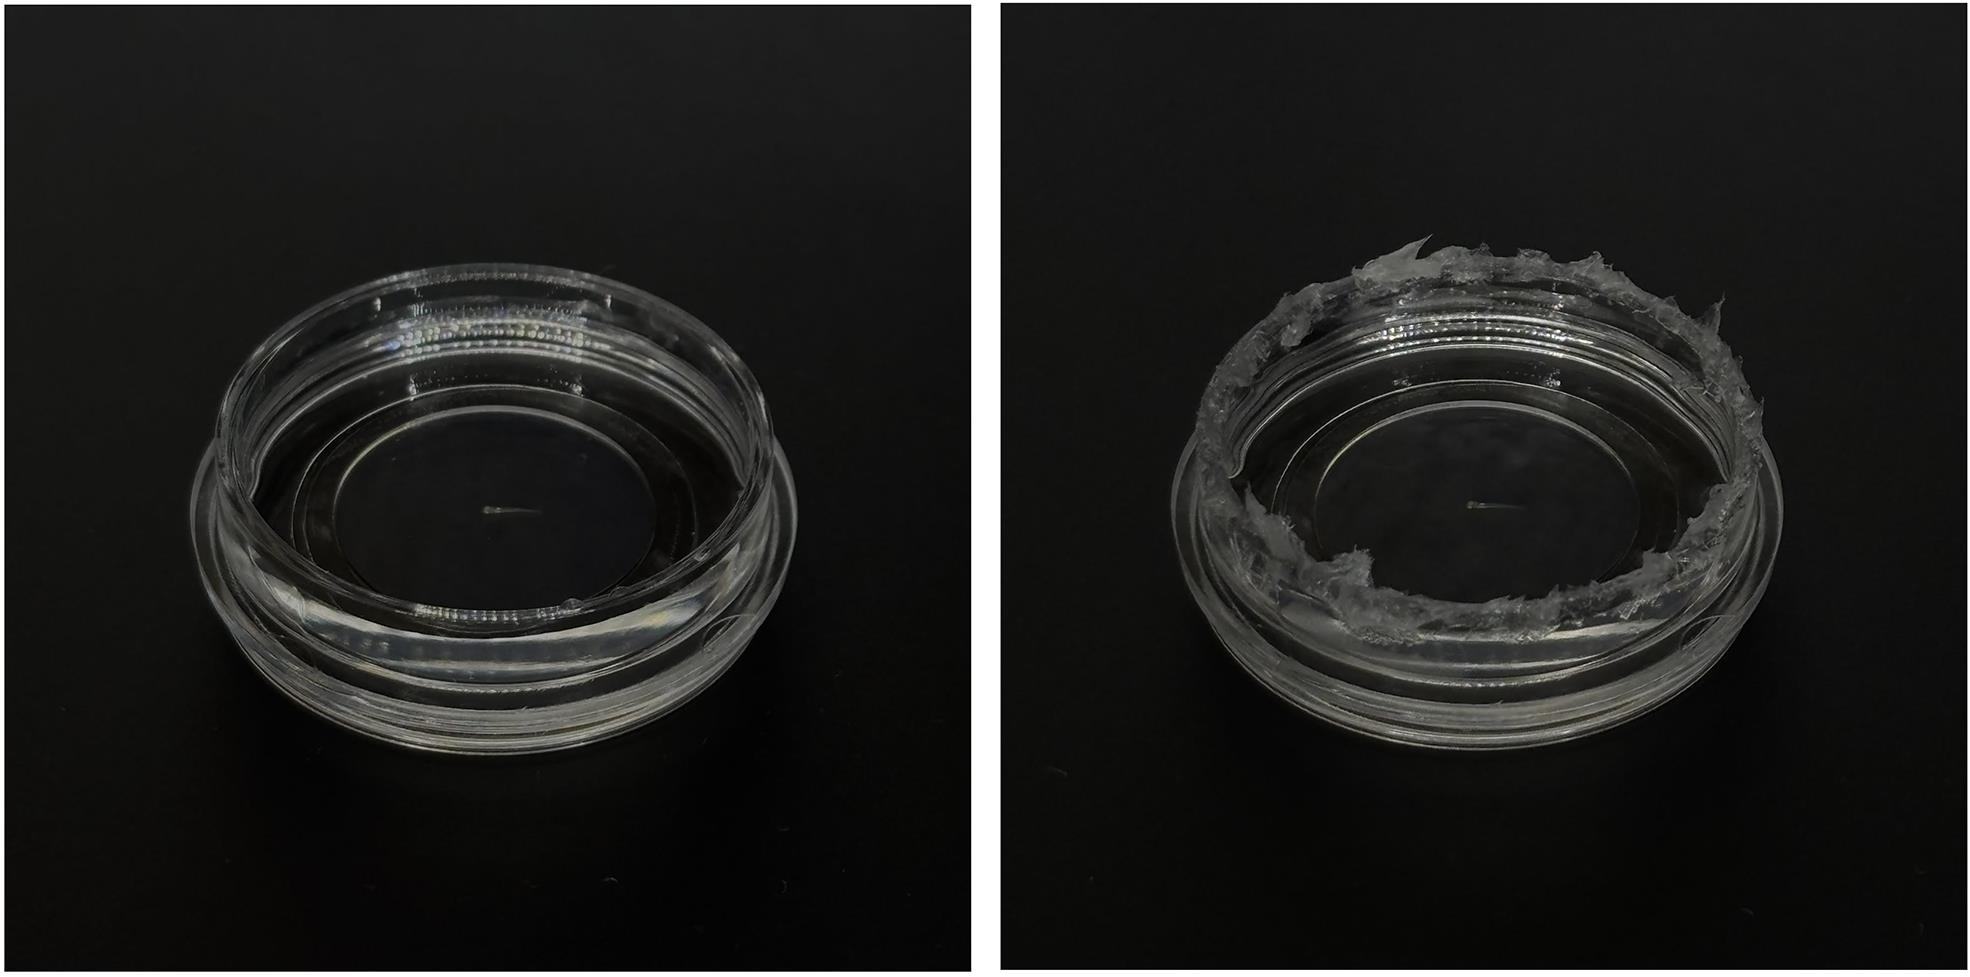
Figure 4. Glass-bottom imaging dish (left) lined with petroleum jelly (right)
2. Carefully fill the petroleum jelly–lined imaging dish to the very top with anesthetic solution.
3. Invert the dual-configuration mounting model 180° and align the petroleum ring with the petroleum jelly–lined confocal dish below. Press together to establish a hydrophobic seal (Figure 5).
Note: If there is a large air bubble, unseal the 35 mm glass-bottom confocal dish and fill with anesthetic solution until a convex meniscus forms. Then, reseal the mounting model.
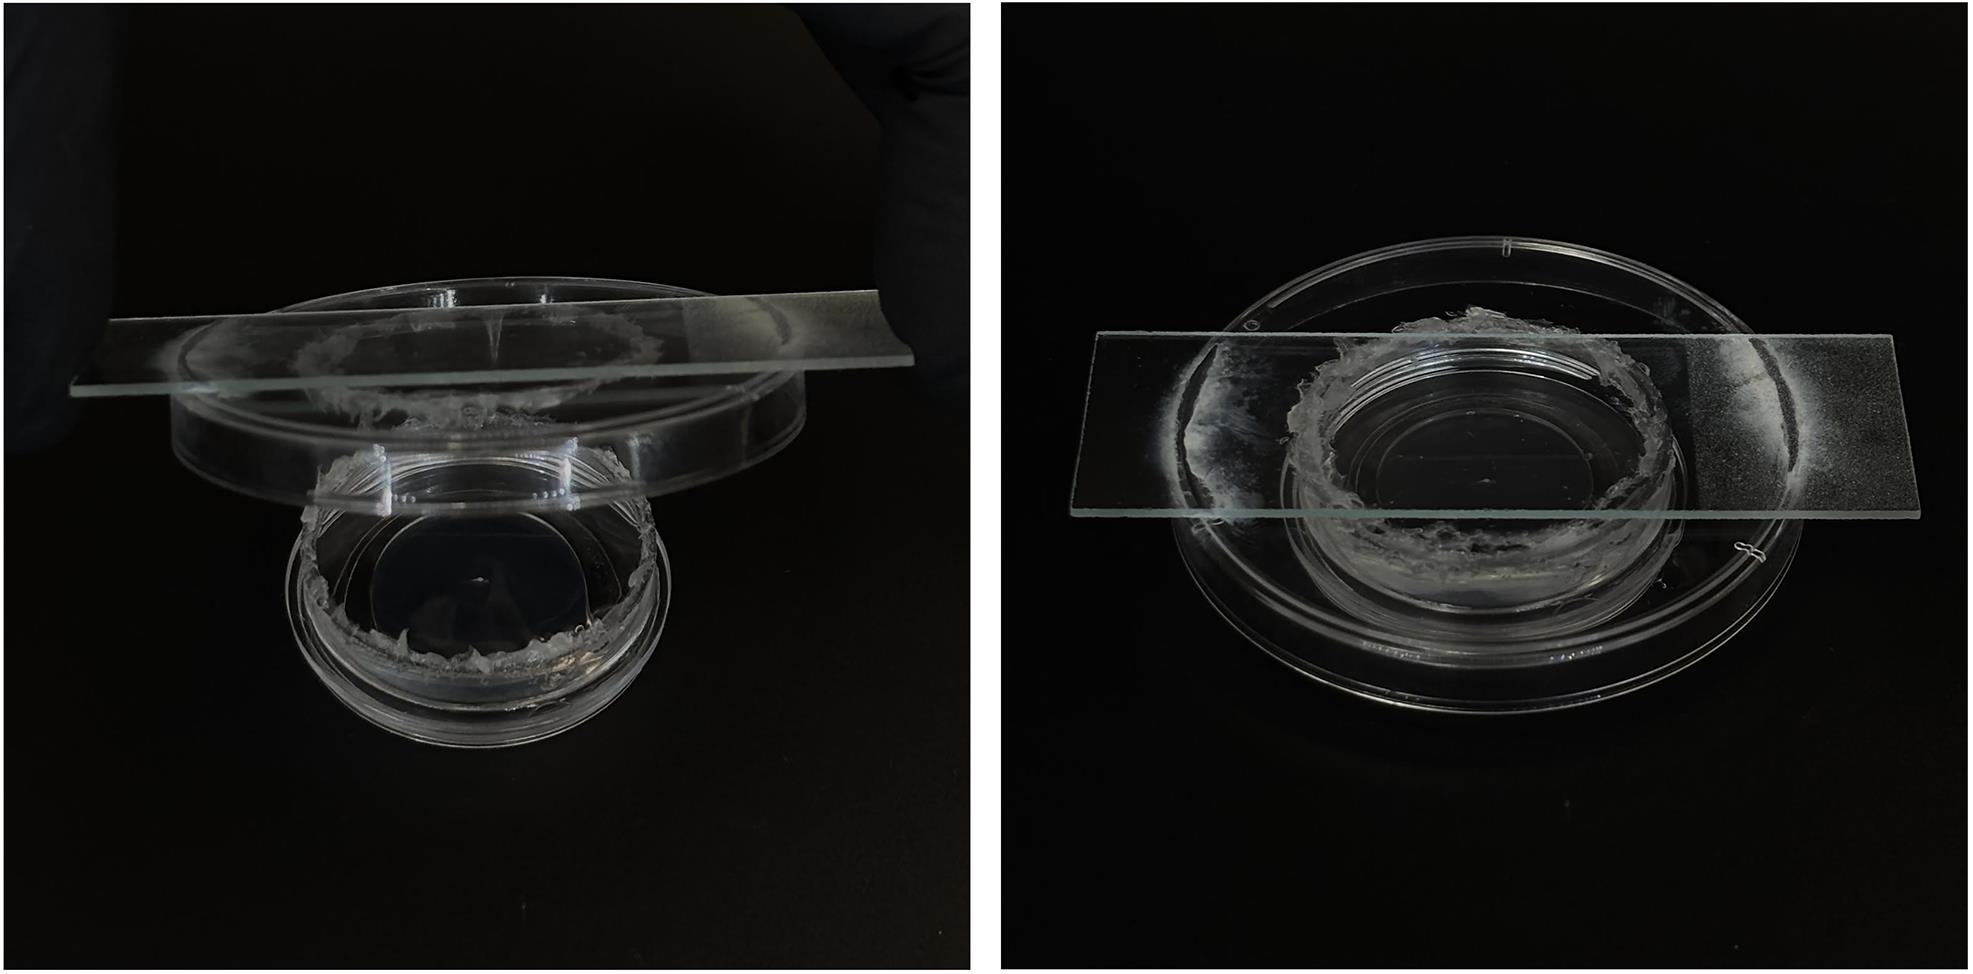
Figure 5. Placing the mounting model onto the imaging dish lined with petroleum jelly (left) to establish a hydrophobic seal (right)
4. Reinvert the mounting model (Figure 6).
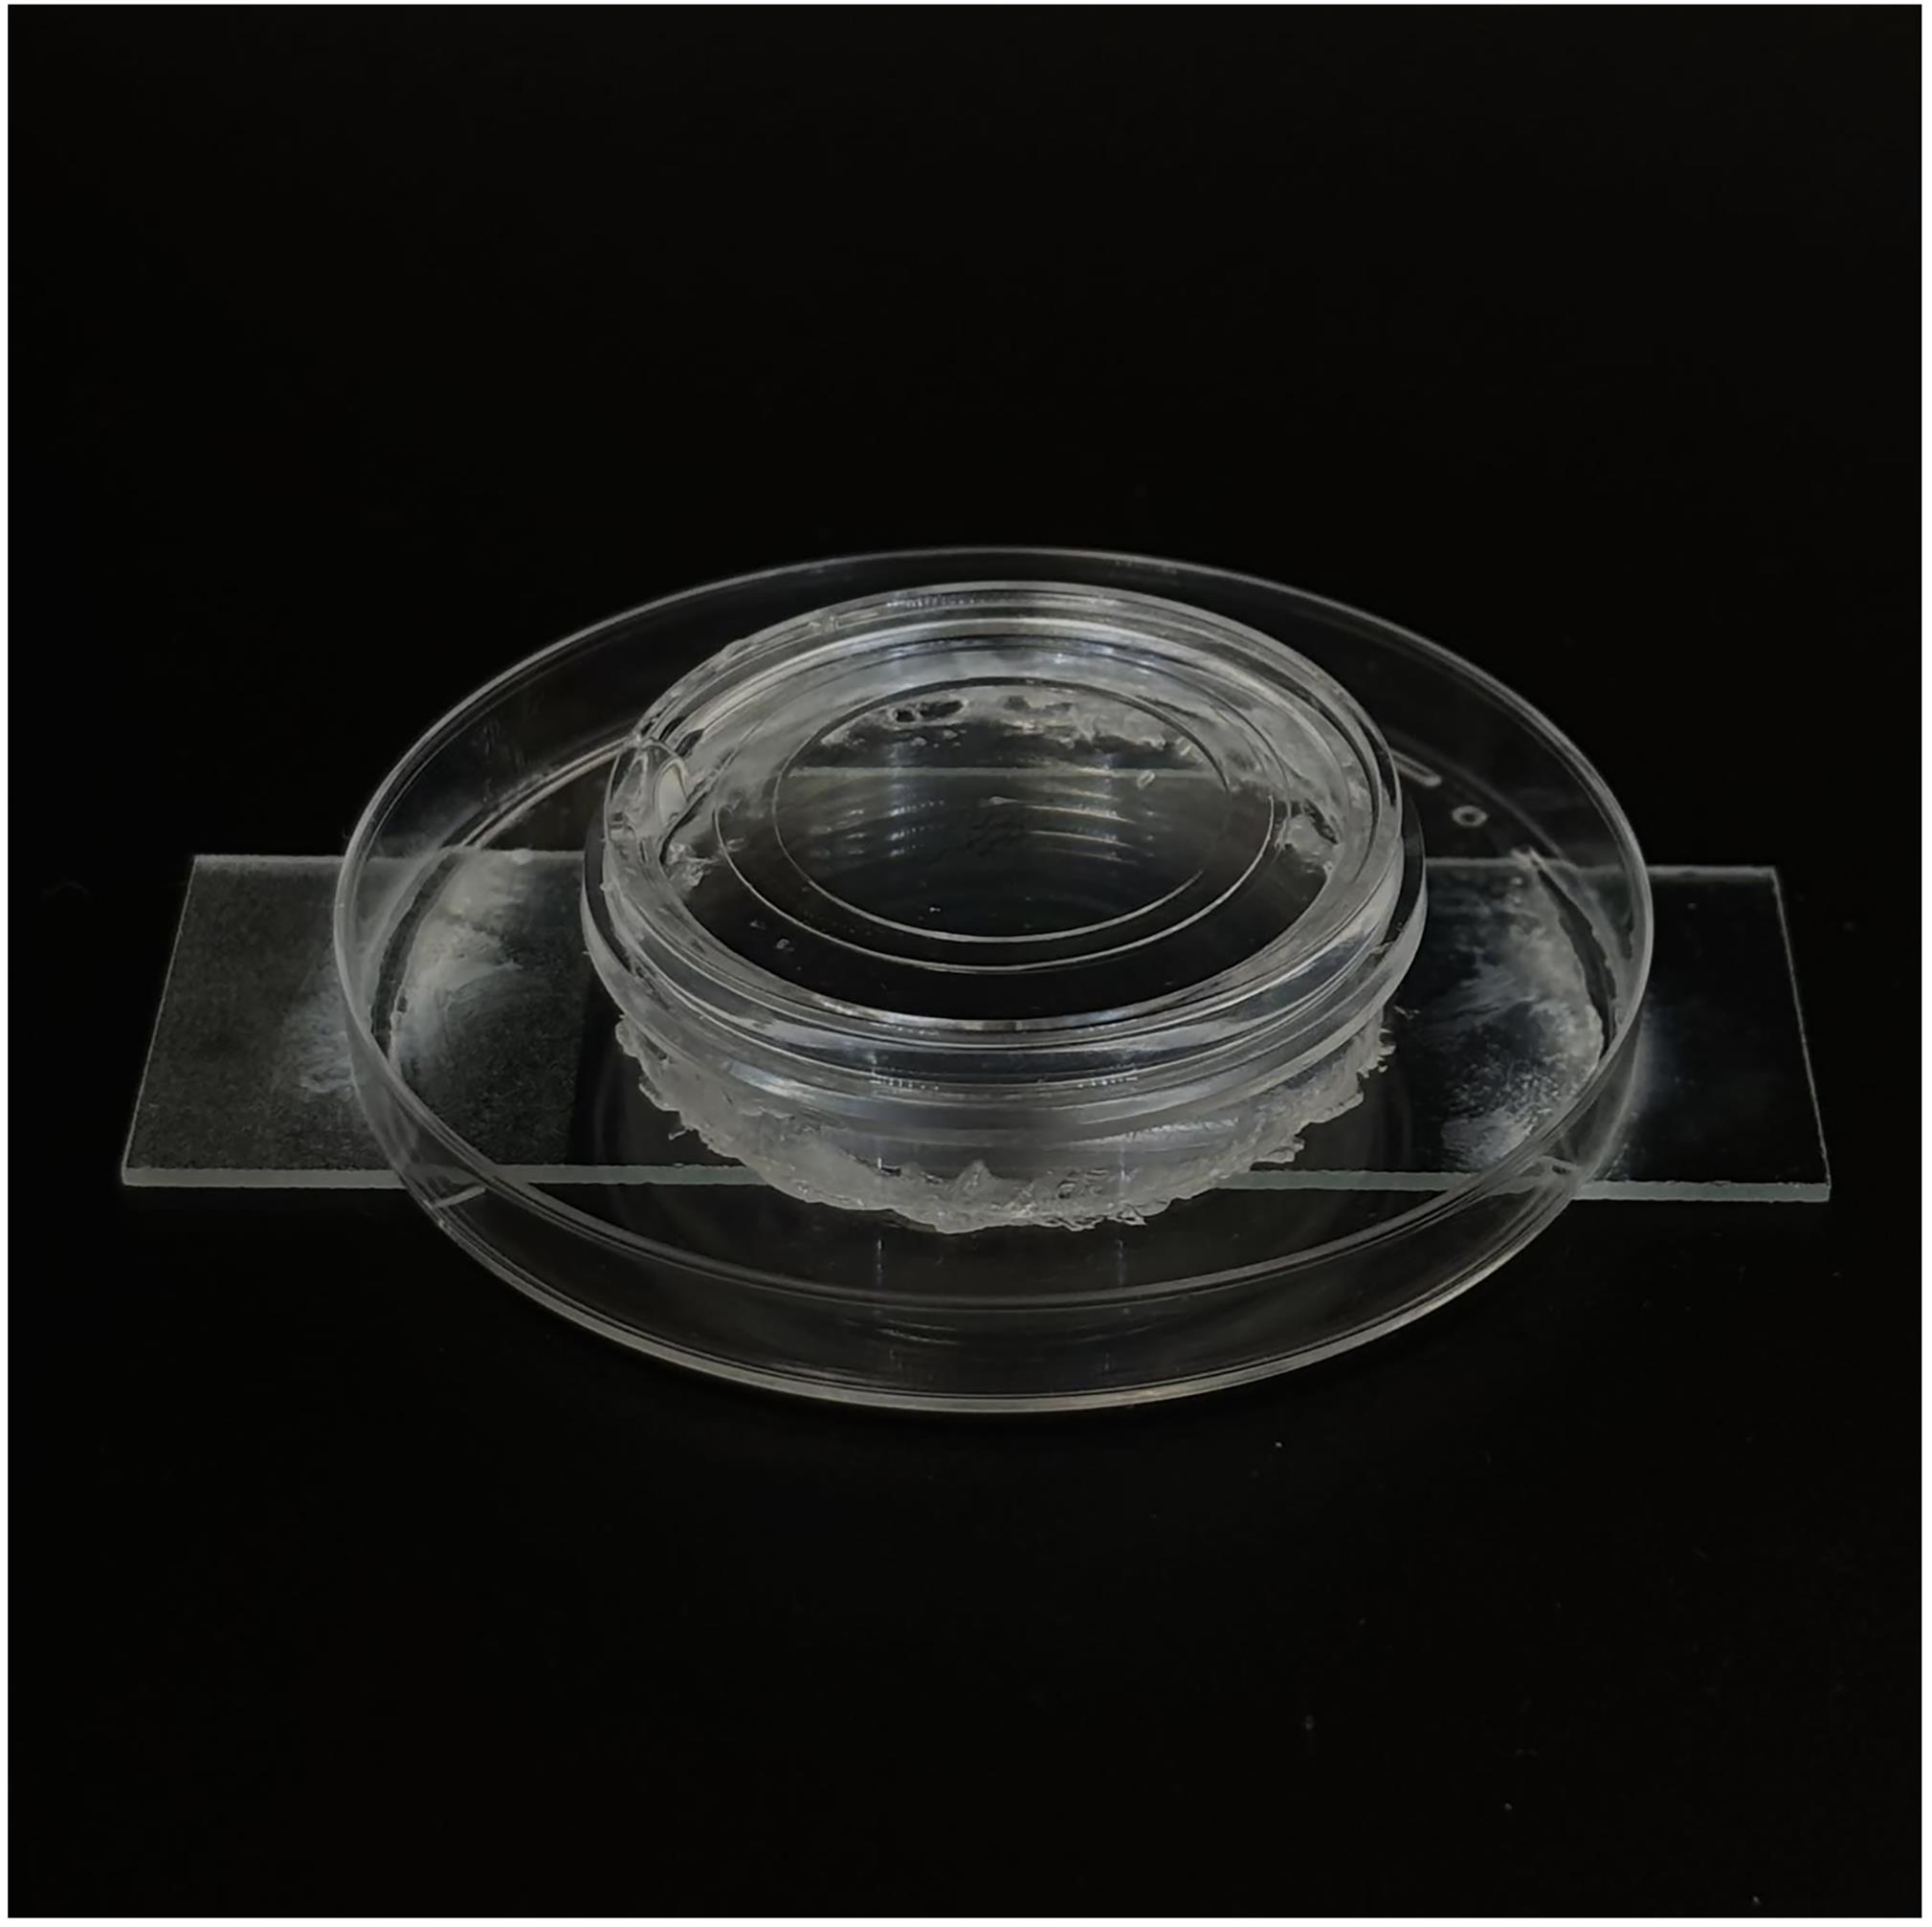
Figure 6. Mounting model ready for use on an upright microscope stage
Validation of protocol
This protocol has been routinely validated by use in our lab to conduct two-photon laser ablation experiments on an upright microscope, followed immediately by time-lapse imaging on an inverted spinning disk confocal (Figure 7). This approach enables rapid switching between imaging modalities, minimizing the time during which the effects of laser perturbation go unobserved. This capability is particularly important for visualizing debris clearance kinetics, allowing for cellular dynamics to be monitored closely from the moment of injury onward. The hydrophobic seal effectively maintains sample accessibility and stability across configurations, contributing to ease in re-identifying the same anatomical region across microscopes (Figure 8).
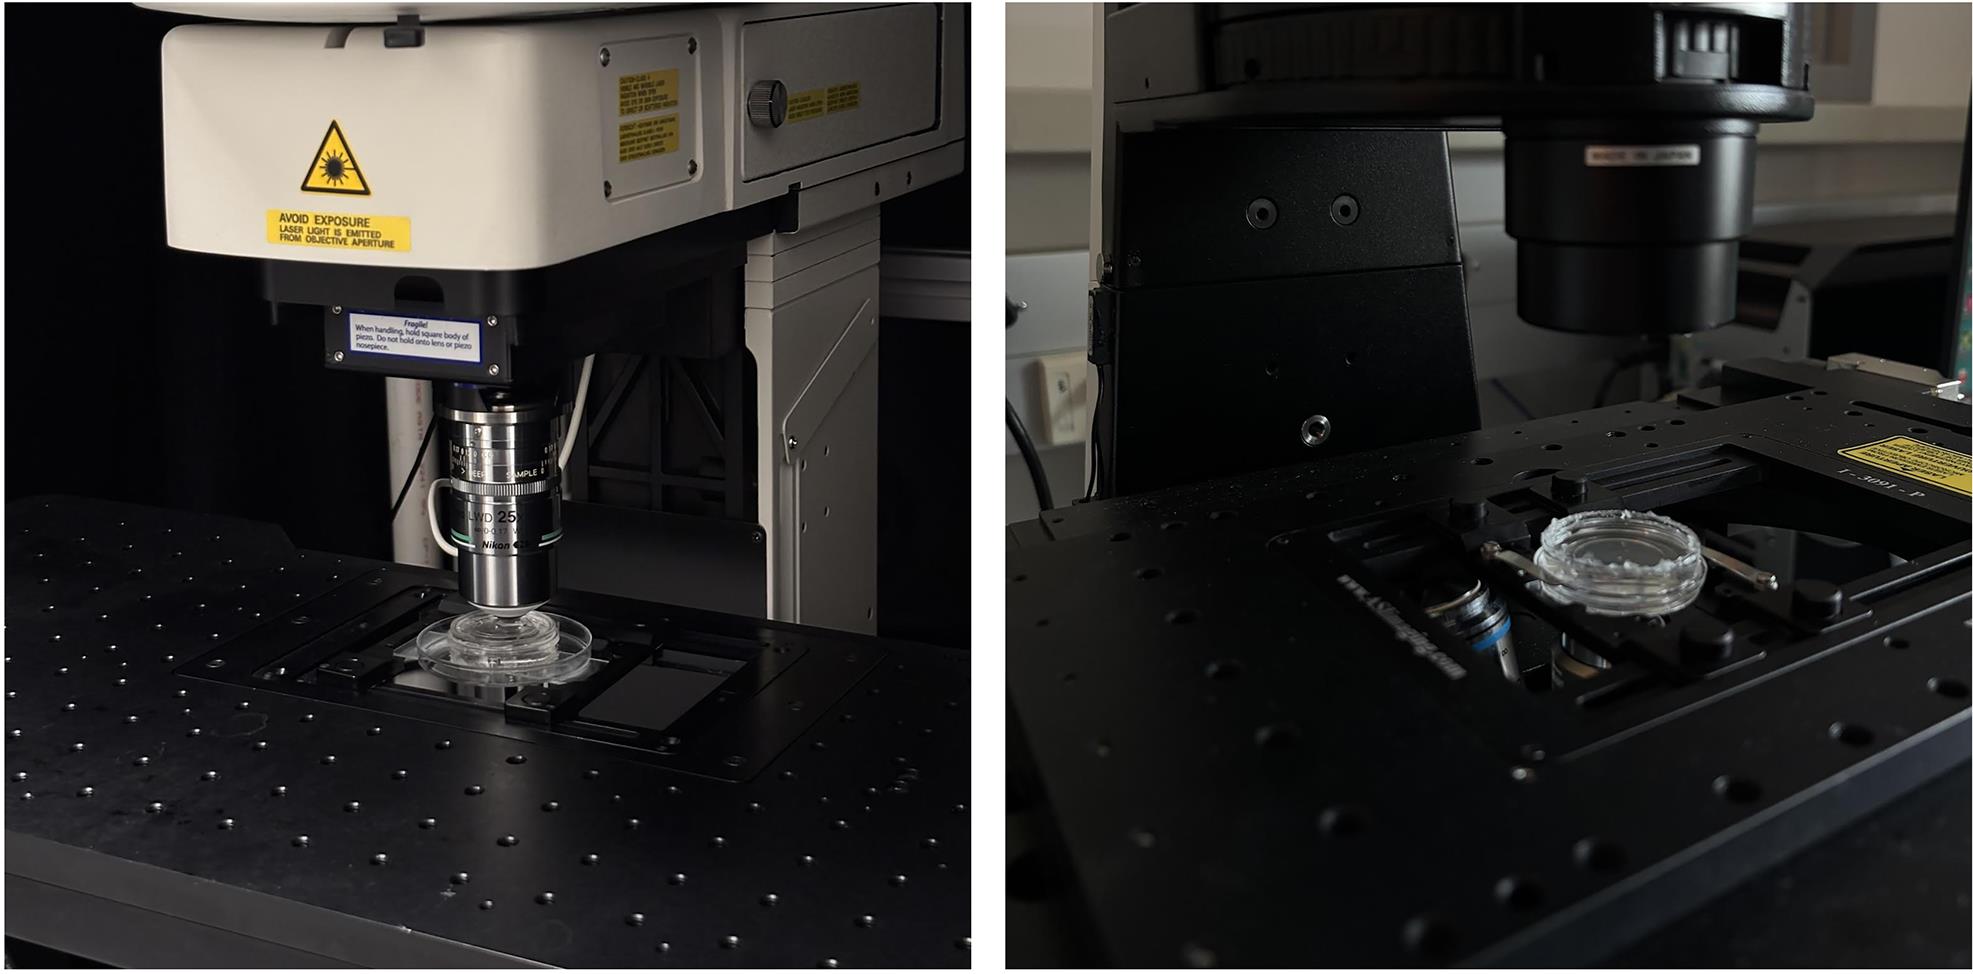
Figure 7. Mounting model demonstrated on upright two-photon (left) and inverted spinning disk confocal (right)
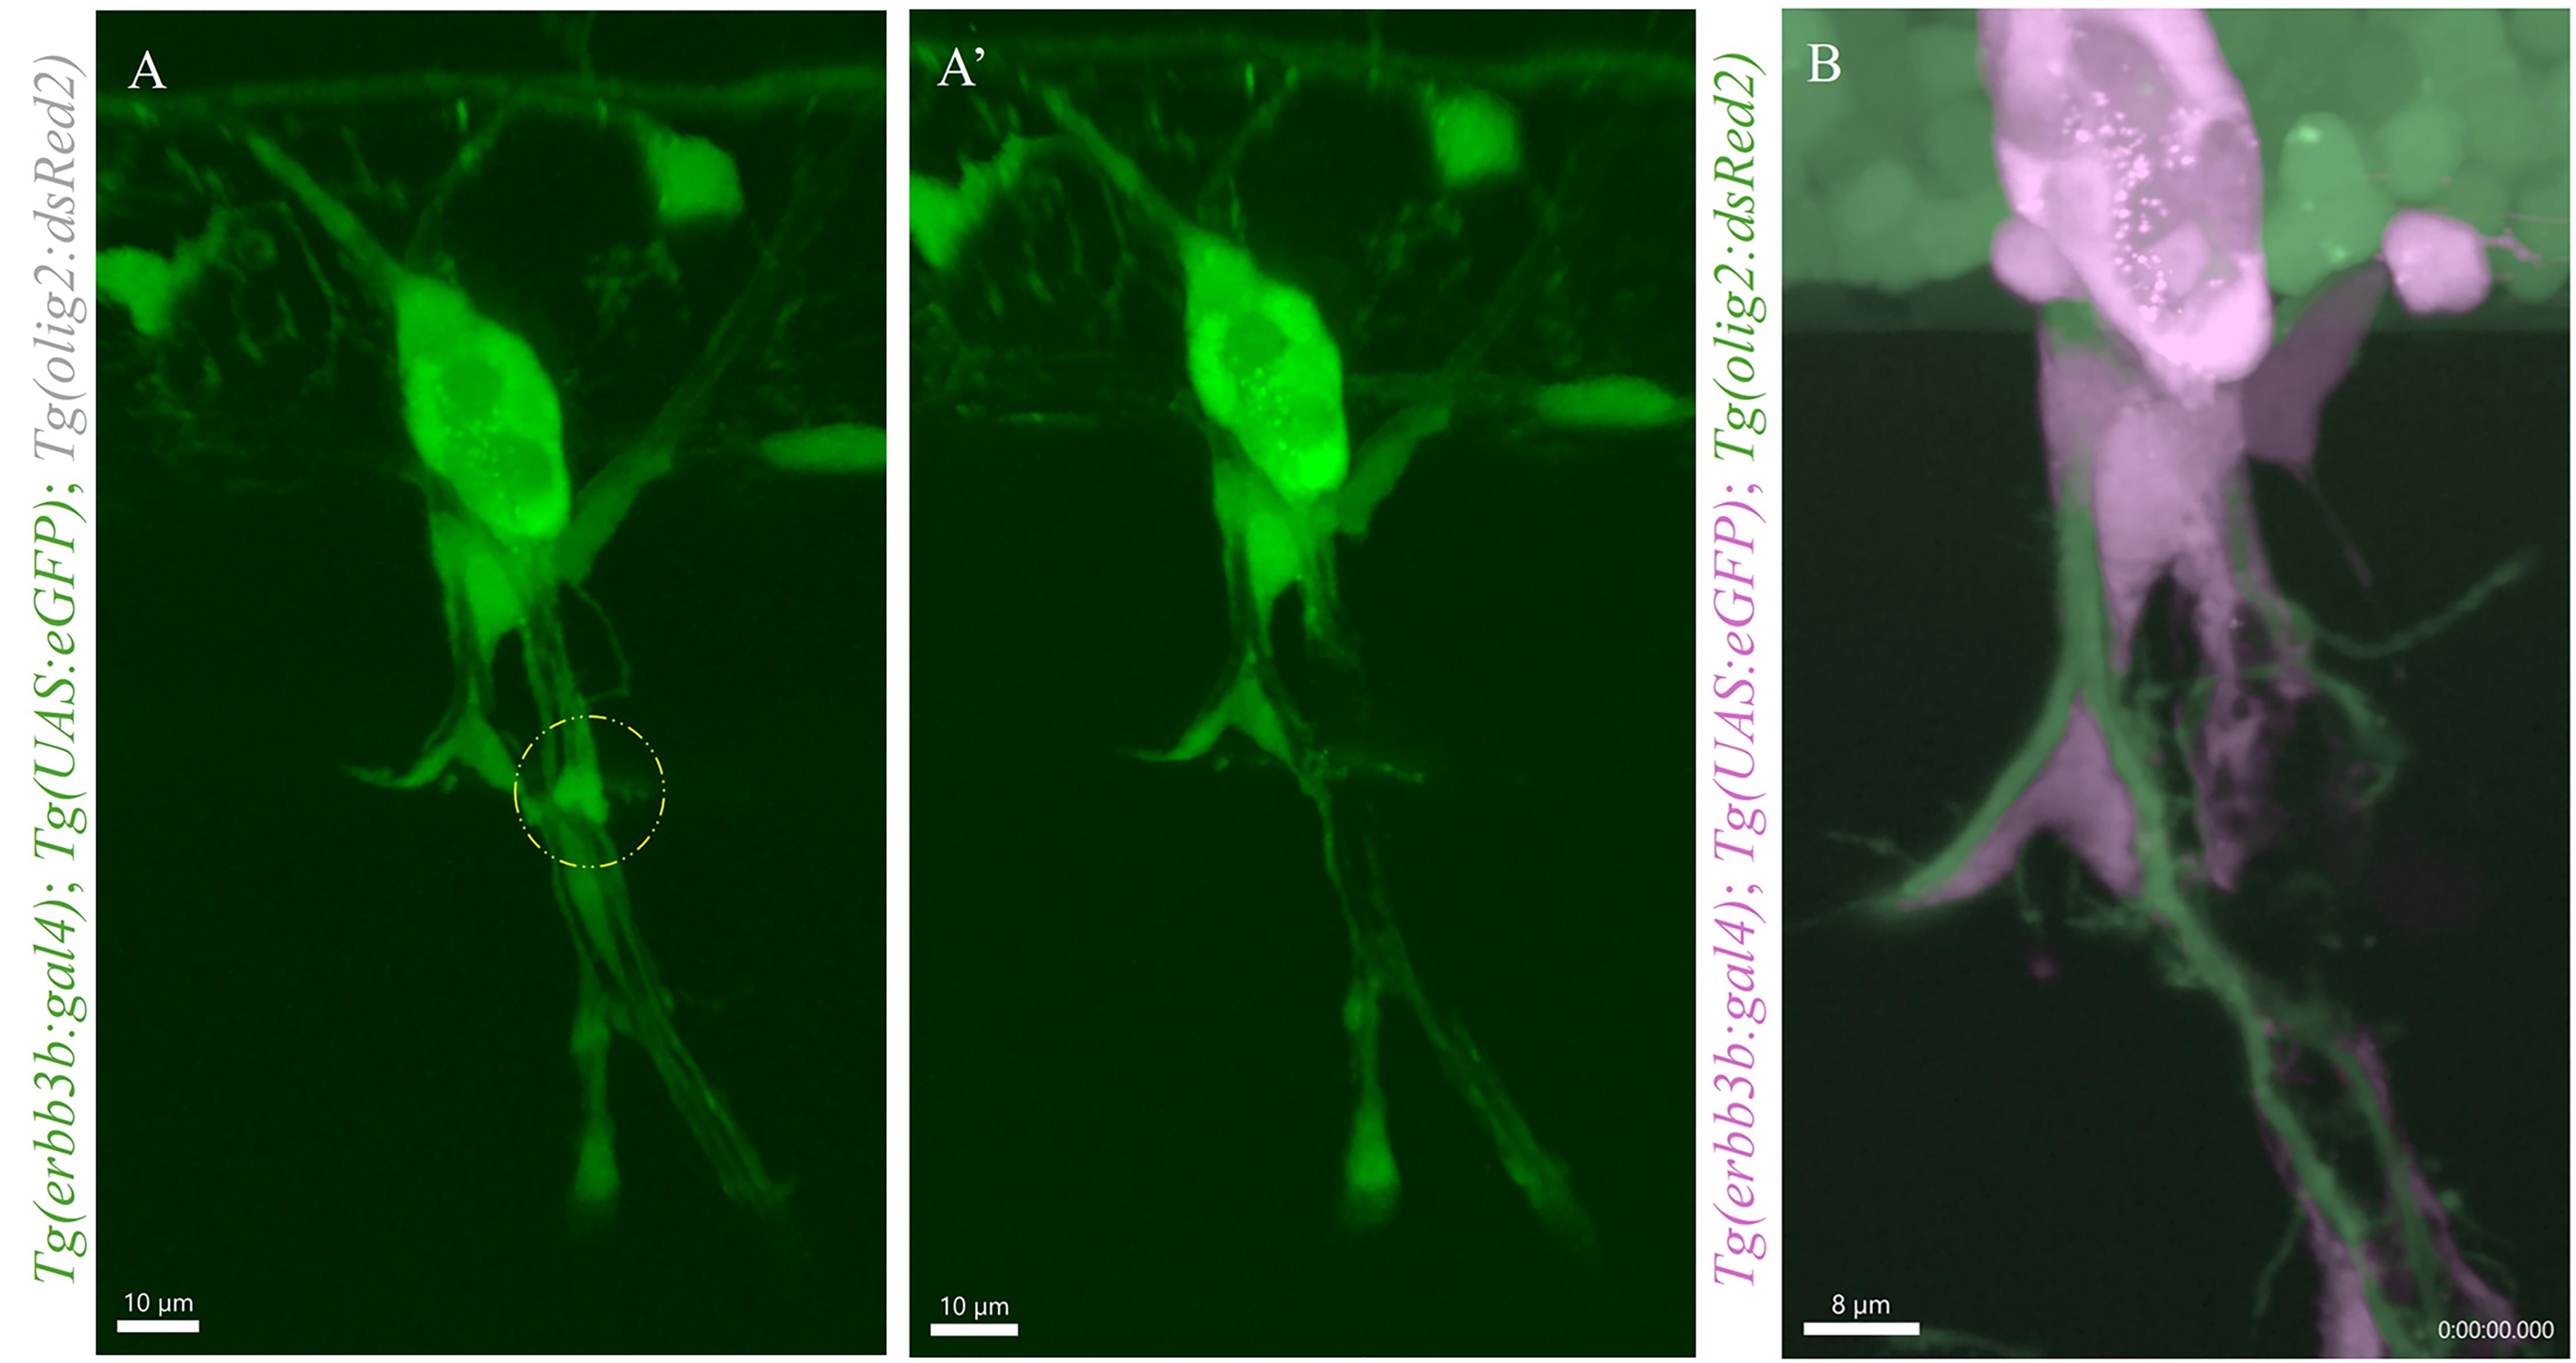
Figure 8. Protocol validation using Tg(erbb3b:gal4)nkgsaizGFFD37A; Tg(UAS:eGFP)nkuasgfp1a; Tg(olig2:dsRed2)vu19 larval embryos at 3 days post-fertilization (dpf). Only the GFP channel is shown in panels A and A’. To explore the phagocytic potential of motor exit point (MEP) glia, an erbb3b+ cell (A) along the caudal primary spinal motor neuron pathway was targeted with laser ablation (A’), as indicated by the yellow circle, using an upright two-photon microscope [13]. This anatomical region of interest was time-lapsed immediately after on an inverted spinning disk confocal (B). This approach allows for targeted focal ablation on a multiphoton microscope with limited red wavelength access, followed by faster imaging speeds and red channel accessibility on a spinning disk confocal. The confocal image in B was pseudocolored in Imaris, with dsRed2 in green and GFP in pink.
General notes and troubleshooting
General notes
While this mounting strategy offers flexibility across imaging configurations and is broadly compatible with common microscope stages, consistent repositioning of the same region of interest still requires visual landmarks like the yolk extension. This model does not change working distance requirements; however, users should still confirm appropriate clearance under upright objectives per the standard procedure.
Troubleshooting
Problem 1: A single air bubble is trapped in the 35 mm imaging dish, obscuring the sample.
Cause: Insufficient volume of anesthetic solution can cause trapped air upon hydrophobic seal.
Solution: Break the hydrophobic seal and fill the dish to maximum capacity, aiming for a convex meniscus with anesthetic solution prior to resealing.
Problem 2: Adhesive degradation between the Petri dish lid and glass slide.
Cause: Standard cyanoacrylate (super glue) forms a semi-permanent bond with glass, so re-adherence is often necessary over time.
Solutions: Re-adhere the Petri dish lid to the glass slide with super glue. Alternatively, more durable materials like UV-curable resin or modeling clay can be used. With the latter, take care to ensure the slide is as flat and flush against the dish as possible.
Acknowledgments
Conceptualization, H.M., L.F.; Investigation, H.M.; Writing—Original Draft, H.M.; Writing—Review & Editing, L.F.; Funding acquisition, L.F.; Supervision, L.F. Funding sources that supported the work: Jupiter Life Science Initiative, Stiles-Nicholson Brain Institute.
We thank the Fontenas lab members for their valuable input on this project and MacKenzie Tackett for great fish care.
The following figures were created using BioRender: Graphical overview, Murphy, H. (2026). https://BioRender.com/x579fyx.
Competing interests
The authors declare no conflicts of interest.
Ethical considerations
Husbandry and generation of embryos: All animal studies were approved by the Florida Atlantic University (FAU) Animal Care and Use Committee. Embryos were raised at 28.7 °C in egg water. Zebrafish cannot be sexed until adulthood; therefore, embryos of undetermined sex were used. Pigmentation was inhibited in embryos using phenyl-thiourea (PTU) (0.003%) in egg water. All studies were conducted using stable, germline transgenic lines. Fish were housed and maintained in our fish facility at FAU under standard laboratory conditions. Adult zebrafish strains were kept at 28 °C on a 14/10 h light/dark cycle. To generate embryos, adult male and female zebrafish were housed in breeding tanks overnight and allowed to spawn naturally.
References
- Howe, K., Clark, M. D., Torroja, C. F., Torrance, J., Berthelot, C., Muffato, M., Collins, J. E., Humphray, S., McLaren, K., Matthews, L., et al. (2013). The zebrafish reference genome sequence and its relationship to the human genome. Nature. 496(7446): 498–503. https://doi.org/10.1038/nature12111
- Teame, T., Zhang, Z., Ran, C., Zhang, H., Yang, Y., Ding, Q., Xie, M., Gao, C., Ye, Y., Duan, M., et al. (2019). The use of zebrafish (Danio rerio) as biomedical models. Anim Front. 9(3): 68–77. https://doi.org/10.1093/af/vfz020
- Jarque, S., Rubio-Brotons, M., Ibarra, J., Ordoñez, V., Dyballa, S., Miñana, R. and Terriente, J. (2020). Morphometric analysis of developing zebrafish embryos allows predicting teratogenicity modes of action in higher vertebrates. Reprod Toxicol. 96: 337–348. https://doi.org/10.1016/j.reprotox.2020.08.004
- Doszyn, O., Dulski, T. and Zmorzynska, J. (2024). Diving into the zebrafish brain: exploring neuroscience frontiers with genetic tools, imaging techniques, and behavioral insights. Front Mol Neurosci. 17: e1358844. https://doi.org/10.3389/fnmol.2024.1358844
- Benninger, R. K. and Piston, D. W. (2013). Two‐Photon Excitation Microscopy for the Study of Living Cells and Tissues. Curr Protoc Cell Biol. 59(1): ecb0411s59. https://doi.org/10.1002/0471143030.cb0411s59
- Grimm, C., Sims, R. R., Tanese, D., Mohamed Lafirdeen, A. S., Bendifallah, I., Chan, C. Y., Faini, G., Putti, E., Del Bene, F., Papagiakoumou, E., et al. (2026). Two-photon voltage imaging with rhodopsin-based sensors. Neuron. 114(7): 1198–1209.e7. https://doi.org/10.1016/j.neuron.2025.12.014
- Dalangin, R., Jia, B. Z., Qi, Y., Aggarwal, A., Sakoi, K., Drobizhev, M., Molina, R. S., Patel, R., Abdelfattah, A. S., Zheng, J., et al. (2025). Far-red fluorescent genetically encoded calcium ion indicators. Nat Commun. 16(1): e1038/s41467–025–58485–z. https://doi.org/10.1038/s41467-025-58485-z
- Abu-Siniyeh, A. and Al-Zyoud, W. (2020). Highlights on selected microscopy techniques to study zebrafish developmental biology. Lab Anim Res. 36: 12. https://doi.org/10.1186/s42826-020-00044-2
- Brown, E. A., Kawakami, K. and Kucenas, S. (2022). A novel gene trap line for visualization and manipulation of erbb3b+ neural crest and glial cells in zebrafish. Dev Biol. 482: 114–123. https://doi.org/10.1016/j.ydbio.2021.12.007
- Shin, J., Park, H.-C., Topczewska, J. M., Mawdsley, D. J. and Appel, B. (2003). Neural cell fate analysis in zebrafish using olig2 BAC transgenics. Methods Cell Sci. 25(1–2): 7–14. https://doi.org/10.1023/B:MICS.0000006847.09037.3a
- Kimmel, C. B., Ballard, W. W., Kimmel, S. R., Ullmann, B. and Schilling, T. F. (1995). Stages of embryonic development of the zebrafish. Dev Dyn. 203(3): 253–310. https://doi.org/10.1002/aja.1002030302
- Westerfield, M. (2000). The zebrafish book. A guide for the laboratory use of zebrafish (Danio rerio). 4th ed., Univ. of Oregon Press, Eugene.
- Fontenas, L. and Kucenas, S. (2021). Spinal cord precursors utilize neural crest cell mechanisms to generate hybrid peripheral myelinating glia. eLife. 10: e64267. https://doi.org/10.7554/eLife.64267
Article Information
Publication history
Received: Mar 17, 2026
Accepted: Apr 21, 2026
Available online: May 14, 2026
Published: Jun 5, 2026
Copyright
© 2026 The Author(s); This is an open access article under the CC BY-NC license (https://creativecommons.org/licenses/by-nc/4.0/).
How to cite
Murphy, H. and Fontenas, L. (2026). Versatile Dual Mounting Enables Larval Zebrafish Imaging Across Microscope Configurations. Bio-protocol 16(11): e5709. DOI: 10.21769/BioProtoc.5709.

 Download Citation in RIS Format
Category
Biophysics > Microscopy
Cell Biology > Tissue analysis > Tissue imaging
Cell Biology > Cell imaging > Live-cell imaging
Do you have any questions about this protocol?
Post your question to gather feedback from the community. We will also invite the authors of this article to respond.
 Post a Question


