


- Protocols

- Articles and Issues
- For Authors
- About
- Become a Reviewer


In-Culture Antibody Capture Using Transient CHO Expression Systems

(*contributed equally to this work, § Technical contact) Published: Vol 16, Iss 11, Jun 5, 2026 DOI: 10.21769/BioProtoc.5694 Views: 297
Reviewed by: Neha NandwaniNidhi MenonAnonymous reviewer(s)
 PDF
PDF  Ask a question
Original research article
The authors used this protocol in:
Dec 2025
Advertisement


Protocol Collections
Comprehensive collections of detailed, peer-reviewed protocols focusing on specific topics




Related protocols
Abstract
Antibody therapeutics have demonstrated transformative impacts on improving the quality of life of millions of patients, whereas advances in antibody discovery technologies have imposed a significant production challenge for the generation of a large diversity of therapeutic antibody candidates. A demand for the rapid production of dozens of purified antibodies in 10-mg quantities is entailed for functional screening and molecular assessment studies. Here, we present a robust semi-automated production protocol that bridges the gap between miniaturized high-throughput screenings and conventional custom-scale workflows. This methodology and workflow utilize a simple high-titer transient Chinese hamster ovary (CHO) cell host–CHO4Tx® expression system, a procedure of magnetic protein-A bead in-culture antibody capturing, and a semi-automated purification process with the GenScript AmMagTM SA Plus system. This production protocol has been proven to be robust and valuable for the routine production of dozens of antibody constructs per week in sufficient quality and quantity for cell-based and biophysical studies.
Key features
• This protocol utilizes the high-titer CHO4Tx® cell line, which helps increase protein production throughput by decreasing culture volume and eliminating DNA/transfection reagent complexation.
• This protocol simplifies and expedites protein production processes by eliminating time-consuming and costly steps such as cell centrifugation, medium filtration, and medium column loading.
• Although we present this workflow using CHO4Tx®, magnetic bead purification methods can be applied to other CHO cell lines and human embryonic kidney-293 cells.
Keywords: Transient gene expression CHO4Tx®
In-culture antibody capturing
AmMagTM Protein-A magnetic beads
Semi-automation purification
GenScript AmMagTM SA-Plus
CHO4Tx®
In-culture antibody capturing
AmMagTM Protein-A magnetic beads
Semi-automation purification
GenScript AmMagTM SA-Plus
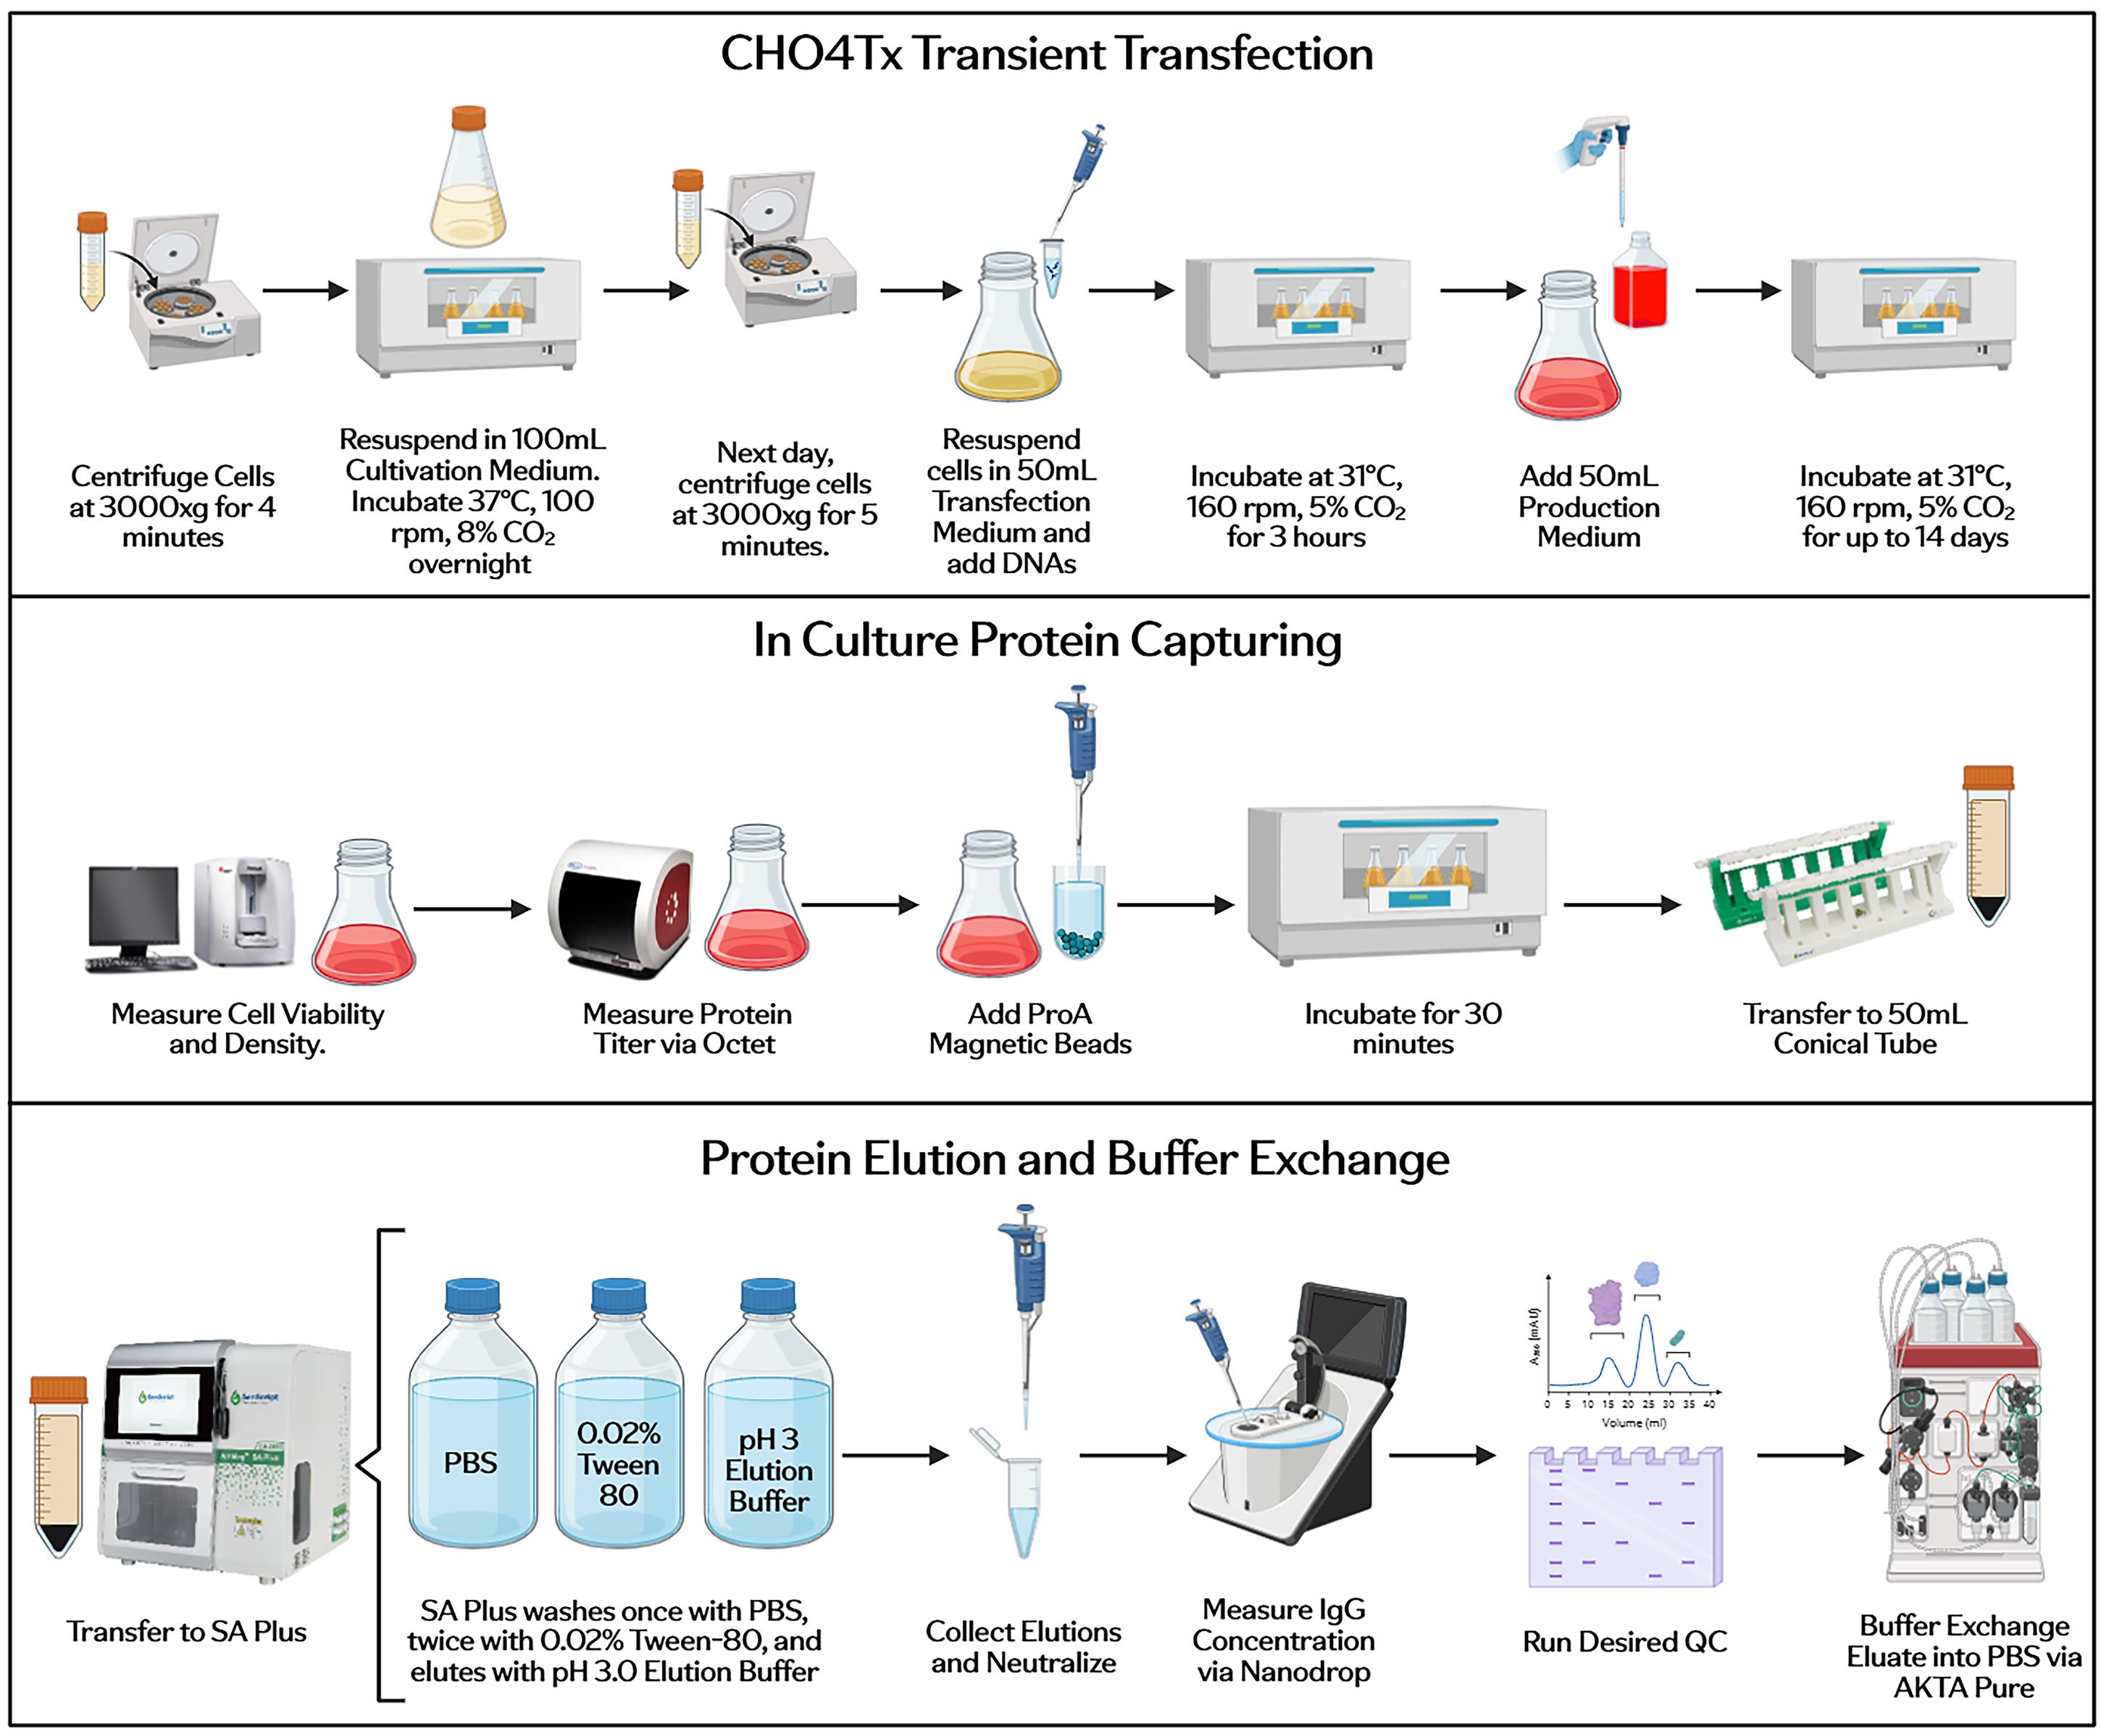
Graphical overview
Background
More than 200 antibody therapeutics have received worldwide approval since the invention of hybridoma technology by Kohler and Milstein in 1975 [1], providing tremendous therapeutic benefits to patients. The modern era of antibody therapeutics, launched by high-quality display technologies, immunization, and single-cell isolation [2–5] and by de novo protein synthesis [6–10], has generated many potential antigen binders. Efficient hit evaluations have created an urgent need for rapidly generating thousands of isolated and engineered antibody proteins with an unknown expression performance via high-throughput screening methods, and a demand for a mid-scale production process for a sizable number of follow-on molecules. Rapid and high-fidelity antibody production is also increasingly important for enabling early mechanistic and safety evaluation in discovery pipelines, which integrates advanced culture models, functional signaling readouts, imaging, and biomarker-based assays [11,12]. Transient gene expression (TGE) technologies in human embryonic kidney (HEK)-293 and Chinese hamster ovary (CHO) cells [13–17], exploiting episomal plasmid DNAs for protein synthesis without chromosomal integrations, can routinely provide proteins in days for screening assays, functional investigations, and preclinical analysis during discovery and early development. HEK293 cells exhibit high transfectability and reproducibility, whereas CHO cells possess a unique advantage of uncovering potential issues for candidate molecules at the early stages of drug development [18–25].
Antibody purification, driven by the increasing speed in antibody discovery, proceeds with automation and high throughput [26–29]. While miniaturized high-throughput (HTP) plate-based or tube-based purification has been widely adopted for material generation to meet the small protein requirements for relatively simple screening, this HTP method cannot provide enough antibodies with suitable purity for more sophisticated assays. Substantially larger quantities of purified antibodies of at least 10 mg are typically required for biophysical characterization and in vitro functional testing. In addition, typical antibody production procedures involve laborious and time-consuming steps such as clarification of cells from cell culture via centrifugation and/or filtration, as well as proA column loading of conditioned media for protein capturing. The cell separation step can potentially increase host cell protein (HCP) levels and proteolytic activity in the clarified materials.
Our protocol offers a semi-automated novel production methodology and workflow by taking advantage of a high-titer transient CHO expression system for 100 mL scale productions to meet the demand for rapid production on the 10 mg scale. A magnetic proA bead in-culture antibody-capturing process for transiently transfected CHO cells, coupled with the utilization of the GenScript AmMagTM SA Plus semi-automation system, can eliminate the steps of cell clarification, filtration, and medium loading in a throughput manner. This production protocol could support the weekly generation of dozens of antibody proteins with adequate quality and quantity for drug discovery characterizations [30].
Materials and reagents
Biological materials
1. CHO4Tx® (Magellan Biologics, origin: CHOExpress®, https://magellanbiologics.com/products/, info@magellanbiologics.com)
Reagents
1. CHO4Tx® cultivation medium (CHO4Tx® CM) (store at 4 °C, 6-month shelf-life) (Magellan Biologics, https://magellanbiologics.com/products/, info@magellanbiologics.com)
2. CHO4Tx® transfection medium (CHO4Tx® TM) (store at 4 °C, 6-month shelf-life) (Magellan Biologics, https://magellanbiologics.com/products/, info@magellanbiologics.com)
3. CHO4Tx® production medium (CHO4Tx® PM) (store at 4 °C, 6-month shelf-life) (Magellan Biologics, https://magellanbiologics.com/products/, info@magellanbiologics.com)
4. AmMagTM Protein A magnetic beads (Genscript, catalog number: L00695-80)
5. Glycine hydrochloric acid (HCl) (Sigma, catalog number: G2879)
6. Sodium chloride (NaCl) (Fisher Scientific, catalog number: S640)
7. 10 M sodium hydroxide (NaOH) (Fisher Scientific, catalog number: SS255)
8. Calcium–magnesium-free phosphate buffered saline (PBS-CMF) (Thermo Fisher, Gibco, catalog number: 21600-044)
9. Tween 80 (Sigma, catalog number: P1754)
10. 5 M hydrochloric acid (HCl) (Baker, catalog number: 5618-02)
11. Dulbecco’s phosphate-buffered saline (DPBS) (Thermo Fisher, Gibco, catalog number: 14190144)
12. L-Glutamine (200 mM) (Thermo Fisher, Gibco, catalog number: 25030081)
13. 1 M HEPES pH 8.0 (Teknova, catalog number: H1090)
14. Reverse osmosis deionization (RODI) water
Solutions
1. Elution buffer pH 3.0 (see Recipes)
2. Wash buffer (see Recipes)
3. CHO4Tx® cultivation medium (CHO4Tx® CM) (see Recipes)
Recipes
1. Elution buffer pH 3.0
| Reagent | Final concentration | Quantity or volume |
|---|---|---|
| Glycine HCl | 150 mM | 33.46 g |
| NaCl | 40 mM | 4.68 g |
| 10 M NaOH (titrant) | 120 mM | 24.00 mL |
| RODI water | n/a | 1.976 L |
| Total (optional) | n/a | 2 L |
2. Wash buffer
| Reagent | Final concentration | Quantity or volume |
|---|---|---|
| PBS-CMF | 99.98% | 9.55 g |
| Tween 80 | 0.02% | 0.213 g |
| 5 M HCl (titrant) | 7.9 mM | 1.58 mL |
| RODI water | n/a | 1 L |
| Total (optional) | 1,001.58 mL |
3. CHO4Tx® CM
| Reagent | Final concentration | Quantity or volume |
|---|---|---|
| CHO4Tx® CM | n/a | 1 L |
| 200 mM L-Glutamine | 4 mM | 20 mL |
Laboratory supplies
1. Thomson Instrument optimum growth 250 mL flask w/ vent cap, sterile (Thomson Instrument Company, catalog number: 931111-PFZ)
2. Corning® Erlenmeyer cell culture 500 mL flask (Corning®, catalog number: CLS431144)
3. Thomson Instrument optimum growth 5 L flask (Thomson Instrument Company, catalog number: 931116)
4. Corning® conical-bottom centrifuge tubes, graduated, sterile (Corning®, catalog number: 430291)
5. Corning® 250 mL PP centrifuge tubes with plug seal cap, sterile (Corning®, catalog number: 430776)
6. Corning® 500 mL PP centrifuge tubes with plug seal cap, sterile (Corning®, catalog number: 431123)
7. Optifit pre-sterilized racked 200 μL pipette tips (Sartorius, catalog number: 790201)
8. Optifit pre-sterilized racked 350 μL pipette tips (Sartorius, catalog number: 790351)
9. Optifit pre-sterilized racked 1,000 μL pipette tips (Sartorius, catalog number: 791001)
10. Optifit pre-sterilized racked 5,000 μL pipette tips (Sartorius, catalog number: 780305)
11. Eppendorf Tube®, 5 mL (Eppendorf, catalog number: EP0030119487)
12. Snap-cap low-retention microcentrifuge tubes, 1.5 mL (ThermoFisher Scientific, catalog number: 3451PK)
13. NuncTM 5 mL serological pipette (ThermoFisher Scientific, catalog number: 170355N)
14. NuncTM 10 mL serological pipette (ThermoFisher Scientific, catalog number: 170356N)
15. NuncTM 25 mL serological pipette (ThermoFisher Scientific, catalog number: 170357N)
16. NuncTM 50 mL serological pipette (ThermoFisher Scientific, catalog number: 170376N)
17. EZFlow sterile PEB syringe filters, 0.22 μm sterilizing membrane, 25 mm (Foxx Life Sciences, catalog number: 50-104-9912)
18. Safety syringe, 3 mL (Sol-CareTM, catalog number: 22-024-411)
19. Biosensor/Protein A (ProA) (Sartorius, catalog number: NC9490476)
20. 96-well, cell culture-treated, flat-bottom, half-area microplate (Greiner Bio, catalog number: 07-000-095)
21. 96-well deep-well plates, square v-bottom (BrandTech Scientific, catalog number: 14-380-947)
22. Reagent reservoir, 10 mL (FisherbrandTM, catalog number: 01-670-461)
23. Disposable roller bottles (Corning, catalog number: 09-761-113)
24. Corning® Erlenmeyer cell culture 125 mL flask (Corning, catalog number: CLS431143)
25. HiPrepTM desalting columns with SephadexTM G-25 resin (Cytiva Life Sciences, catalog number: 17508701)
26. Beckman Coulter Vi-CELL sample vials, 4 mL (ThermoFisher Scientific, catalog number: 50-010-41)
27. Corning® 50 mL centrifuge tubes (Millipore Sigma, catalog number: CLS430290)
Equipment
1. AmMagTM SA Plus semi-automated purification system (Genscript, catalog number: L01013)
2. AmMagTM MR magnetic rack (Genscript, catalog number: L00723)
3. Kuhner ISF1-Z incubator shaker (Kuhner Inc, model: ISF1-Z)
4. Incubator tray with sticky strips, F-size tray, 8 sticky strips (Kuhner Inc., catalog number: 105200)
5. Beckman Coulter Allegra X-12R refrigerated centrifuge (Beckman Coulter, catalog number: BE-AX12R)
6. Octet RED96e (Sartorius, model: Octet RED96e)
7. SterilGARD® e3 Class II biosafety cabinet (The Baker Company, model: SterilGARD e3)
8. Vi-CELL XR Cell Viability Analyzer (Beckman Coulter, model: Vi-CELL XR)
9. Proline® Plus mechanical pipette, single-channel 20–200 μL (Sartorius, catalog number: 728060)
10. Proline® Plus mechanical pipette, 8-channel 30–300 μL multichannel pipette (Sartorius, catalog number: 728140)
11. Proline® Plus mechanical pipette, single-channel 100–1,000 μL (Sartorius, catalog number: 728070)
12. Proline® Plus mechanical pipette, single-channel 5,000 μL (Sartorius, catalog number: 728580)
13. S1 pipette fillers (ThermoFisher Scientific, catalog number: 9541)
14. NanoDropTM One/OneC microvolume UV-Vis spectrophotometer (Thermo Fisher Scientific, catalog number: ND-ONEC-W)
15. Tecan Fluent-480 liquid handler (Tecan, model: Fluent-480)
16. AKTA PureTM chromatography system (Cytiva Life Sciences, model: AKTA PureTM 150)
Software and datasets
1. FortèBio Data Acquisition (Sartorius, Version 7.1)
2. FortèBio Data Analysis (Sartorius, Version 7.1)
3. UNICORNTM Control Software (Cytiva Life Sciences, Version 7.10)
Procedure
A. CHO4Tx® thawing and cell culturing
1. Thaw CHO4Tx® cells by holding the cell cryovial in the palm of a gloved hand or by incubation in a 37 °C water bath.
Note: As soon as cells are thawed, they must be transferred to prewarmed CHO4Tx® CM. Do not leave the cells unattended while thawing. Cryopreserved cells are suspended in DMSO, and prolonged exposure to the reagent will result in poor recovery after thawing.
2. Immediately transfer thawed cells into 7.0 mL of prewarmed CHO4Tx® CM containing 4 mM of L-glutamine.
3. Pellet the cells via centrifugation in the Beckman Coulter Allegra X-12R refrigerated centrifuge at 3,000× g for 5 min at room temperature (20 °C). Use maximum brake settings for decelerating the centrifuge.
4. Then, resuspend in 25 mL of prewarmed fresh CHO4Tx® CM in a Corning® 125 mL Erlenmeyer cell culture flask.
5. Take 1 mL of the culture using a NuncTM 5 mL serological pipette and place it in a Beckman Coulter Vi-CELL sample vial. Place the vial in the Vi-CELL XR cell viability analyzer to measure viable cell density (VCD) and cell viability percentage to confirm the cells are in the acceptable range of >95% cell viability and around 2.0 × 10⁶ cells/mL VCD.
6. Incubate the cells at 110 rpm, 37 °C, and 8% CO2 in the Kuhner IDF1-Z incubator shaker with sticky strips.
7. Within two or three days, cells should have proliferated to the target density of 4.0–6.0 × 10⁶ cells/mL, with >97% viability.
Note: If VCD or cell viability is lower than expected, pellet the cells again via centrifugation at 3,000× g for 5 min at room temperature (20 °C). Use maximum brake settings for decelerating the centrifuge. Resuspend in prewarmed fresh CM and re-count the next day.
8. Passage the cells on a 2- or 3-day schedule to the target density of 0.7 × 10⁶ cells/mL or 0.3 × 10⁶ cells/mL, respectively, in 100 mL of prewarmed CHO4Tx® CM in a 500 mL Corning® Erlenmeyer cell culture flask.
Note: For simplicity, this protocol describes all cell culturing and transfection steps for a singular 0.1 L scale transfection. If you are performing multiple 0.1 L scale transfections, simply scale up the cell culture using the recommendations in Table 1.
Table 1. CHO4Tx® cell culture and centrifugation recommendations by volume
| Cell culture volume | Culture flask | Culture rpm | Transfection flask | Transfection rpm | Centrifugation time (day before transfection) | Centrifugation time (day of transfection) |
|---|---|---|---|---|---|---|
| 0.1 L | Corning® 500 mL Erlenmeyer cell culture flask | 100 | Thomson Instrument optimum growth 250 mL flask | 160 | 4 min | 5 min |
| 0.2 L | Corning® 1 L Erlenmeyer cell culture flask | 100 | Thomson Instrument optimum growth 500 mL flask | 160 | 5 min | 10 min |
| 0.5 L | Corning® 3 L Erlenmeyer cell culture flask | 140 | Thomson Instrument optimum growth 1.6 L flask | 160 | 5 min | 10 min |
| 1.0 L | Corning® 3 L Erlenmeyer cell culture flask | 140 | Thomson Instrument optimum growth 2.8 L flask | 160 | 10 min | 15 min |
| 1.5–2.0 L | Thomson Instrument optimum growth 5 L flask | 140 | Thomson Instrument optimum growth 5 L flask | 160 | 10 min | 15 min |
B. Preparation of DNAs for CHO4Tx® transient transfection
Note: For CHO4Tx transfections, the total DNA requirement is 6.5 mg/L, i.e., 3.25 mg/L of heavy chain (HC) and 3.25 mg/L of light chain (LC). HC and LC in a ratio of 1:1 can be mixed by hand or by a liquid handler like Tecan Fluent-480 if the correct programming is in place. This protocol will focus on manual DNA mixing.
1. Calculate the required volume of the HC and LC DNA needed for a 0.1 L scale transfection.
a. CHO4Tx® total DNA requirement is 6.5 mg/L. This means 0.65 mg of total DNA for a 0.1 L scale. The requirement of each chain is 0.325 mg.
b. To calculate the required DNA volume, simply divide 0.325 mg by the concentration (mg/mL) of the HC DNA.
c. Perform this same calculation for the LC DNA [0.325 mg / LC DNA conc. (mg/mL) = mL to add].
2. Using a mechanical pipette, add the calculated volumes from the previous step to a 5 mL Eppendorf tube.
Note: If the total DNA volume is greater than 5 mL, any sized tube can be used to hold the HC and LC DNA mixture.
3. Proceed to CHO4Tx® transient transfection or store the DNA mixture at 4 °C.
Note: The HC and LC DNAs can be combined up to 48 h before the transfection takes place. The DNA mixtures should be stored at 4 °C until used for transfection.
C. CHO4Tx® 0.1 L transient transfection
1. One day prior to the transfections, take a 1 mL sample of your cell culture to measure CHO4Tx® cell viability and VCD on the Vi-Cell XR to ensure the culture has >95.0% viability and the VCD is between 4 and 6 × 10⁶ cells/mL.
2. Pellet the cells via centrifugation at 3,000× g for 4 min at room temperature (20 °C). Use maximum brake settings for decelerating the centrifuge. Resuspend in 100 mL of prewarmed CHO4Tx® CM to achieve a density of 2.3 × 10⁶ cells/mL in a Corning® 500 mL Erlenmeyer cell culture flask.
3. Incubate cells at 37 °C, 8% CO2, and 100 rpm overnight in the Kuhner ISF1-Z incubator shaker.
4. The next day, verify that CHO4Tx® cell viability and VCD are >95% and around 6 × 10⁶ cells/mL, respectively, using a 1 mL sample on the Vi-Cell XR.
5. Pellet the cells at 3,000× g for 5 min at room temperature (20 °C). Use maximum brake settings for decelerating the centrifuge. Resuspend in 50 mL of prewarmed CHO4Tx® TM in a Thomson Instrument optimum growth 250 mL flask w/ vent cap to achieve a density of 1.2 × 10⁷ cells/mL.
6. After resuspension, add the DNA that was complexed in section B to each flask. The tube from this step contains the required 0.65 total mg of DNA (0.325 mg of HCs and 0.325 mg of LCs) for the 0.1 L scale.
Note: The CHO4Tx cell line does not require any further transfection reagent, DNA dilutant, or DNA incubation time with transfection reagent. The proprietary transfection media contains the necessary reagents for the transient transfection to occur.
7. Incubate the culture at 31 °C, 5% CO2, 160 rpm for 3 h in the Kuhner ISF1-Z incubator shaker.
8. After 3 h, add 50 mL of prewarmed CHO4Tx® PM to the flask using a NuncTM 5 mL serological pipette to achieve a final volume of 100 mL and a VCD of 6.0 × 10⁶ cells/mL.
9. Maintain the transfected culture at 31 °C, 5% CO2, and 160 rpm for up to 14 days in the Kuhner ISF1-Z incubator shaker.
Note: Peak titers are achieved around 11–14 days. There is the option to harvest at an earlier time point if desired. 14 days is the standard recommendation as it allows for the flexibility of transfections to take place on Tuesday through Friday without the need to harvest over a weekend (see Figure 1).
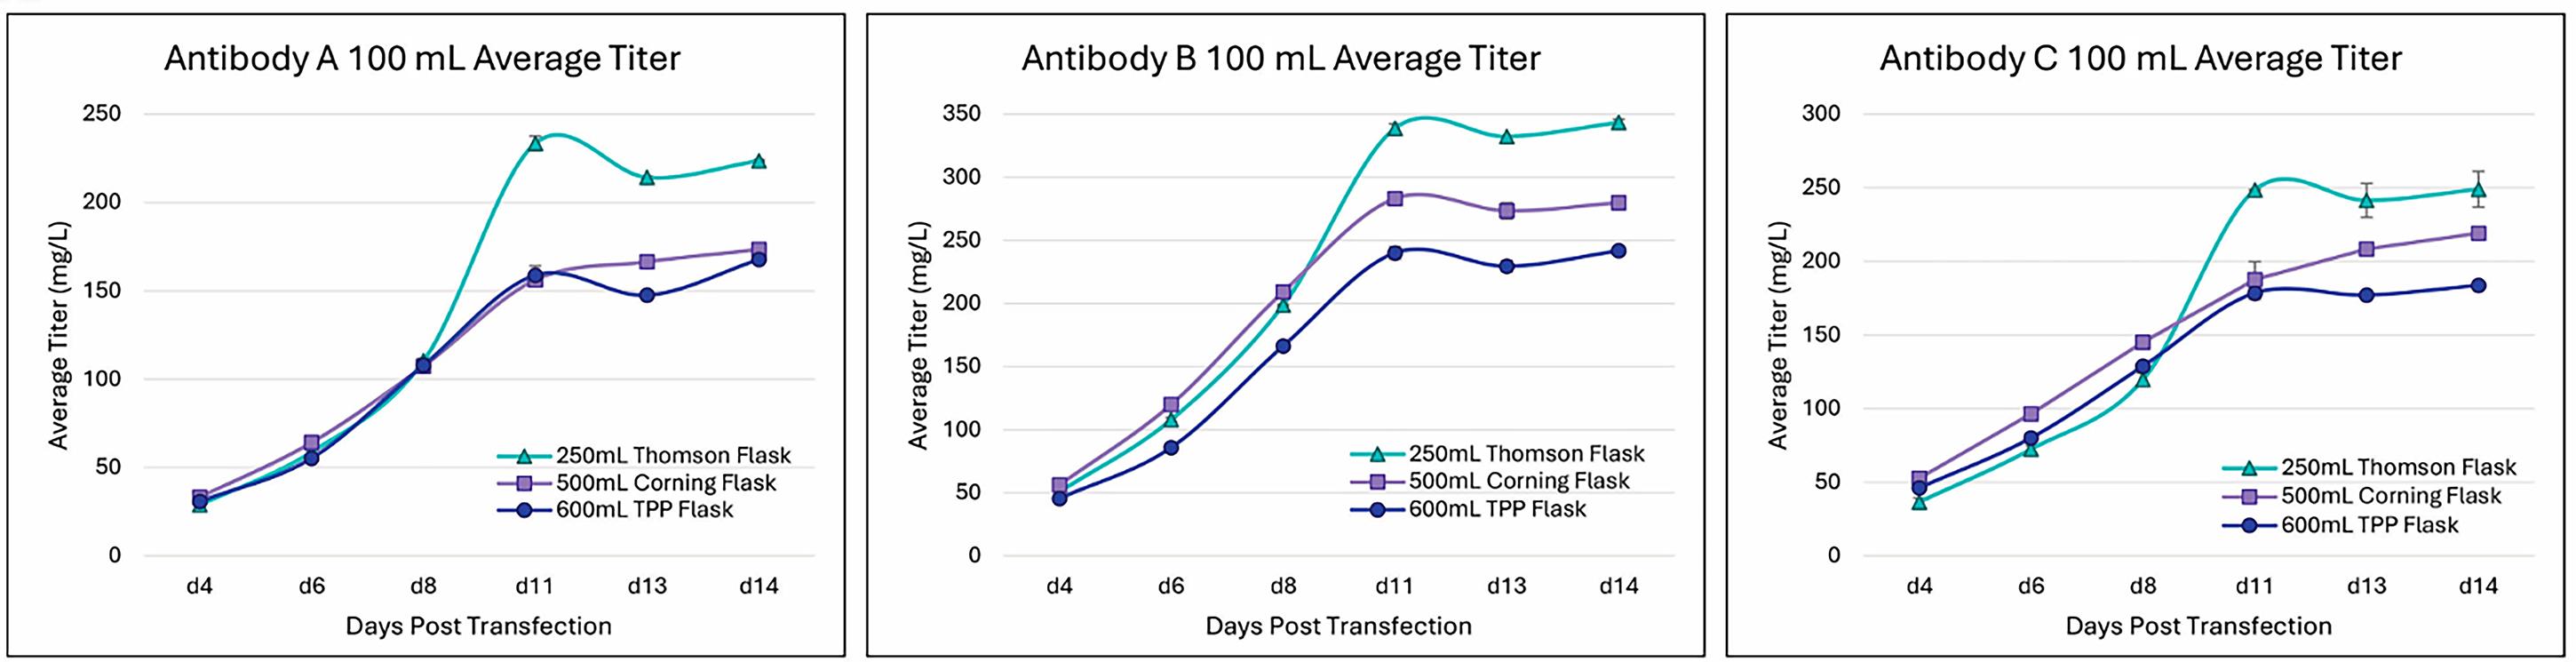
Figure 1. CHO4Tx® titer time course and flask optimization. Average titer, determined via OctetRED96e (see Section E), during the post-transfection time course across three different antibodies and three different flask types (n = 2 ± SE). All targets perform best in Thomson Instrument optimum growth 250 mL flask w/ vent cap and reach peak titer at day 11.
D. Post-transfection data acquisition
Note: Prior to performing in-culture capturing with proA magnetic beads, cell viability and VCD, as well as any desired form of titer measurements, must be taken as the beads cannot go through the cell counter, and all secreted protein will be captured by the beads, resulting in no titer measurement. The titer measurement we prefer is through the Octet RED96e, but other methods could be used if preferred.
1. On the day of harvest, take a 2 mL aliquot of the culture medium from the transfection.
2. Use 1 mL to measure viability and VCD on the Vi-CELL XR.
3. Place the other 1 mL in a snap-cap low-retention 1.5 mL microcentrifuge tube to measure titer with the Octet RED96e system (see section E for further details).
E. Octet RED96e titer analysis
1. Place a 96-well, cell culture-treated, flat-bottom, half-area microplate into the bottom of the Octet biosensor tray. Pour the DPBS into a 10 mL reagent reservoir and pipette 190 μL of DPBS into the desired number of wells (8 wells for the standard curve + number of samples) using a Proline® Plus mechanical pipette, 8-channel 30–300 μL multichannel pipette.
2. Place the top section of the biosensor tray back on and transfer the desired number of protein A biosensors into the wells that you filled with DPBS.
Note: The biosensors must soak in DPBS for at least 10 min, so perform this step first.
3. Generate an 8-point standard curve for the Octet using serial dilutions of a control IgG of choice in DPBS in a 96-well deep well plate, square V-bottom: 500, 250, 125, 62.5, 31.25, 15.628, 7.813, and 0 mg/L.
4. In a separate 96-well, cell culture-treated, flat-bottom, half-area microplate, transfer 190 μL of your standard curve generated in step E3 into the first column.
5. Pipette 190 μL of your transfection samples from step D3 into the following wells, column-wise.
Note: The Octet RED96e reads samples column-wise, so loading your standard curve and samples in this order is recommended.
6. Transfer the biosensor tray with probes and the sample plate into the Octet and power on the instrument.
7. Launch the FortèBio Data Acquisition Software Version 7.1 and select New Quantitation Experiment, Basic Quantitation (Figure 2).
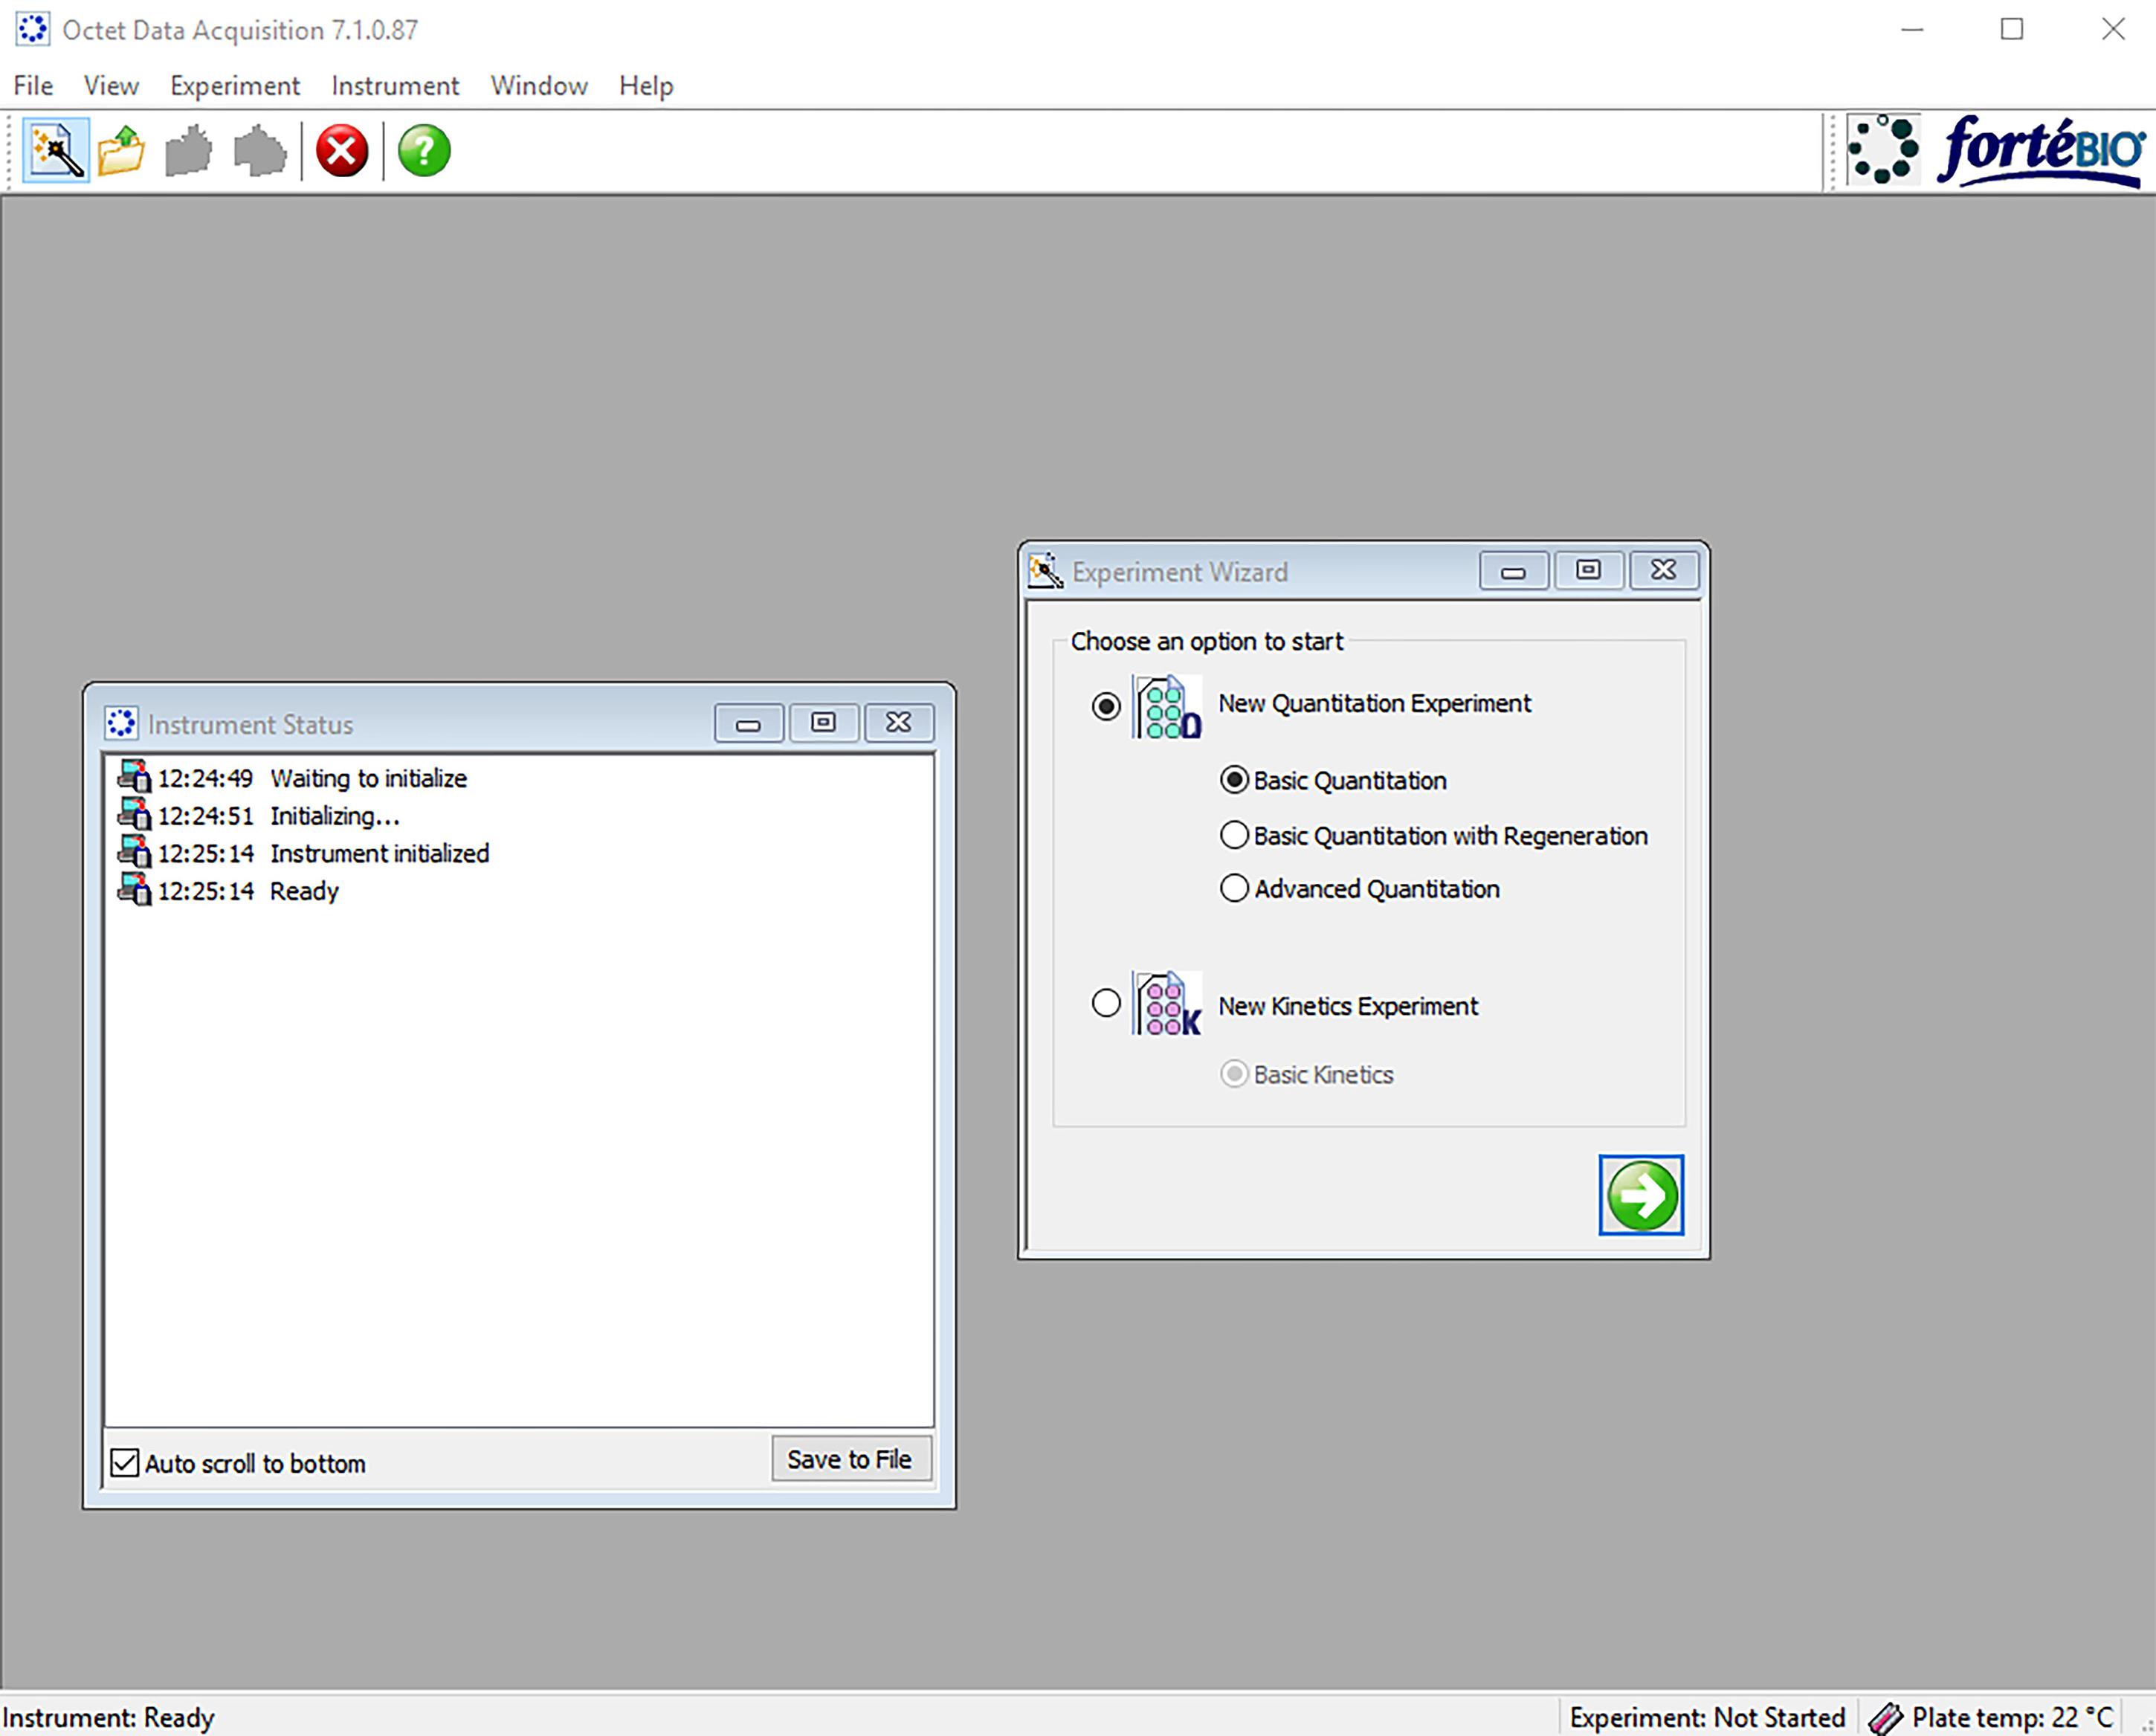
Figure 2. Octet RED96e data acquisition. Initial screen shown when Data Acquisition Version 7.1 is launched. New runs are started by launching a new quantitation experiment in “Basic Quantitation.”
8. A new experiment will launch. Then, on the first tab, create your plate definition (see Figure 3).
a. Assign the wells where the standard has been plated as “Standard” and the wells where the cell culture samples have been loaded as “Unknown.”
b. In the side table, input the concentration of your standard curve in each well and input a name for your unknown samples in the Sample ID column.
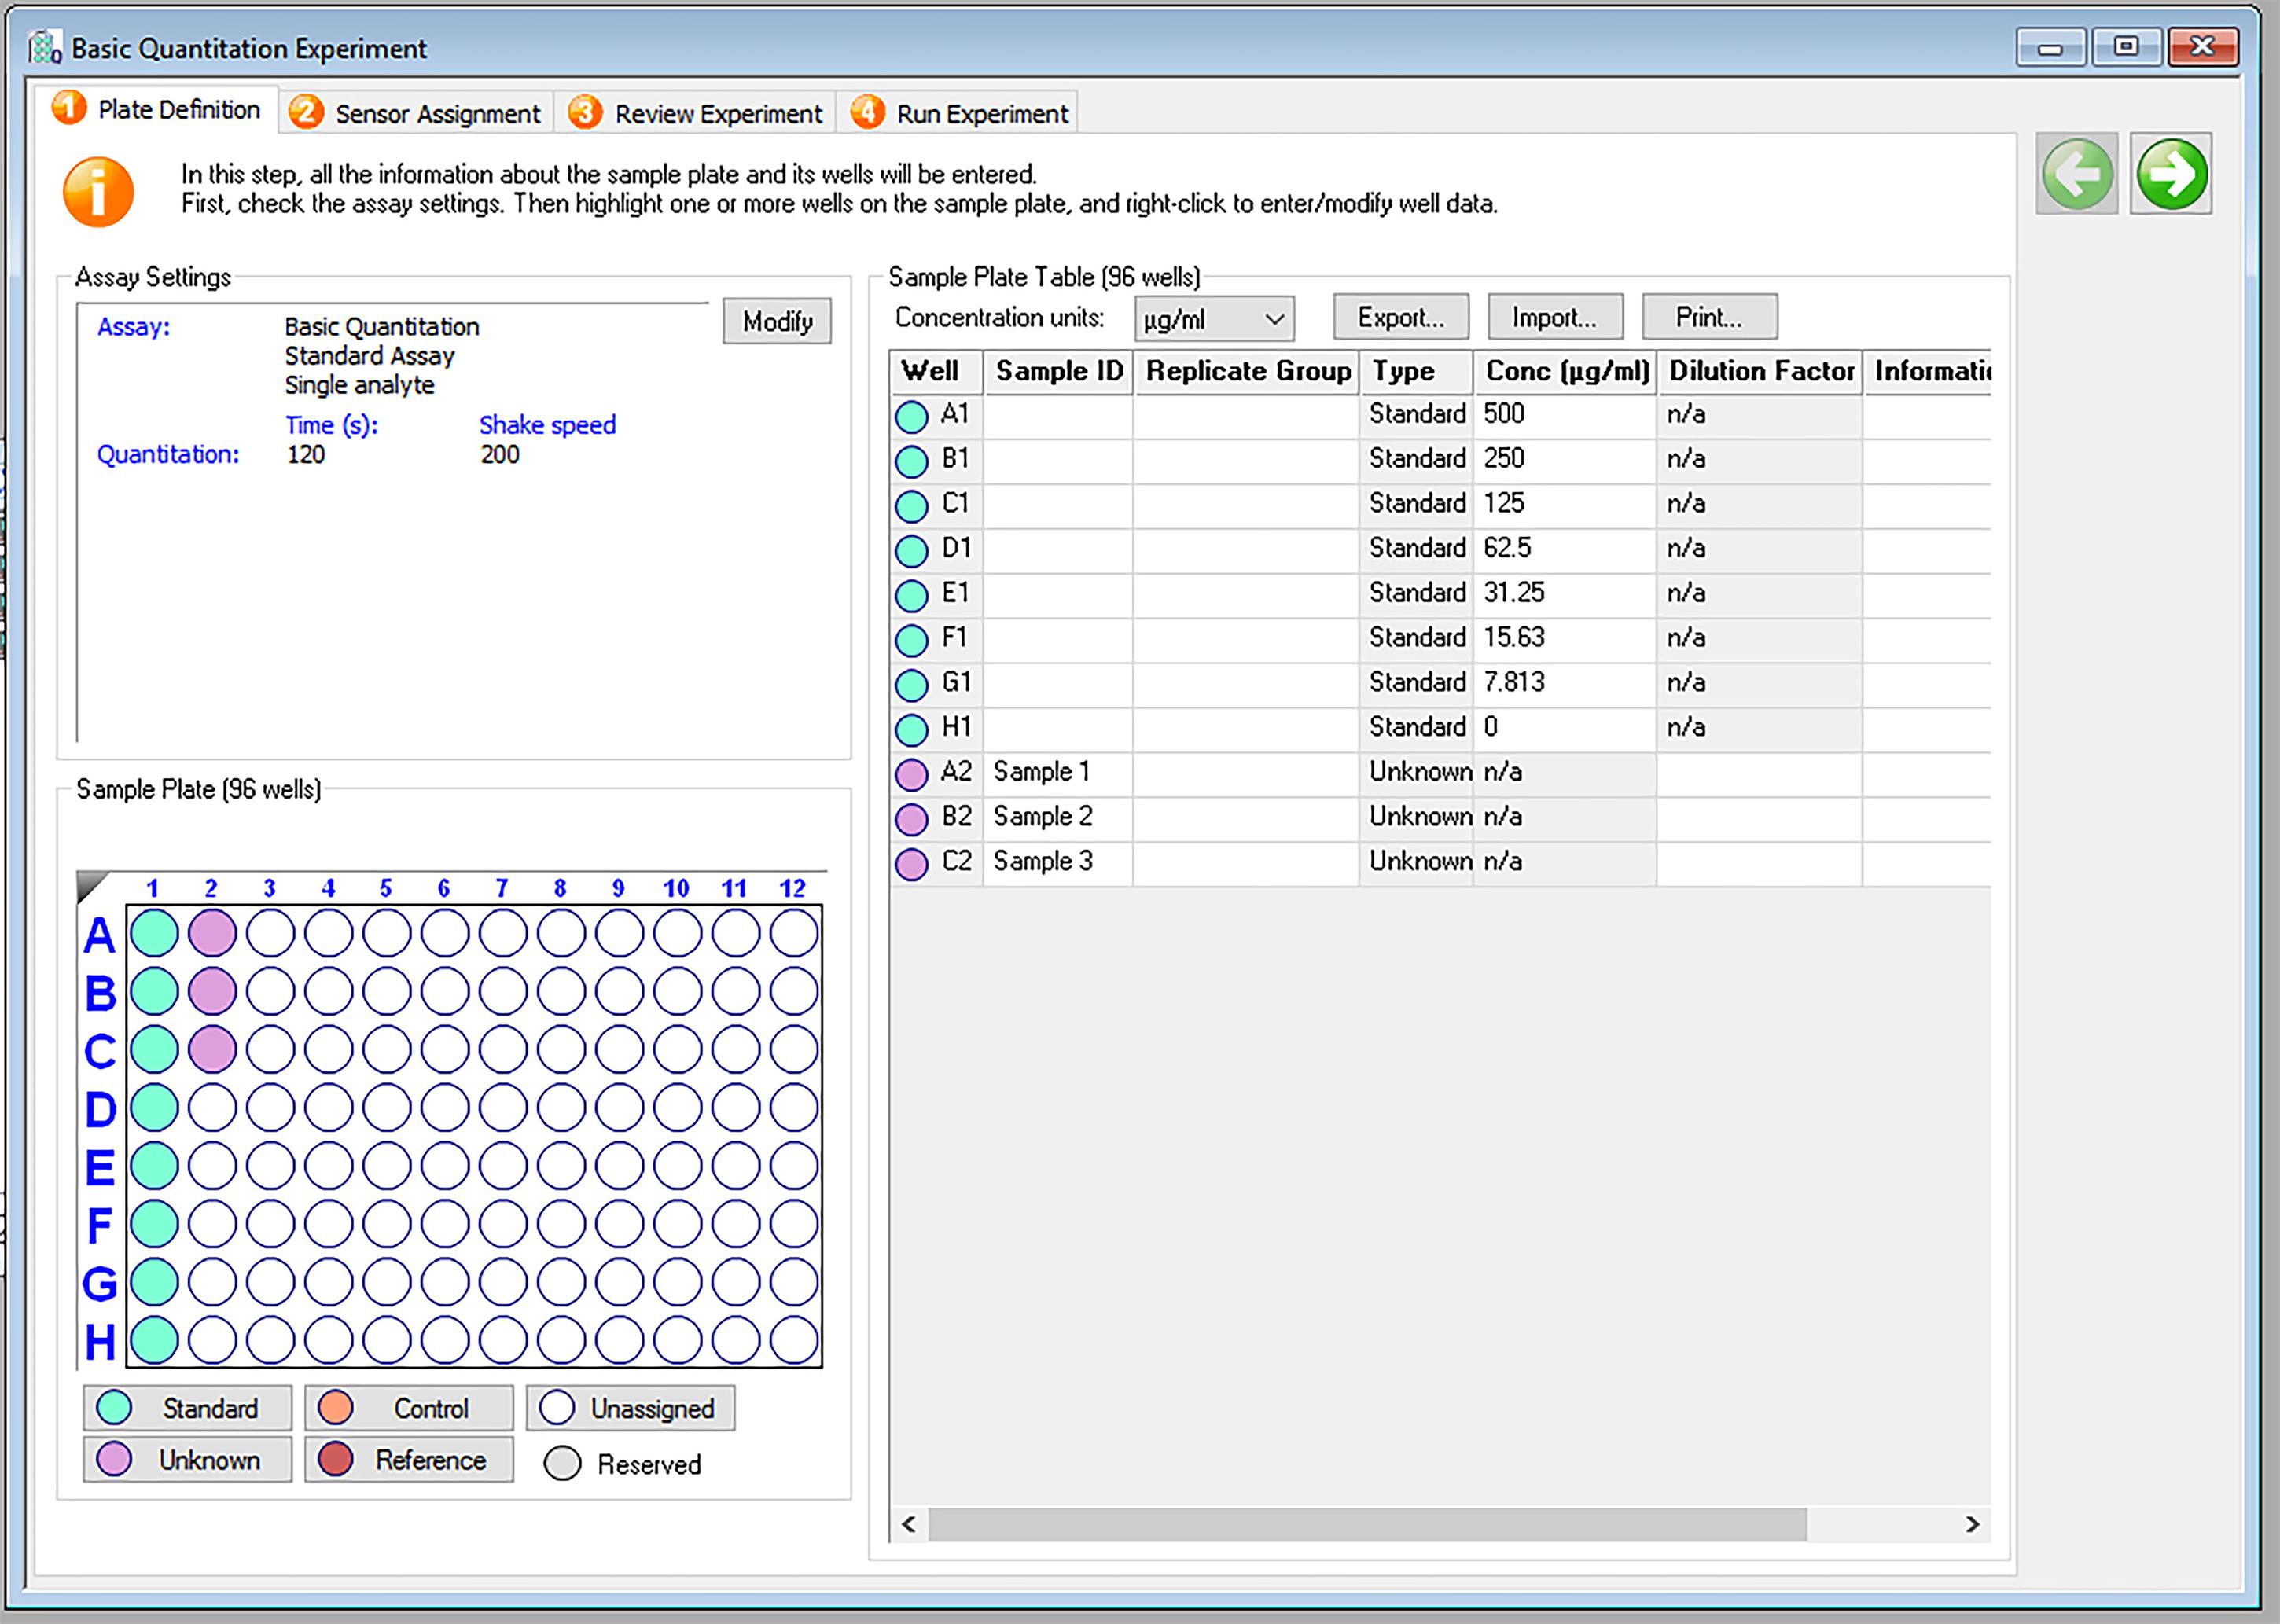
Figure 3. Octet RED96e experiment plate definition. After beginning a new experiment, use the plate definition tab to select the wells where the standard curve and samples have been loaded on the plate map. Input standard curve concentration and sample information in the table.
9. After completing the plate definition, select the green next arrow and input sensor information on the “Sensor Assignment” table (see Figure 4).
a. Sensors will automatically be set to the locations that were selected for the standard curve and unknown samples. If the sensors have been loaded in different locations, adjust accordingly using the remove or fill buttons.
b. Switch sensor type to protein A using the drop-down in the table to the right.
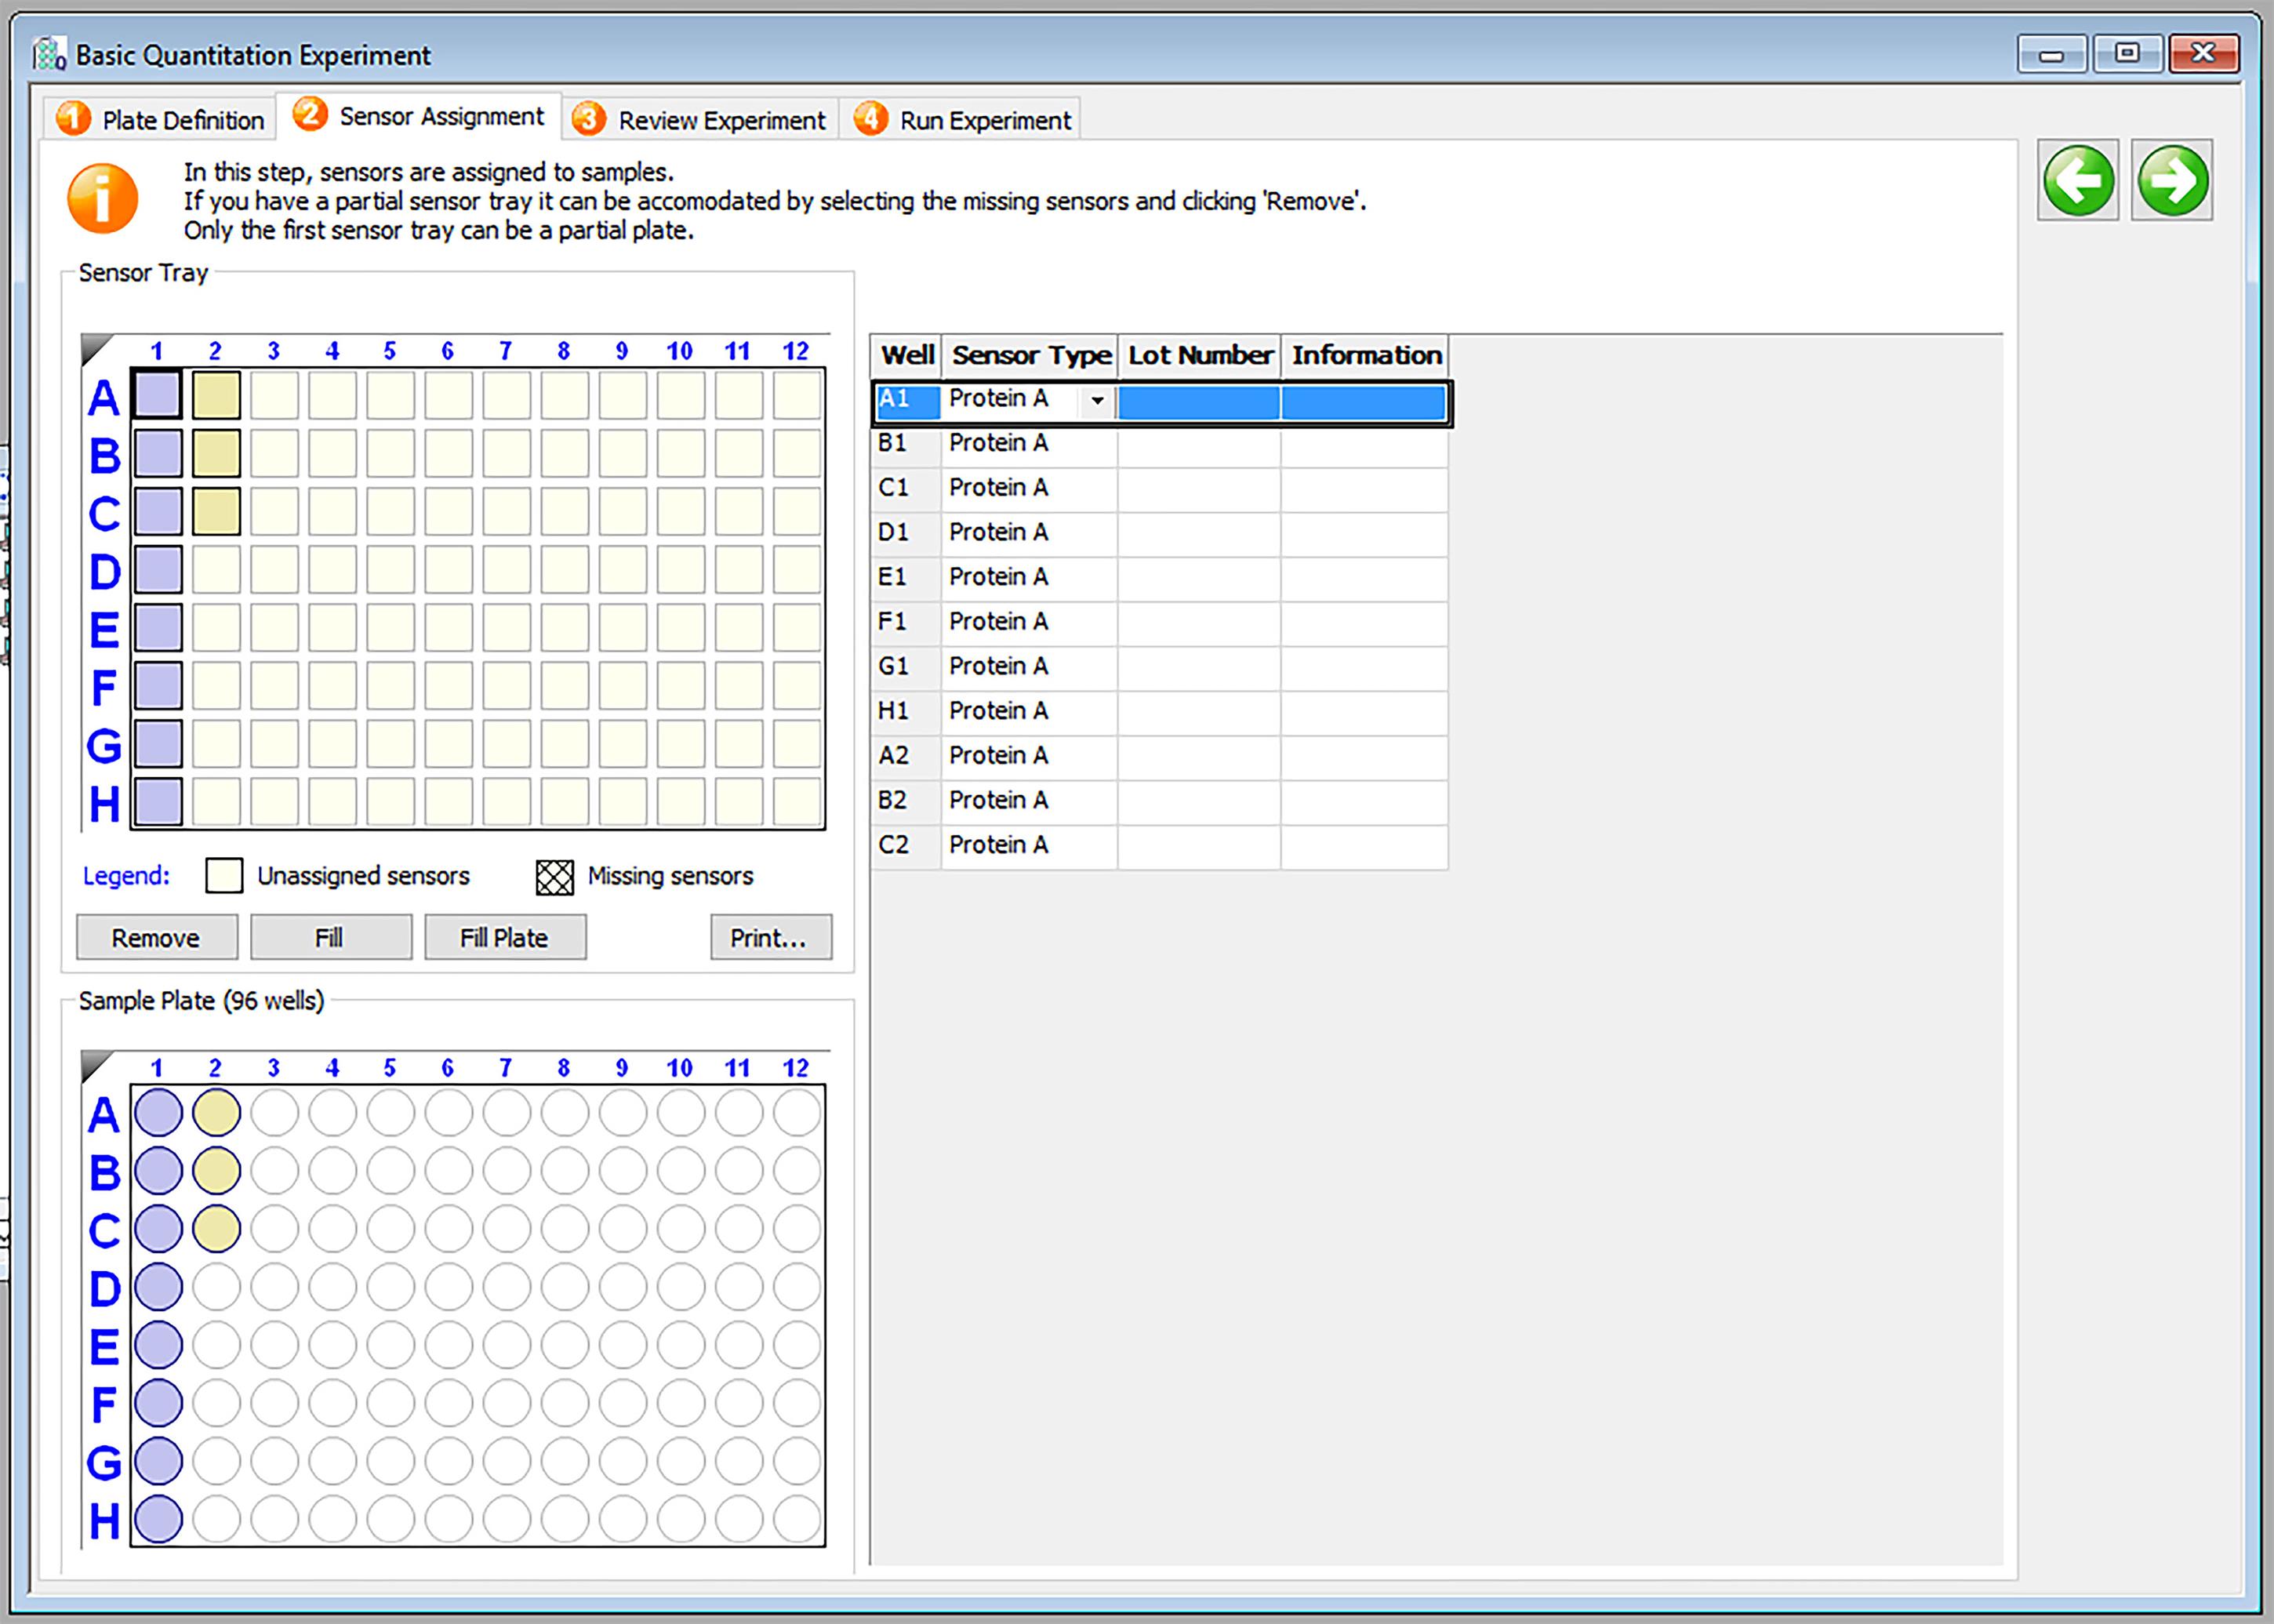
Figure 4. Octet RED96e sensor assignment table. After creating a plate definition, use the sensor assignment tab to confirm the location of the biosensors and select protein A as the sensor type.
10. After confirming the sensor assignments, click the green arrow to move to review experiment. In this step, you can review the information you put in the plate definition and sensor assignment.
11. Click the green arrow once more and name your experiment in the Experiment run name (sub-directory) box under the “Run Experiment” table. Ensure the quantitation data repository is the location you wish to save the data to, then select “Go” to start the run (see Figure 5).
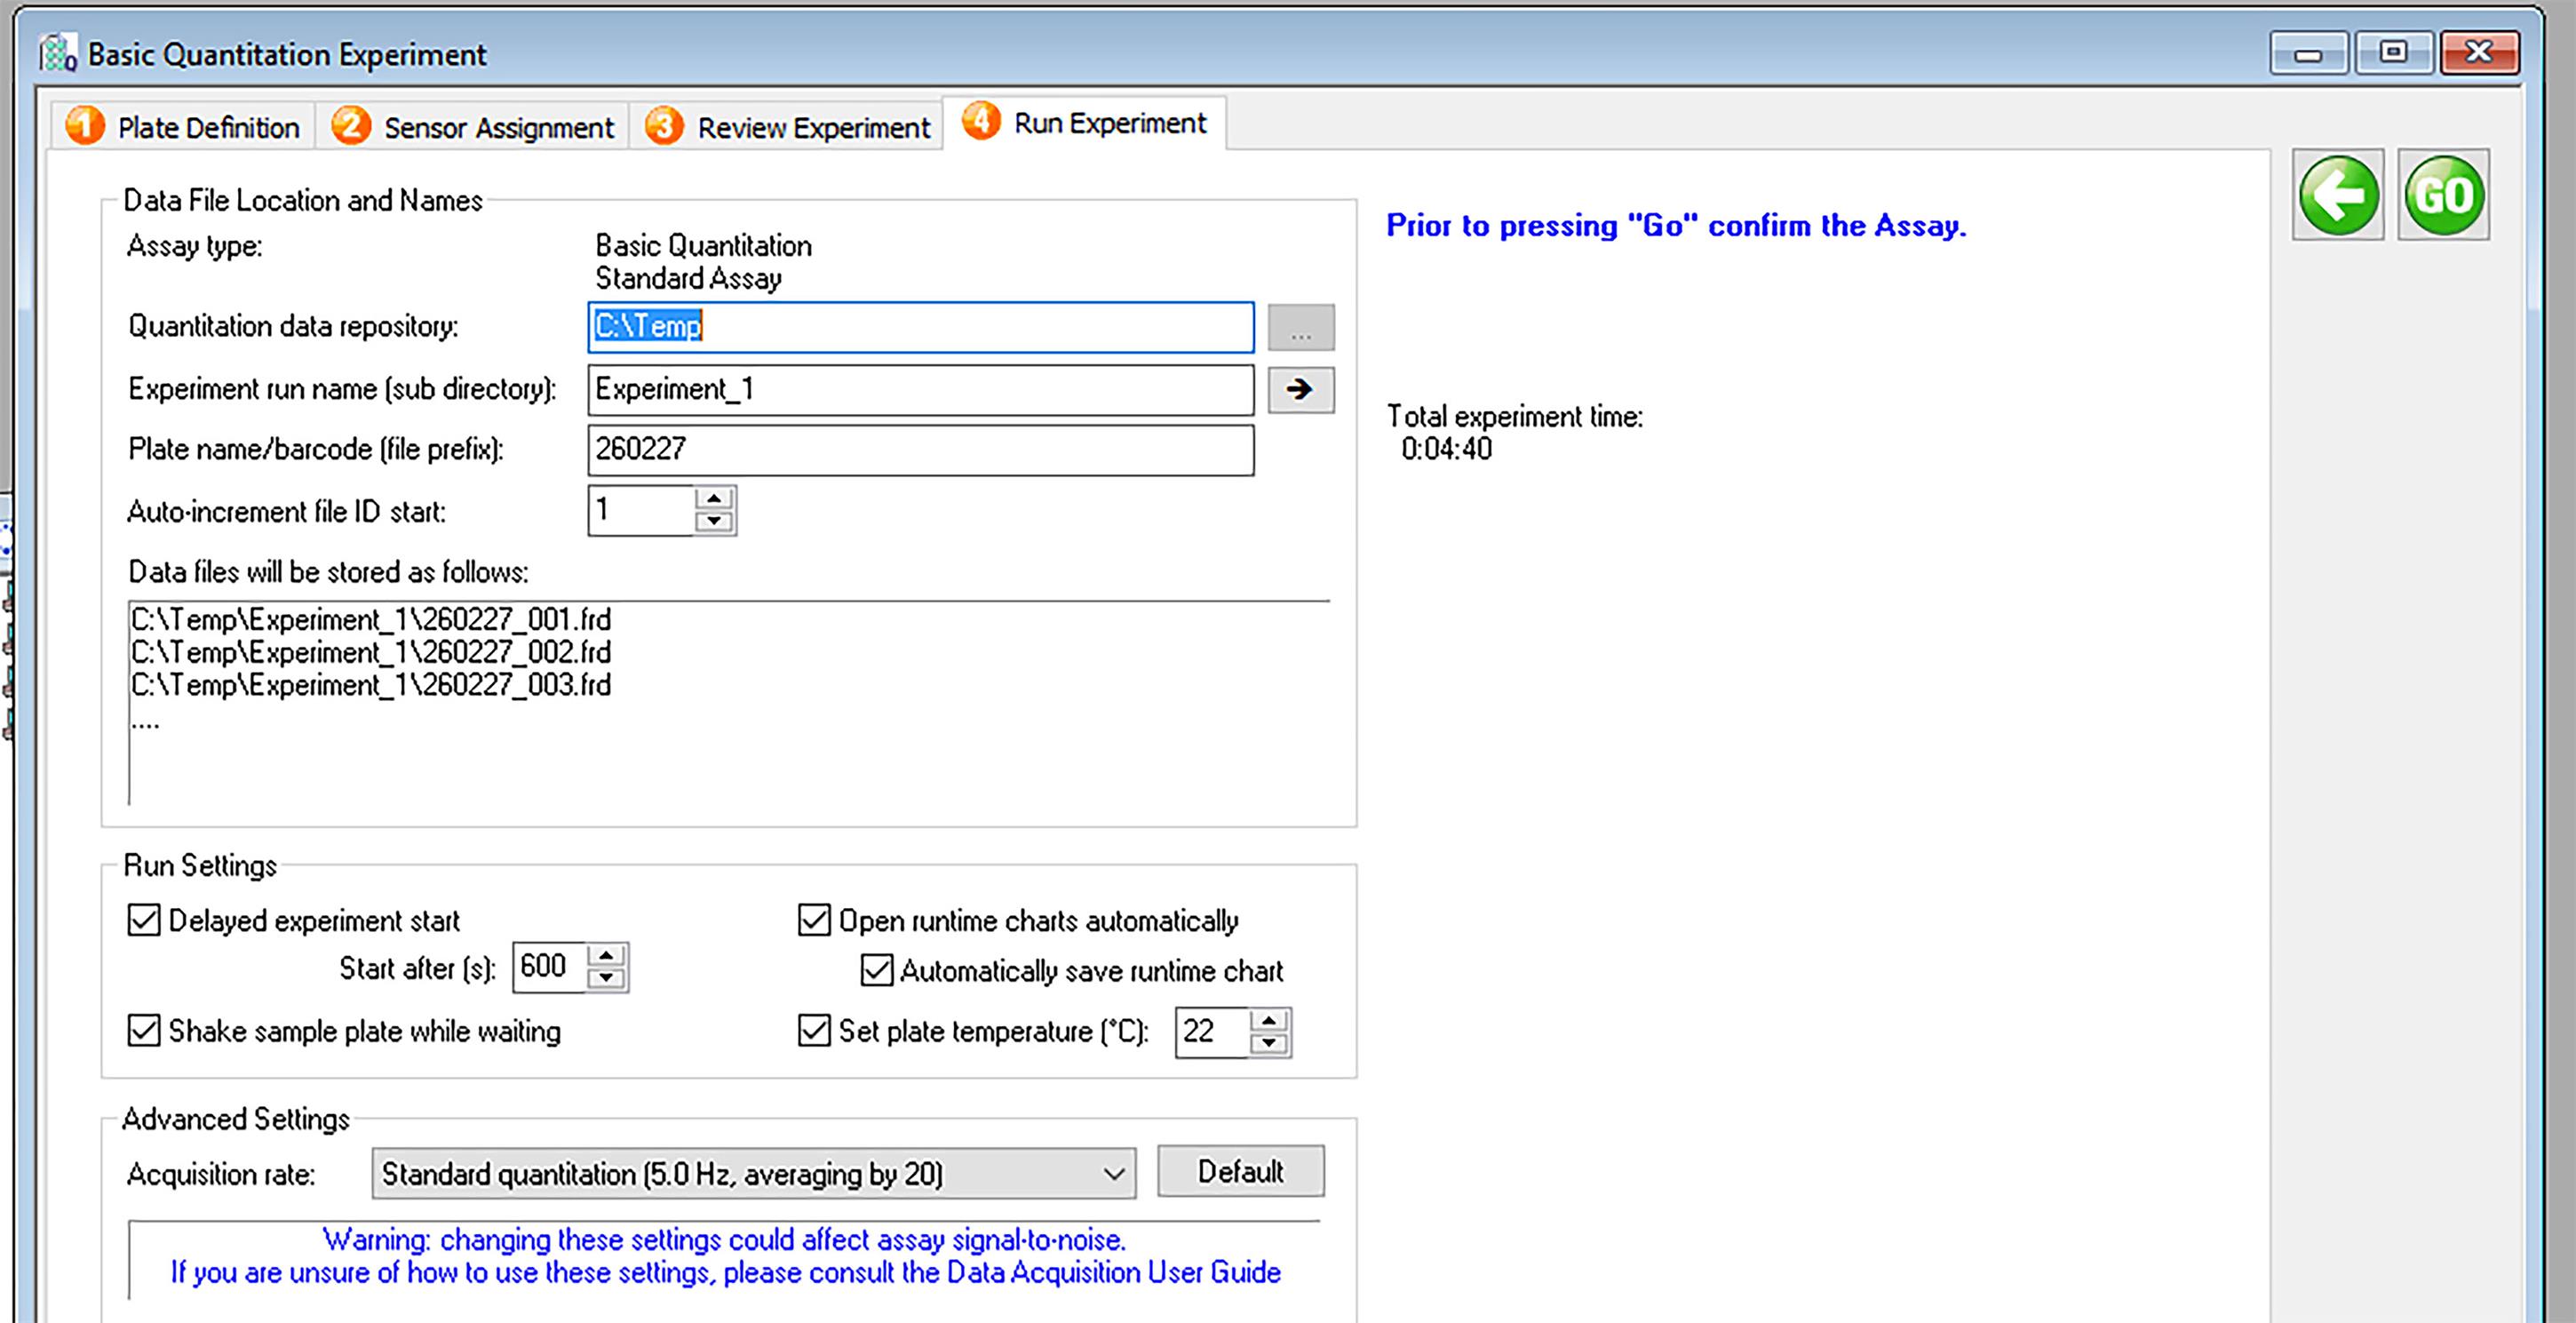
Figure 5. Octet RED96e run experiment table. After confirming the experiment design, create the experiment name and data repository location and begin the run.
12. After the run is complete, launch Data Analysis Version 7.1 and find the experiment under the “Data Selection” table. Double-click to pull up the data (Figure 6).
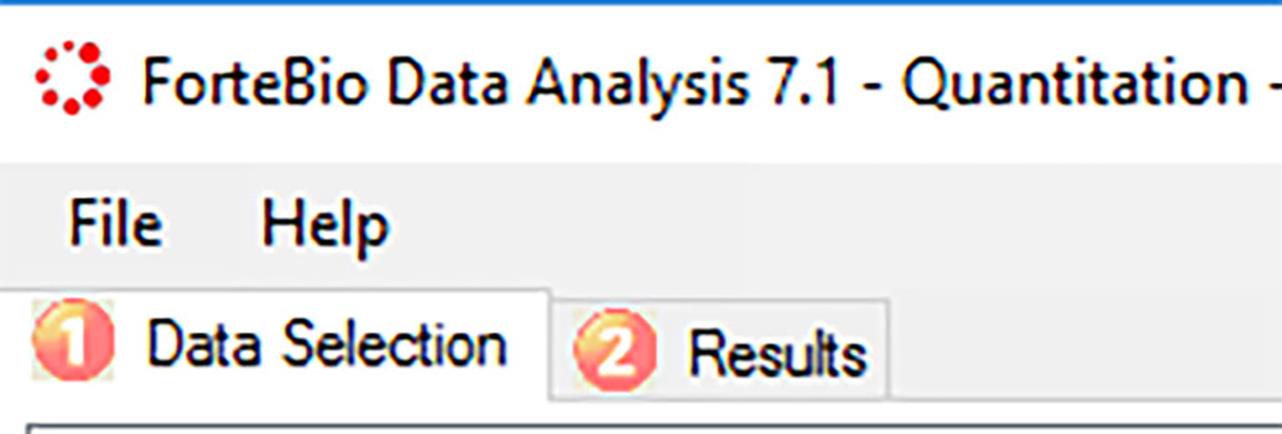
Figure 6. Octet RED96e data analysis. Two available tabs after launching the data analysis software. Select data under “Data Selection” before toggling to “Results.”
13. With the data now available, toggle over to the “Results” table. The binding rate curve graph for all standard curve points, as well as unknown samples, will be selected and displayed (see Figure 7).
Note: If you select only the standard curve points, the binding rate curve graph will only display the standard curve. Ensure that the standard curve results are similar to Figure 8.
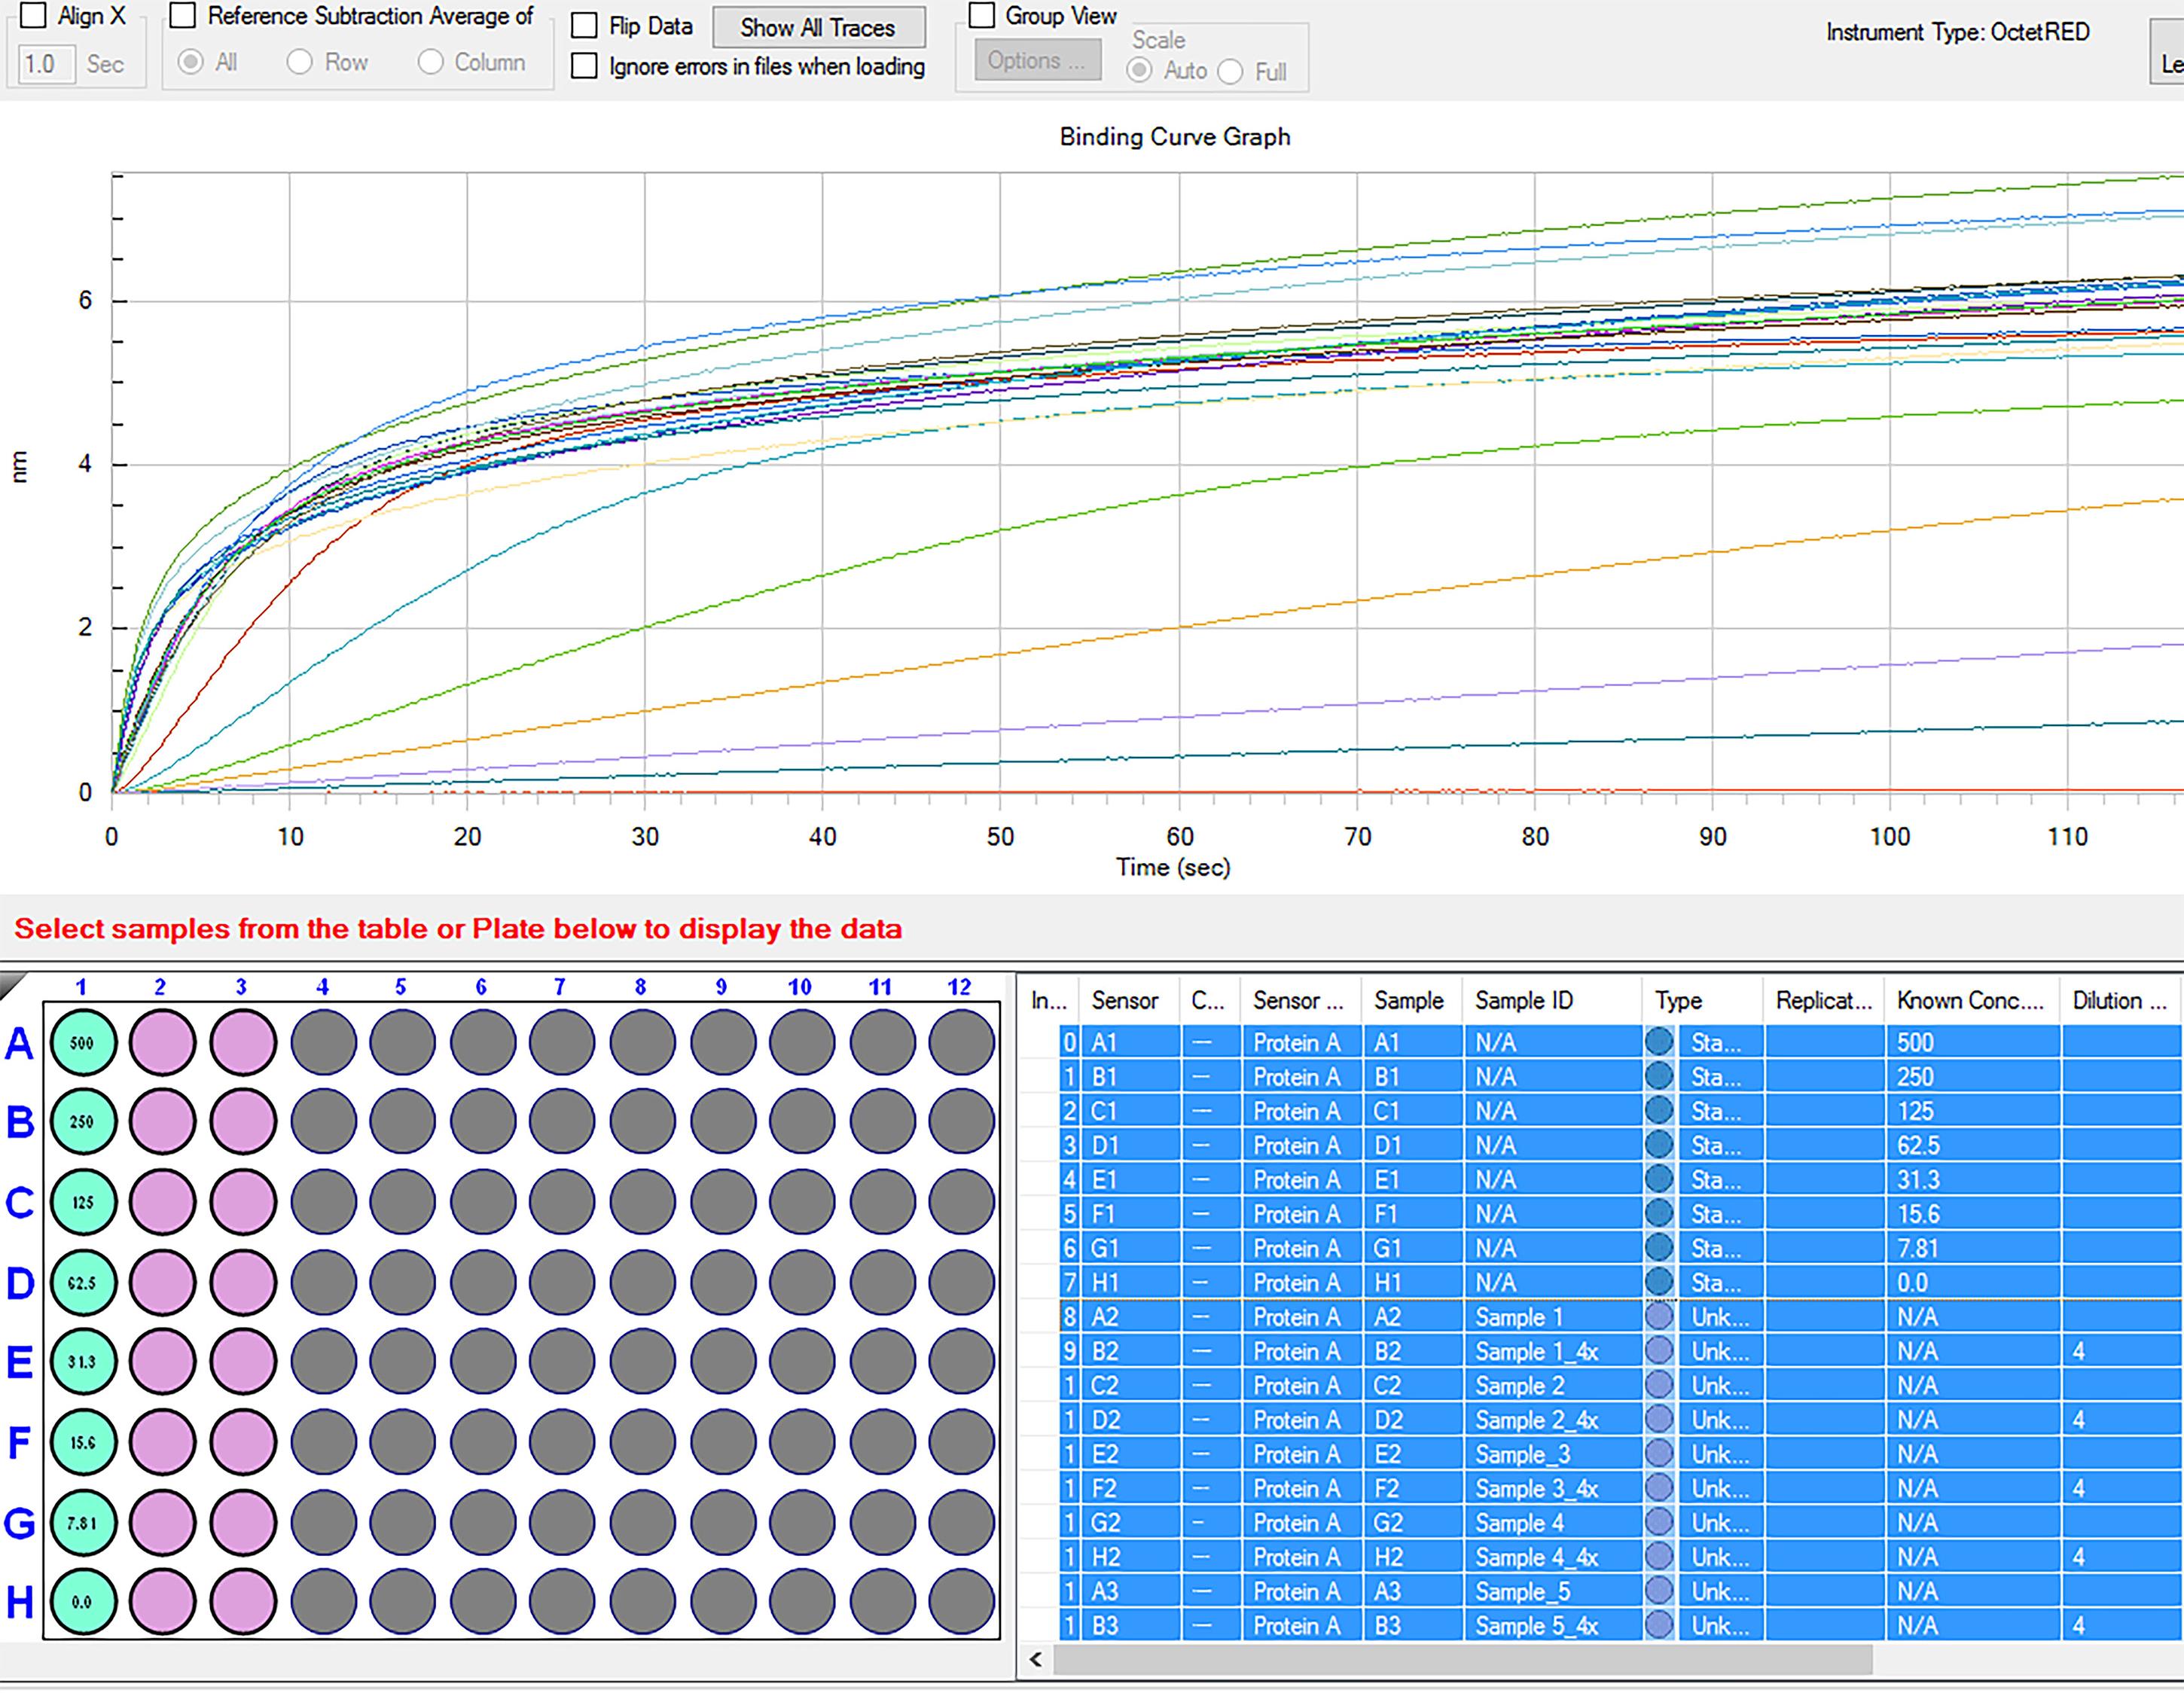
Figure 7. Binding rate curve graph of standard curve and samples. Launching an experiment will pull up the binding rate curve graph for all samples in the experiment.
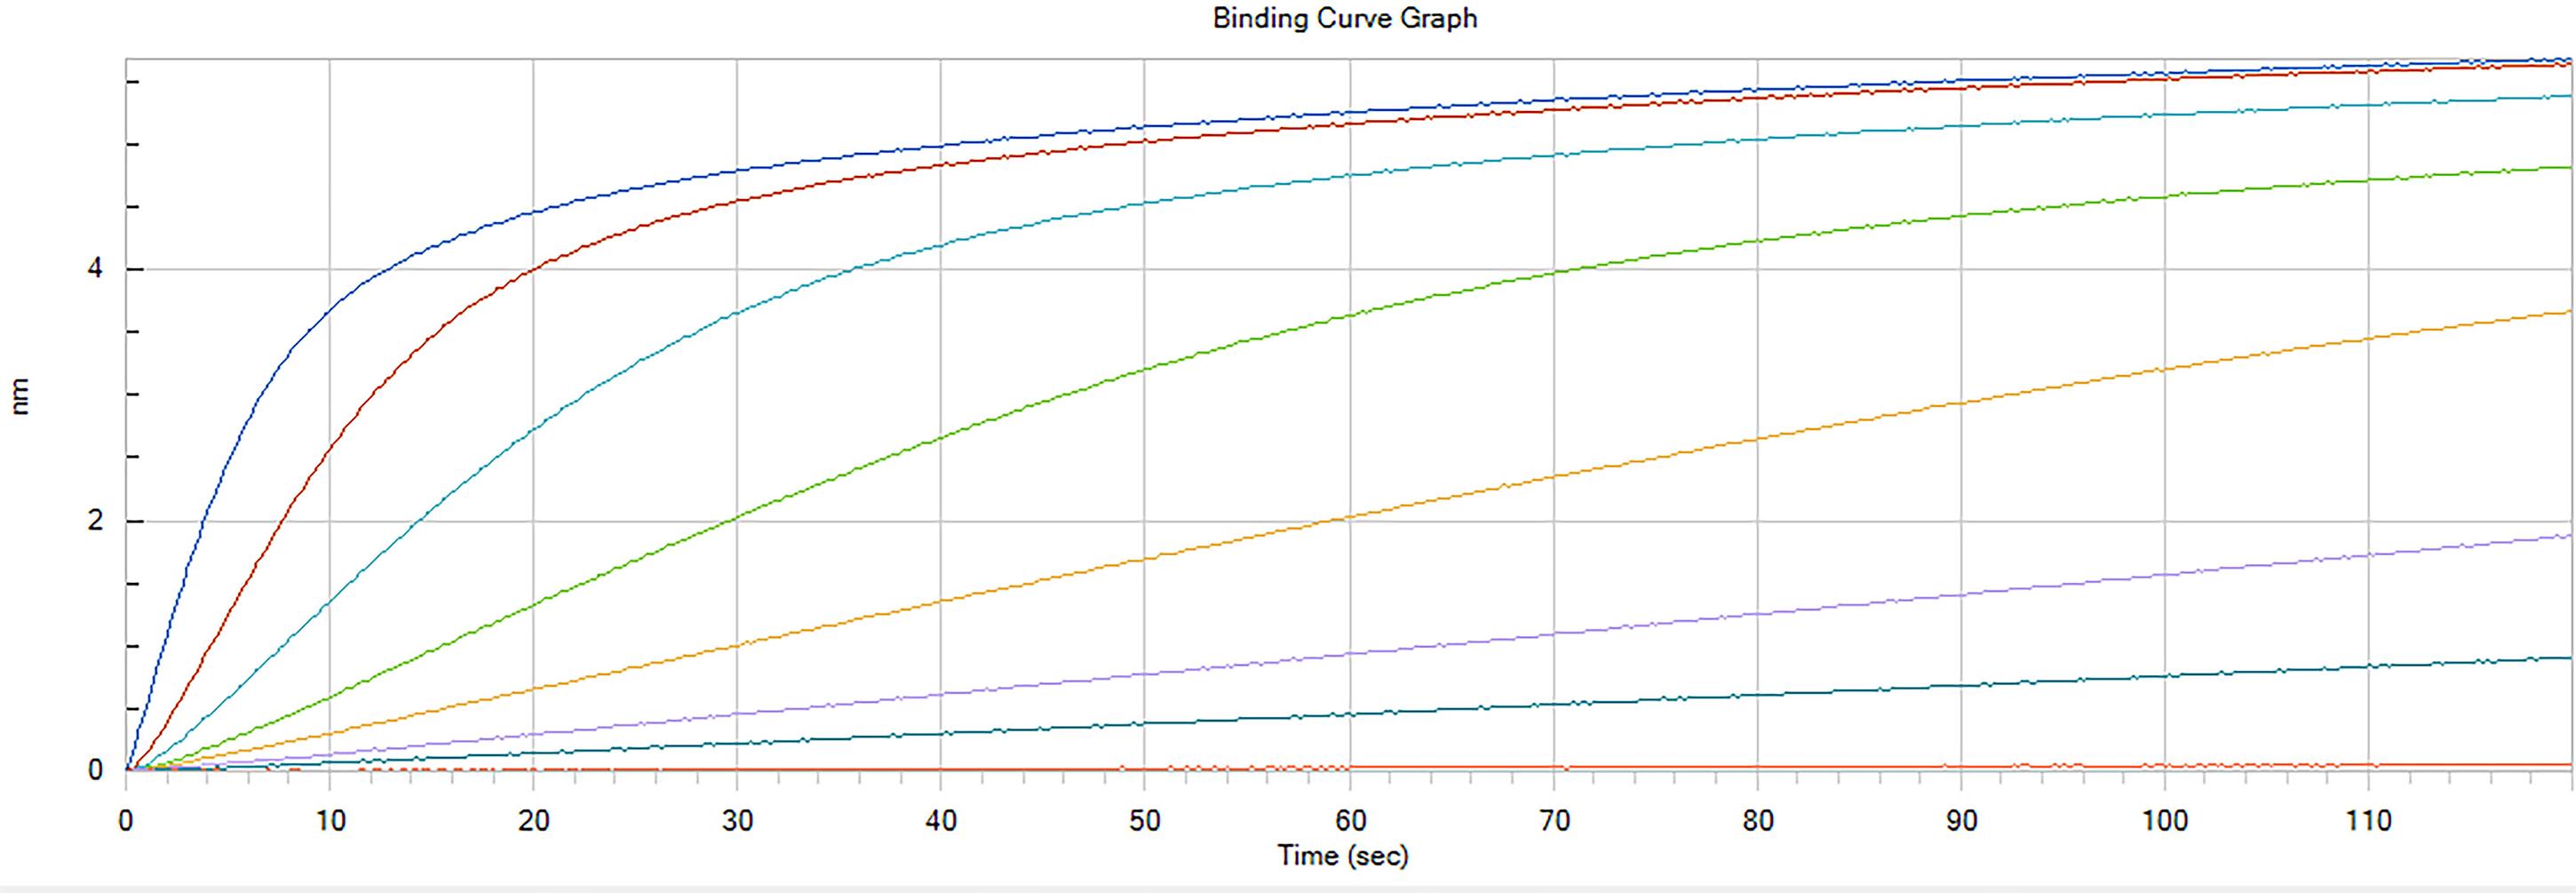
Figure 8. Example standard binding curve. The binding rate curve graph for the standard curve samples should appear as shown. The sample with the highest initial binding rate is 500 mg/L, then 250 mg/L, 125 mg/L, 62.5 mg/L, 31.25 mg/L, 15.628 mg/L, 7.813 mg/L, and 0 mg/L.
14. After verifying that the standard curve ran successfully, click the “Calculate Binding Rate!” button to see the results of the unknown samples (see Figure 9).
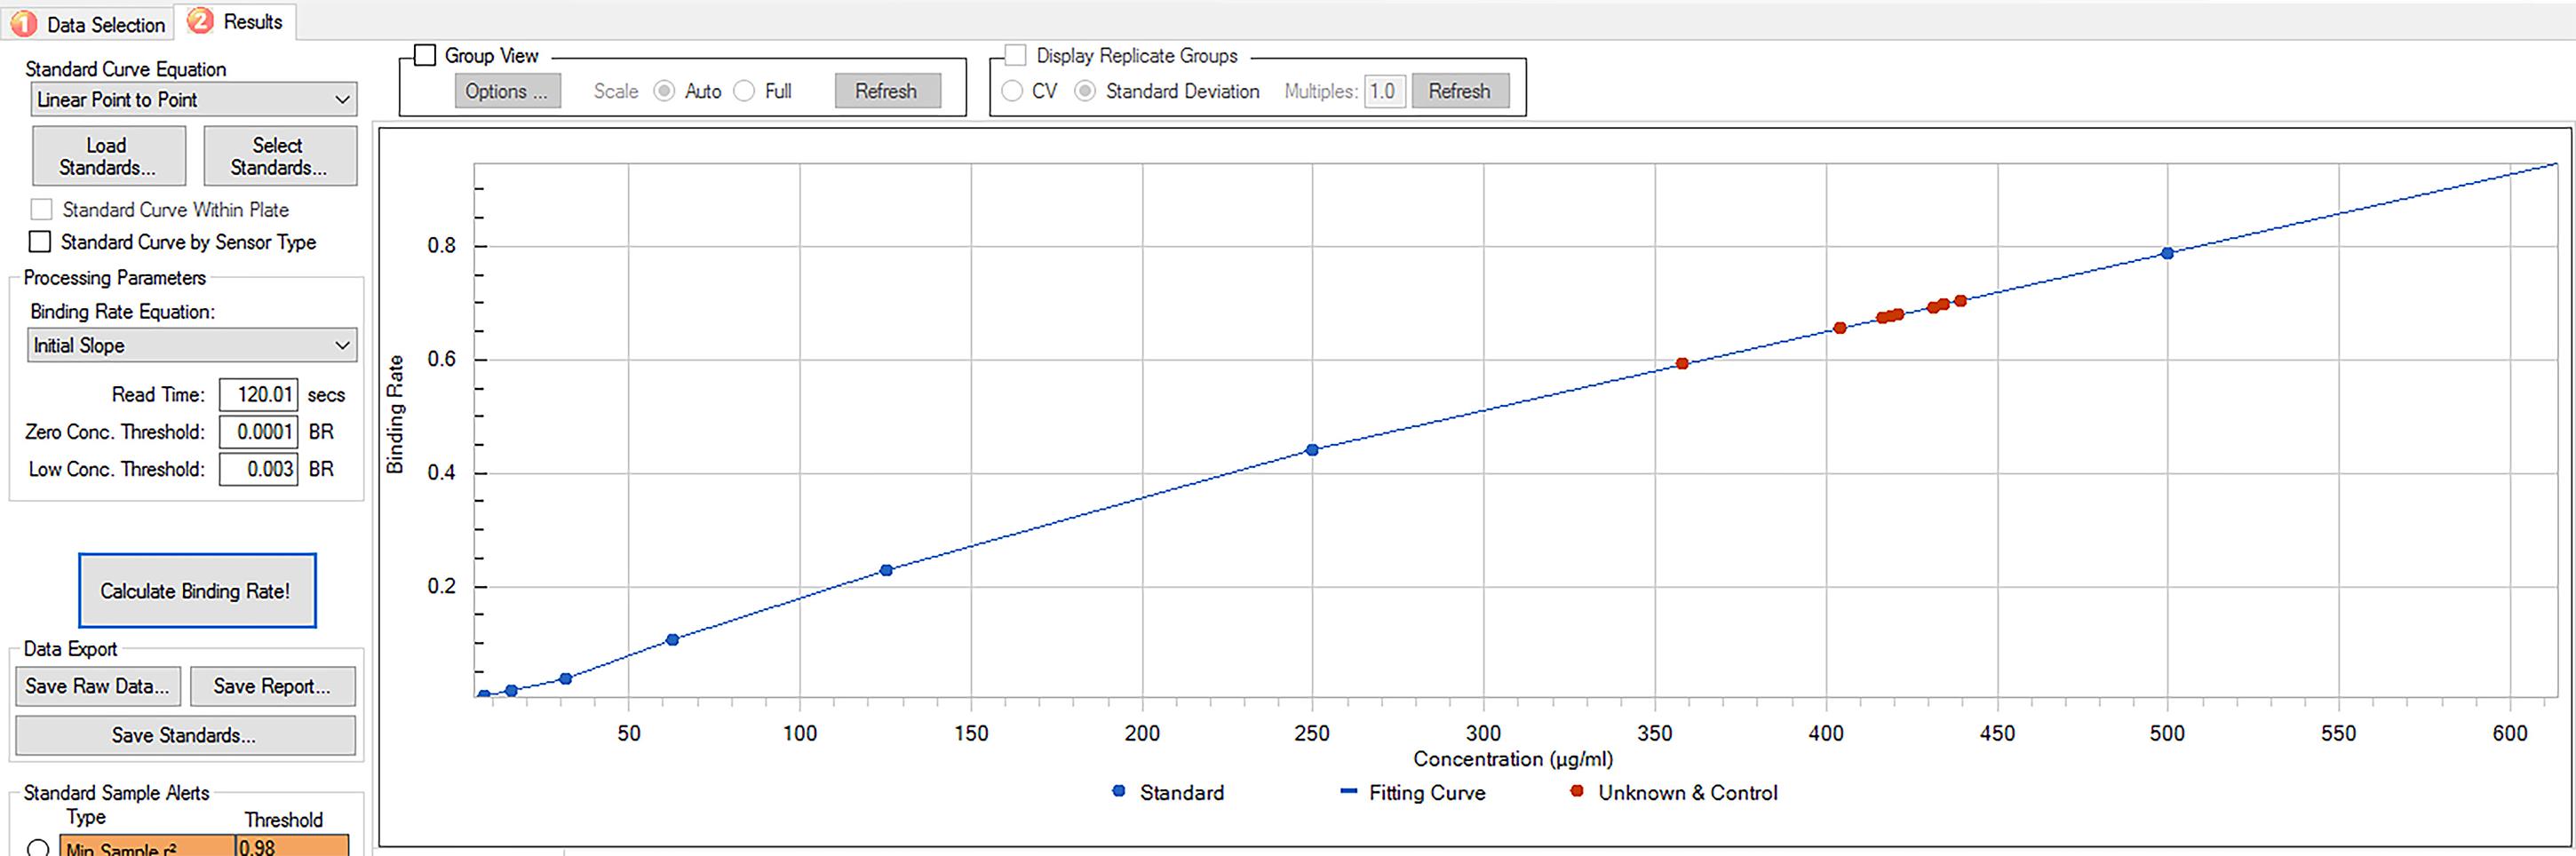
Figure 9. Calculated binding rate. After calculating the binding rate, data analysis will generate a graph and table that contain the binding rate and titer information for the unknown samples.
15. A table with the binding rates will appear under the graph generated. This table contains the titer information of the unknown samples in the concentration of μg/mL. Click “Save Report” to generate an Excel file with the data.
F. In-culture proA capturing
1. After taking the sample for viability, VCD, and titer analysis, create a 50% slurry of AmMagTM protein A magnetic beads. The beads are shipped in a 25% slurry ratio in 20% ethanol, so vigorously shake the storage bottle to resuspend the beads in the ethanol. Then, transfer the contents to a Corning® 50 mL centrifuge tube. Allow the beads to settle at the bottom of the tube. Bead settling without intervention will take approximately 15 min. To speed up this process, place the tube in the AmMagTM MR magnetic rack so the beads will pellet to the magnet in less than 30 s. Once removed from the rack, the beads will quickly fall to the bottom of the conical tube so volume can be determined. Then, remove or add 20% ethanol, so that you have equal parts beads and ethanol, i.e., if your settled beads are 10 mL, you will need 10 mL of 20% ethanol.
2. Vigorously shake the 50% proA magnetic bead slurry to resuspend the beads. Then, add the desired volume of beads to your cell culture.
Notes:
1. 1 mL of settled proA magnetic beads (2 mL of 50% bead slurry) can capture up to 36 mg of IgG. Use the titer measurement and this capturing capacity to decide the volume of beads needed to capture the protein in your sample.
2. Magnetic beads are added suspended in 20% ethanol. As this is an end-stage harvesting method, cell viability is no longer a concern. If preferred, beads could be buffer exchanged into either PBS or cell culture media before addition to cell culture.
3. Transfer the flask with beads added back to the Kuhner ISF1-Z incubator and incubate at 160 rpm, 31 °C, 5% CO2, for at least 30 min.
4. After the 30-min incubation period, transfer the entire contents of your flask into a single Corning® 50 mL centrifuge tube. Place the conical tube in the AmMagTM MR magnetic separation rack and pour in the first 50 mL of your culture with the beads. Wait a few seconds (~10 s) for the beads to pellet to the magnet or until you see that the beads are no longer floating around in the cell culture. Then pour off the culture media into a waste collection bottle.
Note: To pour off the culture medium, simply lift the magnetic separation rack by the sides, keeping the removable top connected to the magnetic bottom, and dump the culture into the waste collection. The magnetic separation rack will securely hold the 50 mL conical tube in place, and the magnet strongly attracts the beads, so there is no need to worry about disturbing the magnetic bead pellet or dropping the tube.
5. Repeat this step until all the beads for the sample have been collected in a single tube.
G. Preparation of the AmMagTM SA Plus
1. Power on the AmMagTM SA Plus.
2. Set up the instrument so that tubing for each port is in the correct buffers in disposable roller bottles. See Table 2 for the recommended port layout and volume recommendations. The actual volume used will vary based on the number of samples and wash volumes selected. The SA Plus will notify you of the volume needed for each buffer before the start of the run.
Table 2. SA Plus port layout and buffer recommendations
| Port number | Buffer | Volume |
|---|---|---|
| 1 | ddH2O | 100 mL |
| 2 | PBS | 500 mL |
| 3 | Elution buffer pH 3.0 | 500 mL |
| 4 | 20% ethanol | 250 mL |
| 5 | 0.02% Tween 80 | 1,000 mL |
| 6 | 50 mM HCl | 500 mL |
| 7 | 0.1 M NaOH | 500 mL |
3. On the pretreatment tab of the instrument interface, click the “Fill” button to fill each port line with the buffer it is placed in. After the lines fill, click the “Fill” button again to ensure all lines are completely flushed with the correct buffers.
H. Elution of captured IgG
1. Open the door of the AmMagTM SA Plus and click on “Rack Out” under the Pretreatment tab of the screen.
2. Load your 50 mL conical tube from step F4 into the instrument, ensuring the cap is off the tube.
3. Select “Rack In” and close the door to the instrument.
4. Navigate to the Processing tab and select the positions that you loaded your conical tube into. See Figure 10.
5. Adjust the MagBeads volume if desired.
Notes:
1. Only one volume of MagBeads can be applied to the entire run. If the samples contain different volumes of MagBeads, input the largest volume of beads so that the washing and elution steps are effective. If a certain washing or elution volume is desired, you may need to adjust the input bead volume and wash or elution MVs to reach the desired volume, as the MVs can only be whole numbers. (MV is a similar concept to column volume and is based on input MagBeads volume. Multiply MagBeads volume by MV to calculate the buffer volume in mL that will be added to your samples.)
2. For example, a 3.5 mL elution volume is desirable for 1 mL of settled beads; however, if you input 1 mL under MagBeads, because you can only input whole numbers for elution MV, you will not be able to get the volume of 3.5 mL. To overcome this, simply put in 0.5 mL as your bead volume and set the elution MV to 7.
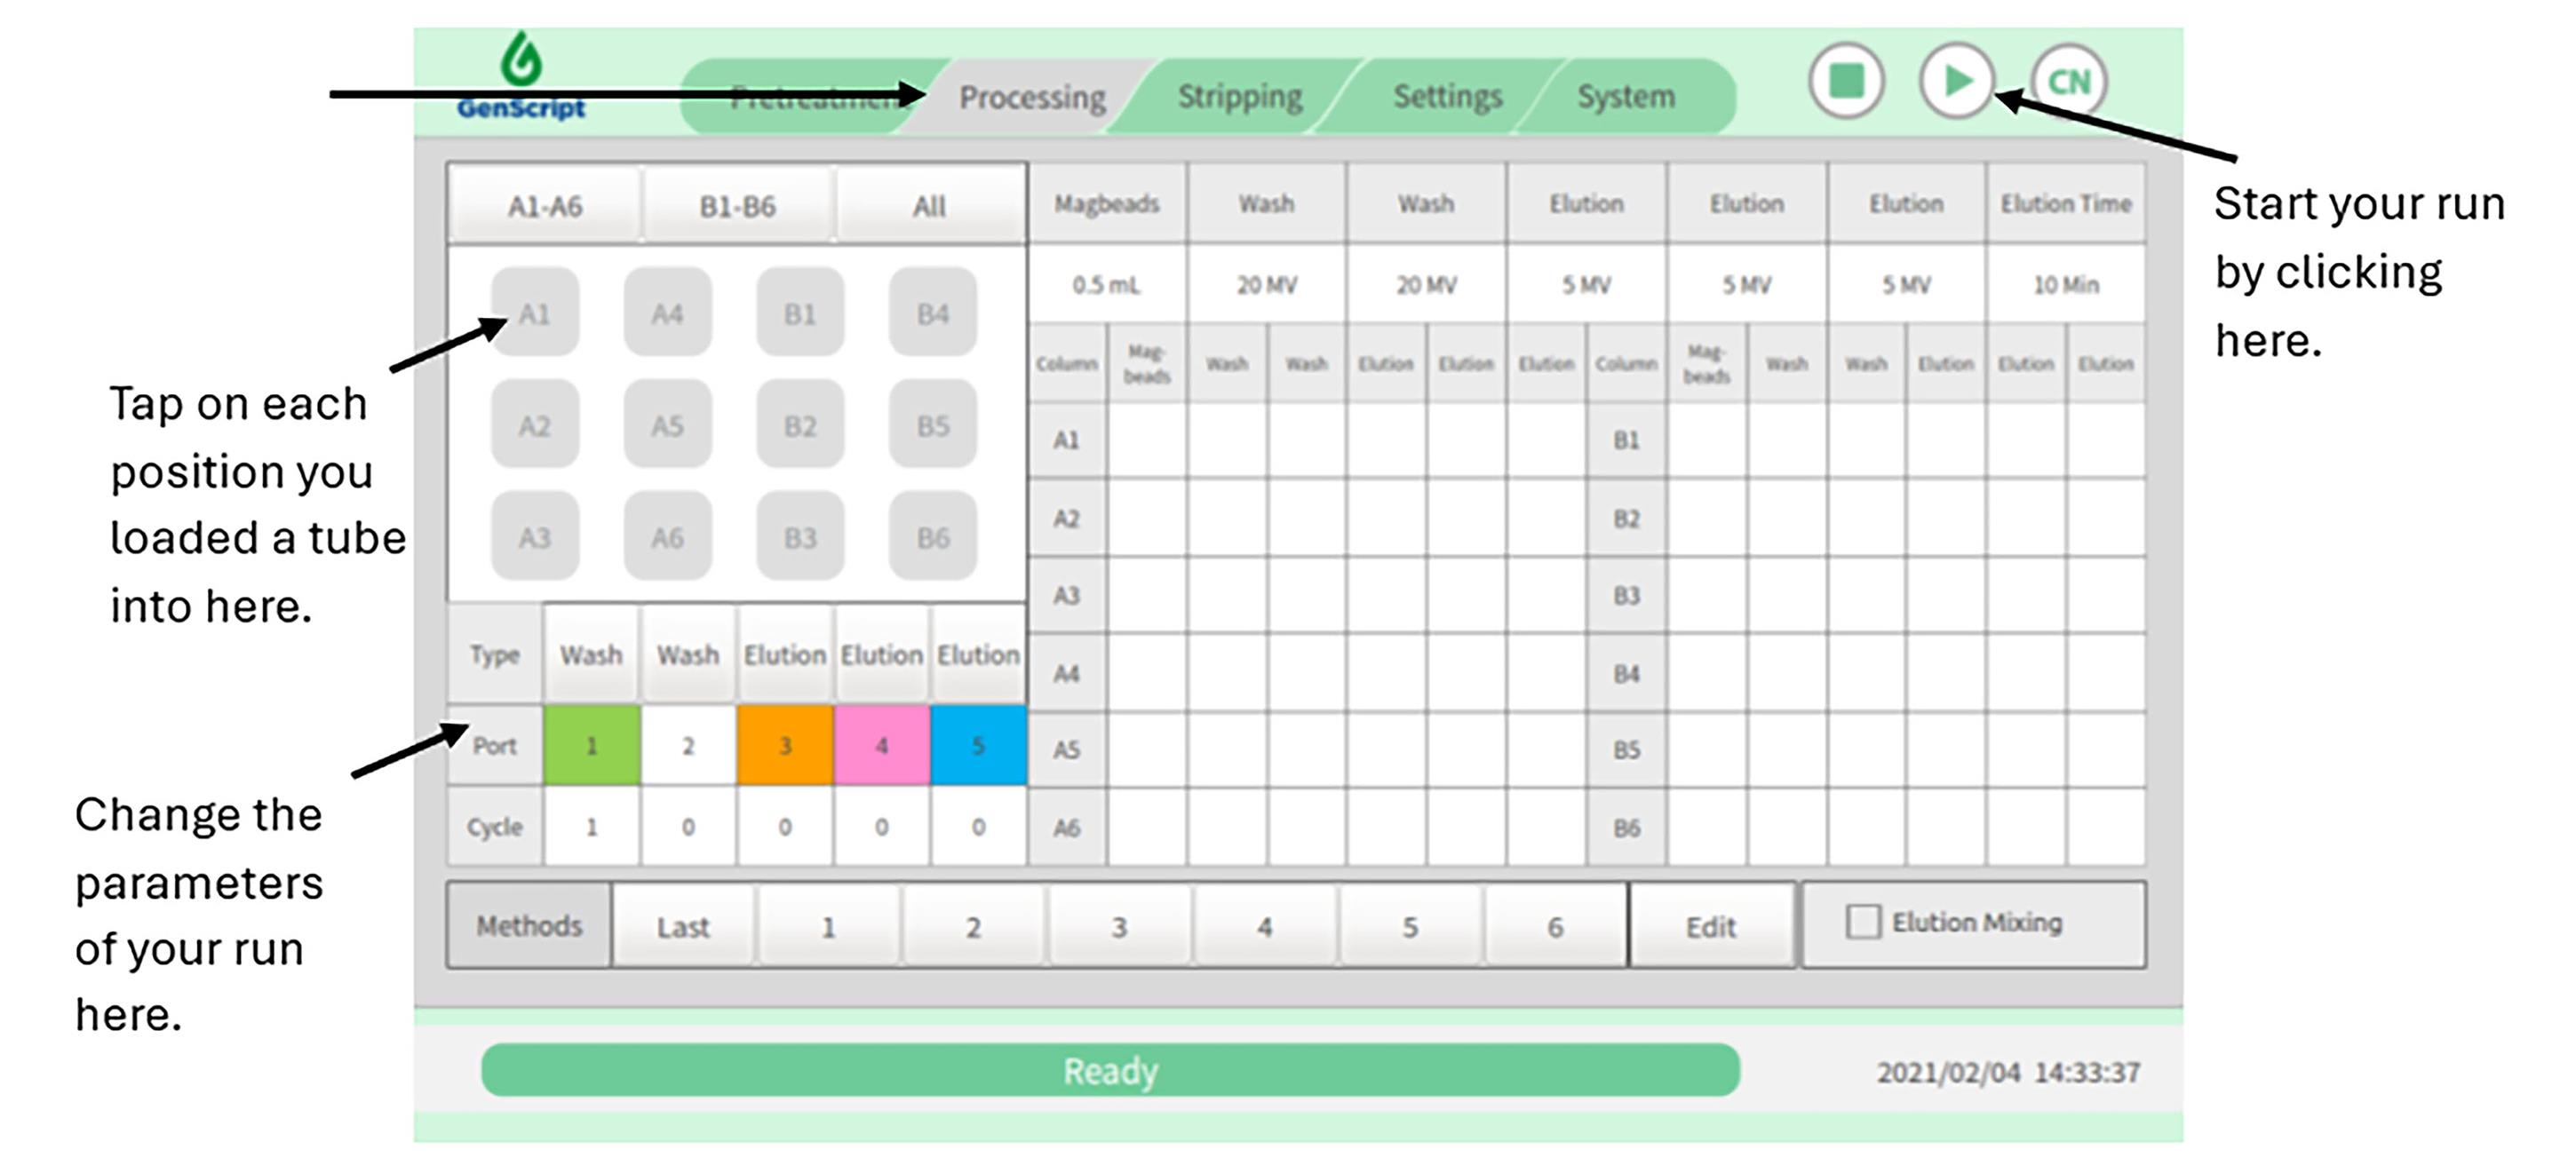
Figure 10. AmMagTM SA Plus processing screen. All experiment parameters will be adjusted under the processing Table. Adjust according to the number of samples and settled bead volume added to the cultures.
6. Set up the parameters so that they read as follows in Table 3.
Table 3. AmMagTM SA Plus parameters for washing and elutions. This program will wash the samples once with PBS and twice with 0.02% Tween 80, and elute twice with elution buffer pH 3.0. The last two elution columns are set to zero cycle so they will not execute any elutions.
| Type | Wash | Wash | Elution | Elution | Elution |
|---|---|---|---|---|---|
| Port | 2 | 5 | 3 | 1 | 4 |
| Cycle | 1 | 2 | 2 | 0 | 0 |
7. Click the play button at the top of the screen to begin the run.
8. In approximately 30 min, elution 1 will be complete. When the machine has finished the washing and first elution, a buzzer will sound. Open the door to the instrument, and the rack will come out automatically. Use a 5,000 μL Proline® Plus mechanical pipette with Optifit pre-sterilized racked 5,000 μL pipette tips to collect the elution buffer and transfer it into a 5 mL Eppendorf tube for elution 1.
9. After you collect the elution, click “OK” on the message that pops up on the screen, and the rack will move back into the instrument automatically. Close the door and wait approximately 10 min for the next elution to be completed.
10. When the second elution is complete, the buzzer will sound again. Open the door and collect the elution with a 5,000 μL Proline® Plus Mechanical pipette with Optifit pre-sterilized racked 5,000 μL pipette tips, transferring it into a separate 5 mL Eppendorf tube for elution 2. After you collect the elution, click “OK” and allow the rack to move back into the machine. Close the door and wait for the “Experiment complete” message.
11. Leave the beads in the instrument for the bead regeneration process (see section I).
12. Add 10% of your elution volume of 2.0 M HEPES to each eluate (i.e., 350 μL of HEPES to 3.5 mL of elution).
13. Measure protein concentration using the NanoDropTM One/Onec Microvolume UV-Vis spectrophotometer. Perform any desired QC on the samples.
Note: Subtle perturbations during protein handling can influence downstream functional readouts, particularly in mechanosensitive biological systems [31].
I. Bead regeneration
1. With the bead already in the SA Plus from the elution process in section H, navigate to the “Stripping” page on the screen. See Figure 11.
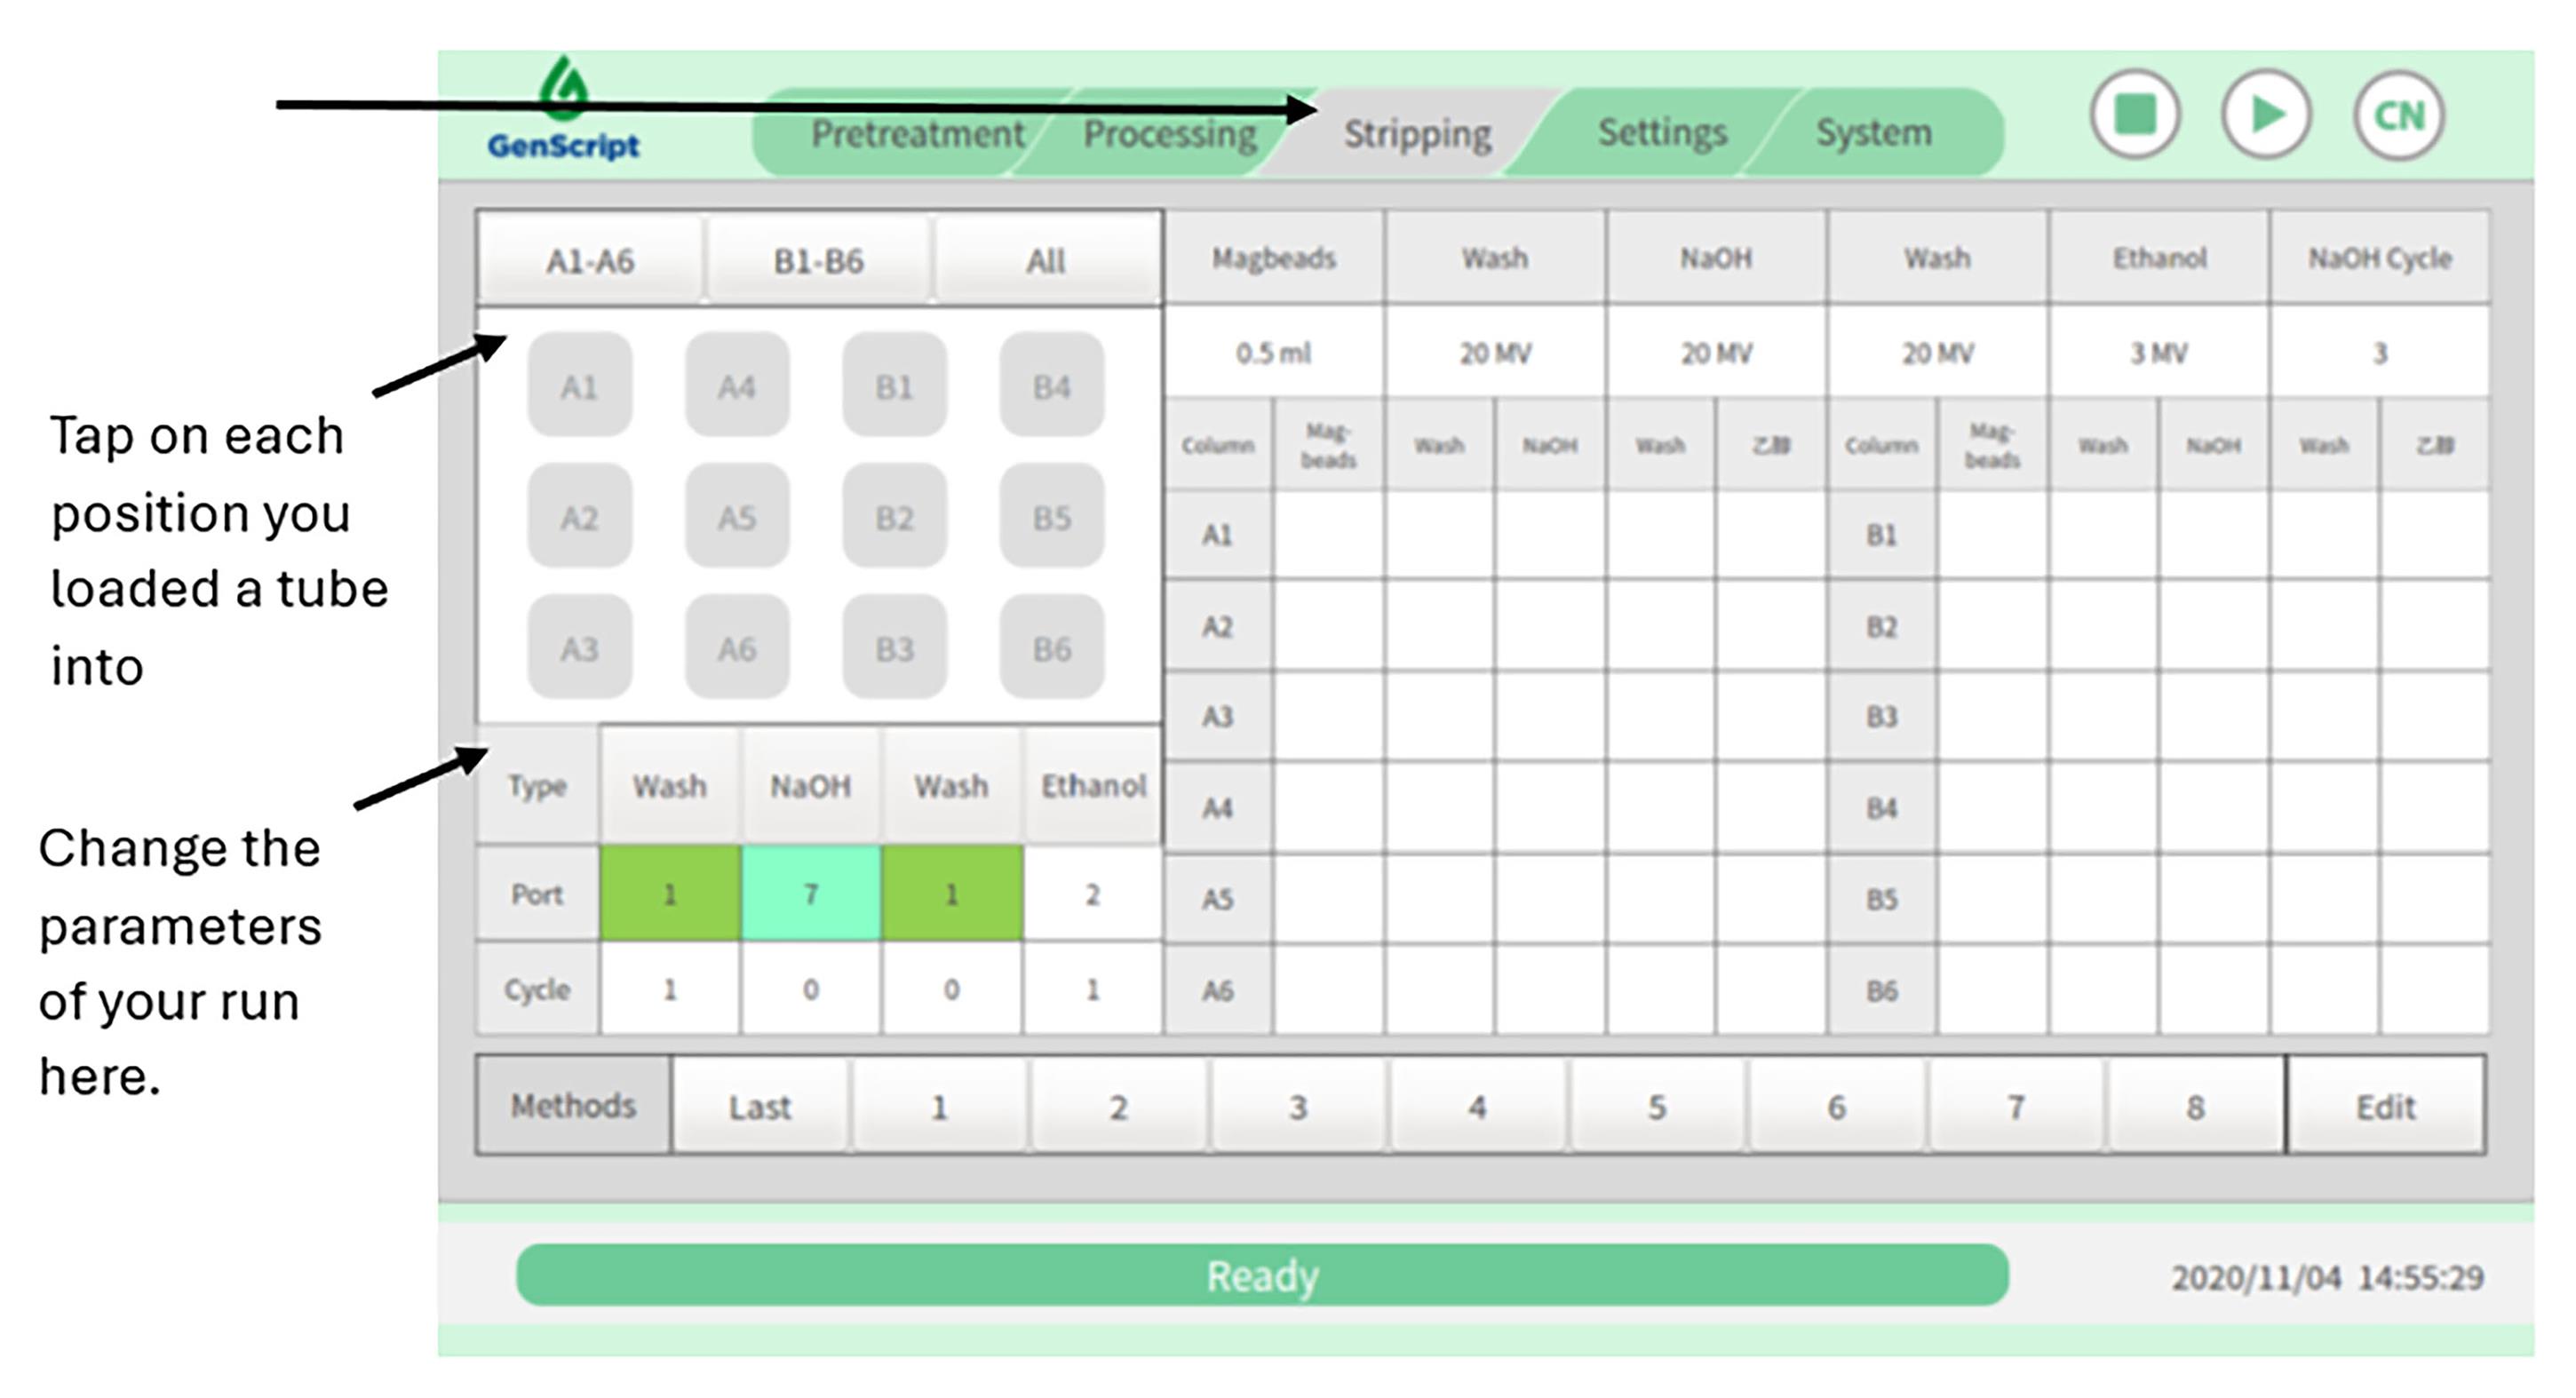
Figure 11. AmMagTM SA Plus Stripping screen. All bead regeneration parameters will be adjusted under the stripping table. Adjust according to the number of samples and settled bead volume added to the cultures.
2. Select the positions of the tubes and set the parameters so they read as follows in Table 4. Adjust the bead volume and buffer MV as desired. We recommend setting the MagBeads volume to the maximum volume of 2 mL and the buffer MVs to their maximum volumes as well to ensure thorough washing of all beads.
Table 4. SA Plus parameters for bead regeneration. This program will wash the samples three times with PBS, twice with 0.1 M NaOH, and three more times with PBS, and store the samples in 20% ethanol.
| Type | Wash | NaOH | Wash | Ethanol |
|---|---|---|---|---|
| Port | 2 | 7 | 2 | 4 |
| Cycle | 3 | 2 | 3 | 1 |
3. In approximately 1 h, the bead regeneration process will be completed, and a buzzer will sound. Open the door, and the rack will come out automatically. Collect the tubes with the now cleaned beads in 20% ethanol. If you have multiple samples, pool them together in a single tube and label it with the number of times the beads have been used.
4. Store the beads at 4–8 °C.
Note: The beads can be used up to 10 times. After 10 uses, the beads can still be used, but capturing efficiency decreases below 50%, so more beads will need to be added to capture protein.
J. Buffer exchange of elution via AKTA PureTM
Note: The following procedure is an optional step to further polish samples. Elutions will be in a glycine and HEPES solution, so this method can be used to buffer-exchange a different buffer solution if required. If higher throughput is required, install two additional eight-position versatile valves on the AKTA PureTM 150 (V9H-X1 and V9H-X2) as shown in Figure 12.
1. Transfer elution samples into a sample rack and place it on the side of the AKTA PureTM.
2. Place sample lines into each sample.
3. Include one position for PBS and one position for 0.1 M NaOH for a clean-in-place (CIP) method to run after each sample so that the system-shared-sample lines, columns, and OUTLET fraction collector are flushed after each sample. See Figure 12 for a machine setup example.
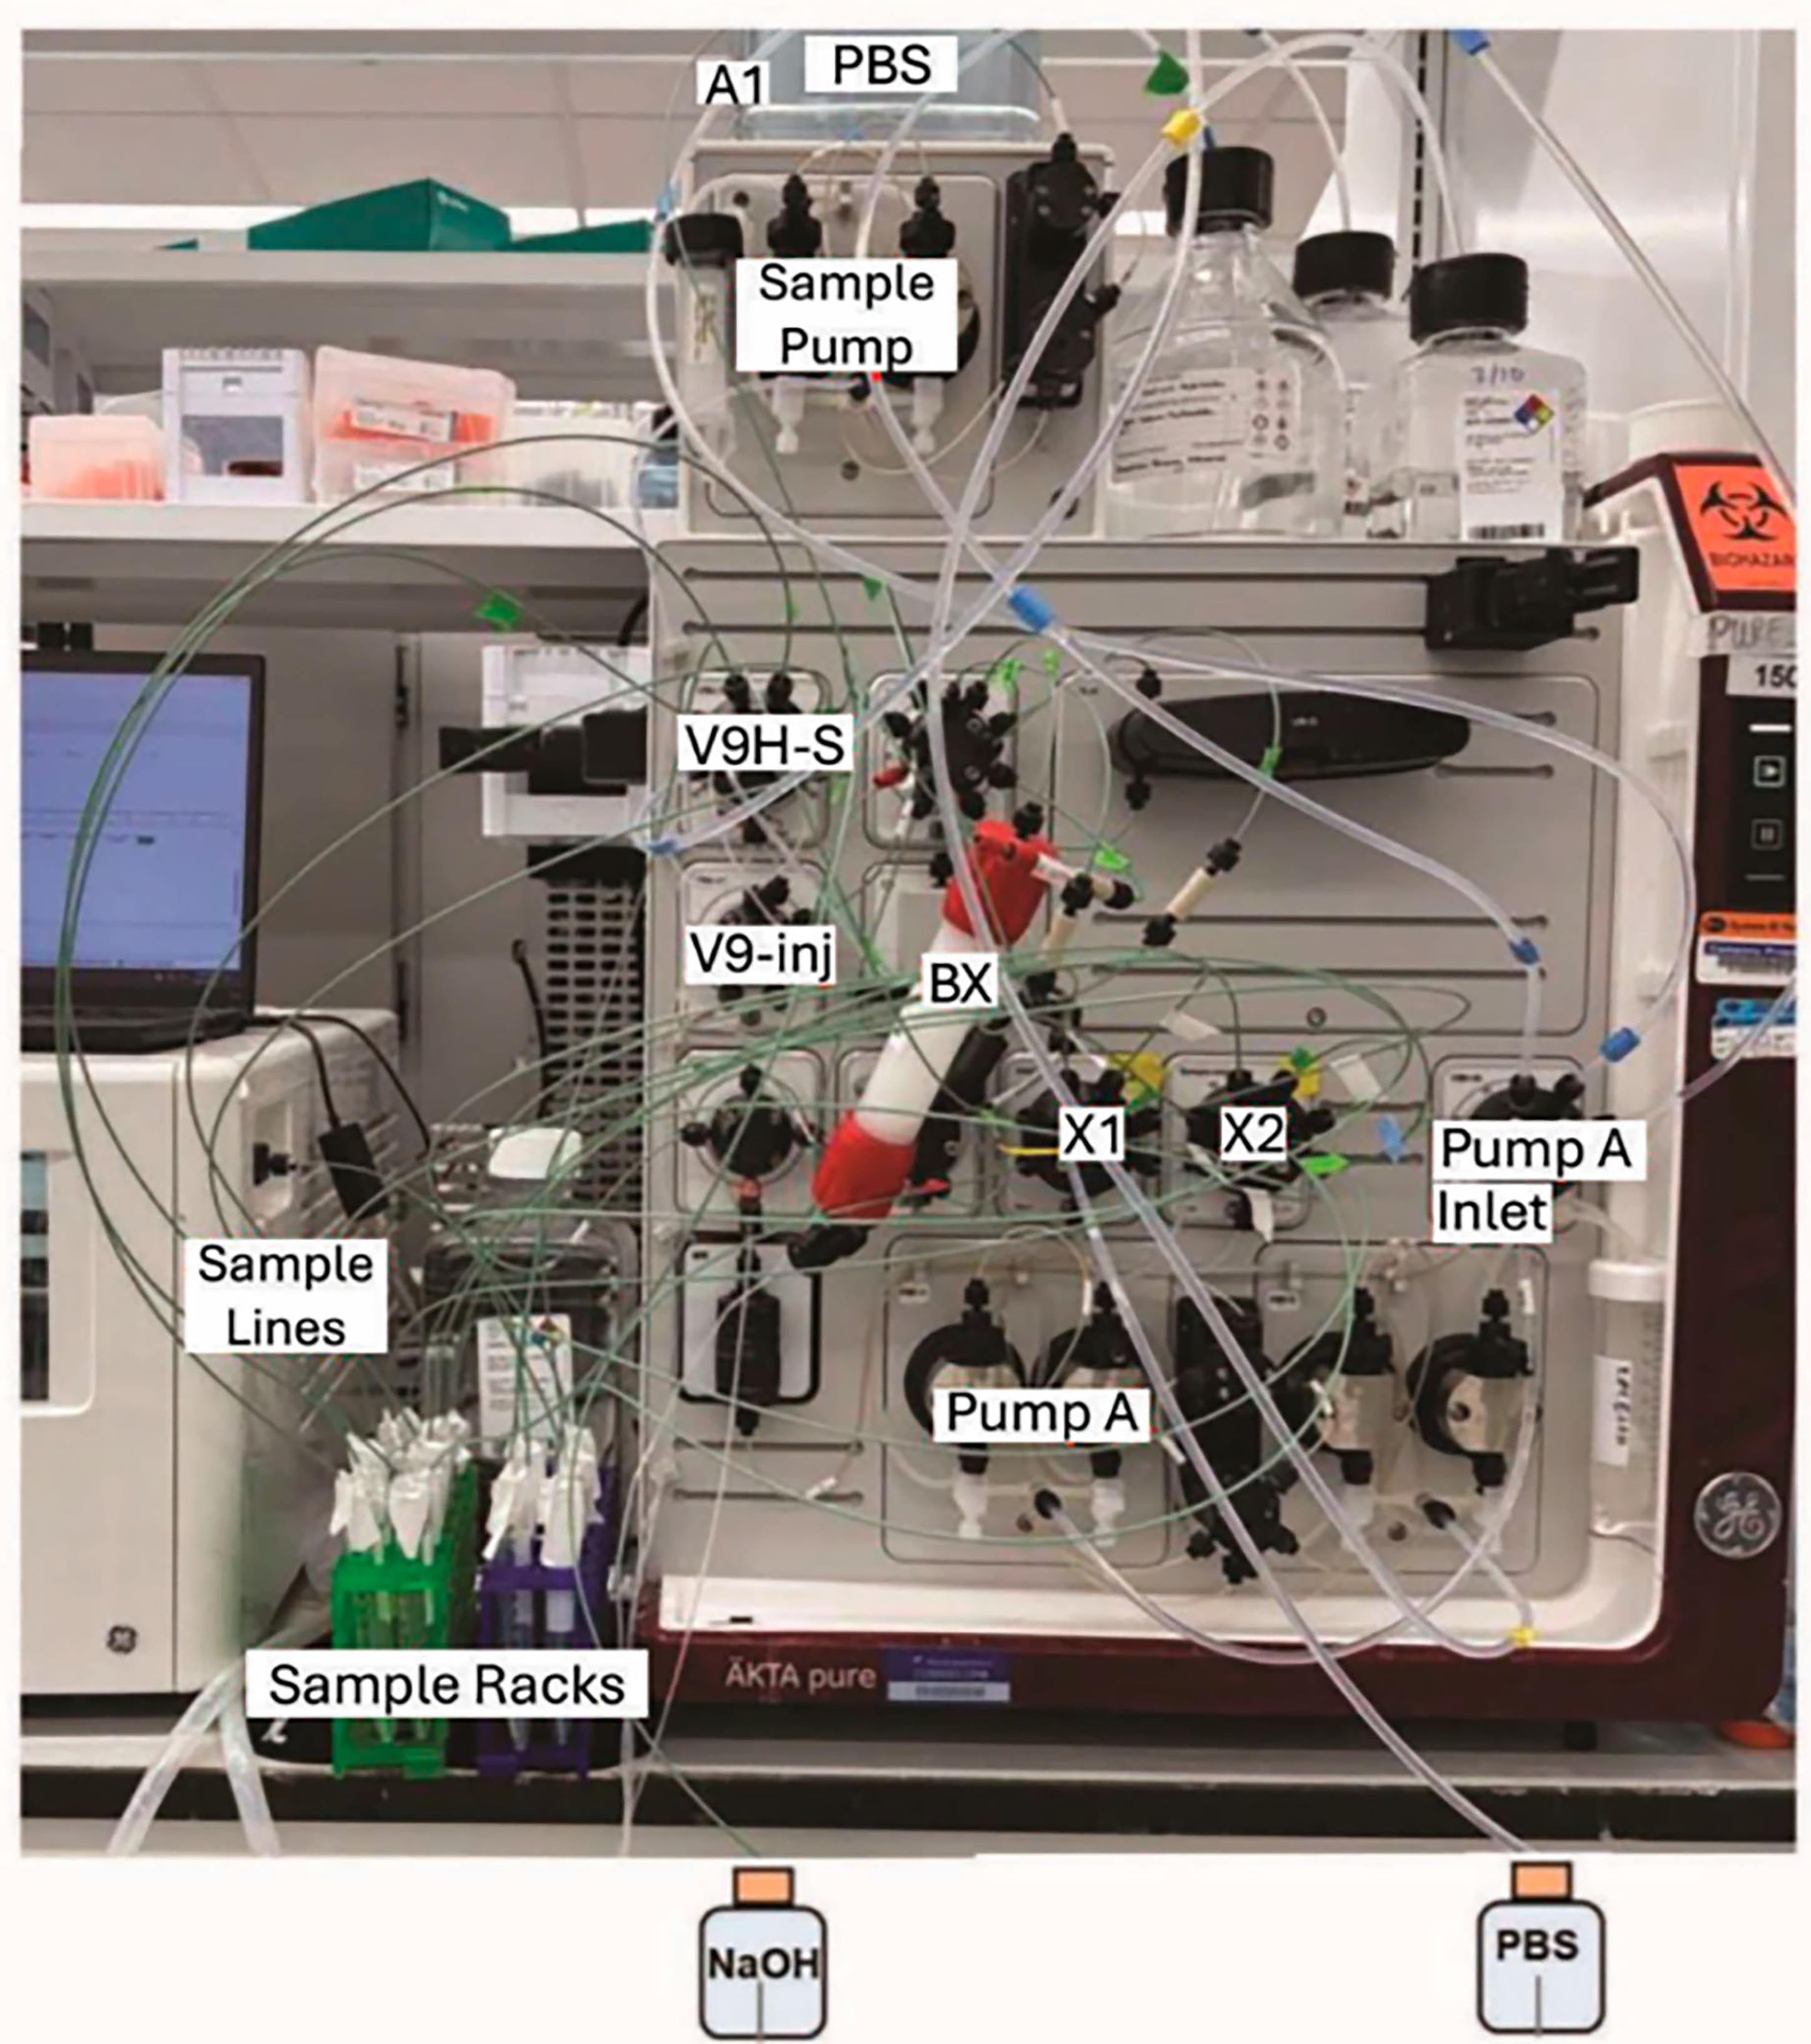
Figure 12. AKTA PureTM setup. Example setup of the AKTA PureTM system fit for buffer exchange with additional 8-position valves to increase sample throughput.
4. Launch the UNICORNTM Control Software (version 7.1) and begin your run. The software will initiate the sample pump to inject the samples through the HiPrepTM desalting column with SephadexTM G-25 resin (BX) connected to the column valve V9H-C.
5. After the run, check the chromatograph from the UNICORNTM Control Software to ensure a successful run and collect your final protein sample, now suspended in PBS. See Figure 13 for an example of a successful run.
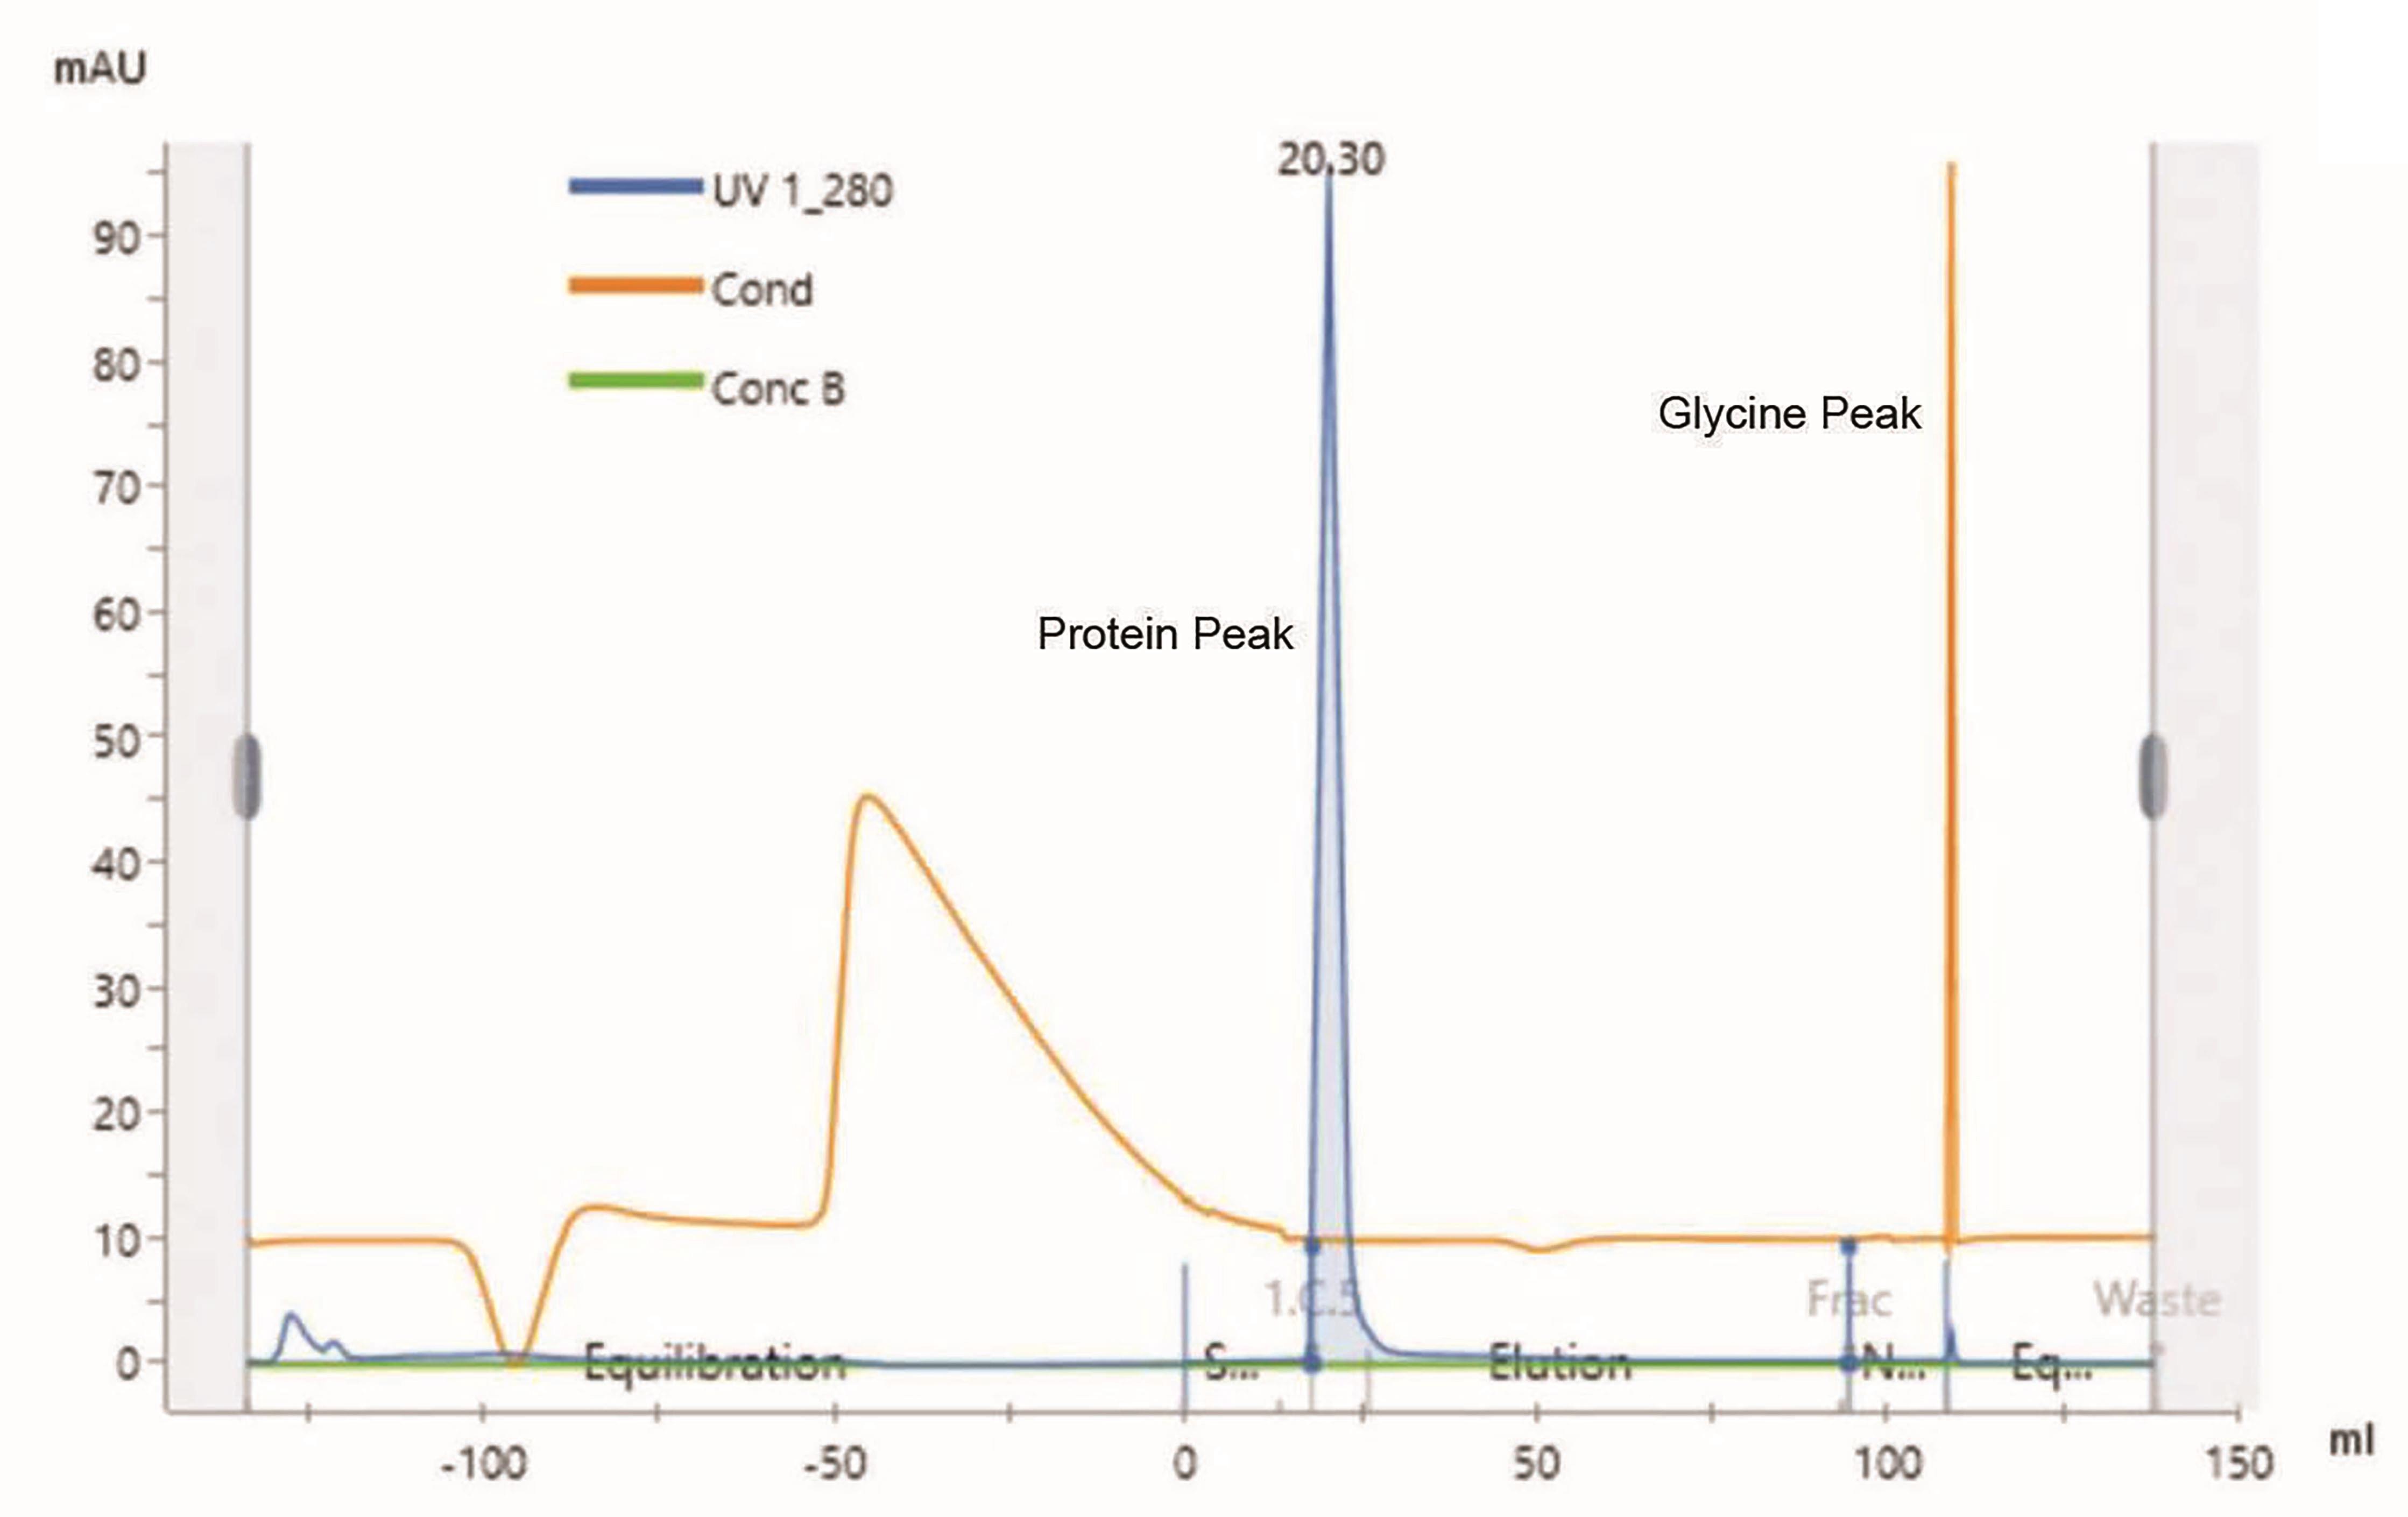
Figure 13. Example chromatograph after buffer exchange. Ensure the run has both a protein and glycine peak. The protein peak will elute in a fraction collection position, and the glycine peak will be washed into the waste collection.
Data analysis
1. SDS-PAGE results
The following SDS-PAGE gel (Figure 14) shows the protein purity that can be achieved from the CHO4Tx transfection, followed by proA magnetic bead capturing.
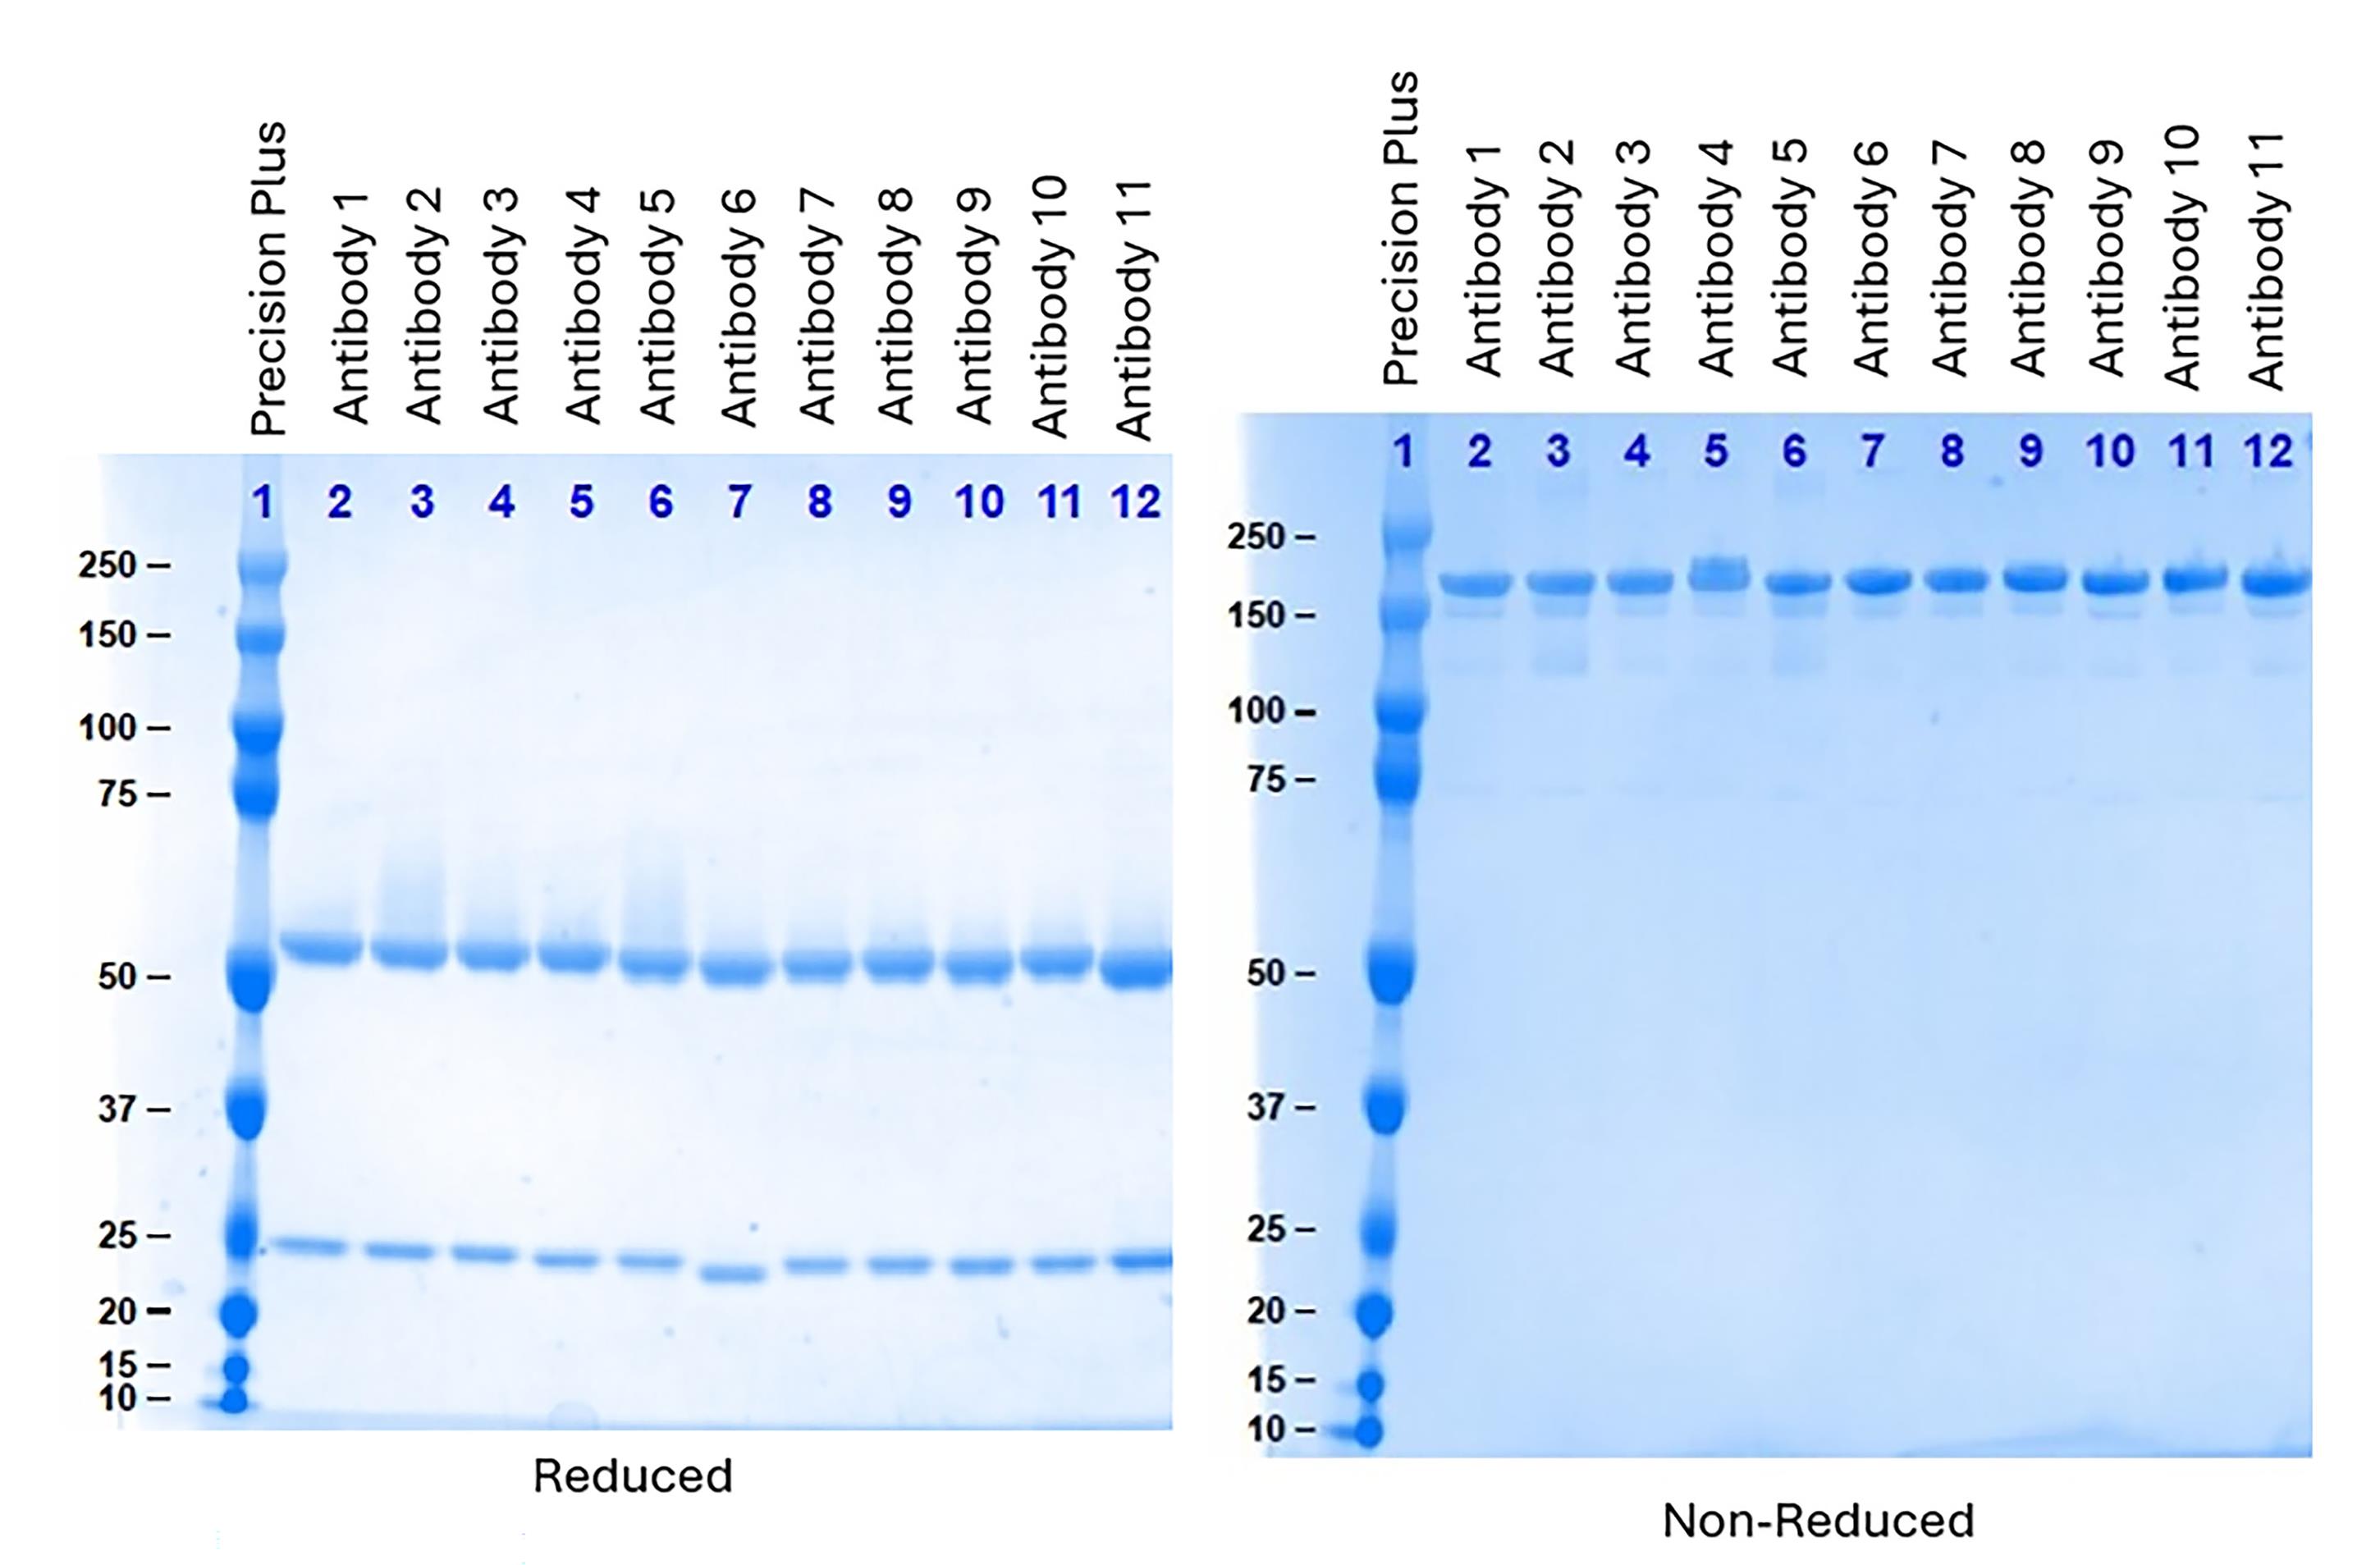
Figure 14. Example SDS-PAGE. The SDS uses proA eluate after the magnetic bead capturing process discussed in the procedure section. Both a reduced and non-reduced gel should be run to ensure both heavy and light chains are present at the correct molecular weight, and intact molecules are also at the correct molecular weight.
2. Results of analytical size-exclusion chromatography (aSEC)
The following aSEC image (Figure 15) shows the protein purity that can be achieved from the CHO4Tx transfection, followed by proA magnetic bead capturing.
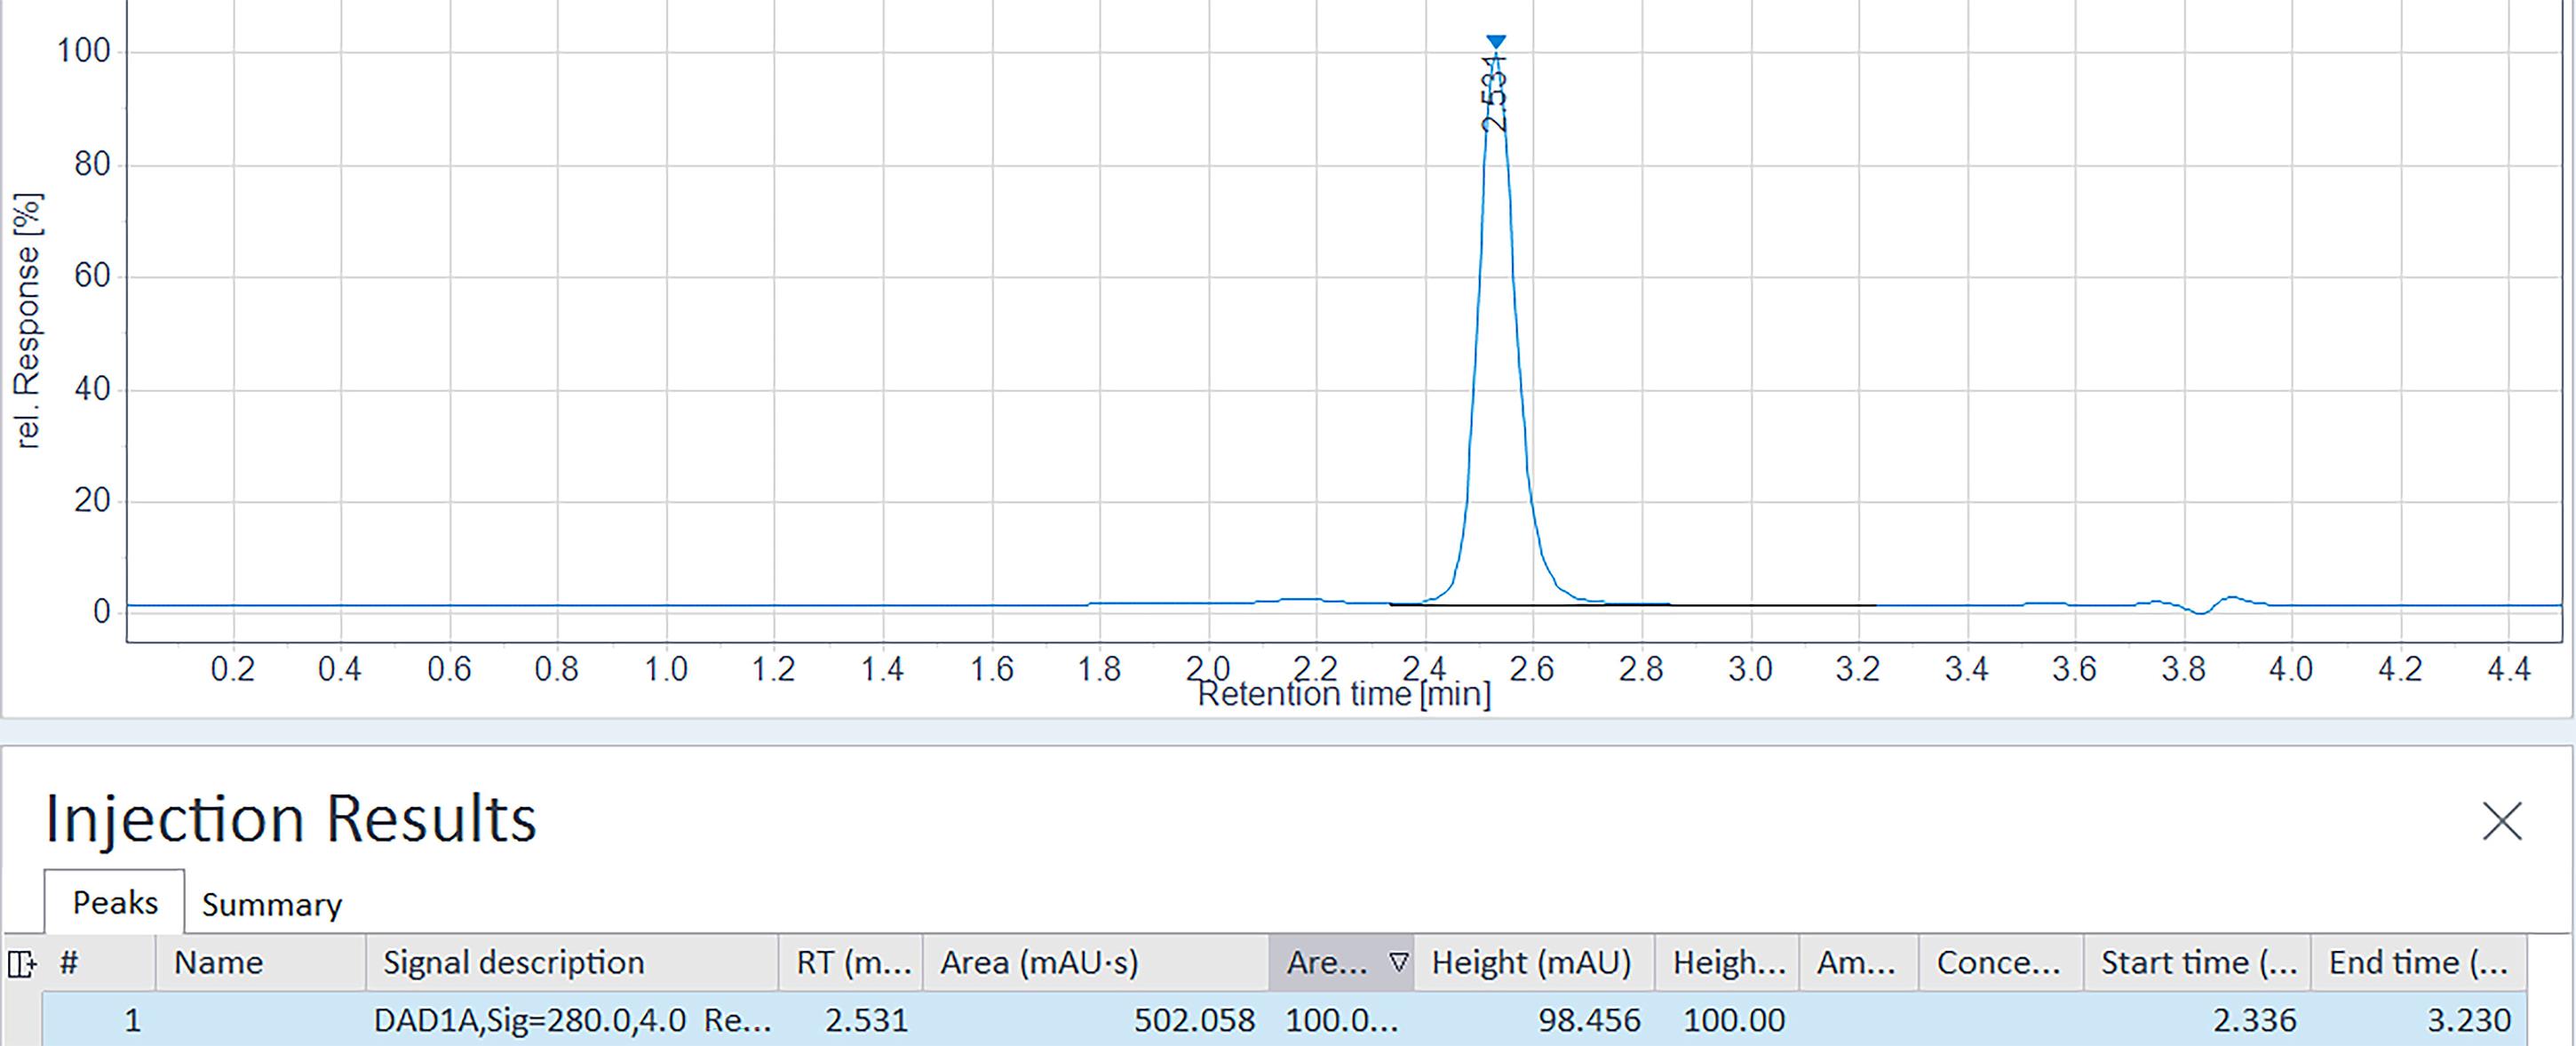
Figure 15. Example aSEC profile. The aSEC run uses a 0.2 μM filtered proA eluate after the magnetic bead capturing process discussed in the procedure section. Ensure the peak of interest (POI) is at the timing and purity expectations.
Validation of protocol
This protocol is an optimized version of our previous method, which was used and validated in the following research article:
• Gebhardt et al. [30]. A Robust, High-Titer, Semi-Automated, and In-Culture Antibody-Capturing Transient CHO Platform Technology. Antibodies (Figures 1–7, 9).
In that paper, Figure 2 shows the robustness of the CHO4Tx expression system, Figure 7C shows the robustness of the proA in-culture magnetic bead capturing system, and Figure 8E, F shows the efficiency and capacity of the buffer exchange system.
General notes and troubleshooting
General notes
1. In-culture antibody capturing using proA magnetic beads can be applied to other CHO cell lines as well as HEK293 cell lines.
2. ProA magnetic beads are added directly to unfiltered culture medium in this protocol, but beads can also be added to filtered condition medium if filtration is preferred.
3. The incubation conditions after adding beads to your cell culture have not been found to affect proA binding efficiency. Incubate the cells with beads at whatever conditions are desirable; just ensure the rpm is high enough to have the beads well suspended throughout the incubation period.
Troubleshooting
Problem 1: Drop in cell viability or slower cell doubling time after thawing.
Possible cause: After thawing, cells may take a few passages to adjust. If viability and VCD are not ideal, and no action is taken, the thaw may not recover fully.
Solution: Re-pellet the cells via centrifugation at 3,000× g for 5 min at room temperature (20 °C) using maximum brake settings for deceleration. Resuspend in fresh, prewarmed CM.
Problem 2: Ineffective protein capturing or protein elution from proA magnetic beads.
Possible causes: ProA magnetic beads have been used too many times, or buffer solutions are not at the optimal pH.
Solutions: Track bead usage and discard after 10 uses. Ensure 0.02% Tween 80 wash buffer has a pH between 4.8 and 5.2 and that elution buffer has a pH of 3.0.
Acknowledgments
Conceptualization, X.Z., A.M.D., M.J.W., F.M.W., L.G., J.Z.; Investigation, L.G., J.Z., M.A., S.L.H.W., A.A., S.L.; Writing—Original Draft, L.G., J.Z., X.Z., A.M.D.; Writing—Review & Editing, J.Z., X.Z., L.G.; Supervision, X.Z., A.M.D., L.L., M.J.W., F.M.W.; Funding acquisition, L.L., F.M.W.
The authors would like to thank Magellan Biologics for the development and continued support with the CHO4Tx® cell line, and GenScript (Chong Xu, Kamil Sekulski, Luciana Rosselli) for the development and continued support with ProA Magnetic Beads and the SA Plus instrument. The graphic abstract was created with Biorender.com. This protocol is adapted from Gebhardt et al. [30].
Competing interests
All authors are employed either by Pfizer Research or by Magellan Biologics. All authors declare that this research was conducted in the absence of any commercial or financial relationships that could be construed as potential conflicts of interest.
References
- Chan, A. C., Martyn, G. D. and Carter, P. J. (2025). Fifty years of monoclonals: the past, present and future of antibody therapeutics. Nat Rev Immunol. 25(10): 745–765. https://doi.org/10.1038/s41577-025-01207-9
- Lu, R. M., Hwang, Y. C., Liu, I. J., Lee, C. C., Tsai, H. Z., Li, H. J. and Wu, H. C. (2020). Development of therapeutic antibodies for the treatment of diseases. J Biomed Sci. 27(1): 1. https://doi.org/10.1186/s12929-019-0592-z
- Pedrioli, A. and Oxenius, A. (2021). Single B cell technologies for monoclonal antibody discovery. Trends Immunol. 42(12): 1143–1158. https://doi.org/10.1016/j.it.2021.10.008
- Teixeira, A. A. R., Erasmus, M. F., D’Angelo, S., Naranjo, L., Ferrara, F., Leal-Lopes, C., Durrant, O., Galmiche, C., Morelli, A., Scott-Tucker, A., et al. (2021). Drug-like antibodies with high affinity, diversity and developability directly from next-generation antibody libraries. Mabs. 13(1): 1980942. https://doi.org/10.1080/19420862.2021.1980942
- Carter, P. J. and Rajpal, A. (2022). Designing antibodies as therapeutics. Cell. 185(15): 2789–2805. https://doi.org/10.1016/j.cell.2022.05.029
- Sulea, T., Kumar, S. and Kuroda, D. (2024). Editorial: Progress and challenges in computational structure-based design and development of biologic drugs. Front Mol Biosci. 11: 1360267. https://doi.org/10.3389/fmolb.2024.1360267
- Graves, J., Byerly, J., Priego, E., Makkapati, N., Parish, S. V., Medellin, B. and Berrondo, M. (2020). A Review of Deep Learning Methods for Antibodies. Antibodies (Basel). 9(2): 12. https://doi.org/10.3390/antib9020012
- Erasmus, M. F., Spector, L., Ferrara, F., DiNiro, R., Pohl, T. J., Perea-Schmittle, K., Wang, W., Tessier, P. M., Richardson, C., Turner, L., et al. (2024). AIntibody: an experimentally validated in silico antibody discovery design challenge. Nat Biotechnol. 42(11): 1637–1642. https://doi.org/10.1038/s41587-024-02469-9
- Bennett, N. R., Coventry, B., Goreshnik, I., Huang, B., Allen, A., Vafeados, D., Peng, Y. P., Dauparas, J., Baek, M., Stewart, L., et al. (2023). Improving de novo protein binder design with deep learning. Nat Commun. 14(1): 2625. https://doi.org/10.1038/s41467-023-38328-5
- Hie, B. L., Shanker, V. R., Xu, D., Bruun, T. U. J., Weidenbacher, P. A., Tang, S., Wu, W., Pak, J. E. and Kim, P. S. (2024). Efficient evolution of human antibodies from general protein language models. Nat Biotechnol. 42(2): 275–283. https://doi.org/10.1038/s41587-023-01763-2
- Tuladhar, A., Guffroy, M., Finnema, S. J., Christmann, R., Van Vleet, T. R., Mayana, S. A. K. and Fossey, S. (2025). Investigation of bone toxicity in drug development: review of current and emerging technologies. Toxicol Sci. 208(2): 207–224. https://doi.org/10.1093/toxsci/kfaf131
- Yu, K., Tuladhar, A., Dankberg, S., Dai, C. and McGee-Lawrence, M. E. (2025). Integrating 3D Osteocyte Culture, Microgravity Simulation, and Fluid Flow Reveals Mechanisms of Osteocyte Mechanosensation and Calcium Signaling Altered by Disuse. Biomolecules. 15(11). https://doi.org/10.3390/biom15111534
- Pham, P. L., Kamen, A. and Durocher, Y. (2006). Large-scale transfection of mammalian cells for the fast production of recombinant protein. Mol Biotechnol. 34(2): 225–237. https://doi.org/10.1385/MB:34:2:225
- Baldi, L., Hacker, D. L., Adam, M. and Wurm, F. M. (2007). Recombinant protein production by large-scale transient gene expression in mammalian cells: state of the art and future perspectives. Biotechnol Lett. 29(5): 677–684. https://doi.org/10.1007/s10529-006-9297-y
- Geisse, S. and Voedisch, B. (2012). Transient expression technologies: past, present, and future. Methods Mol Biol. 899: 203–219. https://doi.org/10.1007/978-1-61779-921-1_13
- Gutierrez-Granados, S., Cervera, L., Kamen, A. A. and Godia, F. (2018). Advancements in mammalian cell transient gene expression (TGE) technology for accelerated production of biologics. Crit Rev Biotechnol. 38(6): 918–940. https://doi.org/10.1080/07388551.2017.1419459
- Jager, V., Bussow, K, and Schirrmann, T. (2015). Transient Recombinant Protein Expression in Mammalian Cells. Springer Interantional Publishing. Switzerland.
- Daramola, O., Stevenson, J., Dean, G., Hatton, D., Pettman, G., Holmes, W. and Field, R. (2014). A high-yielding CHO transient system: coexpression of genes encoding EBNA-1 and GS enhances transient protein expression. Biotechnol Prog. 30(1): 132–141. https://doi.org/10.1002/btpr.1809
- Rajendra, Y., Hougland, M. D., Alam, R., Morehead, T. A. and Barnard, G. C. (2015). A high cell density transient transfection system for therapeutic protein expression based on a CHO GS-knockout cell line: process development and product quality assessment. Biotechnol Bioeng. 112(5): 977–986. https://doi.org/10.1002/bit.25514
- Zhong, X., Ma, W., Meade, C. L., Tam, A. S., Llewellyn, E., Cornell, R., Cote, K., Scarcelli, J. J., Marshall, J. K., Tzvetkova, B., et al. (2019). Transient CHO expression platform for robust antibody production and its enhanced N-glycan sialylation on therapeutic glycoproteins. Biotechnol Prog. 35(1): e2724. https://doi.org/10.1002/btpr.2724
- Stuible, M., Burlacu, A., Perret, S., Brochu, D., Paul-Roc, B., Baardsnes, J., Loignon, M., Grazzini, E. and Durocher, Y. (2018). Optimization of a high-cell-density polyethylenimine transfection method for rapid protein production in CHO-EBNA1 cells. J Biotechnol. 281: 39–47. https://doi.org/10.1016/j.jbiotec.2018.06.307
- Schmitt, M. G., White, R. N. and Barnard, G. C. (2020). Development of a high cell density transient CHO platform yielding mAb titers greater than 2 g/L in only 7 days. Biotechnol Prog. 36(6): e3047. https://doi.org/10.1002/btpr.3047
- Rodriguez-Conde, S., Inman, S., Lindo, V., Amery, L., Tang, A., Okorji-Obike, U., Du, W., Bosch, B. J., Wichgers Schreur, P. J., Kortekaas, J., et al. (2022). Suitability of transiently expressed antibodies for clinical studies: product quality consistency at different production scales. Mabs. 14(1): 2052228. https://doi.org/10.1080/19420862.2022.2052228
- Steger, K., Brady, J., Wang, W., Duskin, M., Donato, K. and Peshwa, M. (2015). CHO-S antibody titers >1 gram/liter using flow electroporation-mediated transient gene expression followed by rapid migration to high-yield stable cell lines. J Biomol Screen. 20(4): 545–551. https://doi.org/10.1177/1087057114563494
- Zhou, J., Yan, G. G., Cluckey, D., Meade, C., Ruth, M., Sorm, R., Tam, A. S., Lim, S., Petridis, C., Lin, L., et al. (2023). Exploring Parametric and Mechanistic Differences between Expi293F(TM) and ExpiCHO-S(TM) Cells for Transient Antibody Production Optimization. Antibodies (Basel) 12(3): 53. https://doi.org/10.3390/antib12030053
- Ferguson, D. E., Mahan, E. R., Ma, W., Bitzas, G., Zhong, X., Zollner, R. and D’Antona, A. M. (2018). Parallel loading and complete automation of a 3-step mAb purification process for multiple samples using a customized preparative chromatography instrument with networked pumps. J Chromatogr A. A 1542: 50–60. https://doi.org/10.1016/j.chroma.2018.02.018
- Tang, S., Tao, J. and Li, Y. (2024). Challenges and solutions for the downstream purification of therapeutic proteins. Antib Ther. 7(1): 1–12. https://doi.org/10.1093/abt/tbad028
- Li, Q., Zhao, H., Liang, X., He, Q., Wang, Z., Qin, G., Li, G. and Xu, D. (2025). The downstream purification of bispecific antibodies. Anal Biochem. 696: 115692. https://doi.org/10.1016/j.ab.2024.115692
- Franke, B., Frigard, T., Grzesiek, S. and Isogai, S. (2020). Versatile modules enable automated multi-column purifications on the AKTA pure chromatography system. J Chromatogr A. 1618: 460846. https://doi.org/10.1016/j.chroma.2019.460846
- Gebhardt, L., Abel, M., Zhou, J., Vogt, A. M., Shin, B. H., Herrick Wagman, S. L., Santos, A., Puginier, J., Wurm, F. M., Wurm, M. J., et al. (2025). A Robust, High-Titer, Semi-Automated, and In-Culture Antibody-Capturing Transient CHO Platform Technology. Antibodies (Basel) 14(4): 87. https://doi.org/10.3390/antib14040087
- Hagan, M. L., Tuladhar, A., Yu, K., Alhamad, D. W., Bensreti, H., Dorn, J., Piedra, V. M., Cantu, N., Stokes, E. G., Blumenthal, D., et al. (2024). Osteocyte Sptbn1 Deficiency Alters Cell Survival and Mechanotransduction Following Formation of Plasma Membrane Disruptions (PMD) from Mechanical Loading. Calcif Tissue Int. 115(5): 725–743. https://doi.org/10.1007/s00223-024-01285-2
Article Information
Publication history
Received: Jan 7, 2026
Accepted: Mar 24, 2026
Available online: Jun 1, 2026
Published: Jun 5, 2026
Copyright
© 2026 The Author(s); This is an open access article under the CC BY-NC license (https://creativecommons.org/licenses/by-nc/4.0/).
How to cite
Zhou, J., Gebhardt, L., Abel, M., Vogt, A., Shin, B. H., Santos, A., Puginier, J., Wurm, F. M., Wurm, M. J., Herrick-Wagman, S. L., Adeniyi, A., Yan, G. G., Lim, S., Lin, L., D’Antona, A. M. and Zhong, X. (2026). In-Culture Antibody Capture Using Transient CHO Expression Systems. Bio-protocol 16(11): e5694. DOI: 10.21769/BioProtoc.5694.

 Download Citation in RIS Format
Category
Cell Biology > Cell-based analysis > Protein synthesis
Biochemistry > Protein > Expression
Molecular Biology > Protein > Expression
Do you have any questions about this protocol?
Post your question to gather feedback from the community. We will also invite the authors of this article to respond.
 Post a Question


