- Protocols

- Articles and Issues
- For Authors
- About
- Become a Reviewer

A One-Step Mouse Model of Parkinson’s Disease Combining rAAV-α-Synuclein and Preformed Fibrils of α-Synuclein
Published: Vol 15, Iss 23, Dec 5, 2025 DOI: 10.21769/BioProtoc.5525 Views: 1710
Reviewed by: Sébastien GillotinAntonisamy William JamesAnonymous reviewer(s)
Original research article
The authors used this protocol in:

Feb 2025

Protocol Collections
Comprehensive collections of detailed, peer-reviewed protocols focusing on specific topics


Related protocols
Abstract
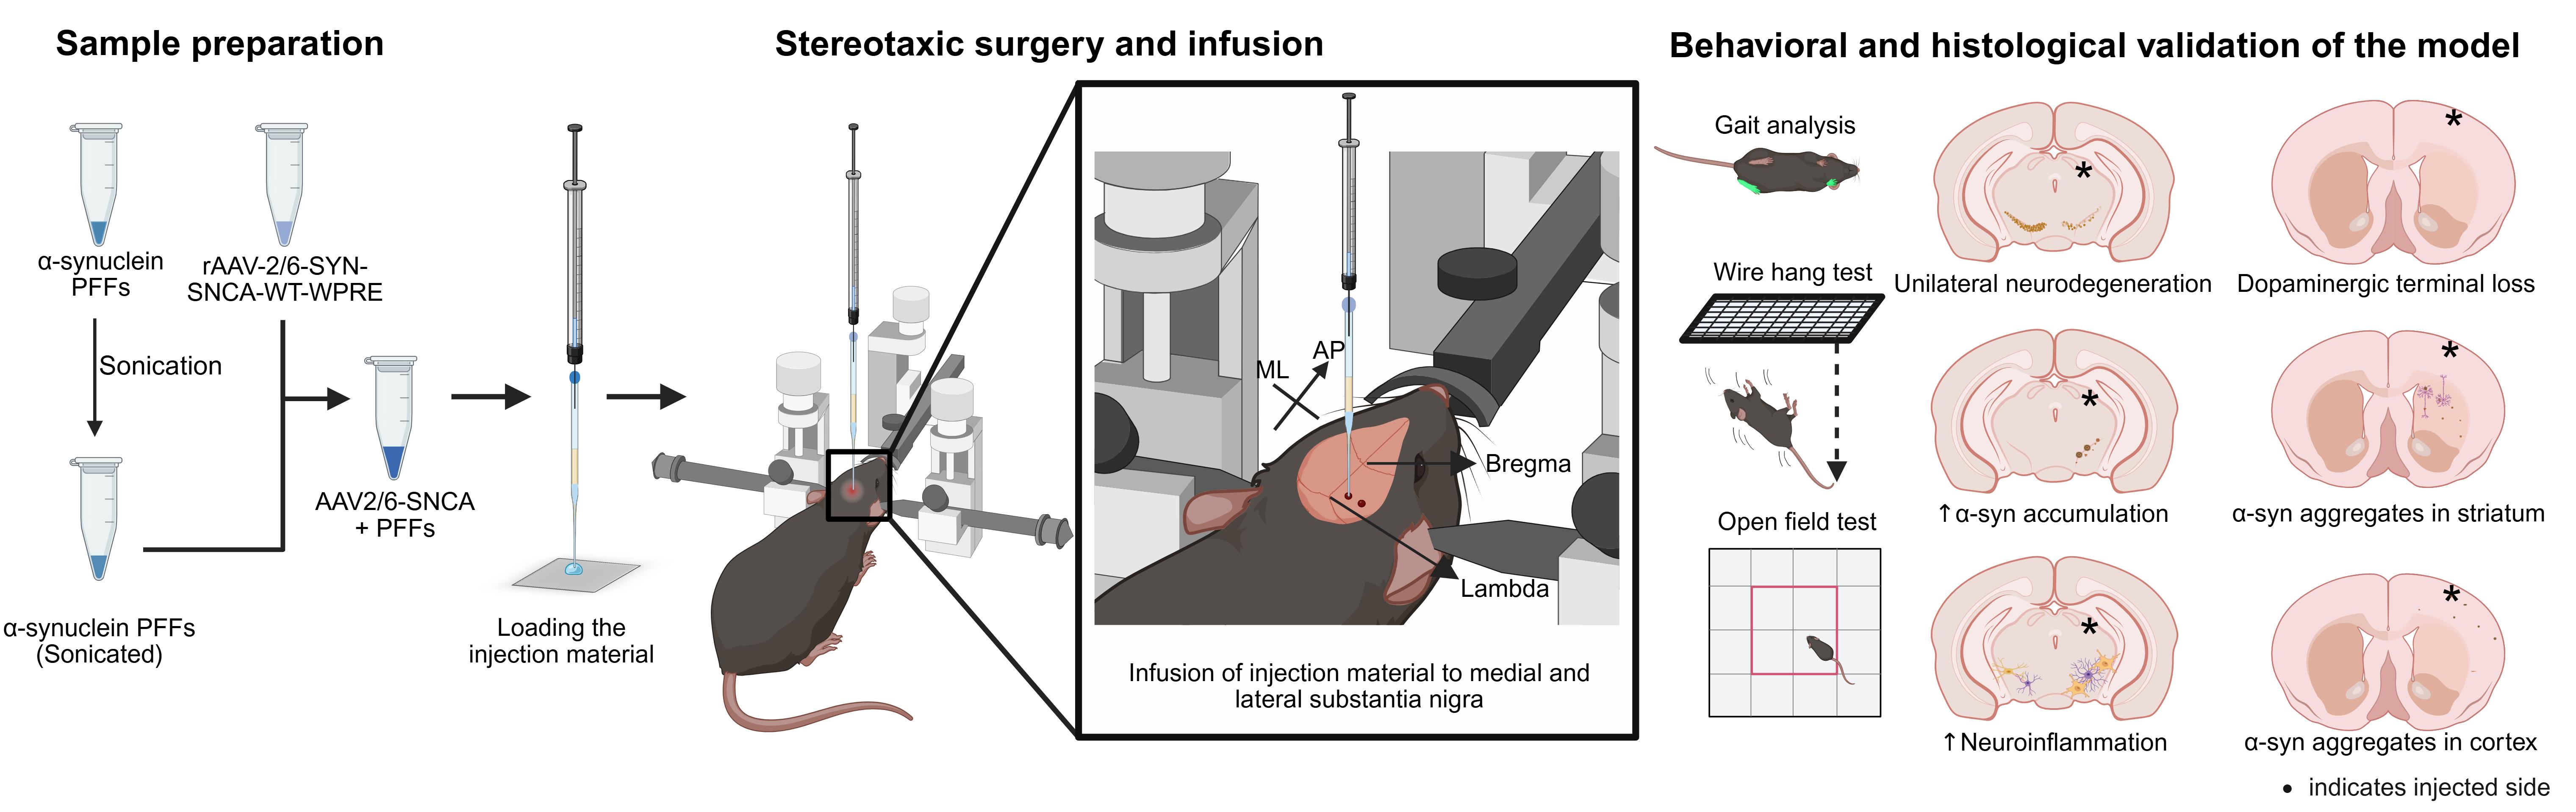
Developing preclinical animal models that faithfully mimic the progressive nature of Parkinson’s disease (PD) is crucial for advancing mechanistic insights as well as therapeutic discovery. While recombinant adeno-associated virus (rAAV)-driven α-synuclein overexpression is widely used, its reliance on high viral titers introduces nonspecific toxicity and limits physiological relevance. The SynFib model, which combines modest rAAV-driven α-synuclein expression (Syn) with α-synuclein preformed fibril (PFF) seeding (Fib), has shown promise in reproducing PD-like pathology. However, current implementations of this SynFib model have largely been confined to rats and require sequential surgeries, which increase animal distress and reduce reproducibility. Here, we present a streamlined protocol to generate a SynFib mouse model of PD that integrates rAAV-α-synuclein delivery and PFF injection into a single stereotaxic surgery. Using fine glass capillaries, this method prevents backflow of injected material, reduces injection-induced trauma, minimizes neuroinflammation, and ensures robust lesion development. This streamlined mouse model provides a reproducible and practical system to investigate α-synuclein-associated pathology and serves as a versatile platform for preclinical testing of potential therapeutics for PD.
Key features
• This protocol optimizes the SynFib model of PD in mice and combines rAAV-driven α-synuclein expression and PFF injection in one stereotaxic surgery, reducing animal distress.
• Uses modest α-synuclein expression levels targeted to cells in the substantia nigra region of the brain.
• The mouse model recapitulates hallmark PD-like features, including α-synuclein aggregation, progressive neurodegeneration, and neuroinflammation.
• This mouse model can be a useful tool for α-synuclein-related mechanistic studies and preclinical therapeutic testing for PD.
Keywords: SynFib modelGraphical overview
Background
Parkinson's disease (PD) is a complex neurodegenerative disorder primarily caused by the degeneration of dopaminergic neurons of the substantia nigra (SN) [1]. This loss is accompanied by abnormal aggregation of the α-synuclein protein in several brain areas [2]. Despite extensive research in the field, the mechanisms driving PD remain incompletely understood, and effective disease-modifying therapies are lacking. Preclinical animal models that faithfully recapitulate both the neuropathological and behavioral features of PD are critical for advancing mechanistic insights and therapeutic development. Historically, the most widely used rodent models have been based on neurotoxins such as 6-hydroxydopamine (6-OHDA), 1-methyl-4-phenyl-1,2,3,6-tetrahydropyridine (MPTP), or rotenone. These models produce a relatively rapid and severe loss of dopaminergic neurons accompanied by behavioral deficits but fail to capture the slow, progressive characteristics of human PD and its important pathological hallmarks such as α-synuclein aggregation [3–9]. To overcome these limitations, transgenic and viral vector-based approaches involving various PD-associated genes or their mutations have been developed [10–12]. Recombinant adeno-associated viral (rAAV) vectors expressing human α-synuclein are among the most widely used strategies and can produce progressive neurodegeneration and α-synuclein pathology [13–15]. While rAAV–based approaches offer the advantage of precise targeting of α-synuclein expression to specific brain regions and even particular cell types through the use of cell-selective promoters or tailored AAV serotypes, achieving strong pathological features such as protein aggregation, enhanced neuroinflammation, and profound motor impairments typically requires very high viral titers. This, however, introduces concerns of nonspecific viral toxicity and limits physiological relevance, since such elevated levels of α-synuclein are not observed in sporadic PD patients.
In recent years, several groups have reported injecting a lower titer of rAAVs overexpressing α-synuclein, with additional injection of α-synuclein preformed fibrils (PFFs) either mixed together or in a sequential surgery, in rodents [16–18]. This combinatorial model, also known as the SynFib model, involves the injection of the rAAV-α-synuclein vector and the PFFs into the medial and lateral SN unilaterally (allowing the non-injected side as an internal control). Such injection is at doses that have only a moderate impact when each component is administered individually; however, their combination elicits robust PD–like pathology, including dopaminergic neuron loss, motor impairments, Lewy body–like inclusions, and pronounced neuroinflammatory responses. Here, we present a refined SynFib protocol optimized for mice that achieves progressive α-synuclein pathology through a single stereotaxic injection. In addition, the use of pulled glass capillaries for delivery minimizes tissue damage, reduces procedure-related neuroinflammatory artifacts, and prevents backflow of injected material. This approach enhances reproducibility, reduces surgical complications, and increases its translational value.
Materials and reagents
Biological materials
1. The rAAV2/6 overexpressing human α-synuclein under Synapsin-1 promoter (rAAV2/6-SYN-SNCA(WT)-WPRE-pA) was prepared and purified at Cell and Gene Technologies Core, Lund University (Lund, Sweden) and was a kind gift from Dr Malin Parmar (titer: 1.2 × 10¹⁴ gc/mL). This vector was used to carry out the procedures mentioned in this protocol. A similar overexpression system [rAAV-CMV-SYN-SNCA(WT)-WPRE-bGHpA] is also available commercially from BrainVTA (catalog number: GT-0070) (Wuhan, China).
2. Human α-synuclein pre-formed fibrils (PFFs) at a concentration of 5 μg/μL were generated in the lab of Dr Kelvin C Luk (University of Pennsylvania, Perelman School of Medicine, Philadelphia, United States) using a previously described methodology [19]. Similar PFFs are also available from commercial sources like StressMarq Biosciences (catalog number: SPR-322) and ACROBiosystems (catalog number: ALN-H5115).
Reagents
1. Isoflurane I.P. (Sosrane, Neon Laboratories Limited, DrugBank Accession Number: DB00753)
2. Absolute ethanol (Merck, catalog number: 100983)
3. Hydrogen peroxide (Himedia, catalog number: PTC1511)
4. Sodium chloride (Merck, catalog number: 1.93206.0521)
5. Milli-Q water (Millipore)
Solutions
1. Saline (0.9%) (see Recipes)
2. Ethanol (70%) (see Recipes)
3. Hydrogen peroxide solution (4%) (see Recipes)
Recipes
Note: All the solutions are recommended to be prepared fresh (preferably a day before the surgery) and should be at room temperature at the time of usage. The hydrogen peroxide solution must be protected from light by storing it in an amber colored tube and should be stored at 4 °C until the day of the surgery.
1. Saline (0.9%)
| Reagent | Final concentration | Quantity or volume |
|---|---|---|
| Sodium chloride | 0.9% | 180 mg |
| Milli-Q water | 99.1% | Volume made up to 20 mL |
| Total | 20 mL |
Autoclave the above solution.
2. Ethanol (70%)
| Reagent | Final concentration | Quantity or volume |
|---|---|---|
| Absolute ethanol | 70% | 35 mL |
| Milli-Q water | 30% | 15 mL |
| Total | 50 mL |
3. Hydrogen peroxide solution (4%)
| Reagent | Final concentration | Quantity or volume |
|---|---|---|
| Hydrogen peroxide (30%) | 4% | 6.67 mL |
| Milli-Q water | 96% | 43.33 mL |
| Total | 50 mL |
Laboratory supplies
1. Glass capillaries GC150TF-10 (Harvard Apparatus, catalog number: EC1 30-0066: 1.5 mm outer diameter, 1.17 mm inner diameter, 100 mm length)
2. Single-use 1 mL syringes [DispoVan, 26G × 1/2 (0.45 × 13 mm)]
3. Hamilton syringe (Hamilton, catalog number: CAL87930/00, SYR 75RN 5 μL, calibrated)
4. Sterile cotton swabs (Q-tips)
5. GenTeal sterile lubricant eye gel (Alcon, 10 g)
6. Lignocaine hydrochloride gel (Neon, 30 g)
7. Surgical blades (Lister, Number 10)
8. Dressing forceps curved (Aesculap, catalog number: BD313R)
9. Durogrip needle holder (Aesculap, catalog number: BM127R)
10. Fine forceps standard (Dumont, catalog number: 11251-35)
11. Operating scissors (RWD, catalog number: S-14016-13)
12. Infrared lamp (Beurer wellbeing, model: IL11)
13. Suture (Suture planet, catalog number: SP 3317, 3/8 circle reverse cutting, USP 5-0, 12 mm)
14. Mineral oil (B-loyal, pack size: 100 mL)
15. Neosporin antibiotic powder (GSK, pack size: 10 g)
16. MicroFil Flexible Needle 28G (World Precision Instruments, MF 28G67-5)
17. Ultra-fine marker (Sharpie, catalog number: 37161PP, 0.3 mm size)
Equipment
1. Power sonic bath sonicator (HWASHIN, model: Powersonic 410)
2. Pipette puller (Narishige, model: PC-100)
3. Digital lab standard with mouse and neonatal adaptor (Stoelting, catalog number: 51925)
4. Micrometer high-speed drill with drill bits (Stoelting, catalog number: 51449)
5. Drill holder (Stoelting, catalog number: 51630)
6. Mouse ear bars (Stoelting, catalog number: 51511W)
7. Quintessential stereotaxic injector (QSI) (Stoelting, catalog number: 53311)
8. Anesthesia air pump (RWD, model: R510-29)
9. Compact small animal anesthesia machine (RWD, catalog number: R500)
10. Gas evacuation apparatus (RWD, catalog number: R546-Pro)
11. Gas filter canister (RWD, catalog number: R510-31)
12. Stereomicroscope (Leica Microsystems, catalog number: S9E)
13. Mountable focus arm for “S” series stereomicroscope (Leica Microsystems, catalog number: 10447255)
14. Flexarm stand with table clamp for stereomicroscope (Leica Microsystems, catalog number: 10450495)
15. SurgiSuite multi-functional surgical platform for mice and rats with warming (Kent Scientific, catalog number: SURGI-M04)
16. Glue gun (Bristo-Generic, model: HL-E-20W)
Procedure
A. Pre-preparation for surgeries
1. Pulling the glass capillaries
a. Turn on the pipette puller and wait for the startup screen to appear (Figure 1).
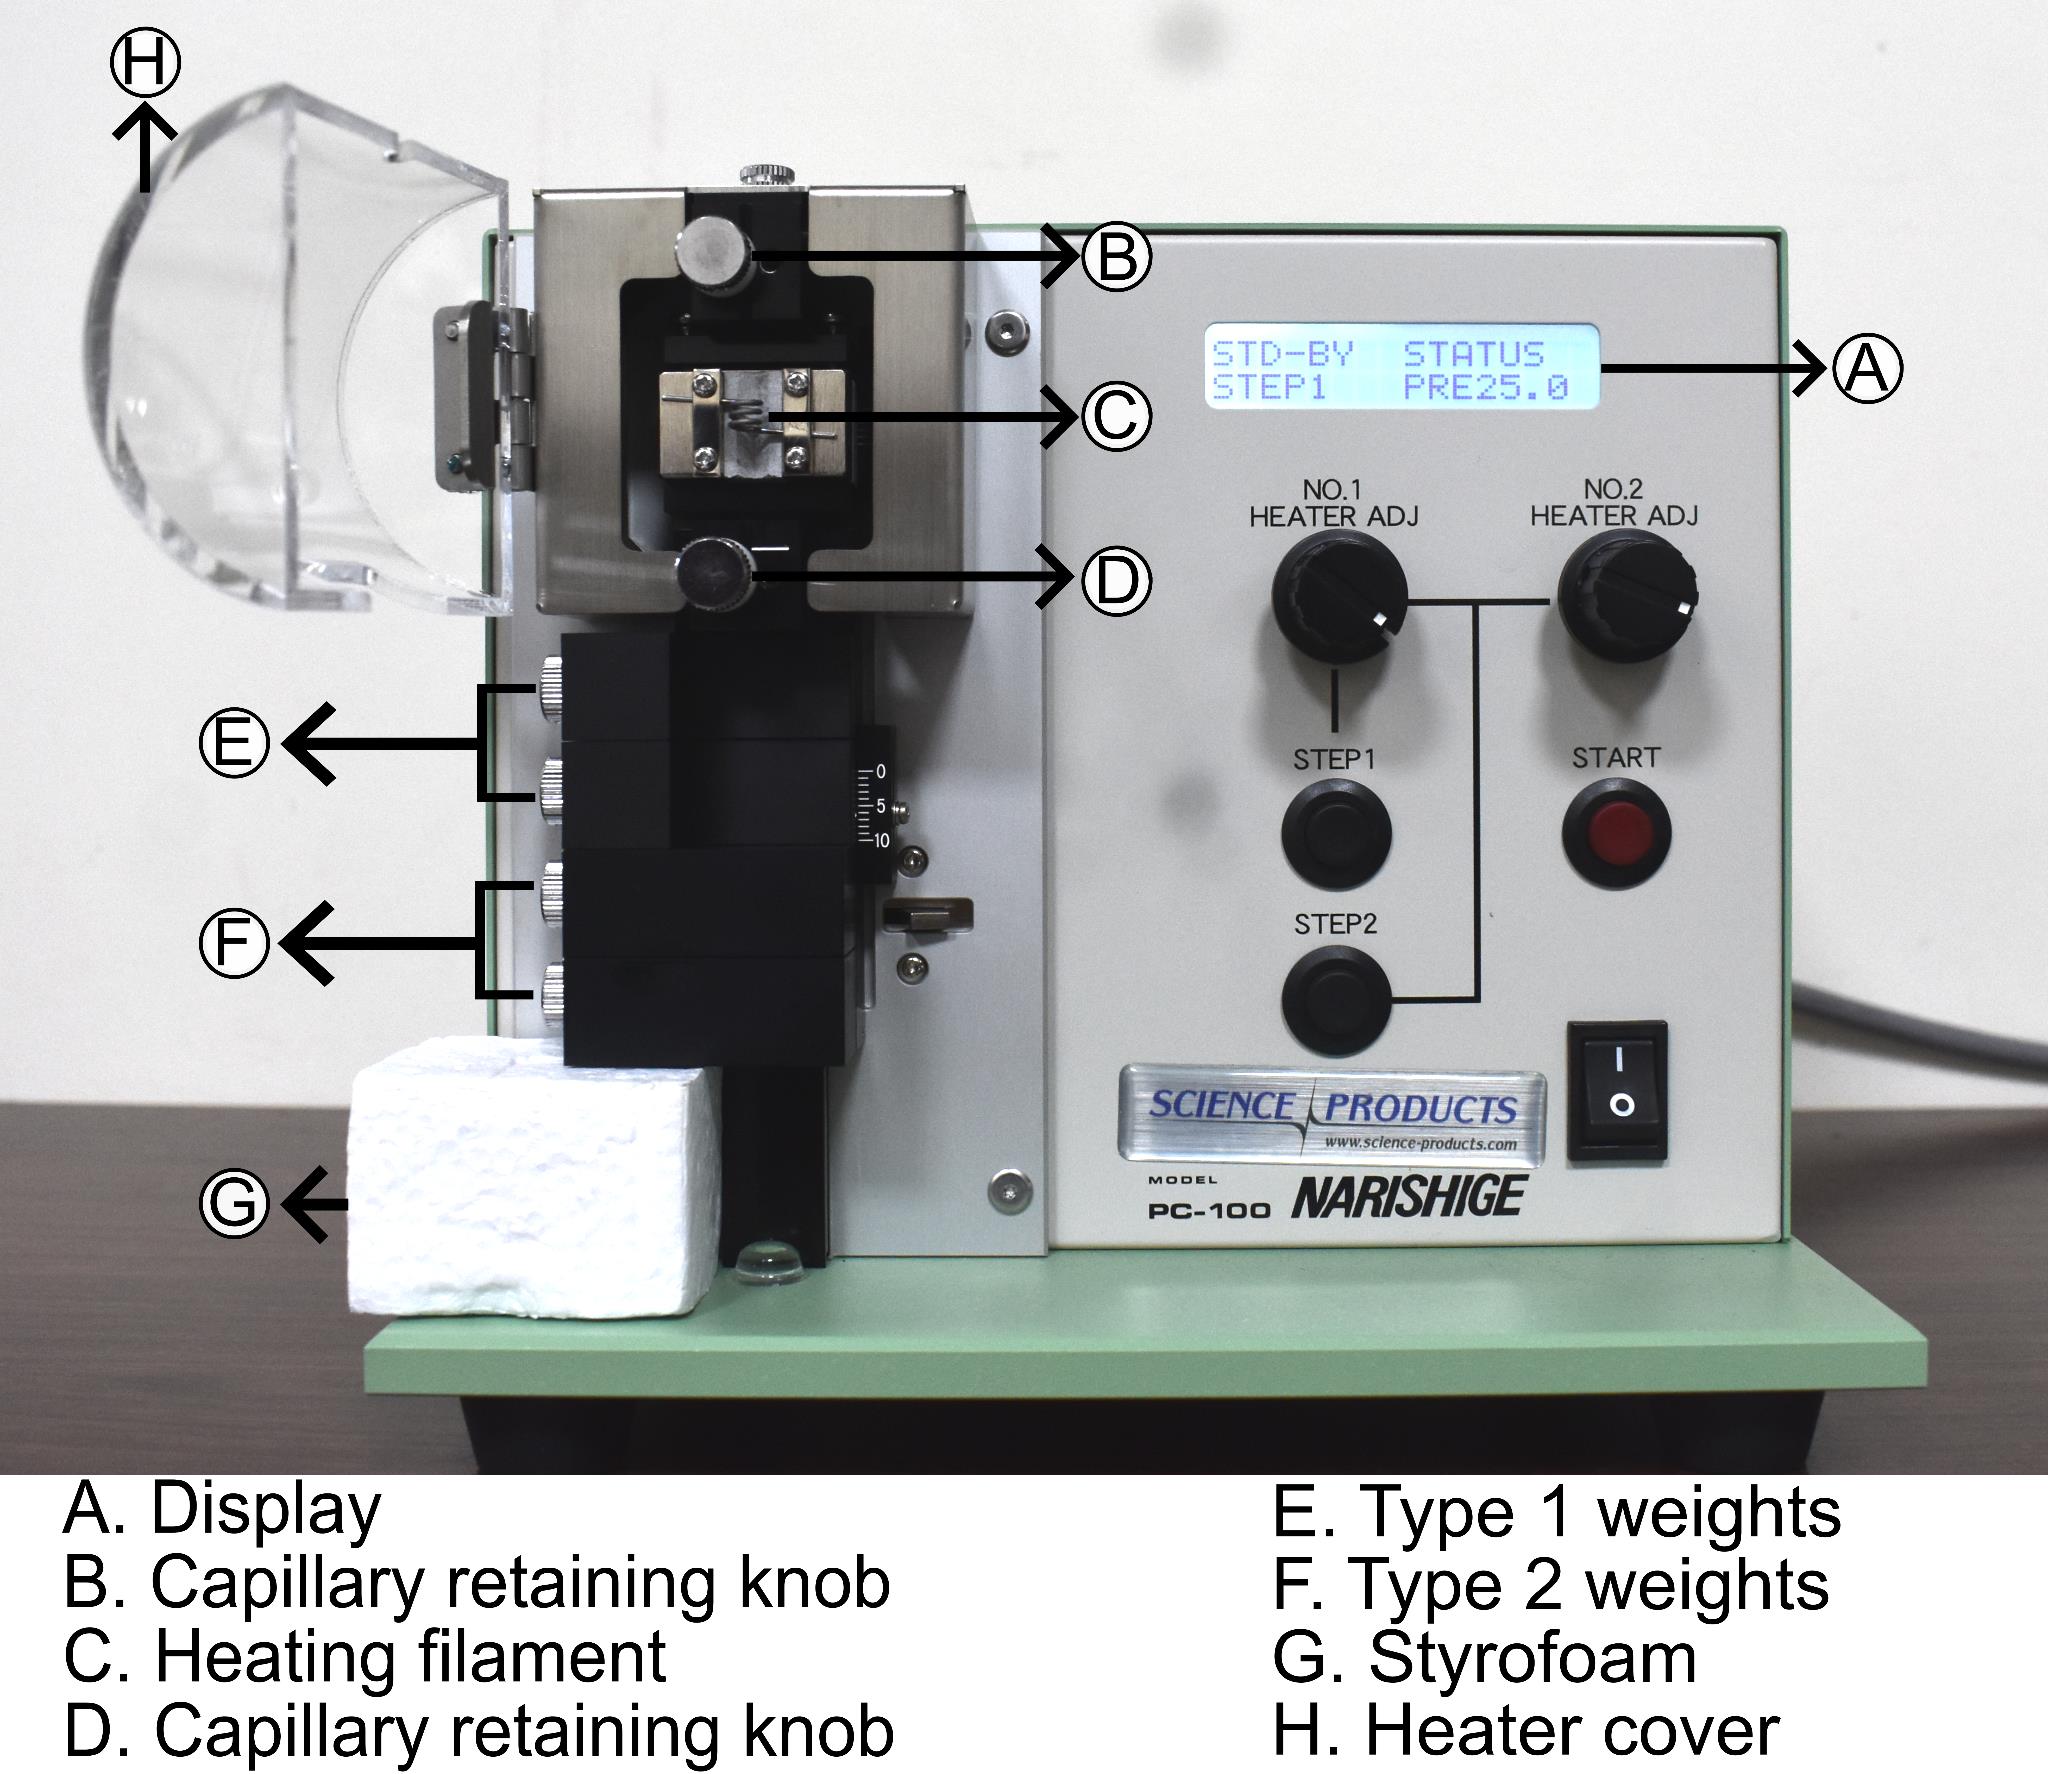
Figure 1. Narishige PC-100 pipette puller. Picture of the pipette puller showing (A) display, (B) upper capillary retaining knob, (C) heating filament, (D) lower capillary retaining knob, (E) type-1 weights, (F) type-2 weights, (G) Styrofoam block, (H) heater cover.
b. Raise the slider unit and place a Styrofoam block (~3 cm height) beneath it to support it.
c. Fix one type-1 weight (25 g) on the slider unit using screws.
d. Open the heater cover, loosen the capillary retaining knobs by turning them counterclockwise, and insert a glass capillary tube through the upper capillary retaining knob, the heating filament, and the lower capillary retaining knob.
e. Ensure the glass capillary is centered and aligned with the middle of the heating filament to produce two evenly pulled capillaries.
f. Tighten the retaining knobs to secure the capillary and close the heater cover.
g. Remove the Styrofoam block, ensuring the slider unit remains secure, and then proceed with pulling.
h. Adjust the No. 1 heater to 65 °C and press the Step1 button for one-step pulling.
i. Press Start to begin the pulling process. The capillary is pulled using a type-1 weight. Allow the filament to cool for 10 s and use operating scissors to cut the pulled capillary from the middle.
j. Trim the tapered ends to the desired length using a pair of operating scissors. Test the sturdiness of capillaries by gently tapping the tip on the flat surface of the forceps. The tapered length should be firm and long enough (approximately 8 mm) to ensure penetration up to the desired depth in the brain.
Note: The taper and length of the pulled segment of capillaries can be adjusted by modifying the heater settings and by using different combinations of weights on the slider unit.
k. Store the pulled capillaries in a dust-free container. Secure the non-pulled ends to the container surface using polymer clay to prevent rolling and accidental breakage.
Note: The pulled capillaries can be stored for extended periods as long as there are no dust particles inside and the pulled tips are not damaged. Before use, the pulled ends should be carefully observed to check for any cracks or breakages.
2. Preparation of the syringe-capillary assembly for surgery
a. The pulled glass capillaries are attached to a Hamilton syringe to prepare for the injections (Figure 2A–D).
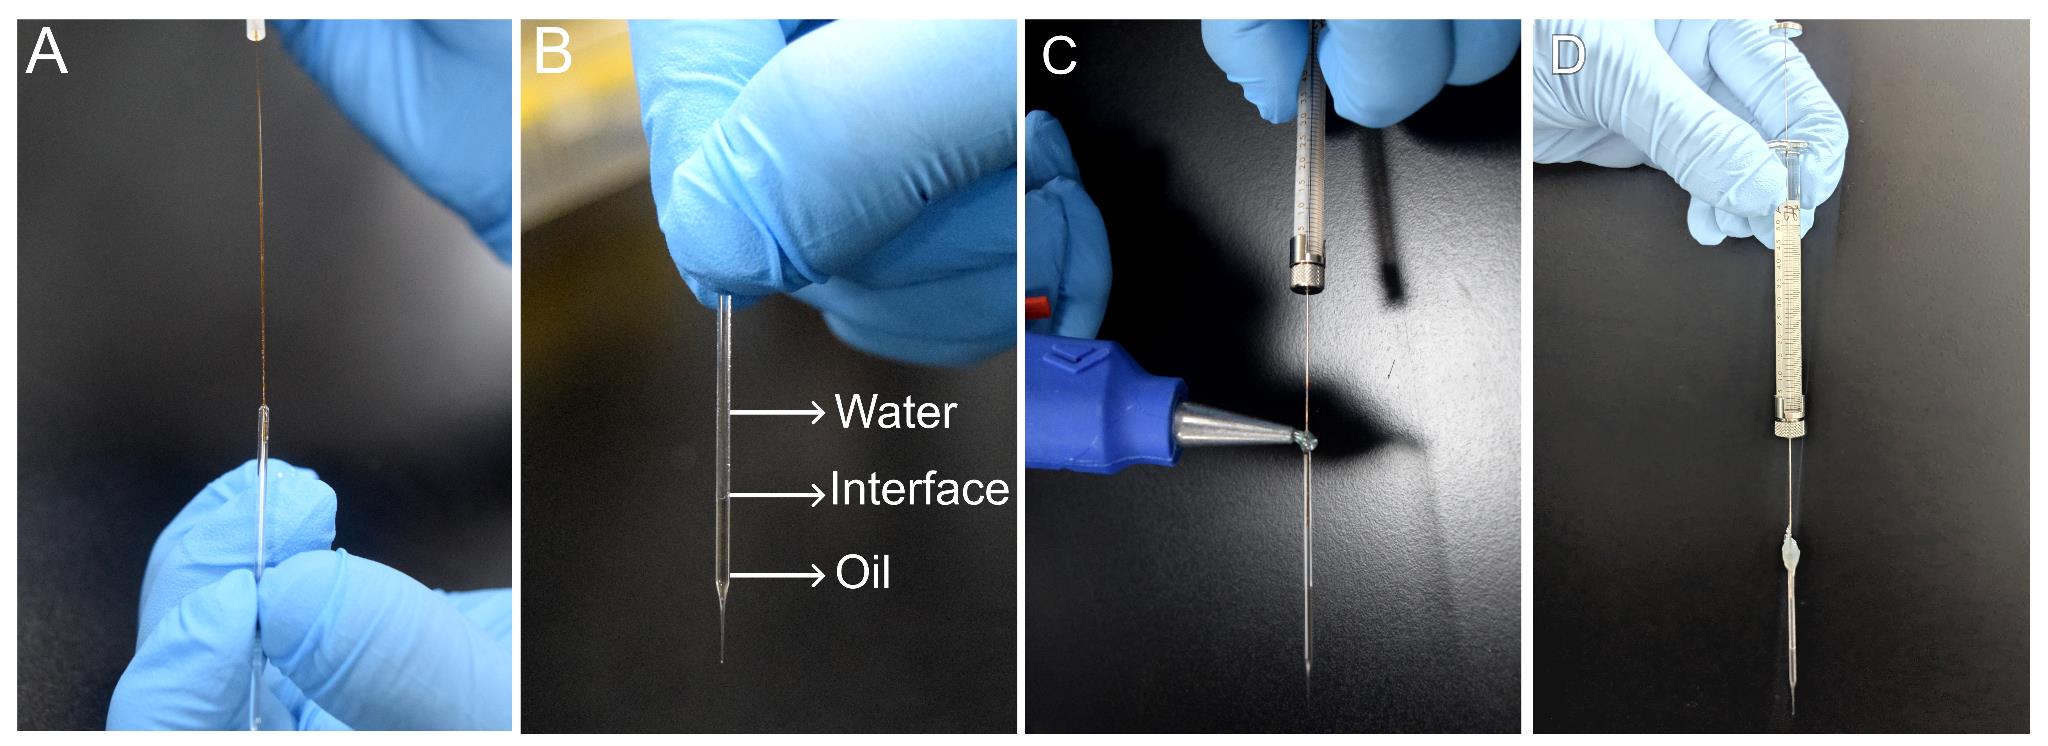
Figure 2. Preparation of a syringe for injections. (A) Image illustrating the loading of the pulled capillary with mineral oil and water using microfil. (B) Glass capillary pipette filled with mineral oil and Milli-Q water displaying the oil–water interface. (C) Attaching the loaded pipette to the Hamilton syringe using a glue gun. (D) Final assembly showing the filled capillary pipette and Hamilton syringe held with glue.
b. Take two 1 mL disposable syringes and fill one with mineral oil and the other with Milli-Q water.
c. Replace the standard syringe needle with microfil flexible needles.
d. Using the mineral oil–filled syringe, insert the microfil into the pulled capillary and carefully dispense oil to fill approximately one-third of its length (approximately 15 mm from the end of the slender length), avoiding air bubbles. The mineral oil prevents the mixing of injection material with water in the syringe.
e. Using the Milli-Q water–filled syringe, gently overlay water on top of the oil until the capillary is filled to the brim. Take care not to disturb the oil–water interface with the microfil (Figure 2B).
f. Load the Hamilton syringe with 5 μL of Milli-Q water, ensuring no air bubbles are present in the needle.
g. Carefully insert the Hamilton syringe needle into the capillary, reaching about halfway through the water column.
h. Wipe any excess water that overflows by gently tapping with a lint-free tissue paper.
i. Using a glue gun, apply a couple of drops of hot glue to seal the circumference of the junction between the capillary and syringe needle securely, without leaving any air gaps to prevent the leakage of injection material (Figure 2C).
j. Allow the glue to set and cool for 2–3 min (Figure 2D).
k. After the glue has set, test the syringe-capillary assembly by pressing the plunger. A continuous oil flow without leakage indicates proper sealing.
Note: The preparation of the syringe capillary must be carried out in a clean, dust-free area. Assistance may be required during sealing to ensure better control and accuracy of the process.
3. Preparation of surgical setup, reagents, and injection materials
a. Prepare 0.9% saline, 4% hydrogen peroxide, and 70% ethanol as in the Recipes section, and aliquot 10 mL of Milli-Q water in two tubes. Also, fill a 5 mL syringe with freshly prepared and autoclaved 0.9% saline.
b. The viral stock should be stored at -80 °C in small aliquots (~5–10 μL each) to minimize freeze-thaw cycles and maintain its integrity. On the day of surgery, thaw the required number of aliquots on ice and centrifuge them at 15,000× g for 3 min at 4 °C.
c. PFFs are also recommended to be stored at -80 °C in small aliquots to prevent repeated freeze-thaw cycles. Thaw the required number of vials at room temperature. Seal the PFFs tube with parafilm prior to sonication to prevent accidental water entry.
d. Fill the Power Sonic 410 bath sonicator with Milli-Q water up to 3 cm from the top of the bath. Place the tube with PFFs on a floater so that the bottom of the tube is submerged in water.
e. Sonicate PFFs for a total of 8 min with a 30 s on/30 s off cycle, at a high strength setting, with the operating temperature set to 25 °C. It is recommended to sonicate the PFFs freshly before use. Storing them after sonication can affect their activity [20].
Note: In comparison to the probe sonicator, use of a bath sonicator avoids aerosol generation in air. As additional precaution, close the lid of the bath sonicator before operating the on/off cycles.
f. After sonication, mix the PFFs with a thawed aliquot of rAAV2/6 to get a final concentration of 6 × 10¹⁰ gc of rAAV2/6 and 2.5 μg of PFFs per μL of the solution for each injection site (medial and lateral SN).
g. Prepare the surgical station by arranging all required tools, including forceps, scissors, surgical blades (number 10), cotton swabs, a suture set, needle holder, and syringes for easy access (Figure 3A).
Note: The forceps and scissors must be wiped with 70% ethanol before the procedure. During and after the surgeries, if the tools come in contact with blood, use 4% hydrogen peroxide solution, followed by 70% ethanol and Milli-Q water to clean the tools. Following the surgical procedure, thoroughly clean all surgical instruments, including forceps and scissors. Seal the instruments in sterilization pouches and autoclave them before subsequent use.
h. Confirm the proper functioning of the digital lab standard setup by testing the display and navigation along antero-posterior (AP), medio-lateral (ML), and dorso-ventral (DV) axes (Figure 3B–D). The QSI injector should be checked for infusion and withdrawal functions (Figure 3E–G), and the hand-held micromotor drill for speed and foot pedal control (Figure 3I–J).
i. Fill the gas vaporizer with isoflurane until the maximum mark indicated by the upper dark line. The vaporizer accommodates a maximum volume of 120 mL.
j. Check the gas evacuation apparatus and the weight of the activated charcoal gas filter canister to ensure proper removal of waste anesthetic gases.
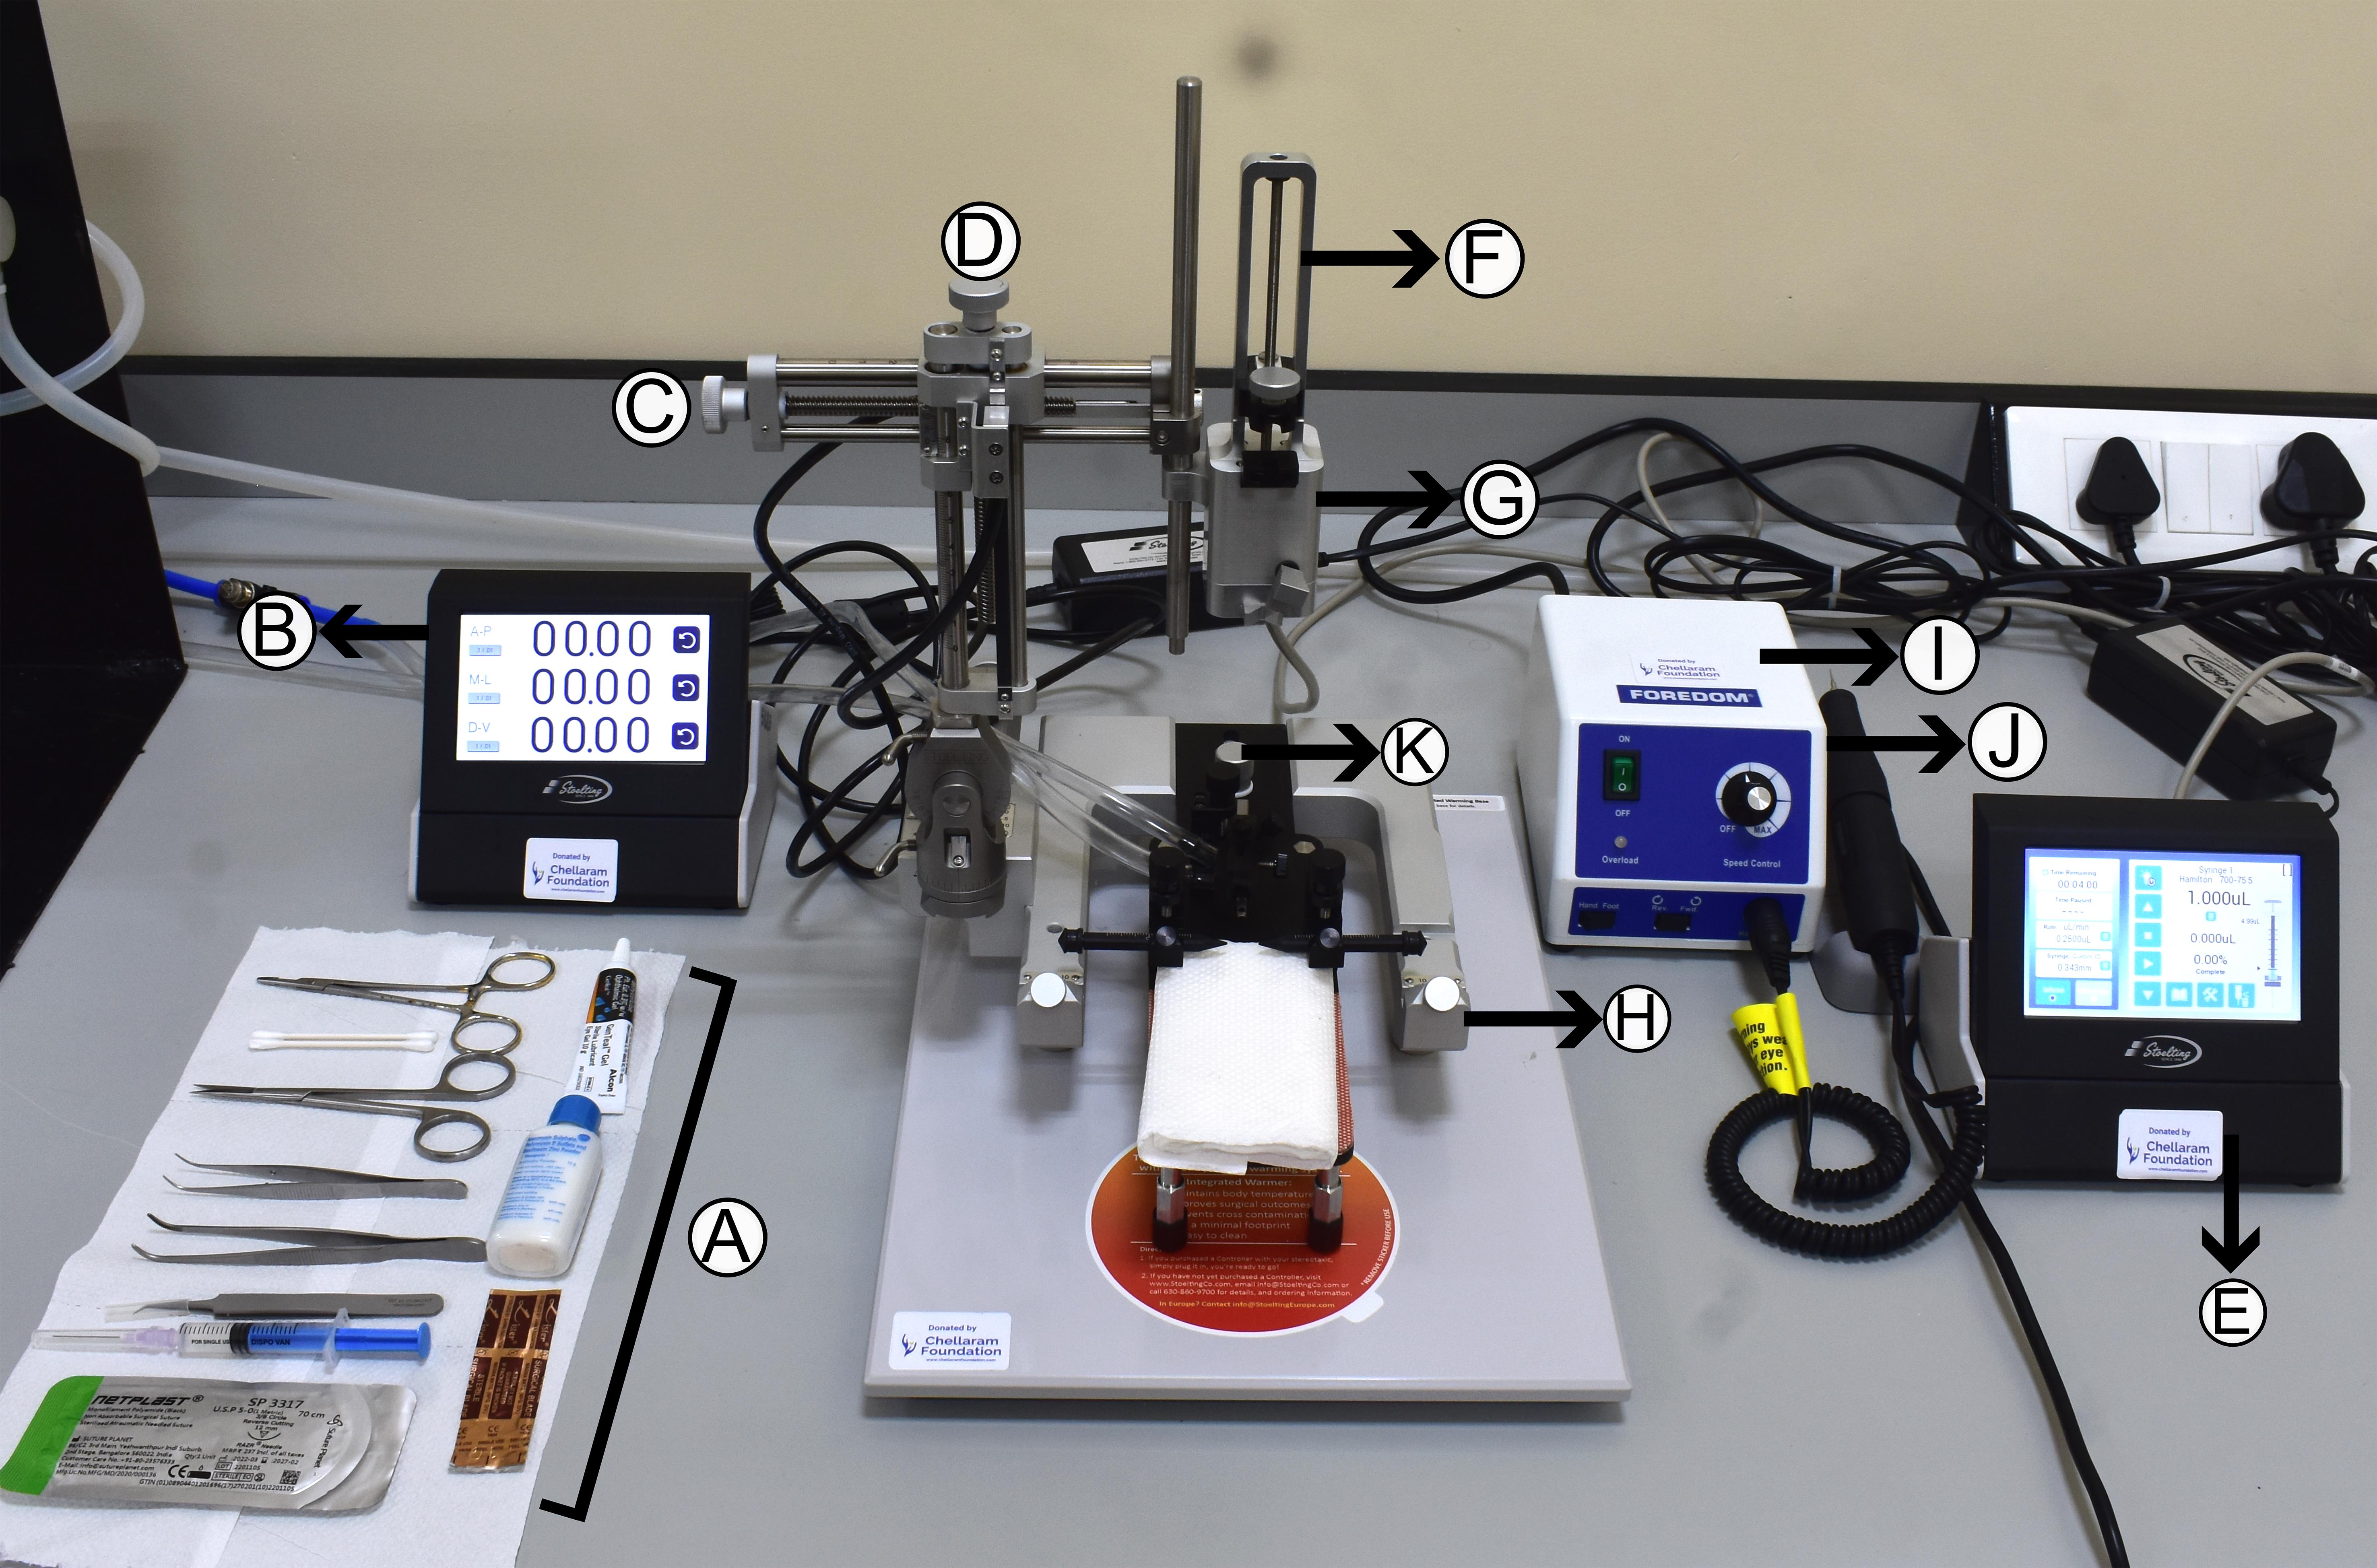
Figure 3. Setup for surgeries. (A) Arrangement of the required surgical tools near the apparatus for ease of access. (B) Digital display records the movements along antero-posterior (AP), medio-lateral (ML), and dorso-ventral (DV) axes. (C) ML knob. (D) DV knob. (E) Quintessential stereotaxic injector (QSI) controller. (F) QSI injector. (G) Syringe holder. (H) Stereotaxic frame. (I) Micromotor drill controller. (J) Handheld drill. (K) Nose cone adjusting knob.
B. Stereotaxic surgery
1. Anaesthetizing the mouse and placing it in the surgery setup
a. Start the air/oxygen supply and set the isoflurane level to 3% volume air/oxygen (Figure 4A). Turn the knob to direct flow into the induction chamber and fill it with isoflurane (Figure 4B). Afterward, reduce the isoflurane level to 2.5% of the volume of air/oxygen (Figure 4C).
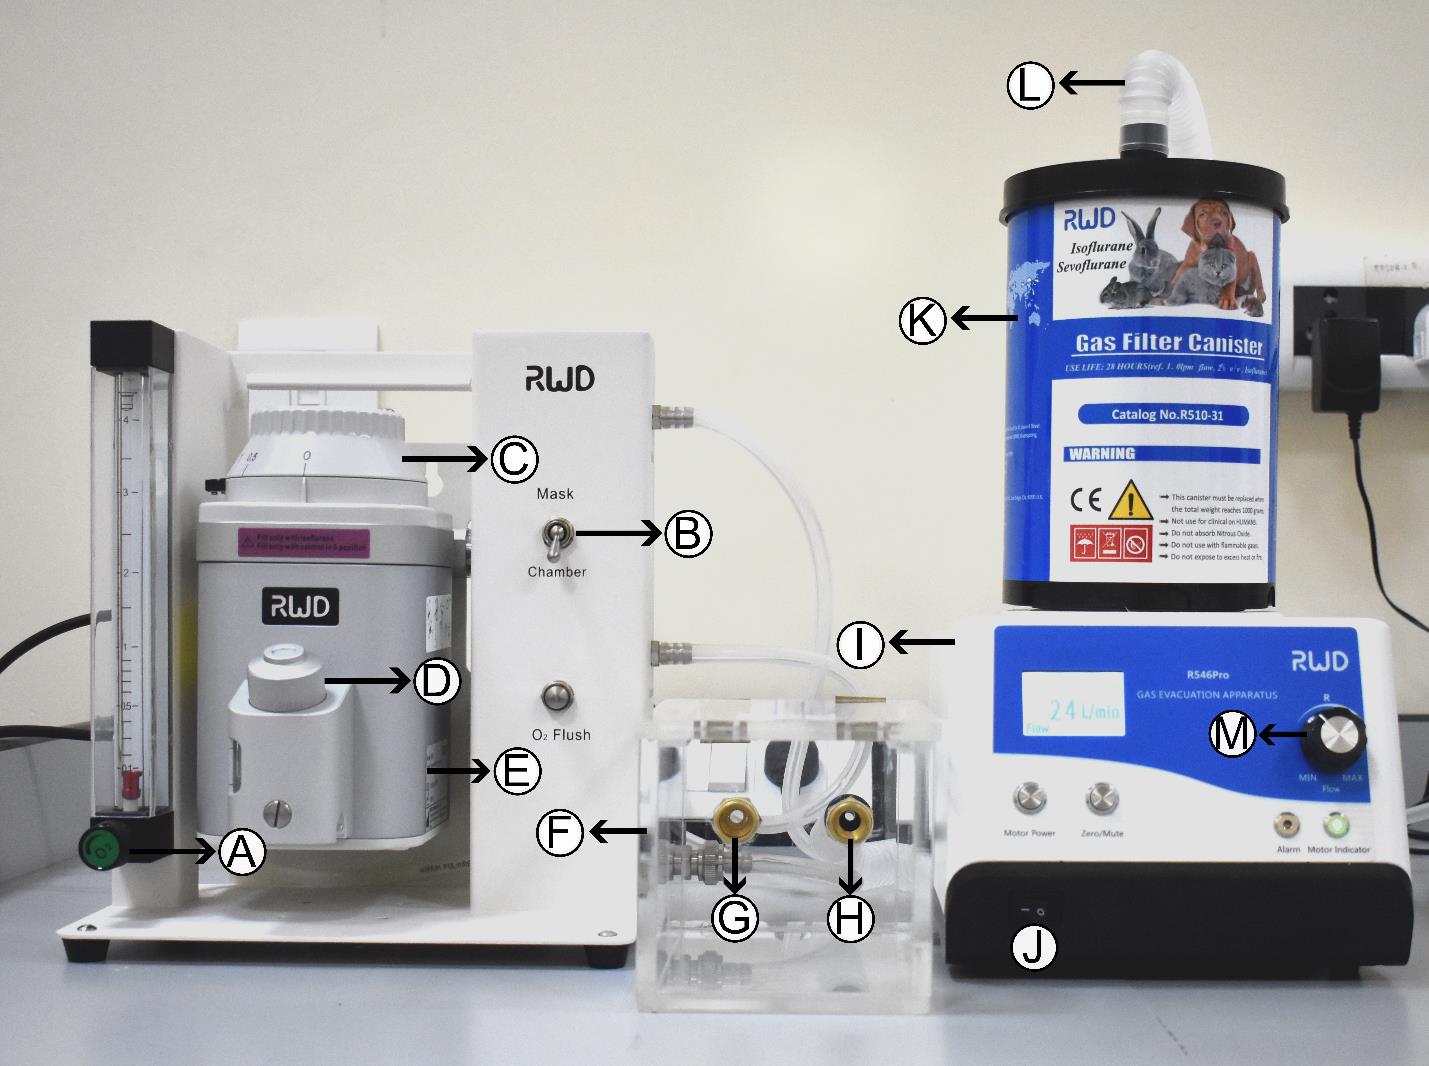
Figure 4. Anesthetic apparatus and induction chamber. Photograph of anesthesia apparatus showing (A) oxygen controller, (B) controller switch, (C) isoflurane controller, (D) nozzle to refill isoflurane, (E) isoflurane tank, (F) induction chamber, (G) isoflurane inlet, (H) isoflurane outlet, (I) gas evacuation apparatus, (J) switch, (K) gas filter canister, (L) anesthesia collection tube from mask, and (M) speed regulator.
b. Place the mouse in the anesthesia induction chamber (Figure 4F). Monitor its breathing and movement.
c. Once anaesthetized, transfer the mouse to the stereotaxic frame and direct isoflurane flow to the mask (nose cone) instead of the chamber using the controller switch (Figure 4B).
d. Secure the mouse by gently opening its mouth with blunt forceps and fixing the incisors on the bite bar. Slide the nose cone over the snout of the mouse and tighten the knob (Figure 5A).

Figure 5. Mounting the mouse on the stereotaxic surgery setup and incision. (A) Securing the mouse in the nose cone. (B) Placing the ear bars to obtain a firm grip of the head. (C) Applying a local anesthetic to the scalp. (D) Incision using scalpel blade. (E) Exposing the skull. (F) Identification of bregma and lambda points.
e. Turn on the gas evacuation apparatus (Figure 4I and J) and set the speed to 24 L/min using a speed regulator (Figure 4M). Adjust the isoflurane level to 1%–1.5%, depending on breathing. Monitor the breathing of the mouse throughout the surgery, and if the mouse is gasping, reduce the isoflurane level and stabilize the breathing.
f. Adjust the position of the nose cone to align with the ear bars using the knob present behind the nose cone (Figure 3K). Place both left and right ear bars and gently tighten both their knobs to firmly secure the skull (Figure 5B). Using a Q-tip, apply gentle pressure on the head to confirm if the head has been firmly secured in the frame.
g. Apply GenTeal Gel to both eyes to prevent drying.
2. Incision and marking of the bregma-lambda coordinates
a. Pinch the hind limb with blunt forceps to confirm deep anesthesia.
b. Apply lignocaine hydrochloride gel (local anesthetic) on the scalp using a cotton swab and massage gently (Figure 5C).
c. Using a surgical blade (number 10), make a single midline incision (~8 mm) along the rostro-caudal orientation. Gently pull the skin laterally using forceps to expose the skull (Figure 5D and E). Gently wipe away the fluid from the skull incision using a sterile cotton swab.
Note: The area of the mouse’s head where the incision is planned may be shaved using a trimmer to remove hair. Disinfect the exposed skin with 70% ethanol before surgery.
d. Locate the bregma and lambda points using a stereomicroscope mounted on a flexi-arm (Figure 5F).
e. Mount the syringe-capillary assembly prepared earlier on the stereotaxic QSI syringe holder and navigate toward the bregma using the AP, ML, and DV knobs by viewing through a stereomicroscope.
f. Lower the capillary tip using the DV knob until it just touches the surface of the skull at bregma. Set AP, ML, and DV coordinates to (0, 0, 0).
g. Raise the syringe assembly and move toward lambda. Measure the DV to ensure the bregma and lambda are at the same horizontal plane. If the values are negative, use the knob of the nose cone to lower the position and elevate the lambda using the left and right knobs near the ear bar. Continue to adjust the bregma and lambda points to arrive at the same horizontal plane.
Note: For example, the bregma value is 0.00 and the lambda value is -0.15. Lower the nose cone knob by turning counterclockwise. Again, measure the bregma point and set the AP, ML, and DV coordinates to 0, 0, 0. Go to the lambda and check if the DV value is 0.00.
h. Once the bregma and lambda points are in the same DV plane, note the AP value (BL distance) at lambda and move the syringe to the midpoint of this measurement. Move 1.00 across ML on either side (±1.00) and measure DV value.
Note: For example, if the AP is -4.2, navigate to -2.1 and move across ML to 1.00 to measure DV. Then, move to -1.00 across ML to measure DV. The DV values at -1.00 and 1.00 should match if the head is in a perfect horizontal plane.
i. If the DV does not match, adjust head height until they match and repeat B2f–h to verify skull alignment before moving to the position of interest.
j. The target coordinates can be determined using the Mouse Brain Atlas [21]. For a mouse with BL = 4.2, the coordinates of medial SN are -3.2, -1.1, and 4.6, and those of lateral SN are -3.2, -1.7, and 4.15, for AP, ML, and DV, respectively.
k. To account for the variations in the skull size of different mice, use the correction formula, AP = (3.2/4.2) × measured BL.
l. Once the corrected AP (cAP) is calculated, navigate to the medial and lateral substantia nigra coordinates by using ML = -1.1 for medial and ML = -1.70 for lateral SN for marking the positions on the skull using an ultra-fine tip marker.
m. Remove the stereotaxic QSI syringe holder to free space for drilling burr holes.
Note: The body temperature of the mouse should be monitored throughout the surgical procedure. An infrared thermometer can be used for periodic measurements. Alternatively, experienced users may detect temperature drops by touch. If a decrease in body temperature is observed, apply external heat using an infrared lamp or heating pad to prevent hypothermia.
3. Craniotomy
a. Drill burr holes at the above marked points with a handheld micromotor drill (0.2 mm bit) operated via foot pedal. Drill burr holes just enough to remove the overlaying skull and expose the brain without letting the drill touch the brain tissue. Clean the drilled area using a sterile cotton swab.
b. Using fine curved forceps, remove any thin pieces of skull inside the drill holes.
c. Blot residual blood with sterile wipes until the brain surface is visible.
Caution: If drilling bruises the cortex and leads to bleeding, ensure that bleeding stops before the injection; otherwise, a blood clot may block the glass capillary. Clean the drill bit using 4% hydrogen peroxide, followed by 70% ethanol and Milli-Q water.
4. Infusing the injection material
a. Re-attach the stereotaxic QSI syringe holder to the apparatus and mount the syringe-capillary assembly.
b. Load 2.3 μL of the injection sample into the pulled pipette. This volume covers 2 μL for medial and lateral SN injections and 0.3 μL for dead volume and pre/post-tests. For loading, place the 2.3 μL sample onto a clean piece of parafilm and load from there to prevent breaking the pulled pipette tip, which can happen if loading directly from a microcentrifuge tube.
c. Perform a pre-test to confirm the proper functioning of the injection assembly (Figure 6A). Dispense ~50 nL to check if an aqueous drop appears at the tip. Blot the drop on the tip using lint-free tissue.
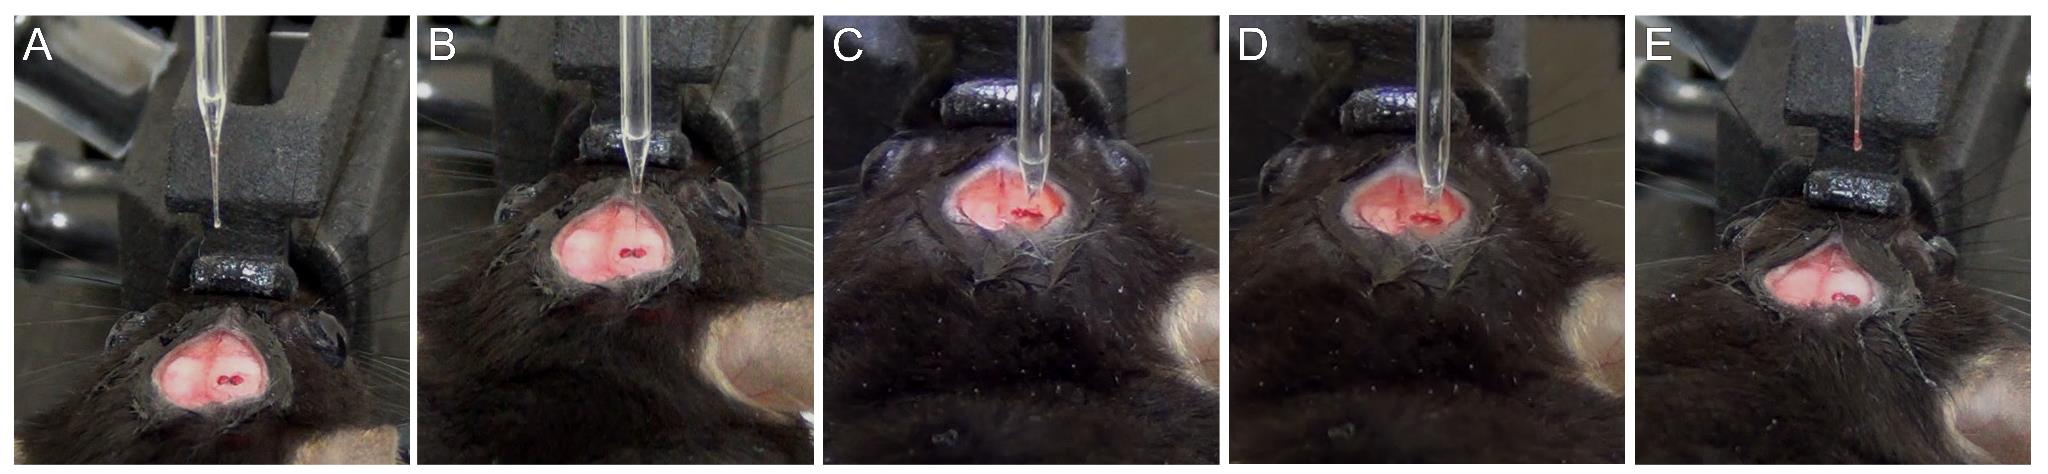
Figure 6. Stepwise process of infusion of the injection material. (A) Pre-test of the injection sample displaying a drop of injection material. (B) Positioning the capillary pipette above the burr hole. (C) Volume of the injection material at the start of injection in the coordinate of interest. (D) Glass capillary showing reduction in the volume of injection material post-infusion. (E) Post-test showing a drop of injection material at the tip of the glass pipette.
d. Position the capillary tip at the center of the burr hole and carefully lower it along the DV axis until it just touches the brain surface (Figure 6B). Reset the DV measurement to 0.00.
e. Slowly enter the brain tissue to reach the DV of 4.15 (for lateral SN) by moving at a speed of 1 mm/min (Figure 6C). This helps in minimizing any tissue damage.
f. After reaching the desired DV value, wait for 4 min. Set the injection flow rate to 250 nL/min and total infusion volume to 1 μL in the QSI controller.
g. Begin infusion with the digital pump. The alarm signals completion once 1 μL is dispensed. Also, note the reduction in the volume of injection material (Figure 6D). Leave the pipette in place for an additional 5 min to allow the injected material to be absorbed in the region.
h. Retract the pipette slowly at 1 mm/min speed to avoid backflow due to capillary action.
i. Once the pipette is outside, clean the tip with sterile, lint-free tissue and perform a post-test by dispensing ~50 nL of sample to confirm if there was any blockage in the capillary (Figure 6E).
j. Now, navigate to the medial SN (ML = -1.1) and repeat steps B4d–i. The DV for medial SN is 4.60 mm.
5. Suturing and recovery
a. Once the injection in both medial and lateral SN is successfully completed, proceed to rehydrate the incision site using about 300–500 μL of sterile 0.9% saline (Figure 7A).
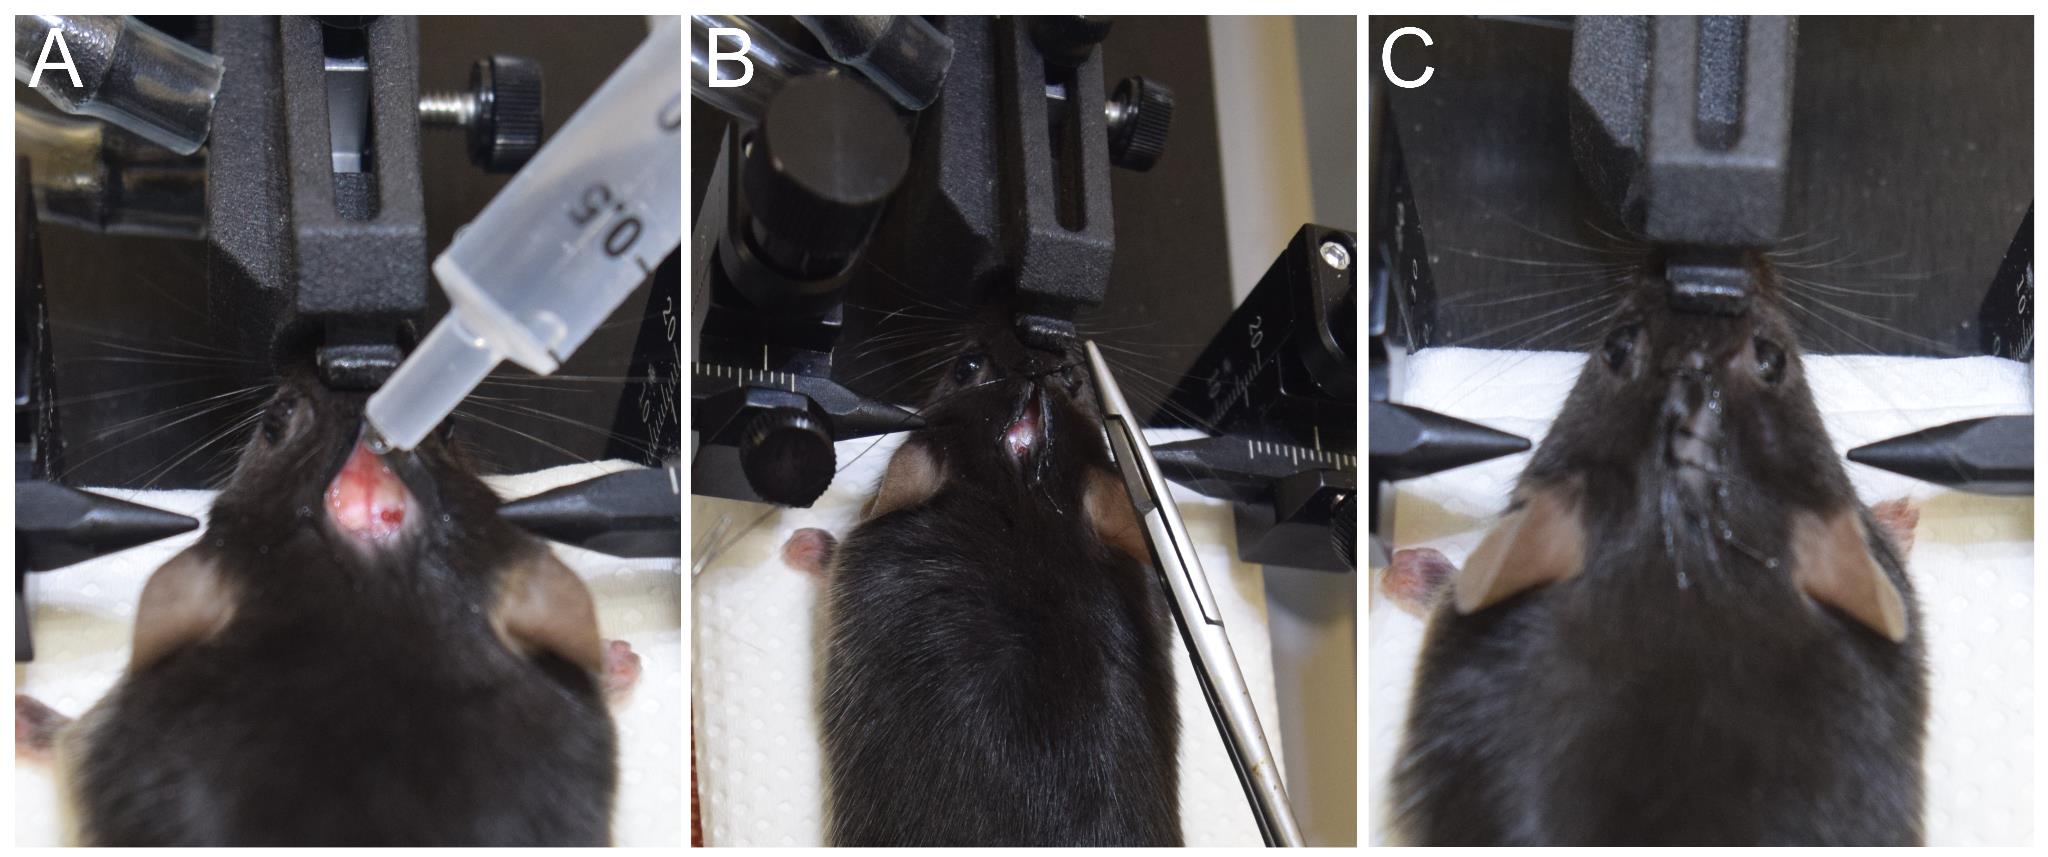
Figure 7. Incision closure by suture. (A) Hydrating the skin and skull using sterile 0.9% saline. (B) Suturing the skin using a reverse cutting needle with suture. (C) Sutured scalp of the mouse.
b. Loosen the ear bars and gently pull back the skin over the skull.
c. Using a needle holder and a suturing needle, close the incision with 3–4 surgeon's knots (Figure 7B, C).
d. Apply Neosporin antibiotic powder evenly over the sutured area, avoiding contact with the eyes.
e. Remove the mouse from the nose cone and place it on a SurgiSuite multi-functional surgical platform or a warm heating pad (~40 °C).
f. Prepare a recovery cage with wet food pellets and a water container on the cage floor.
g. Mice typically start moving within 5 min and appear fully active within 15–20 min of removal from the stereotaxic frame. Transfer fully active mice to the prepared recovery cages and place them in ambient housing conditions.
6. Post-recovery care
a. Once recovered, transfer the mice to their designated housing cages.
b. Monitor the body weight daily for at least 1 week post-surgery. Body weight should remain stable or increase; occasionally, a loss of up to 20% is acceptable.
c. Monitor the mice for healing of the skin incision. Antibiotic powder can be used for 1–2 days to ensure proper healing. It is advised not to house surgically operated mice together with untreated mice.
Validation of protocol
This protocol has been used and validated in the following research article:
• Subramanya et al. [26]. A Novel Mouse Model of Parkinson’s Disease for Investigating Progressive Pathology and Neuroprotection. bioRxiv, 2025-02.
The SynFib model displays progressive gait abnormality over time (Supplementary Figure 1F), dopaminergic (DA) neurodegeneration in the SN (Figure 1B and C) and tyrosine hydroxylase (TH) fiber density loss in the striatum (STR) of the SynFib group (Figure 1D and E), a gradual degeneration of DA neurons in SynFib group over time (Figure 1G and H) and corresponding decline in the striatal TH density (Figure 1I and J), increased accumulation of aggregated α-synuclein in the injected side of SN in the SynFib group (Figure 2B and C), which remains consistent over time in SN of SynFib group (Figure 2D and E), spread of α-synuclein aggregates to medium spiny neurons (Figure 3A) and cortex (Figure 3D), and higher neuroinflammation (percent area occupied by microglia and astrocytes) in the SynFib group (Figure 4A–D). The neuroinflammation persists in the injected side over time (Figure 4E–H).
General notes and troubleshooting
General notes
1. Insert the pipette slowly to minimize tissue damage at a controlled rate (1 mm/min; see step B4e).
2. Similarly, retract the syringe slowly to avoid suction of the injected material along the needle track. This ensures the proper concentration of the injection material at the target region (see step B4h).
3. Detailed video demonstrations of the key surgical procedures (steps B2–B5) are available in previous publications [22,23]. Similarly, users can refer to published protocols [24,25] to learn and practice the suturing procedure.
4. Continuously monitor both anesthesia flow rate and body temperature throughout the surgery to maintain stable physiological conditions.
5. Variance in transduction efficiency of rAAV-α-synuclein batches can arise due to several factors, such as the selected AAV serotype, the choice of promoter/enhancer construct, and its production and purification methods. Therefore, it is recommended to establish a working dose empirically by performing a pilot test by injecting different titers in a few mice. Use of antibodies that specifically detect human α-synuclein is very helpful in immunostaining analysis 3–4 weeks post-injection to determine working titers.
Troubleshooting
Problem 1: Mouse moves during ear bar adjustments.
Possible cause: The pressure applied to the ear bar is affecting the tympanic membrane.
Solution: Reposition the nose cone slightly posteriorly and gently fix the ear bar in place.
Caution: Excessive pressure can cause ear bleeding and hearing loss in mice. Care must be taken to gently fix the ear bars and then slowly adjust the knobs and tighten. When the mouse movements stop after fixing the skull, proceed with the next steps.
Problem 2: Mouse head slips while checking grip.
Possible cause: The nose cone and ear bars may not have been properly aligned.
Solution: Remove the mouse, reposition its snout onto the bite bar, and readjust both ear bars.
Problem 3: Gasping of the mouse.
Possible cause: Isoflurane concentration too high or oxygen/air flow too low.
Solution: Reduce the isoflurane rate and increase the oxygen/air delivery.
Problem 4: Pre-test failure.
Possible causes: Leak at the glued area, broken edge, or cracks in the syringe-capillary assembly.
Solutions: Re-seal the area with more glue or prepare a new capillary pipette.
Problem 5: Backflow of injection materials.
Possible causes: Retracting syringe-capillary assembly too quickly, high injection volume, or high speed of injection.
Solutions: Inject slowly at a controlled rate. Also, pause briefly before retracting the tip at a very slow rate.
Problem 6: Clogged capillaries between two injections.
Possible causes: Formation of a blood clot after the first infusion or blockage caused by tissue debris at the tip of the capillary pipette.
Solutions: Prepare aliquots of 4% hydrogen peroxide, 70% ethanol, and Milli-Q water in sterile 1.5 mL microcentrifuge tubes. Immerse the tip of the clogged capillary pipette sequentially in 4% hydrogen peroxide, 70% ethanol, and Milli-Q water. Finally, dip once more in Milli-Q water and gently dry the tip. Dispense approximately 50 nL of the injection material to remove any portion that may have come into brief contact with hydrogen peroxide. Perform a pre-test by dispensing 20–30 nL of the injection material to confirm unobstructed flow and then resume the surgery. If the blockage persists despite these steps, replace the syringe–capillary assembly.
Problem 7: Bubbles inside the capillary pipettes.
Possible cause: Bubbles may form during the aspiration of the sample.
Solution: Avoid introducing air bubbles while aliquoting the injection material onto the parafilm. If bubbles appear, gently burst them using the tip of a sterile pipette tip or sterile needle. In case bubbles are observed in the capillary after loading, dispense the injection material back onto the parafilm. Using a magnifying lens, pop any bubbles carefully. Reload the sample into the capillary pipette before proceeding with the injection.
Acknowledgments
Conceptualization, P.T.; Investigation, S.K. and P.T.; Writing—Original Draft, S.K., D.S., and P.T.; Funding acquisition, P.T.; Supervision, P.T.
P.T. acknowledges funding support from Cure Parkinson's Trust, UK (PT01), Parkinson's Foundation USA (PF-IMP-1437213), Science and Engineering Research Board, India (SRG/2021/000981), DBT/Wellcome Trust India Alliance Early Career Fellowship (IA/E/17/1/503664), and intramural funds from IISER-Thiruvananthapuram. FIST funding for the animalium at IISER-Thiruvananthapuram is also acknowledged. S.K. is supported by a fellowship from the Department of Biotechnology, Government of India (DBT/2021-22/IISER-TVM/1749).
This protocol was used in Subramanya et al. [26].
The graphical overview was created in BioRender: Kumar S, S. (2025) https://BioRender.com/agr7t9f
Competing interests
The authors declare no conflicts of interest or competing interests.
Ethical considerations
Two- to three-month-old C57BL/6J mice were procured and maintained at the animal facility of the Indian Institute of Science Education and Research, Thiruvananthapuram. The mice were housed in individually ventilated cages with ad libitum food and water with a 12/12 h light/dark cycle. The experimental procedures were approved by the Institutional Animal Ethical Committee (IAEC) and followed the guidelines of the Committee for the Purpose of Control and Supervision for Experiments on Animals (CPCSEA), Government of India.
References
- Tenchov, R., Sasso, J. M. and Zhou, Q. A. (2025). Evolving Landscape of Parkinson’s Disease Research: Challenges and Perspectives. ACS Omega. 10(2): 1864–1892. https://doi.org/10.1021/acsomega.4c09114
- Michel, P. P., Hirsch, E. C. and Hunot, S. (2016). Understanding Dopaminergic Cell Death Pathways in Parkinson Disease. Neuron. 90(4): 675–691. https://doi.org/10.1016/j.neuron.2016.03.038
- Schober, A. (2004). Classic toxin-induced animal models of Parkinson’s disease: 6-OHDA and MPTP. Cell Tissue Res. 318(1): 215–224. https://doi.org/10.1007/s00441-004-0938-y
- Bové, J. and Perier, C. (2012). Neurotoxin-based models of Parkinson's disease. Neuroscience. 211: 51–76. https://doi.org/10.1016/j.neuroscience.2011.10.057
- Blandini, F., Armentero, M. T. and Martignoni, E. (2008). The 6-hydroxydopamine model: News from the past. Parkinsonism Relat Disord. 14: S124–S129. https://doi.org/10.1016/j.parkreldis.2008.04.015
- Betarbet, R., Sherer, T. B., MacKenzie, G., Garcia-Osuna, M., Panov, A. V. and Greenamyre, J. T. (2000). Chronic systemic pesticide exposure reproduces features of Parkinson's disease. Nat Neurosci. 3(12): 1301–1306. https://doi.org/10.1038/81834
- Dauer, W. and Przedborski, S. (2003). Parkinson's disease: mechanisms and models. Neuron. 39(6): 889–909. https://doi.org/10.1016/s0896-6273(03)00568-3
- Maegawa, H. and Niwa, H. (2021). Generation of Mitochondrial Toxin Rodent Models of Parkinson’s Disease Using 6-OHDA, MPTP, and Rotenone. Methods Mol Biol. 2322: 95–110. https://doi.org/10.1007/978-1-0716-1495-2_10
- Cannon, J. R., Tapias, V., Na, H. M., Honick, A. S., Drolet, R. E. and Greenamyre, J. T. (2009). A highly reproducible rotenone model of Parkinson's disease. Neurobiol Dis. 34(2): 279–290. https://doi.org/10.1016/j.nbd.2009.01.016
- Van der Perren, A., Van den Haute, C. and Baekelandt, V. (2014). Viral Vector-Based Models of Parkinson’s Disease. Curr Top Behav Neurosci. 22: 271–301. https://doi.org/10.1007/7854_2014_310
- Dovonou, A., Bolduc, C., Soto Linan, V., Gora, C., Peralta III, M. R. and Lévesque, M. (2023). Animal models of Parkinson’s disease: bridging the gap between disease hallmarks and research questions. Transl Neurodegener. 12(1): e1186/s40035–023–00368–8. https://doi.org/10.1186/s40035-023-00368-8
- He, S., Ru, Q., Chen, L., Xu, G., Wu, Y. (2024). Advances in animal models of Parkinson's disease. Brain Res Bull. 215: 111024. https://doi.org/10.1016/j.brainresbull.2024.111024
- Ip, C. W., Klaus, L. C., Karikari, A. A., Visanji, N. P., Brotchie, J. M., Lang, A. E., Volkmann, J. and Koprich, J. B. (2017). AAV1/2-induced overexpression of A53T-α-synuclein in the substantia nigra results in degeneration of the nigrostriatal system with Lewy-like pathology and motor impairment: a new mouse model for Parkinson’s disease. Acta Neuropathol Commun. 5(1): e1186/s40478–017–0416–x. https://doi.org/10.1186/s40478-017-0416-x
- Kirik, D., Rosenblad, C., Burger, C., Lundberg, C., Johansen, T. E., Muzyczka, N., Mandel, R. J. and Björklund, A. (2002). Parkinson-Like Neurodegeneration Induced by Targeted Overexpression of α-Synuclein in the Nigrostriatal System. J Neurosci. 22(7): 2780–2791. https://doi.org/10.1523/jneurosci.22-07-02780.2002
- Huntington, T. E. and Srinivasan, R. (2021). Adeno-Associated Virus Expression of α-Synuclein as a Tool to Model Parkinson’s Disease: Current Understanding and Knowledge Gaps. Aging Dis. 12(4): 1120. https://doi.org/10.14336/ad.2021.0517
- Thakur, P., Breger, L. S., Lundblad, M., Wan, O. W., Mattsson, B., Luk, K. C., Lee, V. M. Y., Trojanowski, J. Q. and Björklund, A. (2017). Modeling Parkinson’s disease pathology by combination of fibril seeds and α-synuclein overexpression in the rat brain. Proc Natl Acad Sci USA. 114(39): e1710442114. https://doi.org/10.1073/pnas.1710442114
- Volpicelli-Daley, L. A., Kirik, D., Stoyka, L. E., Standaert, D. G. and Harms, A. S. (2016). How can rAAV-α-synuclein and the fibril α-synuclein models advance our understanding of Parkinson's disease? J Neurochem. 139: 131–155. https://doi.org/10.1111/jnc.13627
- Björklund, A., Nilsson, F., Mattsson, B., Hoban, D. B. and Parmar, M. (2022). A Combined α-Synuclein/Fibril (SynFib) Model of Parkinson-Like Synucleinopathy Targeting the Nigrostriatal Dopamine System. J Parkinsons Dis. 12(8): 2307–2320. https://doi.org/10.3233/jpd-223452
- Volpicelli-Daley, L. A., Luk, K. C., Patel, T. P., Tanik, S. A., Riddle, D. M., Stieber, A., Meaney, D. F., Trojanowski, J. Q. and Lee, V. Y. (2011). Exogenous α-Synuclein Fibrils Induce Lewy Body Pathology Leading to Synaptic Dysfunction and Neuron Death. Neuron. 72(1): 57–71. https://doi.org/10.1016/j.neuron.2011.08.033
- Polinski, N. K., Volpicelli-Daley, L. A., Sortwell, C. E., Luk, K. C., Cremades, N., Gottler, L. M., Froula, J., Duffy, M. F., Lee, V. M., Martinez, T. N., et al. (2018). Best Practices for Generating and Using Alpha-Synuclein Pre-Formed Fibrils to Model Parkinson’s Disease in Rodents. J Parkinsons Dis. 8(2): 303–322. https://doi.org/10.3233/jpd-171248
- Paxinos, G. and Franklin, K. B. J. (2004). The Mouse Brain in Stereotaxic Coordinates: Compact Second Edition. Gulf Professional Publishing.
- Fricano-Kugler, C. J., Williams, M. R., Salinaro, J. R., Li, M. and Luikart, B. (2016). Designing, Packaging, and Delivery of High Titer CRISPR Retro and Lentiviruses via Stereotaxic Injection. J Visualized Exp.: e3791/53783. https://doi.org/10.3791/53783
- Barbash, S., Hanin, G. and Soreq, H. (2013). Stereotactic Injection of MicroRNA-expressing Lentiviruses to the Mouse Hippocampus CA1 Region and Assessment of the Behavioral Outcome. J Visualized Exp.: e3791/50170. https://doi.org/10.3791/50170
- Croce, E. and Olmi, S. (2000). Intracorporeal knot-tying and suturing techniques in laparoscopic surgery: technical details. JSLS. 4(1):17–22.
- Nelson, A. (2022). Mouse Stereotaxic Surgery. Available at: https://www.protocols.io/view/mouse-stereotaxic-surgery-n2bvj6qynlk5/v1
- Subramanya, S. K., Shekhar, S., Kumar, D. B., Senthil, S., Allimuthu, D., Luk, K. C. and Thakur, P. (2025). A Novel Mouse Model of Parkinson’s Disease for Investigating Progressive Pathology and Neuroprotection. bioRxiv: e638053. https://doi.org/10.1101/2025.02.13.638053
Article Information
Publication history
Received: Sep 15, 2025
Accepted: Oct 28, 2025
Available online: Nov 6, 2025
Published: Dec 5, 2025
Copyright
© 2025 The Author(s); This is an open access article under the CC BY-NC license (https://creativecommons.org/licenses/by-nc/4.0/).
How to cite
Subramanya, S. K., Singh, D. and Thakur, P. (2025). A One-Step Mouse Model of Parkinson’s Disease Combining rAAV-α-Synuclein and Preformed Fibrils of α-Synuclein. Bio-protocol 15(23): e5525. DOI: 10.21769/BioProtoc.5525.
Category
Neuroscience > Nervous system disorders > Parkinson's disease
Neuroscience > Nervous system disorders > Animal model
Do you have any questions about this protocol?
Post your question to gather feedback from the community. We will also invite the authors of this article to respond.