- Protocols

- Articles and Issues
- For Authors
- About
- Become a Reviewer

Rapid and Uniform NHS-Ester-Based Membrane Protein Labeling of Live Mammalian Cells
Published: Vol 15, Iss 19, Oct 5, 2025 DOI: 10.21769/BioProtoc.5455 Views: 2227
Reviewed by: Rajesh RanjanAnonymous reviewer(s)
Original research article
The authors used this protocol in:

Apr 2025

Protocol Collections
Comprehensive collections of detailed, peer-reviewed protocols focusing on specific topics


Abstract
Rapid and uniform labeling of plasma membrane proteins is essential for high-resolution imaging of dynamic membrane topologies and intercellular communication in live mammalian cells. Existing strategies for labeling live cell membranes, such as fluorescent fusion proteins, enzyme-mediated tags, metabolic bioorthogonal labeling, and lipophilic dyes, face trade-offs in the requirement of genetic manipulation, the presence of non-uniform labeling, the need for extensive preparation times, and limited choices of fluorophores. Here, we present a streamlined protocol that leverages N-hydroxysuccinimide (NHS)-ester chemistry to achieve rapid (≤5 min), covalent conjugation of synthetic small-molecule dyes to surface-exposed primary amines, enabling pan-membrane-protein labeling. This workflow covers dye stock preparation, labeling for suspension and adherent cells, multiplex live-cell imaging, fusion protein co-staining (including insulin-triggered receptor endocytosis), 3D membrane visualization, and in vivo assays for visualizing membrane-derived material transfers between donor and recipient cells using a lymphoma T-cell mouse model. This high-density labeling approach is compatible with various cell types across diverse imaging platforms. Its speed, versatility, and stability make it a broadly applicable tool for studying plasma membrane dynamics and intercellular membrane trafficking.
Key features
• Rapid high-density membrane labeling with small-molecule fluorescent dyes.
• Enables live-cell multiplexed imaging, amenable to primary cells and cells expressing fluorescent fusion proteins, and supports in vivo studies of membrane-associated cell–cell communications.
• Compatible with various fluorescence imaging modalities.
Keywords: NHS-ester labelingGraphical overview
Workflow of N-hydroxysuccinimide (NHS)-ester dye labeling
Background
The plasma membrane hosts dynamic assemblies of proteins whose 3D topology and mobility underlie essential inter- and intracellular signaling. Direct visualization of complex 3D membrane topologies and dynamic protein distributions has greatly enhanced our understanding of how cells exchange information. Receptor-mediated signaling, specialized membrane protrusions (e.g., tunneling nanotubes), and extracellular vesicle release all depend on membrane protein organization [1,2]. Such dynamic platforms are critical for processes like immune synapse formation, epithelial barrier signaling, and neuronal communication. In fact, tunneling nanotubes (TNTs) have been observed connecting cells, enabling direct transfer of proteins, organelles, and electrical signals between cells [1,2]. Imaging of the plasma membrane thus provides needed insights into signal transduction, vesicular trafficking, and cell–cell communication in a diverse set of biological systems.
Despite advances in fluorescence microscopy, membrane labeling techniques remain limited. Protein-specific tags (e.g., fluorescent fusion proteins, HaloTag, SNAP-tag) allow visualization of individual proteins but require exogenous gene expression or enzyme-mediated labeling, which can disrupt native protein function or cell physiology [3,4]. Similarly, metabolic bioorthogonal labeling schemes can be labor-intensive and slow, limiting their routine use in live-cell experiments [5,6]. Other pan-membrane approaches use lipophilic dyes (DiI, DiO, DiD), which label membranes but often stain heterogeneously, have low membrane retention, and can form dye aggregates. Further, glycan-binding lectins can highlight certain membrane domains, but their binding varies with cell type and metabolic state, such as wheat germ agglutinin, which loses sensitivity in some pathological conditions [7]. Commercial covalent membrane stains, such as MemBrite, have been introduced, but they offer limited fluorophores and use proprietary chemistry, limiting transparency and versatility [8].
N-hydroxysuccinimide (NHS)-ester chemistry provides a rapid, uniform, covalent membrane labeling alternative. NHS-esters react instantly with surface-exposed primary amines on proteins to form stable amide bonds. The reaction is fast, allowing for high-density cell surface labeling with minimal dye internalization [1]. Because NHS-esters label all exposed amines indiscriminately, the resulting fluorescence is pan-membrane. The covalent linkage also yields very stable labeling, enabling prolonged live-cell imaging.
Overall, NHS-ester-based membrane labeling combines the speed, density, and uniformity of covalent chemistry with the flexibility of any synthetic dye. It does not require genetic modification and is compatible with several imaging modalities, e.g., total internal reflection fluorescence (TIRF), confocal, and 3D-structured illumination microscopy (SIM). The current protocol is optimized for common mammalian cell lines (Jurkat E6.1 T cells, DC2.4 dendritic cells, U2OS, and HEK293T) and mouse primary splenocytes but can be adapted for most adherent or suspension cells. It is particularly well-suited to live-cell microscopy and multiplex experiments and can be combined easily with fluorescent fusion proteins and small molecule probes as needed. Altogether, this rapid pan-membrane-labeling strategy provides a broadly applicable tool to visualize plasma membrane topology and dynamics in complex cellular systems.
Materials and reagents
Biological materials
1. DC 2.4 (MilliporeSigma, catalog number: SCC142)
2. HEK293T (ATCC, catalog number: CRL-3216)
3. Jurkat E6.1 (MilliporeSigma, catalog number: 88042803-1VL)
4. U2OS (ATCC, catalog number: HTB-96)
5. SNF5fl/fl, CD4-Cre+/- C57/BL6 mice (Jackson Laboratory)
6. Wildtype C57/BL6 mice (Jackson Laboratory)
Reagents
All reagents should be used within their manufacturer-recommended expiration or usage periods to ensure efficacy throughout experiments. Reagents designated as critical are necessary for the core labeling procedure, while non-critical reagents support additional labeling steps or optional protocol variations.
Critical:
1. Alexa FluorTM 647 NHS ester (Thermo Fisher Scientific, Invitrogen, catalog number: A37573)
2. Alexa FluorTM 488 NHS ester (Thermo Fisher Scientific, Invitrogen, catalog number: A20000)
3. NHS-Biotin (Lumiprobe, catalog number: 2551)
4. Sulfo-Cyanine3-NHS ester, 1 mg (Lumiprobe, catalog number: 11320)
5. Sulfo-Cyanine5-NHS ester, 1 mg (Lumiprobe, catalog number: 13320)
6. Alexa FluorTM 488 NHS ester, 1 mg (Lumiprobe, catalog number: 11820)
7. Sodium bicarbonate (NaHCO3), 500 g (MilliporeSigma, catalog number: S6014)
8. Glycine, 500 g (Fisher Scientific, catalog number: BP381-500)
Non-critical:
1. Roswell Park Memorial Institute (RPMI) 1640 cell culture media, 500 mL (Thermo Fisher Scientific, Gibco, catalog number: 11875093)
2. High-glucose Dulbecco’s modified Eagle medium (DMEM) cell culture media (4.5 g/L), 500 mL (Thermo Fisher Scientific, Gibco, catalog number: 11965118)
3. Low-glucose DMEM cell culture media (1 g/L), 500 mL (Thermo Fisher Scientific, Gibco, catalog number: 11885084)
4. Penicillin-streptomycin (Pen-Strep) 10,000 U/mL, 100 mL (Thermo Fisher Scientific, Gibco, catalog number: 1540-122)
5. Dulbecco’s phosphate-buffered saline (DPBS), 500 mL (Thermo Fisher Scientific, Gibco, catalog number: 14190-144)
6. DynabeadsTM, Human T-Activator CD3/CD28 (Thermo Fisher Scientific, Gibco, catalog number: 11161D)
7. Trypan blue solution, 0.4% (Thermo Fisher Scientific, Gibco, catalog number: 15250-061)
8. LipofectamineTM 2000, 1.5 mL (Thermo Fisher Scientific, Invitrogen, catalog number: 11668019)
9. Opti-MEM reduced serum media, 500 mL (Thermo Fisher Scientific, Gibco, catalog number: 51985034)
10. HEPES, 1 M, 100 mL (Fisher Scientific, Gibco, catalog number: 15630080)
11. Non-essential amino acids (NEAA) 100× solution (Fisher Scientific, Cytiva HyClone, catalog number: SH3023801)
12. Sodium pyruvate, 100 mM, 100 mL (Fisher Scientific, Gibco, catalog number: 11360070)
13. Bovine serum albumin (BSA), 100 g (Fisher Scientific, catalog number: BP9703100)
14. Acetonitrile, 8 mL (MilliporeSigma, catalog number: 900644)
15. Fetal bovine serum (FBS), 500 mL (MilliporeSigma, catalog number: F0926)
16. Dimethyl sulfoxide (DMSO), 500 mL (MilliporeSigma, catalog number: D8418-500mL)
17. Poly-L-lysine (PLL), 0.01%, 50 mL (MilliporeSigma, catalog number: P4707)
18. Chloroform, 1 L (MilliporeSigma, catalog number: 366919)
19. Methanol (MeOH), 1 L (MilliporeSigma, catalog number: 154903)
20. Recombinant human insulin, 100 mg (MilliporeSigma, catalog number: 11376497001)
21. Acetic acid, 100 mL (MilliporeSigma, catalog number: 695092)
22. Nucleofector 2b kit V (LONZA, catalog number: VCA-1003)
23. In vivo mAb anti-human CD3 (OKT3), 25 mg, lot: 809022M2 (BioXCell, catalog number: BE0001-2)
24. Paraformaldehyde (PFA), 16%, 100 mL (Electron Microscopy Sciences, catalog number: 15710)
25. FITC anti-mouse CD8α antibody, 0.1 mg (BD Biosciences, lot: 2248217, catalog number: 553030)
26. EasySep Mouse CD8+ T-cell Isolation kit (STEMCELL Technologies, catalog number: 19853)
27. EasySep Mouse CD4+ T-cell Isolation kit (STEMCELL Technologies, catalog number: 19852)
Solutions
1. DC 2.4 cell culture media (see Recipes)
2. HEK293T cell culture media (see Recipes)
3. U2OS cell culture media (see Recipes)
4. Jurkat E6.1 cell culture media (see Recipes)
5. Low-glucose DMEM cell culture media (see Recipes)
6. 0.1 M NaHCO3 (see Recipes)
7. 45 mg/mL glycine solution (see Recipes)
8. 200 nM recombinant human insulin + low-glucose DMEM (see Recipes)
Recipes
1. DC 2.4 cell culture media
| Reagent | Final concentration | Volume |
|---|---|---|
| RPMI 1640 media | n/a | 435 mL |
| FBS | 10% | 50 mL |
| Pen-Strep | 100 units/mL | 5 mL |
| HEPES (1 M) | 0.01 M | 5 mL |
| NEAA (100×) | 1× | 5 mL |
| Total | n/a | 500 mL |
Store at 4 °C for up to 3 months.
2. HEK293T cell culture media
| Reagent | Final concentration | Volume |
|---|---|---|
| High-glucose DMEM (4.5 g/L) | n/a | 440 mL |
| FBS | 10% | 50 mL |
| Pen-Strep | 100 units/mL | 5 mL |
| Sodium pyruvate (100 mM) | 1 mM | 5 mL |
| Total | n/a | 500 mL |
Store at 4 °C for up to 3 months.
3. U2OS cell culture media
| Reagent | Final concentration | Volume |
|---|---|---|
| High-glucose DMEM (4.5 g/L) | n/a | 440 mL |
| FBS | 10% | 50 mL |
| Pen-Strep | 100 units/mL | 5 mL |
| Sodium pyruvate (100 mM) | 1 mM | 5 mL |
| Total | n/a | 500 mL |
Store at 4 °C for up to 3 months.
4. Jurkat E6.1 cell culture media
| Reagent | Final concentration | Volume |
|---|---|---|
| RPMI 1640 media | n/a | 445 mL |
| FBS | 10% | 50 mL |
| Pen-Strep | 100 units/mL | 5 mL |
| Total | n/a | 500 mL |
Store at 4 °C for up to 3 months.
5. Low-glucose DMEM cell culture media
| Reagent | Final concentration | Volume |
|---|---|---|
| Low-glucose DMEM (1 g/L) | n/a | 440 mL |
| FBS | 10% | 50 mL |
| Pen-Strep | 100 units/mL | 5 mL |
| Sodium pyruvate (100 mM) | 1 mM | 5 mL |
| Total | n/a | 500 mL |
Store at 4 °C for up to 3 months.
6. 0.1 M NaHCO3
| Reagent | Final concentration | Quantity or volume |
|---|---|---|
| NaHCO3 | 0.1 M | 126 mg |
| H2O (ultra-pure water) | n/a | 15 mL |
| Total | n/a | 15 mL |
Filter with 0.22 μm. Store at 4 °C for up to 1 month.
7. 45 mg/mL glycine solution
| Reagent | Final concentration | Quantity or volume |
|---|---|---|
| Glycine | 45 mg/mL | 225 mg |
| H2O (ultra-pure water) | n/a | 5 mL |
| Total | n/a | 5 mL |
Filter with 0.22 μm. Store at 4 °C for up to 1 month.
8. 200 nM recombinant human insulin + low-glucose DMEM
| Reagent | Final concentration | Quantity or volume |
|---|---|---|
| Recombinant human insulin (4 μM) | 200 nM | 10 μL |
| Low-glucose DMEM (1 g/L) | n/a | 190 μL |
| Total | n/a | 200 μL |
Recombinant human insulin is stored at -80 °C at 4 μM in PBS. Before each use, thaw and dilute insulin in low-glucose DMEM to 200 nM. Use the solution immediately.
Laboratory supplies
1. 8-well chambered cover glass, no. 1.5 (Cellvis, catalog number: C8-1.5-N)
2. 1.5 mL disposable microcentrifuge tubes (VWR, catalog number: 89000-028)
3. 0.5 mL amber screw-cap microtubes (Thermo Fisher Scientific, catalog numbers: 3422AS and 3471AS)
4. 0.22 μm syringe filter, PVDF, 25 mm (VWR, CellPro, catalog number: 104028-492)
5. Syringes, 10–12 cc, luer lock (Fisher Scientific, Exel International, catalog number: 14-841-54)
6. P10, P200, and P1000 pipettes and respective tips
Equipment
1. Biosafety cabinet (Thermo Fisher Scientific, model: 1300 series A2)
2. Benchtop microcentrifuge (Eppendorf, model: 5424)
3. Tube revolver rotator (Thermo Fisher Scientific, catalog number: 88881001)
4. 6-tube magnetic separation rack (New England Biolabs, catalog number: S1506S)
5. Acid Resistant Refrigerated CentriVap® Centrifugal Vacuum Concentrator (Labconco, catalog number: 7310022)
Software and datasets
1. NIS-Elements Advanced Research software (Nikon, version: 5.42.06)
2. Fiji (National Institutes of Health, version: 1.54 f)
Note: This protocol is adaptable to other image analysis and microscope control software.
Procedure
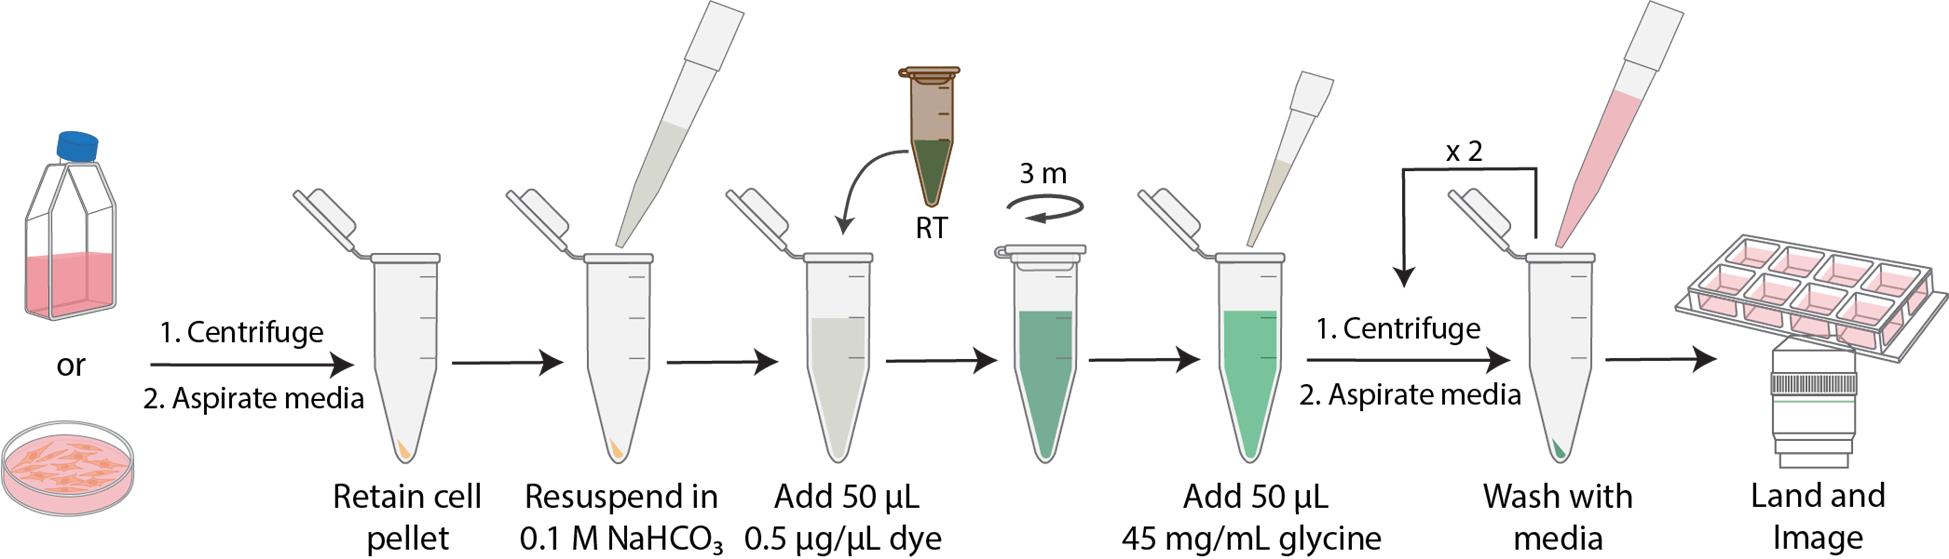
A. Reactive dye handling and preparation (Figure 1)
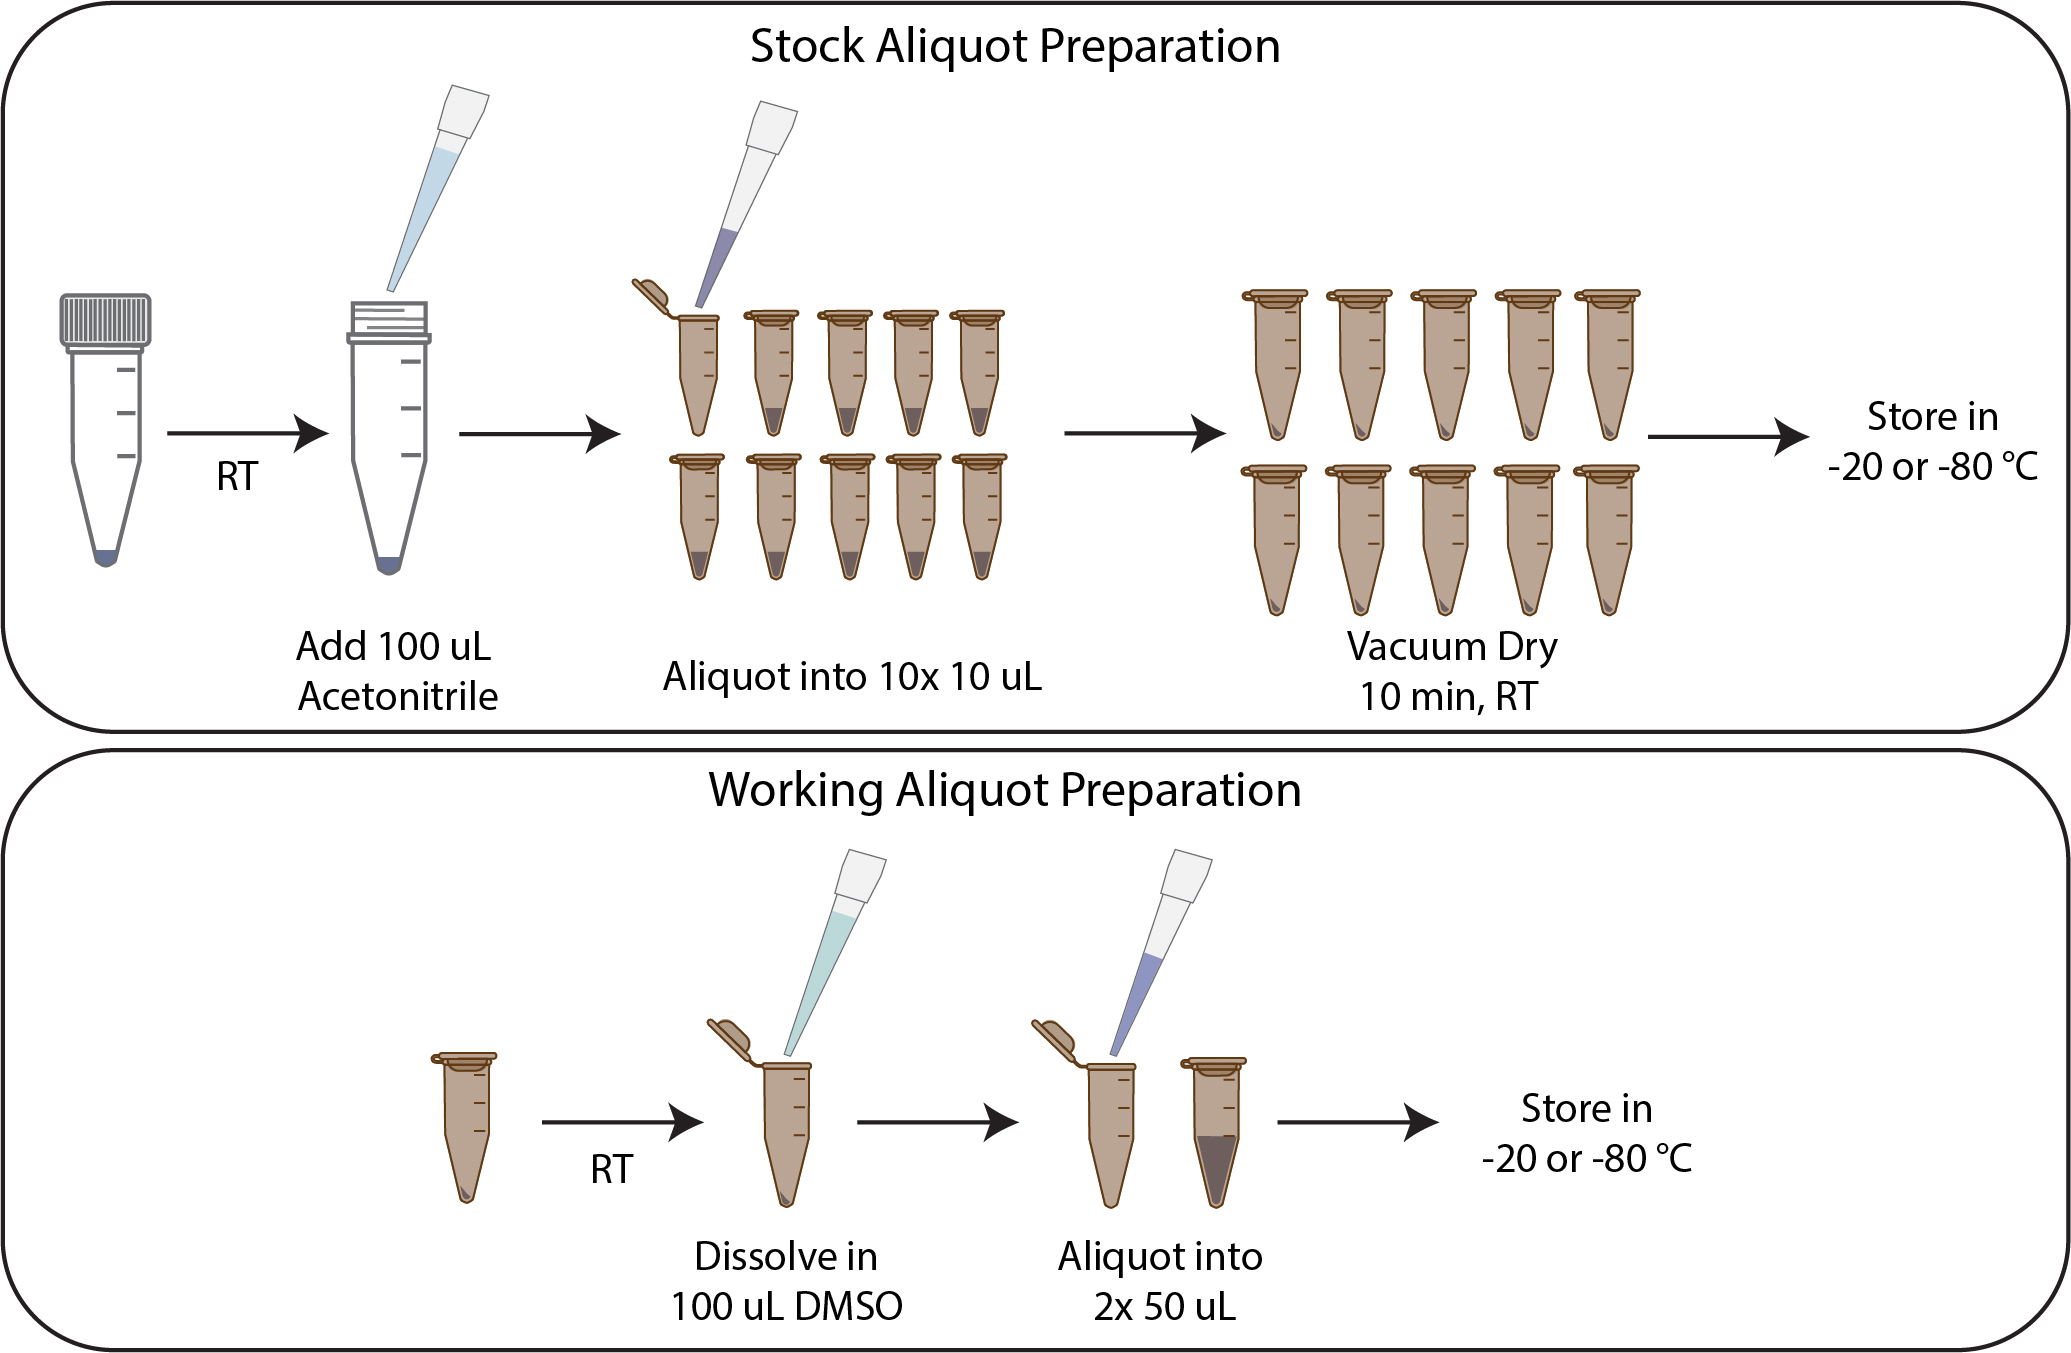
Figure 1. N-hydroxysuccinimide (NHS)-ester dye preparation
A1. Preparing smaller aliquots of solid reactive dye
Notes:
1. The NHS-esters were purchased as 1 mg lyophilized solids. As each labeling reaction needs only 10–20 μg, the dyes were resuspended in a volatile solvent (acetonitrile), aliquoted, and vacuum dried for long-term storage (storage recommended up to 6 months). Alternatively, the solid can be reconstituted in DMSO or dimethylformamide (DMF), aliquoted, snap frozen, and freeze-dried (or lyophilized) (storage recommended up to 12 months).
2. Complete the steps as quickly as possible to avoid spontaneous hydrolysis of the dye. Plan to prepare approximately 10–15 aliquots, as too many aliquots may prolong the time and increase the chances of spontaneous hydrolysis of the reactive dye.
3. NHS-ester dyes are light sensitive; handle them under low-light conditions.
1. Bring the NHS-ester dye tubes to room temperature over approximately 20 min.
Note: This step is critical to avoid water condensation once the tube is open. Exposure to water can promote spontaneous hydrolysis of the reactive dye.
2. Resuspend lyophilized NHS-ester dyes from the vendors (1 mg) in 100 μL of anhydrous acetonitrile.
Note: 100 μL is used to prepare 10 aliquots at 100 μg per tube. This can be scaled as necessary.
3. Aliquot the dye in 10 μL volumes to 10 amber microcentrifuge tubes.
4. Vacuum dry at room temperature for 10 min.
5. Store the solid reactive dye at -20 or -80 °C, desiccated and protected from light.
A2. Preparing working aliquots of solid reactive dye
1. Bring the NHS-ester dye aliquots stored in section A1 to room temperature over approximately 20 min.
Note: This step is critical to avoid water condensation once the tube is open. Exposure to water can promote spontaneous hydrolysis of the reactive dye.
2. Dissolve the vacuum-dried reactive dye aliquot in 200 μL of anhydrous DMSO.
Critical: Using high-quality anhydrous DMSO, stored appropriately desiccated, is vital. DMSO is hygroscopic and readily absorbs moisture from the atmosphere over time. Trace amounts of water in DMSO can promote hydrolysis of the reactive dye.
3. Make 50 μL aliquots of 0.5 μg/μL dissolved dye. Freeze the aliquots and store them at -20 or -80 °C, desiccated and protected from light.
Note: The frozen aliquots in DMSO are suitable for short-term use (1–2 weeks). DMSO is hygroscopic and readily absorbs moisture from the atmosphere over time. Trace amounts of water in DMSO can promote hydrolysis of the reactive dye, and the activity of the dye may decrease with time.
B. Cell staining
B1. Staining in suspension (Jurkat, DC2.4, + mouse primary splenocytes single-cell suspension)
1. Harvest cells from culture and then centrifuge the cell suspension at 300× g for 3 min at room temperature using a benchtop centrifuge. Carefully aspirate and discard the supernatant, leaving the cell pellet intact.
2. Thaw the reactive dye aliquot prepared in step A2. Let it come to room temperature over approximately 20 min.
3. Resuspend the pellet at a density of 2 × 10⁵ cells/mL in 500 μL of room temperature 0.1 M NaHCO3.
Notes:
1. If the cells are sensitive to osmotic pressure, use a 1:1 constitution of serum-free growth media and NaHCO3.
2. The resuspension volume can be adjusted as necessary while maintaining enough solution to allow for sufficient mixing during rotation (step B1.4).
3. Prewarmed solutions may also be used to suspend the cells, but will promote endocytic activity during the reaction time.
4. Handle the dye mixture in a low‐light area. Combine 50 μL of 0.5 μg/μL NHS‐ester dye (Alexa Fluor 647, Alexa Fluor 488, Sulfo-Cyanine 3, or Sulfo-Cyanine 5) in DMSO with the 500 μL cell suspension. Mix well by gentle pipetting.
Critical: The ratio of cell number to reactive dye provided here is validated for the cell types mentioned in this protocol. The ratio will need to be optimized for new cell types to reduce over- or under-labeling. Over-labeling may interfere with normal membrane protein function.
Note: If the DMSO percentage in the reaction can affect the function of the cell type, the working reactive dyes can be prepared in a lower volume of DMSO, or the cells can be resuspended in a larger volume of NaHCO3.
5. Gently rotate the vial in the dark at room temperature for 3–5 min.
Critical: Optimize labeling time per cell type, but do not exceed 15 min to minimize dye internalization.
6. Quench the reaction by adding 50 μL of 45 mg/mL glycine in ultrapure water. Mix briefly by gentle inversion.
Notes:
1. We recommend adding glycine in excess, at a final concentration ratio of 1:90 (dye:glycine, mg/mL), to ensure effective quenching of the reaction.
2. If glycine affects cell function, substitute this step with an appropriate amine of choice, for example, hydroxylamine. 3. This step can be omitted, but its removal may compromise labeling consistency between reactions.
7. To remove excess dye, centrifuge at 300× g for 3 min at room temperature. Then, discard the supernatant without disturbing the pellet.
8. Wash the cells by resuspending the pellet in 1 mL of complete growth media. Centrifuge at 300× g for 3 min at room temperature and discard the supernatant. Repeat once more.
Note: Use prewarmed media at 37 °C to maintain cell viability.
9. Resuspend labeled cells in prewarmed complete media to the desired concentration for seeding.
10. Seed DC2.4 cells
a. Plate 5,000–10,000 labeled DC2.4 cells per well in an 8-well chambered coverglass.
Pause point: Cells can be imaged immediately or incubated at 37 °C with 5% CO2 for the desired duration (1–2 h) before imaging.
11. Seed Jurkat T cells
a. Coat an 8-well chambered coverglass with 0.01% PLL or 1 μg/mL OKT3 in 200 μL of DPBS (see section E1).
b. Add 80,000–100,000 labeled Jurkat T cells per well onto the coated glass slide on the microscope stage.
c. Allow cells to attach (monitor by brightfield microscopy for ~2 min). Then, aspirate the suspension carefully and replace it with prewarmed complete media.
Note: The cell suspension is aspirated to prevent crowding. Alternatively, fewer cells could be landed, and you should wait approximately 5–10 min before image acquisition.
d. Start live-cell imaging immediately.
B2. Staining on the glass (HEK293T + U2OS)
1. Plate 30,000 HEK293T or 10,000–20,000 U2OS cells per well in an 8-well chambered coverglass.
2. Incubate at 37 °C with 5% CO2 to reach the desired confluence.
Note: Ensure even cell distribution to avoid clumping and uneven membrane labeling. Incubation times range from 24 h for HEK293T cells (~70%–80% confluence) and 24–36 h for U2OS cells (~50%–60% confluence).
3. Gently aspirate media and wash cells twice with 500 μL of serum-free media (e.g., DMEM without FBS).
Note: This step is necessary to reduce labeling of serum proteins, which can result in a high background.
Critical: Avoid harsh washing to prevent cell detachment.
4. Thaw the reactive dye aliquot prepared in section A2. Let it come to room temperature.
5. Prepare the labeling solution by mixing 50 μL of 0.5 μg/μL NHS-ester dye in DMSO with 500 μL of 0.1 M NaHCO3 (pH 8.3–8.5) at room temperature.
Note: The pH of the NaHCO3 solution should be verified using a calibrated pH meter.
6. Aspirate the cell media from the wells and gently add the labeling solution (200 μL) to each well, ensuring complete coverage of the well. Incubate in the dark for 2 min at room temperature.
Note: If the cells (for example, HEK293T) are sensitive to osmotic pressure or cell detachment, aspirate the cell media, leaving 100 μL to cover the well. Add 100 μL of the labeling solution that was made by combining 0.5 μg/μL NHS-ester dye in DMSO with 250 μL of 0.1 M NaHCO3 at room temperature.
7. To quench the reaction, add 50 μL of 45 mg/mL glycine in ultrapure water directly into each well to stop labeling.
Notes:
1. If glycine affects cell function, substitute this step with an appropriate amine of choice, for example, hydroxylamine.
2. This step can be omitted, but its removal may compromise labeling consistency between reactions.
8. Aspirate the dye/glycine mixture completely from the well.
9. Wash cells gently three times with 500 μL of complete growth media.
B3. Evaluation of staining protocol
B3.1. Cell surface labeling assessment: trypan blue
1. Gently add trypan blue to each well containing labeled cells to a final concentration of 1 mg/mL.
2. Incubate for 1 min at room temperature on the microscope stage.
3. Image immediately to confirm extracellular labeling.
Notes:
1. Trypan blue is a membrane-impermeable dye that quenches extracellular fluorescence by absorbing emitted light from fluorophores on the cell surface. Quenched fluorescence signal primarily indicates extracellular labeling by the NHS-ester dye.
2. Trypan blue can be replaced with an alternative extracellular fluorescence quencher, depending on experimental requirements.
B3.2. Staining specificity assessment: protein vs. lipid staining
1. Fix labeled cells with 4% PFA in DPBS for 15 min at room temperature and wash twice with DPBS.
2. Incubate fixed cells with a chloroform, methanol, and acetic acid solution (10:55:0.75 v/v/v) for 10 min at room temperature to extract lipids.
3. Wash twice with DPBS.
4. Image cells by fluorescence microscopy.
Note: Minimal loss of fluorescent signal indicates that labeling predominantly targets membrane proteins.
C. Live cell multiplex imaging
1. Label two separate DC2.4 populations with distinct NHS-ester dyes (e.g., AF647 and AF488) following steps A1.1–8.
Note: Cell type may be substituted for the desired cell line with labeling optimization.
2. Mix labeled populations at a 1:1 ratio (e.g., 5,000 cells of AF647-DC2.4 + 5,000 cells of AF488-DC2.4) in complete media.Note: The cell ratios for co-culture can be scaled for the intended purpose.
3. Seed the mixed cells into an 8-well chambered coverglass and incubate for 2 h at 37 °C with 5% CO2.
4. Perform time-lapse TIRF or 2D SIM imaging with intervals of 10 s to track material exchange across tunneling nanotubes.
D. Fusion proteins and insulin stimulation (Figure 2)
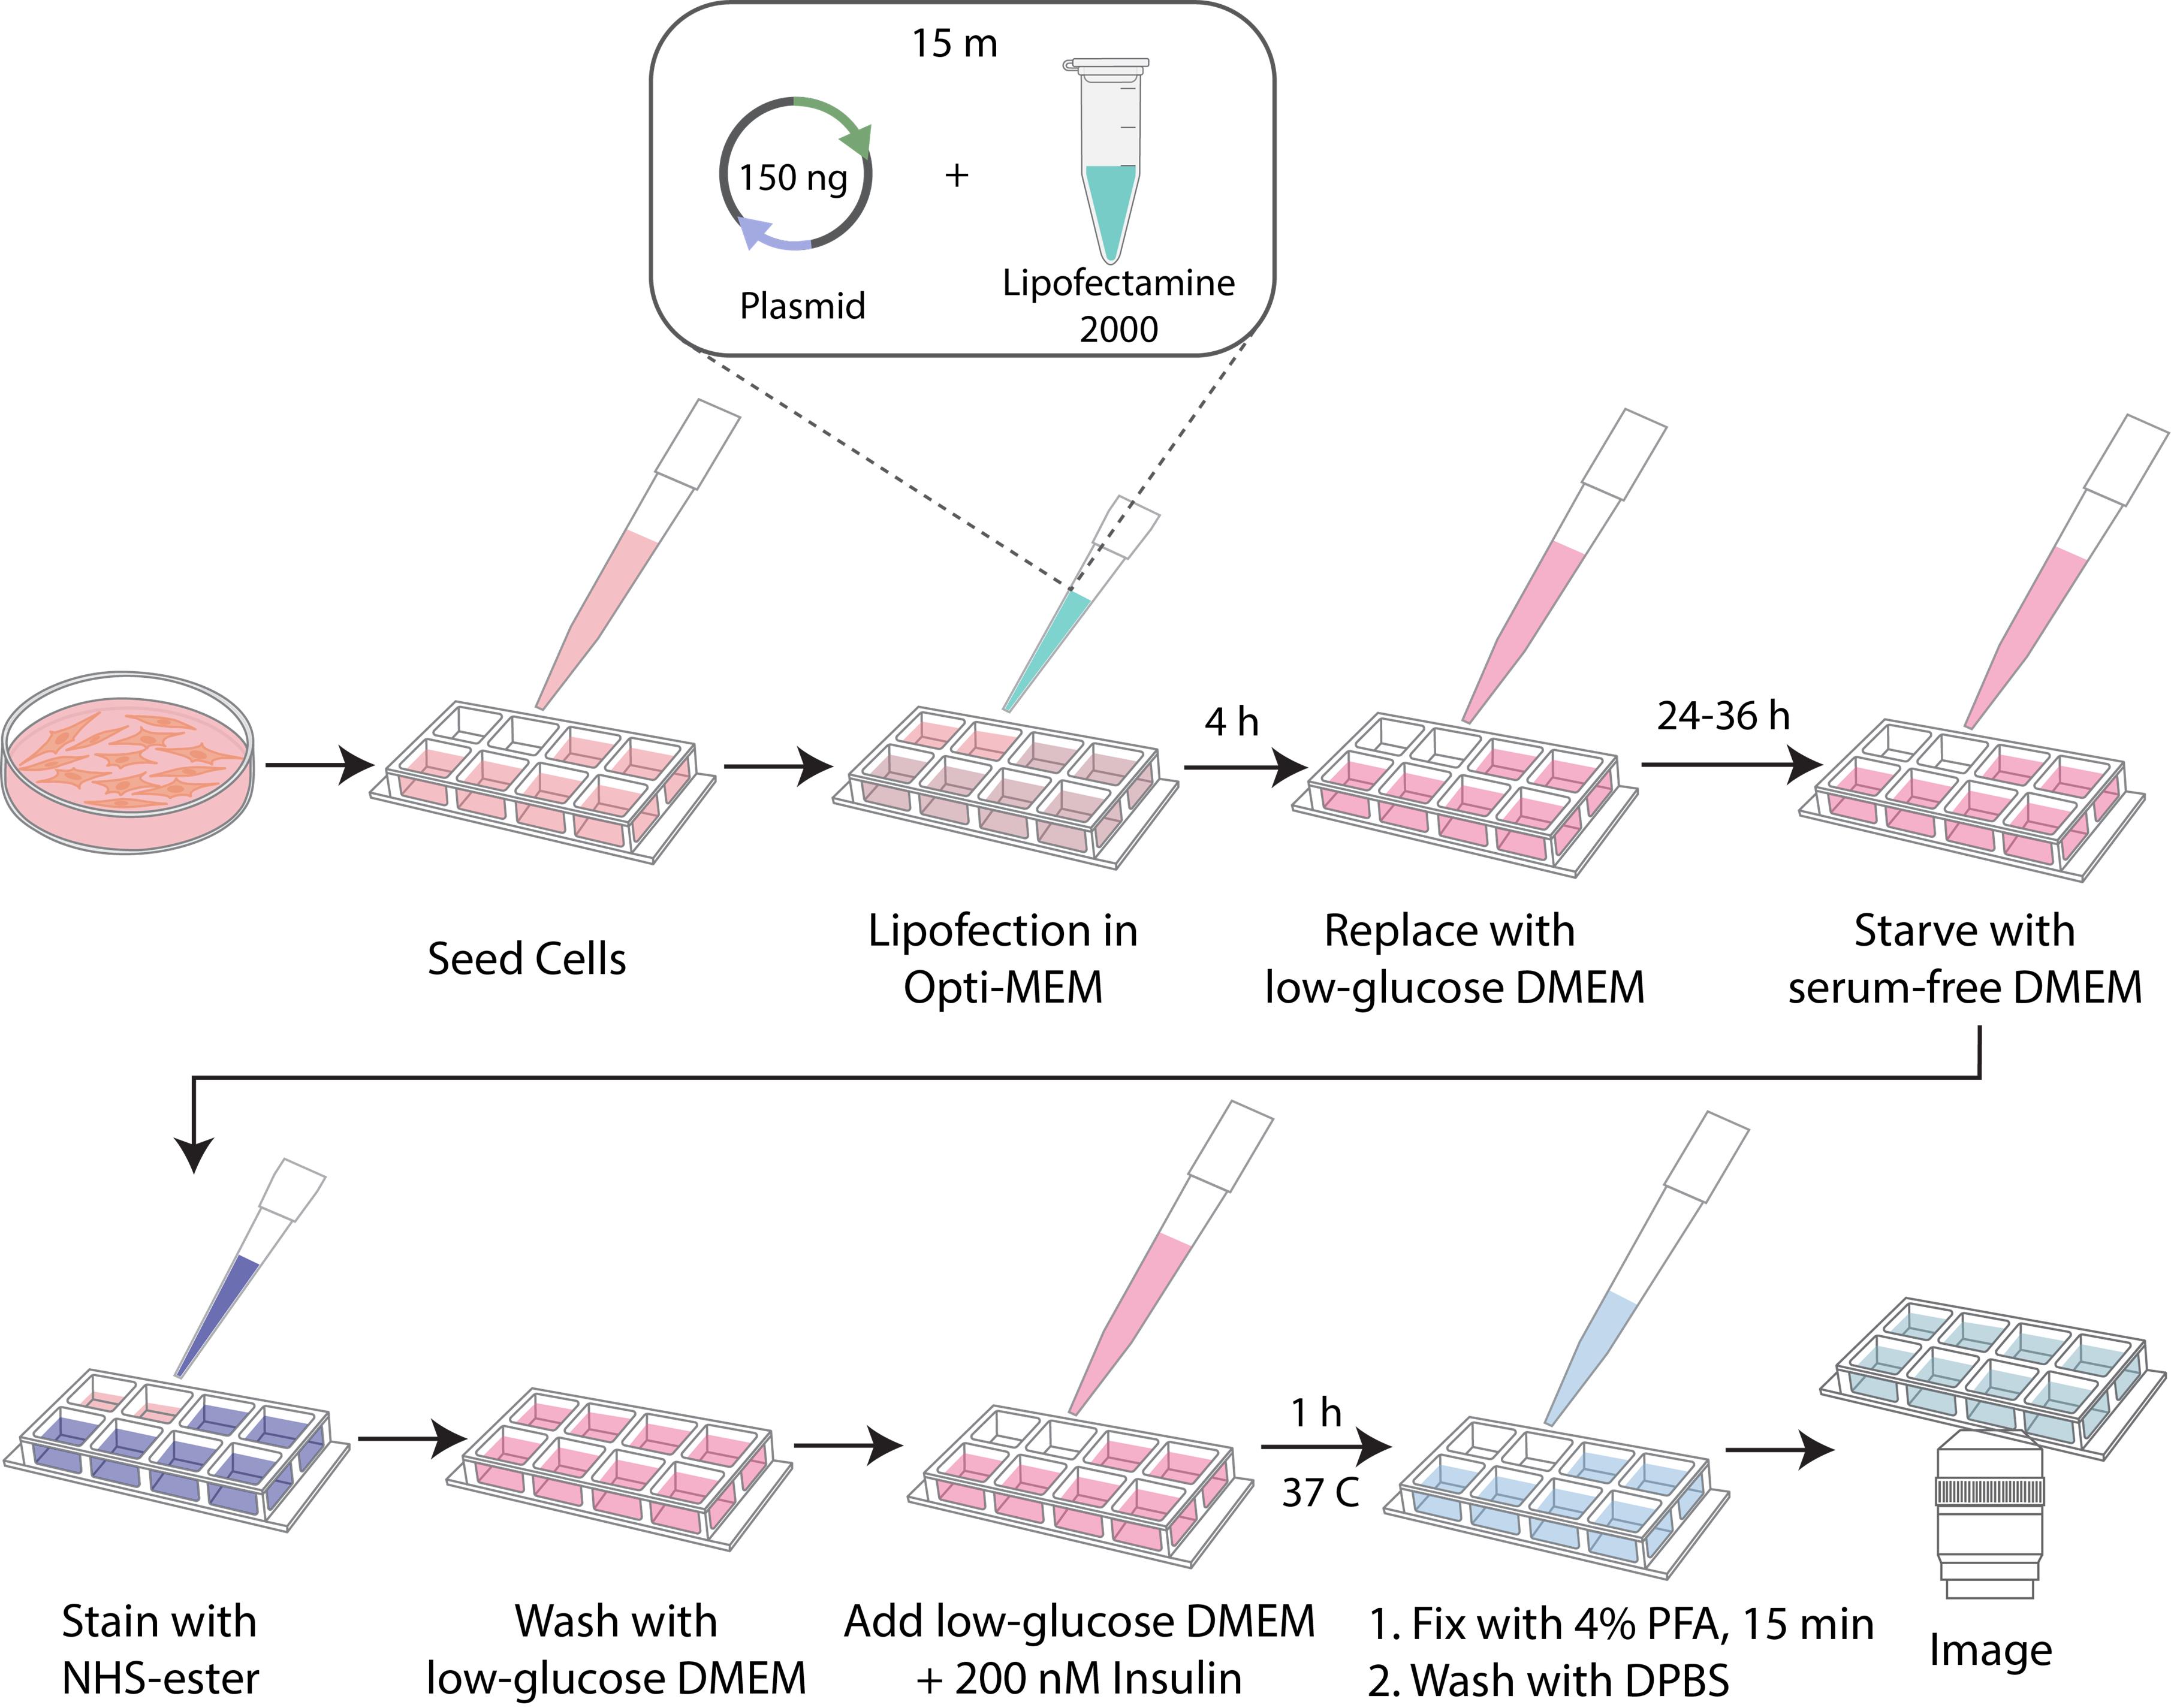
Figure 2. Schematic workflow of fusion protein transfection and insulin stimulation
D1. Suspension cells
1. Transfect unlabeled DC2.4 cells by electroporation (using the Nucleofector 2b kit V in an appropriate electroporation system) and incubate overnight at 37 °C with 5% CO2.
2. The next day, dislodge the cells and label them with a complementary color pair for dual color imaging or proceed to the insulin stimulation protocol (see section D3).
D2. Adherent cells
1. Transfect HEK293T cells using Lipofectamine 2000 in Opti-MEM reduced serum media for 4 h, then incubate in fresh media overnight at 37 °C with 5% CO2.
2. The next day, label seeded cells with a complementary color pair for dual color imaging or proceed to the insulin stimulation protocol (see section D3).
D3. Insulin stimulation of transfected cells
D3.1. Serum starvation
1. At 24–36 h post-transfection (see section D2), aspirate transfection media and wash cells once with 500 μL of prewarmed DPBS; then, aspirate.
2. Add 250 μL of serum-free, low-glucose DMEM (1 g/L glucose) to each well. Incubate for 2 h at 37 °C with 5% CO2.
Note: Serum starvation reduces basal insulin signaling and synchronizes cells for stimulation.
D3.2. NHS-ester labeling
1. Stain according to the appropriate procedure in section B.
D3.3. Insulin treatment
1. Add 200 μL of low-glucose DMEM containing 200 nM recombinant human insulin (see Recipes) to each well.
2. Incubate for 1 h at 37 °C with 5% CO2.
D3.4. Fixation and imaging
1. After stimulation, gently aspirate insulin-containing media and wash once with 500 μL of DPBS.
2. Fix cells with 200 μL of 4% PFA in DPBS for 15 min at room temperature.
Note: Cell fixation should be completed in the dark to minimize photobleaching.
3. Wash cells twice with DPBS to remove residual PFA.
Pause point: Fixed samples can be stored at 4 °C in DPBS and protected from light before imaging.
4. Perform imaging.
Note: Co-localization of labeled membrane proteins and insulin receptor (InsR)-EGFP signal can be assessed to study internalization dynamics.
E. 3D membrane labeling
E1. Preparation of coated glass surfaces
E1.1. PLL surface
1. Add 100 μL of 0.01% PLL solution to each well of an 8-well chambered coverglass.
2. Incubate for 2 h at 37 °C with 5% CO2.
Note: Alternatively, incubate at 4 °C overnight for enhanced coating.
E1.2. T-cell activating (OKT3) surface
1. Add 100 μL of 1 μg/mL anti-human CD3 (OKT3) antibody in DPBS to each well.
2. Incubate for 2 h at 37 °C with 5% CO2.
Note: Alternatively, incubate at 4 °C overnight for enhanced coating.
E2. Dynabead activation
1. Resuspend Dynabeads (CD3/CD28, 4.5 μm) in 1 mL of DPBS + 0.1% BSA + 2 mM EDTA (pH 7.4) to wash.
2. Place the bead suspension on a 6-tube magnetic separation rack for 1 min.
3. Aspirate and discard the supernatant.
4. Resuspend beads in complete growth media (same as Jurkat cell media).
Critical: Use beads at a 1:1 ratio with Jurkat T cells.
5. Follow section B1, steps 1–11, to label and immobilize Jurkat T cells onto a PLL-coated surface.
6. Gently add beads (prewarmed) to each well containing immobilized Jurkat T cells.
7. Start time-lapse imaging immediately to capture membrane ruffling and bead internalization.
F. In vivo
F1. Labeling and transferring labeled mouse primary splenocytes in vivo (Figure 3)
1. Divide freshly harvested bulk splenocyte single-cell suspension into two equal aliquots (~12.5 × 10⁶ cells each).
Note: The number of cells to label can be adjusted according to experimental requirements.
2. Centrifuge cells at 300× g for 3 min at room temperature.
3. Resuspend each cell aliquot in 500 μL of 0.1 M NaHCO3.
4. Add 50 μL of room temperature Sulfo-Cy3-NHS-ester (2 μg/μL) to one of the cell suspensions and 50 μL of Sulfo-Cy5-NHS-ester (2 μg/μL) to the second cell suspension.
5. Incubate cells to react for 1 min at room temperature in the dark.
6. Quench each reaction with 45 mg/mL glycine (50 μL) and wash twice in 1 mL of DPBS, centrifuging at 300 × g for 3 min.
7. Mix sCy3- and sCy5-labeled splenocytes at a 1:1 ratio.
Note: Using two colors and injecting mixed populations is optional, but it is performed to minimize false-positive readouts.
8. Inject 5 × 10⁶ cells retro-orbitally into each 12-week-old male C57BL/6 recipient mouse.
9. At 24 and 48 h post-injection, euthanize the recipient mice.
Note: These time points were selected to demonstrate the compatibility of the labeling with the in vivo studies, considering that cells in vitro have shown internalization of the membrane labeling via endocytic recycling events within 24–48 h. If other cell types or longer time periods are needed, pre-confirm the retention of the membrane labeling for the intended duration in vitro.
10. Harvest spleens and prepare single-cell suspensions, as above.
11. Land the cells on a PLL-coated coverglass (~1 × 10⁵ cells/well) and confirm the presence of membrane-labeled cells or cells that exchanged materials by microscopy.
F2. Confirming specific cell populations (for example, CD8+)
1. Land ~1 × 10⁵ recipient splenocytes per well on a PLL-coated 8-well chambered coverglass.
2. Incubate for 30 min at 37 °C with 5% CO2.
3. Fix with 4% PFA for 15 min at room temperature and wash twice with DPBS.
4. Perform immunostaining for CD8α (e.g., 10 μg/mL FITC-anti-CD8α) overnight at 4 °C.
5. Wash twice with DPBS and image in DPBS to detect sCy3/sCy5 puncta and membrane labeling in recipient cells with or without CD8 immunostaining.
F3. Monitoring specific cell–cell interactions
1. Obtain freshly harvested bulk splenocyte single-cell suspension.
2. Use EasySep Mouse CD8+ and CD4+ Isolation kits for selection of lymphoma T cells per the manufacturer’s instructions.
3. Label each cell population with distinct NHS-esters.
4. Mix the differently colored labeled cell populations in a 1:1 ratio.
Note: Cell ratios can be adjusted for the intended purpose.
5. Land 20,000 total cells per well on a PLL-coated 8-well chambered coverglass.
Note: Lower cell numbers are used when studying live cell interactions to achieve single-cell visualization.
6. Start time-lapse imaging immediately.
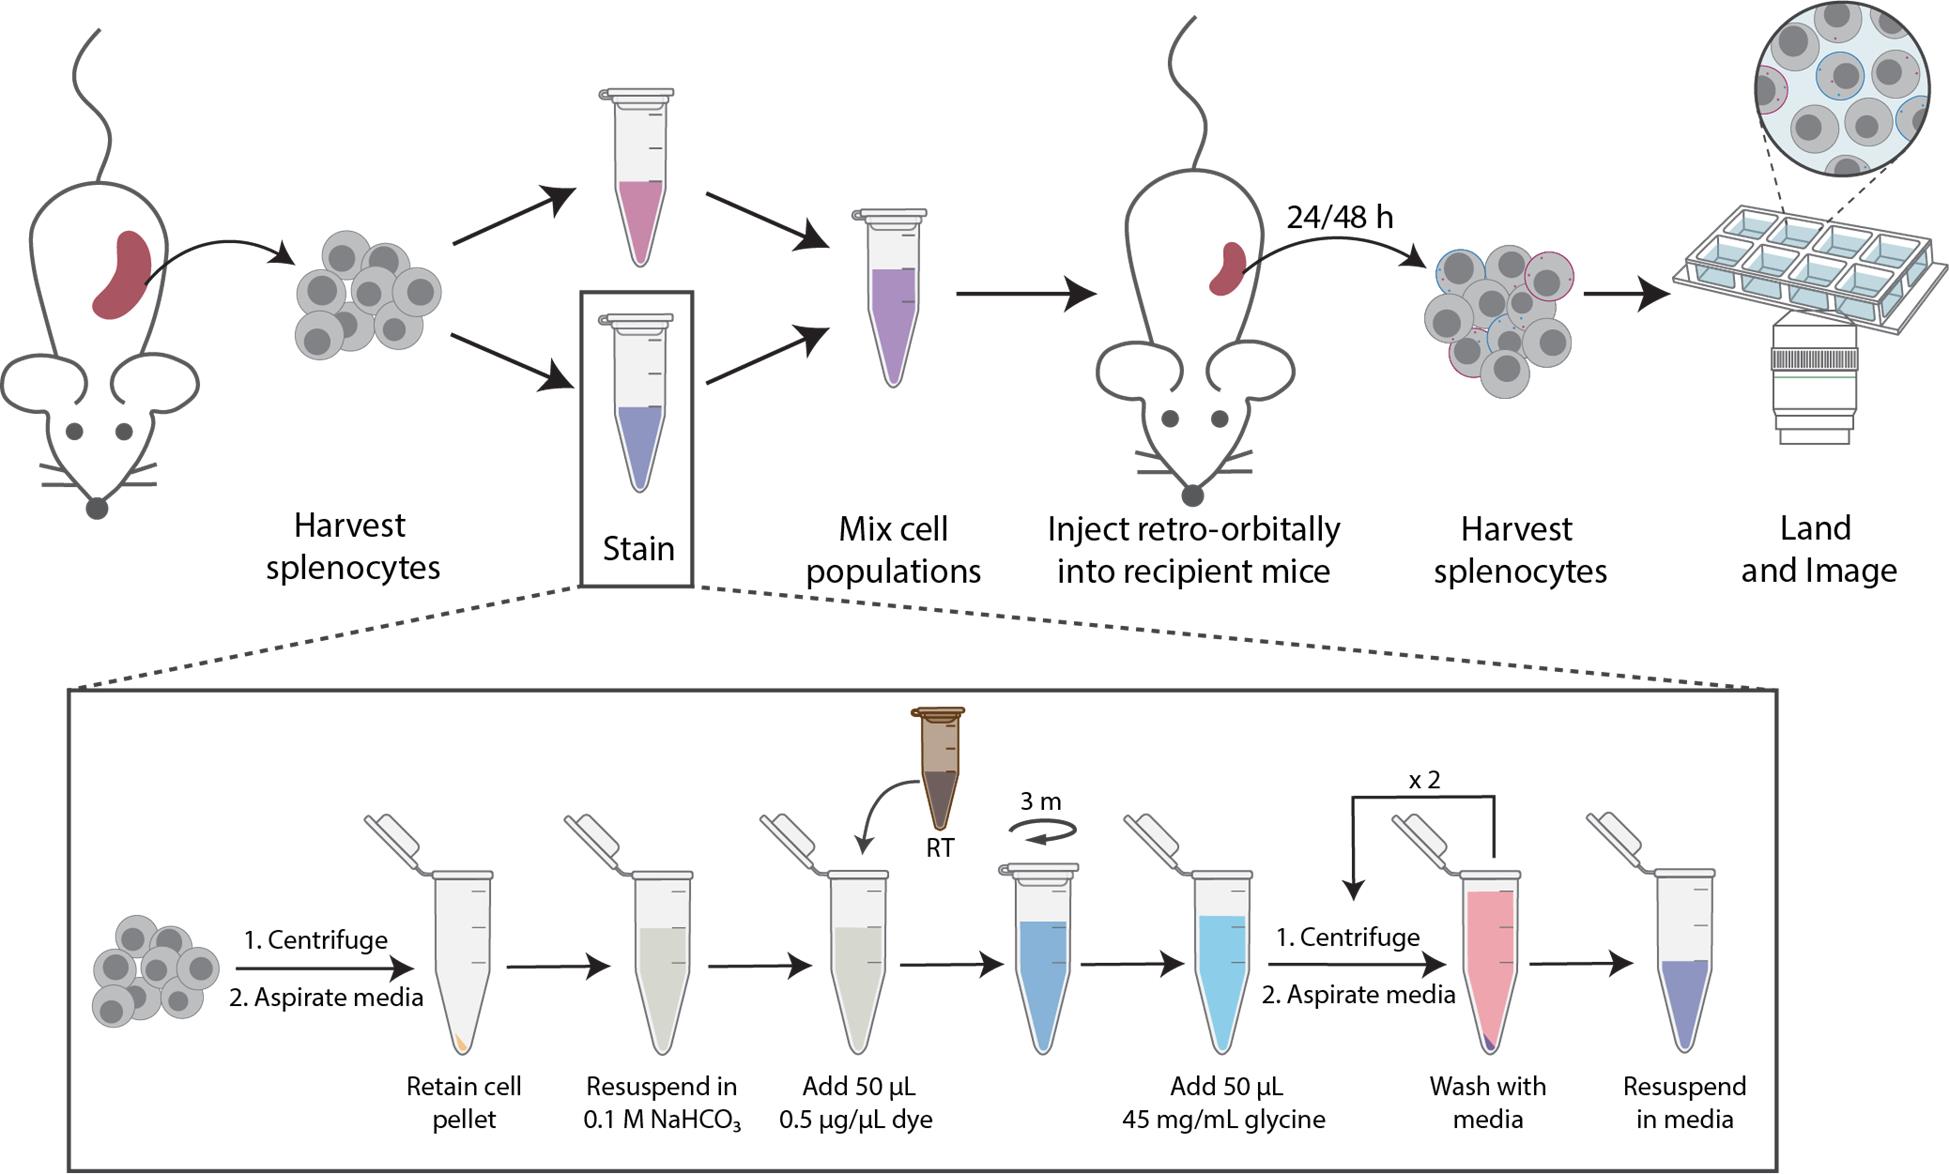
Figure 3. Schematic workflow of in vivo preparation and staining. Splenocytes are isolated from lymphoma mouse tissue and processed into single-cell suspensions. Cells are stained using the NHS-ester staining protocol (bottom panel). Stained cells are then retro-orbitally injected into healthy mice. Splenocytes are harvested following 24 and 48 h, and then imaged.
Data analysis
Data were analyzed using methods previously described and validated by our laboratory [1]. That publication provides detailed information on microscopy methods and image analysis using NIS Elements Advanced Research software (version: 5.42.06) and ImageJ (Fiji, version: 1.54f).
Validation of protocol
This protocol has been used and validated in the following research article:
Gunasekara et al. [1] Unveiling cellular communications through rapid pan-membrane-protein labeling. Nature Communications.
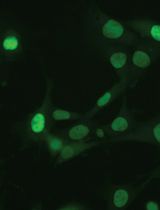
Relevant data confirming the protocol’s reliability can be found within the cited work. Representative examples of pan-membrane protein labeling are shown for DC 2.4 cells (Figures 1, 2, and 3a–c; Supplementary Figure 12), Jurkat T cells (Figure 4), HEK293T cells (Figure 3d–i), and U2OS cells (Supplementary Figure 13). Validation of membrane labeling using trypan blue quenching is provided in Figure 1e–g, and lipid extraction and washing controls are shown in Supplementary Figure 2. Applications to fusion protein-expressing cell lines are demonstrated in Figure 3, followed by insulin stimulation experiments in Figure 3d–e. Co-culture labeling of DC 2.4 and Jurkat T cells is presented in Supplementary Figure 11, and in vivo labeling and imaging data are provided in Figure 5.
General notes and troubleshooting
General notes
1. This protocol has been validated in DC2.4, Jurkat E6.1, HEK293T, U2OS, and primary mouse splenocytes. Optimizations (e.g., dye concentration or incubation time) may be required for other cell lines or primary cells due to differing membrane compositions and endocytic rates.
2. NHS-ester dyes are light sensitive. Perform all dye handling and cell labeling under dim light to minimize photobleaching.
3. NHS-ester dyes are susceptible to hydrolysis; use anhydrous DMSO to dissolve room-temperature NHS-ester dyes and limit exposure to air when thawed.
4. For adherent cell lines (HEK293T, U2OS), aim for 70%–80% confluence. Over-confluent cultures could yield uneven dye access; under-confluent cultures can promote cell detachment during washes.
5. Surface-labeled proteins will eventually internalize over time due to endocytic recycling. Image within 24 h post-labeling to preserve predominantly cell-surface signal.
Troubleshooting
Problem 1: Weak or uneven membrane labeling.
Possible causes:
1. For adherent cells, this could be due to poor mixing or slow diffusion.
2. For suspension cells, this could be due to less reactive dyes from improper storage, which resulted in spontaneous hydrolysis of the dyes.
3. pH of NaHCO3 below 8.3.
4. Insufficient dye concentration or incubation time.
5. Low dye to cell ratios.
Solutions:
1. Gently rock the sample during the dye incubation step to properly mix the labeling solution.
2. Use freshly constituted dye aliquots. Ensure the dye aliquots are properly stored: desiccated, frozen, and protected from light.
3. Check and adjust NaHCO3 pH before labeling. Optimal range: 8.3–8.5.
4. Increase dye from 0.5 μg/μL to 0.75 μg/μL; extend incubation to 7 min (max 15 min).
5. Seed at a lower density (~70% final confluence desired).
Problem 2: High background fluorescence in imaging in adherent cell labeling.
Possible causes:
1. Serum proteins deposited on the glass surface being labeled.
2. Absorbed excess dye from incomplete washing.
Solutions:
1. Wash well with serum-free media or grow cells in a protein-free nutrient media.
2. Ensure glycine is added immediately after dye incubation.
3. Perform at least three washes with DPBS prior to imaging.
Problem 3: Rapid internalization of dye.
Possible causes:
1. Accumulation into mitochondria/ER is due to over-incubation with NHS-ester dye.
2. Presence of the labeling in the endosomal network due to a highly endocytic cell type.
Solutions:
1. Decrease labeling time. Do not exceed 10–15 min.
2. Label at room temperature, with all reagents being room temperature. Labeling at colder temperatures may reduce endocytic activity, decreasing endocytic membrane recycling. However, the labeling efficiency would decrease with temperature and might need to be compensated for by either increasing the amount of dye or labeling time.
Problem 4: Cell lysis following dye incubation.
Possible causes:
1. High concentration of NHS-ester dye, causing over-reaction with cell surface proteins and disrupting membrane integrity.
2. Solvent toxicity with DMSO.
3. Ineffective or delayed dye quenching.
Solutions:
1. Optimize NHS-ester dye concentration for each cell type.
2. Decrease the volume of DMSO added to the cell population. This can be achieved by reconstituting the NHS-ester (in section A2) in a smaller DMSO volume. While this may change the dye concentration in DMSO, the overall NHS-ester dye:cell ratio remains the same.
3. Add glycine quenching solution quickly following dye incubation time and ensure thorough washing.
Acknowledgments
Author contributions: Conceptualization, H.G., Y.S.H.; Investigation, H.G.; Writing—Original Draft, A.B.; Writing—Review & Editing, A.B., H.G., Y.S.H.; Funding acquisition, Y.S.H.; Supervision, Y.S.H.
This work was supported by the National Institute of General Medical Sciences of the National Institutes of Health grant R35GM146786. The content is solely the responsibility of the authors and does not necessarily represent the official views of the National Institutes of Health.
This protocol is related to the following paper: Gunasekara et al. [1] Nat. Commun. (2025), DOI: 10.1038/s41467-025-58779-2.
Competing interests
The authors declare no conflicts of interest.
References
- Gunasekara, H., Cheng, Y. S., Perez-Silos, V., Zevallos-Morales, A., Abegg, D., Burgess, A., Gong, L. W., Minshall, R. D., Adibekian, A., Murga-Zamalloa, C., et al. (2025). Unveiling cellular communications through rapid pan-membrane-protein labeling. Nat Commun. 16(1): e1038/s41467–025–58779–2. https://doi.org/10.1038/s41467-025-58779-2
- Han, X. and Wang, X. (2021). Opportunities and Challenges in Tunneling Nanotubes Research: How Far from Clinical Application?. Int J Mol Sci. 22(5): 2306. https://doi.org/10.3390/ijms22052306
- Chamma, I., Letellier, M., Butler, C., Tessier, B., Lim, K. H., Gauthereau, I., Choquet, D., Sibarita, J. B., Park, S., Sainlos, M., et al. (2016). Mapping the dynamics and nanoscale organization of synaptic adhesion proteins using monomeric streptavidin. Nat Commun. 7(1): e1038/ncomms10773. https://doi.org/10.1038/ncomms10773
- Erdmann, R. S., Baguley, S. W., Richens, J. H., Wissner, R. F., Xi, Z., Allgeyer, E. S., Zhong, S., Thompson, A. D., Lowe, N., Butler, R., et al. (2019). Labeling Strategies Matter for Super-Resolution Microscopy: A Comparison between HaloTags and SNAP-tags. Cell Chem Biol. 26(4): 584–592.e6. https://doi.org/10.1016/j.chembiol.2019.01.003
- Saka, S. K., Honigmann, A., Eggeling, C., Hell, S. W., Lang, T. and Rizzoli, S. O. (2014). Multi-protein assemblies underlie the mesoscale organization of the plasma membrane. Nat Commun. 5(1): e1038/ncomms5509. https://doi.org/10.1038/ncomms5509
- Mateos-Gil, P., Letschert, S., Doose, S. and Sauer, M. (2016). Super-Resolution Imaging of Plasma Membrane Proteins with Click Chemistry. Front Cell Dev Biol. 4: e00098. https://doi.org/10.3389/fcell.2016.00098
- Battistella, R., Kritsilis, M., Matuskova, H., Haswell, D., Cheng, A. X., Meissner, A., Nedergaard, M. and Lundgaard, I. (2021). Not All Lectins Are Equally Suitable for Labeling Rodent Vasculature. Int J Mol Sci. 22(21): 11554. https://doi.org/10.3390/ijms222111554
- Hassdenteufel, S. and Schuldiner, M. (2022). Show your true color: Mammalian cell surface staining for tracking cellular identity in multiplexing and beyond. Curr Opin Chem Biol. 66: 102102. https://doi.org/10.1016/j.cbpa.2021.102102
Article Information
Publication history
Received: Jul 12, 2025
Accepted: Aug 25, 2025
Available online: Sep 3, 2025
Published: Oct 5, 2025
Copyright
© 2025 The Author(s); This is an open access article under the CC BY-NC license (https://creativecommons.org/licenses/by-nc/4.0/).
How to cite
Burgess, A., Gunasekara, H. and Hu, Y. S. (2025). Rapid and Uniform NHS-Ester-Based Membrane Protein Labeling of Live Mammalian Cells. Bio-protocol 15(19): e5455. DOI: 10.21769/BioProtoc.5455.
Category
Cell Biology > Cell imaging > Live-cell imaging
Immunology > Immune cell imaging
Do you have any questions about this protocol?
Post your question to gather feedback from the community. We will also invite the authors of this article to respond.