- Protocols

- Articles and Issues
- For Authors
- About
- Become a Reviewer

A Simple and Adaptable Method for Cloning Genes Into Transposon Vectors Using Topo and Restriction Systems for Chicken Embryo Transgenesis
Published: Vol 15, Iss 16, Aug 20, 2025 DOI: 10.21769/BioProtoc.5416 Views: 1883
Reviewed by: Laxmi Narayan MishraAnonymous reviewer(s)
Advertisement


Protocol Collections
Comprehensive collections of detailed, peer-reviewed protocols focusing on specific topics


Abstract
Transposon-based genetic transformation enables stable transgene integration in avian genomes and is increasingly used in the development of transgenic chickens for enhanced disease resistance, productivity, and biopharmaceutical applications. Conventional transformation techniques in avian biotechnology, including viral vectors and primordial germ cell (PGC) manipulation, are limited by biosafety risks, low efficiency, and technical complexity. This protocol outlines a two-step cloning approach for generating transposon-compatible gene constructs suitable for chicken embryo microinjection. Topoisomerase-based (TOPO) cloning is used as the first step due to its ability to directly clone PCR-amplified products without the need for restriction site-engineered primers while simultaneously producing an insert flanked with EcoRI restriction sites. The insert is subsequently transferred into the transposon vector through EcoRI-mediated restriction digestion and ligation. This approach simplifies construct generation by integrating the speed of TOPO cloning with the precision of restriction cloning, while ensuring compatibility with transposon-mediated integration systems. The protocol is efficient, reproducible, and does not require specialized equipment, providing a practical and scalable tool for gene construct assembly in avian transgenesis research.
Key features
• Uses TOPO PCR cloning for initial gene insertion.
• Applies restriction cloning to transfer inserts to the destination vector.
• Employs pKTol2C-EGFP as the final transposon vector.
• Suitable for generating constructs for chicken embryo transgenesis.
Keywords: TransgenesisGraphical overview
Background
Genetic engineering in chickens has been used to create lines of chickens resistant to different poultry diseases and to introduce desired traits for agricultural or biomedical uses [1]. Both viral and non-viral techniques have been explored for generating genetically modified chickens. Historically, lentiviruses and retroviruses have been used as vectors to transfer genetic material into host cells [2,3]. The first successful production of transgenic chickens was achieved through injection of a retroviral vector carrying a transgene construct into chicken embryos at the blastodermal stage [4]. This strategy is useful but has drawbacks, such as insert size restrictions, transgene silencing, low germline transmission efficiency, and possible biosafety issues brought on by environmental viral shedding [5,6]. To address these drawbacks, non-viral transfection methods involving primordial germ cells (PGCs) have been developed. PGCs are isolated from embryonic tissues, cultured in vitro, genetically modified by transfection, and then reinjected into developing embryos or adult gonads [7]. However, there are drawbacks as well, like poor transfection efficiency, difficulties maintaining PGCs in long-term culture, and irregular germline transmission [8].
Transposon-based transformation has emerged as a potent tool for chicken transgenesis because it can mediate stable transgene expression without tissue-specific repression and integrate into the host genome efficiently [5]. It introduces genetic material into host cells by means of transposable elements, also known as "jumping genes." A transposase enzyme introduces and integrates a transposon containing the desired gene into the genome in this system [9,10]. Stable transgenic lines in chicken have been produced using this method with success [11–13]. Transposon systems have several advantages over viral and non-viral transformation methods, such as stable gene integration, lower biosafety risks, increased transgene carrying capacity, and compatibility with multiplexed gene delivery and insertional mutagenesis [14,15]. The procedure outlined here provides a methodical approach to creating gene expression cassettes that are suitable for transformation in chickens. It uses TOPO cloning as the initial cloning step to achieve high cloning efficiency and enable rapid insertion of PCR-amplified fragments into an entry vector, eliminating the need for restriction site-engineered primers and laborious ligation steps [16,17]. This technique makes use of DNA topoisomerase I, an enzyme that has dual roles as a ligase and a restriction enzyme [18]. Topo PCR cloning takes advantage of the single A-overhangs generated at the 3′ ends of PCR products when a non-proofreading DNA polymerase is used, allowing for direct ligation into the vector with complementary T-overhangs [19,20]. The procedure is simplified into three easy steps: mixing the PCR product with the TOPO vector, incubating at room temperature for a few minutes, and transforming competent E. coli cells [16]. This approach produces inserts flanked by EcoRI restriction sites, enabling restriction ligation of the gene of interest into the transposon vector. The transposon vector used in this protocol, pKTol2C-EGFP, employs a mini-CAG promoter to drive expression of the inserted gene, while an EGFP reporter gene allows for tracking of transgene integration within host cells [21, 22]. The vector is flanked by Tol2 transposon sequences, positioned immediately upstream of the promoter and downstream of the β-globin poly(A) signal termination sequence. These Tol2 sequences are recognized by the host-derived transposase, facilitating precise excision of the transgene and its stable integration into the host genome [22]. This hybrid strategy combines the speed and reliability of TOPO cloning with the flexibility of restriction-based assembly. This protocol offers a flexible approach for generating customized vectors suited to diverse applications, including gene expression, genome editing, and functional genomics. It supports the efficient assembly of constructs encoding disease resistance or productivity-enhancing traits, and is adaptable for use in chickens and other avian species relevant to research, biotechnology, and agriculture [13].
Materials and reagents
Biological materials
1. Blood from indigenous chickens (obtained from Embu and Makueni Counties)
2. One Shot Chemically Competent E. coli (Invitrogen, catalog number: K250020, preserved at -80 °C)
3. Plasmid pKTol2C-EGFP (Addgene, catalog number: 85598, preserved at -20 °C)
4. TOPO vector (Invitrogen, catalog number: K250020, preserved at -20 °C)
Reagents
1. UltraPure phenol:chloroform:isoamyl alcohol (Invitrogen, catalog number: 15593-049, stored at 4 °C)
2. SDS (Sigma-Aldrich, catalog number: 151-21-3)
3. Proteinase K (Promega, catalog number: V302B)
4. Chloroform (Sigma-Aldrich, catalog number: 67-66-3)
5. Isoamyl alcohol (Sigma-Aldrich, catalog number: 123-51-3)
6. Molecular-grade isopropanol (Scharlau, catalog number: 67-63-0)
7. Molecular-grade ethanol (Scharlau, catalog number: 64-17-5)
8. Nuclease-free water (Bioconcept, catalog number: 3-07F04-I)
9. SYBR Green I nucleic acid gel stain (MedChemExpress, catalog number: HY-K1004)
10. LE agarose powder (Cleaver Scientific, catalog number: 9012-36-6)
11. 5× TAE buffer (Glentham Life Sciences, catalog number: GB8437-1l)
12. 6× DNA loading dye (New England Biolabs, catalog number: B7025SVIAL)
13. O'GeneRuler 1 kb Plus DNA ladder (Thermo Scientific, catalog number: SM1343)
14. MyTaq DNA Polymerase (Bioline, catalog number: BIO-21105)
15. Oligonucleotides: Insert Forward Primer: 5'-AGACGAGTACACCGAGTATCCA-3', Insert Reverse Primer: 5'-GCACGGAGCTAACCTCACTT-3', Vector Forward Primer: 5'-GCAACGTGCTGGTTATTGTG-3'
16. Spectinomycin (Sigma-Aldrich, catalog number: 22189-32-8)
17. Kanamycin sulfate powder (Fisher Scientific, catalog number: BP 906-100)
18. LB agar Miller (Scharlau, catalog number: 01-385-500)
19. LB broth (Scharlau, catalog number: 02-384-500)
20. Calcium chloride (Oxford Labchem, catalog number: 10035-04-8)
Solutions
1. 0.1 M calcium chloride solution (see Recipes)
2. 1 M Tris-HCl stock solution pH 7.5 (see Recipes)
3. 0.5 M EDTA stock solution pH 8.0 (see Recipes)
4. 10% SDS stock solution (see Recipes)
5. 10 mg/mL proteinase K stock solution (see Recipes)
6. SDS Proteinase K Lysis Buffer (see Recipes)
7. 1× TAE buffer (see Recipes)
8. LB liquid media (see Recipes)
9. LB agar solid media (see Recipes)
10. Spectinomycin (see Recipes)
11. Kanamycin (see Recipes)
Recipes
1. 0.1 M calcium chloride solution
| Reagent | Final concentration | Quantity or Volume |
|---|---|---|
| Distilled water | n/a | 1 L |
| Calcium chloride | 0.1 M | 14.7 g |
2. 1 M Tris-HCl stock solution pH 7.5
| Reagent | Final concentration | Quantity or Volume |
|---|---|---|
| Distilled water | n/a | 500 mL |
| Tris-HCl | 1 M | 60.57 g |
3. 0.5 M EDTA Stock solution pH 8.0
| Reagent | Final concentration | Quantity or Volume |
|---|---|---|
| Distilled water | n/a | 500 mL |
| EDTA | 0.5 | 73.0625 g |
4. 10% SDS stock solution
| Reagent | Final concentration | Quantity or Volume |
|---|---|---|
| Distilled water | n/a | 500 mL |
| SDS powder | 10% | 50 g |
5. 10 mg/mL Proteinase K stock solution
| Reagent | Final concentration | Quantity or Volume |
|---|---|---|
| Nuclease-free water | n/a | 10 mL |
| Lyophilized proteinase K | 10 mg/mL | 100 mg |
6. SDS proteinase K lysis buffer
| Reagent | Final concentration | Quantity or Volume |
|---|---|---|
| 1 M Tris-HCl stock solution | 0.1 M | 10 mL |
| 0.5 M EDTA stock solution | 0.05 M | 10 mL |
| 10% SDS stock solution | 1% | 10 mL |
| 10 mg/mL Proteinase K | 100 µg/mL | 1 mL |
| Distilled water | n/a | 69 mL |
7. 1× TAE buffer
| Reagent | Final concentration | Quantity or Volume |
|---|---|---|
| Distilled water | n/a | 980 mL |
| 5× TAE | 1× | 20 mL |
8. LB liquid media, pH 7.0
| Reagent | Final concentration | Quantity or Volume |
|---|---|---|
| Distilled water | n/a | 1 L |
| LB broth powder | 25 g/L | 25 g |
9. LB agar media, pH 7.0
| Reagent | Final concentration | Quantity or Volume |
|---|---|---|
| Distilled water | n/a | 1 L |
| LB agar | 40 g/L | 40 g |
10. Spectinomycin
| Reagent | Final concentration | Quantity or Volume |
|---|---|---|
| Distilled water | n/a | 10 mL |
| Spectinomycin | 100 mg/mL | 1 g |
11. Kanamycin
| Reagent | Final concentration | Quantity or Volume |
|---|---|---|
| Distilled water | n/a | 20 mL |
| Kanamycin | 50 mg/mL | 1 g |
Laboratory supplies
1. Petri dishes (BoenMed, catalog number: 620201)
2. Corning PYREX round media storage bottles (Fisher Scientific, catalog number: 10462716)
3. Powder-free nitrile gloves (Medisolve, catalog number: E2022-06-01)
4. Parafilm (Amcor, catalog number: PM996)
5. PCR reaction strips (Genaxy Scientific, catalog number: GEN-0108-C-PCR)
6. 10 μL pipette tips (Genaxy Scientific, catalog number: GEN-UT-10-C)
7. 200 μL pipette tips (Genaxy Scientific, catalog number: GEN-UTG-200-Y)
8. 1,000 μL pipette tips (Genaxy Scientific, catalog number: GEN-UT-1000-B)
9. P10 micropipette (Eppendorf, catalog number: 4861000-0005)
10. P1000 micropipette (Eppendorf, catalog number: 4861000-0001)
11. P200 micropipette (Eppendorf, catalog number: 3123000055)
12. 50 mL Falcon tubes (Thermo Fisher Scientific, catalog number: AM12502)
13. 1.5 mL microcentrifuge safe-lock tubes (Genaxy Scientific, catalog number: GEN-MT-150-C)
14. Cell spreaders (Chemglass Life Sciences, catalog number: CLS-1350-02)
15. Spectrophotometer cuvettes (Thermo Fisher Scientific, catalog number: 14-955-127)
16. Syringe microfilters 0.22 μm (Sigma-Aldrich, catalog number: SLGVR33RS)
17. GeneJET Plasmid MiniPrep kit (Thermo Fisher, catalog number: K0502)
18. pCR 8/GW/TOPO TA Cloning kit (Invitrogen, catalog number: K250020)
19. ISOLATE II PCR and Gel kit (Bioline, catalog number: BIO52059)
20. Zymoclean Gel DNA Recovery kit (Zymo Research, catalog number: D4007)
21. EcoRI Enzyme (New England Biolabs, catalog number: R0101S)
22. T4 DNA ligase (New England Biolabs, catalog number: M0202S)
23. Shrimp alkaline phosphatase (New England Biolabs, catalog number: M0371S)
24. O'GeneRuler 1 kb Plus DNA ladder (Thermo Scientific, catalog number: SM1343)
Equipment
1. Nanodrop (Thermo Fisher Scientific, Model: Nanodrop One C)
2. Thermocycler (Cleaver Scientific, catalog number: GTC96S-230)
3. Weighing scale (Adam Equipment, serial number: AEAAY68)
4. -20 °C freezer (Haier Biomedical, model: DW-25L92)
5. Refrigerator 4–8 °C (Haier Biomedical, model: HLR-310F)
6. Gel Doc (UVITEC Cambridge, model: UVIDOC-HD6T, TOUCH-PLUS)
7. Biosafety cabinet (Haier Biomedical, model: HR1200-IIA2-S)
8. Gel electrophoresis system (Cleaver Scientific, model: NANOPAC-300P)
9. Autoclave (Tuttnauer, model: T-LAB ECO V85)
10. Water bath (Cole-Parmer, model: BWS-8/78905-21)
11. Refrigerated microcentrifuge (Biobase, model: BKC-PCR16)
12. Microcentrifuge (Eppendorf, serial number: 5427LO534084)
13. Incubator with shaker option (Major Science, model: SI-200)
14. Spectrophotometer (Eppendorf, model: 6135)
15. Vortex (Thermo Fisher Scientific, catalog number: 9501200)
Software and datasets
1. NEBioCalculator v1.15.7 (20/8/2024)
Procedure
A. DNA isolation from chicken blood
1. Pipette 500 μL of EDTA-anticoagulated blood sample into a 2 mL Eppendorf tube.
Note: The starting sample volume can be adjusted as required. Maintain a 1:1 ratio between the sample and reagents.
2. Add 500 μL of 1% SDS lysis buffer containing proteinase K (100 µg/mL) and vortex to mix.
3. Incubate the sample at 65 °C for 30 min.
4. Add 500 μL of phenol/chloroform/isoamyl alcohol (25:24:1) to the tube.
Caution: Phenol/chloroform/Isoamyl (PCIA) mix is toxic and should be handled carefully in a fume chamber.
5. Mix by inversion 6–8 times until homogenous.
6. Centrifuge at 9,000× g for 10 min.
Note: After centrifugation, three distinct phases should be visible: a clear aqueous phase at the top (containing DNA), a white interphase in the middle (containing denatured proteins), and a red-brown organic phase at the bottom (containing phenol, chloroform, and lipids). See Figure 1.
7. Carefully transfer all the upper, clear aqueous phase to a new 1.5 mL sterile Eppendorf tube without disturbing the interphase or the organic layer.
8. To the clear aqueous phase, add an equal volume of chloroform/isoamyl alcohol (24:1).
9. Mix gently by inversion 6–8 times until homogenous.
10. Centrifuge at 9,000× g for 10 min.
11. Transfer all the upper aqueous phase to a fresh 1.5 mL sterile Eppendorf tube.
12. Add an equal volume of cold isopropanol to the aqueous phase.Note: Absolute molecular-grade ethanol can be used if isopropanol is not available.
13. Mix gently by inversion and incubate at -20 °C for 1 h.
Note: Cold temperature accelerates DNA precipitation.
14. Centrifuge at 9,000× g for 10 min to pellet the DNA.
15. Carefully pour out the supernatant without disturbing the pellet.
16. Wash the DNA pellet twice with cold 70% ethanol.
17. Air-dry the pellet completely at room temperature.
Note: Drying time may vary depending on laboratory humidity conditions.
18. Resuspend the pellet in 50 μL of nuclease-free water.
Note: The volume of nuclease-free water used for elution should be adjusted based on the size of the DNA pellet. It is advisable to begin with a smaller volume to prevent excessive dilution of your DNA.
19. Quantify the DNA using a Nanodrop spectrophotometer.
Note: Gel visualization with a quantification ladder can be used as an alternative in labs without a Nanodrop.
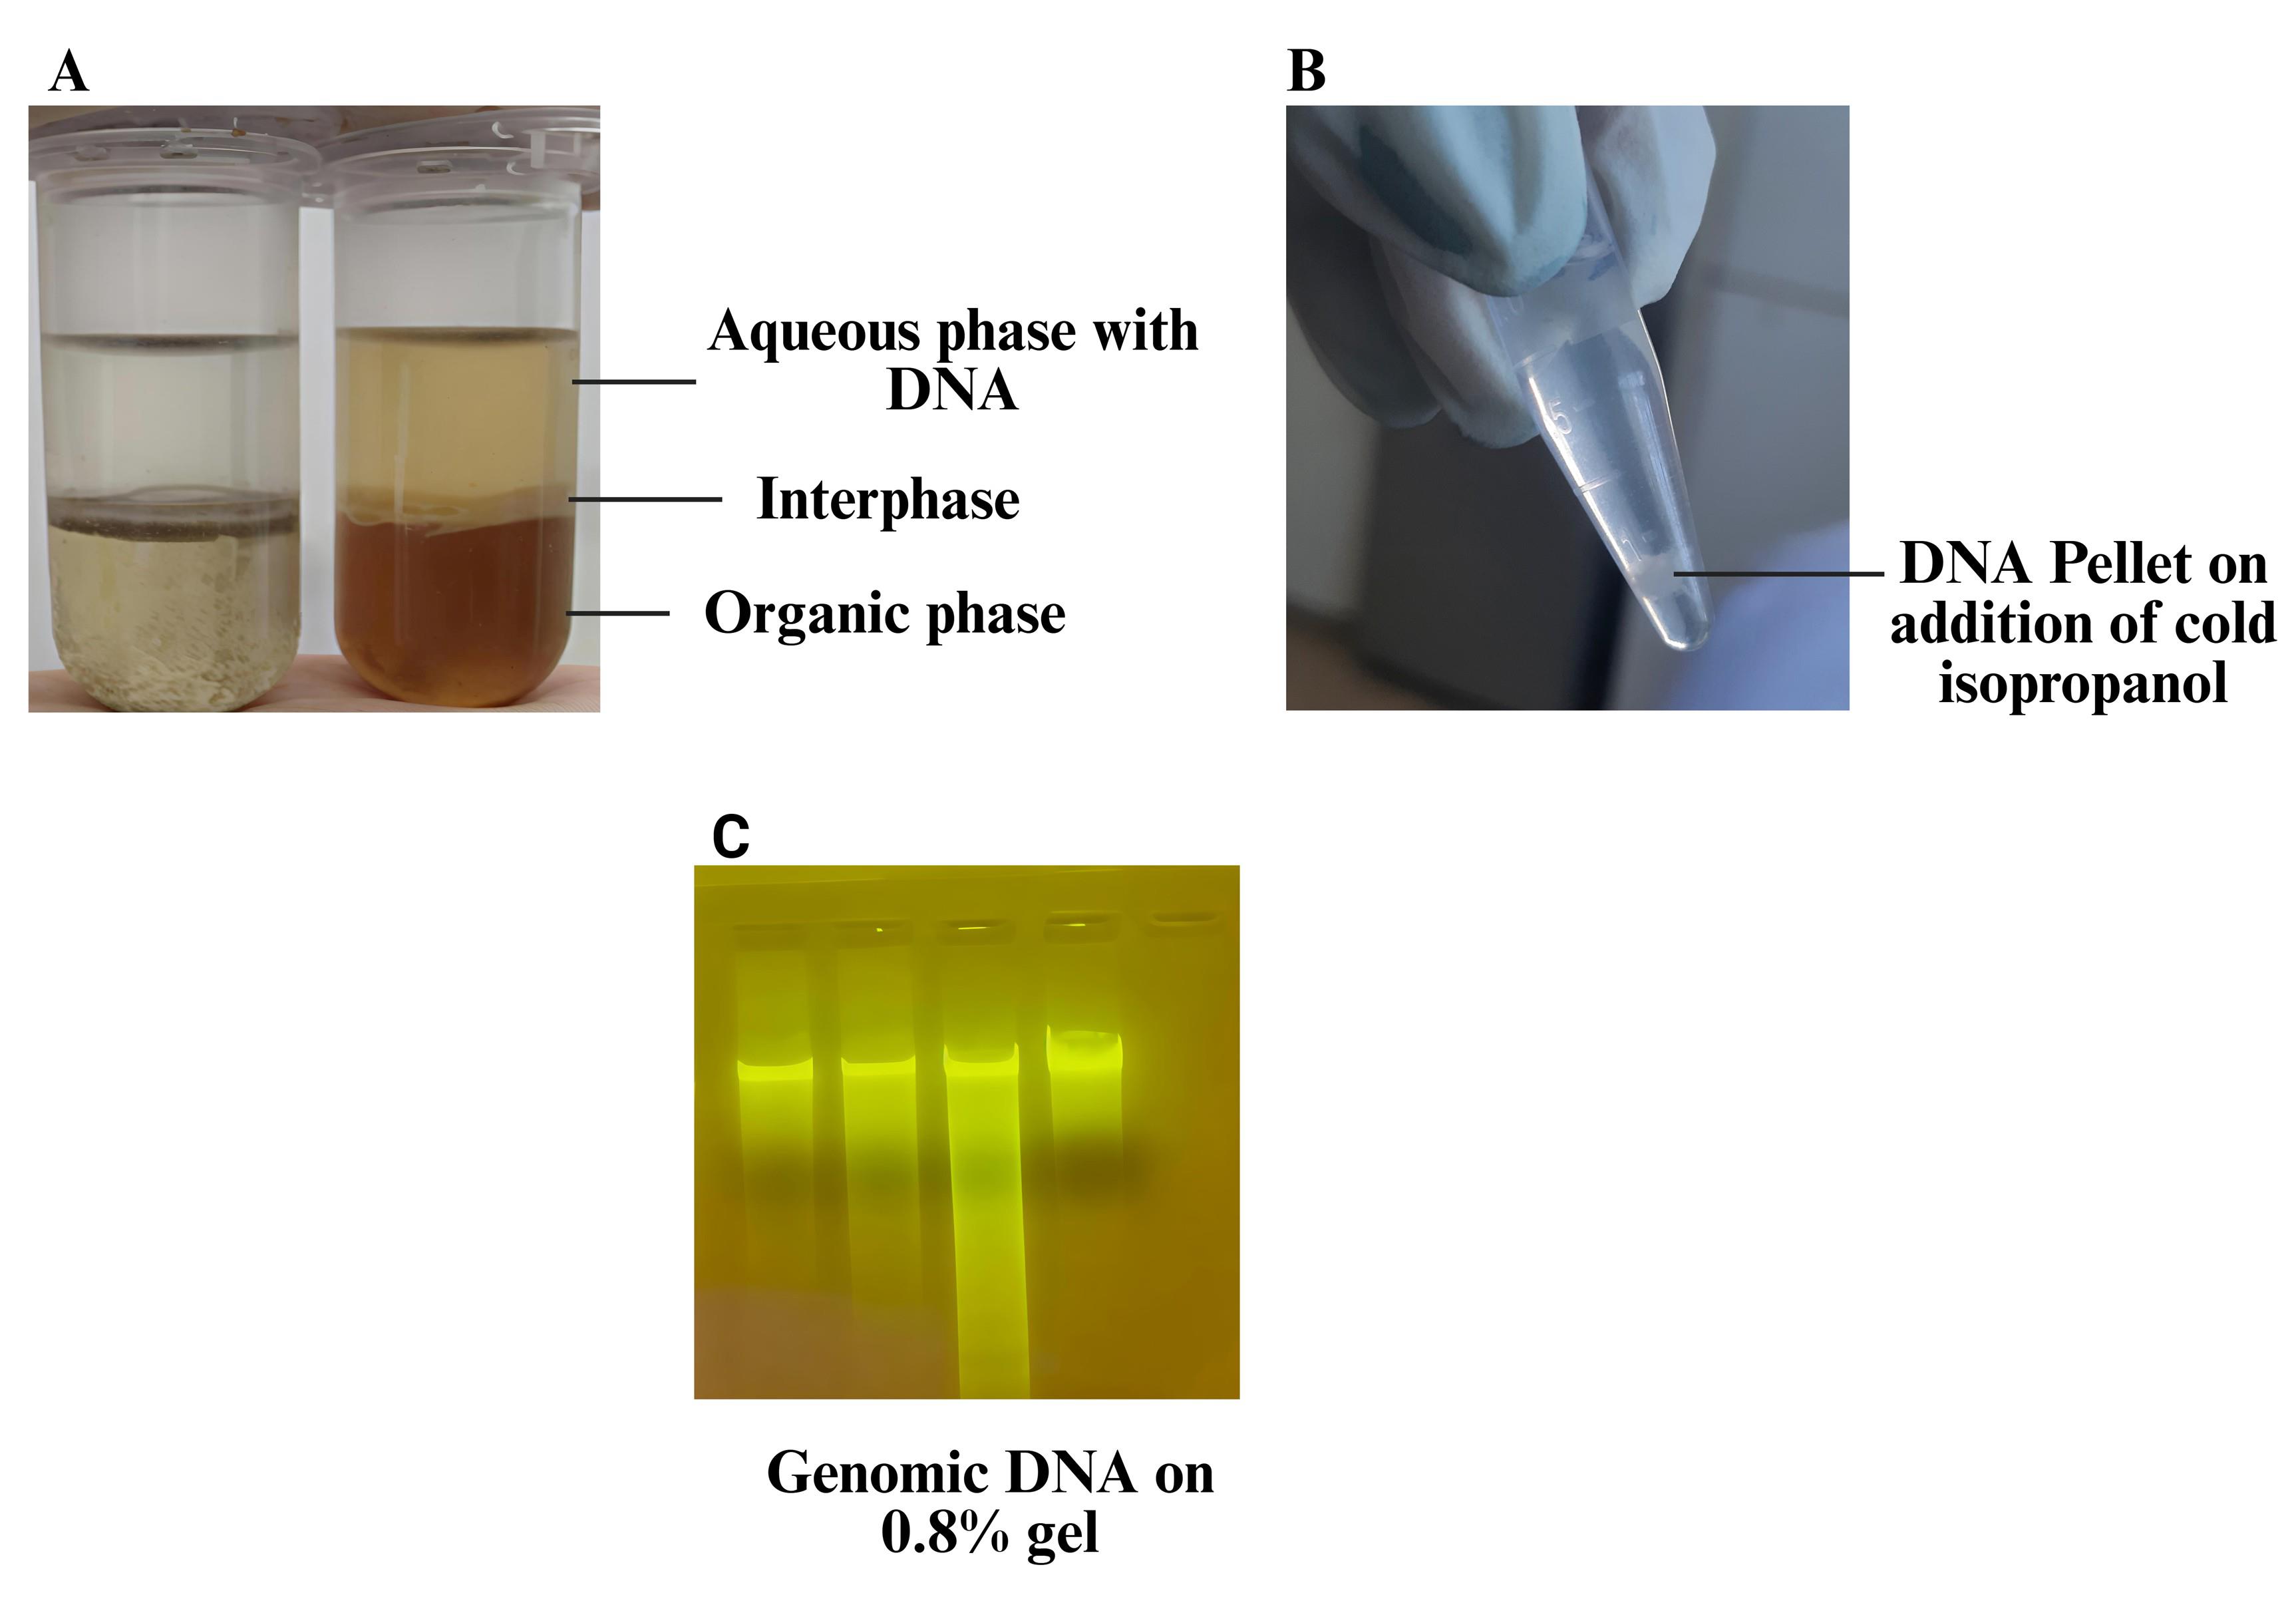
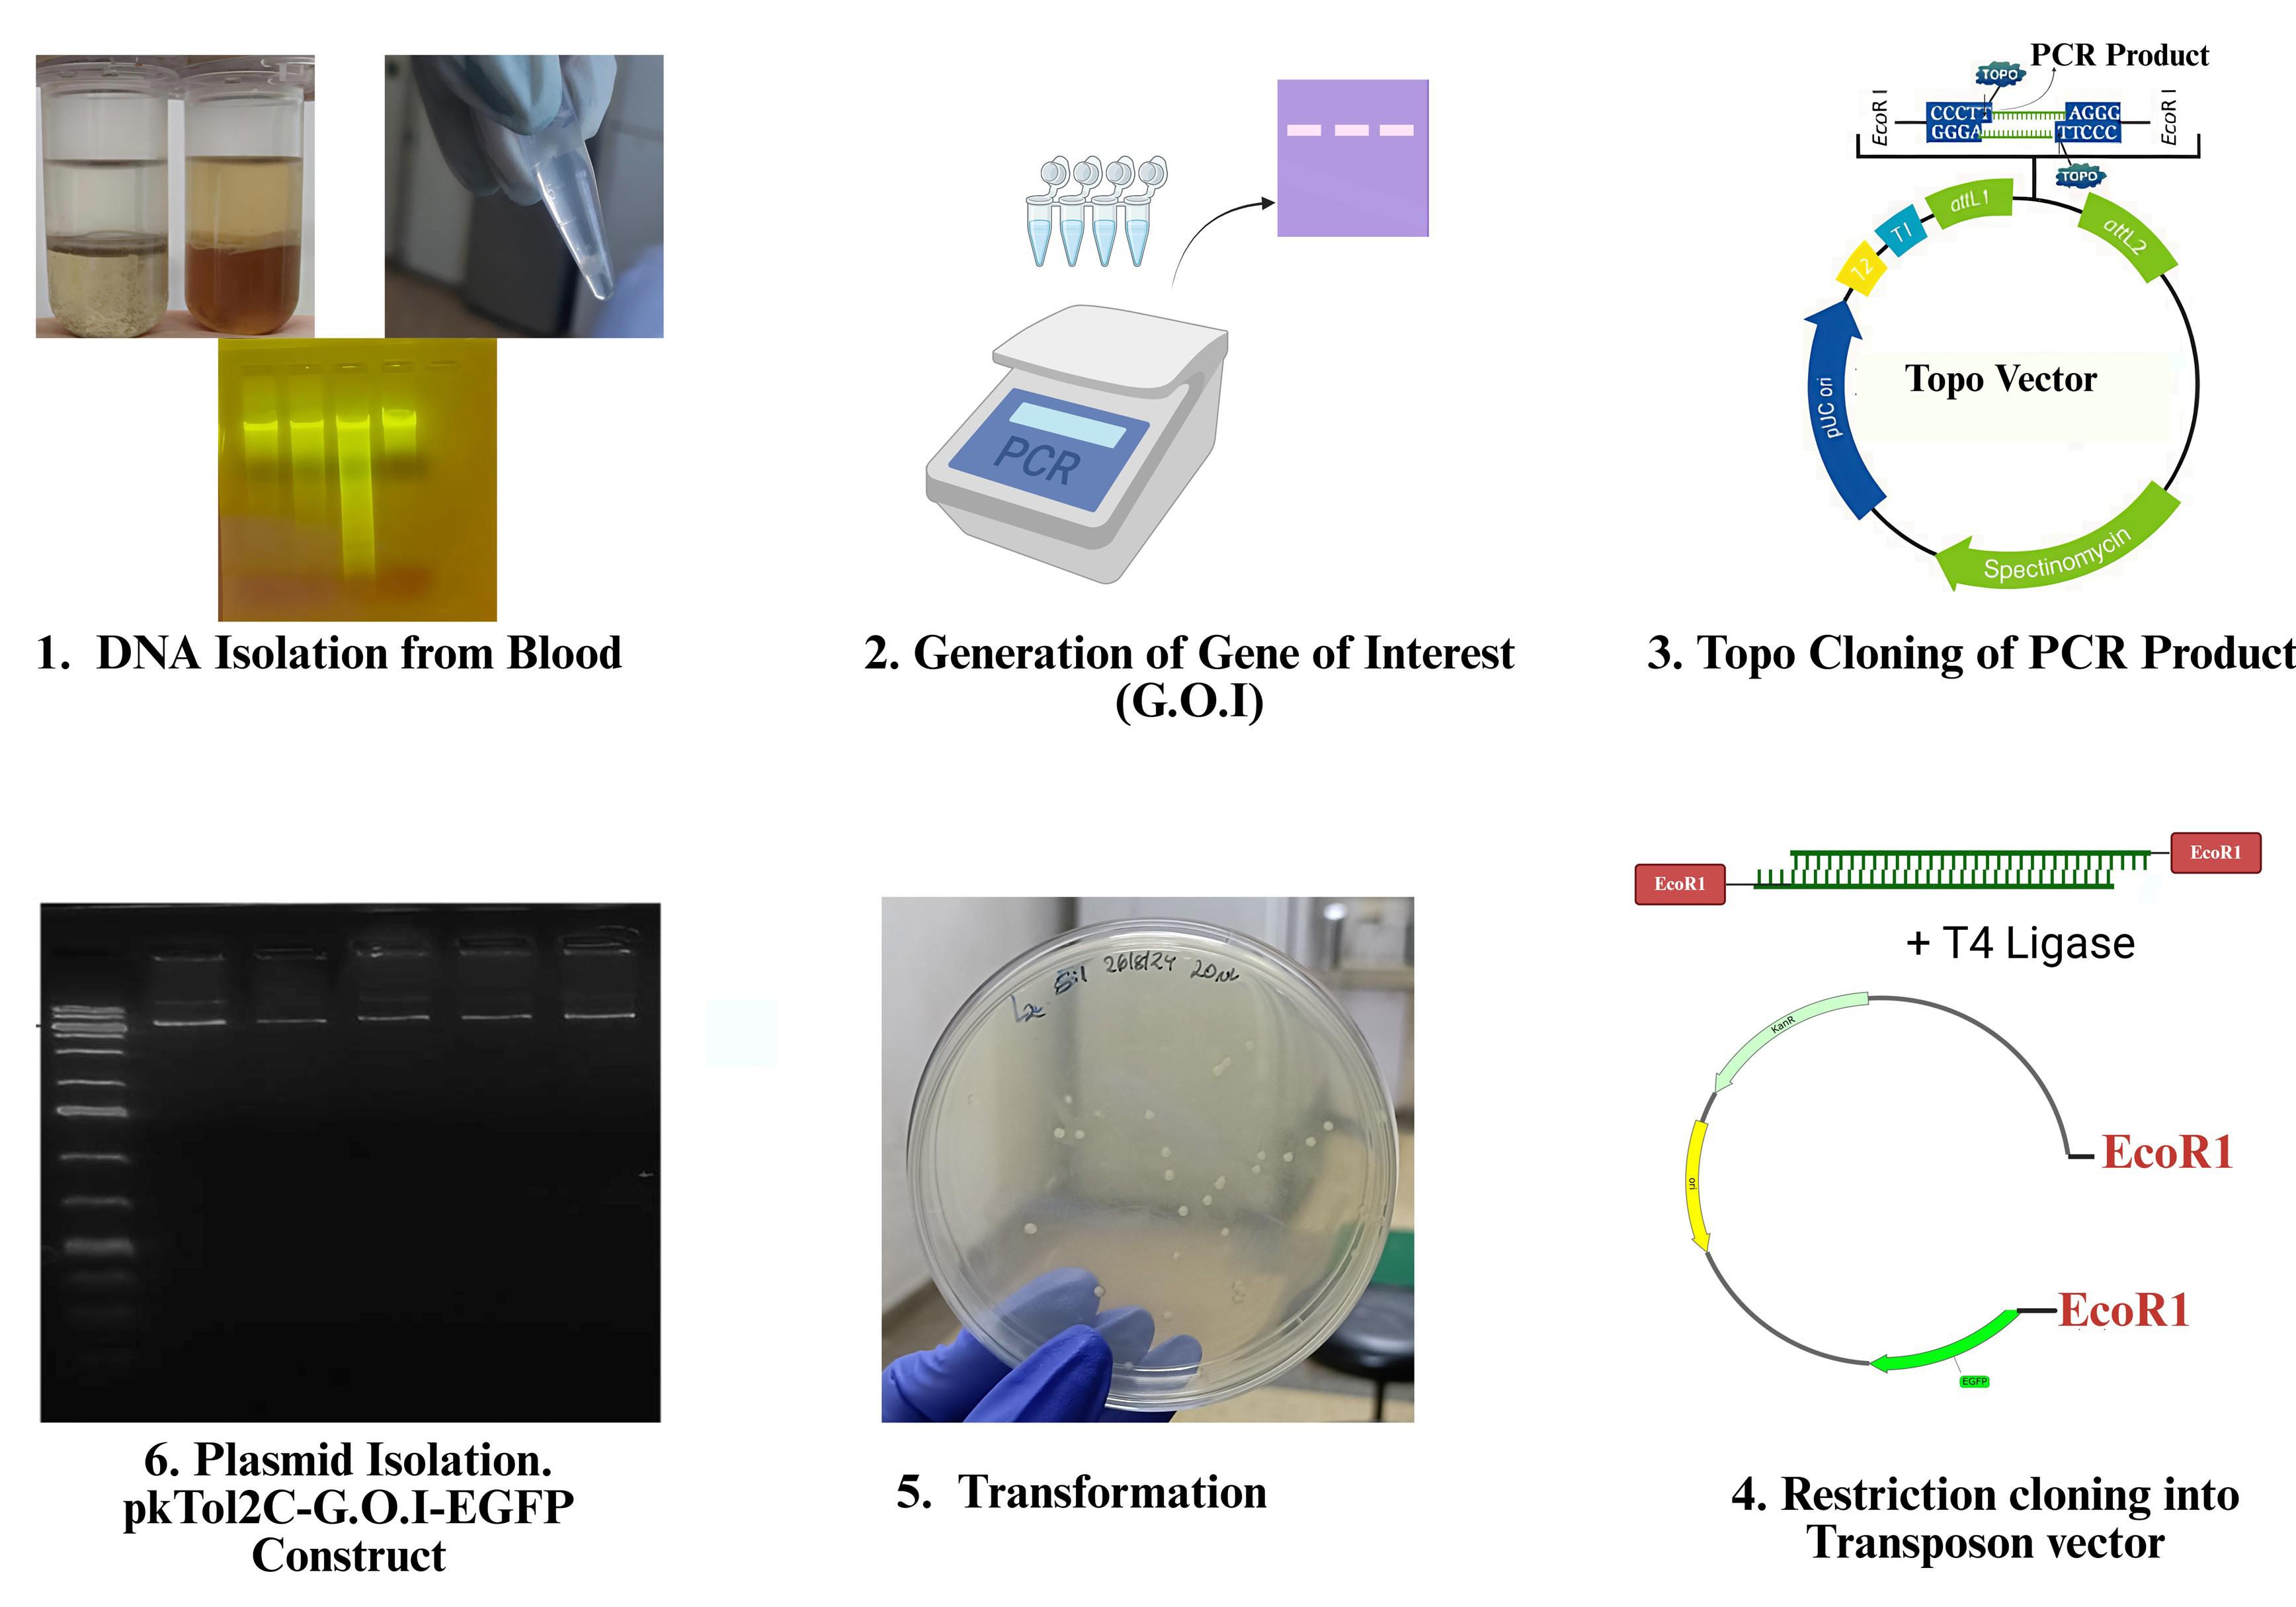
Figure 1. DNA isolation from blood using the phenol-chloroform-isoamyl alcohol method. (A) Phase separation during extraction. (B) Precipitated DNA pellet after cold isopropanol treatment. (C) Gel showing genomic DNA.
B. Gene preparation for TOPO cloning
1. Set up PCR to generate amplicons for Topo cloning.
a. Retrieve primers for the target gene from literature (Table 1) [23].
Table 1. Amplification primer sequences for the chicken TVB Gene
| Primer name | Sequence |
|---|---|
| Target gene forward primer | 5'-AGACGAGTACACCGAGTATCCA-3' |
| Target gene reverse primer | 5'-GCACGGAGCTAACCTCACTT-3' |
b. Set up a 50 μL PCR reaction according to the components listed in Table 2.
Table 2. 50 μL PCR reaction setup with MyTaq DNA polymerase
| Reagent | Volume |
|---|---|
| 5× MyTaq reaction buffer | 10 μL |
| DNA template | up to 50 ng |
| 10 μM forward primer | 2 μL |
| 10 μM reverse primer | 2 μL |
| My Taq DNA polymerase | 1 μL |
| Nuclease-free water | up to 50 μL |
c. Program the thermal cycler using the PCR conditions shown in Table 3.
Table 3. Thermocycler temperature conditions
| Step | Temperature °C | Duration | No. of cycles |
|---|---|---|---|
| Initial denaturation | 94 | 2 min | 1 |
| Denaturation | 94 | 30 s | 25 |
| Annealing | 57 | 30 s | 25 |
| Extension | 72 | 30 s | 25 |
| Final extension | 72 | 5 min | 1 |
| Hold | 4 | ∞ |
Note: Annealing temperature is dependent on the primers used. Steps 2–4 are repeated for 25 cycles, followed by a final extension and indefinite hold.
2. Prepare a 1% LE agarose gel for electrophoresis.
a. Weigh 0.5 g of LE agarose powder and dissolve it in 50 mL of 1× TAE buffer.
b. Heat the mixture in a microwave at 30-s intervals, gently swirling between heating cycles, until the agarose is completely dissolved.
c. Allow the solution to cool down to a temperature where it can be safely handled by hand.
d. Cast the gel in a gel tray with a comb inserted and allow it to solidify at room temperature.
3. Load and run the gel.
a. Load 5 μL of DNA marker into the first well.
b. On a piece of Parafilm, mix 1 μL of SYBR Green stain, 2 μL of loading dye, and 5 μL of the PCR product for each sample.
c. Load the stained PCR samples into the respective wells.
d. Set the electrophoresis apparatus to run at 100 V for 30 min.
e. Visualize the gel using a gel doc to assess the PCR product band size. See Figure 2.
Note: This gel visualization step is performed to confirm successful amplification of the gene during PCR prior to purification of the PCR product for downstream Topo cloning.
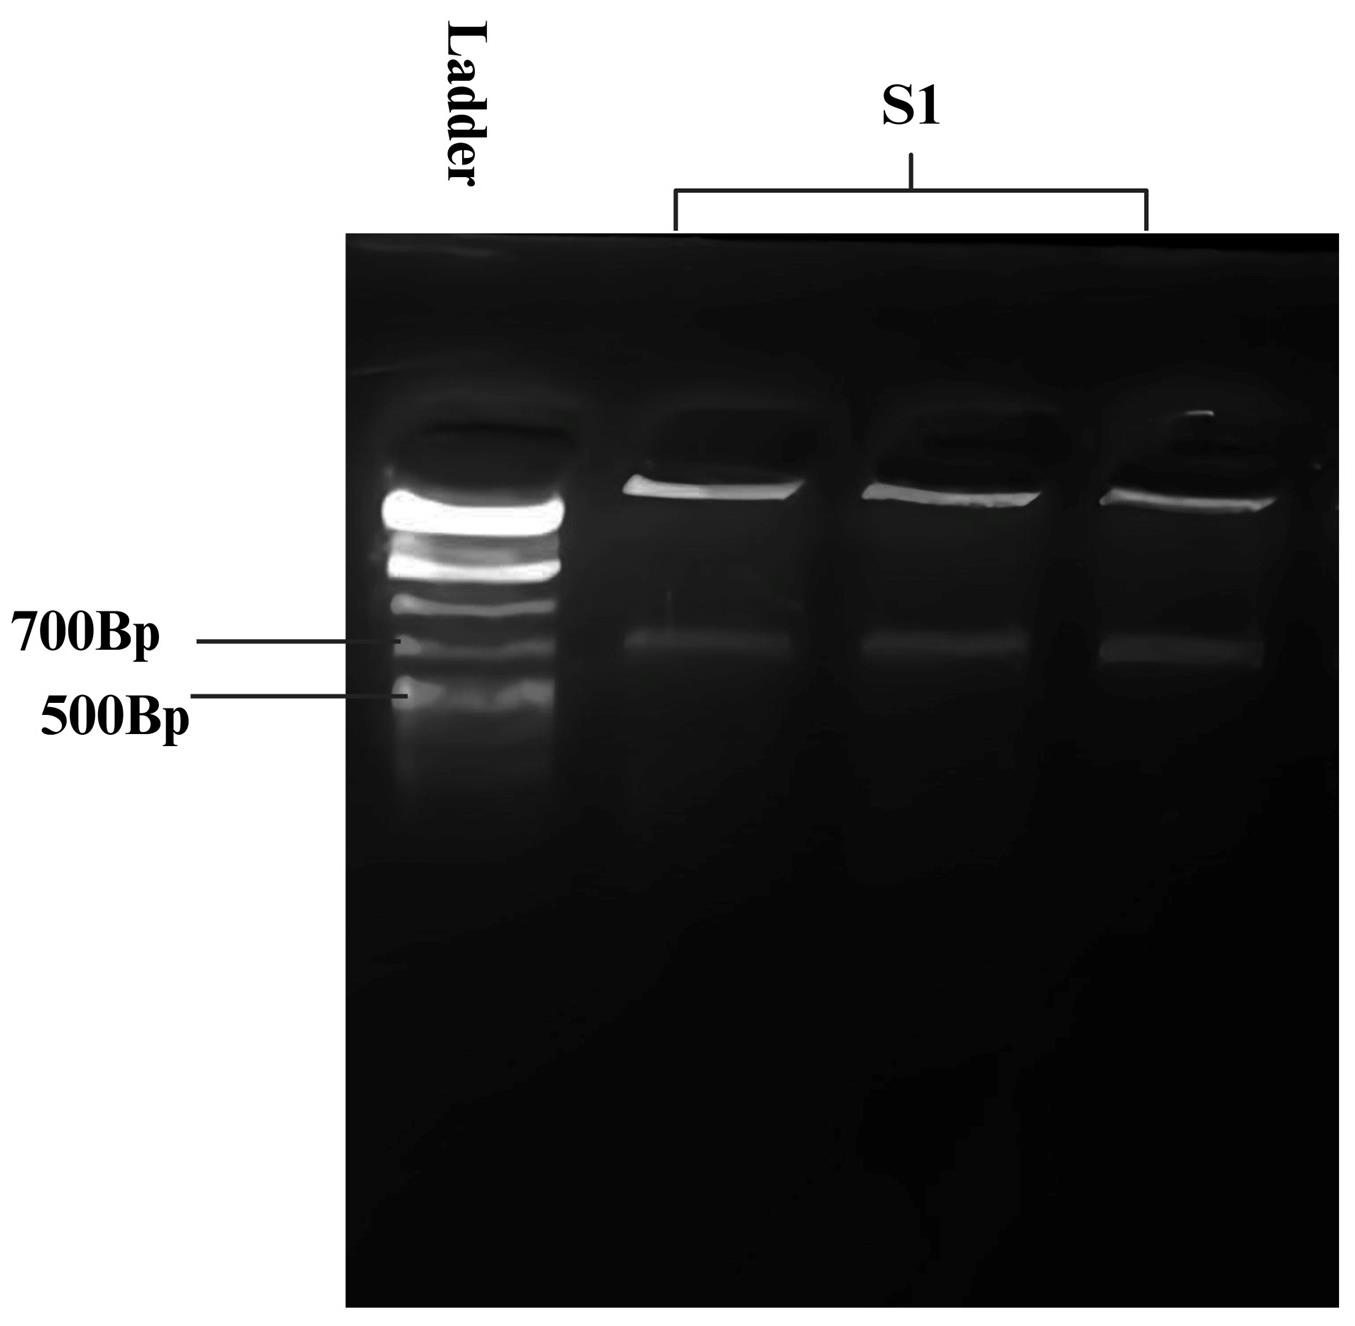
Figure 2. Gel image of PCR-amplified gene of interest (G.O.I). The target gene used in this study belongs to the Tumor Necrosis Factor family (TNF) and determines susceptibility or resistance to avian leukosis in chickens. The amplified fragment is approximately 700 bp. O'GeneRuler 1 kb Plus DNA ladder is used for size estimation.
4. Purification of PCR product
a. Purify the entire 50 μL PCR reaction product using the ISOLATE II PCR and Gel Kit, following the manufacturer’s instructions.
b. Refer to Figure 3 for an overview of the purification workflow.
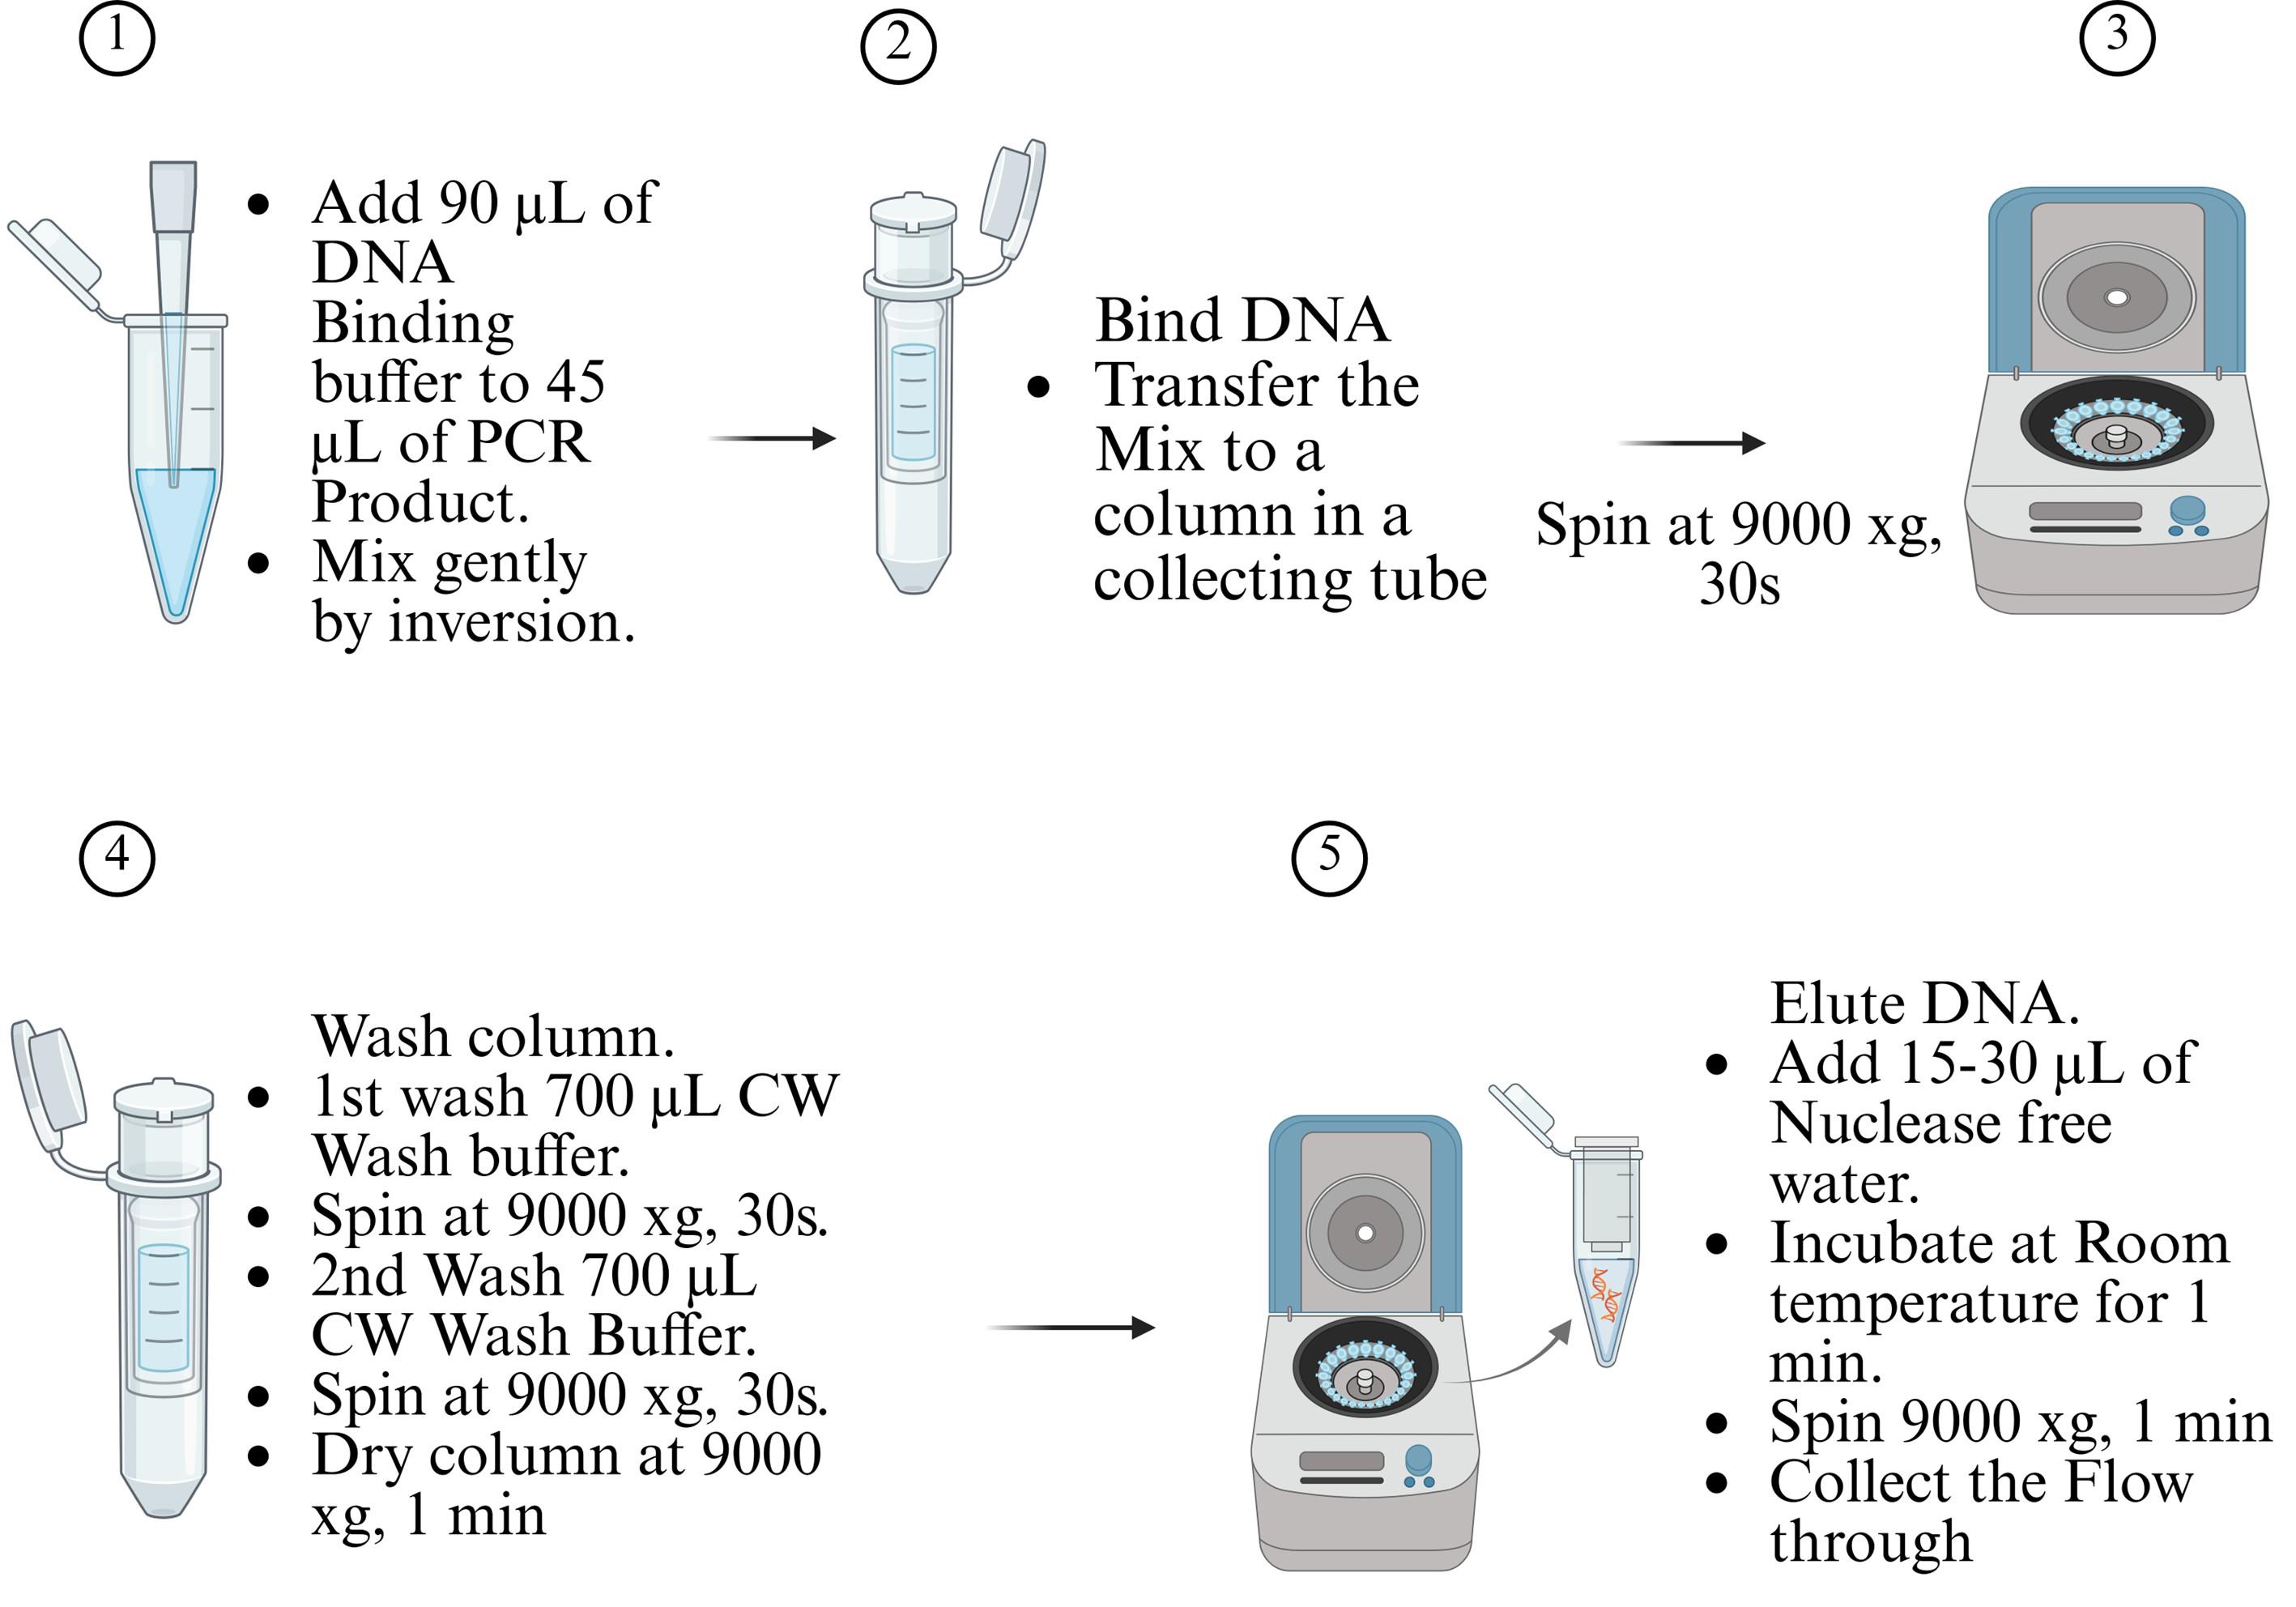
Figure 3. PCR product purification using the ISOLATE II PCR and Gel kit
Critical: After generating the PCR product, it is necessary to either send the purified product for sequencing or perform restriction digestion to confirm the correct gene before proceeding to cloning steps.
C. TOPO cloning
1. Preparation of chemically competent E. coli cells for TOPO cloning
a. Pick a single colony of E. coli One Shot TOP10 Chemically Competent cells and inoculate it into 40 mL of LB broth without antibiotics.
Note: One Shot TOP10 Chemically Competent cells are supplied with the TOPO kit. Although these cells are pre-prepared, they require storage at -80 °C, which may not be practical during kit transit. Therefore, it may be necessary to revive the cells and prepare fresh competent cells in the laboratory. The cells are supplied as a 50 μL glycerol stock. For revival, lawn the cells on freshly prepared LB agar plates without antibiotics under sterile conditions and incubate overnight to allow selection of a single colony for further steps.
b. Incubate the culture overnight at 37 °C with shaking at 200 rpm.
c. Inoculate 1 mL of this overnight culture into 30 mL of fresh LB broth without antibiotics.
d. Incubate at 37 °C with shaking at 200 rpm until the optical density at 600 nm (OD600) reaches approximately 0.4.
Critical: Start checking the OD after 2.5 h of incubation. It typically takes 3–4 h to achieve an OD of 0.4 under standard conditions.
e. Prepare a 0.1 M solution of CaCl2 and cool it at -20 °C.
f. Centrifuge the bacterial culture at 9,000× g for 2 min at 4 °C.
Note: It is essential to use a refrigerated centrifuge set to 4 °C to maintain low temperature and preserve cell competency.
g. Transfer the pellet into pre-chilled 2 mL sterile Eppendorf tubes.
h. Chill the tubes on ice for 1 h.
i. Resuspend the bacterial pellet in 1 mL of sterile, ice-cold 0.1 M CaCl2.
j. Incubate the suspension on ice for another 1 h.
k. Centrifuge at 9,000× g for 2 min at 4 °C.
l. Carefully discard the supernatant and resuspend the cells in 200 μL of sterile, ice-cold 0.1 M CaCl2.
m. Aliquot 50 μL of competent cells into sterile 1.5 mL Eppendorf tubes and keep them chilled on ice, ready for transformation.
Note: If the competent cells are not used immediately, add sterile glycerol to a final concentration of 50% and store the aliquots at -80 °C for future use.
2. TOPO cloning reaction setup
a. Use the entry vector pCR8/GW/TOPO and the purified PCR product for setting up the cloning reaction.
b. Prepare the cloning reaction according to the reagent volumes listed in Table 4.
c. Mix the reaction components gently by flicking the tube and incubate the reaction mixture at room temperature (approximately 24 °C) for 30 min.
Note: In laboratories with variable temperature conditions (below 20–25 °C), the reaction can be incubated using a thermal cycler set to 24 °C for 30 min.
Table 4. TOPO cloning reaction setup for PCR product
| Reagent | Volume |
|---|---|
| Purified PCR product (10–20 ng) | 1.5 μL |
| Salt solution (1.2 M NaCl, 0.06 M MgCl2) | 0.5 μL |
| Topo vector (10 ng/μL) | 0.5 μL |
| Nuclease-free water | 2 μL |
| Total reaction volume | 3 μL |
3. Transformation
a. Add 3 μL of the TOPO cloning reaction directly to the 50 μL of prepared chemically competent cells on ice and mix gently by flicking the tube.
b. Incubate the mixture on ice for 30 min.
c. Heat-shock the cells at 42 °C for exactly 30 s.
d. Immediately transfer the tubes back onto ice and incubate for 2 min.
e. Add 250 μL of SOC media to each tube.
Note: If SOC media is unavailable, prewarmed sterile LB broth without antibiotics can be used as a substitute.
f. Incubate the mixture at 37 °C for 1 h with shaking or rotation to allow cell recovery and expression of the antibiotic resistance marker.
g. Spread 50 μL of the transformation mixture onto prewarmed LB agar plates containing 100 mg/L spectinomycin.
h. Incubate the plates overnight at 37 °C.
Critical: Include positive control (transformation with the control template provided by the kit) and negative control (non-transformed competent cells) to verify the success of the transformation process. It is important to plate non-transformed competent cells onto LB-spectinomycin plates as a negative control to check the efficacy of the antibiotic and confirm the suppression of non-transformants.
Note: The pCR 8/GW/TOPO vector carries a spectinomycin resistance gene. Therefore, spectinomycin is used to selectively allow the growth of transformants while suppressing the growth of non-transformants.
4. Screening of transformants by colony PCR
a. Select 3–5 colonies from the LB agar plate containing spectinomycin and label them.
b. Set up the PCR reaction using gene insert primers as described in Table 1.
c. Use a sterile toothpick to pick a small amount of each labeled colony directly from the plate and place it into a separate labeled PCR tube containing the PCR master mix, prepared as described in Table 5.
d. Run the PCR reaction using the conditions set in Table 3.
Table 5. 10 μL colony PCR setup
| Reagent | Volume |
|---|---|
| 5× MyTaq reaction buffer | 2 μL |
| DNA template (colony) | 1 μL |
| 10 μM forward primer | 0.5 μL |
| 10 μM reverse primer | 0.5 μL |
| My Taq DNA polymerase | 0.3 μL |
| Nuclease-free water | 5.7 μL |
5. Gel visualization
a. Stain 5 μL of the PCR product with 1 μL of SYBR Green and 2 μL of DNA loading dye.
b. Load the stained PCR product onto a 1% precast agarose gel in TAE buffer.
c. Load 5 μL of DNA ladder (stained with 1 μL of SYBR Green) into the first well.
d. Perform electrophoresis at 100 V for 30 min.
e. Visualize on a gel doc system. See Figure 4.
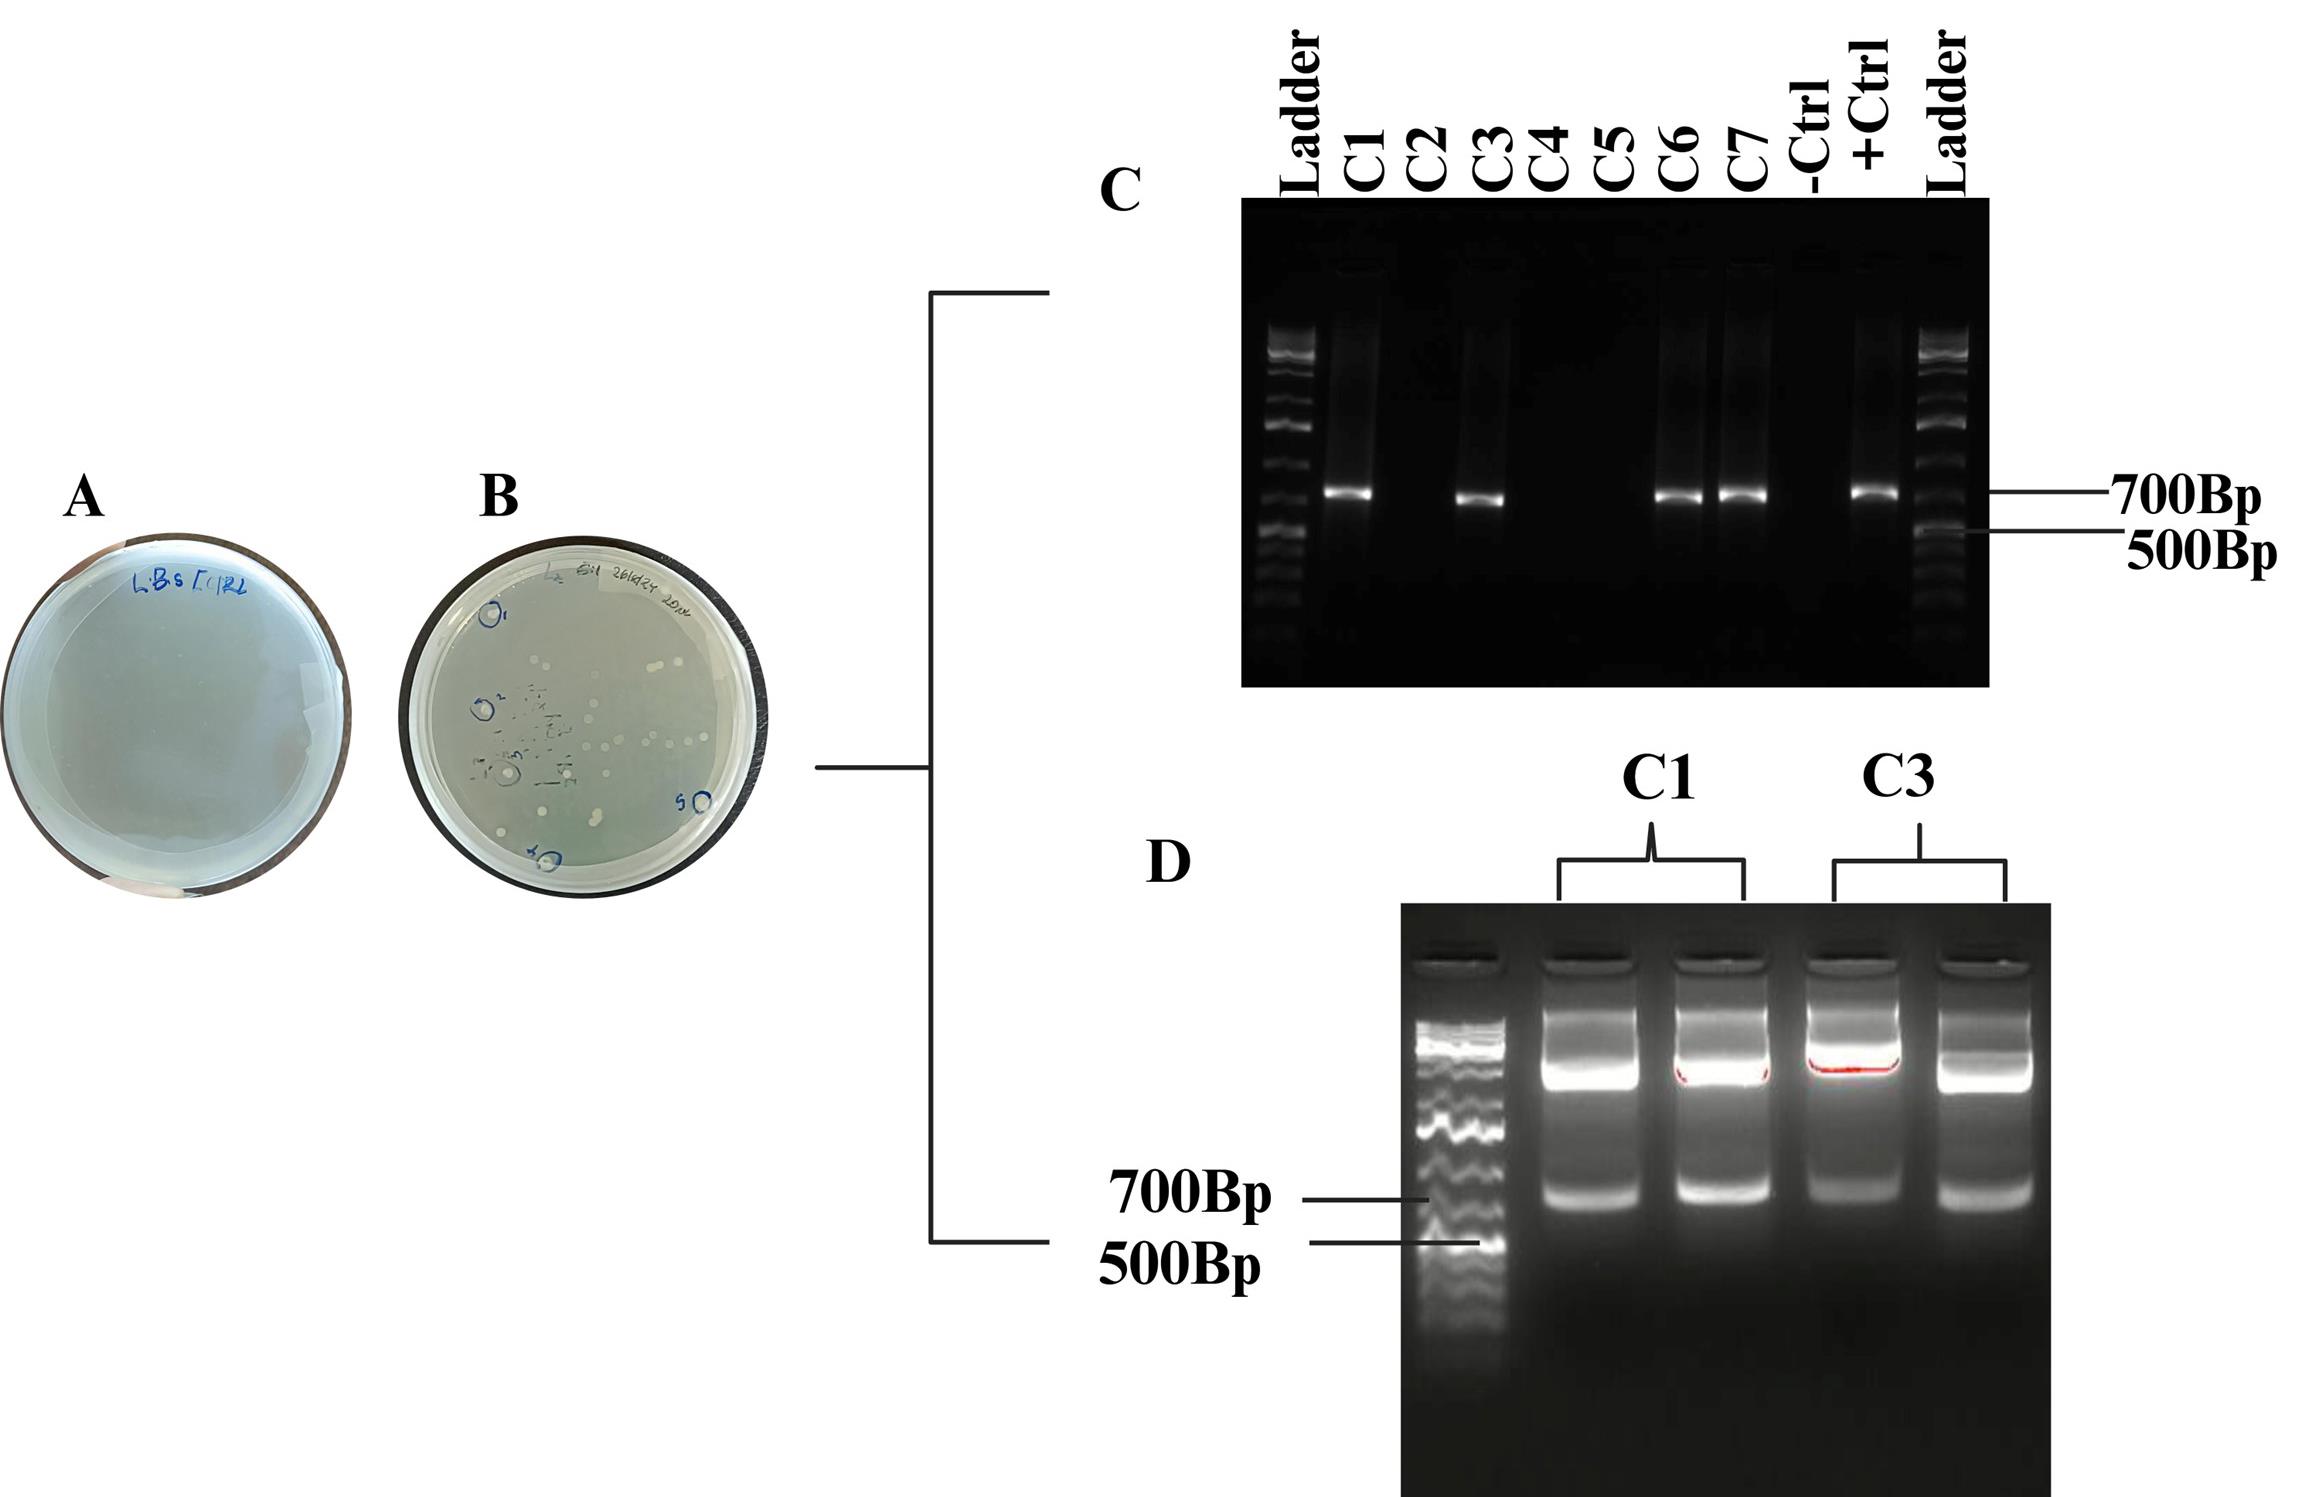
Figure 4. Successful TOPO cloning and transformation. (A) Negative control: no growth. (B) Positive transformants on LB with spectinomycin. (C) Gel image of colony PCR. (D) Restriction digest of two positive colonies.
6. Plasmid isolation of Topo-GOI-recombinant vector
a. Inoculate two colony PCR-positive colonies into 20 mL of LB broth containing spectinomycin and incubate overnight at 37 °C on a rotary shaker.
b. Centrifuge the culture at 9,000× g for 5 min, then discard the supernatant.
c. Perform plasmid isolation using the GeneJET Plasmid Miniprep kit according to Figure 5.
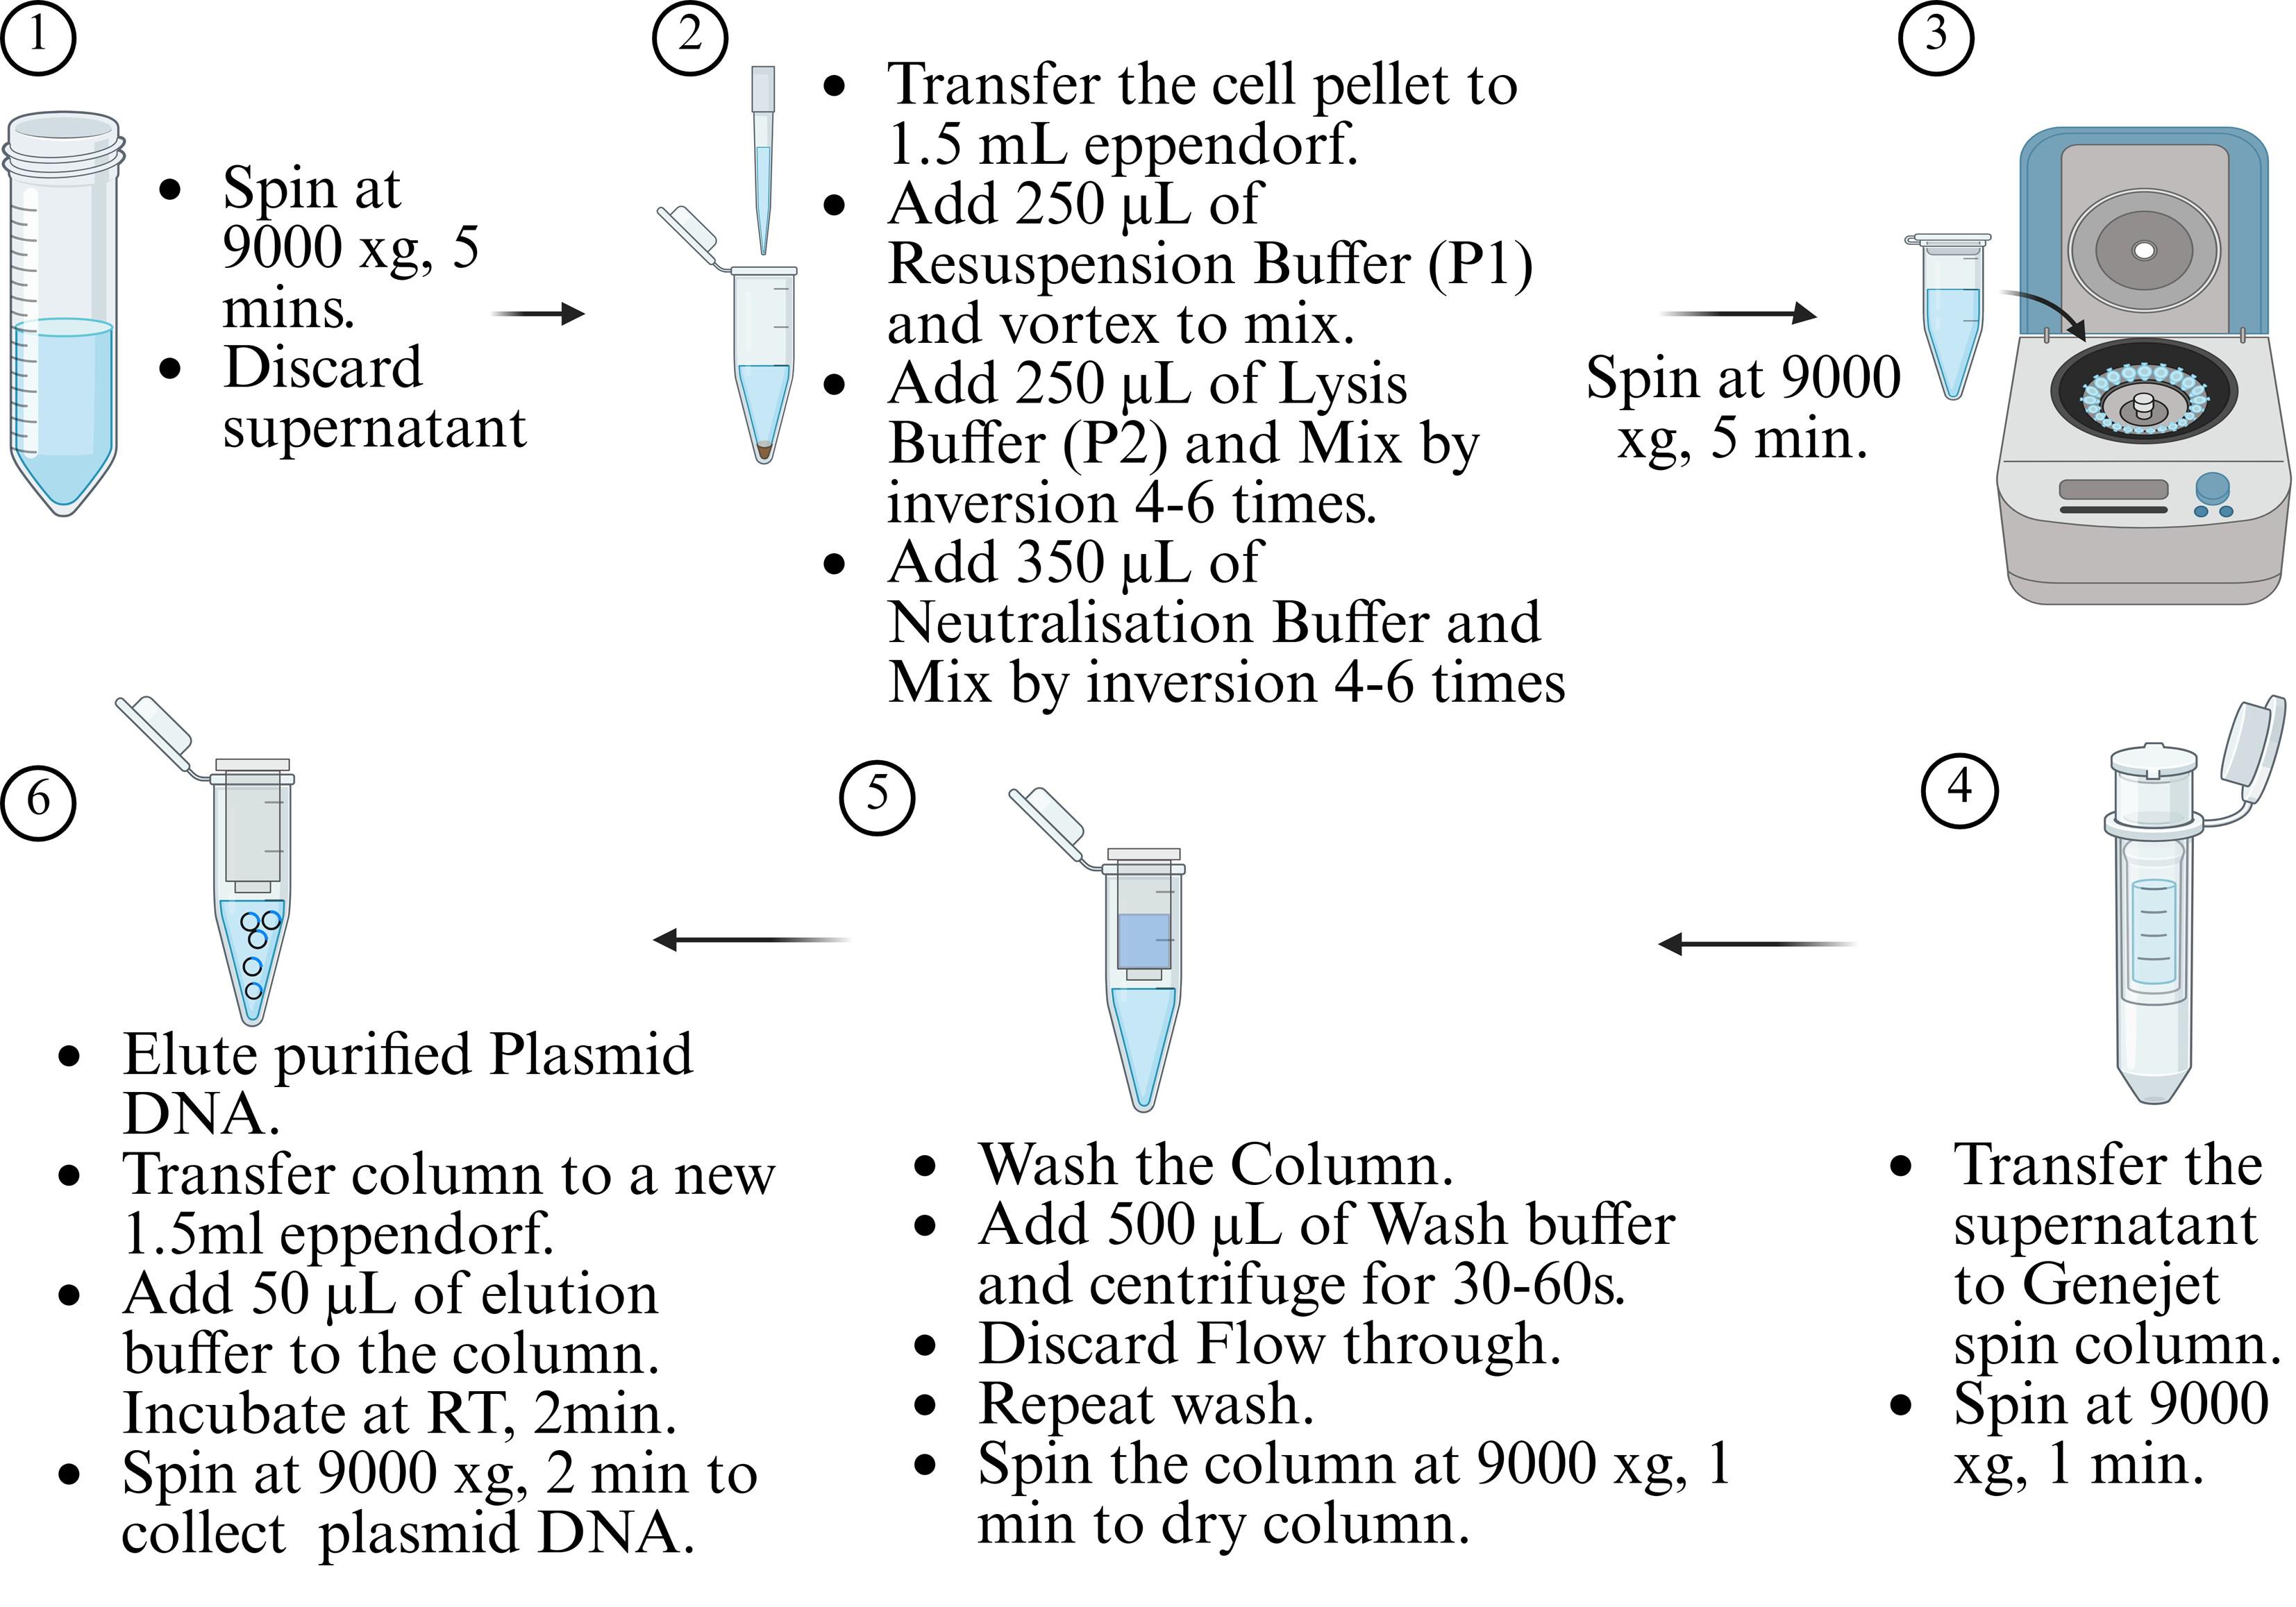
Figure 5. Plasmid isolation protocol using GeneJET Plasmid Miniprep kit
D. Restriction cloning of the gene of interest into pKTol2C-EGFP transposon vector
1. Restriction digestion of Topo-gene of interest recombinant vector
a. Perform restriction digestion using the EcoRI enzyme.
b. Prepare a 50 μL reaction in a PCR tube as in Table 6:
Table 6. Restriction digest setup with EcoR1
| Reagent | Volume |
|---|---|
| Digestion buffer | 5 μL |
| DNA template | up to 1 μg |
| Nuclease-free water | up to 50 μL |
| EcoR1 enzyme | 2 μL |
c. Incubate at 37 °C for 1 h.
Note: It is a good practice to set the reaction in duplicate in order to obtain a good yield during gel purification.
d. Run the digested product on a 1% agarose gel at 100 V for 1 h.
e. Excise the gene of interest from the gel under UV illumination.
f. Purify the excised DNA fragment using the Zymoclean Gel DNA Recovery kit (Figure 6).
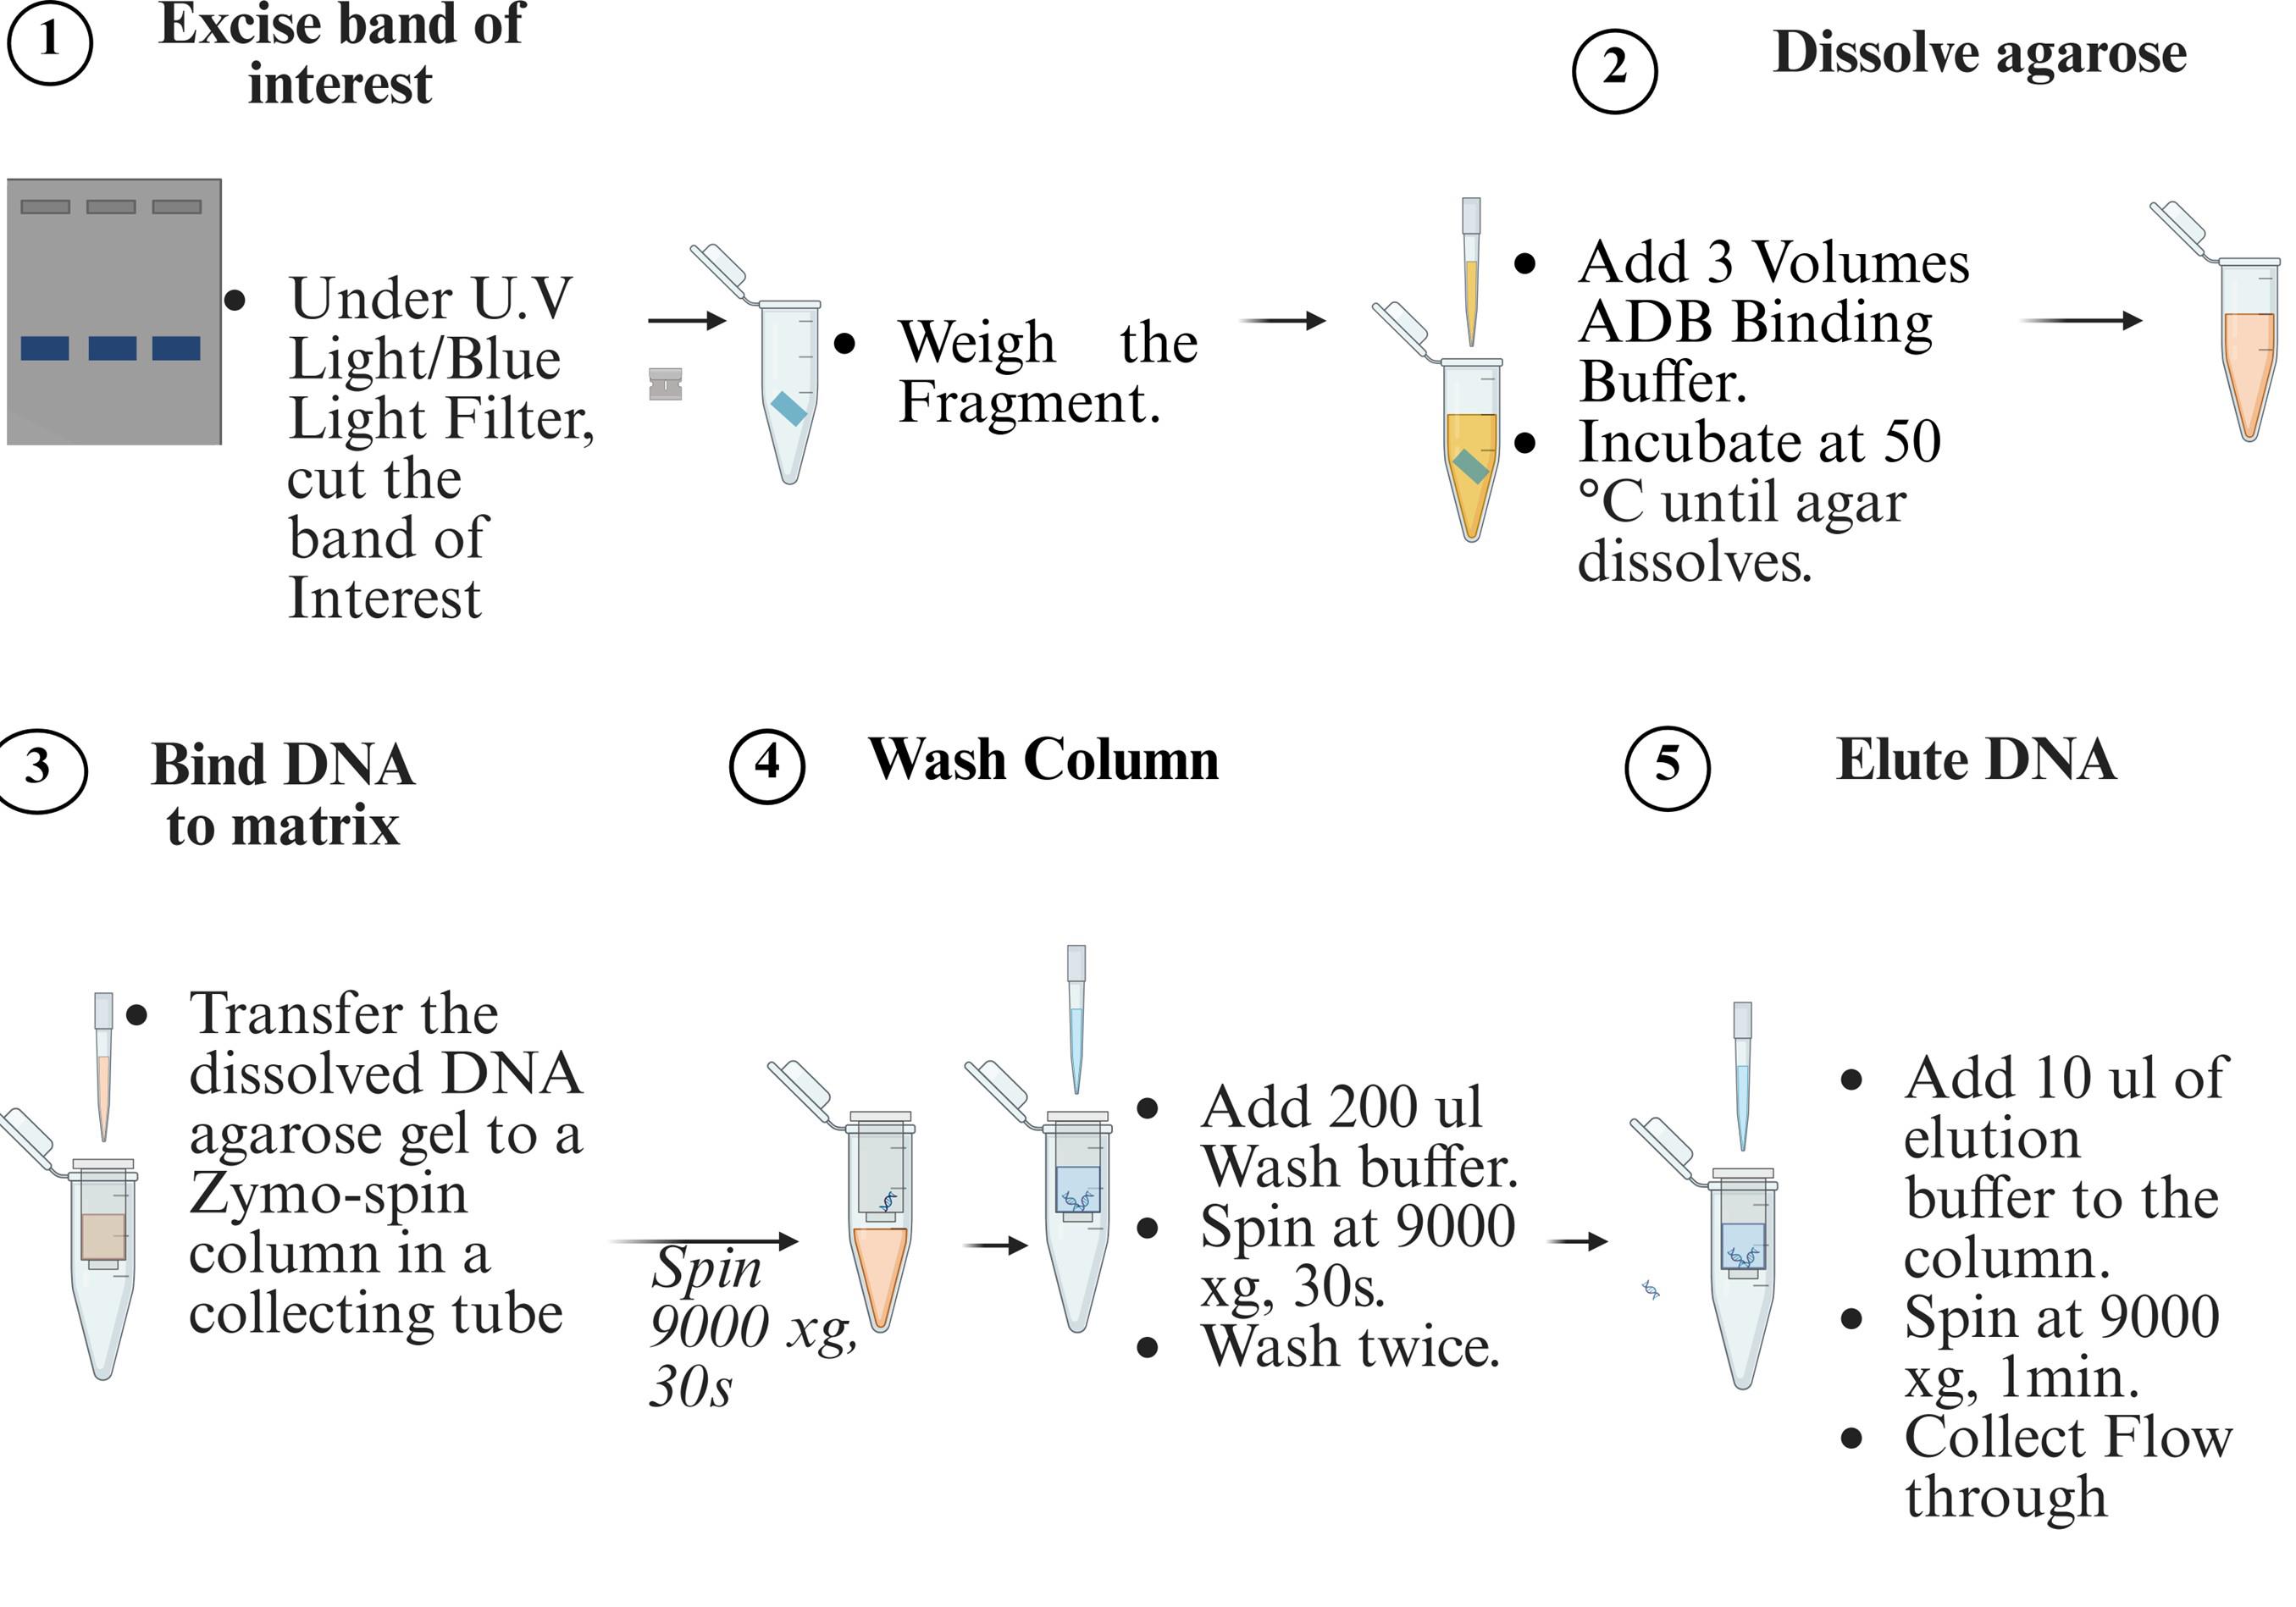
Figure 6. Gel purification of DNA using Zymoclean Gel DNA Recovery kit
2. Restriction digestion and gel purification of pKTol2C-EGFP
Preliminary steps:
a. Subculture the pKTol2C-EGFP plasmid from the supplied Addgene agar stab onto fresh sterile LB agar plates supplemented with 50 μg/mL Kanamycin.
Note: Perform this step under sterile conditions.
b. Incubate the plates overnight at 37 °C.
c. Select a single colony from the plate.
d. Inoculate the colony into LB-Kanamycin broth (50 µg/mL).
e. Incubate the culture overnight at 37 °C with shaking at 200 rpm.
f. Isolate the plasmid DNA from the overnight culture using the GeneJET Plasmid Miniprep kit (refer to Figure 5).
Restriction digestion and gel purification of pKTol2C-EGFP
a. Set up a 25 μL digestion-dephosphorylation reaction as follows:
Table 7. Digestion and dephosphorylation setup for pKTol2C-EGFP
| Reagent | Volume |
|---|---|
| Digestion buffer | 2.5 μL |
| DNA template | up to 1 μg |
| Nuclease-free water | up to 25 μL |
| EcoR1 enzyme (25 Units) | 1.5 μL |
| Recombinant shrimp alkaline phosphatase (rSAP) | 1 μL |
Critical: Dephosphorylation is essential to prevent self-ligation of the linearized vector. Skipping this step could result in a high background of empty vector colonies during cloning.
b. Mix gently and briefly spin down.
c. Incubate at 37 °C for 1.5 h.
d. Deactivate the enzymes at 65 °C for 20 min.
e. Run the digested product on a 1% agarose gel at 100 V for 1 h.
f. Excise the DNA fragment corresponding to the expected size of the vector backbone (~4.4 kb) under UV illumination.
g. Purify the excised DNA fragment using the Zymoclean Gel DNA Recovery kit (Figure 6).
h. Quantify the linearized vector using a nanodrop.
3. Ligation setup of pKTol2C-EGFP and gene of interest insert
a. Prepare a 20 μL ligation reaction as follows (Table 8):
Table 8. Ligation reaction setup
| Reagent | Volume |
|---|---|
| Ligation buffer | 2 μL |
| Linearized vector DNA (pkTol2C-EGFP) | 50 ng |
| Digested insert DNA (G.O.I) | 37.5 ng |
| T4 ligase enzyme | 1 μL |
| Nuclease-free water | Up to 20 μL |
Critical: Before setting up the ligation reaction, it is important to quantify both the insert and vector DNA to accurately determine the amounts required. Online tools such as the NEBioCalculator Ligation Calculator can be used to calculate the appropriate insert-to-vector molar ratios. For this setup, a 1:3 molar ratio of vector to insert was used based on the DNA sizes.
b. Gently mix and briefly spin down the reaction.
c. Incubate the ligation mixture overnight at 16 °C.
d. Heat-inactivate the ligase by incubating at 65 °C for 10 min.
4. Transformation
a. Thaw 50 μL of chemically competent E. coli cells on ice.
b. Add 5 μL of ligation reaction (from Table 8) to the competent cells and gently flick the tube to mix.
c. Incubate the mixture on ice for 30 min.
d. Heat-shock the cells at 42 °C for 30 s, then immediately return them to ice for 2 min.
e. Add 250 μL of SOC media to the cells and incubate at 37 °C for 1 h on a rotator shaker for cell recovery.
f. Spread 50 μL of the transformed culture onto prewarmed LB agar plates containing 50 mg/L kanamycin.
g. Include controls:
i. Positive control: Cells with the uncut plasmid onto a separate LB plate with kanamycin.
ii. Negative control: Competent cells without plasmid onto a separate LB plate with kanamycin.
h. Incubate the plates overnight at 37 °C for colony growth.
5. Screening of transformants
a. Ligation of insert
i. Select 3–5 colonies from the LB agar plate containing kanamycin and label them.
ii. Use GOI primers to check for the presence of the insert (Table 1).
iii. Pick a small amount of each colony using a sterile toothpick and transfer it into the respective PCR tubes containing the master mix prepared as in Table 5.
iv. Run the PCR reactions using the conditions outlined in Table 3.
b. Direction of ligation
Note: In this protocol, a single restriction enzyme, EcoRI, is used to generate identical ends, resulting in a 50% chance of the insert ligating in either direction. Therefore, to verify the insert's orientation, directional PCR is required. This step is usually not required when two distinct enzymes are used because ligation is directional by design.
i. Select 3–5 colonies from the LB agar plate containing kanamycin and label them.
ii. Use forward vector primer (p-CAG-F) and a reverse insert primer to check for direction of insertion (Table 9).
iii. Pick a small amount of each colony using a sterile toothpick and transfer it into the respective PCR tubes containing the master mix prepared as in Table 5.
iv. Run the PCR reactions using the conditions outlined in Table 3.
Table 9. PCR primers for checking orientation of insert
| Primer name | Sequence |
|---|---|
| pCAG-F vector forward primer | 5'- GCAACGTGCTGGTTATTGTG-3' |
| Insert reverse primer | 5'-GCACGGAGCTAACCTCACTT-3' |
6. Gel visualization
a. Stain 5 μL of the PCR product with 1 μL of SYBR Green and 2 μL of DNA loading dye.
b. Load the stained PCR product onto a 1% agarose gel in TAE buffer.
c. Load 5 μL of DNA ladder (stained with 1 μL of SYBR Green) into the first well.
d. Perform electrophoresis at 100 V for 30 min.
e. Visualize the gel under UV light. See Figure 7.
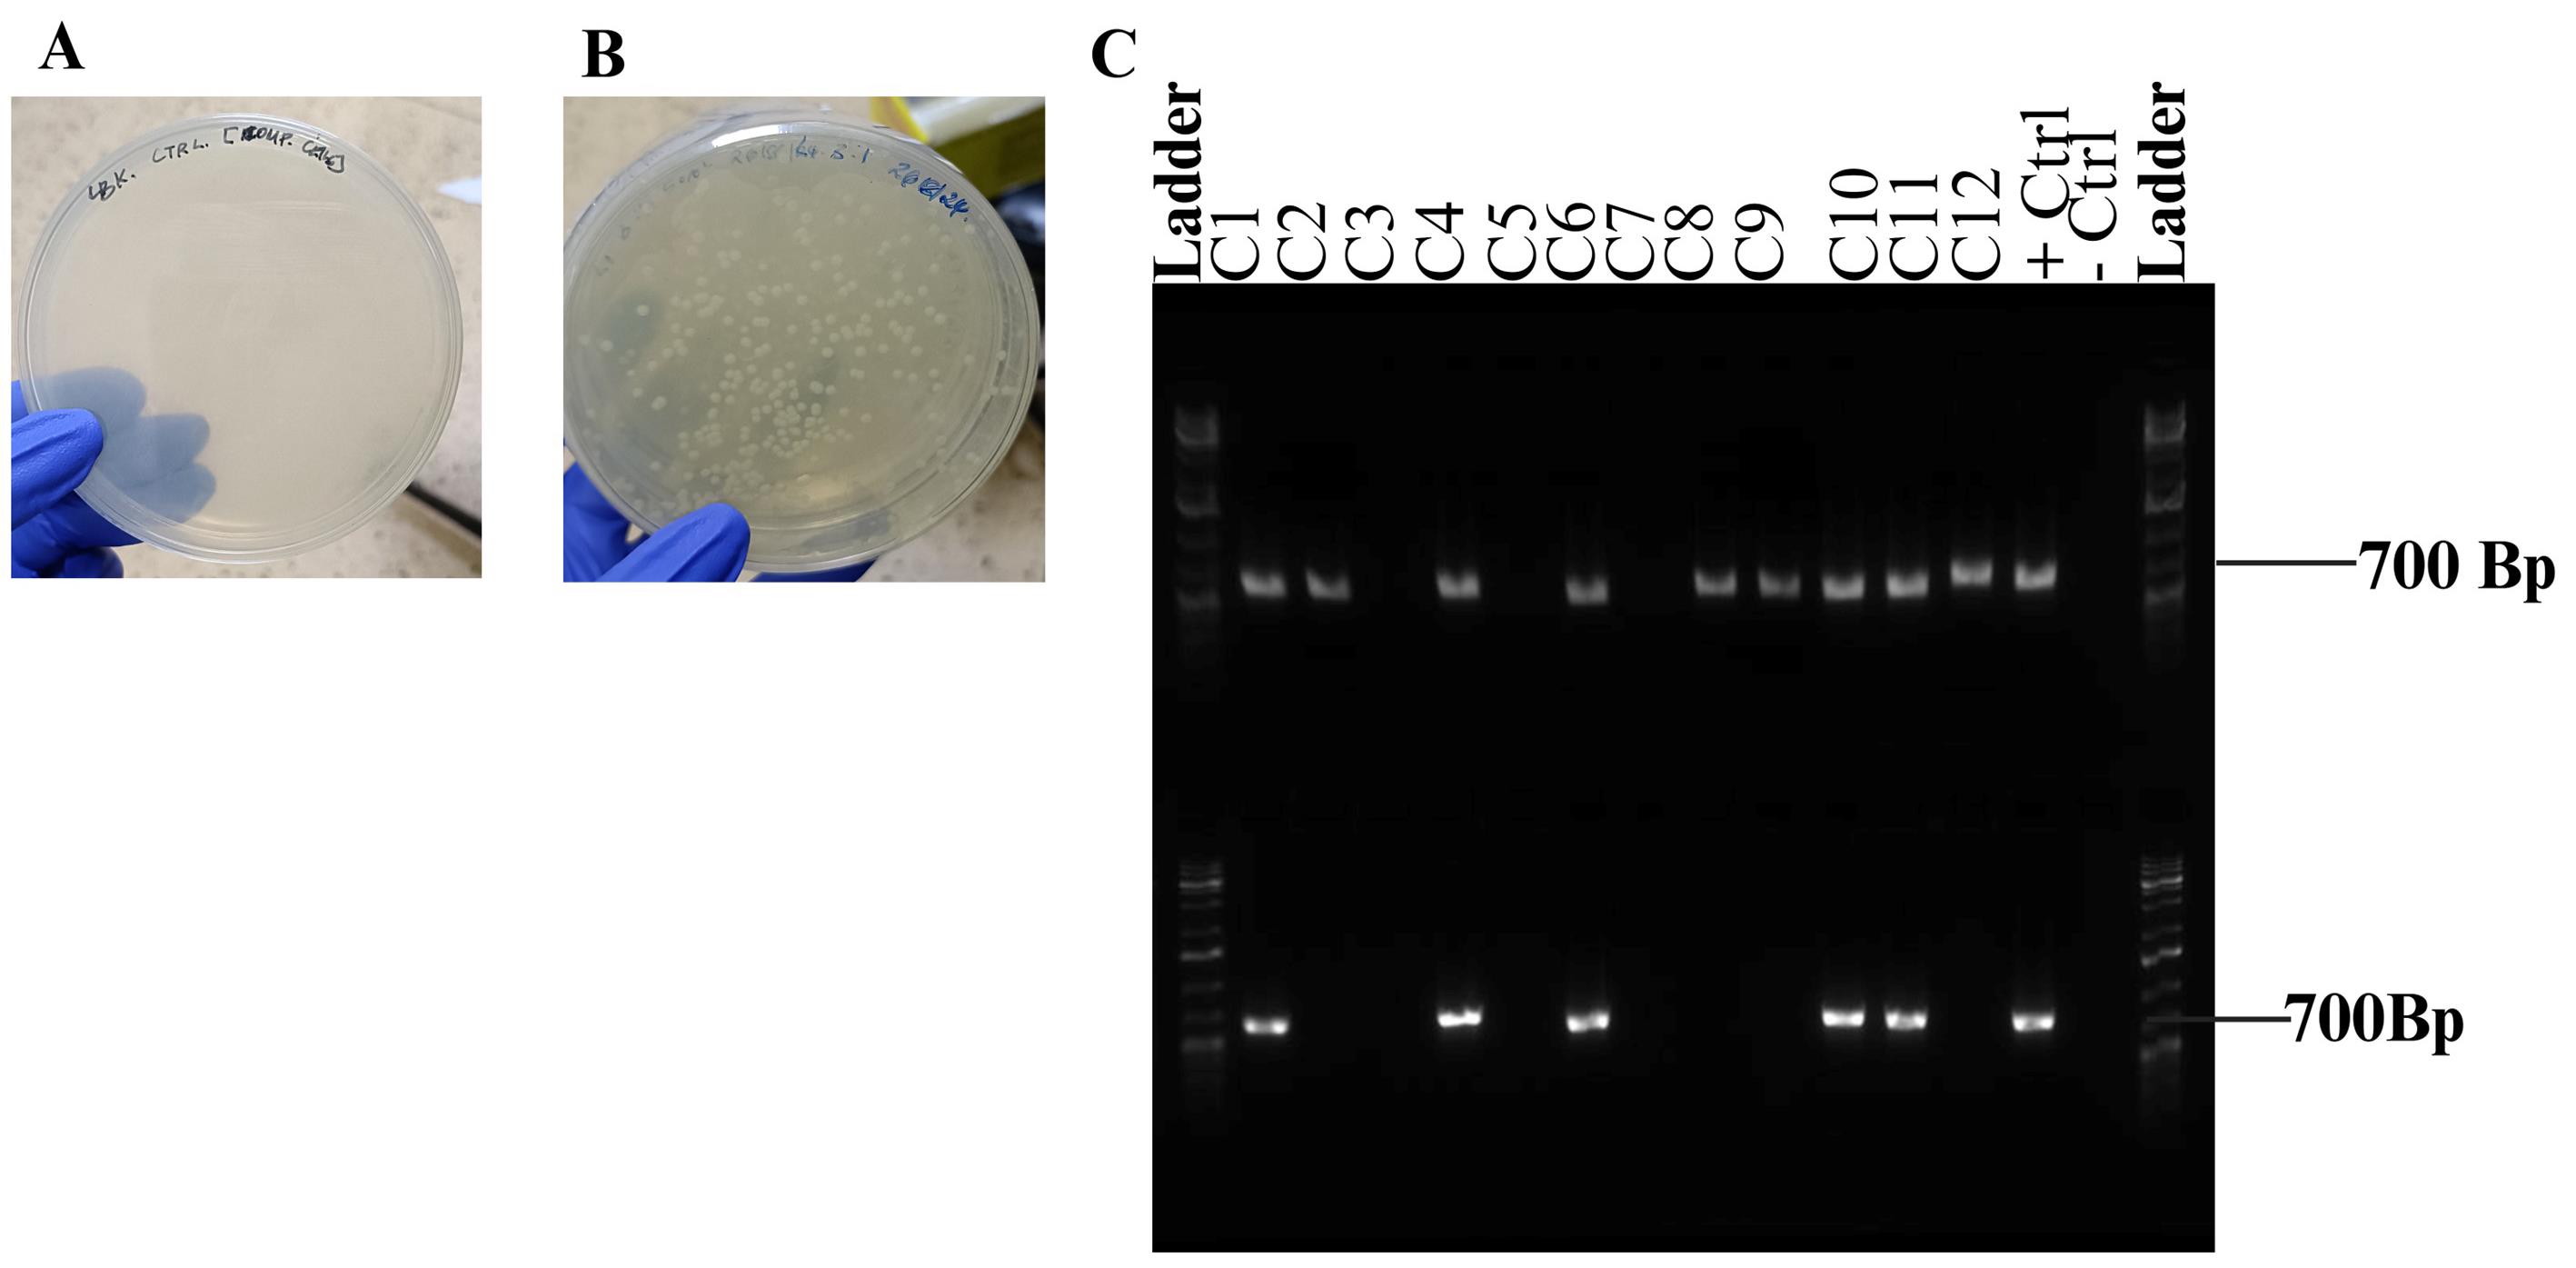
Figure 7. Successful restriction cloning of gene of interest into pKTol2C-EGFP transposon vector. (A) Negative control; (B) Positive transformants on LB-Kan; (C) Gel image showing colony PCR (top) and directional PCR (bottom).
7. Plasmid isolation and restriction digest of pKTol2C-GOI-EGFP transposon recombinant vector
a. Colonies that test positive for both insert ligation and orientation by colony PCR are selected.
b. Each selected colony is inoculated into 20 mL of LB broth containing kanamycin (50 µg/mL) and incubated overnight at 37 °C on a rotary shaker.
c. The overnight culture is centrifuged at 9,000× g for 10 min at room temperature.
d. The supernatant is poured out, and the plasmid DNA is isolated using the GeneJET Plasmid Miniprep Kit (Figure 5).
e. A restriction digestion is set up as in Table 6 to confirm the successful ligation of the insert.
f. The digested product is analyzed by electrophoresis on a 1% agarose gel at 100 V for 1 h to check for expected band patterns. See Figure 8.
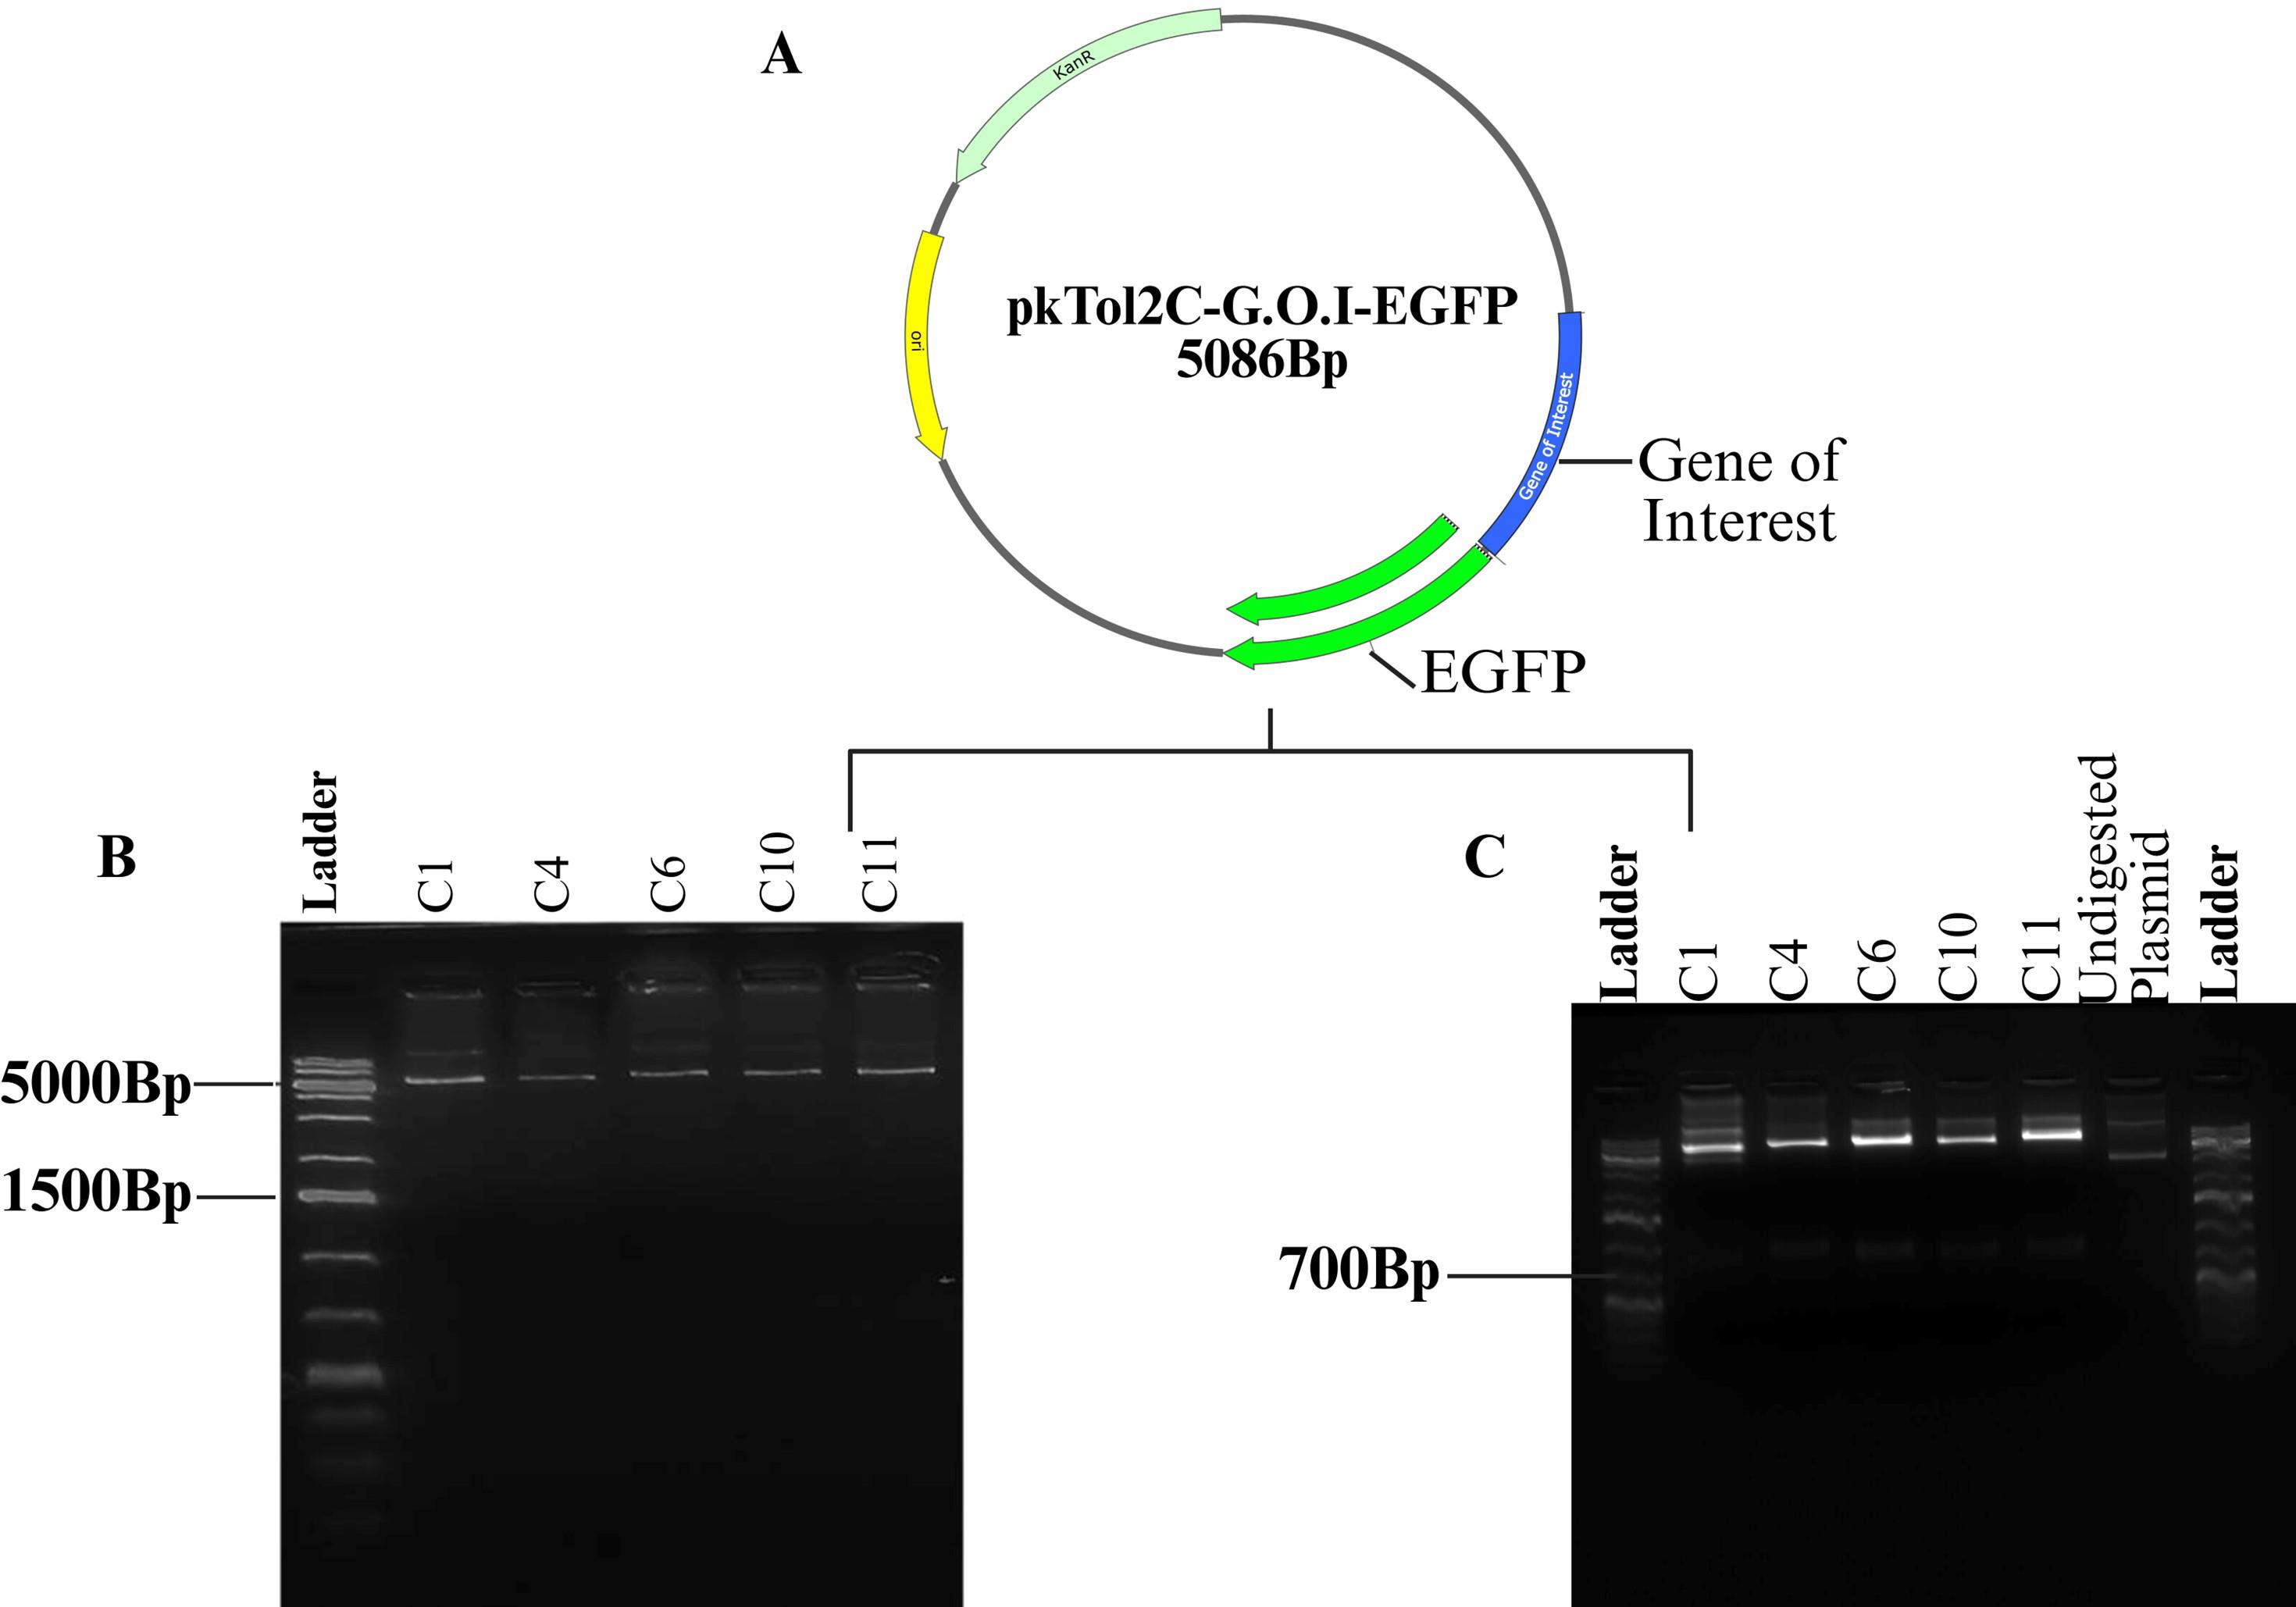
Figure 8. Plasmid isolation and restriction digest of pKTol2C-G.O.I-EGFP transposon construct. (A) Recombinant pKTol2C-G.O.I-EGFP construct. (B) Plasmid isolation. (C) EcoRI digest releasing the Gene insert.
Note: Colony PCR and restriction digestion are used as validation steps to confirm the successful ligation of the insert into the vector, resulting in the generation of the pKTol2C-GOI-EGFP recombinant vector. Plasmid constructs that test positive by both colony PCR and restriction digest can be sent for sequencing as a final verification step prior to microinjection into chicken embryos.
Data analysis
Strict quality control procedures were used in this protocol's gene preparation. To verify the gene's identity after PCR amplification, the PCR product was sent for sequencing. To guarantee that the right gene is cloned, this step is essential. The number of transformant colonies that grew on selective media supplemented with spectinomycin for Topo vector and kanamycin for destination vector was one of the data points gathered from transformation experiments. The TOPO cloning approach relied on both colony PCR and restriction digest as validation checks to verify the successful ligation of the gene. As a visual indicator of successful transformation, only distinct colonies from clear LB agar plates were taken into consideration for additional analysis. Two PCR validation stages were carried out in restriction-based cloning: insert screening PCR and directional PCR to confirm the insert's orientation. Restriction digest analysis served as an additional confirmation step for the presence of the insert. In the transformation experiments, if the negative controls, which are used to identify contamination, showed signs of colony growth, the plates were not included in the analysis. Similarly, samples of plasmid DNA that were deemed low quality (defined as having an A260/A280 ratio that was not between 1.8 and 2.0) were not processed further.
Validation of protocol
DNA isolation and PCR amplification were carried out in replicates. The resulting PCR product was sequenced using Sanger sequencing to verify the target gene identity before cloning. All cloning steps were carried out in triplicate to ensure precision. Colonies of transformants were screened using colony PCR and then confirmed by restriction digestion in TOPO cloning; only colonies that tested positive in both tests were chosen for further use. Three layers of validation were used in restriction cloning: first, colony PCR with insert-specific primers to check for the gene, then directional PCR with a forward vector primer (p-CAG-F) and a reverse insert primer to verify proper orientation, and finally, EcoRI restriction digestion to release the insert. Plasmid isolation and final validation by Sanger sequencing were only performed on colonies that passed all three checks. The transformation efficiency of the pKTol2C-GOI-EGFP recombinant vector was determined using the formula described by Liu et al. [24]. The calculated transformation efficiency was approximately 14,400 CFUs/µg, which falls within the expected and acceptable range for restriction-ligation cloning protocols using standard chemically competent E. coli cells [25]. The bacterial transformation method described in this protocol has been used and validated by Chang et al. [26] in the preparation of calcium-competent Escherichia coli and heat-shock transformation.
Tol2-based constructs have proven to be effective at integrating the genome and exhibiting consistent transgene expression in avian systems. In chicken embryonic cells, Sato et al. [12] confirmed successful integration by reporting stable retention of EGFP transgene expression in approximately 40% of transfected cells. Additionally, Tyack et al. [13] demonstrated that Tol2 constructs facilitate germline transmission by achieving stable transgene inheritance in G1 progeny. These studies demonstrate that Tol2 constructs have the ability to produce transgenic birds capable of naturally passing the transgene to their offspring without the need for further genomic manipulation.
General notes and troubleshooting
General notes
1. DNA isolation: The anticoagulant used in this study is EDTA-anticoagulated fresh blood. In case of delays in processing, store the blood vials at -20 °C to prevent poor DNA quality. While this protocol is used for DNA isolation from blood, it can also be adapted for DNA isolation from soft animal tissues.
2. PCR design: Primers described in this protocol have been identified from the literature. However, for your target gene, you can use primer design software such as Primer3 to design primers and run a virtual PCR on SnapGene or https://www.bioinformatics.org/sms2/pcr_products.html to validate the primers.
3. PCR setup: Ensure that primer concentrations are maintained within the recommended range of 0.1–0.5 μM, depending on the specific polymerase used. Using primers at excessively high concentrations may lead to the formation of primer dimers or nonspecific amplification.
4. Restriction enzyme selection: Prior to cloning, it is essential to perform a restriction map of the gene of interest to ensure that the chosen restriction enzymes do not cut within the gene sequence. Online tools such as restrictionmapper.org can be used for this purpose. Additionally, review the multiple cloning site (MCS) of the vector you intend to use to confirm compatibility with your selected enzymes. Vector maps used in this study are provided in the supplementary information.
5. Cloning preparations: Before cloning, it is important to test your E. coli cells against the antibiotic available in the lab. This ensures that the antibiotic is still effective and that selection for transformants will be successful after transformation.
6. Ligation temperature: To maintain temperatures for ligation and avoid room temperature variation, you can set the thermocycler to the recommended ligation temperature: 24 °C for Topo and 16 °C for T4 ligase. This helps maintain consistency in the ligation process.
7. Validation of ligation: As an additional validation check for T4 ligation, you can run a quick gel check prior to transformation to confirm ligation success. This can help ensure that the insert is ligated into the vector before proceeding to transformation.
8. Transformants’ growth: Transformant cells may sometimes grow slowly and require 24–48 h for visible colony growth. Ensure that you do not discard the plates too early, as slow-growing colonies can still be viable and successful transformants.
Troubleshooting
Problem 1: Poor yield or no DNA yield after PCIA isolation.
Possible cause: Low starting material, inefficient cell lysis, or loss of DNA pellet during wash steps.
Solution: Start with a minimum of 200 μL of blood. Ensure a 1:1 ratio of SDS lysis buffer to sample and use freshly prepared lysis buffer with active Proteinase K. Incubate adequately for complete lysis. During ethanol washes, mark the tube to locate the DNA pellet and carefully decant without disturbing the pellet.
Problem 2: Poor A260/A280 or 260/230 ratio.
Possible cause: Carryover of organic extraction reagents due to inadequate washing.
Solution: Perform at least two washes with 70% ethanol. Allow complete air-drying of the DNA pellet to prevent ethanol carryover.
Problem 3: No PCR product after amplification.
Possible cause: Incorrect annealing temperature, missing PCR components (e.g., Taq), or poor-quality DNA.
Solution: Use a gradient PCR to optimize annealing temperature. Confirm the addition of all PCR components, including DNA polymerase. Start with 50 ng of DNA template per reaction. Include a housekeeping gene or a known positive control to validate the PCR setup.
Problem 4: Primer-dimers.
Possible cause: High primer concentration, inappropriate annealing temperature, and excess magnesium ion concentration.
Solution: Use gradient PCR to determine the best annealing temperature. Lower the primer concentration to the recommended concentration of 0.1–0.5 µM depending on your polymerase. Do PCR post purification procedures such as gel purification to remove any dimers before downstream applications.
Problem 5: No colonies after TOPO transformation.
Possible cause: Failed ligation, incorrect antibiotic concentration, or improper heat shock.
Solution: Strictly follow recommended ligation volumes and conditions, using a thermocycler set at 24 °C. Confirm the correct antibiotic and its concentration in selective media. Maintain 30 s heat shock at 42 °C and allow at least 1 h recovery in SOC medium before plating.
Problem 6: No colonies after restriction cloning.
Possible cause: Unsuccessful ligation due to expired ligase, degraded ligation buffer (lacking ATP), incorrect insert-to-vector ratio, or improper antibiotic selection.
Solution: Use fresh, active T4 ligase and buffer; supplement buffer with ATP if needed. Use online tools (e.g., NEBioCalculator) to calculate correct insert-to-vector ratios. Dephosphorylate the vector to prevent self-ligation. Set the thermocycler to 16 °C for overnight ligation and ensure the correct antibiotic is used during plating.
Problem 7: Low transformation efficiency.
Possible cause: Poor-quality or degraded plasmid or insert DNA, suboptimal insert-to-vector ratio, improper storage/handling of competent E. coli cells, and use of too much DNA, which can be toxic to cells.
Solution: Verify the concentration of plasmid and insert DNA prior to ligation procedures to avoid too low or excess DNA. Use freshly prepared or commercially validated high-efficiency competent cells. Purify DNA to remove inhibitory contaminants such as salts or ethanol before ligation procedures. Use 10 pg to 100 ng of plasmid DNA per transformation to avoid overloading the cells.
Problem 8: Failed restriction digestion.
Possible cause: Expired enzyme, incorrect buffer or incubation conditions, excessive template or enzyme volume (leading to star activity).
Solution: Use freshly supplied enzymes with compatible buffers from the same manufacturer. Quantify DNA to adjust the enzyme amount properly. Do not exceed 10% of the total reaction volume with enzyme. Follow enzyme-specific incubation temperature and time.
Supplementary information
The following supporting information can be downloaded here:
Figure S1. Annotated Map of the TOPO Cloning Vector Highlighting Key Features
Figure S2. pKTol2C-EGFP Vector Map with Annotated Features
Figure S3. Schematic Representation and Key Residue Positions of Functional Domains in the Chicken TVB Receptor.
Acknowledgments
Conceptualization, P.K., N.O., J.N.; Investigation, P.K., N.O.; Writing—Original Draft, P.K., J.M.M.; Writing—Review & Editing, P.K., N.O., J.M.M.; Funding acquisition, J.N., N.O., P.N., Y.P.; Supervision, J.N., P.N., J.M.M. Funding sources: This study was supported by the National Research Fund Kenya under grant GRNT-CALL-2022-00001 as part of the PAMOJA PHC Grant Call. Plasmid pKTol2C-EGFP used in this study was a gift from Karl Clark & Scott Fahrenkrug (Addgene plasmid #85600; http://n2t.net/addgene:85600; RRID: Addgene_85600). The transformation protocol used in this study was modified from Chang et al. [26]. The scientific illustrations in this manuscript were created using BioRender.com. Finally, the authors express their gratitude to the Plant Transformation Laboratory at Kenyatta University for offering both space and resources to carry out this research.
Figure 1 was created in BioRender.com – https://BioRender.com/bl0okdx; Figure 2 was created in BioRender.com – https://BioRender.com/hpufygr; Figure 3 was created BioRender.com – https://BioRender.com/zn5nsa8; Figure 4 was created in Biorender.com – https://BioRender.com/igfudy1; Figure 5 was created in BioRender.com: https://BioRender.com/d94hbk0; Figure 6 was created in BioRender.com – https://BioRender.com/oarslks; Figure 7 was created in Biorender.com: https://BioRender.com/ w5572eh; Figure 8 was created in Biorender.com: https://BioRender.com/91pzogz.
Competing interests
The authors declare no conflicts of interest.
Ethical considerations
The use of indigenous chickens in this study was approved by the Kenyatta University Institutional Animal Care and Use Committee (IACUC), approval number KU/ACUC/COND.APPROVAL/VOL.1/016.
References
- Gul, H., Habib, G., Khan, I. M., Rahman, S. U., Khan, N. M., Wang, H., Khan, N. U. and Liu, Y. (2022). Genetic resilience in chickens against bacterial, viral and protozoal pathogens. Front Vet Sci. 9: e1032983. https://doi.org/10.3389/fvets.2022.1032983
- Bednarczyk, M., Kozłowska, I., Łakota, P., Szczerba, A., Stadnicka, K. and Kuwana, T. (2018). Generation of transgenic chickens by the non-viral, cell-based method: effectiveness of some elements of this strategy. J Appl Genet. 59(1): 81–89. https://doi.org/10.1007/s13353-018-0429-6
- Semple-Rowland, S. L. and Berry, J. (2014). Use of lentiviral vectors to deliver and express bicistronic transgenes in developing chicken embryos. Methods. 66(3): 466–473. https://doi.org/10.1016/j.ymeth.2013.06.026
- Nishijima, K. and Iijima, S. (2012). Transgenic chickens. Dev Growth Differ. 55(1): 207–216. https://doi.org/10.1111/dgd.12032
- Park, T. S. and Han, J. Y. (2012). piggyBac transposition into primordial germ cells is an efficient tool for transgenesis in chickens. Proc Natl Acad Sci USA. 109(24): 9337–9341. https://doi.org/10.1073/pnas.1203823109
- Bahrami, S., Amiri-Yekta, A., Daneshipour, A., Jazayeri, S. H., Mozdziak, P. E., Sanati, M. H. and Gourabi, H. (2020). Designing A Transgenic Chicken: Applying New Approaches toward A Promising Bioreactor. Cell. 22(2): 133–139. https://doi.org/10.22074/cellj.2020.6738
- Li, J. J. and Lu, L. Z. (2010). Recent progress on technologies and applications of transgenic poultry. Afr J Biotechnol. 9(24): 3481–3488. https://www.ajol.info/index.php/ajb/article/view/82344
- Mathan, Zaib, G., Jin, K., Zuo, Q., Habib, M., Zhang, Y. and Li, B. (2023). Formation, Application, and Significance of Chicken Primordial Germ Cells: A Review. Animals. 13(6): 1096. https://doi.org/10.3390/ani13061096
- Katter, K., Geurts, A. M., Hoffmann, O., Mátés, L., Landa, V., Hiripi, L., Moreno, C., Lazar, J., Bashir, S., Zidek, V., et al. (2012). Transposon‐mediated transgenesis, transgenic rescue, and tissue‐specific gene expression in rodents and rabbits. FASEB J. 27(3): 930–941. https://doi.org/10.1096/fj.12-205526
- Kwon, D. H., Gim, G. M., Eom, K. H., Lee, J. H. and Jang, G. (2022). Application of transposon systems in the transgenesis of bovine somatic and germ cells. BMC Vet Res. 18(1): e1186/s12917–022–03252–1. https://doi.org/10.1186/s12917-022-03252-1
- Kawakami, K. (2007). Tol2: a versatile gene transfer vector in vertebrates. Genome Biol. 8: S7. https://doi.org/10.1186/gb-2007-8-s1-s7
- Sato, Y., Kasai, T., Nakagawa, S., Tanabe, K., Watanabe, T., Kawakami, K. and Takahashi, Y. (2007). Stable integration and conditional expression of electroporated transgenes in chicken embryos. Dev Biol. 305(2): 616–624. https://doi.org/10.1016/j.ydbio.2007.01.043
- Tyack, S. G., Jenkins, K. A., O’Neil, T. E., Wise, T. G., Morris, K. R., Bruce, M. P., McLeod, S., Wade, A. J., McKay, J., Moore, R. J., et al. (2013). A new method for producing transgenic birds via direct in vivo transfection of primordial germ cells. Transgenic Res. 22(6): 1257–1264. https://doi.org/10.1007/s11248-013-9727-2
- Li, M. A., Turner, D. J., Ning, Z., Yusa, K., Liang, Q., Eckert, S., Rad, L., Fitzgerald, T. W., Craig, N. L., Bradley, A., et al. (2011). Mobilization of giant piggyBac transposons in the mouse genome. Nucleic Acids Res. 39(22): e148–e148. https://doi.org/10.1093/nar/gkr764
- Kim, S. W., Lee, J. H., Han, J. S., Shin, S. P. and Park, T. S. (2021). piggyBac Transposition and the Expression of Human Cystatin C in Transgenic Chickens. Animals. 11(6): 1554. https://doi.org/10.3390/ani11061554
- Patel, B. (2009). Simple, Fast, and Efficient Cloning of PCR Products with TOPO® Cloning Vectors. Biotechniques. 46(7): 559–559. https://doi.org/10.2144/000113200
- Tanaka, Y., Kimura, T., Hikino, K., Goto, S., Nishimura, M., Mano, S. and Nakagaw, T. (2012). Gateway Vectors for Plant Genetic Engineering: Overview of Plant Vectors, Application for Bimolecular Fluorescence Complementation (BiFC) and Multigene Construction. Genetic Engineering - Basics, New Applications and Responsibilities : e5772/32009. https://doi.org/10.5772/32009
- Clark, D. P., Pazdernik, N. J. and McGehee, M. R. (2019). Cloning Genes for Synthetic Biology. Mol Biol. 199–239. https://doi.org/10.1016/b978-0-12-813288-3.00007-0
- Clark, D. P., Pazdernik, N. J. and McGehee, M. R. (2019). Cloning Genes for Synthetic Biology. Mol Biol. 199–239. https://doi.org/10.1016/b978-0-12-813288-3.00007-0
- Invitrogen. (2012). Five-minute, TOPO cloning of Taq polymerase-amplified PCR products into an entry vector for the Gateway system (Catalog No. K2520-20) [PDF]. Thermo Fisher Scientific. https://assets.thermofisher.com/TFS-Assets/LSG/manuals/pcr8gwtopo_man.pdf
- Addgene. (2025). Addgene pKTol2C-EGFP - Sequence Analyzer. Addgene.org. https://www.addgene.org/browse/sequence/165953/
- Clark, K. J., Carlson, D. F., Foster, L. K., Kong, B. W., Foster, D. N. and Fahrenkrug, S. C. (2007). Enzymatic engineering of the porcine genome with transposons and recombinases. BMC Biotech. 7(1): e1186/1472–6750–7–42. https://doi.org/10.1186/1472-6750-7-42
- Li, X., Chen, W., Zhang, H., Li, A., Shu, D., Li, H., Dai, Z., Yan, Y., Zhang, X., Lin, W., et al. (2018). Naturally Occurring Frameshift Mutations in thetvbReceptor Gene Are Responsible for Decreased Susceptibility of Chicken to Infection with Avian Leukosis Virus Subgroups B, D, and E. J Virol. 92(8): e01770–17. https://doi.org/10.1128/jvi.01770-17
- Liu, J., Chang, W., Pan, L., Liu, X., Su, L., Zhang, W., Li, Q. and Zheng, Y. (2018). An Improved Method of Preparing High Efficiency Transformation Escherichia coli with Both Plasmids and Larger DNA Fragments. Indian J Microbiol. 58(4): 448–456. https://doi.org/10.1007/s12088-018-0743-z
- Ma, X., Liang, X. and Huo, Y. X. (2019). Developing a Transformation-Independent and Unbiased qPCR Assay to Rapidly Evaluate the Determinants of DNA Assembly Efficiency. Engineering. 5(4): 803–810. https://doi.org/10.1016/j.eng.2019.06.002
- Chang, A. Y., Chau, V., Landas, J. A. and Pang, Y. (2017). Preparation of calcium competent Escherichia coli and heat-shock transformation. JEMI methods. 1(22–25).
- Fandiño, S., Gomez-Lucia, E., Benítez, L. and Doménech, A. (2023). Avian Leukosis: Will We Be Able to Get Rid of It? Animals 13(14): 2358. https://doi.org/10.3390/ani13142358
- Federspiel, M. J. (2019). Reverse Engineering Provides Insights on the Evolution of Subgroups A to E Avian Sarcoma and Leukosis Virus Receptor Specificity. Viruses. 11(6): 497. https://doi.org/10.3390/v11060497
Article Information
Publication history
Received: May 16, 2025
Accepted: Jul 11, 2025
Available online: Jul 24, 2025
Published: Aug 20, 2025
Copyright
© 2025 The Author(s); This is an open access article under the CC BY-NC license (https://creativecommons.org/licenses/by-nc/4.0/).
How to cite
Kirimi, P., Okumu, N., Maingi, J. M., Ngeranwa, J., Nyaga, P. and Binepal, Y. (2025). A Simple and Adaptable Method for Cloning Genes Into Transposon Vectors Using Topo and Restriction Systems for Chicken Embryo Transgenesis. Bio-protocol 15(16): e5416. DOI: 10.21769/BioProtoc.5416.
Category
Molecular Biology > DNA > DNA cloning
Microbiology > Heterologous expression system
Do you have any questions about this protocol?
Post your question to gather feedback from the community. We will also invite the authors of this article to respond.