- Protocols

- Articles and Issues
- For Authors
- About
- Become a Reviewer

Dissecting the Mechanical Control of Mitotic Entry Using a Cell Confinement Setup
Published: Vol 14, Iss 6, Mar 20, 2024 DOI: 10.21769/BioProtoc.4959 Views: 2749
Reviewed by: Rajesh RanjanSevgi OnalAnkur GargAnonymous reviewer(s)
Original research article
The authors used this protocol in:

Oct 2022
Advertisement


Protocol Collections
Comprehensive collections of detailed, peer-reviewed protocols focusing on specific topics


Abstract
Proliferating cells need to cope with extensive cytoskeletal and nuclear remodeling as they prepare to divide. These events are tightly regulated by the nuclear translocation of the cyclin B1-CDK1 complex, that is partly dependent on nuclear tension. Standard experimental approaches do not allow the manipulation of forces acting on cells in a time-resolved manner. Here, we describe a protocol that enables dynamic mechanical manipulation of single cells with high spatial and temporal resolution and its application in the context of cell division. In addition, we also outline a method for the manipulation of substrate stiffness using polyacrylamide hydrogels. Finally, we describe a static cell confinement setup, which can be used to study the impact of prolonged mechanical stimulation in populations of cells.
Key features
• Protocol for microfabrication of confinement devices.
• Single-cell dynamic confinement coupled with high-resolution microscopy.
• Static cell confinement protocol that can be combined with super-resolution STED microscopy.
• Analysis of the mechanical control of mitotic entry in a time-resolved manner.
Graphical overview

Background
As proliferating cells prepare to enter mitosis, they undergo a series of biochemical and morphological changes that contribute to the assembly of the mitotic machinery and the efficiency of chromosome segregation [1]. Many of these changes are regulated by the activity and subcellular localization of the cyclin B1-CDK1 complex [2,3]. Notably, nuclear translocation of cyclin B1 seems to be essential to ensure full activity of the complex, as it stimulates its own nuclear import [3] through the nuclear pore complexes, triggering a positive feedback mechanism [4]. While the biochemical pathways that regulate the activity and localization of the cyclin B1-CDK1 complex have been well established [5], the contribution of mechanical forces to these processes remained unknown. We have recently identified a tension-dependent signal on the prophase nucleus that fine-tunes cyclin B1 translocation across the nuclear pores, setting the time for mitotic entry [6]. We further show that this signal relies on actomyosin contractility that leads to an unfolding of the nucleus and increased tension on the nuclear envelope (NE). Overall, we propose that mechanical forces are an important contributor for mitotic entry.
Here, we describe a protocol that enables the mechanical manipulation of cells during mitotic entry with high temporal and spatial resolution in single cells undergoing mitosis. This method allows the implementation of cell confinement techniques [7] in combination with high- (spinning-disk) and super-resolution (STED) microscopy to probe how mitotic entry is mechanically regulated. We provide step-by-step instructions on cell seeding, preparation of the confinement slides, assembly of the confinement devices, live-cell imaging, and data analysis. Moreover, we explain how to generate coverslips coated with polyacrylamide (PAA) hydrogels of calibrated stiffness that can be used in combination with high-resolution spinning-disk live-cell imaging. Finally, we describe an experimental setup that allows the long-term confinement of cell populations for fixed-cell immunofluorescence analysis. While these are used in the context of cell division, these methods could be easily adapted to other experimental settings.
Materials and reagents
Biological materials
RPE-1 parental cell line, already available in the lab
RPE-1 expressing endogenously tagged with H2B-GFP and tubulin mRFP, already available in the lab
RPE-1 cell line expressing exogenous cyclinB1-Venus (gift from Jonathon Pines)
RPE-1 cell line expressing cyclinB1-Venus/tubulin-mRFP, generated in our lab by transduction with lentiviral vectors containing pRRL-mRFP-α-tubulin
shRNAi-ROCK1-LV to deplete ROCK1 (gift from João Relvas)
RPE-1 cell line expressing exogenous cGAS-GFP (gift from Matthieu Piel)
RPE-1 cell line expressing GFP-NLS/tubulin-mRFP, created by lentiviral transduction using a pCDJ-NLS-copGFP-EF1-BlastiS plasmid (Addgene, catalog number: 132772)
RPE-1 cell lines expressing exogenous LBR-mCherry and endogenous cyclinB1-Venus/LBR-mCherry, generated by lentiviral transfection using a plasmid pWPT LBR-mCherry (gift from Stephen Royle)
DN-KASH plasmid (gift from Edgar Gomes)
Rap1Q63E plasmid (gift from Jean de Gunzburg)
Reagents
RO-3306 (Santa Cruz Biotechnology, catalog number: sc-358700A), used at 9 mM for 16 h
Importazole (gift from Helder Maiato), used at 40 mM for 2 h
Y-37632 (Sigma-Aldrich, catalog number: Y0503), used at 5 mM for 30 min
AACOCF3 (TOCRIS, catalog number: 1462), used at 20 μM for 30 min
BAPTA-AM (Abcam, catalog number: ab120503), used at 10 μM for 15 min
2APB (Abcam, catalog number: ab120124), used at 10 μM for 30 min
Para-nitro-blebbistatin (MotorPharma, catalog number: 1621326-32-6), used at 50 μM for 30 min
ML-7 (Merck, catalog number: I2764), used at 50 μM for 30 min
Cytochalasin D (Biogen Cientifica, catalog number: TO-1233), used at 0.5 μM for 30 min
Nocodazole (Merck, catalog number: M1404), used at 3.3 μM for 30 min
BI2536 (Axon Med Chem, catalog number: AXON 1129), used at 200 mM for 2 h
Etoposide (Selleck Chemicals CO., catalog number: S1225), used at 1 μM for 2 h
Thymidine (Sigma-Aldrich, catalog number: T1895), used at 2 mM for 16 h followed by a 10 h release
Dimethyl sulfoxide (DMSO) (Sigma-Aldrich, catalog number: D4540)
Lipofectamine 2000 (Invitrogen, catalog number: 11668019)
Lipofectamine RNAiMAX (Invitrogen, catalog number: 13778150)
Dulbecco’s Modified Eagle Medium (DMEM) (Corning, catalog number: 10-013-CV)
Fetal bovine serum (FBS) (Gibco, catalog number: 11550356)
Fibronectin (FBN) (Sigma, catalog number: F1141)
Leibovitz’s-L15 medium (Life Technologies, catalog number: 11415064)
Antibiotic-Antimycotic 100× (Life Technologies, catalog number: 15240096)
Bind-Silane (Sigma, catalog number: M6514)
Acetic acid (glacial) 100% (Merck, catalog number: 1.00063)
40% (w/v) acrylamide stock solution (Bio-Rad, catalog number: 1610140)
2% (w/v) bis-acrylamide stock solution (Bio-Rad, catalog number: 1610142)
PDMS crosslinker A + B (Momentive, catalog number: RTV615)
Isopropanol (Merck, catalog number: 1.09634)
dH2O
Trypsin (TrypLE Express Enzyme 1×) (Thermo Fisher Scientific, catalog number: 12605010)
Trypan Blue solution 0.4% (Gibco, catalog number: 15250061)
Sodium hydrogen carbonate (NaHCO3) (Sigma-Aldrich, catalog number: S6014)
Sodium chloride (NaCl) (Sigma-Aldrich, catalog number: 31434)
Potassium chloride (KCl) (Merck, catalog number: 1.04936)
Dissodium hydrogen phosphate (Na2HPO4) (Merck, catalog number: 1.06586)
Potassium dihydrogen phosphate (KH2PO4) (Merck, catalog number: 1.04873)
Absolute ethanol (Sigma-Aldrich, catalog number: E7148)
Hydrochloric acid (HCl) 37% (Merck, catalog number: 1.00317)
Sodium hydroxide (NaOH) (Merck, catalog number: 1.06498)
Solutions (see note 1)
10% acetic acid (see Recipes)
Bind-silane solution (see Recipes)
Phosphate buffered saline (PBS) 10× (see note 2) (see Recipes)
Fibronectin (FBN) solution (see note 3) (see Recipes)
70% ethanol (see Recipes)
Recipes
10% acetic acid
Reagent Final concentration Quantity or Volume Acetic acid (glacial) 100% 10% (v/v) 10 mL Absolute ethanol n/a 90 mL Total n/a 100 mL Bind-silane solution
Reagent Final concentration Quantity or Volume Acetic acid 10% 5% 2.5 mL Bind silane 0.3% 15 μL Absolute ethanol n/a 2.485 mL Total n/a 5 mL Phosphate buffered saline (PBS) 10×
Reagent Final concentration Quantity or Volume NaCl 1.37 M 80 g KCl 0.027 M 2 g Na2HPO4 0.1 M 14.4 g KH2PO4 0.018 M 2.4 g H2O n/a Top up volume for 1 L Total n/a 1 L Fibronectin (FBN) solution
Reagent Final concentration Quantity or Volume FBN 25 mg/mL 25 mg NaHCO3 pH 8.6a 100 mM Top up volume for 1 mL Total n/a 1 mL a Dilute 84 mg of NaHCO3 (MW = 84.01 g/mol) in 10 mL of ddH2O and adjust the pH to 8.6. Store at room temperature.
Ethanol 70% solution
Reagent Final concentration Quantity or Volume Absolute ethanol 70% 700 mL dH2O n/a Top up volume for 1 L Total n/a 1 L
Laboratory supplies
FluoroDishes (WPI, catalog number: FD-35-100)
Round glass coverslips 10 mm thickness #1.5 (Fisher Scientific, catalog number: NC1272767)
Square glass coverslips 22 mm × 22 mm thickness #1.5 (Corning, catalog number: 2850-22)
Microfabricated coverslips with confining pillars
6-well cell culture plate (Corning, catalog number: CLS3516)
6-well static confiner (4DCell, catalog number: CSOW 620)
T25 cell culture flasks (Sarstedt, catalog number: 83.3910)
Scotch Magic tape (3M, catalog number: 8-1933)
Parafilm M (Fisher Scientific, catalog number: 10018130)
Scalpel blade or razor blade
Fine forceps (Fine Science Tools, catalog number: 11254-20)
SU-8 mold with micropillar design (either custom-designed or ordered from MesoBioTech, France)
Harris Uni-Core puncher (0.75 mm) (WPI, catalog number: 504529)
Disposable 5 mL sterile pipettes (nerbe plus, catalog number: 12-441-9105)
Disposable 10 mL sterile pipettes (nerbe plus, catalog number: 12-461-9108)
Disposable 50 mL centrifuge tubes (Corning, catalog number: 734-1868)
Disposable 15 mL centrifuge tubes (Corning, catalog number: 734-1812)
Cell counting slides (Bio-Rad, catalog number: 1450011)
Equipment
Temperature-controlled TE2000 microscope equipped with a modified Yokogawa CSU-X1 spinning-disk head (Yokogawa Electric), an electron multiplying iXon+ DU-897 EM-CCD camera (Andor), and a filter wheel (Nikon)
Immersion oil 60× 1.4NA Plan-Apo DIC objective (Nikon)
Dynamic cell confiner (adapted from Le Berre et al. [7])
AF-1 dual vacuum/pressure controller (Elveflow)
6-well confinement device (4DCell, France)
Low-pressure plasma cleaner (Zepto, Diener Electronics, Germany)
Centrifuge
Hot plate
pH meter
Electronic TC10TM/TC20TM cell counter device
Vacuum degasser (optional)
37 °C humidified CO2 (5%) incubator
Laminar flow hood
Software and datasets
NIS Elements AR software (Nikon)
ImageJ (version 1.54)
Custom-designed MATLAB algorithm for nuclear pore analysis (The MathWorks Inc, USA; v2018b)
Procedure
Preparation of cell confinement setup (see note 4)
Preparing the PDMS suction cup (Figure 1A)
Mix the PDMS crosslinker A with the PDMS crosslinker B in a 10/1 mixture (w/w).
Mix until it is homogenous and centrifuge (150× g) for 5 min to remove all air bubbles. Alternatively, degas the PDMS mixture in a vacuum degasser for 5 min.
Pour the mixture on top of the custom-made mold (design instructions obtained from Le Berre et al. [7]) and let it bake for 1 h on a hot plate at 80 °C.
Create a hole on the side of the PDMS suction cup using a Harris Uni-Core puncher (0.75 mm).
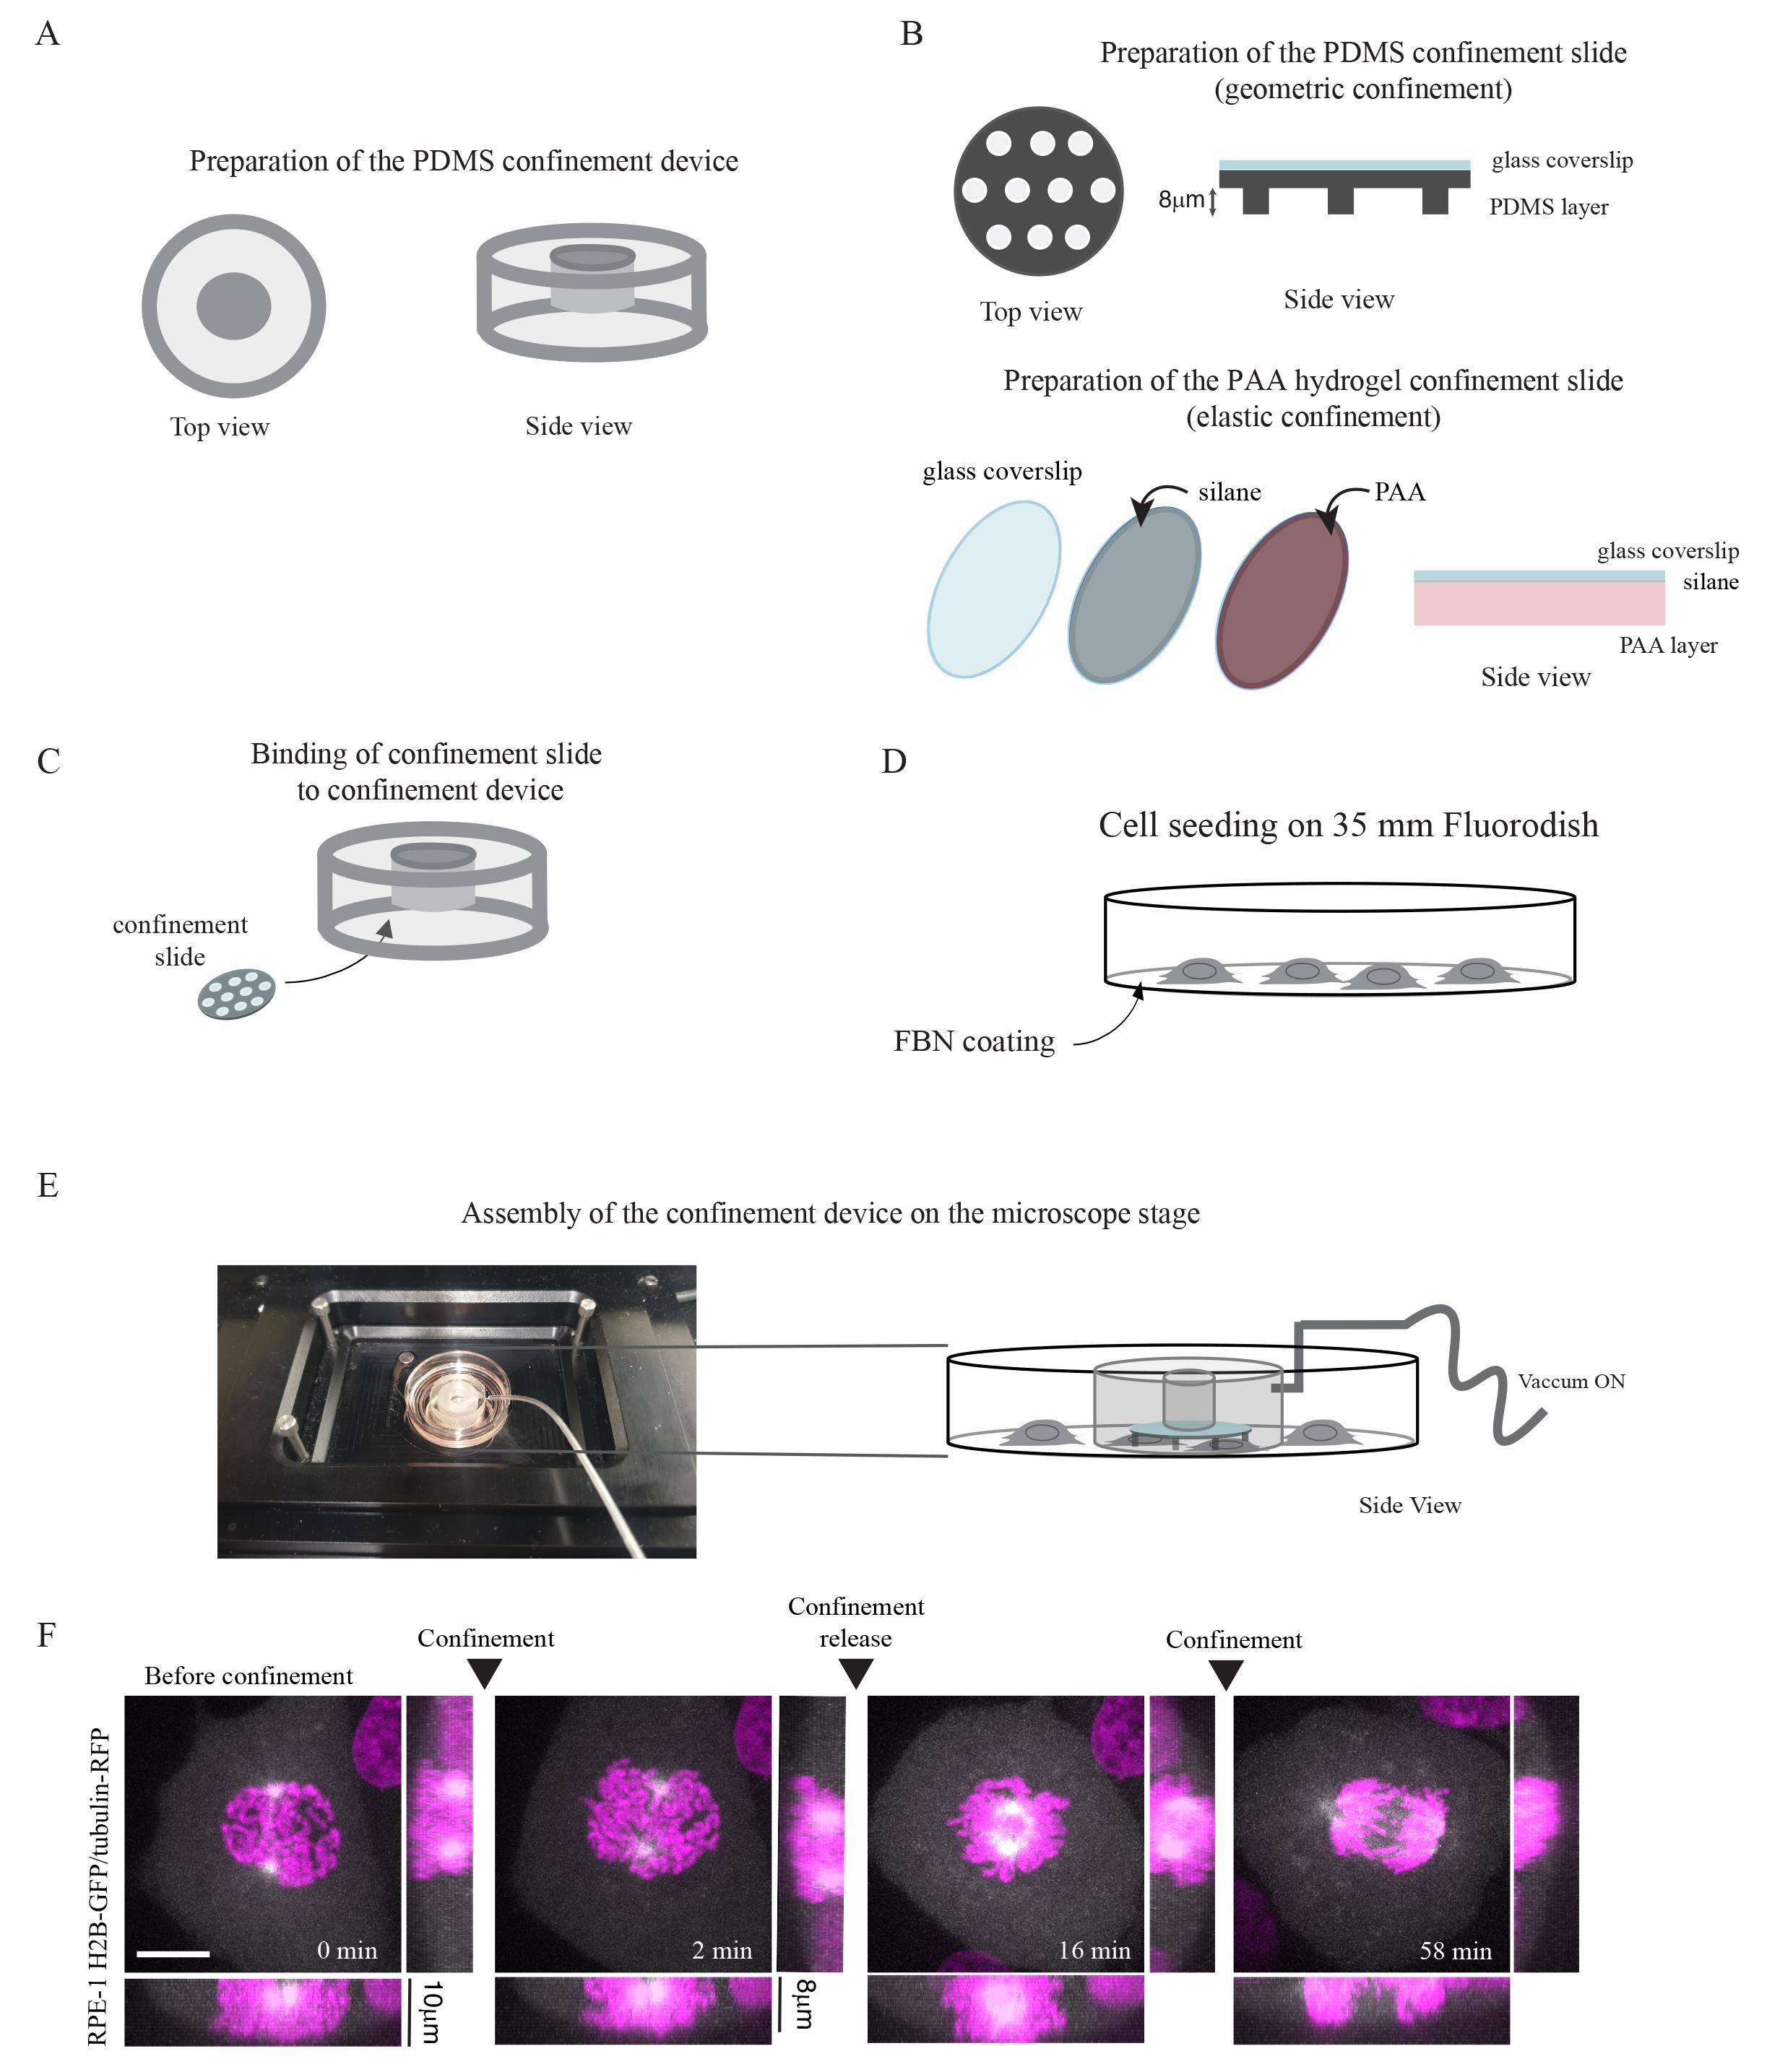
Figure 1. Overall workflow for preparation of a dynamic cell confinement setup. A. Prepare a PDMS suction cup using a mold (design instructions available from Le Berre et al. [7]). B. Prepare either a PDMS confinement slide for rigid confinement with the desired micropillar height or a polyacrylamide (PAA) confinement slide for elastic confinement. C. Bind confinement slide to the PDMS suction cup. D. Seed cells on a 35 mm dish, previously coated with fibronectin (FBN). E. Remove the lid of the 35 mm dish and assemble the confinement device on top of the dish. Turn on the vacuum pump to secure the confinement device in place and confine cells. F. Representative time-lapse images of a cell undergoing multiple rounds of dynamic compression during mitosis. Timelapse is 2 min and scale bar is 10 mm.Preparing the PDMS confinement slide for rigid confinement (Figure 1B)
Prepare a mix of PDMS with a crosslinker A/B mixture with a ratio of 10/1 (w/w).
Mix until it is homogenous and centrifuge (150× g) for 5 min to remove all air bubbles. Alternatively, degas the PDMS mixture in a vacuum degasser for 5 min.
Plasma-treat the 10 mm glass coverslips for 2 min. This step will activate one side of the coverslips and promote the binding of the glass with the PDMS layer in the next step.
Distribute drops of the PDMS mix on the SU-8 wafer mold with the micropillars of desired height (in this case, 8 μm) and place a coverslip on top of each drop, making sure the plasma-treated side is facing the PDMS. It is important to ensure a very thin layer of PDMS under the coverslips.
Bake the wafer with the coverslips on a hot plate at 95 °C for 15 min. Remove excess PDMS by washing with isopropanol and using a scalpel and forceps, being careful not to scratch the SU-8 mold.
Place a drop of isopropanol on the wafer next to the slides to peel off the confinement slides. Using a razor blade or scalpel, carefully lift the glass coverslips with the PDMS pillars (8 μm height) from the wafer.
Preparing the confinement slide with PAA hydrogels for elastic confinement (Figure 1B)
The confinement slides are prepared on 10 mm coverslips. The coverslips are initially treated with air plasma for 2 min using a plasma cleaner.
After cleaning, incubate the coverslips with a solution of 0.3% Bind-silane + 5% acetic acid in ethanol. Spread the mixture on top of the coverslips and make sure the entire surface of coverslip is covered in solution. Let the solution dry by evaporation.
Rinse the coverslips once with 70% ethanol and leave to dry again.
Prepare a gel mixture corresponding to approximately 15 kPa of stiffness. Full details are available in Le Berre et al. [7]. Place a drop of the mixture (25 μL) on a parafilm strip and place a silanized coverslip on top (silanized side facing the mixture). Allow the gel to polymerize.
Carefully lift the coverslip with the gel from the parafilm using a razor blade or scalpel, making sure the gel remains attached to the coverslip.
Hydrate gels with at least 1 mL of PBS for 5 min and then incubate with cell culture medium for at least 30 min (see notes 5 and 6).
Dynamic cell confinement
Seeding RPE-1 cells for confinement
Plasma-treat a fluorodish using the plasma cleaner (2 min air exposure).
Coat the clean fluorodish with 50–100 mL of FBN for at least 30 min. Gently rinse with 2 mL of dH2O.
Wash cells growing on a T25 flask with 5 mL of room-temperature PBS. Aspirate the PBS, add 2 mL of trypsin, and incubate the cells at 37 °C for 5 min (see notes 7, 8, and 9).
Resuspend cells by gently pipetting up and down, collect the cell suspension, and add 5 mL of fresh medium.
Determine the number of cells in your sample using an electronic cell counter. Calculate the volume of cell suspension needed for a recommended seeding density of 1.5 × 10⁵ cells per fluorodish.
Place the corresponding number of cells in the previously coated fluorodish (see note 10) and add 2 mL of cell culture medium supplemented with Antibiotic-Antimicotic (Figure 1D, E).
Let the cells grow overnight at 37 °C in a humidified incubator with 5% CO2.
Once RPE-1 cells are adherent and whenever necessary, transfections with the DN-KASH, Rap1Q63E, or shRNAi-ROCK1-LV plasmids are done using Lipofectamine2000 or Lipofectamine RNAiMAX, according to the manufacturer's instructions.
Using the dynamic cell confiner (Figure 1E, F)
Before imaging, change the medium of the RPE-1 cells to Leibovitz’s-L15 medium (500 μL, see note 11) supplemented with antibiotics. If using any of the drugs described in the Reagents section (Reagents 1–13) or their corresponding DMSO control, they should be added at this point and cells should be incubated for the corresponding time as described in the reagents list.
Carefully dry the back of the confinement slide with absorbing paper and attach it to the piston of the suction cup device. If the glass side of the confinement slide is not completely dry, it will not stick to the PDMS piston of the suction cup, causing it to detach during imaging.
Attach the PDMS suction cup to the vacuum generator apparatus and set the pressure to zero (see notes 12 and 13).
Place the 35 mm dish with the RPE-1 cells on the microscope. To start the experiment, carefully remove the lid of the fluorodish, place the suction cup on top of the fluorodish, and lower the pressure of the vacuum generator to -30 mbar until the suction cup is firmly attached to the bottom of the fluorodish, without compressing the cells.
Start imaging.
Lower the pressure on the vacuum generator until it reaches -100 mbar.
Confirm on the microscope if the cells remain in focus and compression is visible.
When adding drugs to the cells, slowly increase the pressure on the vacuum generator to allow the PDMS suction cup to detach.
Without removing the PDMS suction cup, add the drug to the imaging medium and mix carefully by gently pipetting up and down.
To compress cells again, decrease the pressure on the vacuum generator to -100 mbar.
Confinement can be modulated at any time by either decreasing or increasing the pressure on the vacuum line (see notes 12 and 13).
Static cell confiner
For static confinement experiments, we used a commercially available 6-well confinement device with custom-designed confinement slides (see note 4) that were prepared using 10 mm standard round microscope coverslips and designed with regular hole arrays (diameter 449 μm, 1 mm spacing), similar to what was published previously in Le Berre et al. [7].
Preparing the confinement slides
To prepare the confinement slides, use the same method outlined above in step A2 or A3, depending on whether you require rigid or elastic confinement, respectively.
Seeding cells for confinement
Plasma-treat a 6-well plate or 22 mm × 22 mm square coverslips with air plasma for 2 min, depending on your need.
Coat the 6-well plate or the coverslips with FBN (see note 10) and incubate at room temperature for at least 30 min. Rinse with dH2O.
If your experiment requires the use of 22 mm × 22 mm square coverslips, place one coverslip in each well of the 6-well plate using a fine forceps.
Wash cells with 5 mL of room-temperature PBS. Discard the PBS, add 2 mL of trypsin, and incubate the cells at 37 °C for 3–5 min (see notes 7, 9, and 14).
Add fresh DMEM medium supplemented with FBS, resuspend, and collect the cellular suspension.
Determine the number of cells in your sample using an electronic cell counter (see note 15). Calculate the volume of cell suspension needed for a recommended seeding density of 1.5 × 10⁵ cells per well.
Place the corresponding number of cells in the wells and add 2 mL of cell culture medium supplemented with antibiotics (see note 8).
Allow cells to adhere to the substrate at 37 °C in a humidified incubator with 5% CO2.
Assembly of the 6-well confinement device
Rinse the microfabricated confinement slide with 70% ethanol and air-dry with compressed air.
Clean the PDMS pistons supplied with the static confiner (4DCell, CSOW 620) with 70% ethanol. If the PDMS pistons have dust particles, remove them with Scotch Magic tape and rinse once again with 70% ethanol (see note 16).
Place the PDMS pistons on the lid of the 6-well confiner device. Ensure that the PDMS spacers are aligned with the holes in the lid (see note 17).
Attach each confinement slide to the PDMS piston by carefully pressing the glass side of the confinement slide against the PDMS piston. Ensure that the slides are well centered on the pistons and avoid creating air bubbles between the two surfaces.
To equilibrate the PDMS, place the lid of the confinement device containing the PDMS pistons and the confinement slides on a regular 6-well plate. Ensure the confinement device is set to “resting position.” Add sufficient cell culture medium to submerge the slides and incubate for at least 1 h at 37 °C in a humidified incubator with 5% CO2 (see note 18).
Imaging with the static confiner
Approximately 30 min before using the cells, change the medium of the RPE-1 cells to Leibovitz’s-L15 medium supplemented with antibiotics.
After equilibrating the PDMS confinement slide (see step C3e), transfer the lid of the confinement device to the 6-well plate where your cells are seeded. Gently pull down the metal springs on the confinement lid, one by one, to attach the lid to the bottom of the 6-well plate.
Place the cells on the microscope and start imaging.
To confine the cells, gently and simultaneously press the locks on both sides of the confinement lid down. At this point, the pressure imposed by the lid on the PDMS pistons will induce confinement of the cells.
If the experiments require addition of drugs (Reagents 1–13) or the corresponding DMSO control, they can be added through the holes present on the lid of the confinement device (see notes 17 and 18). After addition of the drugs, mix by carefully shaking the 6-well plate.
To release the confinement, gently pull out the locks on the lid of the 6-well confinement device. This will release the pressure on the PDMS pistons.
Using the static confiner for fixed cell analysis
For experiments involving fixed-cell imaging, follow the instructions provided in the previous sections (steps C1–C4), until the moment of adding fixative to the cells.
Fixative is added through the holes on the lid of the confinement device. Alternatively, the lid can be removed and cells fixed immediately after release of confinement.
Incubate cells with fixative for 10 min at room temperature.
After fixation, use your standard immunofluorescence protocol to label cells.
Data analysis
Quantification of cellular parameters after dynamic, single-cell confinement was done using ImageJ. Initially, the efficiency of the confinement was determined by measuring cell height.
Open the images using ImageJ.
Adjust brightness and contrast by clicking Image > Adjust > Brightness and Contrast > Auto.
Prepare the lateral projections. Click Image > Stacks > 3D project. Do the lateral projections for both the xz and yz axes.
Combine the lateral projections in the SUM projection of the movie.
Measure cell height by determining the size occupied by the cells in the lateral projections. Select the cells that were confined to a maximum of 8 mm of height (see note 19).
In our specific case, we wanted to analyze the effect of mechanical confinement on the nuclear translocation of cyclin B1. To quantify the levels of cyclin B1 inside the nucleus, ImageJ was used:
Draw a small region of interest (ROI) and add it to the manager (Edit > Selection > Add to manager).
Measure cyclin B1 intensity by selecting Analyze > Measure. Copy the values to an Excel sheet.
Using the same ROI from the Manager, select a region outside of the cell and measure the background fluorescence intensity. Copy the values to an Excel sheet.
Background-correct the fluorescence intensity values by subtracting the background fluorescence intensity from the cyclin B1 fluorescence intensity measured in 2b.
Normalize nuclear cyclin B1 fluorescence intensities by dividing the fluorescence intensity of each time point with the lowest intensity level of cyclin B1.
To obtain a measure of cyclin B1 nuclear translocation rate, align fluorescence values for all cells relative to the lowest nuclear intensity. The time point corresponding to the lowest nuclear fluorescence intensity was defined as zero.
To correlate cyclin B1 translocation with the time of nuclear envelope permeabilization (NEP), the fluorescence intensity values were normalized and aligned relative to the accumulation of tubulin in the nucleus, which acts as a proxy for the loss of the nuclear barrier function.
A minimum of three independent experiments is recommended, with at least 30 cells analyzed for each condition. Normality of the samples was assessed using the Kolmogorov-Smirnov test. In comparing multiple groups with a normal distribution, a parametric one-way analysis of variance (ANOVA) was done. In other cases, a nonparametric ANOVA (Kruskal-Wallis) was performed. No power calculations were used. All specific details regarding data analysis can be found in the original manuscript [6].
Validation of protocol
This protocol was used and validated in Dantas et al. [6]. doi:10.1083/jcb.202205051. The dynamic cell confiner was used in Figures 1, 2, 3, 5, S1, S2, and S3. The static cell confiner was used in Figure 4.
In addition, this protocol or parts of it have been used and validated in the following research articles:
Le Berre et al. [7] Methods for two-dimensional cell confinement. Methods Cell Biol.
Lancaster et al. [8] Mitotic rounding alters cell geometry to ensure efficient bipolar spindle formation. Dev Cell (Figures 1, 4, and 6).
Liu et al. [9] Confinement and low adhesion induce fast amoeboid migration of slow mesenchymal cells. Cell.
Maiuri et al. [10] Actin flows mediate a universal coupling between cell speed and cell persistence. Cell.
Le Berre et al. [11] Fine control of nuclear confinement identifies a threshold deformation leading to lamina rupture and induction of specific genes. Integr Biol (Camb).
General notes and troubleshooting
General notes
pH of solutions should be carefully adjusted using either HCl or NaOH, whenever necessary. For the NaHCO3 solution, this is extremely relevant as the basic pH facilitates the adhesion of FBN to the coverslip.
The pH of the PBS 10× solution should be adjusted to 7.4 and the solution should be autoclaved afterwards.
Once reconstituted, the FBN solution should be stored at 4 °C for a maximum of two weeks.
The cell confiner and the cell confinement slides used for the static confiner can be acquired commercially (4DCell). The dynamic confiner was microfabricated in the lab using an adaptation of the protocol described previously [7] to adjust the diameter of the confiner slide to a 10 mm diameter coverslip. Adjust the equipment and laboratory supplies according to the purpose of your experiments.
The PAA hydrogels used to create the confining slides can be stored at 4 °C for a week, covered in PBS and sealed with parafilm.
When using drugs, prepare a new suction cup for each experimental condition, as the PDMS can uptake hydrophobic molecules from the cell medium. Washing is not sufficient to remove them efficiently from the PDMS.
The continuous use of antibiotic in the cell culture medium should be avoided. Antibiotics are advised only when preparing cells for imaging or fixed-cells analysis.
Use a laminar flow hood to perform all cell manipulation protocols. Prepare, use, store, and dispose of all the reagents according to the Material Safety Data Sheet (MSDS) guidelines. All the mediums and buffers used for cell culture should be prewarmed unless otherwise stated.
Cells should be used at a low passage number and frequently tested for possible mycoplasma infections.
For 22 mm × 22 mm coverslips and fluorodishes, use 100 μL of FBN 25 mg/mL; for 6-well plates, use 500 μL of FBN 25 mg/mL per well. For other sizes, adjust the volume accordingly.
Add a small volume of cell culture medium (usually less than 500 mL) when using the dynamic cell confiner to avoid suction of culture medium into the vacuum line attached to the pressure/vacuum generator.
Frequently check the tubing of the vacuum generator to avoid the trapping of air bubbles. This will influence the generation of vacuum and therefore affect compression efficiency.
Frequently calibrate the vacuum/pressure controller.
Different volumes can be used according to the dimension of your cell culture dish. For example, for a T75 flask, use approximately 10 mL of PBS to wash, 3 mL of trypsin to detach the cells, and at least 6 mL of fresh medium supplemented with 10% FBS to resuspend the cells.
Dust particles interfere with the attachment of the glass to PDMS. Ensure that the glass is cleaned thoroughly. The use of Scotch Magic tape is highly recommended, as it removes dust efficiently without leaving residues.
To count cells using the automated cell counter, prepare a mixture of 10 μL of the cellular suspension and 10 μL of the Trypan Blue solution. Mix gently and apply 10 μL on the cell counting slide. Then, place the counting slide onto the electronic counter device.
The holes that are present in the lid of the cell confinement device allow the access for pipettes through the glass plate and can be used to add or aspirate medium and/or drugs. If necessary, these holes can be closed with the caps provided in the kit.
Whenever drugs are used in the experiment, they should be added during this incubation step, as PDMS can absorb small molecules from the medium.
Confinement experiments were performed in cells confined to a minimum of 8 μm height. This is the minimum height that RPE-1 cells can cope without inducing cell death. Other cell types need to be tested.
Troubleshooting
Problem 1: Suction cup not attaching to the 35 mm dish.
Possible cause: Vacuum is not being generated.
Solution: Check the tubing for air bubbles. Calibrate the vacuum/pressure generator. Check integrity of the suction cup as it needs a flat surface to work.
Problem 2: Cell height varies and is not accurately controlled.
Possible cause: Micropillar height is not correct or PDMS layer is not flat.
Solution: Check the integrity of the SU-8 mold as it can deteriorate with use. Make sure that you use a very thin layer of PDMS when preparing the confinement slide and press homogeneously over the entire coverslip to ensure it is lying flat.
Problem 3: Confinement slide detaching from suction cup.
Possible cause: Slide is not dry.
Solution: Make sure the glass side of the confinement slide is thoroughly dried before attaching it to the PDMS piston. Any moisture will prevent binding of glass to PDMS.
Acknowledgments
This protocol is related to the paper: Dantas et al. [6] “Nuclear tension controls mitotic entry by regulating cyclin B1 nuclear translocation,” originally published in the Journal of Cell Biology (DOI: 10.1083/jcb.202205051).
This work was funded by Portuguese funds through FCT—Fundação para a Ciência e a Tecnologia/Ministério da Ciência, Tecnologia e Ensino Superior in the framework of the project PTDC/BIA-CEL/6740/2020.
Competing interests
The authors have no competing interests.
Ethical considerations
There are no ethical considerations associated with this protocol.
References
- Champion, L., Linder, M. I. and Kutay, U. (2017). Cellular Reorganization during Mitotic Entry. Trends Cell Biol. 27(1): 26–4.
- Gavet, O. and Pines, J. (2010). Activation of cyclin B1–Cdk1 synchronizes events in the nucleus and the cytoplasm at mitosis. J. Cell Biol. 189(2): 247–259.
- Gavet, O. and Pines, J. (2010). Progressive Activation of CyclinB1-Cdk1 Coordinates Entry to Mitosis. Dev. Cell 18(4): 533–543.
- Santos, S. D., Wollman, R., Meyer, T. and Ferrell, J. E. (2012). Spatial Positive Feedback at the Onset of Mitosis. Cell 149(7): 1500–1513.
- Lindqvist, A., Rodríguez-Bravo, V. and Medema, R. H. (2009). The decision to enter mitosis: feedback and redundancy in the mitotic entry network. J. Cell Biol. 185(2): 193–202.
- Dantas, M., Oliveira, A., Aguiar, P., Maiato, H. and Ferreira, J. G. (2022). Nuclear tension controls mitotic entry by regulating cyclin B1 nuclear translocation. J. Cell Biol. 221(12): e202205051.
- Le Berre, M., Zlotek-Zlotkiewicz, E., Bonazzi, D., Lautenschlaeger, F. and Piel, M. (2014). Methods for Two-Dimensional Cell Confinement. Methods Cell Biol.: 213–229.
- Lancaster, O. M., Le Berre, M., Dimitracopoulos, A., Bonazzi, D., Zlotek-Zlotkiewicz, E., Picone, R., Duke, T., Piel, M. and Baum, B. (2013). Mitotic Rounding Alters Cell Geometry to Ensure Efficient Bipolar Spindle Formation. Dev. Cell 25(3): 270–283.
- Liu, Y. J., Le Berre, M., Lautenschlaeger, F., Maiuri, P., Callan-Jones, A., Heuzé, M., Takaki, T., Voituriez, R. and Piel, M. (2015). Confinement and Low Adhesion Induce Fast Amoeboid Migration of Slow Mesenchymal Cells. Cell 160(4): 659–672.
- Maiuri, P., Rupprecht, J. F., Wieser, S., Ruprecht, V., Bénichou, O., Carpi, N., Coppey, M., De Beco, S., Gov, N., Heisenberg, C. P., et al. (2015). Actin Flows Mediate a Universal Coupling between Cell Speed and Cell Persistence. Cell 161(2): 374–386.
- Le Berre, M., Aubertin, J. and Piel, M. (2012). Fine control of nuclear confinement identifies a threshold deformation leading to lamina rupture and induction of specific genes. Integr. Biol. 4(11): 1406.
Article Information
Copyright
© 2024 The Author(s); This is an open access article under the CC BY-NC license (https://creativecommons.org/licenses/by-nc/4.0/).
How to cite
Readers should cite both the Bio-protocol article and the original research article where this protocol was used:
- Dantas, M., Vareiro, D. and Ferreira, J. G. (2024). Dissecting the Mechanical Control of Mitotic Entry Using a Cell Confinement Setup. Bio-protocol 14(6): e4959. DOI: 10.21769/BioProtoc.4959.
- Dantas, M., Oliveira, A., Aguiar, P., Maiato, H. and Ferreira, J. G. (2022). Nuclear tension controls mitotic entry by regulating cyclin B1 nuclear translocation. J. Cell Biol. 221(12): e202205051.
Category
Cell Biology > Cell structure > Nucleus
Cell Biology > Single cell analysis
Cell Biology > Cell-based analysis > Cytosis
Do you have any questions about this protocol?
Post your question to gather feedback from the community. We will also invite the authors of this article to respond.