- Protocols

- Articles and Issues
- For Authors
- About
- Become a Reviewer

Iterative Indirect Immunofluorescence Imaging (4i) on Adherent Cells and Tissue Sections
(*contributed equally to this work) Published: Vol 13, Iss 13, Jul 5, 2023 DOI: 10.21769/BioProtoc.4712 Views: 4539
Reviewed by: Chiara AmbrogioAnthony FlamierAkira Karasawa
Original research article
The authors used this protocol in:

Jul 2022
Advertisement


Protocol Collections
Comprehensive collections of detailed, peer-reviewed protocols focusing on specific topics


Related protocols
Abstract
Highly multiplexed protein measurements from multiple spatial scales using fluorescence microscopy recently emerged as a powerful way to investigate tumor microenvironments in biomedicine and the multivariate nature of complex systems’ interactions. A range of methods for this exist, which either rely on directly labeling the primary antibody with oligonucleotides/rare metals or employing methods to remove fluorescence for cyclic acquisition. Here, we describe a protocol that uses off-the-shelf primary and secondary antibodies without further need for modification and only commonly available chemical reagents. The method harnesses the observation that antibodies can crosslink to bound epitopes during light exposure, thus preventing elution. By utilizing a simple oxygen radical scavenging buffer during imaging and by blocking free sulfhydryl groups before antibody incubation, the presented method can employ comparably mild conditions to remove bound antibodies from epitopes, which preserves sample integrity. Thus, with the stated minor modifications, it allows for a standard immunofluorescence imaging protocol in cyclic fashion, currently permitting staining of up to ~80 unique epitopes.
Graphical overview
Background
A multitude of research questions across various fields of biology can only be addressed by the ability to simultaneously visualize the abundance and subcellular distribution of proteins in single cells, within their tissue context. Multiplexed imaging enables the identification of multiple cell types in a single sample, which facilitates the characterization of tissue microenvironments and cellular ecosystems in biomedicine (Cole et al., 2022; Wahle et al., 2022). It further enables an in-depth description of the multivariate nature of cellular states, which are predictive of higher-level biological phenomena in basic research. Given the substantial research potential of multiplexed imaging methods, multiple methods have recently been developed, as outlined in Hickey et al. (2022). These methods rely either on directly conjugating the primary antibodies to oligonucleotides or metal-chelating moieties that can bind rare metals, which requires additional processing of the antibodies, or employ chemical conditions to elute the bound antibodies, which might affect sample integrity. For researchers who wish to use multiplexed imaging but are not specialists in these methods, or who require the detection of epitopes for which no modified antibodies exist, a protocol that uses off-the-shelf antibodies would be highly beneficial.
During fluorescence imaging, the generated oxygen radicals can crosslink antibodies to their bound epitopes, thereby hindering antibody removal. By employing a radical scavenging buffer during imaging, this crosslinking can be prevented, allowing antibody removal using relatively mild conditions. This allows for cyclic imaging using a conventional immunofluorescence staining protocol and off-the-shelf primary and secondary antibodies.
The ease of application of the described protocol, lack of need for specialized equipment, and the reliance on off-the-shelf antibodies and commonly available reagents allows researchers with various backgrounds to easily obtain multiplexed images of their sample of interest. While here we describe the protocol for a conventional 96-well imaging plate, using adherent cell lines and formalin-fixed paraffin-embedded (FFPE) sections, the procedure can readily be extended to a variety of samples and formats. For instance, it can readily be employed on coverslips, 384-well plates, and various other formats with minor adaptations. Combined with automated liquid-handling equipment, the approach can be scaled up.
Materials and reagents
For both tissue culture cells and FFPE tissue sections
L-Glycine-hydrochloride (Sigma-Aldrich, catalog number: G2879); storage: room temperature (RT)
Guanidium-hydrochloride (Sigma-Aldrich, catalog number: G3272); storage: RT
Urea (Sigma-Aldrich, catalog number: U5128); storage: RT
Tris(2-carboxyethyl)phosphine hydrochloride (Sigma-Aldrich, catalog number: C4706); storage: 4 °C
N-acetyl-cysteine (Sigma-Aldrich, catalog number: A7250); storage: 4 °C
Bovine serum albumin (Sigma-Aldrich, catalog number: A9418); storage: 4 °C
Maleimide (Sigma-Aldrich, catalog number: 129585); storage: 4 °C
Phosphate-buffered saline (PBS) (Thermo Fisher, catalog number: 10010023); storage: RT
1 M 4-(2-hydroxyethyl)-1-piperazineethanesulfonic acid (Thermo Fisher, catalog number: 15630080); storage: 4 °C
12 M hydrochloric acid (Sigma-Aldrich, catalog number: 320331); storage: RT
10 M sodium hydroxide (Sigma-Aldrich, catalog number: 72068); storage: RT
Primary antibodies (various manufacturers); storage: according to manufacturers’ recommendations
Secondary antibodies (Thermo Fisher, choose according to color requirements and species of primary antibodies. We recommend Donkey-anti-Primary antibodies); storage: according to manufacturers’ recommendations
4’,6-Diamidino-2-phenylindole (Thermo Fisher, catalog number: 62247); storage: -20 °C
Specific for tissue culture cells
96-well imaging plate (Greiner, catalog number: 655096); storage: RT
16% paraformaldehyde (Electron Microscopy Sciences, catalog number: 15710); storage: RT
Triton-X (Sigma-Aldrich, catalog number: X100); storage: RT
Succinimidyl Ester Alexa Fluor 647 (Thermo Fisher, catalog number: A20006)
Specific for FFPE tissue sections
Glass bottom Nexterion (Schott Glass, catalog number: 1535661)
Grace Bio-Labs ProPlate MPTM microtiter plate superstructure (Sigma-Aldrich, catalog number: GBL204969-1EA)
National DiagnosticsTM Histo-ClearTM tissue clearing agent (Chemie Brunschwig AG, catalog number: D1620333)
100% EtOH (chemical under K20 chemical hood, was diluted in ddH2O)
Feather A35 1 × 50 Blades (Biosystems Switzerland AG, catalog number: 81-0358-00); storage: RT
30% w/v acrylamide/0.8% w/v bis-acrylamide (Sigma-Aldrich, catalog number: A3699-100ML); storage: 4 °C
TEMED (Thermo Fisher, catalog number: 17919); storage: 4 °C
Poly-L-lysine solution (Sigma-Aldrich, catalog number: P4832-50ML); storage: 4 °C
Glass basin length 21 cm × 15 cm × 6 cm
Superfrost plus microscope slides, 1 × 72 slides, 25 mm × 75 mm × 1 mm (Menzer-Glaseritem, catalog number: J1800AMNZ); storage: RT
PAP pen (Electron Microscopy Science, catalog number: 71310); storage: RT
Water-resistant, ethanol-soluble pen, 1 × 72 (Staedtler Lumocolor® permanent pen 318)
Histoclear clearing agent (National Diagnostic, catalog number: HS-200)
Solutions
40 mL elution buffer (EB) (see Recipes)
6 mL 4i blocking buffer (sBB) (see Recipes)
10 mL conventional blocking buffer (cBB) (see Recipes)
20 mL 4i imaging buffer (IB) (see Recipes)
20 mL fixation solution (FS) (see Recipes)
10 mL permeabilization solution (PS) (see Recipes)
5 mL primary antibody staining solution (1° AS) (see Recipes)
5 mL secondary antibody staining solution (2° AS) (see Recipes)
10 mL DNA stain solution (DSS) (see Recipes)
10 mL whole protein staining solution (WPSS) (see Recipes)
Embedding solution (ES) (see Recipes)
Equipment
Microm HM355S (Thermo Scientific, catalog number: 90 520 0STS)
Steamer (Betty Bossi, catalog number: 10003614)
(Optional: to ease liquid handling steps) Washer dispenser (Agilent, catalog number: EL406)
Procedure
The following procedure is based on using a standard 96-well plate containing 100 μL per well. Every volume and step are indicated on a per well basis. However, the protocol works for any container and adherent cell type if the volumes are adjusted accordingly. Numbers in bold indicate the final dilution.
For every step described in section C, the sample needs to be protected from light at all times. This is essential for the protocol to work. The procedure works best when using automated liquid handling, which necessitates building light-protecting containers around the machines. If manual handling is performed, keep the light as dim as possible, and preferentially at wavelengths above ~600 nm.
When performing 4i on tissue culture cells, perform A and then repeat C and D to achieve the desired level of multiplexing. In the last 4i cycle, perform C, E, and D. 4i works well with poorly adherent cell lines, which require a coated surface (e.g., poly-lysine). However, liquid handling should be performed very cautiously.
When performing 4i on tissue sections, perform B and then repeat C and D to achieve the desired level of multiplexing.
Sample preparation, tissue culture cells
Prepare the fixation solution (FS, see Recipes) and the permeabilization solution (PS, see Recipes).
Perform experiment as desired.
Add 100 μL of FS. 1:2
Incubate at RT for 20 min.
Wash three times with 100 μL of PBS.
Aspirate to a volume of 50 μL.
Add 50 μL of PS. 1:2
Incubate at RT for 10 min.
Wash three times with 100 μL of PBS.
Aspirate to a volume of 100 μL.
Store the plate at 4 °C until proceeding to Section C.
Sample preparation, FFPE (tissue sections)
Place the microtiter plate superstructure over the glass bottom. Mark the position of the microtiter plate well on the glass bottom by running the water-resistant, ethanol-soluble pen along the inside of each well while the pen is also touching the glass bottom. Each well will contain one tissue section.
Remove the plate superstructure and turn the glass bottom over.
Using a PAP pen, encircle all well markings with one single line. This line will serve as a tension barrier in the next step.
Add 7.5 mL of Poly-L-Lysine inside the PAP pen line and ensure that the whole surface within the surface tension barrier is covered by the solution.
Incubate in a chemical hood at RT for 1 h.
Remove the Poly-L-Lysine solution from the glass bottom by aspiration or by gently tipping the glass bottom on its side.
Use a water microtome cutter to generate sections 2–6 μm thick of the precooled paraffin block and let them float in the water bath of the microtome. A detailed protocol for cutting the paraffin sections can be found in Wang and Hasnain (2017).
Insert the glass bottom at a 45° angle into the water bath, with the coated side facing the samples.
Using the well markings, place the edge of the paraffin on the slanted plate and pull the plate out at a 45° angle.
Dry the glass bottom slide in a plate at 37 °C for 2 min.
Repeat steps 7–10 until you have transferred all sections to your slides, or all positions on the slide are occupied by sections. Do not resubmerge areas that have sections recently placed on them!
Store the glass bottom slide at 37 °C overnight.
To perform deparaffinization, place the glass bottom slide in a glass container, on top of two microscopy glass slides with the sections facing upwards.
For the following steps (15–22), use volumes that ensure that the glass bottom is just about covered. Do not pour the solutions directly onto the glass bottoms.
Histoclear three times for 4 min.
Histoclear one time for 3 min.
100% EtOH two times for 2 min.
96% EtOH two times for 2 min.
80% EtOH one time for 2 min.
70% EtOH one time for 2 min.
50% EtOH one time for 2 min.
PBS one time for 2 min.
Place 40 mL of 10× Antigen Retrieval solution together with 360 mL of ddH2O in a steamer.
In the steamer, place a sieve close to the steam source.
Place the glass bottom with deparaffinized sections on or into the sieve, with the sections facing upwards.
Turn the steamer on and set it to run for 40 min. Every 10 min, rotate the sieve by 90°.
Switch off the steamer, carefully tilt the plate at an angle, and let it air dry for 1 h.
Place the glass bottom with the sections facing up on a kitchen towel, positioned on a firm surface.
To combine the glass bottom with the plastic superstructure, first expose the adhesives of the plastic superstructure and then align the wells to the sections as best as possible.
Lightly press the glass to the superstructure through the edges, to ensure that all points of interest have no bubbles in them.
Add 50 μL of ddH2O per well.
Add 50 μL of ES per well.
Incubate at RT for 90 min.
Add 33.33 μL of FS.
Wash five times with 100 μL of H2O.
Store the plate at 4 °C until proceeding to Section C.
Indirect iterative (cyclic) immunofluorescence imaging on tissue culture cells and tissue sections
Reminder: Keep the sample protected from light at all times.
Prepare the elution buffer (EB, see Recipes), the 4i blocking buffer (sBB, see Recipes), and the conventional blocking buffer (cBB, see Recipes).
Wash five times with 100 μL of ddH2O.
Aspirate to a volume of 30 μL.
Add 100 μL of EB. 1:1.3
Incubate at RT for 10 min.
Wash three times with 100 μL of ddH2O.
Aspirate to a volume of 30 μL.
Add 100 μL of EB. 1:1.3
Incubate at RT for 10 min.
Wash three times with 100 μL of ddH2O.
Aspirate to a volume of 30 μL.
Add 100 μL of EB. 1:1.3
Incubate at RT for 10 min.
Wash five times with 100 μL of PBS.
Aspirate to a volume of 30 μL.
Add 30 μL of sBB. 1:2
Incubate at RT for 1 h.
While incubating, prepare the primary antibody staining solution (1° AS, see Recipes).
Wash five times with 100 μL of PBS.
Aspirate to a volume of 30 μL.
Add 30 μL of 1° AS. 1:2
Incubate at RT for 2 h.
While incubating, prepare the secondary antibody staining solution (2° AS, see Recipes).
Wash five times with 100 μL of PBS.
Aspirate to a volume of 30 μL.
Add 30 μL of 2° AS. 1:2
Incubate at RT for 1 h.
While incubating, prepare the DNA stain solution (DSS, see Recipes) and the imaging buffer (IB, see Recipes).
Wash five times with 100 μL of PBS.
Aspirate to a volume of 30 μL.
Add 100 μL of DSS. 1:1.3
Incubate at RT for 10 min.
Wash five times with 100 μL of ddH2O.
Aspirate to a volume of 30 μL.
Add 100 μL of IB. 1:1.3
Let the samples rest at RT for ~30–45 min.
Image sample at appropriate conditions. See section D for more details.
Wash five times with 100 μL of PBS.
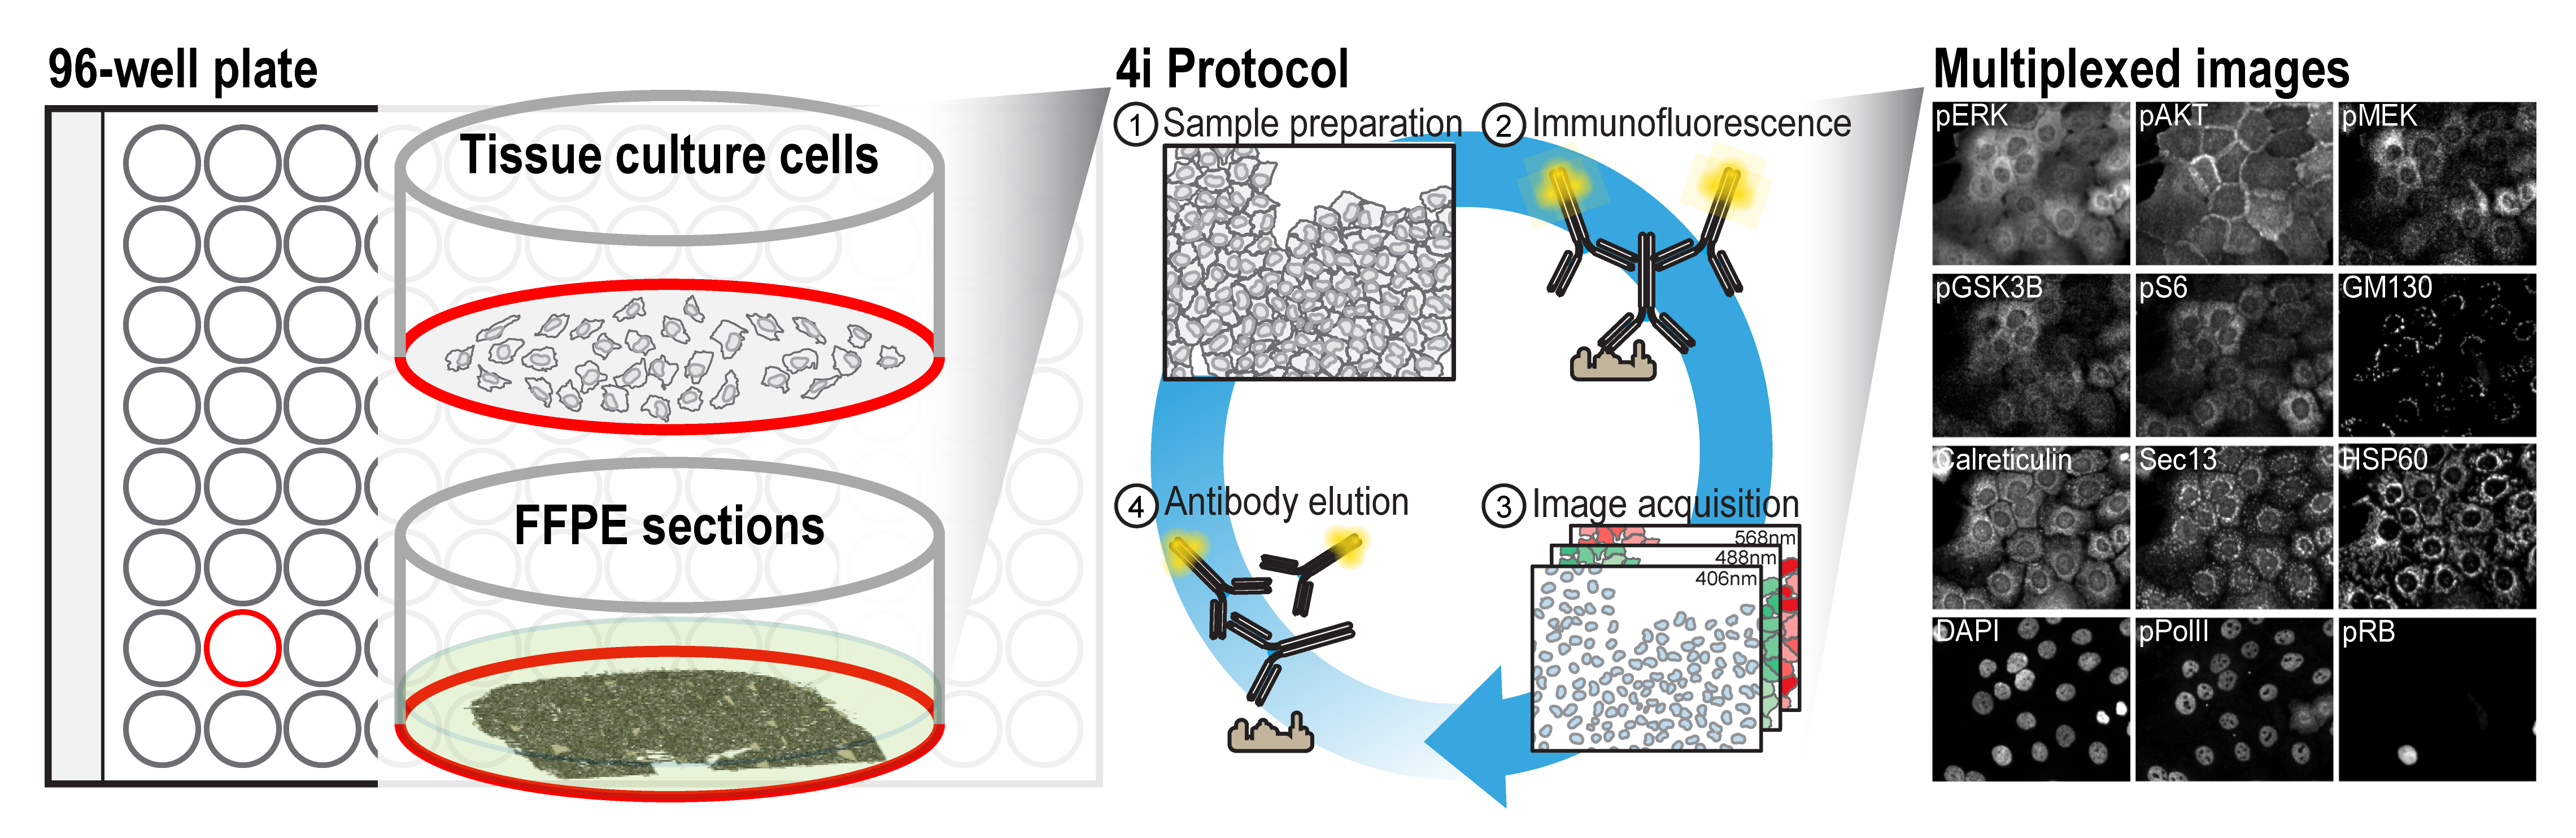
Repeat (in a cyclic fashion) from step 1 until every desired epitope is imaged (see Figure 1 for the workflow and Figure 2 for an example panel of epitopes) and move to Section E. Recommendation: do not exceed 25 iterations.

Figure 1. Flowchart depicting the standard workflow of 4i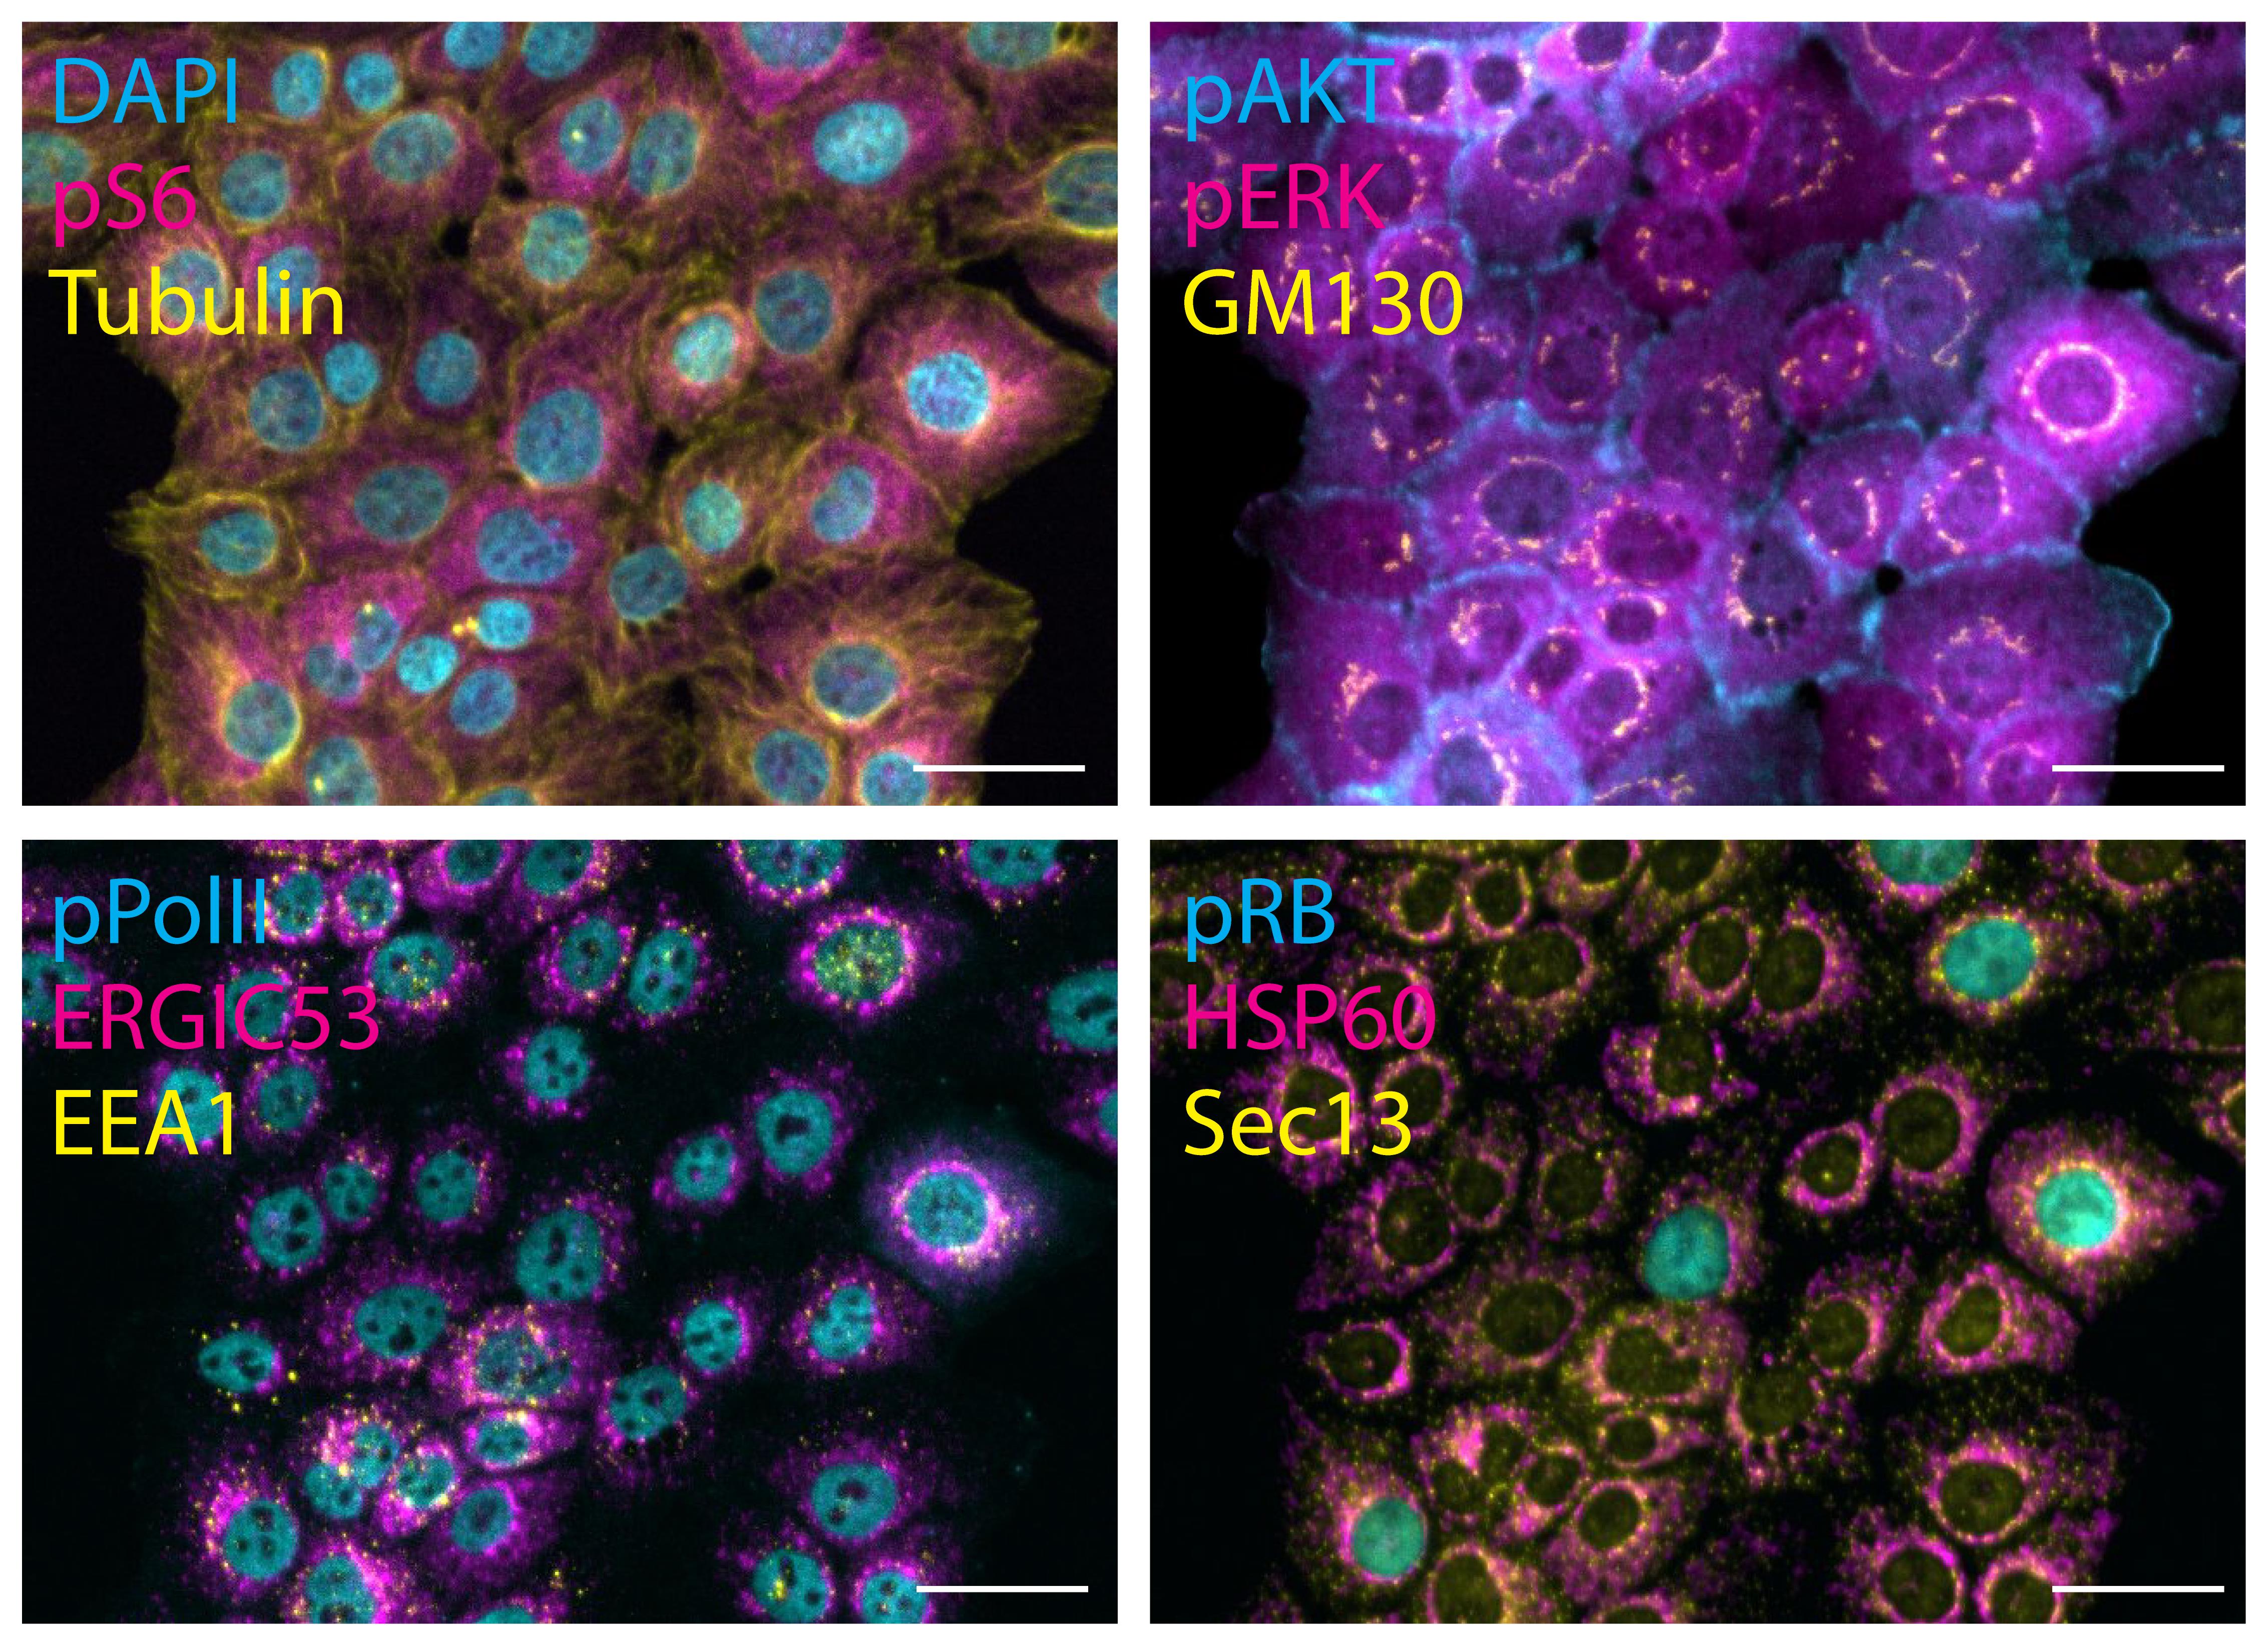
Figure 2. Multiplexed images obtained by performing 4i. 184A1 cells were deprived of serum and growth factor for 16 h, and then stimulated with 100 ng/mL EGF for 5 min before fixation. Then, 4i was performed as described for the tissue culture cells. Representative composites of a 30-plex experiment are displayed with the stained epitopes indicated. The same field of view is shown in all composites. Scale bars: 20 μm.
Imaging
Align the imaging roster to the imaging roster of the previous 4i cycle.
Use the lowest possible amount of laser and light exposures (sufficient signal-to-noise ratio).
Whole protein staining
Prepare the whole protein staining solution (WPSS, see Recipes)
Wash five times with 100 μL of PBS.
Aspirate to a volume of 50 μL.
Add 100 μL of WPSS. 1:1.5
Wash five times with 100 μL of PBS.
Aspirate a volume of 100 μL.
Image the sample at appropriate conditions.
Notes
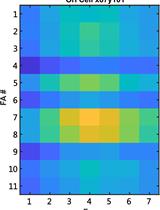
Reproducibility: when adhered to carefully (preferentially using automated liquid handling), the method achieves almost perfect technical reproducibility (Figure 3). For reference, see Gut et al. (2018) (Figure 1C–1E) and Kramer et al. (2022) (Supplementary Figure 1D and 1E).
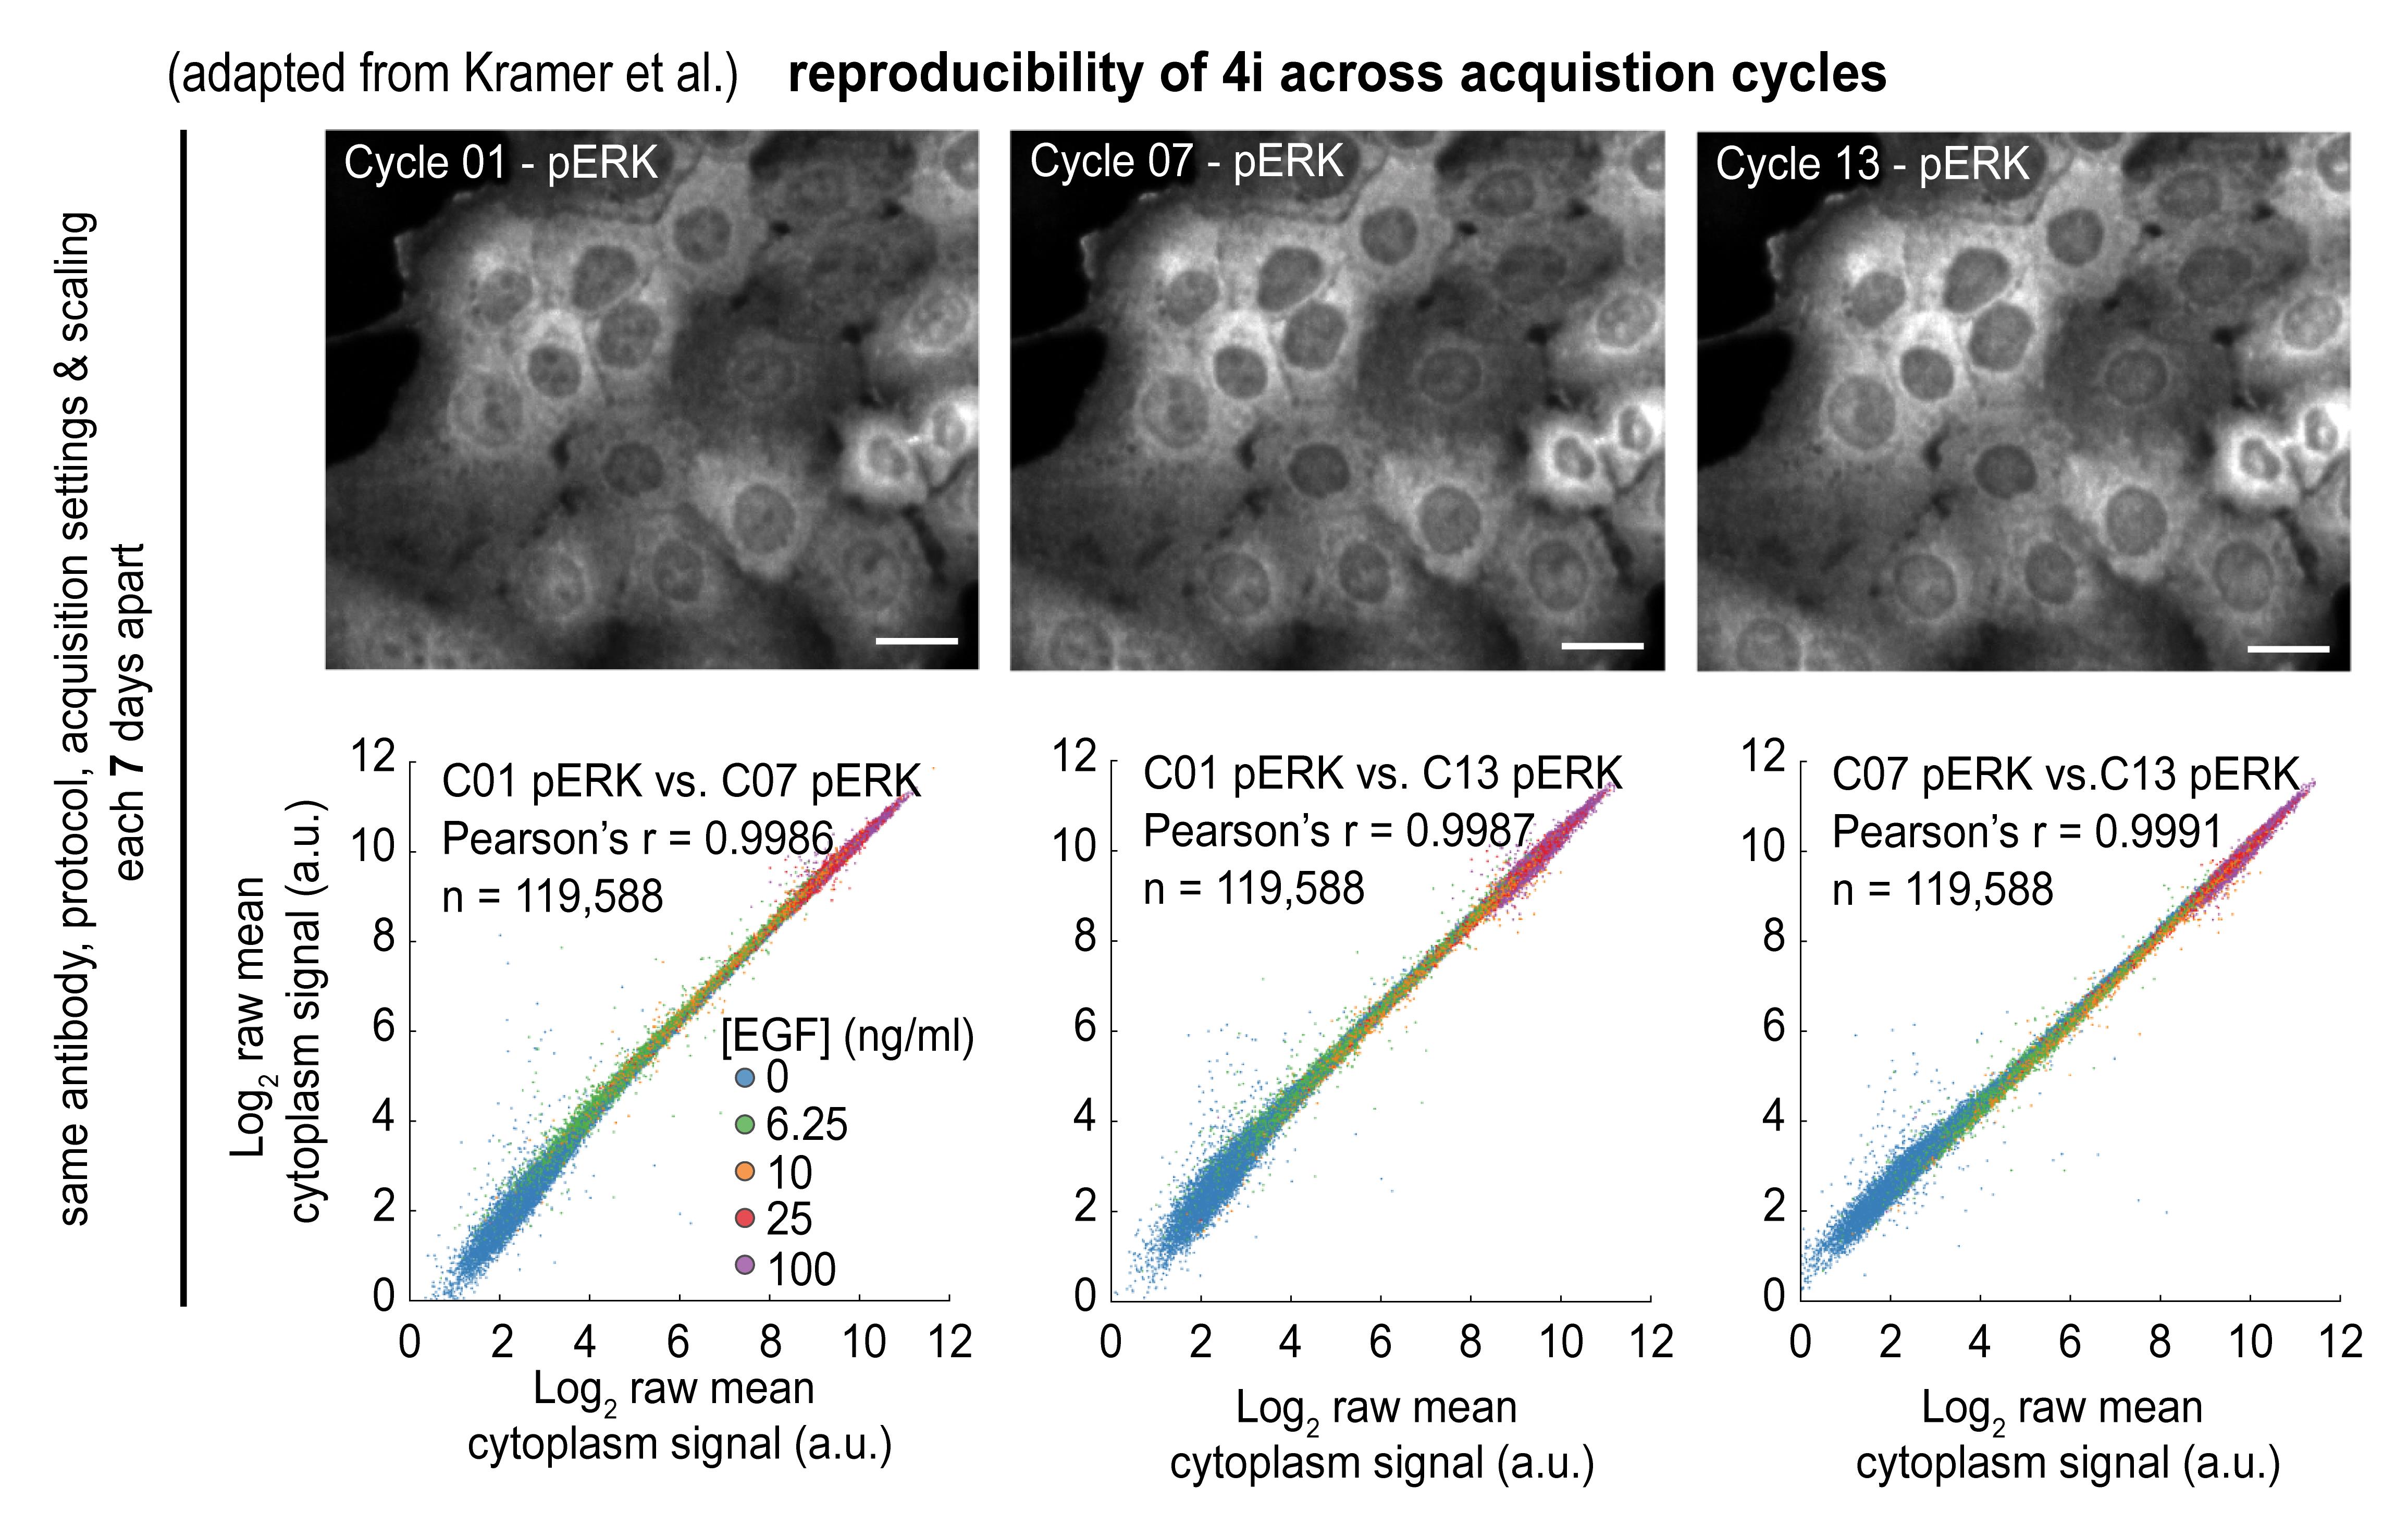
Figure 3. 4i is reproducible across acquisition cycles. The top panel shows representative images of repeated staining against phosphorylated ERK in different cycles (01, 07, and 13) in 184A1 cells exposed to 100 ng/mL of EGF. The bottom panel shows the bivariate plot of quantified pERK intensities for each combination of indicated 4i cycles. Scale bars: 20 μm.
Cautionary points
The method described relies on employing mild conditions to elute bound antibodies from epitopes for cyclic acquisition. This is enabled by using a radical scavenging imaging buffer during fluorescence imaging. As the sample cannot be kept in this buffer at all times during processing since primary and secondary antibodies at times are bound, it is crucial to protect the sample from light exposure at these times. This is crucially the case after incubation with the primary and secondary antibodies, but before adding the radical scavenging imaging buffer.
Antibody selection
Rarely, antibodies may be incompatible with the 4i protocol. As a result, the antibody staining appears altered or no signal is detected at all. Thus, it is advisable to perform a validation experiment prior to including new antibodies in a 4i panel. The aim of the validation experiment is to compare the staining of an antibody in conventional immunofluorescence and 4i. In a first step, perform (indirect) immunofluorescence using the unvalidated antibody and image the sample in imaging buffer. Next, elute the antibody and perform one round of 4i. Next, compare the antibody staining achieved using conventional immunofluorescence and 4i.
Antibody panel design and epitope prioritization
When designing a 4i antibody panel, it is important to identify the minimal concentration with which a reliable staining can be achieved. We generally start with the manufacturer’s recommended concentration and perform serial dilutions (1:2 steps) to identify the minimal concentration using conventional IF. Then, we assess whether that concentration yields discernable and reliable staining using the 4i protocol. If needed, increase the concentration only in small steps, as keeping the antibody concentration low will help in preventing photo-induced antibody crosslinking during imaging. Another important factor to consider when designing a 4i antibody panel is the potential change in detectability of epitopes as a consequence of multiple cycles of 4i. This can be assessed using repeated mock 4i cycles, by performing all the liquid handling steps but omitting the antibodies, and imaging interchanged with true 4i cycles (see workflow in Figure 4).
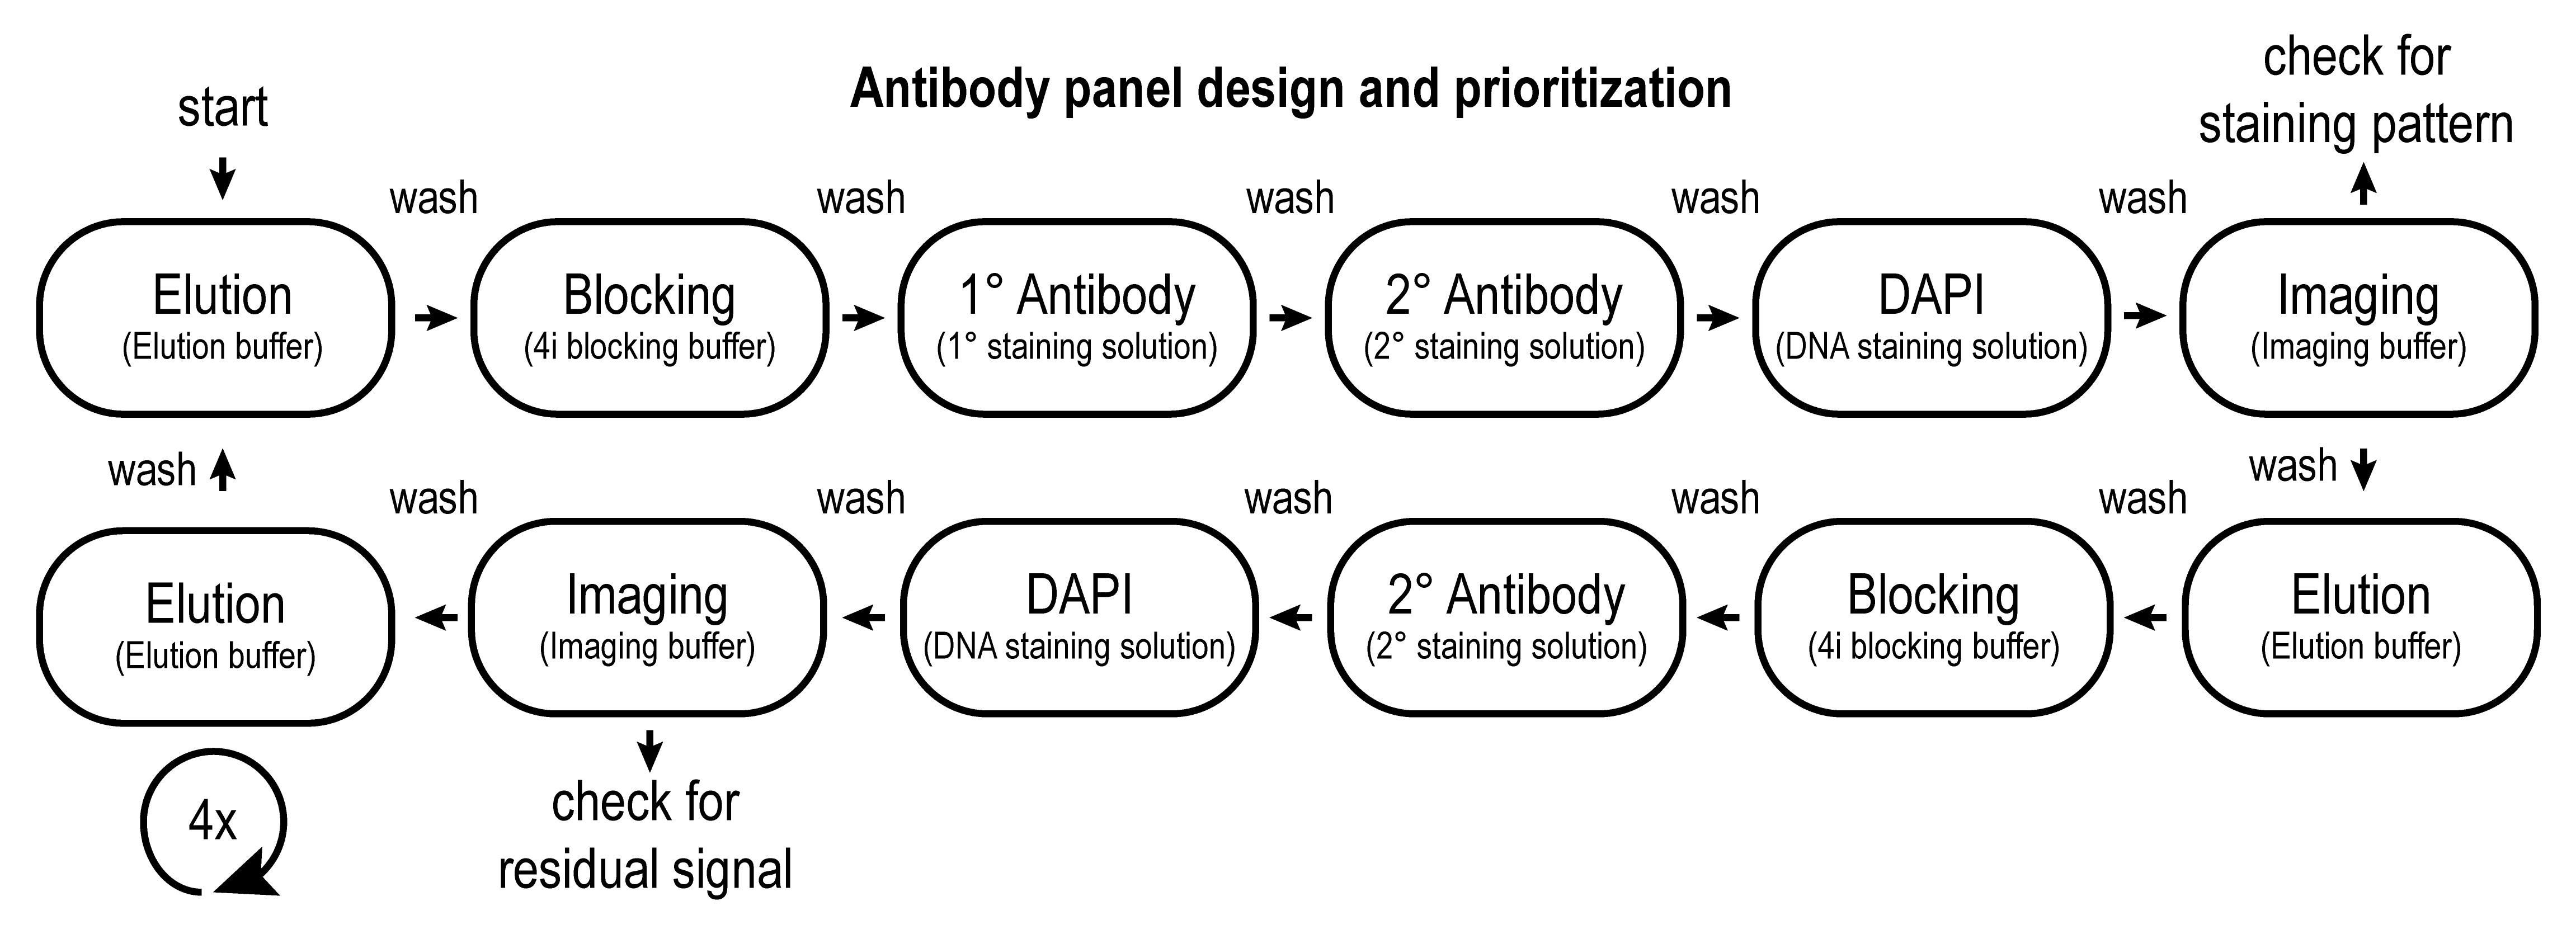
Figure 4. Standard workflow of an antibody panel design experiment
The following example describes a detectability assay for a 19 cycle 4i experiment. First, perform a 4i cycle including imaging. These images serve as staining references. Then, perform a round of elution, stain only with the secondary antibody, and image the sample. These images serve as reference whether the primary antibody can be eluted from their epitopes. Then, perform four cycles of elution followed by a complete cycle of 4i. This is treated as an antibody used during the seventh cycle. Repeat this, including the elution control, in a fashion yielding images that represent the staining obtained during cycles 1, 7, 13, and 19 (for an example, see Figure 5). Compare the images and identify whether the staining becomes less reliable in later cycles of 4i. In your antibody panel, prioritize antibodies for which altered staining patterns are observed in later cycles. In general, we find that phosphorylated specific antibodies are most prone to signal decay (with exceptions) after many rounds of 4i. Thus, we would advise to prioritize them, using them in earlier cycles.
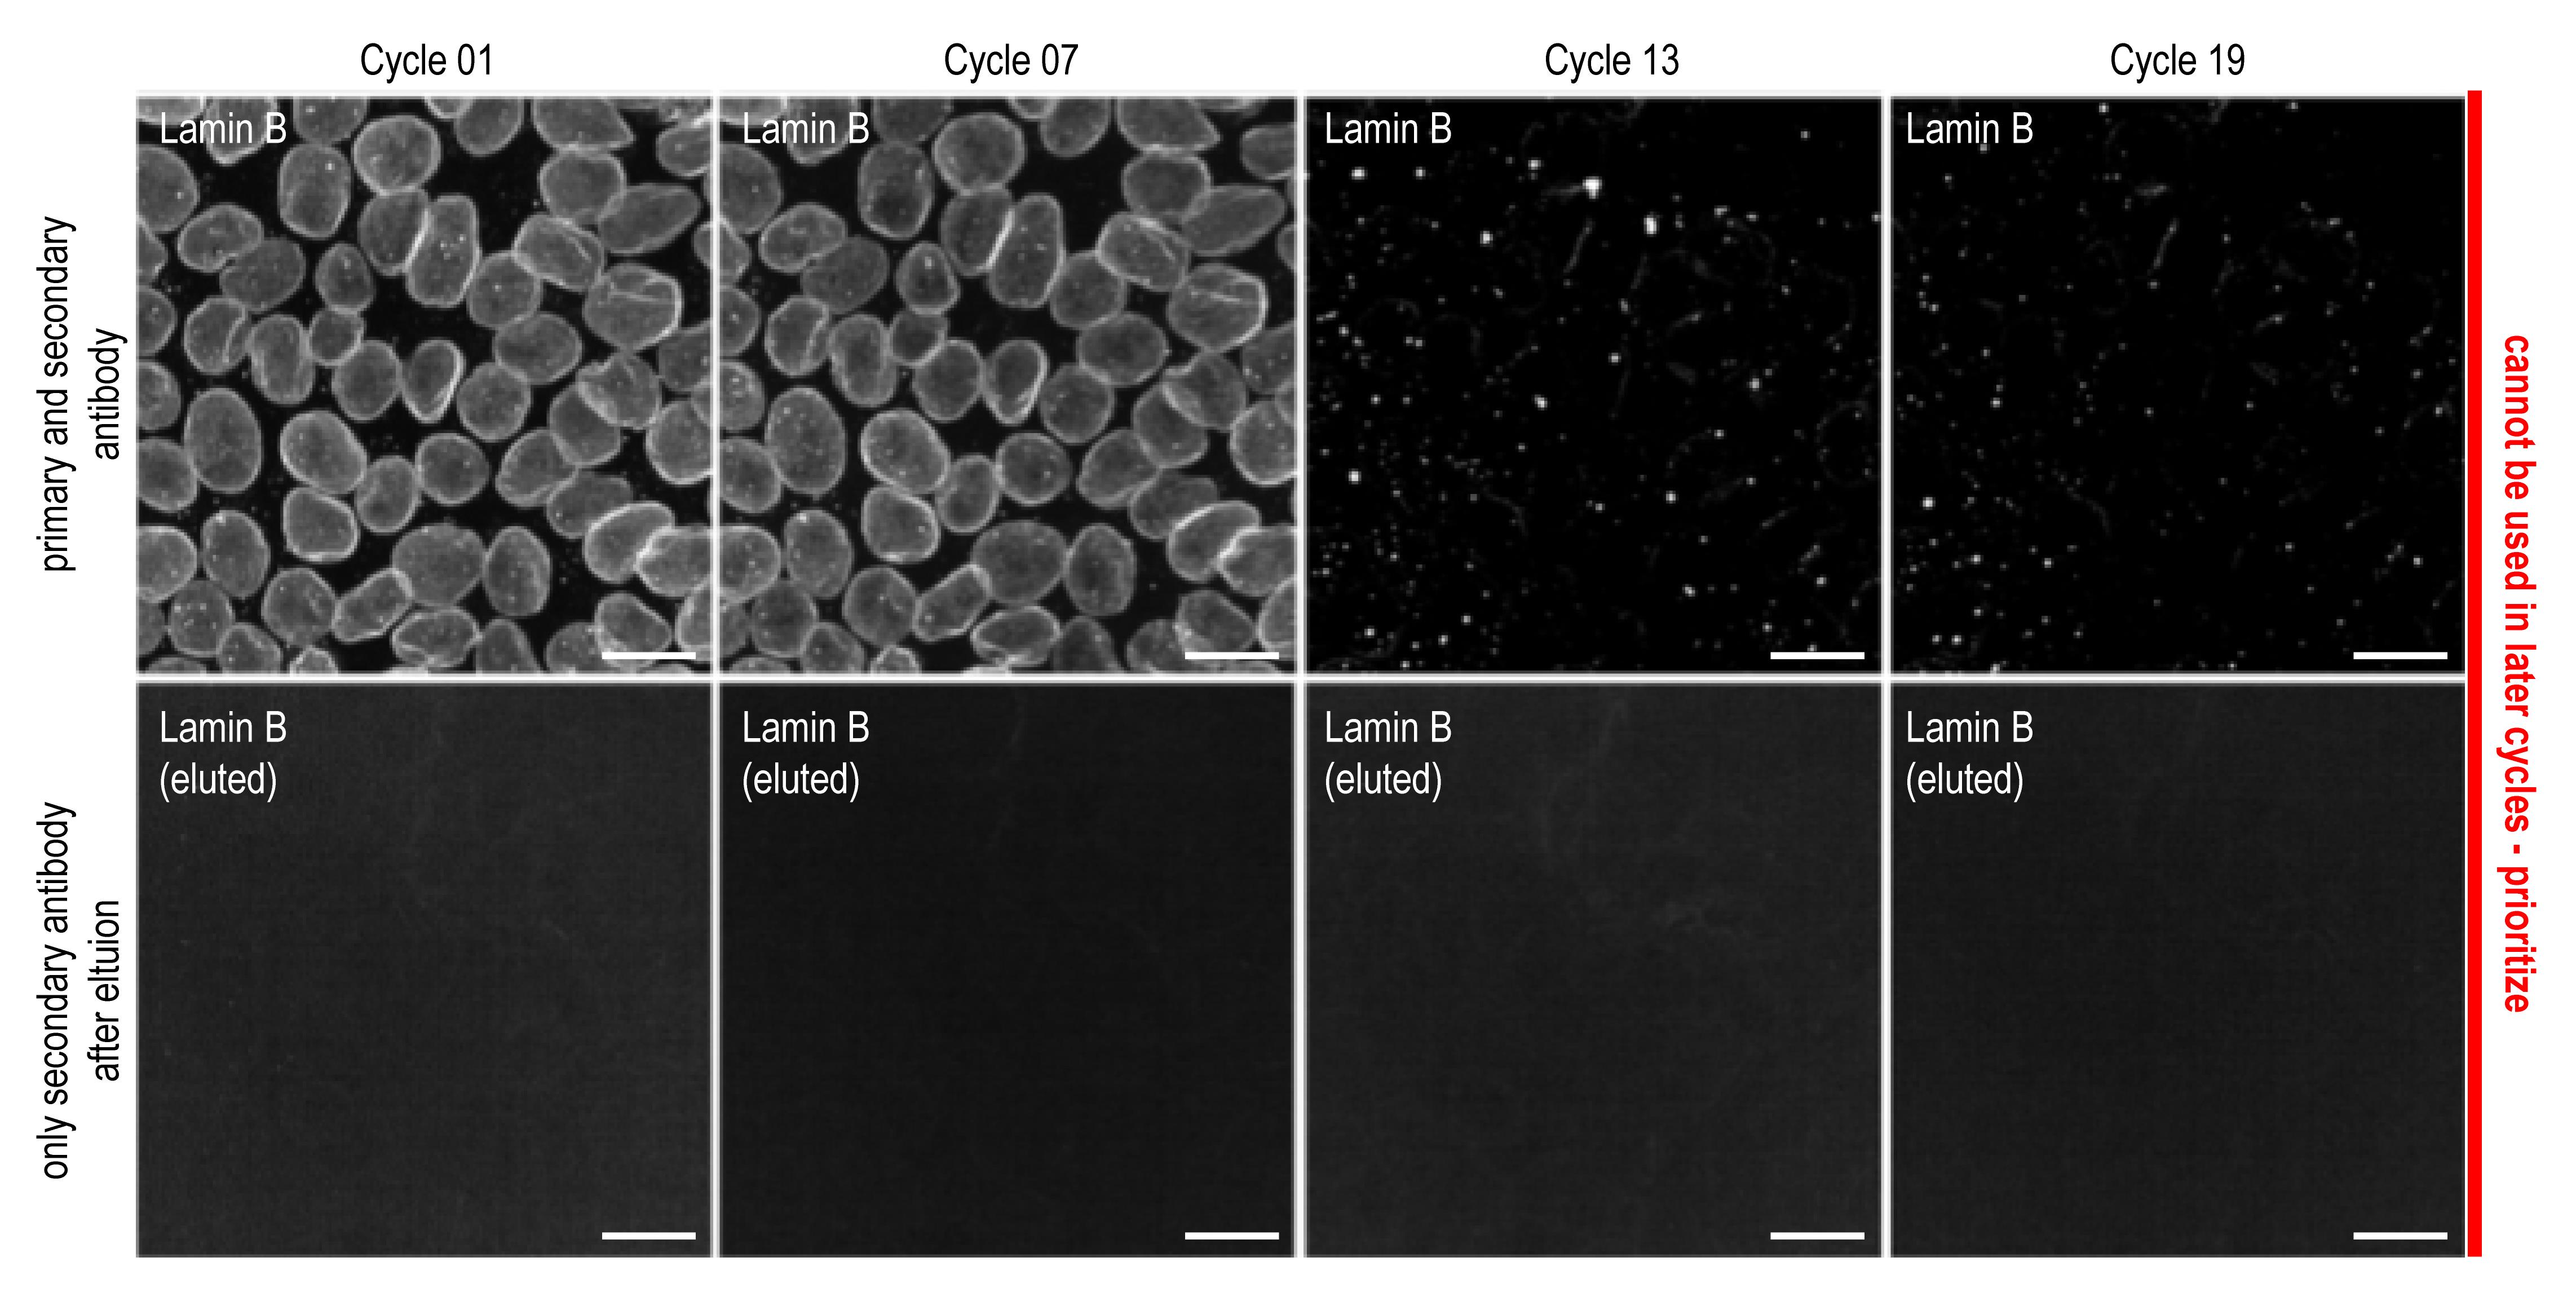
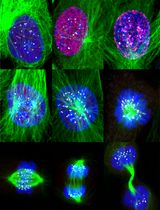
Figure 5. Images obtained during an antibody panel design experiment. Lamin B is an example of an antibody that needs to be prioritized, due to altered signal in later cycles. The top panel depicts staining at the respective cycles with mock cycles (repeated elution but no antibody incubations) with both primary and secondary antibodies. Bottom panel depicts the residual signal after elution and staining with only secondary antibody.
Residual antibody staining from previous cycles
You may discover that signal from a previous 4i cycle is still detected in your current staining. This is due to a (partially) failed elution, which in turn is normally due to photo-induced antibody crosslinking during the imaging step of the previous cycle; thus, the residual signal from the previous cycle cannot be removed anymore. Using minimal antibody concentration and photon load during imaging prevents elution failures.
Recipes
Recipes are calculated based on requirements for a standard 96-well plate and a standardized antibody dilution. Adjust accordingly for different volumes. The number in bold indicates the final concentration.
40 mL elution buffer (EB)
L-Glycine (molar mass: 75.067 g/mol), 1.5 g, 0.5 M
Guanidinium hydrochloride (molar mass: 95.53 g/mol), 11.46 g, 3 M
Urea (molar mass: 60.06 g/mol), 7.2 g, 3 M
Tris(2-carboxyethyl)phosphine hydrochloride (molar mass: 286.65 g/mol), 0.69 g, 70 mM
ddH2O, ~23 mL
12 M hydrochloric acid, ~800 μL
Total: 40 mL
Adjust pH to 2.5 using hydrochloric acid and sodium hydroxide
6 mL 4i blocking buffer (sBB)
Bovine serum albumin, 0.24 g, 4% (w/v)
Maleimide (molar mass: 97.07), 0.17 g, 300 mM
PBS, ~5.8 mL
Total: 6 mL
10 mL conventional blocking buffer (cBB)
Bovine serum albumin, 0.4 g, 4% (w/v)
PBS, ~9.9 mL
Total: 10 mL
20 mL 4i imaging buffer (IB)
N-acetyl-cysteine (molar mass: 163.19 g/mL), 2.28 g, 700 mM
1M HEPES, 2 mL, 100 mM
ddH2O, 16 mL
10 M sodium hydroxide, 2 mL
Total: 20 mL
Adjust pH to 7.4 using hydrochloric acid and sodium hydroxide
20 mL fixation solution (FS)
16% paraformaldehyde, 10 mL, 8% (v/v)
ddH2O, 10 mL
Total: 20 mL
10 mL permeabilization solution (PS)
Triton-X, 50 μL, 0.5% (v/v)
PBS, 9.5 mL
Total: 10 mL
5 mL primary antibody staining solution (1° AS)
Primary antibody solution, 25 μL, 0.5% (v/v)
cBB, 4.975 mL
Total: 5 mL
5 mL secondary antibody staining solution (2° AS)
Secondary antibody solution, 25 μL, 0.5% (v/v)
cBB, 4.975 mL
Total: 5 mL
10 mL DNA stain solution (DSS)
4’,6-Diamidino-2-phenylindole, 750 μg, 75 μg/mL
PBS, 10 mL
Total: 10 mL
10 mL whole protein staining solution (WPSS)
Succinimidyl Ester Alexa Fluor 647, 1.66 μg, 0.166 μg/mL
PBS, 10 mL
Total: 10 mL
Embedding solution (ES)
ddH2O, 6.67 mL
Acrylamide/bis-acrylamide (30%/0.8% w/v), 0.83 mL
1.5 M Tris-HCl (pH 8.8), 2.5 mL
*10% (w/v) ammonium persulfate (APS), 100 μL
*TEMED, 10 μL
Total: 10 mL
*To be added right before addition on the well
Acknowledgments
G.G. received funding from the Swiss National Science Foundation and InnoSuisse as part of the BRIDGE program, as well as from the University of Zurich through the BioEntrepreneur Fellowship. We also would like to thank the authors of Gut et al. (2018), for which the presented protocols were originally designed for. L.P. received funding from the Swiss National Science Foundation (grant 310030_192622), the European Research Council (advanced grant CROSSINGSCALES-885579), the Chan Zuckerberg Initiative (grant CZF2019-002440), and the University of Zurich. This protocol is derived from the original research paper (Kramer et al., 2022).
Competing interests
G.G. and L.P. are authors on multiple patent applications concerning the 4i technology.
References
- Cole, J. D., Sarabia Del Castillo, J., Gut, G., Gonzalez-Bohorquez, D., Pelkmans, L. and Jessberger, S. (2022). Characterization of the neurogenic niche in the aging dentate gyrus using iterative immunofluorescence imaging. Elife 11: e68000.
- Wahle P., Harmel C., He Z., Gut G., Santos A., Yu Q., Noser P., Fleck J. S., Gjeta B., Pavlinić, D., et al. (2022). Multimodal spatiotemporal phenotyping of human organoid development.bioRxiv. doi: https://doi.org/10.1101/2022.03.16.484396.
- Wang, R. and Hasnain, S. Z. (2017). Analyzing the Properties of Murine Intestinal Mucins by Electrophoresis and Histology. Bio-protocol 7(14): e2394.
- Hickey, J. W., Neumann, E. K., Radtke, A. J., Camarillo, J. M., Beuschel, R. T., Albanese, A., McDonough, E., Hatler, J., Wiblin, A. E., Fisher, J., et al. (2022). Spatial mapping of protein composition and tissue organization: a primer for multiplexed antibody-based imaging. Nat Methods 19(3): 284-295.
- Gut, G., Herrmann, M. D. and Pelkmans, L. (2018). Multiplexed protein maps link subcellular organization to cellular states. Science 361(6401): eaar7042.
- Kramer, B. A., Sarabia Del Castillo, J. and Pelkmans, L. (2022). Multimodal perception links cellular state to decision-making in single cells. Science 377(6606): 642-648.
Article Information
Copyright
© 2023 The Author(s); This is an open access article under the CC BY-NC license (https://creativecommons.org/licenses/by-nc/4.0/).
How to cite
Readers should cite both the Bio-protocol article and the original research article where this protocol was used:
- Kramer, B. A., Sarabia del Castillo, J., Pelkmans, L. and Gut, G. (2023). Iterative Indirect Immunofluorescence Imaging (4i) on Adherent Cells and Tissue Sections. Bio-protocol 13(13): e4712. DOI: 10.21769/BioProtoc.4712.
- Kramer, B. A., Sarabia Del Castillo, J. and Pelkmans, L. (2022). Multimodal perception links cellular state to decision-making in single cells. Science 377(6606): 642-648.
Category
Cell Biology > Cell imaging > Fixed-cell imaging
Do you have any questions about this protocol?
Post your question to gather feedback from the community. We will also invite the authors of this article to respond.