- Protocols

- Articles and Issues
- For Authors
- About
- Become a Reviewer

A Fast and Reliable Method to Generate Pure, Single Cell-derived Clones of Mammalian Cells
(*contributed equally to this work) Published: Vol 12, Iss 16, Aug 20, 2022 DOI: 10.21769/BioProtoc.4490 Views: 4137
Reviewed by: Ralph Thomas BoettcherJungeun YuAnonymous reviewer(s)
Original research article
The authors used this protocol in:

Jun 2021
Advertisement


Protocol Collections
Comprehensive collections of detailed, peer-reviewed protocols focusing on specific topics


Abstract
Stable cell cloning is an essential aspect of biological research. All advanced genome editing tools rely heavily on stable, pure, single cell-derived clones of genetically engineered cells. For years, researchers have depended on single-cell dilutions seeded in 96- or 192-well plates, followed by microscopic exclusion of the wells seeded with more than or without a cell. This method is not just laborious, time-consuming, and uneconomical but also liable to unintentional error in identifying the wells seeded with a single cell. All these disadvantages may increase the time needed to generate a stable clone. Here, we report an easy-to-follow and straightforward method to conveniently create pure, stable clones in less than half the time traditionally required. Our approach utilizes cloning cylinders with non-toxic tissue-tek gel, commonly used for immobilizing tissues for sectioning, followed by trypsinization and screening of the genome-edited clones. Our approach uses minimal cell handling steps, thus decreasing the time invested in generating the pure clones effortlessly and economically.
Graphical abstract:

A schematic comparison showing the traditional dilution cloning and the method described here. Here, a well-separated colony (in the green box) must be preferred over the colonies not well separated (in the red box).
Background
Genetically engineered expression and genome manipulating plasmids are routinely utilized (Soutoglou and Misteli, 2008; Toiber et al., 2013; Simon et al., 2019). Studies involving the characterization of cellular localization, or recruitment of a factor to a cell organelle under basal or induced conditions, depend on a short-lasting ectopic expression of the desired gene (Soutoglou and Misteli, 2008). However, modern biological processes and physiological studies involve long-term characterization, requiring stable cell lines expressing or inhibiting the function of a specific gene or cluster of genes (Condreay et al., 1999). In addition, the varying percentage of transfected cells also generates a wide range of undesired experimental variation. Thus, the generation of pure lines of genetically engineered cells is essential in studying any given protein's function more accurately and reproducibly.
Over the decades, several ways have been devised to generate genetically engineered pure cells (Condreay et al., 1999; Aranda et al., 2014; Giuliano et al., 2019; Singh, 2019). Dilution cloning and fluorescence-activated cell sorting (FACS) are the most commonly used (Giuliano et al., 2019; Singh, 2019). However, both these techniques have their advantages and disadvantages. Dilution cloning is the cheapest method to generate stable cell lines, as it does not involve unique and expensive instrumentation (Singh, 2019). However, this technique is very time-consuming and highly laborious. Indeed, many scientists spend a considerable amount of time each day identifying and marking the wells in a 96-well plate showing colony growth from a single cell, and marking the wells that receive multiple or no cells. Similarly, as an alternative to dilution cloning, FACS requires advanced sorting instrumentation and a sorting expert. In addition, FACS can sometimes be stressful for cells, thus altogether challenging the desired outcome.
To overcome these drawbacks, we generated a simple and easy method for generating stable, single cell-derived clones of anchorage-dependent cells. This method neither involves a labor-intensive step nor expensive instrumentation. Our protocol utilizes the inherent property of the cells to attach to the tissue culture (TC) surface and the use of a selection marker to identify and then select the desired cells. Over time, the stable cells that survive the selection will be from a small colony. These colonies will be refined by encircling them with a cloning cylinder and a non-toxic gel. Considering the innovative design, simple steps, and ease of applicability, any cell culture-trained personnel can follow this method for generating stable cells. The protocol presented is labor-saving and economical, with high reproducibility in developing pure, stable, single cell-derived clones, suitable for long-term and extensive scale up use in subsequent experiments.
Materials and Reagents
Materials
6-well clear flat bottom TC-treated multiwell cell culture plate (Gibco, catalog number: 353046)
100 mm TC-treated cell culture dish (Corning, Falcon, catalog number: 353003)
150 mm Nunc EasYDish culture dish (Thermo, catalog number: 150468)
T75 TC flask (Greiner Cell STAR T75, catalog number: 658170)
15 mL centrifuge tube, conical bottom sterile (Corning, Falcon, catalog number: 352099)
Cryogenic vials, 1.2 mL (Corning, catalog number: 430487)
1.5 mL tubes (Sarstedt, catalog number: 72.690.301)
Pyrex Cloning Cylinders (Corning, catalog number: 3166-10)
Pipette tips 10–200 µL (Greiner bio-one, catalog number: GB775362)
Micropipette (Thermo scientific, Finnpipette F1, catalog number: GJ06928)
Universal permanent marker pen (Schneider, catalog number: Maxx 222)
Artis Tweezer (Sigma, catalog number: 18072ARS)
Reagents
0.05% Trypsin-EDTA (PAN Biotech, catalog number: P10-040100)
Puromycin (Invivo Gen, catalog number: ant-pr-1)
Turbofect® Transfection reagent (Thermo Scientific, catalog number: R0531)
DMEM (1×, Gibco, catalog number: 31885-023)
Dimethyl sulfoxide (DMSO; Thermo Scientific, catalog number: 85190)
Dulbecco's Phosphate buffered saline without Ca and Mg (Sigma, catalog number: D8537-500ML)
pSp-Cas9(BB)-2A-Puro (PX459) V2.0 Plasmid (Addgene, catalog number: 62988)
SIRT1 gRNA (CAACAGGTTGCGGGAATCCAA) (Sigma; Oligo: 8815731198-000040)
Tissue-Tek® O.C.T. Compound (Sakura, catalog number: 4583)
Protein assay dye concentrate (Biorad, catalog number 5000006)
Anti-SIRT1 antibody (Cell Signaling, catalog number: 9475S)
Anti-β-Actin antibody (Cell Signaling, catalog number: 8457S)
Anti-Rabbit-IgG HRP conjugated (Cell Signaling, catalog number: 7074)
Hemocytometer (Sigma, catalog number: Z359629)
Penicillin/Streptomycin (Pan Biotech, catalog number: P06-07100)
Fetal bovine serum (FBS), Heat Inactivated (Gibco, catalog number: A38401-02)
L-Glutamine (Pan Biotech, catalog number: P04-80100)
Protease inhibitor cocktail 100× (Cell Signaling, catalog number: 5871)
Plasmid preparation Kit (Qiagen, catalog number: 12362)
Glycine (Sigma, catalog number: G8898)
Tris-Base (Trizma; Sigma, catalog number: T1503)
EDTA (Acros, catalog number: 147850010)
Tween-20 (Sigma, catalog number: P9416)
Glycerol (Honeywell, catalog number: 15523)
Sodium dodecyl sulfate (SDS; Bio-Rad, catalog number: 161-0302)
Bromophenol blue (BPB; Merck, catalog number: 1.08122.0005)
Dithiothreitol (DTT; Sigma, catalog number: D9779)
β-Mercaptoethanol (β-ME; Sigma, catalog number: M3148)
Mini-Protean TGX Gels (Bio-Rad, catalog number: 4561094)
Color Prestained protein standard marker (Cell Signaling, catalog number: P7719S)
Solutions and Media
Tris-Glycine SDS-PAGE running buffer (5×) (see Recipes)
Lysis buffer (see Recipes)
Basal cell culture medium (see Recipes)
Cell freezing medium (see Recipes)
5× SDS PAGE Loading dye or Laemmli’s buffer (see Recipes)
Equipment
TC incubator (Binder,model: CB 170, catalog number: 9640-0009)
Refrigerated benchtop centrifuge (Sigma, model: 3-18KS, rotor number: 11133)
Refrigerated Microcentrifuge (Eppendorf, model: 5430 R, rotor number: FA-45-30-11)
Ultra-low freezer (Thermo Scientific, catalog number: TSX60086D)
Liquid Nitrogen storage (Wharton, model: K-Series)
Compound Microscope (Wilovert, Hund Wetzlar, catalog number: 008.0309.0)
Procedure
Principle: This protocol is based on two principles; the first utilizes the inherent proliferation potential of the cells used in genetic manipulation (expression or deletion of the desired gene). The second principle relies on the availability of a functional drug-resistant gene for selection in the plasmid backbone. These two principles will be combined to rapidly and easily generate reliably stable, single cell-derived clones.
The detailed procedure describing the step-by-step method for generating the stable clones of cells comprises five (A–E) Parts:
(A) Preparation of cells and design of the pre-experimental set-up
(B) Transfection
(C) Selection and recovery of cells
(D) Colony selection followed by micro-trypsinization in cloning cylinders
(E) Testing of gene expression or gene editing
Before you begin: Prepare and stock the required reagents, medium, cell culture dishes, or plates in sufficient quantity for the planned work. In addition, prepare the study plasmids needed to prepare the stable clones (like CRISPR or fluorescent tagged-protein expressing plasmids or others) with a plasmid preparation kit (refer to Materials and Reagents section).
Preparation of cells and design of the pre-experimental set-up
In this preparatory phase, plan the pre-experiment set-up as follows:
Take a vial of the desired cells out of the liquid nitrogen tank and plate them in a T75 culture flask in 15 mL of basal cell culture medium, routinely used for maintaining these cells. If the cells are already in culture, set aside a T75 flask of healthy, well-growing cells. Usually, 0.5 × 10⁵–1 × 10⁵ cells are sufficient for this step.
Culture these cells in a TC incubator, adjusted to the needs of the cells used. For Hela/U2OS cells, we use a TC incubator maintained at 37 °C, 5% CO2, and 90–95% Relative Humidity (R.H.).
When the culture is 75–80% confluent, aspirate the supernatant and rinse cells with 10–15 mL of Calcium/Magnesium free PBS (1×). Trypsinize the cells to obtain a single-cell suspension for re-seeding.
Seed the cells in a 6-well plate, so they are about 70–75% confluent the next day. Approximately 0.8 × 10⁵–2.4 × 10⁵ cells work very well for most cells. Usually, we seed a single well of cells for each transfection and an additional well for the negative control.
Note: If the kill curve (obtained by incubating the cells with an increasing concentration of the selection drug needed to kill cells over 2–5 days) of the cell type used is not known for the desired selection marker, then seed 6 lanes in triplicate (6 × 3 wells) of the 96-well plate. To begin with, seed approximately 0.5 × 10⁴–1.2 × 10⁴ cells in each well of this plate. More details on kill curve preparation were described previously (Delrue et al., 2018).
Incubate cells in the TC incubator, as indicated in Step A2, or under the basal growth conditions required for the experimental cells.
Transfection of the cells and selection
In this part, we will transfect the cells with the desired plasmid meant to express a gene or for sequence-specific genome editing (such as CRISPR) or others as needed. For this, we suggest following the below-mentioned steps:
Replace the culture medium from each well of the 6-well plate with fresh medium (2 mL/well).
Prepare the transfection mix as shown in the table (Table 1).
Table 1. Preparation of the transfection mix used for cell transfection.
Components needed for transfecting the cells/well Mix A (Plasmid or DNA Part) Mix B (Transfection Reagent Part) DMEM* 200–(X) µL DMEM* 200–A µL Desired Plasmid 0.5–2 µg (X µL) Turbofect Reagent A µL (6 µL) Total Volume of Mix A 200 µL Total Volume of Mix B 200 µL Now mix Mix A and Mix B, and incubate at 25 °C for 15 min Total volume: 200 µL + 200 µL = 400 µL * This DMEM does not contain FBS or any antibiotics.
Notes:This protocol uses the Turbofect® transfection reagent (a cationic polymer in water, which forms a compact, stable complex with DNA). Still, any other transfection reagent suitable for DNA transfection could be used for transfection. In that case, please follow the parameters suggested by the manufacturer of the alternative transfection reagent.
We successfully tested these conditions (as described in Table 1) with Hela, U2OS, NIH-3T3, HEK293, and A549 cells using the Turbofect® transfection reagent. However, for other cells, one needs to define the conditions that yield maximum transfection efficiency with minimal toxicity.
After incubation, transfer the transfection mixture in drop-wise (in a total of 400 µL/well) manner to each well. Do not remove the growth medium from the cells before adding the transfection mix. Place the plate back in the TC incubator.
After 6 hours of transfection, replace the medium with fresh basal cell culture medium (2.0 mL per well) and place it back in the TC incubator.
Selection and recovery of cells
This part provides the details on selecting the transfected from the non-transfected cells. Considering the inherent properties of the antibiotic-resistant genes in the plasmid used for transfection, these can be utilized (such as neomycin, puromycin, or others) for selecting the transfected cells. For this, we suggest following the succeeding steps:
Replace the culture medium from each well of the 6-well plate with fresh medium containing an appropriate selection agent. Do not forget to add the selection agent containing medium to a non-transfected (negative) control. For example, we aim to generate homozygous SIRT1-/- Hela cells using the CRISPR-Cas9 system (details of the vector and the gRNA sequence are provided in the methods section) using a CRISPR-Cas9 vector backbone containing the puromycin gene as a eukaryotic selection marker. Therefore, in this case, we use puromycin at a 1.0 μg/mL concentration (determined by the kill curve for our Hela cell stock; refer to Step A4). Re-incubate the cells in the TC incubator as stated above.
Note: Shorter selection with puromycin mainly propagates the CRISPR plasmid as an episomal vector. However, a more extended duration selection with puromycin will select the cells stably integrated with this plasmid. Though shorter or longer selection does not affect the desired genetic manipulations (CRISPR-mediated genome editing). We recommend keeping the antibiotic selection for a longer duration because the stably integrated plasmid can be utilized as a tool (in case of cross-contamination) in these cells.
Replace the used medium (and also the dead cells) with fresh medium containing the appropriate selection agent as utilized in Step C1, every 48 h. During this time, keep track of the untransfected well (negative control). Within 3–5 days, all untransfected cells will die. This indicates the selection agent is working. The negative control well will be discarded at this stage. Continue selection of transfected cells for an additional week. Further, one can observe the selection much longer to keep a positive pressure or prevent the heterochromatinization of the integrated backbone. This ensures continuous expression of the desired gene.
Trypsinize the transfected cells that survive after selection. Re-seed cells from every well into two culture dishes (15 cm, about 40–100 cells in each plate, respectively) (Figure 1) with about 20 mL of medium containing the selection agent described in Step C1.

Figure 1. Selection, tryspsinization, and re-seeding. The schematic representation shows drug selection, trypsinization, and cell re-seeding in a fresh cell culture dish (15 cm).Incubate the cells in the TC incubator and allow them to form individual colonies. Replace the medium every 4th day and keep the selection. Single cells will form separate colonies, and the size of these colonies will grow over time. Compound microscope can be used to determine the progress in colony growth.
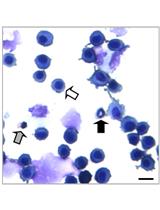
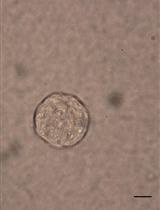
After approximately 10 days, the colonies will be more or less visible to the naked eye (Figure 2), particularly when checked against a dark background. However, a brief analysis with a compound microscope is always helpful.

Figure 2. Selection and marking of the colonies. A. Schematic representation shows the appearance of colonies after 10–14 days of selection. The individual colonies are marked with a laboratory marker pen at the outer bottom surface of the cell culture dish, as shown in green curves. The colonies which are too close (red rectangle) remain unselected. B. Representative compound microscopy image of Hela cells after 13 days of re-seeding on a cell culture dish.Mark the individual colonies using a lab marker from the bottom of the plate without removing the medium. To keep the selection pure, the colonies that are very close to each other should not be selected.
Note: Usually, when 40 or 100 cells are used, colonies are well separated from each other. However, there are chances that some of the colonies have originated from 2 different cells; such clones can be distinguished during the characterization process described in Part E.
Mark 12–36 colonies in total. More colonies can be marked; however, the indicated numbers are sufficient to obtain several stable, single cell-derived clones. Transfer the marked cell culture dish back to the TC incubator.
Representative data Part C: This section presents the data from our recent Hela cell lines generated using CRISPR-Cas9-based genome editing. After about 13 days of re-seeding, the cells survived during the initial puromycin (1 μg/mL) selection. The visible colonies are shown in Figure 2B. The colonies will start becoming visible after approximately 8–10 days.
Colony selection followed by micro-trypsinization in cloning cylinders
In this part, we will transfer the selected colonies to the wells of 6-well plates. This step is critical. Therefore, it needs both attention and speed.
Arrange the following items in a clean TC laminar hood, so they are well within reach without moving out or wasting any time. The sequence of arrangement is shown in Table 2.
Table 2. The sequence of item arrangement for transferring the clones to parent and copy plates.
S.No. Name of the item Remarks 1 Cloning cylinders* Place them in a fresh sterile dish 2 Forceps Sterile, curved ones are better for holding cylinders 3 Pre-warmed trypsin 0.05% (w/v); sufficient volume 4 Pipette tip boxes Sufficient, sterile; 1–200 μL tips for micropipette 5 Micropipette Range 20–200 μL 6 6-well plates (sterile)
Parent plate wells can be labeled as 1P, 2P, 3P, and so on
Copy plate wells can be labeled as 1C, 2C, 3C, etc.* Cloning cylinders supplied non-sterile; these can be sterilized by placing/submerging them in a water filled glass beaker that is then autoclaved. Remove the cell culture medium from the previously marked cell culture dish (from Step C6) and gently rinse colonies with PBS (1×; free from CaCl2 and MgCl2); thereafter, remove the PBS.
Using sterile forceps, take the cloning cylinder and place it directly around the marked colony so that the colony resides in the center of the cylinder. To minimize stress on the cells, work quickly!
Repeat step (Step D3) for the other colonies on the dish; while doing this, please ensure that you do not move the already secured cloning cylinders. A standard 15 cm dish can accommodate 30–50 well-separated cloning cylinders; however, 20–30 cylinders are typically more than enough to begin with.
Once the placing of cloning cylinders is finished, use the Tissue-tek bottle and dispense enough of this medium around all the cloning cylinders without touching or moving them (Figure 3 and Video 1). One must pay attention not to drop Tissue-tek inside the cylinder. Tissue-tek is a viscous, sticky, high-density liquid; thus, one does not need any time to immobilize the cloning cylinder.

Figure 3. Tissue-tek mediated immobilization of cloning cylinders. A. A snapshot shows the bottle of embedding fluid, named Tissue-Tek®. B. The pictorial depiction shows the cloning immobilization of the cylinders by surrounding them with Tissue-tek (in yellow). Video 1. Placing of cloning cylinder and their immobilization with Tissue-tek.
Add 100 μL of pre-warmed trypsin (0.05%) to fill the cavity of each cloning cylinder (Figure 4). Place the back of the culture dish lid and keep it aside for 2–4 min (in the TC laminar hood). During this incubation, start arranging the parent and the copy 6-well plates in parallel (Figure 5).
Note: The concept of parent and copy plates is similar to that of bacterial replica plating. The copy plate will be utilized for initial characterization, and then a selected number of desired clones will be amplified from the parent plate.

Figure 4. Micro-trypsinization of colonies in cloning cylinders. Pictorial representation showing the cloning cylinders surrounded by Tissue-tek (yellow) before or during trypsinization of the colonies. Trypsin is shown in red.
Figure 5. Seeding of cells in Parent and Copy plates. A. Labeling pattern of a 6-well plate. B. Scheme shows the transfer of a cell suspension from the cloning cylinder to the indicated wells of the parent or the copy plate.After 2–4 min of incubation, use a microscope to verify if the cells have detached from the surface. Close monitoring of 2–3 colonies is more than enough.
Mix the trypsinized cell suspension by repeated pipetting with a 200 μL micropipette (usually, 2–3 times, to form a homogenous mixture of cells), and then transfer the cell suspension from the cloning cylinder to the 6-well parent (approximately 30 μL) and copy (approximately 70 μL) plate. This will ensure that enough cells are transferred and simultaneously prevents accidental mix-up of clones. Repeat this for all other cylinders, one by one. Keep on maintaining the parent plate under antibiotic selection. However, to ensure stable clone selection, the copy plate can be devoid of selection at this stage.
Note: Ensure the proper labeling of wells like (P1, P2…… and C1, C2…….). In addition, ensure that you transfer the cell suspension accurately in the parent and the respective copy well without any error.
Transfer the plates to the TC incubator and maintain them as described in Step A2.
Change the exhausted medium every other day.
Most copy plate wells will be confluent within 3–5 days. These cells can be harvested and frozen at -80 °C for a suitable time, or proceed directly to Part E.
Keep monitoring the growth of the parent plates. Once these wells become confluent, trypsinize and freeze them in appropriately marked cryotubes in the freezing medium (see Recipes).
Representative data Part D: To generate the SIRT1-/- Hela cells, cloning cylinders were placed on the well-separated colonies. After the desired number of cloning cylinders was secured, these were immobilized by the addition of Tissue-tek on the outside of these cylinders (Figure 6A). After immobilizing these cylinders, pre-warmed trypsin was used to dissociate the cells from the colonies surrounded using cloning cylinders (Figure 6B).

Figure 6. Cloning cylinders surround Hela cell colonies. A. Representative image showing the immobilized cloning cylinders surrounding the colonies of Hela cells. B. The representative image shows the trypsinization of colonies in immobilized cloning cylinders.
Testing of gene expression or gene editing
The harvested cells can be processed to analyze the outcome, such as CRISPR-based knock-out or the stable expression of any factor. This part will use immunoblotting to determine if the desired result is achieved. For this, the below-given steps can be followed:
Resuspend the cell pellet in ice-cold lysis buffer (please see Recipes section) supplemented with protease inhibitors to a final concentration of 1×.
Incubate the tubes on ice for 20 min, for complete lysis of the harvested cells.
Now centrifuge the tubes at 14,000 rpm (20,800 rcf) at 4 °C for 15 min.
Collect the supernatant of the lysate in pre-labeled tubes for immunoblotting. Simultaneously, prepare the lysate from untransfected control cells for comparison of the expression pattern.
Quantify the total protein content of these lysates.
Note: This method used the Protein assay dye concentrate as a protein quantification reagent. However, other protein quantification methods or reagents can quantify total protein content.
Load and run the SDS-PAGE with approximately 20 μg of the total lysate and analyze it for the desired expression pattern, using the appropriate antibody.
Note: The detailed protocol on SDS-PAGE can be found in the following references (Al-Tubuly, 2000; Hellewell, 2017).
Data analysis
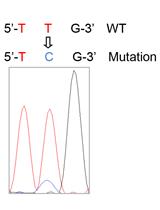
We selected 14 colonies and analyzed them for SIRT1 expression. The mentioned SIRT1 gRNA was directed around the Exon-1 of the human SIRT1 gene. Therefore, a complete absence of SIRT1 protein was expected in homozygous clones. Similarly, the heterozygous clones were expected to present a decreased expression of SIRT1. Upon immunoblotting of the copy colonies, we observed that colony numbers 2, 3, 5, 8, 9, and 11 were SIRT1-/- Hela cells, whereas colony numbers 1, 4, 6, 7, 10, 12, 13, and 14 were originated from SIRT1+/+ or SIRT1+/- cells (Figure 7).

Figure 7. Immunoblotting of the Hela cell genome-edited clones. Representative immunoblot showing the SIRT1 bands detected in the lysates of the wild-type (control) or gSIRT1 edited Hela clones (colonies 1 to 14). The blue dotted line represents two independent but simultaneously performed immunoblots. β-Actin serves as a loading control.Recipes
Tris-Glycine SDS-PAGE running buffer (5×)
Reagent Final concentration Amount Tris-base 125 mM 15.1 g Glycine 1.25 M 94 g SDS 0.5% 5 g H2O n/a to 1,000 mL Lysis buffer (Store at 4 °C for up to 1 month)
Reagent Final concentration Amount NaCl (5 M) 150 mM 3 mL Tris-HCl (1 M, pH 8.0) 50 mM 5 mL EDTA (0.5 M, pH 8.0) 5 mM 1 mL NP-40 (IGEPAL CA-630) 1% 1 mL Sodium deoxycholate (10%) 0.5% 5 mL Sodium dodecylsulfate (SDS; 10%) 0.1% 1 mL H2O n/a to 1,000 mL Keep ice cold. Just before use, supplement (1×) it with a Protease inhibitor cocktail (100×).
Basal cell culture medium (Store at 4 °C up to 4 months)
Reagent Final concentration Amount DMEM (1 g/L D-Glucose) 1× 440 mL Fetal bovine serum 10% 50 mL Penicillin/Streptomycin (100×) 1× 5 mL L-Glutamine (100×) 1× 5 mL Total n/a 500 mL Pre-warm to 37 °C before use.
Cell freezing medium
Reagent Final concentration Amount Basal cell culture medium 80% 8 mL Fetal bovine serum 10% 1 mL DMSO 10% 1 mL 5× SDS PAGE Loading dye or Laemmli’s buffer
Reagent Final concentration Tris-Cl buffer (pH 6.8) 250 mM SDS (electrophoresis grade) 10% (w/v) Bromophenol blue 0.5% (w/v) Glycerol 100 mM DTT or β-ME 10% (w/v)
Note: Loading buffer lacking thiol reagents can be stored at room temperature. Add the thiol reagent from 1 M (DTT) or 14 M (β-ME) stocks just before use.
Acknowledgments
This study was supported by the Deutsche Forschungsgemeinschaft (SFB 1118 & GRK 1874-DIAMICOM). We thank all members of our group and the ALMF/EMBL for their support. This protocol was established to generate the clones used in the following publications: Kumar et al. (2017), Kumar et al. (2020), Madhavan et al. (2021a), and Madhavan et al. (2021).
Competing interests
The authors declare no competing financial interests. Correspondence and requests for materials should be addressed to V.K. (varun.kumar@med.uni-heidelberg.de or varun.kumar@embl.de).
References
- Al-Tubuly, A. A. (2000). SDS-PAGE and Western Blotting. Methods Mol Med 40: 391-405.
- Aranda, A., Bezunartea, J., Casales, E., Rodriguez-Madoz, J. R., Larrea, E., Prieto, J. and Smerdou, C. (2014). A quick and efficient method to generate mammalian stable cell lines based on a novel inducible alphavirus DNA/RNA layered system. Cell Mol Life Sci 71(23): 4637-4651.
- Condreay, J. P., Witherspoon, S. M., Clay, W. C. and Kost, T. A. (1999). Transient and stable gene expression in mammalian cells transduced with a recombinant baculovirus vector. Proc Natl Acad Sci U S A 96(1): 127-132.
- Delrue, I., Pan, Q., Baczmanska, A. K., Callens, B. W. and Verdoodt, L. L. M. (2018). Determination of the Selection Capacity of Antibiotics for Gene Selection. Biotechnol J 13(8): e1700747.
- Giuliano, C. J., Lin, A., Girish, V. and Sheltzer, J. M. (2019). Generating Single Cell-Derived Knockout Clones in Mammalian Cells with CRISPR/Cas9. Curr Protoc Mol Biol 128(1): e100.
- Hellewell, A. L., Rosini, S. and Adams, J. C. (2017). A Rapid, Scalable Method for the Isolation, Functional Study, and Analysis of Cell-derived Extracellular Matrix. J Vis Exp(119): 55051.
- Kumar, V., R. Agrawal, A. Pandey, S. Kopf, M. Hoeffgen, S. Kaymak, O. R. Bandapalli, V. Gorbunova, A. Seluanov, M. A. Mall, S., et al. (2020). Compromised DNA repair is responsible for diabetes-associated fibrosis.EMBO J 39(11): e103477.
- Kumar, V., T. Fleming, S. Terjung, C. Gorzelanny, C. Gebhardt, R. Agrawal, M. A. Mall, J. Ranzinger, M. Zeier, T. Madhusudhan, S., et al. (2017). Homeostatic nuclear RAGE-ATM interaction is essential for efficient DNA repair.Nucleic Acids Res 45(18): 10595-10613.
- Madhavan, B. K., Han, Z., Singh, B., Bordt, N., Kaymak, S., Bandapalli, O. R., Kihm, L., Shahzad, K., Isermann, B., Herzig, S., Nawroth, P. and Kumar, V. (2021). Elevated Expression of the RAGE Variant-V in SCLC Mitigates the Effect of Chemotherapeutic Drugs. Cancers (Basel) 13(11): 2843.
- Madhavan, B. K., Z. Han, A. Sickmann, R. Pepperkok, P. P. Nawroth and V. Kumar (2021). A laser-mediated photo-manipulative toolbox for generation and real-time monitoring of DNA lesions. STAR Protoc 2(3): 100700.
- Simon, M., Van Meter, M., Ablaeva, J., Ke, Z., Gonzalez, R. S., Taguchi, T., De Cecco, M., Leonova, K. I., Kogan, V., Helfand, S. L., et al. (2019). LINE1 Derepression in Aged Wild-Type and SIRT6-Deficient Mice Drives Inflammation. Cell Metab 29(4): 871-885 e875.
- Singh, A. M. (2019). An Efficient Protocol for Single-Cell Cloning Human Pluripotent Stem Cells. Front Cell Dev Biol 7: 11.
- Soutoglou, E. and Misteli, T. (2008). Activation of the cellular DNA damage response in the absence of DNA lesions. Science 320(5882): 1507-1510.
- Toiber, D., Erdel, F., Bouazoune, K., Silberman, D. M., Zhong, L., Mulligan, P., Sebastian, C., Cosentino, C., Martinez-Pastor, B., Giacosa, S., et al. (2013). SIRT6 recruits SNF2H to DNA break sites, preventing genomic instability through chromatin remodeling. Mol Cell 51(4): 454-468.
Article Information
Copyright
© 2022 The Authors; exclusive licensee Bio-protocol LLC.
How to cite
Han, Z., Madhavan, B. K., Kaymak, S., Nawroth, P. and Kumar, V. (2022). A Fast and Reliable Method to Generate Pure, Single Cell-derived Clones of Mammalian Cells. Bio-protocol 12(16): e4490. DOI: 10.21769/BioProtoc.4490.
Category
Cancer Biology > General technique > Cell biology assays > Cell isolation and culture
Cell Biology > Cell isolation and culture > Monolayer culture
Do you have any questions about this protocol?
Post your question to gather feedback from the community. We will also invite the authors of this article to respond.