- Protocols

- Articles and Issues
- For Authors
- About
- Become a Reviewer

Combination of Immunofluorescence and Quantitative Fluorescence In-situ Hybridization for Analysing Differential Gene Expression in the Niche Cells of the Drosophila Lymph Gland
Published: Vol 12, Iss 2, Jan 20, 2022 DOI: 10.21769/BioProtoc.4290 Views: 3479
Reviewed by: Pilar Villacampa AlcubierrePradeep Kumar BhaskarMario Ruiz
Original research article
The authors used this protocol in:

Jul 2021
Advertisement


Protocol Collections
Comprehensive collections of detailed, peer-reviewed protocols focusing on specific topics


Abstract
The Drosophila larval haematopoietic organ or lymph gland consists of multiple cell types arranged in zones. The smallest stem cell compartment consists of 40-45 cells that constitute the haematopoietic niche. In order to analyse the haematopoietic niche, it needs to be labelled with a specific antibody to differentiate it from the other cell types. To characterise a phenotype, it is often necessary to investigate the expression of a gene in a particular stem cell compartment within the lymph gland. In such a situation, in-situ hybridization is performed, as it indicates the localization of gene expression. Although chromogenic in-situ hybridization enables us to compare the signal and tissue morphology simultaneously, it fails to harness the information related to the degree of gene expression. Dual immunofluorescence and in-situ hybridization (IF-FISH) serves as the powerful technique that helps to visualize both protein and mRNA expression within the same cell type. This technique also provides reliable quantification regarding mRNA expression levels. When dealing with a few cells within the organ, like the niche of the larval lymph gland, fluorescently labelled riboprobes allows us to localize and assess the magnitude of gene expression within the niche cells, which are also immunolabelled with a niche-specific marker, to distinguish them from the adjoining cell types.
Background
Larval haematopoiesis in Drosophila melanogaster takes place in a defined organ known as the lymph gland (Rugendorff et al., 1994; Lanot et al., 2001; Evans et al., 2003; Mandal et al., 2004). The lymph gland consists of a pair of anterior lobes, known as the primary lobes, and a few posterior lobes. On the basis of granularity and molecular markers, three distinct zones are defined within the primary lobe. The inner core (medullary zone: MZ) houses blood progenitors that, upon differentiation, populate the outer periphery of the lymph gland (cortical zone: CZ) (Jung et al., 2005). This event of differentiation is carefully orchestrated by a group of cells situated at the posterior end of the primary lobe of the lymph gland, called the posterior signalling centre (PSC), also termed the “niche” of the lymph gland (Krzemień et al., 2007; Mandal et al., 2007; Baldeosingh et al., 2018; Banerjee et al., 2019; Sharma et al., 2019). With the help of various genetic and molecular techniques, researchers were able to understand the mechanistic basis of intercellular crosstalk and stem cell maintenance, using the lymph gland as a model for haematopoiesis. Located next to the larval heart tube, the PSC/niche of the lymph gland is comprised of 40-45 cells, which are embedded within the lymph gland; therefore, isolating these cells and performing a quantitative analysis of a particular “transcript of interest” is immensely difficult and prone to error. To circumvent this hurdle posed by the PSC/niche cells, we perform a detailed protocol of whole-mount immuno-fluorescence and fluorescence in-situ hybridization (IF-FISH) technique in the lymph gland. This technique is fairly quantitative compared to traditional NBT-BCIP based ISH. Using IF-FISH, we can reliably mark the cells of interest and perform a densitometric quantitative measurement of the transcript we are analysing.
Materials and Reagents
Needles (Needle Industries)
Glass slide (Blue Star, 1 mm and 0.1 mm thickness)
Conical Flasks and Test tubes (Tarsons)
96 well plate (Falcon, catalogue number: 353072)
Micro centrifuge tubes and Falcons (Eppendorf)
Parafilm (Bemis Parafilm M)
Competent E. coli strain (DH5-alpha) (Nishimura et al., 1990)
LB broth (Himedia, catalogue number: M1245)
Chloramphenicol (Sigma, catalogue number: C0378)
GeneJET Plasmid Miniprep Kit (Thermo Scientific, catalogue number: K0502)
Restriction Enzymes (NEB, catalogue numbers: R0195S [EcoR1]; R0146S [Xho1])
Phenol:Chloroform:Isoamyl alcohol (Sigma, catalogue number: P2069)
Ethanol, ACS grade (Merck, catalogue number: 1.00983.0511)
Glycogen (Invitrogen, catalogue number: R0551)
Roche DIG RNA Labeling Kit (SP6/T7) (Roche, catalogue number: 11175025910)
8 M LiCl (Sigma, catalogue number: L7026)
Anti-DIGOXIGENIN-POD conjugate (Roche, catalogue number: 11207733910)
tRNA, from BAKER'S YEAST (Sigma, catalogue number: 10109495001)
DTT (Sigma, catalogue number: 43816)
RNase inhibitor (Roche, obtained along with DIG RNA labelling kit)
16% formaldehyde (W/V) methanol free (Invitrogen, catalogue number: 28908)
Bovine serum albumin (BSA) (Sigma, catalogue number: A9418)
Vecta shield (Vector Labs, catalogue number: H1000)
Diethyl pyrocarbonate /DEPC (Sigma, catalogue number: D5758)
Relish clone (DGRC, Clone id: GH01881)
Tyramide Signal Amplification (TSA) Kit (Thermo Fisher, catalogue number: B40957)
Salmon Sperm DNA (Sigma, catalogue number: D7656)
Tween-20 (Sigma, catalogue number: P-7949)
Anti-GFP (rabbit polyclonal) (Cell Signalling Technologies, catalogue number: 2555)
Ultrapure water (Millipore Elix)
Positively Charged Nylon membrane (GE Healthcare, catalogue number: RPN119B)
50× Denhardt’s solution (Invitrogen, catalogue number: 750018)
NBT (nitro-blue tetrazolium chloride) and BCIP (5-bromo-4-chloro-3'-indolyphosphate p-toluidine salt) solution (Sigma, catalogue number: 11681451001)
20× SSC Buffer (Sigma, catalogue number: SRE0068)
1× PBS (see Recipes)
Hybridisation buffer (HB) (see Recipes)
Washing buffer (see Recipes)
Detection buffer (see Recipes)
Medium A (see Recipes)
Medium B (see Recipes)
Fly food (see Recipes)
Equipment
Heating Block (Eppendorf, ThermoStat Plus)
Incubator Shaker (New Brunswick Innova 42)
Centrifugation Machine (Eppendorf, model: 5424R)
Laminar Airflow Hood
UVP HL-2000 HybriLinker (UV CrossLinker)
Microseal (Bio-Rad, catalogue number: MSB1001)
37°C incubator with shaking platform
pH meter (Metrohm pH lab-827)
Microscope (Zeiss Stemi 2000-C)
Cavity block
Nanodrop (Thermo Scientific, NanoDrop ONEC)
Confocal microscope (Zeiss LSM-900)
Brush (NOVELTY Taklon 131)
Dissection needle Holder (Himedia, catalogue number: LA040)
Software
Fiji (Fiji is just ImageJ, Version 2.0.0-rc-49/1.51d), RRID:SCR_002285
Photoshop CC 2019, RRID:SCR_014199
Procedure
Competent cell preparation
Grow the bacterial culture overnight.
Inoculate 500 μL of the culture in 50 mL of Medium A (see Recipes).
Grow the culture till 0.6 OD600.
Keep the culture on ice for 10 min.
Centrifuge the cells at 1,500 × g for 10 min at 4°C.
Discard the supernatant and resuspend the pellet in 500 μL of Medium A.
Add 2.5 mL of Medium B (see Recipes) and make 100 μL aliquots in micro-centrifuge tubes, immediately followed by flash freezing the cells with liquid nitrogen. Store at -80°C.
Amplification of DGRC clone (https://dgrc.bio.indiana.edu/clones/Catalog)
Clones can be obtained from Drosophila Genomics Resource Centre (DGRC) in an FTA disc format.
Transfer the disc into 100 μL of autoclaved distilled water and incubate at 25°C for 60 min. This infuses the clone DNA into the water.
Add 20 μL of DNA solution into freshly prepared chemically competent DH5-alpha (dip the tip properly into the competent cells and ensure proper mixing by tapping, do not vortex).
Incubate the mixture for 30 min on ice and pre-set the heating block at 42°C.
Transfer the tube to the heating block set at 42°C and incubate for 1 min. Immediately transfer the tube back over to ice.
Add nine volumes of LB broth to the DNA-competent cells mixture and incubate at 37°C for 60 min, with shaking at 180 rpm.
Centrifuge the cells at 10,000 × g for 1 min and resuspend the pellet in 100 μL of LB broth.
Spread the resuspended mix onto LB agar plates with the appropriate antibiotic specified in the clone construct. Incubate the plates for 12-16 h at 37°C in an incubator.
Note: For colonies grown in a bacteriostatic antibiotic like “Ampicillin”, excessive incubation can lead to satellite colonies.
Harvest the colonies by streaking into a second antibiotic plate.
Plasmid isolation
Set a primary inoculum of DH5-alpha containing the DGRC clone into a 5 mL test tube containing LB Broth with appropriate antibiotic and incubate it overnight at 37°C in an incubator shaker with a rotation of 180 rpm.
Add 10 μL of this overnight culture to a 100 mL conical flask containing 30 mL of LB broth with appropriate antibiotic. Grow the cells up to 0.6 OD600 and transfer the culture on to ice to slow down the culture growth.
Centrifuge the culture at 10,000 × g for 10 min for 4°C to obtain a pellet.
The following procedure is performed using GeneJET Plasmid Miniprep Kit, with a few added modifications.
Keep autoclaved Type I water in the heating block set at 65°C.
The bacterial pellet obtained in the above steps is thoroughly drained of LB broth and resuspended in 500 μL of “Resuspension buffer” from the kit, containing RNase as per the manufacturer’s protocol. This pellet is divided into two 1.5 mL MCTs, each containing 250 μL of resuspended bacterial pellet.
Add 250 μL of “Lysis buffer” into each tube and mix thoroughly, by tapping and inverting the tube several times. (Do not vortex)
Then add 350 μL of “Neutralization buffer” and mix thoroughly, by inverting tube several times.
Centrifuge the mix at 15,000 × g for 10 min at room temperature (RT). Transfer the supernatant into the columns provided with the kit.
Centrifuge the column at 12,000 × g for 1 min at RT. Discard the flowthrough post centrifugation.
Add 500 μL of wash buffer to the column and centrifuge it at 12,000 × g for 1 min at RT. Discard the flowthrough after centrifugation.
Give a dry spin to the column again at 12,000 × g for 1 min, to remove residual wash buffer.
Transfer the column into a fresh 1.5 mL tube, add 50 μL of autoclaved ultrapure water kept at 65°C into the centre of the column, and spin at 15,000 × g for two minutes.
The plasmid obtained can now be quantitated using a Nanodrop spectrophotometer.
Note: The DNA obtained so far can be used for restriction digestion prior to in-vitro transcription (IVT). However, if it directly proceeded towards IVT, then the quality of the DNA is sub-optimal for IVT and the reaction may not occur suitably.
Restriction Digestion of DGRC clone
The clone requires digestion to avoid extension of the transcript into the vector sequence, so that only the gene of interest will be converted to probe RNA.
Take 5 μg of plasmid DNA and setup a restriction digestion with the appropriate restriction enzymes (Table 1).
Table 1. Restriction digestion of amplified clones.
Undigested EcoRV Only Xho1 Only DNA 5 μg 5 μg 5 μg 10× Buffer 2 μL 2 μL 2 μL Enzyme - 10 Units 10 Units dH2O make up to 20 μL make up to 20 μL make up to 20 μL Incubate the mix at 37°C for at least 4 h.
Perform two digestions as seen in Figure 1 with specific enzymes, to generate the desired DNA fragments for in vitro transcription.
Xho1 digestion: Will create RNA similar to the mRNA of the gene of interest, called the “sense probe” (This will be used as control probe).
EcoRV digestion: Will create anti-sense mRNA called “anti-sense probe” (This will be complementary to the mRNA used as experimental probe) (Figure 1).
After complete digestion, perform a phenol:chloroform isoamyl purification of the digested DNA product, for better yield during in-vitro transcription.

Figure 1. Restriction Digestion of DGRC Clone. A. Description of Clone obtained from DGRC. B. Two digestion patterns are obtained from the clone construct: (i) Upon digestion with “EcoRV”, a 4.1 kb fragment is generated, which can be used for making the anti-sense probe from the SP6 promoter site. (ii) “Xho1” digestion will generate a DNA band of 3.5 kb, which then can be used for making the sense probe from the T7 promoter site.
Phenol Chloroform Isoamyl based purification
Dilute the digested volume to 100 μL, using autoclaved ultrapure water.
Add 100 μL of 25:24:1 of Phenol:Chloroform:Isoamyl Alcohol to the solution and mix well by inverting the tube several times.
Centrifuge the solution at 5,000 × g for 10 min.
The solution will be divided into two phases: the upper phase is the aqueous phase containing the DNA, and the bottom phase is the organic phase containing proteins.
Carefully aspirate the upper aqueous phase into a new tube and add 0.5 μL of glycogen.
Add two volumes of absolute ethanol onto the solution, and incubate the mix at -20°C for 2 h.
Centrifuge the solution at 12,000 × g for 10 min and decant the supernatant.
Wash the pellet with 70% ethanol: to do that add 100 μL of 70% ethanol to the pellet and swirl gently.
Centrifuge it again at 7,500 × g for 10 min. Repeat the wash step to remove residual salts from the DNA.
After centrifugation, decant the supernatant, then air dry the pellet until it becomes translucent.
Resuspend the pellet in ~50 μL of autoclaved ultrapure water.
Perform Nanodrop spectrophotometric analysis for quick quantitation of the DNA, and/or check the purified DNA product in a gel, to do both a qualitative and quantitative analysis.
In-Vitro Transcription (Roche-DIG labelling Kit)
Preparing DIG labelled RNA probes
Take 1 µg of digested and purified DNA (for both sense and anti-sense probes) and set the following reaction from the reagents provided in the Roche DIG Labelling kit (Table 2).
Table 2. DIG Labelling reaction.
DNA 1 µg of DNA Buffer 2 μL DIG RNA labelling Mix 2 μL Enzyme 2 μL RNase Inhibitor 2 μL Nuclease Free H2O make up to 20 μL Incubate the mix at 37°C for 2-4 h (the viscosity of the solution will increase drastically if the RNA probe was synthesized properly).
Post incubation, add 2 μL of RNase free DNase to each mix and incubate for 30 min.
After incubation, inactivate the DNase by performing a 5 min incubation at 75°C, then immediately cooling it down to 4°C.
Note: This step will inactivate the DNase and also help linearize the RNA probe strands.
Note: Following this, perform a LiCl based precipitation of DIG labelled RNA, to obtain purified probes and get rid of proteins, and undigested and digested DNA.
Precipitation of RNA probes using LiCl
Make up the volume of the synthesized probe to 50 μL by adding ultrapure water.
Add 0.5 volumes of 7.5 M LiCl (25 μL) and incubate at -20°C for 2-4 h.
Note: Although not preferable, add glycogen if the final yield of RNA probe is not enough.
Spin down the solution at 15,000 × g at 4°C for 20 min. Discard the supernatant.
Add 200 μL of 70% ethanol to the pellet and spin down at 10,000 × g for 15 min.
Air dry the pellet and resuspend the pellet in ~30 μL of ultrapure water.
Check the probe in a gel and perform an NBT/BCIP based dot blot to analyse the efficiency of the DIG label on the probe (Figure 2).
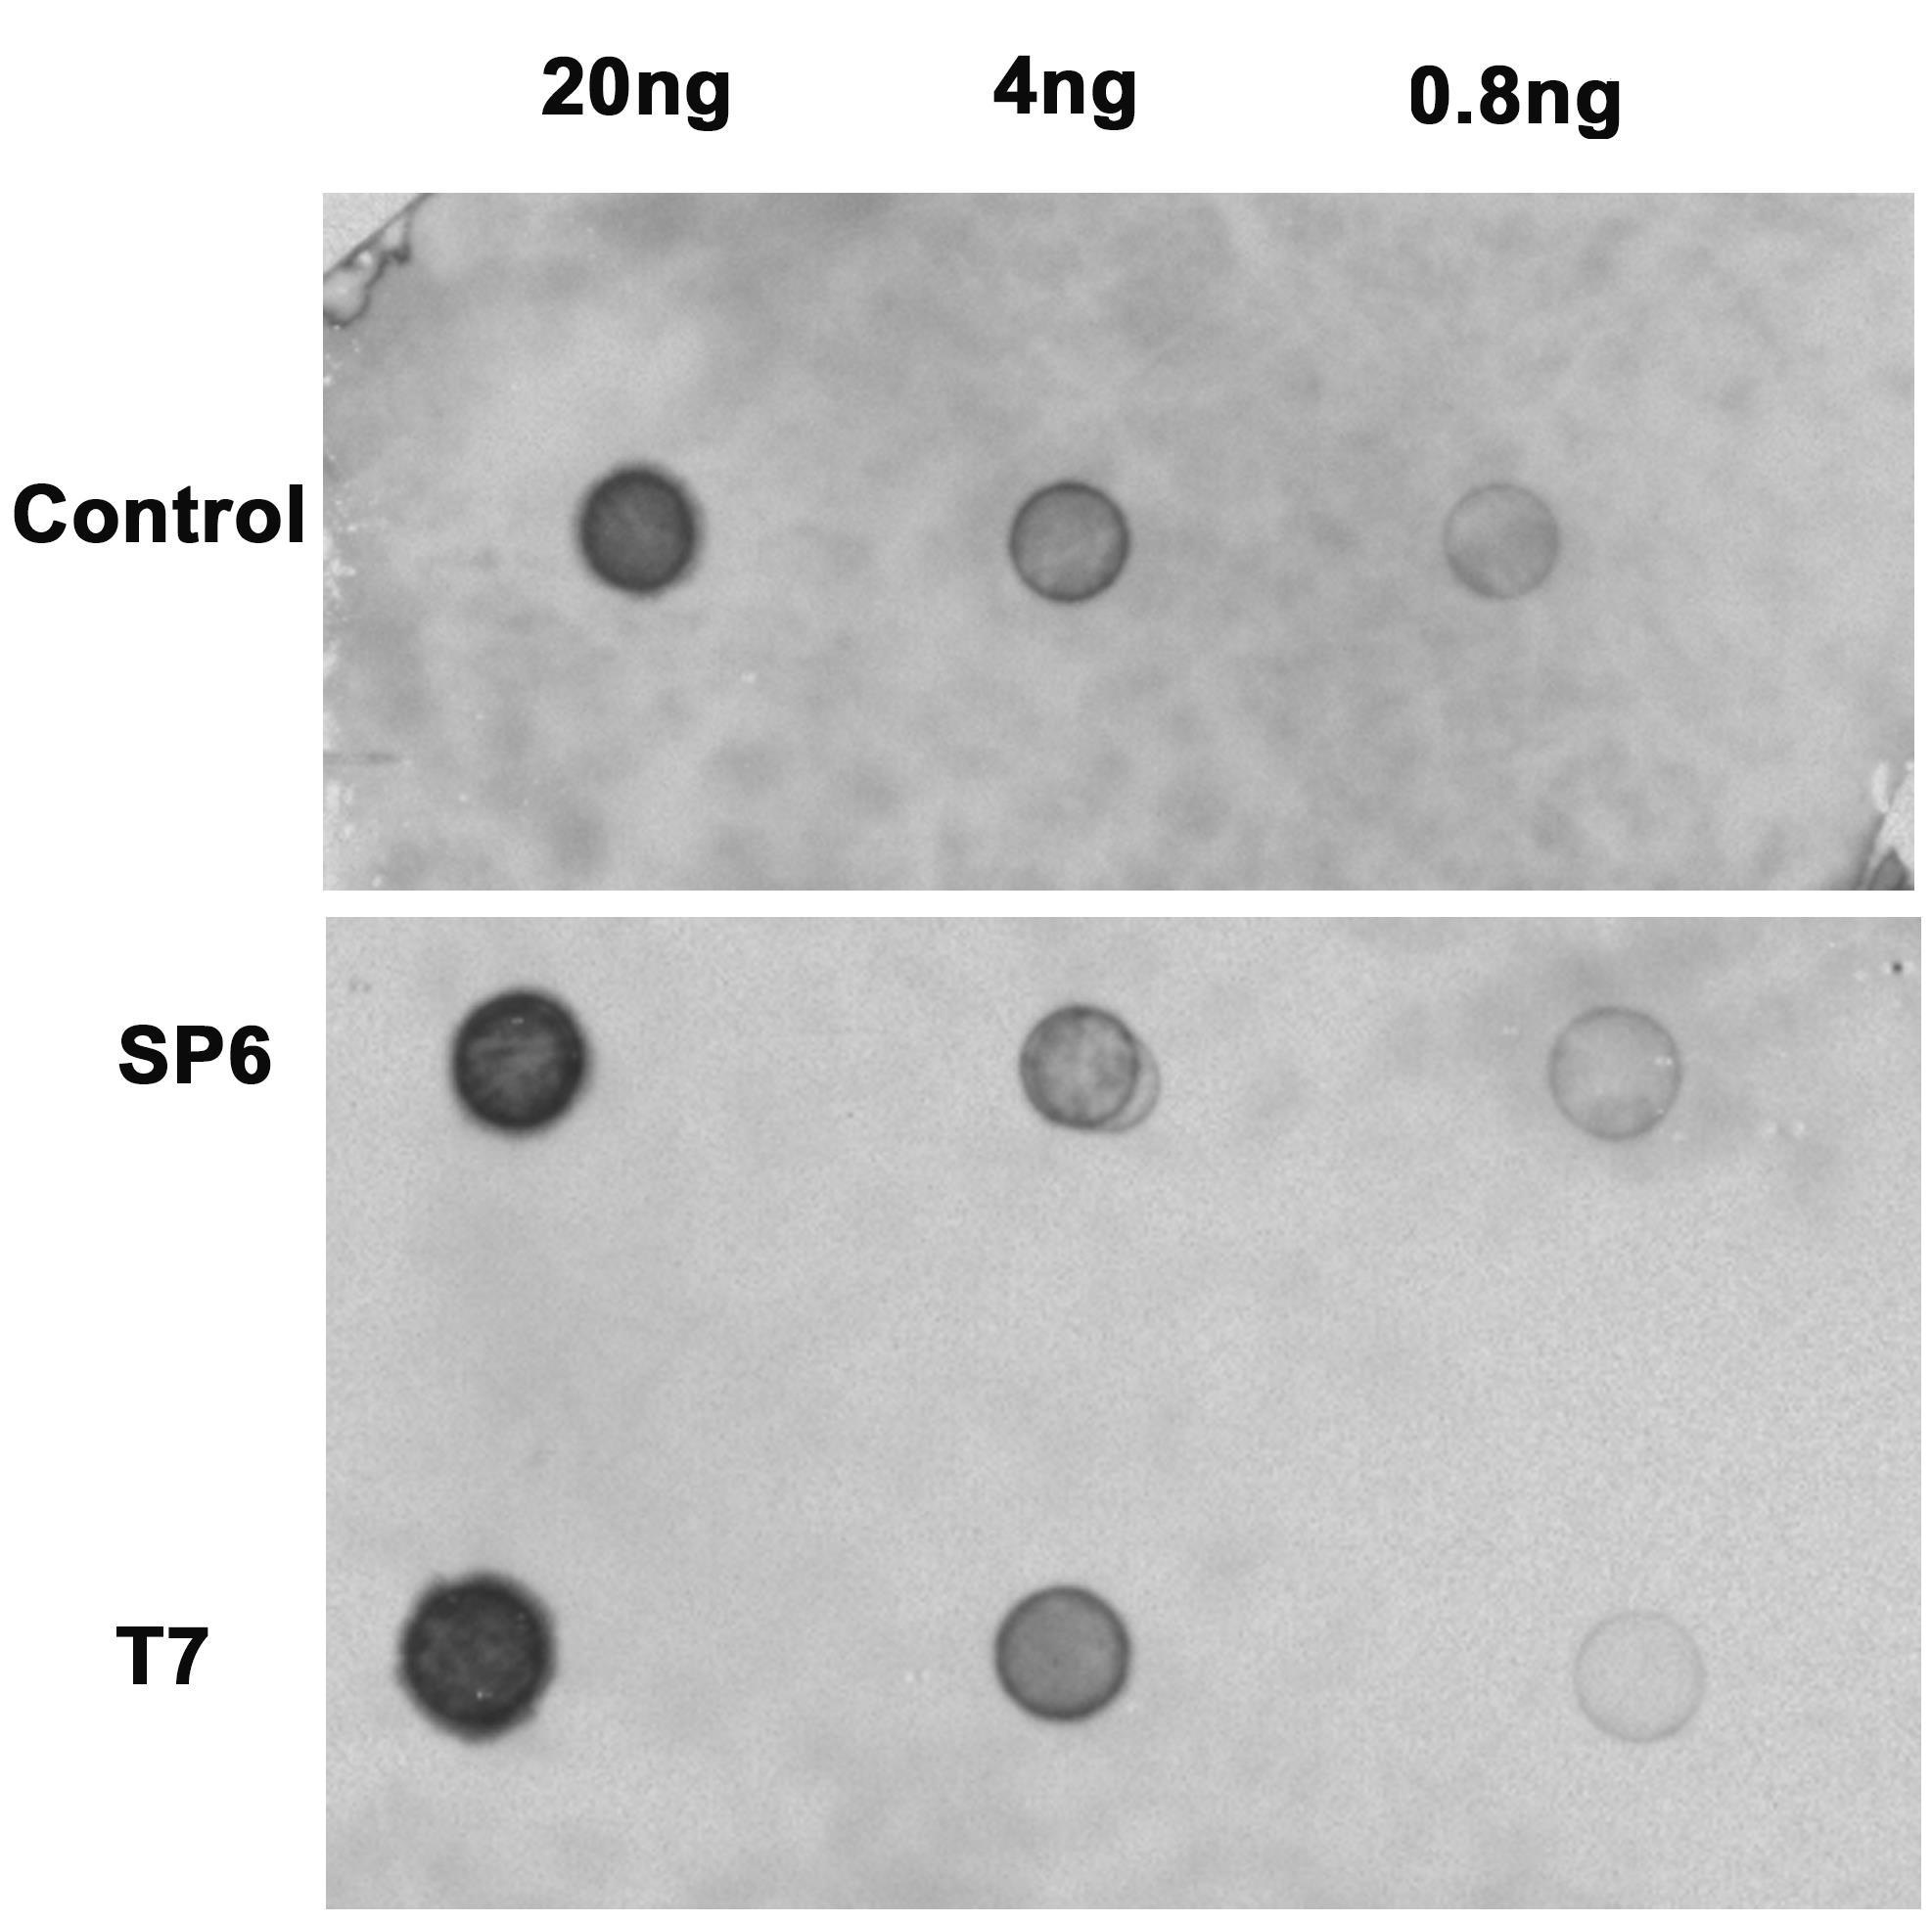
Figure 2. Estimation of probe efficiency. Dot blot showing the efficiency of DIG label on the control probes provided with the kit, lower blot (serially diluted) shows the efficiency of DIG labelling in synthesized SP6 and T7 probes. Quantitation is done by comparing the dot intensities of probes with intensities of control dots of known concentration.
NBT/BCIP based dot blot
Cut the nylon membrane in the required sizes.
Spot serially diluted RNA probe (control and experimental) on the membrane.
Incubate the membrane in an UV crosslinker at 1,500 μJ/cm2 for 10 min, to crosslink the probe with the membrane.
Dry the membrane at 55°C for 10 min in a moist chamber.
Note: Make sure to stick the membrane onto the petri dish’s wall using parafilm.
Wash the membrane using 1× SSC (see Recipes) for 10 min at RT.
Add 1× Denhardt’s solution (Blocking solution) and incubate for 30 min-1 h.
Add anti-DIGOXIGENIN-AP conjugate (primary antibody) prepared in blocking solution and incubate for 1-2 h.
Remove the primary antibody (can be re-used) and wash twice for 15 min using washing buffer (see Recipes).
Equilibrate the membrane for 2 min using detection buffer (see Recipes).
Add the NBT/BCIP solution prepared in detection buffer, incubate the membranes in a wet chamber at 37°C, and check for colour formation. (NBT and BCIP yield an intense insoluble black-purple precipitate when reacted with alkaline phosphatase, a popular enzyme conjugate for antibody probes.)
Visualize the image of the blot in a Gel/Blot imaging platform (UVP Gel-Doc).
The probe efficiency is evaluated by comparing the dot intensity of several dilutions of synthesized probes to that of control dots of probes with known concentration provided with the DIG labelling kit.
Note: Steps from 10 are light sensitive and should be performed in the dark.
FISH – Modified from Toledano et al. (2012)
Sample preparation and immunofluorescence
Before commencing the protocol, treat all the materials including phosphate buffer saline (PBS) with DEPC, to avoid any RNase contamination.
Collect third-instar (L3) wandering larvae and wash them in a cavity block containing 1× PBS. Wash them properly to remove any food particles.
Dissect and transfer the larvae to a cavity block containing 1× PBS. The block should be kept on ice (Figure 3 and also refer to Video 1).
Fix at RT in 4% formaldehyde fixative for 30 min, with gentle shaking. Do not over-fix the samples, as over-fixation often results in low signal.
Wash thrice, for 5 min each, in 1mL of 0.1% PBTween-20 mixed with tRNA (250 μg/mL) (PBTH) with gentle shaking.
Block for 30 min in 5% BSA prepared in PBTH.
Remove as much of the last wash as possible, but do not allow the tissue to dry completely. Prepare primary antibody at the recommended concentration in PBTH mixed with RNase inhibitor (1:200) and DTT (1 mM) (PBTHR).
Incubate the tissues in primary antibody at 4°C for at least 16 h.
Note: The reducing agent DTT and the RNase inhibitor enzyme are essential to inactivate RNases commonly found in antibody solutions.
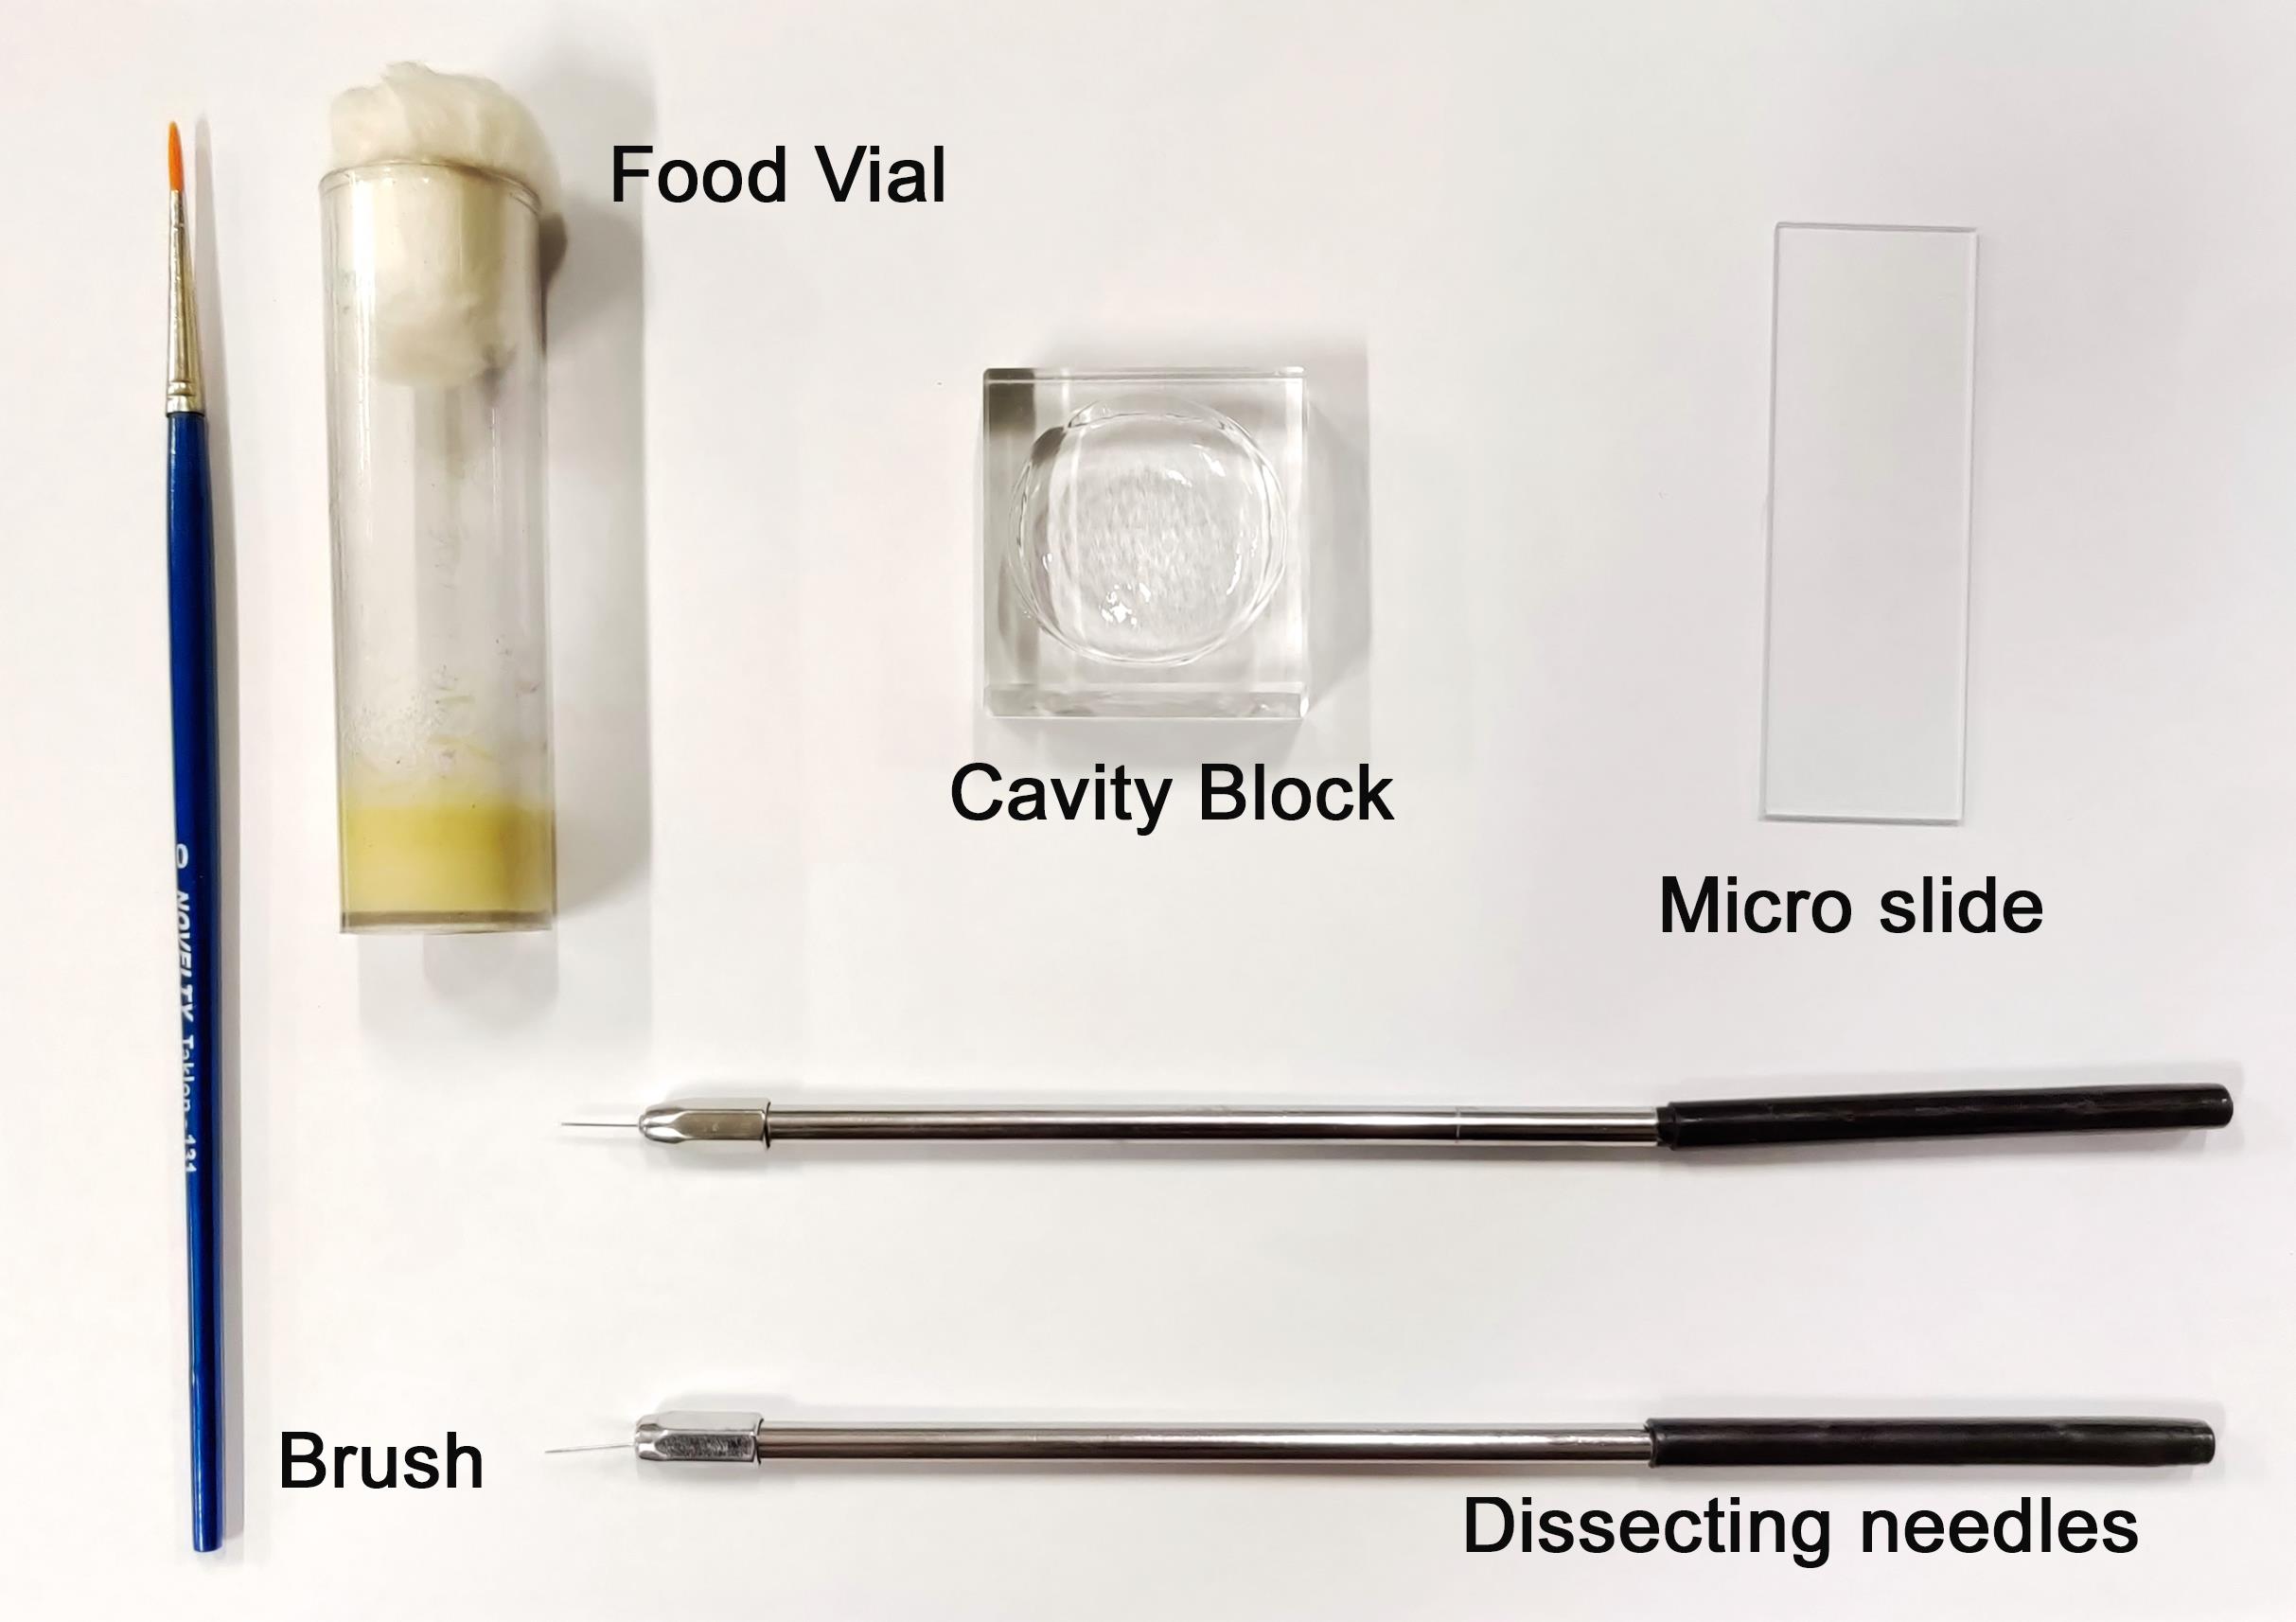
Figure 3. Dissection set up. Video 1. Larval dissection.
In-situ hybridisation
Take out the cavity block and wash the tissues thrice with PBTH for 5 min.
Incubate the samples with fluorescent-labelled secondary antibody in PBTHR for 4 h (LIGHT SENSITIVE).
Wash the tissues thrice with PBTH, for 5 min, with gentle shaking.
Remove the last wash and fix the samples using 10% formaldehyde (in 1× PBS) for 30-35 min at RT on a shaker.
Note: The second fixation is to crosslink and prevent the denaturation of the primary and secondary antibody complex.
Wash the tissues thrice, for 5 min in PBTH.
Note: During these washes, heat up the hybridisation buffer (HB) to 65°C. Keep the tissue chamber moist to prevent evaporation of the solutions in the cavity block.
Incubate the tissues with prewarmed HB for 10 min in the hybridisation chamber set at 65°C.
Mix hybridisation buffer with 5% BSA to make the blocking solution.
Note: Make sure that the BSA is completely dissolved.
Remove HB and block with blocking solution for 1 h in a 65°C.
Before the completion of the above incubation, prepare the RNA probe mix.
To prepare the RNA probe mix, add the DIG-labelled probes to the blocking solution and make the final concentration of the solution to ~2 μg/mL. Heat the mix to 80°C for 10 min, briefly spin down, and cool to ~65°C.
Note: Heating is essential, as it prevents the formation of secondary structures.
Add the RNA probe mix to a 96-well plate and transfer the samples to the wells.
Seal the 96-well plate using microseal. Place the plate within a moisture chamber. Incubate the tissues for at least 18 h at 65°C.
Prepare three dilutions of PBT in HB (vol/vol) as follows: 1:4 (Solution A), 1:1 (Solution B) and 4:1 (Solution C) (two washes per sample). Prewarm the solutions at 65°C.
Take the tissues from the plate and transfer them to the cavity block containing solution A. Rinse once quickly and then wash the tissues twice with the same for 20 min at 65°C.
Remove solution A, rinse once using solution B, and then wash twice for 20 min at 65°C.
Remove solution B, rinse once quickly in solution C, and then wash twice for 20 min at 65°C.
Remove the last wash of solution C and bring the tissues back to RT. Wash the tissues using PBT, twice for 15 min each time, with gentle shaking.
Block the tissues with 10% Normal Goat Serum (NGS, provided with the TSA kit) prepared PBT buffer for 30 min at RT.
Remove the block buffer and incubate the samples with DIG-POD–specific antibody prepared in block (1:500) overnight at 4°C.
Signal detection (TSA amplification)
Once the peroxidase (POD) tagged antibody is bound to the probe, we use tyramide-based amplification of signal intensity, in which a fluorophore tagged with tyramide (inactive) is used. Peroxidase activity in the antibody in the presence of H2O2 activates this inactive tyramide, which attaches itself to the protein tyrosine side chain of the antibody, amplifying the signal. TSA-based amplification becomes necessary, as it provides enhanced sensitivity and high specificity compared to normal FISH, which gives a low to moderate signal intensity and is also inefficient for detecting low expressing transcripts.
Wash the samples twice for 10 min each using PBT.
Rinse the samples with PBS. During this time, prepare the TSA labelling solution.
Freshly prepare the H2O2 solution (working concentration) from the stock solution in dH2O.
Prepare the labelling mix using the components provided and as mentioned in the kit, and keep it at RT (Table 3).
Table 3. TSA labelling mixture (for 200 μL).
Tyramide 2 μL 100× H2O2 2 μL Reaction buffer 10 μL dH2O 186 μL Remove the PBS, add the labelling solution to the tissues, and keep it at RT for 8-10 min. Ensure that the samples are completely immersed in the solution. During this time, prepare the stop reagent from the stock solution.
Note: Incubation time has to be standardised according to the signal obtained.
Add the stop reagent and keep the samples in RT for 30 s-1 min.
Note: The time duration of this step has to be standardised according to the signal obtained.
Remove the solution from the tissues and wash with PBS twice for 5 min each at RT on a shaker.
Mount the samples in Vectashield and observe under the microscope (Figure 4).
Note: Extra care should be taken while mounting the samples, as the lymph gland will be fragile due to harsh in-situ treatments. If an RNA probe is being used for the first time, mount only a small sample and use the microscope to check for background. If the fluorescence background is too high to observe a specific signal, wash for 10 min in PBT at 65°C, followed by another 5 min wash in PBT at RT, and then mount the tissues in Vectashield.
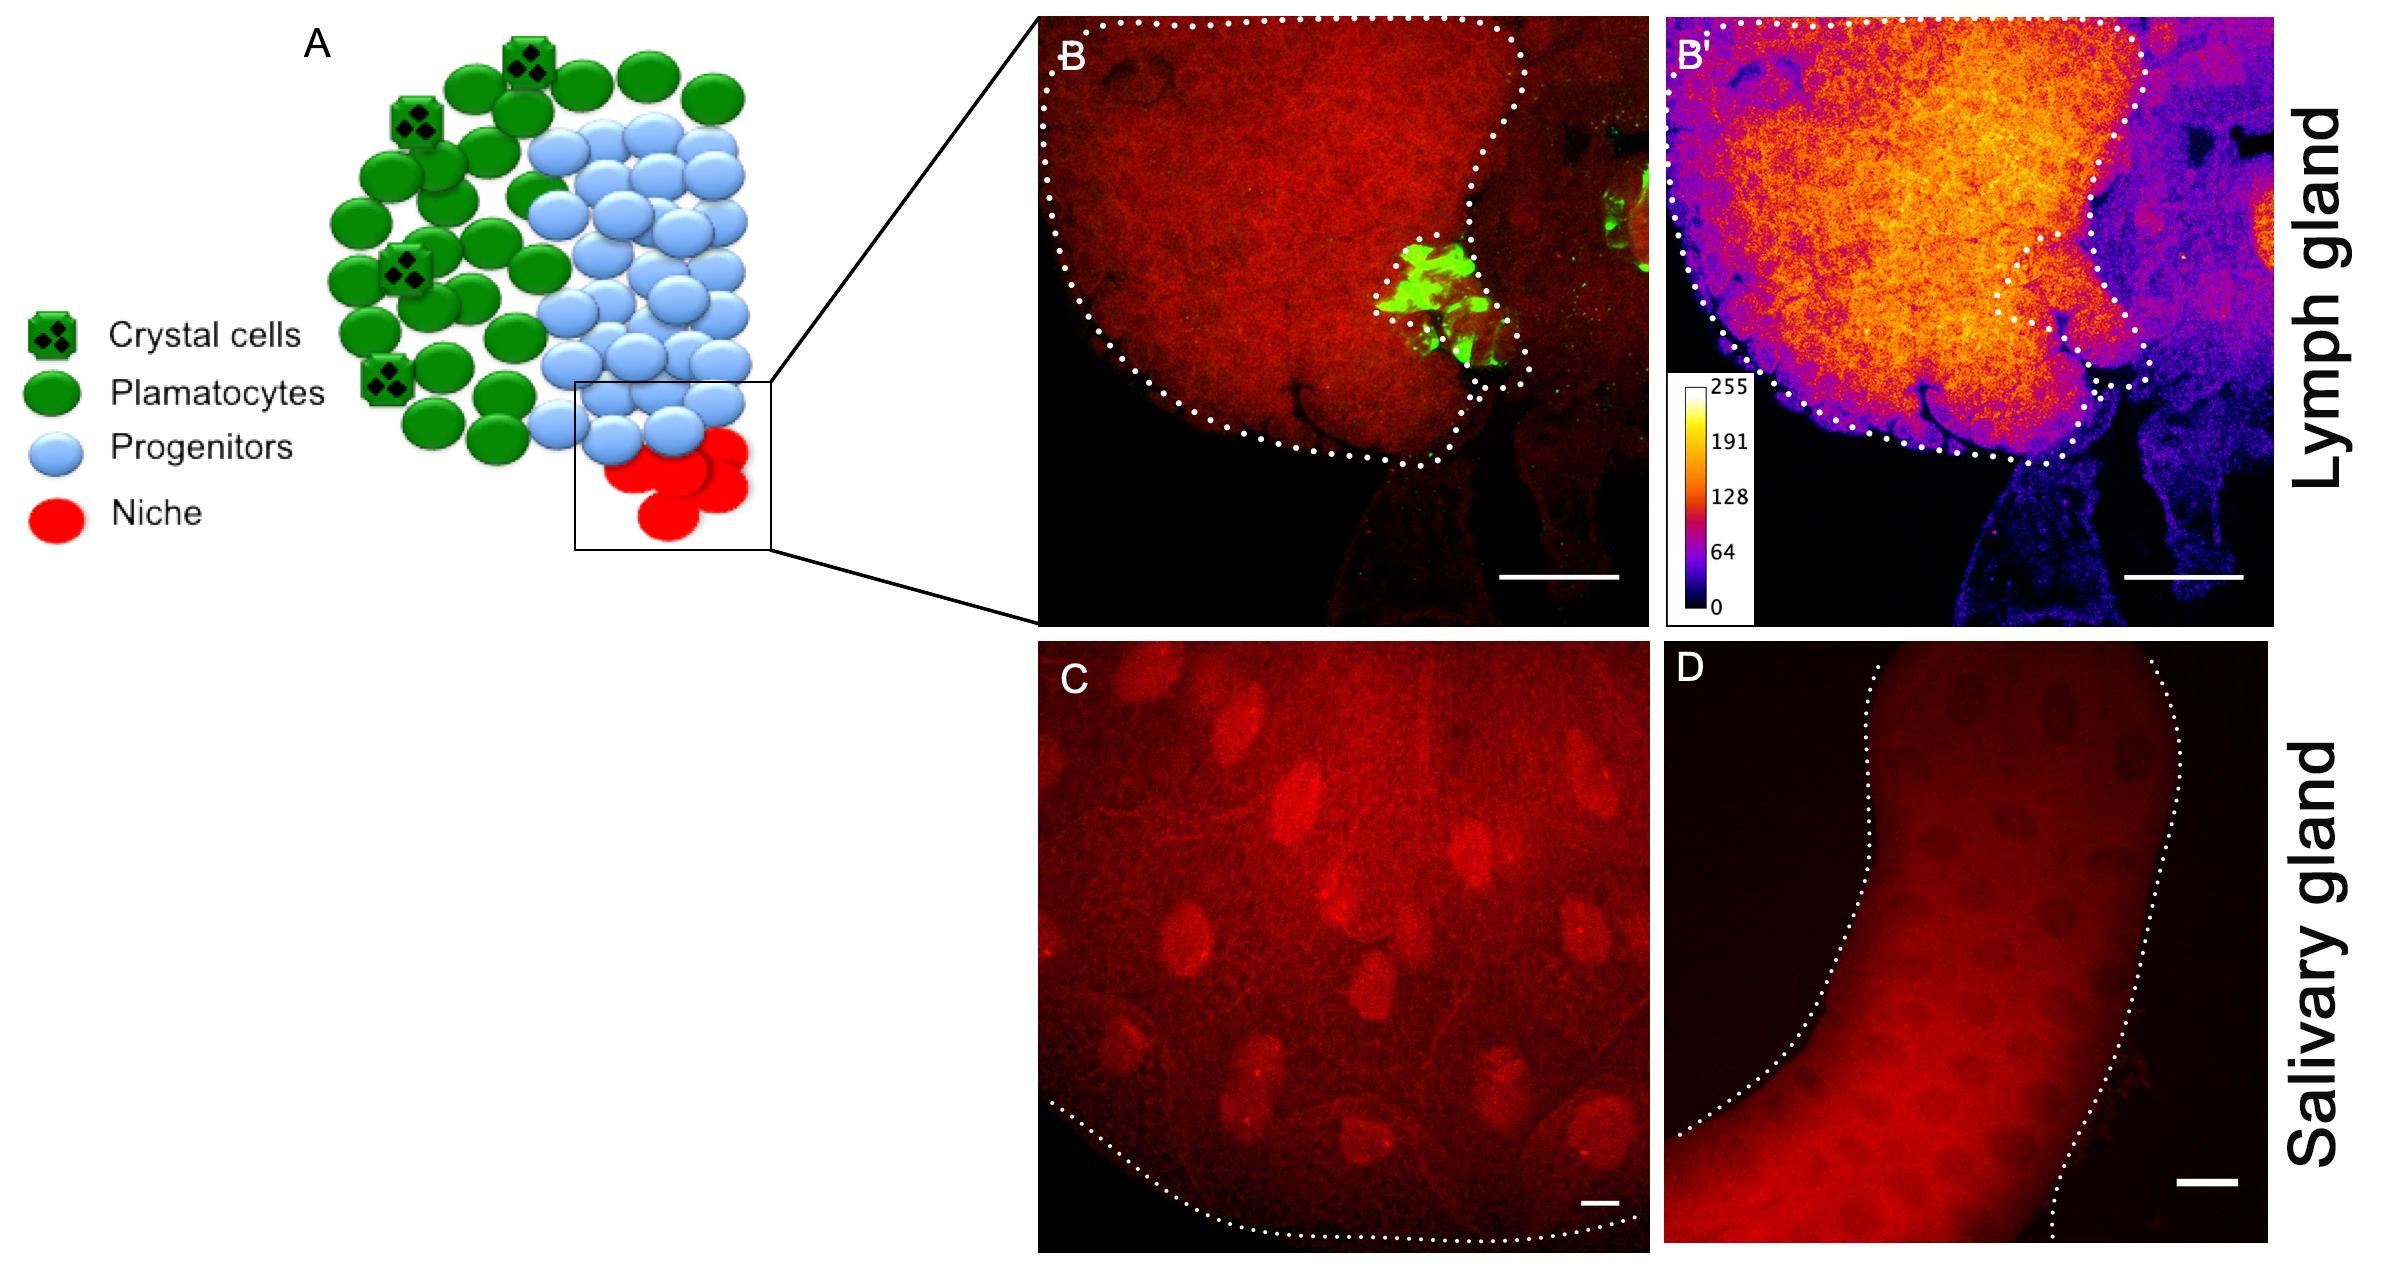
Figure 4. Expression of RNA transcript in tissues. A. Image of lymph gland depicting different cell types. B. IF-FISH showing the expression of RNA transcripts (specific for Relish gene) within the niche, which is positively labelled with niche specific primary antibody (green). B’. Intensity profiling using fire tool (ImageJ), shows Relish transcript enrichment in the lymph gland cells. C. Salivary gland shows strong expression of Relish transcripts in the nucleus (positive control). D. Sense probe shows nonspecific background expression in the salivary gland (negative control). The white dots mark the boundary of the lymph gland, the niche, and salivary glands. Scale bar: 20 μm.Imaging
Always keep a positive and negative controls (sense probe) along with the experimental tissue.
Keep the slides in a slide box at 4°C post mounting.
It is advisable that the imaging of the sample slides is done on the same day, to have maximum signal intensity for error free quantifications.
Image analysis was done using Fiji. The fluorescence intensity can be qualitatively represented by using the fire tool in ImageJ (Image > Lookup Tables > Fire), which can differentially label high and low intensity zones in the image. For quantitative purposes, for comparing control and experimental images, we followed the steps mentioned in https://theolb.readthedocs.io/en/latest/imaging/measuring-cell-fluorescence-using-imagej.html. The mean fluorescence intensity of the RNA probe expression (red) in the niche cells (green) was plotted in GraphPad Prism for statistical analysis.
Note: Make sure to subtract the background intensity (region next to your cell that has no fluorescence) from the mean intensity, to get the absolute values, which can be further plotted.
Recipes
Hybridisation buffer (HB) (15 mL)
Deionised formamide, 7.5 mL
20× SSC, 3.75 mL
10% Tween-20, 0.15 mL
Salmon sperm DNA (10 mg/mL), 0.15 mL (serves as a strong blocking reagent)
Adjust the pH to 5.0 using HCl, and make up the volume to 15 mL using DEPC-treated H2O.
1× PBS (1 L)
NaCl, 8 g
KCl, 0.2 g
Na2HPO4, 1.44 g
KH2PO4, 0.24 g
Use DEPC-treated dH2O for preparing PBS.
Adjust the pH to 7.2 and autoclave before using.
Washing buffer
0.1 M Tris-HCl, pH 9.5 (20°C)
0.1 M NaCl
0.05 M MgCl2
Detection buffer
0.1 M Tris-HCl, pH 9.5 (20°C)
0.1 M NaCl
Medium A (50 mL)
10% Glucose, 1 mL
0.5 M MgSO4, 1 mL
LB media, 48 mL
Medium B (5 mL)
87% Glycerol, 2 mL
Polyethylene glycol (PEG), 0.6 g
0.5 M MgSO4, 0.12 mL
LB media, 2.6 mL
Filter sterilize the media before using.
Fly food (1 L)
Components Amount Agar 9 g Maize powder 51 g Sugar 45 g Yeast 18 g Methylparaben 3 g in 6 mL of absolute ethanol Propionic acid 3 mL
Acknowledgments
The work herein was supported by the Wellcome Trust DBT India Alliance (IA/S/17/503100) to LM. This protocol has been demonstrated to work for dual labelling of mRNA and proteins in the stem cell niche of the lymph gland of Drosophila third instar larvae (Ramesh et al., 2021) published in eLife (DOI: 10.7554/eLife.67158). Figure 1 was generated with the help of Biorender (https://app.biorender.com/).
Ethics
The authors declare no competing interests.
References
- Baldeosingh, R., Gao, H., Wu, X. and Fossett, N. (2018). Hedgehog signaling from the Posterior Signaling Center maintains U-shaped expression and a prohemocyte population in Drosophila. Dev Biol 441(1): 132-145.
- Banerjee, U., Girard, J. R., Goins, L. M. and Spratford, C. M. (2019). Drosophila as a Genetic Model for Hematopoiesis. Genetics 211(2): 367-417.
- Evans, C. J., Hartenstein, V. and Banerjee, U. (2003). Thicker than blood: conserved mechanisms in Drosophila and vertebrate hematopoiesis. Dev Cell 5(5): 673-690.
- Jung, S. H., Evans, C. J., Uemura, C. and Banerjee, U. (2005). The Drosophila lymph gland as a developmental model of hematopoiesis.Development 132(11): 2521-2533.
- Krzemień, J., Dubois, L., Makki, R., Meister, M., Vincent, A. and Crozatier, M. (2007). Control of blood cell homeostasis in Drosophila larvae by the posterior signalling centre. Nature 446(7133): 325-328.
- Lanot, R., Zachary, D., Holder, F. and Meister, M. (2001). Postembryonic hematopoiesis in Drosophila. Dev Biol 230(2): 243-257.
- Mandal, L., Banerjee, U. and Hartenstein, V. (2004). Evidence for a fruit fly hemangioblast and similarities between lymph-gland hematopoiesis in fruit fly and mammal aorta-gonadal-mesonephros mesoderm. Nat Genet 36(9): 1019-1023.
- Mandal, L., Martinez-Agosto, J. A., Evans, C. J., Hartenstein, V. and Banerjee, U. (2007). A Hedgehog- and Antennapedia-dependent niche maintains Drosophila haematopoietic precursors. Nature 446(7133): 320-324.
- Nishimura, A., Morita, M., Nishimura, Y. and Sugino, Y. (1990). A rapid and highly efficient method for preparation of competent Escherichia coli cells. Nucleic Acids Res 18(20): 6169.
- Rugendorff, A., Younossi-Hartenstein, A. and Hartenstein, V. (1994). Embryonic origin and differentiation of the Drosophila heart. Rouxs Arch Dev Biol 203(5): 266-280.
- Ramesh, P., Dey, N. S., Kanwal, A., Mandal, S. and Mandal, L. (2021). Relish plays a dynamic role in the niche to modulate Drosophila blood progenitor homeostasis in development and infection. Elife 10: e67158.
- Sharma, S. K., Ghosh, S., Geetha, A. R., Mandal, S. and Mandal, L. (2019). Cell Adhesion-Mediated Actomyosin Assembly Regulates the Activity of Cubitus Interruptus for Hematopoietic Progenitor Maintenance in Drosophila. Genetics 212(4): 1279-1300.
- Toledano, H., D'Alterio, C., Loza-Coll, M. and Jones, D. L. (2012). Dual fluorescence detection of protein and RNA in Drosophila tissues. Nat Protoc 7(10): 1808-1817.
Article Information
Copyright
![]() Ramesh et al. This article is distributed under the terms of the Creative Commons Attribution License (CC BY 4.0).
Ramesh et al. This article is distributed under the terms of the Creative Commons Attribution License (CC BY 4.0).
How to cite
Readers should cite both the Bio-protocol article and the original research article where this protocol was used:
- Ramesh, P., Ghosh, S. and Mandal, L. (2022). Combination of Immunofluorescence and Quantitative Fluorescence In-situ Hybridization for Analysing Differential Gene Expression in the Niche Cells of the Drosophila Lymph Gland . Bio-protocol 12(2): e4290. DOI: 10.21769/BioProtoc.4290.
- Ramesh, P., Dey, N. S., Kanwal, A., Mandal, S. and Mandal, L. (2021). Relish plays a dynamic role in the niche to modulate Drosophila blood progenitor homeostasis in development and infection. Elife 10: e67158.
Category
Developmental Biology > Cell signaling
Molecular Biology > RNA > RNA detection
Cell Biology > Cell imaging > Confocal microscopy
Do you have any questions about this protocol?
Post your question to gather feedback from the community. We will also invite the authors of this article to respond.