
- Home
- Protocols

-

DNA processing and Duplex-Seq
Last updated date: Sep 30, 2023 Views: 819 Forks: 0
Library Preparation Protocol for Mitochondrial Duplex Sequencing
Reagents Needed:
- QIAamp DNA Micro kit (50) Cat#56304. MinElute columns stored at 4C.
- DNeasy Blood & Tissue kit 50 Cat# 69504 or 250 reactions Cat# 69506.
- NEB Next® Ultra II DNA Library Prep Kit for Illumina (NEB E7645S)
- KAPA Real-Time Library Amplification Kit w/ Florescent Standards
- IDT XGen Hybridization and Wash kit (Cat#1072281)
- Human Cot-1DNA (1ug/uL) (Life Technologies) small box -20C
- Qubit dsDNA High Sensitivity Assay kit and tubes (Life Technologies)
- Agencourt Ampure XP magnetic beads
- Dynabeads M-270 Streptavidin Beads
- Freshly prepared 80% ethanol
- Always use Nuclease free water
- Agilent SureSelect Elution and Neutralization Buffer
- Vivacon 500 columns – 30,000 MWCO kit of 25 (Sartorious Stedim): optional if concentration is needed
- NEBNext® Multiplex Oligos for Illumina® (96 Unique Dual Index Primer Pairs) (NEB 6440S)
Custom-made
- MWS-13 shifted, MWS-20 and mouse mito reverse primers, 100 uM
- Blocking Oligos MWS-60 and MWS-61, 1mM
- IDT DUMI adapters, 25 uM
Materials Needed:
- microTUBE-50 AFA Fiber Screw-cap
- Low-Bind/High Recovery 1.5mL microcentrifuge tubes (Eppendorf DNA LoBind 1.5mL microcentrifuge tubes or Axygen Maximum Recovery recommended)
- Biotix Low-Bind 0.65 mL Tubes
- Axygen 0.5 mL Tubes for Qubit, thin wall, clear, flat cap PCR-05-C
- GeneMate 0.2 mL PCR Tubes with dome cap
- BioRad 0.2 mL low profile PCR Tubes, white
- BioRad Optical flat 8-cap strips for 0.2 mL PCR Tubes
Equipment:
- Thermocycler
- Quantitative PCR machine
- SpeedVac (optional)
- Magnetic tube rack
- Qubit Fluorimeter
Before starting library prep:
- Break large batches of samples into small (6-8 samples) groups of samples for easy handling. Processing more than 8 samples at once by one person is complicated, especially in the capture steps.
- If processing multiple experimental groups, randomize samples when breaking into sub-batches in a way that not all samples from the same experimental group are processed in the same batch. This corrects for sequence differences among batches and prevents losing an entire experimental group if something goes wrong with a specific batch.
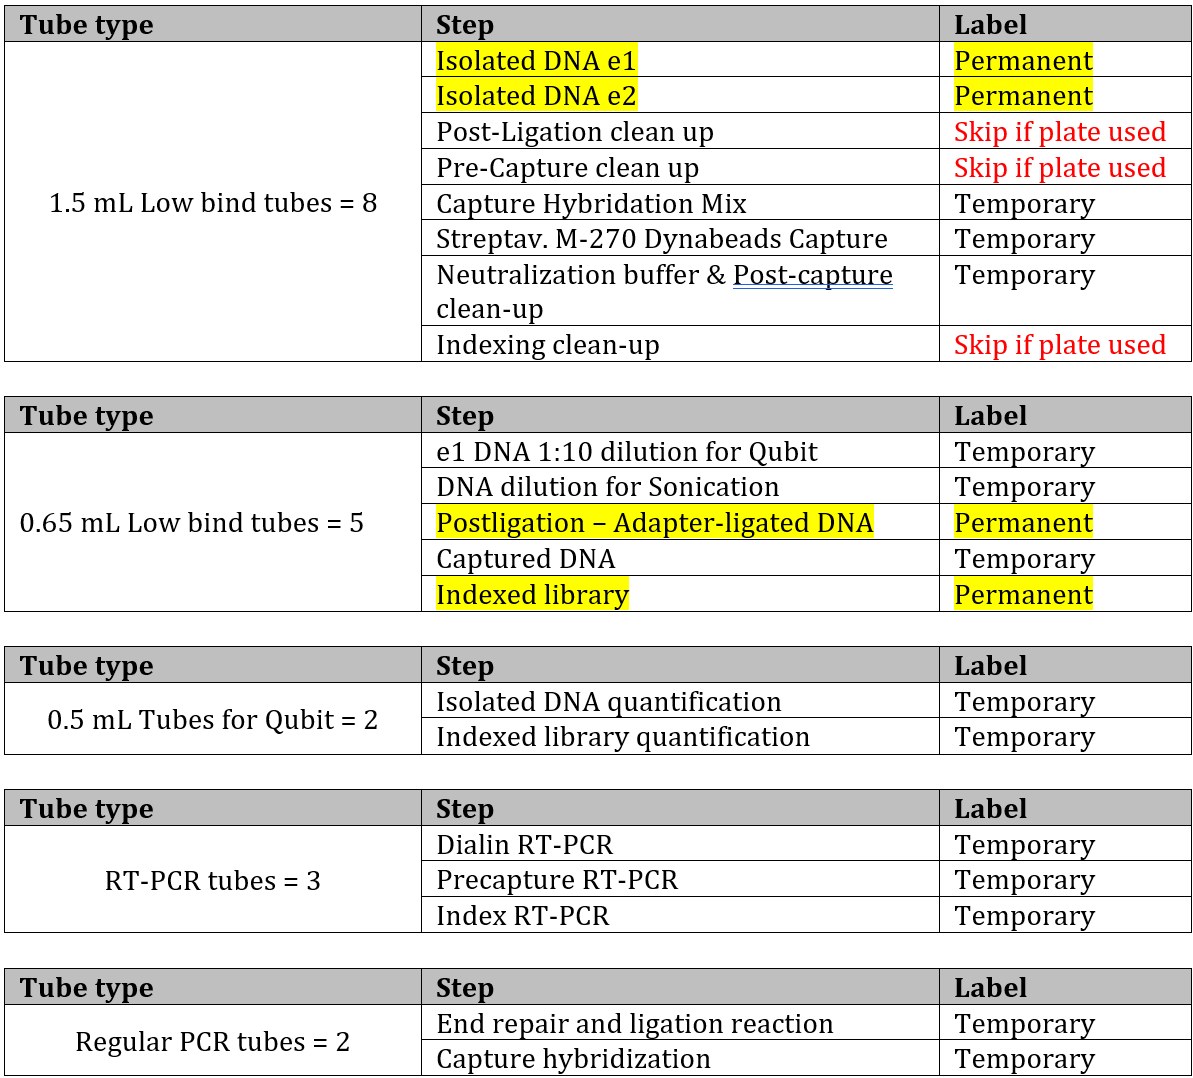
- Label tubes, this is what is needed per sample:
DNA Extraction
Selecting which Qiagen kit to use depends on the amount of starting tissue:
For isolation of genomic DNA from tissue between 10 - 25 mg tissue or 100 – 5 x 10⁶ cells, use the QIAamp DNeasy Blood & Tissue Kit cat#56306. Protocol: Purification of Total DNA from Animal Tissues (Spin-Column Protocol) on Page 28 with modifications.
If tissue is not visible with the naked eye, less than 100 cells or less than 10 mg, use the QIAamp DNA Micro Kit cat#56304. Protocol: Isolation of Genomic DNA from Tissues on Page 25 with modifications. For one fly head or one fly, use only one fifth the volume in step 2 and 3.
Important points before starting
- Perform all centrifugation steps at room temperature (15–25°C)
- If using frozen tissue, ensure that the sample does not thaw out before addition of Buffer ATL in step 2.
- Equilibrate Buffer AE or distilled water for elution to room temperature (15–25°C).
- Set an incubator to 56°C for use in step 4.
- If Buffer AL or Buffer ATL contains precipitates, dissolve by heating to 70°C with gentle agitation.
- If kit is used for the first time, ensure that Buffers AW1 and AW2 have ETOH added.
Procedure
- To start, the sample should be less than 10 mg for the Micro protocol and less than 25 mg in weight for DNeasy protocol and be in a 1.5 ml microcentrifuge tube.
If sample is a cell culture/suspension, an extra washing step is required:
- If volume is 1mL or higher, spin large tubes at 300 x g (190 rpm) for 5 min or faster to obtain a pellet. Discard supernatant and resuspend in 500 uL of Buffer AE and vortex for 5s. Briefly centrifuge to collect liquid in the lid and transfer the suspension to a new 1,5 mL tube. Centrifuge at 6000 x g (8000 rpm) for 2 min. Discard supernatant.
- If volume is less than 1mL, centrifuge 300 x g (190 rpm) for 5 min to obtain a pellet. Discard supernatant and resuspend in 200 uL of 1x PBS and vortex for 5s. No tissue lysis is required so skip ATL and proceed to step 3.
2. Immediately add Buffer ATL:
180 μl for Tissue
300 uL for cell culture/suspension
Equilibrate to room temperature (15–25°C).
3. Add 20 μl proteinase K, and mix by pulse-vortexing for 15 s.
4. Place the 1.5 ml tube in the incubator at 56°C until the sample is completely lysed:
~1 to 2 hours and a half for tissue (highly relies on tissue type)
~1 hour for cell culture/suspension
If sample is not lysed in this time, grind with a pestle (for fly brain) and vortex until no clumps are seen.
We don’t leave samples incubating overnight as the Qiagen recommends as this can oxidize DNA.
Reminder: take Qubit STDs 1 and 2 from fridge around the end of incubation so they are equilibrated at RT for DNA quantification
5. Add 200 μl Buffer AL, close the lid, and mix by pulse-vortexing for 15 s. To ensure efficient lysis, it is essential that the sample and Buffer AL are thoroughly mixed to yield a homogenous solution. Do one sample at a time.
6. Add 200 μl ethanol (96–100%), close the lid, and mix thoroughly by pulse-vortexing for 15s. Incubate for 5 min at room temperature (15–25°C) for Micro kit, not required for DNeasy.
7. Briefly centrifuge the 1.5 ml tube to remove drops from inside the lid.
8. Carefully transfer the entire lysate from step 7 to:
a. QIAamp MinElute column (Stored at 4C) placed in a 2 ml collection tube
b. DNeasy Mini spin column (stored at RT) placed in a 2 ml collection tube
Avoid wetting the rim. Close the lid, and centrifuge at 6000 x g (8000 rpm) for 1 min.
9. Place the column in a clean 2 ml collection tube and discard the collection tube containing the flow-through. If the lysate has not completely passed through the membrane after centrifugation, centrifuge again at a higher speed until the column is empty.
10. Carefully open the column and add 500 μl Buffer AW1 without wetting the rim. Close the lid, and centrifuge at 6000 x g (8000 rpm) for 1 min. Place the column in a clean 2 ml collection tube, and discard the collection tube containing the flow-through.
11. Carefully open the column and add 500 μl Buffer AW2 without wetting the rim. Close the lid, and centrifuge at 6000 x g (8000 rpm) for 1 min. Place the column in a clean 2 ml collection tube, and discard the collection tube containing the flow-through. Contact between the column and the flow-through should be avoided.
12. Centrifuge at full speed (20,000 x g; 14,000 rpm) for 3 min to dry the membrane completely.
13. Place the column in a clean 1.5 ml microcentrifuge tube (labeled properly with tissue and DNA ID, volume, and date) and discard the collection tube containing the flow-through. Carefully open the lid of the column and apply:
a. Micro kit: 20 – 100 uL (typically 50 uL) Buffer AE
b. DNeasy kit: 100 – 200 uL (typically 150 uL Buffer AE, more than 200 uL if will make the column and eluate to touch contact)
Dispense Buffer AE onto the center of the membrane to ensure complete elution of bound DNA.
14. Close the lid and incubate at room temperature (15–25°C) for 5 min. Centrifuge:
a. Micro kit: full speed (20,000 x g; 14,000 rpm) for 1 min
b. DNeasy kit: 6000 x g (8000 rpm) for 1 min
15. Elute again by adding:
a. Micro kit: 20 uL Buffer AE
b. DNeasy kit: 50 uL Buffer AE
16. Incubate at RT for 5 min and spin at full speed for 1 min.
Quantitate DNA by Qubit:
Standards are stored at 4°C, ensure they are at RT before beginning the assay.
- Make DNA dilutions: This depends on the type of sample:

2. Set up two Assay Tubes for the standards and one Assay Tube for each user sample.
3. Prepare the Qubit Working Solution by diluting 1 μL Qubit reagent 1 + 199 μL Qubit buffer. Calculate to get 200 μL of Working Solution for each standard and sample.
4. Prepare the Assay mixes using Qubit Tubes according to the table below:

5. Vortex all tubes for 2–3 seconds.
6. Incubate the tubes for 2 minutes at RT.
7. Insert the tubes in the Qubit Fluorometer. Choose High Sensitivity. Set volume. Start with STDs and then samples. Take note of the readings (ng/μL).
DNA Shearing
DNA must be sheared in order to properly be amplified during PCR and later read by the Illumina Sequencer. Average fragment size of 400-500 bp is ideal for this protocol.
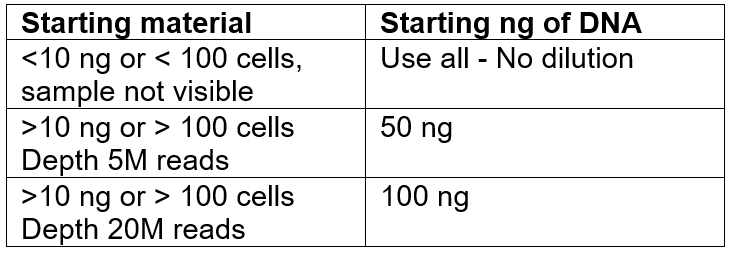
- Make a mix with each extracted DNA to get a final volume of 52 uL per sample. The amount of DNA depends on the sample and the aimed depth. As a reference from previous runs:
2. Use all the volume left after Qubit (~38 μL) and add water to a final volume of 50 μL (~12 μL). If possible, calculate to get ~52uL total to avoid having less volume at End Repair and Ligation step.
3. Transfer the 50 μL mix to a special Covaris tube for sonicator using a pipette,
4. Fill out the holder with Molecular Grade water up to the level indicator.
5. Sonicate one sample at the time: Insert the covaris tube with the sample in the sample holder (stored in a clear container with red caps in the drawer). Ensure that the sample is correctly placed in the holder.
6. Click OPEN to select a saved method. Select Monica_50 μL tube_400bp. This method is the recommended for 50 μL and target 400bp and has:
- Peak incident power (W) 50
- Duty factor 10%
- Cycles per burst 200
- Treatment time (s) 70
7. Click START to sonicate each sample. The method will run and show an OK message when done. Proceed with the next samples.
8. Exit the SonoLAB software by closing all screens and selecting EXIT on the main panel. Select SHUTDOWN in the dialog box. Power off the instrument after the SonoLAB software has closed. Power off the instrument using the switch located in the back of the instrument. Dry the sample holder and place back in the drawer. Empty the water bath with the syringe and dry the water tray.
9. Spin samples in the covaries tubes and transfer to PCR tubes if proceeding directly with ligation and End repair or in .65uL tubes if storing for short periods.
Enzymatic Shearing
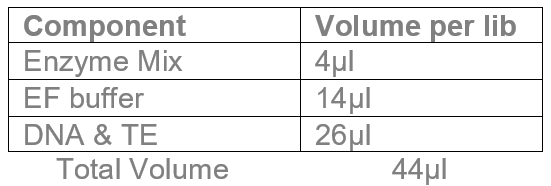
Total DNA +TE volume should be 26µl.
- Set up rxns in PCR tubes on ice. Vortex and quick spin both Fragmentation enzyme and buffer and set on ice.
- If using Fragmentation enzyme from TS kit:
3. Digest at 37˚C for 40 min(check each batch). Deactivate enzyme at 65˚C for 15 min.
4. Add 1µl of Fragmentation buffer 2 (FB2).
5. Digested DNA ready for end repair is at 45µl.
6. Add 5µl of NFW so total DNA volume is 50µl.
Duplex Sequencing Library Prep
1. NEBNext Ultra II Library Prep
The NEBNext Ultra II Library Prep kit is a multi-step process that repairs the ends of the DNA fragments, A-tails the repaired ends, and ligates the adaptors, without the need for sample purification between steps. This protocol dramatically reduces handling time, Ampure bead use, and sample loss and increases library prep efficiency and inter-sample consistency, relative to the original protocol.
Note: the following steps are modified from the NEBNext Ultra II protocol to be compatible with our adapters.
1.1 NEBNext End Prep.
- Add the following components to a sterile nuclease-free 0.2 mL tube:

b. Set a P200 pipette to 50 μL and pipette up and down at least 10 times to mix. Quickly spin down tube.
c. Place sample in thermocycler (Homicycle maniac), with the heated lid on, and run the following program (ENDREP):
30 minutes @ 20 °C
30 minutes @ 65 °C
Hold @ 4 °C
Reminder: take Ampure XP beads out of refrigerator to equilibrate to room temperature for 30 minutes. Vortex to mix well.
1.2 Adaptor Ligation.
- Mix the Ultra II Ligation Master Mix by pipetting up and down several times prior to adding to the reaction.
- Add the following components directly to the End Prep reaction mixture and mix well:

The adaptors are stored in aliquots in the -80C, in 0,5 mL tubes in a box labeled DSv3 adaptors. The ones in use are stored in the -20C.
c. Set a P200 pipette to 80 μL and pipette up and down at least 10 times to mix. Quickly spin down tube.
d. Incubate sample at 20 °C for 60 minutes in thermocycler (Program: Ligation, use timer).
e. Transfer sample into 1.5 mL low-bind tube.
1.3 Sample clean-up & size-selection with Ampure XP beads.
- Add 0.8X vol (75 μL beads for 100μL reaction) room temperature Ampure XP beads to sample. Mix well by pipeting up and down at least 10 times and vortex to mix.
- Incubate at room temperature for 5 minutes then briefly spin down to collect sample.
- Place on magnet until solution is clear.
- Discard supernatant; leave tube on magnet.
- Wash beads with 200 μL freshly made 80% EtOH, vortex/pipette to mix thoroughly, spin down shortly.
- Repeat steps c-e.
- Discard supernatant; use P10 pipette to remove all residual EtOH. Make sure there are no droplets in the tube.
- Let air dry in hood for 3 minutes, on magnet. Do not overdry, beads should look dark brown and glossy but with no visible liquid.
- Remove from magnet and add 32 μL TE. Mix to elute DNA from beads.
- Incubate 5 minutes at room temperature then place on magnet.
- Transfer 30 μL supernatant to new 1.5 mL low-bind tube (supernatant contains DNA). Avoid carry over any beads. Samples can be stored at -20C.
- This is a safe point to stop.
2. DNA Library Quantification – Dial-in PCR
It is important to have an accurate measurement of DNA concentration of your adapter ligated DNA library in order to use the right amount of DNA to the Pre-Capture PCR Amplification in step 3 which will result in a specific family size.
A standard sample is required for dial-in. Pick a standard based on the desired family size and the aimed depth. There are samples used as historical standards because they have shown optimal duplex sequencing data in previous experiments. A sample is selected as a standard if previously had:
√ A good family size peak (between 10-15).
√ A similar depth to the one aimed for the current experiment.
√ A good “on-target” proportion which means that the capture was efficient.
√ A record of the volume and dilution that was used of the sample for pre-capture PCR.
√ Enough volume left of the post-ligation reaction to re-run multiple times with the Dial-in PCR.
√ Ideally the standard should be of the same species and same tissue as the current samples.
The Dial-in PCR is done with 2 primers:
Forward: MWS-13 primer is the same used for Pre-capture but at 10 mM. Make a 1:10 dilution from the 100 mM for this reaction.
Reverse species-specific: This primer depends on the species that is being sequenced.
For fly mito: Fly mito rev primer
For mouse mito: mouse mito rev
For human mito: human mito rev
Run samples in triplicates
2.1 This PCR follow the instructions for KAPA’s Library Quantification Kit for Illumina Platforms.
- SYBR fast reaction:
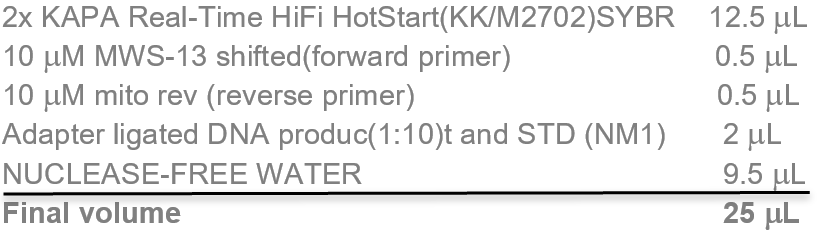
Split mix with a new pipette per sample to improve quantification. Use Biorad white tubes.
b. PCR on RT Thermocolypse:
- Turn ON the machine, open lid and clean rack with the spray.
- Click New Experiment, then Open from template. Select KAPA’s HiFi RT PCR Library Amplification (SYBR included).
45 sec at 95 °C
30 cycles:
15 seconds at 95 °C
30 seconds at 60 °C [data acquisition]
30 seconds at 72 °C
~1:20 h long
- Sync plate.
- With all well selected, select Blank from the drop drown menu to blank them all.
- Place the tubes in the rack and select the wells in the plate layout making sure they are correctly matched.
- Select SYBR only.
- Close lids of the machine.
- On the Thermal profile tab click run experiment. A message warning contamination will show up, click Yes. Save experiment with the date and the experiment’s_name.
- When done, go to Saved experiments. Select the experiment and copy. Paste it in a flash drive.
- Open the AriaMx software in the laptop and then open the experiment. To be able to see Cq values select a range of 5 cycles around the best point where the fluorescence starts (11-16).
- Export to excel and save the excel file on a flash drive.
Manually correct the fluorescence background, usually selecting background fluorescence around 5-10 cycles. Export the Cq values and enter them in the Dial-in_calculation sheet. In this calculation, the Cq values of standards and samples are used to calculate the amount of DNA to be used for pre-capture by adjusting it to the standard. If the resulting DNA volume is too low, make a 1:10(make 100µl) dilution to prevent pipetting errors and then use this dilution to make the pre-capture PCR reaction.
3. Pre-Capture PCR Amplification (Note: I would recommend following the NEB protocol that comes with the NEBNext® Multiplex Oligos for Illumina®
The input into this first PCR is critical and determines the success of the protocol and resulting sequencing depth and family size. Use the calculated amount of DNA from previous step to get desired family sizes.
Do as many PCR reactions per sample as needed to get enough DNA, for mitochondrial genome I have done just one but to get a good amount of nuclear targets they have done 5 x 25 μL reactions and pooled them all together later for bead purification.
3.1 Amplify ligated DNA using a qPCR machine.
- Using KAPA Real-Time Library Amplification Kit w/ Fluorescent Standards. Each PCR reaction will have the following:
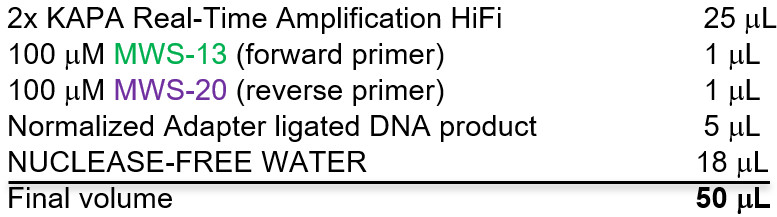
b. PCR conditions:
45 seconds at 98 °C
30 cycles:
15 seconds at 98 °C
30 seconds at 65 °C
30 seconds at 72 °C
25 ° C hold
Pull reaction(s) as they approach Third Florescent Standard and start to plateau. Note cycle number for each sample. Cut tubes after setting them in machine so it will be easier to pull them out as they come up.
Reminder: If not already at room-temperature, take Ampure XP beads out of refrigerator to equilibrate to room temperature for 30 minutes, vortex to mix.
3.2 Transfer each sample (~50 μL) to 1.5 mL low-bind tubes for Ampure bead clean-up and size selection.
- Add 0.8X vol (40 μL beads for 50μL reaction) room temperature Ampure XP beads to sample and vortex to mix.
- Incubate at room temperature for 5 minutes then briefly spin down to collect sample.
- Place on magnet until solution is clear.
- Discard supernatant; leave tube on magnet.
- Wash beads with 200 μL freshly made 80% EtOH, vortex/pipette to mix thoroughly.
- Repeat steps c-e.
- Discard supernatant; use P10 pipette to remove all residual EtOH.
- Let air dry in for 3 minutes, on magnet.
- Remove from magnet and add 32 μL TE. Mix to elute DNA from beads.
- Incubate 5 minutes at room temperature then place on magnet.
- Transfer 30 μL supernatant to new 1.5 mL low-bind tube (supernatant contains DNA).
4. Capture Using IDT Probes and xGen Hybridization and Wash Kit (Note: I would recommend using the IDT xGen Hybridization capture protocol that comes with the kit.)
The following is essentially the IDT capture protocol with minor changes. Probes allow for targeted DNA sequencing of areas of interest. This step in the protocol requires an overnight incubation, plan timing accordingly. Best to start this part in the afternoon so it will go overnight.
This part is typically split into 2 days:
Day 1
4.1.1 Samples with low DNA: using AMPURE bead clean up
- Get AMPure XP Beads to RT and make fresh 80% ethanol
- In a 1.5 mL Low-bind tube, mix your 30µl sample with 7.5 µl of Human Cot-I DNA.
- Add 67.5 µl (1.8X volume) of AMPure XP beads to the mix.
- Vortex thoroughly to mix.
- Incubate for 10 min at RT.
- Move the tube to the magnet and allow beads to bind for at least 2 min or until supernatant is clear.
- Remove and discard supernatant. Keeping the tube on the magnet, add 80% ethanol to cover the surface of the beads.
- Incubate for 30 sec without disturbing the beads.
- Remove and discard supernatant, and repeat ethanol wash
- Remove and discard supernatant.
- Allow the beads to air dry for approx. 2 min. Do not overdry.
- While tubes are air drying, make the Hybridization Reaction Mix:

n. Resuspend dry beads on 19 µL of Hybridization Mix
o. Vortex to mix. Ensure that the beads are fully resuspended
p. Incubate for 5 min at RT.
q. Place on a magnet for 5-10 min or until supernatant is clear.
r. Transfer 18 µL of this volume to a 0.2mL PCR tube.
s. Run IDT_Hyb_program in thermocycler (saved in Cyclopath):
30 seconds at 95 °C
∞ at 65 °C
4.1.2 Prepare wash buffers from xGen Lockdown Hybridization and Wash Kit. For each capture, dilute the following volumes of stock buffers to 1X:
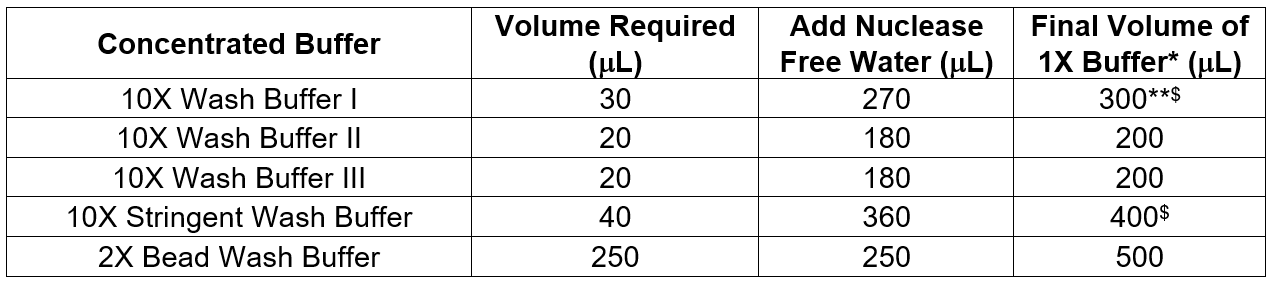
* 1X buffers can be stored at room temperature for up to 2 weeks
** Take 1/3 of this volume and aliquoted as Hot Wash Buffer I which will be heated and used in step b the next day
$ If doing many samples, calculate at least for 2 more samples
Day 2
4.2 Post-capture washes:
- For each capture, preheat 400 μL 1X Stringent Wash Buffer and 100 μL 1X Wash Buffer I to 65 °C. Equilibrate these two buffers at 65 °C for at least 2 hours before starting wash steps.
4.3 Prepare M-270 Streptavidin beads:
The buffer that the streptavidin beads come in must be washed and removed before binding DNA to streptavidin beads.
- Incubate streptavidin beads at room temperature for at least 30 minutes. These beads are stored in aliquots of 500 μL in a small plastic box with pink tape at 4C. Mix beads thoroughly by vortexing for 15 seconds.
- Aliquot 25 μL streptavidin beads per capture into a single 1.5 mL low-bind tube (do not calculate for extra samples. If multiple samples, do the entire volume for all samples in one tube at the same time but not more than 7 in a 1.5 mL tube.
- Place tube on magnetic separation rack, allow beads to separate from the supernatant. Carefully remove and discard supernatant ensuring all the beads remain in the tube.
- Add 200 μL 1X Bead Wash Buffer per 25 μL beads. Vortex 10 seconds.
- Place tube on magnetic separation rack, allow beads to separate from the supernatant. Carefully remove and discard the supernatant, ensuring all the beads remain in the tube.
- Repeat steps d-e.
- After removing buffer following the second wash, add 75 μL per capture of 1X Bead Wash Buffer (add ~10 μL extra so you can pipette 75 μL evenly in the next step), resuspend streptavidin beads by vortexing and spin but not too much.
- Transfer 75 μL beads into a new 1.5 mL tube for each capture reaction.
- Place tube with beads on magnet >2 minutes (until super is clear) then discard supernatant. Move directly to next step.
Caution!!! This step has been done wrong multiple times and this will damage the entire batch as there is no way to fix it
4.4 Bind captured DNA to streptavidin beads. DNA containing probes will strongly bind to streptavidin beads.
- Transfer the captured DNA (~17 μL still at 65 °C) directly to the dried streptavidin bead 1.5 mL tube from above. Pipet up and down 10 times to mix. Move samples to Thermomixer and start shaking.
- Incubate streptavidin bead/DNA solution at 65 °C for 45 minutes, vortex every 15 minutes to ensure streptavidin beads stay in solution.
4.5 Wash streptavidin beads to remove unbound DNA.
a to e are temperature-sensitive steps! Work quickly during the heated wash steps so reaction temperature is ~65 °C.
- Add 100 μL HOT Wash Buffer I (set pipette to 90 uL) to each sample and vortex to mix.
- Place tube on magnet & discard supernatant.
- Wash streptavidin beads/DNA with 200 μL HOT Stringent Wash Buffer (set pipette to 180 uL) and mix in Thermomixer for 5 min.
- Incubate sample at 65 °C for 5 minutes. Place tube on magnet and discard supernatant.
- Repeat step c-d.
- Wash streptavidin beads/DNA with 200 μL room temperature Wash Buffer I and vortex for 2 minutes. Place tube on magnet and discard supernatant.
- Wash streptavidin beads/DNA with 200 μL Wash Buffer II and vortex for 1 minute. Place tube on magnet and discard supernatant.
- Wash streptavidin beads/DNA with 200 μL Wash Buffer III and vortex for 30 seconds. Place tube on magnet and discard supernatant.
- Resuspend in 23µl of NFW and proceed to indexing on bead. (10/6/2022)
Reminder: If not already at room temperature, take Ampure XP beads out of refrigerator to equilibrate to room temperature for 30 minutes, vortex to mix.
For mitochondrial DNA, Post Capture PCR Amplification and 2nd Capture is not necessary, move directly to step 7. Index PCR. For all other sample types, proceed to step 6. Post Capture PCR Amplification, using all of sample for next capture.
5. Index PCR
In order to combine samples together for sequencing, an index must be attached to each sample. This allows multiplexing samples on sequencing lanes and sorting/analyzing later.
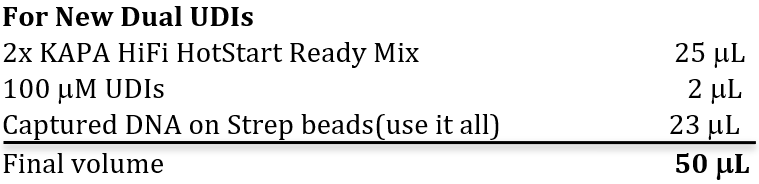
Reminder: UDIs can be single or dual. For Single UDIs, the second primer, MWS-20, is replaced with a sample-specific index primer, MWS-1-index. Each sample gets a different index reverse primer. For Dual UDIs, the 2 forward and reverse primers are already mixed.
Make note of which sample is assigned which index.
5.1 Amplify captured DNA using qPCR machine, running ONE tube per reaction.
- Using KAPA Real-Time Library Amplification Kit w/ Florescent Standards. Each 50 μL PCR reaction will have the following:
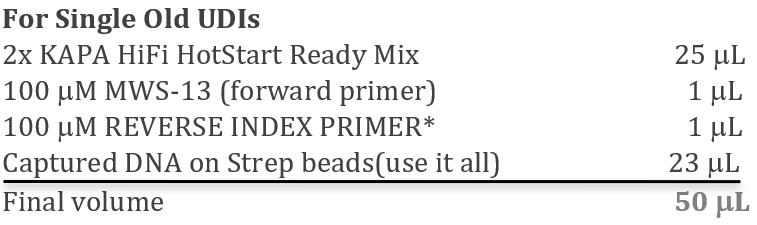
*Note: reverse primers will be added separately, as they are sample specific and contain the index. Each sample must be run in a separate tube.
Run together with the STDs
b. PCR conditions are the same as for pre-capture PCR (KAPA HiFi RT-PCR program in Thermocolypse)
45 seconds at 98 °C
30 X cycles:
15 seconds at 98 °C
30 seconds at 65 °C
30 seconds at 72 °C
Pause PCR cycles after 9 cycles and remove 2µl. Qubit to aim for 7-15ng/µl. It can take between 12 and 13 cycles.
Reminder: take Ampure XP beads out of refrigerator to equilibrate to room temperature for 30 minutes, vortex to mix. Also take the Qubit buffers from fridge here to equilibrate at RT.
5.2 Post-index sample clean-up & size-selection
Note: the bead wash steps for post-index PCR clean-up are more robust because the index primer tends to dimerize, which will waste sequencing space if residual primer dimers are present in the sequencing mix.
- Transfer sample from the 0,2 mL tube to a low-bind 1,5 mL tube.
- Add 0.8X vol (40μL beads for 50μL reaction) Ampure XP beads to sample and vortex to mix well.
- Incubate at room temperature for 5 minutes then briefly spin down to collect sample.
- Place on magnet until solution is clear.
- Discard supernatant; leave tube on magnet.
- Wash beads with 200 μL freshly made 80% EtOH by pipetting up and down.
- Repeat steps c-e.
- Discard supernatant: use P10 pipette to remove all residual EtOH.
- Let air dry in hood for 3 minutes, on magnet.
- Remove from magnet and add 23 μL TE. Mix to elute DNA from beads.
- Incubate 5 minutes at room temperature then place on magnet.
- Transfer 21 μL supernatant to new 1.5 mL low-bind tube (supernatant contains DNA).
6. Library Pooling and Sequencing Mix Preparation
6.1 Post-Index PCR quantitation and pooling.
- Quantify each library using Qubit. Recommended to make 1:10 dilutions
- Adjust DNA concentrations and pool desired ratios of libraries into one pool using concentrations acquired from Qubit, (be sure none of them share the same index from Index PCR step, as the sequencer will not be able to differentiate).
Qubit the final pool to obtain the final pool concentration. Since all samples were added at the same DNA amount, the final pool should have the same concentration.
c. Make 1:10 and 1:100 serial dilutions of the final pool using water and use them to measure average base pair length using Agilent HS Tape Station.
d. Enter these Qubit and TapeStation values in the Library_Pool sheet to calculate the library’s molarity (nM).
6.2 The processing of the library, denaturation and sequencing depend on how the library is being sequenced:
6.2.1 If the sequencing is done in-house: Calculate the dilutions and/or volumes of pool to load 14 fmol DNA library into sequencer and follow Illumina’s Denature and Dilute Libraries Guide protocol depending on the platform: MiSeq, NextSeq or HiSeq. For NextSeq, protocol on Denature libraries (page 6). You need to know the length of your fragment and indexes to set up the run. It is usually: Paired End/ Read 1=156/ Read 2=156/Index=6.
6.2.2 If the sequencing is done with GeneWiz/Azenta: Calculate dilutions and volumes to meet their requirements: a final library of 20uL at 15nM.
- Sweetwyne, M and Kennedy, S(2023). DNA processing and Duplex-Seq. Bio-protocol Preprint. bio-protocol.org/prep2450.
- Sanchez-Contreras, M., Sweetwyne, M. T., Tsantilas, K. A., Whitson, J. A., Campbell, M. D., Kohrn, B. F., Kim, H. J., Hipp, M. J., Fredrickson, J., Nguyen, M. M., Hurley, J. B., Marcinek, D. J., Rabinovitch, P. S. and Kennedy, S. R.(2023). The multi-tissue landscape of somatic mtDNA mutations indicates tissue-specific accumulation and removal in aging. eLife. DOI: 10.7554/eLife.83395
Do you have any questions about this protocol?
Post your question to gather feedback from the community. We will also invite the authors of this article to respond.