Improve Research Reproducibility A Bio-protocol resource

- Home
- Protocols

-

Preprint
Data acquisition of resting-state fMRI and optogenetic fMRI experiments
Last updated date: May 23, 2023 Views: 634 Forks: 0
Data acquisition protocol for resting-state fMRI and optogenetic fMRI experiments in mice
Setup before fMRI data acquisition
- The mice were anesthetized with 3.5% isoflurane for 5 minutes.
- Then, the mice were injected with a bolus of dexmedetomidine (0.02 mg/kg) intraperitoneally.
- One drop of 2.5% lidocaine was then applied to the chords of mice to provide local anesthesia before endotracheal intubation.
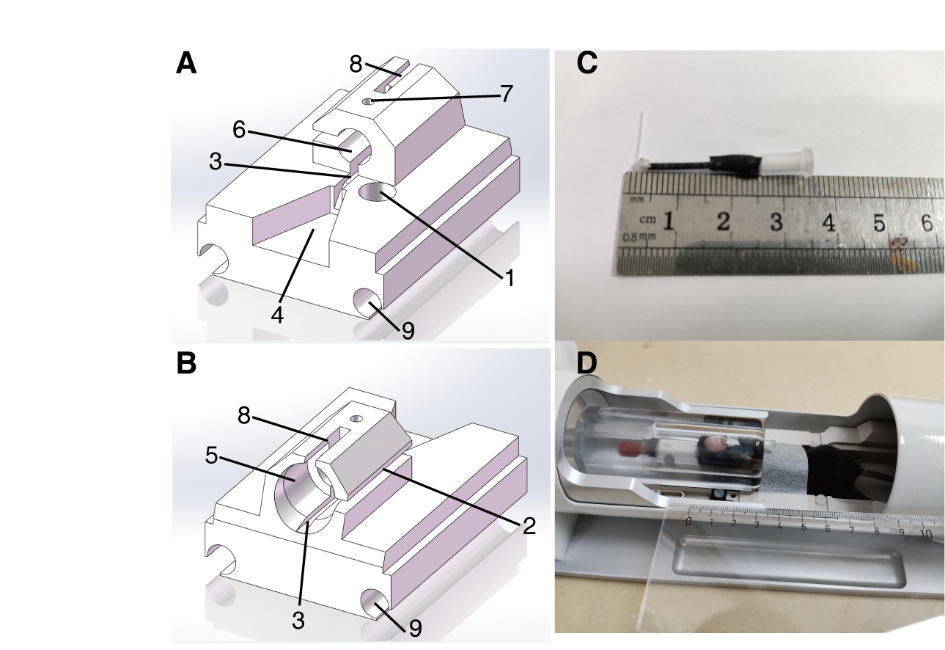
- The mice were positioned on an MRI-compatible cradle, fixed by ear bars and a bite bar, and connected to a ventilator (TOPO, Kent Scientific, USA) using a homemade 3D-printed mouse breathing mask (Fig. 1, A and B), which was compatible with mechanical ventilation under the Bruker mouse head crycoil (MRI CryoProbe, Bruker BioSpin, Germany). The mice were mechanically ventilated at a rate of 80 breaths per minute, with a respiration cycle of 25% inhalation and 75% exhalation (the gas source is medical oxygen).
- The mice were connected to a variety of physiological detectors, including ones that measured respiration, rectal temperature, and oxygen saturation. Mouse rectal temperature was maintained at 37 ± 0.1°C with an MR-compatible heater system (Heater system, Small Animal Instruments, USA). Continuous physiological monitoring was performed throughout the duration of the experiments.
- After the above setup, isoflurane was reduced and maintained at 0.4%, and a continuous subcutaneous infusion of dexmedetomidine (0.04 mg/kg per hour) was started to maintain the sedation level.
- The above setup of mice took approximately 15 minutes. During this period, the physiological states of mice gradually stabilized to normal ranges (rectal temperature: 37 ± 0.1°C, breathing: 80 breaths per minute, heart rate: 350 to 420 beats per minute, oxygen saturation: >95%) before the start of the fMRI data acquisition.
fMRI data acquisition
- All fMRI experiments were performed on a Bruker 7T MRI scanner (Bruker BioSpin, Germany) equipped with a mouse head cryocoil.
- Data acquisition includes localizer scanning, high-resolution anatomical image acquisition, B0 map acquisition, and fMRI image acquisition.
- Turbo-RARE: The anatomical images were acquired using a spin echo (Turbo-RARE) sequence [field of view (FOV) = 16 × 16 mm2, matrix = 256 × 256, RARE factor = 8, repetition time (TR)/echo time (TE) = 2500/35 ms, slice thickness = 0.4 mm].
- GE-EPI: Local field homogeneity was optimized in the brain using the B0 field maps scanned in advance. fMRI images were then obtained using a single-shot gradient echo planar imaging (GE-EPI) sequence with FOV = 16 × 16 mm2, matrix = 64 × 64, flip angle = 54.7°, slice thickness = 0.4 mm, dummy scans = 10, TE = 15 ms, TR = 750 ms (resting-state fMRI) or 1000 ms (optogenetic fMRI), averages = 1, Segments = 1, Slice gap = 0, repetitions = 450 (resting-state fMRI) or 360 (optogenetic fMRI). fMRI image acquisition has the same slice geometry imported from the previously acquired T2-weighted anatomical image.
- An Arduino programming board was used to synchronize the scanner trigger and the optogenetic stimulation laser for optogenetic experiments. A 473 nm blue light was delivered using a laser transmitter via an optical patch cable. The optogenetic stimulation (10 Hz; light power: 3.5 mW at the fiber tip; 15% duty cycle) was delivered with a duration of 20 s.
Image
Copyright: © 2023 The Author(s); This is an open-access article under the CC BY-NC license (https://creativecommons.org/licenses/by-nc/4.0/).
How to cite:
Readers should cite both the Bio-protocol preprint and the original research article where this protocol was used:
- Liu, J, Wu, E, Feng, Y and Cao, X(2023). Data acquisition of resting-state fMRI and optogenetic fMRI experiments. Bio-protocol Preprint. bio-protocol.org/prep2312.
- Liu, J., Mo, J., Wang, X., An, Z., Zhang, S., Zhang, C., Yi, P., Leong, A. T. L., Ren, J., Chen, L., Mo, R., Xie, Y., Feng, Q., Chen, W., Gao, T., Wu, E. X., Feng, Y. and Cao, X.(2022). Astrocyte dysfunction drives abnormal resting-state functional connectivity in depression. Science Advances 8(46). DOI: 10.1126/sciadv.abo2098
Do you have any questions about this protocol?
Post your question to gather feedback from the community. We will also invite the authors of this article to respond.
0 Q&A
This protocol preprint was submitted via the "Request
a Protocol" track.