
- Home
- Protocols

-

Immunoblot analysis
Last updated date: Aug 30, 2022 Views: 743 Forks: 0
Making the SDS-PAGE Gels:
1. Make a 14% acrylamide resolving gel in order to get separation between the cleavage product and substrate:
14% Resolving Gel (10 mL- 2 short gels)
ddH2O 4.5 mL
Prosieve (Lonza 50618) 2.8 mL
1.5M Tris-HCl (pH 8.8) 2.5 mL
10% SDS 100 μL
10% APS 100 μL
TEMED 4 μL
2. Mix the resolving gel with TEMED (4 L for 2 gels) and pipet into the top of the cassette (add until 1 cm below the comb location). Add ddH2O slowly to the top. Polymerize for at least 20 minutes.
3. Pour water out. Check to make sure gel is even and straight.
4. Make stacking gel:
Stacking Gel (6 mL- 2 short gels)
ddH2O 4.5 mL
Prosieve 600 μL
1M Tris-HCl (pH 6.8) 780 μL
10% SDS 60 μL
10% APS 60 μL
TEMED 6 μL
5. Add TEMED to the stacking gel mixture (6 μL for 2 gels) and add to the top of the resolving gel. Add comb. Polymerize for at least 15 min.
6. Remove comb.
Sample Preparation from IPTG Induced Cell Pellets:
7. Make Lysis Buffer:
Lysis Buffer (per 500 mL)
ddH2O 389 μL
1M Tris-HCl (pH 7.5) 50 μL
1M MgCl2 10 μL
50 mM EDTA 20 μL
100 mM Peflabloc 10 μL
50 mg/mL Lysozyme 20 μL
10 mg/mL DNase I 1 μL
8. Remove cell pellets from -80˚C storage and place on ice
a. Cell pellets are Escherichia coli BL21(DE3) (Novagen, Cat# 69450) containing pET vector plasmid to produce proteins of interest (maintained through antibiotic selection).
b. To induce protein production, grow (250 rpm, 37˚C) until E. coli reaches an optical density of 60-80 Klett units (KU), which corresponds to an absorbance at 600 nm (A600) of about 0.6-0.8, and then add 50 L of 100 mM IPTG. Incubate the cultures for 2 hours (250 rpm, 37˚C).
i. For our proteins of interest, we determined that the maximum amount proteins accumulated after a 2-hour incubation with IPTG.
ii. We recommend determining the best induction conditions for your proteins by collecting samples at different times after IPTG addition. Some proteins may require less induction time or more (e.g., overnight 16˚C induction to prevent formation of inclusion bodies).
c. After induction, store equivalent cells by pipetting (200/KU x 500) L, which corresponds to (200/A600 x 5) L into microfuge tubes and store at -80˚C.
9. Add 50 μL of Lysis Buffer and pipet up and down 15 times.
10. Incubate 10 min at 37˚C.
11. Place on ice.
12. Add 50 μL of 2X Sample Buffer with DTT by mixing 4 parts 2X Sample Buffer with 1 part 1M DTT (example: 360 μL SB + 90 μL 1M DTT = 450 μL total, which is good for 8 samples).
2X Sample Buffer (20 mL)
2.5 mL 1M Tris-HCl (pH 6.8)
8 mL 50% Glycerol
8 mL 10% SDS
1 mL of 4% w/v Bromophenol Blue
0.5 mL ddH2O
13. Pipet viscous mixture 5 times.
14. Boil for 3 min.
15. Place on Ice.
16. Quick spin to get condensation to the bottom of the microfuge tube.
17. Either store in -80˚C or use immediately for immunoblot analysis.
Running SDS-PAGE Gel(s):
18. Add Running Buffer to SDS-PAGE gel(s):
Tris/Tricine Running Buffer (1L)
12.1 g Tris
17.9 g Tricine
10 mL 10% SDS
Fill to 1000 mL
19. Wash out wells by pipetting running buffer in and out several times.
20. Load prepared samples.
a. Load 4 μL SeeBlue Plus2 Prestained Standard (Invitrogen) ladder
b. Load 5 μL samples
21. Run gel for 85 volts for 30 minutes.
22. Switch to 126 volts for about 45 minutes.
Note: Make sure running buffer is at the top and does not leak down cassette.
Note: DO NOT run gels with different acrylamide concentrations in the same cassette.
Transfer:
23. After running the gel, open the gel cassette and cut off the stacking gel using razor blade (cut downwards, do not drag blade)
24. Prepare other materials:
a. Cut 5 pieces of filter paper per gel
b. Cut PVDF membrane (use filter paper as template, then check size with gel)
c. Place membrane in methanol to activate
d. Make sure you have enough CAPs transfer buffer
CAPs Buffer Transfer (4L)
8.85 g CAPs
Dissolve in 4000mL ddH2O
pH to 11 with NaOH
Add 400 mL Methanol
Add 600 mL ddH2O
Note: CAPs transfer buffer can be used up to 10 times. When making, add the date it was made and keep track of the number of times it was used.
25. To transfer, we used the semi-submerged method:
a. Place transfer cassette and sponge in Pyrex dish
b. Add CAPs transfer buffer to halfway submerge cassette
c. Pour remaining transfer buffer into tank
d. Place 2 pieces of filter paper down (bending slightly in the middle)
e. Add cut gel (soak first briefly in transfer buffer)
f. Add PVDF membrane (soak briefly first in transfer buffer)
g. Place 3 pieces of filter paper down (bending slightly in the middle)
h. Use a test tube to roll out any potential bubbles
i. Add second sponge
j. Add top cassette, close and transfer to tank
26. Move tank (make sure orientation is correct):
Negative Charge
2x Filter paper
Gel
PVDF membran
3x Filter paper
Positive charge
27. Transfer for 1 hour at 400 mA.
Note: Transfer buffer heats up, so check every 15 min to make sure mA do not increase
Note: DO NOT run with warm transfer buffer. In some setups, you can add an ice try to keep the buffer cool. We recommend this if using a small Bio-Rad tank.
Staining the Membrane:
28. Add membrane to container with TBST and 5% milk (0.75 g dry milk (Meijer) and 15 mL TBST).
29. Incubate for 1 hour with shaking at room temperature.
30. Pour off blocking solution.
31. Add primary antibody solution with 2% milk in TBST (0.3 g dry milk and 15 mL TBST).
Primary antibodies we use:
anti-His 1:10,000 dilution= 1.5 L per 15 mL (penta-His QIAGEN catalog #34460)
anti-FLAG 1:10,000 dilution= 1.5 L per 15 mL (Sigma-Aldrich catalog #A8592)
anti-MBP 1:10,000 dilution= 1.5 L per 15 mL (NEB catalog #E8030S)
anti-GFP 1:10,000 dilution= 1.5 L per 15 mL (Kroos et al., 2002)
anti-SpoIVFA 1:3,000 dilution= 5 L per 15 mL (Kroos et al., 2002)
anti-SpoIVFB 1:3,000 dilution= 5 L per 15 mL (Yu and Kroos, 2000; Halder et al., 2017)
anti-Pro-σK 1:3,000 dilution= 5 L per 15 mL (Lu et al., 1990)
32. Incubate overnight in cold room (approximately 12˚C) with shaking.
Washing and Secondary Antibody (If Needed):
33. Retrieve immunoblot from cold room.
34. Pour off 2% milk in TBST with primary antibody.
35. Rinse quickly 3 times with TBST to remove milk solution.
36. Wash 3 times with shaking at room temperature for 10 minutes each wash (30 minutes total).
If only primary antibody is needed (HRP linked), develop and image the immunoblot.
37. If needed, add secondary antibody solution with 2% milk in TBST (0.3 g dry milk and 15 mL TBST).
Secondary antibody we use:
Goat anti-Rabbit 1:10,000 dilution= 1.5 L per 15 mL
38. Incubate 1 hour with shaking at room temperature.
39. Pour off 2% milk in TBST with secondary antibody.
40. Rinse in same manner as above (steps 34-36).
Developing/Imaging:
41. Make 1:1 mixture of Western Lightning Plus ECL reagent (PerkinElmer) by taking 1 mL of each reagent and mixing in a conical tube.
Note: mix immediately before imaging. Do not let the reagent sit for >15 minutes before adding to the immunoblot.
42. Add immunoblot to cling wrap then pour mixture on top.
43. Incubate 1 minute.
44. Clean Imaging dock (Bio-Rad ChemiDoc MP imaging system) with 70% ethanol solution.
45. Add immunoblot directly to Imaging dock.
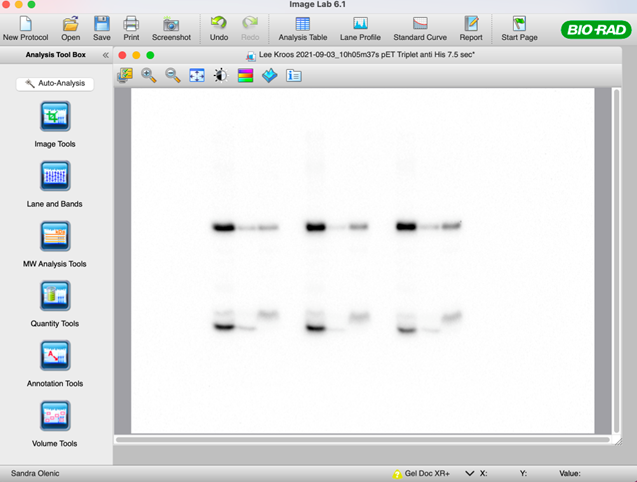
46. Image blot using the Image Lab software (Bio-Rad).
Quantifying Cleavage Ratio:
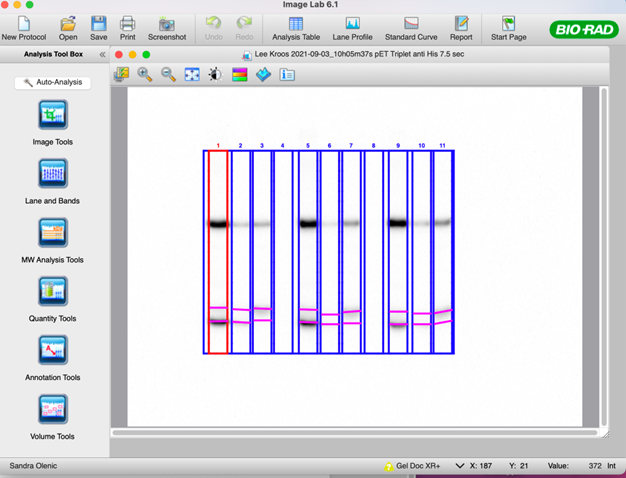
47. Once you have a desirable immunoblot image to analyze using the Bio-Rad Image Lab software, select the “Lane and Bands” tool. Manually input the number of lanes you loaded and adjust the frame of each lane to include all bands of interest. Set the lane width to ensure that all lanes are similar in size.
48. Once the lanes have been defined, select the “Band” tool and manually add in each band of interest (substrate and cleavage product bands).
49. Once the bands have been defined for each species, select the “Lane Profile” tool to adjust the band boundaries.
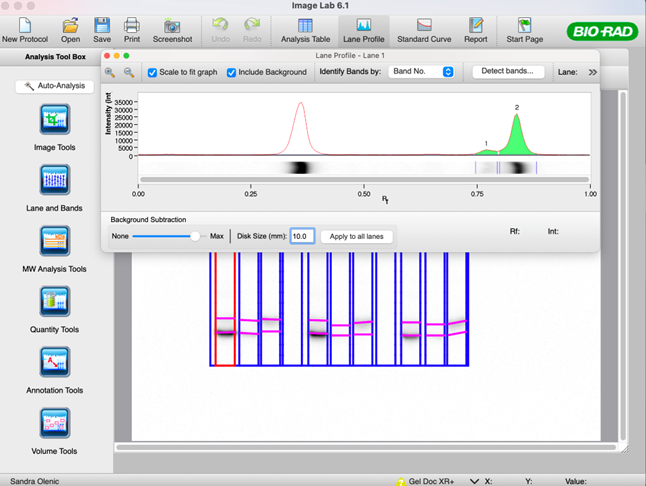
50. Click the “Analysis Table” tool to get the adjusted volume intensity.
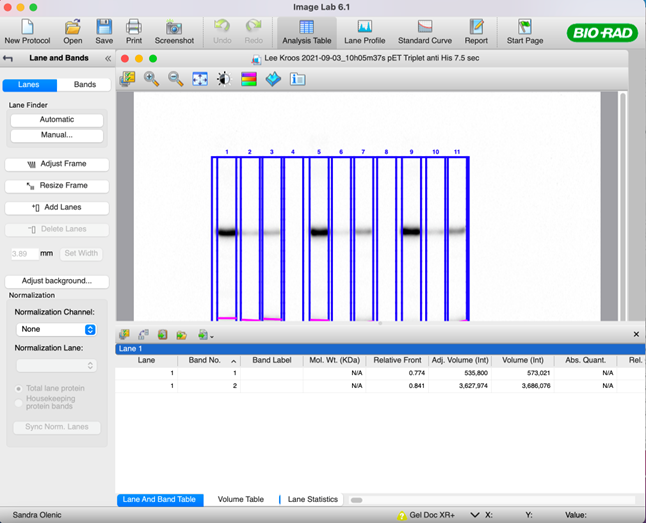
51. Calculate the cleavage ratio: (cleavage product intensity)/(total intensity of cleavage product and substrate) to compare the amount of cleavage between different samples.
Immunoblot analysis for cross-linked protein samples:
Making the SDS-PAGE Gels:
1. Make a 10% acrylamide resolving gel and stacking gel in order to get separation between the different protein species:
10% Resolving Gel (10 mL- 2 short gels)
ddH2O 5.3 mL
Prosieve (Lonza 50618) 2.0 mL
1.5M Tris-HCl (pH 8.8) 2.5 mL
10% SDS 100 μL
10% APS 100 μL
TEMED 4 μL
Stacking Gel (6 mL- 2 short gels)
ddH2O 4.5 mL
Prosieve 600 μL
1M Tris-HCl (pH 6.8) 780 μL
10% SDS 60 μL
10% APS 60 μL
TEMED 6 μL
Note: For details on this step, refer to the previous protocol (steps 1-6)
Note: The proteins should have different epitope tags for visualization, thus we recommend running 2 separate immunoblots to determine if cross-linking occurred (i.e. one anti-His and one anti-FLAG immunoblot).
Sample Preparation:
2. Remove cross-linked protein samples from -20˚C storage and place in a tube rack.
3. Thaw at room temperature for approximately 5-7 minutes.
4. Quickly vortex.
Note: Cross-linked samples do not need to be boiled before loading.
Optional: We load in the following order for each sample: 1. Negative control (+DTT, -Cu); 2. Cross-linked proteins (-DTT +Cu), and 3. Reduced proteins (+DTT +Cu).
Running SDS-PAGE Gel(s):
5. Add Tris/Tricine Running Buffer to SDS-PAGE gel(s):
6. Wash out wells by pipetting running buffer in and out several times.
7. Load prepared samples
a. Load 4 μL SeeBlue Plus2 Prestained Standard (Invitrogen) ladder
b. Load 5 μL samples
8. Run gel for 85 volts for 30 minutes.
9. Switch to 126 volts for about 45-50 minutes (if looking at cross-linked samples, this will run the 34 kDa ladder band near the bottom of the SDS-PAGE gel).
Note: You may need to run a long gel to get separation of your cross-linked protein samples. We recommend running a long 10% gel, for approximately about 2 hours (30 min at 85 volts and 1.5 hours at 126 volts) to get the 34 kDa ladder band near the bottom of the SDS-PAGE gel.
Transfer: See previous protocol steps 23-27.
Staining the Membrane:
10. Add membrane to container with TBST (see recipes) and 5% milk (0.75 g dry milk (Meijer) and 15 mL TBST).
11. Incubate for 1 hour with shaking at room temperature.
12. Pour off blocking solution.
13. Add primary antibody solution with 2% milk in TBST (0.3 g dry milk and 15 mL TBST).
We recommend using the following HRP-linked primary antibodies:
anti-His 1:10,000 dilution= 1.5 L per 15 mL (penta-His QIAGEN catalog #34460)
anti-FLAG 1:10,000 dilution= 1.5 L per 15 mL (Sigma-Aldrich catalog #A8592)
14. Incubate overnight in cold room (approximately 12˚C) with shaking.
Washing:
15. Retrieve immunoblot from cold room.
16. Pour off 2% milk in TBST with primary antibody.
17. Rinse quickly 3 times with TBST to remove milk solution.
18. Wash 3 times with shaking at room temperature for 10 minutes each wash (30 minutes total).
Developing/Imaging: See previous protocol steps 41-46.
Quantifying Ratio of Cross-linked Complex: See previous protocol steps 47-50 for visual aids.
19. Once you have a desirable immunoblot image to analyze using the Bio-Rad Image Lab software, select the “Lane and Bands” tool. Manually input the number of lanes you loaded and adjust the frame of each lane to include all bands of interest. Set the lane width to ensure that all lanes are similar in size.
20. Once the lanes have been defined, select the “Band” tool and manually add in each band of interest like the protein monomer, species of your two cross-linked proteins of interests and species of cross-linked dimer.
21. Once the bands have been defined for each species, select the “Lane Profile” tool to adjust the band boundaries.
22. Click the “Analysis Table” tool to get the adjusted volume intensity for the monomer, complex and dimer.
23. Calculate the cross-linking ratio: (complex intensity)/(total intensity of monomer, complex and dimer) to compare the amount of cross-linked complex between different samples.
- Olenic, S and Kroos, L(2022). Immunoblot analysis. Bio-protocol Preprint. bio-protocol.org/prep1889.
- Feig, M., Heo, L., Kroos, L. and Olenic, S. Inhibitory proteins block substrate access by occupying the active site cleft of Bacillus subtilis intramembrane protease SpoIVFB. eLife. DOI: 10.7554/eLife.74275
Do you have any questions about this protocol?
Post your question to gather feedback from the community. We will also invite the authors of this article to respond.